
Work with Issues and Risks
Introduction to the Issues Tool and Risks
The Issues tool helps you identify and manage issues and risks for all the projects in your workspace, so you can deliver on time and within your defined budget and scope. Risks are defined as potential issues that may happen in the future, while issues have already occurred and may impact your project plan.
To round out the entire workflow of how risks and issues are managed and addressed in ProjectPlace it is possible to associate risks and issues with activities or cards. This gives the project managers the possibility to quickly associate the risks and issues to work that is needed to address them and get an overview of the status of all that work.

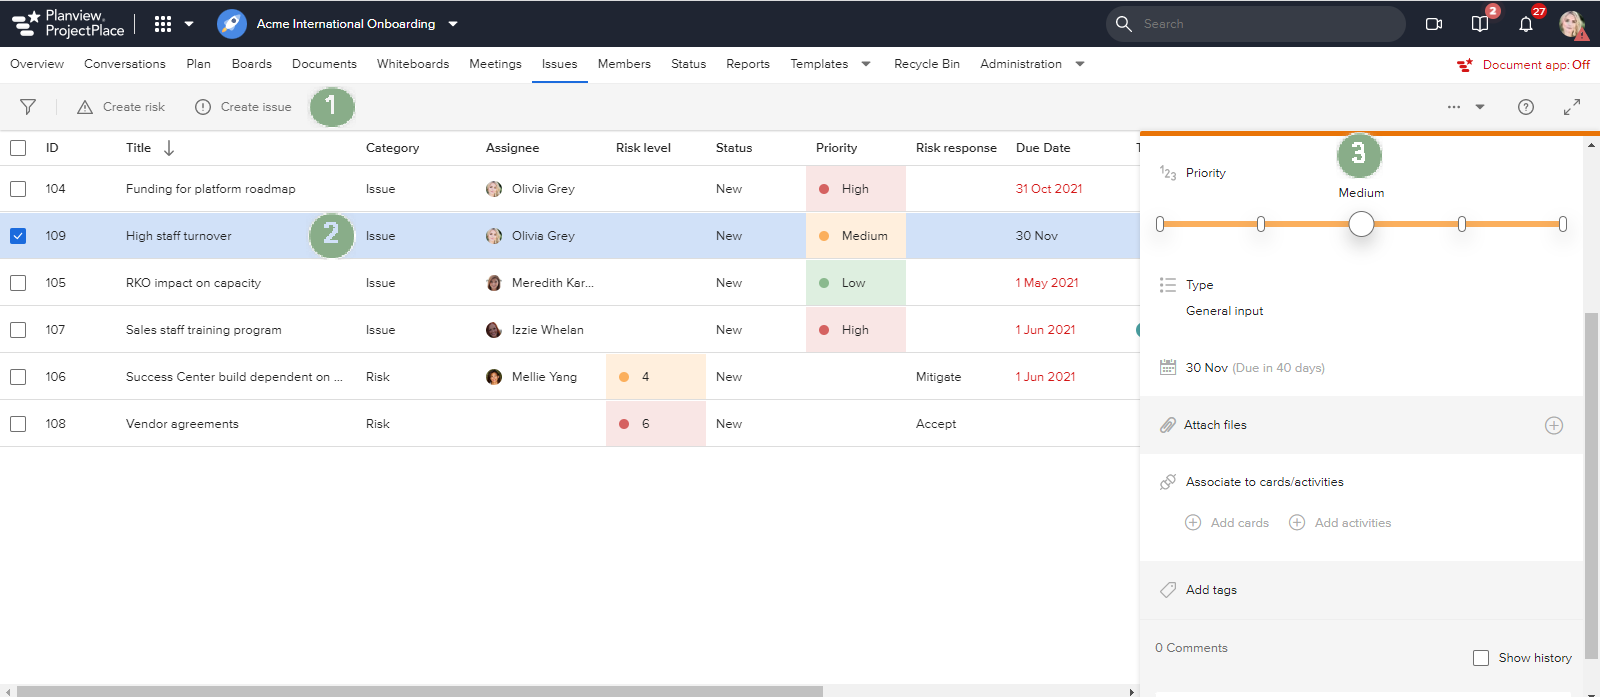
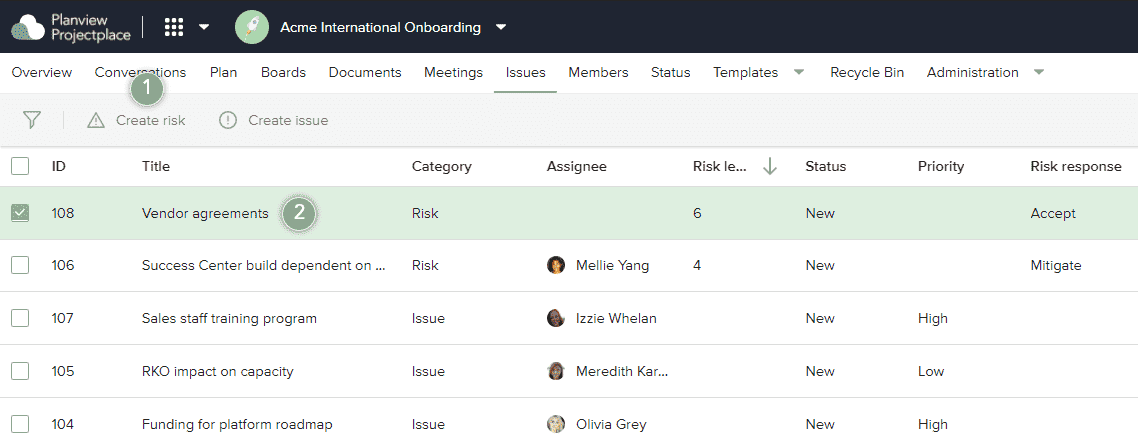
- Click the Filter icon
 to filter the list of issues and risks by ID, title, status, assignee, category, due date, risk level, risk response, issue priority, issue type, or tag.
 - Create a new risk.
- Create a new issue.
- Click the column headers to change sorting parameters.
- Select an issue or a risk to view its details.
- Click the Options menu
 to access various tool settings or export the data to Excel.
About Risks
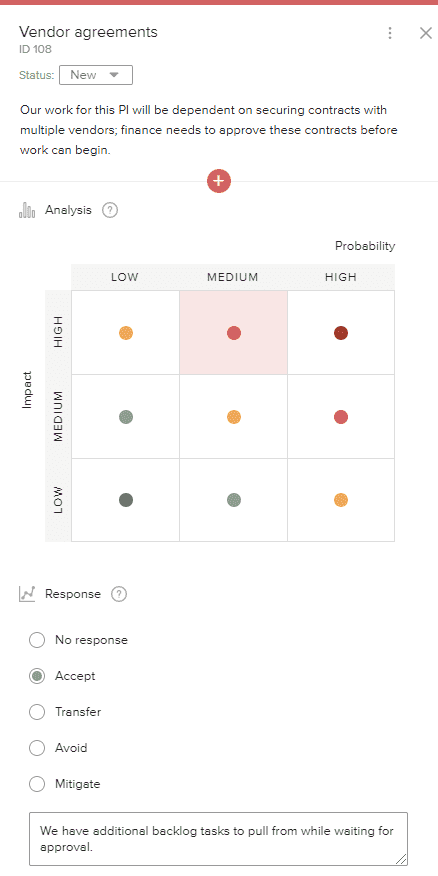
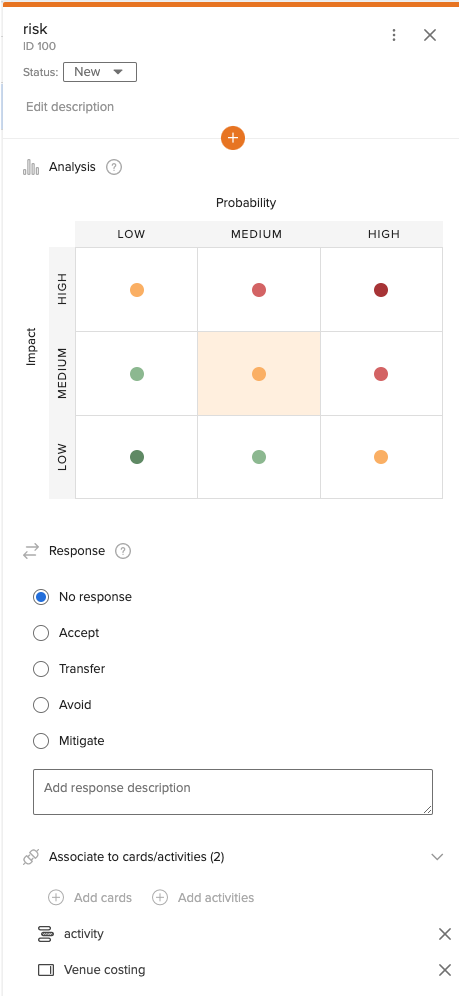
In the Analysis section, use the risk matrix to assess risk level. The risk matrix visually represents risk level by plotting the probability the risk will occur on the x-axis, and the severity or impact of the risk on the y-axis. The resulting risk level (a numerical value ranging from 1-9) depends on the selected square's position in the risk matrix. For example, the selection in the above image results in a risk level of 6, because its x-axis value is 2 and its y-axis value is 3.
After evaluating the risk, use the Response section to indicate how the risk will be handled, and if needed, add additional details in the Add response description field:
- Accept: Recognize the risk and set up mechanisms to control and monitor it.
- Transfer: Pass ownership and/or the negative impact associated with the risk to a third party.
- Avoid: Adapt your plan to completely eliminate the probability of the risk occurring or the effect of the risk if it does occur.
- Mitigate: Adapt your plan to reduce the impact or probability of the risk occurring.
About Issues

To help determine which issues should be fixed first, you can assign each issue a priority value of very low, low, medium, high, or very high. You can also categorize issues by type. Use the example issue types listed below, or customize issue types in the Settings menu.
- Error report
- Change request
- Request for information
- General input
The Logbook Tool
Planview Logbook is a shared capability within the Planview Platform that provides the ability to efficiently create and manage various types of logs, such as changes, risks, issues, lessons learned, assumptions, decisions and much more. It is a centralized repository that offers customizable configurations and ensures a seamless user experience across all Planview Platform products.
In the future, Logbook will include all the current features of the Issues Tool and Risks, plus additional functionality. This is a long-term goal, however. If a customer does not have Planview Admin, they cannot remove the Issues tool.
NOTE
Planview Admin needs to be enabled for your account in order to make the change from the Issues tool to the Logbook tool. See Introduction to Logbook for more information on configuration and activation of Logbook in ProjectPlace.
If the account has set up ProjectPlace either in production or sandbox, Logbook will be made available in PV Admin and with that also available in ProjectPlace. For existing workspaces. the Logbook option resides in Workspace administration/ Tools. Logbook will be visible in the list but disabled by default so the workspace administrator needs to turn that on for these workspaces where Logbook should be visible.
Logbook capabilities that Issues is currently lacking:
- Custom attributes to help a customer capture more information, rather than the standard fields provided.
- In a synced workspace with an work item in Portfolios, the information added and edited will always be the same in both places.
- Logbook is more than just risk and issues. You can set up your own log types, lessons learned, changes, and decisions, etc., which are also available in the workspace.
Still lacking for Logbook in ProjectPlace compared to current Issues tool (future enhancements):
- Widgets missing in Reports tool.
- Widget missing on Workspace overview.
- Any log item associations made to any cards on a board are not visible on the cards in the board.
- Any log item associations made to any activities/milestones are not visible on the activities/milestones in the plan.
- Email to a logbook.
- Any external members are not able to use Logbook.
Create an Issue
To create a new issue:
- In the Issues tool, click Create issue on the toolbar.
- Enter a name for the issue and press Enter.
- In the Detail pane, click each field to add the following information:
- Description. Give the issue a detailed description. (See image below.)
- Add assignee. Add the person who is primarily responsible for resolving the issue. (See image below.)
- Priority. Use the slider to indicate the issue's priority level.
- Type. Select an issue type to categorize or group the issue.
- Add due date. Add a due date for the issue to be resolved.
- Attach files. Add documents (in any file format) that are related to the issue.
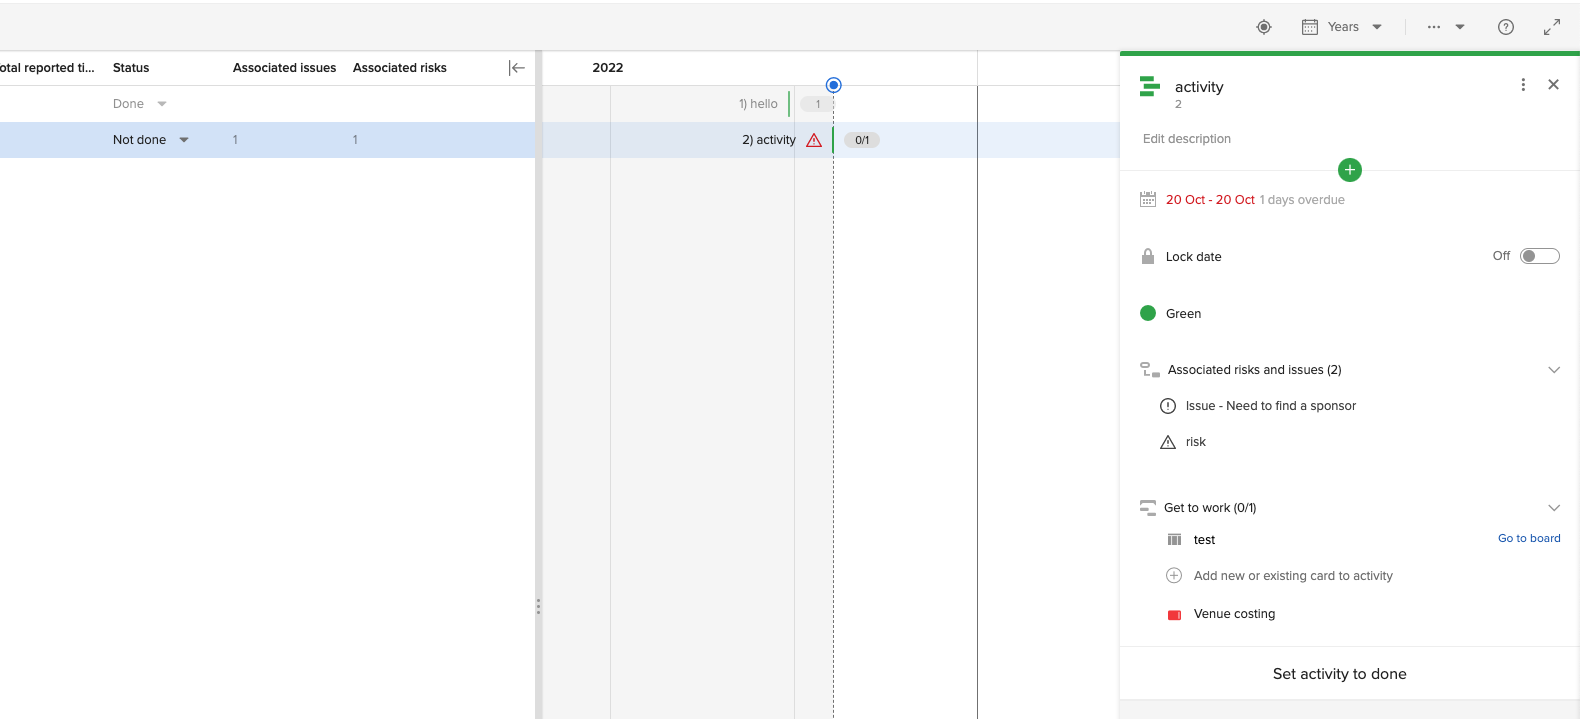
- Associate to cards/activities. Click the plus sign to Add cards/activities. Type the card or activity name into the field that appears. Matches will appear on a dropdown menu. Select the appropriate choice. There is no upper limit to the many associations that can be added. The association is only a visual indicator of the relationship and means that there will not be any notifications sent if a associated card or activity is set to done. In the Plan tool, it will be possible to view the association in the WBS list and the activity details pane, and in the Boards tool, it will be possible to view the information on the associated card and in the card details pane.
- Add tags. Use tags to categorize different types of issues.
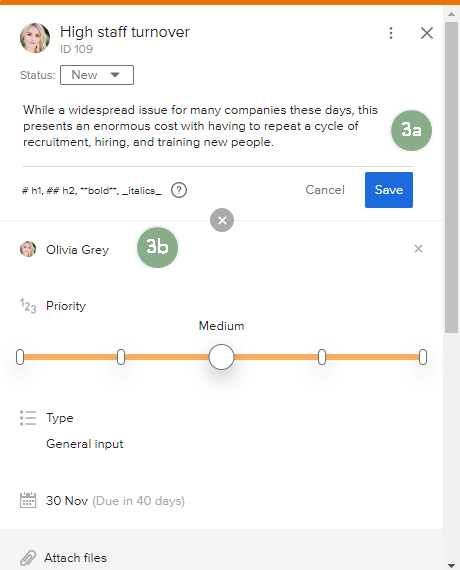
Description and assignee An Issue associated with a card and activity
Create a Risk
To create a new risk:
- Click Create risk.
- Enter a name for the risk and press Enter.
- In the Detail pane, click each field to add the following information:
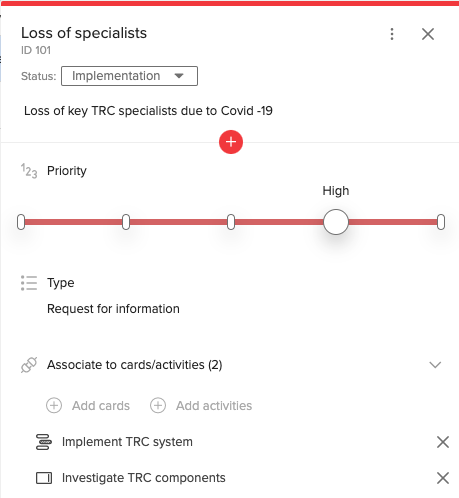
- Description. Give the risk a detailed description.
- Add assignee. Add the person who is primarily responsible for resolving the risk.
- Impact. Use the risk matrix to assign a risk level.
- Response. Select an issue type to categorize or group the issue.
- Add due date. Add a due date for the risk to be resolved.
- Attach files. Add documents (in any file format) that are related to the risk.
- Associate to cards/activities. Click the plus sign to Add cards/activities. Type card or activity name/title into the field that appears. Matches will appear on a dropdown menu. Select the appropriate choice. There is no upper limit to the many associations that can be added. The association is only a visual indicator of the relationship and means that there will not be any notifications sent if an associated card or activity is set to done. In the Plan tool, it will be possible to view the association in the WBS list and the activity details pane, and in the Boards tool, it will be possible to view the information on the associated card and in the card details pane.
- Add tags. Use tags to categorize different types of risks.
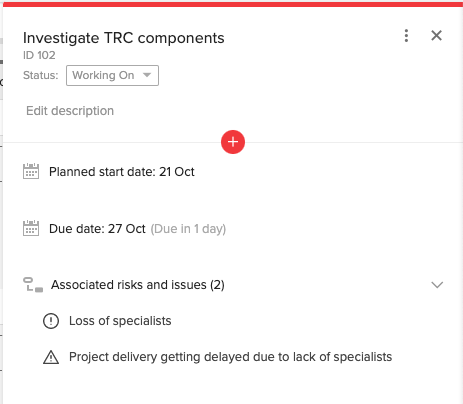
Detail pane: a risk associated with a card and activity Associated risk and issue in card
Associated risk and issue in Activity
Edit Issues and Risks
- Navigate to the Issues tool.
- Click the name of the issue or risk you want to edit.
- In the opened Detail pane, make your changes to the risk or issue's fields.
Risks and Issues Settings
To access the Issues tool settings, click the Options menu ![]() and select Settings.
and select Settings.
Activate Risks and Issues Email
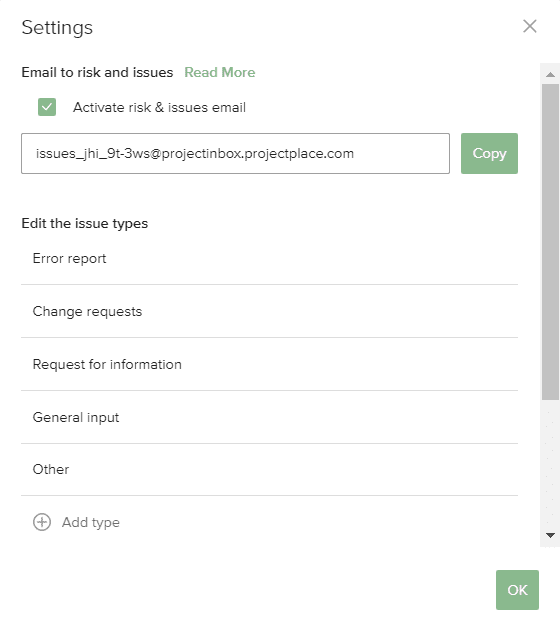
In the Issues tool settings, click the Activate risk and issues email checkbox to allow users to create issues via email. The email's subject transfers to the issue's title, and the email's content transfers to the issue's description.
Anyone, even people who aren't workspace members, can send emails to the Issues tool. After an external user sends the initial email to create the issue, they will receive an additional confirmation email after their original email is received. If they want to add any additional information to the issue, they can respond directly to the confirmation email. Note that workspace members will not receive these emails, as they have access to the Issues tool by default.
Users with access to the Issues tool can communicate with external users through the comment section of the issue. Select the Send to external creator option to send the comment to the external creator via email.
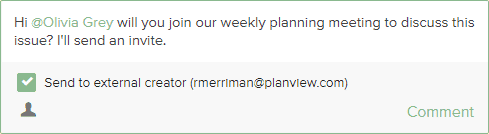
When the external creator responds to the email, their response is added as a comment on the issue.
Edit Issue Types
To edit existing issue types for a workspace, or create new issue types:
- Click the Options menu and select Settings.
- In the Edit issue types section, you can make changes to existing issue types, or click Add type to create a new issue type.
- Rearrange the list of issue types by dragging and dropping.
- Click OK to save your changes.
Notify by Email When New Issues Are Created
To add or remove users to the list of people notified when a new issue is created:
- Click the Options menu and select Settings.
- In the Notify by email when issues are created section, you can remove users from the list by hovering over their name and clicking the X, or click Add to select a user from the dropdown.
- Click OK to save your changes.
Export Issues and Risks to Excel
To export issues and risks to Excel:
- Click the Options menu and select Export to Excel.
- Select if attached files should be downloaded or not, and then click Download.