
Work with ProjectPlace Teams
Teams in ProjectPlace are groups of people that have a shared goal or objective. Teams can be competency-based (such as IT, marketing, sales, or design) or cross-functional groups of people who don't necessarily work in the same department or organization, but need to work together to complete a project.
Team members can use the Team overview page to see a variety of details about their teams, including what other team members are working on, the number of assignments in progress, and the workspaces connected to the team. You can also use the Team overview to conduct conversations with other team members.
One important attribute of teams is the ability to invite an entire team into a workspace, simplifying the invitation process. This feature is useful in a scenario where a project manager needs to add a resource from another team to a project. Instead of searching for an individual contributor on another team, they can simply invite the team and then that team can choose the best resource for the project.
You can also work with Teams directly from the Boards tool by requesting a card assignment to a team.
There are no limits as to how many teams can be created within an account, and account members can be part of any number of teams.
Account Administrators Working with Teams
Account administrators can manage all teams in the account from the Teams tab of the Account administration tool. Managing team memberships and creating, editing, and deleting teams can all be managed from this tool.
Workspace Administrators Working with Teams
A Workspace administrator can invite Teams to their workspaces from the Members tab in a workspace. The Team needs to be invited to a workspace in order for the team members' assignments to show up in the Team Assignments widget on the Team Overview page, and when using the Pin boards widget, only boards from workspaces that the Team is invited to will be available for pinning to the Team Overview.
Team Members Working with Teams
All account members can view and interact with their teams on their team overview pages, accessed from the My teams tool.
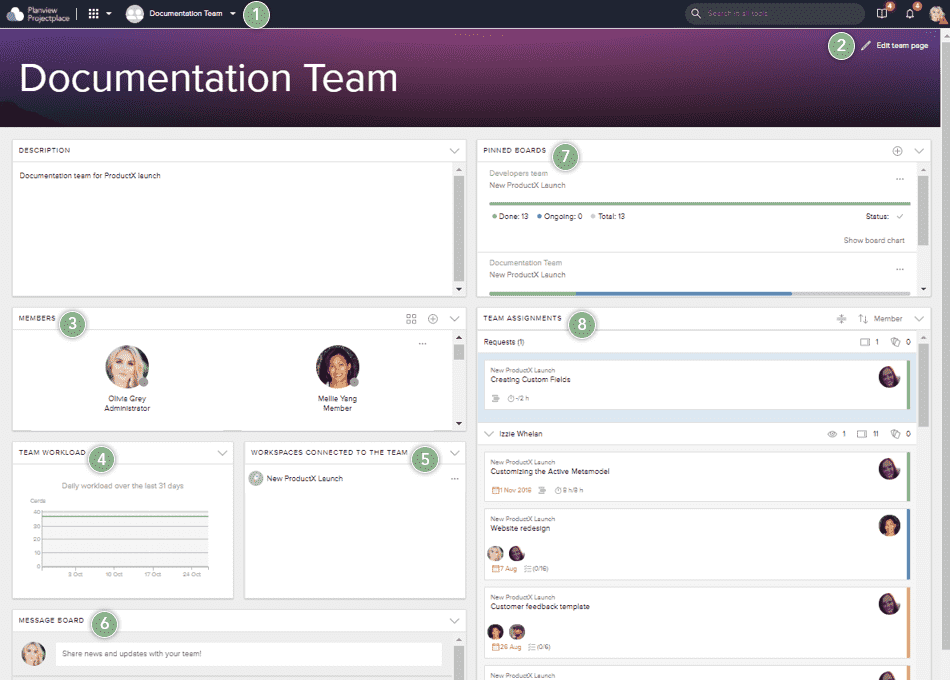
- Use the dropdown menu to select the team you want to view an overview for. Here you can also create a new team.
- Click Edit team page to update the team page's banner image, rearrange widgets, resize widgets, or collapse widgets.
- The Members section includes a list of members included in the team, and their individual workload trend charts
- The Team Workload trend widget displays the team's total workload over time (including assignments in non-team workspaces).
- The Workspaces connected to the team section includes a list of workspaces connected to the team. To add a workspace to this list, the team needs to be invited to the workspace. Learn more by visiting Work with members and groups.
- Use the Message Board widget to communicate with your team members.
- The Pinned Boards widget displays boards you've added to the widget for quick access, and basic statistics about those boards. Only boards from workspaces connected to the team can be pinned to this widget.
- The Team Assignments widget includes a list of the work team members are assigned to in the workspaces that the team is connected to, including active requests.
Working with Requests in Teams
Learn more about sending team requests here.
To accept or deny requests that have been sent to the team, a team member may click any of the requests included in Requests section of the Team Assignments widget.
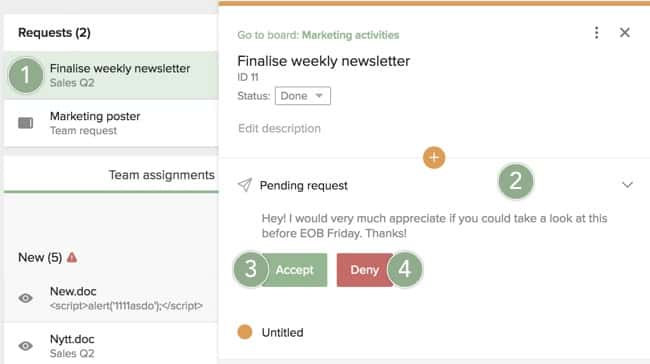
- Click the desired active request.
- A detail pane appears, click the Pending request section to see the available options.
- Click the Accept button. A new window opens, where you can assign the card to a team member from the available list and include a message detailing the request. When you are ready, click Send.
- Click the Deny button to open a dialog where you can send a message to the request initiator to explain why the team will not work on the card.
Accepting a Request
To accept a request, click Accept and the following new window appears.
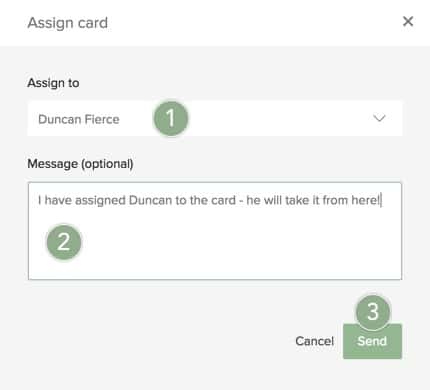
- Select the desired team member from the available list.
- Type a message in the available text box. The message you type is added as a comment on the card.
- Click Send.
Once the request is accepted, the assigned team member will be invited to the workspace. Both the team and workspace will be connected (if they were not already). The connected workspace appears in the Workspaces connected to the team section of the Team Overview.
Denying a Request
To deny a request, click Deny and a new window appears.
- Type a message in the available text box. The message you type is added as a comment on the card. (This step is optional.)
- Click Send.
