
Work with the Plan
Find Your Way Around the Plan Tool
The Plan tool has two key components:
- A Work Breakdown Structure (WBS) of activities and milestones in a hierarchical list.
- A Gantt chart, the graphical representation of the WBS where you can see progress of all activities with their associated cards.
Learn more about projectplanning.
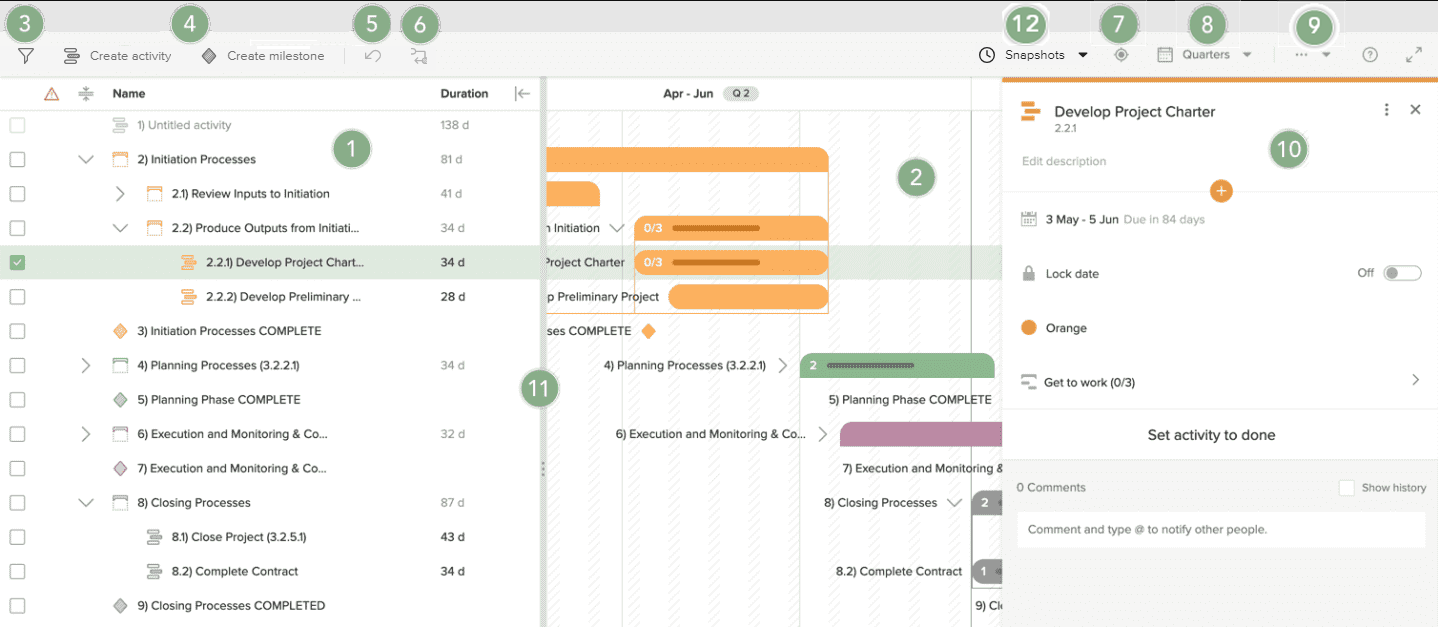
- Work Breakdown Structure, where you can view and edit activities and milestones. Administrators can customize the WBS.
- Gantt chart. The areas of the timeline displayed with the striped pattern
 represent the days that are set as non-working in the Working days settings for the workspace.
 - Filter activities or milestones.
- Create a new activity or milestone.
- Undo the most recent date change. This button will be enabled after you change dates or the duration of activities and milestones. You can also use the keyboard shortcut Ctrl+Z (Windows) or Command+Z (Mac).
- Optimize dependencies. This button will be enabled if you select an activity or milestone with following dependencies, or with sub-activities that have following dependencies.
- Navigate to the current date in the Gantt.
- Select the view level of the Gantt chart by Weeks, Months, Quarters, Tertiles, or Years.
- Click the More Options menu
 to share a link to the plan, customize the WBS, print the plan, export the plan to Excel, import MS Project Plan, import a .CSV file or Customize Labels.
 - Click an activity or milestone to open the detail pane, where you can see and change all detailed information for the selected activity or milestone. Use the comments section in the detail pane to discuss details with others, keeping all discussions transparent and in context.
- Resize the Gantt or WBS viewing area by clicking and dragging the handle
 in the vertical separator bar to the right or left.
 - Learn how the plan has progressed over time by taking Snapshots of the whole plan from a given point in time. When selecting a snapshot you will be able to view the progress and see if there are any deviations from the current plan in the Gantt chart and WBS.

You can change dates and the duration of activities and milestones by entering the dates in the WBS, or by using drag and drop functionality in the Gantt.
NOTE
Changing the date of an activity or milestone might affect its parent activities, sub-activities, or dependencies, if any. Undoing a date change will restore all of the affected activities or milestones to their previous state.
Working Days
When displaying and editing activities and milestones, the Plan tool follows the working and non-working days defined in the Working days settings.
- Activities' dates can not be set on a non-working day, so they are automatically adjusted to the next working day available.
- Non-working days are disabled when editing activities dates in the WBS and detail pane.
- In the Gantt, if start or end date of an activity is dropped on a non-working day, it will automatically be moved to the next working day.
- Activities' duration is expressed in working days. Non-working days included within an activity's start and end date are not calculated in the duration.
NOTE
If new working or non-working days are added in the Working days settings, the plan might be affected:
- Activities' start dates that are set on non-working days are recalculated following the logic above.
- End dates are recalculated if they are set on a non-working day, or as a consequence of recalculating the start date and preserving the duration.
- Dependencies can be moved as a result of adjusting dates.
- Locked items might also be moved when recalculating dates.
Create Activities and Milestones
Use milestones to describe the important target dates, such as delivery dates.
- Milestones must always have an established date that can either be a working or a non-working day.
- Milestones' duration is 0 working days.
Add activities to group and visualize the work needed to reach your goals.
- Activities must have a start and end date. Both start and end dates cannot be on a non-working day.
- Activities' duration is at least 1 working day.
To create an activity or milestone:
- In the toolbar, click Add activity or Add milestone.
- The new activity or milestone will be created and visible at the end of the WBS.
- Click on the activity or milestone to rename it.
NOTE
Activities and milestones are initially created on the current day's date. If the current day is a non-working day, activities are automatically moved to the next working day available.
TIP
If you have the need to describe certain activities that cannot start until others have been completed, you can add dependencies to activities.
TIP
Have you already started on a project plan in Microsoft Project? You can easily import it to ProjectPlace.
NOTE
If you’re using the Planview Portfolios – ProjectPlace connector or the PPM Pro – ProjectPlace connector, the project schedule is synced to your ProjectPlace workspace, and you will not be able to add activities and milestones in ProjectPlace.
Break Down Activities
You can create a hierarchy of activities in a WBS (Work Breakdown Structure) if needed. There are two methods to do this.
To add activities and milestones, then create the hierarchy:
- Create all activities and milestones needed.
- Hover over an activity or milestone in the WBS.
- Move the activity or milestone into the correct position in the hierarchy:
- Click the handle that appears to the right, then drag and drop the item to the desired position.
- When the grab cursor
 appears, drag and drop to the desired position.
- Click the handle
To create an activity directly in the correct position within the hierarchy:
- Hover over the activity that you want to be a parent activity.
- Click the plus icon that appears. A menu is opened where you can choose to create a sub-activity or milestone.
- A sub-activity or a milestone is created.
NOTE
Parent activities are only regarded as containers and not work to be done. Therefore, you can not estimate and report time on the parent activities. Cards can only be added to the activities on the lowest level in the hierarchy.
TIP
If the activity already has a sub-activity, you can also go to the activity detail pane and add sub-activities in the Break down the activity into sub-activities section.
NOTE
If you’re using the Portfolios – ProjectPlace connector or the PPM Pro – ProjectPlace connector, the project schedule is synced to your ProjectPlace workspace, and you will not be able to create sub-activities in ProjectPlace.
Work with an Activity
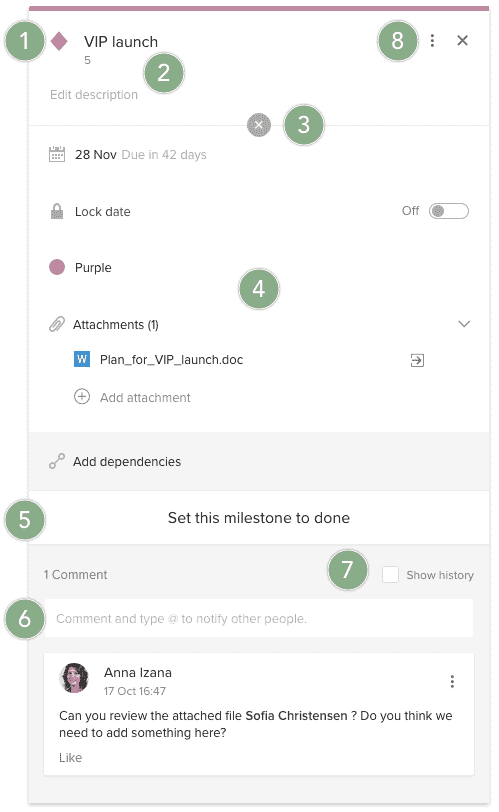
Click an activity, either in the Work Breakdown Structure or in the Gantt, to open the detail pane where you can see and change all related information.
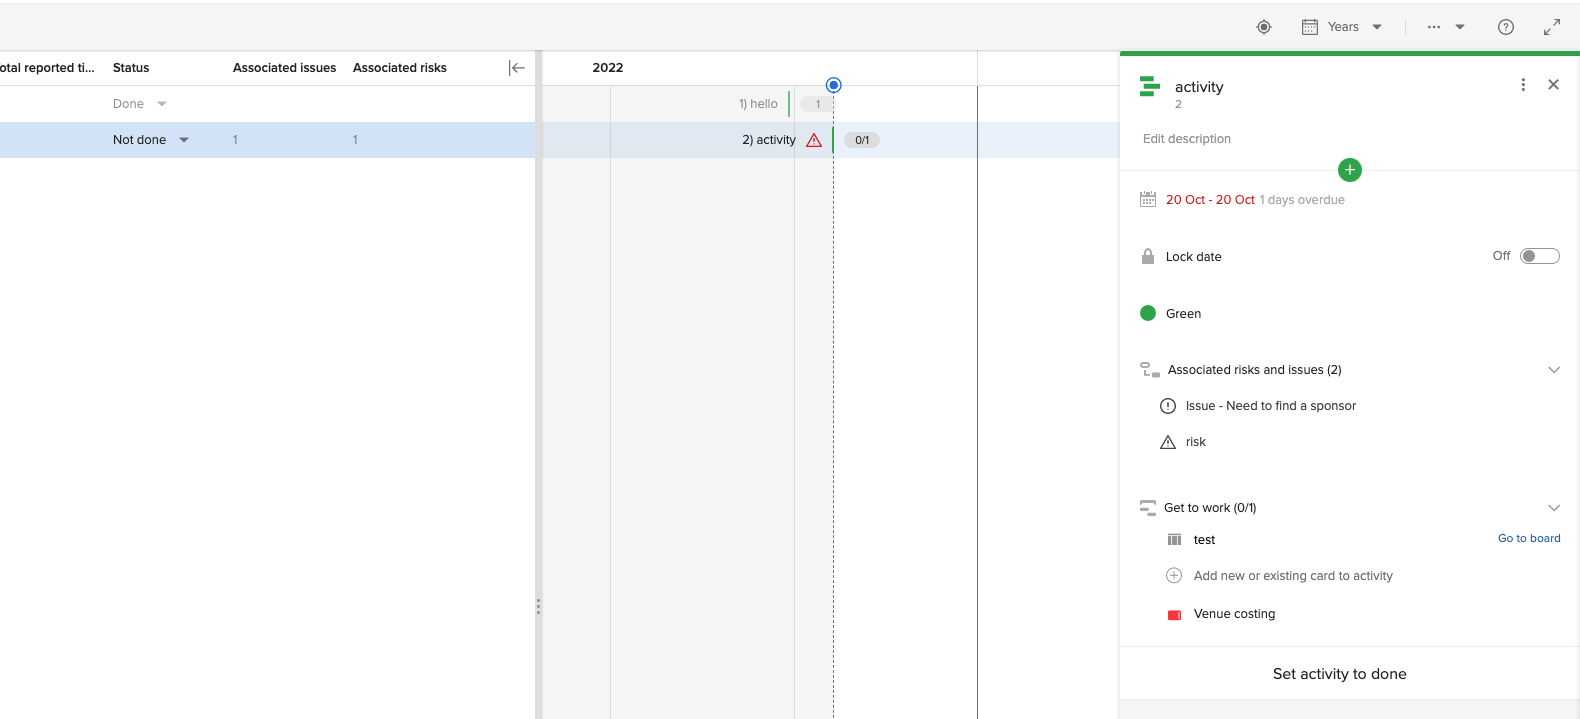
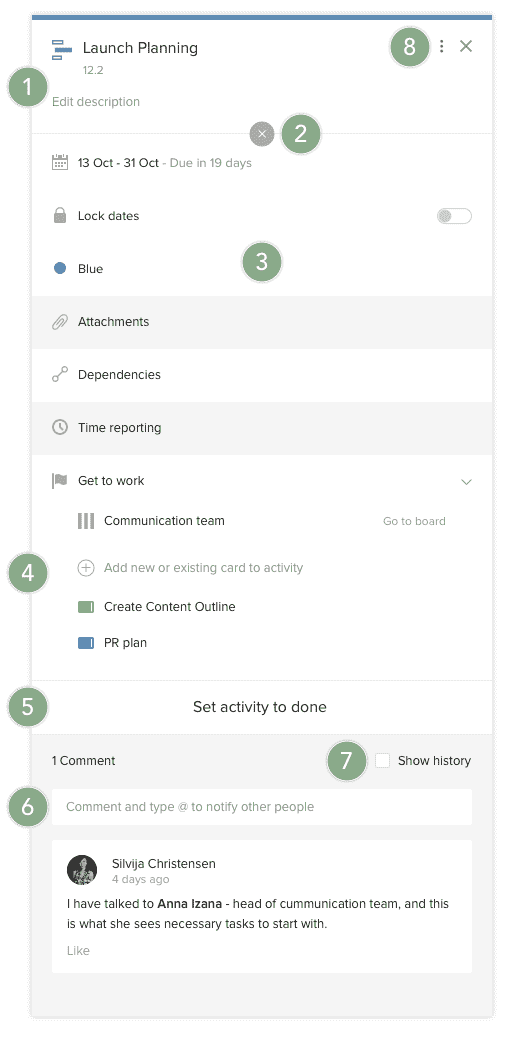
- Click to change name or description.
- Click to hide the fields that don't have a value (gray background). The icon changes to a plus
 . Click again to show all fields.
 - Click to add or change the information:
- Change date. Enter work start and end dates or duration (expressed in working days) to schedule the activity.
- Lock dates. Lock the date so that no one can accidentally move the activity. Note: Parent activities cannot be locked. However, their dates will be locked if at least one of its sub-activities or milestones is locked.
- Change color/label of the activity. The plan will be easier to read and give a better overview. If, for example, activities of a certain type have the same color.
- Attach files. Add information needed to do the work described in the activity in any file format from ProjectPlace, from your computer, and from other cloud document services such as Box, Google Drive, Dropbox, and OneDrive.
- Add dependencies. State if one activity needs to be completed before another activity starts.
- Time reporting. Estimate and report time on activities. Note: If the activity is a parent, it is not possible to do any estimations. You can only view a summary of the reported time of the sub-activities.
- View associated risks or issues. It is only possible to view the associations in the details pane.
- Start work on the activity. Break down the work into cards and connect the activity to a board so the work can begin.
- Set the activity to Done. When all work is done, click Set activity to done. Cards connected to an activity that is marked Done will no longer be visible on any board. Those cards are only visible in the activity.
NOTE
Parent activities cannot be set to Done. However, the parent activities status is inherited from the status of all its sub-activities and milestones.
- Comment and discuss the activity.
- See the history of the activity.
- Click the More menu icon
 to:
to:
- Convert an activity into a milestone. (Note that certain types of activities, such as parent activities or activities that are connected to boards, cannot be converted into milestones.)
- Duplicate an activity.
- Copy an activity to another workspace.
- Delete an activity.
TIP
Select multiple activities to edit their label, which board they are connected to, locked/unlocked status, and done/not done status. You can also convert multiple activities to milestones (but remember that certain types of activities, such as parent activities or activities that are connected to boards, cannot be converted into milestones.)
NOTE
If you’re using the Planview Portfolios – ProjectPlace connector or the PPM Pro – ProjectPlace connector, the project schedule is synced to your ProjectPlace workspace and cannot be edited.
Start Work on the Activity
When it is time to involve the team that is going to do the work, connect the activity to a Board. If you need to prepare by breaking down the work into actionable cards, this is where you do it. You can also connect existing cards to the activity.
To connect the activity to a board:
- Select an activity to open the activity detail pane.
- In the Get to work section, click the Connect to a board field.
- In the Connect to a board field, you can select an existing board from the list, or create a new board. If you select an existing board, you can type the name of the board to filter the list. To a new board, type the name of the new board and press Enter.
- Any cards connected to the activity will be made visible on the board you select. Once the activity is marked Done, any cards connected to it will no longer be visible on the board.
TIP
Select more than one activity and repeat the steps above to quickly connect multiple activities to the same board. (Parent activities cannot be connected to boards.)
To break down the activity into cards:
- Navigate to the detail pane of the activity.
- In the Get to work section, click the Add new or existing card to activity field.
- Write the name of the new card and press Enter.
NOTE
Cards can only be added to activities on the lowest level in the hierarchy since the parent activities are only regarded as containers and not work to be done.
To connect existing cards to the activity:
- Navigate to the activity detail pane.
- In the Get to work section, click in the Add new or existing card to activity field.
- Select the card in the list. Start writing the name of the card to filter the list.
NOTE
If you select a card that is visible on a Board, and the activity is not connected to that board and the card will no longer be visible on the board.
Copy an Activity
You can duplicate an activity in the current Plan, or copy it to another workspace that you have Read and write access to.
When an activity is duplicated or copied, the date range, label, attachments, estimated time, and custom fields will be copied over to the new activity. However, the reported time, dependencies, previous history, and comments are not included on the new activity. Locked activities that are duplicated or copied will become unlocked and activities that are set to Done will be changed to the Not done setting.
Duplicating or copying a parent activity will include all child activities and milestones within the parent activity hierarchy.
When activities and sub-activities are connected to boards and cards are duplicated or copied, cards will be duplicated but connections to boards are removed. For duplicated cards, all settings such as due date, labels, attachments, checklist items, points, estimated time, and customized fields will remain the same. Assignee, reported time, dependencies, and comments are not included in the duplication.
To duplicate an activity:
- Click the activity you want to duplicate to open the activity detail pane.
- Click the
More menu and select Duplicate. The duplicated activity will be added to the same Work Breakdown Structure (WBS) level as the original activity and at the end of the hierarchical list.
To copy an activity to another workspace:
- Click the activity you want to copy to another workspace, to open the activity detail pane.
- Click the
More menu and select Copy to another workspace.
- In the window that appears, choose a workspace from the list.
- The copied activity will be added to the chosen workspace Plan at the end of the WBS.
NOTE
The Copy to another workspace option is present only if there is at least one workspace in which you have Read and write access to the Plan tool.
Work with a Milestone
Click a milestone in the Gantt or the WBS to open the detail pane where you can see and change all related information.
- Click to change the type of milestone.
- Click to change the name or description.
- Click to hide fields that don't have a value (gray background). The icon changes to a plus . Click again to show all fields.
- Click to add or change the following information:
- Click to change date.
- Lock date. Lock the date so that no one can accidently move the milestone in the timeline.
- Change color/label of the milestone. The plan will be easier to read if, for example, milestones of a certain type have the same color.
- Attach files. Add information about the milestone in any file format from ProjectPlace, from your computer, and from other cloud document services such as Box, Google Drive, Dropbox, and OneDrive.
- Add dependencies. State if the activity needs to be completed before the milestone.
- Set milestone as Done.
- Comment and discuss the milestone.
- See the history of the milestone.
- Click the More menu icon to:
- Convert a milestone into an activity.
- Duplicate a milestone.
- Copy a milestone to another workspace.
- Delete a milestone.
NOTE
Converting a milestone into an activity causes dates recalculations if the milestone's original date is set on a non-working day. In this case, the newly converted activity's dates are automatically moved to the next working day available.
TIP
Select multiple milestones to edit their label, locked/unlocked status, and done/not done status. You can also convert multiple milestones to activities.
Copy a Milestone
You can duplicate a milestone in the current Plan, or copy it to another workspace that you have Read and write access to.
When a milestone is duplicated or copied, the due date, label, attachments, and custom fields will be copied over to the new milestone. The dependencies, previous history, and comments are not included on the new milestone. Milestones set to Done will be changed to Not done on the new milestone.
To duplicate a milestone:
- Click the milestone you want to duplicate to open the milestone detail pane.
- Click the
More menu and select Duplicate. The duplicated milestone will be added to the same Work Breakdown Structure (WBS) level as the original milestone and at end of the hierarchical list.
To copy a milestone to another workspace:
- Click the milestone you want to copy to another workspace, to open the milestone detail pane.
- Click the
More menu and select Copy to another workspace.
- In the window that appears, choose a workspace from the list.
- The copied milestone will be added to the chosen workspace Plan at the end of the WBS.
NOTE
The Copy to another workspace option is present only if there is at least one workspace in which you have Read and write access to the Plan tool.
Filter Activities and Milestones
You can filter the activities and milestones within the plan based on attributes such as status, plan items, date range, warnings, labels, boards, cards, risks & issues, and custom fields. Click the Filter icon ![]() in the toolbar to display the filter options on the left side of the window.
in the toolbar to display the filter options on the left side of the window.
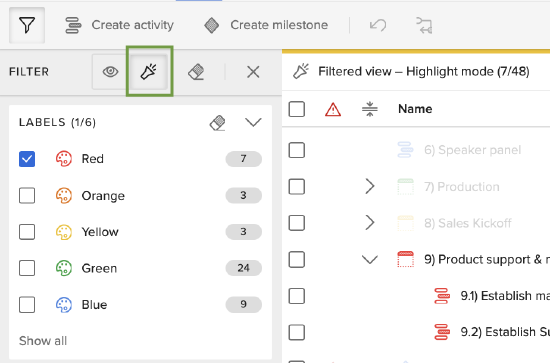
Once you have started to apply the filter you can alternate between Show Only  or Highlight
  view found at the top of the filter options.
Clicking on the Show Only icon will display a filtered view of the plan in which activities and milestones that you are not filtering for will be hidden entirely from the plan.
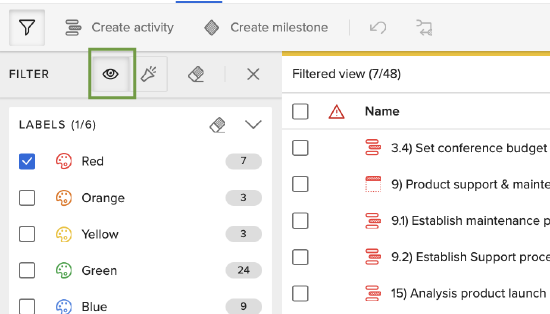
Clicking on the Highlight icon will display a filtered view of the plan in which activities and milestones that you are not filtering for will be dimmed.
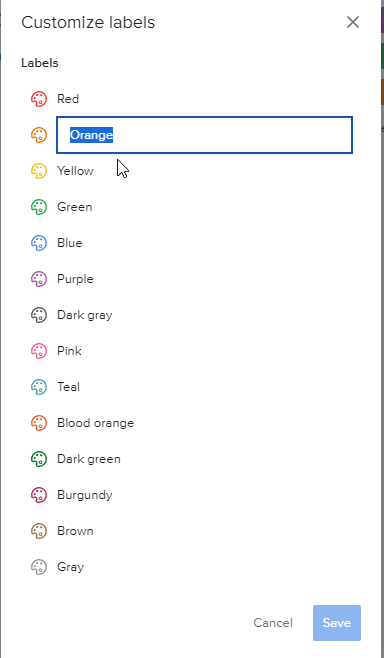
Customize Labels
Use labels to categorize activities in the plan. Each label is represented by a specific color. Plan labels and board labels are named separately, even though they share the same fourteen colors.
- Open the plan and click More Options.
- Click Customize Labels.
- Click in the field next to the label color to change the label name.
Connected Plans (Planview Portfolios or PPM Pro)
If your organization uses ProjectPlace where a workspace Plan is connected to a Portfolios or PPM Pro project schedule, the ProjectPlace Workspace Plan is not editable and is available with a read-only status. The only operations available in this case are:
- Connecting, disconnecting or changing a board on activities.
- Adding or removing cards on activities.
- Changing label on activities or milestones.
- Setting activities or milestones to done.
If you’re using the Portfolios – ProjectPlace connector, you’ll build out the project schedule (consisting of phases, activities, and milestones) in the Portfolio Resource Management application and sync it to your ProjectPlace workspace. ProjectPlace cards flow back into Portfolios as action items, capturing team member progress in the project schedule. Learn more here.
If you’re using the PPM Pro – ProjectPlace connector, tasks are synced from the PPM Pro project to your ProjectPlace workspace. Creating new tasks in PPM Pro results in the creation of corresponding ProjectPlace activities, and resources on the project Staffing screen are added automatically to the ProjectPlace workspace Members tab. Learn more here.