
Import a plan
Import a MS Project Plan
If you have started working on a time plan in Microsoft Project, you can easily import it and continue to work with it in the Plan tool. The activities and milestones will be added to your existing plan.
- The MS Project plan must be created in version 2007 or newer versions after 2007.
- The file size cannot exceed 15MB.
- All activities and milestones must have start and end dates.
To import a MS Project plan to ProjectPlace:
- Save the MS Project plan in an xml version.
- In the Plan tool, click the More Options menu
 and select Import MS Project.
 - Select the xml file to import and click Import.
- The plan is imported to the Plan tool. Work packages are presented as activity groups and Tasks are presented as activities.
If an activity's start or end date is on a day that is set as non-working, it will be moved to the next working day, following the working days rules. On the contrary, milestone dates can be set on non-working days.
Import a .CSV File
You can also upload a .CSV (comma separated) file to the Plan tool. The activities and milestones will be added to your existing plan.
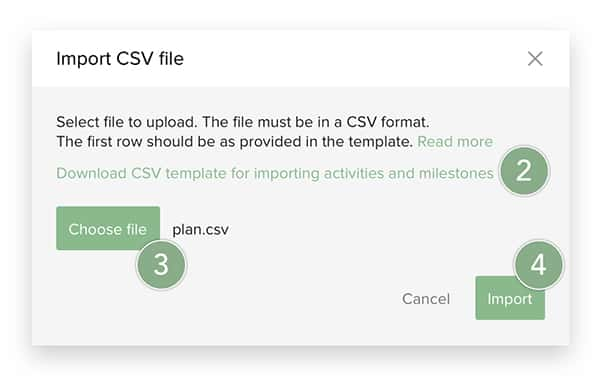
To import a .CSV file:
- In the Plan tool, click the More Options menu and select Import .CSV file.
- If you want to download a pre-formatted template to help you import the records, click Download .CSV template for importing activities and milestones. See About the .CSV File for instructions on using the template.
- Click the Choose file button. Locate and select the desired .CSV file.
- Click the Import button. Each record in the uploaded .CSV file is converted into a corresponding activity or milestone in the plan, and the new activities and milestones are imported to the Plan tool.
If the conversion produces any errors or warnings, they will be visualized in a new Import .CSV file window that appears. Two issues can occur: records can be rejected or they can be adjusted. To learn more, see the Import Errors and Import Adjustments sections below.
About the .CSV File
We recommend that you download the .CSV template file (Step 2 in the above section.) This file contains all of the necessary columns to complete the conversion, and is ideal for a spreadsheet application such as Microsoft Excel. Refer to the image below to see an example of a completed .CSV template file.
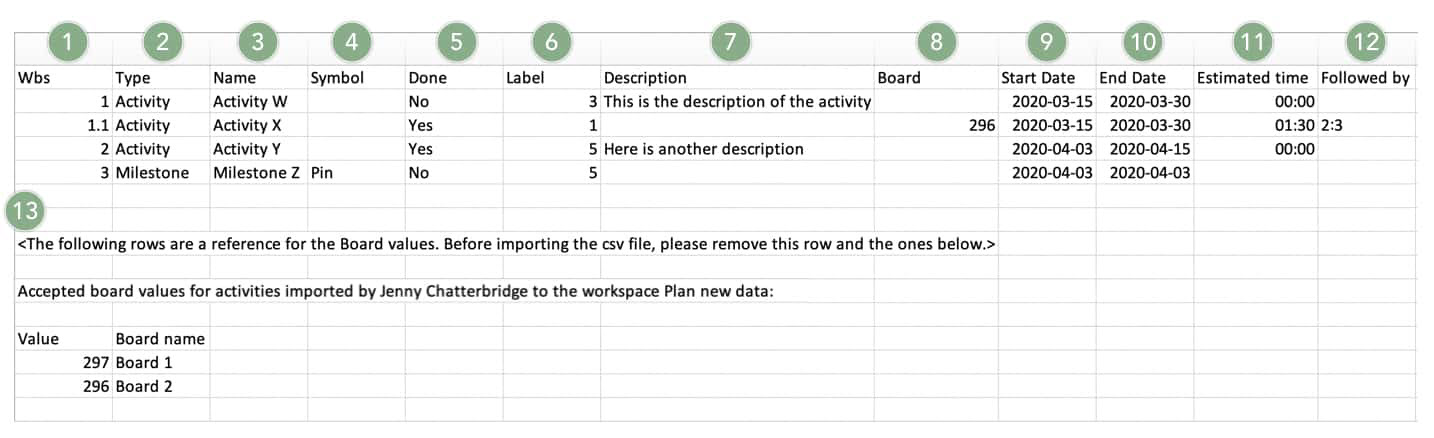
| Item # | Input Value | Value Action | Value Description |
| 1 | Wbs | Required |
Use a string with "." separated numbers to indicate the activity or milestone's position in the WBS hierarchical structure. For example: 1.2.2. Note: If activities already exist in the plan, the new activities and milestones will be placed at the bottom of the existing hierarchy, and the first part of their WBS will be adjusted accordingly. |
| 2 | Type | Required |
Use either of the following strings: Milestone, Activity. |
| 3 | Name |
Required |
Must contain at least 1 character and no more than 256 characters. |
| 4 | Symbol | Optional |
Use one of the following strings: Diamond, Star, Pin. Note: If this field remains empty, milestones will get the diamond symbol by default. Activities don't have any symbol so any of the above values will be ignored. |
| 5 | Done | Required | Accepted values are either No or Yes. |
| 6 | Label | Required |
Use a number within a range of 0 through 13 to assign a label. These numbers correspond to the order of labels listed in the activity details pane: 0: Red, 1: Orange, 2: Yellow, 3: Green, 4: Blue, 5: Purple, 6: Dark gray, 7: Pink, 8: Teal, 9: Blood orange, 10: Dark green, 11: Burgundy, 12: Brown, 13: Gray. |
| 7 | Description | Optional | If this field remains empty, the activity or milestone will not include a description. |
| 8 | Board | Optional | Any number corresponding to the ID of a board that exists in the workspace and that is accessible to the user performing the import. |
| 9 | Start date | Required |
The value must use the following date format: YYYY-MM-DD. Note: For activities, if the Start date is on a day that is defined as non-working in the working days settings, the Start date will be adjusted to the next working day. Milestones set on a non-working day will not be adjusted. |
| 10 | End date | Optional |
The value must use the following date format: YYYY-MM-DD. The End date must be set on a date that is the same or later than the Start date. Note: If this field remains empty, activities's end date will be set to the same day as the start date. Note: For activities, if the End date is on a day that is defined as non-working in the working days settings, the End date will be adjusted to the next working day. Milestones set on a non-working day will not be adjusted. |
| 11 | Estimated time | Optional |
Expected format: 00:00. Estimated time is not allowed for parent activities and milestones. |
| 12 | Followed by | Optional |
Indicate the WBS number of activities or milestones that follow the current one in a dependency chain. Use a string with "." separated numbers. Multiple values must be separated by ",". For example, 1.2.3,3.4.5. Note: If any of the values doesn't correspond to the WBS number of another activity or milestone in the same file, the record will be rejected. |
| 13 |
List of valid board IDs and their corresponding names. These are the boards that are available for your user in the current workspace. Note: This section is only for your reference and must be removed before importing the file. |
- If a required value is omitted, the record will be rejected and the data in the file will not be imported.
- Any empty row will cause the file to be rejected.
- The file can not have more than 1000 records.
If the column headers are displayed in one single column, you may need to change the delimiter settings in your Microsoft Excel spreadsheet. The template file uses a semicolon (;) for the delimiter.
To change the Excel setting:
- Navigate to and click the Data tab.
- Select the From Text/.CSV option.
- Select the desired template file and click Import.
- In the dialog box that appears, select the Semicolon option under Delimiter (if it is not already selected).
- Click Load.
Resolve Import Errors
If any errors occur during the import, records get rejected. If any record is rejected, the import process fails and none of the activities or milestones in the .CSV file are added to the plan.
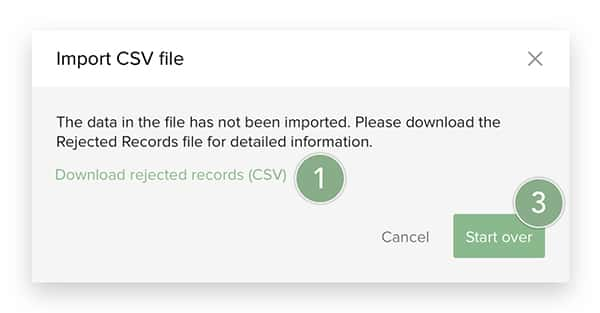
To resolve reported errors:
- Download the Rejected Records (.CSV) file.
- In the .CSV file that you previously imported, address each error included in the downloaded report. (There is no green number on the above image intentionally. See below image for additional information on this step.)
- Click the Start over button to return to the Import .CSV file window, and import the revised .CSV file.
To address errors from Step 2 above:
The image below provides an example of the Rejected Records (.CSV) file opened in Microsoft Excel:

- The Row index column indicates the row number that the rejected record has in the previously imported file.
- The Exceptions column contains the details explaining why each record failed to import. The Rejected Record reported in this example is an Expected the id of a valid board error.
Import Adjustments
One or more records in the imported .CSV file may need to be adjusted. This can happen when data in the file is not consistent with the working days settings, or between different records. For example, when activities' dates are set on non-working days, when activities or milestones have dates that don't respect dependency rules, or when parent activities' dates don't match their children's dates.
If this occurs, all the activities and milestones are imported in the Plan tool, but some adjustments are made to their dates.
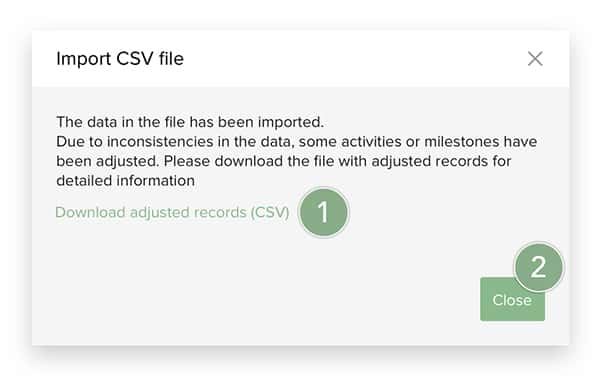
To review adjusted records:
- Download the Adjusted Records (.CSV) file to check which of the records have been adjusted.
- Click the Close button. The new activities and milestones are imported to the Plan tool.
The image below provides an example of the Adjusted Records (.CSV) file opened in Microsoft Excel:

- The Row index column indicates the row number that the adjusted record has in the previously imported file.
- The Exception column contains the details explaining what adjustment has been made.