
Work with Boards
Video: Work with boards
Board Basics
The lowest level of work to be done can be represented by a card that individual team members can take responsibility for. A board can be used to plan the work and visualize progress. Each card contains information about the task to perform, who is assigned to it, and the current status. The status of a card is represented by which status column the card is located. Cards are moved from left to right as work progresses, and when the work is done, the card is placed in the last column to the right. The default columns are Planned, Working on, and Done, but columns can be added or renamed to support your way of working.
Check out the How to Work with Kanban Boards webinar for more on working with boards!
Find Your Way Around the Boards Tool
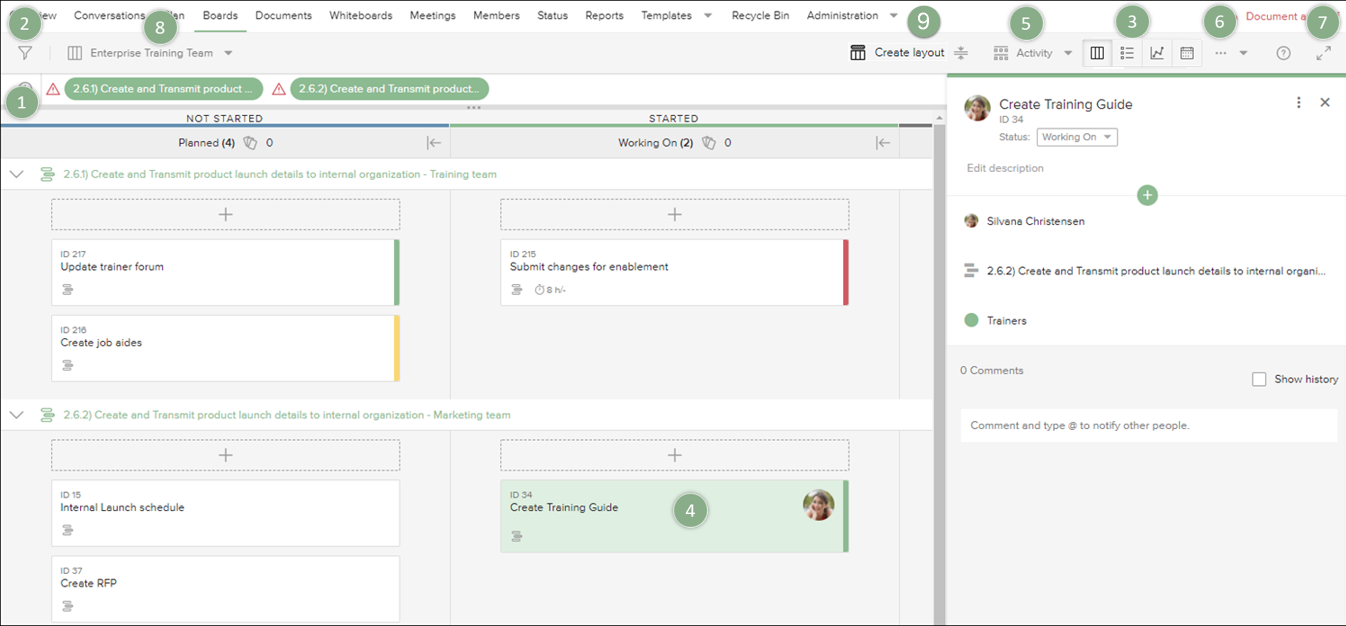
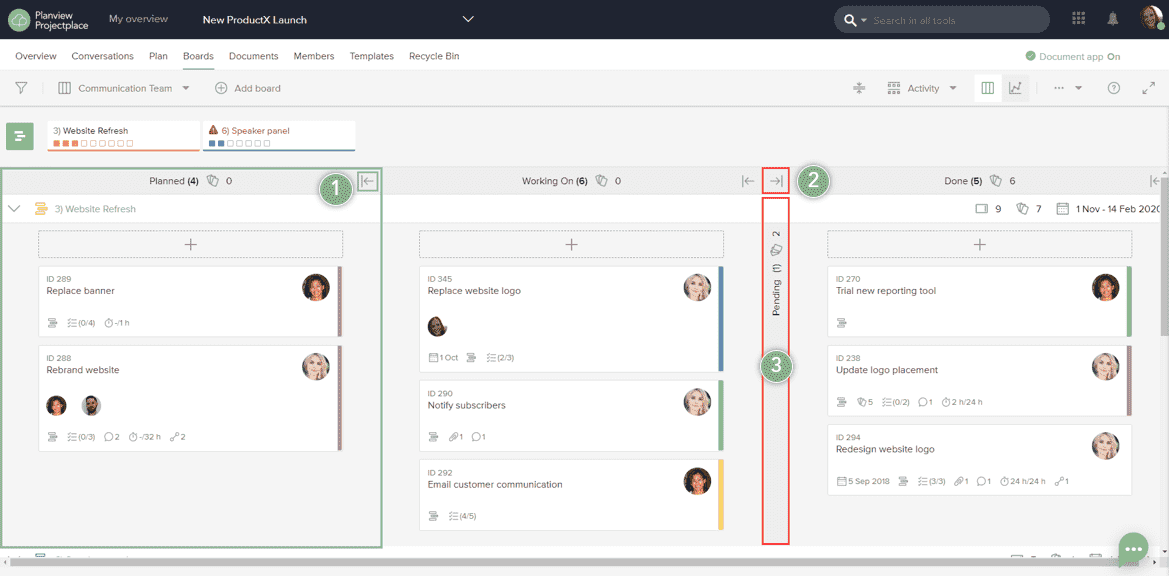
Elements of the Boards tool
Activities connected to the board are found on the Boards tool.
- Click the Add activity
 icon to create an activity or connect to an existing activity.
 - Click the Filter icon to open the panel to filter cards.
- Use these icons to select different views of the board. The board view displays work to be done represented by visual cards, the list view displays cards on the board in a collapsed list with their attributes listed in rows, the chart view displays multiple charts each designed to help you follow up on work progress, and the calendar view displays the scheduled work on the board.
- Click a card to see the card's detail pane including important information about the task represented on the card. You can also comment and discuss the work to be done allowing you to keep all communications and information in one place. You can select multiple cards using the Shift or Control keys. Learn more about working with cards.
- Group cards from different perspectives depending on your needs. You can group cards on the Boards tool by Label, Assignee, Due date or Activity. Each group is represented by a horizontal swim lane.
NOTE
If an activity associated with a board is marked done, any cards related to that activity are no longer visible on the board by default. However in the Boards settings you can change this and change so that Activities that are done are still visible on the board. This is a personal setting and will not affect other users.
- To customize a board to fit your way of working, select Settings from the options menu to edit the workspace name, activation of board email, columns, list view, labels, and access rights. The options menu also allows you to duplicate, share, print, import cards, download, hide, and delete boards (if you have permission). Board Personal Settings are their own option on the boards menu. See Define Personal Settings in Customize a Board.
- Maximize the board view to be able to view more cards at once.
- Select from the boards available in the workspace. When this list is open, you can click Add board to create a board.
- Create a customized board layout to customize a board to suit an occasion such as standup, sprint planning for the teams, or for meetings with stakeholders. For additional information, click here.
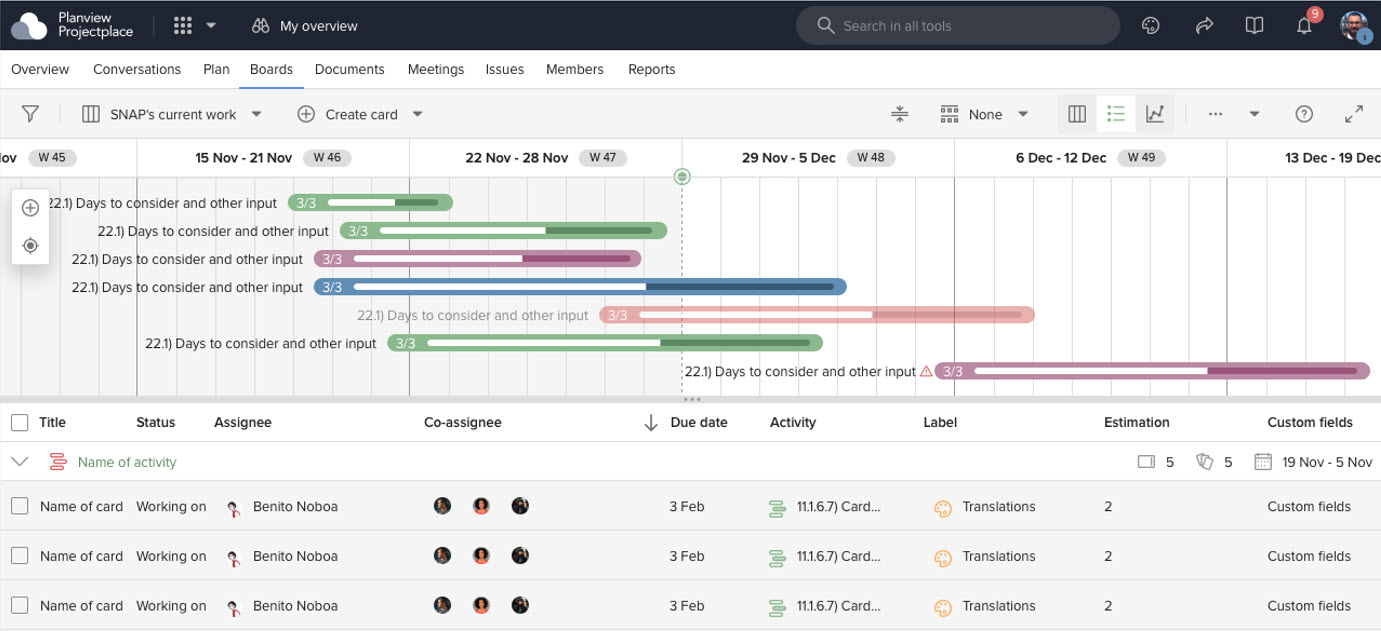
List view
The Boards view provides a structured, spreadsheet-like representation of cards within a board. It enables teams to quickly scan, update, and manage multiple cards without opening each card individually.

This view is optimized for faster updates, bulk visibility, and efficient navigation, making it ideal for teams that need to review and modify large sets of tasks.
On any board toolbar, click the List View icon.
The board switches to a tabular list format, where each row represents a card and columns display card attributes such as Status, Assignee, Dates, Activity, Tags, etc.

In the Boards List View, you can:
-
Expand or collapse activities to show or hide cards within specific phases.
-
Edit card details inline directly within the list without opening the card.
-
Navigate across rows and columns using keyboard navigation for faster updates.
-
Click a card name to open the card and view or update additional details.
Card Actions Menu
In the Boards List View, additional card actions are available by right-clicking on a card or by clicking the three-dot menu on the right side of the card row.

The following actions are available:
-
Copy link: Copy a direct link to the card for easy sharing.
-
Duplicate: Create a copy of the card with the same details.
-
Create template based on card: Save the card as a template that can be reused to create similar cards.
-
Move to another board: Move the card to a different board within the workspace.
-
Send request to team: Send a request related to the card to a team.
-
Delete: Permanently remove the card from the board.
The Boards List View helps teams quickly review and update multiple cards while maintaining visibility across board activities.
Fields you can edit in List View:
-
Name
-
Status
-
Assignee
-
Co-assignee
-
Planned start date
-
Due date
-
Activity
-
Tags
-
Labels
-
Points
-
Estimated time
-
Custom attributes
Calendar view
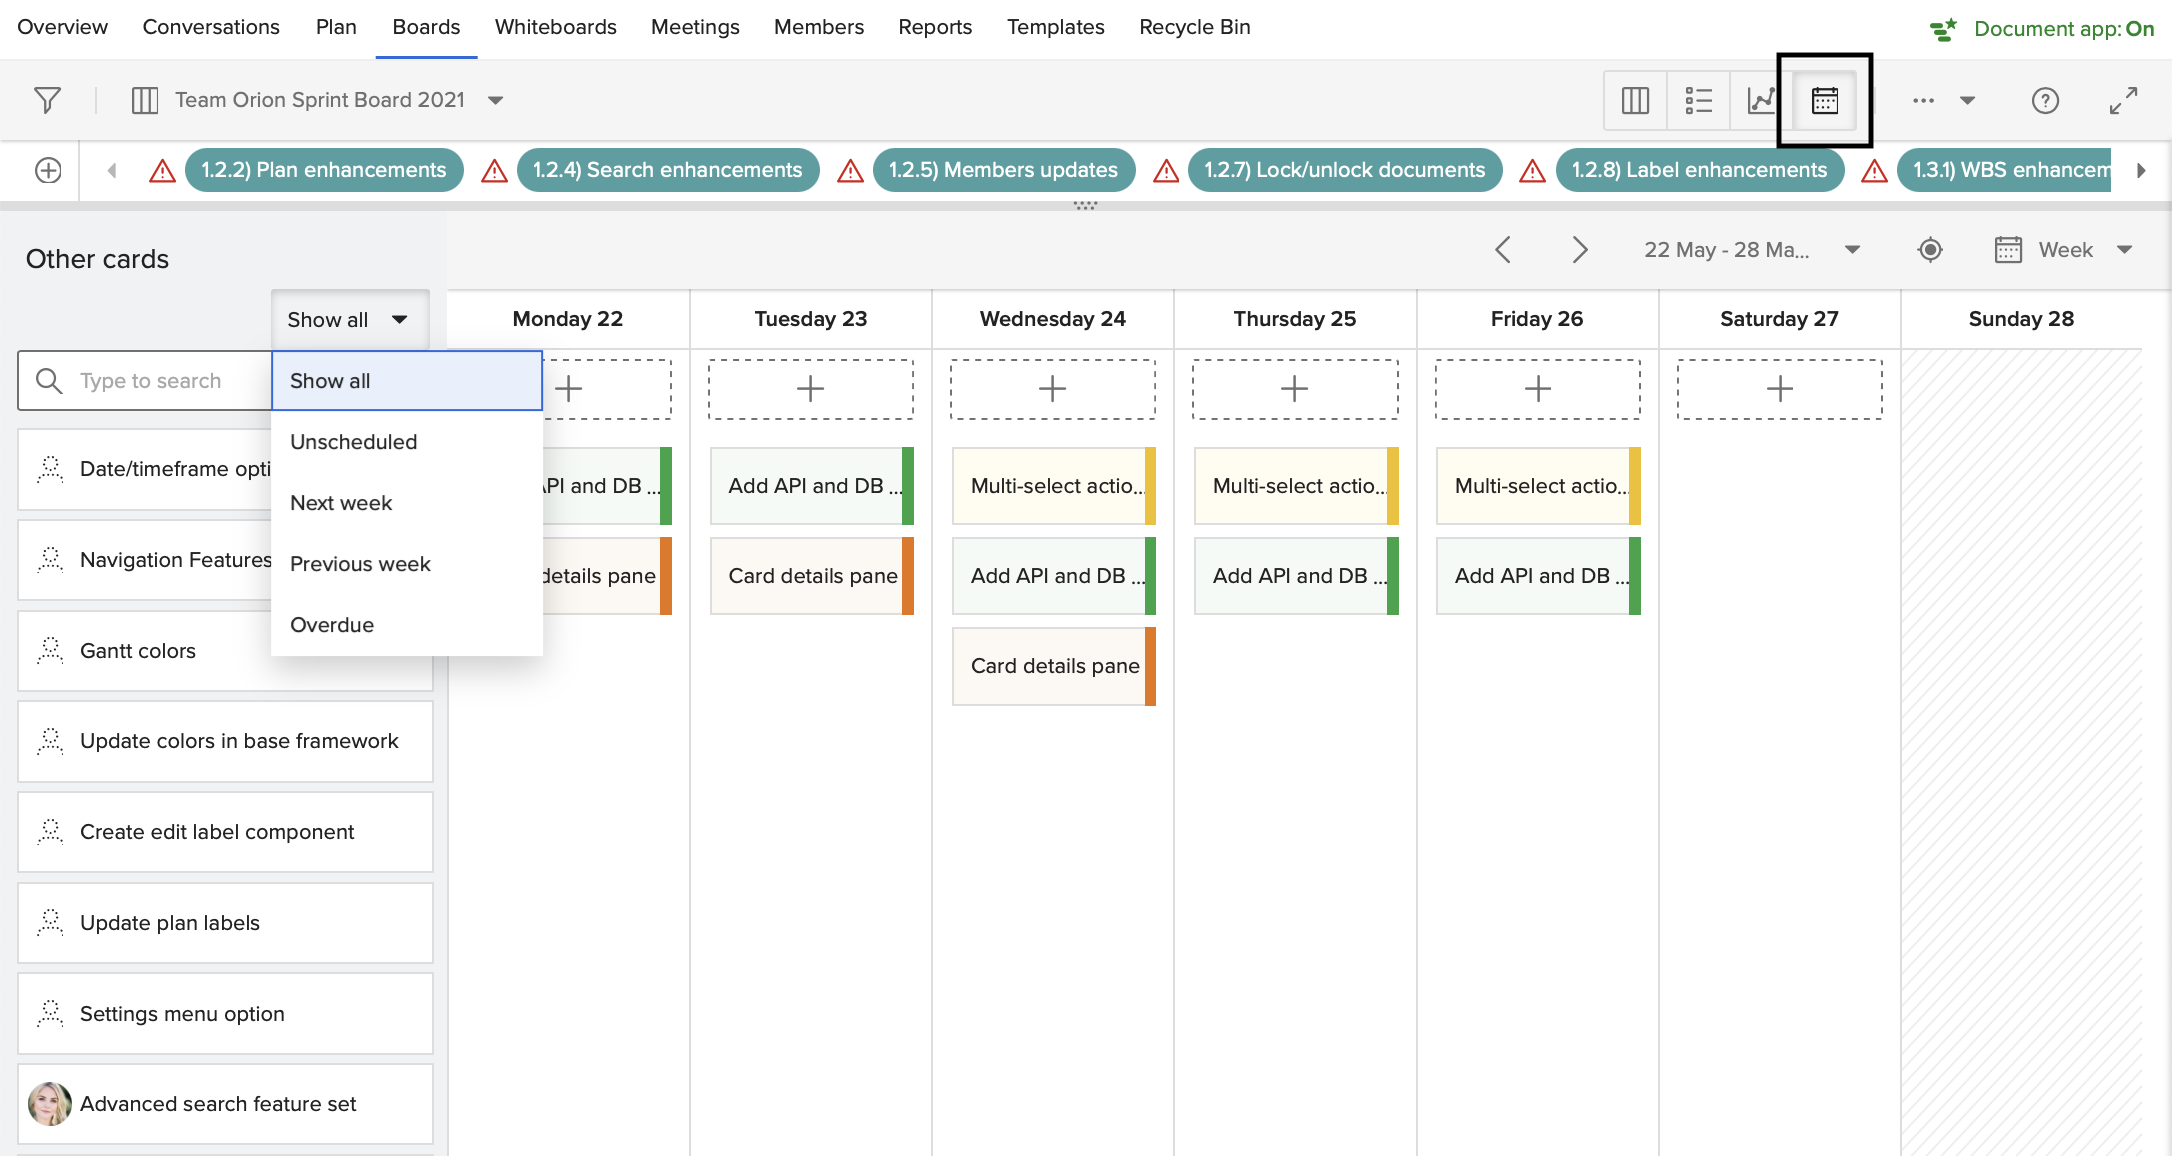
The calendar view provides the team and individual members an easy way to see when each task is planned to start and when it is due, and how the workload is distributed over time. It helps them to plan and prioritize tasks based on the deadline, effort, and other tasks they need to finish.
In the board toolbar, you will find the Calendar button next to the other views options. You will be able to select it if you want to view the calendar per month or per week. You will be able to filter the other cards by All, Unscheduled, Next month, Previous month, and Overdue and these cards in the list can be dragged and dropped to the day in the calendar the work should start. The planned start and due date can always be changed by clicking on the cards and editing them in the details pane.
Working days and custom days set for the workspace are grayed out in the calendar.
To work with Calendar view
- On any board toolbar, click Calendar view.
- Cards can be moved from the side panel on the left to the Calendar view.
- Cards in the Calendar view can be rearranged, updating their start/due dates in the process.
View Activities in a Timeline View
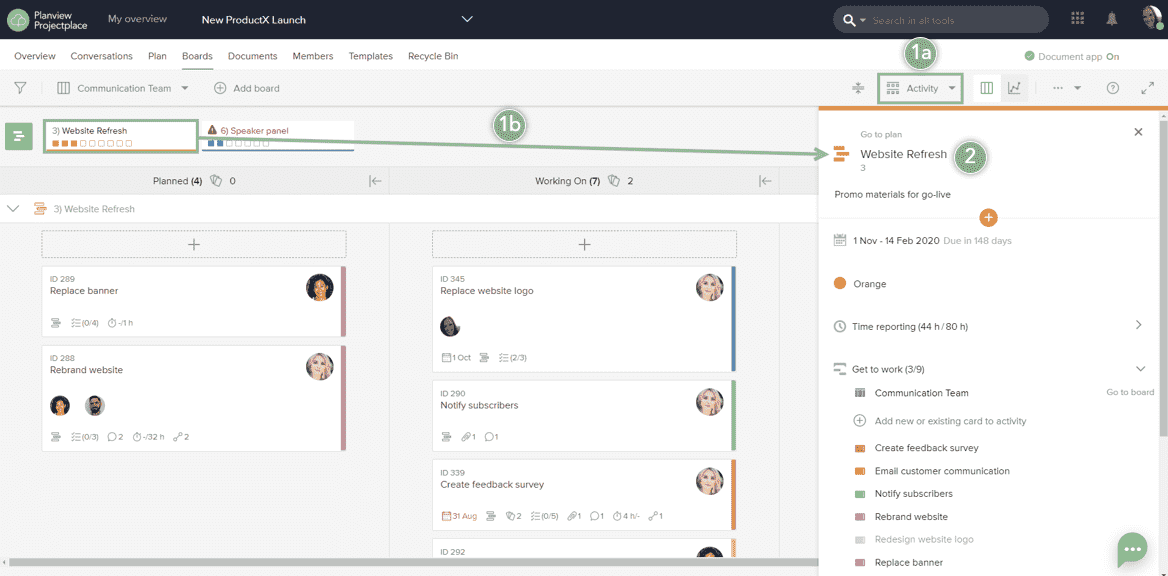
By expanding the activities panel at the top of the board, you can display activities connected to the board in a timeline view. The activities panel helps provide a deeper understanding of the work that is being done in terms of priority and timing. All activities connected to the board are visible on the timeline and the timeline view can be adjusted to show more or fewer of the activities. Teams working on the board can use the activities panel to see when work is planned to be performed and completed.
You can access the activities panel when viewing the board in either the Board view or the List view.
![]()
The Boards tool showing the expanded activities panel
Work with the Activities Panel
- To expand the activities panel, click and drag the horizontal separator bar
 located just above the board's column headers.
 - Click an activity name or its timeline bar to open the Activity detail pane, which will appear on the right side of the window. You can update the activity's details directly from the Boards tool in the same manner as if you were working from the Activity detail pane from the Plan tool.
- To display a different timescale—such as weeks, months, or quarters—click
 , then click the timescale.
 - To view the current date in the timeframe, click
 .
. - To create new activities, click > Create activity, type a name for the new activity, and then click Create.
- You can enable or disable the activities panel by configuring the board's Personal settings.
NOTE
The ability to expand the activities panel is currently limited to boards that have fewer than 200 activities connected to them.
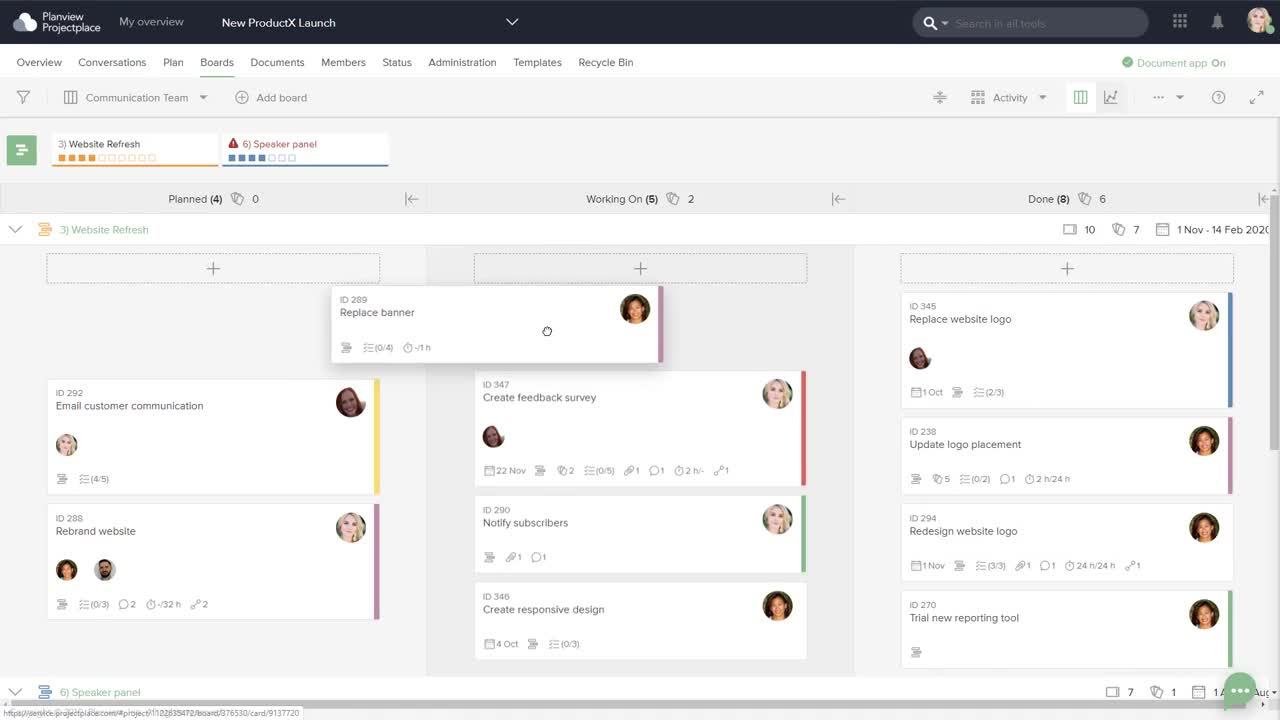
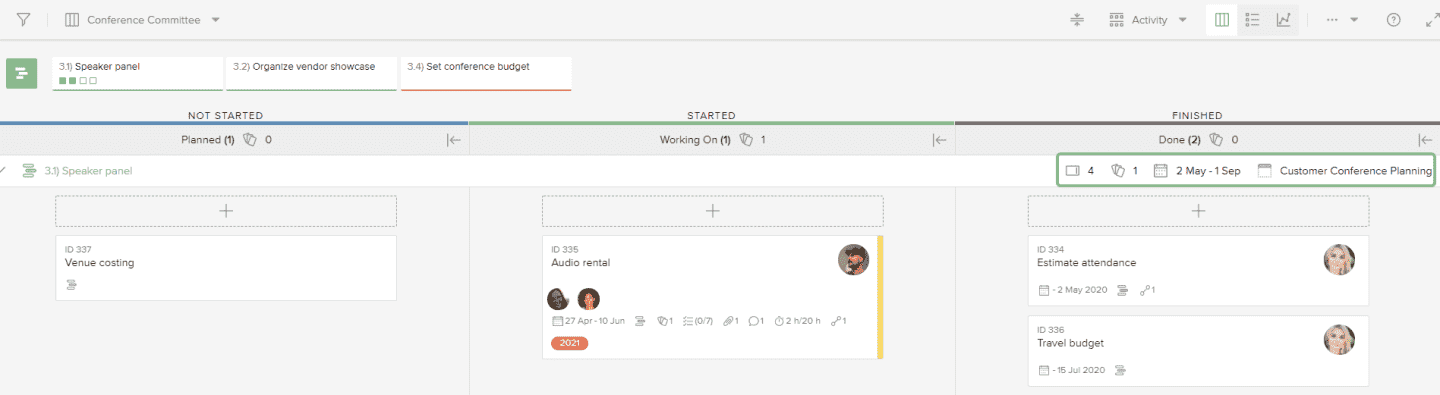
Swim Lane Attributes
Depending on how cards are grouped in the board view, swim lane headers will display aggregated information about the cards in the lane. In the example pictured below, the board is grouped by activity, and the swim lane header displays information about the total number of cards in the lane, the points total of cards for the activity, the range of due dates for the cards associated with the activity, and the name of the parent activity.
When you drag a card from one swim lane to another, the card attributes are changed to the attributes of the new swim lane. In the following example, the card's assignee is changed when it is moved from one user to another.
See and Update Activity Details from the Board
- When cards are grouped by Activity, the Board is organized into multiple horizontal swim lanes. (See Item #5 in the Find Your Way Around the Boards Tool image above.)
- Click an activity name to open the Activity detail pane on the right side of the window. You can update the Activity's details directly from the Boards tool in the same manner as if you were working from the Activity detail pane from the Plan tool.
Learn more about Activities and the Plan tool by visiting Work with the Plan.
Board Activity Risk Summarizer
The Board Activity Risk Summarizer is an AI-driven tool that analyzes data from all cards associated with an activity, identifies risks, determines their potential causes, and suggests tailored mitigation plans. By prioritizing the most critical parameters within the cards, it generates a concise yet comprehensive risk summary, enabling users to proactively manage challenges and make informed decisions for improved project outcomes. Note that the produced summary is only supporting English.
 .
. 
1. Click on the Summarize icon in the activity lane.
2. The system will take a few seconds to generate the summary for the selected activity.
a. Within the summary, you can click on any card or activity link to view its details.
3. If you're not satisfied with the summary, click the refresh  icon to re-generate it.
4. To copy the summary, click the copy  icon and paste it wherever needed.
Collapse and Expand Columns on Boards
When a board contains a large amount of information, you can collapse one or more of the columns so that only the columns that you want to focus on are displayed.
To collapse a column on a board:
- Click the Collapse icon
 of the column you want to collapse. Users can collapse as many columns as they prefer as long as there is at least one column that remains visible.
 - Click the Expand icon
 of the column you want to expand.
 - Collapsed columns display the following information:
a. Status (column) name
b. Number of cards
c. Maximum number of cards set (if any)
d. Sum of the estimated points for the cards in the column
Users can drag and drop cards into collapsed columns.
Create a Board
You can create any number of boards in a workspace, but keep in mind that too many boards reduces the strength of a board to visualize all related work at once. A good practice is to create one board for each team.
The Board description features provides the user the ability to add and manage descriptions for all boards within a given workspace in ProjectPlace. This feature aims to enhance the clarity and contextual understanding of each board by providing descriptive text that explains the purpose, goals, and relevant details of the board.
To create a board:
- Navigate to the Boards tool.
- In the screen's upper left, click
 to expand the list of boards available in the workspace and then click Add board.
 - In the Add board window, type a name for the new board and add a description.
- Click Add to create the board.

Board description in the Add board dialog box
Planview Anvi® AI Integration with Rich Text Editor in Board Description
You can now take advantage of our Planview Anvi feature in the Editor to enhance your board description.
With AI-powered tools, we offer several options to improve your board descriptions, including grammar correction, translation into multiple languages, adjusting tone to be either professional or casual, and modifying content length.

Add board screen with Planview Anvi indicated

Planview Anvi Options on Add board screen

Planview Anvi generating content

Planview Anvi response
To view or edit the board description, follow these steps:
- Click the Board description icon next to the board selection icon to view or edit the description.
- Alternatively, you can select Board description from the options menu to open the board description modal. In the modal, you can add or edit the description using the built-in editor. The editor allows you to create rich, formatted descriptions with features such as headings, bold, italics, underline, text color, code snippets, links, block quotes, and bulleted lists.
NOTE
Users with read-only access to the board will not be able to edit the description.
 .
.

"Board description" section in settings options

Looking for board design inspiration? Check out our article on customizing boards to fit your way of working!
Create Cards
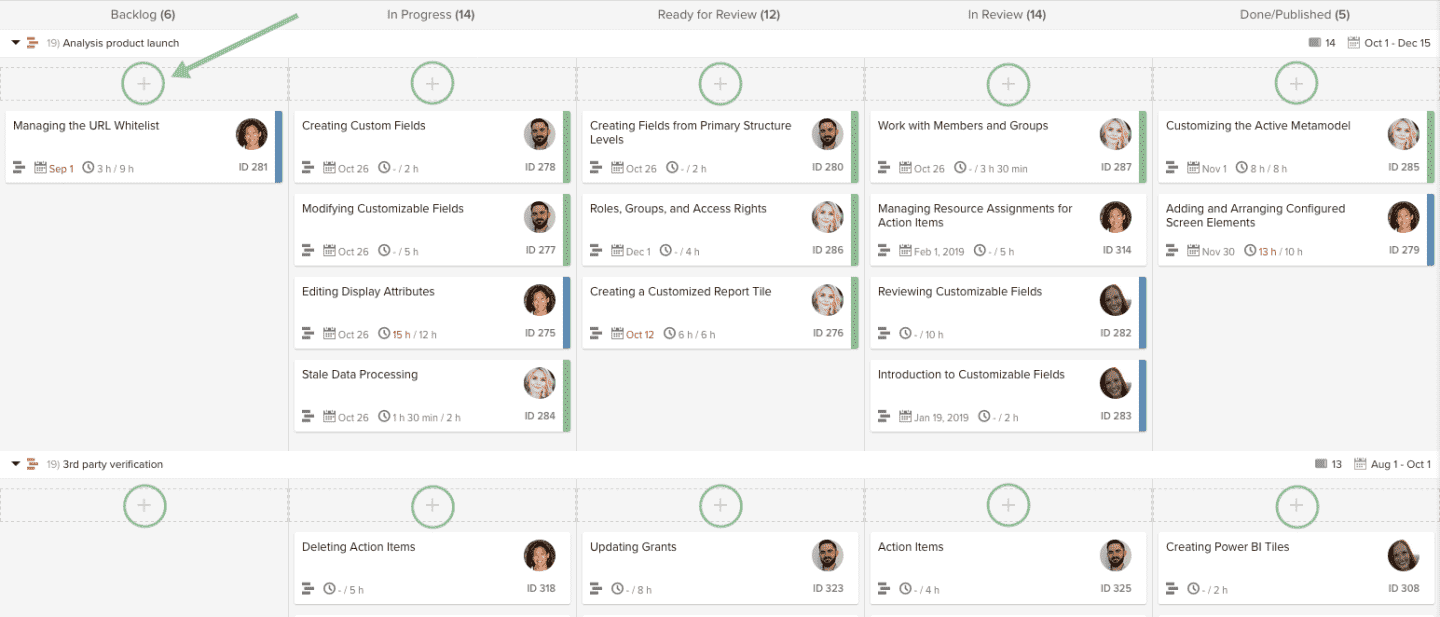
To create a card in a Status column, click the plus icon ![]() below the activity name (or swim lane title) for the column.
below the activity name (or swim lane title) for the column.
If you group cards by Label, Assignee, or Activity, click the plus icon ![]() in the desired group to add the card to that group. To create a card outside of the groups, click the plus icon
in the desired group to add the card to that group. To create a card outside of the groups, click the plus icon ![]() in the last group at the bottom of the list titled No activity, No assignee, or No label.
in the last group at the bottom of the list titled No activity, No assignee, or No label.
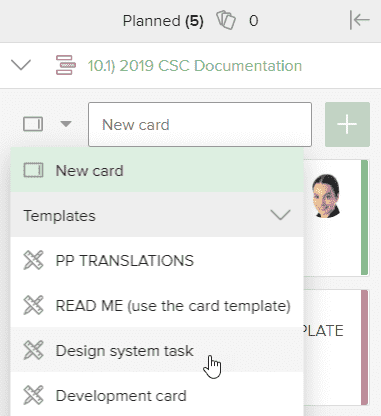
You can also create a card based on a card template. Click the template icon ![]() to the left of the New card field, and then select the template.
to the left of the New card field, and then select the template.
Users who do not have access to a Board can create cards using the Email to Board function.
You can drag the most important cards to the top of a list in the first column so the team can work on the most important cards first.
Planview Anvi in Card details pane
You can now take advantage of our Planview Anvi feature in the Editor to enhance your card description.
With AI-powered tools, we offer several options to improve your card descriptions, including grammar correction, translation into multiple languages, adjusting tone to be either professional or casual, and modifying content length.
To work with Planview Anvi in the Card details pane:
- Create a card on a board.
- On the card's Detail pane, click the Planview Anvi icon
 and select from the dropdown menu which aspect of your card description you wish Planview Anvi to modify. See dropdown options below.

Filter Cards
You can filter the cards on a board based on card attributes such as assignee, status, activities, labels, dependencies, due date, custom fields, and so on. Click the Filter icon ![]() in the toolbar to display the filter options on the left side of the window.
in the toolbar to display the filter options on the left side of the window.
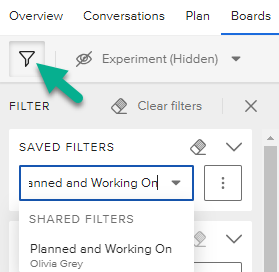
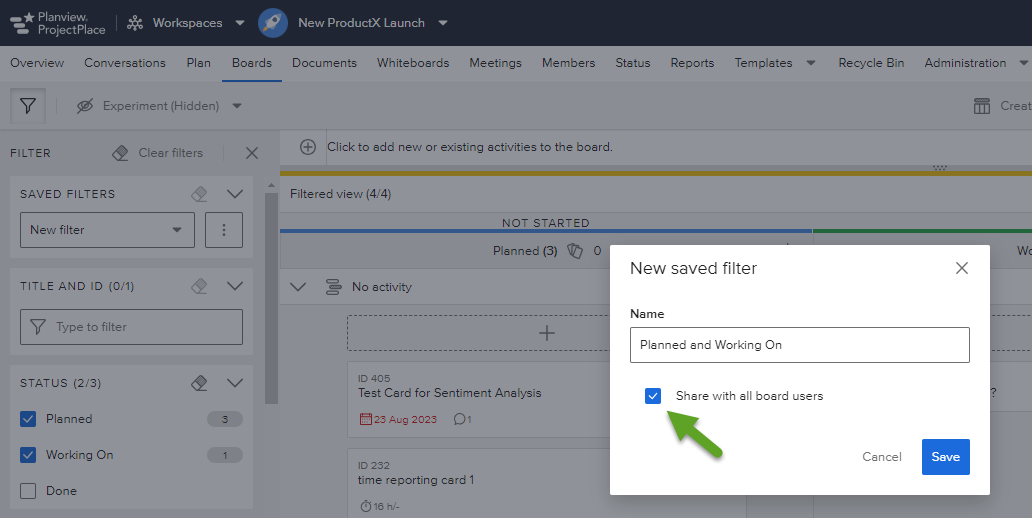
You can save filters in Boards so that you can easily switch between filter settings that you use on a regular basis. You can save these filters as personal filters that are only visible to you or share the filters with other members of the workspace.
Importing Cards
You can import cards to a board from another resource, tool, or system by uploading a .csv (comma separated) file that contains the required data.
There is a .csv file template that includes all of the headers required to successfully import cards.
To download the .csv file template:
- Navigate to any board.
- Click the Options menu icon
 > Import cards.
 - In the Import cards dialog, click Download .csv template for importing cards to board.
- For instructions on using the template, see About the .csv File.
To import cards to a board:
- Navigate to the board.
- Click the Options menu icon > Import cards.
- In the Import cards dialog, click Choose files.
- Locate and select the .csv file.
- Click Next to continue.

- The service now attempts to convert each record in the uploaded .csv file by creating a corresponding card on the board. After this process is completed, the conversion results are included in a new Import cards window that appears.
- Review the New cards created and Rejected records results reported in the window.
- If there are any Rejected records, click the Download Rejected Records (csv) link to open the failure report. The report includes a list of records that did not convert along with a potential reason as to why the failure occurred. Learn more about the Rejected records report in the Import Errors section below.
- Click the Start over button to restart the conversion process for the failed records or to start the process for a different .csv file.
About the .csv File
We recommend that you download the (.csv template) file mentioned in the above section, Importing Cards. This file contains all of the necessary headers to complete the conversion and is ideal for a spreadsheet application such as Microsoft Excel.
The following requirements must be satisfied for each record in the file.
| Item # | Input Value | Value Action | Value Requirements |
| 1 | Title | Required | Must contain at least 1 character and no more than 255 characters. Note: If the Title is omitted, the record will fail to convert to a card. |
| 2 | Description | Optional | If this field is empty, the card will not include a description. |
| 3 | Assignee | Optional | The email address of the workspace member who has board access to assign the record/card. If this field is empty, the corresponding card will be unassigned. This field is case sensitive when importing the file. |
| 4 | Start date | Optional | Must be in the following date format: YYYY-MM-DD. |
| 5 | Due date |
Optional |
Must be in the following date format: YYYY-MM-DD. |
| 6 | Label | Optional | Use a number for a range of 1 through 14 to assign a card label. These numbers correspond to the order of labels listed in the board settings. If this field is empty, the corresponding card will not be labeled. |
| 7 | Estimated time | Optional | The number of seconds for the desired estimated time value. For example, if you want to report an estimated time value of one hour, input a value of 3600 seconds. If this field is empty, the corresponding card will not include an Estimated time. |
| 8 | Blocked reason | Optional | Describe the reason for the card being marked as blocked if the corresponding card is blocked. If this field is empty, the corresponding card will be unblocked. |
| 9 | Points | Optional | One of the following point values: 0, 0.5, 1, 2, 3, 5, 8, 13, 20, 40, 100. If this field is empty, the corresponding card will not have a points value assigned. |
| 10 | Column | Optional | Number that corresponds to the column in the board into which the card will be placed. From left to right, 1 is the first column and X is the last column. For example, if you have a board with 5 status columns, you can specify a number between 1 and 5. If this field is empty, the corresponding card will be placed in the first column on the board. |
| 11 | Checklist | Optional | Items in the checklist column will become items in a checklist on the created card. Use double hashtags between each checklist item (e.g. Item 1##Item 2##Item 3). Normal restrictions regarding item length and total number of items in a checklist apply. |
| 12 | Co-Assignees | Optional | Email addresses of workspace members that are co-assignees on the card, with double hashtags between each email address (e.g. user_1@domain.com##user_2@domain.com##user_3@domain.com). The same restrictions as the assignee column apply. This field is case sensitive when importing the file. |
| 13 | Tags | Optional | Names of tags (cannot include spaces) for assigning tags to the created card, with double hashtags between each tag (e.g. TagOne##TagTwo##TagThree). They have the same restrictions as regular tags, and if one does not match an existing tag, a new tag will be created. |
| 14 | Activity | Optional | ID of the activity to be connected to the card. The Activity ID can be located by selecting the activity (by clicking on the name to open the Activity details pane) and finding the ID in the URL (e.g. in this URL: https://service.projectplace.com/#pr...vity/976797868, the Activity ID is 976797868). Only activities that are currently connected to the board are allowed. If you use the Excel sheet and you have long activity ID's you might need to change the format of the column. Please view the Tip box below for further instructions. |
| 15 | Predecessors | Optional | Row number in the import file where the predecessor card is listed, with commas between each row number if more than one predecessor should be added (e.g. 1,2,3). |
Change Column Headers from one Single Column to several Columns
If the column headers are displayed in one single column, you might have to change the delimiter settings in your Microsoft Excel spreadsheet. The template file uses a semicolon (;) for the delimiter.
To change the Excel setting:
- Navigate to and click the Data tab.
- Select the From Text/CSV option.
- Navigate to and select the desired template file and click Import.
- In the dialog box that appears, select the Semicolon option in the dropdown box under Delimiter (if it is not already selected).
- Click Load.
Long Activity ID's
If you use Excel to edit the file you should format the Activity column as Text (instead of General) before adding any ids to it.
To format the column:
- Right-click the letter at the top of the column
- Click Format cells ...
- Select Text in the Category box and click OK
See https://docs.microsoft.com/en-us/office/troubleshoot/excel/last-digits-changed-to-zeros for more information
Import Errors
When errors occur during the import, a Download Rejected Records (csv) .csv file and link (from Step #8 in the above section, Importing Cards) are created. This report is similar to the .csv template file, however, a new Error column has been inserted to the left of the Title column. The reason an error occurred is provided for each record in the Error column.
To resolve reported errors:
- Downloading the Rejected Records (csv) file
- Review and address each error included in the report
- Delete the Error column
- Attempt the import process again to convert the remaining corrected records into cards.
The image below provides an example of an error.csv file opened in Microsoft Excel:

- The Error column (A) contains the details explaining why each record failed to import. Note: Once these errors have been corrected, delete the Errors column and upload the corrected .csv file again to import the remaining records.
- The Rejected Record reported in this example is an Invalid estimated time error.
- The value in the Estimated time column is "ö" which is not a valid value. Delete the value and enter a valid value (if one exists) as defined in the About the .csv File section above (refer to item #6).
To hide or delete a Board, visit Hide and Delete Boards.
Work with Boards on Mobile Apps
Access your boards on the go with our mobile apps! Add boards, create cards, filter cards on the board, and much more all from your phone (even if you're offline.)
To request offline support for boards, contact Customer Care (this feature is off by default.) Once this feature is turned on, recent boards will be synced to the apps and available in offline mode.