
Manage Workspace Settings
Workspace settings are managed in the Administration tool and include general information about the workspace used in different places within ProjectPlace. There are settings for which tools to use in the workspace, who should administrate the workspace, how and where information about the workspace is published, password requirements to access the workspace, and what kind of automatic email updates workspace members receive. From the Administration tool you can also download all workspace artifacts, archive and delete workspaces.
Only workspace administrators can change workspace settings.
Change General Information
You can rename a workspace and add general information displayed and used in different ways as described below.
To change general workspace information:
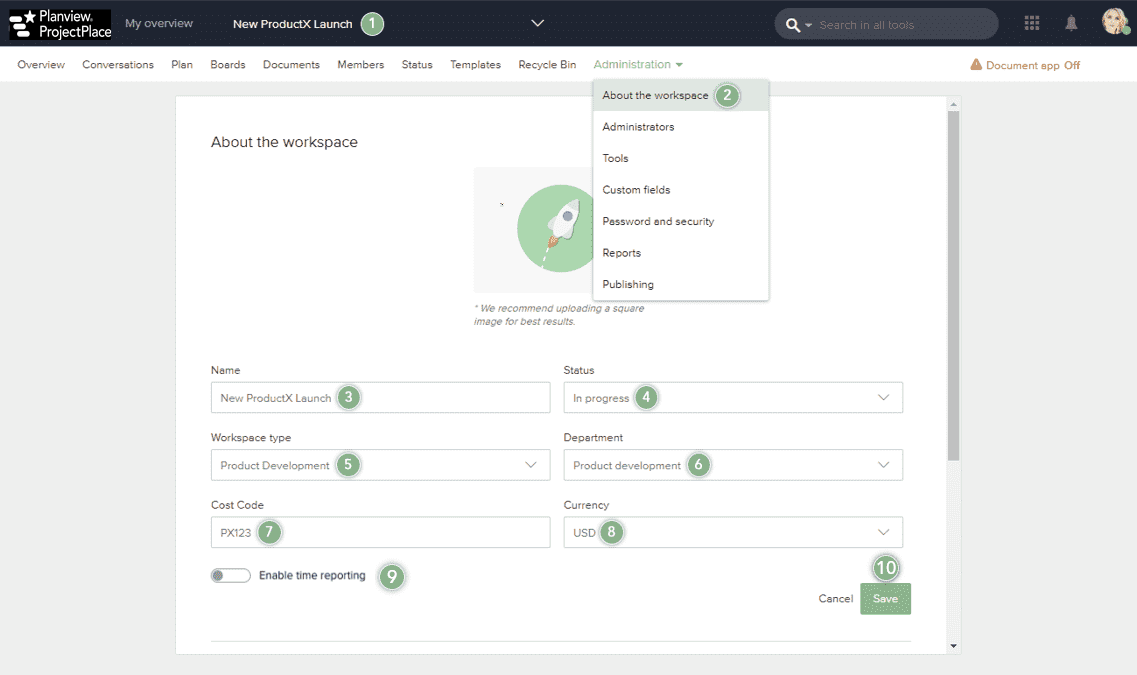
- Navigate to a workspace you are a member of.
- In the workspace toolbar, click the Administration menu and select About the workspace.
- In the Name field, you can edit the workspace name.
- In the Status list, select a workspace status of Not started, In Progress, or Completed.
- In the Workspace type list, select the workspace type associated with the workspace.
- In the Department list, click the department name associated with the workspace.
- Type the relevant Cost code.
- In the Currency list, select the appropriate currency type.
- Switch the Enable time reporting toggle to the on position if you want to enable time reporting on cards, even if the Team Member Plus time reporting option is configured for the account. (Time reported in ProjectPlace can be accessed through the Plan or Board downloads, but the Time reporting option in the global navigation will still point to the Enterprise One - PRM or PPM Pro time sheet.)
- If custom fields have been added in Account administration they will be presented below the default fields. The custom values will not be mixed with the default fields since only the default fields are localized.
- Click Save.
Department and Cost code are used for internal invoicing. Currency is used if financial figures are reported to portfolios. The contact information is published on the public site when the public site is activated for the workspace.
See Used Storage
Every workspace has an allocated storage space.
To see how much storage has been used and how much storage is available for a workspace:
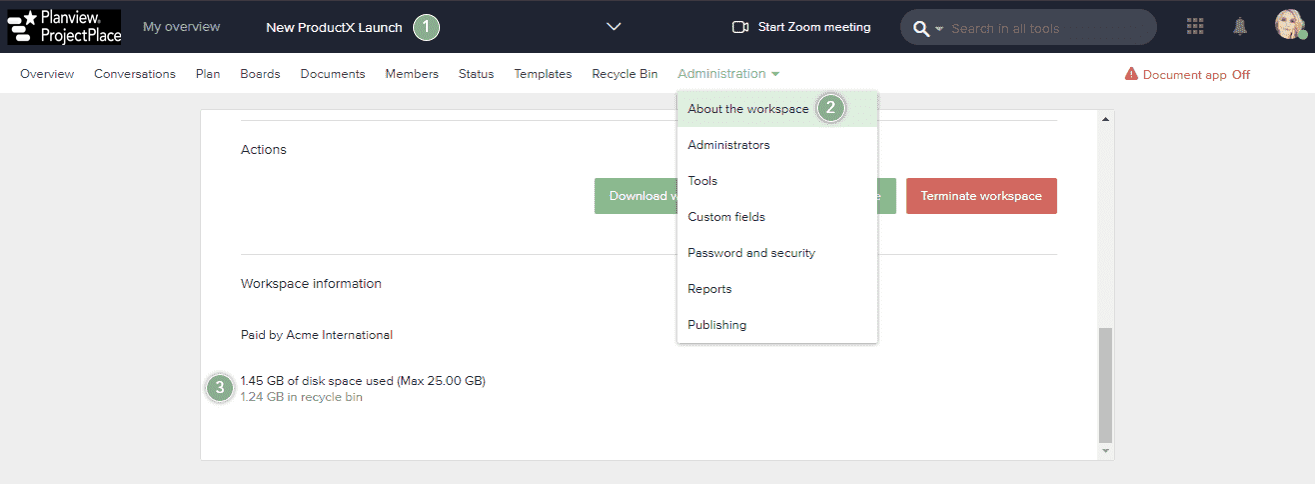
- Navigate to a workspace you are a member of.
- In the workspace toolbar, click the Administration menu and select About the workspace.
- Under the Workspace information section, you can see how much storage the workspace is using and how much storage is available.
If your workspace runs out of storage space, please send an email to support@projectplace.com.
If your workspace storage is nearing its capacity, we recommend you check the recycle bin to see if space can be increased by deleting unwanted files.
Change the Workspace Manager
Only an administrator can be assigned as the Workspace manager. The workspace manager is responsible for reporting to portfolios within the workspace. When a new workspace is created, the workspace manager and the workspace head administrator roles are assigned to the same person by default. One of the workspace administrators, however, can assign the workspace manager role to a different workspace administrator.
To change a workspace manager:
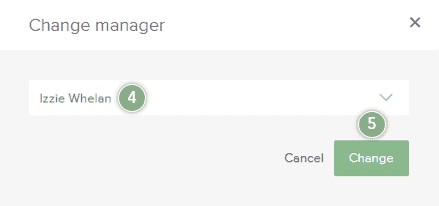
- Navigate to a workspace you are a member of.
- In the workspace toolbar, click the Administration menu and select Administrators.

- In the Manager section, click the Change button.

- From the overlay window that appears, select a new administrator from the available list.
- Click Change to set the selected person as the new workspace manager.
Add Workspace Administrators
The person who created the workspace automatically becomes the head administrator. We recommend that you add one or more administrators to help manage the workspace. Workspace administrators can, for example, set access rights to document folders and determine the tools that are available in the workspace.
A person must first be invited to a workspace as a member, before being assigned as an administrator.
To add workspace administrators:
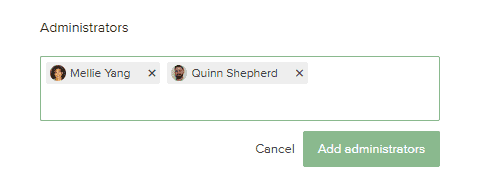
- Navigate to a workspace you are a member of.
- In the workspace toolbar, click the Administration menu and select Administrators.
- In the Administrators section, click the
 Add Administrators button.
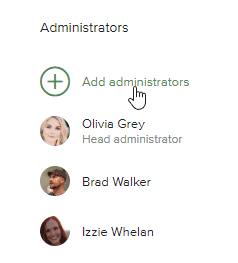
- Select one or more workspace members and click Add administrators.
You can also change the head administrator if needed.
Remove Workspace Administrators
- Navigate to a workspace you are a member of.
- In the workspace toolbar, click the Administration menu and select Administrators.
-
In the Administrators section, hover the cursor over the administrator name you want to remove and click the delete icon
 that appears on the right.
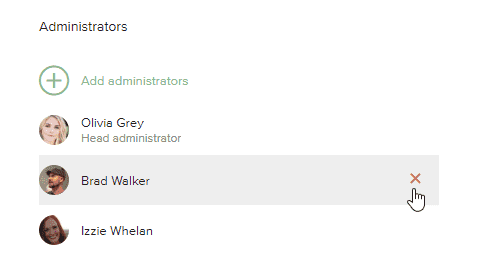
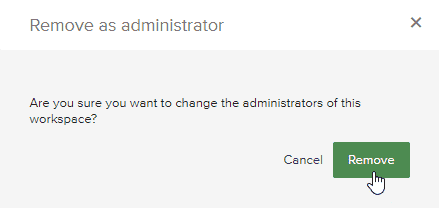
-
From the overlay window that appears, click Remove.
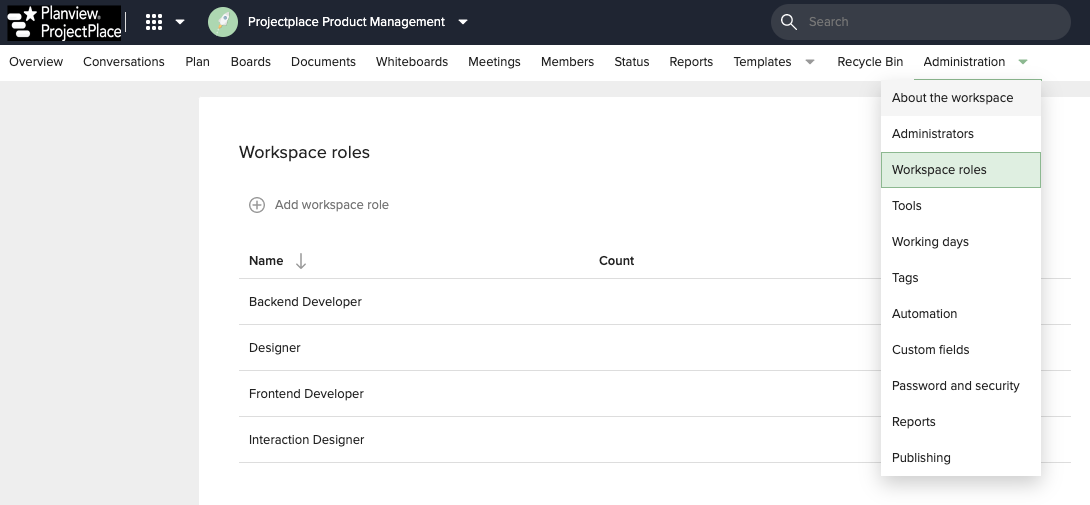
Manage Workspace Roles
Workspace administrators can create predefined roles within the workspace which is done from Administration > Workspace roles. There is no limit on how many workspace roles can be created by Workspace administrators.
Once the workspace roles have been created, the workspace administrator, owner, or a member with read and write access can add these roles to themselves or any other member in the workspace in the Members tool. A member can have several workspace roles. If more than one role is added to a member, the first role that is added will be set to the primary role.
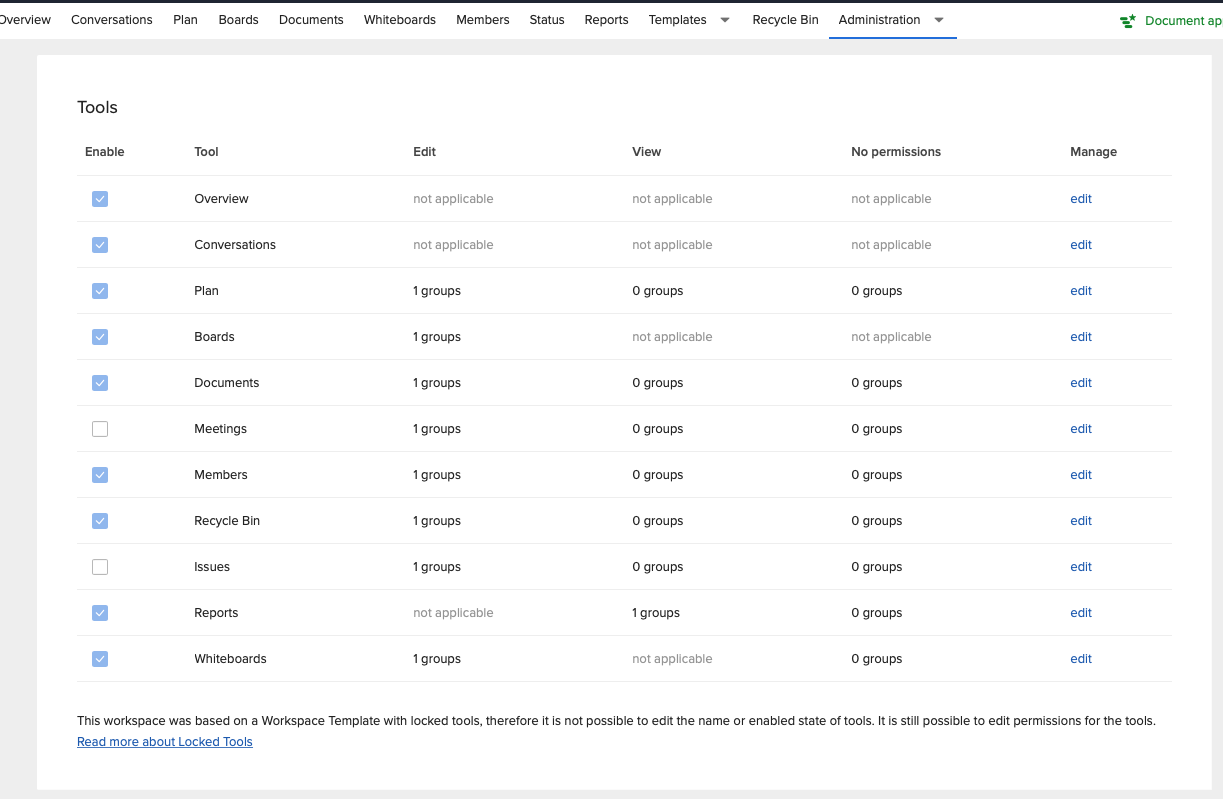
Activate/Deactivate Tools
Use the various tools within ProjectPlace for planning, execution and follow up, communication and collaboration, and document management. You must be a workspace administrator to perform these tasks.
If you deactivate tools not needed in the workspace, you will reduce complexity and make it easier for workspace members to understand how they use ProjectPlace.
To deactivate/activate tools:
-
Navigate to a workspace you are a member of.
-
In the workspace toolbar, click the Administration menu and select Tools.
-
Use the checkboxes to select the tools you want to be included in the workspace. Overview, Conversations, and Plan are always active and cannot be deactivated.
-
Set custom tool names that better align with terminology used within the organization or changing permissions for the groups by clicking Edit on the right column.
If the Workspace has been created from a Workspace template where a setting to keep the visibility of the tools and name locked in new workspaces has been activated, the workspace administrator will only be able to manage group permissions for each tool, but not edit the name or the visibility of the tools. This setting can only be changed in the Workspace template by the Template Administrator.
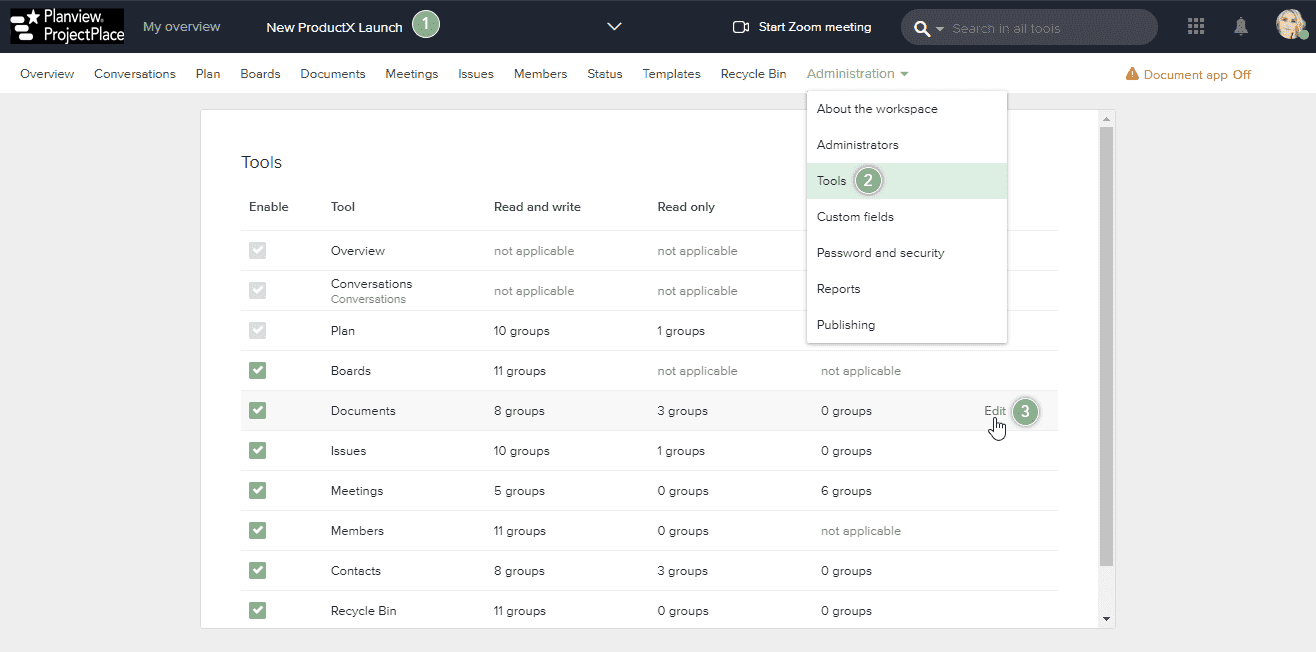
Set up Access to Tools
After activating or deactivating the workspace tools they want workspace members to use, workspace administrators set permission levels on tools to restrict members' access to certain information and functionality. Administrators will always have full access to all tools, and this setting cannot be changed.
ProjectPlace permissions are set using member groups. Learn more on how roles, groups, and permissions are used to define who can see and do what in ProjectPlace.
To define access levels to tools for groups:
- Navigate to a workspace you are a member of.
- In the workspace toolbar, click the Administration menu and select Tools.
- Hover the cursor over the tool name you want to set permissions for and click Edit. A new window appears.
- In the Set permissions section, select the access level for each group.
- Click Save.
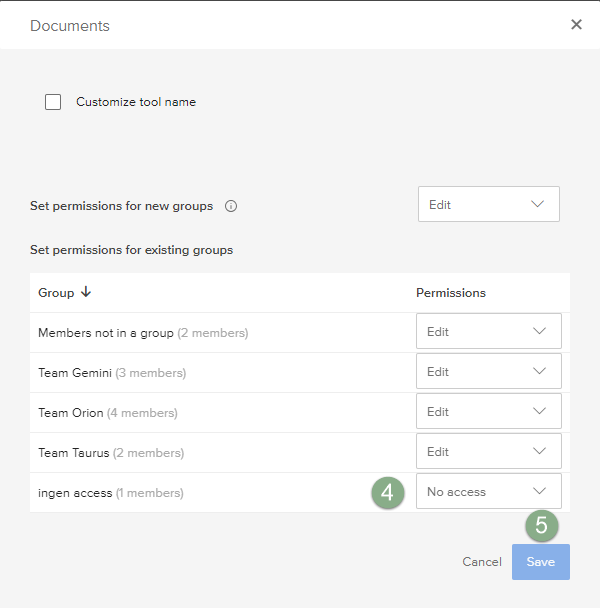
Members that are not included in a specific group automatically end up in a group called Members not in a group. Note that members placed in this group will have full access to data in the workspace. If you have information that you want to restrict access to, we recommend that you give this group a No Access setting. This way new members that have not yet been added to the appropriate groups have restricted access by default.
For the Documents tool, you have the option to set the access level for new groups in addition to existing groups. See Manage Access to Document Folders for more information.
If you want to review the permissions to all tools for a specific group (for example a new group), click the group name and edit access to all tools simultaneously.
Manage Working Days
Workspace administrators can manage Working days through the Workspace Administration tool. In the Working days page, it is possible to set up recurring working and non-working days that will repeat every week, as well as custom days, which are single days or ranges of days that can be set as working or non-working. Any changes to Working days might cause recalculations of start and end dates of activities and milestones in the Plan tool.
To manage working days:
- Navigate to a workspace you are a member of.
- In the workspace toolbar, click the Administration menu and select Working days.
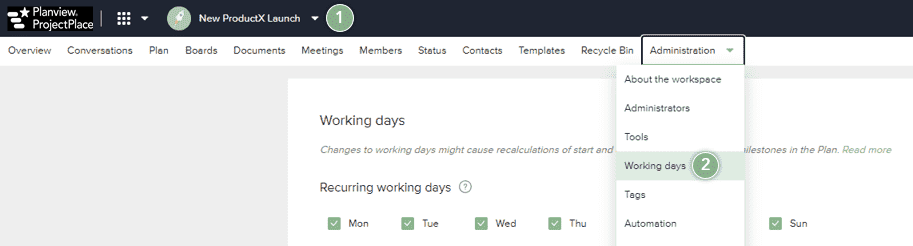
- In the Recurring working days section, use the checkboxes to select the days of the week that you want to set as working, and deselect the days that you want to set as non-working.
- Optionally, specify custom days:
- In the Custom days section, click the Add custom days button. A new row appears at the top of the list.
- Give the custom day a name.
- Select a start and end date for the custom day. Select the same day as the start date if you want to set a single custom day, or choose a day that follows the start date, to set a date range.
- Select a type (either working on non-working) for the custom day. If you selected a date range, the specified type will be applied to all days included in the range.
- Click Save to save your changes. In the confirmation window that appears, click Continue.
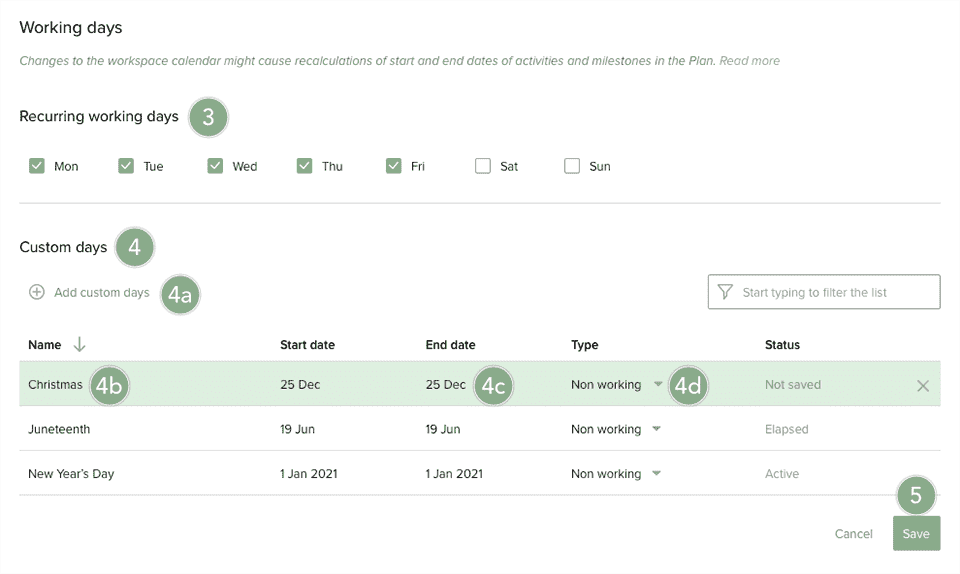
Custom days with no dates are not saved.
Manage Tags
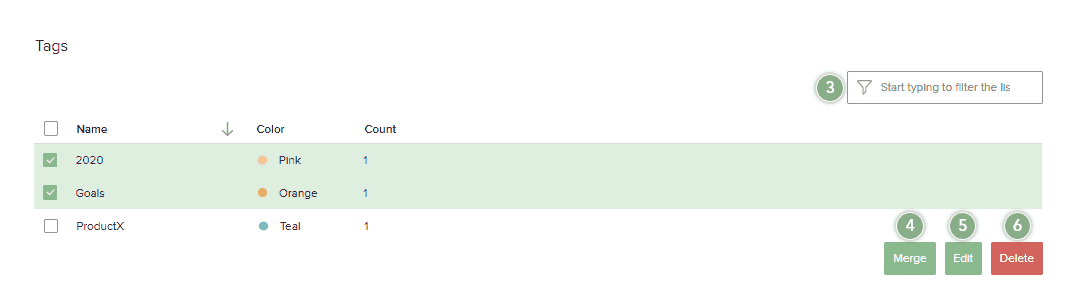
Tags are used to classify documents and cards in a workspace. Workspace administrators can merge, edit, and delete tags.
To manage tags:
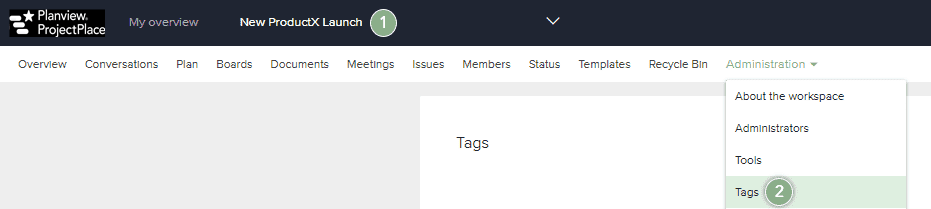
- Navigate to a workspace you are a member of.
- In the workspace toolbar, click the Administration menu and select Tags.
- Type to filter the list of tags.
- Merge tags. If you have one or more similar tags, use the shift key to select the tags you want to merge and click Merge. Type a name and select a color for the new tag, then click OK.
- Edit a tag: To edit a tag's name or color, select the tag you want to edit and click Edit.
- Delete tags: To delete a tag, select the tag(s) you want to delete and click Delete. In the confirmation window, click OK to confirm the deletion.
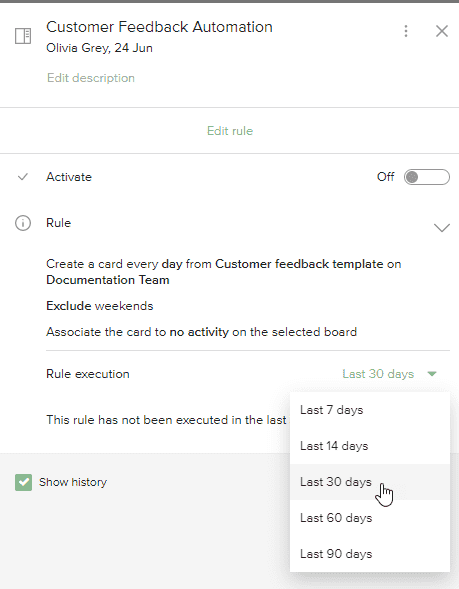
Create Automation Rules
Workspace Administrators can automate certain processes, such as onboarding and task management, by creating automation rules. Rules are created from templates, and workspace administrators can create multiple rules which may be active at the same time.
To create a new rule:
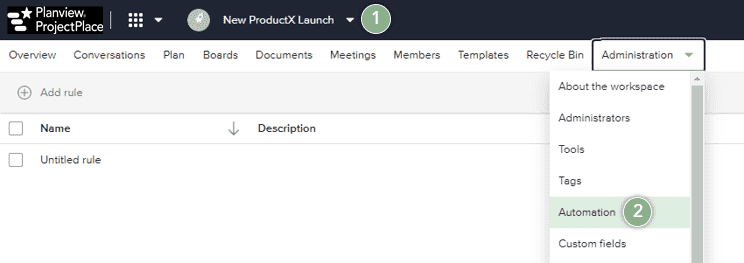
- Navigate to a workspace you are a member of.
- In the workspace toolbar, click the Administration menu and select Automation.
- Click the Automated Template icon
 or
or  . From the Templates view, click the template you want to base the new rule on.
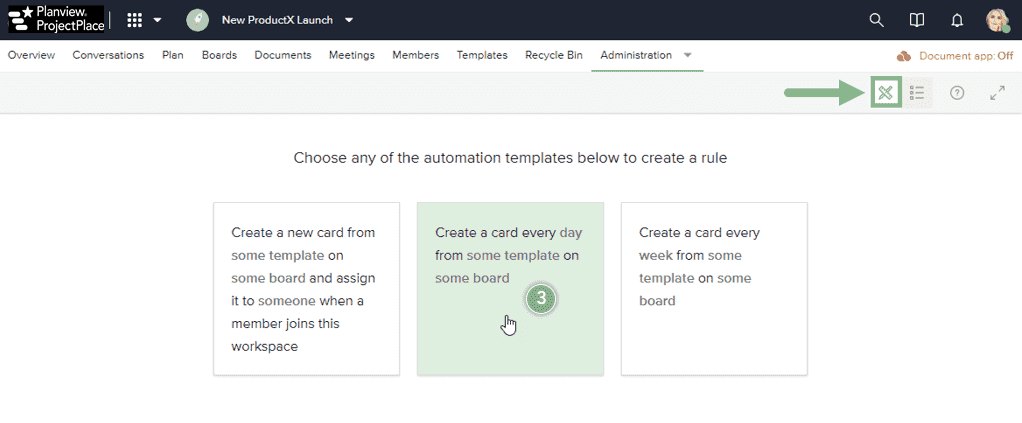
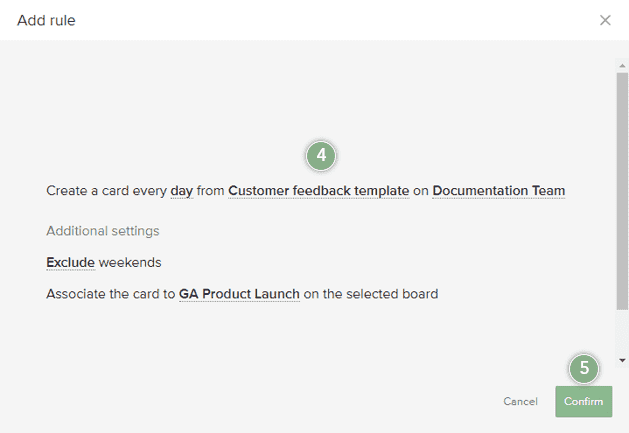
- In the Add Rule window, use the dropdown menus to create the desired rule.
- Click Confirm.
- In the detail pane, give your rule a name and description.
- To make the rule active, click the Activate toggle to switch it to the on position.
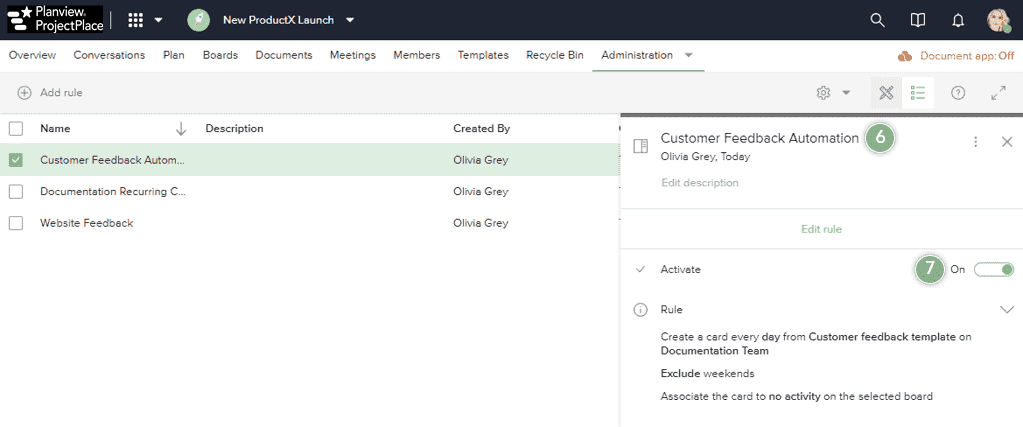
Use the icons in the menu bar to toggle between the Templates and Rules views. The Templates view displays the available rule templates, which you can click on to create a rule. The Rules view displays a list of all rules for the workspace, with the option to create a new rule using the Add rule button.
To view more information about a rule's status and history, see the Rule execution section in the rule's detail pane.
Automated Snapshots of the Plan
To create an Automated Snapshot of the Plan, see this article. You can create weekly or monthly snapshots with configurable parameters.
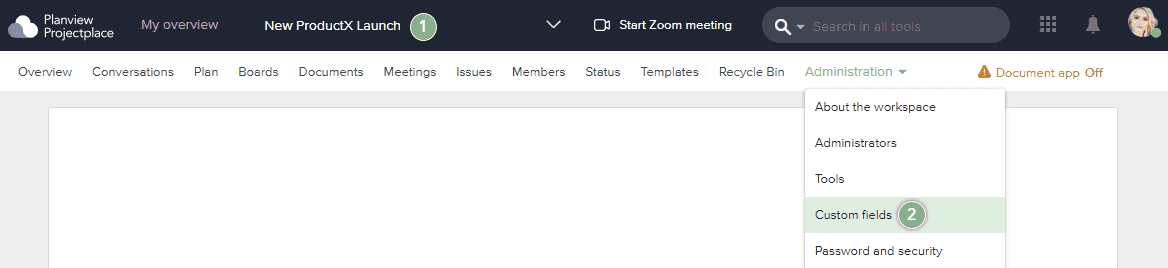
Custom Fields
Custom fields allow Workspace Administrators to create additional data fields for items in the workspace, such as cards and documents.
To create a custom field:
- Navigate to a workspace you are a member of.
- In the workspace toolbar, click the Administration menu and select Custom fields.
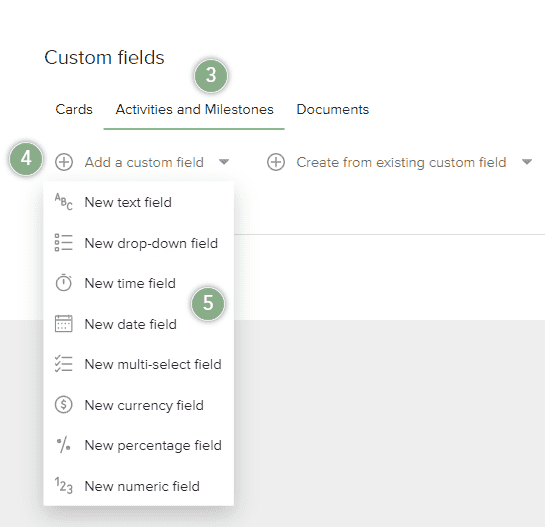
- In the Custom fields section, use the tabs to select the tool (Cards, Activities, or Documents) for which you would like to create a custom field.
- Click
 Add a custom field. You can also click Create from existing custom fields option to create a new custom field based on an existing one.
 - Select the custom field type from the available list.
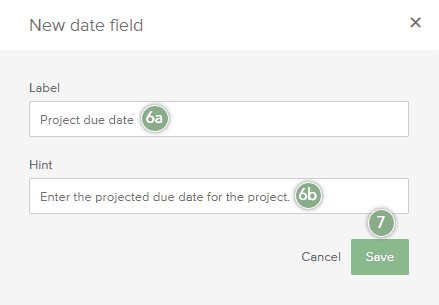
- In the window that appears, enter a Label and Hint for the new field.
- Click Save.
Users can reuse existing custom fields in more than one location. You can use the same custom fields in cards as you do with activities so there is no need manually recreate the custom fields you use in each instance.
To learn more about managing custom fields, visit Manage Custom Fields.
Set Password and Security Requirements
Password and security requirements can be set on the account level and on the workspace level. If set on both levels, workspace members must authenticate using the strictest requirements. After workspace administrators make changes to password requirements, workspace members will be prompted to change their password next time they log in if their current password does not meet the new requirements.
To change password requirements for a workspace:
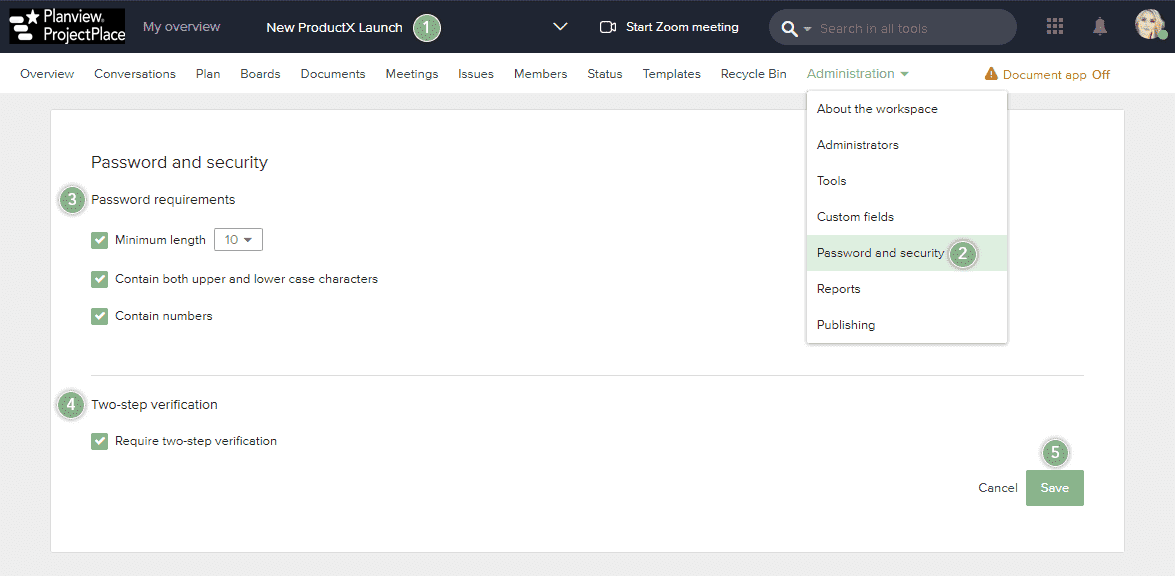
- Navigate to a workspace you are a member of.
- In the workspace toolbar, click the Administration menu and select Password and security.
- In the Password requirements section, click any of the checkboxes to activate the available password requirements:
-
- Minimum length (the minimum number of characters the password must contain; select 8 or 10 from the list.)
- Contain both upper and lower case characters
- Contain numbers
-
- In the Two-step verification section, select the checkbox to require two-step verification for user authentication. Note that if you choose this option, all members of your workspace need to use two-step verification every time they log in to ProjectPlace, even if other workspaces do not require the same security level.
- Click Save.
Change Activity Report Settings for Members
Workspace members can receive a daily and/or weekly reports providing details about actions occurring in the workspace. The daily report provides a view of what has happened during the last 24 hours in the workspace. The weekly report provides an update on the overall progress, including warnings for overdue milestones and activities, as well as recently changed documents.
Workspace members can self-select if he or she wants to receive these reports, but this setting may also be changed by the workspace administrator.
To change report settings for members:
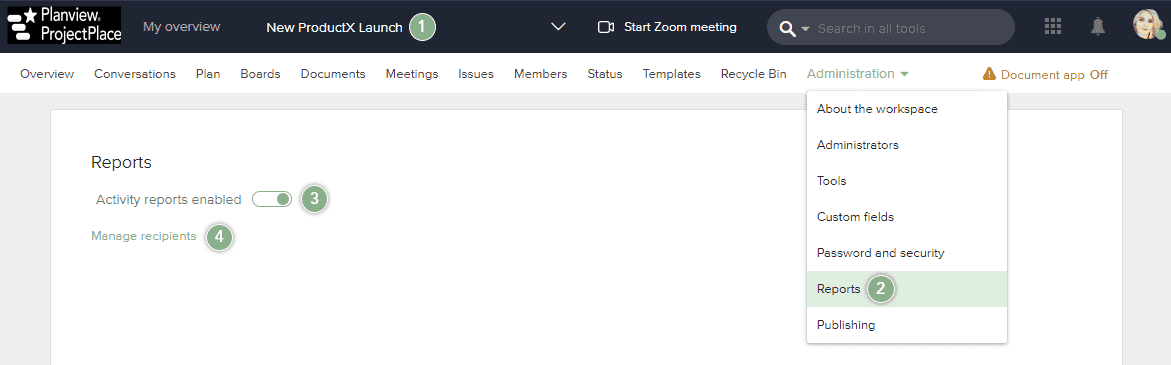
- Navigate to a workspace you are a member of.
- In the workspace toolbar, click the Administration menu and select Reports.
- Click the Activity reports enabled/disabled toggle to the on or off position to enable or disable receiving activity reports.
- If activity reports are enabled, select which members receive either daily or weekly activity reports:
- Click Manage recipients.
- In the overlay window that appears, click the Daily report and Weekly report checkboxes for each member.
- Click Save.
Define Publishing Settings to Portfolios
There are a number of ways that work progress and information can be published, and be made available to different kinds of stakeholders.
To define publishing settings:
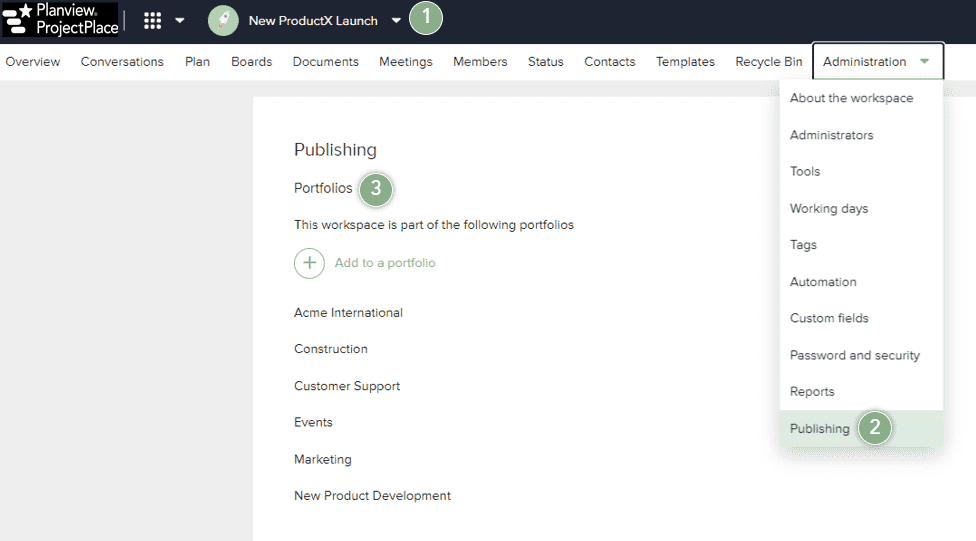
- Navigate to a workspace you are a member of.
- In the workspace toolbar, click the Administration menu and select Publishing.
- Add the workspace to a portfolio. If you have stakeholders that need to follow up on a group of projects that aim towards the same goal on a regular basis, the Portfolios tool is a good choice.
Import Contents of Workspace Templates to a Workspace
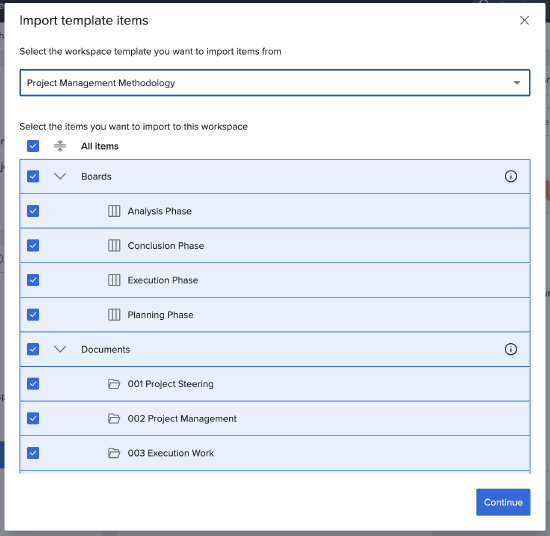
For workspace administrators and owners, it is possible to import all or selected boards and documents items from published workspace templates within the account. Being able to import predefined boards and document items is a very useful and time-saving functionality for connected workspaces that are about to get started and need to be set up, and also for ongoing projects about to enter a new phase.
Import of boards includes all cards and the board setup. For documents, the user can select to import the whole document structure with all the subfolders and documents or just parts of it. Additionally the workspace administrator can select whether groups or custom fields for cards and documents should be imported. If groups are selected, any defined permission rights will also be copied and applied to the imported boards and folders and their content. The workspace administrator is notified by an email once the import is done.
You can access this feature from Administration within a workspace. To read more about what a published workspace template means, see this article.
To Import Boards or Document folders from an existing Workspace Template to a Workspace:
1. Navigate to a workspace to which you wish to import and click Administration > Import template items.
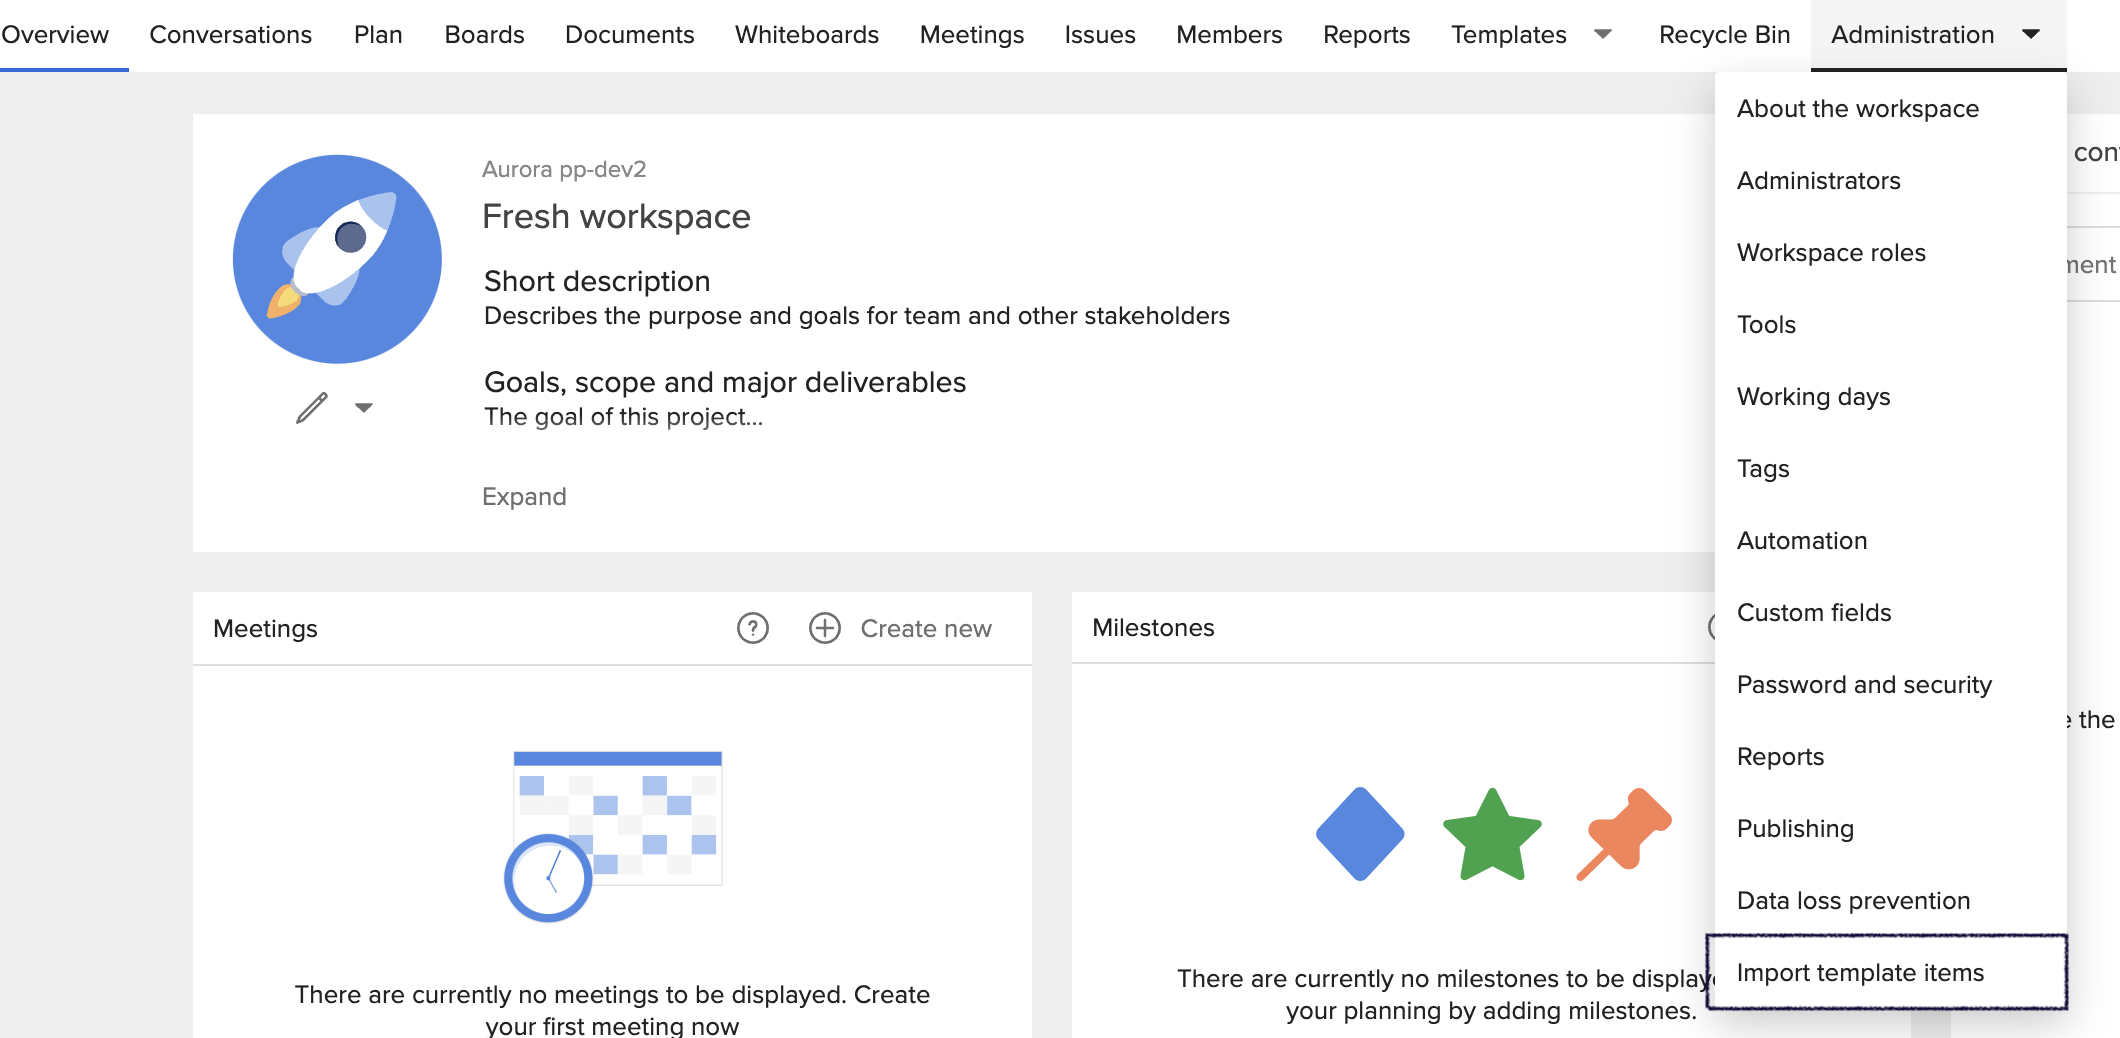
2. Select the items you wish to import to this workspace.
3. If you would like to ignore Custom Fields and Groups when importing, uncheck the checkboxes:
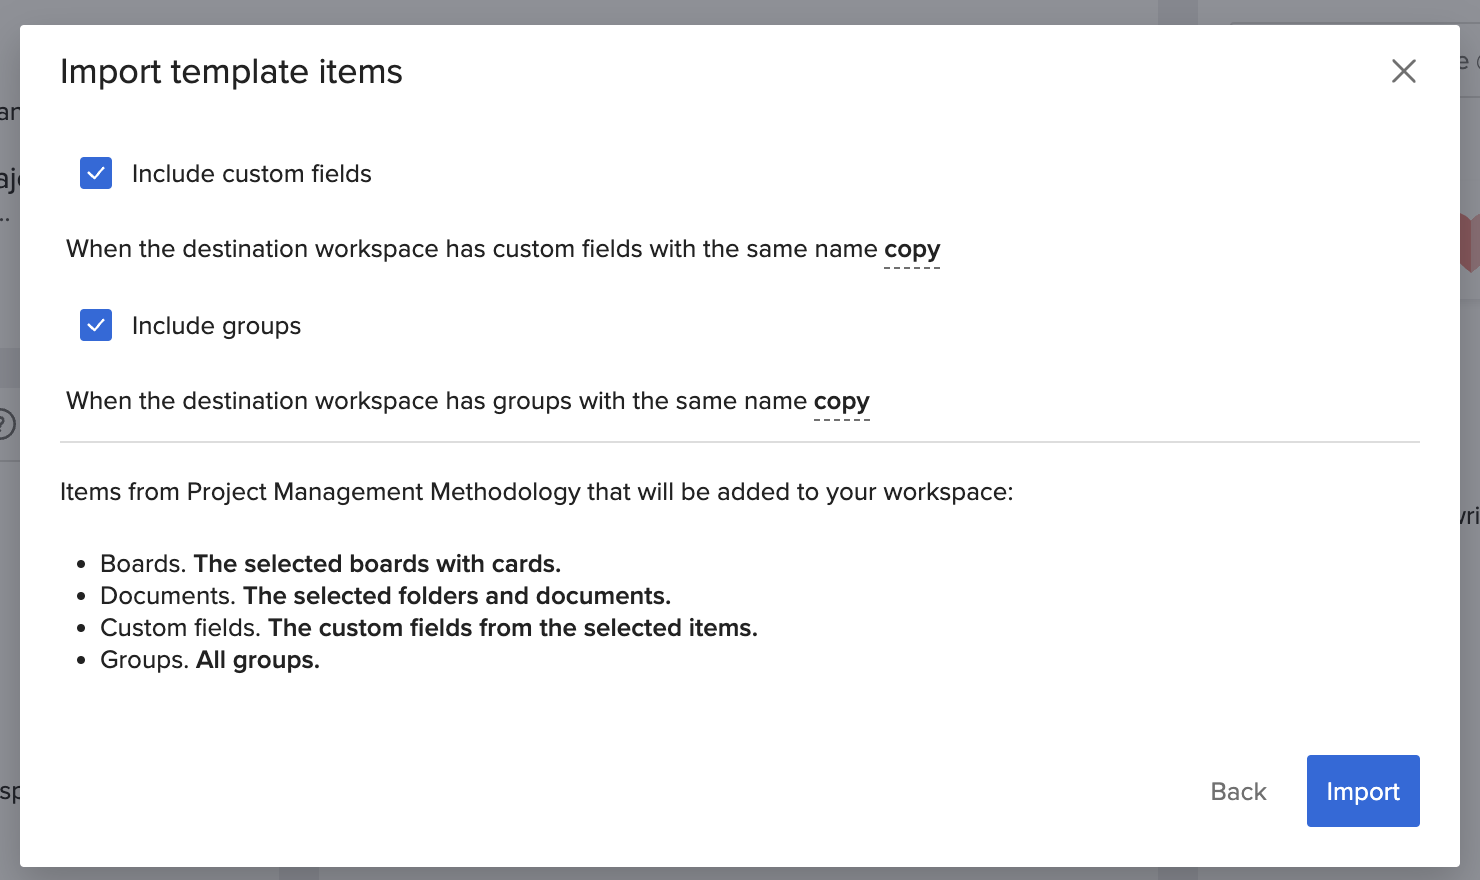
4. Click Import. You will receive a notification confirming that the Import is done.