
Work with Document Tags
Document Tags allows users to classify or group documents by assigning keywords to identify a particular subject or topic. Users can simply find documents by performing a filter search with the tags assigned to a document or documents to narrow down search results.
Add or Remove Document Tags
To add or remove a document tag:

- Open a document's detail pane.
- Click the Tags section to expand it.
- Click the
 Add tags and type the tag in the available text field. If the word you type currently exists as tags in other documents, you will see a list of matching tags appear in the available list. You may select a tag from the available list or create a new tag and you may add more then one tag to a document's detail pane.
 - Click the X next to a tag to delete the tag.
Bulk Tagging for Documents
Overview
The Bulk Tagging for Documents feature allows you to efficiently organize and categorize multiple documents at once. By applying tags to several documents simultaneously, you can enhance your document management system, making retrieval and organization simpler and more effective.


How to Use Bulk Tagging
Step 1: Select Documents
To begin tagging, use the checkboxes or selection methods provided to choose multiple documents. You can easily select all documents in a folder or pick individual files that require tagging.
Step 2: Access the Details pane
Once you’ve made your selections, a details pane will appear that allows you to apply tags to the chosen documents:
- Click the Tags section to expand it.
- Click the Add tags and type the tag in the available text field. If the word you type currently exists as tags in other documents, you will see a list of matching tags appear in the available list. You may select a tag from the available list or create a new tag and you may add more then one tag to a document's detail pane.
- Click the X next to a tag to delete the tag.
Step 3: Apply Tags
You can apply one or more tags to all selected documents at the same time. This feature ensures that your tagging process is efficient, allowing you to categorize documents in bulk without the need to edit each one individually.
Step 4: Modifying Tags
If you need to make changes later, you can easily modify or remove tags from the selected documents. Any adjustments you make will be reflected across all selected files, ensuring consistency and accuracy in your tagging.
Please note that you won't be able to edit or add tags to read-only documents, documents in public folders, and documents in knowledge base folders.
Filter Documents by Tags
Once tags are added to documents they can be used to filter Documents.
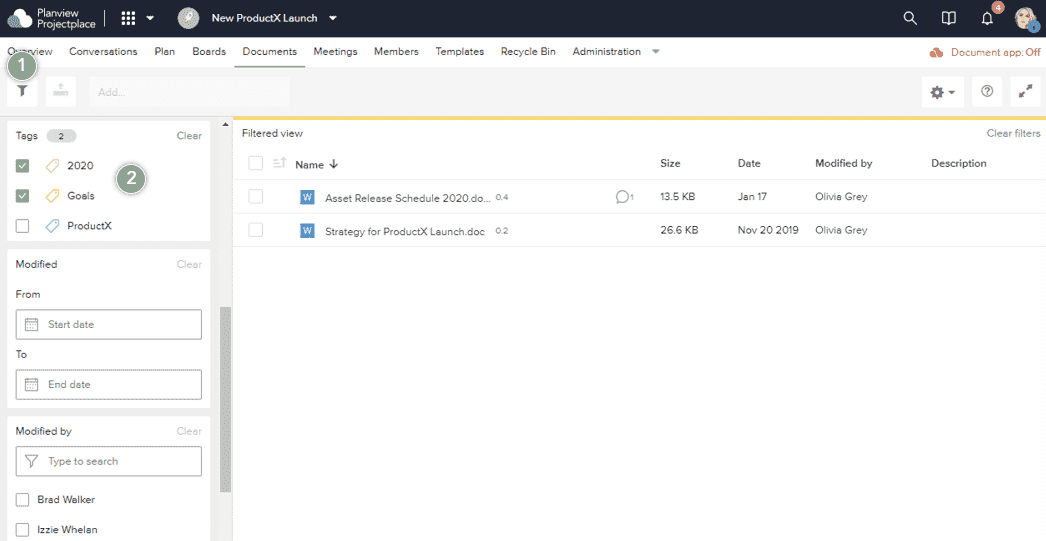
- Click the Filter icon
 to open the filter pane on the left side of the window.
 - Click the checkbox of the tags you want to find and the Documents that have matching tags will appear in the available Documents list on the right side of the window.