
Manage Users in the Account
Account administrators have the ability to manage members in the ProjectPlace account. Account administrators can:
- See how many total members are in the account.
- View how many members the account pays for.
- View which members are active.
- View when members joined the account.
- Decide and set which members can start new workspaces.
- Change the department a member belongs to.
- Add new members to the account.
View Account Members
To view Account Members:
- Click
> Account Administration in the top navigation bar. (Or My overview > Account administration.)
- Click the People tab to see a list of account members.
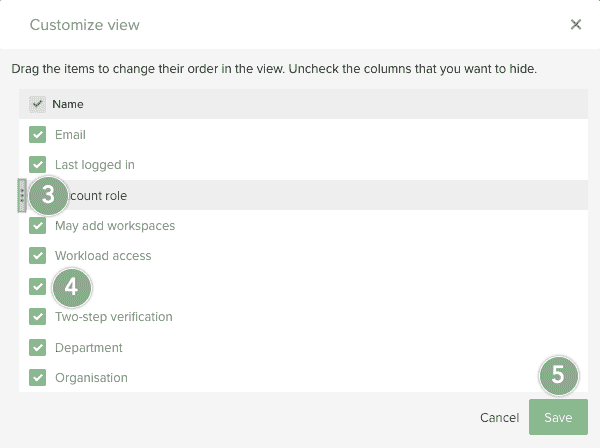
Customize the View
To customize the view from the People tab:
- Click the Settings icon
 from the right side of the tool bar.
 - Click Customize view.
- Click and hold the move icon
 to drag or move the column titles to rearrange the order of the available list.
 - Clear any checkbox to clear those columns you want to hide from the view.
- Click Save.
Filter the View
To filter your view of the People tab:
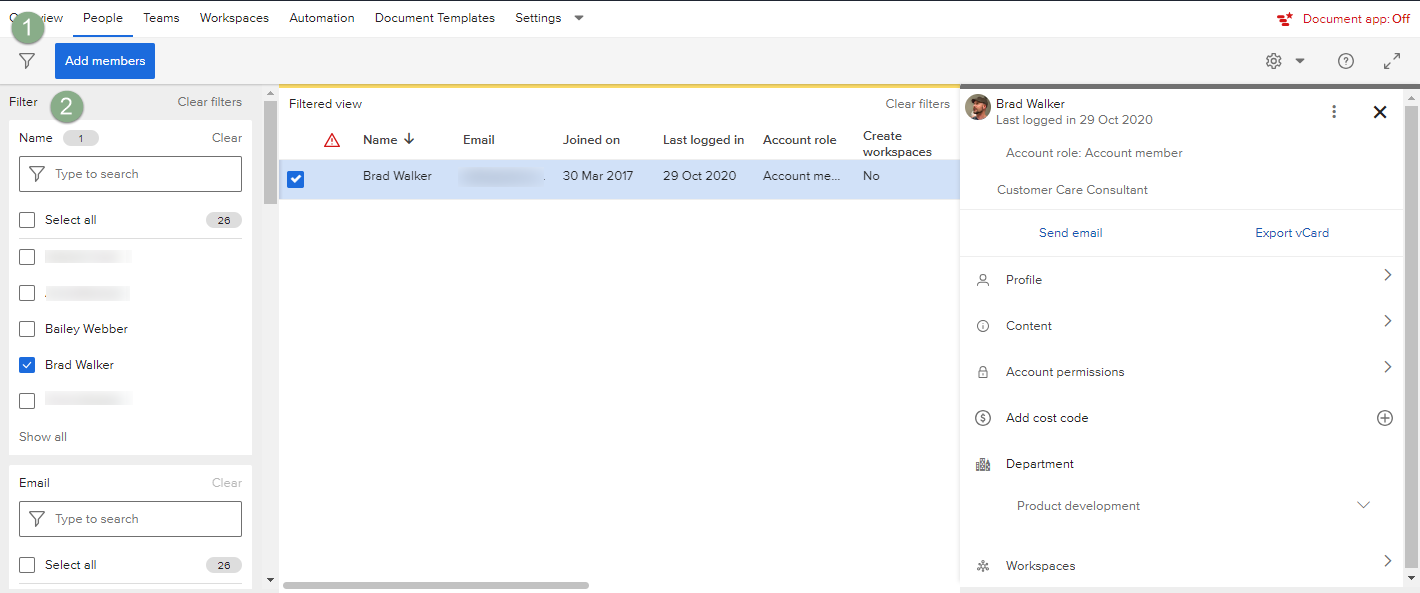
- Click the Filter icon
 to open the filter pane on the left side of the window.
 - Select the filter criteria for the following filter attributes to filter your list:
- Name: Search for a specific person in the account.
- Email: Search for a person with a specific email address.
- Joined on: Look for account members who joined the account within a specified date range.
- Last logged in: Look for account members who logged in within a specified date range.
- Access: Filter members who have access to create workspaces or the Workload tool.
- Department: Filter by department name.
- Cost code: Search for a person with a specific cost code associated with their member account.
- Account role: Filter by account role.
- Workspace role: Filter by workspace role.
- Workspace membership: Filter members who are members a of workspace and/or those that are not.
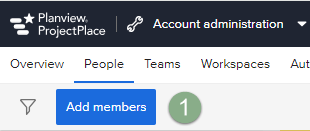
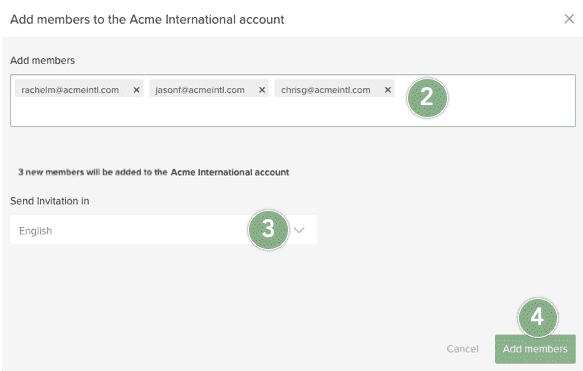
Add Account Members
To add account members to the account:
- Click the Add members button on the top left corner of the People tab.
- A new window appears.
- If you are adding external members, type the email address of each member you want to add and separate each with a comma.
- To add existing members who are not yet members of the account, select the member's name from the available list.
NOTE
The members you add must not be part of another account.
- An invitation email is sent to the new member(s):
- New members who do not have a member account with ProjectPlace are prompted them to register, creating a new member account. Until they have registered as a member they will appear as an "Unregistered" email-address in the member list.
- New members who already have a member account with ProjectPlace are prompted to accept the invitation. They will appear as "Pending Account Member" until they have accepted the invitation. Account invitations are valid for 30 days.
- You can select the language for the invitation email from the available list. Languages include: Dansk, Nederlands, English, Français, Deutsch, Norsk, Svenska, and Español.
- Click the Add Members button to send the email invitation.
Adding Account Administrators
An account owner can set an account member as an account administrator from the details pane.
To add account administrators:
- Navigate to the People tab.
- Click the checkbox next to the member you wish to make an account administrator. The member needs to be an account member before you can view the option Make account administrator in the next step.
- Click Account permissions in the detail pane and select administrative actions you wish to enable for this member.
Add Account Co-owner in Account Administration
The account member needs to be an account administrator before they can view the option Make account co-owner in the More menu.
-
The maximum number of account co-owners an account can have is five.
-
The account co-owner has the same rights as the account owner except that the account co-owner will not be able to remove or add other account co-owners.
To add an account co-owner:
- Navigate to the People tab.
- Click the checkbox next to the member you wish to make an account co-owner.
- Click the Action menu (⋮) in the upper right corner of the detail pane and select Make account co-owner.
Change Owner of the Account in Account Administration
If you are the owner of an account - you can transfer your ownership to another account member. The new intended owner must be at least administrator for the option to show up.
Warning: If you relinquish ownership - you will become an administrator of the account.
To transfer your ownership to another account member:
- Navigate to the People tab in Account Administration.
- Click the checkbox next to the administrator or co-owner you wish to transfer your ownership to.
- Click the Action menu (⋮) in the upper right corner of the detail pane and select Make account owner
Reset Two-Step Verification for Account Members
As an administrator, you can reset two-step verification for account members (except the account owner) if they lose access to their two-factor authentication. Follow these steps:
- Verify the user's identity.
- Go to the People tab in Account Administration.
- Locate the user and click the Action menu (⋮) in the upper-right corner of their detail pane.
- Select Reset two-step verification.
The user will be signed out of active sessions and their account will be blocked until they change their password. They'll receive an email to reset their password and, if two-step verification is enforced, will need to set it up again.
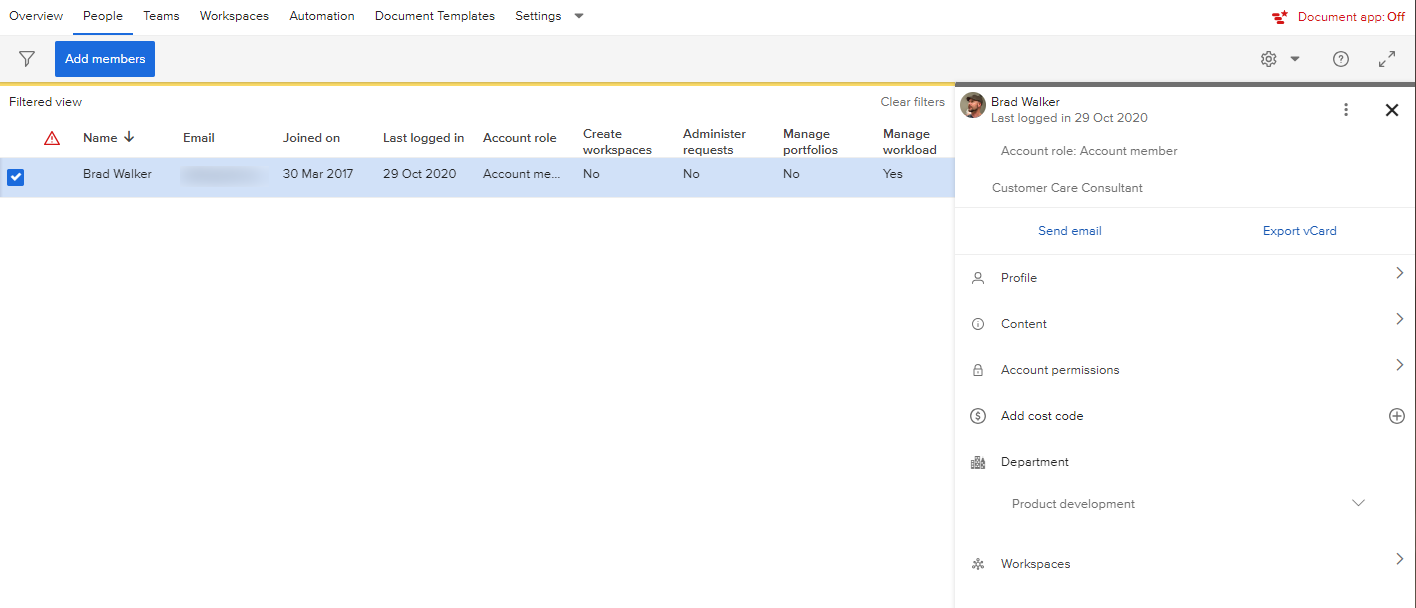
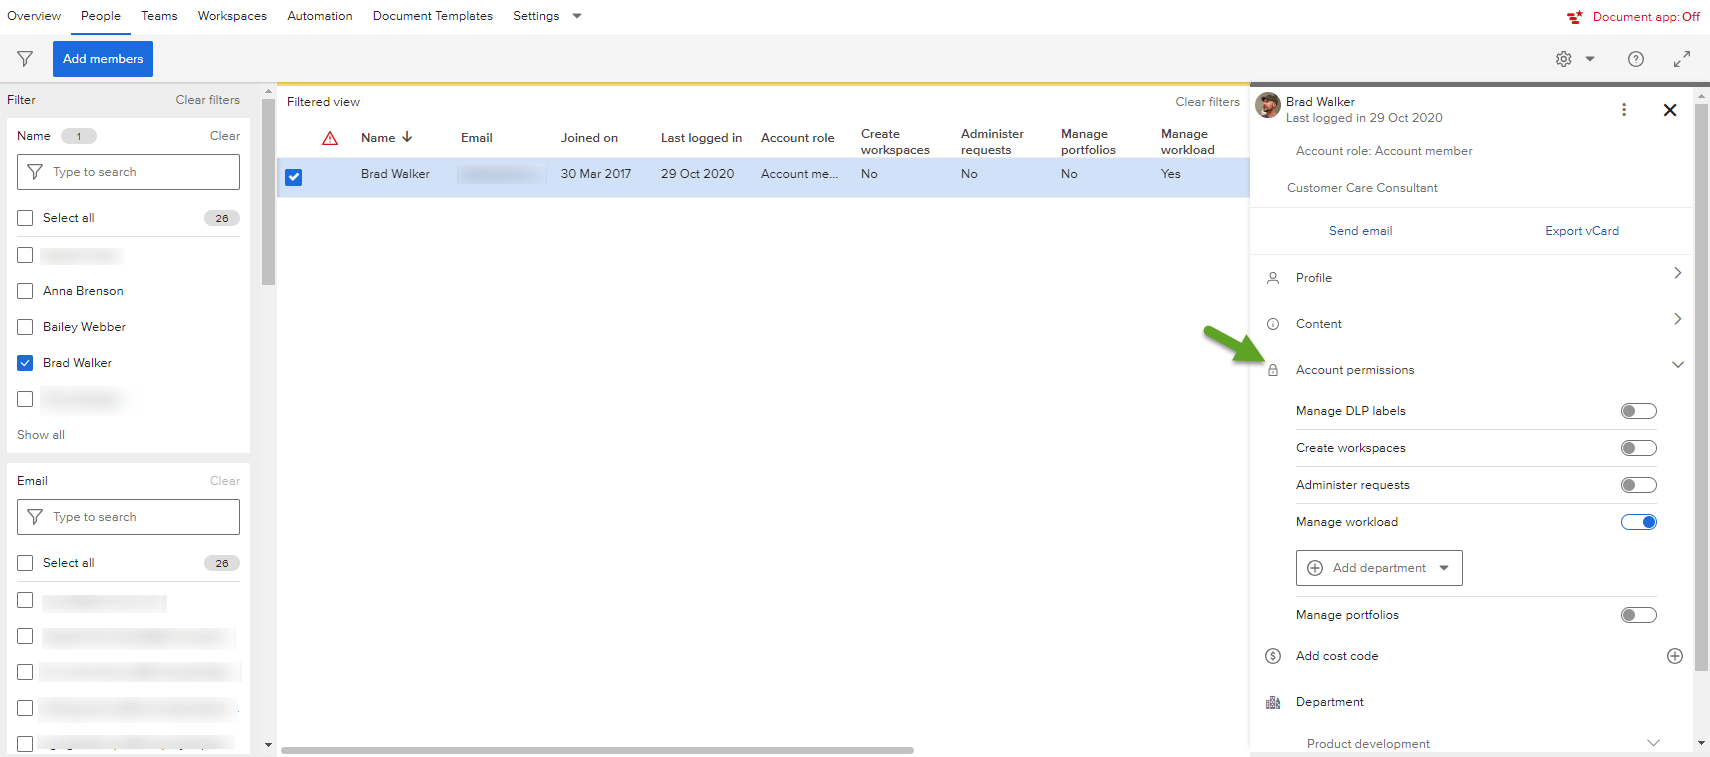
View and Edit Account Member Details
To view and edit an account member's details:
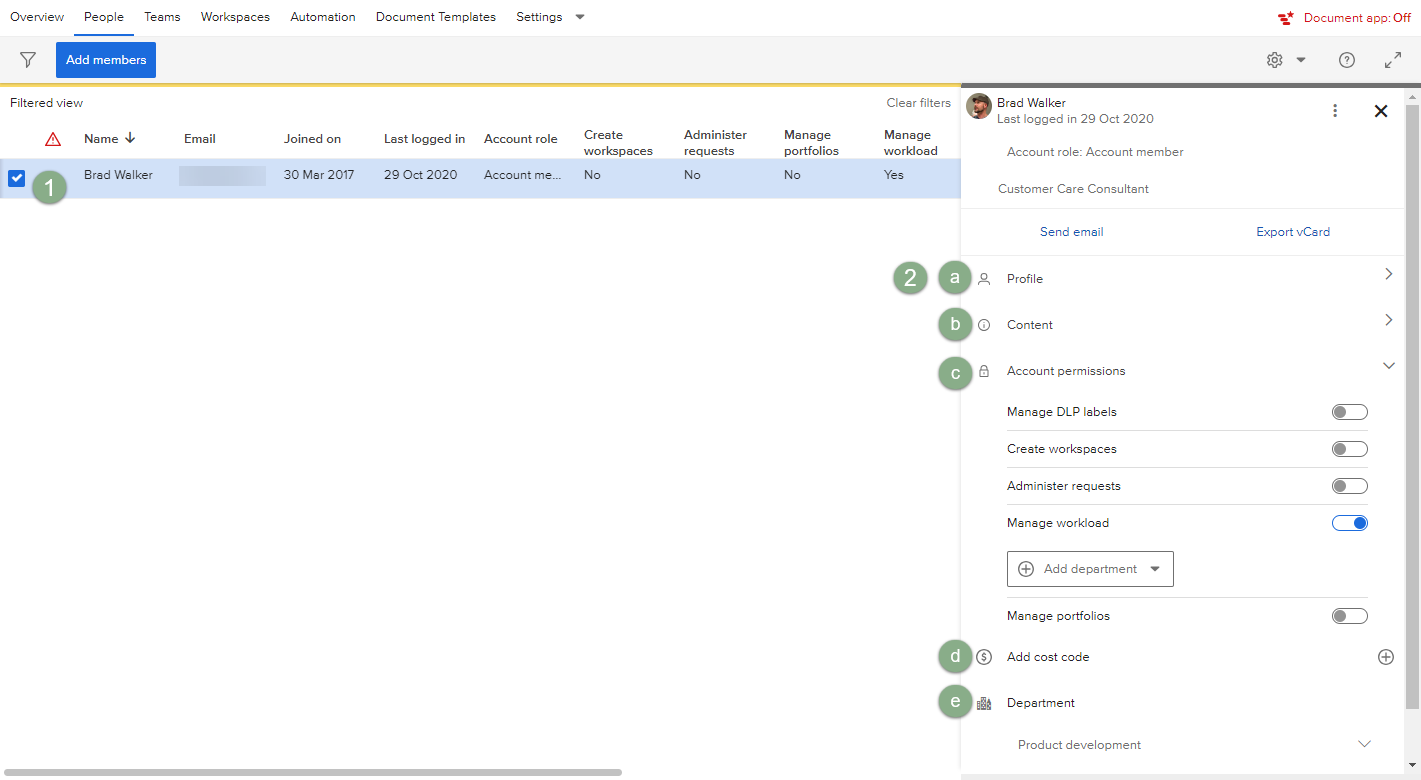
- Click the checkbox next to the member's name.
- In the detail pane, you can view and/or edit the member's:
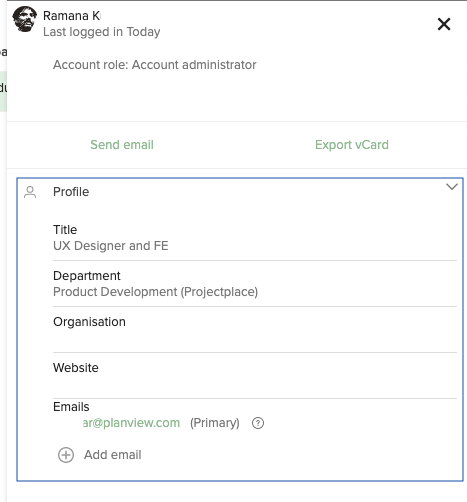
- Profile: Title, Department, and Email address.
NOTE
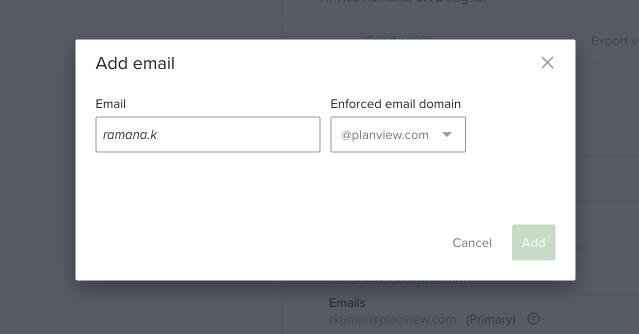
An account administrator can add a new email address to a members account, which might be required if the member's email address has changed and they cannot log in using their old address to change it themselves. To add an email address, click the Add email link under the Profile section. The new email address must match one of the enforced email domains added to the account. The email address that the account administrator adds will be set as the new primary email address. When the new email address has been added, an information email is sent to both the member's old primary email address and the newly added email address.
This functionality is available only for accounts that have enforced emails enabled for them, so if the Add email link is not visible, submit a ticket to ProjectPlace Support for assistance enabling enforced email domains.
- Content: The number of Workspaces, Portfolios, and Teams the member is part of.
- Account permissions: Use the toggle to specify whether the member can:
- Create workspaces.
- Administer requests. Access rights can also be set on a department level.
- Access the Workload tool. Access rights can also be set on a department level. Note that access to the Workload tool is also given to Workspace administrators or Team administrators by default, however filtered to only show workspaces or teams they are administrators of.
- Access the Portfolios tool.
- Cost Code: The cost code associated with the member.
- Department: The department to which the member belongs.
- Workspaces: (not shown) The workspaces to which the member belongs.
- Profile: Title, Department, and Email address.
- You can communicate with a member by clicking the Send email link.
Remove and Delete Account Members
To remove or delete account members:
- Navigate to the People tab and select the member that needs to be removed or deleted from the account. In the details pane that opens, click the action menu icon
 in the top right corner to Remove or Delete account members. Removing an account member allows the member to continue as an active ProjectPlace member without having access to the customer account. When an account member is deleted, the member account will be permanently deleted from ProjectPlace.
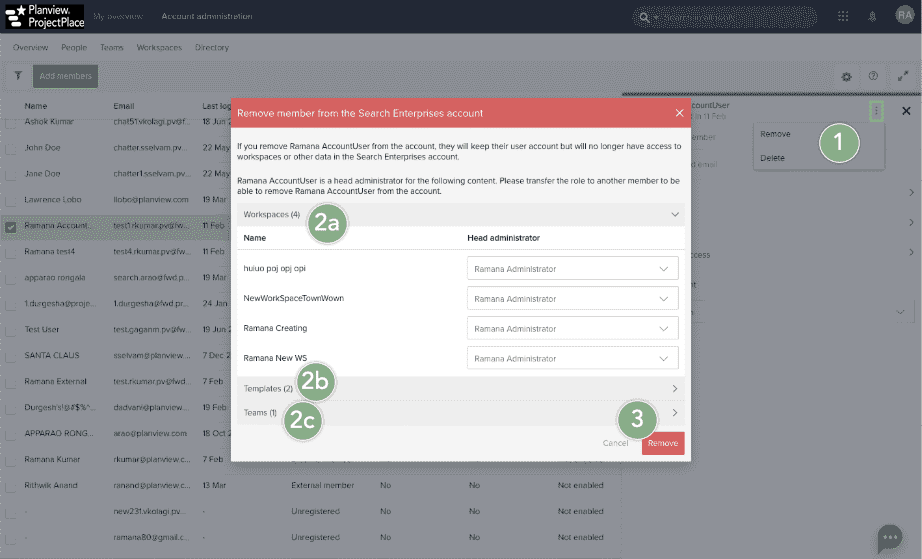
 - If you try to remove an account member who is a Workspace owner (a), Template owner (b), or a Team owner (c), you must first transfer ownership to another account member before removing or deleting that account member.
- Click Remove.
NOTE
- An email notification is sent to the member when their account has been deleted. External and internal members that are members of other accounts, or any member that own workspaces can only be removed from the account, not deleted.
- If the member has been removed from the account and their member account remains inactive 12 months later, their member account will automatically be deleted from ProjectPlace.
Add or Remove Departments
To add or remove departments from the account:
- Navigate to the People tab.
- Click the Settings icon from the right side of the tool bar, then click Department. A new window appears.
- Account administrators can set the following settings:
- Select the check box to request those account members who have not assigned a department to select a department during the login process.
- Click the Add department icon
 to add departments to the account.
 - Rest the cursor on any department that you want to delete. Click the remove icon
 that appears to the right of the department's name.
NOTE
When a department is deleted, all members belonging to the deleted department will no longer have a department assignment.
- Click Save to save your changes.
You can export all the account members details by clicking the Export option from the Settings icon ![]() .
.