
Manage Account Settings
Before creating workspaces in your new ProjectPlace account, review and define the following settings:
Workspaces Tab
Configure Workspace Creation, Termination, and Public Report Sharing Options
By default, all members in the account can start new workspaces. This allows each member to set up and organize their workspaces in a simple process without restrictions helping each user get the most out of using ProjectPlace. However, you can define who has the capability to start new workspaces or choose to prevent new users from creating workspaces, as described in the following procedure.
About Workspace Settings
Settings for workspaces can be done from two places, under Workspaces tab > Settings icon ![]() > Settings for new workspaces option and Settings > Workspaces.
> Settings for new workspaces option and Settings > Workspaces.
Under Workspaces tab > Settings icon ![]() > Settings for new workspaces option following settings can be made:
> Settings for new workspaces option following settings can be made:
Under Settings > Workspaces following options can be made:
-
Prevent new users from creating workspaces
-
Prevent workspaces from being terminated
-
Custom message for terminating or archiving a workspace
-
Allow public sharing of workspace reports
NOTE
If you wish to change the default setting, an account administrator must write a request and send the request to the ProjectPlace contact listed in the overview in Account administration.
Define Who Should Be Allowed To Start New Workspaces
To define who should be allowed to start new workspaces:
- Click
> Account administration in the top navigation bar.
- Click Settings > Workspaces.
- In the Prevent new users from creating workspaces section, specify whether you want to enable this functionality.
- In the Prevent workspaces from being terminated section, specify whether you want to enable this functionality.
NOTE
Enabling this may also cause integrations and automation rules that need to terminate workspaces to fail.
-
In the Allow public sharing of workspace reports section, specify whether you want to enable this functionality.
NOTE
Disabling this also deactivates existing public hyperlinks.
-
Click Save.
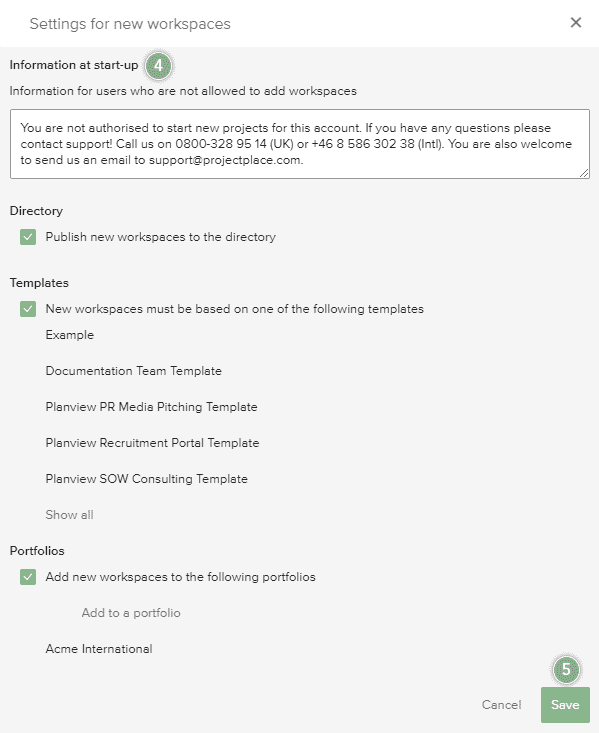
Define Information for Members Not Allowed to Start New Workspaces
You can define the type of information displayed when a member tries to create a new workspace, but doesn't have the ability to create the new workspace. State who to contact within the organization, and what process to follow to create a new workspace. Be specific with your message and instructions to prevent frustration and help improve the process.
NOTE
By default, the message you create refers users to ProjectPlace support, so it is important to provide a personalized and detailed message so members in the account get the appropriate information.
To add information to users not allowed to start workspaces:
- Click
> Account administration in the top navigation bar.
- Click the Workspaces tab.
- Click the Settings icon
 and select the Settings for new workspaces option.
 - In the Information at start-up section, change the information displayed for users who are not allowed to add workspaces.
- Click Save.
Define If New Workspaces Must Select a Department
Associating a workspace with a department is helpful for internal invoicing purposes, and if desired, you can require that users select a department when creating a new workspace.
To define if users must select a department when creating a workspace:
- Click
> Account administration in the top navigation bar.
- Click the Workspaces tab.
- Click the Settings icon and select the Settings for new workspaces option.
- In the Department section, select the Must select department while creating a new workspace check box to specify users must select a department when creating a workspace.
- Click Save.
Define If New Workspaces Must Be Based on a Template
Using the same template for new, similar workspaces helps members navigate through the new workspace. Members are familiar with the format of the new workspace when the workspace is based on a template that matches other workspaces they currently use. This is especially useful if the workspace an organization works from follows the same methodology or structure for every workspace within the organization.
NOTE
If the requirements of each workspace differs, the workspace creator should decide if the new workspace should be based on a template or not. Otherwise, a great deal of time and effort will go into changing/removing the predefined content for each workspace that has different requirements/uses.
To define if new workspaces must be based on a template:
- Click
> Account administration in the top navigation bar.
- Click the Workspaces tab.
- Click the Settings icon and select the Settings for new workspaces option.
- In the Templates section, select the New workspaces must be based on one of the following templates check box to specify if new workspaces must be based on a template from the available list.
NOTE
If you do not see a list of templates, it may indicate that you have not yet published any templates.
- Click Save.
Define If New Workspaces Should Be Published in a Default Portfolio
Collecting new workspaces in a portfolio makes it easier for account administrators to keep track of new workspaces being created in the account. The portfolio, and the workspaces within the portfolio, will only be visible for account administrators if no other portfolio owner or stakeholders are added.
To define a default portfolio for new workspaces:
- Click
> Account administration in the top navigation bar.
- Click the Workspaces tab.
- Click the Settings icon and select the Settings for new workspaces option.
- In the Portfolios section, select the Add new workspaces to the following portfolios check box to specify if new workspaces should be added to portfolios from the available list.
- Click Add to a portfolio to add one or more portfolios to the available list, then click Add.
- Click Save.
NOTE
Regardless of the default setting, administrators for a specific workspace can choose if that workspace should be displayed in the portfolio or not.
Settings Tab
The Settings Tab lets you make more global changes, compared with the micro-adjustments that the gear icon ![]() allows on some of the individual Tabs. Each dropdown item on the Settings Tab is discussed below in order of appearance.
allows on some of the individual Tabs. Each dropdown item on the Settings Tab is discussed below in order of appearance.
Upload, Change, or Remove a Company Logo
- Click
> Account administration in the top navigation bar.
- Settings > About the Account.
- Upload, change, or remove a Standard logo or PDF Logo by taking the following actions:
- To upload or change a logo to be used in emails, portfolios, and status reports, click the pencil icon in the Standard logo section, then click Change logo. Select the relevant logo file that you want to use.
- To upload or change a logo to be used in plan printouts, click the pencil icon in the PDF Logo section, then click Change custom avatar.
- To remove a logo from each section, click the respective section's pencil icon and then click Remove logo or Remove custom avatar. Click Confirm to verify you want to remove the logo.
Modify auto-enrollment rules
Auto-enrollment rules allow you to define a set of domains (e.g., @company.com, @example.com). Any user who registers to your organization and can verify that they have an email on this domain automatically become members of your organization. If you add a new auto-enrollment domain, any external member associated with your organization will be added as a full member.
User Browser Session and Account Security Settings
To set login and session settings:
- Click
> Account administration in the top navigation bar.
- Click Settings > Login and sessions.
- In the Session timeout section, configure how long you want the session duration to be before it times out. Options include 14 days, 48 hours, 24 hours, 120 minutes, 90 minutes, or 60 minutes.
- Enable concurrent sessions by selecting whether you want to Enable or Disable.
- Set the maximum number of failed login attempts for workspace members by setting the Number of failed login attempts before being locked out option.
- In the PIN protection on mobile apps section, you can require that users define and use a pin-code to access info in mobile apps by selecting Enable.
- Click Save.
Define Password Requirements
Minimum password requirements can be set for the account that all account members would be required to meet. You can also set a time interval before the password expires requiring the password to be updated. The password requirements apply to all members in the account, including external workspace members.
Try to keep the requirements as simple as possible, and as complex as necessary!
To define password requirements for the account:
- Click
> Account administration in the top navigation bar.
- Click the Settings tab, then click Password and security.
- Select the desired password requirements. The list below includes password variables you can include in the password requirements you set:
- Minimum number of characters the password must contain.
- If the password must contain both upper and lower case letters.
- If the password must contain numbers.
- Select how often users need to update their passwords. A change of this parameter becomes valid the next time the user logs in.
- Enable two-step verification to access ProjectPlace by selecting whether you want to enable or disable.
NOTE
Users belonging to an account that has SSO configured will always log in using the login procedure required by the customer's Identity Provider.
- Click Save.
NOTE
Password and two-step verification requirements can also be set on the workspace level. The strictest requirements will prevail when a user logs in to ProjectPlace.
For example:Steve is a member of three workspaces in an account, with the following password requirements:
- Account level – Password must contain at least 6 characters.
- Workspace 1 – Password must contain at least 8 characters AND contain lower and upper case characters.
- Workspace 2 – Password must contain at least 8 characters, contain lower and upper case characters AND numbers.
- Workspace 3 – Password must contain at least 8 characters, contain lower and upper case characters, numbers AND expire every month.
So, for Steve to be able to access all workspaces of which he is a member, his password needs to be a minimum of 8 characters, contain lower and upper case characters, include numbers, and expire every month. Steve will need to change his password at least once a month.
Define Third-Party Document Repository Settings
Account administrators can control which third-party document repositories they want to use within their organization.
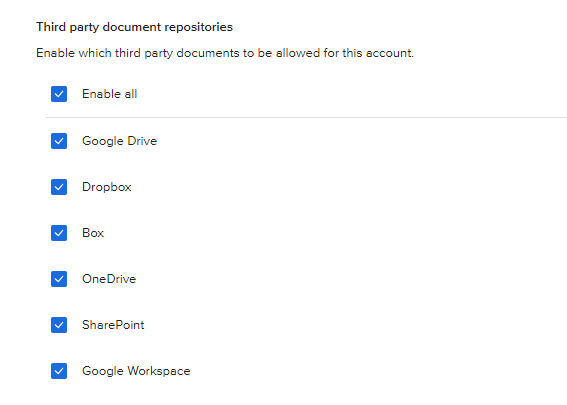
Third party document repositories
NOTE
Documents from third-party services are stored in their respective repositories and are only referenced in the Documents tool, with the exception of documents from OneDrive and SharePoint.
In other words, document cannot be linked, but only be downloaded from OneDrive and Sharepoint.
OneDrive: allows only downloading files to workspace
Sharepoint: allows only downloading files to workspace
Any other third-party repository: enables linking files to workspace
To define third-party document repository settings:
- Click
> Account administration in the top navigation bar.
- Click Settings > Documents.
- In the Third party document repositories section of the screen that appears, specify if you want to enable all third-party document repositories, or select specific ones from the list.
- Click Save.
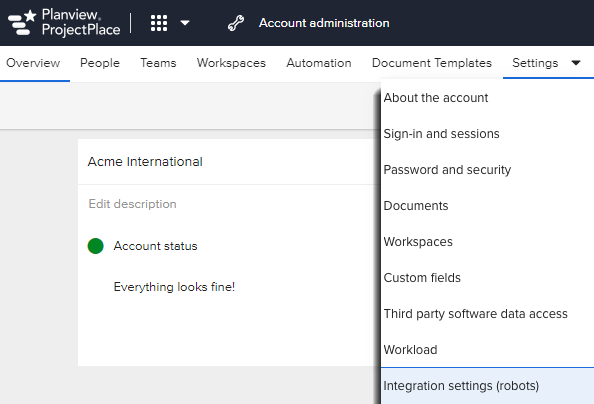
Manage Robots in the Account
A Robot is a special super user that allows programmatic access to an entire organizational account. It can create, read, update, and delete any information across all workspaces in the organizational account. This new feature can be accessed from the Account Administration > Settings dropdown. For more information, see this article.
Enable Document Sharing and Uploading
- Click
> Account administration in the top navigation bar.
- Click Settings > Documents.
- In the Allow documents to be shared as email attachments section, specify whether you want to enable this functionality.
- In the Allow documents to be shared with an external email address section, specify whether you want to enable this functionality.
- In the Allow users to upload documents from their computer section, specify whether you want to enable this functionality.
- Click Save.
Workspace Settings
Settings for workspaces can be done from two places, under Settings > Workspaces and Workspaces tab > Settings icon ![]() > Settings for new workspaces option.
> Settings for new workspaces option.
Under Settings > Workspaces following options can be made:
-
Prevent new users from creating workspaces
-
Prevent workspaces from being terminated
-
Custom message for terminating or archiving a workspace
-
Allow public sharing of workspace reports
Under Workspaces tab > Settings icon ![]() > Settings for new workspaces option following settings can be made:
> Settings for new workspaces option following settings can be made:
In addition to Defining who should be able to start new workspaces, the other Workspace Settings on this dropdown are covered in Manage Workspaces in the Account under Selecting Workspace Settings.
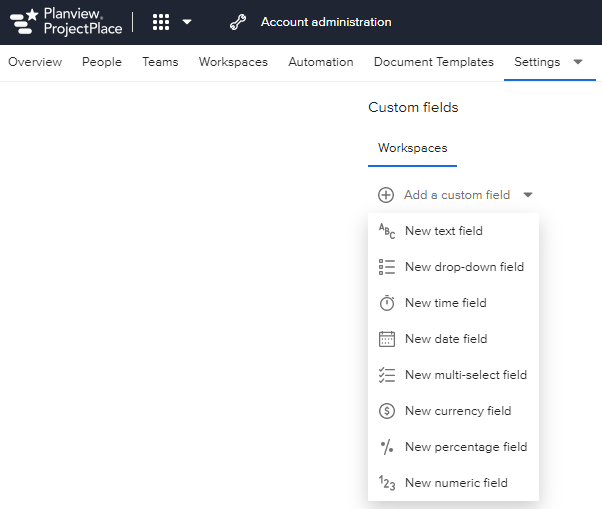
Custom Fields for Workspaces
Account administrators can create custom fields that will be published to all workspaces. This will allow workspace managers to add values to custom fields in a workspace and help stakeholders to have more detailed information about every workspace in the account.
- Click
> Account administration in the top navigation bar.
- Click Settings > Custom fields.
- Select and add between the different types of Custom fields need for the account. Up to 20 custom fields can be added. Custom fields can be archived and deleted. When a custom field is archived, it will not be visible in the user interface, but all the data previously entered will be preserved. If a custom field is reactivated, the data associated with the custom field will become available.
The account administrator will also be able to view and edit the custom values that have been published to the workspace by selecting a workspace in Account administration > Workspaces tab. The detail pane of a workspace will show the custom fields.
The workspace owner/administrator can view and edit the custom values that have been added to the workspace.
NOTE
If custom fields have been added in Account administration they will be presented below the default fields. The custom values will not be mixed with the default fields since only the default fields are localized.
Define If Third Party Software Can Access ProjectPlace Data
Third party application developers and ProjectPlace customers can use ProjectPlace Application Programming Interfaces (APIs) to create applications that access information in ProjectPlace workspaces and present it in new ways.
Applications that use the ProjectPlace APIs fully respect the security and authorization mechanisms you are already familiar with in ProjectPlace. For example, a workspace member using a third party application will never have access to more information than what is already available to the member.
To define third-party software settings:
- Click
> Account administration in the top navigation bar.
- Click Settings > Third party software data access.
- In the Third party software data access section, switch the toggle to either the on or off position:
- On – Third-party software can read or change data in workspaces in the account.
- Off – Third-party software cannot read or change data in workspaces in the account.
- If the toggle is on, use the check boxes to select the specific third-party software you want to enable.
- Click Save.
Manage Workload Settings in Workload tool
We have added Settings for the Workload tool in Account administration. In the Settings window the account administrator will be able to set:
- how cards without a start and due date should be handled, and
- when warnings in the tool should be enabled
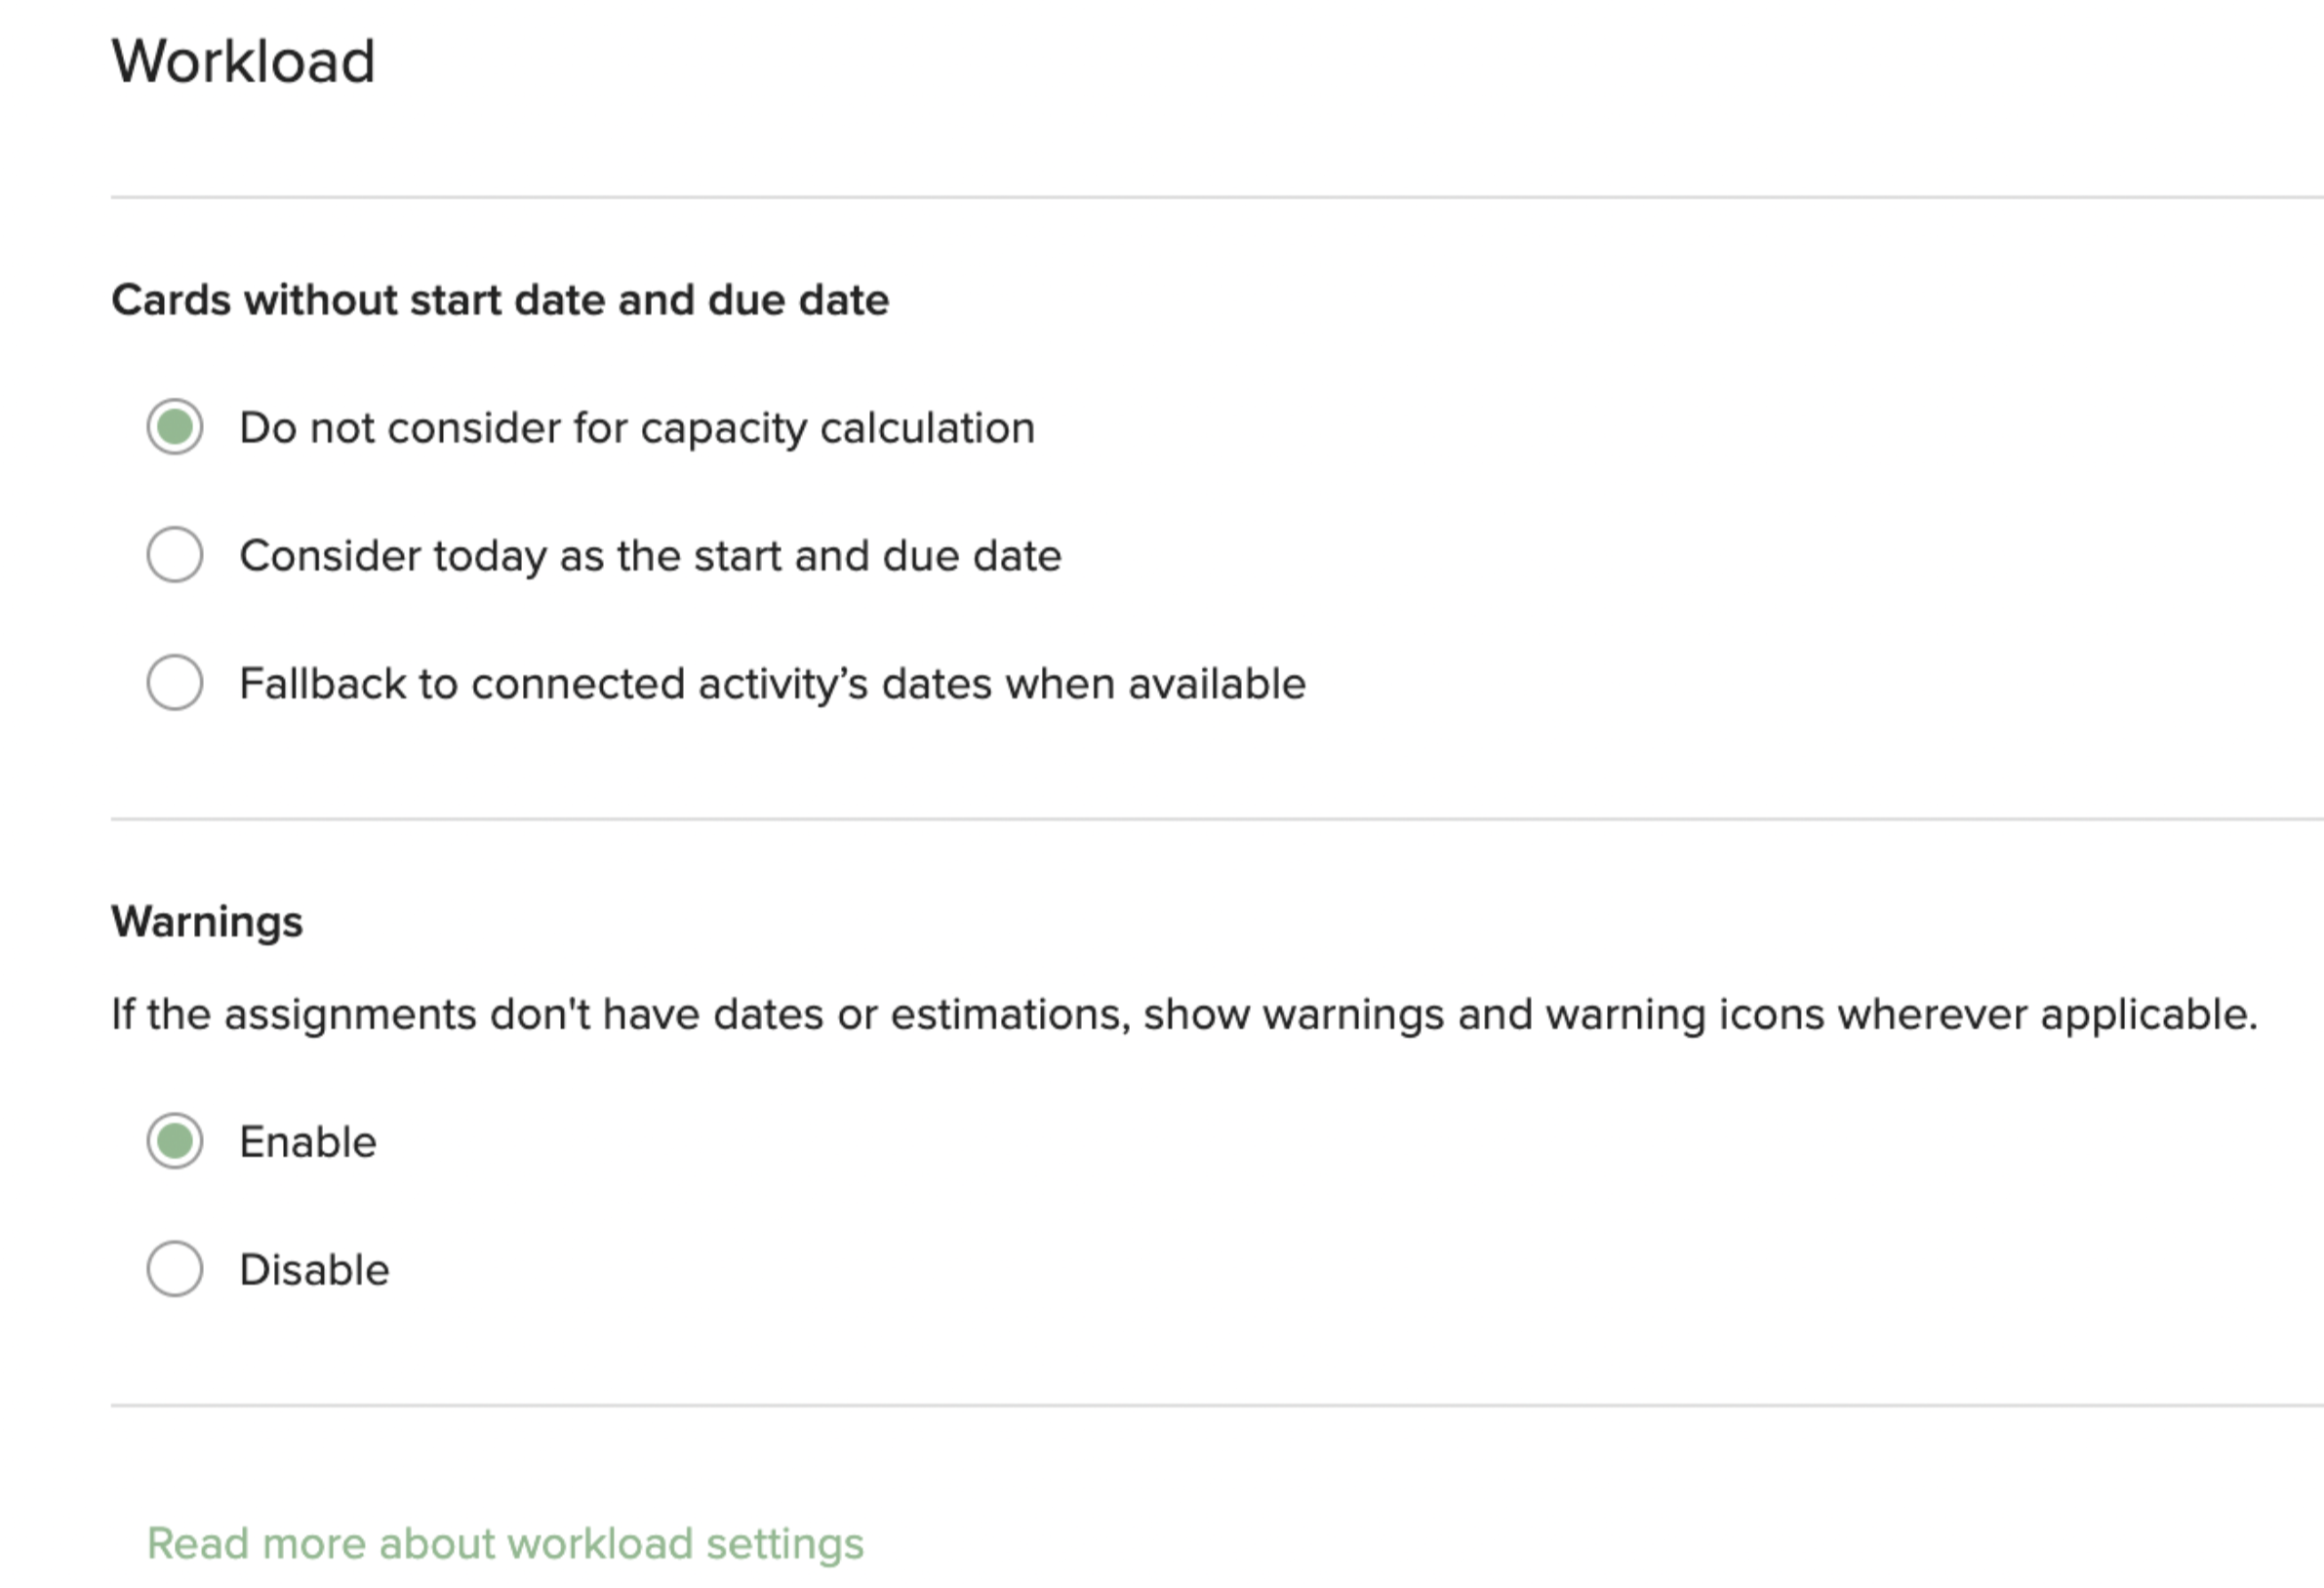
To set Workload settings:
- Click
> Account administration in the top navigation bar.
- Click Settings > Workload.
- Select appropriate radio buttons .
- Click Save.
People Tab
Define Departments and If Users Should Set Department Themselves
If all users are connected to a department, you can get an overview to divide the cost of ProjectPlace between departments. Account administrators can always change the department for a user.
To set a department for users:
- Click
> Account administration in the top navigation bar.
- Click the People tab.
- Click the Settings icon and select the Department option.
- To add a department, click Add department and type the new department in the empty department field.
- If you want users to assign themselves to a department, select the Ask users that have not set department to do so when logging in check box.
- Click Save.
Add a department called Others for account members that do not know their department or do not find a matching department. It is then easy for the account administrators to find those users and assign them to the correct department.