Work with Cards
- Last updated
- Save as PDF
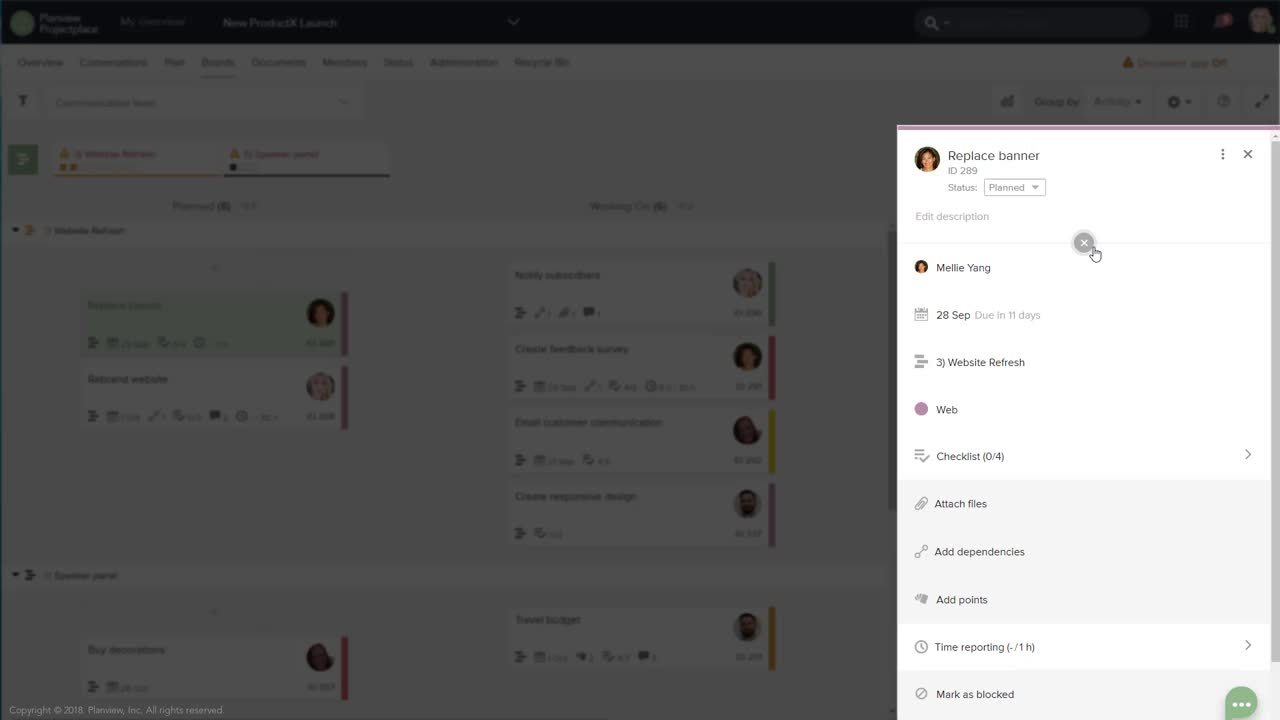
Video: Work with cards
A card is work that needs to get done. Cards can be created as the lowest level of work on an activity in the Plan tool, or be added to a Kanban board in the Boards tool. Each card contains information about the task to perform, who is assigned to it, a due date (if applicable), and the task's current status.
See a list of all cards you are assigned to on My overview. Here, you can plan when the work gets done and also add personal tasks you need to complete.
Change Card Status
The status of a card is represented by one of several status columns where the card currently resides. Each card is moved from left to right as work progresses. When the work is done, the card is placed in the last column to the right (typically, the Done column). Drag and drop the card to the next column to change its status. Status can also be changed in the detail pane for one or multiple selected cards.
When the card has been placed in the last column it is considered as Done and will be removed from My work on My overview, and Scheduled work on the workspace overview.

Change Card Details
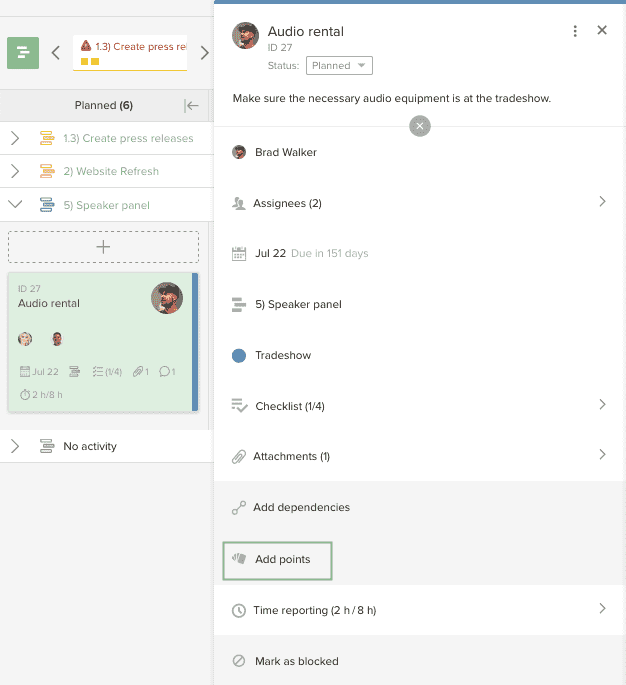
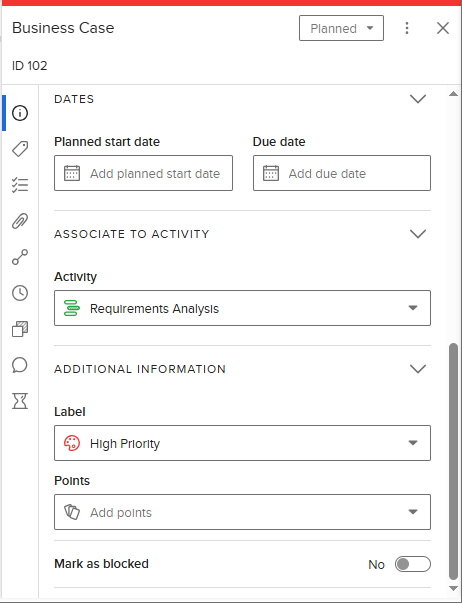
Click a card to open the detail pane where you can see and change all information related to the card.
- Click the card title to change the name of the card.
- Click the card status to move the card to another status column, showing the progression of the card.
- Click Edit description to modify the description. You can add or update the description using the built-in editor. (See Format the Description below.)
- The color assigned to the label will be applied to the color bar at the top of the Detail Pane.
NOTE
To edit card details using Planview Anvi™, see Planview Anvi in Card details pane under Work with Boards.


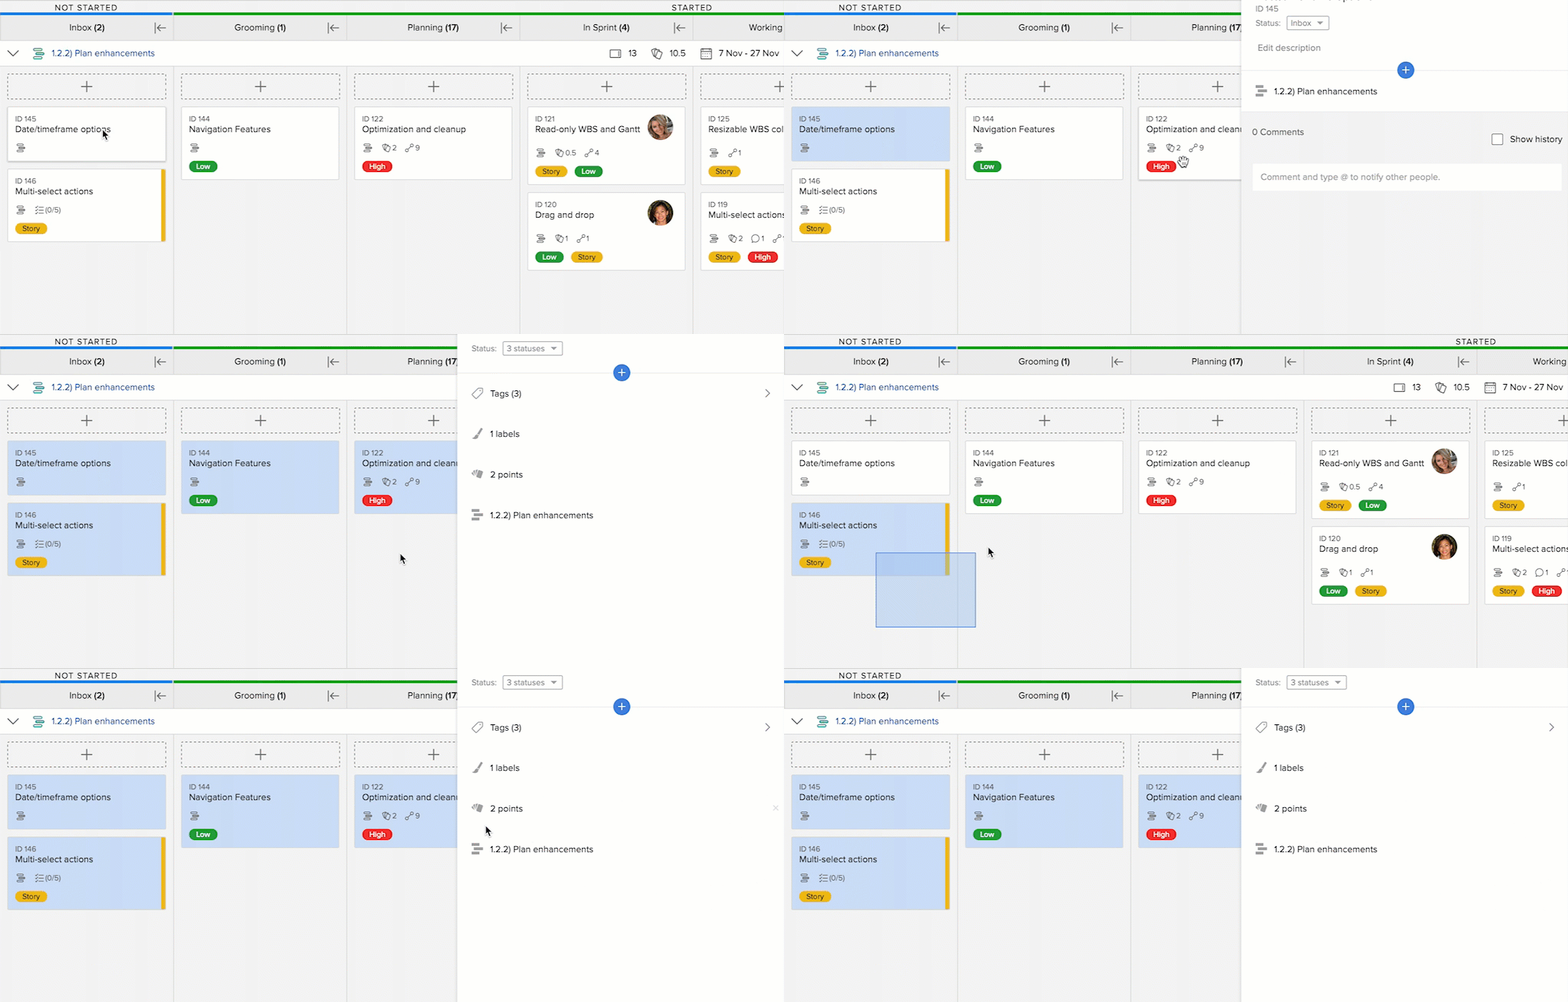
You can also select multiple cards in several ways; holding the Shift key on the keyboard and with the use of the pointer select multiple cards or drag the pointer over cards to select them or press Ctrl key (Mac users, press the Command key) and in the detail pane change information for all selected cards at once.
If you want feedback from a specific person, you can ask them to give their comments directly in ProjectPlace. Type @ and the first letters of the person's name you want to notify. Select the desired person's name from the list that appears. If you type, for example, "@jo" all persons with first or last name that begins with "Jo" will appear in the list. This process is called "at-ref" or "@-ref" and the person you @-ref will be notified both in ProjectPlace and through email.
If your organization uses ProjectPlace where a workspace Plan is connected to a Planview Portfolios project, the following ProjectPlace card attributes will transfer as action items in the connected project:
To learn more, visit Create/Synchronized Cards from Workspaces to Projects.
Assign Multiple People on a Card
You may assign a card to multiple workspace members to get the work done. Users may be assigned to the card in one of two levels: primary assignee and assignees.
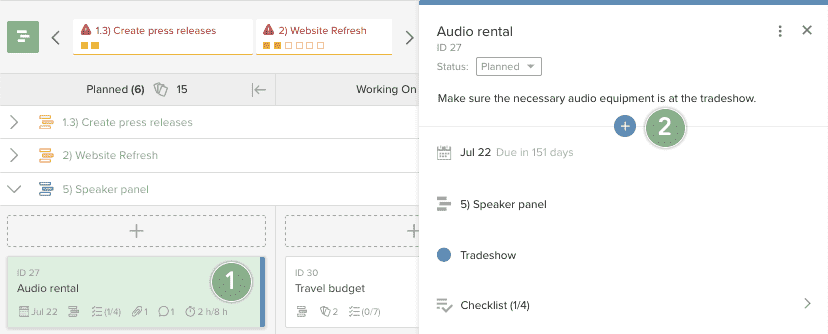
To add a primary assignee or additional assignees:
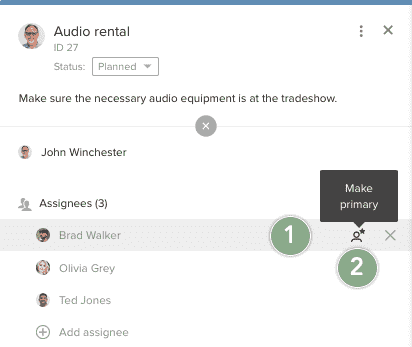
To promote an assignee to a primary assignee:
Estimate Work Effort for a Card
There are two ways of estimating the work effort on a card.
An aggregated estimate from individual cards will be displayed in the detail pane in the Plan tool for the activity the card is connected to.
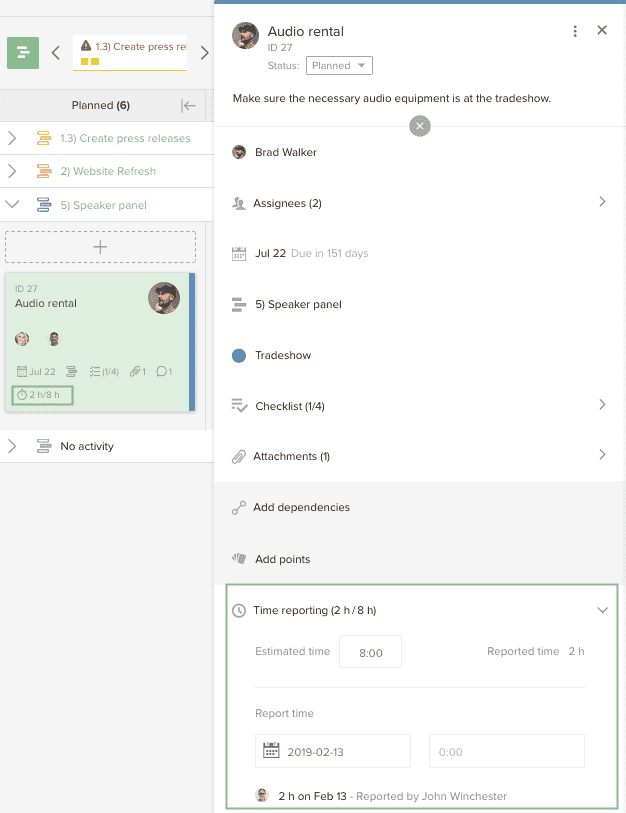
Time can be reported on activity or card level.
Use a Checklist
When you want to break up the work into smaller segments or create a list of reminders of those tasks, create a checklist.
To create a checklist:
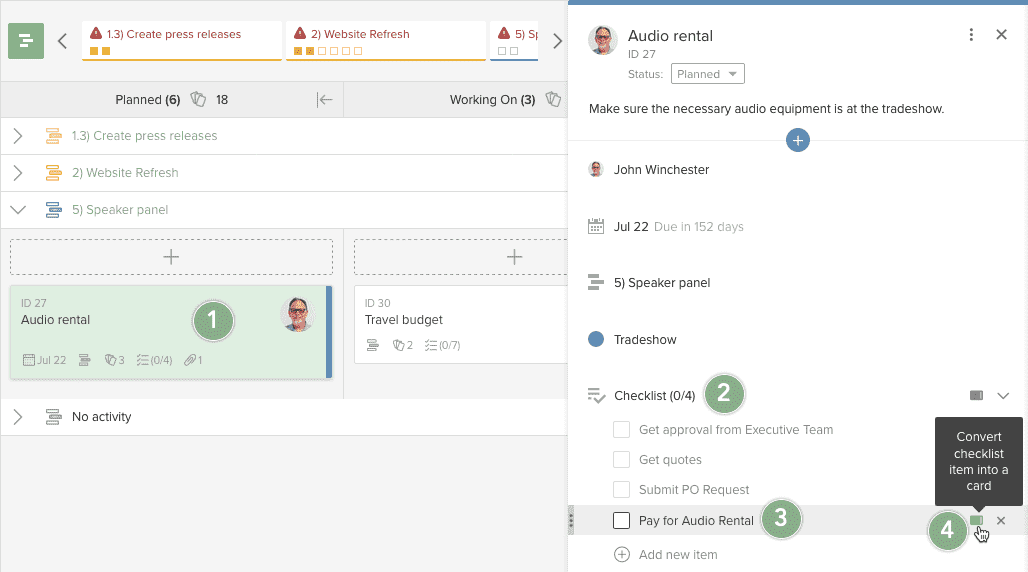
Convert a Checklist or Checklist Item into a Card
Sometimes, users discover that a checklist or a checklist item on a card, should be converted to independent cards. Moving a checklist or a checklist item to cards provides the full functionality of a card with all of the card's attributes making it easier to get the work done. Checklist Items do not allow you to specify the details of how the work is done in the way that a card can.
To convert a checklist into cards:
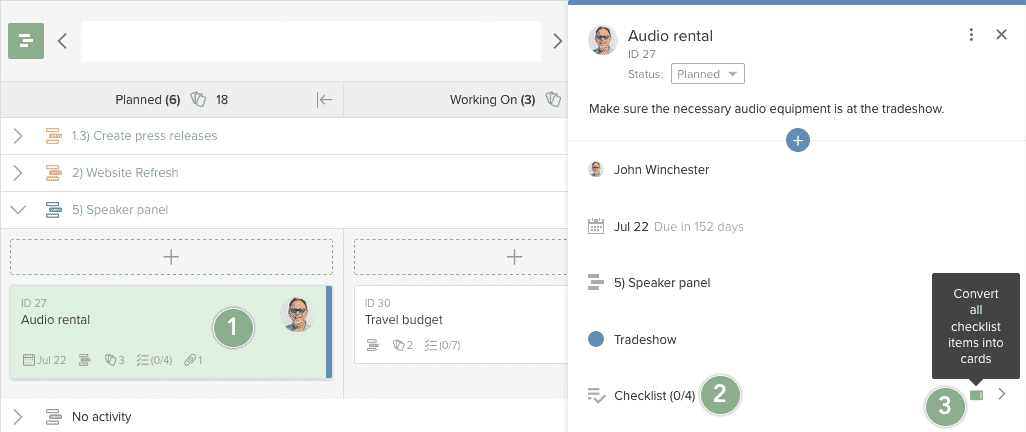
When the entire checklist is converted, all of the checklist items included in the checklist will disappear from the current card. Each checklist item because an individual card and all of the cards created from the checklist share the following card attributes from the original card:
- Board
- Activity
- Column name
- Label type
- Due date
To convert a checklist item into a card:
Add Card Tags
Use tags to organize and categorize cards, so you can easily find work items with the same type or subject matter.

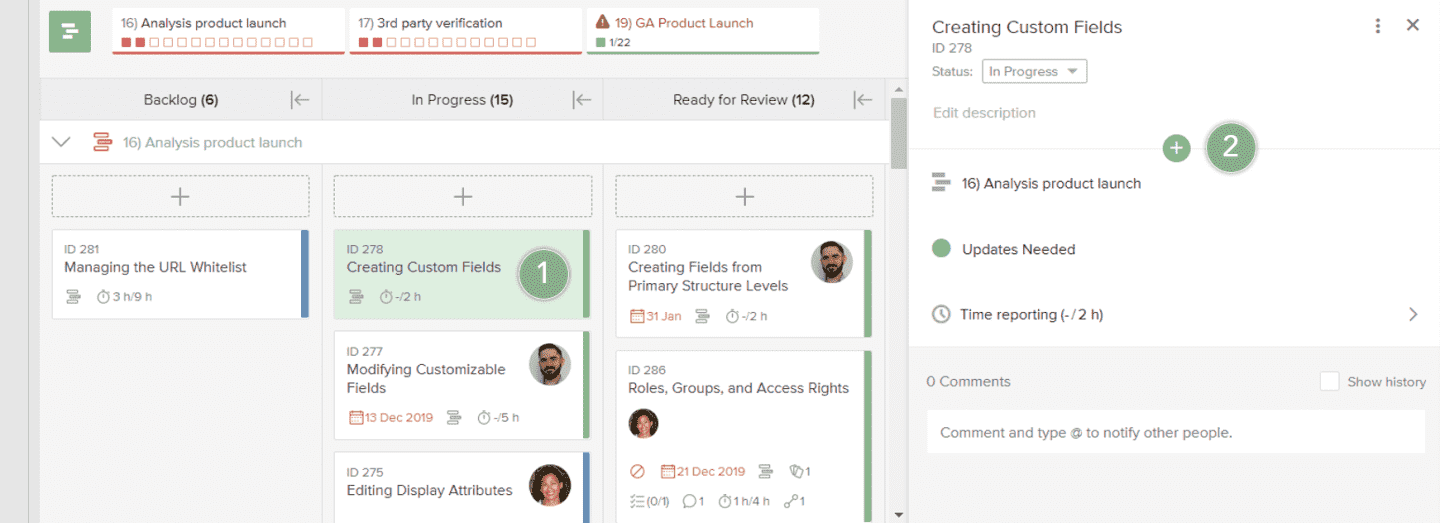
To add tags to a card:
Create Card Dependencies
Cards can be linked to each other using dependencies. A card can either be made to be dependent on another card, or have its own dependents.
Users can also add a duplicated card as a dependency in two ways: either as a card that is "waiting for" another card to be completed or as a card that other cards are dependent on. This dependency tracking helps in better project management and ensures that all related tasks are properly coordinated and tracked.
All metadata is displayed directly on the card face, providing immediate visibility.
Users can follow a dependency card by clicking on the More icon  on the card's Detail pane.

Add dependencies by using the search dialog in the detail pane (below). You can search for the card names or ID numbers of the cards you wish to create dependencies between. You can link between cards from different boards and also across different workspaces.

To remove a dependency, click the dependency's  icon.
icon.
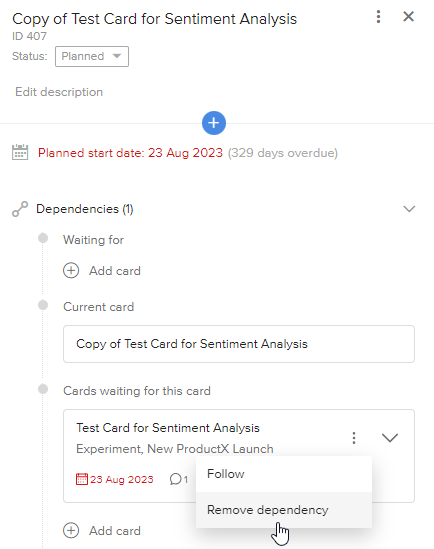
Once all dependencies have been completed, the person assigned to the dependent card will be notified that it’s time to get to work.
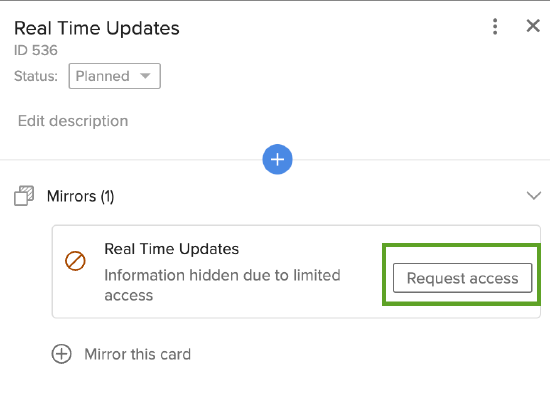
You can create card dependencies between cards, even if the boards have access rights restrictions. If a board has any restrictions, the title of the card will appear with a message indicating that its information is hidden due to access rights, and users will not be able to navigate to the card.
Request access to a Dependencies card
If a user without access to a card in Dependencies clicks the Request Access button, a dialog box will appear, prompting them to confirm their desire to request access to the card. An email will be sent to the workspace owner or administrators to give access to workspace and board. Once the user has been given permission the card information will become visible to the user.


Mirror a Card
Users can now mirror a card to a board either within the same workspace or across different workspaces (where they have access).
This feature helps keep information synchronized across multiple boards without duplicating effort.
To mirror a card:
-
Open the card you want to mirror.
-
On the Card's Detail Pane, click the Mirror icon
 .
.
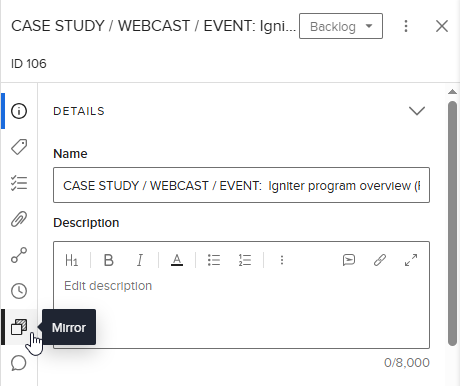
3. Click + Mirror this card.

4. Select the Workspace, Board, Activity, and Column where you want to mirror the card.

5. Click the Mirror button.
Attributes mirrored and synchronized across all mirrors:
-
Title
-
Description
-
Planned date
-
Due date
-
Assignee (if assignee is part of the same workspace)
Attributes mirrored only once (copied during initial mirroring, then unique to each card):
-
Checklist (including item status at the time of mirroring)
-
Tags (if part of the same workspace)
-
Blocked status (including blocked reason)
-
Custom fields (if created in the same workspace)
Attributes never mirrored (always unique to each card):
-
Attachments
-
Labels
-
Dependencies
-
Points
-
History
-
Time reported
-
Follow
Viewing history and comments across mirrors:
-
History and comments are unique to individual cards and are not mirrored automatically.
-
However, you can view the history and comments of any card within the same mirror group from any card in that group.
-
In the card details pane, under the History & Comments section, there is a dropdown listing all cards in the mirror group.
-
Select any card from this dropdown to see its details, history, and comments.
-
You can also add new comments directly from this view for the selected mirrored card.


Viewing attachments across mirrors:
-
Attachments are unique to individual cards and are not mirrored automatically.
-
However, you can view the attachments of any card within the same mirror group from any card in that group.
-
In the card details pane, under the Attachments section, there is a dropdown listing all cards in the mirror group.
-
Select any card from this dropdown to see its attachments.
-
You can also add new attachments directly from this view for the selected mirror card.
 .
.
Viewing checklist across mirrors:
-
Checklist are unique to individual cards and are not mirrored automatically.
-
However, you can view the checklist of any card within the same mirror group from any card in that group.
-
In the card details pane, under the Checklist section, there is a dropdown listing all cards in the mirror group.
-
Select any card from this dropdown to see its associated checklist items.
-
You can also add a new checklist item(s) for the cards in the same mirror group from this view.

NOTE
You can create up to 20 mirrors for a single card (total).
You can also create a mirror of a mirror. These will automatically belong to the same mirror group.
Unlink a mirrored card
Users can unlink a mirrored card by opening the Card Detail Pane, navigating to the mirrored section, clicking the More  icon next to the mirrored card they want to unlink, and selecting Unlink Mirror.
Important: Unlinking a card removes its connection with the mirror group. It becomes an independent card, and future updates will no longer be synced.

Request access for a mirrored card
If a user doesn't have access to a mirrored card, they can click on the Request Access button on the card. Once clicked, a dialog box will appear to confirm their request. An email will then be sent to the workspace owner or administrators to grant access to the workspace and board. Once permission is granted, the card information will become visible to the user.
Following and Notifications
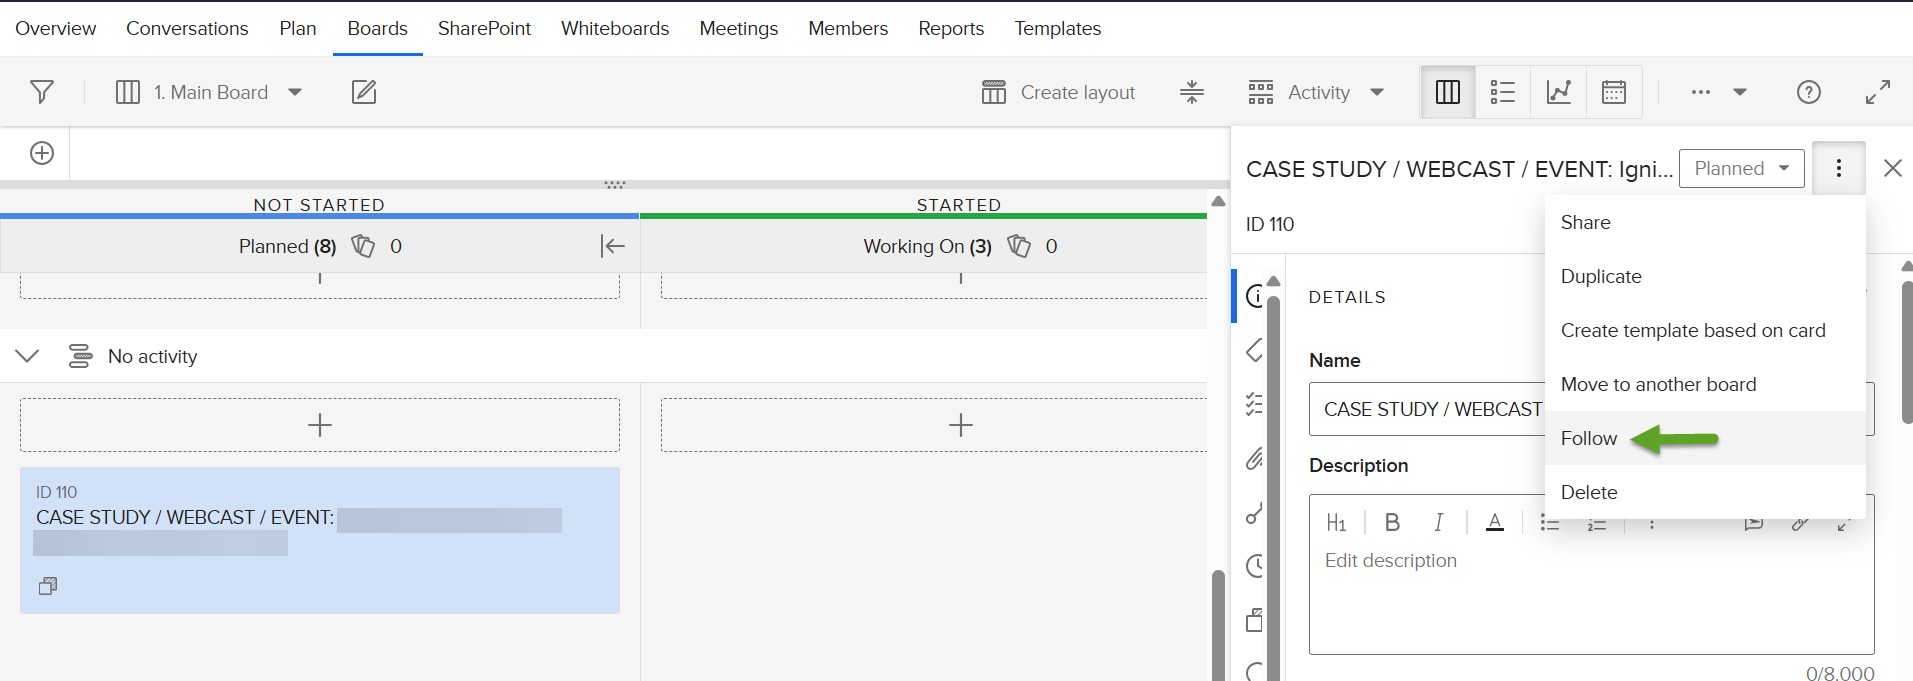
Users can follow a card by selecting the More icon  in the Card Detail Pane and select Follow. Once a card is followed, users will receive notifications about any updates made to the selected card.
Duplicate a Card
Create a duplicate card on the same board. When a card is duplicated, all settings such as assignee and labels will remain the same, but reported time and comments are not included on the duplicated card.
Users can duplicate a card and move it to a different project, board, activity, or column. Additionally, users have the option to follow the duplicated card, ensuring they stay updated on any changes or progress. Furthermore, users can add the duplicated card as a dependency in two ways: either as a card that is "waiting for" another card to be completed or as a card that other cards are dependent on. This dependency tracking helps in better project management and ensures that all related tasks are properly coordinated and tracked. (For more information, see above section on card Dependencies.)
To duplicate a card:
- Click on a card on a board.
- Click the More
 menu on the card's detail pane.
 - Click Duplicate on the drop down menu.

4. If you wish to also follow this card, click the check box on the following screen.
5. If you wish to add as a dependency, click the check box and select either option.
6. Click the Duplicate button.

Mark a Card as Blocked
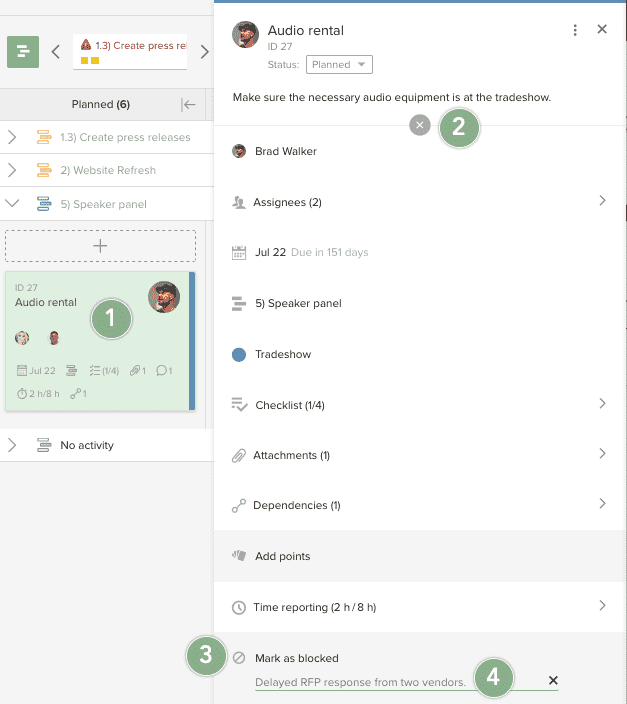
You can mark a card as blocked signaling that work might be obstructed. When marking a card as blocked, you must specify a reason why the card is being marked as blocked.
Once a card is marked as blocked, a Blocked ![]() icon will appear on the left, bottom corner of the card as highlighted by the green box in the image below:
icon will appear on the left, bottom corner of the card as highlighted by the green box in the image below:
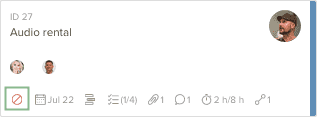
Blocked cards maintain full functionality so you can use and interact with a blocked card the same way you would with an unblocked card. Blocked cards, however, includes a Blocked ![]() icon providing a visual indication that cards with those icons are marked as blocked.
icon providing a visual indication that cards with those icons are marked as blocked.
Share a Card
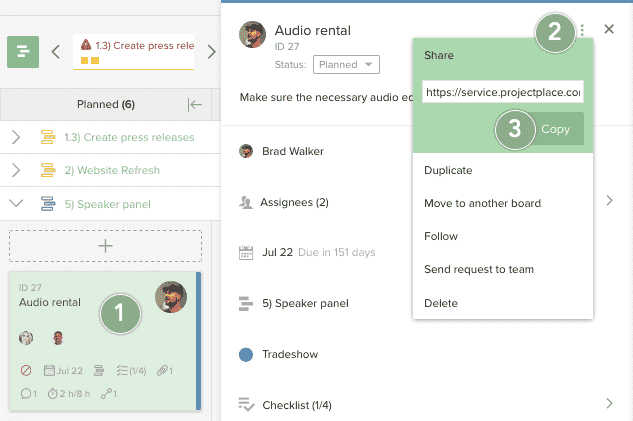
You can share a card with other workspace members by copying a specific link created for the card. The link can be shared in an email, a conversation, or a comment on another card, activity, or document.
Workspace members need board access in order to access the card.
To share a card:
Create a Card Template
Card templates make it quick and easy to create frequently recurring cards which have requirements for standard information.
To create a card template:
Note that the activity, dependencies, and reported time attributes will not be copied to the card template.
Move Cards to Another Board
If you need to reorganize how work is done, move one or more cards to another board in the same workspace or to another workspace in the same account.
To move cards to another board:
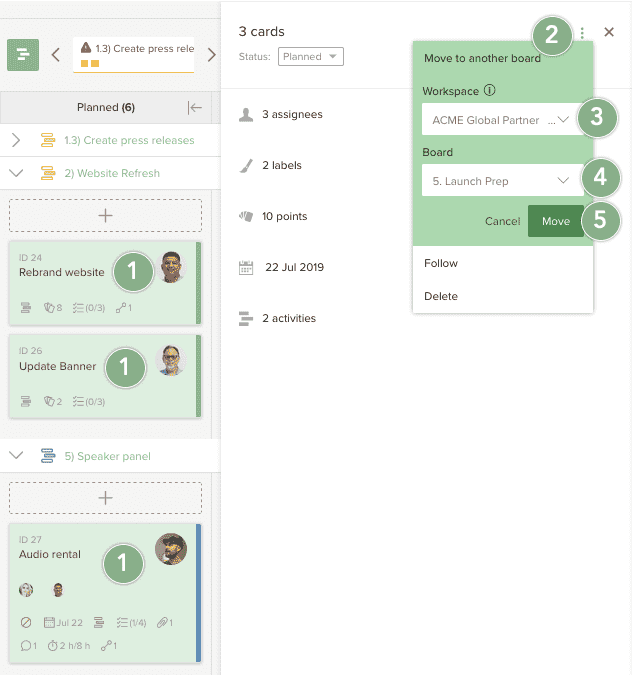
Moved cards will always appear in the first status column on a new board, regardless of which column they originate from. When moving cards to a board in another workspace, there is a slight difference to this rule; cards that are in the last column, commonly known as Done, will also appear in the last column in the destination board, otherwise they appear in the first column.
When moving cards to another workspace, note the following card attributes that will be removed:
- Attachments linked from the document archive of the current workspace will not move with the cards you move. However, documents uploaded to the card will move to the new Board or Workspace with the card, as will Dropbox, Box, and Office 365 documents. But, if you have linked a document in the workspace's document archive to a card, that archived document will not move to any other workspace.
- Custom fields configured in the current workspace will not remain on the card after the card has been moved.
- Assignees of cards that are not members of the destination workspace will not remain as assignees after the move has been completed.
- Followers of the card who are not members of the destination workspace will not remain as followers of the moved card.
- Dependencies will not remain on the card after the card has been moved.
Set Activity to Done when all cards have been Closed
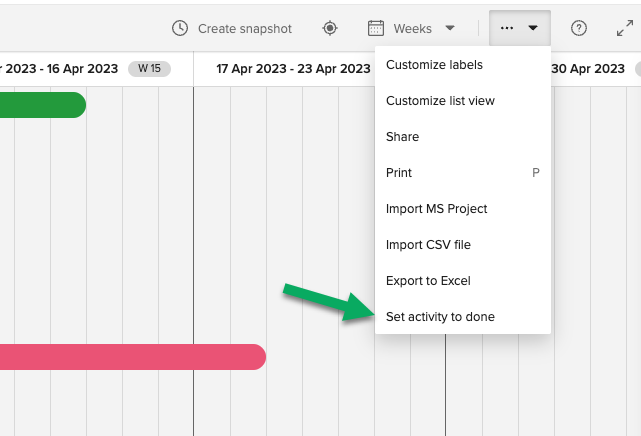
This is a setting that you can apply directly to a plan. With this setting activated, any activity is automatically set to done once all cards on it are closed:
- Navigate to a Plan to which you have access.
- Click the More
 menu.
menu. - Select Set activity to done from the dropdown menu.
4. On the popup menu move the slider to Automatically set activities to done.
5. Click the blue Confirm button.

Activities will be automatically marked as completed once all the associated cards are moved to the Done lane.
Behaviors of note:
- Even if a user does not have write access to the plan, if they close the last card on an activity, that activity is set to done.
- In an integrated scenario where ProjectPlace controls the plan, the first bullet still applies, meaning a user without write access to the plan, regardless of rights in Portfolios, can indirectly close activities in Portfolios.
- In an integrated scenario, where Portfolios controls the plan, this setting will not be available.
- If the ProjectPlace plan has this setting activated and is later integrated to Portfolios, the setting will be deactivated if Portfolios controls the plan. If ProjectPlace controls the plan, the setting is still applied after integration is set up.
Delete a Card
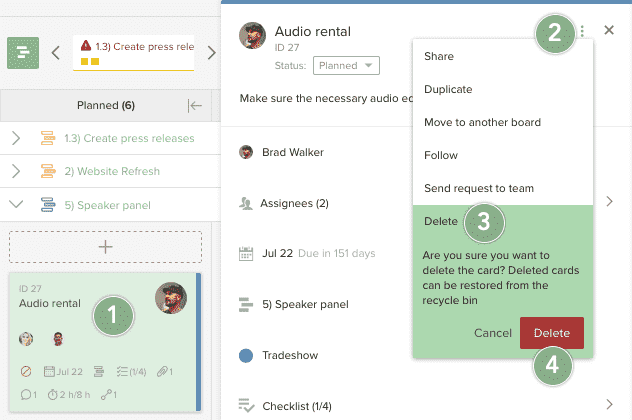
To delete a card:
Format the Description
The rich text editor allows users to create and format text with various styles, fonts, and colors, enhancing the visual and structural presentation of the text. It enables the creation of rich, formatted descriptions, offering features like headings, subheadings, bold, italics, underline, text color, code snippets, links, block quotes, and bulleted lists. Additionally, users can expand the description to full-screen mode.
The toolbar is organized with formatting options on the left and actions on the right. Most options are accessible via both keyboard shortcuts and markdown support.

# This is a heading
## This is a subheading

**This is bold text**

_This is italic text_

1. Numbered list
2. Numbered list

* Bulleted list
* Bulleted list
Add Links
Add a name for links within the brackets [ ] followed by an URL within the parenthesis ( ).
[Projectplace](http://www.projectplace.com)
Even more ways to format the workspace description can be found in this list of all available markdown options. http://commonmark.org/help/
Click the x to hide the fields that don't have a value (gray background) where the icon changes to a plus  . Click the icon again to show all of the available fields.
- Click each field to add or change the information:
- Add primary assignee. Assign the card to the person who is primarily responsible to get the work done. The primary assignee is the go-to contact for the card when team members have questions. The person assigned to the card will receive a ProjectPlace (in-service) notification and an email.
- Add assignees. Additionally, you can add multiple assignees that are also working on the card. Additional assignees may work at the same level as the primary assignee or are working on the task at some point. Each assignee will receive a ProjectPlace (in-service) notification and an email.
- Add due date. Enter a due date when the work needs to be done.
- Planned start date. Enter a date when the work needs to be started.
- Connect to activity. Connect the card to an activity in the Plan or move the card to another activity. Note: if the activity you select is not connected to the associated board, the card will no longer be visible on the board.
- Add label. Use labels to differentiate different types of work. You can then group the cards by their label in order to focus on one type of card (or work) at a time.
- Create checklist. Remember and list related tasks or pieces of work necessary to complete the work associated with the card.
- Add tags. Use tags to classify or group types of work. Select a tag from the available list, or create a new tag.
- Attach files. Add documents (in any file format) necessary to complete the work described in the activity. Attach files from ProjectPlace, your local computer, and other cloud document services such as Box, Google Drive, Dropbox, and OneDrive.
- Create dependencies. Set dependencies to other cards on the board or other boards in the same workspace or other workspaces that you are a member of.
- Add points. Estimate work effort needed to complete the card by assigning point values.
- Time reporting. Estimate work effort in hours and minutes and report time on cards. Note: it is only possible to report and follow up on time in Projectplace Enterprise.
- Custom fields. Custom fields allow Workspace administrators to create additional data fields for cards in the workspace. The added custom fields appears at the bottom of the card attributes list.
- View associated risks or issues. It is only possible to view the associations in the details pane.
- Team members can add comments and discuss work progress on the card.
- Click the check box to see the history of the card such as who made progress, what progress was made, and when the work was completed.
- Use this menu to:
- card title
- card status
- due date
- points
- assignee
- description
- Click the card you want to add assignees to. The card's detail pane will open on the right side of the window.
- Click the plus
 icon to display additional card attributes.
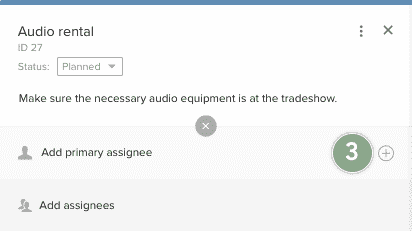
- Click Add primary assignee.
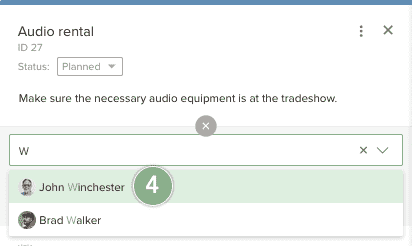
- Type the first few letters of the user's first or last name and from the available list, click the name of the user who will be the card's primary assignee. Once the selection has been made, the name and picture of the primary assignee will be displayed in the first position on the card's detail pane. The primary assignee's picture is also located next to the Card title at the top of the detail pane.
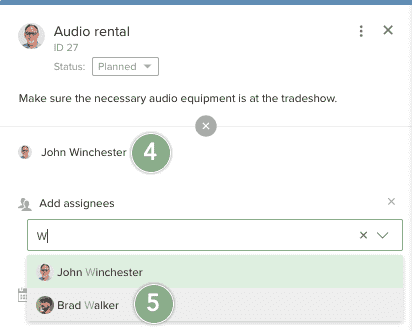
- Type the first few letters of the user's first or last name and from the available list, click the name of the user you want to add as an assignee. Once the selection has been made, the name and picture will be listed in the assignees section of the card, under the primary assignee section.
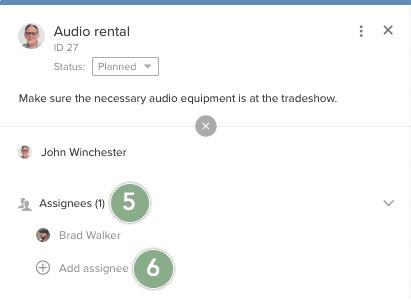
- Click the Add assignee
 icon to add additional assignees.
 - Hover the cursor over the Assignee name you want to promote.
- Click the Make primary
 icon to replace the existing primary assignee with the replacement you have selected.
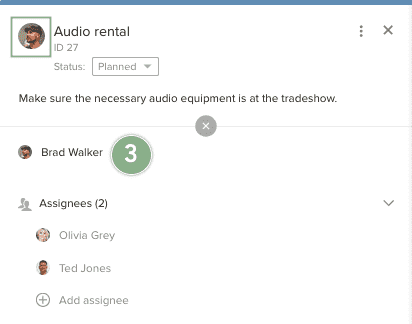
- The initial primary assignee has been replaced with the new primary assignee and has been removed from the Assignees list.
- Point estimation. Estimate the relative size of work on a card using the planning poker estimation with points http://en.wikipedia.org/wiki/Planning_poker. This will help the team break down work tasks into suitable sizes. You can get a good overview of the progress in the burn-up chart. When you select to base the chart on points, you will see the results in the burn-up chart.
- Time estimation. Estimate how many hours it will take to complete the work on a card in the Time reporting section of the detail pane. Note: it is only possible to report and follow up on time in Projectplace Enterprise.
- Click the card you want to create a check list for. The card's detail pane will open on the right side of the window.
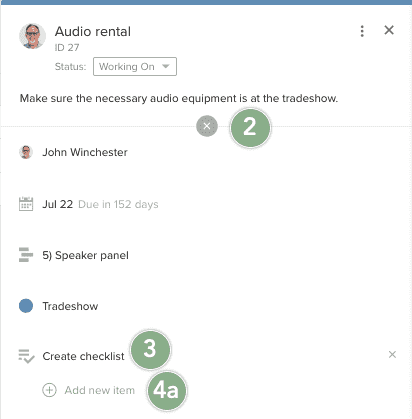
- Click the plus
 icon to display additional card attributes.
 - Click Create checklist.

- Click Add new item and type the name of the task in the available Name item field.
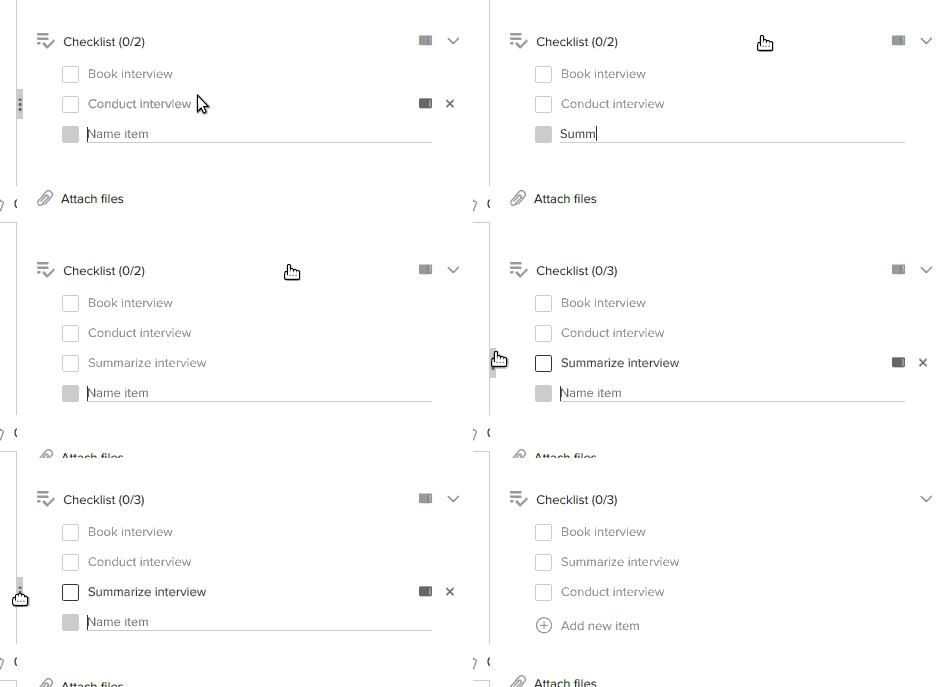
- Hover the cursor over the checklist item you want to move. On the left side of the checklist item, click and hold on the move
 icon. Drag the checklist item to the new location (either above or below its current location) and release the click to set the checklist item in its new location.
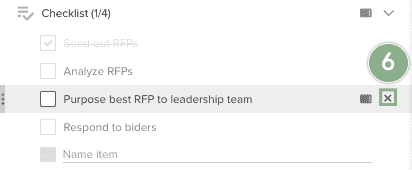
- If you want to delete a checklist item, hover the cursor over the checklist item you want to delete. Click the delete X icon that appears on the right.
- Click the card you want to convert checklist items into cards. The card's detail pane will open on the right side of the window.
- Hover the cursor over the checklist card attribute.
- Click the card
 icon on the right to convert the entire checklist into individual cards.
 - Click the card you want to convert checklist items into cards. The card's detail pane will open on the right side of the window.
- Click Create checklist.
- Hover the cursor over the Checklist item you want to convert.
- Click the card
 icon on the right to convert the checklist item into a card.
 - Click the card you want to add a tag to. The card's detail pane will open on the right side of the window.
- Click the plus
 icon to display additional card attributes.
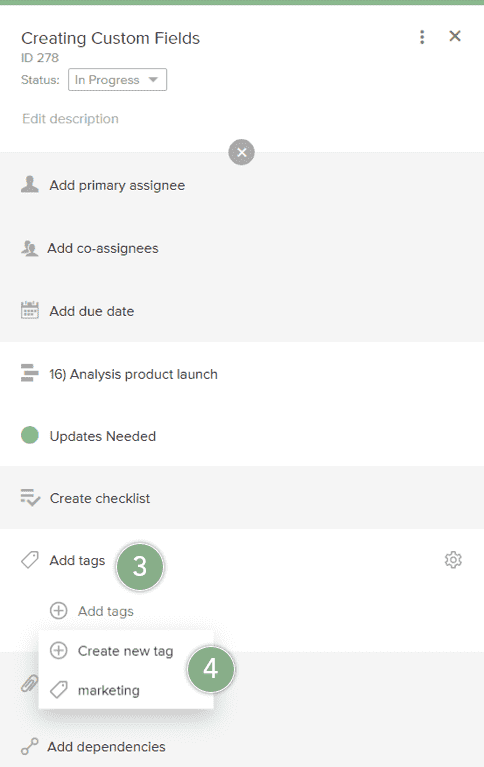
- Click Add tags.
- Select a tag from the dropdown menu. If the tag you want to add is not available, click Create new tag to create a tag.
- Open the detail pane for the card that you want to duplicate.
- Click the more options icon
and select Duplicate.
- Open the detail pane by clicking the card you want to block.
- Click the
 (plus) icon to open and edit the available card fields.
 - Click the Mark as blocked field.
- Type the reason the card is being blocked.
- Navigate to the card you want to share and click the card to open a detail pane appearing on the right side of the window.
- Click the more options
icon from the top right corner of the detail pane and select Share.
- Copy the URL and paste it in the desired location or just click the Copy button.
- Click the card you want to base a card template on to open its detail pane.
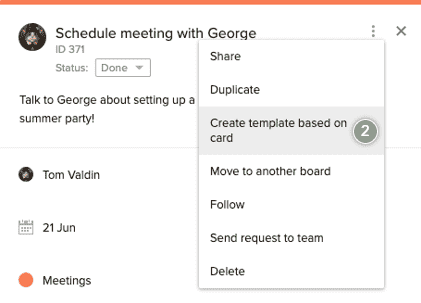
- Click the
More menu and select Create template based on card.
-
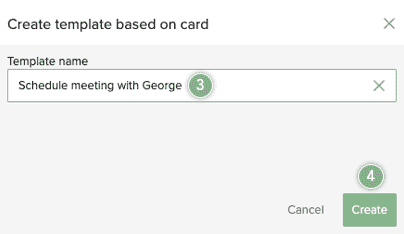
If desired, rename the card template.
-
Click Create.
- Click the card you want to move, or use one of the different multi-select options for cards: hold the Shift key on the keyboard and with the use of the pointer, select multiple cards or drag the pointer over cards to select them, or press Ctrl key (Mac users, press the Command key), then click each card you want to move.
- In the detail pane that appears, click the more options
icon and select Move to another board.
- Select the desired workspace (if you want to move to another workspace) in the Workspace list. This list includes the available workspaces you are a member of. Note: the name of the workspace you are currently in is the default for the Workspace list. This step is only needed if you wish to move the card or cards to another workspace.
- Select the board you wish to move the card to in the available Board list.
- Click Move to confirm
- Open the detail pane of the card that you want to delete.
- Click the more options
icon.
- Select Delete.
- Click the Delete button to confirm.
Sentiment Analysis
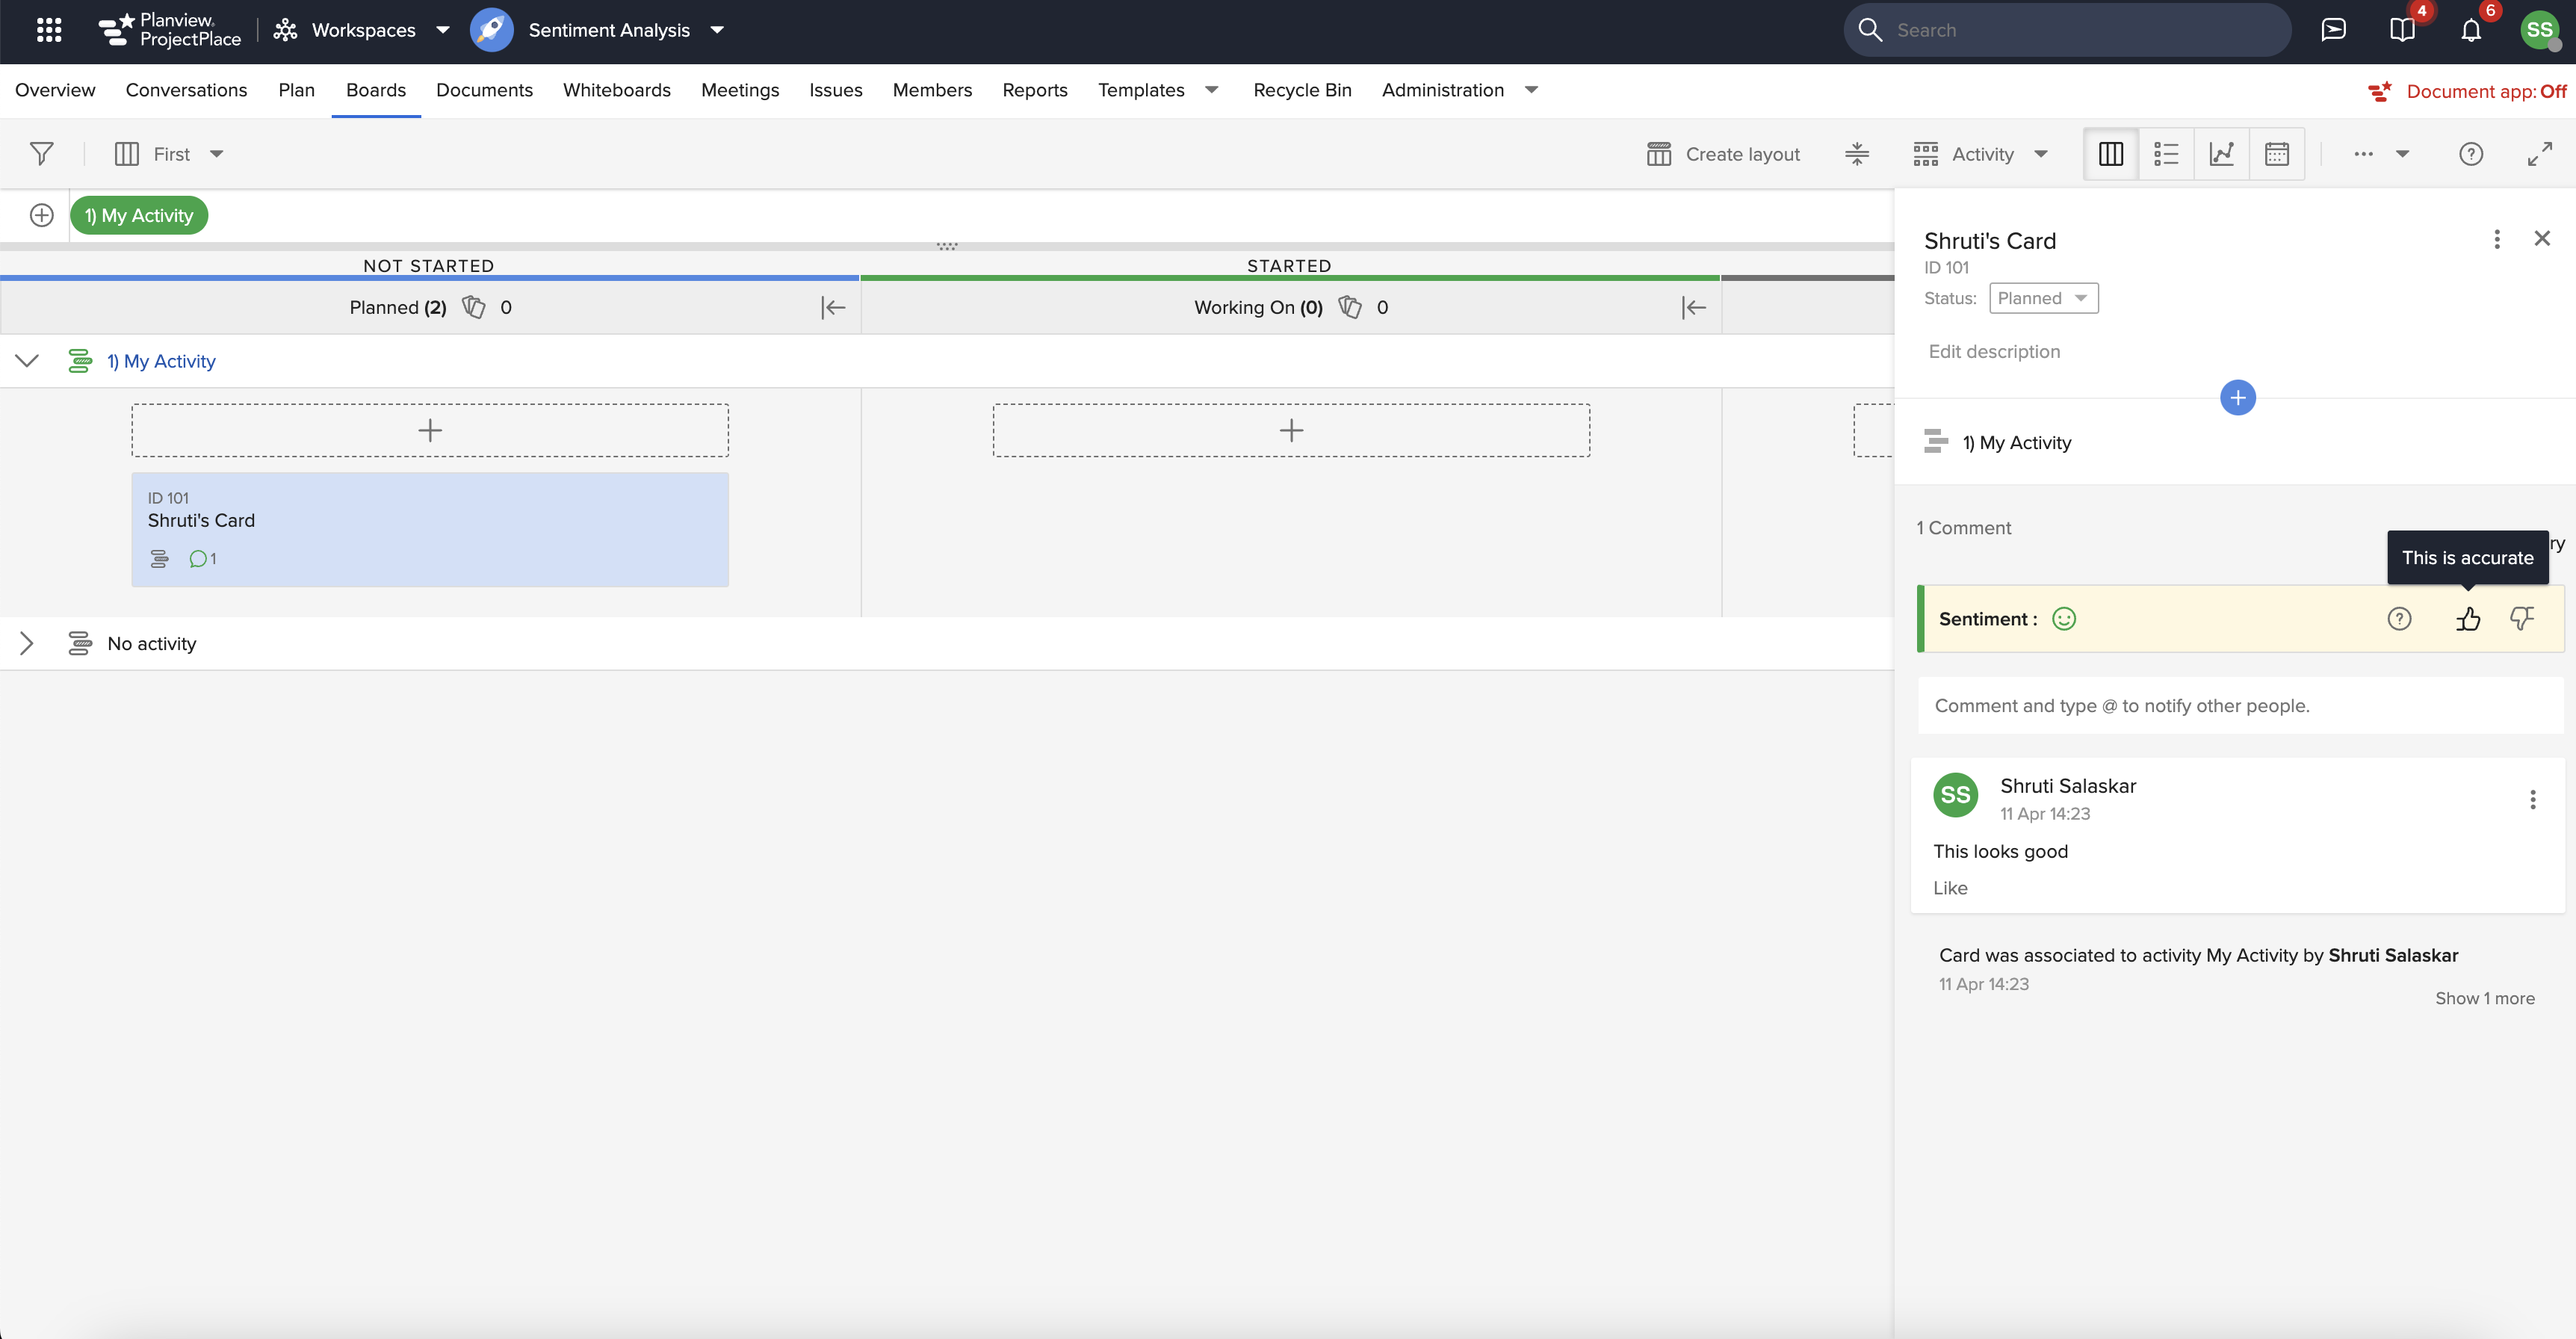
ProjectPlace provides a qualitative status of work based on comments on a card. A sentiment (Positive, Neutral & Negative) displays on a card's details pane and the card view that is derived from the content and tonality of comments on the card.
This feature only works if the account is Planview Admin enabled. (See this article regarding the Product Switcher, enabled by Planview Admin). Also, you need to be in Board View  to see the sentiment on the card, as well as on the card's Detail Pane.
Sentiment Analysis Feedback
Users can give feedback on the sentiment score via two icons at the end of the row (thumbs up or thumbs down). This helps us to become better at giving you a more accurate sentiment on the card. The thumbs voting options ![]() are located at the same place the sentiment score is presented within the card.
are located at the same place the sentiment score is presented within the card.
Sentiment Analysis at Activity Level
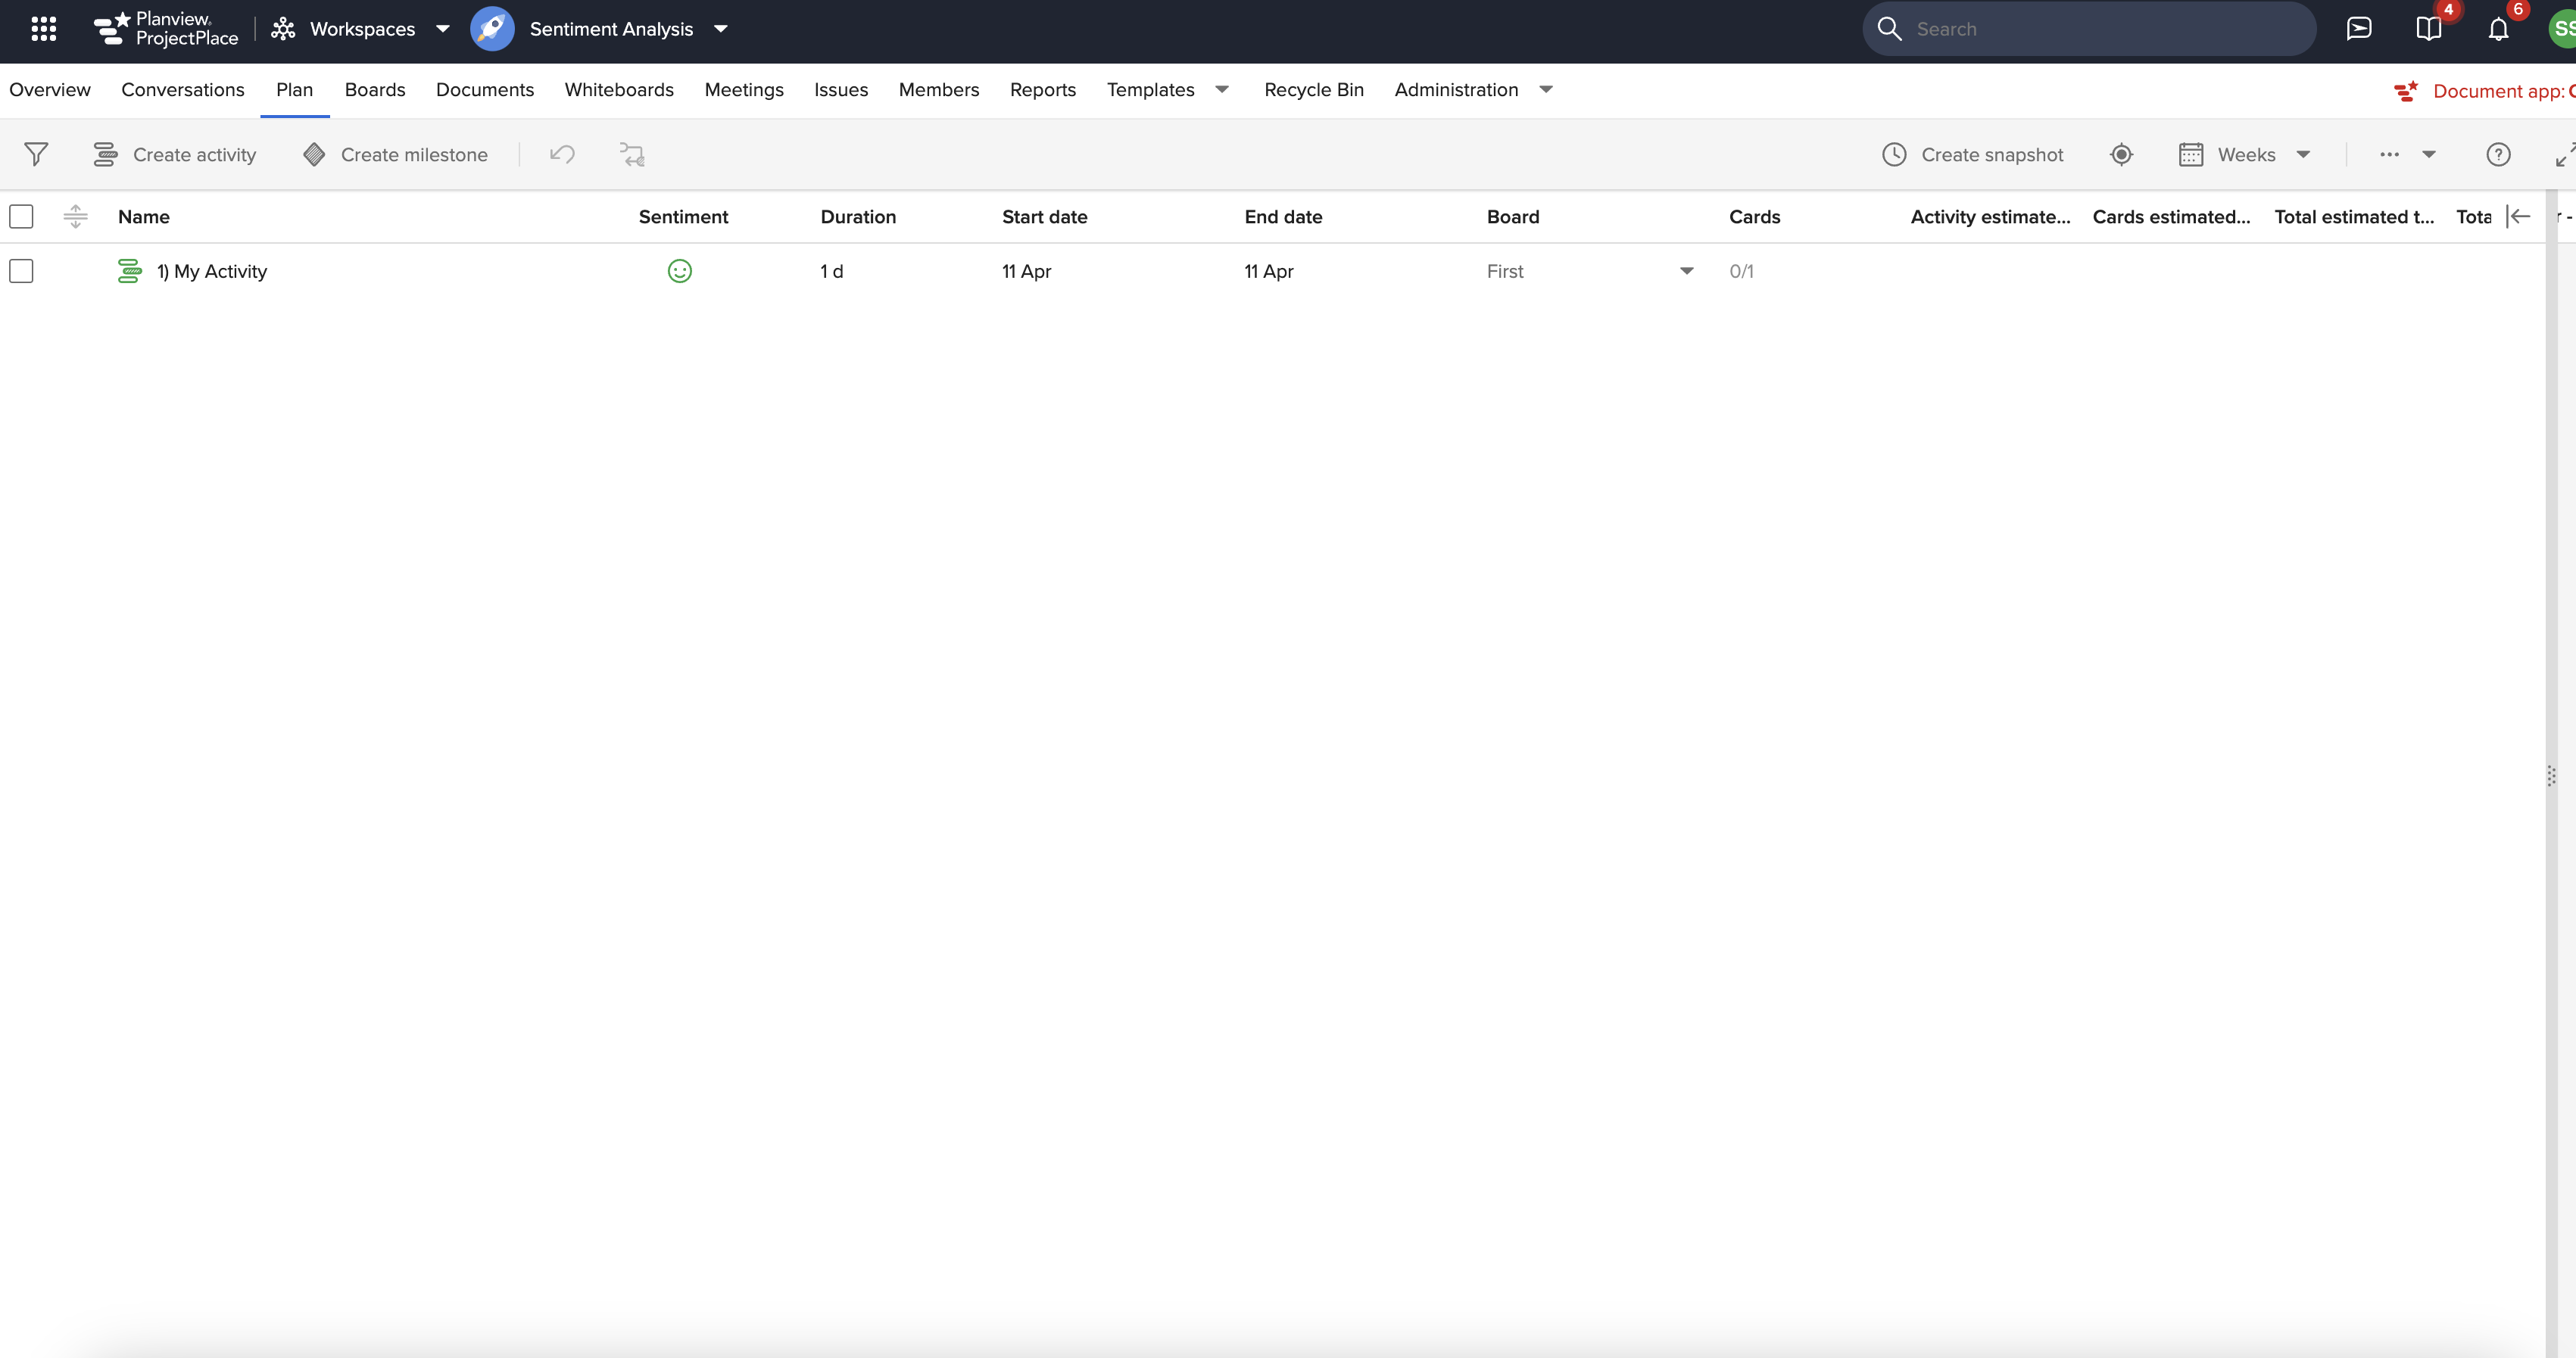
Sentiment analysis at the activity level offers a qualitative status of work, derived from aggregated sentiment on associated cards and activity comments. As individual cards are populated with sentiments, this information aggregates at the Project Plan level, allowing project managers to gauge project health through overall sentiment. The sentiment column is enabled by default and if you wish to change its position in the WBS list you can go to Plan settings and change its position using the Customize list view functionality.
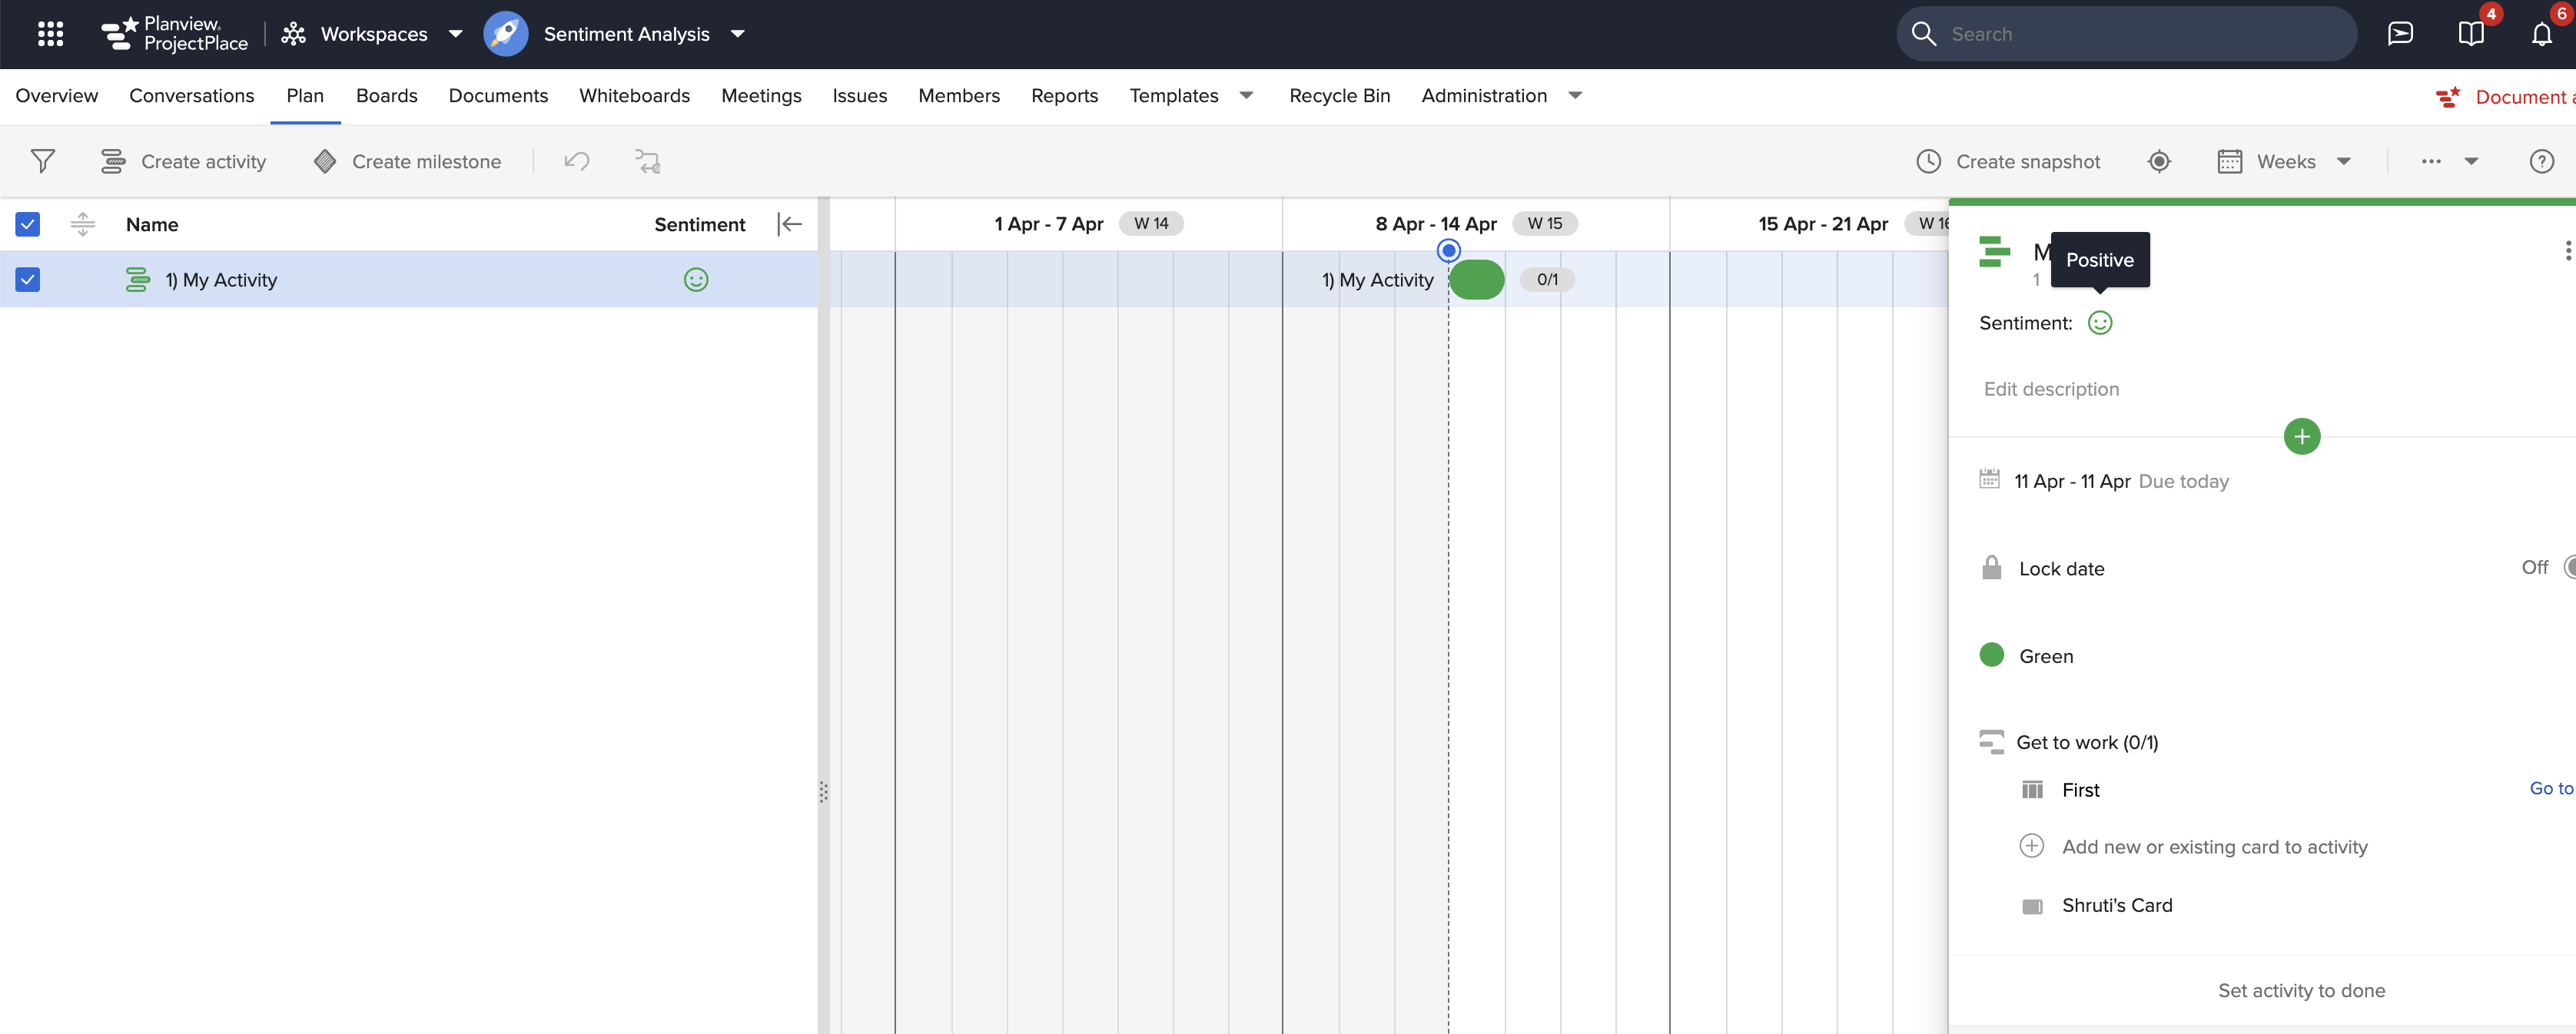
Additionally, sentiment analysis is visible in the Plan list view and within the activity's Details Pane.
Follow Cards
Following a card is a great way to keep informed on how work is getting done. You can follow a card (even if you are not assigned to the card) to help stay informed with work you have an interest in. When you follow a card, My Overview includes information about the cards you are following, giving you a direct and simple way to access continual changes that occur on the card.
From My Overview, click the Following tab in the top, right side of the window, next to the My Work tab.
Click any card from the Following tab to access details and make changes without leaving My Overview.
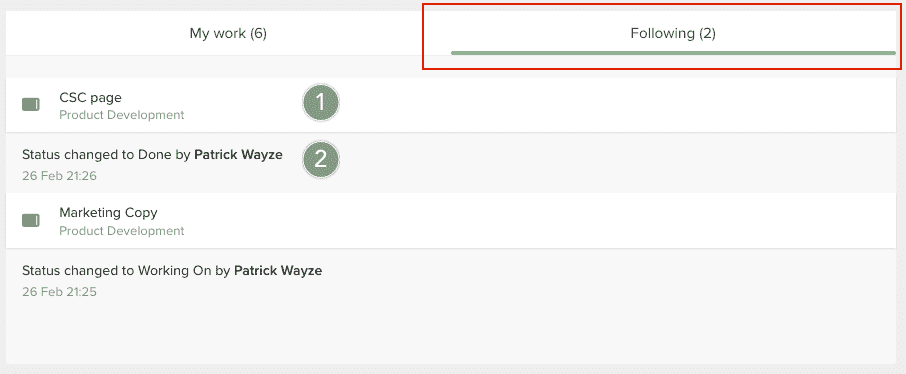
Following a card allows you to get a ProjectPlace (or in-service) notification when the card is updated and you will be notified when:
If you are assigned to a card, you will also get the same notifications above, but the card (and its recent change detail) will not show up in the Following tab.
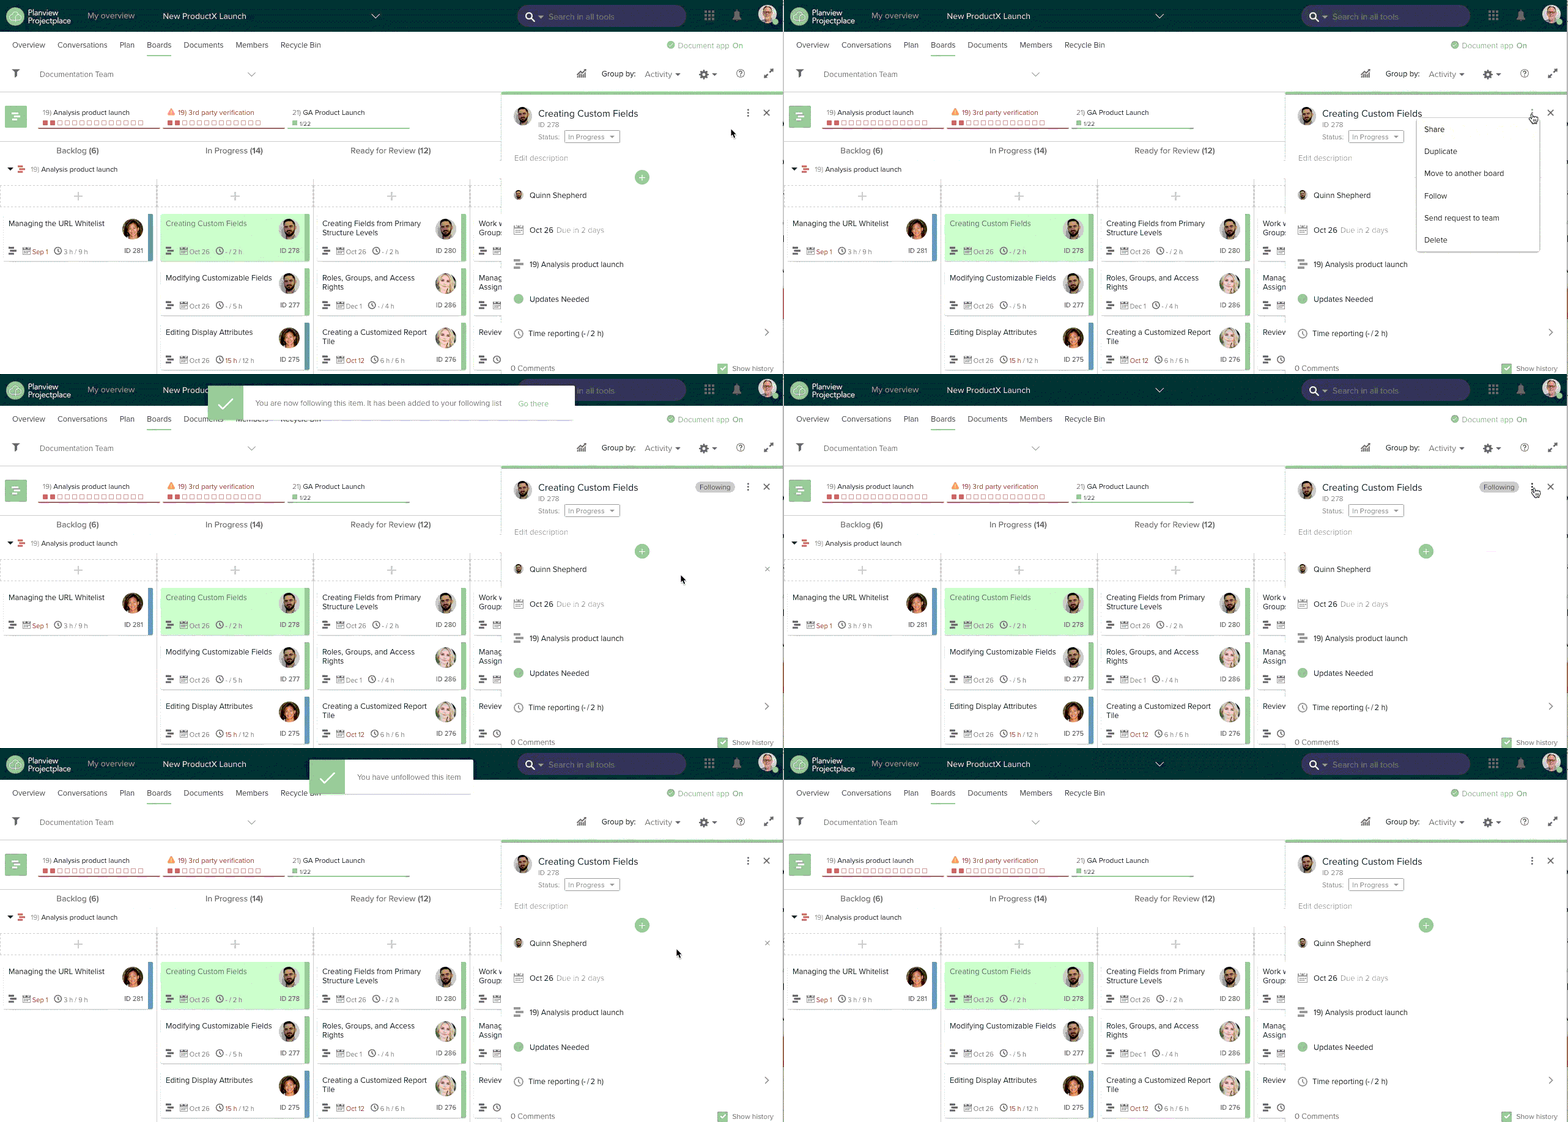
To follow a card:
Click the more options icon and select Follow card. A confirmation message will appear at the top of the window.
To unfollow a card you are currently following:
Select Unfollow card. This will remove the card from the Following tab, and you will stop receiving ProjectPlace (in-service) notifications about the card you are no longer following.
Both of the Following and Unfollowing processes are illustrated in the animated image below:
Request Card Assignments for a Team
As an alternative to assigning a card to a person in the workspace, you can instead send a card in a request to a Team. This notifies the entire team of the need for them to pay attention to a particular card and to assign the card to one of their team members. The Team accepts the card by assigning one of the team members to the card.
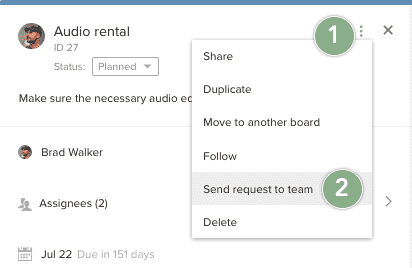
To send a request to a team:
- Only workspace members who have full access to the Members tool will be able to send requests to teams. The rationale for this is that sending a request to a team will add members of that team to the Workspace.
Once you send the request, all of the team members are notified and the request is displayed in the Team Overview. The sender of the request automatically follows the card so the sender remains informed of any changes that take place once the card has been sent.
The team can now either accept or deny the card.
When the card is Accepted:
When the card is Denied:
There can only be one active request per card and you cannot send the same card as a request to multiple teams.
Work with Cards on Mobile Apps
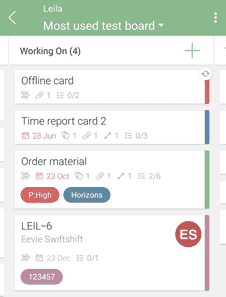
Stay on top of your cards with our mobile apps! Update card details, change card status, comment on cards, and much more all from your phone (even if you're offline.)
To request offline support for cards, contact Customer Care (this feature is off by default.) If card attributes are updated while a user is offline, all updates will be added to the card when user comes back online, and the timestamp on the update will reflect when the user came back online.
- Was this article helpful?
- Each card you follow is listed under the Following tab and includes a card icon
 on the left side of the card.
 - The most recent change or event is listed under each card and includes what changes were made and when these changes occurred. These entries do not include the card icon.
- the card is moved to another column
- the assignee changes or is removed
- the card is moved to another board
- the card is associated to another activity
- the card is marked or unmarked as blocked
- the card's due date is today
- a comment is added to the card
- the card is deleted
- Click the more options
icon.
- Select Send request to team.
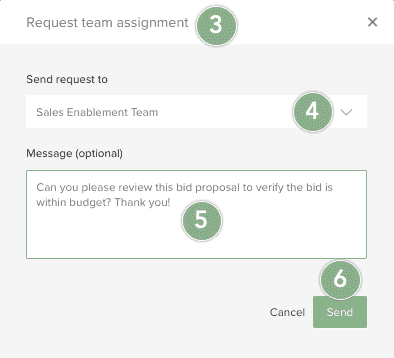
- A new Request team assignment window appears.
- Select a team from the available list.
- Type a message detailing your request to the team. The message you type here is also added as a comment on the card.
- Click Send.
- A notification is sent to the sender that the card has a new assignee.
- The message included on the card (if there is a message) is added as a comment on the card.
- A notification is sent that the team has denied working on the card.
- The message included on the card (if there is a message) is added as a comment on the card.


