Manage Your User Account and Settings
My Profile
Add information about yourself so that other members involved in the same workspaces know who you are and can contact you. Remember to add your picture! Seeing each other’s faces help establish connections and facilitates finding a member's contact information making communicating with one another easier. This is especially important if you are a member of a distributed team and haven’t met teams members located in another location.
Each individual member must update their own personal details. The workspace administrator does not have access to anyone's personal preferences.
To change your details:
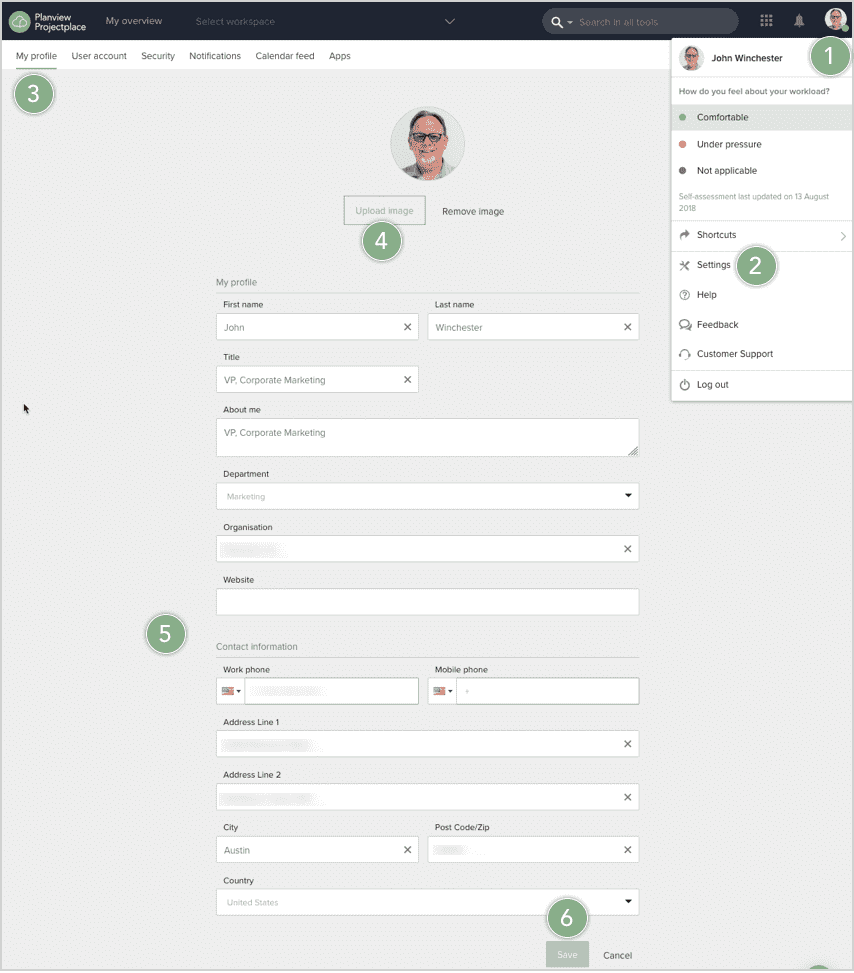
- Click your avatar/initials in the right corner of the top navigation bar.
- Select the Settings option.
- Click the My profile tab.
- Click Upload image to upload your picture. At the top of the page, your initials are displayed in a colored box. Your initials will become your profile picture throughout ProjectPlace if you do not upload a picture of yourself.
- Add your contact information such as your title within the organization, address, organization, and other details.
- Click Save.
User Account
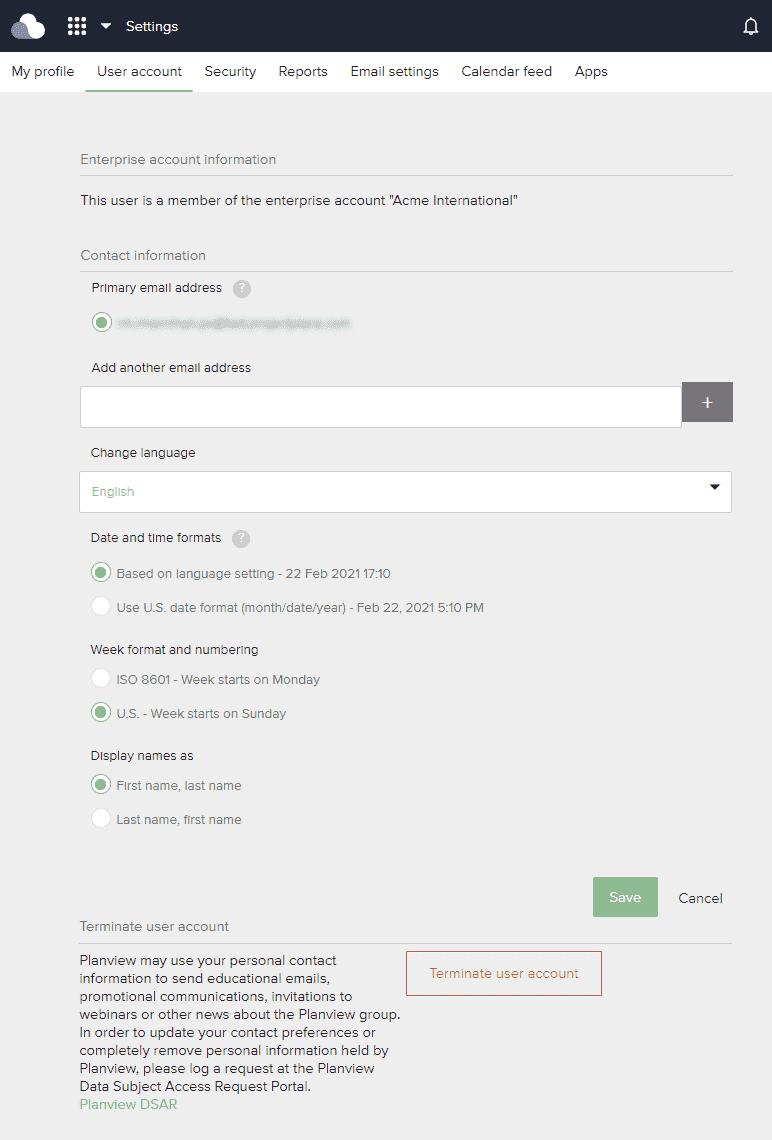
Click the User account tab to view information about which account you are a member of, your primary email address, and choose additional settings to personalize your ProjectPlace experience. You can also terminate your user account in the User account tab.
Combining Two User Accounts
We recommend that you only have one user account. If you have multiple user accounts, you must log in with each different email address in order to access the workspaces that apply to that specific account. It is technically not possible to combine or merge two user accounts. We, however suggest that you make sure you can access all pertinent workspaces with all user accounts. Then, keep one account and delete all of your other accounts.
To keep one (primary) user account and delete the other accounts:
- Log in to the user account(s) where you have workspaces to which you may be re-invited (that is, where you are not the head administrator).
- Invite yourself with the primary e-mail address, the one you want to keep, to the workspaces you have on this account (if you primary email address is not currently included on the workspace members list).
You may not have proper access to invite yourself to the desired workspaces. In that case, ask a workspace administrator to invite you again with your primary e-mail address, the one you want to keep.
Once you have been invited to all your workspaces with your primary e-mail address, you may delete your other user accounts. When that is done, you can add your other e-mail addresses to the primary user account.
If your organization is using Single Sign-On (SSO), your IT-department needs to point to the correct e-mail address to be able to login to the correct user account.
Email Addresses
When you register, a ProjectPlace user account is created. Your user account allows you to be a member of one or several workspaces. Your email address identifies you in the system.
If you use more than one email address, add all of your email addresses preventing a second ProjectPlace account from being created if someone invites you to workspaces using one of your other email addresses.
To add email address:
- Click your avatar/initials in the right corner of the top navigation bar.
- Select the Settings option.
- Click the User account tab.
- Enter your email address in the field Add another email address and click the plus icon.
- Click Save.
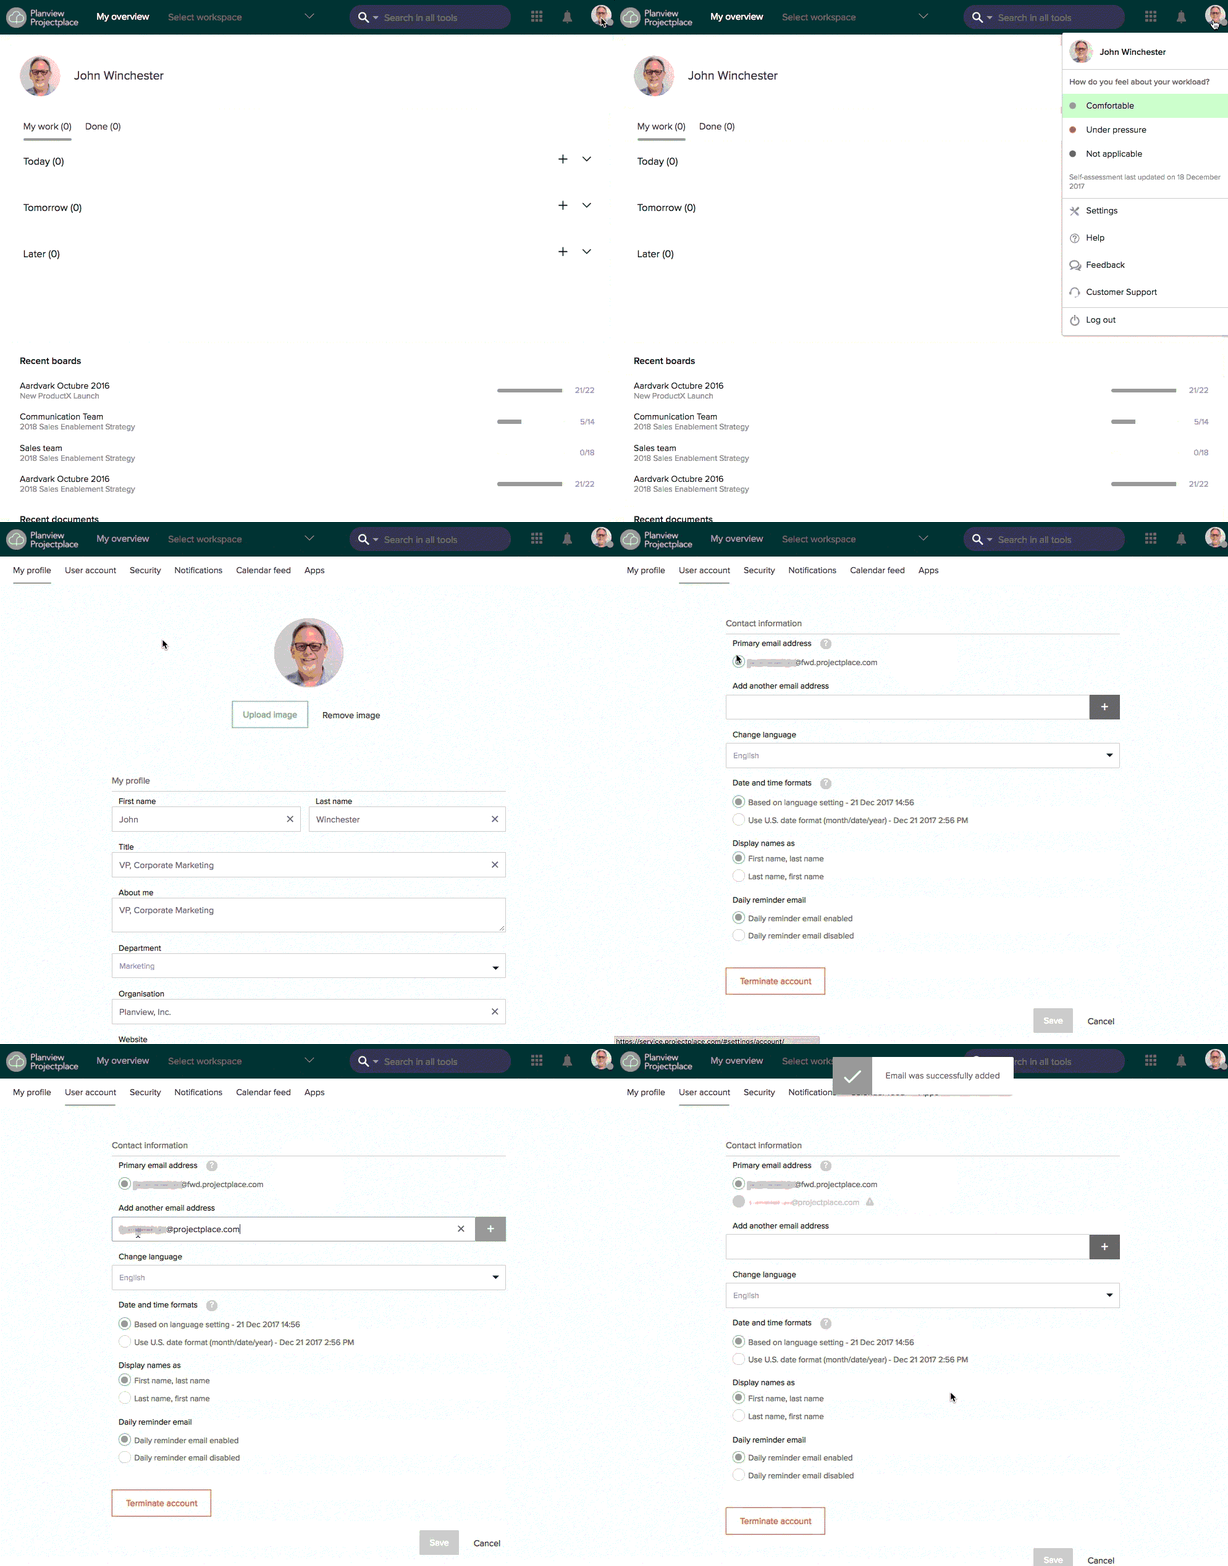
To change your email address:
- Add the new email address following the instructions above.
- In the list of email addresses, select the new one as your primary email address.
- Click Save.
- Hover over the old email address and click the red x that appears, and then click Remove to delete the old email address.
Before you can log in to ProjectPlace with a recently added email address, as a security measure you must verify the new address. Click the link in the email you receive to validate your new email address.
Change the Interface Language
You can change the interface language to Danish, Dutch, English, French, German, Norwegian, Spanish, or Swedish.
To change the language to your preferred language:
- Click your avatar/initials in the right corner of the top navigation bar.
- Select the Settings option.
- Click the User account tab.
- Select your preferred language in the Change language list of available options.
- Click Save. The page is reloaded and the language immediately changes.
Date and Time Formats
By default, date and time formats are decided by your language setting. You may select an option to list dates and time in the U.S. format.
Week Format and Numbering
The week format is set to ISO 8601 by default. According to the ISO standard, weeks start on Mondays and end on Sundays. The ISO format also affects the week numbering system.
If you want the week to start on a Sunday, choose the U.S. format option. If this option is selected, the week number calculation will follow the U.S. system as well.
Display Names
If you want the last name of other workspace members to be displayed before the first name, select the Last name, first name option.
Terminate Your User Account
If you no longer want to use ProjectPlace, you can delete your user account. When your account is deleteed, you will be removed from any workspace you are a member of.
You must delete all workspaces, templates, portfolios, and teams that you have created. Or, you can transfer ownership of these artifacts to someone else before the account can be terminated.
How do I change head administrator?
How do I change owner of a template?
To delete your user account:
- Click your avatar/initials in the right corner of the top navigation bar.
- Select the Settings option.
- Click the User account tab.
- Click Terminate account.
Security
Configure security aspects of your user account such as your password, and two-step verification.
You may have to login as a security measure to access the different options described below.
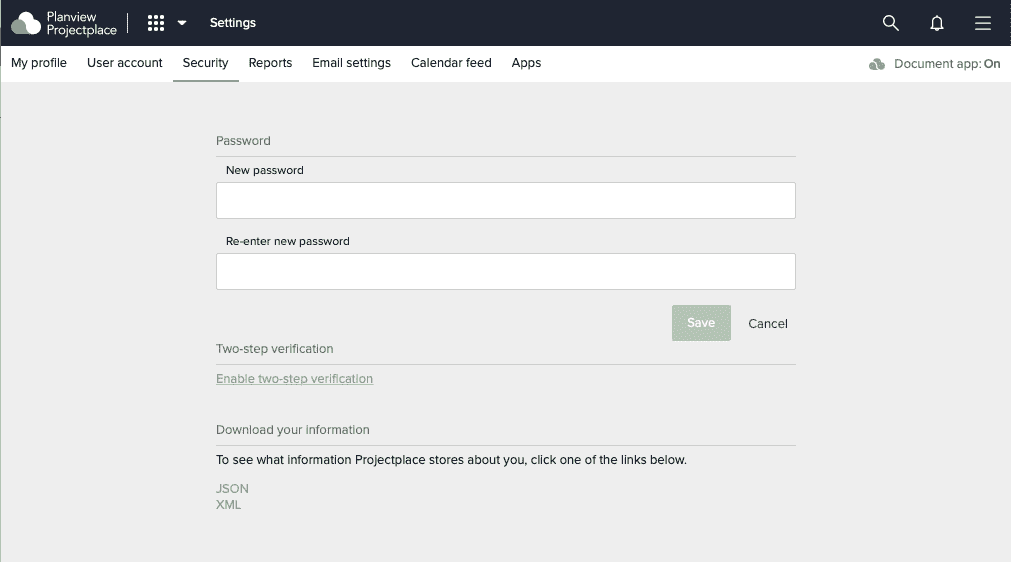
Change Your Password
You can change your password at any time.
- Click your avatar/initials in the right corner of the top navigation bar.
- Select the Settings option.
- Click the Security tab.
- Enter your new password twice and click Save.
You may have to login again as a security measure.
Set Up Two-Step Verification
It's easier than you think for someone to steal your password. Any of these common actions could put you at risk of having your password stolen:
- Using the same password on more than one site
- Downloading software from the Internet
- Clicking links in email messages
Two-step verification can help reduce the chances of a security breach if or when your password is used by someone other than you.
To set up two-step verification:
You may have to log in again as a security measure.
- Click your avatar/initials in the right corner of the top navigation bar.
- Select the Settings option.
- Click the Security tab.
- Click the link Enable two-step verification (Once it has been activated, there is a link to Disable two-step verification instead.)
- Choose the method you want to use for getting the two-step verification security code:
- If you choose the Use SMS to phone method, ProjectPlace will send a text message with the code to the mobile phone number that you have registered on your user account.
- If you choose the Use authenticator app method, you will get the code from a one-time password (OTP) generator app. Scan the QR code displayed with the OTP generator app to associate it with your ProjectPlace user account.
- If you choose the Use Yubikey method, you will need to insert your Yubikey into your computer and tap the sensor on your Yubikey to generate the code. If you use this method and want to log in to the ProjectPlace iOS or Android mobile app, you will be prompted to enter an App Password when you log in instead of authenticating with your Yubikey.
- If you choose the Use Email option, ProjectPlace will send a verification code to the user's primary email that needs to be entered before the login can be completed.
Make sure your cursor is located in the security code field before tapping the sensor on your Yubikey.
When two-step verification is activated, you will need an app password to log in to the ProjectPlace for Windows or Mac Documents apps.
Log In Using Two-Step Verification
There will be an additional step when you log in to ProjectPlace using two-step verification.
To log in using two-step verification:
- Enter your username and password.
- Wait for a security code to be sent to your mobile phone as a text message, sent to your email, or generate a security code using your OTP app or tapping your Yubikey sensor.
- Enter the security code and login.
If you click the Keep me logged in checkbox, you will only have to go through the two-step verification process once your session expires.
App Passwords
If you have enabled two-step verification, or if you use single sign-on, you will have to create a special app password to be able to use the Document apps ProjectPlace for Windows or Mac.
To create an app password:
You may have to login again as a security measure.
- Log into ProjectPlace using your web browser.
- Click your avatar/initials in the right corner of the top navigation bar.
- Select the Settings option.
- Click the Security tab.
- In the App passwords section, click Create code.
- Copy the generated code and paste it at the login prompt in your app.
Reports
You can select which workspaces you want to receive daily and weekly reports for and what updates you want the daily report to be triggered by.
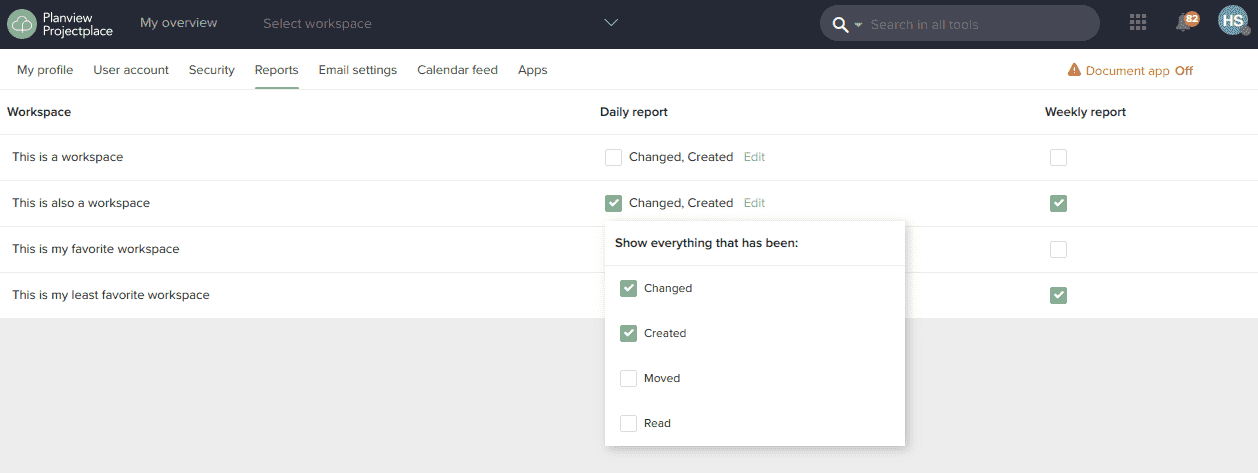
To change workspace report settings:
- Click your avatar/initials in the right corner of the top navigation bar.
- Select the Settings option.
- Click the Reports tab.
- Choose which reports you want for each respective workspace:
- Daily report. Get an activity report on what has occurred during the last 24 hours in the workspace.
- Weekly report. Get an update on the overall status for work in the workspace, and information about total estimated and reported time. The update also includes next upcoming milestones, warnings for overdue milestones, and activities, as well as a list of recently changed documents.
- Click Save to save your change.
To define what events to be included in the daily reports:
- Click Edit.
- Select events you want to be included:
- Created: Every event that results in the creation of something new, for example, added, or removed Documents or folders.
- Moved: Every event that has resulted in something being moved to or within Documents.
- Changed: Every event that has resulted in something being revised or amended.
- Read: Every time anyone opens or retrieves a document, it is recorded here.
Email Settings
You can decide how you want to receive email notifications. When an event occurs in ProjectPlace, you will often get an email notification describing what has taken place. For example, you will receive an email if someone @-references you in a comment, or assigns a card to you.
To select or set your email notification settings, you can choose to:
- Turn on or off email notifications (you will continue to see all notifications in the browser or in your mobile app). If email notifications are turned on, by default you will receive notifications from all workspaces. You can select which workspaces to receive notifications from, which will also be applied to "Action required-", and "For your information" email notifications, if they are enabled.
- Turn on or off Action required email notifications - notifications related to events that you need to take an action on (if you are assigned to a card, for example)
- Turn on or off For your information email notifications - notifications related to status updates and conversations or when you are directly @-referenced in a comment. Examples include:
- when a card you follow has been updated.
- when someone makes a comment on a card where you have been previously involved.
- Activate email summarizations based on an hour or day cadence instead of real time email notifications. Note: if you have defined Do Not Disturb (see below), any summary email triggered by this setting will be postponed until the Do Not Disturb interval expires. This setting gives users more control of the amount of emails that they are receiving.
- Define a daily do-not-disturb time interval when email notifications for events happening during that specified time interval will be paused. Once the time interval has been set, you will not receive any email notifications during the specified time interval. Email notifications or summarizations will continue to be delivered outside of the established time interval.
If you select the option to turn off email notifications, most email notifications from ProjectPlace will be suppressed. You will continue to receive some emails continuously however: invitations to workspaces, emails about cards or milestones that are due today, and emails with your selected daily and weekly reports will continue to be sent (see the Reports section above).

If clicking a ProjectPlace link from an email you receive results in an error message, these are the likely causes:
- You are not a member of the workspace.
- You are a workspace member but do not have the correct access rights in the workspace.
- The associated file has been moved or deleted, rendering the link obsolete.
When an error message occurs, please contact the individual who sent you the link or contact the workspace administrator for more information.
Setting a Do Not Disturb interval
You can choose to turn off email notifications for a specified period of time if you do not wish to receive email notifications for a specific time period every day e.g. during the night.
Notifications in Service
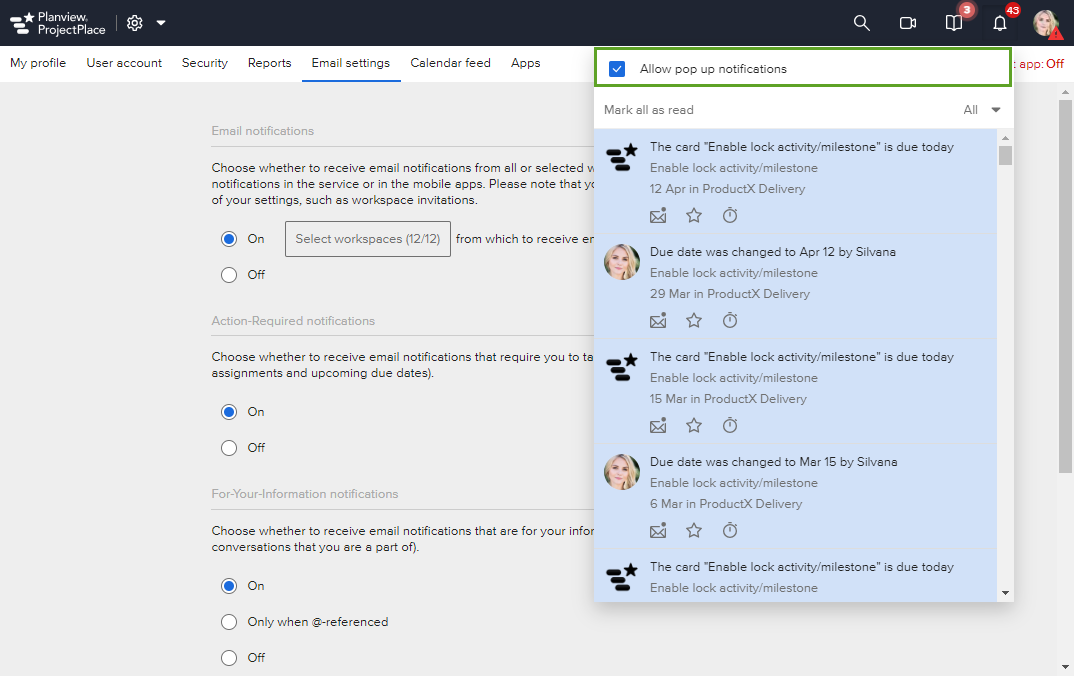
You can turn off the pop-up notification that shows up in the service when you are being notified for different events. Click the notifications icon ![]() in the upper right corner. You'll see a toggle checkbox at the top of the dropdown.
in the upper right corner. You'll see a toggle checkbox at the top of the dropdown.
Calendar Feed
Set Up the Calendar Feed
Subscribe to a calendar feed with important dates in your ProjectPlace workspaces to display them in your calendar. Microsoft Outlook, OSX Calendar, Google Calendar, and all other calendar applications that support the iCalendar format are supported.
The feed includes events that have occurred within the past two weeks. When events are Done, they are removed from the calendar feed. Activities are removed when the associated cards are Done and/or when the activity end date has passed.
To set up the calendar feed:

- Click your avatar/initials in the right corner of the top navigation bar.
- Select the Settings option.
- Click the Calendar feed tab.
- Click the Enable and adapt your calendar feed checkbox.
- Copy the displayed link.
- Do the following for each calendar you use:
- MS Outlook on Windows
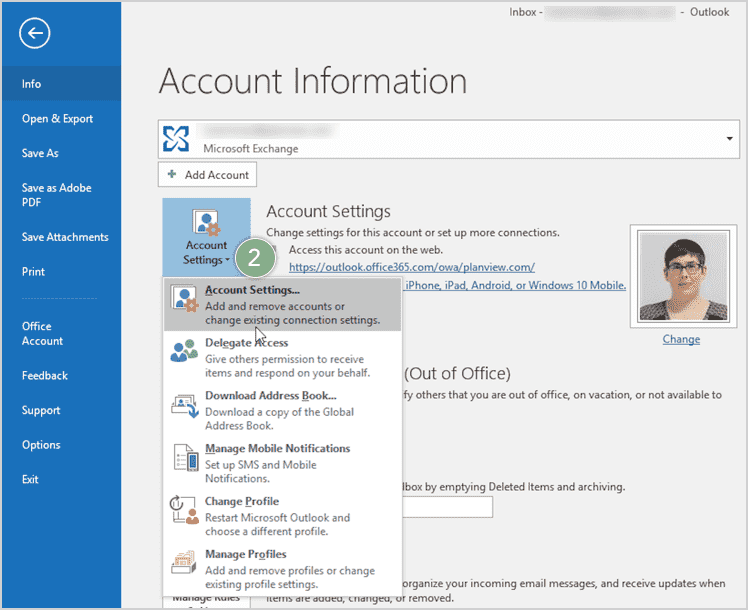
- Open Microsoft Outlook.
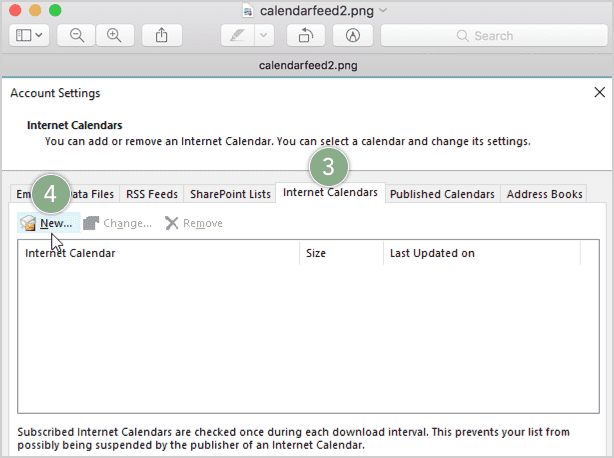
- Navigate to Account Settings.
- Select the Internet Calendars tab.
- Click New.
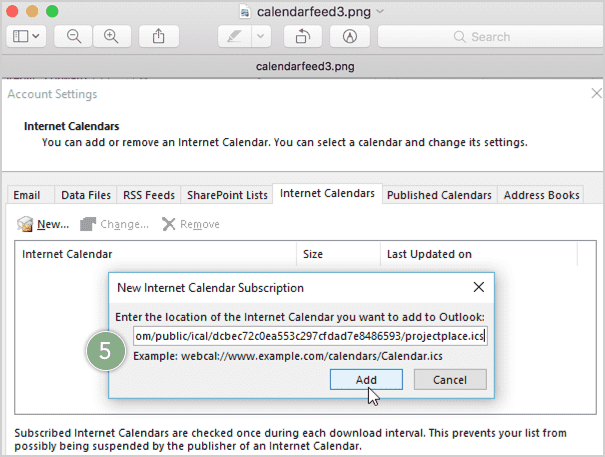
- Paste the link from ProjectPlace and click Add.
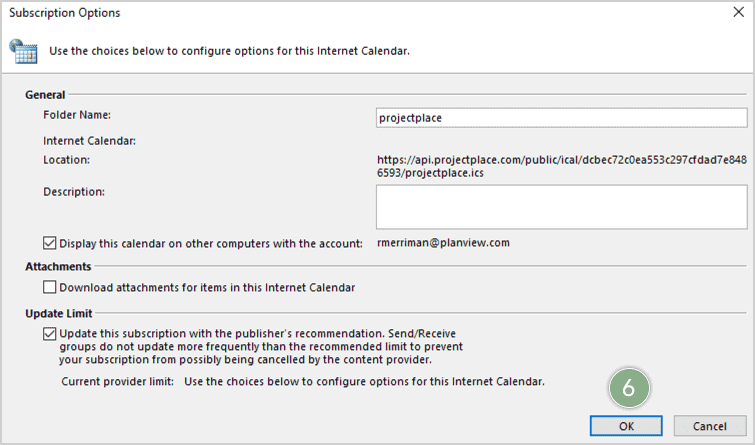
- A new Subscription Options window appears. Review the settings and make any necessary changes. Click OK to establish settings and close the window.
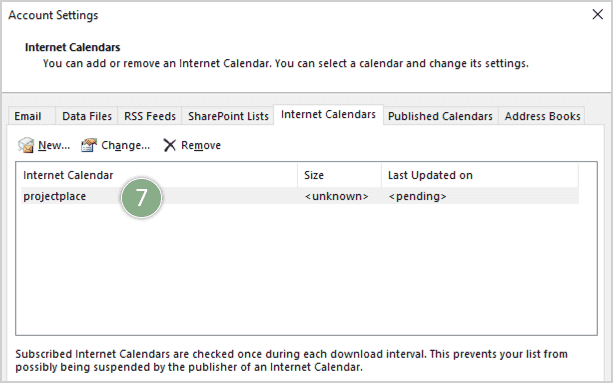
- The new ProjectPlace Calendar is now included in the Account Settings window.
- OSX Calendar
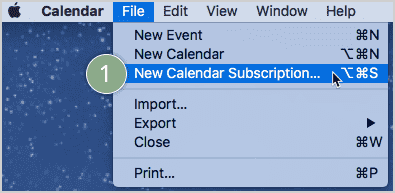

- Select New Calendar Subscription from the File menu.
- A new window appears. Paste the link for ProjectPlace Calendar Feed in the Calendar URL box.
- Click Subscribe.
- Microsoft Outlook on Mac
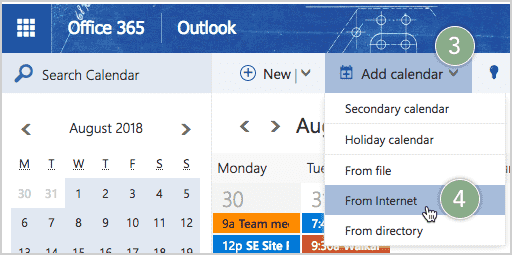
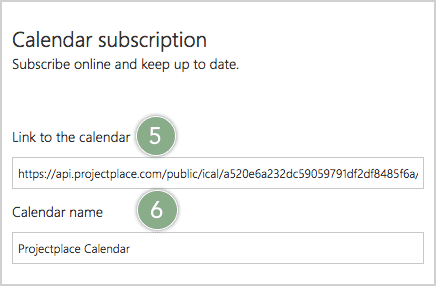
- Login to Microsoft Outlook Web Access
- Go to Calendar.
- Click the down arrow
 in the Add Calendar from the menu bar at the top of the window
 - Select the From Internet option from the available list.
- Supply the URL to the Calendar feed in the Link to the calendar box.
- Type a calendar name in the Calendar name box and press the return key.
- Outlook for Mac will sync the calendar automatically.
- Google Calendar

- In the Google Calendar interface, click the down arrow
 to expand a list of available options next to Add calendar.
 - Select From URL from the menu.
- Paste the link for the ProjectPlace Calendar Feed in the input box.
- Click Add calendar.
- In the Google Calendar interface, click the down arrow
- MS Outlook on Windows
Customize What is Included in the Calendar Feed
After you have activated Calender feed, then if you create a new workspace or become a member of a workspace, you can decide from which tool you should continue getting calender feeds. By default all tools are unchecked (green boxed area in figure below).
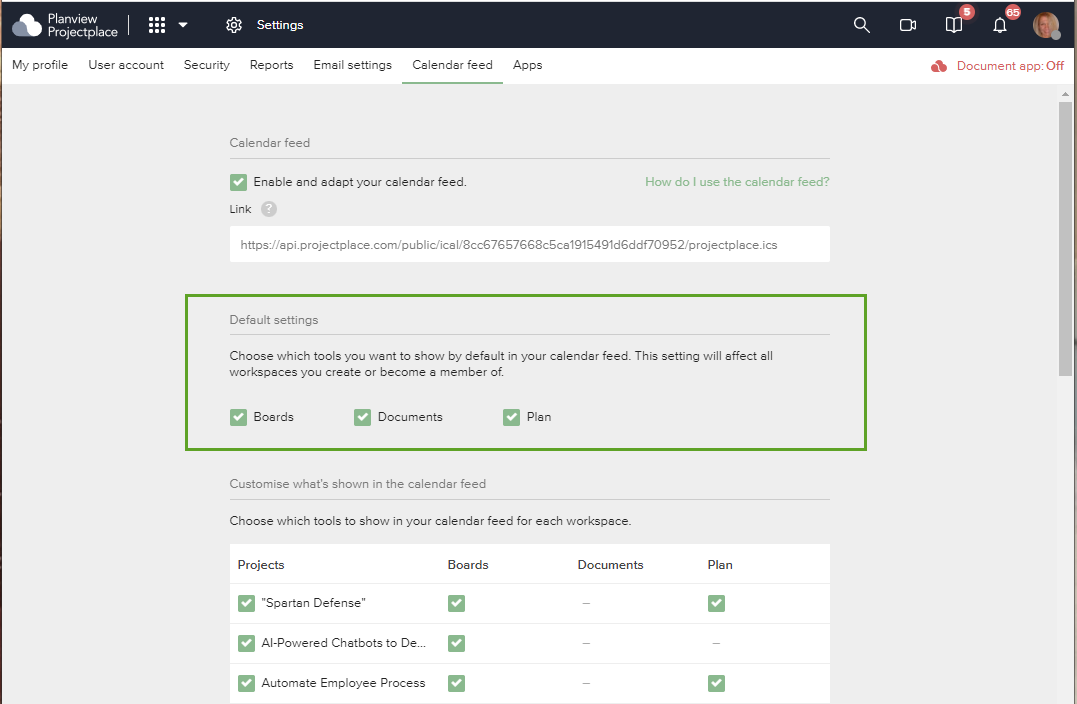
To select what is included in the calendar feed:
- In the Customize what's shown in the calendar feed, choose the events you want to display and for which workspaces:
- Boards. Cards that are assigned to you and includes a due date.
- Documents. Due dates for document reviews you participate in or have initiated.
- Plan. End date for activities and milestone.
- Click Save.
Apps
All apps you have accepted that can use your ProjectPlace account are listed here. It can be apps created by ProjectPlace or third party developers.
For apps that you no longer use, you can remove the connection to ProjectPlace.
To revoke access to apps:
- Click your avatar/initials in the right corner of the top navigation bar.
- Select the Settings option.
- Click the Apps tab.
- Hover over the app you want to remove from your ProjectPlace account and click on the red X that appears.
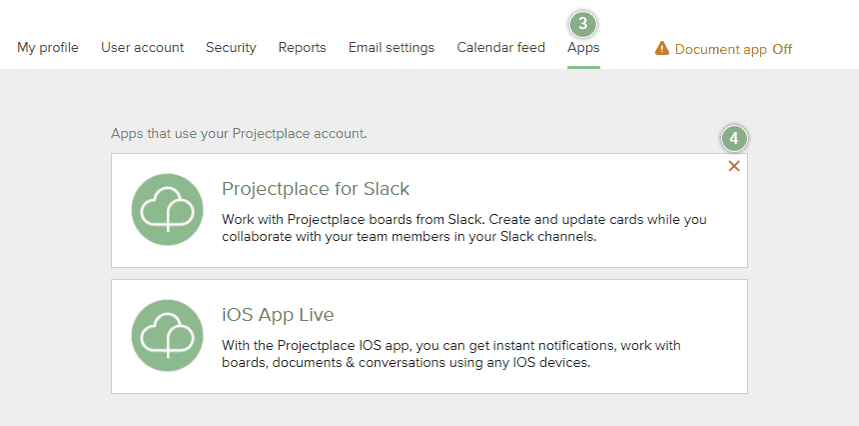
- A red banner appears at the top of the app box, confirming you want to revoke access. Click the red Revoke access button.

Developer settings
ProjectPlace users can create API Applications, which can be used to interact with ProjectPlace's Restful APIs.
If you plan to develop an integration towards ProjectPlace's APIs. Please also refer to these additional resources:
- Our API documentation site - where you can learn more about endpoints and our authorization models
- Our API code example repository on github.com - where you can see some examples of how to authorize users for access as well as hands on examples of how to access and manipulate resources within ProjectPlace.
To add your first application:
- Click your avatar/initials in the right corner of the top navigation bar.
- Select the Settings option.
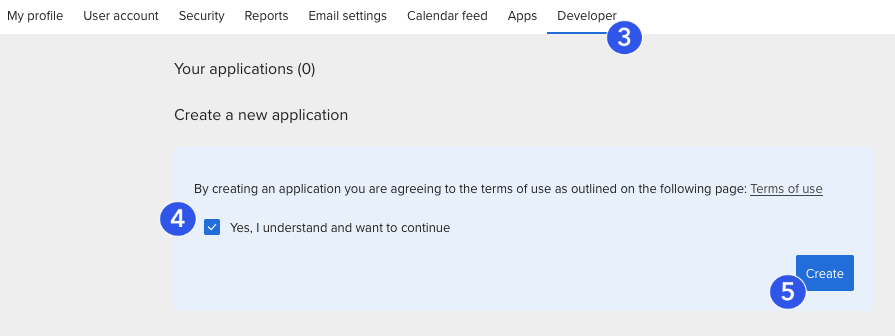
- Click the Developer tab.
- Read the Terms of use then indicate your agreement by clicking the Yes, I understand and want to continue checkbox.
- Click the Create button.
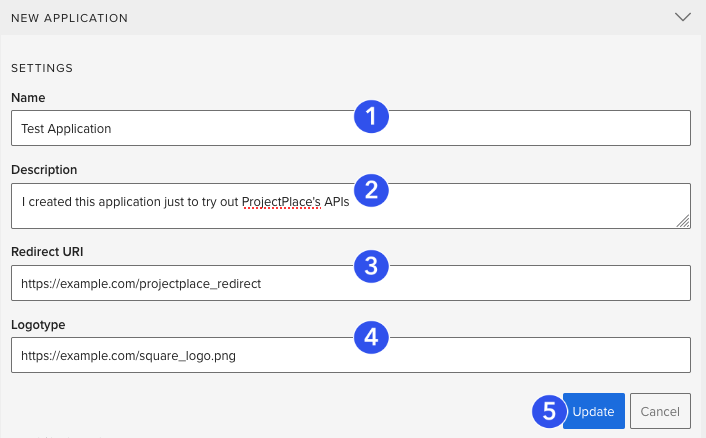
- A editable form for your application will now appear.

Create an access token for yourself:
As a convenience you can create an access token for yourself. This token gives your application permission to access and manipulate ProjectPlace resources on your behalf. You can choose to generate an OAuth1 or OAuth2 token.
- Click Yes to generate a new OAuth1 or OAuth2 token for yourself, this will reveal:
- For OAuth1:
- An access token (OAuth1: "oauth_token")
- An access token secret (OAuth2: "oauth_token_secret")
- For OAuth2:
- An access token (valid for 30 days from creation)
- A refresh token
- For OAuth1:
- You can reveal and hide the values, as well as revoke the token, making it impossible to use.
- Note: Token keys and secrets are visible only once, at the time of creation. Take this opportunity to copy and store them. From this point onward they will be redacted in the UI. You can always regenerate a brand now token.
Caution: Do not share these credentials, especially via unencrypted/persistent channels like email or chats.


Delete your application
Finally, you can naturally terminate your application. Doing so has the following repercussions.
- The application's keys/secrets will become impossible to use in order to authorize new users or reauthorize new users.
- Your application will not be able to call APIs on behalf of any existing authorized users. The users will be "logged-out" of your application permanently and any attempt to use their credentials will result in 401 Unauthorized responses from the ProjectPlace servers.
To delete your application, simply indicate that you have understood these repercussions by:
- Checking the Yes, I understand and want to continue checkbox, and
- Clicking Delete.
This will instantly remove your application. There are no other confirm dialogues or warnings once you click Delete.

Request a robot account
If you are a member of an enterprise account, you can request API credentials for a robot. The word "robot" is simply ProjectPlace terminology for keys and secrets representing a powerful super user capable of seeing and updating any data in the entire enterprise account. As such, they are to be used carefully and utmost care must be taken not to lose or disseminate keys and secrets carelessly. With great power comes great responsibility.
- Click your avatar/initials in the right corner of the top navigation bar.
- Select the Settings option.
- Click the Developer tab.
- Write a message stating the reasons why you require a robot.
- Submit the message and await a response from the owner or co-owners of the account.
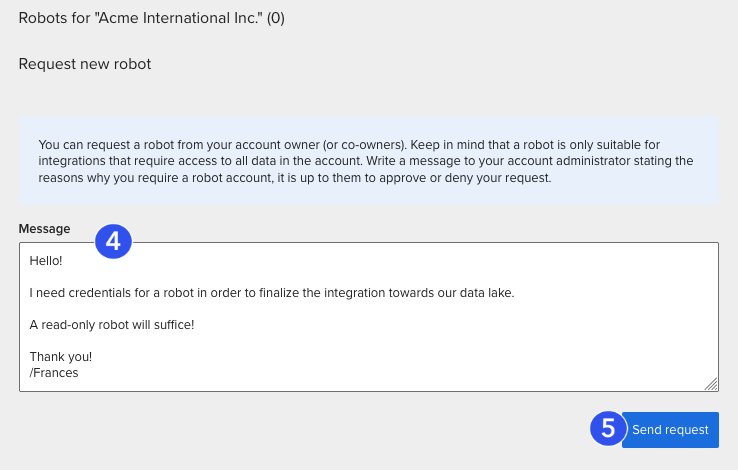
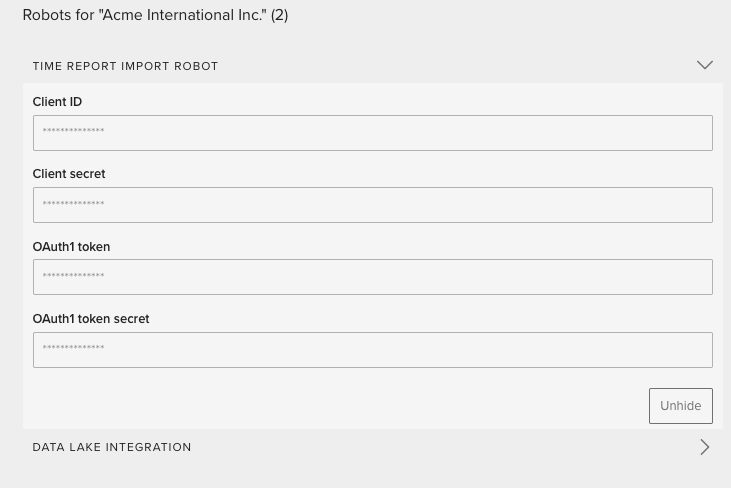
Once an owner or co-owner has created a robot account and shared it with you, you will receive an email message informing you. At that point, the robot will also appear on your developer settings page. In the below screenshot, the credentials of two robots have been shared. "Time report import robot" and "Data lake integration". The keys and secrets represent an already pre-authorized super user. There is no need to go through any user authorization flow.
There are two ways to make use of the robot:
- We recommend using the OAuth2 Client Credentials flow, which requires only the Client ID and Client secret below. Read more about OAuth2 client credentials flow here.
- Via OAuth1 credentials, which requires all values below. Read more about OAuth1 here.
