
Add members to the workspace
About Workspace Members and Groups
Add team members and stakeholders as members in the ProjectPlace workspace, to facilitate communication, planning, and execution of work.
In workspaces, members can also be organized into member groups that can be used for two main purposes:
- Facilitate communication. Creating and using groups are easy ways of creating and managing distribution lists when you want to broadcast information to many people at once—in conversations and comments, for example. Learn more about how ProjectPlace can be used for communication and collaboration.
- Restrict access. Administrators can define different permissions for different group members. If, for example, you do not want to provide access to stakeholders for information in the workspace, you can restrict access to the stakeholders by selecting permissions restrictions. Workspace members can belong to one or more groups, depending on the permissions they have been assigned by the administrator. Learn more on how roles, groups, and permissions are used to define who can see and do what in ProjectPlace.
All workspace members with Read and write access to the Members tool can add and remove members, but only workspace administrators can invite teams and change who belongs to a member group, which may change access to information.
When working with permissions, it is recommended that you first create the groups you want to use and define the permissions for these groups. Then you can invite members to the workspace and put them directly into the member groups that give them the right access!
Find Your Way Around the Members Tool
The Members tool
The Members tool displays a sortable list of all members and some basic information about them, such as an email address, the organization the member belongs to, and when the member last logged in to ProjectPlace.
Each individual member has to update their own personal details in their settings. The workspace administrator has no access to anyone's personal preferences.
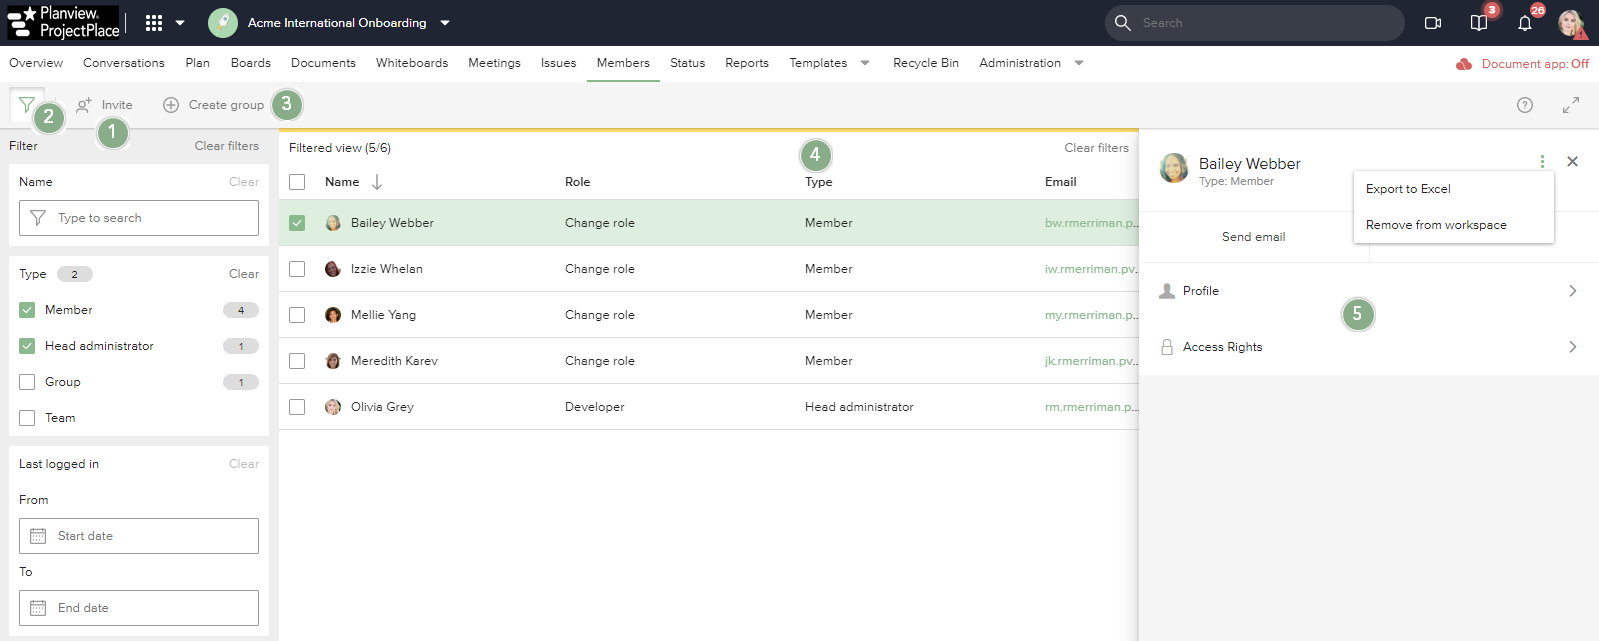
If you select members using the checkboxes, applicable options such as delete members and exporting a list of members to Excel, appear in the more menu in the details pane.
Using the Members tool, you can perform the following tasks:
- Click the Invite button to invite more members or to invite a team if you are a workspace administrator.
The option to invite a team does not appear if no teams have been created.
- Click filter icon
 to do the following:
- Search for specific members, teams, and groups by name.
- Filter members, teams, and groups by type.
- Filter members, teams, and groups by the start or end date when they last logged in.
- Filter member by workspace roles.
- Create groups.
- Click any column header to change the sorting method. For example, the Type column displays a list where groups, teams, and members are not mixed.
- Click a member, team, or group name to see all available details. In the member details pane, you will see the workspace role(s) the member has in the workspace and the title they have within the organization. If a workspace administrator or owner has added Workspace roles to the workspace it will be possible to add one or several roles to a member. The workspace role can be added to a member by a workspace administrator, workspace owner, or a member with read and write access.
The workspace administrator can get an overview of all their members, using the Export permissions function in the Documents tool.
Add a Member
You can invite anyone to a workspace, regardless of if they already have a ProjectPlace account or not. If they already have a ProjectPlace account, your workspace will be added to their list of workspaces next time the member logs in. If the member does not have a ProjectPlace account, the invitation will include instructions for creating an account.
You can add more members from the following places:
- From the workspace Overview, click the plus icon next in the members section of the overview.
- In the Members tool, click the Invite button.
To invite members:
- Start the invitation process by either of the ways described above.
- Enter the email addresses for the people you want to invite. If the individual is already a member of other workspaces in the account, you can select the individual's name from the available list.
- You can choose to add the member to a group used for permissions and/or communication purposes.
- Write a personal message including information about the purpose of the workspace. Include a sentence or two about why you are sending the workspace invitation.
- Specify whether you want the invited members to receive daily and weekly workspace reports. The daily report gives a view of what has occurred in the workspace during the previous 24 hours. The weekly report provides an update on the overall status of work, including warnings for overdue milestones and activities, as well as recently changed documents.
- Click Send. An invitation email will be sent to all email addresses included in the invitation.
Add Teams
If one or more teams exist in the account, workspace administrators can invite each team to the workspace. When a team is invited, all of its members are added to the workspace and will automatically be included in the team group. Team groups, like member groups, can be used for communication purposes and to apply specific permissions.
There are three places where you can add a team if you are a workspace administrator:
- From the workspace Overview, click the plus icon next in the members section of the overview.
- In the Members tool, click the Invite button.
To invite teams:
- Start the invitation process by either of the ways described above.
- Click the Team tab.
- Choose a team from the Add team list.
- Write a message to the team including information about why you are inviting them to the workspace.
- Specify whether you want team members to receive daily and weekly reports from the workspace. The daily report gives a view of what has occurred in the workspace during the previous 24 hours. The weekly report provides an update on the overall status of work, including warnings for overdue milestones and activities, as well as recently changed documents.
- Click Send. An invitation email will be sent to all specified team members.
Learn more on how to create and manage teams as an account administrator.
Add Administrators
We recommend that you add one or more administrators to help manage the workspace. Workspace administrators can set permissions to document folders and determine what tools are available in the workspace.
Add Groups
To create a new group:
- Navigate to the Members tool.
- Click Create group.
- Enter the name of the group and press Enter.
- Click the created group name to open a detail pane where you can enter more details.
Add and edit Workspace roles in the Members Details pane
In a workspace you can add one or several workspace role(s). These roles are only found within the workspace. In the members tool you can also find a member's Title that they use within the organization (updated in their personal Settings) which may not the same as their workspace roles. Once a workspace administrator has added Workspace roles to the workspace it will be possible to add roles to a member. If a member wants to add a workspace role that have not been added to the workspace they need to reach out to the workspace administrators or the owner of the workspace. Once created, the workspace roles can be added to a member by the workspace administrator, owner, or by a member with read and write permissions.
Add workspace roles to a member
To add workspace roles for a specific workspace:
- Go to the Members tool in the workspace.
- Search and in the list, select the member you want to add one or several roles to.
- The detail pane will open and in the section Workspace Roles you can add roles. The first role that is being added is defined as Primary role. There is no limit to how many roles you can add to a member.
Tip! You can also select several members at once and add their roles.
Change primary role
If a member has several roles you can change which of the roles are primary.
- Go to the Members tool in the workspace.
- Search and in the list, select the member you want to add one or several roles to.
- The detail pane will open and in the section Workspace Roles you find the added roles.
- Hover over the role you want to make primary and you will be able to view an icon on the row.
- Click on the icon and the role will be made into a primary role.
Edit Members in Groups
To add or remove several members at once:
- Navigate to the Members tool.
- Click the name of the group you want to add participants to.
- In the opened detail pane, click the Members section.
- Click Add members.
- Type to search the member name and select it from the available list. Repeat the process for all members you want added to the group.
Edit Members in Teams
Adding or removing members from a team can only be done by the team members in the My team view.
Change the Team Name or Description
To change the team name or description:
- Navigate to the Members tool.
- Click the name of the team you want to change.
- In the opened detail pane, click the team name or the description to make changes.
Restrict Access for Groups or Teams
To change permissions for member groups:
- Navigate to the Members tool.
- Click the name of the group or team you want to change.
- Click the Permissions section in the opened detail pane.
- Review/change the permissions of the group or team providing access or restricting access to the available tools.
Members of a workspace that are not members of a specific group, are automatically included in a group called Members not in a group. This group is not displayed in the list of groups in the Members tool, but the workspace administrator can see and change permissions for this group. Setting restricted permissions for this group can be useful to restrict access for new members that have not yet been added to the appropriate groups.
Re-invite Members
To send an invitation reminder:
- Navigate to the Members tool.
- Click the name of the member you want to re-invite.
- In the opened detail pane, click the Resend invitation button.
Remove Members, Teams, or Groups
When a workspace member is removed, they will no longer have any access to the workspace. Their ProjectPlace user account will remain though, so they can continue work in other workspaces they are a member of, and be added to new workspaces without having to create a new account.
To remove members, teams, or groups from the workspace:
- Navigate to the Members tool.
- Select the members or groups you want to remove using the check boxes.
- Click
 > Remove.
If you remove a group or a team, the members of that group or team will still have access to the workspace and can gain extended permissions.
Add workspace role to members