
Working with Agile Planning

This guide provides an overview of the Agile Planning features, a walk-through of its functionality, and various use cases.
What is Agile Planning?
Agile Planning is AgilePlace's capability for creating and managing planning and delivery cadences. It was developed to better support teams and organizations that plan and deliver in time-boxed iterations. For example, this could appear as a PI Planning and sprint model, where you plan your work out across multiple Program Increments (PIs) and deliver that work across the sprints within those PIs. It allows you to configure different planning, release, and delivery cadences for different product lines, departments, business units, or your entire organization, if you are all following the same cadence. You might have a different cadence or plan for your Marketing department versus Development, so you can assign the different planning series out to their respective boards. Agile Planning better supports teams and organizations, leveraging Scrum methodologies, but can accommodate a wide-range of non-Scrum use cases.
Agile Planning Workflow
- When Agile Planning is enabled, Administrators will see the Planning Series icon
 on the AgilePlace Home Screen toolbar.
 - Clicking this icon takes you to the Planning Series Administration home screen. You'll see a list of all the Planning Series that have been created for your organization as well as the ability to create a new one.
- You can define top-level increments and sub-level increments for a Planning Series. These top-level and sub-level increments could represent different planning and delivery iterations. For example, your top-level increments could represent your Program Increments (PIs) and your sub-level increments could represent your Sprints.

Figure 1 - Accessing the Agile Planning feature
Creating a Planning Series
You can create a Planning Series (Figure 2), by clicking the Create icon  on the Planning Series Administration home screen.
This allows you to:
- Name the Planning Series (on the right side of the screen) to differentiate between various teams in your organization.
- Select boards that can use this series (either All Boards or Specific Boards) via two radio buttons. Providing all boards access to this Planning Series means all boards will be able to create cards and assign those cards to different planning increments. The use case for All Boards would be if all of your organization followed the same delivery cadence. You can also choose specific boards to allow access to a Planning Series. This use case could look like wanting to separate out and differentiate your marketing organization’s Planning Series vs. your development organization’s Planning Series.
- Select Default Sub-Increment Range. This is the default duration for which a sub-increment will get created; 14 days is the default, given that there’s enough room in this overall PI to still have 14 days left to divide.
- Click Save.
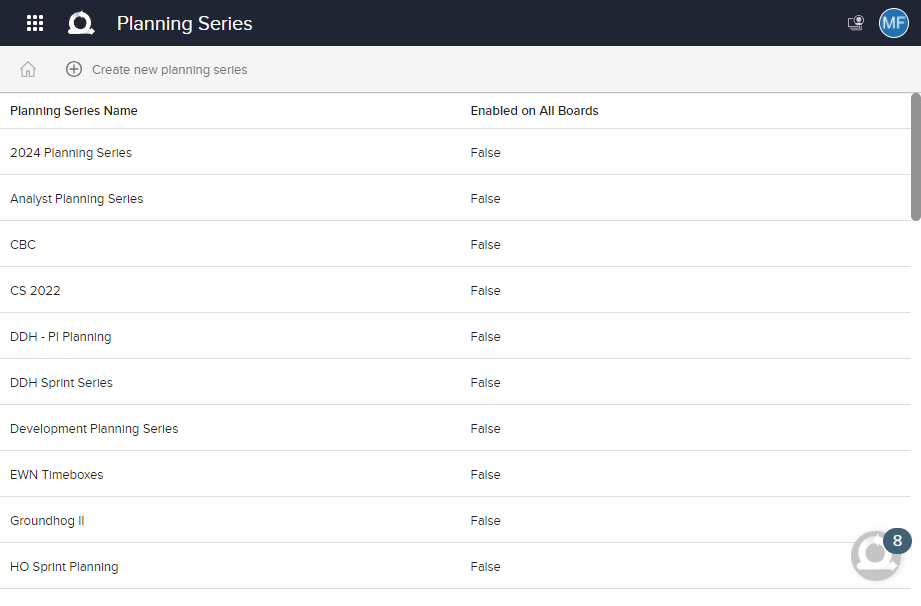
Figure 2 - List of existing Planning Series and Create icon

Figure 3 - A Planning Series with boards selected
Viewing & Assigning Agile Planning Information to Cards

Agile Planning View
Once a Planning Series is assigned to a new board, users of that board will see a new field within the card details called Planning increment, which takes the Planning Series that was assigned and allows users to assign different increments to their work, to start planning and delivering based on those different iterations. See Figure 4a and b, where the board that this card is on has been given access to a Planning Series.
This enables teams to assign different increments to the cards on their board. If this were a portfolio board, perhaps you'll be committing epics to different program increments. If this were a team level board, you'd most likely be committing different features or user stories to different sprints.
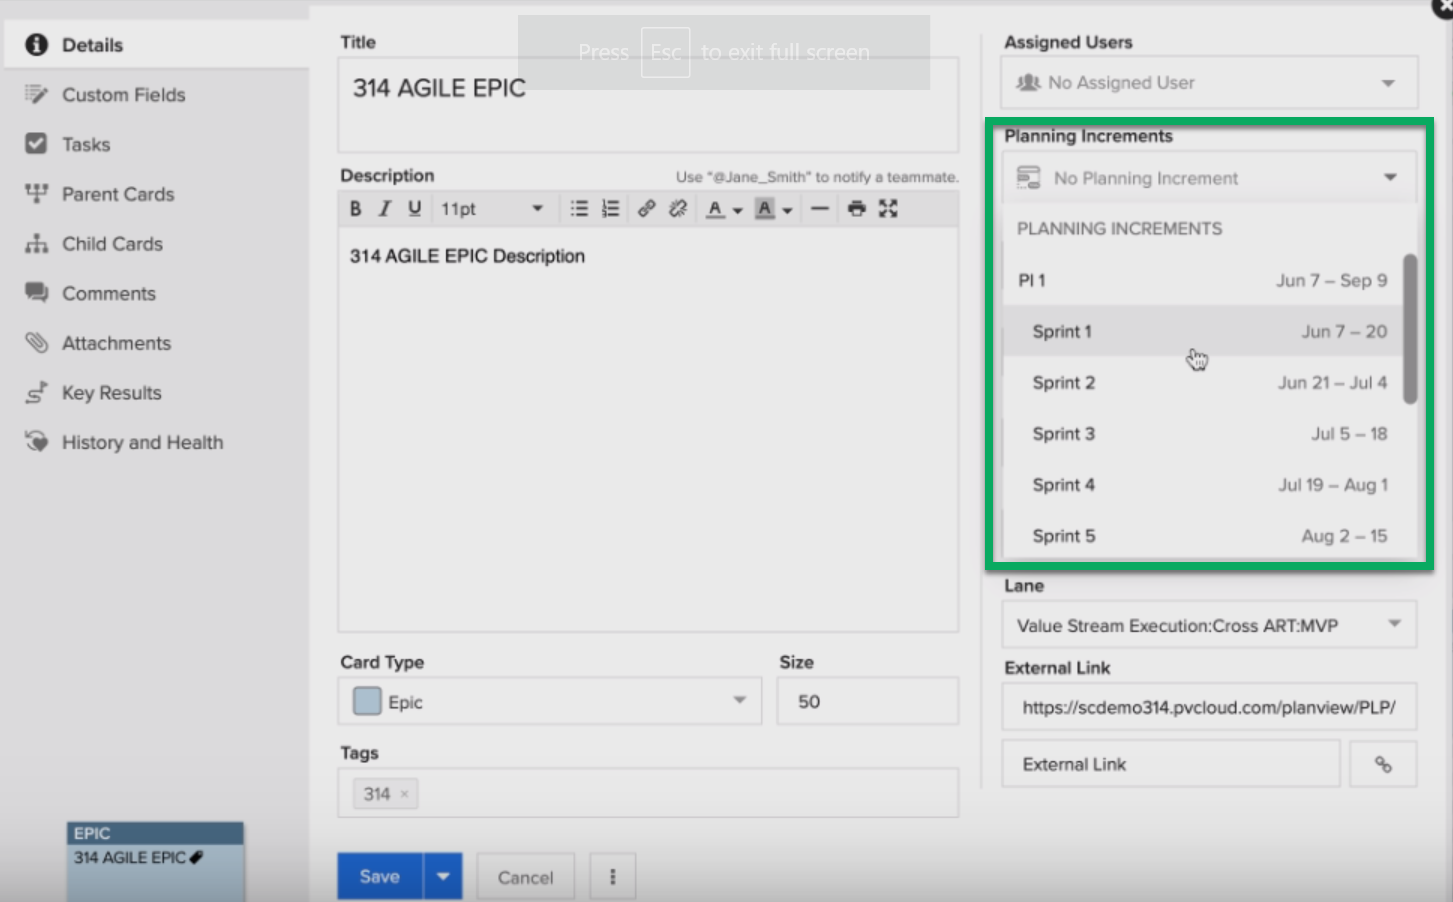
Figure 4a - Assigning a sprint to a Planning Increment on a card
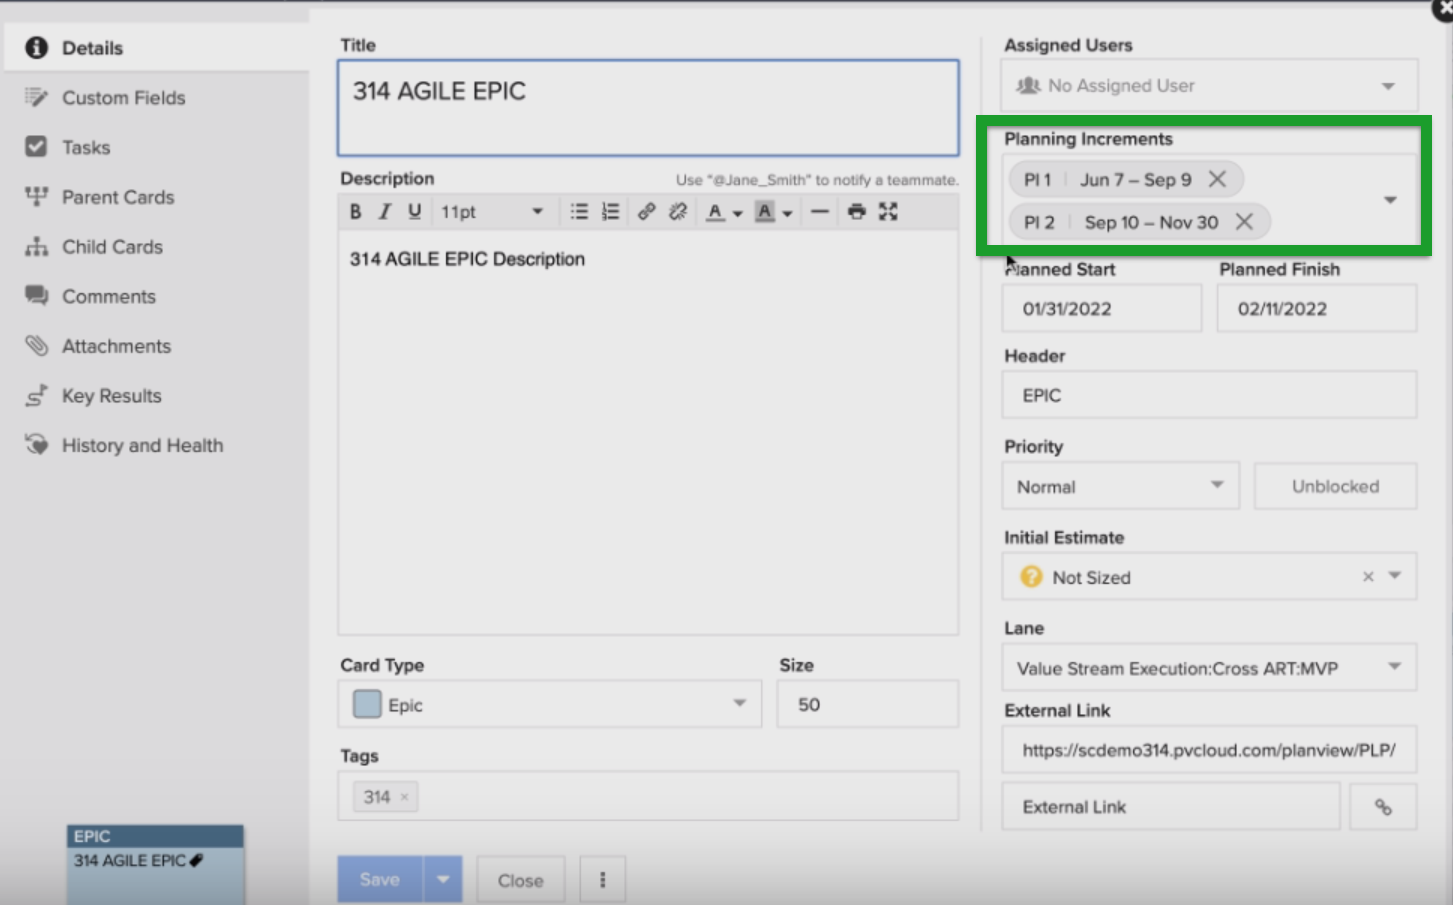
Figure 4b - Sprint assigned to a Planning Increment on a card
This card dropdown has the exact same values that were defined in the Planning Series that this board has access to.
The Planning Increments field is a multi-select value for the purposes of saving forecasts and initiating an epic across multiple PIs. You have the ability to assign multiple values to a card in the Planning Increments field.
On the 2024 Program Board below, we have the ability to assign out high level increments, if say, we were in pre-planning and we only have a high level idea of what work we’re going to commit to in that PI. Then, when the work actually progresses and we have a better idea of when it will be delivered, we can go ahead and start to assign those delivery sub-increments.

Figure 5 - Agile Planning View
Having the ability to assign out different increments provides a unified reporting approach for those different cadences. You can report on this Agile Planning information across all your boards. You might have, say, 15-20 development boards, but they're all leveraging the same Planning Series. That data is standardized and you have the ability to build unified reports to understand across your entire organization what work is planned, what work is delivered, and when all the remaining work is actually getting delivered across those different iterations.
Flexibility in how you configure your boards
The real value or benefit of the Agile Planning capability is it gives you a lot more flexibility in how you can configure boards. Prior to Agile Planning the way to define or visualize these increments, was to build out specific lanes that say sprint 1, 2, 3, etc., which clutters the board and constrains how you might want to represent your actual workflow, while still enabling you to get that more scrum, iterative type view on your board.
On the board below, you can see that we have a very generic kind of current PI planning, but we don’t have those sprints on that board.

Figure 6 - Board View
If we switch to the Agile Planning view, which is accessed from the new icon up in the secondary toolbar (Figure 7), you can see that we’ve taken that 2024 Agile Planning and automatically overlaid the increments and created automatically visualized swim lanes across the different iterations of this board (Figure 8).

Figure 7 - Board View vs. Agile Planning View toggle
This gives us a dual hybrid view of all the work that’s happened and that more scrum-forward timeline iterative view of that board, automatically, without having to actually build out those sprint lanes on your board. You simply build the Agile Planning and assign the work to it. From here you can actually start to do your planning activities: you can assign cards to different planning and delivery increments.
Planning Increment Dates
You can see all the different dates across your increments in your Planning Series: high level from a calendar view across Q2 of the year in Figure 8 below, and then, hovering over a lane will show you the exact dates of those increments.

Figure 8 - Hovering over a planning increment lane shows exact increment dates
Card Status Indicator
We also provide the ability within Planning Increments to represent card status with colored icon bars at the top. Blue left represents not started, green middle means started, and black right bar means finished. This lets you quickly understand the progress of work assigned across all your increments.
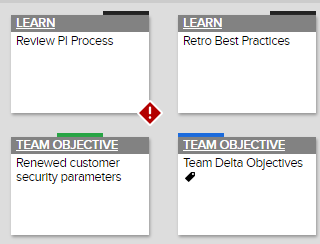
Figure 9 - Color-coded card status indicators
Full Board Filter
Agile Planning view supports the full board filter. Perhaps you just want to focus on work that is currently in your plan and filter your backlog and not planned work, and start to plan that out a bit more. You can also filter on all the attributes across your board, if you want to focus on just features.
All board features are supported here. For example, maybe you’re going through your planning activity, and you’ll be planning out your next increment. You can just select all, and then say move to, perhaps, your Currently Implemented Iane. You have the ability to quickly adjust and make some board movements from this Agile Planning view as well.
Moving cards in Agile Planning view does not move cards on main board
This brings the best of both worlds together here in terms of supporting a hybrid and simpler view on your actual delivery board while still being able to represent those different time box iterations. As you’re moving cards around in this view, you are not actually moving cards on the main board itself. What moving these cards around in this view does is just update that planning increment field.
Adjusting the planning increments gives your teams a lot of flexibility in "what-if" planning, and you can move elements around without worrying about actually impacting the position of the work on your main board view.
Adjustable Lane Width
In Agile Planning view, there's a display option to adjust lane width  . For every 15 cards you get an extra card width, or you can choose to make all lanes wider, or narrow. according to your preference, Each user can configure this view however they wish.
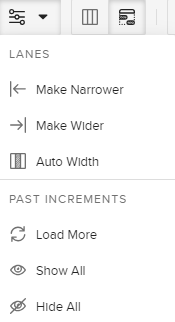
Figure 10 - Adjust lane width
Show/Hide Planning Increments
By default, for past increments within a new Agile Planning, there's a setting called Hide Past Planning increments that is selected.

Figure 11 - Hide Past Increments set
When you click into the PI picker, you’ll only see the top level and then the current and future sub level increments. This prevents you from accidentally choosing past increments to assign.

Figure 12 - PI picker
If you have planned out previous Planning Increments and you want to take a look at "What was our plan?", "How did we do?", "What were our actuals vs. our plan?", you do have the ability to load past increments in a collapsed lane. Then you also have the ability to Load More (will load two past increments at a time), Show All, or Hide All.

Figure 13 - Load More
The new Agile Planning view bridges the best of both worlds: offering flexibility on how you can design your board to represent your workflow best, and keep it simple if that’s your preference, while giving you the benefit of visualizing and planning your work out across time-boxed, time-based iterations.
Bulk Edit/Multiple Assignment
You also have the ability to bulk edit Planning Increments across multiple cards. For example, if you’re doing some backlog grooming and sprint planning, you have the ability to select all cards, muti-select cards, right click, edit the selected cards, as well as and click Planning Increment on the dropdown and assign one or multiple planning increments at once.
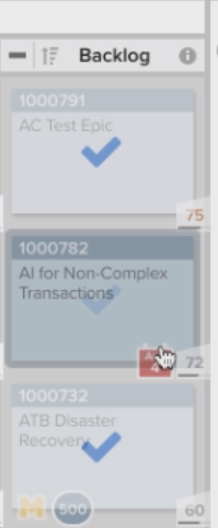
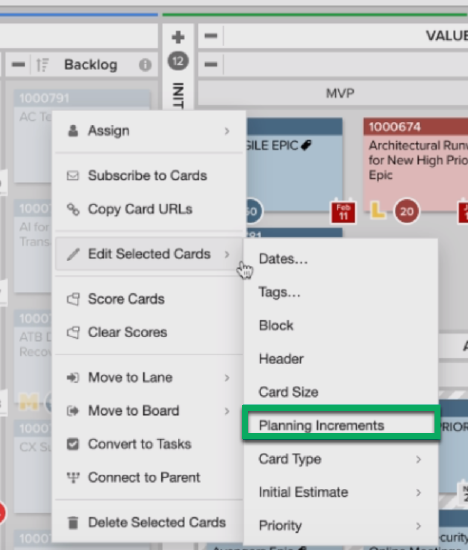
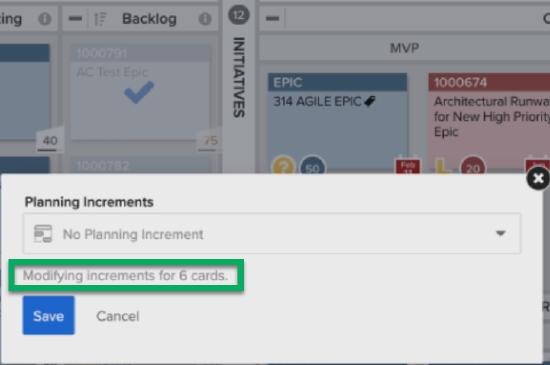
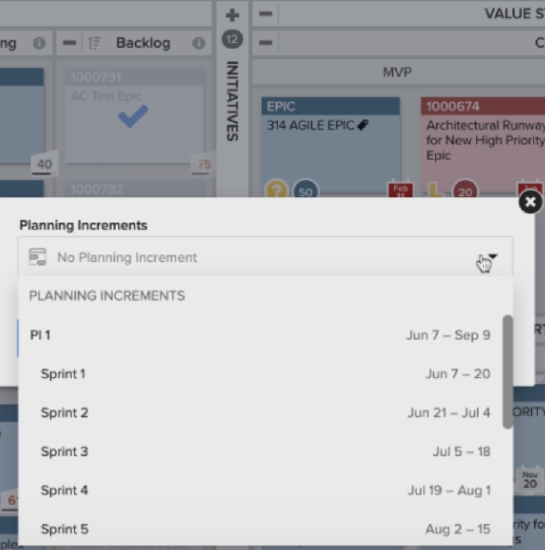
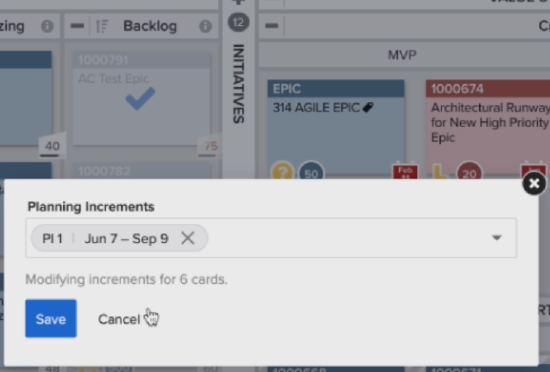
Figure 14 - Additional options when using Planning Increments
Filtering Planning Series
You also have the ability to filter cards by Planning Increments. An example of this might be if you only want to see your cards that have been committed to, say, PI1.
To filter a Planning Series:
- Click the filter icon

- Click Planning Series on the list.
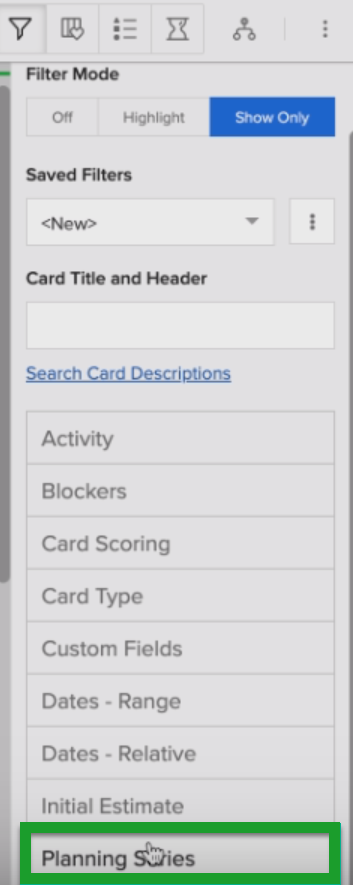
Figure 15 - Filter Mode with Agile Planning option
Reporting
Lastly, on the Home Screen, there’s a Reporting icon  . All Planning Series data is available through AgilePlace’s APIs and extracts. For example, you might want to view all the cards that have been assigned to Planning Increments today.
How to access the specific data source for Planning Increments:
- Click the Reporting icon.
- Click Reporting Data Extract.
- Click the Planning Increments data source.

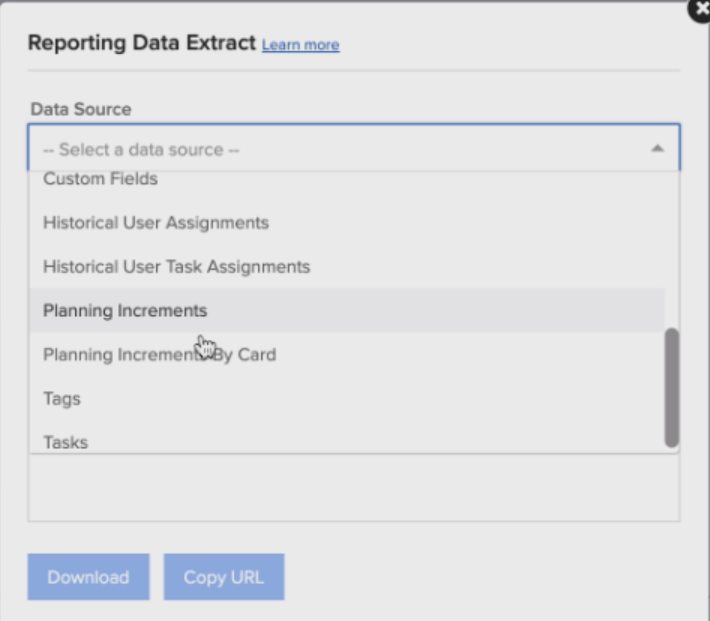
Figure 16 - Planning Increments Data Source on the Reporting Data Extract screen
You can adjust this extract into your BI tool of choice (Power BI or Tableaux) and all that information will be there and ready for you to consume in that tool.
Planning Series and time increment information will soon be available in AgilePlace's Power BI template as well.