Cloud-Based User Provisioning with Microsoft Azure Active Directory
To view a table of contents for this page, click the "On this page" option on the right side of this article.
Background
User provisioning is the process by which organizations create, modify, disable and delete user accounts and their profiles across IT infrastructure and business applications (e.g. AdaptiveWork).
Provisioning tools are used to automate onboarding, offboarding and other administration workforce processes (for example, new hires, transfers, promotions and terminations).
AdaptiveWork has previously offered an AD User Sync installable Windows package to automate provisioning of groups of users toAdaptiveWork.
While on-premise installable packages continue to cause challenges with initial setup and with ongoing maintenance issues, there is a growing trend for enterprise IT migrations to cloud-based services, including cloud-based user provisioning.
Benefits
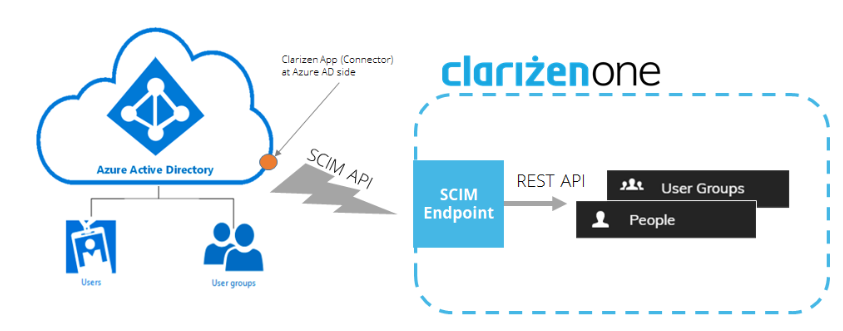
With AdaptiveWork’s cloud-based user provisioning it is possible to create users and groups directly inside Azure AD and “push” (provision) them to AdaptiveWork using the SCIM (System for Cross-Domain Identity Management) protocol.
Setup should be as simple as creating a cloud connector to Azure AD from the Azure Enterprise Applications ecosystem.
This functionality complements AdaptiveWork’s existing SSO (Single Sign-On) solution to provide a complete Federated Authentication suite.
Since SCIM is a well-known standard for cloud-based user provisioning, it will allow AdaptiveWork to support additional cloud identity providers (Google, OKTA, etc.) in the near future.
Features
- API key mechanism to authenticate SCIM-based user provisioning service
- Provisioning (creation, updating and deletion) of users and groups in AdaptiveWork
- Picking up existing AdaptiveWork users to be managed by Azure AD (subject to proper configuration in Azure AD)
- Automatic mapping of predefined standard fields and entities:
-
- User Name
- Display Name
- First Name
- Last Name
- Office Phone
- Mobile Phone
- Direct Manager
- Job Title (The automatic mapping is to an internal text field. It will require an additional workflow rule to further map it to the corresponding job title in AdaptiveWork)
- Ability to include additional fields (String only) in the automatic mapping (Examples: “Country”, “Department”, etc. attributes. may require adding custom fields and workflow rules to ensure proper mapping to a target entity in AdaptiveWork)
- Hard-coded “best provisioning practices”:
- Do not send invitation emails automatically
- If a user’s Direct Manager is not included in the sync group, do not add it to AdaptiveWork
- When a synced user is removed from a sync group, suspend such a user in AdaptiveWork
- When a synced user is disabled in Azure Active Directory, suspend such a user in AdaptiveWork
- When a synced user is deleted from Azure Active Directory, delete such a user in AdaptiveWork
- Provisioning log – sync events, errors, warnings, etc.
Initial Setup in Azure AD
To perform an initial setup, an Azure Premium account and Admin permissions are required.
Creating a New Application in Microsoft Azure
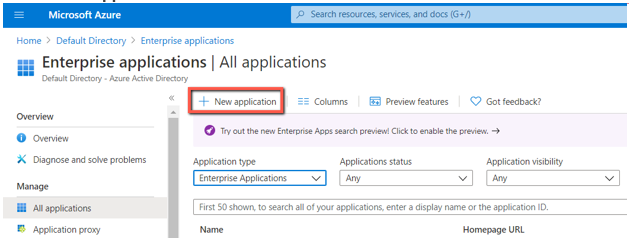
- In Microsoft Azure, go to Azure Active Directory → Enterprise applications
- Click + New application
- Search for AdaptiveWork and select AdaptiveWork.
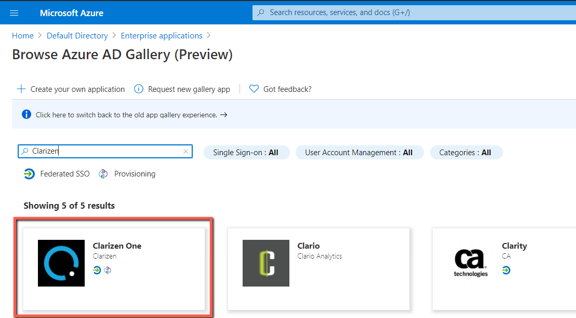
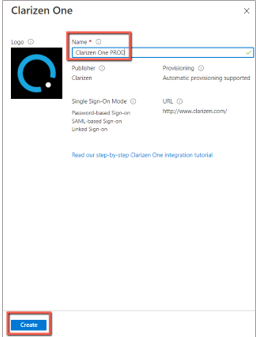
- Enter a meaningful name and click Create.
Setting Up Provisioning
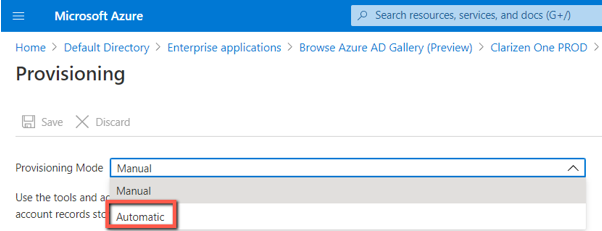
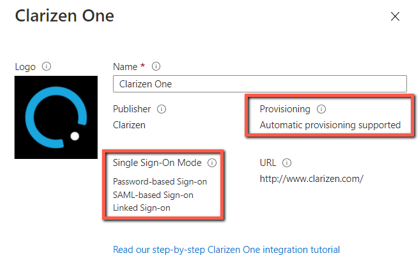
- Inside the newly created app, go to Provisioning, click Get Started, and select Automatic Provisioning Mode.
- Under Admin Credentials, provide the Tenant URL and Secret Token:
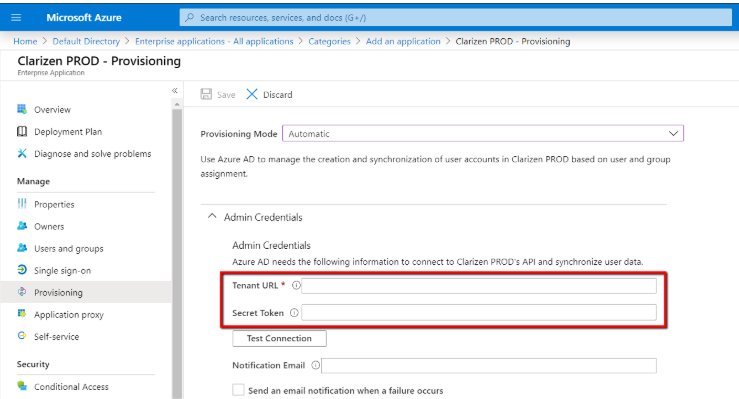
- Tenant URL is the URL of the AdaptiveWork SCIM endpoint:
- For the US Production data center: https://servicesapp2.clarizen.com/scim/v2
- For the EU Production data center: https://serviceseu1.clarizen.com/scim/v2
- For the US Sandbox data center: https://servicesapp.clarizentb.com/scim/v2
- For the EU Sandbox data center: https://serviceseu.clarizentb.com/scim/v2
- Secret Token:
AdaptiveWork provides a dedicated API Key mechanism to authenticate SCIM-based user provisioning service. Refer to the API Keys article on success.clarizen.com for instructions on how to generate an API Key for your newly created application. Once you get a key, simply paste it inside the Secret Token field.
- Tenant URL is the URL of the AdaptiveWork SCIM endpoint:
- Click Test Connection inside the Admin Credentials section of the new app. Wait for the “Success” notification:
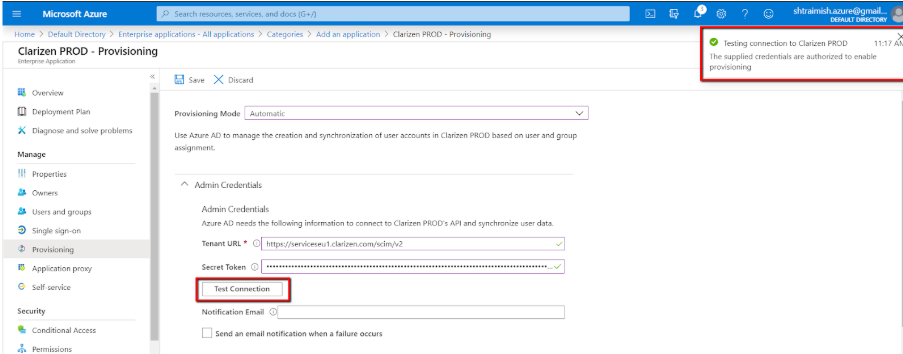
- Click Save.
Best Practices:
- Creation of users and groups in AdaptiveWork will be made on behalf of the integration user, which is used to generate the API Key. Therefore, make sure to give the integration user at least Lite Admin privileges.
- The API Key contains information about a AdaptiveWork instance, where the key was generated. This way AdaptiveWork knows which instance to provision users and groups to. If you use multiple Azure applications to provision several AdaptiveWork instances, make sure you use the right key in each application.
Assigning Users and Groups
At this stage you can select which users and groups (out of all existing users and groups in your Azure AD) will be provisioned by the newly created application. This operation is frequently referred to as “Assigning to a sync group”.
There is no need to select group members individually, if their entire group is assigned (added) to the application. Note: adding/creating sub-groups is currently not supported by Azure AD.
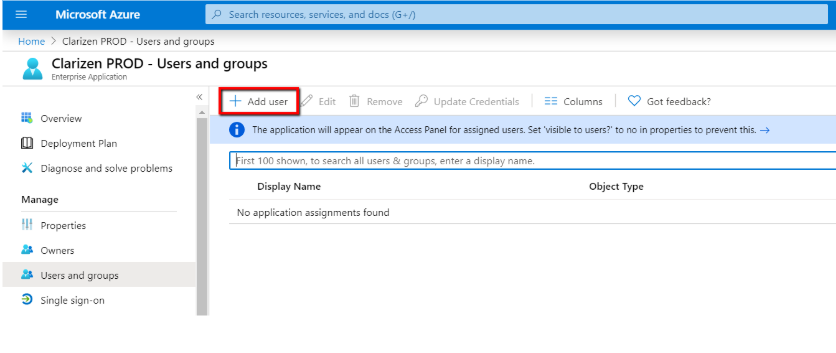
- Go to Users and Groups inside the new app in Azure AD. Click + Add user
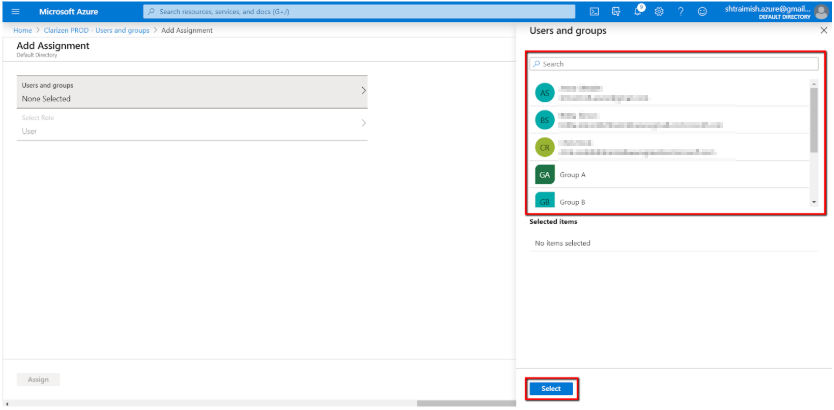
- Select members (users and/or user groups):
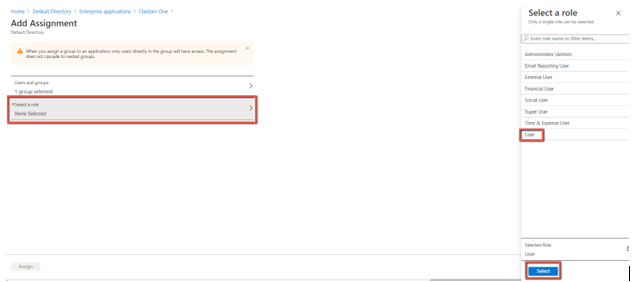
- If role selection is mandatory, just select User and click Select. For now, the rest of the roles are unnecessary.
- Click Assign to assign selected members to the sync group.
- Do the same for Group(s).
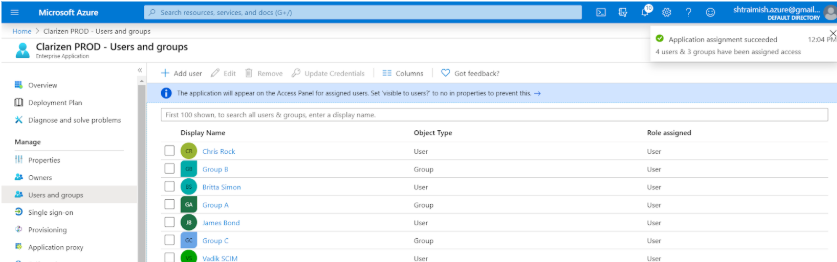
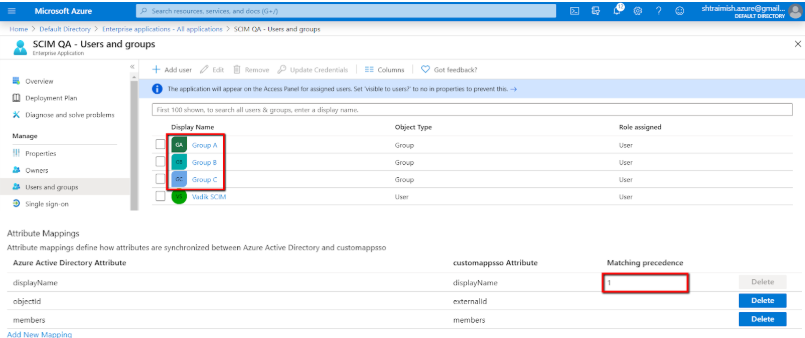
- You should now see all your added Users and Group(s):
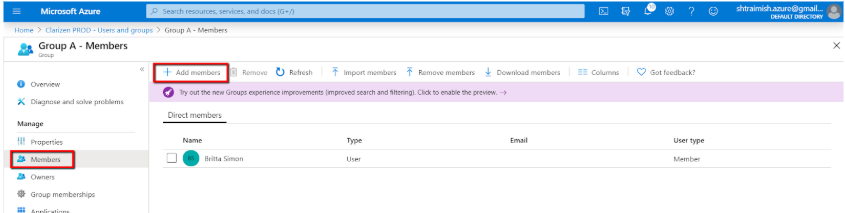
- Click on one of the added Group(s), go to Members and make sure your Group(s) have actual members inside. Press + Add member to add members if required:
Setting up Mappings
Go back to the Provisioning screen, expand the Mappings section and click Synchronize Azure Active Directory Users to customappsso link:
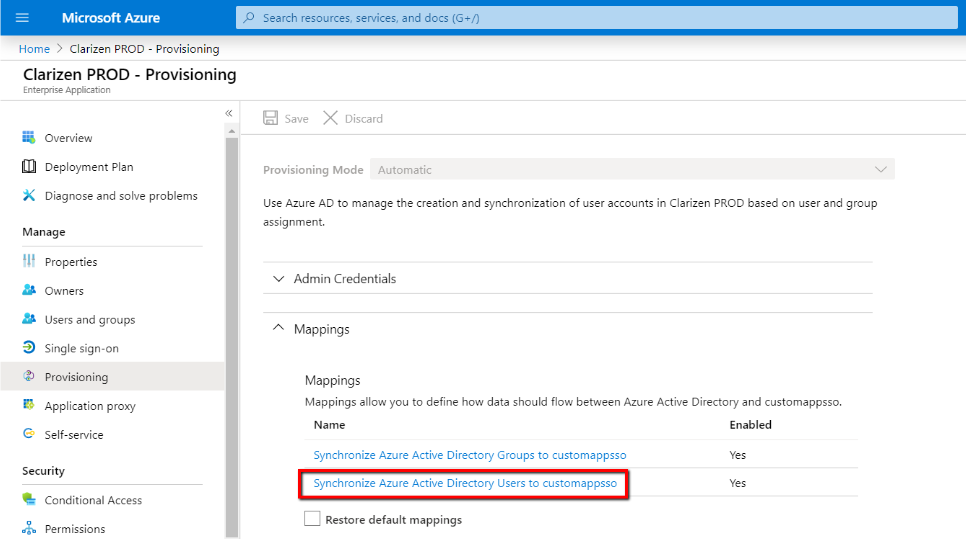
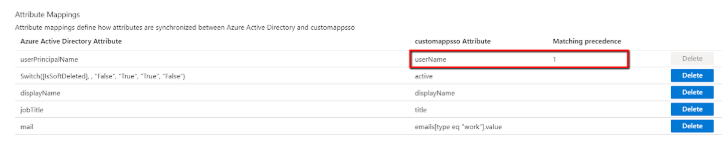
Here you will be able to change the default mappings from the native Azure AD user attributes to the corresponding (standard SCIM) fields in your application, which will further be mapped to the actual fields in AdaptiveWork:
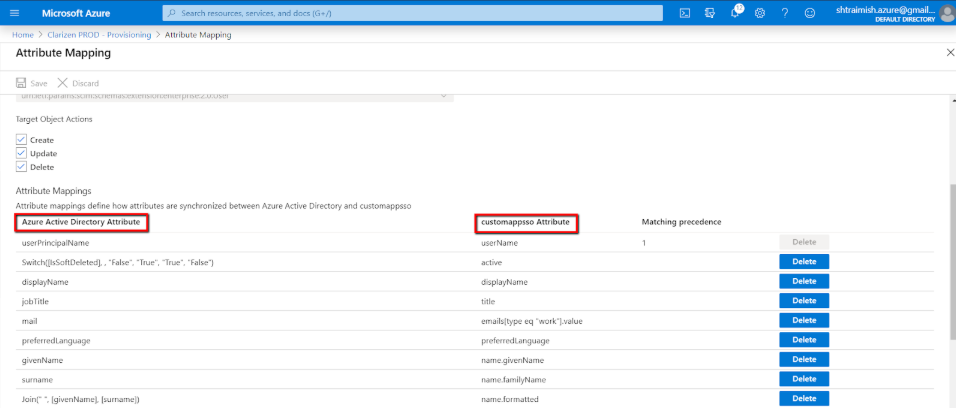
For example, you can decide to source the userName field of your application from a different Azure AD attribute (e.g. onPremSecurityIdentifier), rather than userPrincipalName (UPN):

You can delete or add new mappings, if required. Press Save if you make any changes.
Notes
- We recommend deleting all unused attributes
- Some attributes are mandatory and thus cannot be deleted
Refer to the Best Practices section below for more information about picking up existing AdaptiveWork accounts or SSO-related considerations.
Initial Setup in AdaptiveWork
Predefined standard fields (see Features section above) are automatically mapped. However, AdaptiveWork allows changing some of the predefined mappings or adding new ones.
In AdaptiveWork, log in with an admin account, go to Settings → Extensions. Locate the new User Provisioning section:
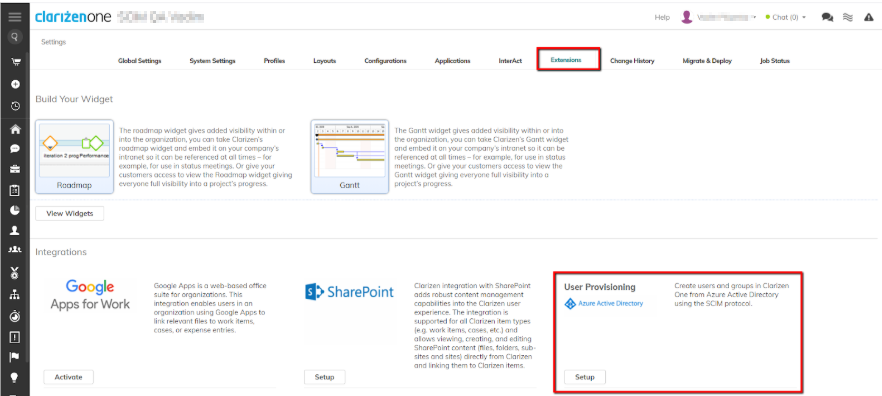
Click Setup to view and define how the user attributes are mapped from your newly created application in Azure to the User entity fields in AdaptiveWork:
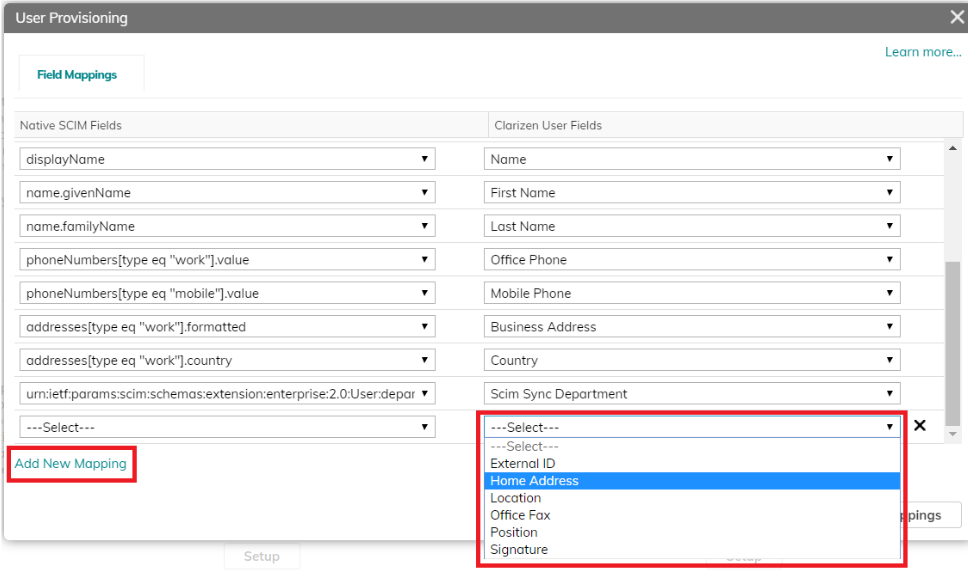
The first few mappings are read-only and cannot be changed.
The rest of the mappings can be changed by clicking the corresponding item (on both sides) and selecting an alternative value from the list:
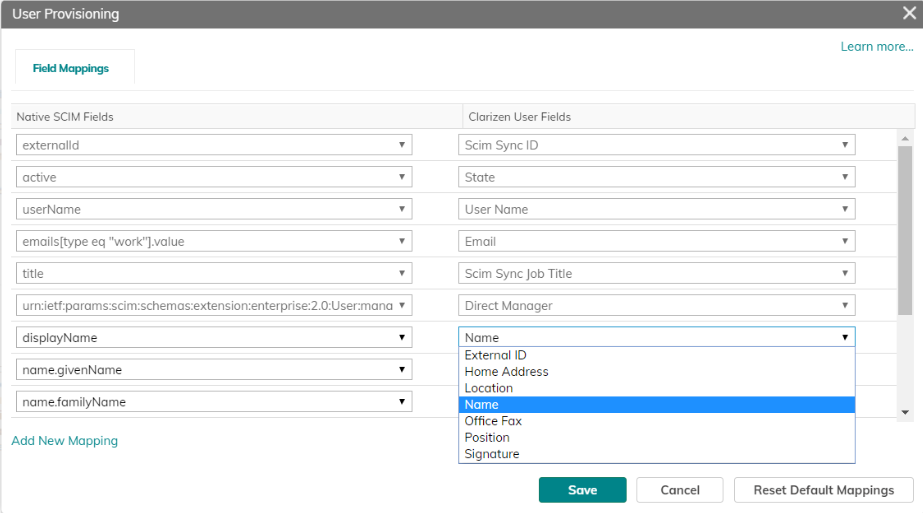
You can add new mappings by clicking Add New Mapping, if needed. It is possible to add mappings to any standard or custom field on the User entity in AdaptiveWork.
Notes:
- Only mapping to textual (string) fields is supported
- Refer to the Best Practices section below for more information on how to provision ‘reference to objects’ fields in AdaptiveWork using an intermediate mapping to a textual custom field, which triggers a workflow rule to map it further to an object in AdaptiveWork
You can also delete unnecessary mappings or restore default mappings if needed:
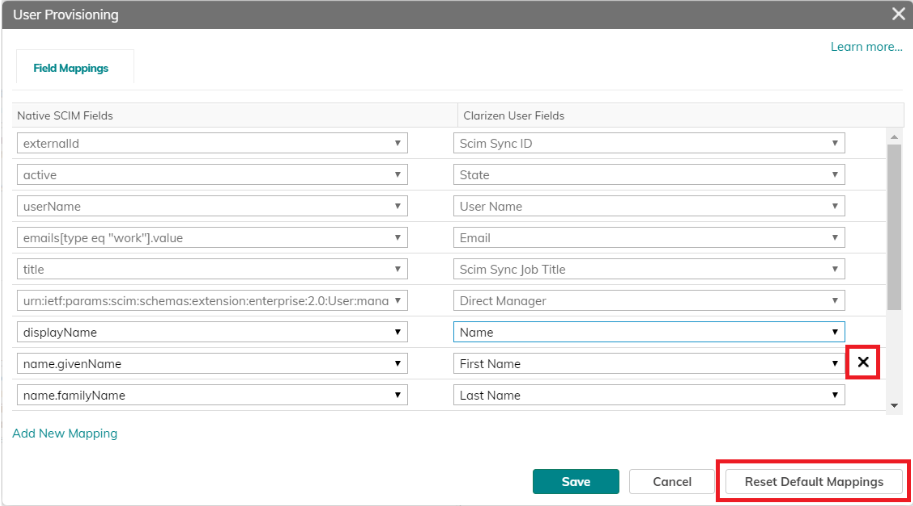
Click Save when done.
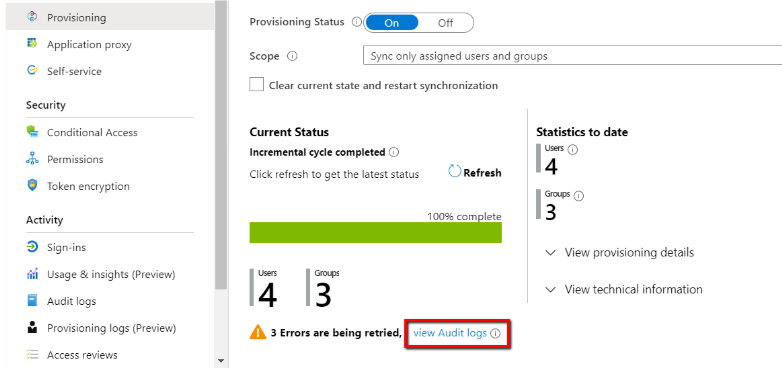
Enabling Provisioning
Once you have set up the provisioning in Azure AD, and made all necessary preparations (mappings, missing custom fields, missing workflow rules, etc.) in AdaptiveWork, you are ready to enable the actual provisioning process.
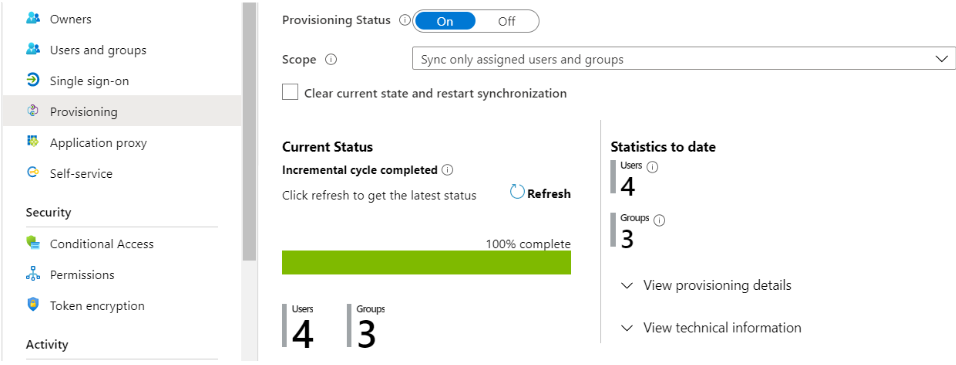
- Go back to your newly created application in your Azure account. Under the Provisioning section, set the Provisioning Status to On and make sure that Sync only assigned users and groups option is selected under the Scope section:
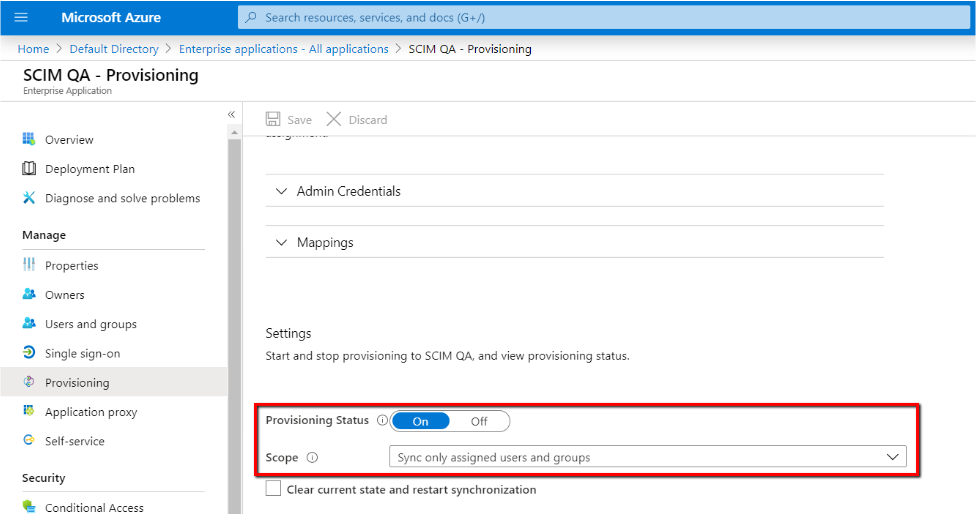
- Click Save.
Initial Synchronization Cycle
Note: It may take up to 90 minutes until the first sync cycle is launched. This timing is solely controlled by the Azure AD side.
During the initial run, the user provisioning process will run the following procedure:
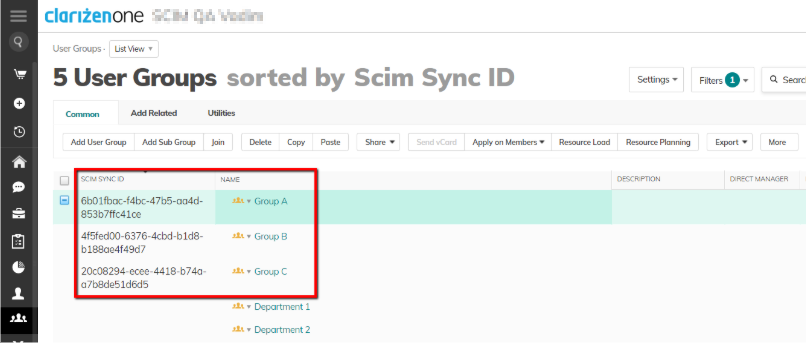
- For each group assigned to your Azure application, try to match a corresponding group in AdaptiveWork using a group’s display name as a primary matching attribute:
- If a corresponding group is found in AdaptiveWork, assign a unique value to its Scim Sync ID field. Once the Scim Sync ID field is assigned, the group is “picked up” to become manageable by Azure AD.
- If a corresponding group is not found, it will be created and assigned a unique Scim Sync ID
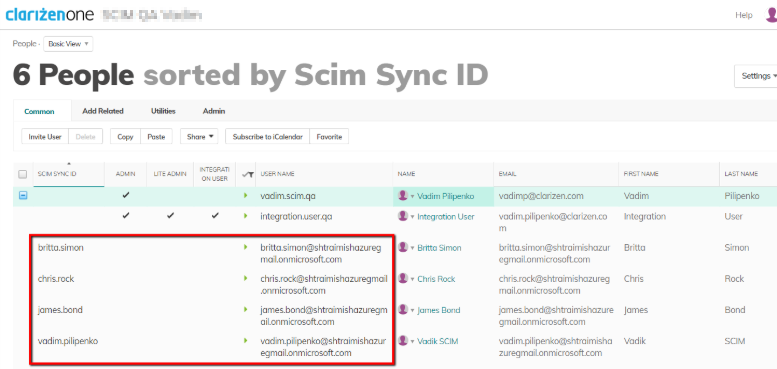
- For each user assigned to your Azure application (either directly or as a member of a group), try to match a corresponding user account in AdaptiveWork using the user’s User Name field as a primary matching attribute:
- If a corresponding user is found in AdaptiveWork, assign a unique value to its Scim Sync ID field. Once the Scim Sync ID field is assigned, the user is “picked up” to become manageable by Azure AD.
- If a corresponding user is not found, it will be created and assigned a unique Scim Sync ID
- For the manager of each user assigned to your custom Azure application (either directly or as a member of a group), find the corresponding user account in AdaptiveWork (supposed to be already provisioned during step #2 above) and assign it to the user’s Direct Manager field.
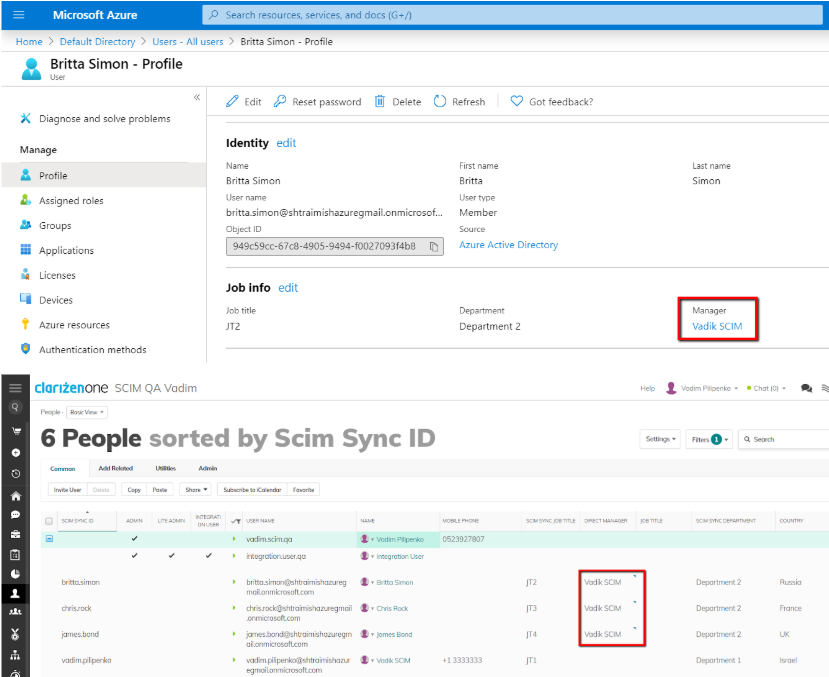
- For each user assigned to your Azure application (either directly or as a member of a group), provision all additional attributes defined by your mappings.
Refresh the page to see the updated sync status. You should see the expected number of synchronized Users and Group(s):
Periodic Synchronizations
As long as user provisioning is enabled in Azure AD, it will run periodically to synchronize changes (if any) from your SCIM application to AdaptiveWork.
The provisioning interval is controlled in Azure AD, and is usually set to 40 minutes. This means that every 40 minutes Azure AD will automatically attempt to run a sync:
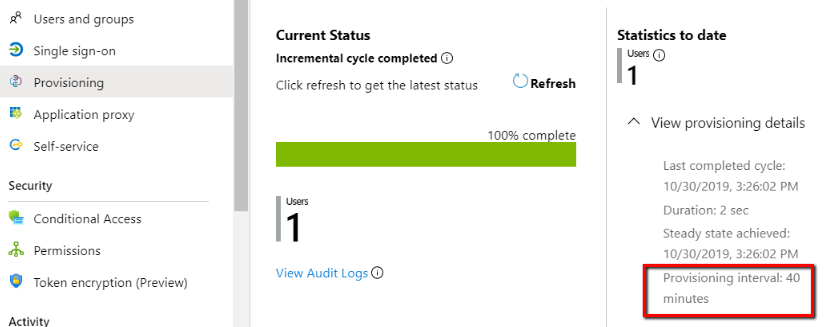
During the periodic provisioning runs, Azure AD will run over all groups and users assigned to your application. If there is a change found in any attribute in the mapping scope, this change will be automatically provisioned to AdaptiveWork.
Notes
- Nullified/cleared attributes
If an attribute in Azure AD is nullified/cleared, the change will not be communicated to AdaptiveWork. This is a known limitation of Azure AD. - Direct Manager
If a direct manager is not included in a sync group during the initial sync, then even if it is added to the sync group later, it won’t be assigned links to its corresponding reports (users) in AdaptiveWork, as this is not interpreted as a change in the user’s manager link from Azure AD’s perspective. This is a known limitation of Azure AD. There two ways to work around this limitation:- Remove/replace the current manager link in Azure AD → let it sync to AdaptiveWork → then set the manager link to the correct manager value → sync to AdaptiveWork again.
- Check the Clear current state and restart synchronization option to force an initial sync to run again.
Default Provisioning/Deprovisioning Rules
During the User Provisioning process, the system will execute the following provisioning / deprovisioning rules:
- Do not send invitation emails automatically
- If a user’s Direct Manager is not included in the sync group, do not add it to AdaptiveWork
- When a synced user is removed from a sync group, suspend such a user in AdaptiveWork
- When a synced user is disabled in Azure Active Directory, suspend such a user in AdaptiveWork
- When a synced user is deleted from Azure Active Directory, delete such a user in AdaptiveWork
Best practices
Migrating from on-premise Active Directory
If you currently manage your users and groups in an on-premise Active Directory and you need to move them to Azure AD as a part of a transition to a cloud-based user provisioning to AdaptiveWork, there is no need to manually export all your users and groups from the Active Directory and then upload them to your Azure AD instance.
All you have to do is to use the Azure AD Connect tool from Microsoft, which can automatically synchronize your users and groups directly to Azure AD.
If you currently provision users and groups to AdaptiveWork using the AD Sync tool, and decide to switch to a cloud-based user provisioning, these are the recommended steps to perform, before you set up your cloud-based user provisioning:
- Make sure all recent changes in the on-premise Active Directory are synchronized to AdaptiveWork by the AD Sync tool
- Disable user provisioning by the AD Sync tool and stop making changes to AdaptiveWork-related users and groups in your on-premise Active Directory. All AD Sync tool’s out-of-the-box user/group fields can be left as they are, as they will not interfere with the SCIM-related fields.
- Review all existing provisioning-related workflow rules. Some may require changes to support mapping to objects when working with Azure AD. Some may need to be disabled.
- Make sure all users and groups are synchronized from the on-premise Active Directory to your Azure AD instance, as explained above.
- Make sure the Azure AD is going to use the same User Name format as has been used by the AD Sync tool so far. This will cause Azure AD to pick up existing AdaptiveWork accounts, rather than duplicating them.
- Set up and enable your cloud-based user provisioning.
Picking up Existing Accounts in AdaptiveWork
There can already be existing users or groups in AdaptiveWork from before - either provisioned manually or by using the AD Sync tool.
If you need such existing users and groups to be “picked up” (become provisioned) by Azure AD, when you switch to cloud-based user provisioning, you will need to ensure the following:
- The names of the groups that are assigned to your user provisioning application in Azure AD must be the same as the names of already existing groups in AdaptiveWork
- The value of userName attribute of users, which will be provisioned by Azure AD (defined by the mapping you define - see Setting Up the Mappins), is identical to the User Name of the existing user accounts in AdaptiveWork
See the Initial synchronization cycle section for more details.
If required, you can create a custom action (“update field” action on User entity) in AdaptiveWork to update the user names of existing users.
Mapping to Objects in AdaptiveWork
The best practice around mapping Azure AD’s user/group attributes to objects inside Clarien (e.g. Job Title, User Groups, etc.) is to do it in two stages:
- First, map the attribute to an intermediate textual custom field in AdaptiveWork.
Note: For the “Title” attribute attribute, there is a dedicated standard field (“Scim Sync Job Title”) that exists for this purpose. - Every time the intermediate field in AdaptiveWork is updated with a new value from Azure AD, it can trigger a workflow rule, which will further link the corresponding user to the desired object in AdaptiveWork.
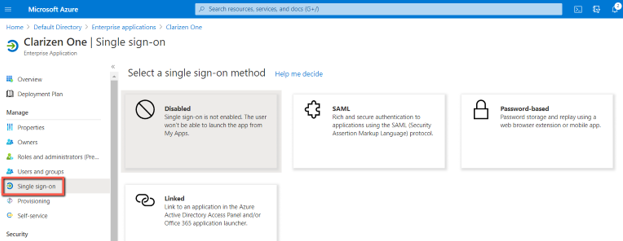
User Provisioning with SSO
The latest official application for AdaptiveWork in Azure’s application gallery supports both automatic user provisioning and SAML-based Single Sign-On (SSO).
To enable the SSO function in your newly created Azure application, navigate to the Single sign-on section, and follow the required configuration steps:
If you’re already using theAdaptiveWork gallery application for SSO access, you can now enable the Provisioning function in the very same application and start benefiting from an automatic user provisioning, without creating a new application and reassigning users and groups to it.
Provisioning to Multiple AdaptiveWork Instances
It is possible to provision several AdaptiveWork instances from a single Azure AD instance. These are the basic guidelines to keep in mind:
- There needs to be a dedicated enterprise application (connecter) in Azure AD for each AdaptiveWork instance
- You need to specify the correct URL and Secret Token for each AdaptiveWork Instance in its dedicated application (see Setting Up Provisioning section)
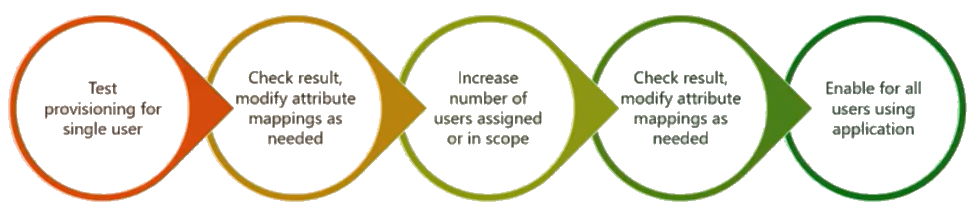
Gradual Rollout
Automatic user provisioning is very powerful at scale.
However, since it requires careful planning and quite an extensive configuration, we recommend starting small in a controlled environment (Sandbox, Testing, etc.) and checking every step, as well as every critical scenario (such picking up existing accounts) you need to support.
There are plenty of existing tutorials and best rollout practices available from Microsoft. This diagram (provided by Microsoft) can help you plan your initial user provisioning rollout:
API Key Renewal
- After generating an API key, we recommend the AdaptiveWork admin to set a reminder to renew the API key a few days before the expiration date of the key.
- On the API key renewal date, the AdaptiveWork admin should log in to AdaptiveWork as an integration user and generate a new (secondary) API Key. Generating a secondary API key does not affect the validity of the primary key if it exists.
- Once the new key is generated, the AdaptiveWork admin should provide the new key to the Azure admin and ask to update the Secret Token of the corresponding Azure application with the newly generated API Key.
Note: The system will keep using the existing API Key (which is still supposed to be valid) until the Azure admin does the actual replacement of the Secret Token. - As soon as the Azure admin saves the updated Secret Token, the system will immediately (without delay) start using the new API Key. As of this moment, the previous API Key can be revoked.
Troubleshooting
Duplications and Conflicts
During provisioning cycles the Azure AD portal checks whether each assigned user already exists in the target AdaptiveWork instance. If a user does not exist in this particular AdaptiveWork instance, Azure AD will try to create the user in AdaptiveWork.
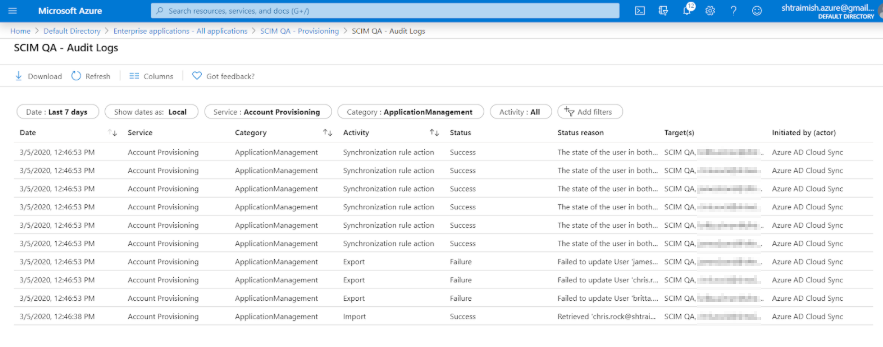
However, it may happen that, when AdaptiveWork tries to create the user, it will become evident that such a User Name already exists in another AdaptiveWork instance. In this case the user-creation process will fail. Such a failure will be listed in the provisioning log (Audit Log) in Azure AD.
Provisioning Logs
There are two ways to monitor/debug the user provisioning process:
- By viewing the Audit Log in Azure AD:
Example of an audit log from Azure AD:
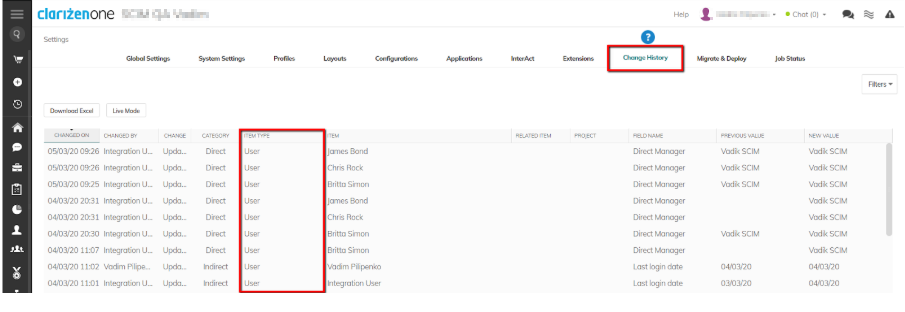
- By going to Change History in AdaptiveWork settings: