
Custom Objects
Go to:
- Introduction
- Creating a Custom Object
- Linking a Custom Object to Other Objects
- Customizing Custom Objects and Custom Object Links
- Setting up Profiles with Custom Objects
- Indexing Custom Fields & High Volume Scenarios
- Best Practices
- Deleting Custom Objects
- Adding Followers
Introduction
Custom Objects let you tailor AdaptiveWork to suit your business-specific scenarios, while preserving the familiar AdaptiveWork user experience.
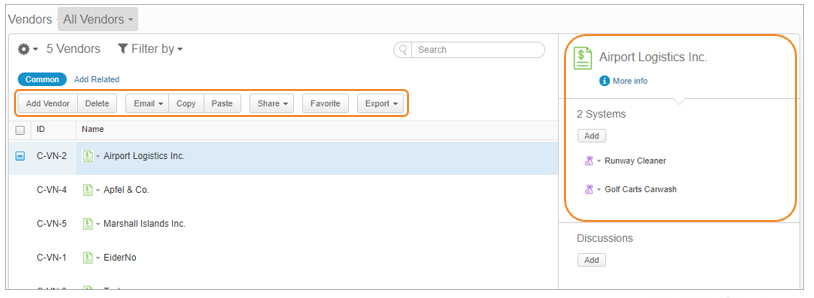
Create Custom Objects to extend AdaptiveWork beyond standard functionality and when you need additional elements that do not exist in AdaptiveWork. Examples include deliverables, vendors, systems, and purchase orders.
A Custom Object is a fully functional AdaptiveWork object, and includes:
- Access from the navigation panel and global search
- Full collaboration capabilities including discussions and files
- Parent-child and many-to-many relationships to other objects
- Standard set of fields, actions and workflow capabilities, such as add, edit, share, etc.
- Standard report capabilities such as filter, export, update, etc.
- API support
- All standard customization options (fields, actions, panels, etc.)
- Permission Access Levels - Enable in System Settings to work with Access Level Permissions
When should I create a Custom Object?
Create a Custom Object when the existing out-of-the-box objects do not directly support your business needs.
If you are using out-of-the-box objects with custom workflows to create workarounds for your requirements, consider creating new custom objects to replace customizations.
Example Use Case
Background – My projects use various Systems, managed by System Leads. The Systems are supplied by Vendors.
Objective – As a PMO, I want to link my Project's Issues and Requests to specific Systems, and provide System Leads a 360° view of activity around the Systems they are responsible for.
Requirement – I need System and Vendor objects linked to my Projects.
Solution – I create 2 custom objects, System and Vendor, and define necessary relationships: a Project involves multiple Systems, each with a related Vendor. A Vendor can supply multiple Systems.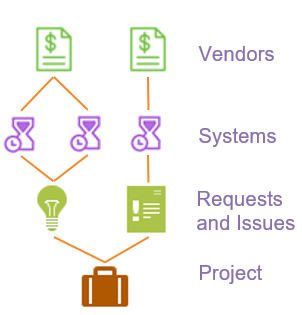
After creating the Custom Objects, depending on the required relationships with other objects, I can create many-to-many links between Custom Objects and other standard or Custom Objects.
Some examples of relationships include:
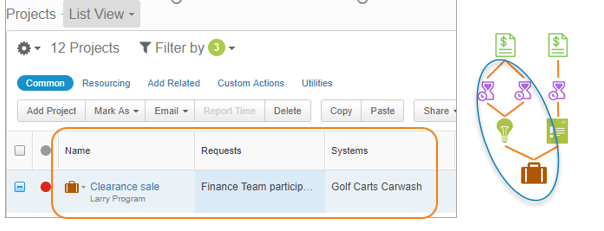
- List of Projects with Requests and Systems
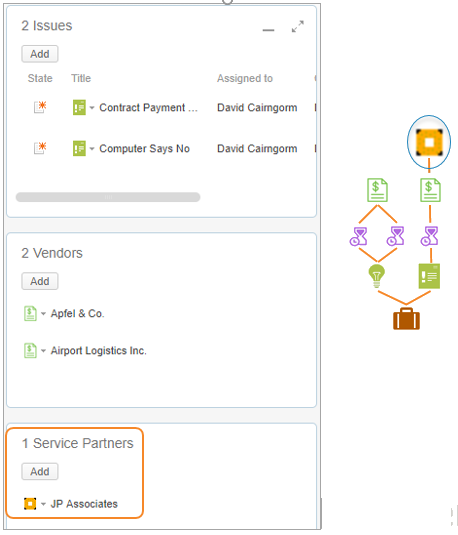
- A System-level drill down with Projects in the main grid, and Issues, Vendors in related panels

- And now I need to track Service Partners since Vendors have different integrators at different locations. Not a problem, I just add a new Custom Object.
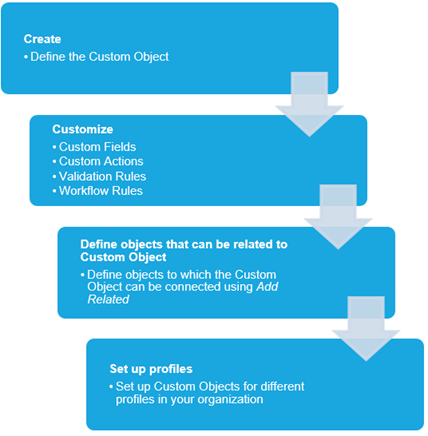
The Process for creating a Custom Object
A recommended process includes the following steps:
Known Issues
Custom Objects are not displayed as a standard Home panels.
Creating a Custom Object
To create a custom object:
- Go to Settings > Configure.
-
In the left menu, click Add Custom Object.

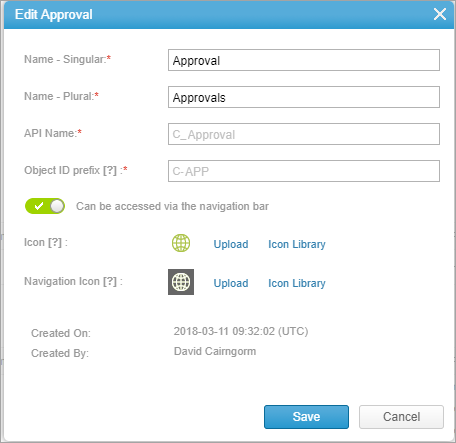
- Fill in the following details:
- Name - Singular and Name - Plural: Enter the Custom Object’s names as they will appear in their singular and plural forms.
- API Name: The name used in AdaptiveWork’s API. The default name is the singular name field. If you change it, it should not have spaces.
- Object ID prefix: As with regular objects, each Custom Object has a unique ID. The prefix must begin with C- followed by free text.
-
Icon: Upload an icon to appear in list and details pages, or select an icon from the Icon Library.
Tip: We recommend an icon suitable for white backgrounds. PNG, GIF, JPG and ICO formats are supported. The Icon Library includes icons already suitable in size and color. -
Navigation Icon: The default icon in the navigation menu is the icon uploaded in the previous step. To use a different icon in the navigation menu, upload a new icon.
Tip: For the navigation panel we recommend using a white color icon on a transparent background. For optimal results use the .ICO image format, though PNG, GIF and JPG formats are also supported. The Icon Library already includes icons suitable for the Navigation Panel. Any icon selected as the regular icon, when used for the Navigation panel, gets a light on dark format.
-
Can be accessed via the navigation bar: Enable this option if you want the Custom Object to appear in the main navigation menu. You can control which users it's available to with Profiles.
Selecting icons from the Icon Library![]()
-
Click Create.
The Custom Object is created and can now be customized.
To access the Custom Object, go to Settings > Configure. Under Item Types, the new Custom Object will appear under Custom Objects.
The Custom Object is created with standard fields and actions.
Custom Object standard fields
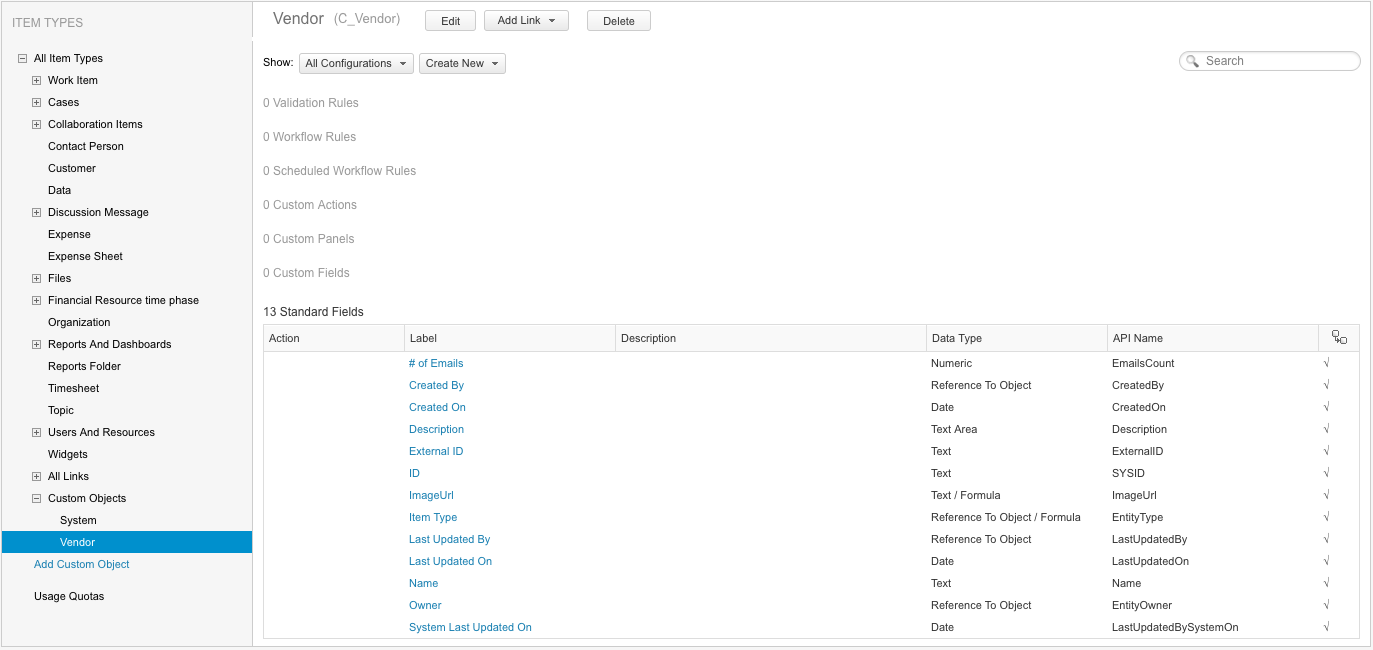
Actions in the Custom Object ribbon
Linking a Custom Object to Other Objects
After creating the Custom Object, you can define to which objects, standard or custom, the Custom Object can be linked to using the Add Related action.
For example, a Custom Object called ‘Deliverable’ can be linked to objects such as Project and Customer.
Create the link when you need many-to-many relationships between the objects.
Consider 2 Custom Objects - System and Vendor. A System can only have one Vendor (parent-child relationship). Therefore a link is unnecessary. But when you need to connect your standard Request objects to Systems, then create a link for the many-to-many relationship between them.
Note: See Reverse Reference of Existing Objects to understand the differences between using Custom Objects and Reverse References.
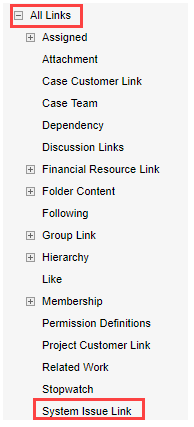
Linking the Custom Object to another object creates a new link object in the system. The link objects themselves can be accessed in the Configure settings under All Links.
To add a linked object:
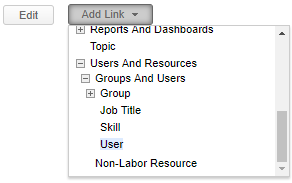
- Access your Custom Object. Go to Settings > Configure, and expand the Custom Objects list under Item Types. Select your Custom Object.
-
Click Add Link.
-
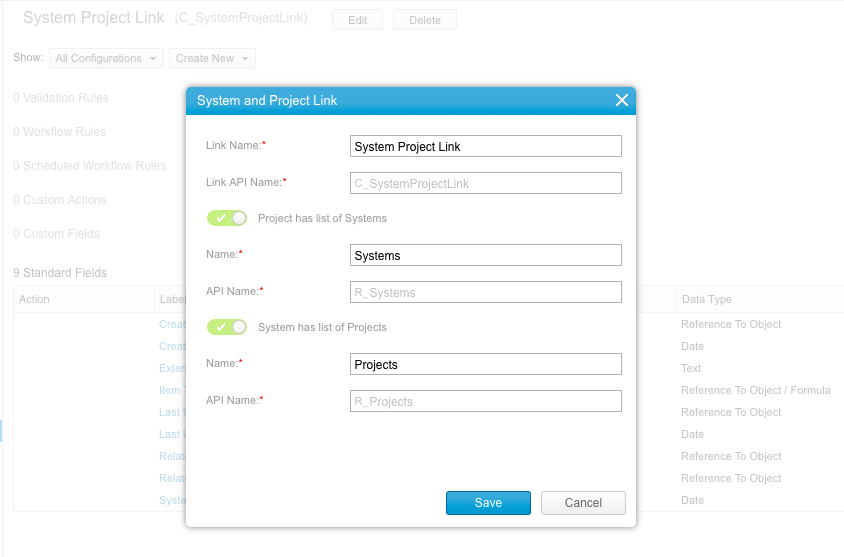
Select the object, and enter the following details:
- Link Name: The name of the link
- Link API Name: The name of the link in the API.
- <Linked object> has list of <Custom Object>: This option cannot be disabled.
- Name: The default Custom Object name that can be edited if needed
- API Name: The default Custom Object API name includes a non-editable prefix followed by free text
-
Repeat the above steps for the reverse reference.
Configuring Custom Objects and Custom Object Links
Configure the Custom Objects and their links as you would for standard objects in AdaptiveWork, by adding Custom Actions, Workflow Rules, etc.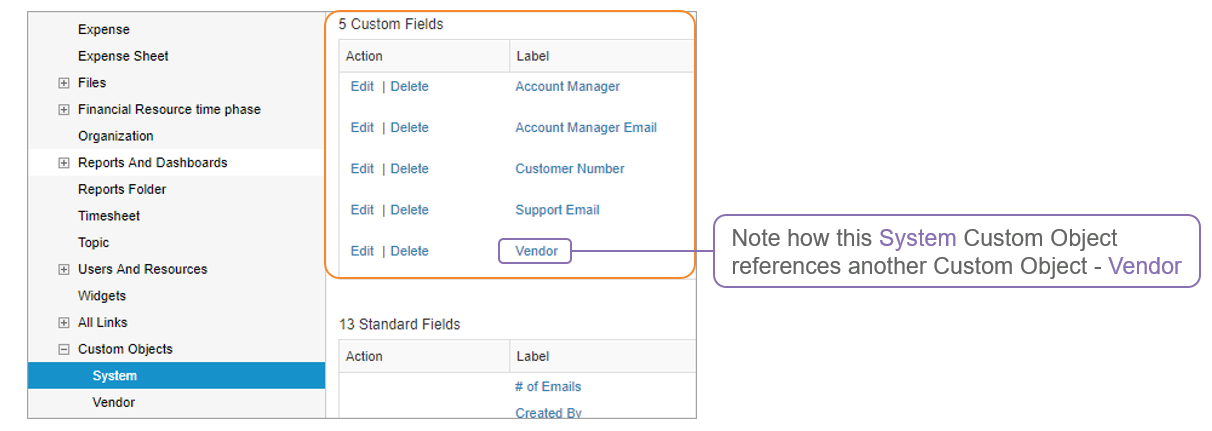
To learn more about configuration options, click here.
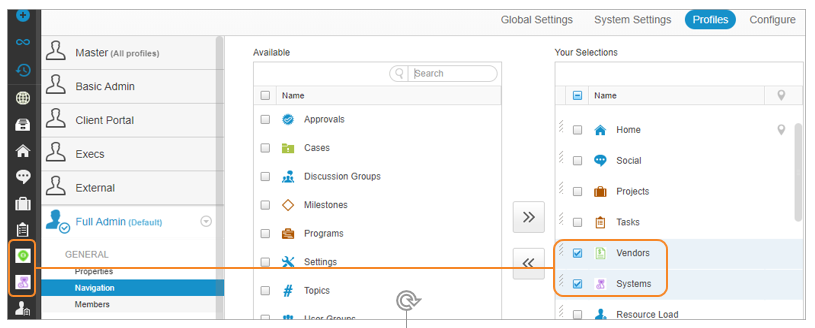
Adding Custom Objects to Profiles
After creating and configuring your Custom Objects, set up how they are displayed in the system for different user profiles. Define how Custom Objects are accessed, viewed, and which actions are available for each profile. Setting up profiles for Custom Objects is the same as for standard objects in AdaptiveWork.
With the many options available, we recommend that the following basic settings are defined per profile:
- Define whether the Custom Object appears in the navigation panel
-
Define whether the linked items appear as Related Items (defined in the Fields & Relations section in the Profiles settings)
-
Define layouts and grid views. For example, add custom fields that you added to the Custom Object to the columns in the main list/grid view, and define which fields to include in the Property Card.

To learn more about profiles, click here.
Indexing Custom Fields & High Volume Scenarios
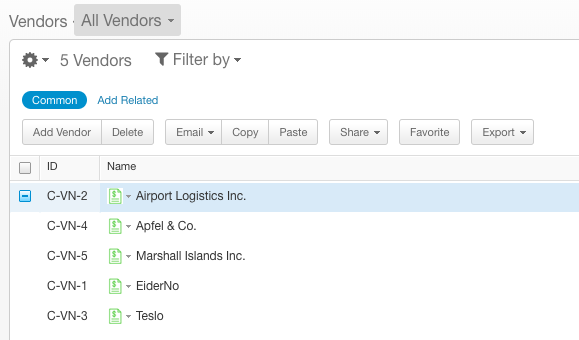
You can use Custom Objects for a wide variety of different business scenarios, from a 25 item list of Vendors, to a Decisions log for all projects which may run into tens of thousands of items.
To optimize overall system performance, AdaptiveWork uses "indexing", a solution to improve sorting, filtering and search in databases of all types.
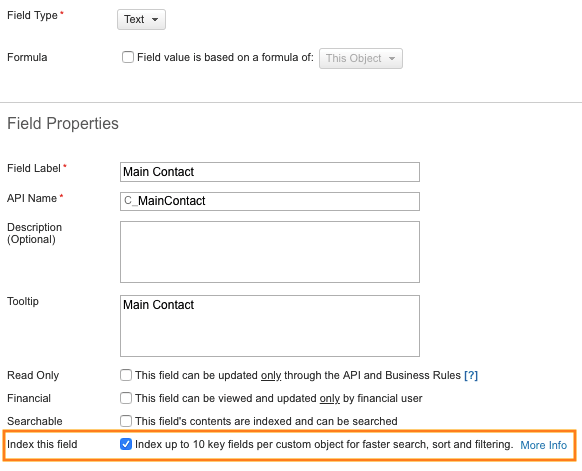
On Custom Objects, you have full control over which of your custom fields should be indexed. You can index up to 10 fields per custom object, though some fields are indexed automatically for you.
Why Index?
Indexing increases performance of filters, search and sorting. This is especially important if your custom object has a module view that is accessed from the Navigation bar. It is highly recommended that Admins set the most commonly-used fields for indexing.
High Volume Scenario
High Volume is the term used to describe a custom object type with over 100,000 items.
When you reach 100,000 items for a particular custom object type users will only be able to filter, sort and search in the module view using indexed fields.
|
Automatically Indexed |
Can Be Indexed |
Field Type cannot be indexed |
|---|---|---|
| Name | Text | Text Area |
| ID | Number | Rich Text Area |
| External ID | Currency | Multi-Select Picklist |
| Owner | Date | URL |
| Custom Reference to Object | Reference to Object | - |
| Created By | Duration | - |
| Last Updated By | Toggle | - |
| Created On | - | - |
| Last Updated On | - | - |
How to Index a custom field
Using a checkbox in a custom field's configuration page, you can mark a custom field to be indexed at any point, or remove it from indexing.
You may want to remove fields from the index if you have reached your 10 field limit and want to change which fields are indexed.
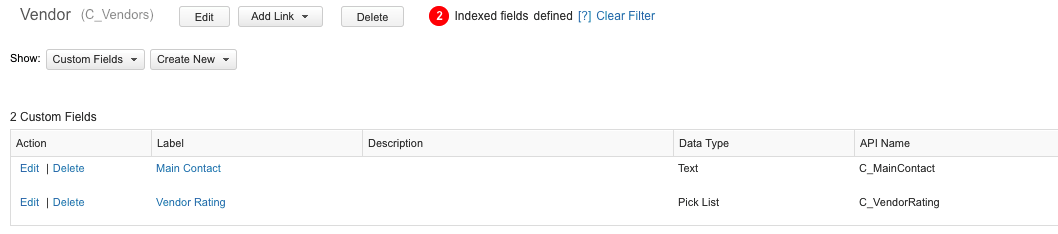
Tracking Indexed Fields
In the configuration screen of a Custom Object, you can see how many fields you have indexed.

Click to filter the view showing only the filtered fields.
Best Practices
The following best practices describe some common use cases for using Custom Objects, and recommend how to best implement the solutions.
Reverse Reference of Existing Objects
AdaptiveWork has supported Reference to Object fields with "reverse references", which you may have used for existing functionality. This method gives you the ability to map new one-to-many logical references between existing objects in AdaptiveWork’s underlying data model.
An example here is if you wanted to map a Project to a Customer’s main contact.
In this case you would create the custom Reference to Object field to link the Project to the Contact, and define a Reverse Reference and a label. From the Contact record, you would be able to add a panel with a collection of projects where that Contact is the main contact.
|
Reverse Reference on Reference to Object Custom Field |
Custom Object |
|
One to many (parent-child relationship) |
Many to many |
|
Multiple items only on one side (example: Project Manager has many projects, but project has only one Project Manager) |
Multiple items on each side (example: resources and tasks) |
|
Reassigning the one-to-many relationship overrides the existing relationship |
Includes a link object for additional data and functionality |
Design Consideration: Custom Objects vs Picklists
When extending AdaptiveWork, you'll need to take some decisions whether to use picklists or more powerful custom objects. The following guidelines can help your design decisions:
Custom Objects
- 360° view of an object with details view
- Module view
- Collaboration & Hashtagging
- Multiple links to other objects
- Full Permission management
- New items can be added by regular users
- 1-100K+ items
Uses:
- Data type that has its own core use case, like Products, that can be used in reference or on its own.
Picklists
- Simpler for reporting
- Color coding for reports
- Closed list, managed by Admins
- 1-500 items
Uses:
- Simple descriptive tagging, ie. project type
Deleting Custom Objects
When deleting a Custom Object, make sure to:
- Delete all links
- Delete all references to custom objects and their fields in:
- Custom Fields (reference to AND relations summary fields)
- Workflows
- Custom Actions
- Reports and Dashboards
Note: If you have Reference to object fields on your custom object that reference other objects, with Reverse References that make them appear as related lists on Custom views, you do not have to remove them from Related Items or Views.
To delete a Custom Object:
- Go to Settings > Configure.
- In the left menu, select the Custom Object.
- Click Delete.

Adding Followers
Custom Objects support Followers.
See Support for Followers on Custom Objects and Followers on Custom Objects is Supported in Configurations.