Getting Started - Preparing Your Environment
Intended audience - Admins
If you’re new to Capacity Planning, you must prepare your organization in AdaptiveWork. This includes creating and setting up new entities, and defining relationships between them and existing entities such as user groups and job titles.
Click here to see a Quick Start guide
Mandatory steps
- AdaptiveWork Settings: Enable the following settings in AdaptiveWork:
- Capacity Planning - enables the Capacity Planning module.
- Resource Planning - enables the Staffing Request option in the Project’s Resource Planning view
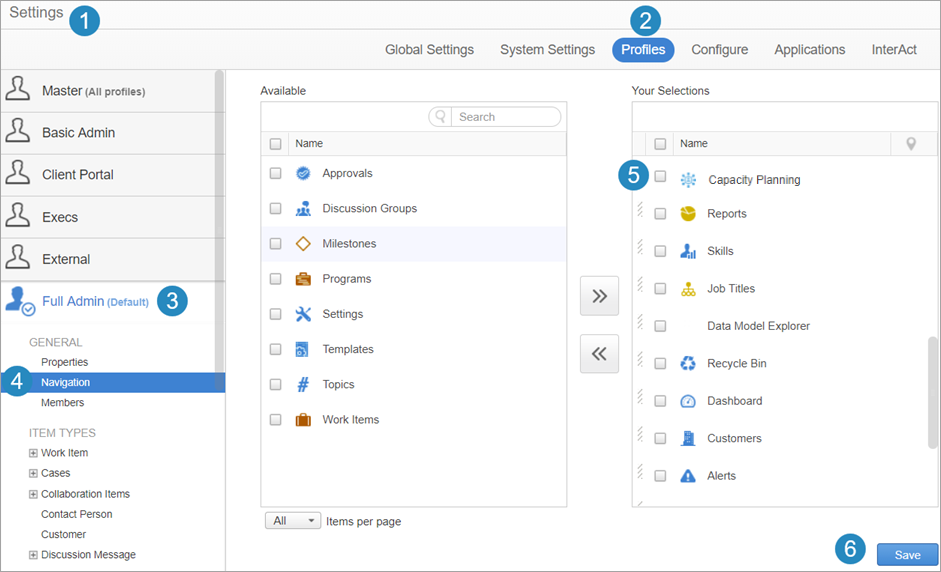
- Profiles: Add the Capacity Planning module to the navigation panel of relevant Profiles.
- Resourcing Groups - Define which of your user groups to include in the Capacity Planning process. For example, if your projects are R&D related, include all R&D groups, but exclude the Finance group, as they are not relevant to your projects, and should not appear in the Capacity Planning module as available resources.
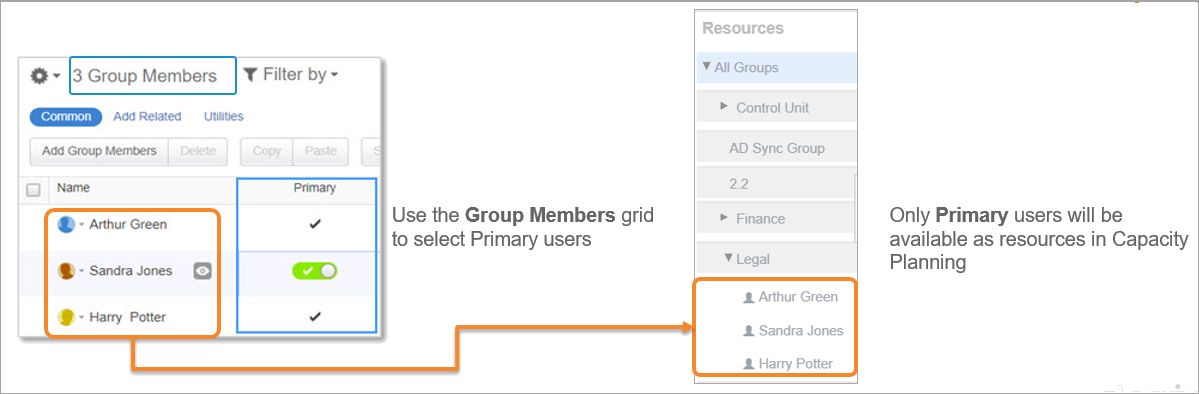
- Primary Groups and Primary Users - Define Primary Groups for your resources. A resource can belong to multiple user groups, however only one group can be used for resource allocation in Capacity Planning; this is the resource’s primary group.
On the Group level, a group includes group members, of which only some are Primary users, and therefore will be available for resource allocation in Capacity Planning. - Resource Manager Role - Assign the Resource Manager role. The Resource Manager can update and approve requests, and assign resources to projects. You can have multiple Resource Managers per user group. In the Capacity Planning module, the Resource Manager will only be able to see groups of which he/she is Resource Manager.
Note: The Direct Manager of the group automatically gets the Resource Manager role of the group and its sub-groups if they exist.
- Enabling Direct Work Assignment for Groups by Project Managers - For organizations with varying staffing methods, you can decide which groups will use staffing requests, and which groups will be assigned work on the Project by the Project Manager.
Optional and Recommended Steps
- Job Title - If you are going to use job titles for resource allocations, verify all resources have been assigned a job title. To learn more about assigning job titles, click here.
- Skills - When requesting or assigning resources, you can use Skills to easily identify the resources you need by skillset. If not already defined, add one or more skills to named resources. To learn more, click here.
- Create Projects - If you previously created projects by way of requests as part of the intake process, we recommend creating your projects at an earlier stage, so that you can begin your capacity planning on projects already in AdaptiveWork. In Capacity Planning, you can work on projects in different states including draft and active projects.
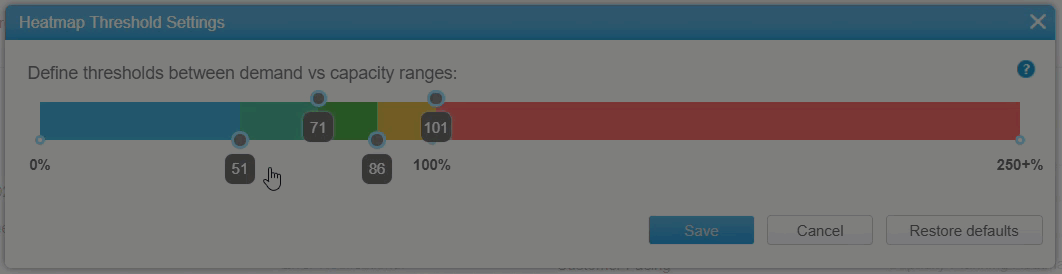
- Defining the Heatmap Color Thresholds - Define how the colors in the heatmap represent different levels of workload as a percentage of the capacity.
Enabling Capacity Planning in AdaptiveWork
- Go to Settings > System Settings > Resource Management.
- Enable Resource Planning (system setting 8.7). This setting enables the Staffing Request panel in the Project’s Resource Planning view.
- Enable Capacity Planning (setting 8.8). This setting enables the Capacity Planning module for Resource Managers.
- Click Save.
Adding the Capacity Planning Module to Profiles
- Go to Settings > Profiles.
- Select a profile to which you want to add the Capacity Planning module to the navigation panel. Under General > Navigation, move Capacity Planning to selected columns.
- Click Save.
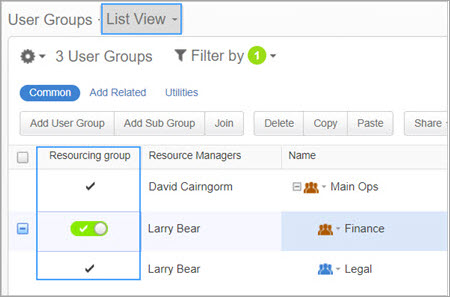
Enabling Resourcing Groups
You can define which groups will be resource groups from various modules and views. In this example, enable Resource Groups for multiple groups using the User Groups List View.
To enable a Resource Group:
- From the main navigation panel, select User Groups.
- Select the List View (default view).
- Click the gear icon and select Columns. Add Resourcing Group to the list of selected columns.
- For each group that you want to enable, toggle the Resourcing Group option on or off.
Defining the Primary Group for Resources
You can define whether a resource is a primary user in a user group from various modules and views.
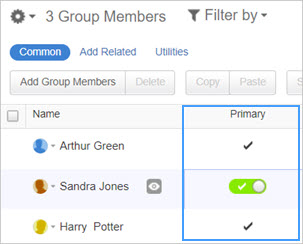
In this example, the Group Members panel is used to determine which users in the group are Primary users.
- From the main navigation panel, select User Groups.
- Open a User Group and go to the Group Members panel.
- Click the gear icon and click Columns. Add Primary to your selected columns.
- For each team member, toggle the Primary option on or off.
Sub-Groups
To preserve the hierarchy with the parent group, the sub-group must be defined as the primary group in the parent group (in addition to being a Resourcing Group). This will ensure the Resource Manager of the parent group keeps control of the resources in the sub-group, and capacity for the parent group includes the sub-group(s).
Assigning the Resource Manager Role
To assign the Resource Manager role:
You can assign one or more Resource Managers to groups from a number of modules and views.
For example, assign Resource Managers to multiple groups using the User Groups List View.
- From the main navigation panel, select User Groups.
- Select the List View (default view).
- Click the gear icon and then select Columns. Add Resource Managers to the list of selected columns.
- Add Resource Managers to groups as needed.
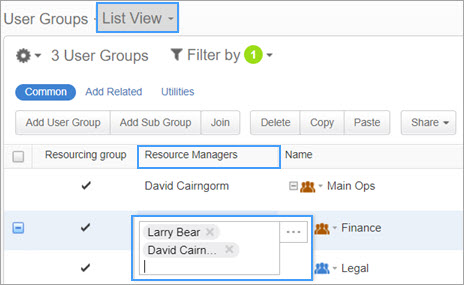
Another example is to open the People List View, and select the Resource Manager of Groups column, allowing you to select managed resource groups for users.
Defining the Heatmap Color Thresholds
The colors in the Capacity Planning module represent the demand as a percentage of the capacity. In the screenshot below, the default threshold settings show red as exceeding 100% capacity, and the blue zone means demand is less than 51% of the capacity. You can change these percentages, for example, define an overload as being above 110% rather than 100%.

A partial overload (for a time period, a resource in the group, etc.) is indicated by the red dot in a cell, which is based on the defined threshold for the red zone in the map rather than above 100%.

To change the threshold values:
- Go to Global Settings.
- Under Organization Settings, find Capacity Planning Heatmap, and click Edit.
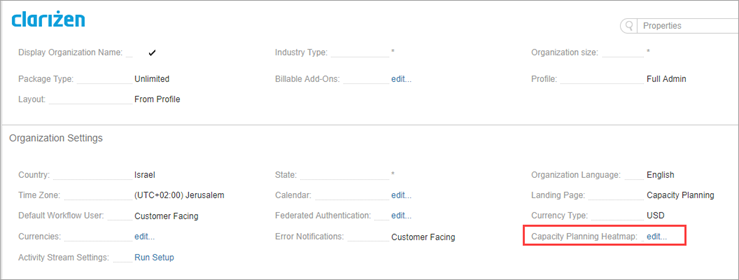
- Move the sliders to adjust the thresholds and click Save.