Importing and Updating Data Using MS Excel
Overview
Export Excel spreadsheets with existing data, add and update data offline, and import back intoAdaptiveWork. The import process validates the data, highlights invalid data, and allows you to make corrections inline at the time of import.
This feature is supported for:
- Cases
- Customers
- Users
- User Groups
- Work Plan (Work Items).
To learn more about exporting and importing Cases, Users, etc., see Importing Cases.
To learn more about exporting and importing Work Plans, see Importing Work Plans.
Importing Cases
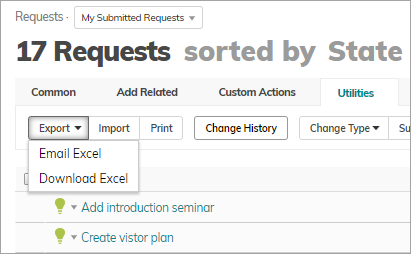
To export Cases, for example, Requests:
- Open the relevant module (Requests), and under the Utilities tab, click Export > Download Excel.
- In the downloaded Excel file, add, update and delete entries.
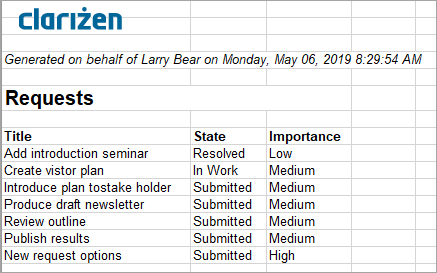
- Save the file.
- Import the updated data. Under Utilities, click Import. Select the file and click Open.
- In the Import from Excel window you can view all the new and updated data. You can also see errors and update (change entries) using the drop-down lists.
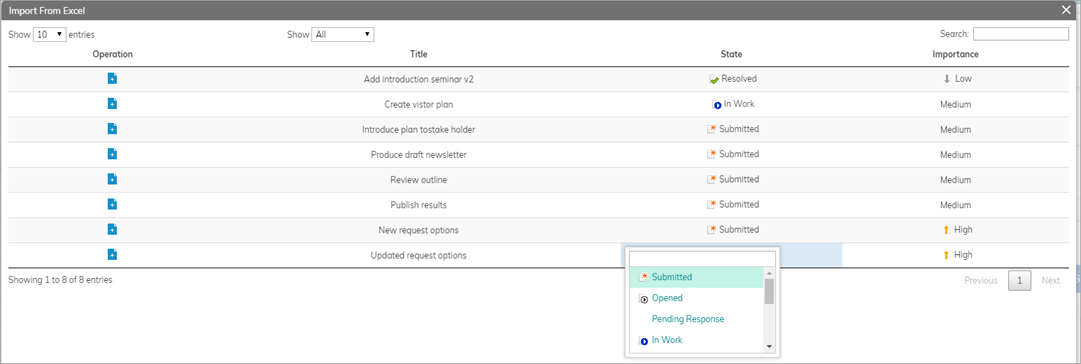
- When done, click OK.
Importing Work Plans
The Workplan import process includes a built-in preview window that catches data problems before they reach your project, giving you the opportunity to review and fix any errors right inside AdaptiveWork.
Before you Begin
Please make sure the following requirements are met before starting an import. If you are unsure about any system settings, contact your AdaptiveWork administrator.
System Settings
Two system settings must be enabled by your administrator:
|
Setting |
Description |
Required Value |
|
Setting 6.8 |
Link attachments to objects |
Set to Allow All or Allow Upload of files |
|
Setting 7.15 |
Enable Advanced Export Work Plan |
Must be turned ON |
|
Please Note: If the ribbon action on your project reads 'Import' instead of 'Import Workplan', you still have the old Import functionality. Please reach out to your administrator so they can raise a ticket. |
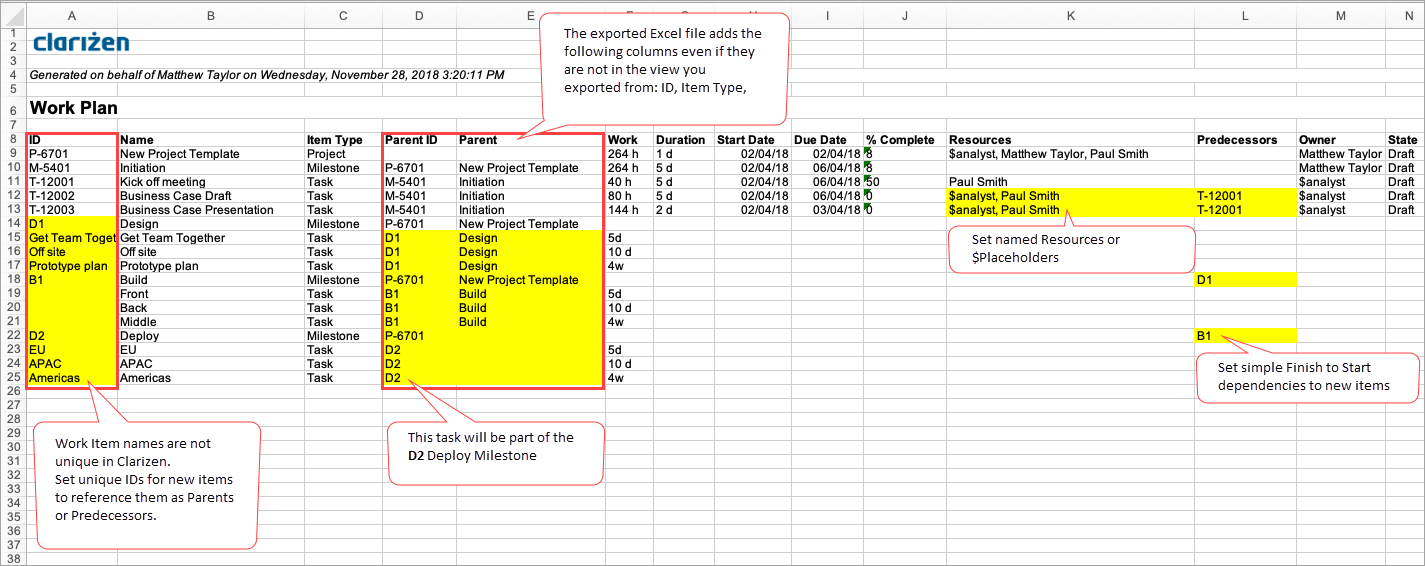
From the Work Plan view you can export the Work Plan to Excel. You can use the exported file to create complete Work Plans or modify existing ones offline.
Getting the Import Template & Working on the template
To ensure your file is formatted correctly, always use the AdaptiveWork export template. The template is generated from an existing project and includes all the required column headers.
- Go to an existing project in AdaptiveWork.
- Click the Utilities tab in the ribbon.
- Select Export Workplan → Work Offline mode. (This option won't appear if Setting 7.15 is not turned on the system settings).

- The Work Plan is exported with the columns present in your current view and adds the fields required for adding and updating Work Items.
- The following fields are added to the Excel file even if not present in the current view -
- ID
- Parent Name
- Parent ID (a feature added to support importing hierarchies)
- Item Type (Project, Milestone, Task)
- In the Excel file:
- Add new Work Items as new rows.
Setting an ID is not mandatory, but you can enter a unique ID with any text, which can be used for dependencies and parent-child hierarchies. The ID you set will be replaced with a real system ID after import. - If you do not enter dates, they will be inherited from the parent Work Item.
- State (Requested, Draft, Active) is inherited from the parent Work Item, and cannot be set by the Import.
- Add new sub-items. For sub-items, enter the Parent ID.
- You can add new rows in between hammocks as needed. If you are adding a new hierarchy, use the unique ID you've manually set.
If you add new sub-items to a completed Work Item, the parent will become 'Active'. - Edit Work Items and additional details as needed.
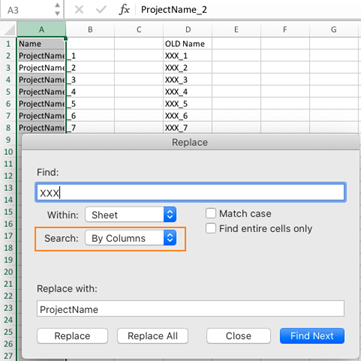
Note: If you use Excel's Replace All function to edit multiple cells, you must first change the search option from Search By Rows (default) to Search By Columns.
- Dependencies: Add simple Finish to Start (FTS) dependencies by adding the IDs of the predecessor items. Add multiple predecessors by separating IDs with a comma ",". If you do not have predecessors in your existing plan, add a column to your Excel file.
- Add new Work Items as new rows.
Tip: Always use this template as your starting point. Importing a file with mismatched or missing headers will result in errors.
File Requirements
Your import file must meet the following criteria:
|
Category |
Details |
|
Supported formats |
.xls or .xlsx (Microsoft Excel) |
|
Maximum rows |
500 rows (remove unnecessary rows for best performance) |
|
Template |
Must use the AdaptiveWork export template (see Getting the Template below) |
|
Column headers |
Headers must match AdaptiveWork field names exactly |
|
Custom fields |
New columns must already exist as custom fields in AdaptiveWork before importing |
|
Related items supported |
Predecessors and Resources only |
| Field Types | Not all field types are supported in this version. The following field types are currently not supported and shouldn't be included in your import file to avoid any data or synchronization issues - Rich Text/Text Area, Controlling or Dependent Pick list, URL |
How to Import a Workplan
Follow these steps to import your Excel workplan into AdaptiveWork. The import takes place in three stages: uploading the file, reviewing and fixing errors, and finalizing the import.
Step 1 Open the Import Dialog
1. Navigate to the project you want to import into. This can be a new, empty project or an existing one you wish to update.
2. Click the Utilities tab in the ribbon.
3. Click Import Workplan.
Step 2 Upload Your File
The Upload File dialog opens.
4. Click the file area or browse to select your Excel file (.xls or .xlsx).
5. Once selected, the file name appears in the dialog (for example, PhoenixProjectPlan.xlsx).
6. If your file is already correctly formatted, click Continue.
7. If you need to choose a different file, use the delete icon next to the file name to clear your selection before proceeding.
Step 3 Review the file in the Preview Window
After the file is processed, the Imported Work-Plan Preview window opens. This window shows all the rows from your file in a spreadsheet-style view, along with an Errors panel on the right side – Basic Errors, Business rule errors.
The top of the preview confirms the total number of entries imported (for example, "96 Entries Imported").

Understanding the Errors Panel
The Errors panel on the right guides you through a two-step process:
|
Step |
Error Type |
What to Do |
|
Step 1 |
General (Basic) Errors |
Fix all basic errors first. The system highlights the exact cell where each error occurs. Simply click the error in the panel and AdaptiveWork takes you directly to the problematic cell. Edit the value inline and move on to the next error. Once all basic errors are resolved, click Continue. |
|
Step 2 |
Business Rule Errors |
Business rule errors appear one at a time after all general errors are cleared. Unlike basic errors, the system cannot navigate directly to a specific cell. instead, read the error description carefully to understand what needs to be corrected, then locate and fix the relevant row or value in the preview grid manually. Resolve each error before the next one appears. Once all business rule errors are resolved, system uploads the file. Click Finish to close the import dialog. |
|
ℹ Tip Business rule errors can be detailed — for example, a task with a start date earlier than its parent milestone, or a milestone with a negative duration. Read each description fully before making changes. |
Filtering the Preview
Use the Dropdown at the top-left of the preview to filter the view. You can choose to display all rows, only rows with errors, or only updated rows making it easier to focus on what needs attention.
Step 4 Finalize the Import
Once all errors have been resolved:
8. The system uploads the file to your project in the background.
9. Click Finish to close the import dialog.
10. Your project Workplan is now updated with the imported data.
Additional Information
- Import does not allow you to delete Work Items in AdaptiveWork
- You cannot add new parent items above the existing Project
- Import creates regular work items only, and does not support Recurring Tasks or Shortcut work items
- You can set dates for work items in Requested, Draft, Active or On Hold states.
- Cancelled items: You cannot add new sub-items under Cancelled Work Items.
- Scheduling: If you set both Start and Due Date and a Duration, the Duration will not be imported.