
Jira Integration V2
Notes:
- We support integration with Jira Software only. We do not support Next-gen or other Atlassian products, such as Jira Service Desk, Jira Align, etc.
- This feature incurs additional fees.
- This integration uses AdaptiveWork's iHub application. Some of the sections below refer to the iHub article, which describes the integration options in detail.
This page describes the Jira integration and includes the following sections:
- Overview
- Integration and synchronization process
- Working with multiple instances of JIRA
- Basic Setup
- Integration Use Cases:
- Research and development use cases
- Syncing any type of Jira issue with a AdaptiveWork case
- Linking AdaptiveWork tasks with Jira issues and projects
- Syncing Support Tickets
- Syncing timesheets and worklogs
- Syncing social communications
- Managing Projects in a Jira-integrated environment
Overview
Jira is a flexible software development tool, developed by Atlassian and used primarily by software and services teams for managing product life cycles and support-related issues.
The AdaptiveWork integration with Jira has been developed to support a variety of use cases to allow AdaptiveWork customers to configure the integration between the two systems in a way that better fits their business needs.
AdaptiveWork supports integration between a single AdaptiveWork account and multiple instances (up-to ten) of Jira. The integration supports both on-demand and on-premise versions of Jira and all previously supported use cases.
One of the main use cases is to support the ability to manage cross-functional projects, where the detailed R&D part of the project is managed by developers in Jira, and the effort and status updates are synchronized back into AdaptiveWork. Project managers, executives or any other stakeholders are provided with a clear view of the entire product launch, regardless of whether part of it follows Agile methodologies (the R&D part), or the traditional ‘waterfall’ practices.
AdaptiveWork’s Jira integration comes out of the box with best practice mappings and events so you can hit the ground running. The AdaptiveWork integration with Jira has been developed to support a variety of use cases to allow AdaptiveWork customers configure the integration between the two systems in a way that better fits their business needs.
For more information on the Jira Integration, please review the webinar that describes the value drivers and technical aspects of the integration.
* Getting started PS package required
Additional changes to Best Practices, though easy, should be done carefully. It’s recommended you contact your AdaptiveWork Customer Success Manager if you wish to update or create your own mappings.
Integration and Synchronization Process
AdaptiveWork is integrating with Jira using AdaptiveWork’s iHub integration platform which establishes a connection to Jira by calling Jira's API.
During the initial one-time setup process, the iHub performs a handshake between the two systems in a secure manner.
After the integration is established, the synchronization process can be triggered from both JIRA or AdaptiveWork based on configured triggering events, or scheduled to run on a daily basis.
Triggered synchronization
- When the synchronization process is triggered from Jira, for example, when a new issue is created in Jira, Jira uses Jira's REST API webhooks to call back to AdaptiveWork’s iHub.
- When the synchronization process is triggered from AdaptiveWork, for example, when issue details are updated in AdaptiveWork, AdaptiveWork web service connects to the iHub, which then sends a call to Jira's API.
Scheduled synchronization
AdaptiveWork supports a daily synchronization process using iHub in 2 separate cycles (Jira to AdaptiveWork and AdaptiveWork to Jira). Once initiated, the scheduled process iterates on all records that are mapped in the iHub sync registry (e.g. AdaptiveWork task to Jira Issue), and executes a sync using both systems' APIs.
In each scenario, an active connection or network route must be opened, enabling iHub to access the Jira server's internal API from an external network.
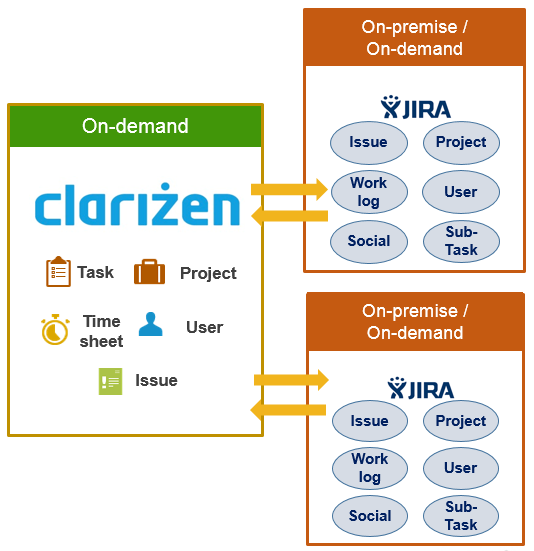
If your organization employs multiple Jira instances, for example, separate instances of Jira per customer, you can now integrate each Jira instance with your AdaptiveWork account. You can also work with a mix of on-premise and online instances of Jira.
AdaptiveWork supports up to 10 Jira instances, however this can be expanded if needed. The integration supports both on-demand and on-premise versions of Jira and all previously supported use cases.
Each JIRA integration has its own set of mappings and events, which can be configured independently. You can switch between integrations using a list of Jira organization names in the iHub application.
Note: You must have administrative privileges for both Jira and AdaptiveWork to enable and configure each integration.
Using Multiple Instances
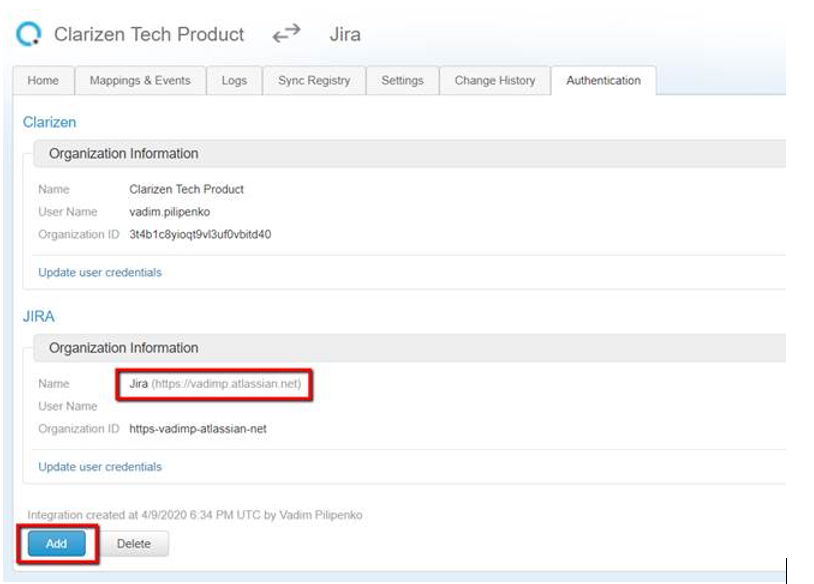
You can add another Jira instance in the Authentication tab in iHub. Each Jira instance will be identified by its unique name.
After adding additional instances, you will be able to switch between instances by clicking on the Jira instance selector.
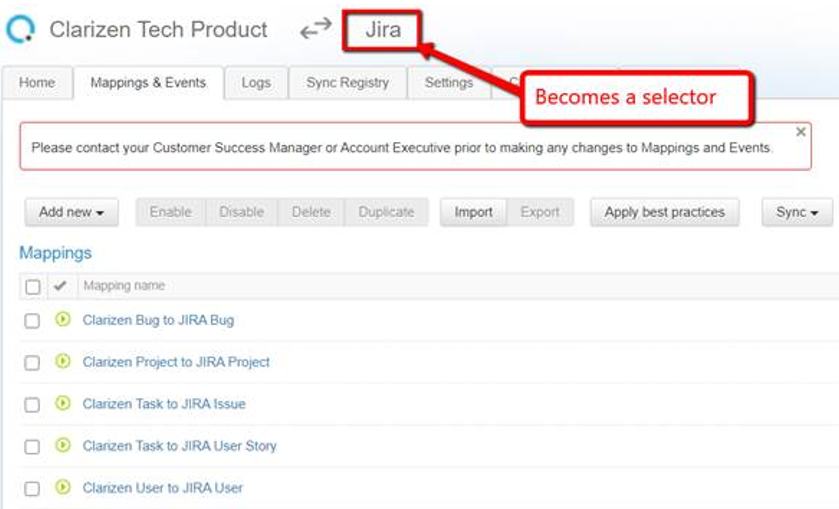
For each instance, you can configure events/mappings and check the sync.
Important Note: Avoid creating identical events (same conditions) for different Jira instances, because iHub does not support a one-to-many (one Work Item to multiple Jira issues) sync process, however it does not block it.
A best practice is to create a custom field in AdaptiveWork, which will identify the target Jira instance, and then add it to the event’s conditions. This is to ensure that an event is triggered in only one Jira instance. This way the automatic (event-based or scheduled) sync will work properly.
When invoking the Sync to Jira action for a particular item in AdaptiveWork for the first time, you will be asked to specify a mapping as well as the target Jira instance. This info will be logged in the sync registry, and this way iHub will know the target Jira instance to sync with for any consecutive syncs.
System Requirements
AdaptiveWork supports integration with the cloud and on-premise versions of Jira (and Jira Agile) version 6.1 or later.
Before you Begin
Consider the following before starting the integration:
- This integration obsoletes the previously released application for Jira integration. If the application has been installed in your environment, you must uninstall it (in Settings > Applications) before configuring the integration.
- The instructions below assume that you have a working instance of Jira .
- A basic understanding of Jira is required. You can review the self-paced training material provided by Atlassian.
- When integrating with an on-premise installation of Jira, ensure that Jira's TCP listening port is open. Jira's default port number is 8080.
- You must have administrative privileges for both Jira and AdaptiveWork to configure the integration.
Basic Setup
To configure a basic integration of AdaptiveWork with Jira, follow these steps:
- Configure Authentication of AdaptiveWork in Jira
- Configure Authentication of Jira in AdaptiveWork
- Enable Mappings and Events
- Configure Synchronization Options
1) Configure Authentication of AdaptiveWork in Jira
- Log into Jira as a system administrator.
- Click the Gear icon in the top-right corner.
- Select Applications.
- Click the Application Links in the left menu.
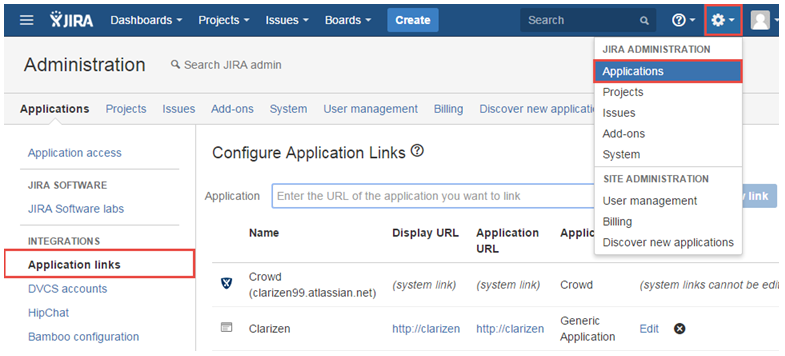
- In Configure Application Links, enter in the Application text box: http://www.clarizen.com

- Click Create New Link.
In the Configure Application Link prompt window, click Continue.
If setting up the Jira On-Demand version, select the Use this URL checkbox to prevent further validation messages.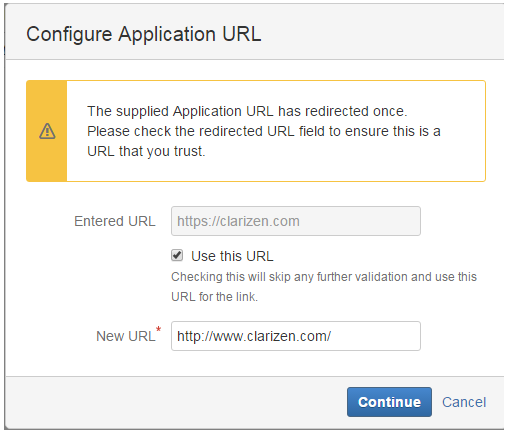
- In the Link Applications screen, enter the following values and click Continue:
- Application Name: AdaptiveWork
-
Application Type: Generic Application
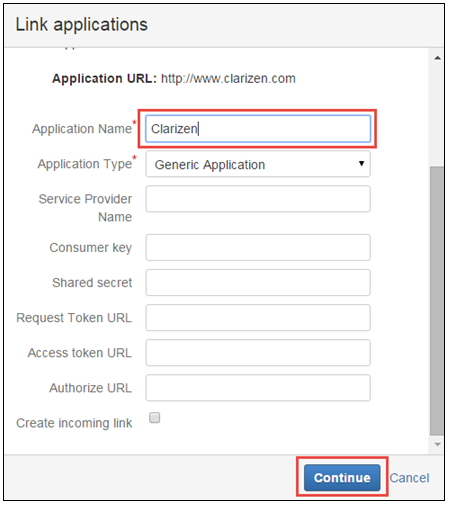
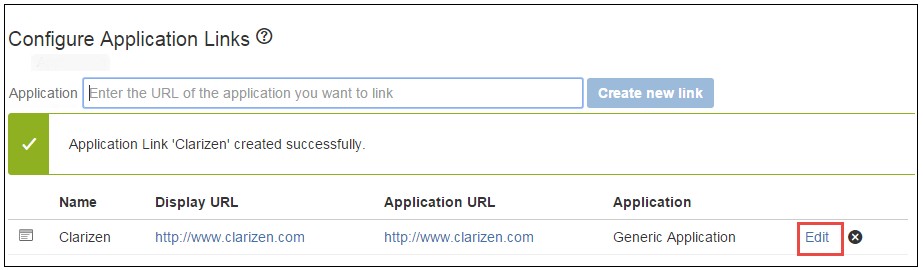
A message appears confirming that the application link was created successfully.
- Click Edit to edit the new application link.
- In the Configure AdaptiveWork screen, click the Incoming Authentication link and enter the following values (use the scrollbar on the left to view all the fields):
- Consumer Key: 940E44CF4FCF4E988D96AAF2B75AD93D
- Consumer Name: AdaptiveWork
-
Public Key:
MIIBIjANBgkqhkiG9w0BAQEFAAOCAQ8AMIIBCgKCAQEAzru98MCpINB0/7Zt9s3YCTDQvRIxJRmthHMMWuUCwxRDPn055uUyL/+Qj9Ta8trwdq6DXpLybgjEHrttQvt2v25fxfbmzknR/ik9DspEg2lEgei3i1HstAb70wUhrkKmUVd8xTi9osiS/O10UWzoBNezPhX4Q8Umq/inAXGfqR1Z3DtRCHBrLYghuh8dS9q7nJdTsnzR3SAYTJ30L1jjFN4YMOYR/DPe2VD5ldjRgaN/pOX10tyeRo4Dj4xHezbGSD0qtYC7mJ0xNrO42IoJEyjo5ePXmFJqkS9vE9srxFrZ3AvOHW1xggFnVXADnUNkawAHAZBp6n2Iz65Jg/XM7QIDAQAB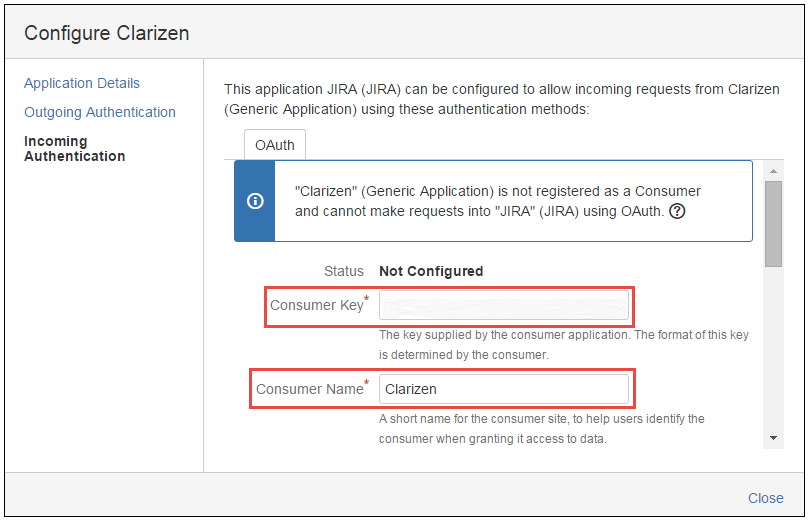
- Click Save and Close to close the dialog box. Authentication has been configured in JIRA for AdaptiveWork.
2) Configure Authentication of Jira in AdaptiveWork
- Log into AdaptiveWork as the system administrator.
- Click your name in the top-right corner and select the Settings option.
- Open the Extensions tab.
- In the Connected Web Apps section, click Allow Access for Jira Integration.
Note: Allow Access changes to Revoke Access which indicates that the integration status is enabled.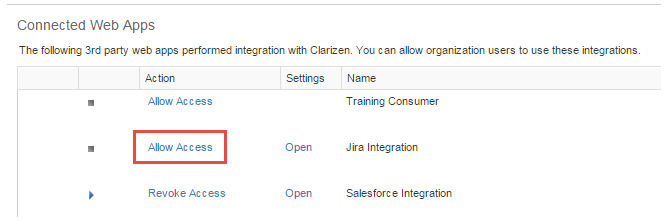
- In the Settings column click Open.
- In the Authentication tab enter the fully qualified domain name for your Jira instance. The domain name is different depending on whether you use a cloud or on-premise version of Jira.
- If you are authenticating with a cloud-based Jira, the domain name will look like:
https://<org_name>.atlassian.net
Where: <org_name> is the name of your instance of Jira . - If you are authenticating with an on-premise Jira installation, the domain name will look like:
https://<domain_name>:<port_number>
Where:
<domain_name> is the domain name used by your Jira integration.
<port_number> is the port number for your Jira installation (default is 8080).
- If you are authenticating with a cloud-based Jira, the domain name will look like:
- Click Login.
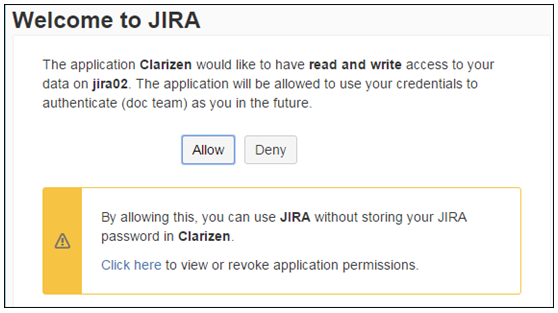
- In the Welcome to Jira screen, click Allow to give AdaptiveWork read and write permissions to your Jira data.
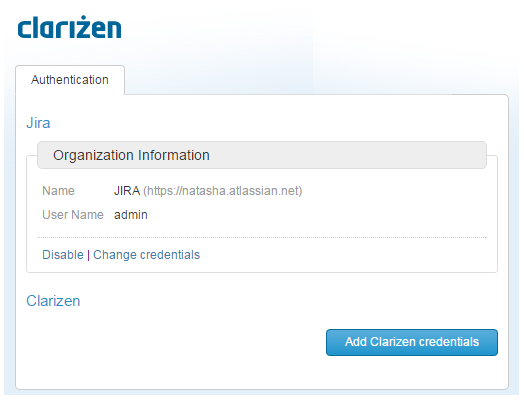
- Click Add AdaptiveWork credentials.
- In the Authorized Access screen, click Grant Access.
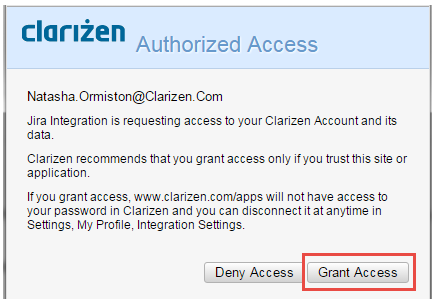
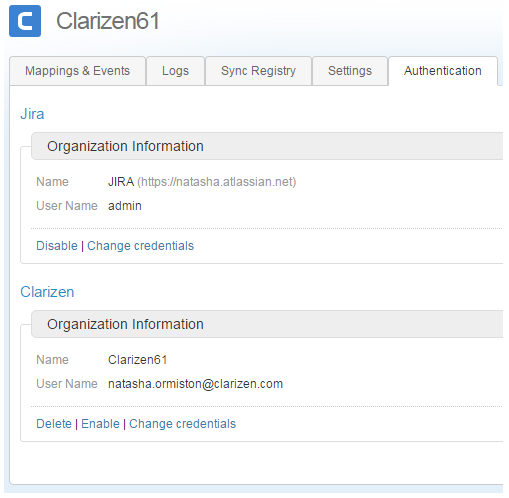
- Once the authentication has been successfully completed, the following screen will appear listing details for your AdaptiveWork and Jira applications.
As part of the integration configuration, you must map objects and events in AdaptiveWork with objects and events in Jira.
AdaptiveWork provides a predefined set of mappings (best practices) which are installed by default.
The best practice package contains AdaptiveWork configurations (workflows, custom fields, etc.) and integration hub (iHub) mappings and events to help you with the configuration.
Note: The best practices package is not counted against the usage quota.
To better understand what objects and events you need to configure, consult the Use Cases for AdaptiveWork and Jira Integration topic.
While the best practices include mappings for most of the scenarios, you may find it necessary to create additional mappings, or modify the existing ones.
For more information about how to create or modify mappings, refer to Mappings and Events.
4) Enable Mappings and Events
Once you have identified and configured mappings and events required for your integration, you must enable them.
To enable mappings and events:
- Select the checkbox next to each mapping and event you wish to enable.
- Click the Enable button.
5) Configure Synchronization Options
Configure synchronization options to specify when data synchronization happens between the two systems. For instructions on how to perform this task, refer to the Synchronization Options topic.
Integration Use Cases
- Research and development use cases
- Syncing any type of Jira issue with a AdaptiveWork case
- Linking AdaptiveWork tasks with Jira issues and projects
- Syncing Support Tickets
- Syncing timesheets and worklogs
- Syncing social communications
Research and Development Use Cases
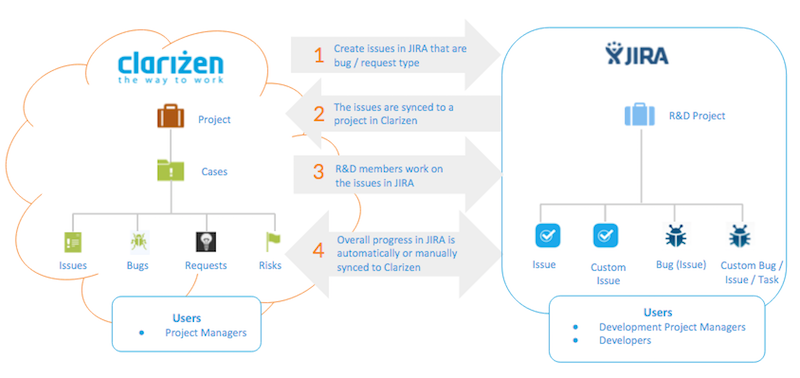
Manage cross-functional projects, where the detailed Research and Development part of the project is managed by the development team in Jira , while the effort and status updates are synchronized back into AdaptiveWork, so that project managers, executives or any other stakeholders are provided with a clear view of the entire product launch, regardless of whether part of it follows Agile methodologies (the R&D part), or the traditional ‘waterfall’ practices.
By default, any work item on the 1st, 2nd and 3rd level is synchronized. AdaptiveWork administrators can reconfigure the levels in AdaptiveWork's iHub settings.
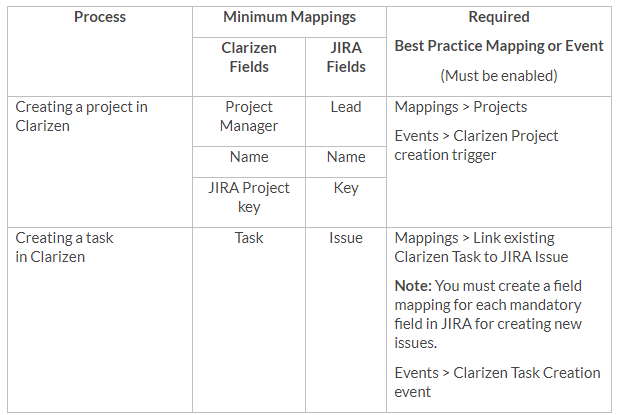
Minimum Mapping Requirements
Syncing Any Type of Jira Issue with a AdaptiveWork Case
In Jira, a project can contain multiple issues, where each issue can be a different type field. An issue in Jira can be a bug, new feature, documentation subtask, etc. An out-of-the-box mapping for Jira issue types and AdaptiveWork cases is available, but a AdaptiveWork administrator can change the mapping and events at any time. During the sync between JIRA issue types and AdaptiveWork cases, the cases are automatically related to a AdaptiveWork parent project.
Benefit: Since Jira issue types may be mapped differently than issues in AdaptiveWork cases, you can customize the mapping to sync cases in a way that makes sense for your organization.
Note: Bugs should be enabled in your AdaptiveWork account. To enable bugs, go to Settings > Profiles > Cases (under Item Types) > Turn Bugs On.
Linking a AdaptiveWork task/issue to a Jira issue
You can link issues or tasks in AdaptiveWork to separate Jira issues without having to sync the project. For example, two tasks from the same project in AdaptiveWork can be connected to issues in Jira under different projects.
To link a specific issue / task in AdaptiveWork to an issue in Jira without syncing to a project, follow these steps:
- In AdaptiveWork, go to an existing task in a project.
- In the Work Plan ribbon, click Utilities > Jira Sync.
- In the new window, click Link to Existing tab to link to an existing issue.
- Select the use case in the Define Use Case dropdown.
- Search for an existing AdaptiveWork work item to link the task.
See also Using the Unlinked Indication for Work Items and triggering workflows
Creating a new AdaptiveWork task under an issue within a Jira project
Since each issue holds projects for a different purpose, you can manage the object where a new issue is created in Jira-based on the AdaptiveWork task it is linked to.
See also Using the Unlinked Indication for Work Items and triggering workflows
Creating support tickets in AdaptiveWork
If a support team member creates a case in AdaptiveWork, such as a customer request or bug, it is not related to any particular AdaptiveWork Project. However, in Jira, issues must have a parent project. Therefore during the integration setup, a project for support tickets needs to be created in Jira to ensure these customer cases are synced and addressed in a specific JIRA project.
Creating support tickets in Jira
If a support ticket is created in Jira (by support or a third-party application like Zendesk), it is replicated in AdaptiveWork as a task, issue, or request in AdaptiveWork.
Note: Bugs should be enabled in your AdaptiveWork account. To enable bugs, go to Settings > Profiles > Cases (under Item Types) > Turn Bugs On.
Syncing Timesheets and Worklogs
Software developers report time worked in specific Jira issues, which are synced with the corresponding tasks in AdaptiveWork, providing project managers transparency across systems when approving reported times.
Note: Timesheets for periods over 24 hours may cause the sync to fail.
Syncing Social Communications
Syncing Jira and AdaptiveWork social communications promotes purposeful collaboration between different teams (Software Development, Sales, QA, Marketing, etc.). For example, R&D may comment on a JIRA issue while a project manager posts a reply from a AdaptiveWork task. Social posts and comments are synced between AdaptiveWork and Jira issues every 60 minutes.
Syncing File Attachments
All file attachments are accessible from both systems via an external web link. Files can be attached to JIRA issues or AdaptiveWork tasks. When files are synced between the two systems, a file object link is created in AdaptiveWork and a download link is created in Jira .
Note: To avoid file management issues, only links to the files are synced.
Managing Projects in a Jira-Integrated Environment
Adding a AdaptiveWork Project to Jira
This topic assumes that you have an existing project in AdaptiveWork, if not, create the project first. The user specified as the Project Manager for the project will become the Project Lead in JIRA.
- Click the Gear icon in the Work Plan and select Columns.
- Add the following fields:

- In the Create in Jira column, switch the toggle.
- In the Jira Project Key field, enter the new key for the project.
- A corresponding project will be created in Jira at the scheduled sync time. You can also check if the tasks have been added to the Sync Registry in iHub.
Once the project is created in Jira, you will see it in Projects > View All Projects page.
Adding a AdaptiveWork Task to Jira
This topic assumes that a tasks exists in AdaptiveWork, if not, create the tasks first.
- Click the Gear icon in the Work Plan and select Columns.
- Add fields that are required fields in Jira for creating a new issue (For example, Jira Assignee).
You must also add the JIJira A Issue Type field. - In the Create in Jira column, switch the toggle.
- In the Jira Issue Type column, enter the type of issue you are creating (for example, Task).
- Complete other fields that are required for creating an issue in Jira.
A corresponding project will be created in Jira at the scheduled sync time. You can also check if the tasks have been added to the Sync Registry in iHub.