
iHub Integration Platform
AdaptiveWork's integration platform is used to integrate 3rd-party applications with AdaptiveWork.
Using iHub, AdaptiveWork decreases the Total Cost of Ownership (TCO) for integrating external applications with AdaptiveWork, and allows for a quick ROI by supporting:
- No additional fees or support costs
- Single entity responsibility for the entire integration
This article should be read in conjunction with the specific integration you are using:
Jump to:
- Key features and benefits
- How it Works
- Accessing the iHub
- Setting Up Authentication
- Mappings and Triggers
- Synchronization options
- Audit
- Sync logs
- iHub Notifications
- Sync registry
- Settings
- Testing Jira or Salesforce Integrations
- Refreshing a Sandbox Account
- Troubleshooting the Sync Process
Key Features and Benefits
AdaptiveWork's features include:
- Automatic out-of-the-box integration setup (Best Practices package)
- Multiple system authentication support
- Unified user experience with core integrations
- Integration monitoring and notifications
- Manual full sync or scheduled change sync of objects between AdaptiveWork and the integrated system
- Customizable sync processes and mapping
- Customizable event triggers
- Real-time feedback on the status of the synchronization process
How it Works
iHub synchronizes entities between two systems by copying data from one system to another. The Admin defines what entities will be synchronized and what data will be copied using entity mappings.
Entity mapping
Entity mappings define the synchronization between objects in AdaptiveWork and the integrated system. This includes:
- Entity keys for objects define the key field for each entity (object). Generally it should be the unique entity identifier that shares the same value in both systems. For example email address for user, company domain name, etc.
- Field mapping entity fields - a list of field pairs that define which fields will be copied to which fields on the other system. There are three types:
- Create only - a field value will be copied only once the entity is created
- Sync only - a field value will not be copied when an entity is created, but will be copied each time it is synchronized after that.
- Create & sync - a field value will be synchronized in all cases.
- AdaptiveWork Link creation allows linking a newly created AdaptiveWork entity with another entity.
- Relations for both systems - defines what related entities will be synchronized for given entities. For example, a user can define that when a project is synchronized, all its active tasks should be synchronized as well. Relations can be defined for both systems.
- Synchronization fields for both systems.
Triggers
Entities can be synchronized between systems using one of the following methods:
- AdaptiveWork trigger
- External system trigger
- Manual sync
- Sync Now (from AdaptiveWork or from integrated system)
- Scheduled sync
Accessing the iHub
The iHub is easily accessed by Admin users from AdaptiveWork's Extensions Settings.
To access the iHub:
- As an Admin user, open AdaptiveWork Settings from under your username.
- Open the Extensions tab and scroll down to Connected Web Apps. This lists applications and purchased integrations.
- If the integration was not yet activated, click Allow Access next to the integration to enable it.
- Click Open in the Settings column of the integration you want to manage.
Setting Up Authentication
iHub provides a flexible authentication mechanism based on the integrated application requirements for a one-time authentication setup process.
All of the integration's security options are saved in AdaptiveWork for a seamless workflow between AdaptiveWork and the the 3rd-party integrated applications.
Depending on the integrated application, AdaptiveWork will use appropriate authentication methods to access resources of the integrated application. Available methods include:
- OAuth Single Sign On versions 1 and 2
- Oauth gives access to an external application with existing credentials
- Authentication to iHub is set up in the integrated application (such as Salesforce), management of sync and field mapping can occur in the iHub within AdaptiveWork or from within the integrated application
- Logon Authentication where a username and password is required to access resources in their application
To define OAuth authentication:
- Access the integrated system as an Admin user (such as Salesforce).
- Enable the integration.
- Define the User.
- In AdaptiveWork, open iHub as explained above.
NOTE
This may happen automatically depending on the integration type.
- Open the Authentication tab. Your third-party credentials should appear on top.
- Define your AdaptiveWork credentials. Click Add AdaptiveWork credentials to add users allowed to use the integration.
NOTE
You can disable or delete users from the list by selecting the user or users and clicking the relevant link below the list. To change a user's login information, click Change credentials.
To define Logon authentication:
- In AdaptiveWork, open iHub as explained above.
- Open the Authentication tab.
- Under the Organization Information section:
- Set your Company ID (if applicable)
- Enter your username
- Enter your password
- Click Login.
NOTE
Use the administrator's credentials of the integrated application.
- Under the AdaptiveWork section, click Add AdaptiveWork to add users allowed to use the integration.
NOTE
You can disable or delete users from the list by selecting the user or users and clicking the relevant link below the list. To change a user's login information, click Change credentials.
Mappings and Event Triggers
All of AdaptiveWork's integrations are based on connecting (or mapping) objects and fields in AdaptiveWork to objects and fields in the integrated system.
Once the system is mapped properly and the objects and fields in the two system are connected, event triggers can be defined to create field-specific synchronization based on activity in one or both systems. For example, in an integration with Jira, a bug created in Jira can create a bug in AdaptiveWork, and in an integration with Salesforce, a project can be automatically created in AdaptiveWork once a lead lifecycle in Salesforce is marked done, etc.
The initial setup of the integrated system in iHub includes automatic synchronization of out-of-the-box object and field mappings and event triggers between AdaptiveWork and the integrated system (Best Practices package). Most integrations allow you to then customize and edit these mappings and triggers, however some integrations require Professional Services assistance for initial (or editing) mapping and triggers. Depending on the integration, the Professional Services team required may be AdaptiveWork's (such as for Salesforce integration) or the integrated application.
Objects between the integrated system and AdaptiveWork can be set as bi-directional while specific field mappings follow the Master-Slave synchronization behavior, where one system is defined as the Master and the other as the Slave. To create bi-directional field mapping you will need to define the field twice, once with AdaptiveWork as the master and once with AdaptiveWork as the slave.
Creating a New Mapping
In the Mapping & Events tab you can define the various mappings and event triggers used in the system, as well as the daily sync activity between the systems and initiate a manual sync process.
You can export the object & field mapping to back up your settings, and with the import option, you can easily implement your settings on multiple platforms, for example when moving from a sandbox environment to production.
Note: When packaging mappings and events, you must package mappings and events separately, so that you can first load the mappings, and then the events. Some events will not load properly if the mappings do not exist.
Even after changing or creating various new mappings, you can always utilize the default settings by clicking Apply Best Practices, which will import all of the default out-of-the-box best practices without overriding the work you have already done in personalizing the mapping end event settings.
To create a new mapping:
- Click Add new under the Mapping list.
- Give the mapping a clear Name.
- For additional information use the Description field.
- Define the Object mapping as described below.
- If applicable, enable Social feed synchronization.
- For project mapping, you can apply templates.
- Define the specific field mapping for the object as described below.
- Set the various (optional) additional settings.
- Click Save to save the changes made and close the window.
To edit or delete an existing mapping:
- Click Disable adjacent to the relevant object in to stop the selected object from synchronizing.
- Click Delete adjacent to the relevant object to delete it completely.
- For specific edits, open the mapping editor by clicking the Edit link adjacent to the relevant object (or the object itself).
- Edit the relevant section you wish to edit.
- Click Save.
Defining Mapping Objects
Define the object mapping in AdaptiveWork and in the third-party integration system. Object mappings can be created for any entity in AdaptiveWork, including custom fields.
Field mappings on the object level can either be created or retained in the respective systems depending on the Master-Slave relationship.
- If the field exists in the Master and not in the Slave, it can be created and synchronized in the Slave.
- If the field exists in the Slave but not in the Master it can be deleted or retained in the Master.
- If both fields exists then they can be synchronized.
To define the object mapping:
- Select the Entity to be synchronized in both AdaptiveWork and in the integrated system.
- Based on the selected entity, select the associated Key Field used as an identifier.
- Define the Deletion policy for both systems in the Delete Policy menu. The deletion policy determines whether the field will be deleted or retained in AdaptiveWork, or the integrated system if it was deleted from the other.
- Define the creation policy for both systems in the Create Policy menu. The Creation policy determines whether the field is to be created in AdaptiveWork or the integrated system when it does not exist, and was referenced in a separate mapping or event trigger.
Applying Templates
When mapping a project entity, you can apply templates to the project created and even apply a set of preset conditions to determine which template to use.
To apply templates:
- Select the Object entity in AdaptiveWork as explained above.
- Click + to open the Template Rules section.
- Click Add Template.
- Select a template from the list of available templates in your organization.
- Create rule(s) for the selected template (optional).
- Click Add Template to add additional conditional templates.
- When using multiple templates, select the order in which the rules are applied.
Select the checkbox next to one of the templates and use the Arrow button to move the selected template.
Enabling Social mapping
Social syncs are performed every 10 minutes provided that the integrated application has a corresponding, accessible API, and that the social sync checkbox is selected in the object mapping.
Defining Field Mapping
Some objects may have more than one information field associated with it.
Once the object is defined, you need to define all of the relevant fields associated with that object, and define the synchronization process between the two systems.
To define the field mapping:
Note: When creating new field mappings, the fields will not retroactively update records that were already created. Those records should be manually synced.
- Select the Object entity in AdaptiveWork as explained above
- Click + to open the Field Mapping section.
- Define the sync Direction.
- From AdaptiveWork - defines AdaptiveWork as the Master and synchronizes the data from AdaptiveWork to the integrated system
- To AdaptiveWork - defines AdaptiveWork as the Slave and synchronizes the data from the integrated system to AdaptiveWork
- Select the integrated system field name from the list.
The list is automatically filtered based on the defined entity. - Select AdaptiveWork's field name from the list.
The list is automatically filtered based on the defined entity. - In the Event Type menu, define whether to create, synchronize, or create & sync the data in the direction defined in step 3.
Note: Create is normally used only for the initial process where you want to ensure that all fields are available in both systems.
- Click Add to define additional fields.
- Repeat steps 3-7 for all of the relevant fields associated with the defined object.
Defining Links and Relations
AdaptiveWork allows you to link and associate related objects as part of the process. In addition you can populate fields both in AdaptiveWork and the integrated system with the synchronization status and date for easy monitoring of the sync process.
AdaptiveWork Links
You can link the mapped AdaptiveWork object to additional objects in AdaptiveWork when a new object is created. For example, link a newly created project to the relevant customer.
To create AdaptiveWork links:
- Select the Object entity in AdaptiveWork as explained above
- Click + to open the Create AdaptiveWork Links section.
- Click Add.
- Link the defined object to an object from the Link to list.
- Some objects may require a linking method. Select the linking method from the using list.
- Define whether to use a Source Object Field from the available list or an evaluation criteria identifier.
- Use source object field - Select a field from the relevant object in AdaptiveWork.
This option requires a mapping between the two item types and will utilize the Object Mapping definition (above) to locate the object in AdaptiveWork.
The link will be created for the object within AdaptiveWork and synced to the object referenced by that field.
If the selected object is not synced to AdaptiveWork, it may be created if the AdaptiveWork Create Policy is Create in the relevant object mapping. - Identified by - Allows you to add evaluation criteria which will determine what object in AdaptiveWork to link to.
- Use source object field - Select a field from the relevant object in AdaptiveWork.
- Click Add to define additional links.
- Repeat steps 4-6 for all required links.
AdaptiveWork Relations
AdaptiveWork relations allows you to map multiple relations to an object in the integrated system.
To define relations:
- Select the Object entity in AdaptiveWork as explained above.
- Click + to open the Map Related AdaptiveWork Objects section.
- Click Add Related Object.
- Define the Related object.
- Define the Relationship type.
- To use conditions:
- Click Add.
- Define the desired conditions.
- When using multiple conditions, you can define the logical expression as either AND (default), or OR.
- Select an object in the integrated system to map.
A link will appear to either view the object mapping if mapping was already defined or to create a new object mapping. In both cases the mapping editor is opened where you can view the mapping settings or complete the same process for the rest of the mapping options for a new mapping. - Click Add Related Object to create an additional relation mapping.
- Repeat steps 4-7 for each of the relations.
Synchronization Fields Mapping
You can define fields in both AdaptiveWork and the integrated system for the purpose of monitoring your sync process.
If sync monitoring on the object is required, we recommend using custom fields created for this purpose.
To set sync field mapping:
- Select a field to be populated by the Sync status in the integrated system.
- Select a field to be populated by the Sync status in AdaptiveWork.
- Select a field to be populated by the Sync date in the integrated system.
- Select a field to be populated by the Sync date in AdaptiveWork.
Defining Event Triggers
Object creation in AdaptiveWork can be triggered by events in the integrated system and vice versa.
The events can be defined with or without conditions to create a seamless workflow between the systems.
To create a new trigger:
- Click Add New under the Event trigger list.
- Give the trigger a clear name.
- For additional information use the description field.
- Define the system in which the trigger should occur.
NOTE
The various trigger options may differ depending on the integrated system you are defining.
- Select the triggering object.
- Define the condition rules.
- Define the object to be created due to the condition.
- Add relations (if available), see above for instructions.
- Click Create to complete the process and close the editor.
To edit an existing trigger:
- Click Disable adjacent to the relevant trigger to stop the trigger function.
- Click Delete adjacent to the relevant trigger to delete it completely.
- For specific edits, open the trigger editor by clicking the Edit link adjacent to the relevant trigger (or the trigger itself).
- Make the desired changes
- Click Update to save the changes and close the editor.
Synchronization options
In addition to the event trigger sync you have the option to define up to two daily sync processes or initiate a sync manually.
NOTE
Social syncs are performed every 10 minutes provided that the integrated application has a corresponding accessible API and that the social sync mapping was activated.
The sync process is located in the Mapping & Event tab.
Click Sync Now to initiate a manual sync process, which affects all of the data defined to be synchronized.
The daily sync process only synchronizes changes to the mapped fields that have occurred since the previous sync process.
To define a daily sync:
- Select the checkbox for the relevant sync process.
- Define the time to start the sync process.
NOTE
You may notice that some hours in the list are grayed out. This means that these times are already used by existing scheduled workflow rules in your AdaptiveWork account(s) and cannot be selected.
Audit
The Audit tab includes a log for mappings. Easily trace previous mapping changes to help in troubleshooting and verification scenarios. The last 100 updates to mappings are available.
Audit details include the mapping name, action type (create, modify, etc.), user, date, old and new values.
Sync logs
The Logs tab displays a log of all the trigger sync statuess for every time the integrated and AdaptiveWork systems are synchronized.
The Log toolbar includes the following options:
- AdaptiveWork Organization name - allows you to select the relevant AdaptiveWork Organization, specifically for integrations allowing multiple organization synchronizations
- Filter the the information shown in the log table using the Show menu. The options include:
- All
- Failed - Objects that encountered a serious error and were not able to complete the synch process
- Partially succeeded - Objects successfully synchronized however the synch process for one or more associated objects were unsuccessful
- Not succeeded - Objects with a Failure, Partial Success, or Pending Retry status
- Success - Objects successfully synchronize
- Refresh - click Refresh to view the latest log sync data
- Global Search box - enables you to search for specific items in the logs
The Log table includes the following information:
- Scheduling Icon
 shows whether the sync item is scheduled, lines without icons represent syncs based on event triggers
 - The Status icons - this icon appears for pending synchronization processes and errors that occurred in the sync process
If no icon appears then the sync process completed successfully- The System will retry the sync 5 times during which time the sync is considered as pending an will display an Amber icon

- If on the fifth time it does not work the sync will be taken out of the process and will be considered unsuccessful and will display a Red icon

- The System will retry the sync 5 times during which time the sync is considered as pending an will display an Amber icon
- Date filter - the Date of the sync can be filtered to display specific dates in the log table
- Trigger name as defined in the Mappings and Triggers editor
- AdaptiveWork Types, such as Project, User, or Customer
- AdaptiveWork object - objects may be hyperlinked in order to allow you to access the actual AdaptiveWork object
NOTE
Not all AdaptiveWork objects support hyperlinks.
- Integrated system type names
- Integrated system object names
- Messages describing the sync status type as well as additional status related information
You can also export the logs to Excel to manage and analyze your sync log.
iHub Notifications
Administrators can configure email notifications for different iHub events.
Notifications can be configured for the following events:
- Scheduled sync
- None - Receive no notifications.
- Any scheduled sync - Receive a notification when any scheduled sync has been completed with full details and log file attached.
- Only when objects fail - Only receive a notification when any objects have failed in a scheduled sync.
- Only when objects partially succeeded - Receive a notification when any object has only partially succeeded. (Partial success occurs when the syncing of an object’s related items has failed).
- Event triggers
- Fail - Receive a notification when an event trigger has failed.
- Partial success - Receive a notification when an event trigger has only partially succeeded. (Partial success occurs when the syncing of an object’s related items has failed).
- General system errors (authentication/communication) - Receive a notification when a general error has occurred, such as an authentication error - invalid credentials that have been entered is preventing successful authentication. For new integrations, this notification is enabled by default and is sent every time a system error occurs.
To manage iHub email notifications:
- Go to Settings > Extensions > Open (app you want to configure notifications for).
- Click Settings.
- Under Notifications, choose the cases in which you want to receive email notifications.
- Under Send To, check the box to receive the notifications in your inbox (as the AdaptiveWork administrator who is currently logged in). You can also add other email account(s) the notifications should be sent to.
Note: The Other Email input box accepts semicolon-separated values.
Sync Registry
In the Sync Registry tab you can see a complete list of all the object mappings available in the integration.
The Sync Registry toolbar includes the following options:
- AdaptiveWork Organization name - allows you to select the relevant AdaptiveWork Organization, specifically for integrations allowing multiple organization synchronization
- System selector - filters the data based on mapping in AdaptiveWork or the integrated system
- Item type filter - allows you to filter the information shown based on item type
- Specific Search capabilities based on the map name and / or identifier
The Sync Registry data table includes information and action columns, including:
- Pending retry Icon
 - indicates pending synchronization processes, clicking the icon initiates an immediate sync attempt
 - Action - allows you to quickly remove object mappings from the sync process
- Last sync Date
- Sync Status
- AdaptiveWork Item Type, Identifier, and Name - object names may be hyperlinked in order to allow you to access the actual AdaptiveWork object
- Integrated system's Item Type, Identifier, and Name
Sync Registry Import
If you have been using AdaptiveWork and your third-party system (Salesforce, Jira, etc.) separately, and now want to integrate the systems, you can link existing objects using the Sync Registry import feature in the Sync Registry tab.
To map objects, you will need the ID from either AdaptiveWork and/or the third-party system, plus the Mapping Name.
If you only have one of the IDs, iHub will search for, and find the missing ID. If not found, a new object will be created with a new object ID.
To import mappings:
- Open the Sync Registry tab.
- Prepare the Excel file with the Id (for integrated system) and/or AdaptiveWorkId object IDs.
NOTE
- For Jira, use the Jira keys for projects and issues, and username for user.
- For Salesforce, use the Object IDs (the 18 chars option). Shadowed objects, such as opportunity, cannot be imported.
- AdaptiveWork uses the External IDs for all fields in the mapping.
- Save the file and click Sync Registry Import to import it into the system.
- Select the file and click Import.
- When the sync finishes, an Excel file will be available that includes a Result column that indicates success or an error message if the sync fails.
Settings
The Settings tab includes advanced options including the ability to refresh the integration metadata and to disable the entire synchronization process.
Click Refresh metadata after adding a new field to either AdaptiveWork or to the integrated system. The data structures and fields of the integrated system and AdaptiveWork will be refreshed.
After refreshing the metadata, a check mark appears on the button indicating that the metadata has been refreshed.N 
Click the Disable entire sync button to stop the entire sync process.
Testing Jira or Salesforce Integrations
With the Test feature, you don't have to leave iHub. You can now trigger the event and check the resulting actions all from within iHub.
Do all your testing in one app without moving between 3 apps (Jira/Salesforce - iHub - AdaptiveWork).
To test a Jira or Salesforce integration:
- In iHub, Click the Run Test button in the Mapping and Events tab.
- Define the test event.
- Click Run.
A Results window displays the successful/unsuccessful result for each step in the process as well as an error message explaining the error, making it easier to troubleshoot.
Refreshing a Sandbox Account
During the Sandbox refresh process, all existing AdaptiveWork Sandbox information is deleted and replaced with the Production environment details.
The following information is overridden by the refresh process:
- Linked accounts (AdaptiveWork-SFDC/JIRA)
- Mappings
- Events
- Synced objects information
- Settings
After a refresh, as Sandbox now reflects the Production settings, Sandbox iHub’s “foreign system” (e.g. Salesforce, Jira, etc.) now points to the Production account.
After each refresh, Administrators should reconnect their AdaptiveWork Sandbox Account to match the foreign system account.
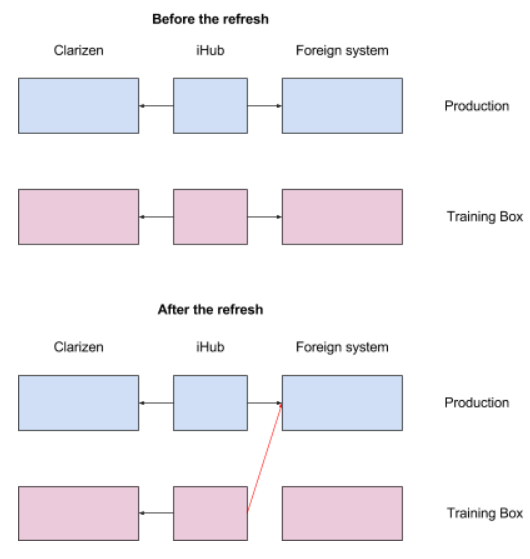
iHub Integrations are disabled during the Refresh process to prevent a situation in which Sandbox data could be unintentionally synced to a Production account.
For a secondary level of protection when using AdaptiveWork-Salesforce integration, AdaptiveWork Sandbox is blocked from connecting to Salesforce Production servers.
Mappings and Events
You may be building a new integration process in Sandbox which you are not ready to deploy on Production, but don’t want to have overwritten.
If your Sandbox settings differ from those in Production, and needs to be backed up before and restored after Sandbox Refresh, follow the instructions below.
Backing Up & Restoring Mappings & Events
To restore the iHub configuration back to the point prior to the refresh, follow these steps:
Before Refresh
- Log into your AdaptiveWork Sandbox account.
- Go to: https://app.clarizentb.com/AdaptiveWork/Pages/Admin/AdminIntegrations.aspx
- Choose the open relevant integration (SFDC, Jira)
- Open the Mappings & Events tab.
- Mark all mappings and events and click Export.
- A JSON file will be created and downloaded to your local machine.
- Important Note: the Sandbox Refresh process does not delete or modify the foreign system triggers (Jira’s Webhooks / SFDC Workflow Rules) and they remain unaffected by iHub, but still will be triggered by the foreign side.
So, select all Events and click Delete.
After Refresh
- Log into your AdaptiveWork Sandbox account.
- Go to: https://app.clarizentb.com/AdaptiveWork/Pages/Admin/AdminIntegrations.aspx
- Open the Authentication tab.
- Click Delete. This will clear the Sync Registry information.
- Connect the AdaptiveWork account to the desired foreign system account.
- Open the Mappings & Events tab.
- [Optional] If not needed, delete all out-of-the-box mappings and events (Best Practices package).
- Click Import and choose the JSON file that you exported before the refresh.
Notes:
- The refresh process will keep the SyncRegistry as it was in Production. This means that the foreign side of SyncRegistry holds production data, which cannot and should not be used in Sandbox. SyncRegistry data will be deleted once you delete the integration.
- If your Mappings reference custom fields on the foreign system which exist in Production systems but not in Sandbox, your mapping will no longer work properly.
- Since JIRA has no Sandbox environments, iHub can’t detect and prevent Sandbox from reaching JIRA Production automatically. It means that AdaptiveWork Sandbox can sync with JIRA Production systems. Enabling the integration can cause unexpected and undesired results. It is highly recommended to avoid this scenario.
Troubleshooting the Sync Process
The following elements affect the sync process, and should be checked in case of sync issues:
Pending retry and failed status
Hash
To avoid an unnecessary sync, we use a hash number that combines all field values in the Mapping so that if one of the fields in the mapping has been changed, the hash code is also changed, but If the field is not in the mapping then the hash is not changed and won't sync the item even if the modification time is after last sync on.
If the hash is reset to zero, the sync operation for a single item is forced.
Times in sync registry table
- Last sync on - the last time the item was checked to see if it needs to be synced
- Last update on - the last time the item was synced
When syncing all, we gather the objects from AdaptiveWork according to:
- Comparing ‘Last sync on’ time against the time of specific object modification. If the object has changed after the last check, then it is synced.
- Item is pending retry
- ‘Last sync on’ does not exist means the item was never successfully synced.
- Item is not deleted
- Item is on AdaptiveWork side and is not in failed status - on the integrated system side we send the field of ‘last sync on’ and in the integrated system it is compared to the object modification time.
Directions + sync back
When triggered the integrated system is updated and synced back to the original side.
On sync all and sync single, the AdaptiveWork side is updated and synced to the integrated side and then the integrated side syncs with AdaptiveWork. The sync operation does not sync back unless the item is new.
Changing mapping syncs all
When mapping is changed (any field), all items related to the mapping are synced.
Pending retry and failed status
When syncing an object fails, it get a status of pending retry. We try to sync it 5 more times but if after 5 times is still fails, then it gets the status of failed and we don’t try to sync it again. In the sync registry tab we have a button ‘Retry Failed’ that can return the status from fail to pending retry and reset the number of times to zero.