
SharePoint Online - Managing Content
In this section
- Overview
- Key Benefits
- Supported Versions and Unsupported Functionality
- Linking Existing SharePoint Content to AdaptiveWork Items
- Uploading a File to SharePoint from AdaptiveWork and Linking it to an Item
- Selecting the Default Folder for Uploaded Files
- Site Collections as Default Integration Paths
- Related Files in Discussions Inherit the Default Integration Path
- Creating a New Folder in SharePoint from AdaptiveWork and Linking it to an Item
- Viewing SharePoint Content from AdaptiveWork
- Creating Folders in SharePoint and Linking to AdaptiveWork Work Items (Using Configurations)
- Upload Files Using Configurations
- Create a Default Site Location Path for a Customer
Overview
AdaptiveWork integration with SharePoint Online adds robust content management capabilities to the AdaptiveWork user experience. The integration supports all AdaptiveWork item types (work items, cases, etc.) and allows viewing, adding, and editing SharePoint content (files, folders, sub-sites and sites) directly from AdaptiveWork and linking them to AdaptiveWork items.
AdaptiveWork Customizations for automation and business rules are also supported.
Note: SharePoint folders are sorted alphabetically in AdaptiveWork.
Key Benefits
- Robust content management. AdaptiveWork users can:
- access and manage SharePoint content directly from AdaptiveWork
- easily link documents from SharePoint Libraries into AdaptiveWork
- add new content from AdaptiveWork to SharePoint, and edit linked content directly from AdaptiveWork
- Increased productivity
AdaptiveWork users can securely access the familiar SharePoint environment from AdaptiveWork projects. Do work faster by having all related collaboration content within the context of a project. - Governance and risk management
Manage risk with content management capabilities of SharePoint while having all work done in AdaptiveWork.
Supported Versions and Unsupported Functionality
- Permissions are based on permissions in SharePoint. For example, you cannot access SharePoint files via AdaptiveWork if you do not have direct access to the same file in SharePoint.
- SSO authentication. If you use SSO in AdaptiveWork, your users still need to be authenticated with SharePoint when logging in for the first time.
- At this time, when viewing SharePoint Online content associated with AdaptiveWork items, the content opens in SharePoint and not in the AdaptiveWork file viewer.
Download Overview of SharePoint Online integration with AdaptiveWork to learn more about the integration and supported functionality.
Linking Existing SharePoint Content to AdaptiveWork Items
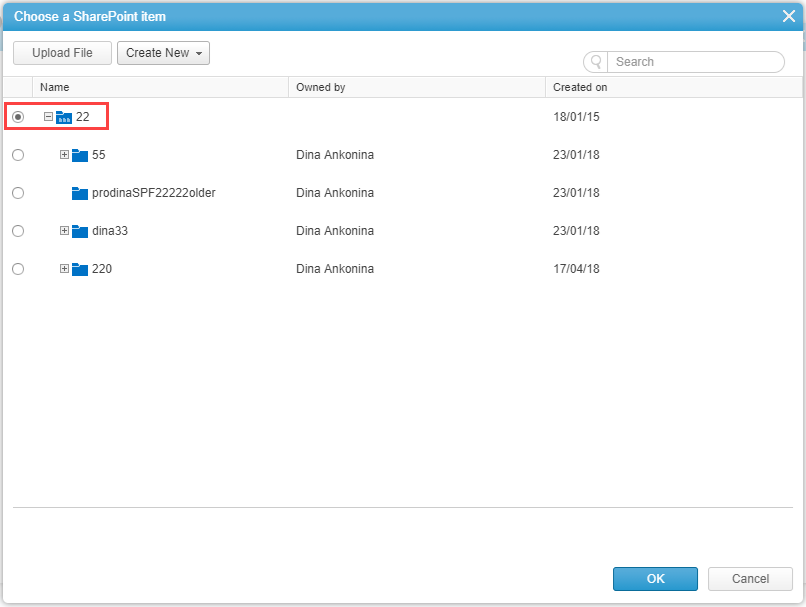
To link a file from SharePoint to a AdaptiveWork item, for example a work item:
Note: The process is similar for all AdaptiveWork items.
- In AdaptiveWork, navigate to the work item. Make sure that the item is selected.
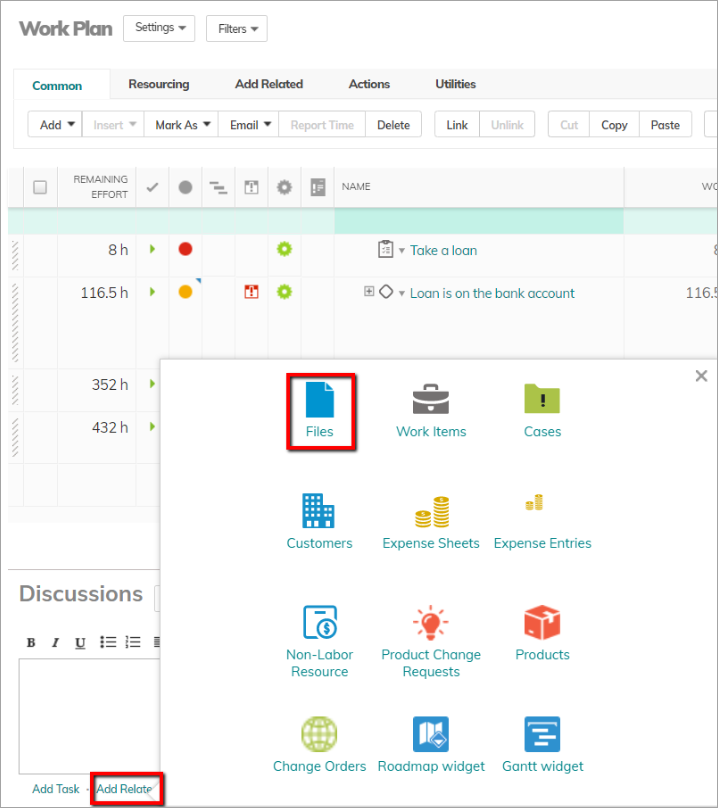
- In the ribbon, click Add Related > Files or click Add in the Files panel.
- In the Add Files pop-up window, click SharePoint.

Note: If your session to SharePoint has expired, you will need to re-authenticate your account by going to My Details > Integration settings. If you do not see the setting in the Properties card, use the Search option and type in Integration Settings. - Click Browse to view and select a file or library in SharePoint.
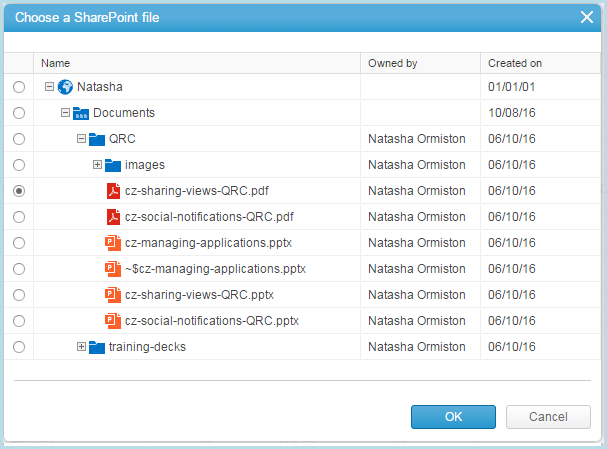
- Click Ok. The newly added file or library is now displayed in the Files panel.
Uploading a File to SharePoint from AdaptiveWork and Linking it to an Item
To create a new folder in SharePoint and link it to an item, for example a work item:
Note: The process is similar for all AdaptiveWork items.
- In AdaptiveWork, navigate to the work item. Make sure that the item is selected.
- In the ribbon, click Add Related > Files. You can also click Add in the Files panel.
- In the Add Files pop-up window, click SharePoint.
- Click Browse, and in the SharePoint hierarchy, select the location where you wish to place the file.
- Click Upload and select the file from your computer. The uploaded file appears in the SharePoint location you selected.
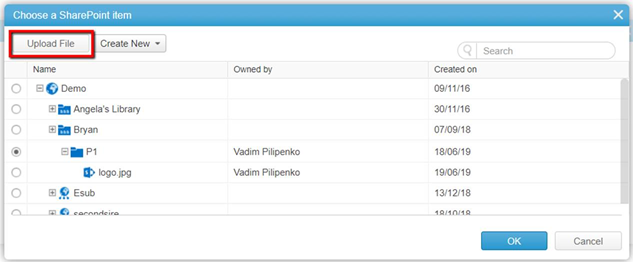
- Click OK.
- Click Save.
Selecting the Default Folder for Uploaded Files
You can change the default folder for Programs, Project Work Items or Cases (Bugs, Issues, Requests, and Risks), and the default folder will apply to all other Work-Items, such as sub-projects, milestones and tasks under the Program/Project Work-Item.
- In the Program/Project Work Item, access the Default Integration Path field.
- Click on the 3 dots to select the folder in SharePoint.
- Select any folder in the SharePoint hierarchy as the default folder.
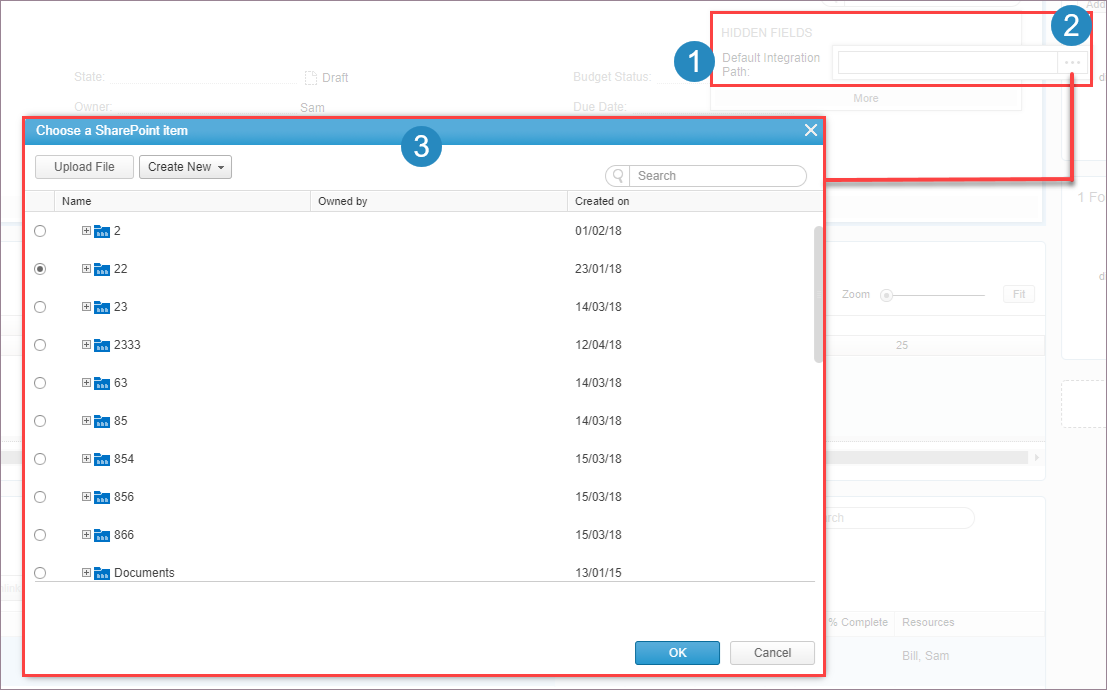
The selected folder -
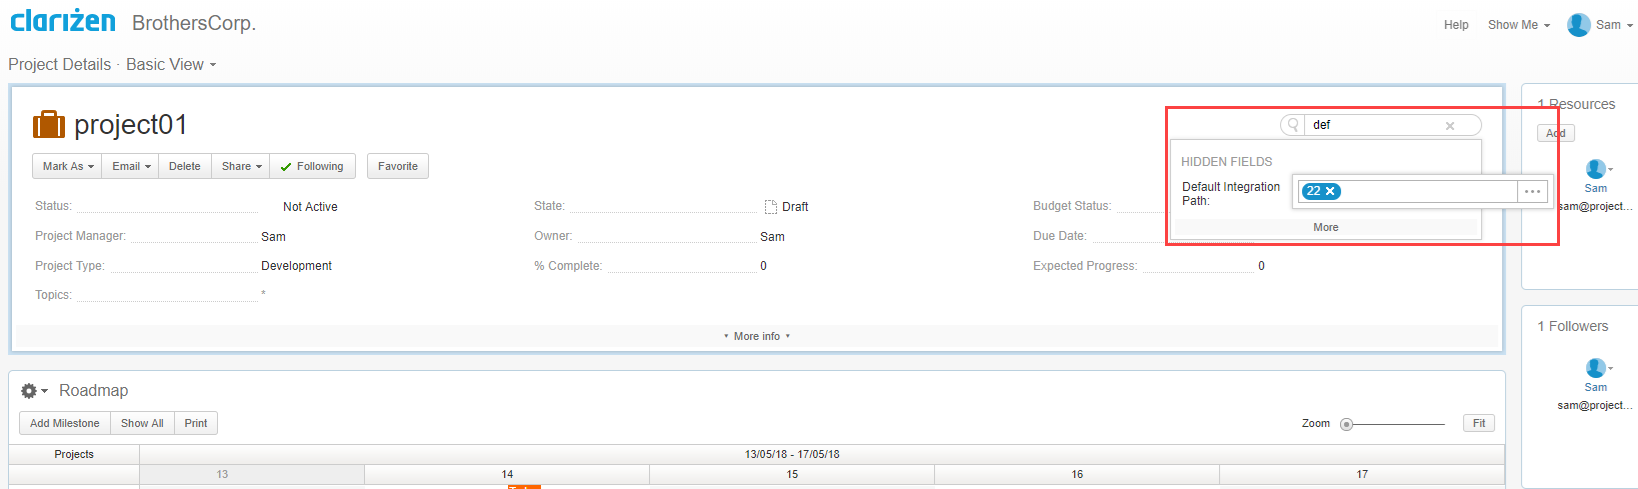
For the user uploading a file, the default folder will appear at the top of the hierarchy.
Note: This feature is meant for easily locating the default folder, and should not be used for security measures. As such the Search option will find all folders in the SharePoint hierarchy including those above the default folder.
Site Collections as Default Integration Paths
In addition to adding folder locations as your default file upload destinations, you can define different Site Collections across Work Items or Cases (Issues, Bugs, and Requests).
This is particularly useful when working with Microsoft Teams, and different teams are storing files across various Site Collections. Learn more.
Related Files in Discussions Inherit the Default Integration Path
When you upload a file from the Discussions panel in Work Items or Cases (Bug, Issue, Request, or Risk), the set location for the file will be that of the Default Integration Path field of the parent Work Item or Case.
This way files are sent to the same location as other Work-Item or Case-related files. If the Default Integration Path is not defined, the file is uploaded to the SharePoint root folder.
Creating a New Folder in SharePoint from AdaptiveWork and Linking it to an Item
To create a new folder in SharePoint and link it to a work item, for example a work item:
Note: The process is similar for all AdaptiveWork items.
- In AdaptiveWork, navigate to the work item. Make sure that the item is selected.
- In the ribbon, click Add Related > Files. You can also click Add Files panel.
- In the Add Files pop-up window, click SharePoint.
- Browse to the location where you wish to create a new folder.
- Click Create new.

- Enter the folder name.

- Click OK. The newly created folder appears in the SharePoint hierarchy.
- In the Add Files pop-up window, click Save to link the new folder to the selected work item. The folder appears in the Files panel.
Viewing SharePoint Content from AdaptiveWork
To view content associated with an item, for example a work item:
Note: The process is similar for all AdaptiveWork items.
- In AdaptiveWork, navigate to the item, for example a work item.
- In the Files panel, click the name of the file or SharePoint Library name you wish to open.
Create Folders in SharePoint and Link to AdaptiveWork Work Items (Using Configurations)
Create SharePoint folders using customizations in AdaptiveWork, and link the folders to Work Items in AdaptiveWork.
The new SharePoint integration feature adds functionality around automation and workflows, saving time and manual work in the business routine.
A common example of this implementation includes automatically creating a folder in SharePoint for every new Project created in AdaptiveWork, and then linking that folder to the newly created Project.
The new integration options allow for various customizations in your organization. Here are two examples.
Notes:
- The following procedures assume familiarity with AdaptiveWork's Configurations module and functionality.
- Web links to folders or files created via configurations are not dynamic. If a folder or file is renamed, the link can break. In such cases it is recommended to select the folder or file using the interface, where the links are dynamic.
Example 1: Create a SharePoint folder for new projects
The following example describes how to create a Workflow Rule in AdaptiveWork that automatically creates a SharePoint folder whenever a new project is created. The folder in Sharepoint will be created with the same name as the newly created Project, and will be linked to the Project, making it easy to connect a related file.
1. Create the custom Workflow Rule
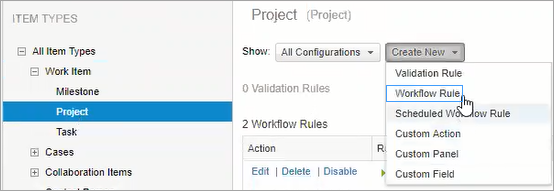
- In Settings > Configure, select the Project Work Item.
- Click Create New > Workflow Rule.
- Define Permissions as needed.
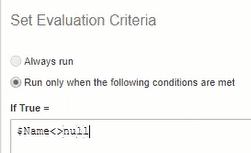
- In Set Evaluation Criteria, select to run the rule only when a condition is met. Then enter $name<>null. Here we are defining the new Project name by calling any project that has a name (not null).
- In Set Actions, select New Item to run on the CurrentObject.
- For NewObject, select New File.
- For Type, select SharePoint Doc.
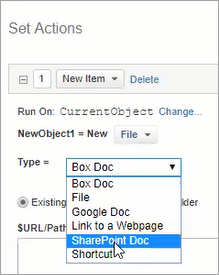
- Select New Folder.
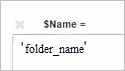
- In the $Folder name field, enter $Name.
- In the AttachTo field, enter CurrentObject(). Here we are connecting the folder to the newly created Project, so that you can add a file from the project's related items panel in AdaptiveWork.
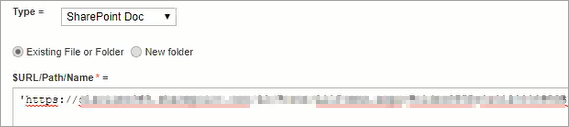
- In the SharePoint parent folder field, enter the path to the folder.
Notes:- Enter the full path, which includes the organization URL and SharePoint folder hierarchy. Example: 'https://companyname.sharepoint.com/Folder A/Folder B'
Your SharePoint organization URL can be found under Settings > Extensions > Integrations > SharePoint > Site URL. - Some predefined folders in SharePoint have special names only visible in the URL path. For example, the Documents folder for the path should be entered as shared documents (note the space). The Photos folder for the path should be entered with a preceding Lists item in the hierarchy, like this: /Lists/Photos/...
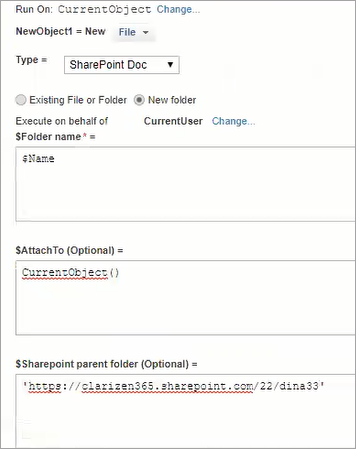
- Enter the full path, which includes the organization URL and SharePoint folder hierarchy. Example: 'https://companyname.sharepoint.com/Folder A/Folder B'
- (Optional) - Make the defined folder the default root folder when uploading files via Add Related. The rest of the folder structure (above the defined folder) will not be available when uploading a file.
Notes:- The default folder applies to all sub-work items; sub-projects, milestones, and tasks below the project.
- This option is valid for new folders only and not for existing folders.

- The default folder, once defined, is currently not editable.
Before the enhancement, the defined folder is displayed as part of the SharePoint hierarchy.
With the enhancement, only the default folder (and sub-items) are available.
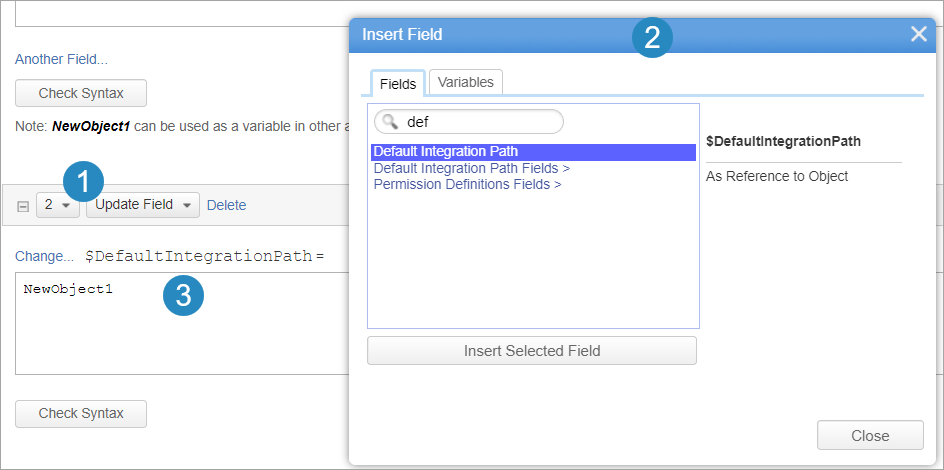
- Click Add Another Action > Update Field.
- Click Select Field... and from the Fields tab, select Default Integration Path.
- Add the variable NewObject1.
- You can also create a new folder based on another folder (a template folder). The new folder is created with all the content of the template folder.
Note: The folder you are copying can contain a maximum of 5000 items. If the folder contains more items, the Workflow Rule will fail.In Set Actions, enter the full path to the template folder in the Copy SharePoint folder field.
Note: Enter the full path, which includes the organization URL and SharePoint folder hierarchy. Example: 'https://companyname.sharepoint.com/Folder A/Folder B'
Your SharePoint organization URL can be found under Settings > Extensions > Integrations > SharePoint > Site URL. - Click Save, and enable the Workflow Rule.
2. Create a Project
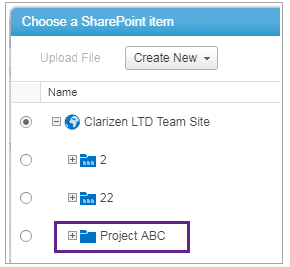
- Create a new Project in AdaptiveWork.
- The folder should be visible in the Project's Files panel.
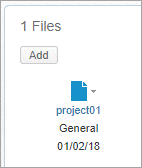
Click on the folder name to open it in SharePoint.
3. Add a file to the folder
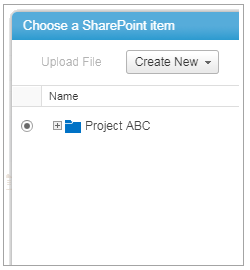
- To add a new file to the folder, click Add in the Files panel.
- Select SharePoint, and open the folder structure. The newly created folder will appear according to the path selected in the Workflow Rule.
- Add a file as you would for other file upload options.
Example 2: Link an existing SharePoint folder to a Work Item:
- In Settings > Configure, select the Project Work Item.
- Click Create New > Custom Action.
- In Set Actions, select Existing File or Folder.
- Enter the full path to the folder. You can copy the URL from your browser when open at the folder location in SharePoint.
- In Set Actions, add a Name field type with the name of the folder.
- Save the Custom Action, and enable it.
- Open a Project and from the Custom Actions options in the ribbon, select the Custom Action you created above.
- The folder should be visible in the Project's Files panel.
Click on the folder name to open it in SharePoint.
Upload Files Using Configurations
Specify a file (new or existing) to be uploaded to a folder in SharePoint (new or existing) using the same New Item action. Learn more.
Create a Default Site Location Path for a Customer
You can define the default Site Location path for files on the Customer level, which makes adding files in a Project related to the customer easier and more intuitive. Click here to read more.