
Salesforce Integration
Overview and Benefits
Note: This feature incurs additional fees.
This integration uses AdaptiveWork's iHub application. To learn more about iHub, click here.
AdaptiveWork's Salesforce integration enables sales and technical support teams to enhance their work process and account management capabilities by initiating and following AdaptiveWork Projects, Cases, Users, and Discussions as well as other AdaptiveWork objects within Salesforce. Additionally, Professional Service teams are able to view all relevant Salesforce information, custom or standard, directly in AdaptiveWork.
The integration allows syncing objects between Salesforce and AdaptiveWork. You can connect multiple AdaptiveWork instances to a single Salesforce instance.
The integration includes a best practices package, which includes out-of-the-box mappings and triggers, allowing teams to get started with no additional setup.
Administrators can then configure their own mappings as needed for the customer's specific business needs.
This provides:
- Superior Account Management — customer-facing executives can convert opportunities into projects more effectively by scoping and budgeting projects more accurately.
- Real-time progress monitoring of customer and prospects related projects and cases, ensures communication of accurate and timely information flow.
- Improved visibility of incoming projects, backlog and expected resourcing for Project and Delivery Teams.
- Convenient creation and integration of new opportunities by Professional Services teams directly from AdaptiveWork into Salesforce
- Full synchronization between Salesforce Chatter and AdaptiveWork discussions, allowing easy and open communication between team members regardless of where they are located.
Note: Social posts and comments are synced between AdaptiveWork and Chatter every 60 minutes.
Notes:
- Admin privileges are required for both Salesforce and AdaptiveWork.
- You will need a Salesforce Enterprise Edition (EE) account
- A Developer Account or a Sandbox account can be used to test the integration
Salesforce integration provides several key benefits:
- Sales Automation
- Execution updates in sales tool
- Real-time team collaboration
Sales automation
The following are just some of the key benefits relating to sales automation when integrating Salesforce with AdaptiveWork:
- Better forecasting capabilities with automatic creation of projects from opportunities
- Allows professional services and customer success teams to view their upcoming pipeline, prioritize and make decisions that better impact the business bottom line
- KPI measurement for success:
- Resource utilization — Ensuring that the right people are staffed on the right projects bringing more projects to successful completion
Execution updates in sales tool
Keep track of the project execution with:
- Real-time updates on project progress directly in Salesforce
- Account executives can take action on customer updates and accounting
- Full visibility into customer revenue recognition stream via milestones/work packages process and progress
- KPI measurement for success: Customer satisfaction
- Account executives gain visibility into project execution/onboarding progress and can react, thereby increasing customer satisfaction
Real-time team collaboration
Full collaboration between the different teams
- Account executives and execution teams can seamlessly collaborate and react to changes in real-time
- Professional services and customer success teams can instantly alert account executives to new opportunities based on past experiences
- KPI measurement for success: Increase sales
- Cross-system collaboration allows for improved sales operation with the added value of scoping out new opportunities
Setup Guide
To get more information about AdaptiveWork integration with Salesforce, contact your account representative or email customercare@planview.com
Before you begin the integration process, contact your Success Manager and follow the instructions below.
Note: The current package version is 1.6
Initial Setup
Key components of the integration:
- Authentication
- Mapping
- Triggers
- Sync schedule
This section explains the initial setup process for new customers, which includes the installation of the best practices package and out-of-the-box triggers and mappings.
AdaptiveWork installs objects, tables and pages as past of this integration.
Note: Make sure that you are logged in with a Salesforce Admin user during the setup and authentication process, as this user permission type is required for the integration to work properly.
- Install the Best Practices package before the setup by going to the Apps Marketplace.
The Best Practices package installs default mappings and event triggers to get started quickly. - In AdaptiveWork, click on your username > Settings > Extensions.
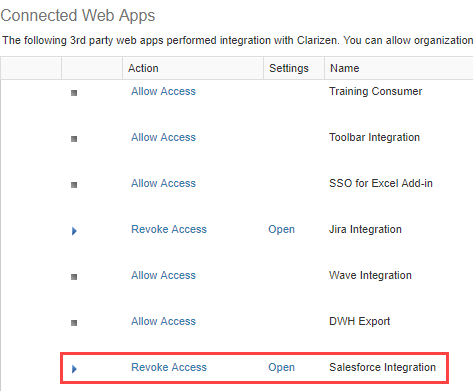
- In the Connected Web apps section, click Open next to the Salesforce app.
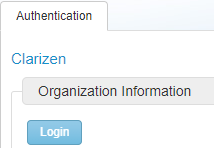
- Click Login.
- In the Authorized Access screen, click Grant Access.
Then click Login.
- You will now be redirected to your Salesforce login page, and after logging in you should see a message that the Best Practices package is being installed.
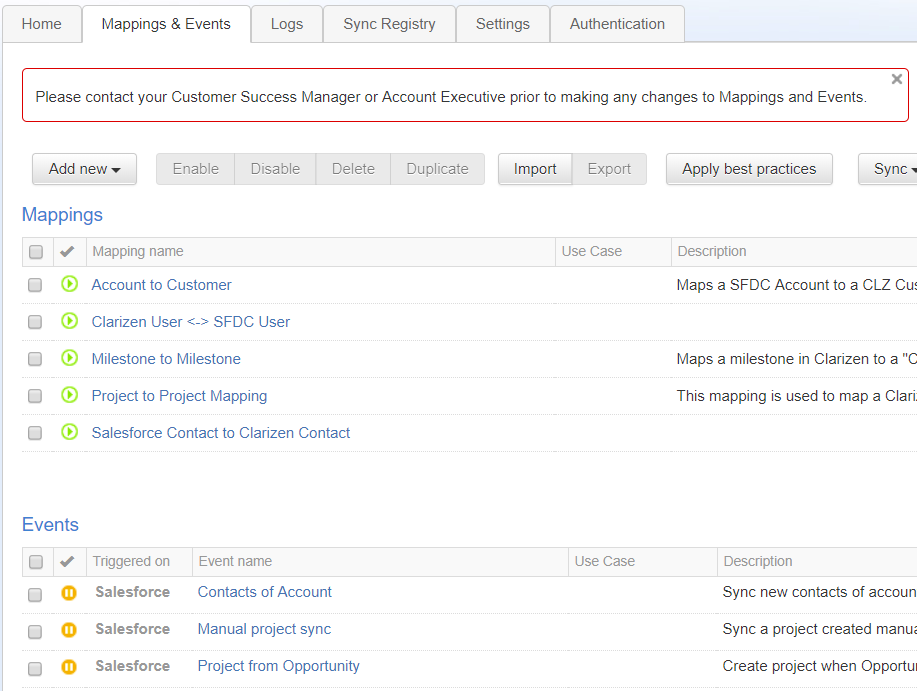
- The default mappings and events installed from the Best Practices package are now available in the Mappings & Events tab.
Notes:
The Events are disabled by default. To enable Events, select one or more and click Enable on the ribbon.
The default events are triggered on Salesforce.
Milestones are synced from AdaptiveWork to Salesforce and not vice versa.
- In Salesforce, you will now be able to see AdaptiveWork objects, however you may need to customize your layout to see the objects.
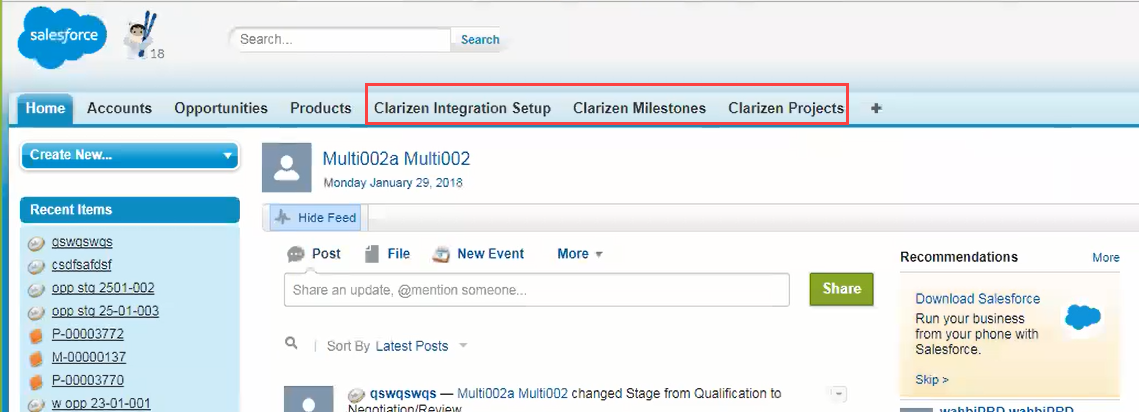
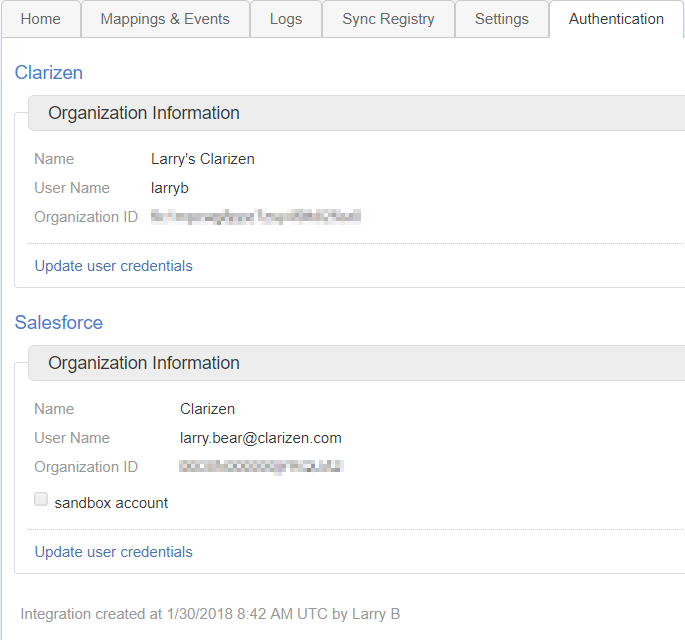
In the AdaptiveWork Integration Setup tab, you can see the same details as in the iHub application. - Set up your Sync Schedule.
The daily sync will sync all updated items in the sync registry up to twice a day.
Go to Mappings & Events, and click Sync > Sync Schedule. Enter the two sync times.
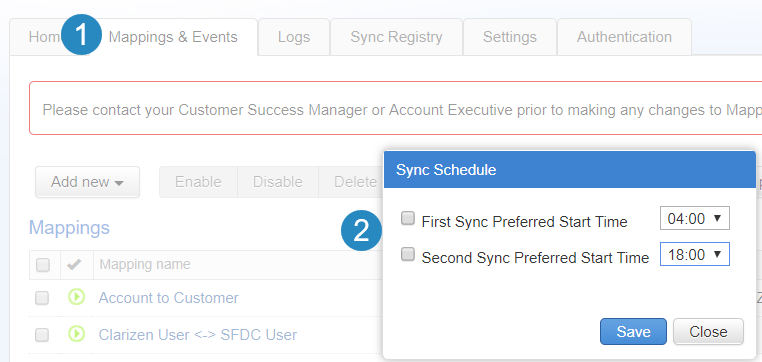
Once selected, the daily sync will create a scheduled workflow rule that does not use your quotas.
Note: You may notice that some hours in the list are grayed out, this means that these times are already used by existing scheduled workflow rules in your AdaptiveWork account(s) and cannot be selected.
To sync selected items, click Sync Now. - Set up additional mappings and event triggers as explained in Triggers and Mappings.
Working Example and Tips
The following example describes creating an Opportunity in Salesforce that creates a new Project in AdaptiveWork.
- In Salesforce, click Create > Opportunity.
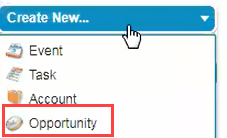
- Fill in the mandatory fields such as Opportunity Name and Account Name.
- For the Stage option, select an option that raises the Probability to over 70%. This is because only a Probability of over 70% triggers the creation of the Project in AdaptiveWork according to the Event trigger rule.

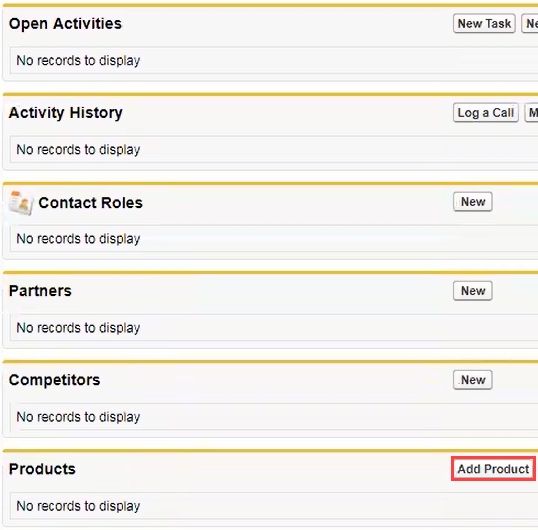
- Save the new Opportunity and open it in Salesforce. Scroll down to see all its properties, where you can take actions. For example, you can add Products to the Opportunity. The Products will be created as Sub-Projects in AdaptiveWork.
- Go to the Sync Registry, either via iHub or Salesforce. Note the newly created Project in Pending state.
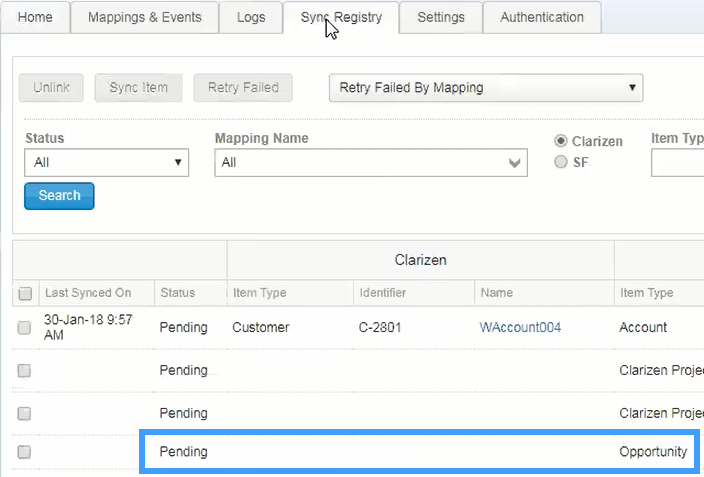
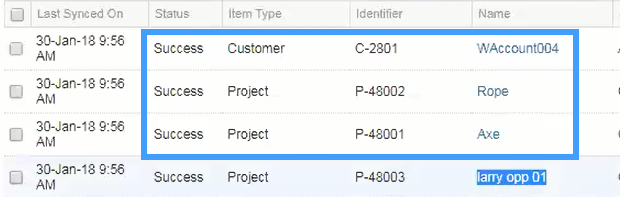
- A Success state appears when the sync is complete. You will also see the added Products (Sub-Projects) and Account (Customer).
- Click on the Project to Project mapping link to see the mapping details, related mapped fields, and links.
- Open the Project in Salesforce to see familiar pages from AdaptiveWork such as Workplan and roadmap, as well as all the AdaptiveWork fields. Click View in AdaptiveWork to open the Project in AdaptiveWork. You can edit in either Salesforce or AdaptiveWork.
Note: Mappings and event triggers are explained in Triggers and Mappings.
Setting up UI Controls
UI controls are visual force pages in Salesforce that allow you to view the relevant Gantt/Roadmap in Salesforce, and access the related item in AdaptiveWork.
Note: If you are using a custom Salesforce URL, some features may not work, such as Sync now, View in AdaptiveWork, and viewing the roadmap and Gantt from Salesforce.
To add these UI controls to the relevant objects in Salesforce , you will need to be an Admin user and follow the steps below.
- Access "Setup"⇒ "Develop" ⇒ "Pages" and click "New"
You'll notice that there are already three VisualForce pages that were added as part of the Best Practices package, and are used on the new "AdaptiveWork Project" custom object (assuming the package was installed)
Working with your Sandbox account
To configure the integration to work with your AdaptiveWork Sandbox account please follow the steps below:
- Access "Setup" ⇒ "Develop" ⇒ "Custom Settings"
- Locate the "AdaptiveWork Settings" with the "Namesake" CLZV6 and click "Manage".
- Click "Edit" for the "default" setting
- Change the server URL as follows:
- Click "Save"
- Access the "AdaptiveWork Integration Setup" tab as described above.
- Access your AdaptiveWork account to ensure that the system is set to allow access to Salesforce.
- Authenticate the relevant Sandbox (or Production) AdaptiveWork accounts.
Re-authenticating Your AdaptiveWork Sandbox Account After a Salesforce Refresh
When a Salesforce sandbox is refreshed, all iHub information related to the Salesforce sandbox is replaced with the Salesforce production environment details. To reconnect AdaptiveWork sandbox with Salesforce sandbox, you must re-authenticate AdaptiveWork with Salesforce.
To re-authenticate, open the Authentication tab in iHub, and re-enter the Salesforce connection details.
For more details on refreshing a sandbox account, click here.
Triggers and Mappings
This section describes the best practices triggers and mappings, as well as detailed explanations on how to create new ones.
Note: If you have been using AdaptiveWork and Salesforce separately, and now want to integrate the systems, you can link existing objects using the Sync Registry import feature in the Sync Registry tab.
What are Triggers (Events) and Mappings
Events:
An event (or trigger) is something that leads to the creation of a new object in AdaptiveWork based on an occurrences in Salesforce and vice versa.
In this version of the integration, you can create events on any object in AdaptiveWork or Salesforce (custom or standard), that will trigger the creation of an object in the other system.
For example, you may want to create an event that will create a Request in AdaptiveWork each time a Salesforce Idea is created.
When creating an event that is triggered from Salesforce, you will also be able to trigger the creation of subsequent objects in AdaptiveWork based on any related data of the original Salesforce object (more information below).
Mappings:
A mapping is what determines how an object in AdaptiveWork is synced to the relevant object in Salesforce (and vice versa).
In the event example above, a Request in AdaptiveWork is created each time an Idea is created in Salesforce.
The event determines which object to create, while the mapping determines what data is moved from Salesforce to AdaptiveWork on the initial creation, and which data is transferred from AdaptiveWork to Salesforce or from Salesforce to AdaptiveWork on subsequent syncs (determined by the daily syncs).
When creating a mapping, you will also have the ability to map any related AdaptiveWork information into new or existing objects in Salesforce (more information below).
Best Practice Triggers and Mappings
Out-of-the-box mappings and triggers can be further customized (or completely removed/disabled) to fit your specific needs.
Note: To customize the out-of-the-box mappings and triggers, consult your AdaptiveWork representative.
The out-of-the-box mappings and triggers include:
|
|
|
| AdaptiveWork User - SFDC User |
This mapping is used to sync between a "User" in AdaptiveWork and a "User" in SalesForce, and is specifically used when syncing between a Chatter feed in SalesForce to a discussion stream in AdaptiveWork. Note: Existing V2 customers who would like to continue to use the "AdaptiveWork Resource" custom object, will need to first disable this mapping and then create a new mapping between a AdaptiveWork User and the "AdaptiveWork Resource" custom object in SalesForce. |
| Account to Customer | Maps an "Account" in Salesforce to a "Customer" in AdaptiveWork and syncs the Discussion/Chatter stream between the objects. |
| Milestone to Milestone | Maps a "Milestone" in AdaptiveWork to a "AdaptiveWork milestone" custom object in Salesforce |
| Project to Project | Maps a "AdaptiveWork Project" custom object in Salesforce to a "Project" in AdaptiveWork. This mapping includes the linking of the "Project" in AdaptiveWork to the relevant "Customer" in AdaptiveWork (based on the Opportunity Account). Additionally, in subsequent syncs, the mapping will sync all project milestones (in AdaptiveWork) as "AdaptiveWork milestones" in Salesforce. |
|
Events |
|
| Create a project when Opportunity probably equals 70% | The event runs each time an opportunity's probability in Salesforce is greater than or equal to 70%. It will then create a "AdaptiveWork Project" in Salesforce that is linked to the Opportunity, and any opportunity products will be accessed and will trigger the creation of sub-projects. |
Creating New Mappings
Mappings define exactly how objects between Salesforce and AdaptiveWork are synced to one another (e.g. what fields are synced, what related items in AdaptiveWork should be synced in Salesforce, etc.).
Note: When packaging mappings and events, you must package mappings and events separately, so that you can first load the mappings, and then the events. Some events will not load properly if the mappings do not exist.
To create a new mapping:
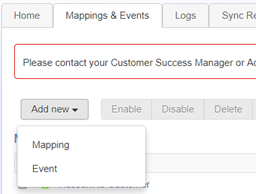
- Access Mappings & Events in AdaptiveWork or Salesforce.
- Click Add New > Mapping.
- In the Mapping Properties, enter the mapping's Name and an optional Description.
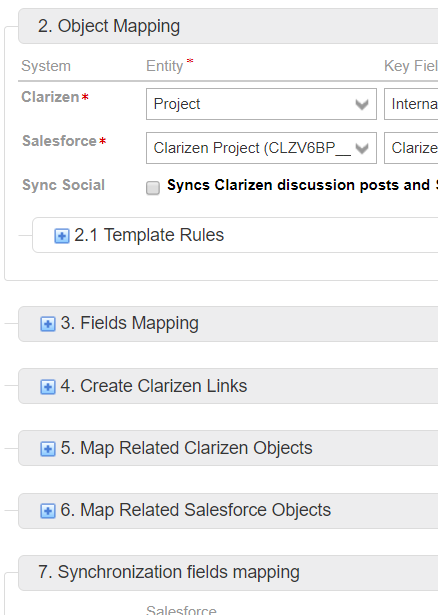
Object mapping: In this section define what object in AdaptiveWork will sync to what object in Salesforce.
|
Entity |
Defines the entity of the object mapped, (e.g. AdaptiveWork Bug will be mapped as a Salesforce Case) |
|
Key field |
Used for identification purposes, the key field will be referenced in other mappings when trying to locate a desired object (such as a project in AdaptiveWork can be found using the External ID) |
|
Delete policy |
Determines if the item in the relevant system will be deleted or retained if the item is deleted in the other system |
|
Create policy |
Determines whether the item should be created if referenced in a separate mapping (or trigger) that doesn't yet exist, searched for using the key field, in the relevant system |
|
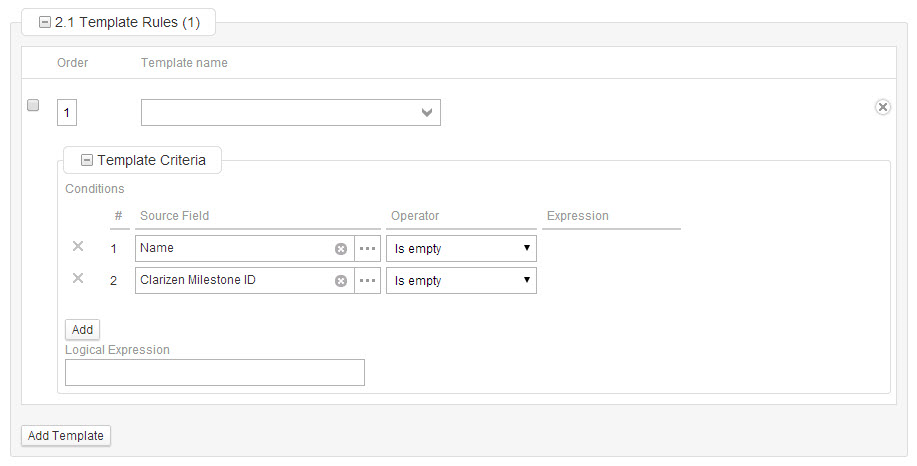
Template rules |
This section only opens if you choose to map a template-able object in AdaptiveWork (such as a project or milestone). · Click Add Template. · Select the template to be used from the Template name menu. · Define the Template Criteria conditions. · Click Add to define additional criteria. Note: When using multiple conditions, you can define the logical expression as either AND (default), or OR, in the Logical Expression field type OR. |
Repeat the process for each template rule you wish to define.
- Social sync: Allows you to sync the chatter feed from an item to the AdaptiveWork discussion feed (and vice versa)
- Fields Mapping: Allows you to define what fields you would like to map between the two objects.
- Enable: Select to enable the specific field map.
|
Direction |
Options include "from AdaptiveWork" and "to AdaptiveWork", and determines whether the data will be sent to AdaptiveWork or will come from AdaptiveWork |
|
Salesforce |
Will be filtered to match only fields fitting the data type of the AdaptiveWork field (e.g. numeric to numeric, pick list to pick list, etc.) |
|
AdaptiveWork |
Will be filtered to match only fields fitting the data type of the Salesforce field (e.g. numeric to numeric, pick list to pick list, etc.) |
|
Event type |
Options include "Create only", "sync only", and "Create and sync", and determines when the data will move in the direction specified above. Add: click to create additional field mappings. |
Note: A field map can be listed multiple times, for instance, you may want a project name to go from Salesforce to AdaptiveWork (to AdaptiveWork) on create only, and then on sync only to go from AdaptiveWork to Salesforce.

- Create AdaptiveWork Links: Allows you to link the AdaptiveWork object to another object in AdaptiveWork.
For instance, if you want to link a newly created project to the relevant Customer in AdaptiveWork.Note: This section remains hidden until Object Mapping is defined.
- Select the link settings from the Link [object] to list.
- Once the item you would like to link to is selected you will be required to select the method from the using list.
There are two methods of identifying the item you want to create the link with:
Note: In cases where there is only one possible link this field will be hidden.
- Use source object field: allows you to select a field from the relevant object in AdaptiveWork (example: opportunity.account ID)
Selecting this option will require a mapping between the two item types and will utilize the Key field and Create policy (from Object Mapping above) to locate the object in AdaptiveWork.
- Identified by: Allows you to add evaluation criteria that will determine what object in AdaptiveWork to link to.
Complete the Field, Value type, and Value fields to determine the identification criteria.
Click Add to create additional identification criteria.
- Use source object field: allows you to select a field from the relevant object in AdaptiveWork (example: opportunity.account ID)
- Map Related AdaptiveWork Objects: Allows you to map objects related to the source object in AdaptiveWork to Salesforce (example: map all milestones from the project to a AdaptiveWork Milestone Salesforce object and link the milestones in Salesforce to the AdaptiveWork project).
- Click Add Related Objects to define the object mapping.
- Select the object intended for mapping from the Related object list.
- Select the relation from the Relationship type list.
- Click Add to add conditions to the mapping, conditions include Source Field, Operator, and Expression.
- Select the map destination from the Map to Salesforce object list.
- Repeat the process for each mapping you wish to create.
- Once you have completed the mapping setup click Save.
- Click Enable to enable the mapping.
Creating New Events
Events define when an item will start to sync (e.g. when an opportunity in Salesforce hits 70% probability, when a bug in AdaptiveWork is set as "reported by customer", etc.).
Notes:
- Creating new events (or any customizations not included in the Best Practices package) should be performed by AdaptiveWork Professional Services.
- Always create the events in iHub and not in Salesforce. Behind the scenes, events create workflows, which can be accessed from Salesforce, however they should not be modified in Salesforce. The events should be modified in iHub.
- When packaging mappings and events, you must package mappings and events separately, so that you can first load the mappings, and then the events. Some events will not load properly if the mappings do not exist.
On creating the event, a workflow rule and workflow outbound message is created.
To create a new mapping:
- Access Mappings & Events in AdaptiveWork or Salesforce.
- Click Add New > Event.

- Enter the Name and optional Use case and Description fields. details.
- Triggered by: Define whether the trigger will occur in Salesforce (e.g. an opportunity is closed) or in AdaptiveWork (e.g. a bug is set to "reported by customer").
Note:
Once selected and after saving the Event, this specific property cannot be edited.
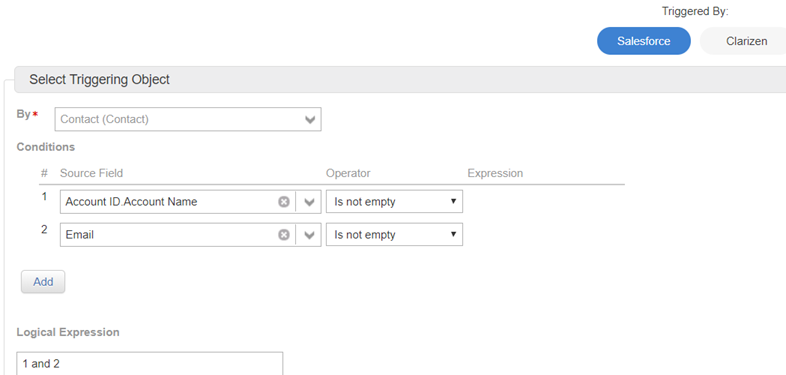
- If you selected Salesforce:
- In the Select Triggering Object section, in the By list, enter a condition criteria that will determine when the object activates the trigger.
- AdaptiveWork Target Object: Select what object in AdaptiveWork the selected Salesforce object will be mapped to, there are two options in this section:
- Entity mapping: The selected triggering object will map directly to the selected AdaptiveWork object (based on a mapping, either previously created or created here within).
- Create new object and synchronize: Allows you to first create an object in Salesforce (e.g. when an opportunity hits 70% create a "AdaptiveWork Project" in Salesforce) and then define what that object will map to in AdaptiveWork.
Selecting this option will also allow you to transfer field values (or constants) from the source object to the newly created Salesforce object.
- Related objects in Salesforce: allows you to sync objects related to the selected Salesforce object to AdaptiveWork (e.g. opportunity products are synced to milestones in AdaptiveWork)
- If you selected AdaptiveWork:
- Triggering object: Allows you to determine the AdaptiveWork object that the trigger will run on.
Once selected, you must enter evaluation criteria that will determine when the object activates the trigger. - Target object: Allows you to select what object in Salesforce the selected AdaptiveWork object will be mapped to, if no mapping exists, you will be able to create one.
- Triggering object: Allows you to determine the AdaptiveWork object that the trigger will run on.
- Click Save when done.
- Click Enable to enable the event (trigger).