
Authentication With Identity Providers (SSO)
Integration With Identity Providers
See also Automatic Allocation of Requestor Licenses to New or Suspended Users via SSO Login
This page is intended for AdaptiveWork Admin users integrating AdaptiveWork with identity provider applications and includes the following sections:
- About AdaptiveWork SAML Integration Infrastructure
- Integrating an SAML-based SSO
- Advanced Options
- Download Metadata
About AdaptiveWork SAML Integration Infrastructure
AdaptiveWork provides out-of-the-box Single sign-on (SSO) solutions utilizing an infrastructure that enables integration with any SAML and SAML2 compliant identity provider.
Integrating an SAML-based SSO
In order to integrate SSO capabilities there are actions required both on AdaptiveWork and on the IDP side as detailed ahead.
AdaptiveWork Side
- Go to Settings⇒Global Settings
Under Federated Authentication click edit - Enable the 'Use Federated Authentication' checkbox
- Upload the Certificate:
- Should be exported for the specific Identity Provider solution
- .pem and .cer certification formats are supported
- Set the SAML end point in the Sign-in URL field:
- Should be provided by specific Identity Provider solution
- [Optional] Set the Sign-out URL, which is the URL to which you will automatically be redirected when signing out of AdaptiveWork
- [Optional] Change the Relaying Party Identifier (Issuer/Entity ID) from the default "AdaptiveWork"
- Define who can access AdaptiveWork with a user name and password instead of via SSO only.
From the Enable Password Authentication menu select:- No one (except Administrators)
- External users
- Internal users
- Everyone - both External and Internal users (default)
- [Optional] Define whether to allow API access to AdaptiveWork using SSO, to enable select the Enable API access checkbox
- [Optional] Define whether to skip the login page, allowing direct access to unauthenticated users when accessing specific pages in AdaptiveWork (for example: by clicking a link received in an email which contains the Organization ID), to enable select the Unauthenticated User URL redirect checkbox
- There are several advanced options available as detailed below
- Access to AdaptiveWork via an SSO is achieved via a special link and not via the AdaptiveWork login page:
- Once the Federated Authentication settings are defined within AdaptiveWork, this link will be added to the AdaptiveWork login page under the login section.
- The link is presented in the following format and depends on your environment as detailed above:
https://eu1.clarizen.com/Clarizen/Pages/Integrations/SAML/SamlRequest.aspx?EntityId=999999
Where 999999 is the internal ID of your AdaptiveWork account.
IDP Side
Configure your identity provider.
Note: Each identity provider may use different terms for the parameters.
Alternatively, utilize the metadata download to import all of your settings to your IDP
- Configure your AdaptiveWork SAML end point (ACS - Assertion Consumer Service) based on the environment you are associated with: Ensure that the AdaptiveWork SAML ID for all of your identity provider's relevant users matches that user's AdaptiveWork user name field
Usually the Identity Provider enables you to configure this through some type of rule (for example, the user's email)- EU – https://eu1.clarizen.com/Clarizen/Pages/Integrations/SAML/SamlResponse.aspx
- SV – https://app2.clarizen.com/Clarizen/Pages/Integrations/SAML/SamlResponse.aspx
- TB – https://app.clarizentb.com/Clarizen/Pages/Integrations/SAML/SamlResponse.aspx
- The Relaying Party Identifier (Issuer/Entity ID) should match the value set above in AdaptiveWork side, by default it is set to 'AdaptiveWork'
NOTE
The IP whitelisting feature will not be invoked for checks when using federated authentication and SSO together with your own IdP. The IdP governs the authentication of users, end-to-end. This provides you, the customer, with control of the authentication process which is the most secure practice.
Advanced options
There are several advanced options available, the more commonly used options are explained below.
Note:
When utilizing the metadata download to import all of your settings to your IDP be sure to first complete all of your AdaptiveWork side setup and only then import the entire settings to your IDP
SAML ASSERTION Encryption
AdaptiveWork supports SAML assertion encryption.
In order to support SAML assertion encryption, you need to either upload your own private key certificate or use an encryption certificate that is internally generated, both of which allows us to decrypt the assertion.
To activate the encryption in AdaptiveWork:
- Complete Steps 1 and 2 detailed in the Integrating an SAML-Based SSO section above
- Open the SSO advanced options
- Choose the encryption certificate to be used, select the Encrypted via internal certificate option from the menu, or:
- Upload your own Private Key certificate
Once uploaded, a confirmation password message will appear. - Type the certificate's password and click OK.
- Confirm that the Encrypted via uploaded certificate option is selected
- Upload your own Private Key certificate
- Click Save.
To add encryption in your IDP:
- Open the AdaptiveWork Properties screen
- Click the encryption tab
- Browse and upload the public certificate
- Apply the changes and close the Property's window
See Configuring ADFS for AdaptiveWork single sign-on (SSO) for an example
Automatic Provisioning
Please note that the SSO solutions explained above does not solve the issue of User Provisioning.
You need to handle user synchronization between your identity provider and AdaptiveWork separately.
This can be done either manually, automatically using the AdaptiveWork SOAP & REST web service APIs or using AdaptiveWork’s Active Directory User Sync tool
Signed Request
The SAML request can be signed. Signed requests need to be enabled in AdaptiveWork's federated authentication settings, after enabling the setting the authentication request certificate can be downloaded from the settings screen.
To enable signed requests:
- Go to Settings⇒Global Settings
- Under Federated Authentication click edit
The Federated Authentication setup window opens - Open the SSO advanced options
- Select the Use HTTP Post Binding option
- Select the Enable additional request features option. Once enabled the Download Certificate button is activated
- Click the Download Certificate button to can download the authentication request certificate
- Click Save.
- Upload the certificate in your IDP
See Configuring ADFS for AdaptiveWork single sign-on as an example
Download Metadata
Once you have completed your setup,defining all of the relevant steps in AdaptiveWork above, download the entire configuration as a Metadata file by Clicking the Download Metadata button.
This file can then be uploaded to the Single Sign On Identity Provider to expedite the AdaptiveWork Single Sign On process.
Please see Configuring ADFS for AdaptiveWork single sign-on for an example of the upload process.
Configuring ADFS for AdaptiveWork single sign-on (SSO)
AdaptiveWork has the ability to integrate with an identity provider. This integration allows your organization to provision users, provide single sign on solutions and integrate with the Microsoft Active Directory Federation Services (ADFS) 2.0 and 3.0 identity provider.
This document includes:
General ADFS Setup
This procedure uses samportal.example.com as the ADFS Web site.
Replace this with your ADFS Web site address.
- Log into the ADFS server and open the management console.
- Right-click Service and choose Edit Federation Service Properties....
- Confirm that the General settings match your DNS entries and certificate names.
Take note of the Federation Service Identifier, since that is used in the AdaptiveWork SAML 2.0 configuration settings - Browse to the certificates and export the Token-Signing certificate.
- Right-click the certificate and select View Certificate
- Select the Details tab
- Click Copy to File…. The Certificate Export Wizard launches. Click Next
- Ensure that No, do not export the private key is select, and then click Next
- Select Base-64 encoded X.509 (.cer). Click Next
- Select where you want to save the file and give it a name. Click Next.
- Select Finish
- Log into AdaptiveWork and follow the SSO setup instructions to activate SSO in AdaptiveWork and upload the certificate
- Set the Sign-in URL in AdaptiveWork based on your preferred ADFS configuration:
- For IDP initiated SSO:
https:// somesite /adfs/ls/idpinitiatedsignon.aspx?logintorp= AdaptiveWork (where the ' somesite ' should be your ADFS external server address and ' AdaptiveWork ' represents the defined identifier) - For SP initiated SSO:
https:// somesite /adfs/ls/ (where the ' somesite ' should be your ADFS external server address)
- For IDP initiated SSO:
- Click Save.
Automatic Configuration
To configure ADFS Automatically:
- Open the ADFS Management console and select Relying Party Trusts.
- Right-click the ‘Relaying Party Trusts.’
- Select ‘Add Relaying Party Trust..’ menu item. A wizard will open
- Click the ‘Start’ button.
- Select the 'Import data about the relying party from a file' option.
- Click 'Browse...' to locate the Metadata file downloaded from AdaptiveWork. Click 'Next.'
- In the ‘Display name’ type ‘AdaptiveWork.’ Click ‘Next.’
- Ensure that Permit all users to access this relying party option is selected. Click ‘Next.’
- In the ‘Ready to Add Trust’ step click ‘Next’ without making any changes.
- Ensure that the checkbox is selected and click ‘Close’ to open the ‘Edit Claim Rules’ dialog.
- Add claim rules as detailed below
Manual Configuration
To manually configure the ADFS follow the instructions below
Configuration summary
The ADFS should be configured with the following parameters:
Relying Party Identifier
- Identifier: AdaptiveWork (default)
- Advanced: Select a hash algorithm. SHA-1 and SHA-2 are supported.
- Endpoint: POST with relevant URL
ADFS Relying Party Configuration
At this point manually configure the Relying partner:
Open the ADFS Management console and select Relying Party Trusts.
- Right-click the 'Relying Party Trusts.'
- Select 'Add Relying Party Trust..' menu item. A wizard will open.
- Click the 'Start' button.
- Select the 'Enter data about the relying party manually' option. Click 'Next.'
- In the 'Display name' type 'AdaptiveWork.' Click 'Next.'
- In the 'Choose Profile' step, select the 'ADFS 2.0 profile' option. Click 'Next.'
- Skip the 'Configure Certificate' step by clicking the 'Next' button.
- In the 'Configure URL' step, enter the relevant API endpoint URL.
- In the 'Configure Identifiers' step, for the 'Relying party trust identifier' enter 'AdaptiveWork' and click on the 'Add' button to the right, so it will be added to the 'Relaying party trust identifiers' list. Click 'Next' to move to the next step.
- Ensure that Permit all users to access this relying party option. Click 'Next'
- In the 'Ready to Add Trust' step click 'Next' without making any changes.
- Ensure that the checkbox is selected and click 'Close' to open the 'Edit Claim Rules' dialog.
- Add claim rules as detailed below.
Enable SAML Assertion Encryption
To enable authentication encryption, activate the authentication in AdaptiveWork as explained here, then complete the following steps:
- From the main window, select AdaptiveWork and click on the 'Properties' link on the right side.
- Click the 'Encryption' tab.
- Click Browse and select the Public certificate file (cer file).
- Click 'Apply' to confirm your selection and 'OK' to close the dialog
Enable Signed Request
The SAML request can be signed. Signed requests need to be enabled in AdaptiveWork's Federated Authentication settings, after enabling the setting the authentication request certificate can be downloaded from the settings screen.
To enable signed requests:
- Open AdaptiveWork's relying party identifier in ADFS
- Click the 'Signature' tab.
- Click 'Add...' to upload the signature certificate downloaded from AdaptiveWork.
- Click 'Apply' to confirm your selection and 'OK' to close the dialog.
Add Claim rules
Define the relevant Claim rules, for the default claim rules settings please see claim rules configuration summary.
- In the 'Edit Claim Rules' dialog, click on the 'Add Rule...' button.
- Ensure that the 'Send LDAP Attributes as Claims' is selected from the options in the 'Claim rule template' list. Click 'Next.'
- In the 'Claim rule name' input, enter 'NameID.'
- From the 'Attribute store' select the 'Active Directory' option.
- For the 'LDAP Attribute' select the attribute you would like to use for authentication ('E-Mail-Address' for instance) and for the 'Outgoing Claim Type' select the 'Name ID' value.
- Click 'Finish' and 'OK' to close this dialog.
- From the main window, select the new claim and click on the 'Properties' link on the right side.
- Click the 'Advanced' tab.
- Select a hash algorithm from the list. SHA-1 and SHA-2 are supported.
- Click 'Apply' to confirm your selection and 'OK' to close the dialog.
Configuring OneLogin
User Management Configuration via OneLogin (LDAP Integration)
This page is intended for AdaptiveWork Admin users setting up SSO capabilities and includes the following sections:
About Automatic User Management Option
The Automatic User Management option is configured in OneLogin solution.
OneLogin uses AdaptiveWork's API to provision, update, suspend and delete users according to the changes in its users' repository
and the configuration set by the administrator.

Figure 1: Automatic User Management Diagram
Configuration
The following steps are used to automatically configure OneLogin to provision users to AdaptiveWork :
Configuration Steps
- To begin the process, you are required to have a OneLogin account in place. It is recommended to add and configure your
organization's LDAP connector to OneLogin in order to create the users identities repository inOneLogin automatically, and
to use the corp-net authentication as the single-sign-on authentication.
To learn more about creating a OneLogin account and configuring your LDAP connector, please visit the OneLogin web site . - Create a new role that defines your OneLogin users who need to be connected to AdaptiveWork to the AdaptiveWork agent in OneLogin.
You can create this role by navigating to People → Roles → New Role . - Navigate to Apps → Find app tab in OneLogin and search for the 'AdaptiveWork' application.
- Click the Add link in order to add it to your list of applications in OneLogin.
- Click continue to be able to edit the application data.
- The authentication tab should appear as follows:
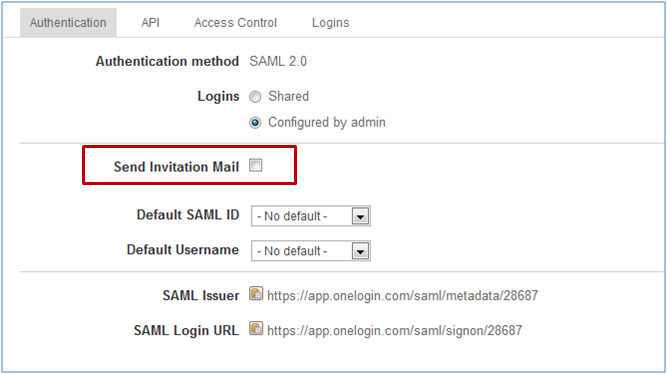
Figure 2: Authentication Tab
You do not need to change any of the basic default settings apart from one exception; you might want to change the
'Send Invitation Email setting'.
This checkbox defines whether or not AdaptiveWork users receive an invitation email from AdaptiveWork when automatically provisioned
by OneLogin .
|
Field
|
Value
|
|---|---|
|
Customer URL
|
|
|
WSDL Document URL
|
-
Click the API tab and set your organization's administrator credentials ( AdaptiveWork Admin credentials used for provisioning
operations). These credentials are used to identify the AdaptiveWork organization to which you provision your users.T he AdaptiveWork agent provisioning process can be connected or disconnected o n the same tab .
After clicking Connect , the Provisioning tab becomes available.

Figure 3: API Tab
- Click the Provisioning tab to configure the provisioning preferences.
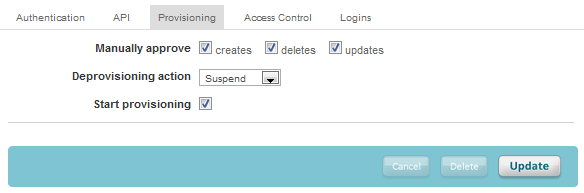
Figure 4: Provisioning Tab
The setting Manually approve defines which of the management actions is approvable by the administrator and which actions occur
automatically. Approve or revoke of actions are achieved by navigating to People → Provisioning → Provisioning Tasks within
OneLogin.
The setting Deprovisioning action defines what action to take within AdaptiveWork on de-provisioning events.
A de-provisioning event may happen when a user is deleted from OneLogin, removed from a AdaptiveWork- assigned role, or if AdaptiveWork
is removed from OneLogin altogether.
Action options when a de-provisioning event occurs are to either change the user's state to 'Deleted' within AdaptiveWork, change the user's
state to 'Suspended' within AdaptiveWork, or to do nothing.
- Click the Access Control tab, and select the role that you created in Step 2 of the Configuration steps .

Figure 5: Access Control Tab
Seeing it Work
Navigate to People → Users and manually add people to your AdaptiveWork role, or create a mapping via People → Mappings that sets
this role automatically for your users according to filters set by you.
Users that have the AdaptiveWork role are automatically added to the Login tab in the AdaptiveWork application configuration.
They are processed automatically or pending authorization, depending on your OneLogin 'Manual Approve' settings.
You can view and authorize provisioning processes via People → Provisioning and see the results in the People module in AdaptiveWork .
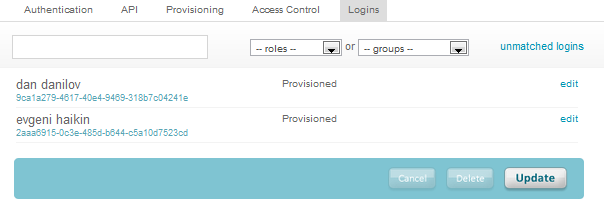
Figure 6: Logins Tab
Configuring Azure Active Directory
To see a guide on configuring Azure Active Directory, click here.
Configuring OKTA
To see a guide on configuring OKTA, click here.