Setting Up Financial Planning (Admins)
The following sections describe how to enable and set up Financial Planning for your organization. This involves:
- Enabling Financial Planning in System Settings - Learn how to enable Financial Planning for your organization
- Enabling Financial Planning for Users - Learn how to enable Financial Planning for your users
- Adding Non-Labor Resources to Profiles - Learn how to add Financial Planning to your user profiles
- Defining and Categorizing Organization Non-Labor Resources - Define and create Non-Labor Resource types
- Setting Up User Rates - Set up user rates across your organization as global rates, per user, per job tile or Work Item
- Importing NLR Time-Phase Data with Data Loader - Import NLR data using the Data Loader
- Setting Up the Financial View - Create a Financial View for your users to update and track financials
Enabling Financial Planning in System Settings
To use Financial Planning in AdaptiveWork, the option must be enabled for your organization.
To enable Financial Planning:
- Under your username, click Settings.
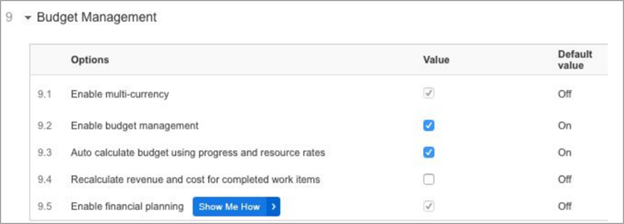
- In the System Settings tab, expand the Budget Management section.
- Select the Enable financial planning option.
- Enable additional budgetary settings as needed.
If your organization works with multiple currencies, enable the option. Apart from that, recommended Budget Management settings are as follows:

Enabling Financial Planning for Users
Allow specific users to view and update financial information. As an admin, you can provide financial permissions to Project Managers or Project Controllers.
To enable permissions:
- In the user’s property card, go to Global Permissions and enable Financial Planning.
or - In the People module, make sure the Financial Planning column is in view. You can then toggle the permission on or off for users.

Adding Non-Labor Resources to Profiles
Add NLRs to the main menu for users of selected profiles.
To add NLR to a profile:
- Under your username, click Settings.
- Click Profiles.
- Select the Profile and in the Navigation options add the Non-Labor Resources to the Your Selections column.

Defining and Categorizing Organization Non-Labor Resources
Non-Labor Resources let you maintain consistency of common project costs across your organization
Tip: Use profiles and validation rules to control who can add NLRs.
Categorization of project costs as Capital Expense (Capex) varies by industry and jurisdiction.
Generally, only internal projects can be capitalized. Consult with your Finance team to verify.
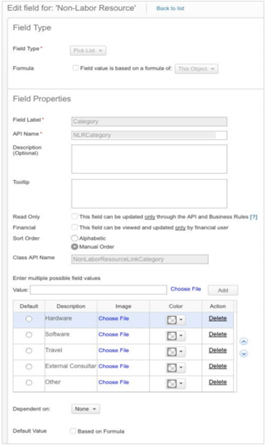
Default Categories
- Hardware
- Software
- External Consultant
- Materials
- Travel
- Other
To add Non-Labor Resources:
- From the main navigation menu select Non-Labor Resources. If you don’t see it in the menu, add it to the profile. See Adding Non-Labor Resources to Profiles.
- Click Add Non-Labor Recourse.
- Enter a Name.
- Select the Expense Type.
- Select a Category.
The categories of the NLRs are important to help you summarize and aggregate your NLR’s per project for reporting purposes and when adding them to a project. Equally as important, is the calculation of your Labor Costs stemming from Task assignments.
Note: You can edit the categories in the settings.

Setting Up User Rates
You can set up global default hourly rates, as well as rates per individual user. Rates per user will override the global rates.
Set your Cost Regular Hourly Rate as your minimum or average Fully Loaded Cost Rate.
Tip: To build accurate project cost estimates before you assign resources, use placeholder resources with the relevant costs and rates to calculate the budget before identifying named resources.
You can also set Billing Rates per Job Title and even per individual Work Item (Project, Milestone, or Task) to reflect project-specific pricing.

To set up global rates:
- Under your username, click Settings.
- Click Global Settings and define the Cost and Billing Rates.
To set up rates for users, Job Titles or Work Items:
- You can define costs from an item’s Property Card, from list views and more depending on your setup.
When planning, work effort estimates * user rates generate the project Budgeted Cost, using users’ Regular Hourly Rates.
When reporting actual effort via timesheets, flagging Timesheet entries as Overtime will make Actual Cost and Actual Revenue calculations use users’ Overtime Hourly Rates.
Note: Timesheets can have an Approval process, set in System Settings. When using the Approval process, Actuals (cost and revenue) are recognized once the timesheets have been Approved.

Importing NLR Time-Phase Data with Data Loader
You can use the Data Loader to import batches of data. When doing so for Time-Phase data, there are a few things to take into account:
- When exporting your Project or Task Non-Labor Resources to get their External IDs, make sure you don't take the Aggregated Non-Labor Resources, as they have a different External ID.
Example 1: Exporting NLR links with External ID

- If you are adding new time-phased data (months that are empty in the Financial Planning grid), you are adding new month time-phased objects.
- Reference the NLR Link using "Non-Labor Resource link" or "ReferenceToMain" (the API name).
Example 2: Data Loader Import file format using External ID as RelatedLink

- When adding new time-phased data for existing months (example: you are adding Actual Cost for Jan 2018, which already has Budget Cost), or you are updating an existing object; then add PK: to column A & B headers, e.g. PK: Non-Labor Resource link and PK: Date
Setting Up the Financial View
Financial Planning is a spreadsheet-like view that can be accessed on the project level. To access the view, you must have Financial Permissions.
Setting up a new Financial View is similar to setting up other views. When setting up the view, select Financial Planning from the Layout drop-down options.
To learn more about creating views, click here.
To learn more about adding the Financial Planning view as a panel, click here.
For the Financial Planning view:
- Enter a name for the view and define permissions, and then select the Financial Planning Layout.
- The following elements can be customized:
- Show Workplan Tree - When enabled, the Workplan Tree is displayed but can still be collapsed if needed.
- Summary Mode - When enabled, the view opens in Summary mode, but the toggle is still present in the view and can be switched off by the user.
- Fields - Define which default fields will be present in the default view for Labor Resource, Non-Labor Resource, and Time Phase fields.
- Show or hide Labor, Grand Totals, and Sub Totals. Simplify views if you're not tracking labor costs, don't require totals or summaries. Learn more.
- Click Save.
To learn more about working with the Financial View, click here.
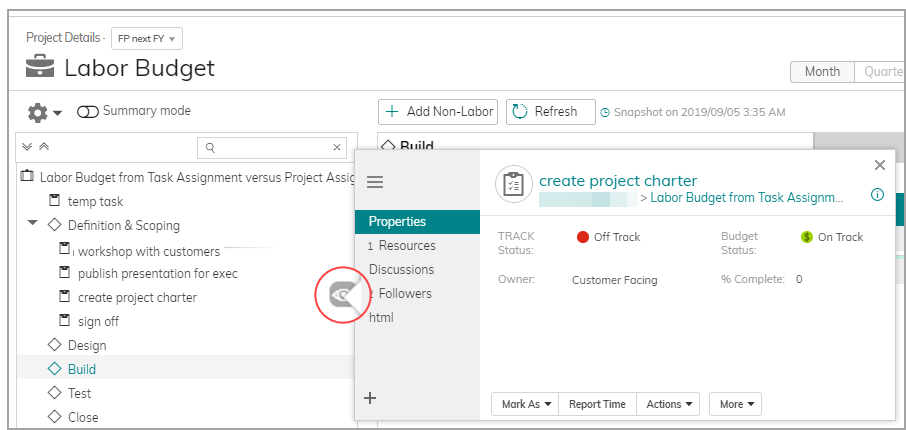
Quick view with shortcuts to commonly used actions
Easily see work item details directly from the Financial Planning view, without navigating away. You can now click on the eye icon to both view and take actions that include changing the status, assigning resources, participating in discussions, and much more.

Financial period highlighted in columns
Columns within the financial periods of the project are now highlighted in yellow.


