
Migrate & Deploy
Concept and Capabilities
You use the Migrate & Deploy tool to compare the configurations of two AdaptiveWork instances and migrate selected configurations from a "source" instance to a "target" instance. The tool can compare and migrate either the entire configuration of an instance or just a part of it. Typically, the Migrate & Deploy tool is invoked from the instance with the most recent configuration updates to compare and migrate (synchronize) them to the target instance. Each instance can be from either a production or sandbox environment.
It is possible to switch the instances designated as source and target or to disconnect from a target instance and reconnect to another one.
The Migrate & Deploy tool is a very powerful tool on its own, but it can also be used with the Instance Cloning feature to support a frequent configuration update flow.
Both the comparison and the migration of configurations run using the AdaptiveWork API.
Comparison approach and capabilities
- The comparison engine of the Migrate & Deploy tool allows comparing specific configuration categories (custom fields, views, profiles, etc.).
- Within each configuration category, the compare engine runs on each item per particular parent module (Project, Milestone, Task, etc.) and tries to match a corresponding configuration item on the “Target” side:
- When a matching item (field, view, custom action, etc.) is identified, each parameter or property of the item is compared, for example, descriptions, tooltips, formulas, etc.
- When a matching item is not found on the source or target instance, the item is marked as “Missing on Source/Target” in the compare results.
- Some items (such as Views, Validation Rules, Workflows, and Custom Panels) cannot be uniquely identified because they could have name duplications on either the “Source” or “Target” sides. In such cases, the comparison engine will flag the “Error” and state that a comparison is impossible.
- Best practice: For best results, it is strongly recommended that you rename items that have duplicate names, which enables the Migrate & Deploy tool to compare all items.
- Once the comparison is complete, a high-level list of differences is displayed, which you can use to assess the configuration differences and selection of particular items/categories to be migrated (synchronized) to the target instance.
- For more details, you can download the detailed comparison results in an Excel file, where all the differences (Diffs) are highlighted and can be filtered for closer analysis.
NOTE
The comparison can take 5 to 7 minutes, depending on the number of selected configuration categories and the size and complexity of the instances being compared.
Migration approach and capabilities
- You can use the Migrate & Deploy tool to migrate selected configuration items or categories.
- On the target instance, existing configuration items are updated or created if the configuration item does not exist.
- When an item is updated, all properties are updated. You cannot specify certain properties only.
- Items that do not exist on the source instance are retained on the target instance. They are not deleted.
- Only items that have a match on the target instance can be migrated.
- During the migration process, all the dependent items are automatically included with the item selected for migration. A detailed dependency list is displayed prior to the actual migration, so that it is possible to assess the actual impact of the migration and take actions accordingly. Items cannot be migrated without their dependencies.
- If a configuration item depends on a user group or a discussion group, then the group is automatically created and linked to the item in the target instance. However, the members of the group (users) are not automatically created in the target instance.
- Customizations referencing a particular data item (user, project, etc.) must be resolved manually on the target instance.
- If a user with the same user name exists on the target, the application will try to match it.
- Only custom fields that have matching types (field, reference, relation summary, and so on) can be migrated.
Picklist Management:
- If a picklist is selected for migration, then its values are overridden in the target instance
- If a picklist is included with an item due to a dependency, then its values are preserved in the target instance
Limitations
The following is a list of the limitations of the Migrate & Deploy tool:
- The Migrate & Deploy tool is relevant only for customers with a Sandbox Instance.
- All views (both system and private) are compared. This currently leads to extensive compare times of the Views category. Please note that views not shared with other users are not getting compared and migrated.
- Currency defaults are not migrated because they are a part of “data” rather than “metadata”.
- The current version can migrate up to 1000 picklist values in a single picklist.
For the complete list of current limitations, refer to the Appendix at the end of this article.
Best Practices:
- It is recommended that you limit the number of configuration categories to be compared at once because, for large accounts, the compare time may exceed the 5-minute connection timeout
- Some configuration categories (such as Views and Profiles) may potentially have long compare times, as these are complex configuration structures.
- It is recommended to migrate Profiles after Custom Fields Migrations.
- It is recommended that you select fewer than 100 custom fields at once to migrate. Instead, do it in several chunks.
- Because the migration performs configuration changes on the target instance, it is advised to start from a small number of changes in a single migration session and verify the results after each migration, either manually or by re-running a comparison.
Usage
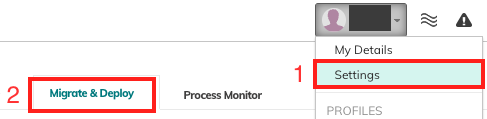
Access the Migrate & Deploy tool under the Migrate & Deploy tab in Settings. Only admins can access these settings:
Connecting to a Target Instance
To run the Migrate & Deploy process, Admin credentials for both the source and target instances are required.
- Sign in to the source instance.
- In Settings, click the Migrate & Deploy tab.
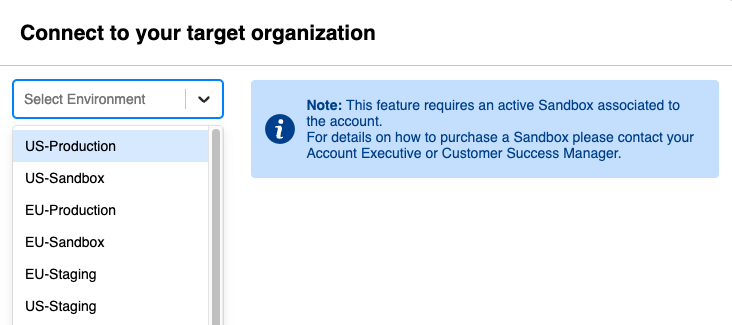
- In the Migrate & Deploy screen, choose the environment (for example, US-Production, US-Sandbox, US-Staging, etc.) where the “Target” instance is located.
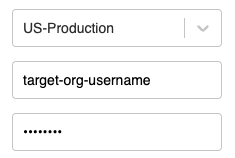
- Provide the credentials for the target instance.
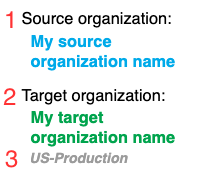
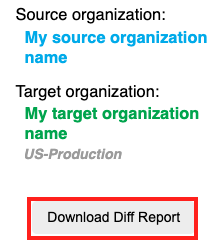
- Click Connect. Verify the names of the source (1) and target (2) instances with target environment (3) on the left side of the screen:
- To reconnect to a different target instance, click Disconnect.
NOTE
Refreshing this screen will disconnect from the target instance.
Comparing Configurations
To compare configurations between the source and the target instances, select the configuration categories that you want to compare, and then click Compare configurations:

NOTES
- Depending on the size and complexity of the configurations, the comparison can take 5 to 7 minutes.
- Some categories (such as Views and Profiles) can take a long time to compare due to their complexity.
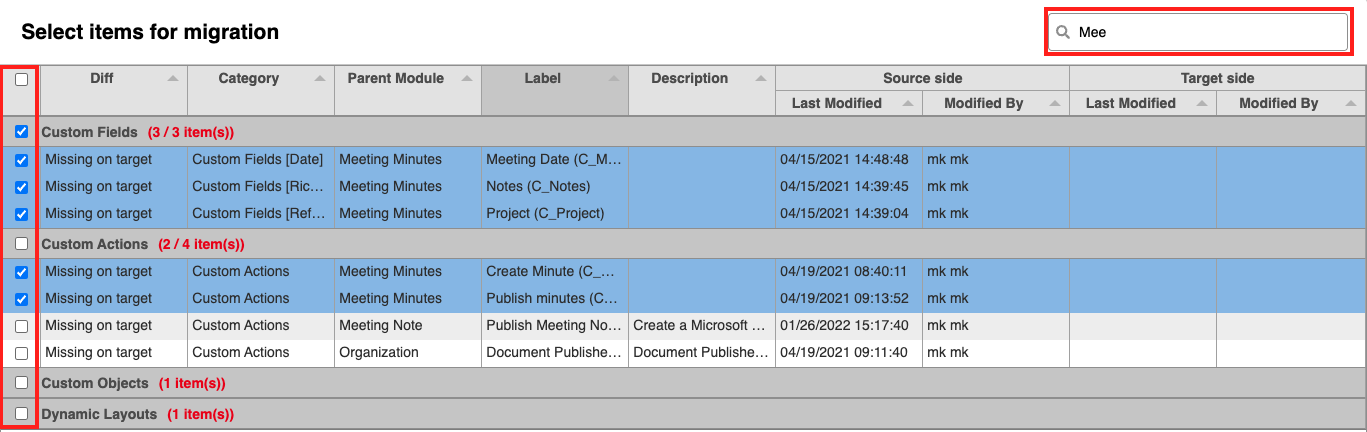
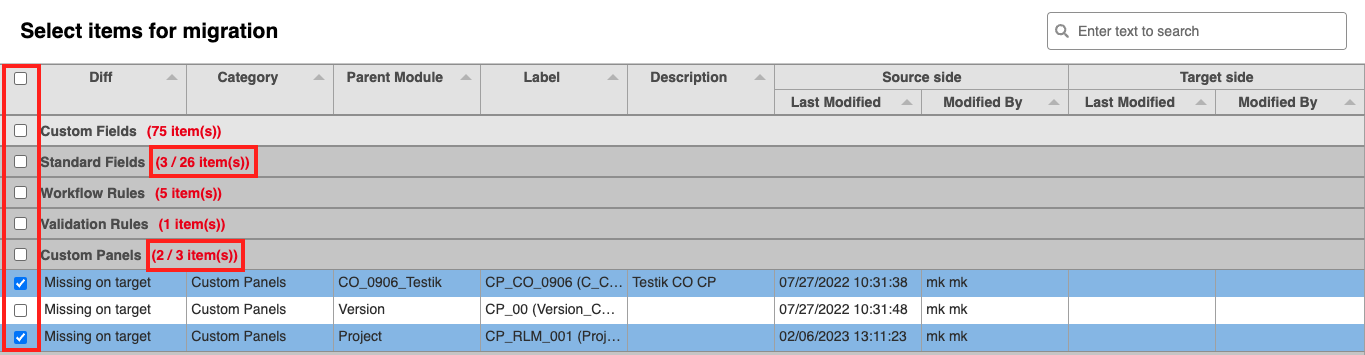
Viewing High-Level Comparison Results
After comparing the instances, the high-level comparison results are displayed in a table. The table includes only the categories that can be migrated in a particular delivery stage and only items that are different on the target instance. You can expand the categories to view more information.
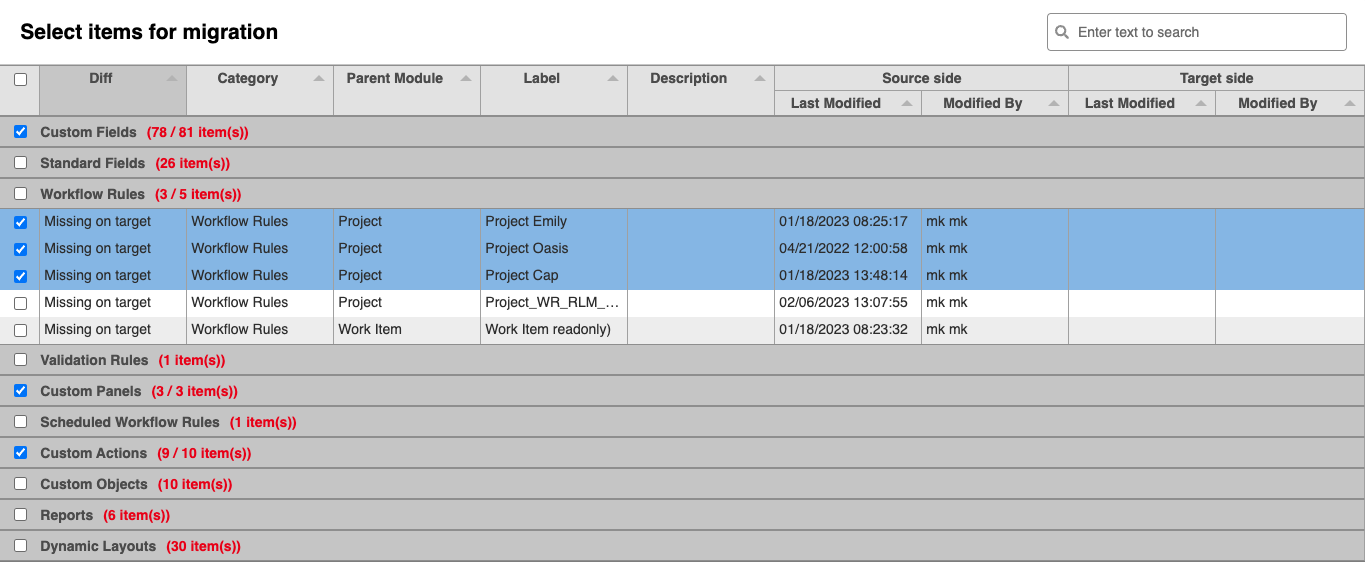
The table includes the following columns:
- Diff – indicates whether the item is different or missing on the target instance.
- Category – the configuration category of an item (and type for Custom Fields and Views)
- Parent Module – the parent module an item is linked to
- Label – the actual name (label) of an item as it appears on the source instance
- Description – the description of an item as defined on the source instance
- Source side (Last Modified / Modified By) – date and time when the item on the source instance was last modified and the user who modified the item.
- Target side (Last Modified / Modified By) – date and time when an existing item on the target instance was last modified and the user who modified the item.
NOTES
- The high-level results contain only limited information about the items that have diffs or do not exist in the target instance.
- You can sort the contents of the table by a particular column.
- If there are no differences in the selected configuration categories between the source and the target, the table is empty.
Viewing Detailed Comparison Results
You can view detailed comparison results by downloading an Excel-based Diff report. Click Download Diff Report.
The Diff Report displays the comparison results for each selected configuration category in a separate worksheet:

You can expand each item separately by clicking the corresponding ‘+’ on the left (1) or by toggling/expanding all at once using the grouping switches in the top left corner (2):
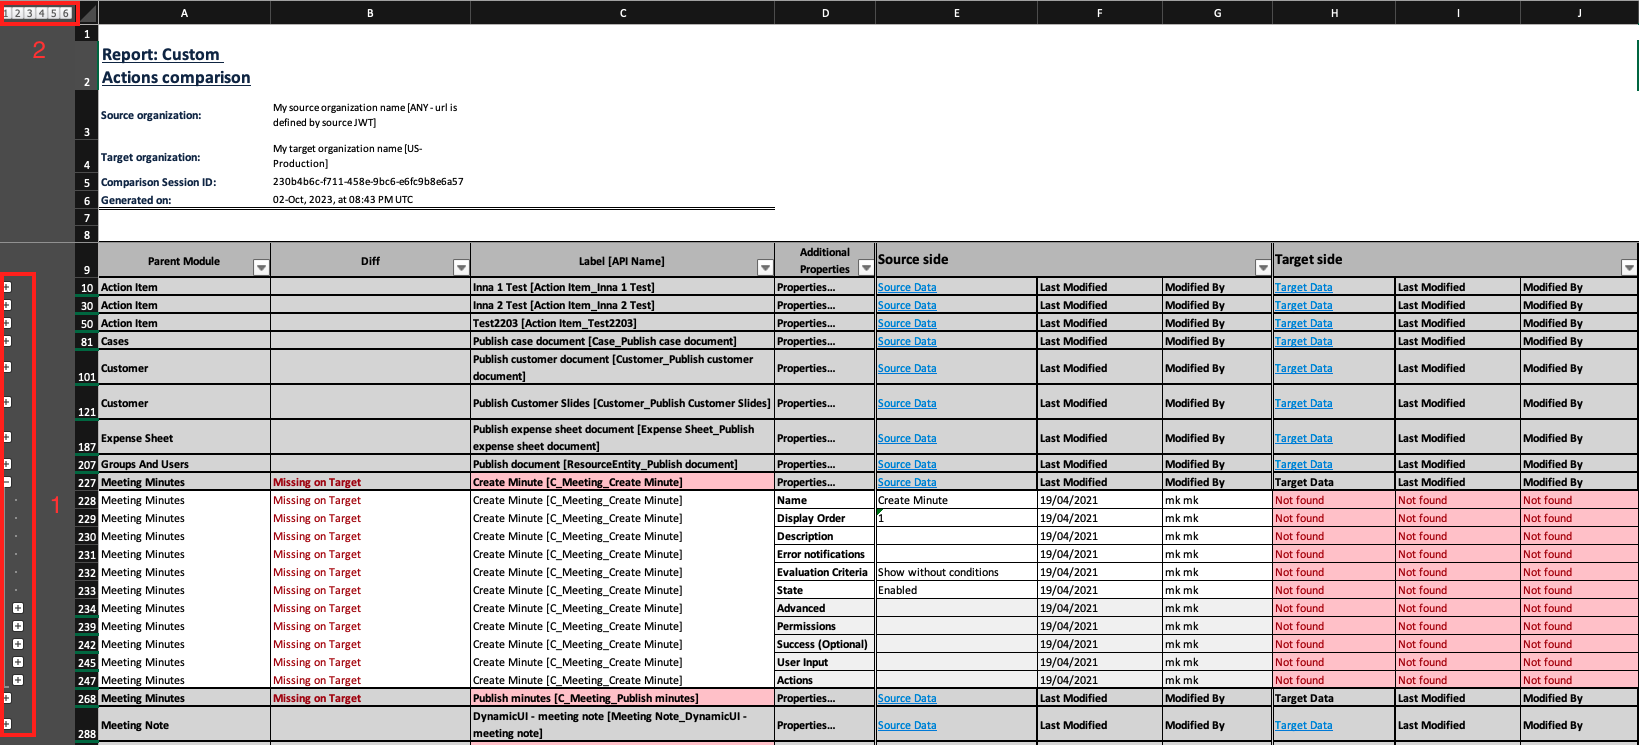
Diff report columns
The Diff report includes the following columns:
- Diff (column B) – displays the results of the comparison per item:
- Empty – the items are identical on both the source and target instances
- Diff – the item exists in both instances, but there is a difference in at least one property. Each property is marked with a “Diff” flag. The differences are highlighted in orange
- Missing on Source/Target – means the item is missing on the source/target respectively
- Label [API name] (column C) – name and identifier/API name of the item
- Additional Properties (column D) – all the properties of the item that are compared
- Source side / Target side (columns E to J) – values of the properties on both instances
TIPS
To effectively read the report, you can filter the Diff column (B) by the “Diff” value to display only the items and properties with differences.
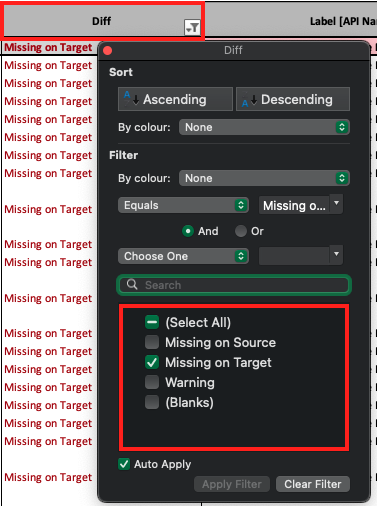
If an item is found on either the source (1) or target (2), there is a quick link to take you directly to the corresponding configuration screen in AdaptiveWork:

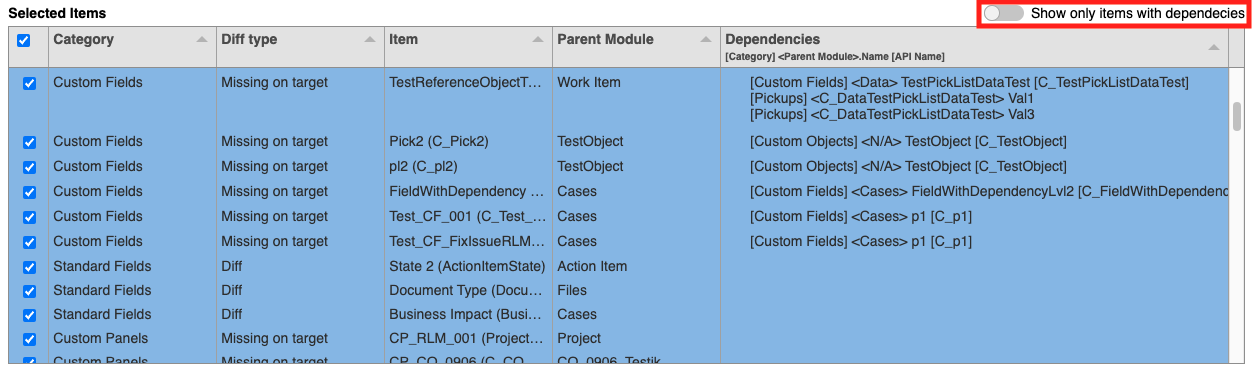
Migrating a Selected Configuration
After viewing the comparison results in a detailed Diff Report, you can specify the items to be migrated. Use the search box at the top right corner to filter items by typing any text (date, partial descriptions, etc.). Then, you can select all filtered items at once.
- Before starting a migration process, you must select at least one item. Otherwise, the Next button will remain disabled.
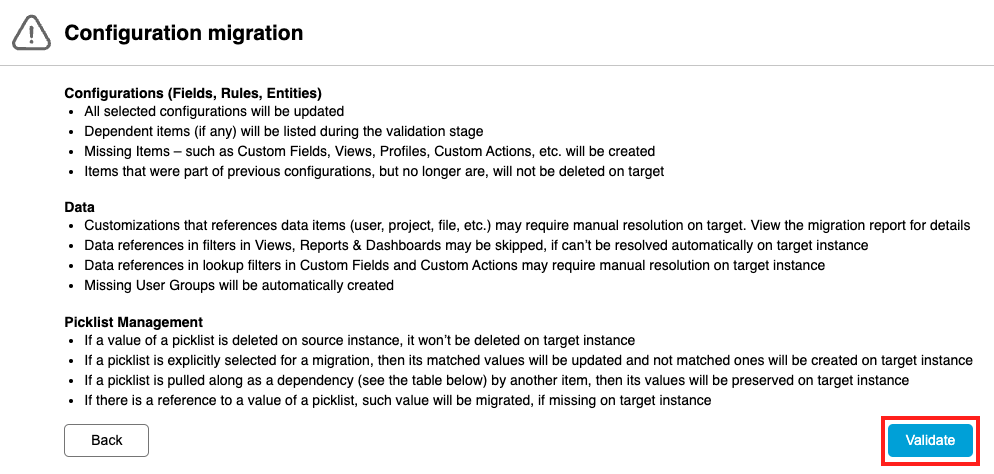
- Click Next. A summary of migration rules appears. Read the rules carefully. You can go back to adjust your selection if needed.
- Click Validate.
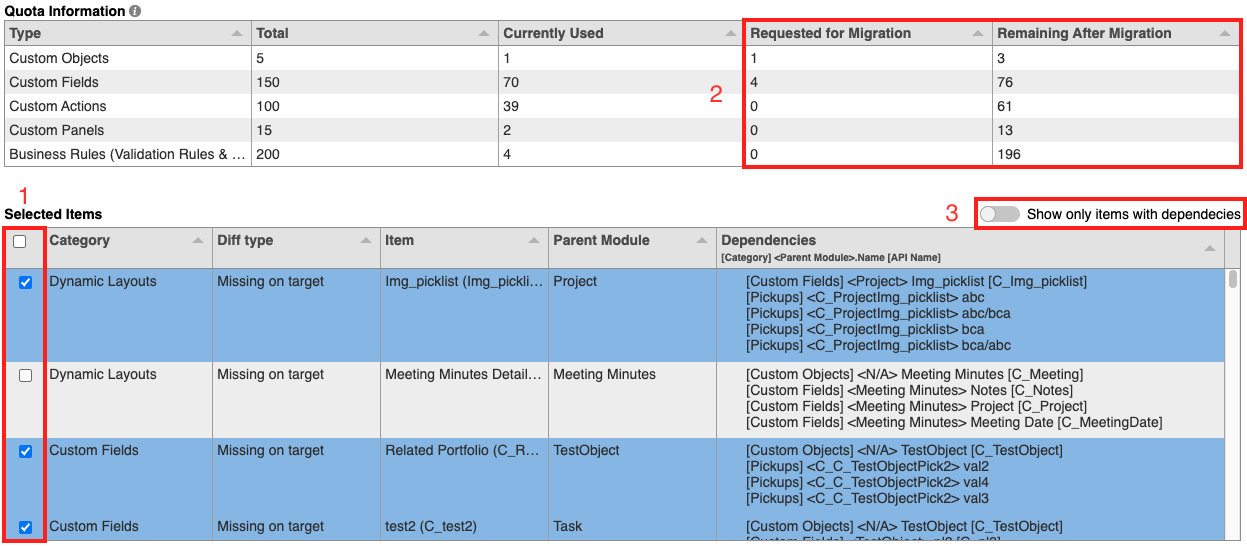
During the validation stage, the dependencies of the selected items and available quotas on the target organization are analyzed. The Quota Information table shows the quota details for each configuration type (Custom Fields, Custom Actions, etc.). If the quota is exceeded for the selected configuration, the Start Migration button is disabled.

NOTE
Dynamic quota pre-calculation mechanism exclusively designed for items and their first-level dependencies. This allocation can undergo modifications during migration due to the potential discovery of second-level dependencies (e.g., you want to migrate formula field C_A that depends on another formula field C_B, which in its turn depends on some other field C_C. The quota calculator will ignore the C_C field since it's already a second-level dependency. However, the Migrate & Deploy tool will try to migrate the C_C field to save data integrity).
- The dependencies are displayed in a grid. To exclude a dependency, you must uncheck the parent item directly inside the dependencies grid. You can uncheck only the parent item and not individual dependencies. The quota information is automatically recalculated after you remove a dependency (1, 2). Toggle (3) helps to sort out the items without dependencies.
- When you are ready, click Start Migration. The migration process begins.
- It may take a few minutes for the migration process to finish. After the migration is successfully completed, you can view the migration report or compare the configurations again:
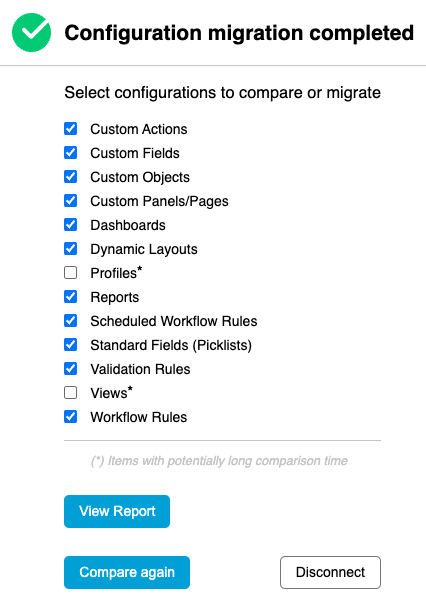
- The migration report lists the migrated items with their corresponding migration status (Passed/Failed):

Usability improvements
To provide a smooth and transparent experience during the configuration migration process, we now introduce the following usability and interface improvements:
- The progress bar will represent the loading process for comparison, validation, and migration steps, providing you full visibility during the migration waiting periods.


Generating the migration report step might take up to 5 minutes, depending on the amount of data that needs to be added. Unless you are prompted with an error, the dots' animation shall be considered a work-in-progress for this particular step. - To reduce the time spent on the initial selection and to clearly show what items will be selected for installation before proceeding, we added a count for selected items in the applicabe item selection step.
- Now, as default, during the validation step we are now displaying all the items items selected in the previous step (instead of items with the dependency only, as before). Checking the toggle in the top right side of the table allows to sort items with existing dependencies.
Appendix - A complete list of current limitations and known issues
Metadata types not yet supported:
- Global and system settings
- Standard fields except for Picklist Standard fields
The following customization actions are not supported currently. They will either be blocked for migration or will migrate with warnings:
- Calculate Project Financials
- Manage Proof
- Set Proof Reviewers
- Schedule Slide Publisher
- Outbound Call with Certificate
Configurations (Fields, Rules, Entities)
- All selected configurations will be updated
- Dependent items missed on target (if any) will be listed during the validation stage
- Missing Items – such as Custom Fields, Views, Profiles, Custom Actions, etc. will be created
- Items that were part of previous configurations but no longer are will not be deleted on the target
Data
- Customizations that reference data items (user, project, file, etc.) may have to be resolved manually on the target instance. You can view the migration report for details.
- Data references for filters in Views, Reports and Dashboards may be skipped, if they cannot be resolved automatically on the target instance/
- Data references in lookup filters in Custom Fields and Custom Actions may have to be resolved manually on the target instance.
- Missing User Groups are automatically created.
Picklist Management
- If a picklist is selected to be migrated, then the items in the picklist that have a match on the target instance will be overridden (means color, order, image of the item). All items that do not have a match will be preserved.
- If a picklist item is included as a dependency by another item, then items of the picklist will be preserved , and the dependent picklist items will be created in the target instance.
- If there is a reference to a custom value of a standard picklist, the value will be migrated if missing on the target instance.
- If a custom value of a picklist is deleted on the source instance, it will not be deleted on the target instance.
FAQs
Does it matter which instance is the source and which is the target?
No, it does not matter which instance is the source or target if you want to compare two instances. The Migrate & Deploy tool is a “mediator” that pulls the entire configuration from two connected instances and compares them item by item. It identifies which items are in sync, which items are different, and which items are missing either in the source or on the target instance.
Why am I getting different high-level comparison results if I switch source and target instances?
The high-level comparison results table is intended to display items to be selected for migration from the source to the target instance. Therefore, the items that are “missing in source” are not listed, which is why there may be differences when switching between “source” and “target” instances.