
Test Synchronization
See the Planview Hub Editions table to determine if your edition contains Test Synchronization functionality.
|
|
Supported Repository |
Supported Hub Version |
|---|---|---|
|
|
Micro Focus ALM/Quality Center |
Planview Hub: 19.2 and later |
|
Micro Focus ALM Octane |
Planview Hub: 20.4 and later |
|
|
|
Tricentis Tosca |
Planview Hub: 19.2 and later |
|
|
Jama Connect |
Planview Hub: 21.3 and later |
|
|
TestRail |
Planview Hub: 21.4 and later |
| Xray Test Management for Jira | Planview Hub: 22.2 and later | |
 |
UiPath Test Manager | Planview Hub: 23.1 and later |
| Microsoft Azure DevOps Server | Planview Hub: 23.3 and later |


Introduction
Planview Hub offers integration solutions to flow test artifacts such as test results, test steps, and their associated tests, test runs, test instances, and folder structures. Please review sections below to learn more about supported test scenarios in Hub.
Test Step Synchronization
Test Step synchronization is currently supported for the following integration scenarios:
- ALM Test Steps → ALM Test Steps
- ALM Test Steps → Octane Test Steps
- Jama Test Steps → Octane Test Steps
- Octane Test Steps → Jama Test Steps
- Jama Test Steps → Jama Test Steps
- TestRail Test Steps → Jama Test Steps
- Jama Test Steps → TestRail Test Steps
Test Step synchronization is currently supported for the following artifacts:
- Design Steps on ALM Tests
- Run Steps on ALM Test Runs
Micro Focus ALM
Use the instructions below to configure the following integrations:
- ALM Test Steps → ALM Test Steps
Step 1: Connect to your Repository
First, connect to your repository by following the instructions here.
You can learn more about ALM-specific configuration in our Connector Docs.
Step 2: Construct your Model
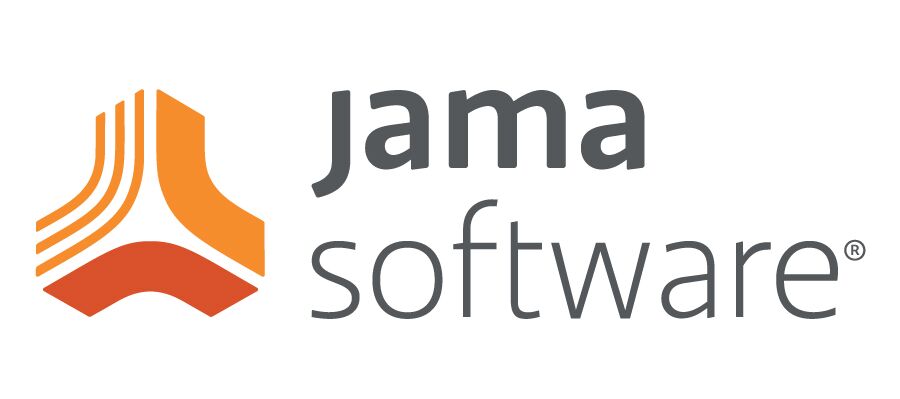
To flow test steps, you will need to add the Test Steps entity when creating your Test model.
To do this, click + Add Entity and select the Test Steps option.
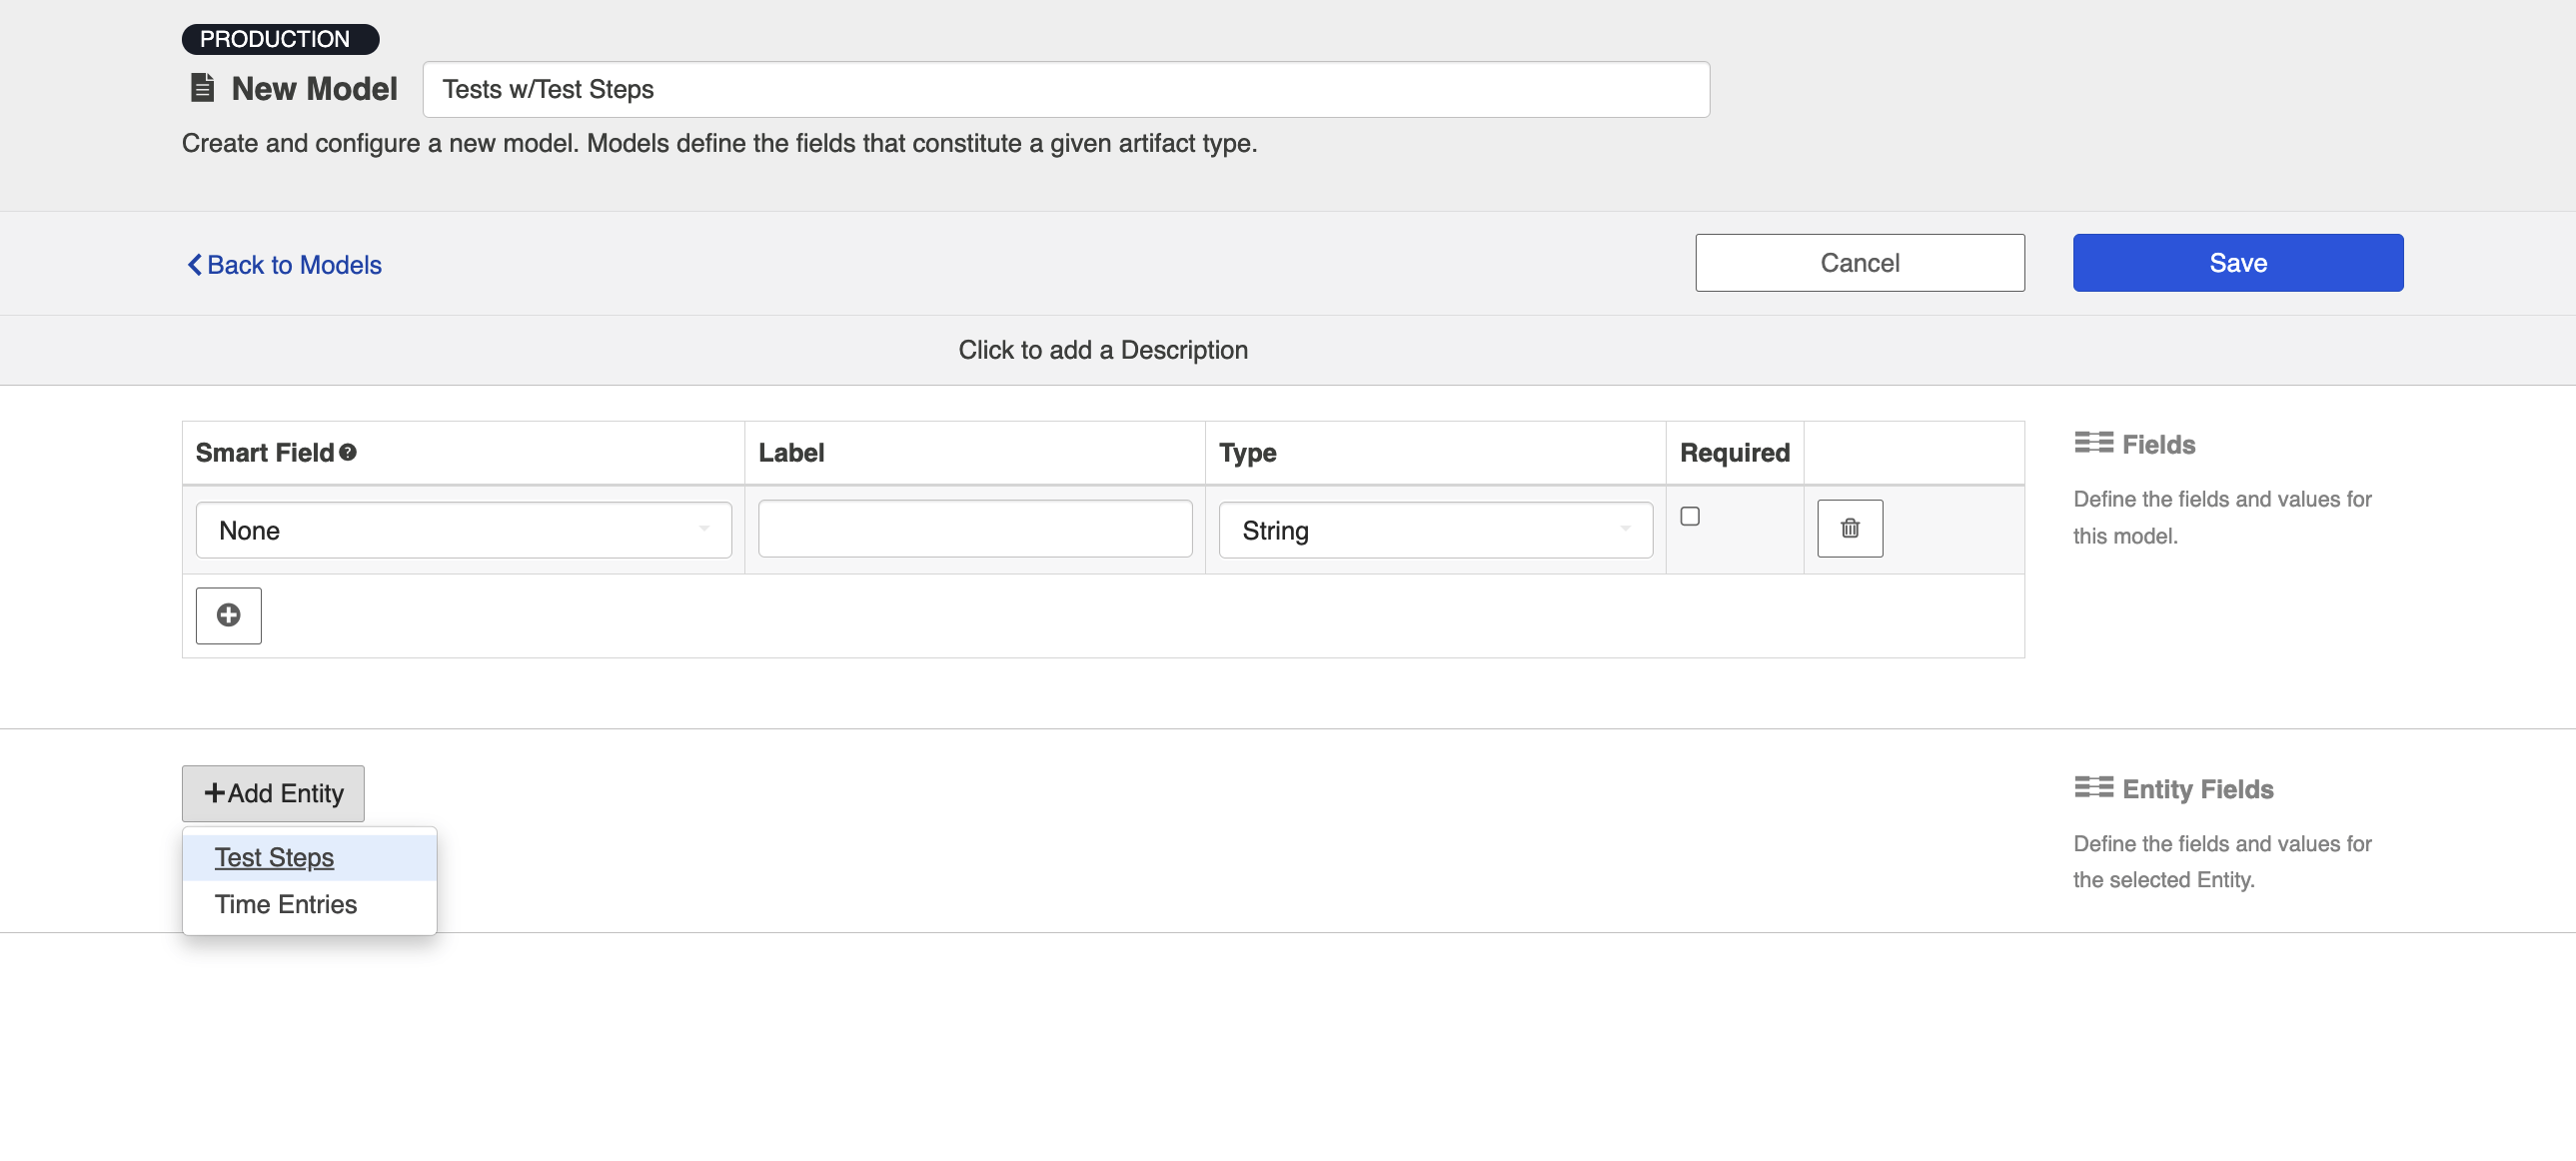
A Test Steps entity will be added. On the Model Configuration screen, you will then see two panels:
- Test Fields: In the top section, add any fields you'd like to flow on the test (or test run) artifact that are not part of its associated test steps.
- Test Step Fields: In the bottom section, add any fields you'd like to flow that are a part of test steps. You'll see that Hub provides some Smart Fields that are test step specific to help you get started, but you can add any other desired fields by leaving the Smart Field blank.
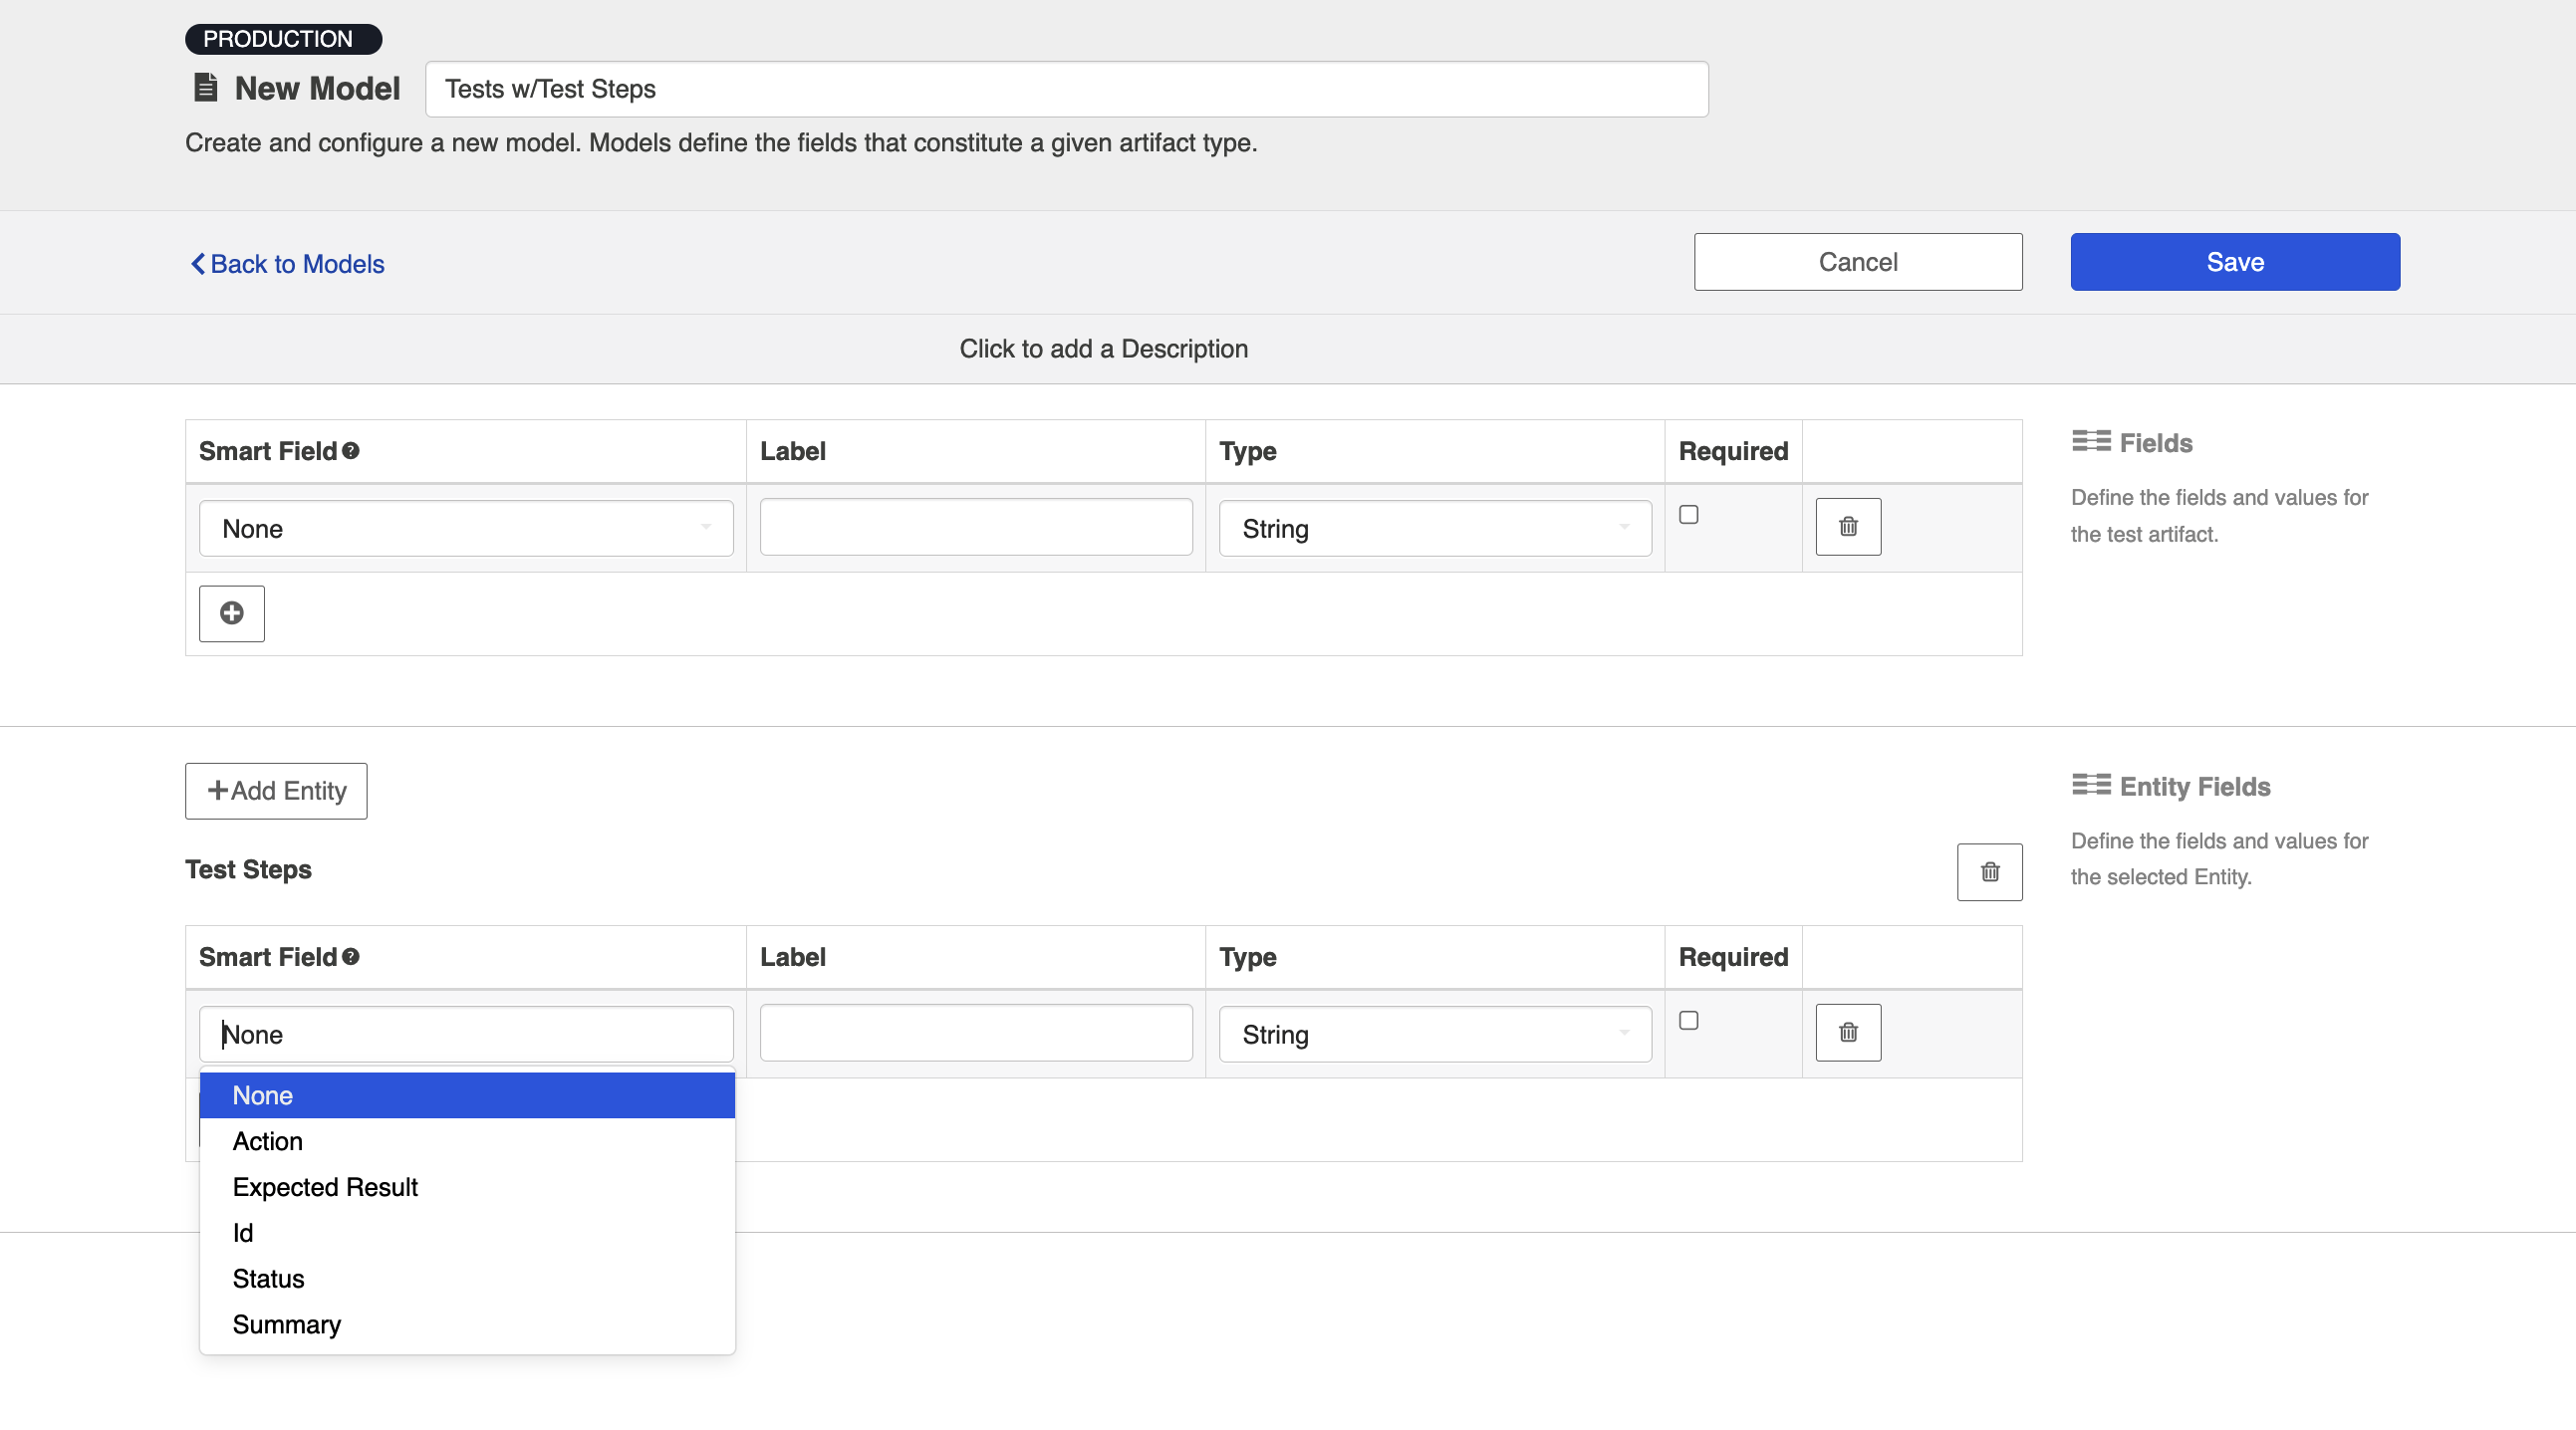
Here is an example of a very simple Test Model with Test Steps:
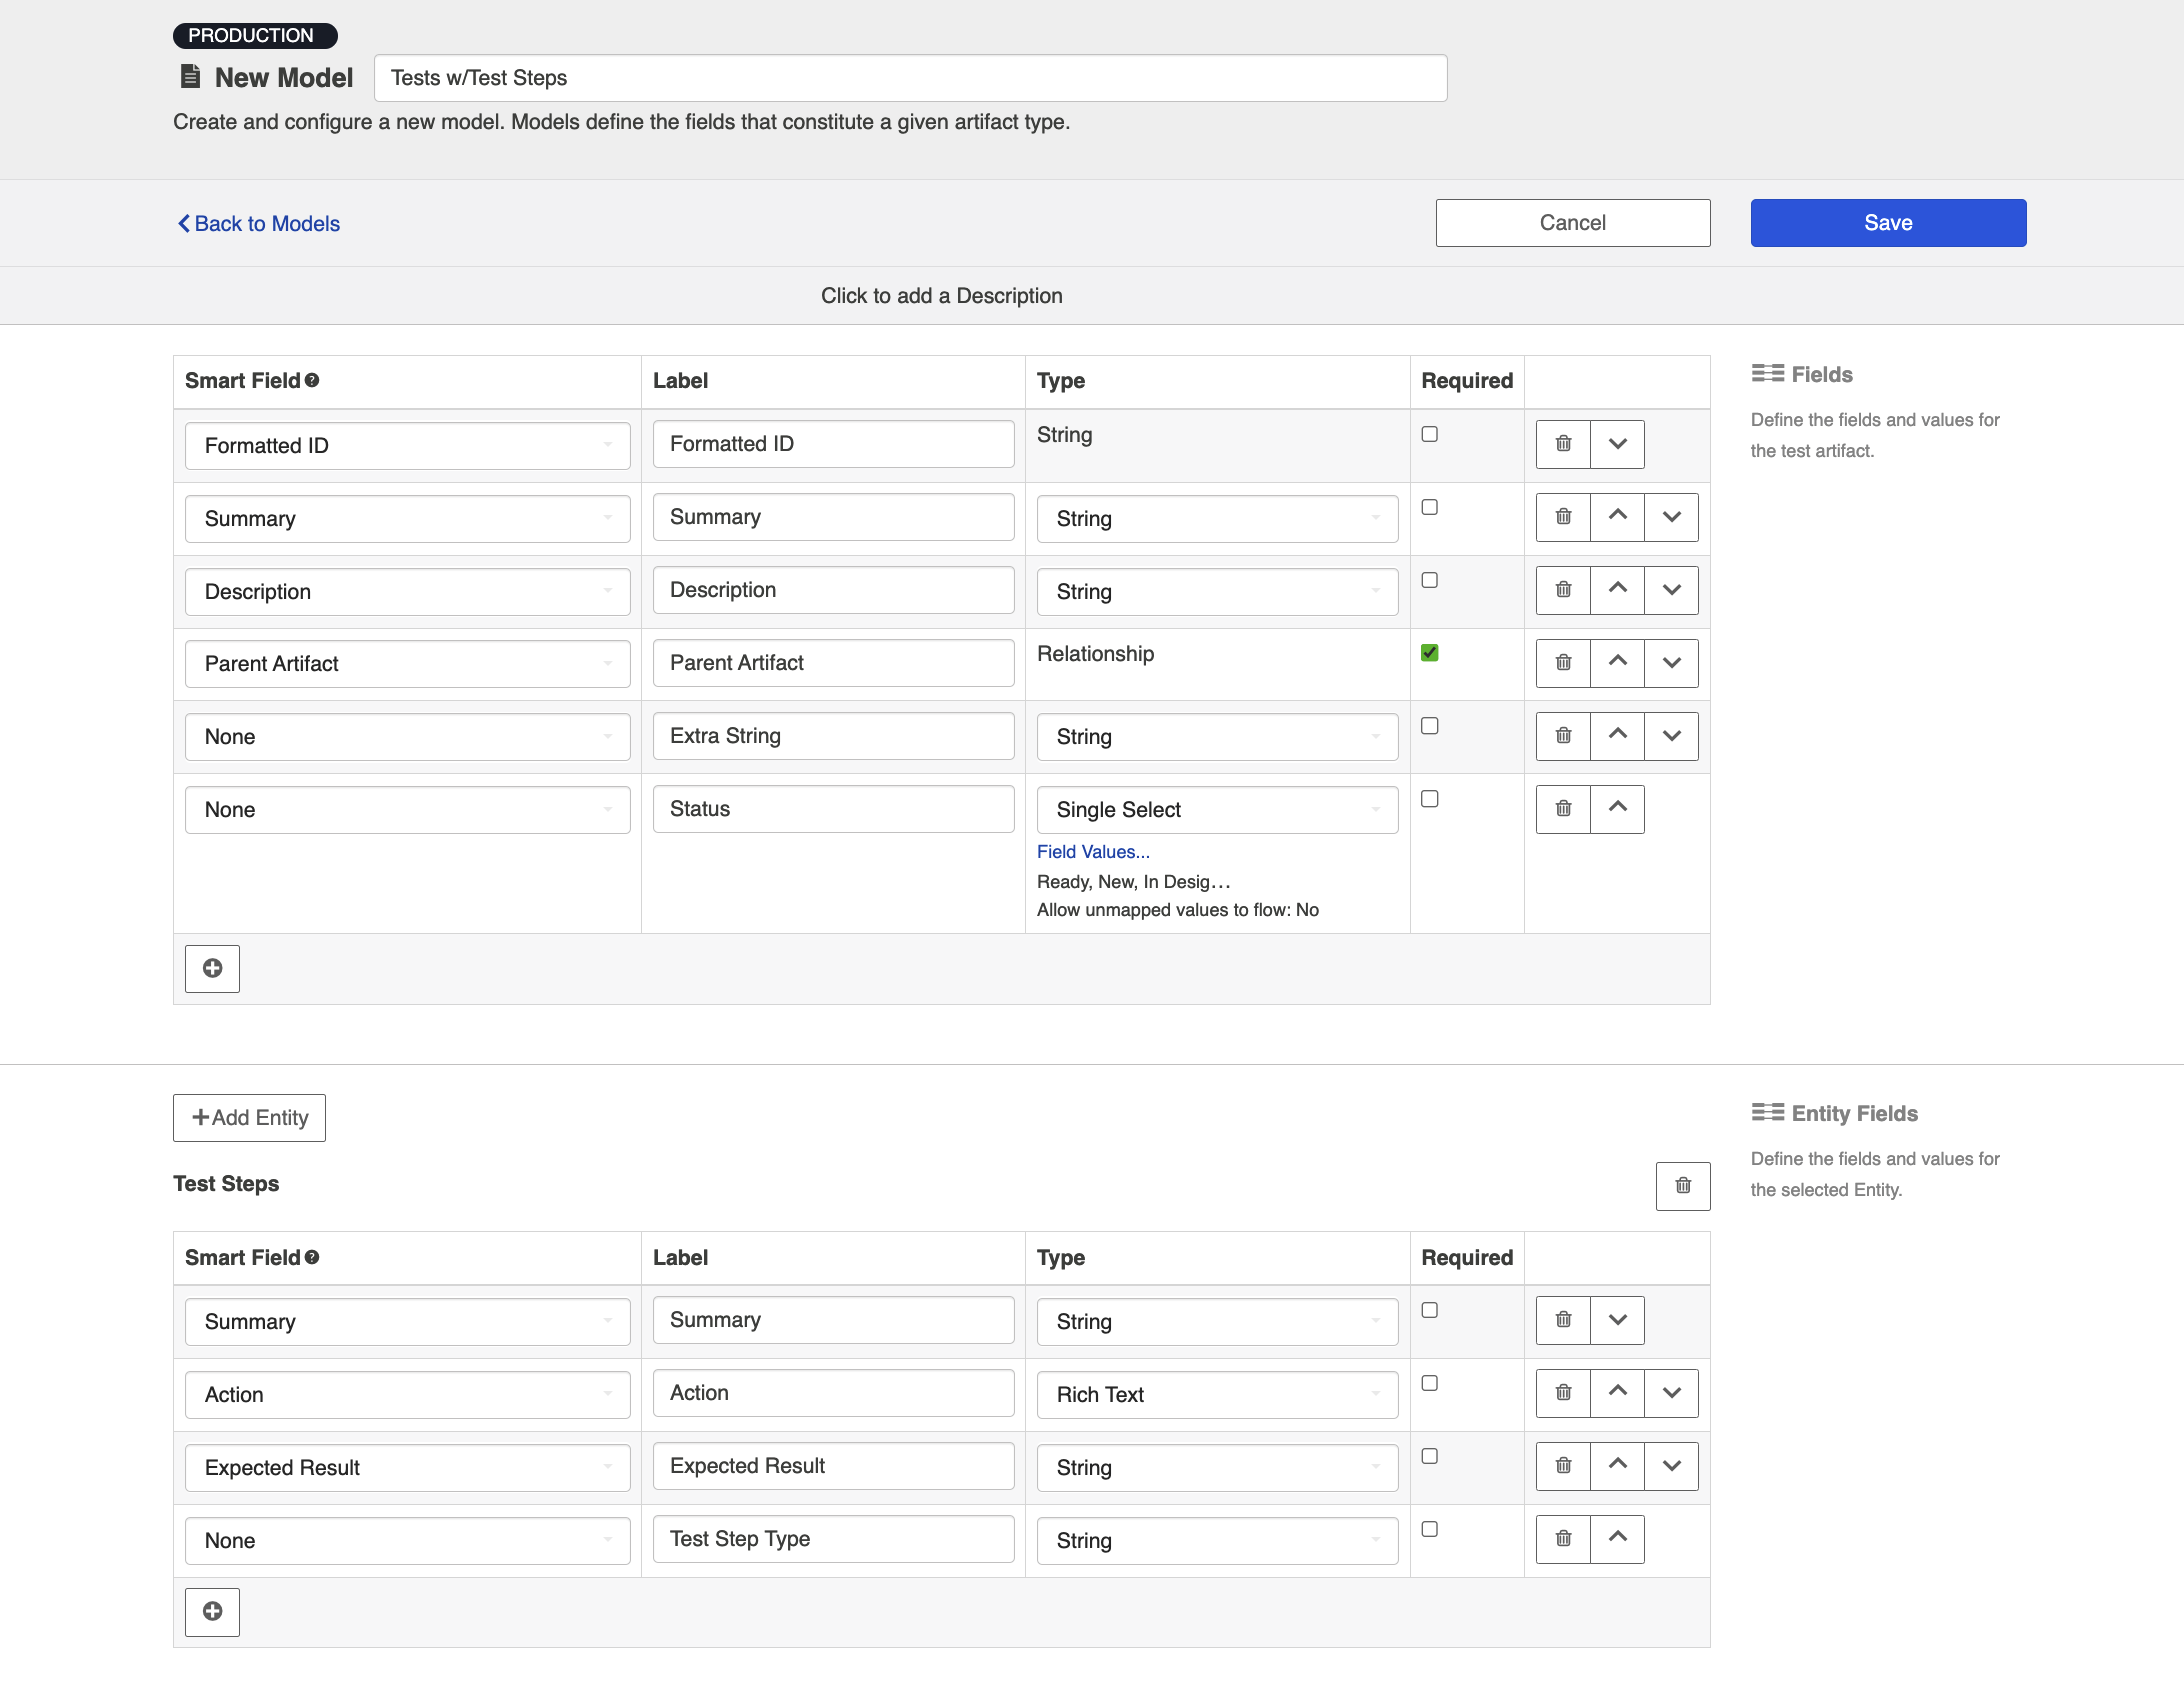
You can find general details on how to create a model here.
Step 3: Create your Collection
You can find general details on how to create a collection here.
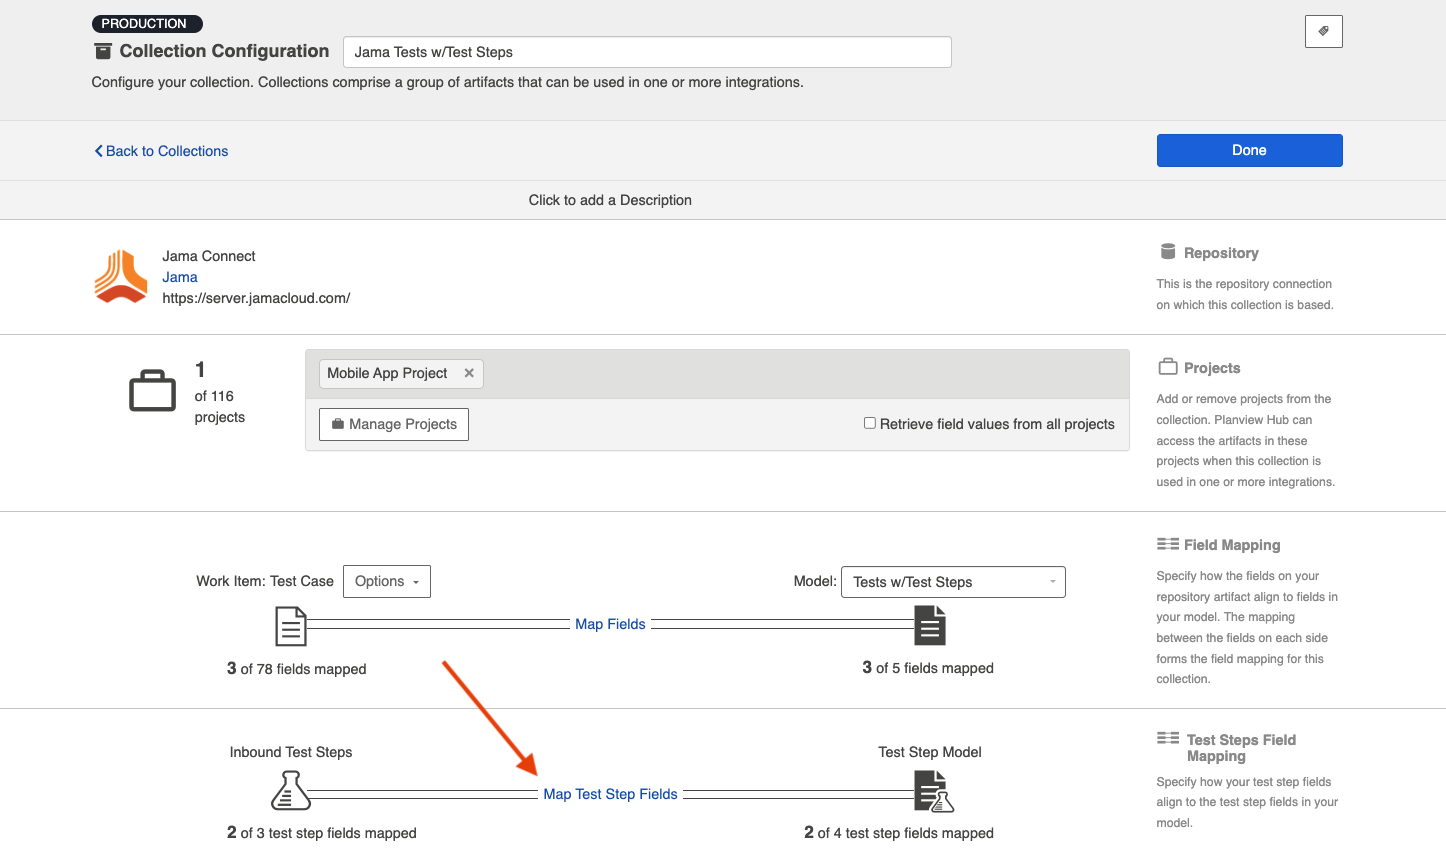
You will see a Map Test Fields sash on your collection if:
- Your model is a Model with Test Steps, and
- Your artifact is an ALM Test, ALM Test Run
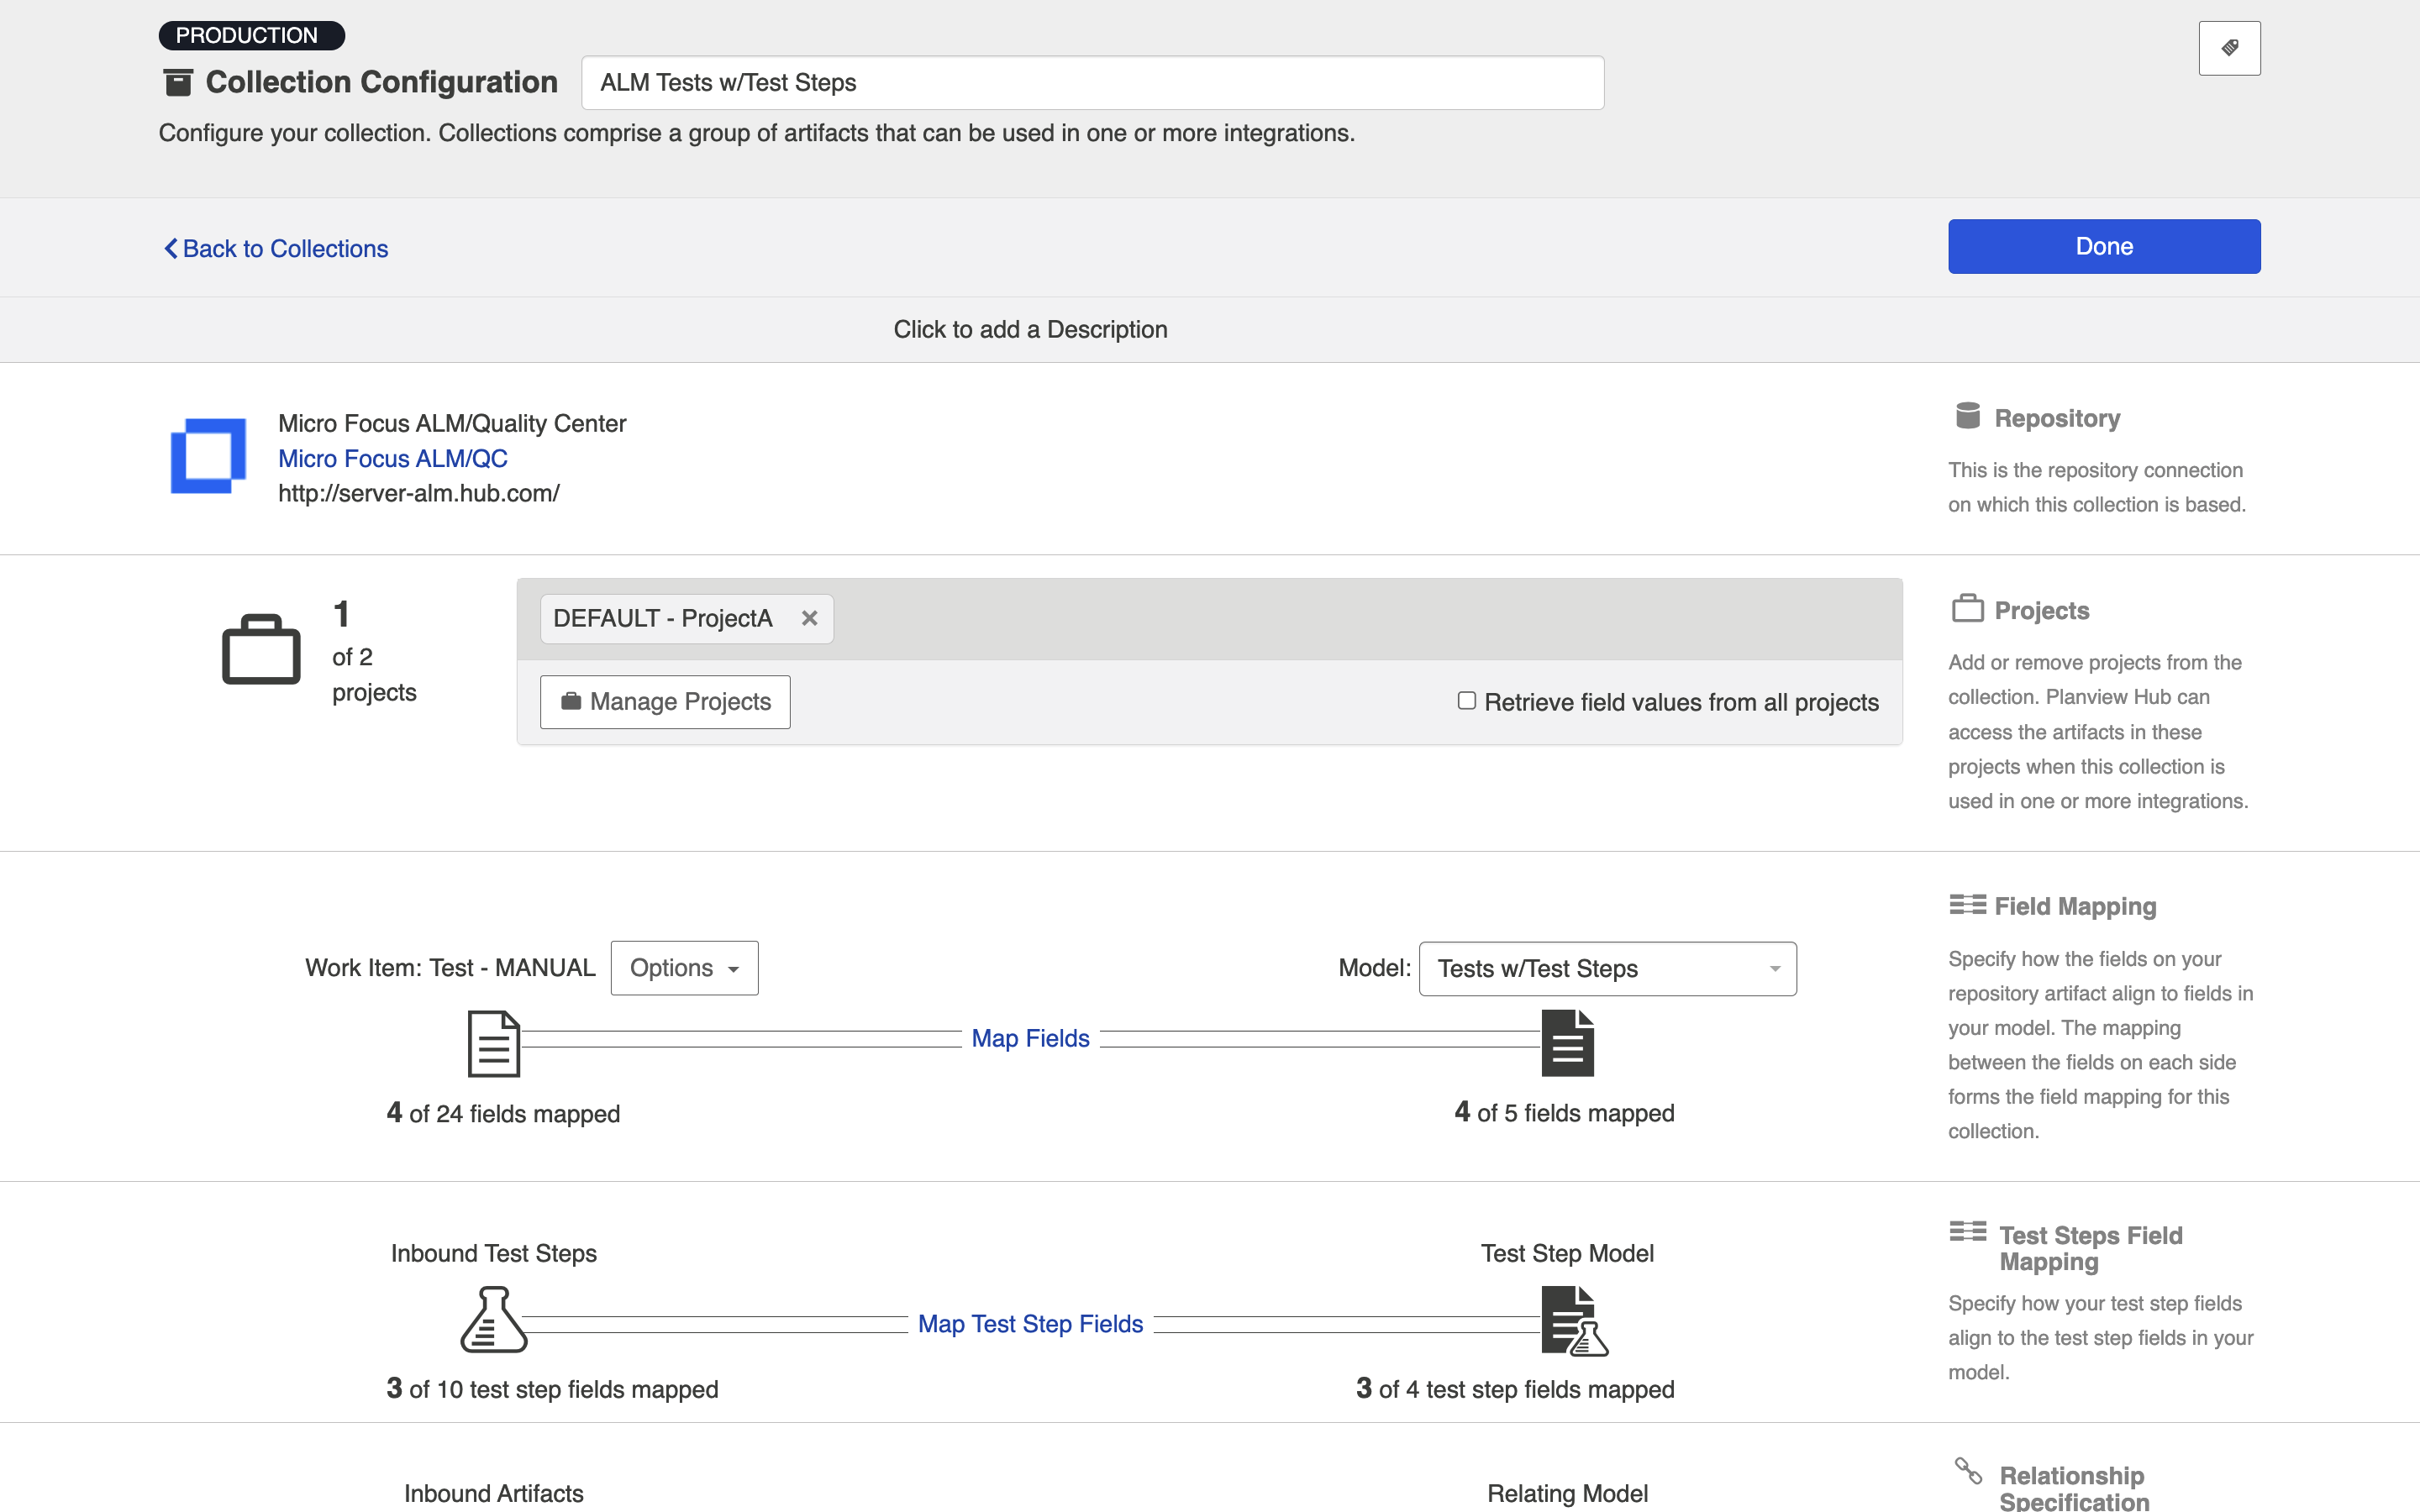
The process to map test step fields is very similar to the process on the normal Field Mapping screen. Note that both relationship(s) and other field types for test steps will be mapped on this one sash.
Note: Tests and Test Steps do not require a typical relationship field mapping to link them. We've added behind-the-scenes smarts to couple them for you.
Step 4: Configure your Integration
You can find general details on how to configure an integration here.
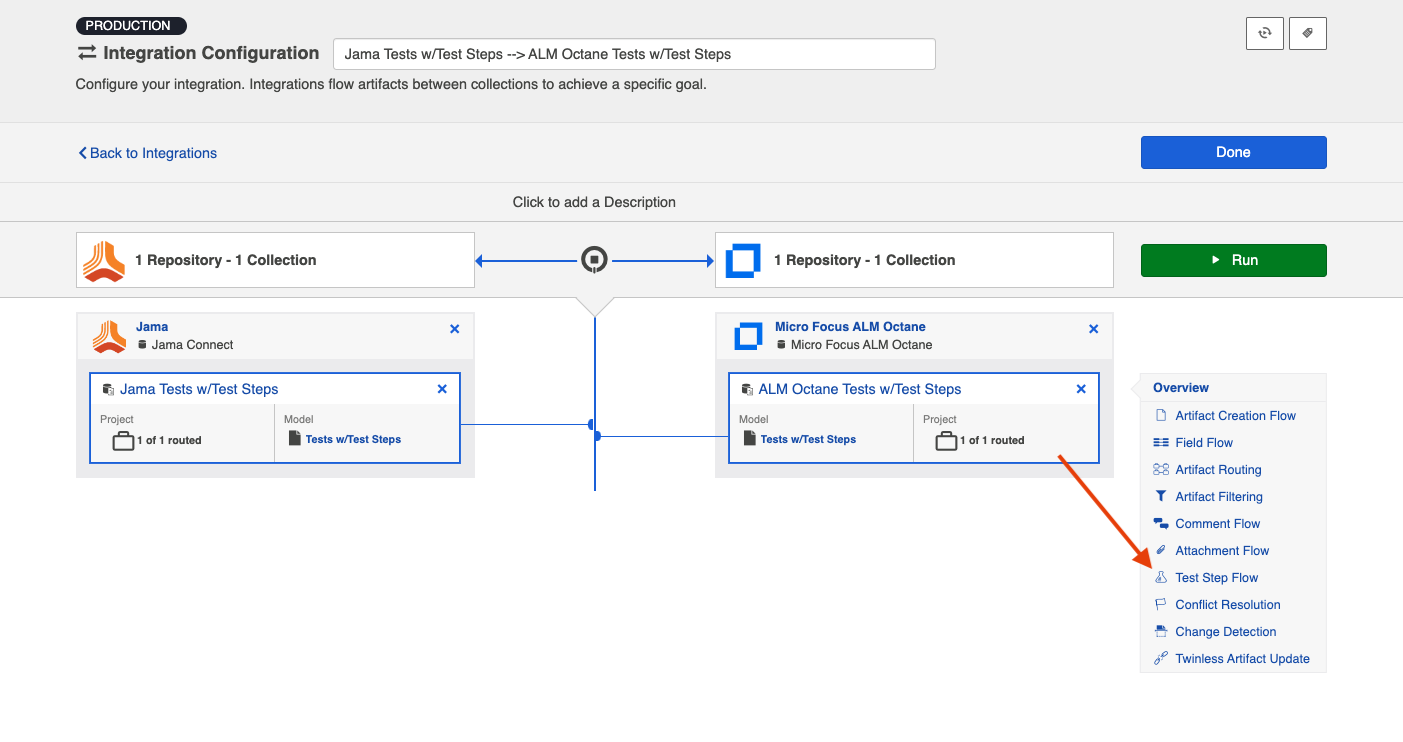
In order to see a Test Step Flow link on the integration configuration screen, the following conditions must be met:
- Model is of type 'Model with Test Steps'
- Artifacts in both collections have test steps
- The relevant Hub connectors must support test steps (see Connector Documentation to confirm)
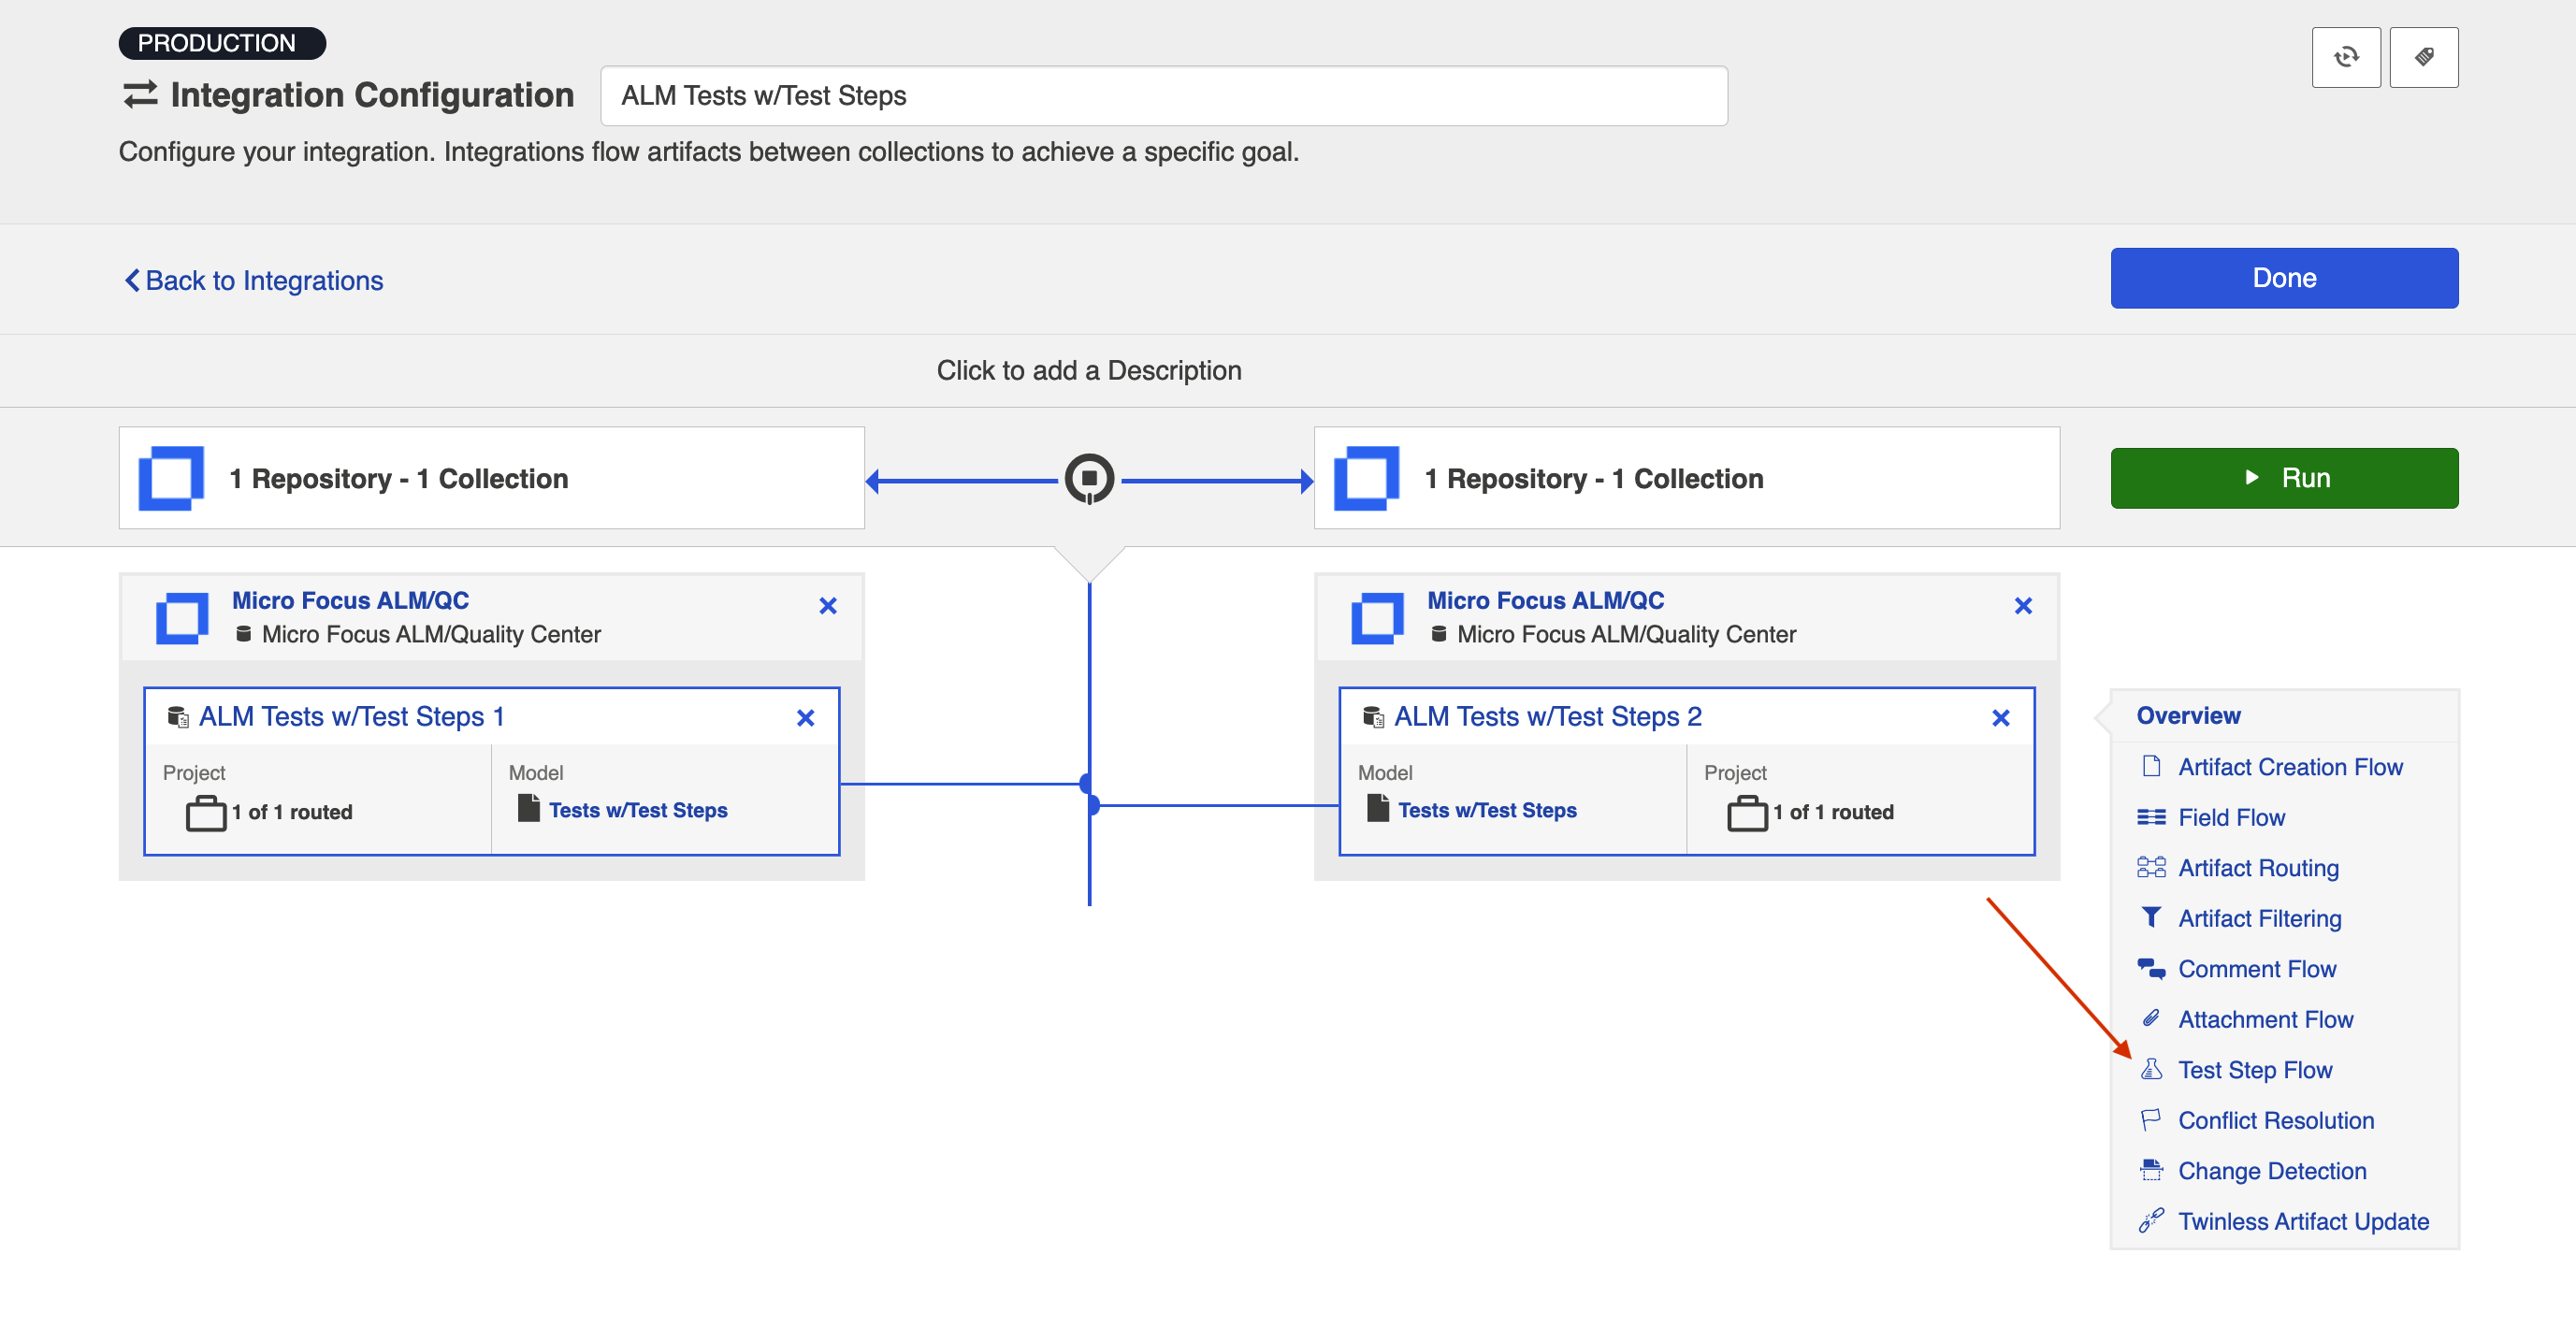
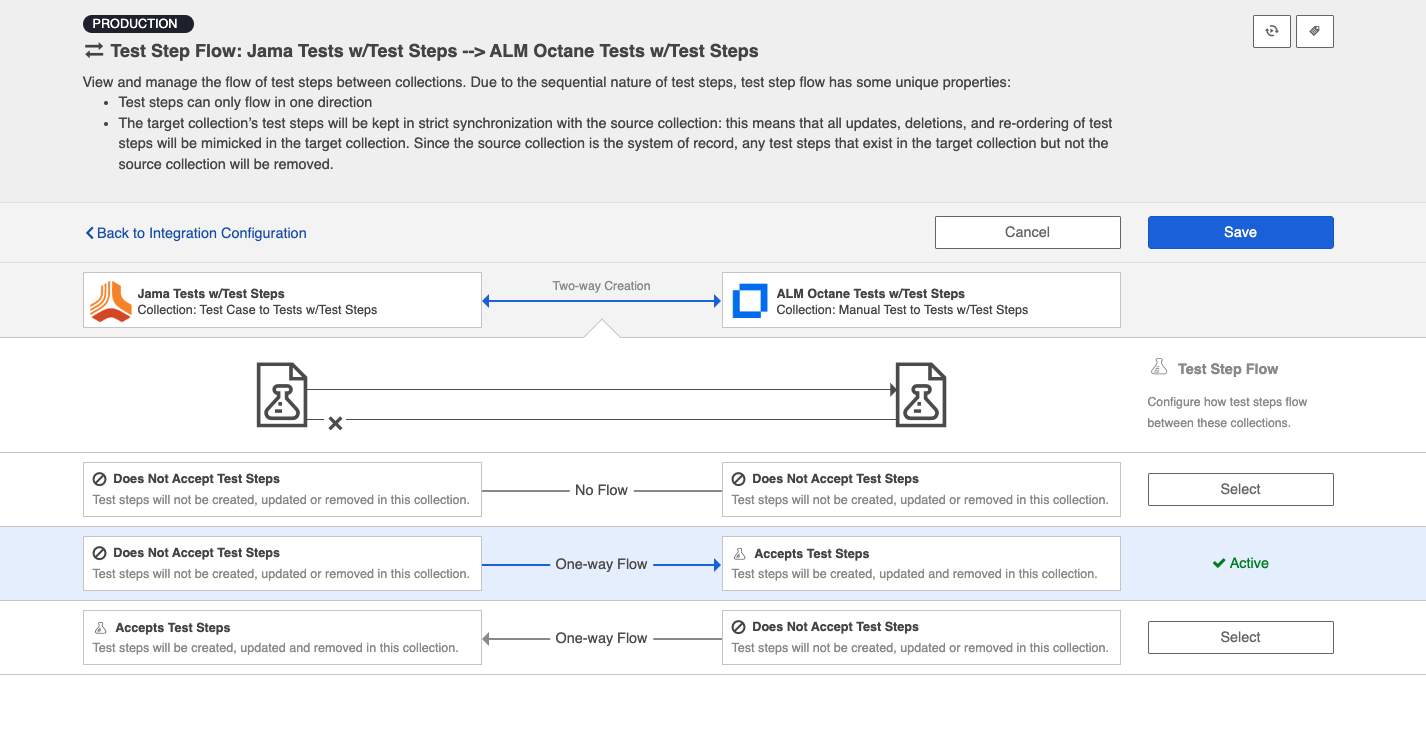
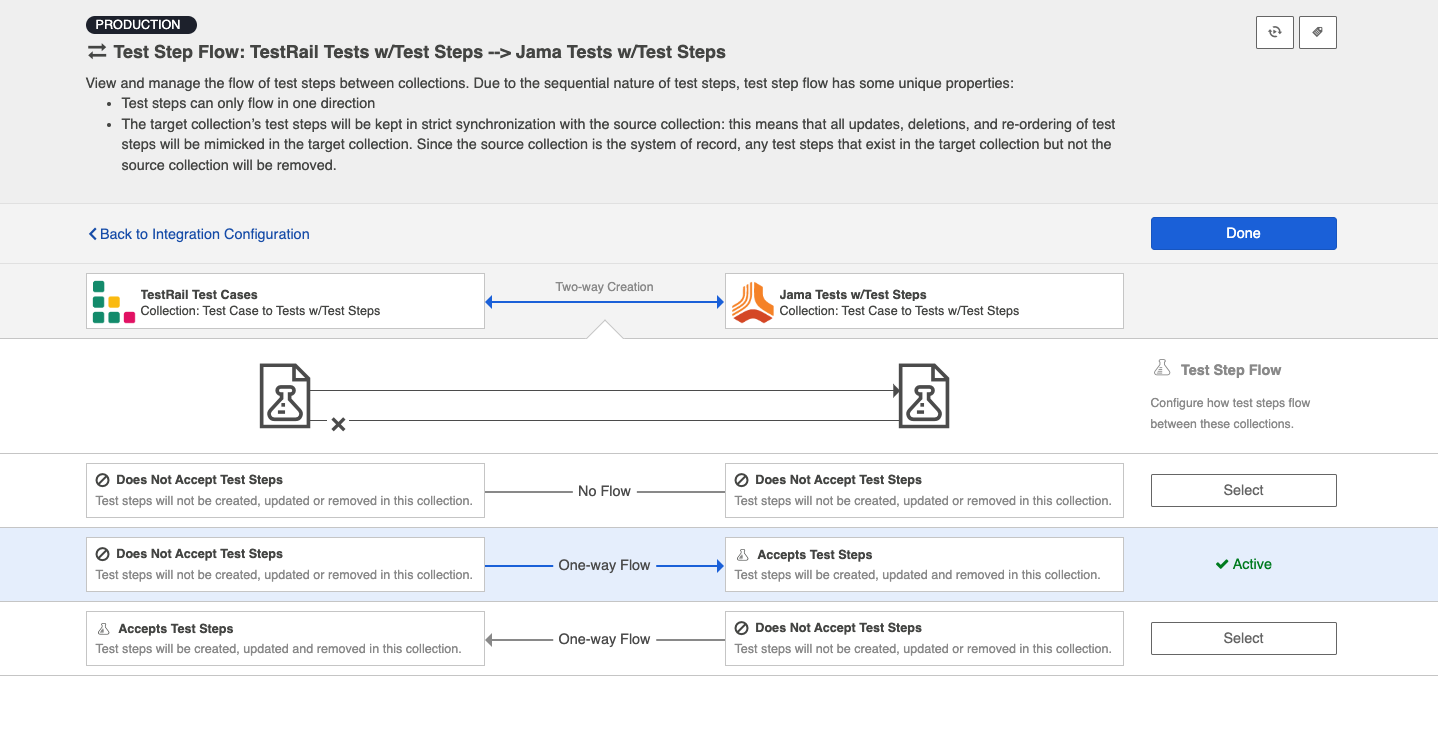
Clicking the link will bring you to the Test Step Flow screen, where you can click Select to choose your desired Test Step Flow style:
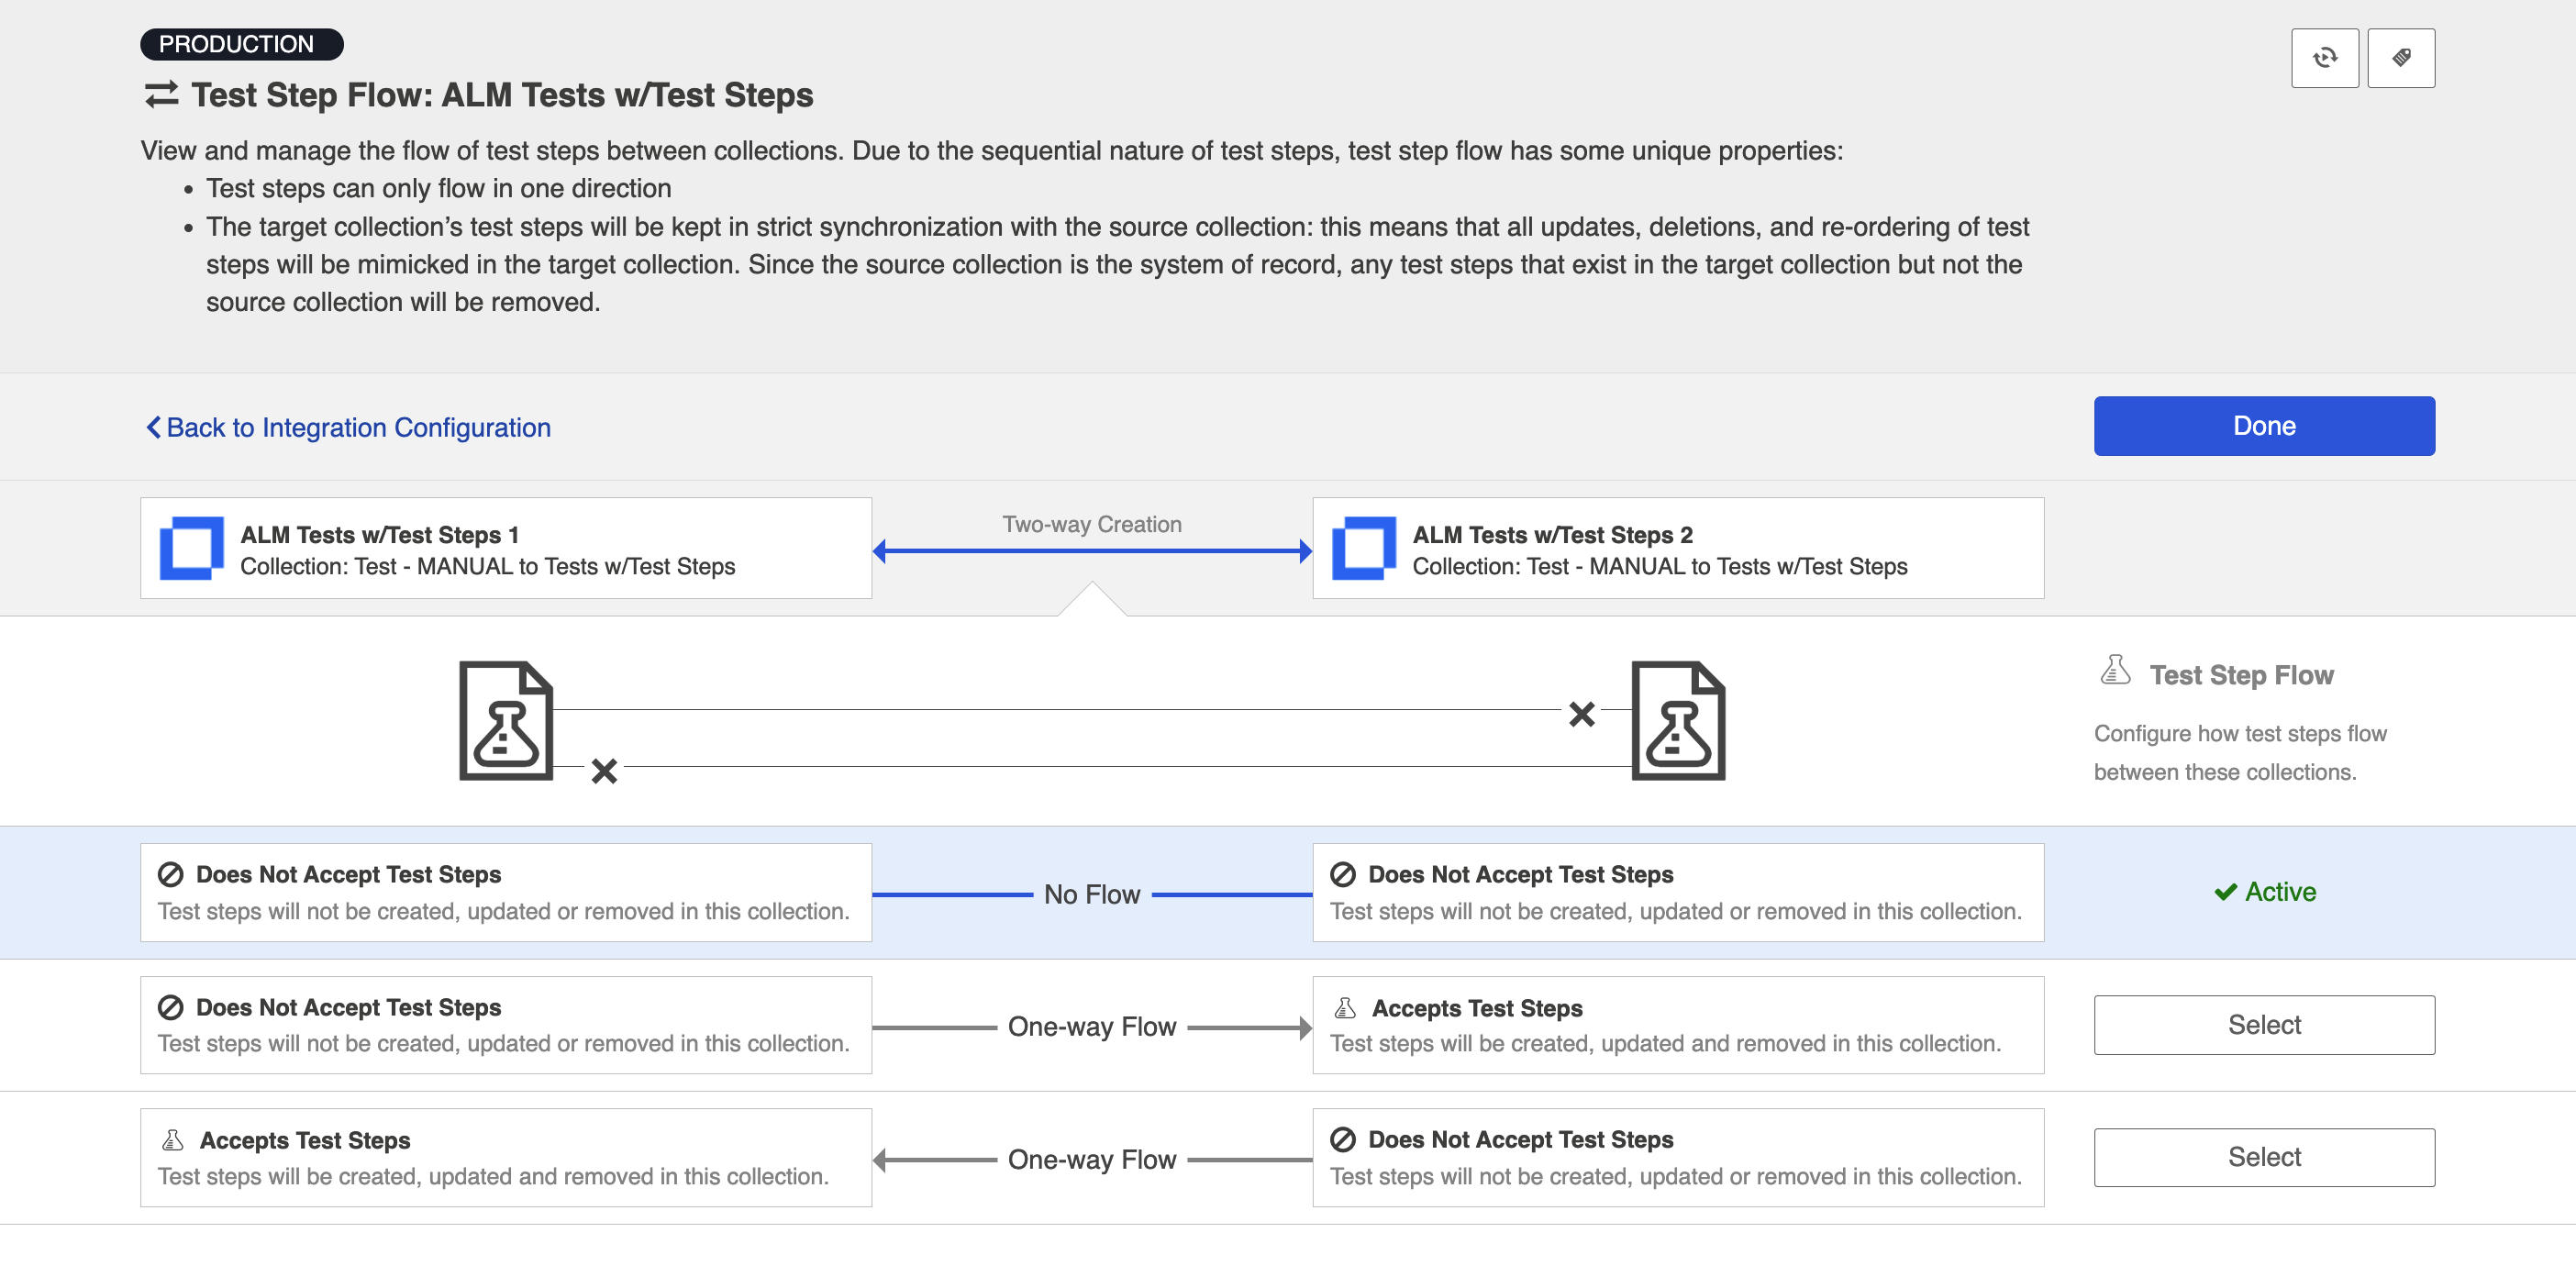
Due to the sequential nature of test steps, test step flow has some unique properties:
- Test steps can only flow in one direction
- The target collection’s test steps will be kept in strict synchronization with the source collection: this means that all updates, deletions, and re-ordering of test steps will be mimicked in the target collection. Since the source collection is the system of record, any test steps that exist in the target collection but not the source collection will be removed.
- If the test steps on the target artifact are changed by an end-user, they will be updated by Hub when one of the fields or ordering on the source artifact's test steps is changed.
Note: Comments and attachments are not currently supported on Test Steps.
Micro Focus ALM Octane
Use the instructions below to configure the following integrations:
- ALM Test Steps → Octane Test Steps
Test Architecture
Before you begin configuring your integration, it's important to understand how test artifacts relate to one another.
While the goal of this integration is to flow test results, the architecture required to do so is more complex than one might assume.
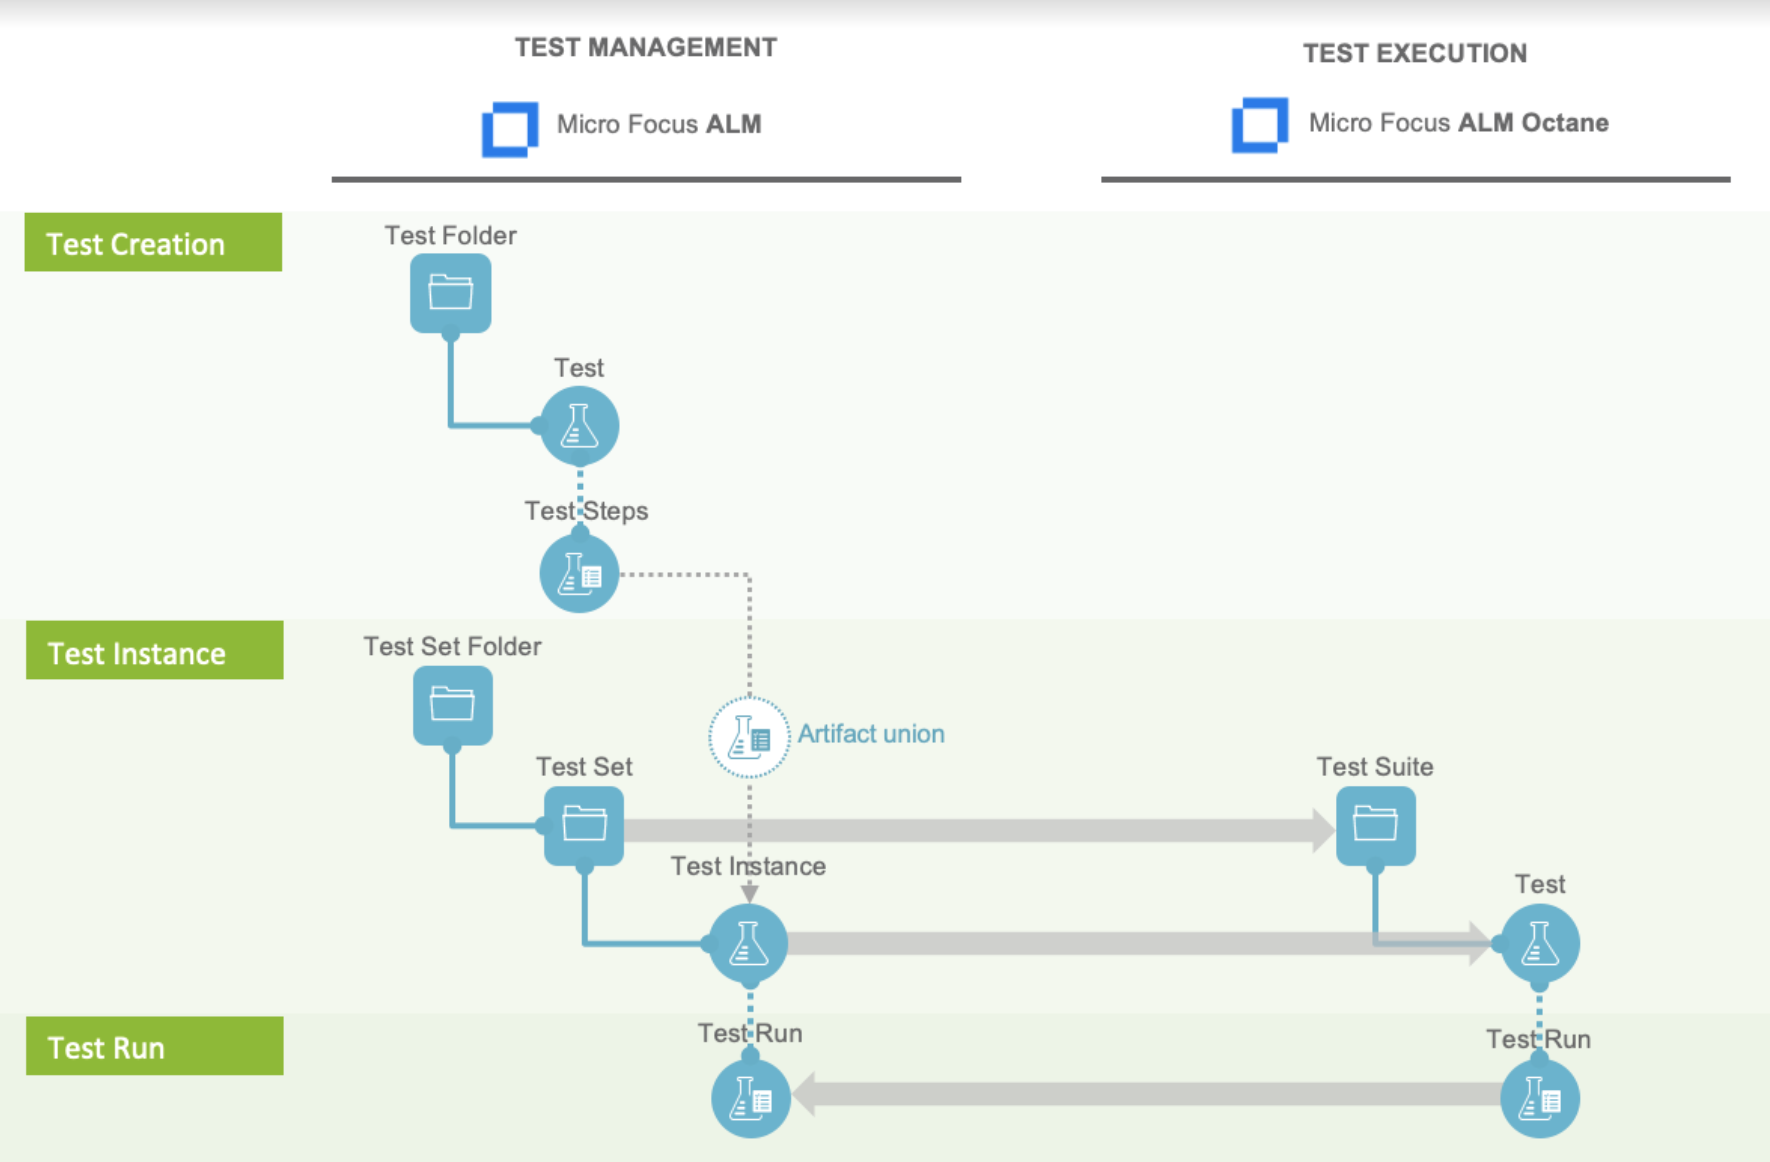
In this integration scenario, the challenge is synchronizing test steps between the two tools:
- In ALM, Test Steps are sub-entities of the Test artifact and referenced by a specific Test Instance.
- In ALM Octane, Test Steps are fields on the Test artifact.
The goal is to synchronize the ALM Test Instance artifact with the ALM Octane Test artifact, while including the Test Steps that exist on the related ALM Test artifact.
But don't worry — it only requires three integrations:
| Integration | Container A | Container B | Work Item |
|---|---|---|---|
|
Test Design |
Test Set |
Test Suite |
-- |
|
Test Planning |
-- |
-- |
Test Instance |
| Test Execution | -- | -- | Test Run |
Once configured, your integrations will look like the images below.

Tip: To keep your integrations in order, we recommend appending a number to the beginning of each title (i.e., "1 - Test Design," "2 - Test Planning," "3 - Test Execution").
Now that you've familiarized yourself with the test architecture for this integration scenario, let's get started!
Step 1: Connect to Your Repository
First, connect to your repository by following the instructions here.
You can learn more about ALM-Octane specific configuration in our Connector Docs.
Step 2: Construct your Model
To flow test steps, you must add the Test Steps entity when creating your Test model.
To do this, click + Add Entity and select the Test Steps option.
A Test Steps entity will be added to your model. On the Model Configuration screen, you will then see two panels:
- Test Fields: In the top section, add any fields you'd like to flow on the test (or test run) artifact that are not part of its associated test steps.
- Test Step Fields: In the bottom section, add any fields you'd like to flow that are a part of test steps. You'll see that Hub provides some Smart Fields that are test step specific to help you get started, but you can add any other desired fields by leaving the Smart Field blank.
Here is an example of a very simple Test Model with Test Steps:
You can find general details on creating a model here.
Step 3: Create your Collection
You can find general details on how to create a collection here.
You will see a Map Test Fields sash on your collection if:
- Your model is a Model with Test Steps, and
- Your artifact is an ALM Test or Octane Test
The process to map test step fields is very similar to the process on the normal Field Mapping screen. Note that both relationship(s) and other field types for test steps will be mapped on this one sash.
Note: Tests and Test Steps do not require a typical relationship field mapping to link them. We've added behind-the-scenes smarts to couple them for you.
Step 4: Configure an Artifact Union
To flow Test Steps from ALM to Octane, you will need to configure an artifact union between ALM Test Instances and ALM Tests so that the Test Steps will flow into the Octane Tests collection.
Artifact unions specify the related artifacts whose fields may flow along with the artifacts in your collection.
As ALM Test Steps only exist on the ALM 'Test' artifact, test steps cannot flow from ALM to Octane. With the help of an artifact union, through a shared relationship field between ALM Test Instances and ALM Tests, the test steps are able to flow.
Learn more about artifact unions here.
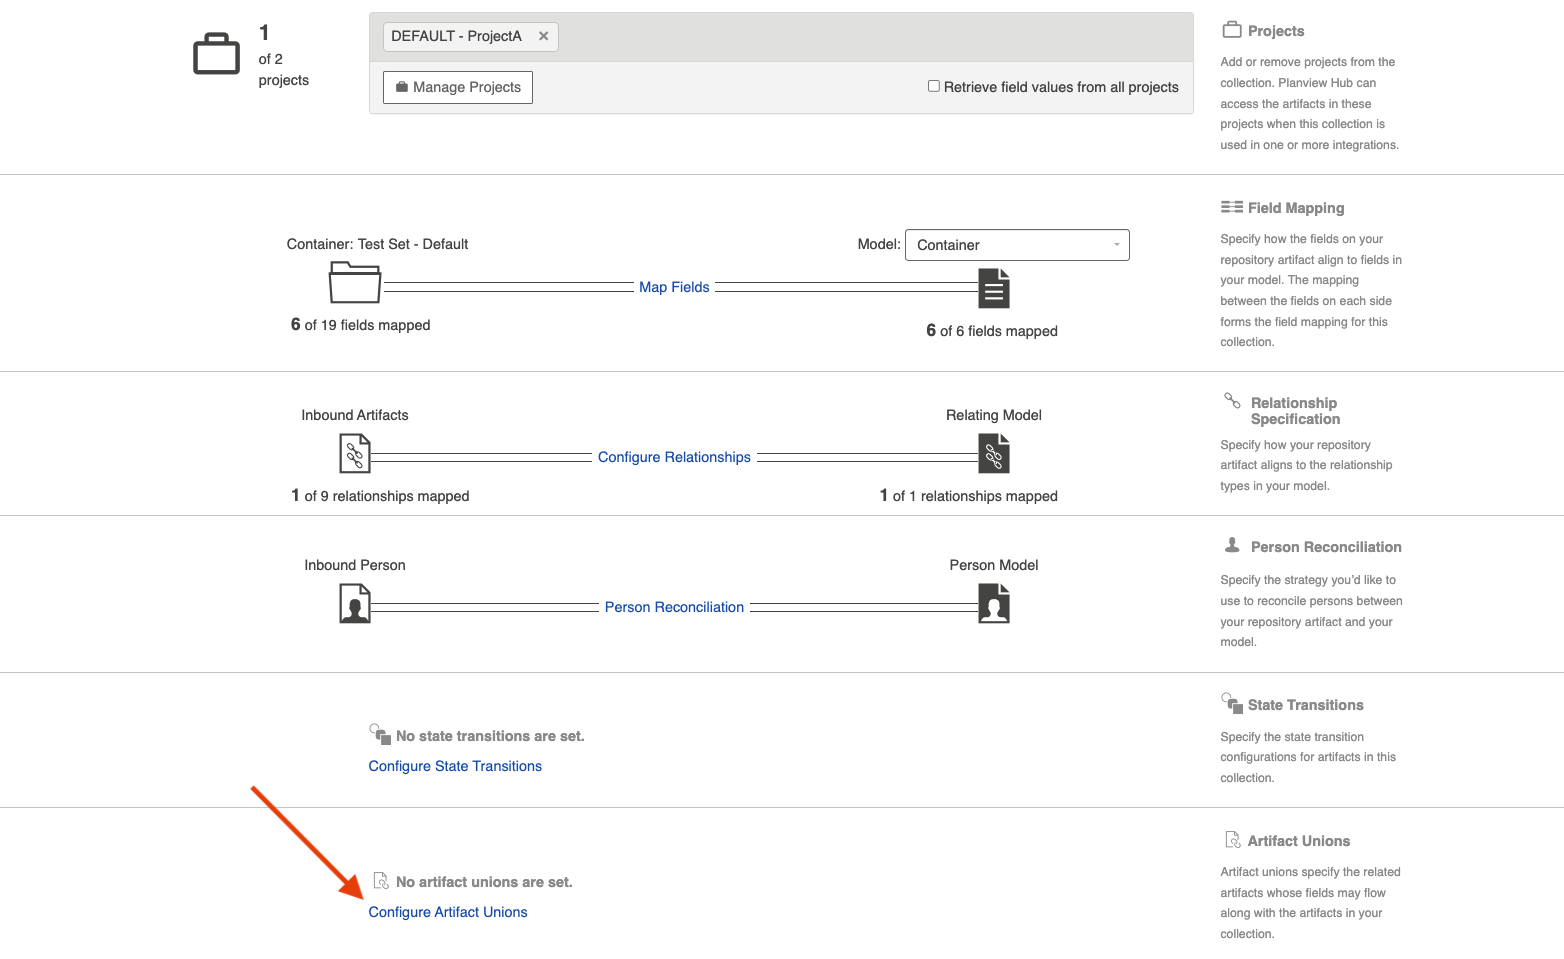
To access artifact unions, navigate to the Collection Configuration screen and click Configure Artifact Unions.
Note: The Artifact Unions sash will only be visible when there is a single relationship/container field available for the collection.
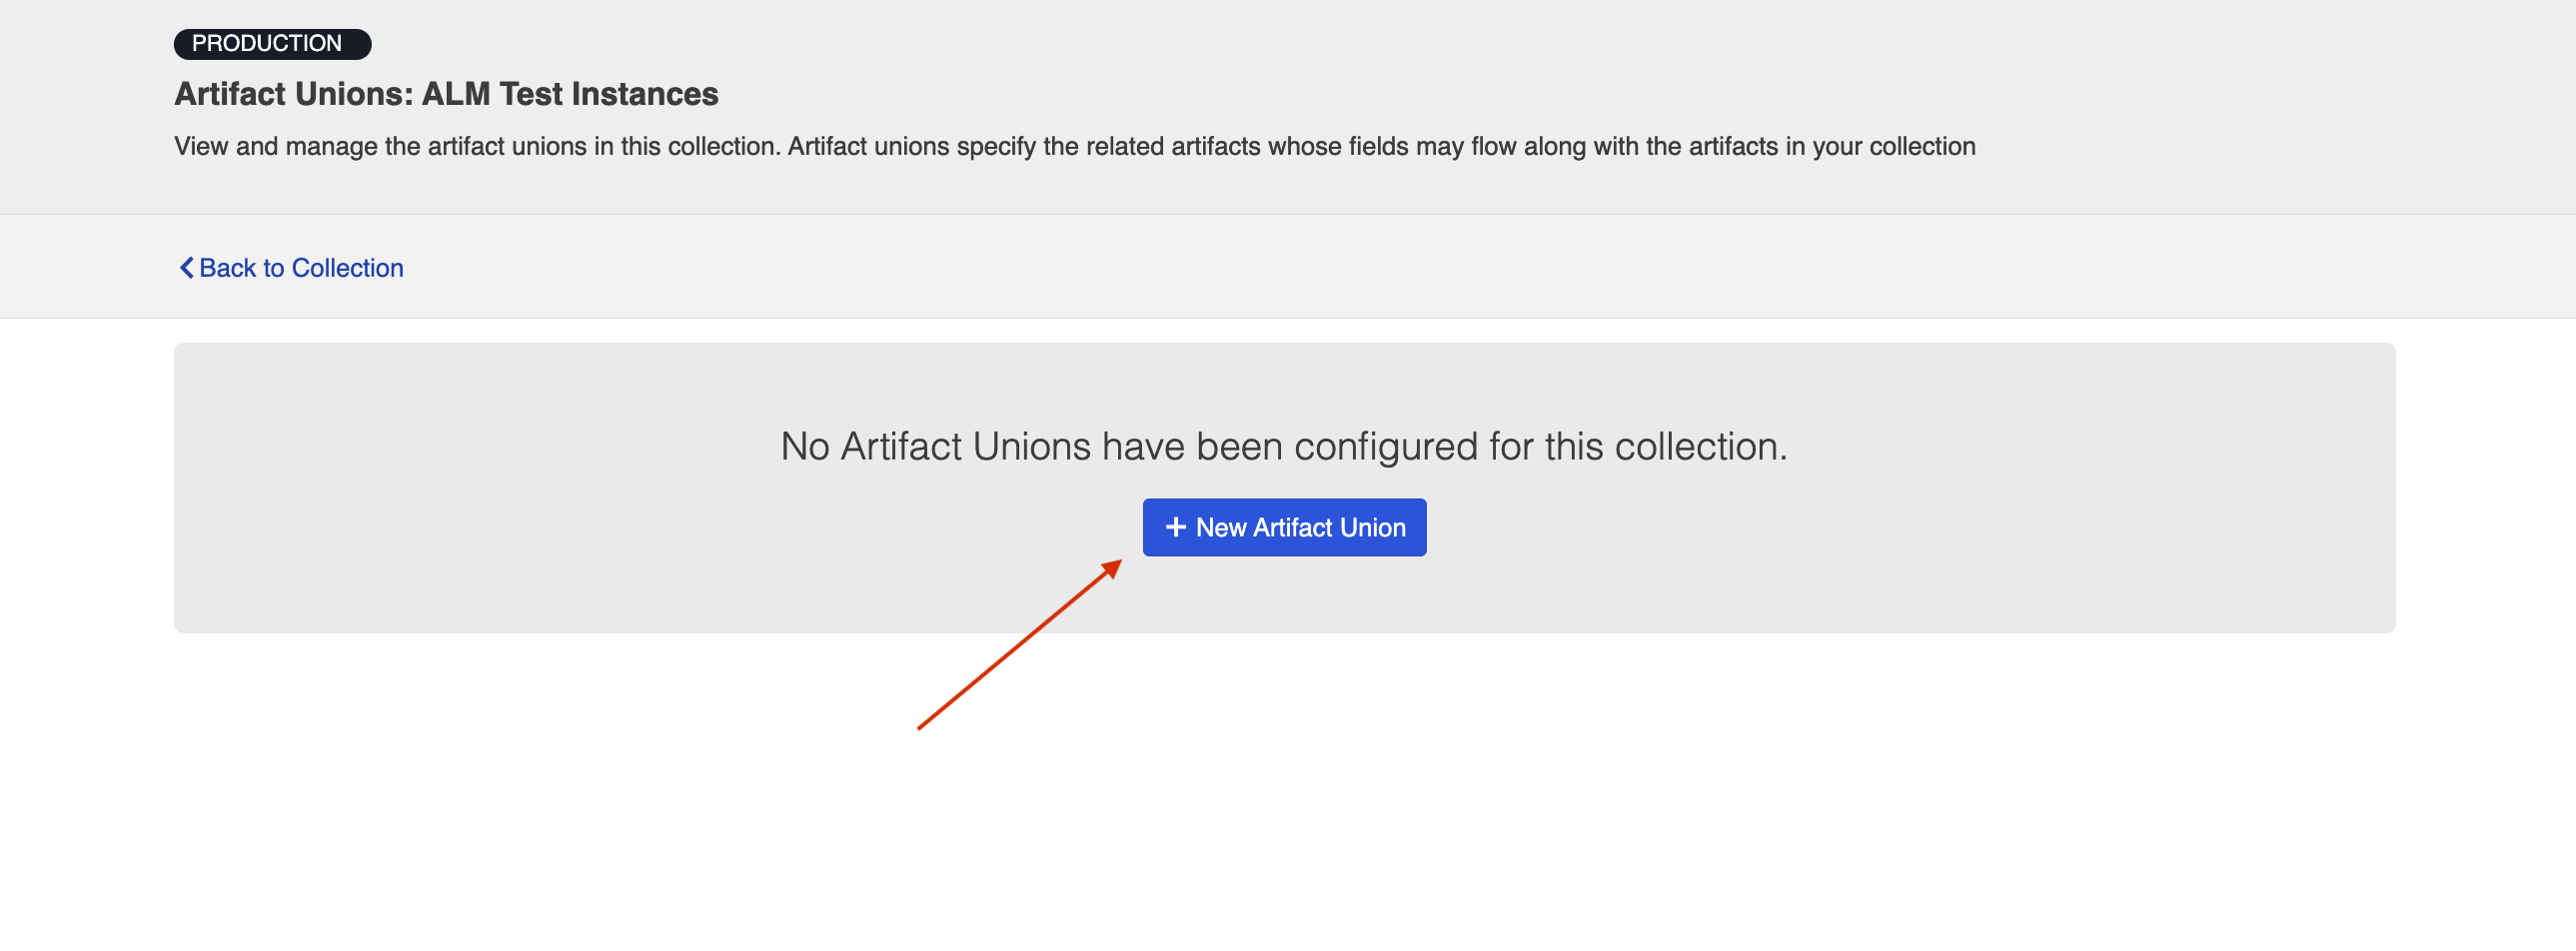
Navigate to the ALM Test Instance collection and create a new artifact union.
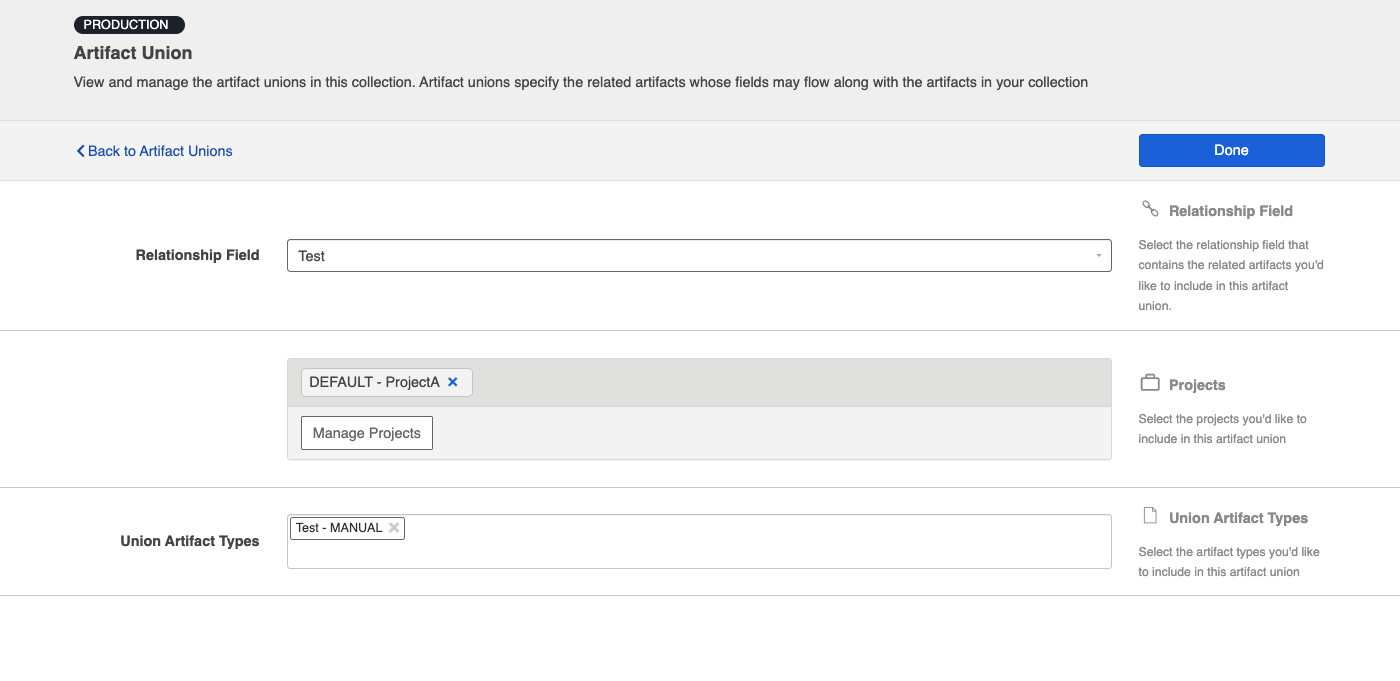
Then, select the Test relationship field, desired project(s), and artifact type.
After saving the artifact union, click Map Test Step Fields on the Collection Configuration screen.
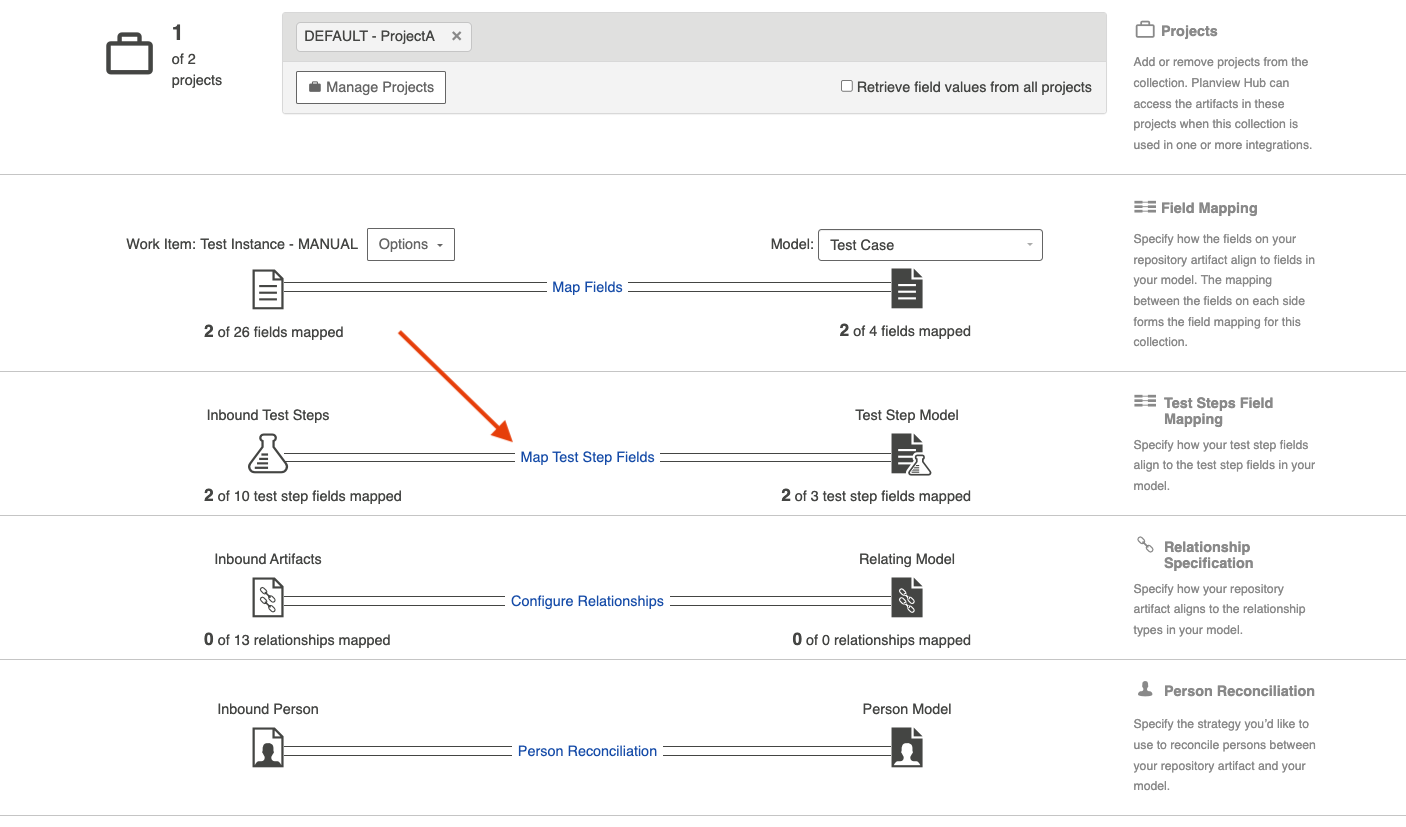
On this screen, select the Test artifact union from the Flow Test Steps From dropdown menu.
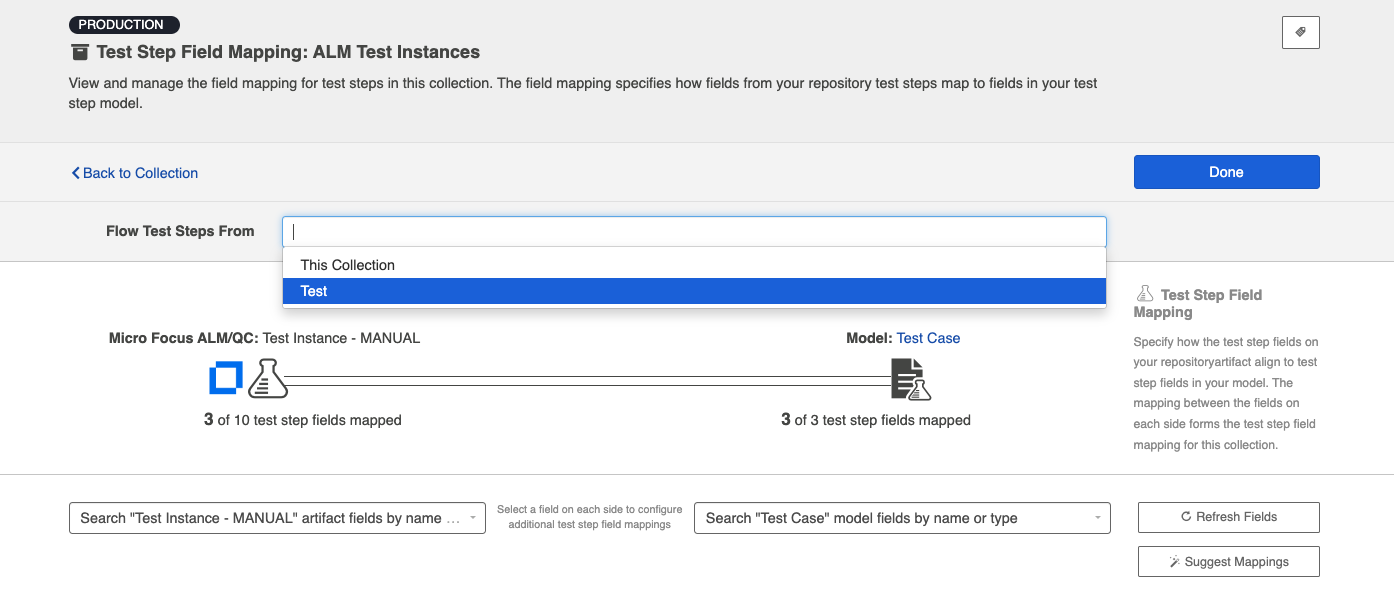
After you've selected where you'd like the test steps to flow from, click Save.
Tip: Clicking ctrl+s on Windows and cmd+s on macOS will save your configuration.
The next step will be to configure the necessary integrations.
Step 5: Configure your Integrations
You can find general details on how to configure an integration here.
In order to see a Test Step Flow link on the integration configuration screen, the following conditions must be met:
- Model is of type 'Model with Test Steps'
- Artifacts in both collections have test steps
- The relevant Hub connectors must support test steps (see Connector Documentation to confirm)
Integration 1: Test Design
The first integration you will configure is a Container + Work Item Synchronization flowing Test Sets/Test Suites (container).

Supported Containers:
- Micro Focus ALM Test Sets
- Micro Focus ALM Octane Test Suites
Artifact Creation Flow should be one way from ALM to Octane.
Integration 2: Test Planning
The Test Planning integration is a Work Item Synchronization that flows Test Instances/Cases from ALM to Test Cases in Octane.

To configure this integration, you will use the normal Work Item Synchronization template.
Work Item Collections:
- ALM Test Instances
- Configure parent relationship of ALM Test Instance to Test Set
- Octane Test Cases
- Configure parent relationship of Octane Test to Link to Test
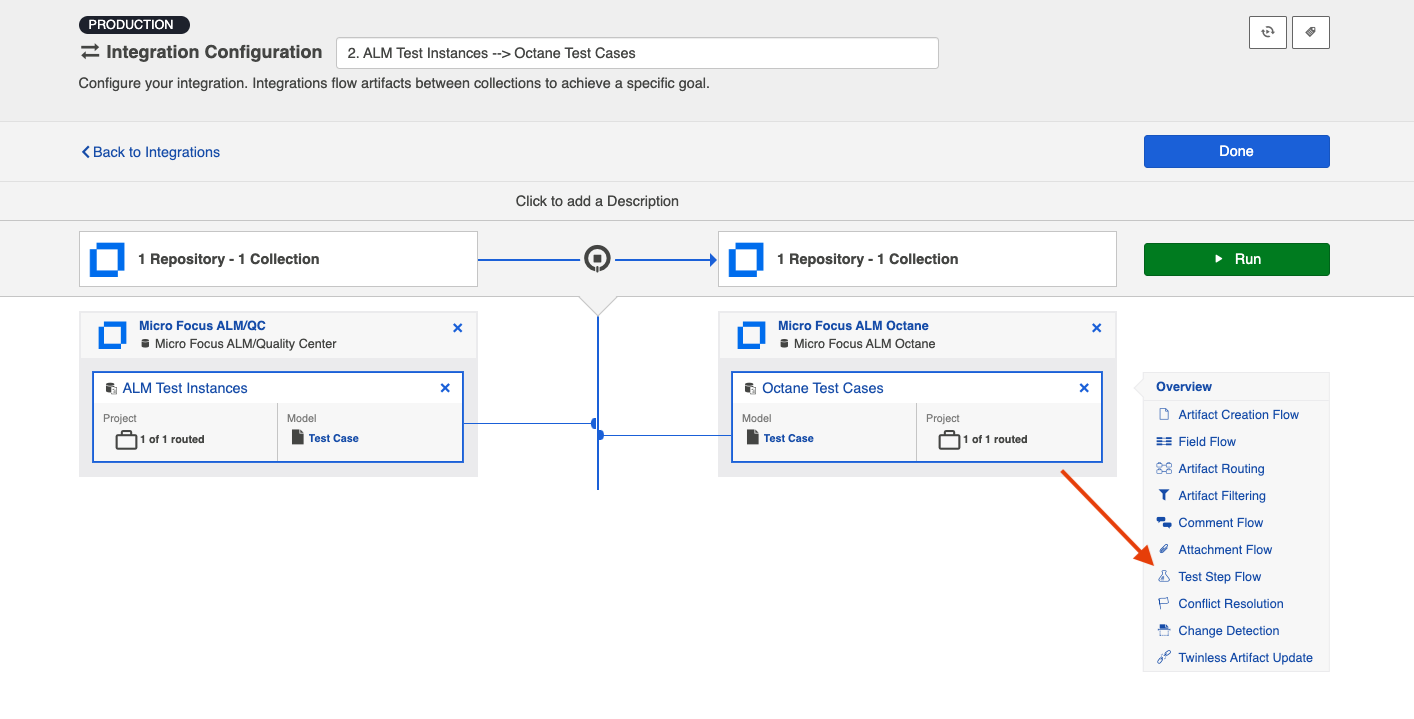
Clicking the link will bring you to the Test Step Flow screen, where you can click Select to choose your desired Test Step Flow style.
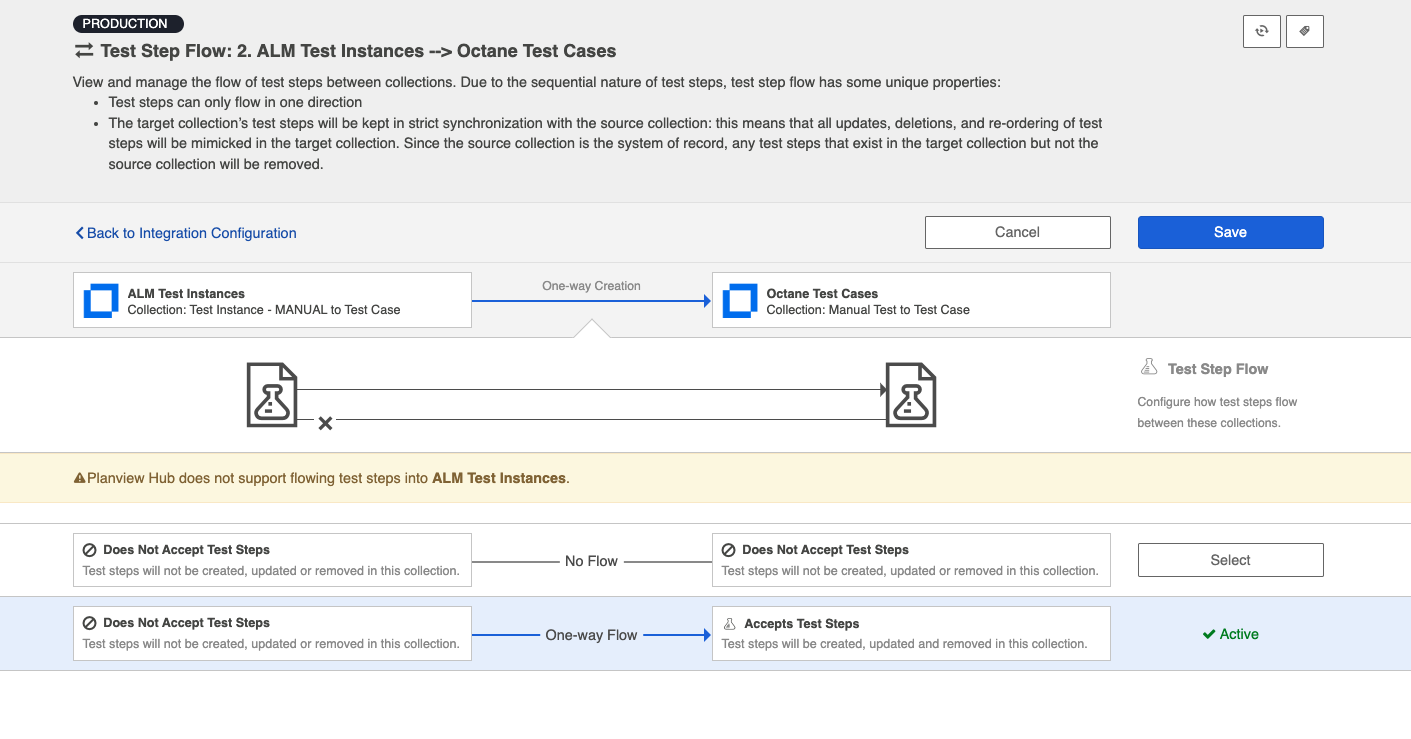
Due to the sequential nature of test steps, test step flow has some unique properties:
- Test steps can only flow in one direction
- The target collection’s test steps will be kept in strict synchronization with the source collection: this means that all updates, deletions, and re-ordering of test steps will be mimicked in the target collection. Since the source collection is the system of record, any test steps that exist in the target collection but not the source collection will be removed.
- If the test steps on the target artifact are changed by an end-user, they will be updated by Hub when one of the fields or ordering on the source artifact's test steps is changed.
Note: Comments and attachments are not currently supported on test steps.
Integration 3: Test Execution
The Test Execution integration is a Work Item Synchronization that flows Test Step Results as a sub-entity located on Octane Manual Runs to ALM Test Runs.

Supported Artifacts:
- ALM Test Run
-
Configure parent relationship of ALM Test Run to Test Instance
-
- Octane Manual Run
- Configure parent relationship of Octane Test Run to Test
Jama
Use the instructions below to configure the following integrations:
- Jama Test Steps → Jama Test Steps
- Jama Test Steps → Octane Test Steps
- Octane Test Steps → Jama Test Steps
Step 1: Connect to your Repository
First, connect to your repository by following the instructions here.
You can learn more about Jama-specific configuration in our Connector Docs.
Step 2: Construct your Model
To flow test steps, you will need to add the Test Steps entity when creating your Test model.
To do this, click + Add Entity and select the Test Steps option.
A Test Steps entity will be added. On the Model Configuration screen, you will then see two panels:
- Test Fields: In the top section, add any fields you'd like to flow on the test (or test run) artifact that are not part of its associated test steps.
- Test Step Fields: In the bottom section, add any fields you'd like to flow that are a part of test steps. You'll see that Hub provides some Smart Fields that are test step specific to help you get started, but you can add any other desired fields by leaving the Smart Field blank.
Note: All test steps fields must be of the same type (i.e., all must be string fields or all must be rich text fields), as you cannot configure different types for each test step field in Jama.
Here is an example of a very simple Test Model with Test Steps:
You can find general details on how to create a model here.
Step 3: Create your Collection
You can find general details on how to create a collection here.
You will see a Map Test Fields sash on your collection if:
- Your model is a Model with Test Steps, and
- Your artifact is an Octane Test, or Jama Test Case
The process to map test step fields is very similar to the process on the normal Field Mapping screen. Note that both relationship(s) and other field types for test steps will be mapped on this one sash.
Note: Tests and Test Steps do not require a typical relationship field mapping to link them. We've added behind-the-scenes smarts to couple them for you.
Step 4: Configure your Integration
You can find general details on how to configure an integration here.
To see a Test Step Flow link on the Integration Configuration screen, the following conditions must be met:
- Model is of type 'Model with Test Steps'
- Artifacts in both collections have test steps
- The relevant Hub connectors must support test steps (see Connector Documentation to confirm)
Clicking the link will bring you to the Test Step Flow screen, where you can click Select to choose your desired Test Step Flow style:
Due to the sequential nature of test steps, test step flow has some unique properties:
- Test steps can only flow in one direction
- The target collection’s test steps will be kept in strict synchronization with the source collection. This means that all updates, deletions, and re-ordering of test steps will be mimicked in the target collection. Since the source collection is the system of record, any test steps that exist in the target collection but not the source collection will be removed.
- If the test steps on the target artifact are changed by an end-user, they will be updated by Hub when one of the fields or ordering on the source artifact's test steps is changed.
Note: Comments, attachments, and inline/embedded images are not currently supported on Test Steps.
TestRail
Use the instructions below to configure the following integrations:
- TestRail Test Steps → Jama Test Steps
- Jama Test Steps → TestRail Test Steps
Step 1: Connect to your Repository
First, connect to your repository by following the instructions here.
You can learn more about TestRail-specific configuration in our Connector Docs.
Step 2: Construct your Model
To flow test steps, you will need to add the Test Steps entity when creating your Test model.
To do this, click + Add Entity and select the Test Steps option.
A Test Steps entity will be added. On the Model Configuration screen, you will then see two panels:
- Test Fields: In the top section, add any fields you'd like to flow on the test (or test run) artifact that are not part of its associated test steps.
- Test Step Fields: In the bottom section, add any fields you'd like to flow that are a part of test steps. You'll see that Hub provides some Smart Fields that are test step specific to help you get started, but you can add any other desired fields by leaving the Smart Field blank.
Note: All test steps fields must be of the same type (i.e., all must be string fields or all must be rich text fields), as you cannot configure different types for each test step field in Jama.
Here is an example of a very simple Test Model with Test Steps:
You can find general details on how to create a model here.
Step 3: Create your Collection
You can find general details on how to create a collection here.
You will see a Map Test Fields sash on your collection if:
- Your model is a Model with Test Steps, and
- Your artifact is a Jama Test Case or TestRail Test Case
The process to map test step fields is very similar to the process on the normal Field Mapping screen. Note that both relationship(s) and other field types for test steps will be mapped on this one sash.
Note: Tests and Test Steps do not require a typical relationship field mapping to link them. We've added behind-the-scenes smarts to couple them for you.
Step 4: Configure your Integration
You can find general details on how to configure an integration here.
To see a Test Step Flow link on the Integration Configuration screen, the following conditions must be met:
- Model is of type 'Model with Test Steps'
- Artifacts in both collections have test steps
- The relevant Hub connectors must support test steps (see Connector Documentation to confirm)
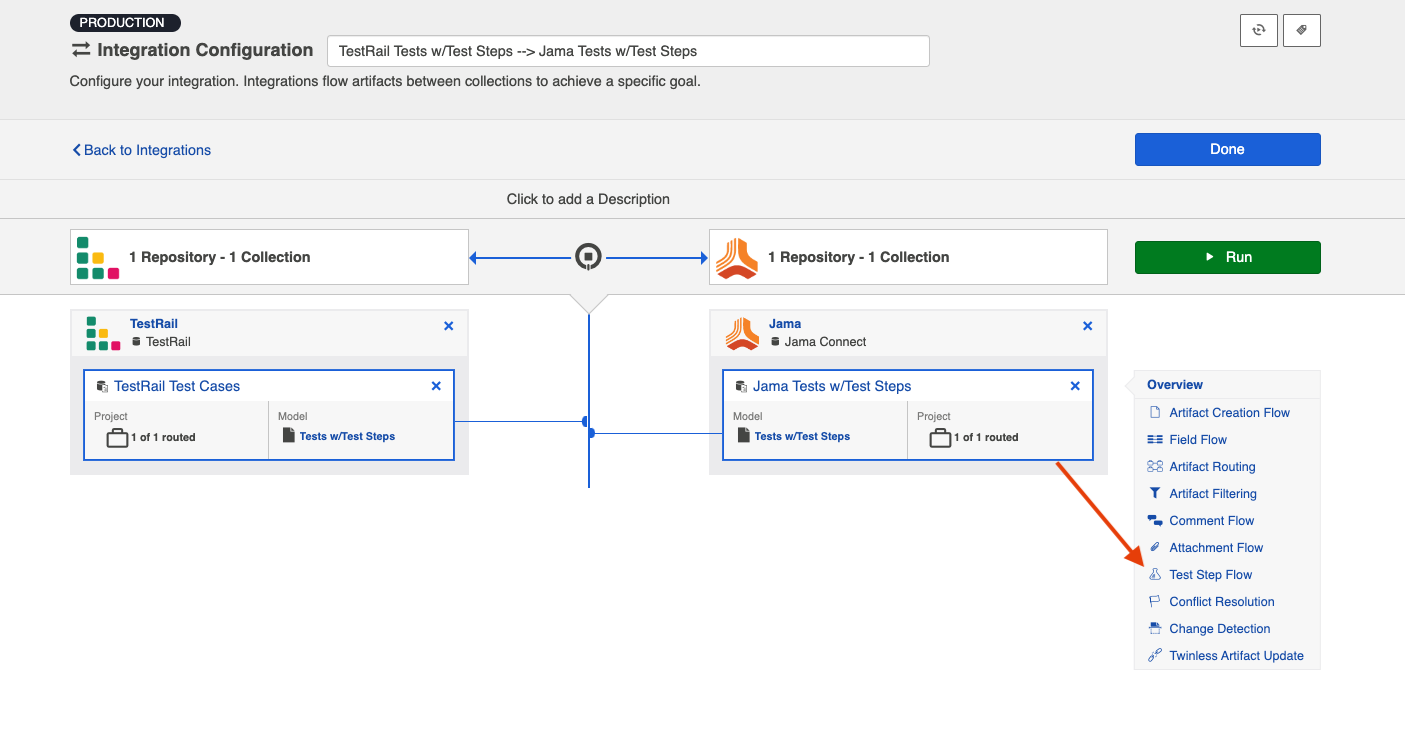
Clicking the link will bring you to the Test Step Flow screen, where you can click Select to choose your desired Test Step Flow style:
Due to the sequential nature of test steps, test step flow has some unique properties:
- Test steps can only flow in one direction
- The target collection’s test steps will be kept in strict synchronization with the source collection. This means that all updates, deletions, and re-ordering of test steps will be mimicked in the target collection. Since the source collection is the system of record, any test steps that exist in the target collection but not the source collection will be removed.
- If the test steps on the target artifact are changed by an end-user, they will be updated by Hub when one of the fields or ordering on the source artifact's test steps is changed.
Test Result Synchronization
Test Result Synchronization is supported for the following integration scenarios:
- Tosca Test Results → ALM Test Results
- ALM Test Results → ALM Test Results
- ALM Octane Test Results → ALM Test Results
To flow test results, please follow the instructions below.
Tricentis Tosca
Many organizations have been using Micro Focus ALM/Quality Center for quality management for years. But where once it was the only tool used for testing, today enterprises are augmenting ALM with additional tools to align with their agile and test automation efforts. That includes tools like Tricentis Tosca. Even as new tools are introduced, ALM remains popular and continues to play an important role in test management, especially when it comes to manual testing, defect management, and quality reporting.
The challenges for QA teams and leadership are how to restore visibility into coverage, quality, and cost, now that testing data is split across multiple tools.
Planview Hub enables users to flow test results into Micro Focus ALM in order to take advantage of ALM's reporting capabilities while using other tools, such as Tricentis Tosca, for their test planning and execution.
The method outlined below will enable you to flow test results into Micro Focus ALM from Tricentis Tosca or from another ALM instance. Due to the architectural specificity of each external tool, the methods below cannot be used for other endpoints.
You can watch this demo video to learn more:
Test Architecture
Before you begin configuring your integration, it's important to understand how test artifacts relate to one another.
While the goal of this integration is to flow test results, the architecture required to do so is more complex than one might assume. Test Results are a field on Test Runs. To create a Test Run in ALM, a Test Instance must exist. For a Test Instance to exist, both a Test and a Test Set must exist (the test is 'added' to the test set and that creates a test instance). For a Test to exist, you need a Test Folder. And for a Test Instance to exist, you need a Test Set and a Test Set Folder. That's 6 different artifacts, just to flow a Test Run!

But don't worry — instead of six complex integrations, Hub cuts that configuration in half. To set up this integration scenario, you will set up three integrations:
| Integration | Container A | Container B | Work Item |
|---|---|---|---|
| Test Design |
Test Folder |
-- | Test |
| Test Planning |
Test Set Folder |
Test Set | Test Instance |
| Test Execution | -- | -- | Test Run |
Once configured, your integrations will look like the images below.
Note: To keep your integrations in order, we recommend appending a number to the beginning of each title (i.e., "1 - Test Design," "2 - Test Planning," "3 - Test Execution").


Before You Begin
Before you get started, you should familiarize yourself with the following steps of integration configuration:
Step 1: Connect to your Repository
Step 2: Construct your Model
Step 3: Create your Collection
Review the details in the sections below to ensure that any required fields are mapped in your collection
Step 4: Configure your Integration
Integration 1: Test Design
The first integration you will configure is a Container + Work Item Synchronization flowing Test Folders/Test Case Folders (container) and Tests/Test Cases (work item).

Supported Containers:
- Micro Focus ALM Test Folders
- Parent field must be mapped to preserve folder hierarchy
- Tricentis Tosca Test Case Folders
- Parent field must be mapped to preserve folder hierarchy
Supported Artifacts:
- Micro Focus ALM Tests
- Subject field must be mapped (this points to the Test folder)
- When flowing tests out of ALM, multiple test configurations are not supported. Tests must have a single test configuration.
- Tricentis Tosca Test Cases
- Test Case Folder field must be mapped
This integration can be run independently, as the Test Folders and Tests do not require any other artifacts to exist before they can be created. Artifact Creation Flow can be one-way or two-way.
Integration 2: Test Planning
The Test Planning integration is a Container + Work Item Synchronization that utilizes child containers, flowing Test Set Folders/Execution List Folders (container), Test Sets/Execution Lists (child container), and Test Instances/Execution Entries (Work Item).
Note: You should not map the Status field in the Test Planning integration. The status field should only be mapped in the Test Execution integration.

To configure this integration, you will use the normal 'Container + Work Item Synchronization' template. Hub has behind-the-scenes magic that will allow you to include a child-container integration once it sees the appropriate collections created:
Container Collections:
- ALM Test Set Folders
- Parent field must be mapped to preserve folder hierarchy
- Tosca Execution List Folders
- Parent field must be mapped to preserve folder hierarchy
Child Container Collections:
- ALM Test Sets
- Parent field must be mapped to preserve folder hierarchy
- Tosca Execution Lists
- Parent field must be mapped to preserve folder hierarchy
Work Item Collections:
- ALM Test Instances
- Test field must be mapped
- Test Set field must be mapped
- Status field must not be mapped
- Tosca Execution Entries
- Test Case field must be mapped
- Execution List field must be mapped
- Status field must not be mapped
Step 1: Test Set Folder/Execution List Folders
Once your collections have been created and configured, create a Container + Work Item Synchronization. First, configure the top-level container integration:
- ALM <=> ALM: Test Set Folder to Test Set Folder, or
- Tosca <=> ALM: Execution List Folder to Test Set Folder
Container Creation Flow will most likely be one way into ALM, but this will depend on the use case.
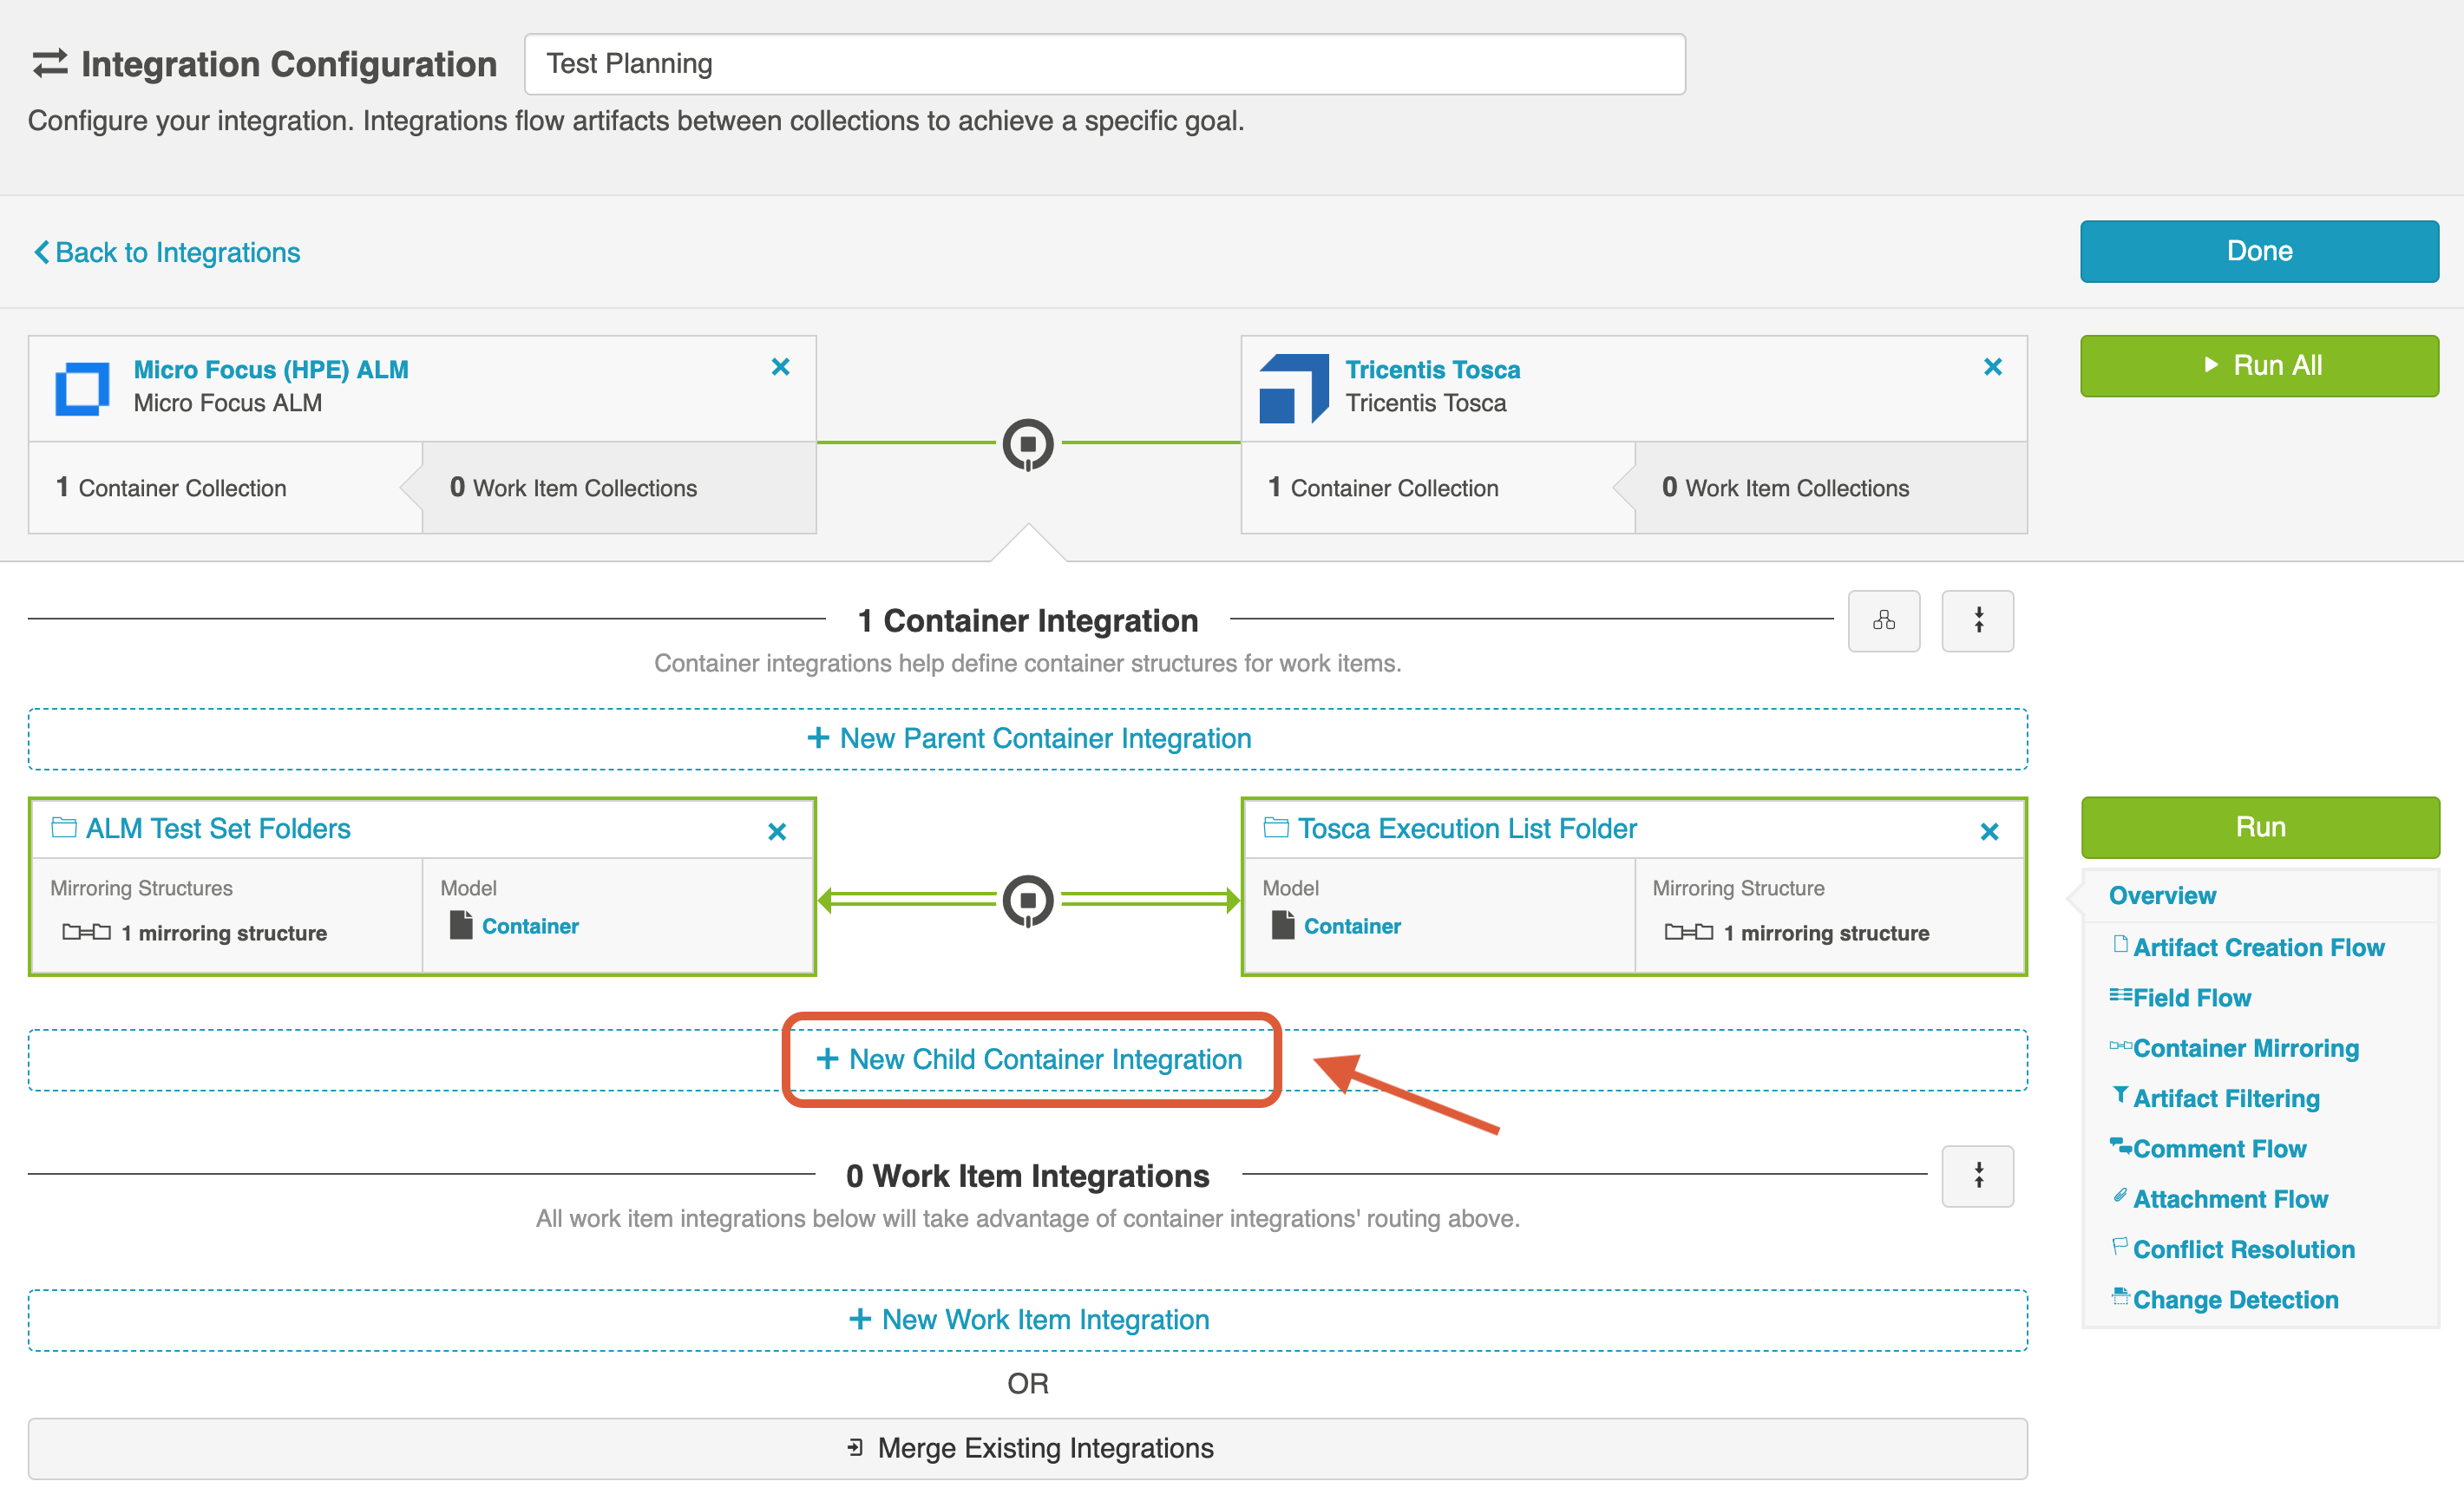
Once this integration has been configured, you'll see an option to create a child container integration.
Note: The Test Instance (or Execution Entry) collection (i.e., the work item collection for this integration) must exist before the "New Child Container Integration" button will appear while configuring this integration.
Step 2: Test Sets/Execution Lists
Your Child Container Integration will be
- ALM <=> ALM: Test Set to Test Set, or
- Tosca <=> ALM: Execution List to Test Set
This integration will likely not require container mirroring configuration, as it will inherit that from the parent container integration.
Step 3: Test Instances/Execution Entry
Finally, you will configure your Work Item integration. It will either be:
- ALM <=> ALM: Test Instance to Test Instance
- Tosca <=> ALM: Execution Entry to Test Instance
Click New Work Item Integration to add the integration.
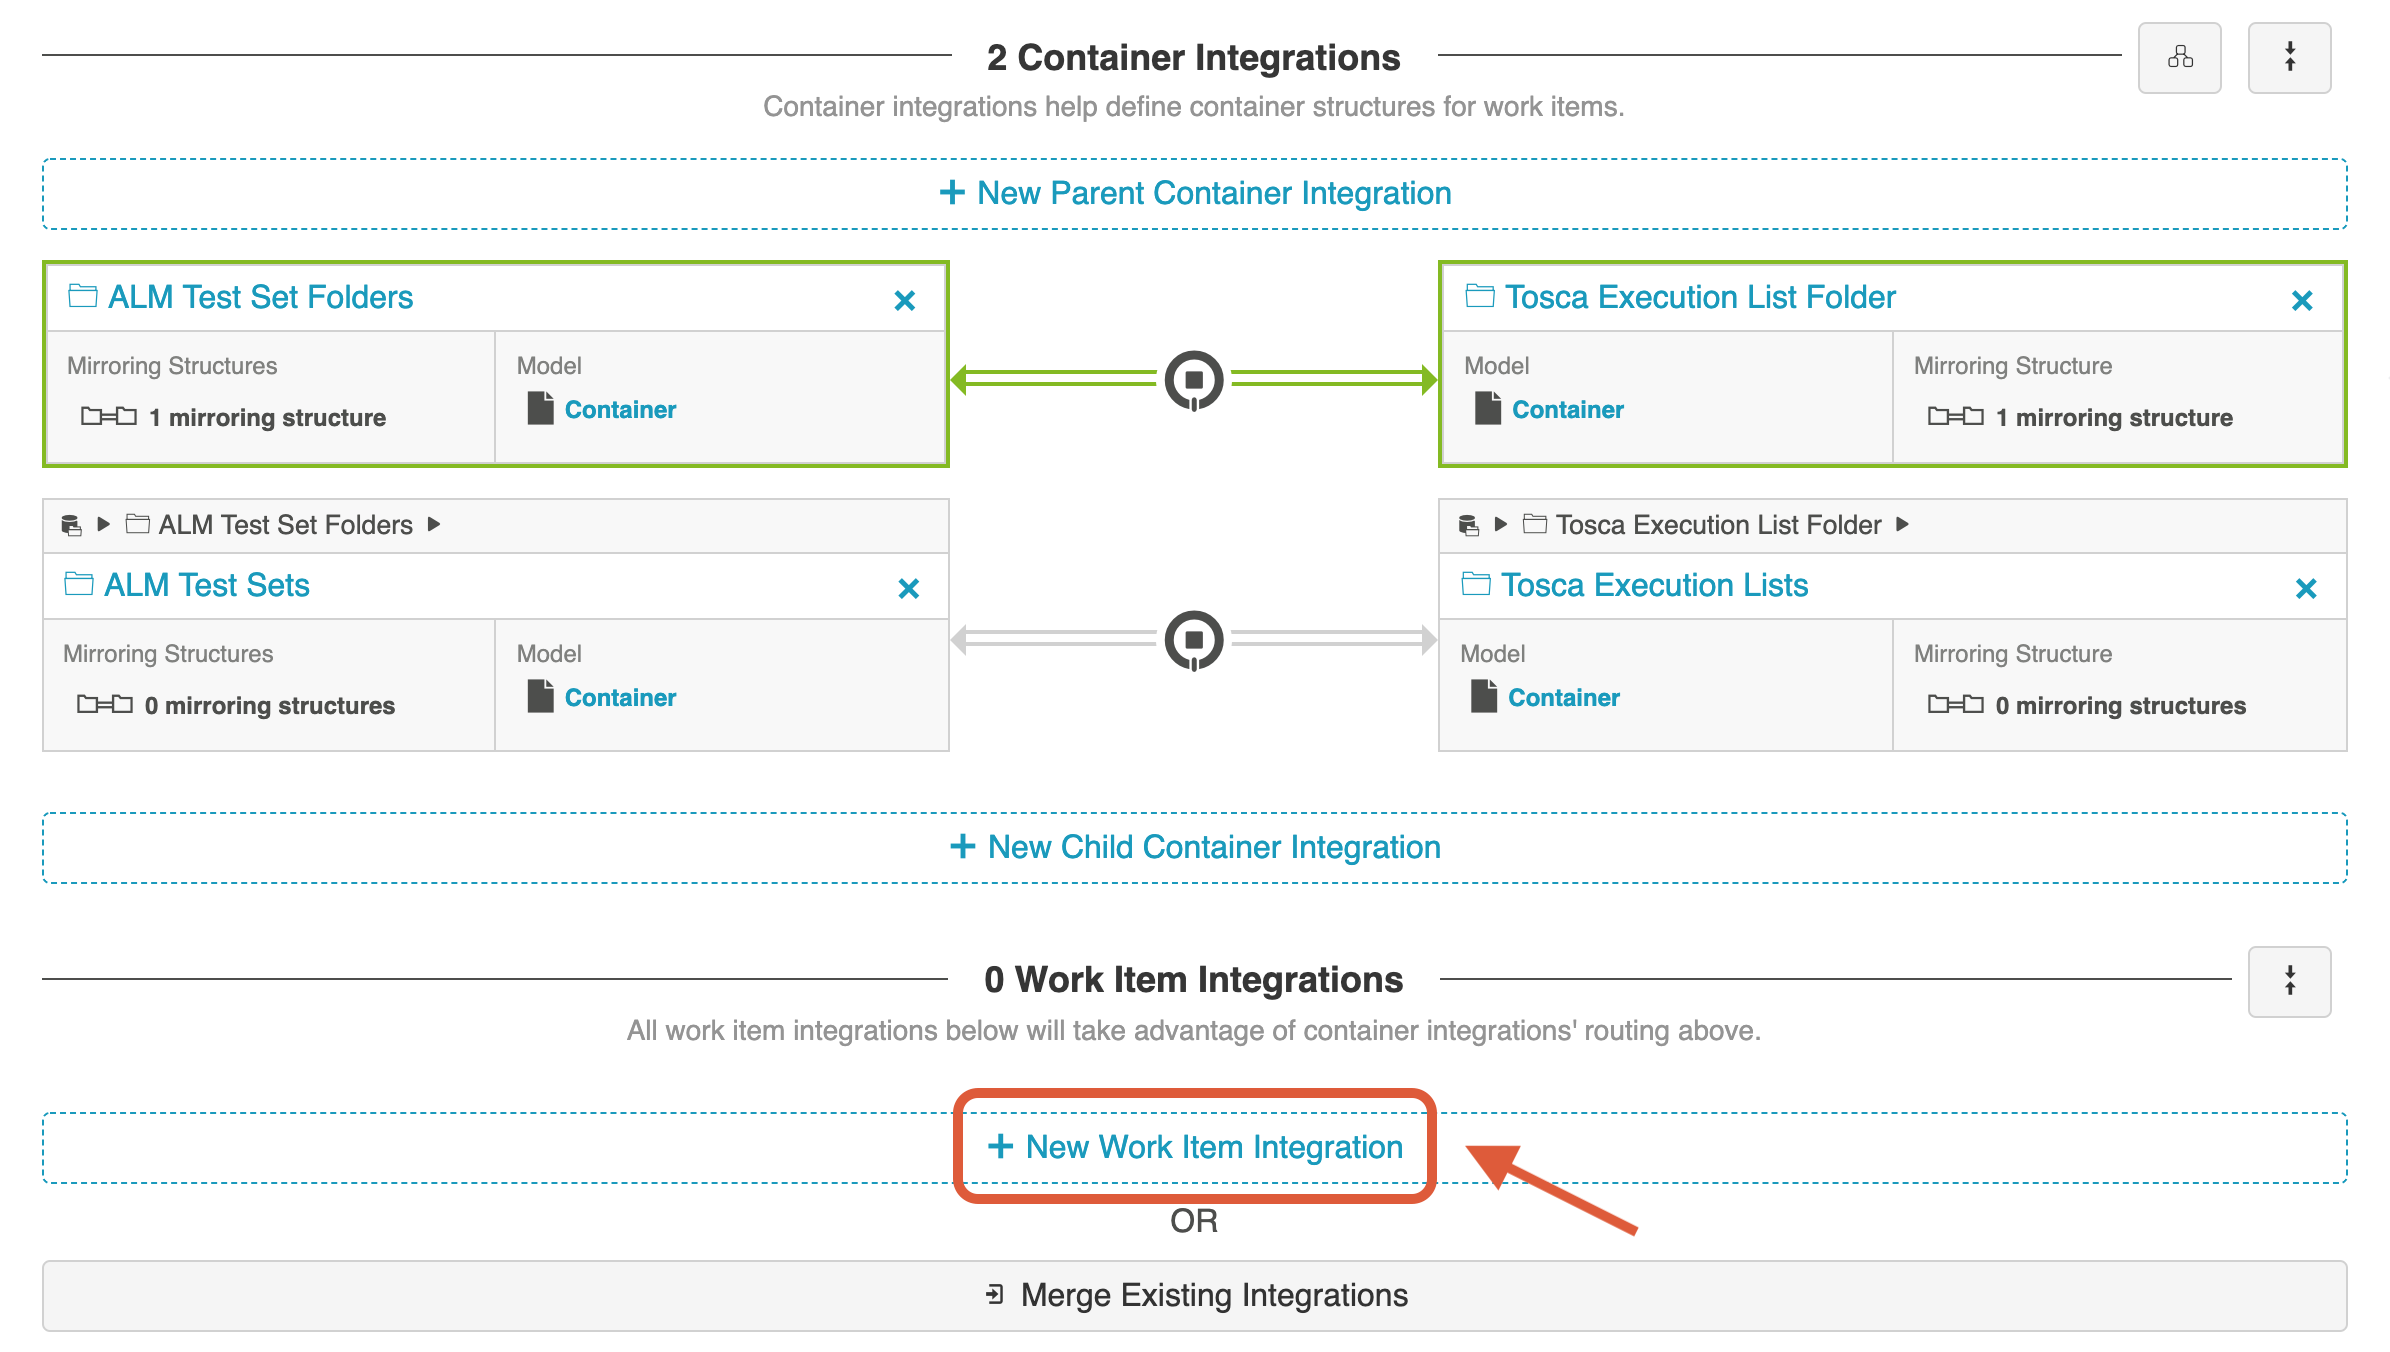
Here is what your fully configured integration will look like:

Step 4: Run Integration
Before you run this integration, you must have the Test Design integration configured and running. This is because in order to create a Test Instance, both a Test Set and a Test (created via the Test Design integration) must exist. When a Test is added to a Test Set, a Test Instance is created.
To run the integration, click the green Run All button.

Integration 3: Test Execution
The Test Execution integration is a Work Item Synchronization that flows Test results located on ALM Test Runs or Tosca Execution Test Case Logs.

Supported Artifacts:
- ALM Test Run
- Test Instance field must be mapped
- Status field must be mapped
- Tosca Execution Test Case Log
- Execution Entry field must be mapped
- Status field must be mapped
Artifact Routing and Filtering
Because Test Runs and Execution Test Case Logs live at the project level, Artifact Routing will only need to be configured at the Project level.
Since routing is at the project level, you may be asking, "How will I know that only the Test Runs that I care about are synchronizing? I don't want every single Test Run in this project to flow!" And you're in luck. Test Execution Integrations behave a little differently from typical integrations: Hub will use built-in magic to only flow the Test Runs or Execution Test Case Logs that are associated with a Test Instance/Execution Entry that is also configured to flow.
It's that simple!
For this reason, you will see an Issue on the Activity Screen of Hub if you attempt to run this integration without running an associated Test Planning integration (Remember: Test Runs require that an associated Test Instance exist first).
Race Conditions
Due to the interdependencies between the three integrations, the order that artifacts synchronize in matters.
In this Test Management integration scenario, Hub won't create an artifact if its parent container or other required artifact does not yet exist.
Examples of when Hub won't flow a work item:
- Trying to create a Test Run without the correct Test Instance already existing in the target system
- Trying to create a Test Instance without the correct Test already existing in the target system
Here's an example of what you can expect to see in a race condition:
- Create a test instance and immediately run the test
- If Hub picks up the Test Run first, it will not have the necessary Test Instance on the target to attach to and will error
- Once Hub picks up the Test Instance & synchronizes it, then the Test Run will be able to flow across on retry and the error will clear
You are most likely to see this condition when first setting up your integrations. For this reason, we recommend setting up the integrations 'from top to bottom'. In other words, start with the Test Design integration. Then move on to the Test Planning integration. And finally, set up the Test Execution integration. If you have the integrations running in that order, you'll be more likely to flow any required artifacts before any dependent artifacts attempt to flow.
To keep your integrations in order in the Integration List View, we recommend appending a number to the beginning of each title, i.e. "1 - Test Design," "2 - Test Planning," "3 - Test Execution"
Another possible time when this race condition could occur is if you have vastly different change detection intervals on your integrations. For example, if you have a short interval on your Test Execution integration, but a much longer interval on your Test Planning integration.
Flowing Test Step Results in Tricentis Tosca
Because test steps are represented as a field on the Execution Test Case Log in Tosca, rather than as a unique child artifact (as they are in ALM), if you would like to flow test steps from ALM → Tosca or Tosca → ALM, it must be configured as part of a Test Execution integration.
To configure test step flow for Tosca, follow the instructions below:
- Create a rich text field on the model used in the Test Execution integration. For explanatory purposes, we'll call this the "Test Steps" field in the model. Since test steps are represented as a field, rather than a separate artifact, your model type will be Standard Model.
- Within ALM, create a custom text field on the ALM Test Run artifact. This field will accept the combined results of all the associated test steps from Tosca. For explanatory purposes, let's call this the LogInfo field.
- In the ALM Test Run collection, map the LogInfo field to the Test Steps field in the model.
- In the Tosca Execution Test Case Log collection, map the AggregatedDescription field to the Test Steps field in the model.
- Once the integration is run, you'll see that the results of each individual step in Tosca are now populated in the new custom LogInfo field on the ALM Test Run.


Micro Focus ALM
Many organizations have been using Micro Focus ALM (aka Quality Center) for quality management for years. ALM remains popular and continues to play an important role in test management, especially when it comes to manual testing, defect management, and quality reporting.
The challenges for QA teams and leadership are how to restore visibility into coverage, quality, and cost, now that testing data is split across multiple instances.
The method outlined below will enable you to flow test results into Micro Focus ALM from another ALM instance. Due to the architectural specificity of ALM, the methods below cannot be used for other endpoints.
You can watch this demo video to learn more:
Step 1: Connect to your Repository
First, connect to your repository by following the instructions here.
You can learn more about ALM-specific configuration in our Connector Docs.
Step 2: Construct your Model
To flow test steps, you will need to add the Test Steps entity when creating your Test model.
To do this, click + Add Entity and select the Test Steps option.
A Test Steps entity will be added. On the Model Configuration screen, you will now see two panels:
- Test Fields: In the top section, add any fields you'd like to flow on the test (or test run) artifact that are not part of its associated test steps.
- Test Step Fields: In the bottom section, add any fields you'd like to flow that are a part of test steps. You'll see that Hub provides some Smart Fields that are test step specific to help you get started, but you can add any other desired fields by leaving the Smart Field blank.
Here is an example of a very simple Test Model with Test Steps:
You can find general details on how to create a model here.
Converting Model Types
Standard Models can be converted to Test Models simply by choosing Model with Test Steps in the Model Type drop down.
Models with Test Steps cannot be converted back to Standard Models, but this should not present any challenges to integration scenarios. If Test Step Flow is not enabled in the related integrations, the test step fields in the model will simply be ignored.
Step 3: Create your Collection
You can find general details on how to create a collection here.
You will see a Map Test Fields sash on your collection if:
- Your model is a Model with Test Steps, and
- Your artifact is an ALM Test, ALM Test Run, Octane Test, or Octane Manual Run

The process to map test step fields is very similar to the process on the normal Field Mapping screen. Note that both relationship(s) and other field types for test steps will be mapped on this one sash.
Note: Tests and Test Steps do not require a typical relationship field mapping to link them. We've added behind-the-scenes smarts to couple them for you.
Step 4: Configure your Integration
You can find general details on how to configure an integration here.
In order to see a Test Step Flow link on the integration configuration screen, the following conditions must be met:
- Model is of type 'Model with Test Steps'
- Artifacts in both collections have test steps
- The relevant Hub connectors must support test steps (see Connector Documentation to confirm)

Clicking the link will bring you to the Test Step Flow screen, where you can click Select to choose your desired Test Step Flow style.

Due to the sequential nature of test steps, test step flow has some unique properties:
- Test steps can only flow in one direction
- The target collection’s test steps will be kept in strict synchronization with the source collection: this means that all updates, deletions, and re-ordering of test steps will be mimicked in the target collection. Since the source collection is the system of record, any test steps that exist in the target collection but not the source collection will be removed.
- If the test steps on the target artifact are changed by an end-user, they will be updated by Hub when one of the fields or ordering on the source artifact's test steps is changed.
Note: Comments and attachments are not currently supported on test steps.
Micro Focus ALM Octane
Many organizations have been using Micro Focus ALM (aka Quality Center) for quality management for years. But where once it was the only tool used for testing, today enterprises are augmenting ALM with additional tools to align with their agile and test automation efforts. That includes tools like Micro Focus ALM Octane.
The challenges for QA teams and leadership are how to restore visibility into coverage, quality, and cost, now that testing data is split across multiple tools.
Planview Hub enables users to flow test results into Micro Focus ALM in order to take advantage of ALM's reporting capabilities while using other tools, such as ALM Octane, for their test planning and execution.
The method outlined below will enable you to flow test results into Micro Focus ALM from ALM Octane. Due to the architectural specificity of each external tool, the methods below cannot be used for other endpoints.
You can watch this demo video to learn more:
Test Architecture
Before you begin configuring your integration, it's important to understand how test artifacts relate to one another.
While the goal of this integration is to flow test results, the architecture required to do so is more complex than one might assume.
In this integration scenario, the challenge is synchronizing test steps between the two tools:
- In ALM, Test Steps are sub-entities of the Test artifact and referenced by a specific Test Instance.
- In ALM Octane, Test Steps are fields on the Test artifact.
The goal is to synchronize the ALM Test Instance artifact with the ALM Octane Test artifact, while including the Test Steps that exist on the related ALM Test artifact.
But don't worry - it only requires three integrations:
| Integration | Container A | Container B | Work Item |
|---|---|---|---|
|
Test Design |
Test Set |
Test Suite |
-- |
|
Test Planning |
-- |
-- |
Test Instance |
| Test Execution | -- | -- | Test Run |
Once configured, your integrations will look like the images below.


Tip: To keep your integrations in order, we recommend appending a number to the beginning of each title (i.e., "1 - Test Design," "2 - Test Planning," "3 - Test Execution").
Now that you've familiarized yourself with the test architecture for this integration scenario, let's get started!
Step 1: Connect to Your Repository
First, connect to your repository by following the instructions here.
You can learn more about ALM-Octane specific configuration in our Connector Docs.
Step 2: Construct your Model
To flow test steps, you will need to add a Test Steps entity when creating your Test model.
To do this, click + Add Entity and select the Test Steps option.
A Test Steps entity will be added. On the Model Configuration screen, you will then see two panels:
- Test Fields: In the top section, add any fields you'd like to flow on the test (or test run) artifact that are not part of its associated test steps.
- Test Step Fields: In the bottom section, add any fields you'd like to flow that are a part of test steps. You'll see that Hub provides some Smart Fields that are test step specific to help you get started, but you can add any other desired fields by leaving the Smart Field blank.
Here is an example of a very simple Test Model with Test Steps:
You can find general details on how to create a model here.
Step 3: Create your Collection
You can find general details on how to create a collection here.
You will see a Map Test Fields sash on your collection if:
- Your model is a Model with Test Steps, and
- Your artifact is an ALM Test or Octane Test
The process to map test step fields is very similar to the process on the normal Field Mapping screen. Note that both relationship(s) and other field types for test steps will be mapped on this one sash.
Note: Tests and Test Steps do not require a typical relationship field mapping to link them. We've added behind-the-scenes smarts to couple them for you.
Step 4: Configure an Artifact Union
To flow Test Steps from ALM to Octane, you will need to configure an artifact union between ALM Test Instances and ALM Tests so that the Test Steps will flow into the Octane Tests collection.
Artifact unions specify the related artifacts whose fields may flow along with the artifacts in your collection.
As ALM Test Steps only exist on the ALM Test artifact, test steps cannot flow from ALM to Octane. With the help of an artifact union, through a shared relationship field between ALM Test Instances and ALM Tests, the test steps are able to flow.
Learn more about artifact unions here.
To access artifact unions, navigate to the Collection Configuration screen and click Configure Artifact Unions.
Note: The Artifact Unions sash will only be visible when there is a single relationship/container field available for the collection.
Navigate to the ALM Test Instance collection and create a new artifact union.
Then, select the Test relationship field, desired project(s), and artifact type.
After saving the artifact union, click Map Test Step Fields on the Collection Configuration screen.
On this screen, select the Test artifact union from the Flow Test Steps From dropdown menu.
After you've selected where you'd like the test steps to flow from, click Save.
The next step will be to configure the necessary integrations.
Step 5: Configure your Integrations
You can find general details on how to configure an integration here.
In order to see a Test Step Flow link on the integration configuration screen, the following conditions must be met:
- Model is of type 'Model with Test Steps'
- Artifacts in both collections have test steps
- The relevant Hub connectors must support test steps (see Connector Documentation to confirm)
Integration 1: Test Design
The first integration you will configure is a Container + Work Item Synchronization flowing Test Sets/Test Suites (container).

Supported Containers:
- Micro Focus ALM Test Sets
- Micro Focus ALM Octane Test Suites
Artifact Creation Flow should be one way from ALM to Octane.
Integration 2: Test Planning
The Test Planning integration is a Work Item Synchronization that flows Test Instances/Cases from ALM to Test Cases in Octane.

To configure this integration, you will use the normal 'Work Item Synchronization' template.
Work Item Collections:
- ALM Test Instances
- Configure parent relationship of ALM Test Instance to Test Set
- Octane Test Cases
- Configure parent relationship of Octane Test to Link to Test

Clicking the link will bring you to the Test Step Flow screen, where you can click Select to choose your desired Test Step Flow style:

Due to the sequential nature of test steps, test step flow has some unique properties:
- Test steps can only flow in one direction
- The target collection’s test steps will be kept in strict synchronization with the source collection: this means that all updates, deletions, and re-ordering of test steps will be mimicked in the target collection. Since the source collection is the system of record, any test steps that exist in the target collection but not the source collection will be removed.
- If the test steps on the target artifact are changed by an end-user, they will be updated by Hub when one of the fields or ordering on the source artifact's test steps is changed.
Note: Comments and attachments are not currently supported on test steps.
Integration 3: Test Execution
The Test Execution integration is a Work Item Synchronization that flows Test Step Results as a sub-entity located on Octane Manual Runs to ALM Test Runs.

Supported Artifacts:
- ALM Test Run
-
Configure parent relationship of ALM Test Run to Test Instance
-
- Octane Manual Run
- Configure parent relationship of Octane Test Run to Test
Viewing Associated Configuration Elements
To view associated configuration elements (such as collections or models that utilize the Test Step Synchronization or Test Result Synchronization you are viewing), click the Associated Elements tag in the upper right corner of the screen.

