
Quick Start Guide
After you have successfully logged into your Hub account and configured your settings, you are ready to set-up your integration!
Setting up a new integration takes four simple steps.
- Connect to your repository.
- Construct your model.
- Create your collection and map it to the model.
- Configure your integration using one of our templates.
Finally, once you've configured your integration, you can easily expand or modify your integration.

Option 1
Option 2
Option 3
Connect to your Repository
The first step to take when configuring an integration is to connect to your repository.
Your repositories refer to the external tools that Hub will flow information between.
You can create two types of repository connections: Standard and Database.
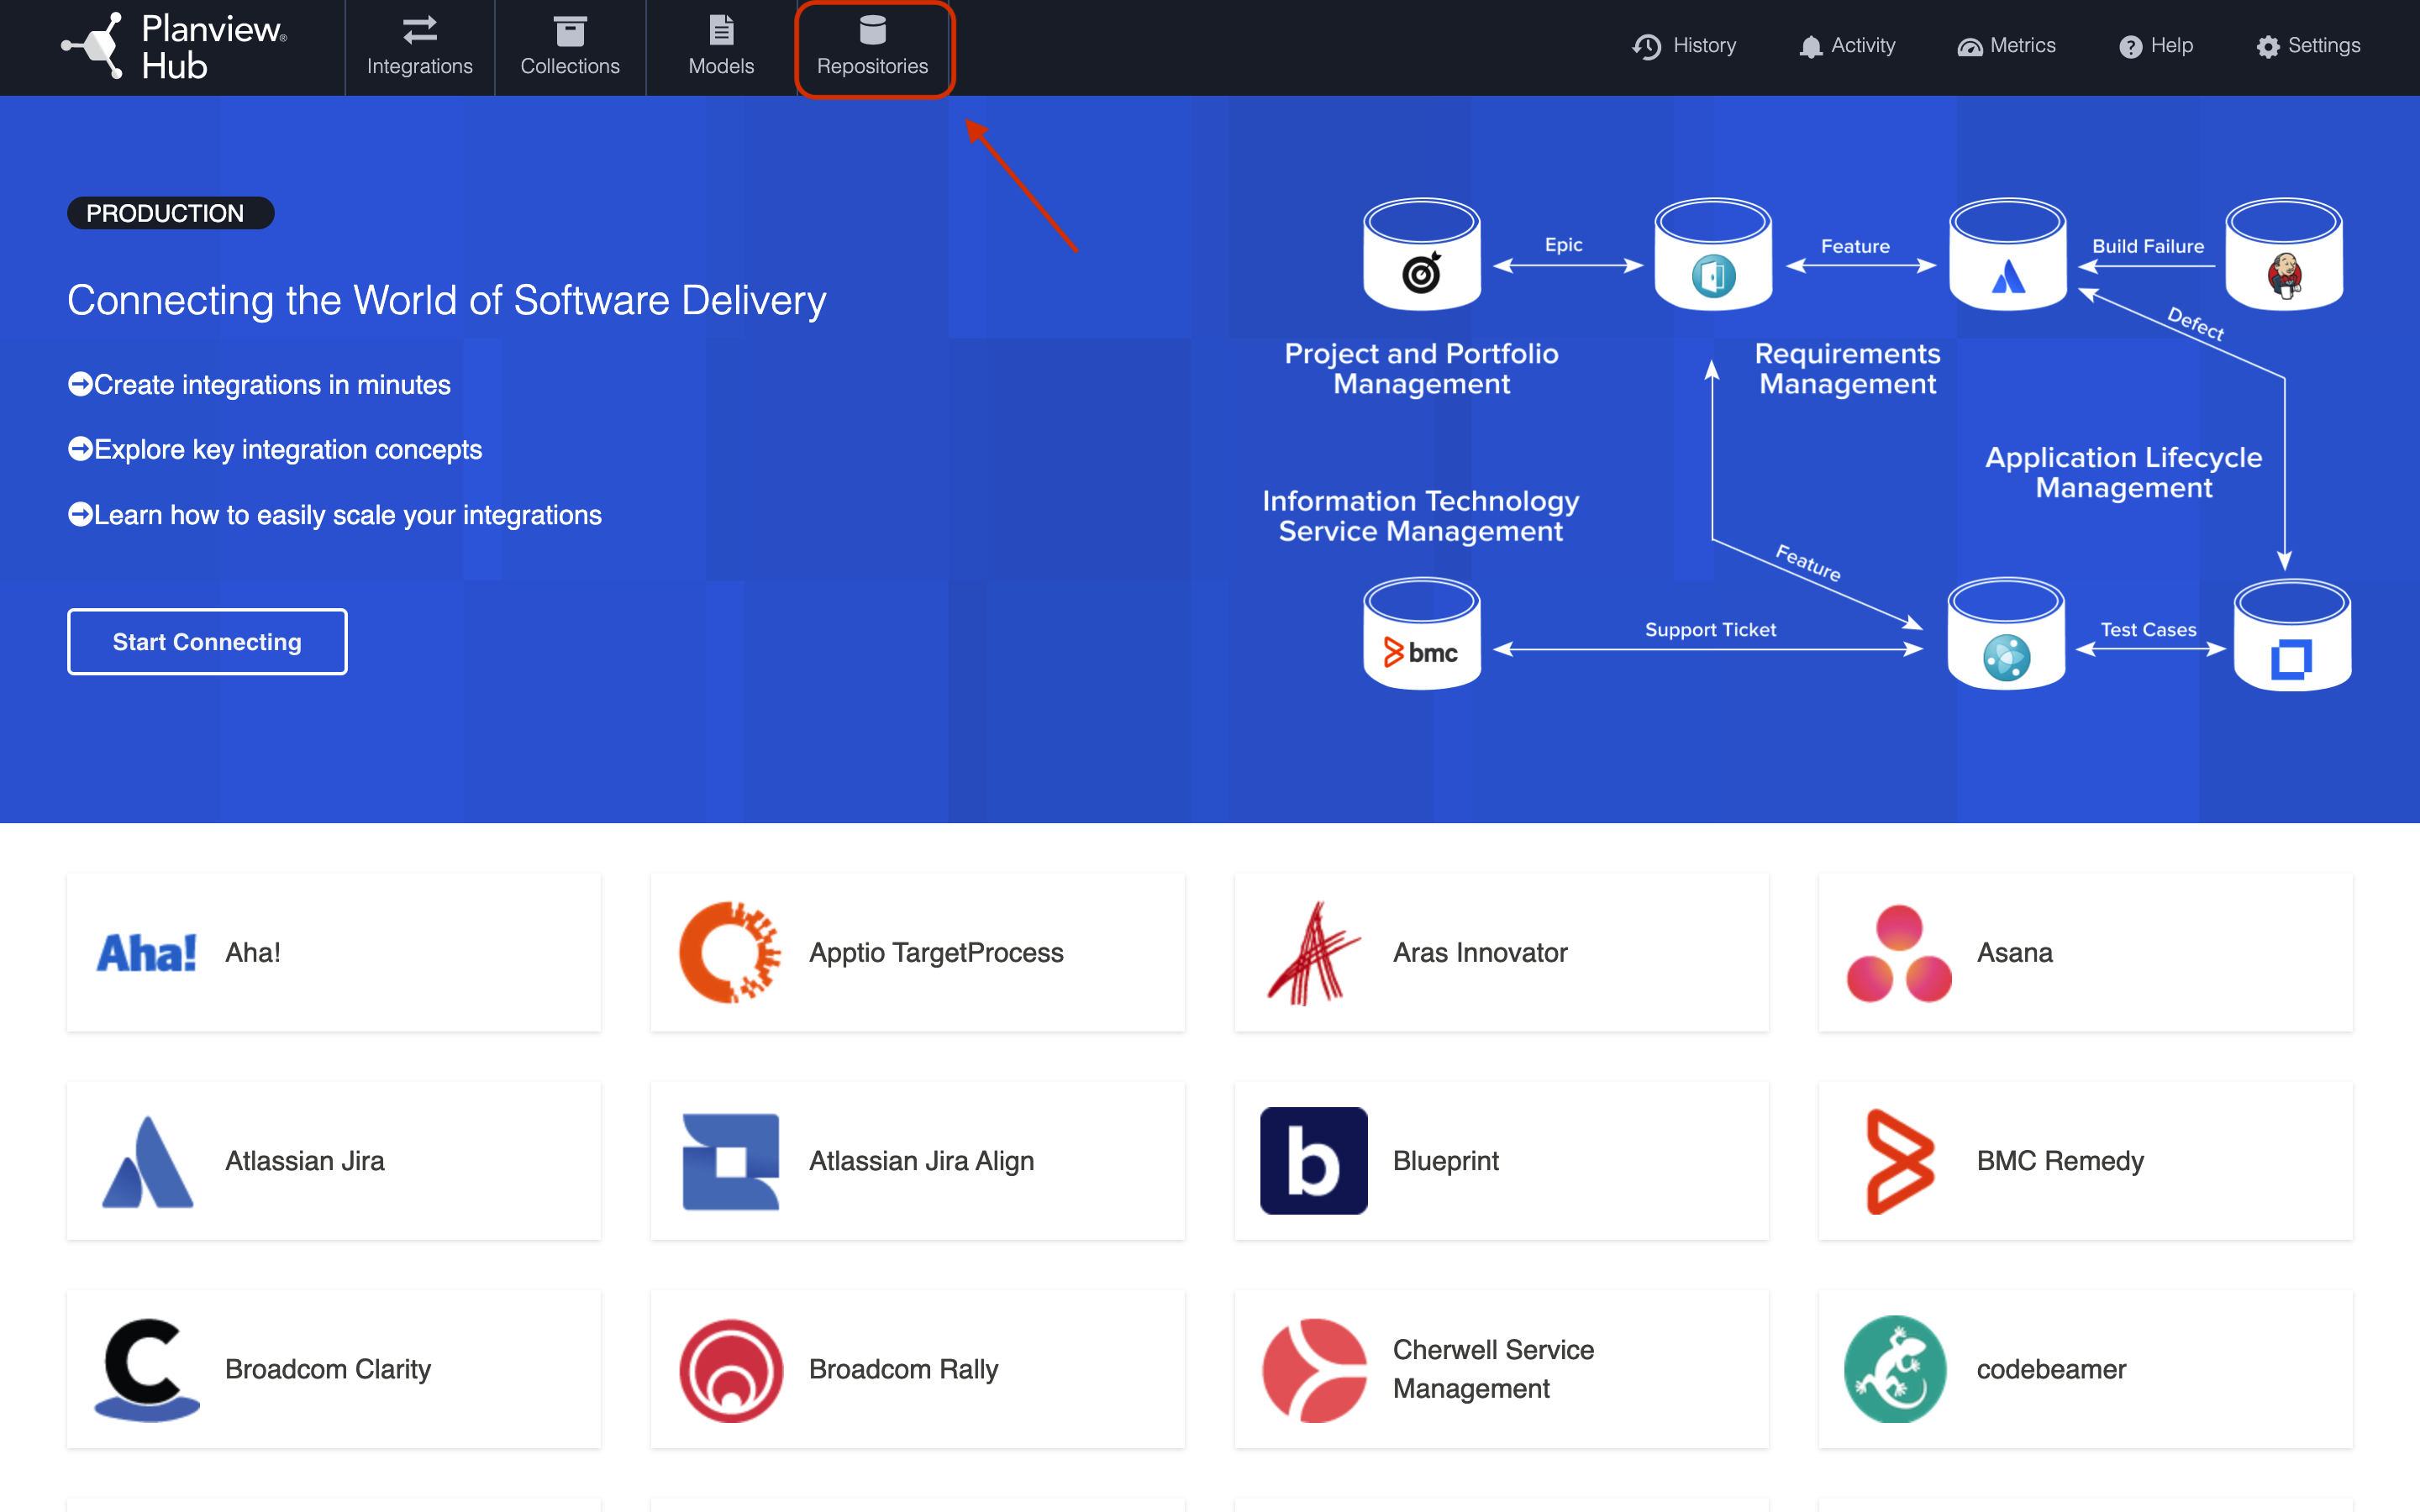
To create a new repository connection, select Repositories at the top of the screen.
Click + New Repository Connection.

Select the repository you would like to connect to in your integration.

Enter your authentication credentials and save your connection.
Create or Reuse a Model
A model is a tool that makes the integration process scalable by defining the fields for each artifact type you would like to integrate.
Hub comes pre-packaged with several out-of-the-box models that are ready for you to use! If you'd like to use a pre-packaged model, you can skip this section and start creating your collections.
On the Models screen, you will see the name of each model, with a number identifying how many fields are included in that model.
To access your models, select Models at the top of the screen.

If you'd like to create a new custom model, click + New Model at the top of the screen.

To add fields to your model, simply click on the plus sign at the bottom left of the model box.

Once you're finished constructing your model, click Save and Done to save your model.

Create your Collections
The next step to take when configuring an integration is to create your collections.
Your collections define which artifacts are eligible to flow as part of your integration.
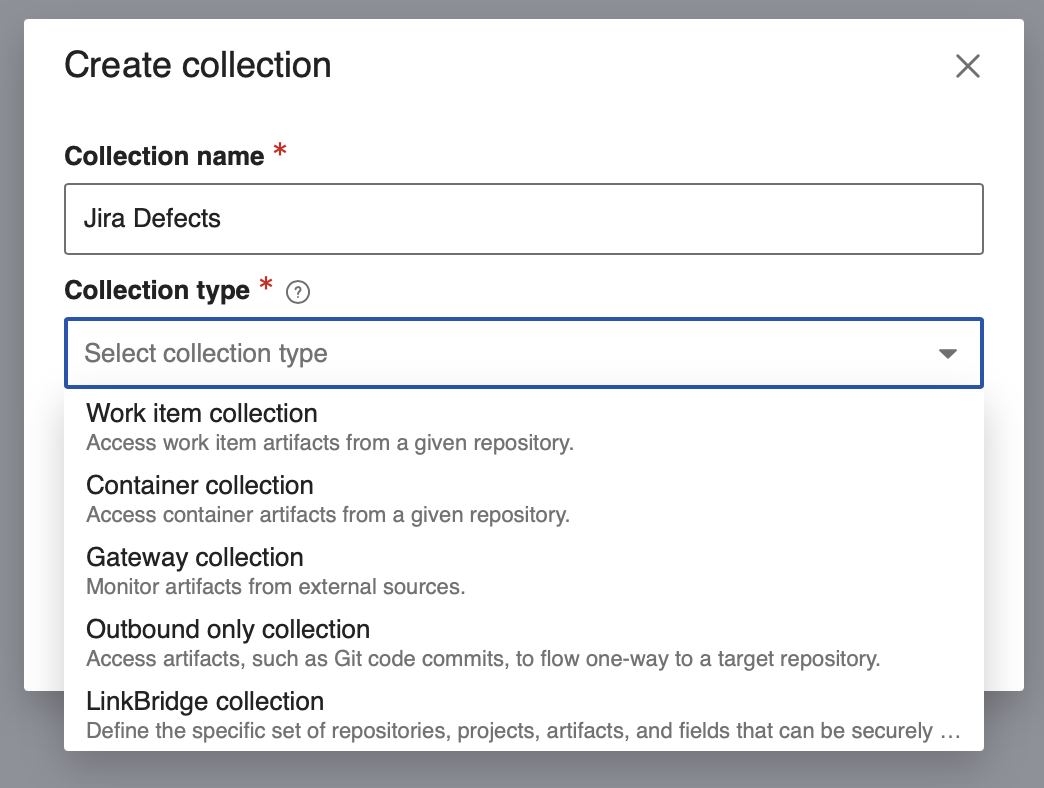
You can create five types of collections: Work Item (Repository), Container, Work Item (Database), Gateway, Outbound Only.
See the Planview Hub Editions table to determine if your edition supports all collection types.
To create a new collection, select Collections from the drop-down list on the home page. Click Create collection.

Select the Collection type and set your Collection name.
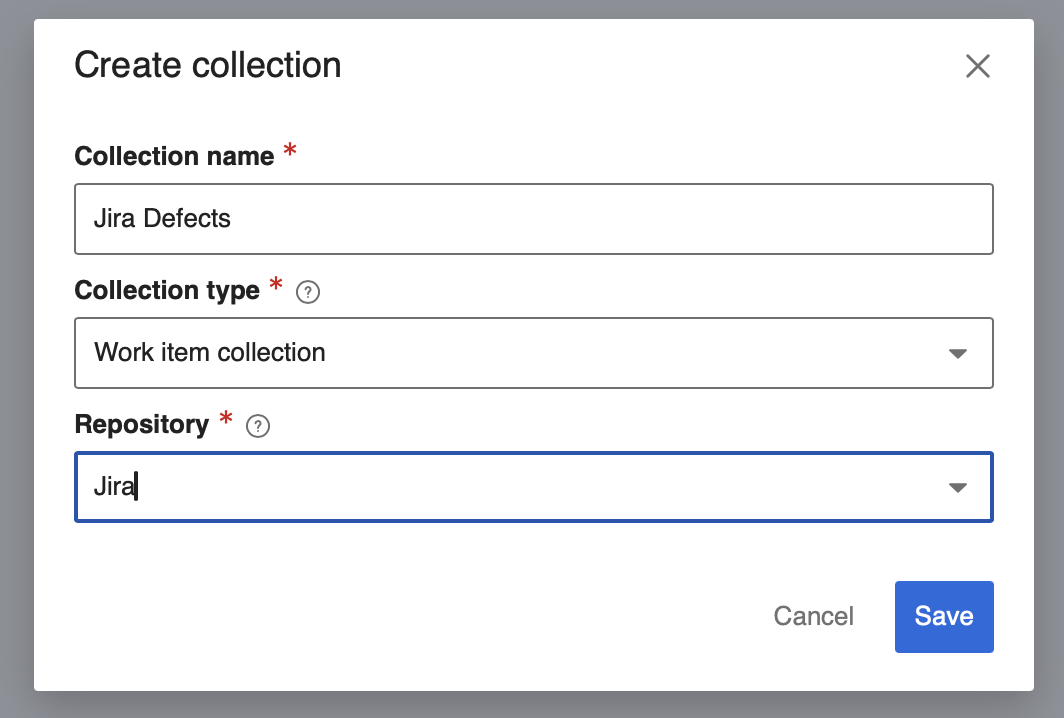
Select the repository that you would like to connect. The collection will include artifacts from the repository you have selected.
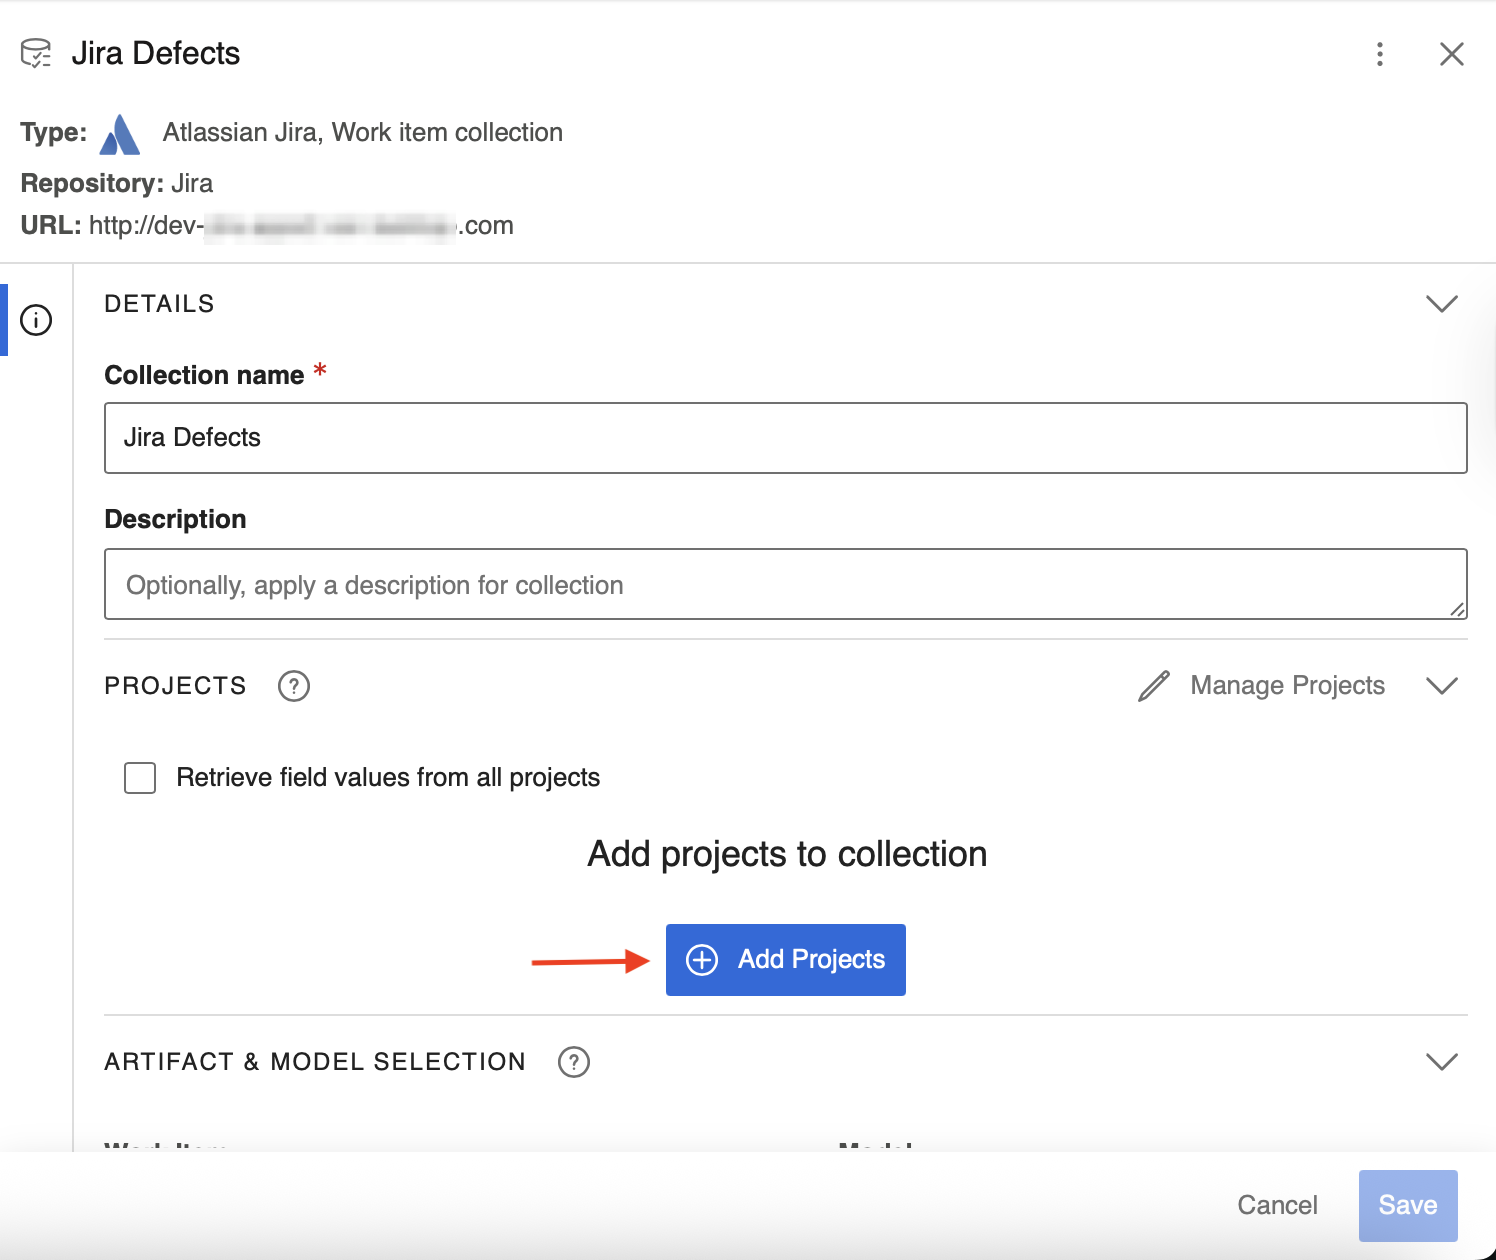
Add projects to your collection by selecting Manage Projects. These are the projects from which Hub will be able to create, retrieve, and update artifacts.

Select the artifact type from the repository that you would like to include in this collection.

Select the model you'd like to use for this collection.

Click Save and Done to save your collection.
For detailed instructions on creating specific collection types, click here.
Configure your Integration
The last step is to configure your integration.
An integration is simply the flow of information between 2 or more tools.
Hub offers a variety of integration styles for your custom integration: Work Item Synchronization, Container + Work Item Synchronization, Enterprise Data Stream, Create via Gateway, Modify via Gateway.
Hub also offers prebuilt integration patterns for your integration: Code Traceability: Create and Relate a Changeset, Code Traceability: Update an Existing Work Item, Test Synchronization.
See the Planview Hub Editions table to determine if your edition supports all integration styles and patterns.
To configure a new integration, select Integrations at the top of the screen, then click + New Integration.


Select a style or pattern for your new integration.

Name and describe your integration, and select your repositories and collections.

Running your Integration
Once you've completed your integration configuration, it's time to run your integration!
- Simply click Run to run the integration, and Stop to stop the integration.


For detailed instructions on configuring specific integration styles, click here.
Overview
After you have successfully logged into your Hub account and configured your settings, you are ready to set-up your integration!
Setting up a new integration takes four simple steps.
- Connect to your repository.
- Construct your model.
- Create your collection and map it to the model.
- Configure your integration using one of our templates.
Finally, once you've configured your integration, you can easily expand or modify your integration.
Option 1
Option 2
Option 3
Connect to your Repository
The first step to take when configuring an integration is to connect to your repository.
Your repositories refer to the external tools that Hub will flow information between.
You can create two types of repository connections: Standard and Database.
To create a new repository connection, select Repositories at the top of the screen.
Click + New Repository Connection.
Select the repository you would like to connect to in your integration.
Enter your authentication credentials and save your connection.
Create or Reuse a Model
A model is a tool that makes the integration process scalable by defining the fields for each artifact type you would like to integrate.
Hub comes pre-packaged with several out-of-the-box models that are ready for you to use! If you'd like to use a pre-packaged model, you can skip this section and start creating your collections.
On the Models screen, you will see the name of each model, with a number identifying how many fields are included in that model.
To access your models, select Models at the top of the screen.
If you'd like to create a new custom model, click + New Model at the top of the screen.
To add fields to your model, simply click on the plus sign at the bottom left of the model box.
Once you're finished constructing your model, click Save and Done to save your model.
Create your Collections
The next step to take when configuring an integration is to create your collections.
Your collections define which artifacts are eligible to flow as part of your integration.
You can create five types of collections: Work Item (Repository), Container, Work Item (Database), Gateway, Outbound Only.
See the Planview Hub Editions table to determine if your edition supports all collection types.
To create a new collection, select Collections from the drop-down list on the home page. Click Create collection.
Select the Collection type and set your Collection name.
Select the repository that you would like to connect. The collection will include artifacts from the repository you have selected.
Add projects to your collection by selecting Manage Projects. These are the projects from which Hub will be able to create, retrieve, and update artifacts.
Select the artifact type from the repository that you would like to include in this collection.
Select the model you'd like to use for this collection.
Click Save and Done to save your collection.
For detailed instructions on creating specific collection types, click here.
Configure your Integration
The last step is to configure your integration.
An integration is simply the flow of information between 2 or more tools.
Hub offers a variety of integration styles for your custom integration: Work Item Synchronization, Container + Work Item Synchronization, Enterprise Data Stream, Create via Gateway, Modify via Gateway.
Hub also offers prebuilt integration patterns for your integration: Code Traceability: Create and Relate a Changeset, Code Traceability: Update an Existing Work Item, Test Synchronization.
See the Planview Hub Editions table to determine if your edition supports all integration styles and patterns.
To configure a new integration, select Integrations at the top of the screen, then click + New Integration.
Select a style or pattern for your new integration.
Name and describe your integration, and select your repositories and collections.
Running your Integration
Once you've completed your integration configuration, it's time to run your integration!
- Simply click Run to run the integration, and Stop to stop the integration.
For detailed instructions on configuring specific integration styles, click here.
Overview
This quick-start guide walks you through setting up a basic integration, including essential steps like connecting to your repository, constructing your model, and creating your collections.
Whether you're just getting started with Hub or need a quick refresher on how to create an integration, read this quick-start guide for a summary of each step and click the links to learn more.
After you have successfully logged into your Hub account and configured your settings, you are ready to set-up your integration!
Setting up a new integration takes four simple steps.
- Connect to your repository.
- Construct your model.
- Create your collection and map it to the model.
- Configure your integration using one of our templates.
Finally, once you've configured your integration, you can easily expand or modify your integration.
Option 1
Option 2
Option 3
Connect to your Repository
The first step to take when configuring an integration is to connect to your repository.
Your repositories refer to the external tools that Hub will flow information between.
You can create two types of repository connections: Standard and Database.
To create a new repository connection, select Repositories at the top of the screen.
Click + New Repository Connection.
Select the repository you would like to connect to in your integration.
Enter your authentication credentials and save your connection.
Create or Reuse a Model
A model is a tool that makes the integration process scalable by defining the fields for each artifact type you would like to integrate.
Hub comes pre-packaged with several out-of-the-box models that are ready for you to use! If you'd like to use a pre-packaged model, you can skip this section and start creating your collections.
On the Models screen, you will see the name of each model, with a number identifying how many fields are included in that model.
To access your models, select Models at the top of the screen.
If you'd like to create a new custom model, click + New Model at the top of the screen.
To add fields to your model, simply click on the plus sign at the bottom left of the model box.
Once you're finished constructing your model, click Save and Done to save your model.
Create your Collections
The next step to take when configuring an integration is to create your collections.
Your collections define which artifacts are eligible to flow as part of your integration.
You can create five types of collections: Work Item (Repository), Container, Work Item (Database), Gateway, Outbound Only.
See the Planview Hub Editions table to determine if your edition supports all collection types.
To create a new collection, select Collections at the top of the screen.

Click + New Collection.

Select the collection type.

Enter a name for your collection and select the repository that you would like to connect. The collection will include artifacts from the repository you have selected.

Add projects to your collection by selecting Manage Projects. These are the projects from which Hub will be able to create, retrieve, and update artifacts.

Select the artifact type from the repository that you would like to include in this collection.

Select the model you'd like to use for this collection.

Click Save and Done to save your collection.
For detailed instructions on creating specific collection types, click here.
Configure your Integration
The last step is to configure your integration.
An integration is simply the flow of information between 2 or more tools.
Hub offers a variety of integration styles for your custom integration: Work Item Synchronization, Container + Work Item Synchronization, Enterprise Data Stream, Create via Gateway, Modify via Gateway.
Hub also offers prebuilt integration patterns for your integration: Code Traceability: Create and Relate a Changeset, Code Traceability: Update an Existing Work Item, Test Synchronization.
See the Planview Hub Editions table to determine if your edition supports all integration styles and patterns.
To configure a new integration, select Integrations at the top of the screen, then click + New Integration.
Select a style or pattern for your new integration.
Name and describe your integration, and select your repositories and collections.
Running your Integration
Once you've completed your integration configuration, it's time to run your integration!
- Simply click Run to run the integration, and Stop to stop the integration.
For detailed instructions on configuring specific integration styles, click here.
After you have successfully logged into your Hub account and configured your settings, you are ready to set-up your integration!
Setting up a new integration takes four simple steps.
- Connect to your repository.
- Construct your model.
- Create your collection and map it to the model.
- Configure your integration using one of our templates.
Finally, once you've configured your integration, you can easily expand or modify your integration.
Option 1
Option 2
Option 3
Connect to your Repository
The first step to take when configuring an integration is to connect to your repository.
Your repositories refer to the external tools that Hub will flow information between.
You can create two types of repository connections: Standard and Database.
To create a new repository connection, select Repositories at the top of the screen.
Click + New Repository Connection.
Select the repository you would like to connect to in your integration.
Enter your authentication credentials and save your connection.

For detailed instructions on connecting to Standard and Database repositories, click here.
Create or Reuse a Model
A model is a tool that makes the integration process scalable by defining the fields for each artifact type you would like to integrate.
Hub comes pre-packaged with several out-of-the-box models that are ready for you to use! If you'd like to use a pre-packaged model, you can skip this section and start creating your collections.
On the Models screen, you will see the name of each model, with a number identifying how many fields are included in that model.
To access your models, select Models at the top of the screen.
If you'd like to create a new custom model, click + New Model at the top of the screen.
To add fields to your model, simply click on the plus sign at the bottom left of the model box.
Once you're finished constructing your model, click Save and Done to save your model.
Create your Collections
The next step to take when configuring an integration is to create your collections.
Your collections define which artifacts are eligible to flow as part of your integration.
You can create five types of collections: Work Item (Repository), Container, Work Item (Database), Gateway, Outbound Only.
See the Planview Hub Editions table to determine if your edition supports all collection types.
To create a new collection, select Collections at the top of the screen.
Click + New Collection.
Select the collection type.
Enter a name for your collection and select the repository that you would like to connect. The collection will include artifacts from the repository you have selected.
Add projects to your collection by selecting Manage Projects. These are the projects from which Hub will be able to create, retrieve, and update artifacts.
Select the artifact type from the repository that you would like to include in this collection.
Select the model you'd like to use for this collection.
Click Save and Done to save your collection.
For detailed instructions on creating specific collection types, click here.
Configure your Integration
The last step is to configure your integration.
An integration is simply the flow of information between 2 or more tools.
Hub offers a variety of integration styles for your custom integration: Work Item Synchronization, Container + Work Item Synchronization, Enterprise Data Stream, Create via Gateway, Modify via Gateway.
Hub also offers prebuilt integration patterns for your integration: Code Traceability: Create and Relate a Changeset, Code Traceability: Update an Existing Work Item, Test Synchronization.
See the Planview Hub Editions table to determine if your edition supports all integration styles and patterns.
To configure a new integration, select Integrations at the top of the screen, then click + New Integration.
Select a style or pattern for your new integration.
Name and describe your integration, and select your repositories and collections.
Running your Integration
Once you've completed your integration configuration, it's time to run your integration!
- Simply click Run to run the integration, and Stop to stop the integration.
For detailed instructions on configuring specific integration styles, click here.
After you have successfully logged into your Hub account and configured your settings, you are ready to set-up your integration!
Setting up a new integration takes four simple steps.
- Connect to your repository.
- Construct your model.
- Create your collection and map it to the model.
- Configure your integration using one of our templates.
Finally, once you've configured your integration, you can easily expand or modify your integration.
Option 1
Option 2
Option 3
Connect to your Repository
The first step to take when configuring an integration is to connect to your repository.
Your repositories refer to the external tools that Hub will flow information between.
You can create two types of repository connections: Standard and Database.
To create a new repository connection, select Repositories at the top of the screen.
Click + New Repository Connection.
Select the repository you would like to connect to in your integration.
Enter your authentication credentials and save your connection.
Create or Reuse a Model
A model is a tool that makes the integration process scalable by defining the fields for each artifact type you would like to integrate.
Hub comes pre-packaged with several out-of-the-box models that are ready for you to use! If you'd like to use a pre-packaged model, you can skip this section and start creating your collections.
On the Models screen, you will see the name of each model, with a number identifying how many fields are included in that model.
To access your models, select Models at the top of the screen.
If you'd like to create a new custom model, click + New Model at the top of the screen.
To add fields to your model, simply click on the plus sign at the bottom left of the model box.
Once you're finished constructing your model, click Save and Done to save your model.
Create your Collections
The next step to take when configuring an integration is to create your collections.
Your collections define which artifacts are eligible to flow as part of your integration.
You can create five types of collections: Work Item (Repository), Container, Work Item (Database), Gateway, Outbound Only.
See the Planview Hub Editions table to determine if your edition supports all collection types.
To create a new collection, select Collections from the drop-down list on the home page. Click Create collection.
Select the Collection type and set your Collection name.
Select the repository that you would like to connect. The collection will include artifacts from the repository you have selected.
Add projects to your collection by selecting Manage Projects. These are the projects from which Hub will be able to create, retrieve, and update artifacts.
Select the artifact type from the repository that you would like to include in this collection.
Select the model you'd like to use for this collection.
Click Save and Done to save your collection.
For detailed instructions on creating specific collection types, click here.
Configure your Integration
The last step is to configure your integration.
An integration is simply the flow of information between 2 or more tools.
Hub offers a variety of integration styles for your custom integration: Work Item Synchronization, Container + Work Item Synchronization, Enterprise Data Stream, Create via Gateway, Modify via Gateway.
Hub also offers prebuilt integration patterns for your integration: Code Traceability: Create and Relate a Changeset, Code Traceability: Update an Existing Work Item, Test Synchronization.
See the Planview Hub Editions table to determine if your edition supports all integration styles and patterns.
To configure a new integration, select Integrations at the top of the screen, then click + New Integration.
Select a style or pattern for your new integration.
Name and describe your integration, and select your repositories and collections.
Running your Integration
Once you've completed your integration configuration, it's time to run your integration!
- Simply click Run to run the integration, and Stop to stop the integration.
For detailed instructions on configuring specific integration styles, click here.