
Atlassian Jira

Overview
Jira is by far the most popular Agile tool in the software delivery toolchain today. It plays a central role in planning and tracking work, primarily for engineers, but often for other teams as well. Integrating Jira with other application development and delivery tools keeps teams and tools in sync automatically, so you can focus on the real value-adding work of developing new features, resolving defects, closing tech debt, and reducing risk.
Key Features and Benefits
Integrating Jira with other tools ensures engineers can spend their time on doing the work that creates value for the business, instead of the busy work required to keep tools and colleagues in sync.
A good integration means:
- You don’t need to enter the same information in multiple tools! Any update you make in Jira automatically flows to the right place in other tools and vice versa
- You don’t need to log in to multiple tools to do your work. All the information you need is right there in Jira, including all the fields, descriptions, attachments, and comments changed in other tools
- You don’t need to communicate about an issue in chats, emails or status meetings! All communication can take place and be seen within Jira comments, even when colleagues enter their replies in other tools
Integration can also tie together multiple Jira instances, even if they are at different version levels, and have them working as one. The same is true for coordinating work between on-prem instances and on-demand instances running in parallel and supporting migration between the two.
Common Integration Patterns
- Aligning Developers across Agile Planning Tools
- Associating Planning Items to Implementation Artifacts
- Escalating Help Desk Problems to Developers
- Sharing Customer Feature Requests with Product
- Reporting Known Defects to the Help Desk
- Aligning Testing Teams across Testing Tools
- Populating Requirements into PLM Tools
Supported Extensions
Atlassian offers a wide variety of applications and plug-ins that are supported by the Atlassian Jira connector.
Jira Core
Jira Core is the default application of the Jira platform, and will always be present in a Jira instance. It includes Jira core functionality, such as users, business projects, and workflows, and its main work item types are tasks and sub-tasks.
Jira Software
Jira Software includes users, software projects, and workflows, and its main work item types are tasks, sub-tasks, stories, bugs, and epics.
Jira Service Management
Jira Service Management (formerly Jira Service Desk) includes users, service projects, and its main work item types are change, access, purchase, IT help, fault, new feature, improvement, incident, problem, and service request.
Service Desk Type Mappings
The Service Desk Type Mappings field enables you to create a Service request for artifacts synchronized into a Service project by specifying the Jira and Service Management artifact type pairs for each project.
When specifying artifact type pairs, please use the following format:
- Project A: Artifact Type in Service Management = Artifact Type in Jira, Artifact Type in Service Management = Artifact Type in Jira; Project B: Artifact Type in Service Management = Artifact Type in Jira
Example:
-
Project A: Get IT help = Service Request, Report a system problem = Incident; Project B: Upgrade or change a managed system = Change, Report a system problem = Incident
Good to Know:
- If the following characters are included in the project or artifact type names (: ; , =), they must be escaped with a preceding backslash (\).
- If an invalid value is provided (e.g., misspelled projects, missing projects or artifact type names), a detailed error message will appear and the debug output will diagnose the error.
- If a project name is incorrect, it can still be mapped. However, as it is possible to create two Service Management types with the same name and different case, the type name must match the case or Hub will be unable to map it.
- If you create a Service request type with extra spaces before and after the name, an error will appear and will need to be diagnosed by the error message and debug output.
Please see details below regarding Jira Service Management limitations.
Jira Data Center
Please see configuration details below if using Jira Data Center.
Zephyr Squad Plugin
Planview Hub provides support for the Zephyr Squad plug-in.
See additional details here.
Jira Agile Plugin
Jira Agile is one of the most common plugins in the marketplace and has become an out-of-the-box piece of Jira Software installation since the 6.3.1 version. This means that if you are on a version later than 6.3.1, you likely did not even have to install the Agile plug-in, as it was automatically installed along with Jira Software. This plugin enables features for easy day to day work management with scrum/agile/Kanban processes. The plugin also creates various custom fields.
Some of the following Jira Agile fields are created by the plugin:
- Jira Agile Sprint Field
- Note: This field is read-only in Planview Hub versions 18.3 and earlier / Tasktop Sync versions 4.15 and earlier. You can learn more in the FAQ below.
- Epic Status
- Epic Name
- Epic Link
Jira nFeed Plugin
The Jira connector supports nfeed fields. Note that nFeed user fields are read-only.
Dynamic Forms for Jira
Planview Hub supports synchronizing dynamic custom fields via the Dynamic Forms for Jira Plug-in.
- Dynamic Forms fields Select, Cascading Select, Radio Buttons, and Checkbox fields are writable.
- Please see details below regarding cascading select fields.
- Bundled fields are read-only.
Jira Crowd
Atlassian Crowd enabled SSO is supported in the Hub versions listed above. When setting up the Crowd server in the customer environment, the instructions outlined in this guide must be followed.
The Hub user created through Crowd should have the same Jira permissions as recommended for the regular Hub user.
Users should review the Atlassian SSO troubleshooting guide to troubleshoot any network issues relating to SSO. If the Hub user is unable to authenticate, the first step should be to try to log in via the Jira UI. If the user is unable to authenticate through the UI, it implies that there are issues with the way Crowd SSO is set up in the customer environment.
Please check the standard authentication section for connection details.
iRise Plug-in for Jira
The iRise Plug-in for Jira allows you to render up-to-date iRise screen thumbnails directly on the corresponding artifact in Jira cloud. To use the plug-in with your Jira-iRise integration, follow the instructions below:
- Install the iRise Plug-in for Jira to your Jira cloud instance.
- Create a string field in your Hub model called 'iRise Prototype.'
- On the iRise side, map that model field to the 'Chapter Simulation URL' location field.
- On the Jira side, create a custom string field called 'iRisePrototypeURL,' and map it to the 'iRise Prototype' model field in Hub.
- On the Field Flow screen for your iRise-Jira integration, update the field update frequency on the Jira side to 'always update.'

- Run your integration.
- On the Jira artifact, copy the link from the 'iRisePrototypeURL' field and paste it into the iRise plug-in field. Then click 'Attach screen.'
- You will see the screen thumbnail for the iRise artifact rendered directly within Jira.


Jira Project Specific Select Field Plug-in
Planview Hub: 21.1.0 and later
Planview Hub supports synchronizing the following custom fields via the Project Specific Select Field Plug-in: Single, Multi, and Simple.
Requirements Management for Jira Plug-in (R4J)
Requirements Management for Jira: 4.3.3 and later
Planview Hub supports synchronizing the relationship fields Child Requirements and Parent Requirements for the R4J plug-in.
Hub also supports R4J Folders as container type artifacts.
Note: This artifact and any related fields will only be visible if the R4J plug-in has been enabled on the server and for the projects in the collection.
- A regular Jira issue in R4J can have multiple parent folders (if the parent folders are not in the same project), but a folder can only have one other folder as its parent.
- The 'Parent Folder' field exists as a container link field on folder type artifacts, and a 'Parent Folders' field has been added as a multi-container link field on regular Jira artifacts.
Note: The supported relationship fields do not support change detection, therefore, a full scan is required to pick up changes for these fields.
See Functional Limitations table below for limitations regarding this plug-in.
Jira Tempo Plug-in
Planview Hub: 21.1.0 and later
Tasktop Sync: 4.25 and later
Jira Tempo: 8.13-15.2.1
Planview Hub supports synchronizing the Team and Account fields for the Jira Tempo plug-in.
-
For a team to appear as an option for the Team field for a project, the Hub user must be added to each team as a member or as part of a group, and the project must be linked to it.
- For the Account field, the account must be linked with the project.
-
For Hub to write to a Tempo field, the field must be added to the Jira edit screens for each project and type used in integrations.
The Tempo Cloud API Token field allows you to retrieve the actual Jira author on worklogs when retrieving worklogs created with the Tempo plugin on Jira Cloud.
Note: If the provided Tempo token is not valid, an error will be thrown when retrieving Tempo worklogs. If no Tempo token is provided, worklogs will be retrieved without using the Tempo API and any Tempo created worklogs will have 'Tempo Timesheets' set as the author.
To create a Tempo API token for your user, open the Jira Tempo App and navigate to Tempo > Settings. Then, scroll down to Data Access and select API integration.
Note: The only access required for the token is View Worklogs access.
Advanced Roadmaps for Jira Data Center Plug-in (on-prem)
Planview Hub: 21.4 and later
Tasktop Sync: 4.28 and later
Planview Hub supports the Team and Parent Link fields for the Advanced Roadmaps (formerly Jira Portfolio) plug-in.
Note: The Hub user created through Advanced Roadmaps must be granted Advanced Roadmaps shared team management permissions. To list non-shared projects/teams, you must also have Advanced Roadmaps user permissions.
Label Manager for Jira Plug-in
Planview Hub: 22.2 and later
Tasktop Sync: 4.30 and later
Planview Hub supports synchronizing the Label Manager fields for the Label Manager for Jira plug-in.
Note: Hub does not support label colors or the “Label Manager Progress” custom field type.
See Functional Limitations table below for limitations regarding this plug-in.
For more information, refer to Jira documentation here.
Xray Test Management for Jira Plug-in
Planview Hub provides support for the Xray Test Management for Jira plug-in.
See additional details here.
Jira Plug-ins (other)
Fields created by other plug-ins may be exposed in Hub as read-only fields. These are typically fields that are added to the normal Jira artifact UI by the plug-in (i.e., a field that is displayed within the typical Jira defect UI). Fields created by unsupported plug-ins that are included in totally new UI sections in Jira, on the other hand, will likely not be exposed in Hub.
Connector Setup Details
This section describes the basic steps needed to prepare your Atlassian Jira instance for use with supported Planview products. Note that additional fields for synchronization or configuration of queries may be required depending on the requirements of your integration.
Minimal User Permissions & Hub User
We recommend that you create a new user within your external tool, to be used only for your Hub integration. This is the user information you will enter when setting up your repository connection within Planview Hub. By creating a new user, you will ensure that the correct permissions are granted, and allow for traceability of the modifications that are made by the synchronization.
In general, your Hub user account should have sufficient permissions to create, read, and update artifacts in your repository. However, depending on the use case, your user may need different permissions. For example, if you are only interested in flowing data out of your repository, your user may not need to have full CRUD access, as the 'create' and 'update' permissions may not be needed.
Your user should have a secure password or token. Please be aware that Hub will not allow you to save a repository connection utilizing a weak password/token, such as 'tasktop.'
See instructions on how to create a new Hub user in Atlassian Jira.
List of minimal user permissions:
Note: The minimal user must be a member of the group and have the following permissions at the project level.
|
|
jira-user |
|---|---|
|
Project Permissions |
Browse Project |
|
Issue Permissions |
Create issues |
|
Voters & Watchers Permission |
|
|
Comments Permissions |
Add Comments |
|
Attachment Permissions |
Create Attachments |
|
Time Tracking Permissions |
Edit Own Worklogs Work On Issues |
| Components Permissions | Administer projects or Administer Jira |
| Versions Permissions | Administer projects or Administer Jira |
|
Global Permissions |
(if using Jira Cloud or Zephyr Cloud after 3/31/19) |
Note: We recommend setting the Hub user in Jira's language to English to prevent errors upon synchronization.
Please see additional details below on the following:
Connecting to the Jira Repository
Learn more about how to set up your repository in Planview Hub here.
Standard Authentication
Required Fields:
-
Location/Connection URL
-
Example Format: https://jiraserver.com:8080
-
-
Username
-
Password
Optional Fields:
-
Zephyr Access Key (see details here)
-
Zephyr Shared Secret (see details here)
-
Xray Cloud Client ID (see details here)
-
Xray Cloud Client Secret (see details here)
-
Xray Cloud Location: This field is for Xray test management artifacts.
-
Note: The Xray Cloud Location should only contain the base URL. The default value for this field is https://xray.cloud.getxray.app
-
-
Tempo Cloud API Token (see details above)
-
Service Desk Type Mappings (see details above)
-
Attachment URL: This field is used to fetch attachments from an alternate URL.
-
Note: The Attachment URL should only contain the base URL.
-
-
Throttling Settings: This field indicates the number of API calls that can be made per minute. See details here.
-
Note: This field should only be set under the guidance of customer care as the ideal value is highly dependent on each customer's unique environment.
-
-
Custom HTTP Header Name: Name of the custom HTTP header to be included in requests for this repository
-
Custom HTTP Header Secret: Value (secret) of the custom HTTP header to be included in requests for this repository
-
Connection Security: If checked, insecure connections to this repository will be allowed. See details here.
-
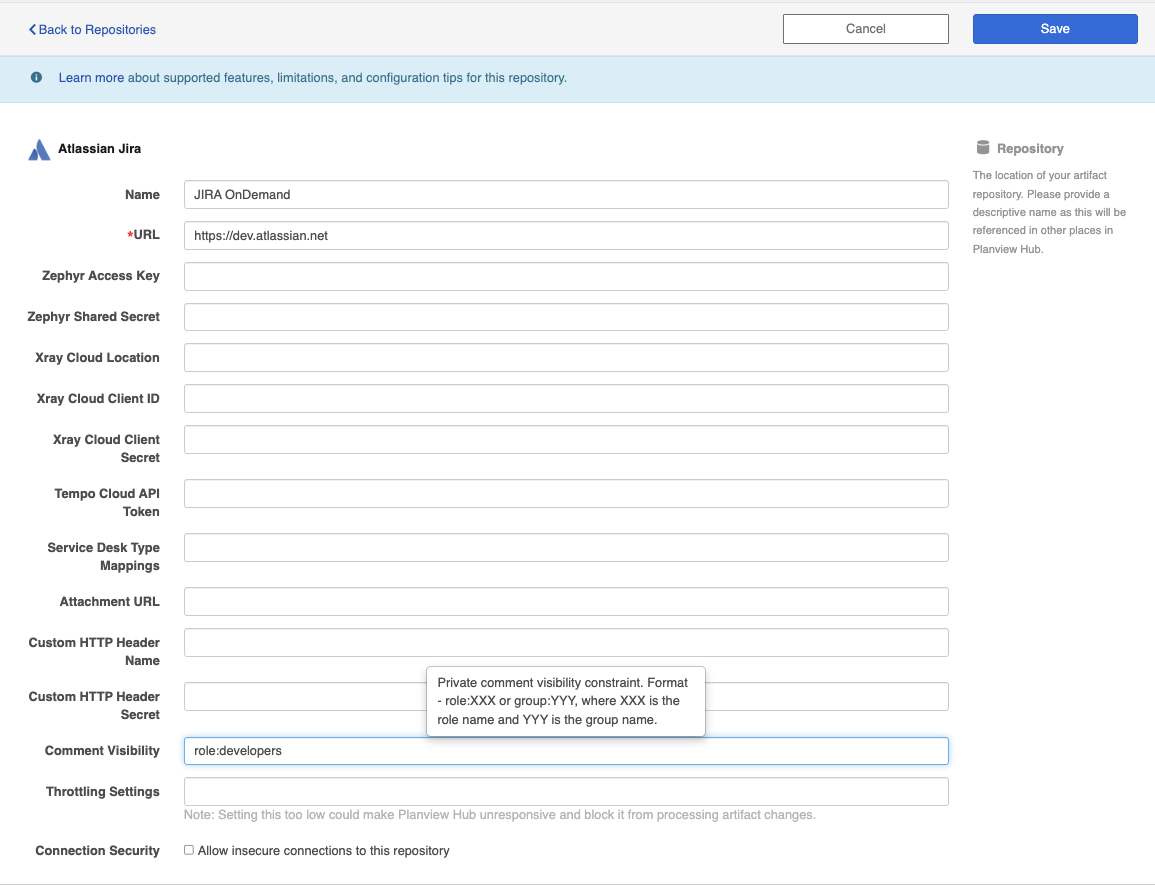
Comment Visibility: Private comment visibility constraint. Format - role: XXX or group: YYY, where XXX is the role name and YYY is the group name.
Note: Atlassian Jira has introduced two-factor authentication (2FA) starting from Atlassian Jira 10.2 and Atlassian Jira Service Management 10.2. If you want to use cookie-based basic authentication, you will need to revert to the legacy login form by adding the following JVM parameter to your start-up arguments while running your Jira server environment:
-Datlassian.revert.login.cookie-authentication=true
For users who still require basic authentication with passwords, Legacy Basic Authentication is supported by the Jira connector.
However, it is always recommended to adopt more secure authentication mechanisms like PAT where possible to ensure compliance with security best practices.

Standard Authentication (Via AWS Secrets Manager)
This authentication method connects to AWS Secrets Manager to retrieve the username and password and then authenticates with the Jira repository via Standard Authentication.
Note: This authentication method is only available to Jira Data Center instances as Jira Cloud does not support standard authentication.
Prerequisites:
- IAM Role Permissions: The machine hosting the application must have IAM Role permissions to access the necessary AWS Secrets Manager secret.
- KMS: Customer managed keys created in AWS Key Management Service (KMS), used for encrypting secrets, should be created in the same AWS account and region of the secret.
Required Fields:
- Location/Connection URL
- Example Format: https://server.atlassian.net
- AWS Secret ARN
- The Amazon Resource Name (ARN) is automatically generated in AWS when a new secret is created.
- The ARN can be copied from the AWS Secrets Manager Secret details page in the AWS console.
- Note: The Secret ARN will also support cross-account cases where the Secret is stored on a different account. In this scenario, the Policy configuration to access external AWS account Secret must be done and tested.
- The username and password must be created in that secret with keys “username” and “password” respectively.
-


Optional Fields:
-
Zephyr Access Key (see details here)
-
Zephyr Shared Secret (see details here)
-
Xray Cloud Client ID (see details here)
-
Xray Cloud Client Secret (see details here)
-
Xray Cloud Location: This field is for Xray test management artifacts.
-
Note: The Xray Cloud Location should only contain the base URL. The default value for this field is https://xray.cloud.getxray.app
-
-
Tempo Cloud API Token (see details above)
-
Service Desk Type Mappings (see details above)
-
Attachment URL: This field is used to fetch attachments from an alternate URL.
-
Note: The Attachment URL should only contain the base URL.
-
-
Throttling Settings: This field indicates the number of API calls that can be made per minute. See details here.
-
Note: This field should only be set under the guidance of customer care as the ideal value is highly dependent on each customer's unique environment.
-
-
Connection Security: If checked, insecure connections to this repository will be allowed. See details here.
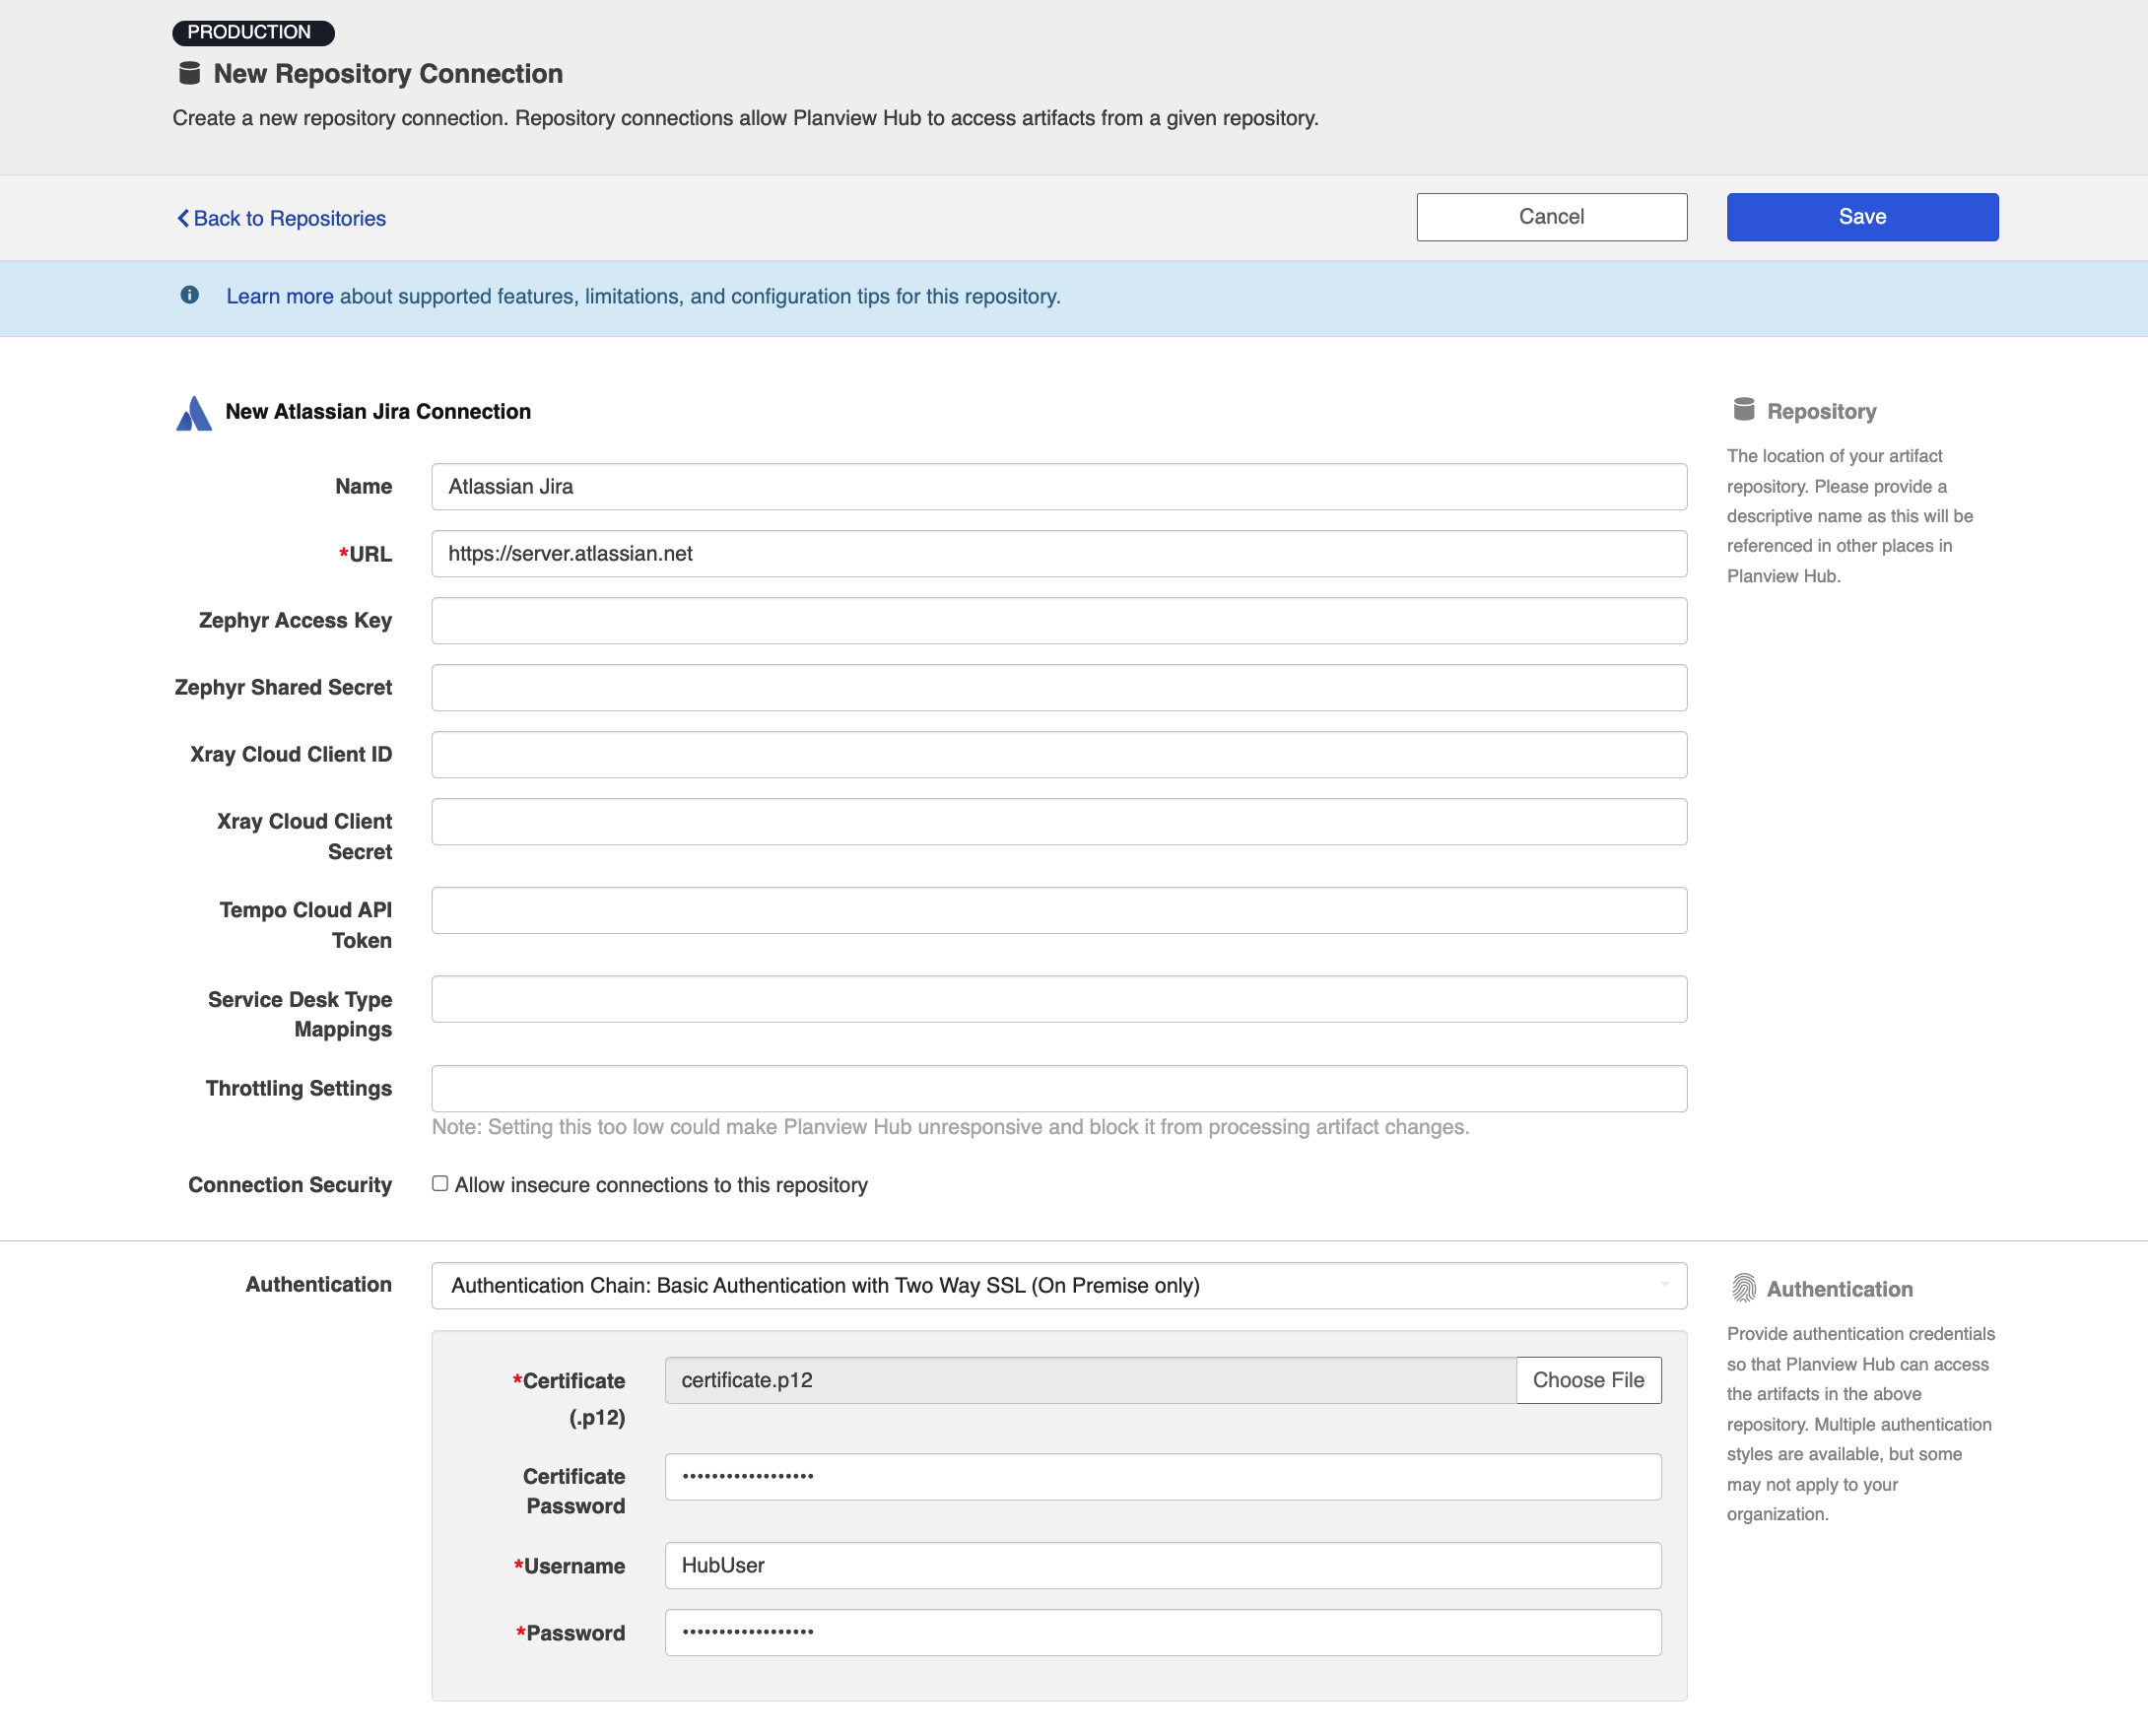
Authentication Chain: Basic Authentication with Two Way SSL
Required Fields:
-
Location/Connection URL
-
Example Format: https://server.atlassian.net
-
-
Certificate (.p12)
-
Certificate Password
-
Username (for Jira)
-
Password (for Jira)
Optional Fields:
-
Zephyr Access Key (see details here)
-
Zephyr Shared Secret (see details here)
-
Xray Cloud Client ID (see details here)
-
Xray Cloud Client Secret (see details here)
-
Xray Cloud Location: This field is for Xray test management artifacts.
-
Note: The Xray Cloud Location should only contain the base URL. The default value for this field is https://xray.cloud.getxray.app
-
-
Tempo Cloud API Token (see details above)
-
Service Desk Type Mappings (see details above)
-
Attachment URL: This field is used to fetch attachments from an alternate URL.
-
Note: The Attachment URL should only contain the base URL.
-
-
Throttling Settings: This field indicates the number of API calls that can be made per minute. See details here.
-
Note: This field should only be set under the guidance of customer care as the ideal value is highly dependent on each customer's unique environment.
-
-
Connection Security: If checked, insecure connections to this repository will be allowed. See details here.
Email Address and API Token Authentication (Jira Cloud only)
Atlassian Jira Cloud only
Required Fields:
-
Location/Connection URL
-
Example Format: https://server.atlassian.net
-
URL format must begin with https
-
-
-
Email Address
-
The email address used to create the API token
-
-
Jira API Token
-
You can learn how to create an API Token in Jira here
-
The token can only be accessed once via the Atlassian website during this setup phase. If you lose the contents of the token, you must revoke the token and start from the beginning.
-
If the token is revoked on the Atlassian website, you must create a new token and update the Hub settings.
-
Optional Fields:
-
Zephyr Access Key (see details here)
-
Zephyr Shared Secret (see details here)
-
Xray Cloud Client ID (see details here)
-
Xray Cloud Client Secret (see details here)
-
Xray Cloud Location: This field is for Xray test management artifacts.
-
Note: The Xray Cloud Location should only contain the base URL. The default value for this field is https://xray.cloud.getxray.app
-
-
Tempo Cloud API Token (see details above)
-
Service Desk Type Mappings (see details above)
-
Attachment URL: This field is used to fetch attachments from an alternate URL.
-
Note: The Attachment URL should only contain the base URL.
-
-
Throttling Settings: This field indicates the number of API calls that can be made per minute. See details here.
-
Note: This field should only be set under the guidance of customer care as the ideal value is highly dependent on each customer's unique environment.
-
-
Connection Security: If checked, insecure connections to this repository will be allowed. See details here.

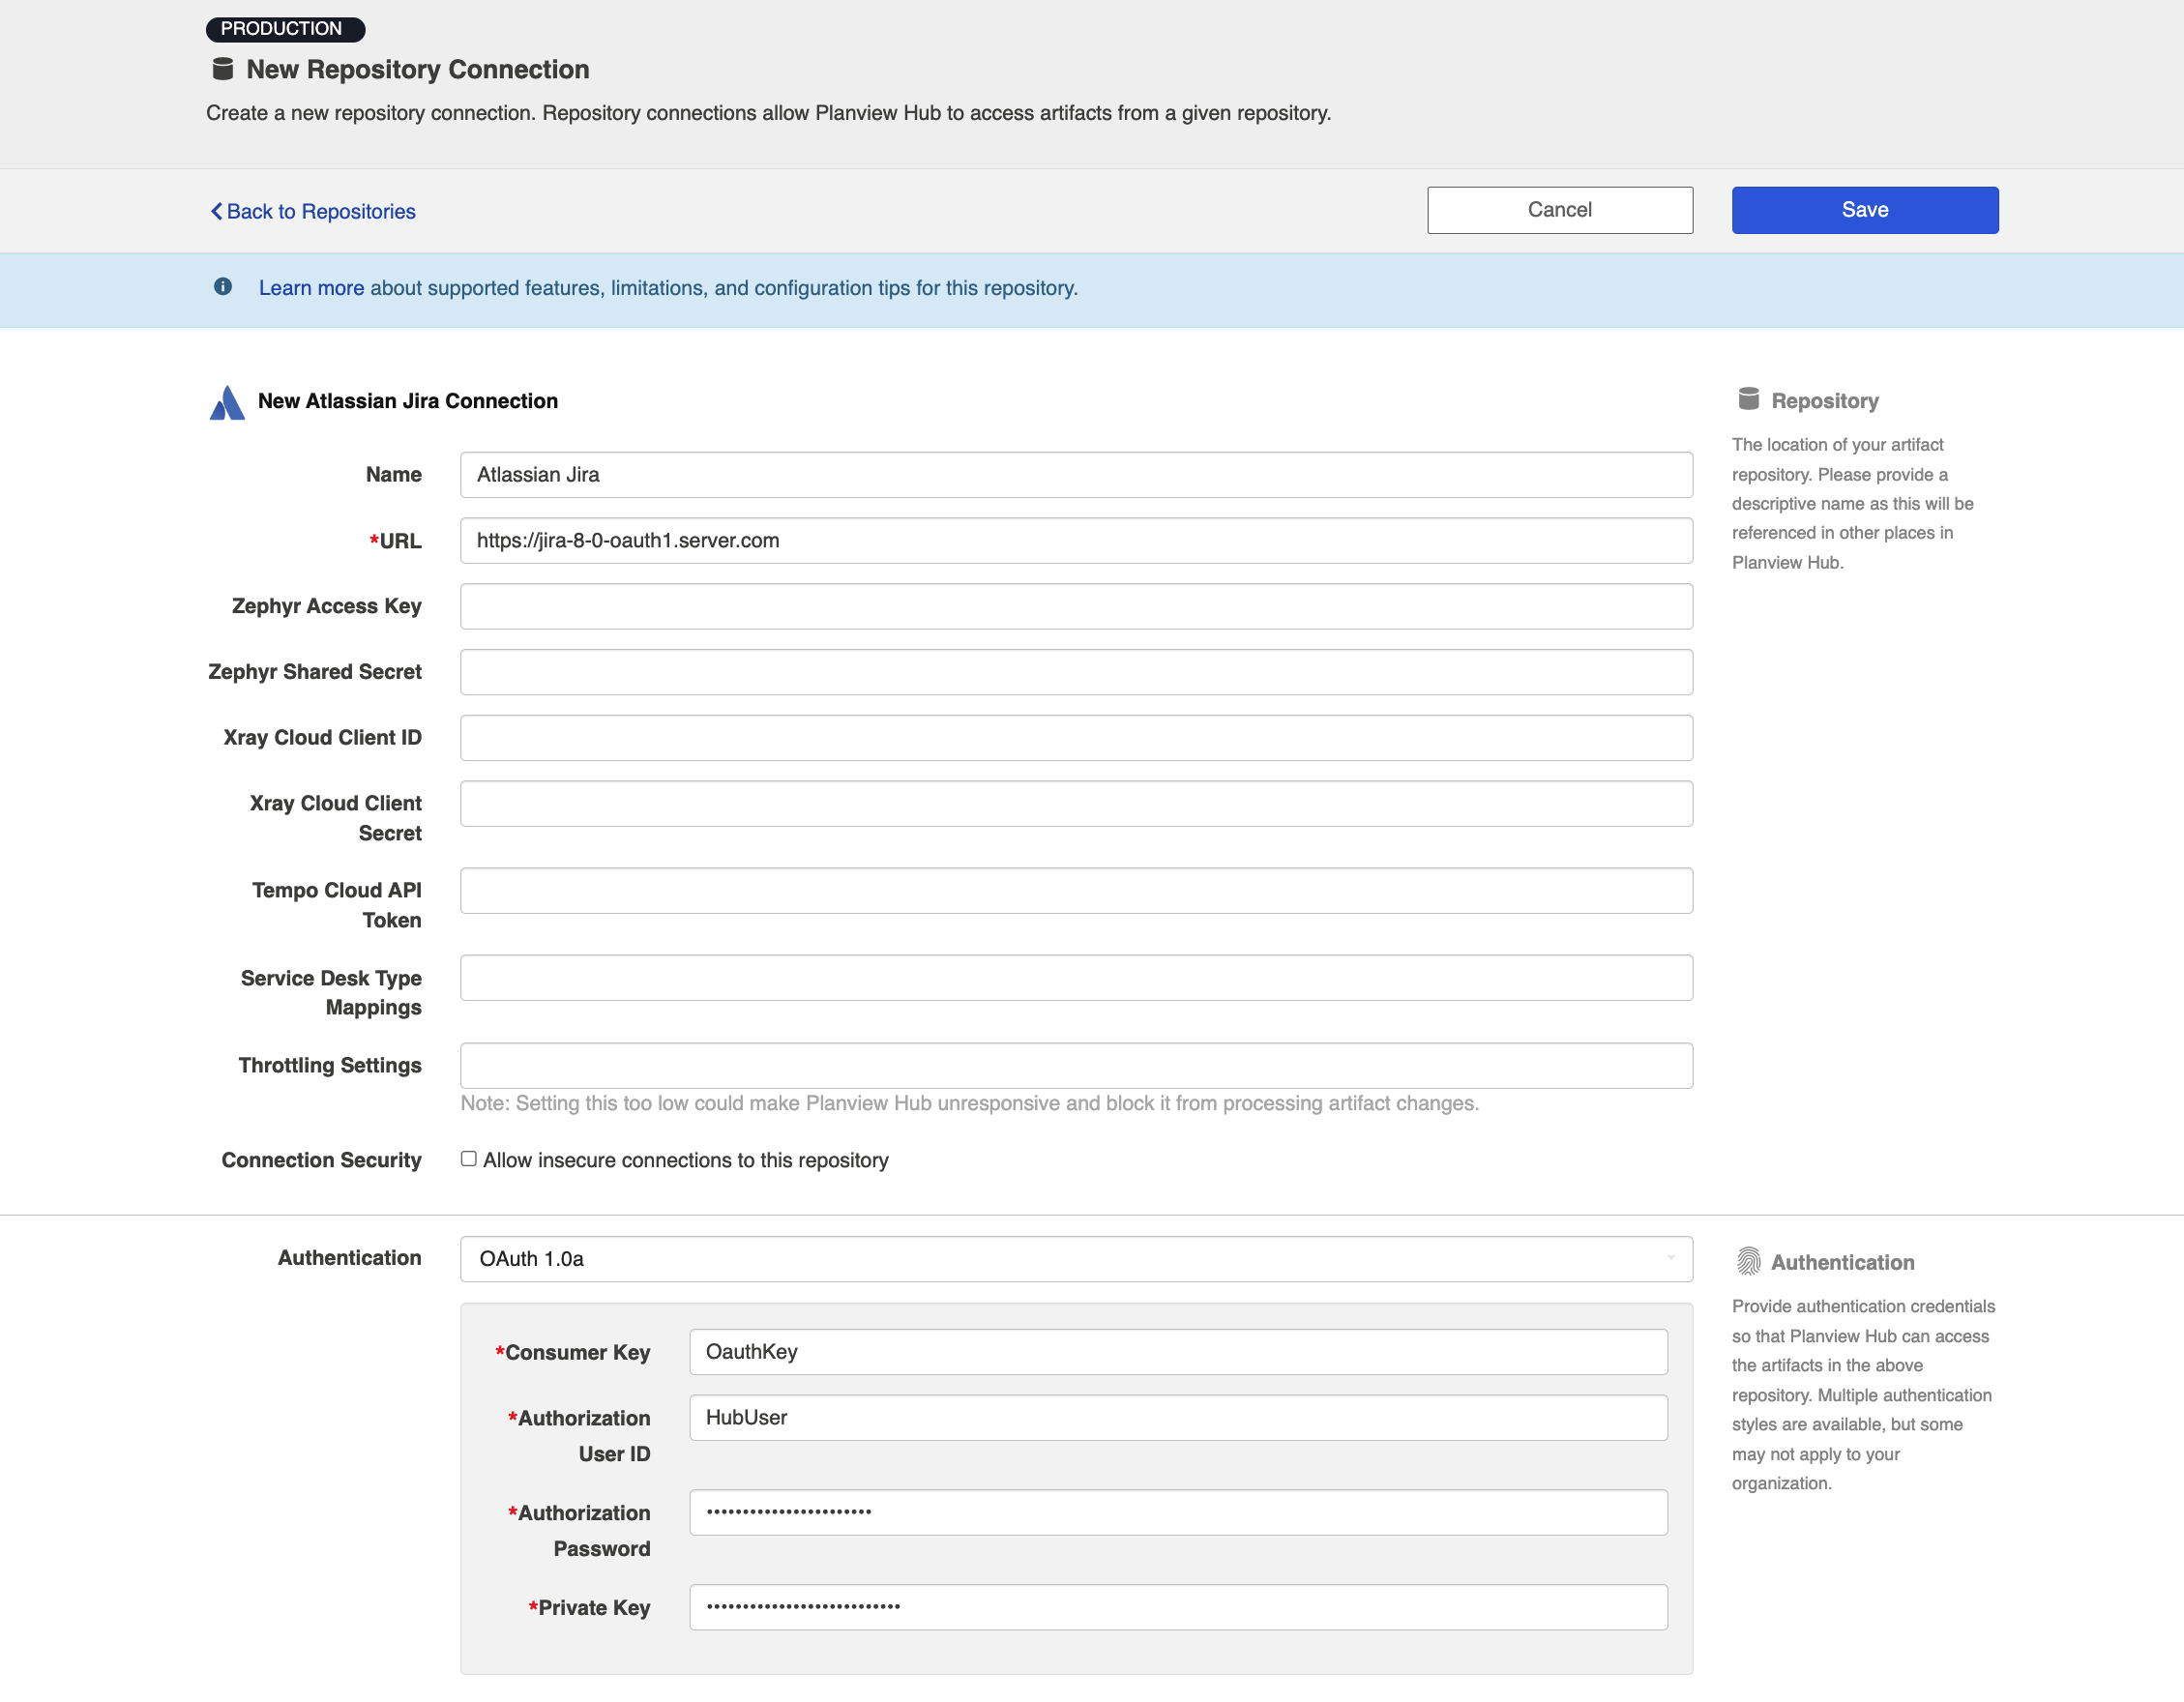
OAuth 1.0a Authentication
Supported versions of Atlassian Jira
Required Fields:
-
Location/Connection URL
-
Example Format: https://jira-8-0-oauth1.server.com
-
-
Consumer Key
-
The consumer key set up using the instructions below.
-
-
Authorization User ID
-
A valid user ID with rights to the issues you'd like to flow (see Minimal User Permissions & Hub User section above).
-
-
Authorization Password
-
The password for the Authorization User ID.
-
-
Private Key
-
The jira_privatekey.pcks8 you created in the steps outlined below. As an example, if the private key looks like the following:
-
-----BEGIN PRIVATE KEY-----
12345
abcde
-----END PRIVATE KEY-----
Note: You only have to copy/paste the 12345abcde text. Hub will handle with the line wrap characters for you.
Optional Fields:
-
Zephyr Access Key (see details here)
-
Zephyr Shared Secret (see details here)
-
Xray Cloud Client ID (see details here)
-
Xray Cloud Client Secret (see details here)
-
Xray Cloud Location: This field is for Xray test management artifacts.
-
Note: The Xray Cloud Location should only contain the base URL. The default value for this field is https://xray.cloud.getxray.app
-
-
Tempo Cloud API Token (see details above)
-
Service Desk Type Mappings (see details above)
-
Attachment URL: This field is used to fetch attachments from an alternate URL.
-
Note: The Attachment URL should only contain the base URL.
-
-
Throttling Settings: This field indicates the number of API calls that can be made per minute. See details here.
-
Note: This field should only be set under the guidance of customer care as the ideal value is highly dependent on each customer's unique environment.
-
-
Connection Security: If checked, insecure connections to this repository will be allowed. See details here.
See additional instructions below.
OAuth 2.0 Client Credentials Service Account Authentication (Jira Cloud Only)
Planview Hub: 26.2 and later
Service Account OAuth 2.0 authentication provides a secure, non-user-based mechanism for integrating with Jira Cloud APIs. It uses the OAuth 2.0 client credentials (2LO) flow to enable server-to-server communication without requiring user credentials.
With this approach, applications authenticate using a service account’s client ID and client secret to obtain an access token, which is then used to authorize API requests. This improves security, simplifies credential management, and aligns with modern authentication best practices for cloud integrations.
Prerequisites
Before configuring the integration, customers must:
-
Create a Service Account in Jira
-
Generate OAuth 2.0 credentials:
-
Client ID
-
Client Secret
-
-
Assign the required OAuth scopes
Refer to:
While creating OAuth 2.0 credentials, configure the required scopes based on your use case.
| Support | Scope |
|---|---|
|
Core (always required) |
read:jira-user |
| Attachments |
read:attachment:jira |
| Worklogs |
read:issue-worklog:jira |
| Issue Links |
read:issue-link:jira |
| Watchers |
write:issue.watcher:jira |
| Transitions |
read:issue.transition:jira |
| History/Changelog |
read:issue.changelog:jira |
| Versions |
read:project-version:jira |
| Components |
read:project.component:jira |
|
Jira Software — Sprints, Boards, Epics |
read:jql:jira |
| Service Desk |
read:servicedesk-request |
| Teams |
view:team:teams |
Required Fields:
-
Location/Connection URL
-
Example Format: https://server.atlassian.net
-
URL format must begin with https
-
-
Client ID
-
Client Secret
-
Optional Fields:
-
Zephyr Access Key (see details here)
-
Zephyr Shared Secret (see details here)
-
Xray Cloud Client ID (see details here)
-
Xray Cloud Client Secret (see details here)
-
Xray Cloud Location: This field is for Xray test management artifacts.
-
Note: The Xray Cloud Location should only contain the base URL. The default value for this field is https://xray.cloud.getxray.app
-
-
Tempo Cloud API Token (see details above)
-
Service Desk Type Mappings (see details above)
-
Attachment URL: This field is used to fetch attachments from an alternate URL.
-
Note: The Attachment URL should only contain the base URL.
-
-
Throttling Settings: This field indicates the number of API calls that can be made per minute. See details here.
-
Note: This field should only be set under the guidance of customer care as the ideal value is highly dependent on each customer's unique environment.
-
-
Connection Security: If checked, insecure connections to this repository will be allowed. See details here.

Public/Private Key Set-up
Before any configuration of Jira or Hub can occur, public and private keys must be created if you have not done so already. The public keys will be configured into Jira. The private key will be used by Hub during REST requests.
Prerequisites: You must have openssl installed (http://www.openssl.org)
These steps should be followed if you want to set up your own:
- Open a command prompt.
- In the command prompt, run the following:
openssl genrsa -out jira_privatekey.pem 1024
openssl req -newkey rsa:1024 -x509 -key jira_privatekey.pem -out jira_publickey.cer -days 365
openssl pkcs8 -topk8 -nocrypt -in jira_privatekey.pem -out jira_privatekey.pcks8
openssl x509 -pubkey -noout -in jira_publickey.cer  > jira_publickey.pem
The files generated will be in the current directory. You will need to refer to these files in the subsequent steps.
Jira Configuration Steps
The following are the steps to be followed to configure a Jira 7.0 instance:
-
Log into the Jira administration console as a user with administration rights.
-
Click on the cog icon and select the Application configuration.
-
From the Application configuration, select Application Links.
-
This configuration may be also available under Add-Ons depending on the version of Jira that you are using.
-
-
In the text box that says Enter the URL of the application you want to link, enter any URL that represents Hub (e.g., https://hub.tasktop.com/). This does not have to be a valid URL. It is used just for descriptive purposes.
-
-
On the first screen of the Link Applications dialog, enter anything you want in the fields. The important part is you ensure the Create incoming link checkbox is checked.
-
-
Press Continue.
-
The Incoming Authentication dialog will appear
-
-
Enter the following:
-
Consumer Key (A unique string to identify Hub. Record this value as it will be needed by Hub to send as part of REST requests)
-
Consumer Name (A short name describing Hub)
-
Description (optional)
-
Public Key (the contents of the jira_publickey.pem you generated above)
-
As an example, if the text below were the public key, you would copy/paste the abcdef12345 text into the field. You do not have to worry about stripping line wrap characters as Jira will do it for you.
-----BEGIN PUBLIC KEY-----
abcdef
12345
-----END PUBLIC KEY-----
-
-
-
Save and close.


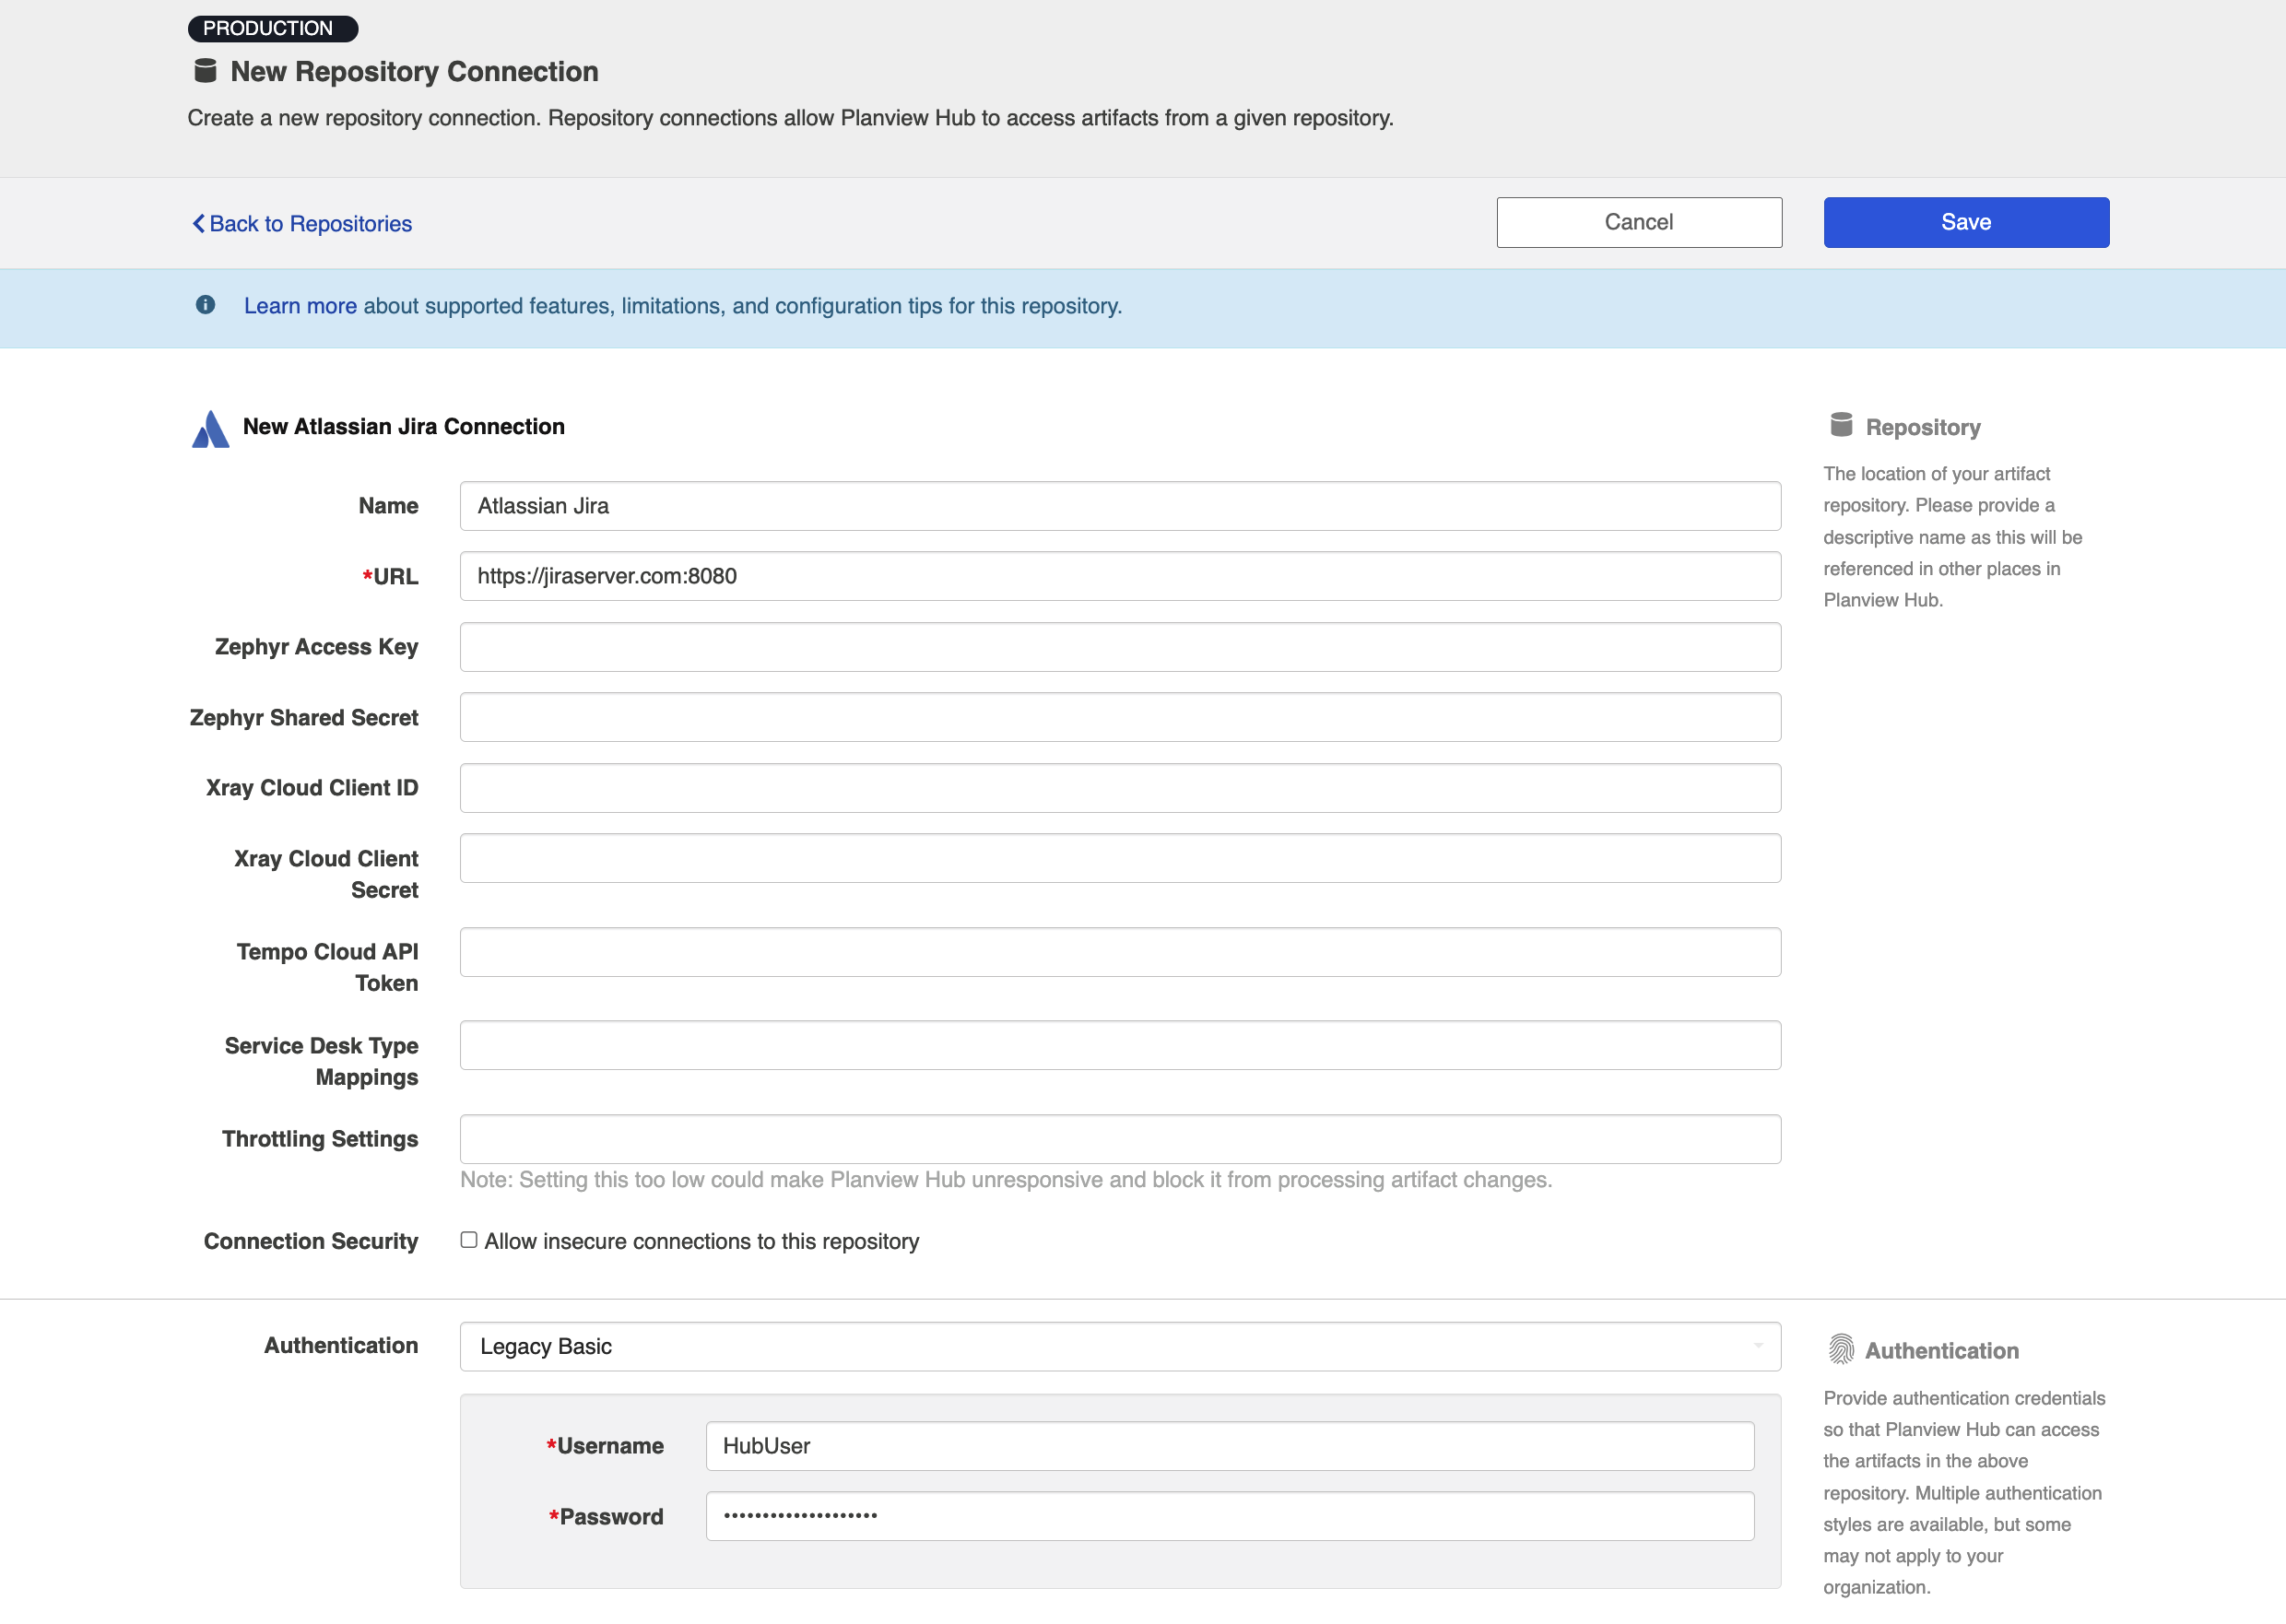
Legacy Basic Authentication
Planview Hub: 20.2.3 and later
Required Fields:
-
Location/Connection URL
-
Example Format: https://jiraserver.com:8080
-
-
Username
-
Password
Optional Fields:
-
Zephyr Access Key (see details here)
-
Zephyr Shared Secret (see details here)
-
Xray Cloud Client ID (see details here)
-
Xray Cloud Client Secret (see details here)
-
Xray Cloud Location: This field is for Xray test management artifacts.
-
Note: The Xray Cloud Location should only contain the base URL. The default value for this field is https://xray.cloud.getxray.app
-
-
Tempo Cloud API Token (see details above)
-
Service Desk Type Mappings (see details above)
-
Attachment URL: This field is used to fetch attachments from an alternate URL.
-
Note: The Attachment URL should only contain the base URL.
-
-
Throttling Settings: This field indicates the number of API calls that can be made per minute. See details here.
-
Note: This field should only be set under the guidance of customer care as the ideal value is highly dependent on each customer's unique environment.
-
-
Connection Security: If checked, insecure connections to this repository will be allowed. See details here.
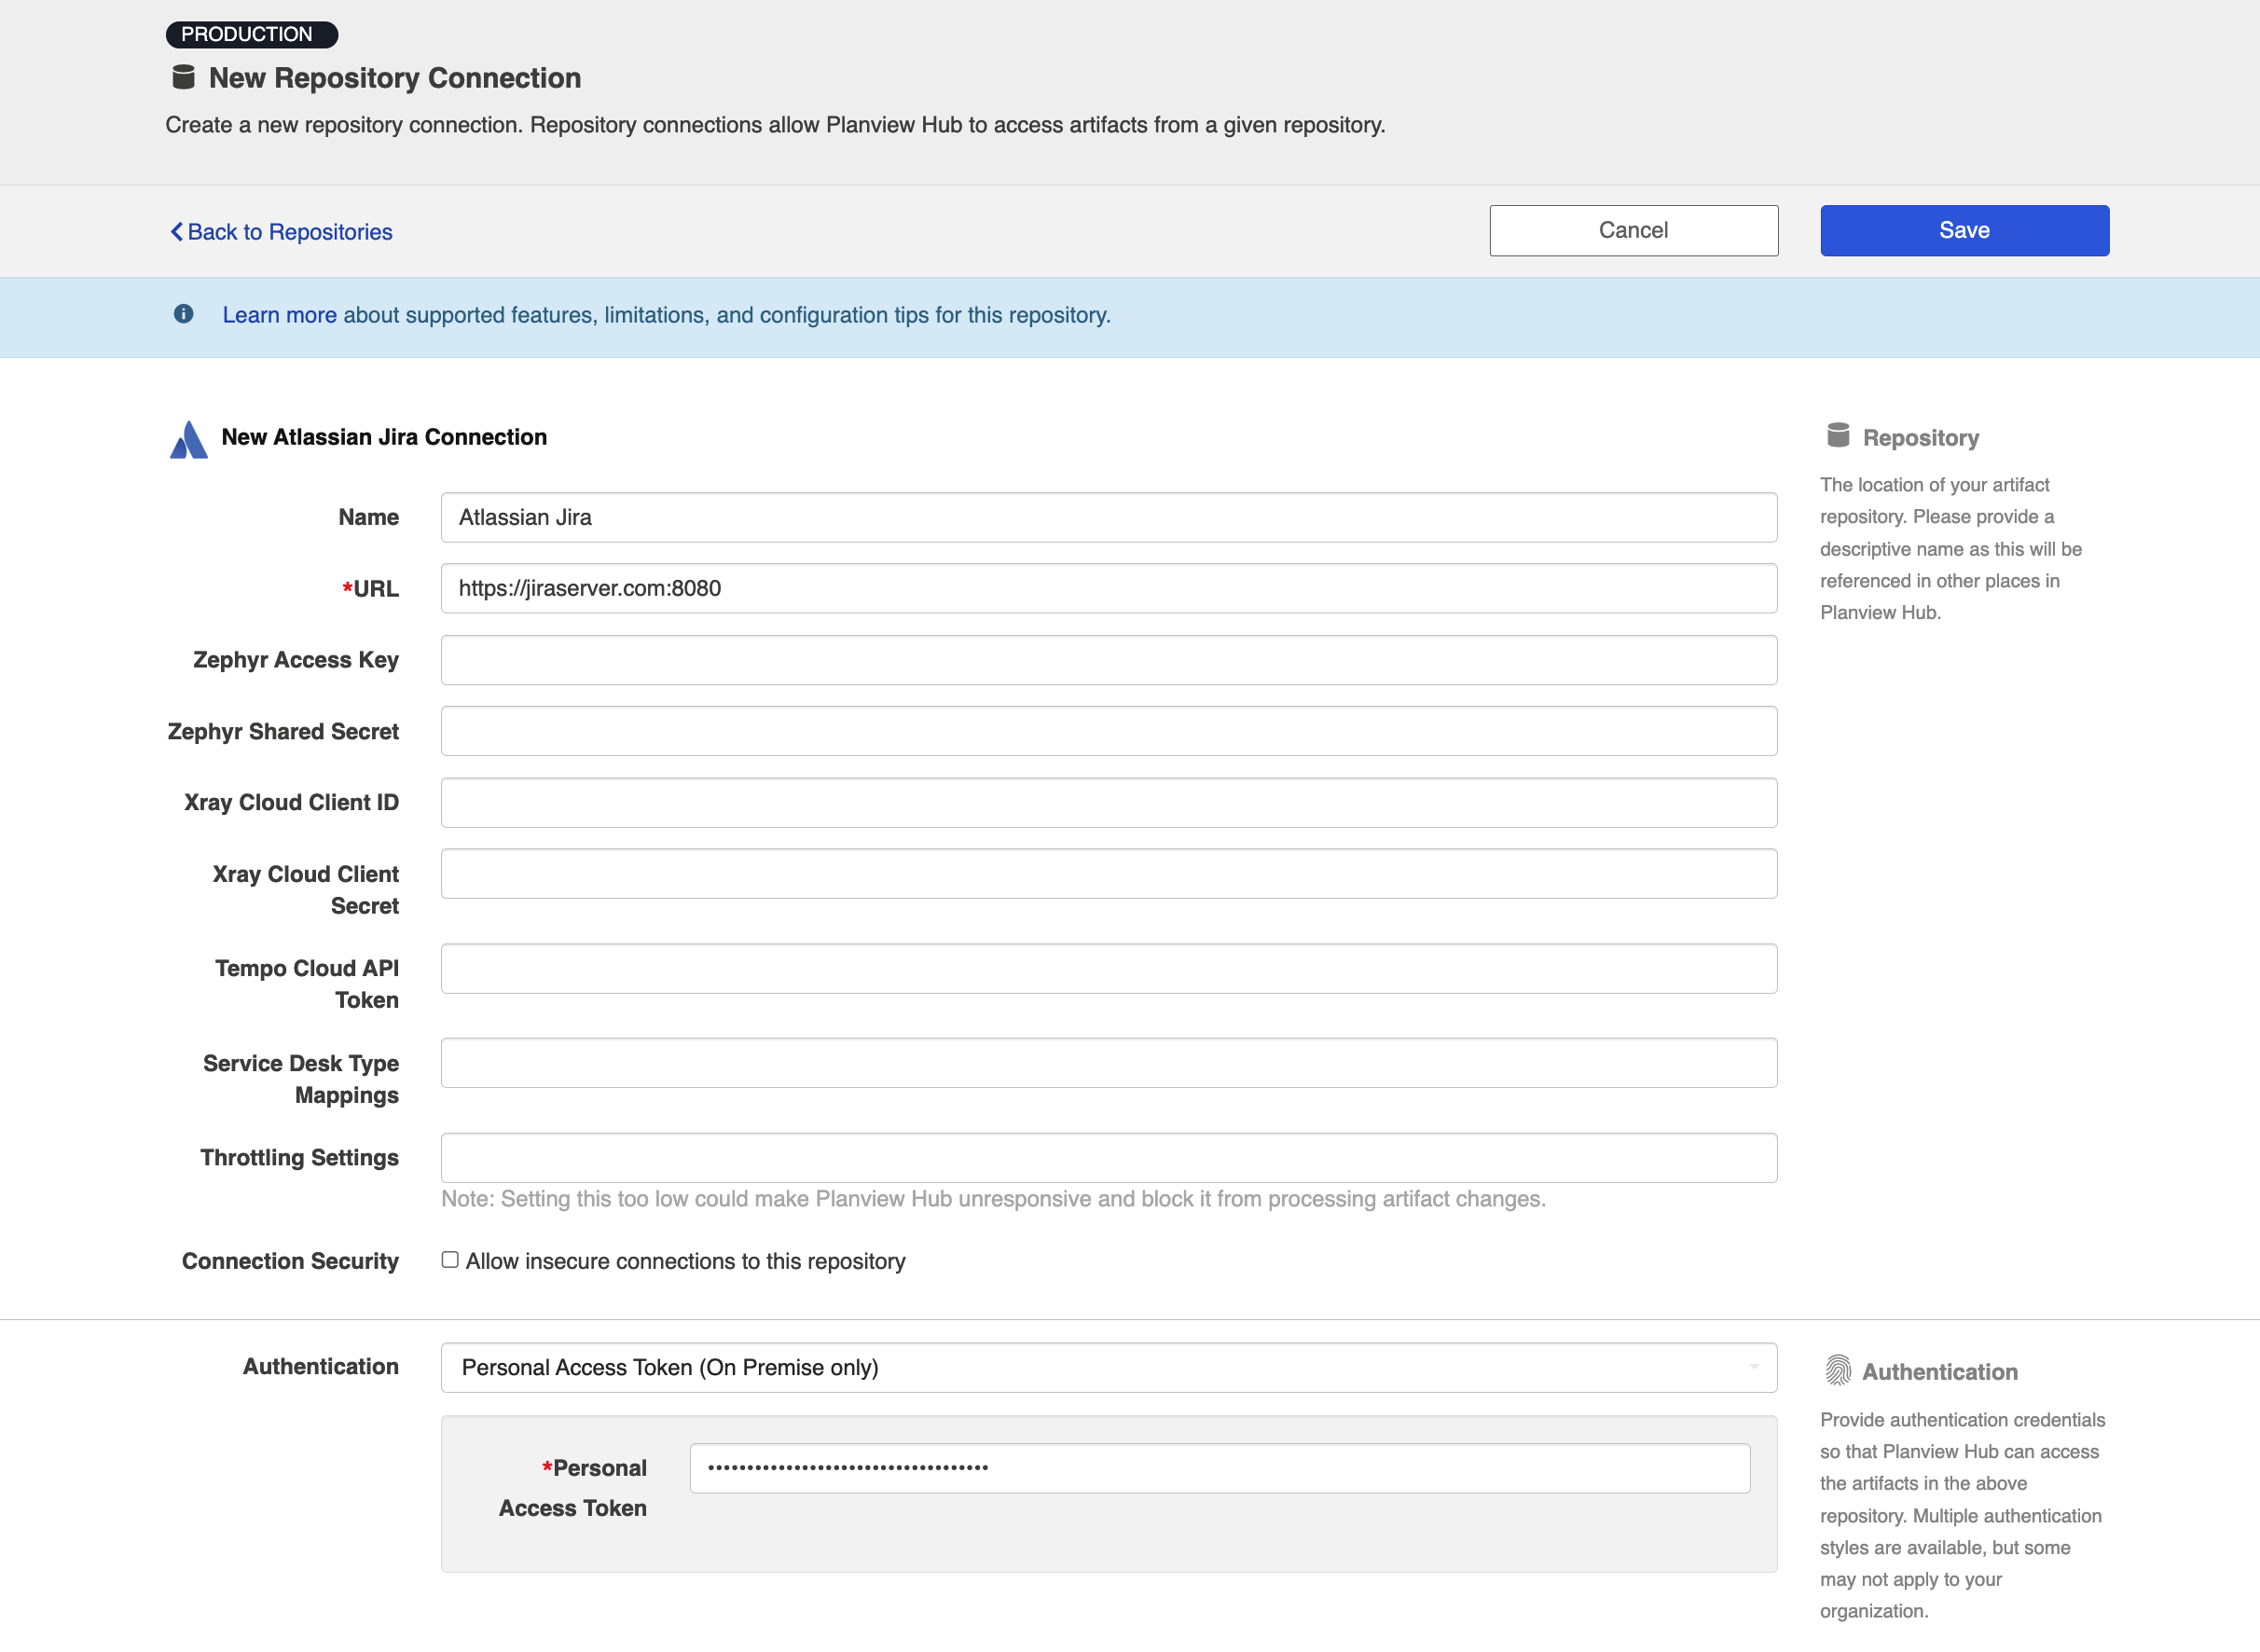
Personal Access Token (On Premise only)
Planview Hub: 22.3.5 and later
Jira Core: 8.14 and later
Jira Software: 8.14 and later
Required Fields:
-
Location/Connection URL
-
Example Format: http://jiraserver.com:8080
-
-
Jira Personal Access Token
-
You can learn how to create an API Token in Jira here.
-
The token can only be accessed once via the Atlassian website during this setup phase. If you lose the contents of the token, you must revoke the token and start from the beginning.
-
If the token is revoked on the Atlassian website, you must create a new token and update the Hub settings.
-
Optional Fields:
-
Zephyr Access Key (see details here)
-
Zephyr Shared Secret (see details here)
-
Xray Cloud Client ID (see details here)
-
Xray Cloud Client Secret (see details here)
-
Xray Cloud Location: This field is for Xray test management artifacts.
-
Note: The Xray Cloud Location should only contain the base URL. The default value for this field is https://xray.cloud.getxray.app
-
-
Tempo Cloud API Token (see details above)
-
Service Desk Type Mappings (see details above)
-
Attachment URL: This field is used to fetch attachments from an alternate URL.
-
Note: The Attachment URL should only contain the base URL.
-
-
Throttling Settings: This field indicates the number of API calls that can be made per minute. See details here.
-
Note: This field should only be set under the guidance of customer care as the ideal value is highly dependent on each customer's unique environment.
-
-
Connection Security: If checked, insecure connections to this repository will be allowed. See details here.
OpenID Connect Private Key Signed JWT Authentication
Note: Jira does not support this authentication method on its own. The following plug in can be used to support this authentication method.
Required Fields
-
URL for OpenID Connect credentials
-
The token endpoint. You can get this from the authentication servers well known configuration endpoint.
-
-
OpenID Connect client ID
-
The client ID registered with the authentication server.
-
The client must have the client credentials grant type enabled.
-
The client must have registered the public certificate given in the “RSA certificate and private key (.p12)” field
-
-
OpenID Connect scope
-
Public Certificate
-
A PEM encoded public certificate of the private key being used to sign JWTs included in the requests client_assertion parameter
-
-
RSA Private Key
-
A PEM encoded PKCS8 private key used to sign JWTs included in the requests client_assertion parameter.
-
Optional Fields
- Resource Parameter
-
The Open ID Connect resource parameter sent in the access token request.
-
Required for versions of Microsoft AD FS prior to 2019.
-
- Key ID
-
The “kid” header of the JWT sent in the access token request.
-
-
Zephyr Access Key (see details here)
-
Zephyr Shared Secret (see details here)
-
Xray Cloud Client ID (see details here)
-
Xray Cloud Client Secret (see details here)
-
Xray Cloud Location: This field is for Xray test management artifacts.
-
Note: The Xray Cloud Location should only contain the base URL. The default value for this field is https://xray.cloud.getxray.app
-
-
Tempo Cloud API Token (see details above)
-
Service Desk Type Mappings (see details above)
-
Attachment URL: This field is used to fetch attachments from an alternate URL.
-
Note: The Attachment URL should only contain the base URL.
-
-
Throttling Settings: This field indicates the number of API calls that can be made per minute. See details here.
-
Note: This field should only be set under the guidance of customer care as the ideal value is highly dependent on each customer's unique environment.
-
OAuth 2.0 Client Credentials Proxy Authentication (For Atlassian Jira Standard artifacts only)
Planview Hub: 24.4 and later
This authentication method enables secure, token-based access via a proxy, using client credentials. Refer here for full details.
Note: Jira does not currently support OAuth 2.0 Client Credentials authentication. As a result, the Jira connector does not allow to connect directly with the Jira repository using the OAuth 2.0 Client Credentials authentication method.
SSO Authentication
Additionally, Jira supports the following SSO implementations:
- Script (HTTP cookies)
- X.509 Certificate
Learn more about how to set up your repository in Planview Hub here.
Configuration Details for Jira Data Center
Load Balancing
When a web application such as Jira requires horizontal scalability, a load-balancing solution is often used to aggregate the network traffic from a pool of web application servers. The solution may be referred to by one of the following labels:
- Load-balancer
- Reverse-proxy
- Application delivery controller (ADC)
Services configured on these solutions usually consist of three common components:
- A listener or virtual server
- A pool or cluster of web servers or nodes
- A health check
The listener is the part of the solution that receives incoming browser requests. It may optionally be configured to perform SSL/TLS termination or offload. The pool component handles connections to the individual web application servers. The health check (if in use) will perform active tests of each of the individual application servers to determine whether or not they should be sent traffic. The health state of each web server combined with the load-balancing algorithm determine which web server receives an individual browser request.
Most load-balancing solutions offer a choice of different algorithms to use. Determining which algorithm to use may require some trial-and-error tuning and is not the subject of this documentation; what is most important when configuring a load-balancing solution for a stateful application like Jira is that all requests originating from a browser or test framework terminate at the same web server for the duration of the application session. The reason for this is that the web server (Jira in this case) creates a new session for each request that does not already belong to a valid session. Session management in the case of Jira is handled by Java's web application framework, and relies on the use of the JSESSIONID HTTP cookie to track all of a user's activities including authentication. The scope of each session is limited to the web server that created the session; Jira application servers do not see the sessions created by other Jira application servers.
To ensure that an application server is always sent the requests belonging to sessions that it creates, the load-balancer must support sticky sessions or session persistence. Apache, HAProxy and NGINX (the community/free version) can each be used to distribute traffic to a Jira Data Center, but they each perform session persistence in different ways:
- Apache::mod_proxy
- The jvmRoute parameter is passed to each Jira cluster member. This causes the JVM for each cluster member to append the value of jvmRoute to the JSESSIONID cookie (delimited with a ".").
- Each Jira cluster member is added to a group as a BalancerMember. The route parameter of each BalancerMember is set to the same value of jvmRoute that was passed to each corresponding Jira instance.
- mod_proxy checks the JSESSIONID cookie for each request for a route and sends each matching request to the corresponding BalancerMember.
- HAProxy
- Does not require jvmRoute to be set on each Jira instance.
- Adds a server identity prefix to a Set-Cookie response header, for a named cookie (the cookie does not need to be JSESSIONID).
- Checks the named Cookie header from the request for a server identity and sends matching requests to the corresponding JIRA instance.
- NGINX
- Does not support cookie-based persistence without a commercial subscription.
- ip_hash load-balancing ensures session persistence, but may result in uneven distribution of traffic.
Jira and JVM
According to the official documentation, the JVM / Tomcat environments for each cluster member will, in addition to having a jvmRoute (Apache only), require some configuration in order to work behind a reverse-proxy server. The following tasks will need to be performed:
- Set the Base URL for Jira to match the URL of the load-balancer (done via the user interface).
- Set the proxyName for the Connector in the server.xml file to match the Base URL (and load-balancer).
- Set the proxyPort for the Connector in the server.xml file to match the port number in the BaseURL.
In the following example server.xml file, we are interpolating the values for proxyName and proxyPost from the CATALINA_OPTS environment variable string eg. -Dconnector.proxyPort=8080 -Dconnector.proxyName=jira.localdomain. In this example, jira.localdomain should resolve to the external-facing side of the load balancer. If the load-balancer is a name-based virtual server, the ServerName parameter for the virtual server should match.
<?xml version="1.0" encoding="utf-8"?>
<!--
Licensed to the Apache Software Foundation (ASF) under one or more
contributor license agreements. See the NOTICE file distributed with
this work for additional information regarding copyright ownership.
The ASF licenses this file to You under the Apache License, Version 2.0
(the "License"); you may not use this file except in compliance with
the License. You may obtain a copy of the License at
http://www.apache.org/licenses/LICENSE-2.0
Unless required by applicable law or agreed to in writing, software
distributed under the License is distributed on an "AS IS" BASIS,
WITHOUT WARRANTIES OR CONDITIONS OF ANY KIND, either express or implied.
See the License for the specific language governing permissions and
limitations under the License.
-->
<Server port="8005" shutdown="SHUTDOWN">
<Listener className="org.apache.catalina.startup.VersionLoggerListener"/>
<Listener className="org.apache.catalina.core.AprLifecycleListener" SSLEngine="on"/>
<Listener className="org.apache.catalina.core.JreMemoryLeakPreventionListener"/>
<Listener className="org.apache.catalina.mbeans.GlobalResourcesLifecycleListener"/>
<Listener className="org.apache.catalina.core.ThreadLocalLeakPreventionListener"/>
<Service name="Catalina">
<!--
==============================================================================================================
HTTP - Proxying Jira via Apache or Nginx over HTTP
If you're proxying traffic to Jira over HTTP, uncomment the below connector and comment out the others.
Ensure the proxyName and proxyPort are updated with the appropriate information if necessary as per the docs.
See the following for more information:
Apache - https://confluence.atlassian.com/x/4xQLM
nginx - https://confluence.atlassian.com/x/DAFmGQ
==============================================================================================================
-->
<Connector port="8080" relaxedPathChars="[]|" relaxedQueryChars="[]|{}^\`"<>"
maxThreads="150" minSpareThreads="25" connectionTimeout="20000" enableLookups="false"
maxHttpHeaderSize="8192" protocol="HTTP/1.1" useBodyEncodingForURI="true" redirectPort="8080"
acceptCount="100" disableUploadTimeout="true" bindOnInit="false" scheme="http"
proxyName="${connector.proxyName}" proxyPort="${connector.proxyPort}"/>
<Engine name="Catalina" defaultHost="localhost">
<Host name="localhost" appBase="webapps" unpackWARs="true" autoDeploy="true">
<Context path="" docBase="${catalina.home}/atlassian-jira" reloadable="false" useHttpOnly="true">
<Resource name="UserTransaction" auth="Container" type="javax.transaction.UserTransaction"
factory="org.objectweb.jotm.UserTransactionFactory" jotm.timeout="60"/>
<Manager pathname=""/>
<JarScanner scanManifest="false"/>
<Valve className="org.apache.catalina.valves.StuckThreadDetectionValve" threshold="120" />
</Context>
</Host>
<Valve className="org.apache.catalina.valves.AccessLogValve"
pattern="%a %{jira.request.id}r %{jira.request.username}r %t "%m %U%q %H" %s %b %D "%{Referer}i" "%{User-Agent}i" "%{jira.request.assession.id}r""/>
</Engine>
</Service>
</Server>
Apache
Configuring cookie-based persistence with Apache requires the extra step of setting the jvmRoute on each of the Jira servers.
For example, at Hub, we use Jira Data Center installed on Docker Containers in our test environment. We pass the jvmRoute parameter to the JVM for each container using the CATALINA_OPTS environment variable eg. -DjvmRoute=jira-a. Alternatively, jvmRoute can be added to the Engine context of the conf/server.xml. Assuming there are two Jira instances named jira-aand jira-b, our Apache configuration should contain the following:
ServerName jira.locadomain
<Proxy "balancer://jira">
  BalancerMember "http://jira-a:8080" route=jira-a
  BalancerMember "http://jira-b:8080" route=jira-b
  ProxySet stickysession=JSESSIONID
</Proxy>
ProxyPreserveHost On
ProxyPass         "/" "balancer://jira/"
ProxyPassReverse  "/" "balancer://jira/"
HAProxy
Since HAProxy does not (is not able to) read server names from the tail-end of the HTTP cookie set by Jira's jvmRoute, jvmRoute does not need to be passed to the Jira servers. There are several different ways that HAProxy can be configured to perform session persistence eg. using different cookie names. The following example instructs HAProxy to add a prefix to the JSESSIONID cookie value eg. s1 or s2, depending on which server was initially selected by the load-balancing algorithm.
defaults
    mode http
    timeout connect 5000ms
    timeout client 50000ms
    timeout server 50000ms

frontend ft_web
  bind 0.0.0.0:80
  default_backend bk_web

backend bk_web
  balance roundrobin
  cookie JSESSIONID prefix nocache
  server s1 jira-datacentre-node-a:8080 check cookie s1
  server s2 jira-datacentre-node-b:8080 check cookie s2
NGINX
There is only one way to ensure session persistence with the free version of NGINX: Change the load-balancing algorithm from round-robin to ip-hash. The documentation states that the sticky directive is only available with a commercial license.
upstream jira-cluster-lb {
    ip_hash;
    server jira-a:8080;
    server jira-b:8080;
}

server {
    listen 80;

    location / {
       proxy_buffer_size 8k;
       proxy_set_header Host $http_host;
       proxy_set_header X-Forwarded-Host $http_host;
       proxy_set_header X-Forwarded-Server $http_host;
       proxy_set_header X-Forwarded-For $proxy_add_x_forwarded_for;
       proxy_pass http://jira-cluster-lb/;
       client_max_body_size 10M;
    }

}
Troubleshooting
User login attempt fails with no error
Lack of functional session persistence manifests as an inability to log in. The sequence diagram below illustrates a simplified version of what happens at the HTTP level.

Redirects and links are broken
If either the Site URL (in Jira) or the proxyName and proxyPort parameters are not set to match the DNS name of the Jira service, URLs inside the application may be incorrect, and the site may try to redirect you to individual JIRA instances instead of the load-balancer.
References
For additional details, please see the Official Atlassian guide for Jira Data Center load-balancing.
Other Configuration Settings
Note about Team-Managed Projects (formerly Next-Gen)
In Fall 2018, Jira added support for Team-Managed projects to Jira cloud. Please note that Hub only provides limited support for Team-Managed projects on Planview Hub.
Please see the section below for detailed limitations.
Enabling Fields to be Synchronized in Jira
Due to API restrictions in Jira, Hub requires that all fields to be synchronized are present on the default screen. If a field is not available on the default screen, Hub may be unable to interact with the field. Adding a field to the default screen is a simple operation and ensures that it is visible in the default view of the issue without going to the edit screen.
Note: Due to an API limitation in Jira, hidden fields are not supported in Planview Hub.
Updating Closed Jira Issues
By default, once an issue is closed in Jira, it cannot be modified by a Jira user or administrator, and therefore also cannot be modified by Hub. In this scenario, the Jira API will not return an error, leading Hub to believe that the update occurred as expected, even though the value(s) were not saved.
To ensure that Hub can write to closed Jira issues, we highly recommend allowing the Hub user to edit closed records. To do this, create a group in Jira (e.g., 'Edit Closed Issues') that contains all users (including the Hub user) that you would like to be able to edit closed issues:
In Jira Workflow management:
- Add the following to the properties of the Closed state:
- jira.permission.edit.group = Edit Closed Issues
- Remove the following from the properties of the Closed state:
- jira.issue.editable = false
- Publish workflow draft
All users that are in the "Edit Closed Issues" group should now be able to make modifications to closed issues. Additional details can be found on the Atlassian website.
Note: This functionality is not supported with the pre-3.5 version of the Jira connector.
Note: In Hub, comments are read-only for closed Jira issues. Comments cannot be added to closed Jira issues using Hub although they are editable through the Jira web interface.
Cascading Select Fields
A cascading select is composed of 2 select fields that share a relationship, in which the options of the 2nd select depend on the selected option of the 1st select. Since Hub is not aware of field dependencies, there are two important implications to be aware of when flowing artifacts to Jira:
- When an event changes the child select option, if the option is not within the same parent select option, the event will fail
- Example: Changing from option 1.2 to option 1.3 works, since they are both options from the same parent (option 1)
- Example: Changing from option 1.2 to option 2.2 fails, since option 2.2 belongs to a different parent than the current selected option.
- When an event changes the parent select option, if the child select option is selected and is not being changed to a valid option, the event will fail.
- Example: Changing parent select from option 1 to option 2 while the artifact has child select option 1.2 will fail, since option 1.2 is not a valid option for option 2
- Example: Changing parent from option 1 to option 2 and changing child select to option 1.2 to option 2.2 will succeed, since the options being changed are valid (option 2 has a child option 2.2)
Note: Reading of cascading-single-select fields requires that the Hub user have editable access to the artifact in Jira. This includes when the artifact is in a closed state (see notes on updating closed Jira issues).
Active or Future Sprint Fields
The Jira API provides some information about Assigned Sprints for the Active or Future Sprint field, however, for Past/Closed Sprints, the information provided is not valid. As a result, Planview Hub needs to be configured to use the Sprint field as a source of information for Past/Closed Sprints.
The Active or Future Sprint field will apply one of the following values depending on what Sprint the artifact is scheduled under:
- Backlog = null / empty
- Active = <active sprint name>
- Future = <future sprint name>
- Past or Closed Sprint = null / empty
Note: A Past or Closed Sprint value is not sent as part of the Active or Future Sprint field. Active or Future Sprint field values are only passed through the Jira connector for the Assigned Sprint field.
Past or Closed Sprint
For a Past or Closed Sprint value to remain populated in the target collection, Planview Hub needs to be set to ignore the field synchronization when the artifact is set to Done in Jira.
Status Category Fields
The Status Category field represents one of four values related to the configuration of the Status field. The values of the Status Category field match the colors assigned to each Jira status and can be used to quickly describe the status of a Jira artifact.
For example:
- To Do = Blue
- In Progress = Yellow
- Done = Green
- No Category = Gray
Note: The following statuses have the same meaning as the Done Status Category: Resolved, Closed, Failed and Canceled. For certain scenarios, it may be useful to map using this field rather than using each individual status.
Version Fields
Planview Hub: 24.4 and later
The Jira connector can automatically create new versions in Jira when an artifact is created or updated, provided the version doesn't already exist. The Planview Hub model field should be set to accept unmapped values.
Below are the field types which are supported for this operation:
-
Version Picker (single version)
-
Version Picker (multiple versions) : e.g., Fix Version/s, Affects Version/s
The authenticated user should have one of the below permissions:
- Administer Jira or Administer Projects for the project the version is added to.
Comments
Planview Hub: All
Tasktop Sync: 3.5 and later
The Comment Content Type setting should be set to Confluence unless comments are configured in Jira to use the “Default Text Renderer”. When the Jira “Default Text Renderer” is configured, the Comment Content Type setting should be set to text/plain.
Learn more about how to configure comment flow in Planview Hub here.
Private Comments
TIP
Planview Hub: 25.4 and later
To support private comments, comment visibility should be set in the repository settings. The values for comment visibility should be in the format role: XXX or group: YYY, where XXX is the role name and YYY is the group name. Private comments created will adhere to the visibility settings defined in the repository settings.
Attachments
TIP
Planview Hub: All
Tasktop Sync: 3.5 and later
The Jira connector determines attachment support in two ways:
- By using the attachment settings from the Jira repository
- Via the edit screen settings of an issue
For attachments to be supported,
- Attachments must be enabled via the 'Attachment Settings' under Jira Administrative Settings
- and the Attachment field must be visible in the Field Configurations screen for the given issue
To find field configurations:
- Go to Jira Administration -> Field Configurations
- Click "Configure" for the appropriate field configuration
- Ensure that the Attachment field is shown.
Learn more about how to configure attachment flow in Planview Hub here.
Time Tracking
The Jira connector supports the integration of Worklogs via a one-way out of Jira time integration.
Worklogs will be summed up per day per user and synchronized to the target repository as an aggregated time entry per user along with the artifact.
Learn more about how to configure a time tracking integration in Planview Hub here.
Person Reconciliation
For person reconciliation, the following fields are available:
|
Fields Used for Hub’s Default Person Reconciliation Algorithm |
Field Names for Person Reconciliation Extensions (Note that these are case sensitive) |
Label in Jira |
|---|---|---|
|
ID |
person-id |
Jira Cloud in Hub 19.1.2+, 4.17.2+, SRs released after 2/4/19:
Jira On Prem for all versions of Hub, Jira Cloud for earlier versions than those listed above:
|
|
Username |
person-username |
Jira Cloud in Hub 19.1.2+, 4.17.2+, SRs released after 2/4/19:
Jira on prem for all versions of Hub, Jira Cloud for earlier versions than those listed above:
|
|
(See Functional Limitations table below for details) |
person-email |
E-mail (i.e., name@tasktop.com) |
|
N/A |
person-display-name |
Display Name (i.e., 'Tasktop User') |
Learn more about how to configure person reconciliation in Planview Hub here.
Full Scan
Planview Hub: All
Tasktop Sync: 3.6 and later
Due to third party API limitations, changes to the following fields may not trigger change detection or cause a synchronization immediately. To ensure these updates synchronize, a high fidelity full scan must occur or another qualifying change must be made to the artifact:
- Duration fields
- Watchers field
- Web Links
- Search results for Jira issues do not report the correct updated timestamp if only the web links have been changed. The updated timestamp is reported correctly when fetching the artifact directly, but not in search results. This is a bug in Jira first reported in March 2013.
- String fields on Test Cycle (cloud only)
- Attachments on Test Execution
- Child Requirements field (R4J Plug-In)
- Parent Requirements field (R4J Plug-In)
Learn more about how to configure change detection and full scan intervals in Planview Hub here.
Supported Features
Special Features Supported
|
Feature |
Custom Type Supported? |
Applicable Hub Version |
Applicable Repository Versions |
Default Maximum Size in Repository |
|---|---|---|---|---|
|
|
N/A |
Tasktop Sync: 3.6 and later |
Any supported repository version: |
N/A |
|
|
N/A |
Planview Hub: All Tasktop Sync: 3.5 and later |
Any supported repository version: |
N/A |
|
|
N/A |
Planview Hub: All Tasktop Sync: 3.5 and later |
Any supported repository version: |
2GB Learn more about maximum attachment size here. |
|
|
Yes |
Planview Hub: All Tasktop Sync: 3.5 and later |
Any supported repository version: |
N/A |

 Impersonation
Supported Artifacts
Supported Work Items
|
Supported Work Item Type |
Applicable Hub Versions |
Applicable Repository Version |
Unique URL |
|---|---|---|---|
|
Story |
Planview Hub: All Tasktop Sync: 3.5 and later |
Any supported repository version: |
Yes |
|
Bug |
Planview Hub: All Tasktop Sync: 3.5 and later |
Any supported repository version: |
Yes |
|
Issue |
Planview Hub: All Tasktop Sync: 3.5 and later |
Any supported repository version: |
Yes |
|
Epic |
Planview Hub: All Tasktop Sync: 3.5 and later |
Any supported repository version: |
Yes |
|
Sub-task |
Planview Hub: All Tasktop Sync: 3.5 and later |
Any supported repository version: |
Yes |
|
Custom Issue |
Planview Hub: All Tasktop Sync: 3.5 and later |
Any supported repository version: |
Yes |
|
Custom Sub-task |
Planview Hub: All Tasktop Sync: 4.5 and later |
Any supported repository version: |
Yes |
| Sprint |
Planview Hub: 23.1 and later |
Jira Cloud | No |
| Component | Planview Hub: 24.4 and later |
Any supported repository version: |
No |
|
Jira Service Management Specific Artifact Types |
|
|
|
|
Change, Access, Purchase, IT Help, Fault, New Feature, Improvement |
Planview Hub: All Tasktop Sync: 3.5 and later |
Any supported repository version: |
Yes |
|
Incident, Problem, Service Request, Service Request with Problem |
Planview Hub: All Tasktop Sync: 3.5 and later |
Any supported repository version: |
Yes |
Learn about the difference between containers and work items in Planview Hub here.
Supported Containers
|
Containers that can synchronize between repositories |
Applicable Hub Versions |
Applicable Repository Versions |
Unique URL? |
|---|---|---|---|
| N/A | |||
|
Containers used to define the boundary of a collection (when clicking 'Manage Projects' on a collection) |
|||
|
Projects Note: Planview Hub provides limited support for Team-Managed Projects |
Planview Hub: All |
Any supported repository version: |
N/A |
|
Containers used for artifact routing |
|||
|
Projects Note: Planview Hub provides limited support for Team-Managed Projects |
Planview Hub: All |
Any supported repository version: |
N/A |
Learn more about containment in Planview Hub here.
Supported Field Types
Note: If one field of a given type is supported, others that are also that type in theory should also work. However, sometimes there are instances in which this is not the case due to the repository. So, while we can claim support for fields at the type level, there is a chance that some specific fields of a given type will not synchronize properly.
|
Standard Field Type |
Does Hub support custom fields of this type? |
How is field type referenced in the repository? |
Sample Repository Fields Supported |
Particular Repository Fields NOT Supported |
|---|---|---|---|---|
|
|
|
Text Field (multi-line) before 17.2.1 Text Field (single line) |
Summary Installed plugin created fields - Any installed plugin can generate new fields and those fields will be supported as read-only fields until particularly supported. |
|
|
|
|
Radio Buttons Select List (single choice) Version Picker (single version) Select list (cascading) *as two single selects For details on configuration, see above. |
Issue Type (read-only after creation) Priority Project (read-only after creation) Resolution Status Security Level Team (Jira Cloud only) |
|
|
|
|
Checkboxes Select List (multiple choices) Version Picker (multiple versions) Project Picker (multiple projects) |
Affects Version/s Fix Version/s Component/s Labels |
|
|
|
||||
|
|
|
Date Picker |
Due Date |
|
|
|
|
Date Time Picker |
Created Resolved Updated |
|
|
|
|
Original Estimate Remaining Estimate Time Spent |
||
|
|
|
Number field |
||
|
|
||||
|
|
|
User Picker (single user) |
Assignee Reporter |
|
|
|
Planview Hub 18.2 and later Tasktop Sync 4.14 and later |
User Picker (multiple users) Supported in: Planview Hub 18.2 and later Tasktop Sync 4.14 and later |
Watchers |
|
|
Learn how to configure relationships in Planview Hub here. |
Planview Hub 17.4 and later Tasktop Sync 4.12 and later |
Relates to Is Blocked by Clones Component/s (Supported in Planview Hub 24.4 and later) |
||
|
|
Planview Hub 17.2.1 or later Tasktop Sync 4.0 and later |
Text Field (multi-line) Supported in: Planview Hub 17.2.1 or later Tasktop Sync 4.0 and later |
Environment Description |
|
|
|
|
|||
|
|
|
URL field |
||
|
|
Hidden Job Switch Job Checkbox |
Functional Limitations
|
Category |
Limitation |
Applicable Hub Versions |
Applicable Repository Version |
|---|---|---|---|
| Third Party API Limitation |
Team Field The Jira Cloud API only retrieves the list of global teams and does not include plan-only teams. |
Planview Hub: All | Jira Cloud |
| Good to Know |
Impact of Jira Upgrade on Teams Upgrading a Jira instance can potentially affect mappings, extensions, or filters, if team fields are involved. This is due to the change in the Jira API response difference between the old and new versions. |
Planview Hub: All |
Any supported repository version: |
|
Third Party API Limitation |
OAuth 1.0a Authentication In certain cases, using OAuth 1.0a authentication may result in unexpected errors. For example, when synchronizing attachments that no longer exist, or interactions with plugins that are no longer available. We recommend using other methods of authentication to avoid these errors. |
Planview Hub: 18.2 and later Tasktop Sync: 4.14 and later |
8.9 and later |
|
Configuration Requirement |
Iteration Fields The Active or Future Sprint (deprecated) single select field and the Active or Future Sprint relationship field cannot both be set. |
Planview Hub: 23.1 and later |
Jira Cloud |
|
Good to Know |
Search for Sprints Only collection search is supported. There will be significant performance impacts if sprints are synchronized in projects with many boards. |
Planview Hub: 23.1 and later |
Jira Cloud |
|
Third Party API Limitation |
Sprint Boards Only boards that are scoped to a project are supported. Boards that are only associated with a user are not supported. |
Planview Hub: 23.1 and later |
Jira Cloud |
|
Third Party API Limitation |
Attachments Jira attachment filenames cannot contain the following characters: \ /"%:$?*; |
Planview Hub: All
|
Any supported repository version: |
|
Third Party API Limitation |
Custom Label Fields The API used to return labels on Jira Cloud will not return labels created for custom fields when retrieving the artifact schema. This means that some label values may not appear when mapping field values to the model in Hub. As a workaround, you should set the Hub model field to accept unmapped values. Note: All labels on individual artifacts will synchronize, as this limitation only impacts the artifact schema retrieved for the field value mapping. |
Planview Hub: 22.2 and later |
Jira Cloud |
|
Good to Know |
Label Manager for Jira Plug-In If an administrator edits the pre-defined labels in their repository, the listed options for the labels in Hub may be inaccurate until the cache is refreshed. Note: By default, Hub will automatically refresh the options within 24 hours. |
Planview Hub: 22.2 and later Tasktop Sync: 4.30 and later |
Any supported repository version: |
|
Third Party API Limitation |
R4J Plug-In If attempting to set a parent folder in the same project as a parent requirement, the existing parent requirement will be cleared. |
Planview Hub: 21.3 and later |
4.3.3 |
|
Third Party API Limitation |
R4J Plug-In There can be multiple parent folders for the same child issue. However, in some cases, this information is not correctly returned by R4J such that Hub is only able to retrieve one parent folder. |
Planview Hub: 21.1 and later |
4.3.3 |
|
Third Party API Limitation |
R4J Plug-In There can be multiple parent requirements for the same child requirements. However, in some cases, this information is not correctly returned by R4J such that Hub is only able to retrieve one parent requirement. |
Planview Hub: 21.1 and later |
4.3.3 |
|
Third Party API Limitation |
Project Specific Select Field Plug-In The "Simple" custom field type will not allow listing of options or provide any validation, but can be written to as a string field. |
Planview Hub: 21.1 and later |
Any supported repository version: |
|
Good to Know |
Project Specific Select Field Plug-In The plug-in allows for options to be disabled in the UI, but the API does not validate this setting. Because there is no API validation, even though the UI limits users to set only configured options, the API does allow text content to be set for the "Simple" custom field type. |
Planview Hub: 21.1 and later |
Any supported repository version: |
|
Third Party API Limitation |
Duration Fields Due to a Jira API limitation, duration fields are only supported in minutes. Any values entered in seconds will not be accepted. |
Tasktop Sync: 3.5 and later |
Any supported repository version: |
|
Configuration Requirement |
State Transitions When configuring a state transition, you should use the actual state name as shown in workflow.xml or when editing a step in Jira. Also, note that state names are case sensitive. |
Planview Hub: All Tasktop Sync: 3.5 and later |
Any supported repository version: |
|
Third Party API Limitation |
Team-Managed Projects Custom fields in team-managed projects are project specific and cannot be shared across projects. |
Planview Hub: 20.1 and later |
Any supported repository version: |
|
Third Party API Limitation |
Labels Field The Jira API is limited to a maximum of 20 label values when retrieving the artifact schema. This means that some label values may not appear when mapping field values to the model in Hub. As a workaround, users should set the Hub model field to accept unmapped values. Note that all labels on individual artifacts will synchronize, as this limitation only impacts the artifact schema retrieved for field value mapping. |
Planview Hub: 17.1 and later |
Any supported repository version: |
|
Third Party API Limitation |
Team-Managed Projects Custom user fields are treated as strings in team-managed projects. |
Planview Hub: 20.1 and later |
Any supported repository version: |
|
Third Party API Limitation |
Team-Managed Projects Epic links cannot be updated in team-managed projects. |
Planview Hub: 20.1 and later |
Any supported repository version: |
|
Third Party API Limitation |
Team-Managed Projects Fields that are not part of team-managed projects (i.e., fields from classic Jira projects) will appear in the schema as read-only, and will not work in your integration. |
Planview Hub: 20.1 and later |
Any supported repository version: |
|
Third Party API Limitation |
Configuring Private/Public Comments If a collection in your integration includes Jira Service Management projects, it should not include any non-Service Management projects, or you will be unable to configure private/public comments. |
Planview Hub: 20.1 and later |
Any supported repository version: |
|
Third Party API Limitation |
Service Desk Type Mappings It is possible to create more than one Service request type with the same name; however, if both are used in the Service Desk Type Mappings field, only one of the request types will be considered. |
Planview Hub: 20.1 and later |
Any supported repository version: |
|
Third Party Functional Limitation |
Person Reconciliation Due to changes made to profile visibility settings in Jira, Hub is unable to match persons by email address. Hub versions released on or after contain a fix that enables Hub to match persons flowing into Jira Cloud by email address, but not out of Jira Cloud. To resolve this, we recommend that customers ask their Jira users to update their profile visibility settings to allow anyone to see their email address. |
Planview Hub: 19.3 and later |
Any supported repository version: |
|
Configuration Requirement |
Artifact Filtering Any field used in Artifact Filtering needs to have a Search Template set in the Jira field configuration. If it does not, a Hub error will occur. |
Planview Hub: 18.3 and later |
Any supported repository version: |
|
Third Party API Limitation |
Comments Comment field in a transition can be ignored if a screen is not associated with the transition. The Jira API does not distinguish between a transition with no associated screen and a transition associated to a screen with no field (only comment). The only information the API returns is the list of fields available on a transition. If the comment field is only associated when there are other fields in the transition, a transition with only a required comment field can never be completed. |
Planview Hub: 17.2.1 and later Tasktop Sync: 17.2.1 and later Note: Earlier versions only provide a comment field if associated screen has at least one field. |
Any supported repository version: |
|
Third Party API Limitation |
Single- and Multi-select Fields The Jira server may timeout when requesting an issue that has a single- or multi-select field with many options. This can affect synchronization and creating a collection. If you have a custom field with many options and you see "Gateway Timeout" errors, consider removing that custom field from the Jira issue screens. |
Planview Hub: All Tasktop Sync: 3.0 and later |
Any supported repository version: |
|
Third Party API Limitation |
Rich Text Description and Comment fields in Jira are assumed to contain Confluence wiki markup regardless of the configured renderer. The Jira API does not provide access to the configured renderer of a field so the connector has no way to determine if a different media type should be used. The only two renderers shipped with Jira are plain text and Confluence wiki markup. |
Planview Hub: All Tasktop Sync: 3.0 and later |
Any supported repository version: |
|
Third Party API Limitation |
Comments Jira supports submitting a comment with transitions via the API as long as the transition has an associated screen The only way to know that a screen is associated with a transition via the API is if the associated screen has at least one field on it (the field shows up in the transition fields section). Thus the connector cannot support submitting comments for transitions that have an associated screen having no fields. |
Planview Hub: All Tasktop Sync: 4.2 and later Note: Earlier versions do not support submitting a comment with a transition. |
Any supported repository version: |
|
Third Party API Limitation |
Relationships The Jira API does not expose relationships between Epics and Issues (Parent to child). Therefore ARM support does not support mapping relationships on the Epic level (to lower level issues), with the exception of Epic to Sub-task relationships. |
Planview Hub: All Tasktop Sync: 4.5 and later |
Any supported repository version: |
|
Third Party API Limitation |
State Transitions Workflow transitions have a read-only Issue Type field, even if the transition is associated with a screen containing an editable Issue Type. This means that transitions from one type to the next are not supported. |
Planview Hub: All Tasktop Sync: 3.0 and later |
Any supported repository version: |
| Good to Know |
Migrating to Jira Cloud When migrating form Jira on-prem to Jira Cloud, the migration process will change the internal IDs of all Jira issues. Artifact Association Management (AAM) professional services will be required to maintain your artifact pairs in Hub. Please reach out to Planview Support before proceeding with a Jira Cloud migration. |
Planview Hub: All | Jira Cloud |
| Good to Know |
TLS v.1.3 TLS v.1.3 is not supported. |
Planview Hub: All Tasktop Sync: All |
Any supported repository version: |
| Feature Unsupported | Private comments are not supported for pure issue types, which are created in Jira Service Management projects.
|
Planview Hub: 25.4 and later |
Any supported repository version |
| Third Party API Limitation |
Creating Artifacts in Jira When creating artifacts in Jira projects, an initial artifact of the same type must already exist in all Jira Projects configured in Hub Collections. For Hub to determine the schema for an artifact (the list of fields & field-types), Hub needs to read an existing artifact. If no artifact exists, it is not possible to obtain this critical information. |
Planview Hub: All |
Any supported repository version: |