
Extensions
Introduction
Extensions can be accessed by clicking the Extensions tab on the Settings screen.

- Extensions
- Key-Value Stores
Extensions
Extensions add to Planview Hub's basic functionality by facilitating processes such as custom data transformations, payload transformations, advanced person reconciliation, and state transitions.
Note: Extensions in Hub are written in JavaScript, or more specifically ECMAScript 2022.
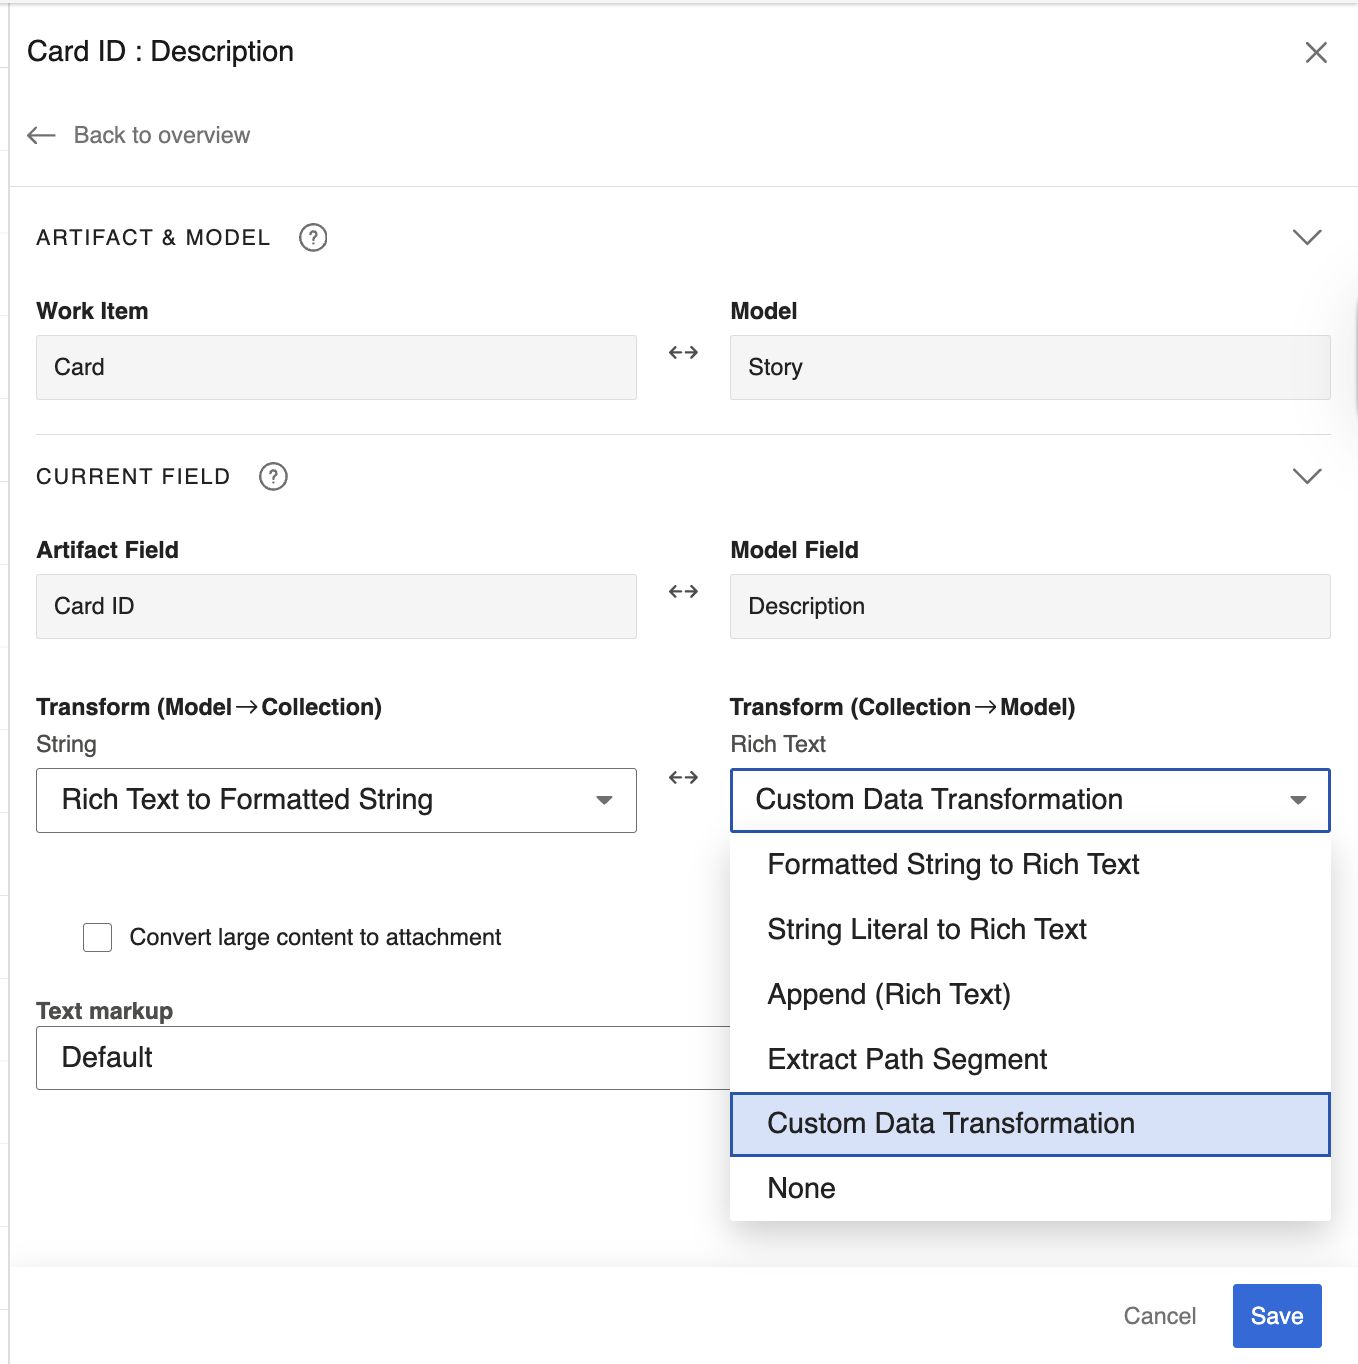
Custom Data Transformation
Custom Data Transformation Extensions enable you to map fields to one another which do not have out-of-the-box transforms, and to create custom transforms for comments.
You can apply this extension when updating your transform on the Field Mapping screen.
Payload Transformation Extensions enable you to take the payload sent in by your Gateway Collection and transform it into a format that Hub can accept.
Once you have saved your extension, you can select it on the Gateway Collection screen.

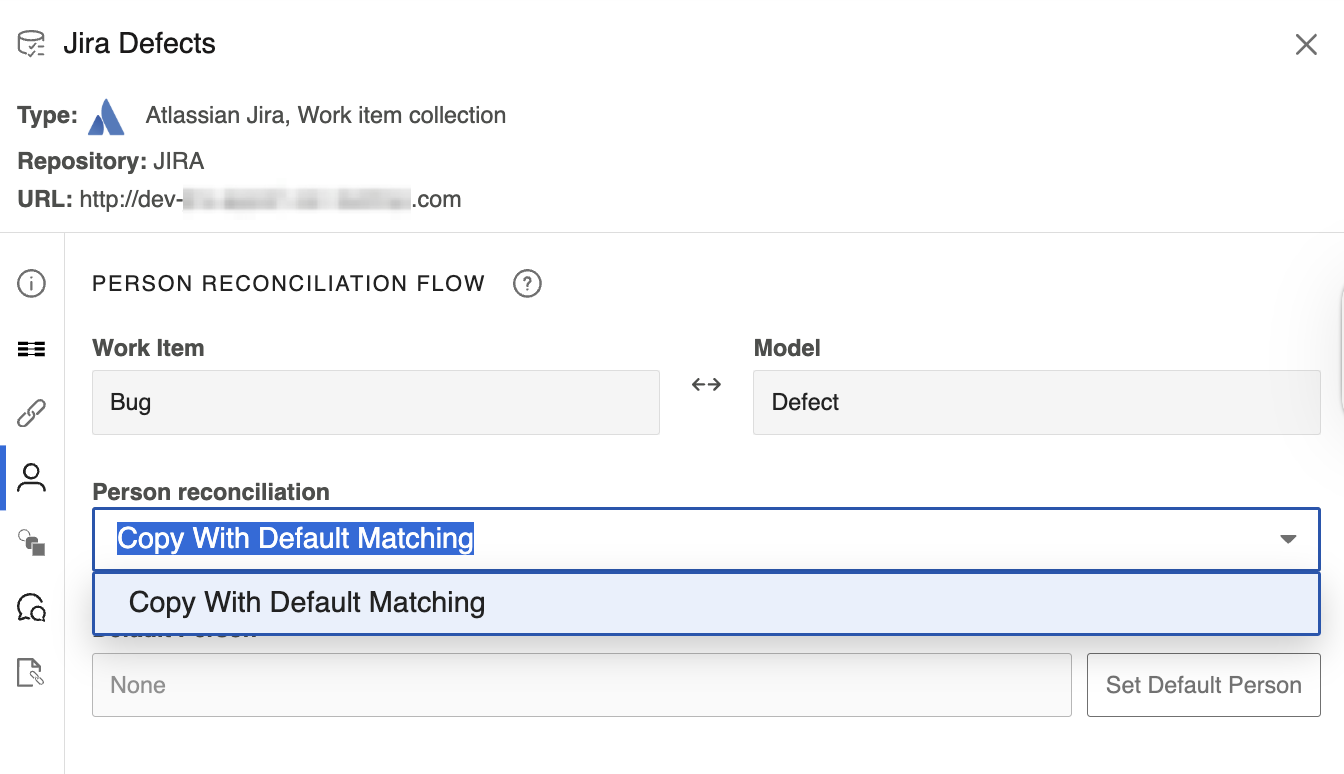
Person Reconciliation
Hub comes with a default person reconciliation strategy (Copy with Default Matching), which matches based on name, ID, and/or email. This strategy should cover most use cases. If needed, you can also configure a custom Person Reconciliation Extension to match person fields from one repository to another.
You can select the extension from the Person Reconciliation icon on your collection screen.
State Transition Extensions enable you to transition artifacts from one state to another according to a set workflow.
The extension can be applied by selecting Create state transition the State Transition screen.

Extensions
Extensions add to Planview Hub's basic functionality by facilitating processes such as custom data transformations, payload transformations, advanced person reconciliation, and state transitions.
Note: Extensions in Hub are written in JavaScript, or more specifically ECMAScript 2022.
Custom Data Transformation
Custom Data Transformation Extensions enable you to map fields to one another which do not have out-of-the-box transforms, and to create custom transforms for comments.
You can apply this extension when updating your transform on the Field Mapping screen.

Payload Transformation Extensions enable you to take the payload sent in by your Gateway Collection and transform it into a format that Hub can accept.
Once you have saved your extension, you can select it on the Gateway Collection screen.

Person Reconciliation
Hub comes with a default person reconciliation strategy (Copy with Default Matching), which matches based on name, ID, and/or email. This strategy should cover most use cases. If needed, you can also configure a custom Person Reconciliation Extension to match person fields from one repository to another.
You can select the extension from the Person Reconciliation sash on the Collection Configuration screen.

State Transition Extensions enable you to transition artifacts from one state to another according to a set workflow.
The extension can be applied from the State Transition sash on the Collection Configuration screen.

Extensions
Extensions add to Planview Hub's basic functionality by facilitating processes such as custom data transformations, payload transformations, advanced person reconciliation, and state transitions.
Note: Extensions in Hub are written in JavaScript, or more specifically ECMAScript 2022.
Custom Data Transformation
Custom Data Transformation Extensions enable you to map fields to one another which do not have out-of-the-box transforms, and to create custom transforms for comments.
You can apply this extension when updating your transform on the Field Mapping screen.
Payload Transformation Extensions enable you to take the payload sent in by your Gateway Collection and transform it into a format that Hub can accept.
Once you have saved your extension, you can select it on the Gateway Collection screen.
Person Reconciliation
Hub comes with a default person reconciliation strategy (Copy with Default Matching), which matches based on name, ID, and/or email. This strategy should cover most use cases. If needed, you can also configure a custom Person Reconciliation Extension to match person fields from one repository to another.
You can select the extension from the Person Reconciliation sash on the Collection Configuration screen.
State Transition Extensions enable you to transition artifacts from one state to another according to a set workflow.
The extension can be applied from the State Transition sash on the Collection Configuration screen.
Extensions
Extensions add to Planview Hub's basic functionality by facilitating processes such as custom data transformations, payload transformations, advanced person reconciliation, and state transitions.
Note: Extensions in Hub are written in JavaScript, or more specifically ECMAScript 2022.
Custom Data Transformation
Custom Data Transformation Extensions enable you to map fields to one another which do not have out-of-the-box transforms, and to create custom transforms for comments.
You can apply this extension when updating your transform on the Field Mapping screen.
Payload Transformation Extensions enable you to take the payload sent in by your Gateway Collection and transform it into a format that Hub can accept.
Once you have saved your extension, you can select it on the Gateway Collection screen.
Person Reconciliation
Hub comes with a default person reconciliation strategy (Copy with Default Matching), which matches based on name, ID, and/or email. This strategy should cover most use cases. If needed, you can also configure a custom Person Reconciliation Extension to match person fields from one repository to another.
You can select the extension from the Person Reconciliation icon on your collection screen.
State Transition Extensions enable you to transition artifacts from one state to another according to a set workflow.
The extension can be applied by selecting Create state transition the State Transition screen.
Creating a New Extension
You can create and save custom extensions for use in your integrations on the Extensions screen. Extensions are created with a name and optional description so that they can be centrally managed and reused if needed.
Note: Fields that are not mapped to the model are not retrieved by Hub, and therefore are not available to be used in an extension. If fields are needed for scripting purposes, please map those fields to the model.
To create and edit your extensions, click Manage Extensions.

You can copy an existing extension by clicking Copy from the Extensions list.

Click New Extension to create and customize an extension.

Then, select one of the following extension types: Custom Data Transformation, Payload Transformation, Person Reconciliation, State Transition.

After choosing your extension type and selecting the collection or model, you can view the schemas of the artifact, comment, or person in the Artifact Schema Information section.
This section provides you with useful schema information when composing extensions.

Viewing Associated Configuration Elements
To view associated configuration elements (such as collections or integrations that utilize the extension you are viewing), click the Associated Elements tag in the upper right corner of the screen.

Key-Value Stores
See the Planview Hub Editions table to determine if your edition contains Key-Value Store functionality.
Key-Value Stores enable you to securely store and manage sensitive data and value mappings. Using key-value stores instead of inlining the data in the extensions reduces the size, complexity, and maintenance of extensions.
Creating a New Key-Value Store
Note: Access via the provided JavaScript API is read-only. Stores can only be created, updated, and deleted using the user-interface and import functionality.
To create a new key-value store, navigate to the Extensions tab and click Manage Key-Value Stores.

Click + New Key-Value Store.

Select the Key-Value store type that best suits your use-case.
- Confidential: Enables you to encrypt your key-value pairs.
- Plain: Enables you to store your key-value pairs in plain text.

After you have selected the Key-Value store type, you can add each key-value pair individually, or you can import key-value pairs using a .csv or .json file.
Note: Keys in a key-value store are case-sensitive and must match exactly.

Once you have finished adding your key-value pairs, click Save and Done to save your changes.
Tip: Clicking ctrl+s on Windows and cmd+s on macOS will save your key-value store.

Importing Files to a Key-Value Store
Planview Hub allows you to import key-value pairs to your key-value store using .csv or .json files.
To import your key-value pairs, click Import from file and select the .json or .csv file you'd like to import.

To ensure that your .json or .csv files are imported successfully, please use the following format:
{
"jsmith@email.com":"John Smith",
"ljones@email.com":"Larry Jones",
"mbrown@email.com":"Mary Brown"
}
Note: If your .json file contains a duplicate key, an error will appear upon importing.
.csv
"jsmith@email.com", "John Smith"
"ljones@email.com", "Larry Jones"
"mbrown@email.com", "Mary Brown"
Note: If your .csv file contains a duplicate key, an error will appear upon importing.
After you have selected the file you'd like to import and it has been imported successfully, the key-value pairs will be displayed in your key-value store.

Accessing Individual Values of a Key-Value Store
Planview Hub provides a JavaScript API to access the values of a store. All types of key-value stores allow direct access to values.
The API is used as follows:
var tokenValue = store.retrieveValue('EngOps Credentials', 'Build Server API token');
Accessing All Pairs of a Key-Value Store
The provided JavaScript API allows the retrieval of all pairs of a store. This is especially useful when using the stored pairs as a lookup table.
The API is used as follows:
var pairs = store.retrievePairs('Project to Product mapping');
Each store is limited to 3000 key-value pairs. For lookup and other purposes, the pairs of multiple stores can be joined in the extension as follows:
var pairs = store.retrievePairs('Project to Product mapping');
var morePairs = store.retrievePairs('Value-Stream mapping');

var merged = Object.assign(pairs, morePairs);
Note: Confidential key-value stores do not allow access to all pairs and can only be accessed by providing the key for individual values.
Key-Value Store API Reference
store- The globally-visible object providing the key-value store API.store.retrievePairs(store)- Provides an object with all the keys as properties and their values as strings. If the store cannot be found, a 'NotFoundException' is thrown.store.retrieveValue(store, key)- Provides the string value associated to the specified key. If the store or key cannot be found, a 'NotFoundException' is thrown.
Technical Guide to Extensions
Extensions add to Hub's built-in functionality to satisfy specific use cases, such as:
- Performing state transitions incorporating business logic
- Enabling custom data transformations between fields
- Defining person reconciliation strategies between repositories
- Transforming payloads sent to Gateway collections into a format Hub can accept
In the following sections, you will find technical implementation details about each extensions type, example extensions, troubleshooting extensions, and how to access web resources and object properties.
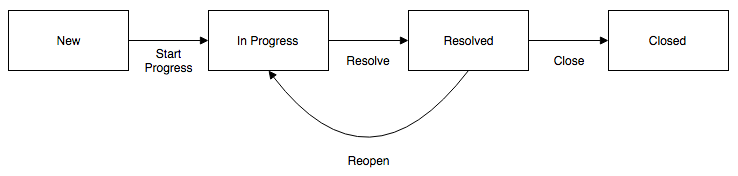
State Transitions
State Transitions are used to transition an artifact from one status to another. To illustrate, we use the fictitious example of an artifact of type Defect with the following status values:
- New
- In Progress
- Resolved
- Closed
The status of a Defect cannot be modified directly. In this example, to move a defect from status New to In Progress, the Start Progress transition is used.
Sometimes multiple status transitions are required. For example, to move a defect from New to Closed, the following transitions are used in sequence Start Progress, Resolve, Close.
The following diagram shows how state transitions are used to move a defect from one status to another:
Configuring State Transitions with Extensions
To perform state transitions, an extension can be used. Add a state transition extension from the Extensions screen, accessible from Settings. Once added, the extension can be applied from the State Transition sash on the Collection Configuration screen.
Note: Hub also provides functionality to configure state transitions using a transition graph. The transition graph is the recommended strategy, as it allows you to configure the state transitions directly within Hub's UI.
Authoring State Transition Extensions
State transition extensions are defined by a single function:
function transitionArtifact(context,transitions)
This function can return a single transition.
For a given artifact, the extension may be called multiple times. Each time the extension is called, the transition that it returns is performed. State transition extensions are called repeatedly until they return undefined, indicating that no more transitions are needed.
To prevent errors, extensions are not called again if they cause an artifact to transition to the same status more than once.
A simple state transition extension could look something like this:
function transitionArtifact(context,transitions) {

    if (context.sourceArtifact.status === 'Resolved' && context.targetRepositoryArtifact.status !== 'Resolved') {
        var transition = findTransitionWithLabel(transitions,'Resolve');
        transition.attributes.resolution = 'Fixed';

        return transition;

    }

}

function findTransitionWithLabel(transitions, label) {

    for each(var transition in transitions) {

        if (transition.label === label) {

            return transition;

        }

    }

}
Two parameters are passed to the transitionArtifact function:
context -A context object that provides state that the extension can use to determine which transitions are neededcontext.sourceArtifact -A JavaScript object representation of the source artifact, whose structure matches the model configured in the integrationcontext.targetRepositoryArtifact -A JavaScript object representation of the target artifact, whose structure matches the structure of the artifact in the repository
transitions -An array of transition objects
Below is an example of a context with a target artifact from Jira:
{
    "sourceArtifact": {
        "summary": "a summary value",
        "priority": "Critical",
        "status": "Done"
    },
    "targetRepositoryArtifact": {
        "issuetype": "Bug",
        "components": null,
        "timespent": null,
        "formattedid": "TPC-144",
        "timeoriginalestimate": null,
        "project": "Test Project C",
        "description": null,
        "fixVersions": null,
        "resolution": null,
        "customfield_11500": null,
        "api-id": "JIRA",
        "attachment": null,
        "resolutiondate": null,
        "id": 14400,
        "summary": "a summary value",
        "watches": null,
        "created": "2016-09-23T15:22:20.000+0000",
        "$closed": false,
        "reporter": "****",
        "priority": "Critical",
        "labels": null,
        "revision": null,
        "customfield_11601": null,
        "customfield_11600": null,
        "customfield_11501": null,
        "environment": null,
        "customfield_11504": null,
        "customfield_11602": null,
        "timeestimate": null,
        "versions": null,
        "duedate": null,
        "web-links": null,
        "location": "http://jira.example.com/browse/TPC-144",
        "assignee": null,
        "worklog": null,
        "updated": "2016-09-23T15:22:20.000+0000",
        "status": "To Do"
    }
}
Each transition object in the array appears as follows:
 {
  id: 'an-id',
  label: 'A Label'
  attributes: {
    first-attribute: null,
    ...
  }
}
For example, transitions corresponding to the Jira artifact example above are as follows:
[{
    "attributes": {
        "project": "Test Project C",
        "issuetype": "Bug"
    },
    "id": "11",
    "label": "To Do"
}, {
    "attributes": {
        "project": "Test Project C",
        "issuetype": "Bug"
    },
    "id": "21",
    "label": "In Progress"
}, {
    "attributes": {
        "project": "Test Project C",
        "issuetype": "Bug"
    },
    "id": "31",
    "label": "Done"
}]
Attributes of a transition are values that may be set when performing the transition. Attributes should not be set unless needed or required.
The available attributes and whether or not they are required will vary depending on the type of repository of the collection.
Payload Transformations
Gateway collections can accept a JSON payload via HTTP, enabling clients to use a REST API to publish artifacts in Hub.
Without further configuration, Gateway Collections require a JSON payload that matches the model of the collection.
By configuring a Gateway Collection with an extension, it is possible to accept arbitrarily complex JSON payloads, enabling integration with third party products that integrate with webhooks.
Examples of such third party webhook notifiers include:
- Jenkins Notification Plugin
- Microsoft VisualStudio Web Hooks
- GitHub Webhooks
Configuring Gateway Collections with Extensions
To configure a Gateway Collection with an Extension, add a payload transformation extension from the Extensions screen, accessible from Settings. Once added, the extension can be referenced from the Gateway Collection screen.
Authoring Payload Transformation Extensions
Payload transformation extensions are defined by a single function:
function transformPayload(payload)
The function must return an array of 0 or more JSON objects matching the model of the gateway collection.
Given a model representing build jobs with the following fields:
created -A date signifying the creation datesummary -A brief one-line descriptionstatus -A single-select indicating the build status
A simple payload transformation extension could look something like this:
function transformPayload(payload) {
  var createdTimestamp = new Date(payload.build.completion_time).toISOString();
  var created = createdTimestamp.substring(0,createdTimestamp.indexOf('T'));
  return [
    {
      'created': created,
      'summary': payload.name + ': '+payload.build.full_url,
      'status': payload.status
    }
  ];
}
The example above corresponds to the payload provided by the Jenkins Notification plugin, which provides JSON payloads as follows:
{
	"name": "Robot Lawnmower",
	"url": "job/Robot%20Lawnmower/",
	"build":
	{
		"full_url": "http://build.example.com:8081/job/Robot%20Lawnmower/4/",
		"number": 4.0,
		"phase": "COMPLETED",
		"status": "FAILURE",
		"url": "job/Robot%20Lawnmower/4/",
		"scm":
		{

		},
		"causes":
		[
			"Started by user admin"
		],
		"duration_string": "9 ms",
		"completion_time": 1.476313762942E12,
		"failing_since_build":
		{
			"full_url": "http://build.example.com:8081/job/Robot%20Lawnmower/1/",
			"number": 1.0,
			"change_set":
			[

			],
			"completion_time": 1.47631304791E12,
			"failing_since_time": "11 min"
		}
	}
}
Ignoring Webhook Payloads
For cases where the gateway collection is called and no corresponding action should be performed, the extension should return a 0-length array:
function transformPayload(payload) {
  ...

  if (nothingToDo) {
     return [];
  }
  ...
}
Creating Multiple Artifacts From A Single Webhook Payload
There may be cases when multiple artifacts should be created from a single webhook payload depending on the use case. For example, a GitHub PushEvent can contain multiple commits. To link each commit to an artifact separately, a payload transformation extension would be used as follows:
function transformPayload(payload) {
  var gatewayPayloads = [];
  for each (var commit in payload.commits) {
     gatewayPayloads.push(createCommitPayload(commit));
  }
  return gatewayPayloads;
}
Query Parameters and HTTP headers (optional)
Payload transformations can take two additional parameters — query parameters and HTTP headers:
-
Query Parameters: Provides the query parameters sent with the payload as a JavaScript object with property names corresponding to parameter names and values as arrays of values of the corresponding query parameter
-
HTTP Headers: Provides the HTTP request headers sent with the payload as a JavaScript object with property names corresponding to HTTP header names and values as arrays of values of the corresponding HTTP header
This might appear as follows:
function transformPayload(payload, parameters, headers)
Custom Data Transformations
In cases where specialized value transformations are needed for use in field mappings, such transformations can be added as custom data transformation extensions.
Note: When using a custom data transformation, we recommend not mapping an extension that loses information from collection to model. Because the model is used for change detection, if information is lost, change detection may fail. For example, an extension that transforms a list of links into a single link should not be mapped from collection to model, as subsequent change detection would only have a single link to compare rather than the full list. We recommend keeping as much information as possible in the model and mapping any lossy transformations from model to collection.
The Context Object
The context object provides information that the extension can use to determine which transformations are needed.
For a custom data transformation, use the following:
-
context.sourceArtifact:A JavaScript object representation of the source artifact-
If you are mapping from model to repository, this will match the structure of the artifact in the model
-
If you are mapping from repository to model, this will match the structure of the artifact in the repository
-
-
context.targetArtifact:A JavaScript object representation of the target artifact-
If you are mapping from model to repository, this will match the structure of the artifact in the repository
-
If you are mapping from repository to model, this will match the structure of the artifact in the model
-
Note: If existing scripts are utilizing targetRepositoryArtifact instead of targetArtifact, they will continue to work.
If you are creating a custom data transformation extension for test steps, use:
context.sourceTestStepto access the source test step-
If you are mapping from model to repository, this will match the structure of the artifact in the model
-
If you are mapping from repository to model, this will match the structure of the artifact in the repository
-
context.targetTestStepto access the target test step-
If you are mapping from model to repository, this will match the structure of the artifact in the repository
-
If you are mapping from repository to model, this will match the structure of the artifact in the model
-
See Planview Hub Editions to determine if your edition contains Test Step functionality
The context parameter also has field properties:
context.sourceField: If processing a single fieldcontext.sourceFields: A list of field objects, if processing more than one fieldcontext.targetField: If processing a single fieldcontext.targetFields: A list of field objects, if processing more than one field
A field object only has two properties: ID, and label:
{
    id: "assignee",
    label: "Assignee"
}
Creating a Custom Data Transformation Extension
Custom data transformation extensions are created from the Extensions screen, accessible from Settings. Created extensions can be selected when configuring a field mapping of a collection.
Custom data transformation extensions appear as follows:
var inputTypes = 'String';
var outputTypes = 'String';

function transform(context, input) {
	// returns the transformation result
}
All custom data transformation extensions must declare their input and output types as shown in the example above. Transformations are only available for a field mapping if the input types and output types match the fields selected in the mapping. In the case of a mapping with multiple source and target fields, the order of the declared input and output types must match the order of the source and target fields.
A simple split-and-trim value custom data transformation extension could look like this:
var inputTypes = 'String';
var outputTypes = ['String', 'String'];

function transform(context, input) {
    if (input) {
        var values = input.split('/');
        if (values.length != 2) {
            throw 'Unexpected value ' + input;
        }
        return values.map(function(s) {
            return s.trim();
        });
    }
}
Single Select and Multi Select in Custom Data Transformation Extensions
Single Select and Multi Select values are specified using their labels. Extensions that accept a Single Select as the input type will receive a string containing the option’s label. Extensions that specify a Single Select as the output type should return a string containing the option’s label.
To specify the empty option, return undefined from the extensions instead of a value. Extensions that accept a Multi Select as the input type will receive an array of strings of the option labels. Extensions that specify a Multi Select as the output type should return an array of strings with the option labels or an empty array to specify no options.
If the field has options, field options are available on the field of the context passed into an extension. For example, the options can be accessed with something like this:
context.sourceField.options
context.targetField.options
Rich Text Support in Custom Data Transformation Extensions
To perform Rich Text transformations, Rich Text must be declared as input or output types of the extension.
A Rich Text input parameter is passed as a valid HTML string.
For Rich Text as output type, the extension is expected to return a valid HTML string.
To escape HTML characters, the following function is provided:
html.escape(string)
A simple String-to-Rich-Text value transformation could look like this:
var inputTypes = 'String';
var outputTypes = 'Rich Text';

function transform(context, input) {
    if (input) {
        return '<pre>' + html.escape(input) + '</pre>';
    }
}
Web Links in Custom Data Transformation Extensions
To perform a web links transformation, web links must be declared as the input or output types of the extension. A web links field consists of a list of web link objects. A web link object consists of a location and other attributes.
The following is an example of a web link output:
[
   {
      label: 'Tasktop',
      location: 'http://www.tasktop.com'
   },
   {
      location: 'http://www.alt-tasktop.com'
   }
]
Note: The label attribute is optional and if specified will be used to populate the label of the web link.
Relationships in Custom Data Transformation Extensions
Planview Hub provides a JavaScript API for working with relationship fields. This API can retrieve, search, and get associated artifacts for artifacts.
Artifact Service API Reference
Artifacts returned from the Artifact API are the raw JSON representation of a Repository's Artifact. These representations may include internal IDs and other fields not mapped to the model. It may be necessary to manually interpret the results of these calls on a per-repository basis to determine the exact information that is returned.
-
artifacts.retrieveArtifact(relationship):Artifact- Retrieves the artifact for the provided relationshipartifacts.listSearchTypes():SearchType[]- Lists the valid search types for the targeted repositoryartifacts.getSearchDefinition(searchTypeId):SearchDefinition- Returns an object with the parameters that are required for the given search type idartifacts.search(searchType, searchDefinition):Relationship[]- Searches the target repository with the given search type id and search definition, returns a list of relationships which then can be looked up viaartifacts.retrieveArtifact(relationship)to retrieve the artifactartifacts.getFormattedIdSearchDefinition():SearchDefinition- Returns an object with the parameters that are required for a formatted ID searchartifacts.searchByFormattedId(searchDefinition):Relationship[]- Searches by formatted ID with the provided search definition and returns a list of relationships which then can be looked up viaartifacts.retrieveArtifact(relationship)to retrieve the artifactartifacts.toContainer(relationship, summary):Container- Converts a relationship into a container, summary is optionalartifacts.toRelationship(container):Relationship- Converts a container into a relationshipartifacts.getAssociatedRelationship(relationship):Relationship- Finds the associated relationship for the given relationship. When mapping from model to collection the input value and source artifact relationship field values are from the source repository and must be converted to their associated value to be used in the target system. An exception is thrown if no artifact is found or multiple artifacts are found.artifacts.getAssociatedContainer(container):Container- Finds the associated container for the given container. When mapping from model to collection the input value and source artifact container link field values are from the source repository and must be converted to their associated value to be used in the target system. An exception is thrown if no artifact is found or multiple artifacts are found.
A sample relationship transformation extension:
var inputTypes = 'Relationship';
var outputTypes = 'Relationship';

function transform(context, input) {
	if (input) {
  		return findParentFolder(context.sourceArtifact);
	}
	return null;
}

function findParentFolder(artifact) {
	var parent = artifacts.retrieveArtifact(artifact['parent']);
	if (parent['subtype'] === 'Folder') {
		return artifact['parent'];
	} else if (parent['subtype'] === null) {
		return null;
	}
	return findParentFolder(parent);
}
Looking at the above extension, we find the parent artifact and if that artifact is a folder we return that as the parent.
var inputTypes = 'Relationship';
var outputTypes = 'Relationship';

function transform(context, input) {
	var searchDefinition = artifacts.getFormattedIdSearchDefinition();

	searchDefinition['formatted-id'] = 'TPA-42';
	var results = artifacts.searchByFormattedId(searchDefinition);
	if (results[0]) {
		return results[0];
	}
	return null;
}
The above extensions uses the formatted ID search to find the correct artifact for the link.
The following extension uses a custom search to determine a relationship:
var inputTypes = 'Relationship';
var outputTypes = 'Relationship';

function transform(context, input) {
	var searchType = getCustomSearchType();
	var searchDefinition = artifacts.getSearchDefinition(searchType);

	searchDefinition['domain'] = 'DEFAULT';
	searchDefinition['project'] = 'My Project';
	searchDefinition['summary'] = context.sourceArtifact.summary;
	var results = artifacts.search(searchType, searchDefinition);
	if (results[0]) {
		return results[0];
	}
	return null;
}

function getCustomSearchType() {
	var searchTypes = artifacts.listSearchTypes();
	for (var i=0; i<searchTypes.length; i++) {
		if (searchTypes[i] === 'My Custom Search') {
			return searchTypes[i];
		}
	}
	return i;
}
Note: The returned search results are limited to a maximum of 1024 entries.
Containers and Relationships
A Container can be used as input and output type in a Custom Data Transformation extension. Planview Hub provides a JavaScript API for working with container fields.
The following two functions are provided to handle containers:
artifacts.toRelationship(container)
artifacts.toContainer(relationship[, summary])
All container objects provide a summary property.
.toContainer(relationship[, summary])- Converts a relationship object into a container. The summary is provided as a String and is optional. Is no summary provided, the summary of the related artifact is used. An exception is thrown if the artifact or the summary field of the artifact cannot be found..toRelationship(container)- Converts a container into a relationship object to use with theartifacts.retrieveArtifact(relationship)- API or return as result of the extension.
The following extension finds the first parent folder and returns that as the parent container.
var inputTypes = 'Relationship';
var outputTypes = 'Container';

function transform(context, input) {
	if (input) {
		var parentRelationship = findParentFolder(context.sourceArtifact);
  		return artifacts.toContainer(parentRelationship);
	}
	return null;
}

function findParentFolder(artifact){
	var parent = artifacts.retrieveArtifact(artifact['parent']);
	if (parent['subtype'] === 'Folder') {
		return artifact['parent'];
	} else if (parent['subtype'] === null) {
		return null;
	}
	return findParentFolder(parent);
}
The next extension retrieves the parent of our parent container field and returns it as relationship.
var inputTypes = 'Container';
var outputTypes = 'Relationship';

function transform(context, input) {
	if (input) {
		var parentRelationship = artifacts.toRelationship(input);
		var parentArtifact = artifacts.retrieveArtifact(parentRelationship);
		var container = parentArtifact['parent'];
  		return artifacts.toRelationship(container);
	}
	return null;
}
Note: Only containers based on artifacts are supported.
Comments in Custom Data Transformation Extensions
Comment extensions can be used to achieve use cases such as:
- Splitting long comments in a source collection into multiple comments in a target collection
- Excluding comments from integration based on some set criteria
- … and more!
Once saved, the extension can be applied on the Comment Configuration screen.
To create a comment extension, comments must be declared as the input or output types of the extension.
Note: Comment extensions will only impact new comments as they flow through Planview Hub. Existing comments that have already been synchronized will not be impacted.
If you are creating a custom data transformation for comments,
- The Comments type is supported as an array of comment objects
- A comment will be a javascript object with field ids as the key
-
For example, a private comment with ID 1 and content This is a comment may look like this:
-
{
    "id":"1",
    "is-private":true,
    "comment-content":"<p>This is a comment</p>"
}
Here's an example of an extension that replaces user information with a default user in outbound comments:
// The following extension can be set on Collection to Model transformation on a collection.
// It replaces user information at a repository's comment to a default user and returns comments that matches to Hub comment model.
var inputTypes = 'Comments';
var outputTypes = 'Comments';

function transform(context, input) {
    if(input.length >0){
        input.forEach(function(element) {
            replacePeople(element);
        });
    }
     return input;
}

function replacePeople(comment){
    var pattern = /user(\d*)/gi;
    comment['creator']='default';
    comment['work_notes']=comment['work_notes'].replace(pattern,'default');  //replace user information at a repository's comment contents field, work_notes
    comment['content']=comment['work_notes'];  //assign updated repository's comment content to the Hub's comment object's comment content field
}
Here's an example of an extension that adds a header to inbound comments with a default user:
// The following extension can be set on Model to Collection transformation on a collection.
// It addes comment header with default user to the given Hub model's comment input.
var inputTypes = 'Comments';
var outputTypes = 'Comments';

function transform(context, input) {
    if(input.length >0){
            addCommentHeader(input[0]);
    }
     return input;
}

function addCommentHeader(comment){
    var headerText = '<p>[Comment from '+'default_user'+']</p>';
    comment['content']=headerText+comment['content'];  //Hub's comment object's comment content field is comment['content']
}
Concatenation
To concatenate two fields on the source artifact into one field on the target artifact, a custom data transformation extension can be used.
Note: You can also concatenate fields on the Field Mapping screen. Learn more here.
Below, we've outlined how to configure a custom data transformation extension in order to concatenate the Formatted ID and Name from Broadcom Rally into the Summary model field. The concatenated values will then flow from the model to the chosen field on the target artifact.

 in your target repository")
- Go to the Field Mapping screen for the source (Rally) collection.
- If the Summary model field is already mapped in the source collection, delete the mapping.
- Choose Formatted ID and Name from the left side (repository) dropdown and Summary from the right side (model) dropdown and Press Connect.
- Make a note of the Type for each of the 2 fields and the order in which they are added. For example, in the below example Formatted ID was added first and is of type String and Name was added next and is of type String. The Model Field is also of type String.
- Open the Settings in a different tab and go to Extensions > Manage Extensions.
- Create a new data transformation extension.
-
Give the extension a name and update the input types based on Step 5. In this case we have 2 Inputs of types String and String. Update the input types as follows:
var inputTypes = ['String', 'String'];
-
Note: This will take the Formatted ID as the 1st parameter and Name as the 2nd parameter.
-
- Update the output types based on Step 5. In this example, we have 1 output of type String. Update output types as follows:
-
var outputTypes = 'String';
-
- In the body of the function, use the following statement to concatenate:
-
return 'ID: ' + input[0] + ' :: '+input[1];
-
- Here's an example of the full script:
-
var inputTypes = ['String', 'String'];
var outputTypes = 'String';


function transform(context, input) {
   // returns the result of the transformation
   return 'ID: ' + input[0] + ' :: '+input[1];
}
-
- Save and go back to the source collection.
- Configure the Summary mapping from Step 4:
-
You will now see the extension you created as an option for the transform on the right (model) side. Choose this extension and click Save and Done.
-
-
In your target collection, simply map the Summary model field to your chosen field on the target artifact (i.e., Summary, Name, Title, etc).
-


This will concatenate the 2 fields (ID, Name) on the source artifact to a single Summary field on the target artifact.
Person Reconciliation
Integrations that create or update artifacts often need to deal with differences between the representation of persons in different systems.
Planview Hub comes with a default person reconciliation strategy (Copy with Default Matching), which matches based on name, ID, and/or e-mail.
More specifically, the algorithm will compare the metadata from each side as follows:
- Username (person-username) from source to username (person-username) on target
- Username (person-username) from source to ID (person-id) on target
- ID (person-id) from source to username (person-username) on target
- ID (person-id) from source to ID (person-ID) on target
- Email (person-email) from source to email (person-email) from target
Please review the Connector Docs to determine which fields are available for your specific repository. If a field (i.e., person-username) is not available, Hub will simply skip that step.
This strategy should cover most use cases. However, if needed, you can also configure a custom Person Reconciliation Extension to match person fields from one repository to another.
Configuring Person Reconciliation with Extensions
A person reconciliation extension can be created from the Extensions screen, accessible from Settings. Created extensions are selected in the Person Reconciliation section of the Collection screen. In most cases it makes sense to have one extension per repository, since each repository will have different requirements for mapping persons to and from the repository. Person reconciliation extensions apply to all person fields of an artifact, including person fields in comments and attachments.
The Context Object
The context object provides information that the extension can use to determine how person reconciliation should be handled.
For a custom data transformation, use the following:
-
context:A context object that provides information that the extension can use to determine which transformations are needed -
context.sourceArtifact:A JavaScript object representation of the source artifact-
If you are mapping from model to repository, this will match the structure of the artifact in the model
-
If you are mapping from repository to model, this will match the structure of the artifact in the repository
-
context.targetArtifact*:A JavaScript object representation of the target artifact-
If you are mapping from model to repository, this will match the structure of the artifact in the repository
-
If you are mapping from repository to model, this will match the structure of the artifact in the model
-
If you are creating a custom data transformation extension for test steps, use:
context.sourceTestStepto access the source test step-
If you are mapping from model to repository, this will match the structure of the artifact in the model
-
If you are mapping from repository to model, this will match the structure of the artifact in the repository
-
-
context.targetTestStepto access the target test step- If you are mapping from model to repository, this will match the structure of the artifact in the repository
- If you are mapping from repository to model, this will match the structure of the artifact in the model
See Planview Hub Editions to determine if your edition contains Test Step functionality
The context parameter also has field properties:
context.sourceField: If processing a single fieldcontext.sourceFields: A list of field objects, if processing more than one fieldcontext.targetField: If processing a single fieldcontext.targetFields:A list of field objects, if processing more than one field
A field object only has two properties: ID, and label:
{
    id: "assignee",
    label: "Assignee"
}
Authoring Person Reconciliation Extensions
Person reconciliation extensions are defined by two functions:
mapPersonFromRepository(repositoryPerson, unresolvedPerson)
mapPersonToRepository(modelPerson)
Both functions are expected to return a string value corresponding to the user id of the person. Returning undefined sets the person field to empty. In the case where a user cannot be mapped and having the field empty is not an option, throw an exception as follows:
if (noMatchFoundCondition) {
    throw 'some descriptive message';
}
Such errors will cause processing of an artifact to result in an error with error code CCRRTT-17011E which will display under the Activity screen.
mapPersonFromRepository(repositoryPerson, unresolvedPerson)
mapPersonFromRepository is used to create a model representation of a person from a repository representation of a person, which occurs whenever a person is copied from a repository artifact to a model artifact. The return value of this function is used as the id of the person in the model artifact.
Two parameters are passed to the mapPersonFromRepository function:
repositoryPerson- An object representing the person corresponding to the repository representationunresolvedPerson- This parameter contains whatever information may be available about the person from the repository. It contains information only ifrepositoryPersondoes not.
An example repositoryPerson from Jira On-prem looks like:
{
	"person-id": "userA",
	"person-email": "userA@test.tasktop.com",
	"person-display-name":"User A",
	"active": true
}
An example unresolvedPerson from Jira On-prem might look like:
{
	"person-id": "userA",
	"person-email": "userA@test.tasktop.com"
}
mapPersonToRepository(modelPerson)
mapPersonToRepository is used to create a repository representation of a person from a model representation of a person, which occurs whenever a person is copied from a model artifact to a repository artifact. The return value of this function is used to lookup the corresponding person in the repository.
A single parameter is passed to the mapPersonToRepository function:
modelPerson- An object representing the person corresponding to the model representation
A modelPerson always has the following properties:
{
	"id": "userId",
	"display-name": "Jane Smith"
}
Note: Display-name could be empty.
Simple Person Reconciliation Example
A simple person reconciliation mapping extension could look like this:
function mapPersonFromRepository(repositoryPerson, unresolvedPerson, context) {
    if (repositoryPerson) {
        return repositoryPerson.id;
    }
}

function mapPersonToRepository(modelPerson, context) {
    if (modelPerson) {
        try {
            var person = persons.searchPerson('id', modelPerson.id);
            console.log("found match " + person.id);
            return person.id;
        } catch (e) {
            console.log("no match found mapping to " + context.targetField.id);
            if (context.targetField.id === "assignee") {
                return "default-assignee";
            } else if (context.targetField.id === "reporter") {
                return "default-reporter";
            } else if (context.targetField.id === "comments") {
                return "default-commenter";
            }
        }
    }
}
The SimplePersonReconciliation script is a simple script which makes use of dictionary concept in Javascript to map key and values.
Scenario 1: Using E-mail
Consider an example where Repository 1 has email john.s@email.com and Repository 2 has email john.smith@email.com and the display names and ID’s don't match. Assume that the integration has one-way person flow from Repository 1 (john.s@email.com) to Repository 2 (john.smith@email.com).
In that case, we would edit the var mapping on the mapPersonToRepository() function so that the incoming value checks the dictionary (key) and returns a valid email (value) for the repository.
In this example, we would edit the var mapping = { 'john.s@email.com' : 'john.smith@email.com'} in the mapPersonToRepository() function.
If the integration has two-way person flow, we must also edit the mapPersonFromRepository() function. The mapPersonFromRepository() function will show the e-mail addresses in the opposite order - i.e. var mapping = {‘john.smith@email.com’ : ‘john.s@email.com’}. For two-way integrations, the person reconciliation extension must be added to both the source collection and the target collection.
Scenario 2: Using ID
If the source repository does not provide an e-mail, we can use the Simple Person Reconciliation script above to match person ID to person email.
For example, if Repository 1 has user id "JohnSmith" and the matching user in Repository 2 is "john.smith@email.com," then we should edit the script at var mapping = { JohnSmith: 'john.smith@email.com'}.
If the integration has two-way person flow, we will also need to edit the mapPersonFromRepository() as outlined in Scenario 1. We must also remember to edit the extension in var result as modelPerson[person-id] for scenarios where we are using ID instead of email. The edit must be done on both the mapPersonFromRepository() and mapPersonFromRepository() functions.
Selecting a Default Person when No Match is Found
Below is a script which uses the context to select a default person when no match is found:
function mapPersonToRepository(modelPerson, context) {
	var person;
	try {
		person = persons.searchPerson("email", modelPerson.id);
	} catch (e) {
		// no matching person found
		// select a default person by team
		if (context.sourceArtifact["team"] === "Team A") {
			person = persons.searchPerson("email", "team.a.lead@company.net");
		} else if (context.sourceArtifact["team"] === "Team B") {
			person = persons.searchPerson("email", "team.b.lead@company.net");
		}
	}
	// return a match if found
	if (person) {
		return person["person-id"];
	}
}
Person Reconciliation Extension Javascript API
Planview Hub provides a JavaScript API for working with persons in a person reconciliation extension. This API includes two functions:
persons.listPersonSearchFields():Object\- Allows for the discovery of the searchable fields on a person. Not all fields from a person are searchable and vary between connectors.persons.searchPerson(fieldId, fieldValue):Person\- Used to search for person in a repository. This person can then be used to return the correct ID for a user in a repository.persons.searchPerson(fieldId, fieldValue)will find exactly one person and will throw aPersonNotFoundExceptionif no match is found orTooManyPersonsFoundExceptionif more than one person is found. These exceptions can be caught and handled by the extension.
Artifacts returned from the artifact API are the raw JSON representation of a repository's artifact. These representations may include internal IDs and other fields not mapped to the model. It may be necessary to manually interpret the results of these calls on a per-repository basis to determine the exact information that is returned.
Below is a person reconciliation extension that will take the id of a model person, retrieve the user by username and return the exact ID from the repository. This is helpful for systems where the person’s ID is a number or some other non-human readable value.
function mapPersonFromRepository(repositoryPerson, unresolvedPerson) {
    return repositoryPerson['Username'];
}

function mapPersonToRepository(modelPerson) {
    // persons.listPersonSearchFields(); determines the fields usable by .searchPerson(...)
    var repositoryPerson = persons.searchPerson('Username', modelPerson['id']);
    return repositoryPerson['ID'];
}
SearchPerson Example Script
Below is an example SearchPerson script. Persons.searchperson (fieldId, fieldValue) is used to search for a person in a repository using the two parameters: fieldId and fieldValue.
This person can then be used to return the matching ID of a user in that repository.
Persons.searchPerson(fieldId, fieldValue) will find exactly one person and will throw a PersonNotFoundException if no match is found or TooManyPersonsFoundException if more than one person is found. These exceptions can be caught and handled by the extension. searchPerson() is a native Hub call, which means it is functionality that is unique to Hub.
function mapPersonFromRepository(repositoryPerson) {
    	...
}

function mapPersonToRepository(modelPerson) {
    	if (!modelPerson){
           	console.log('incoming model person is empty')
           	return undefined
    	}

    	console.log('modelPerson = ' + modelPerson['id']);

   var repoPerson = persons.searchPerson('person-username', modelPerson['id']);

   console.log('repoPerson = ' + repoPerson['id']);
	return repoPerson['id'];
}
Scenario 1: Mismatched E-mails
Consider an example where Repository 1 has email john.s@email.com and Repository 2 has email john.smith@email.com. The persons.searchPerson(fieldId, fieldValue) can be used to search the repository for matching person values.
Assume that the integration has one-way person flow from Repository 1 (john.s@email.com) to Repository 2 (john.smith@email.com). In this case, the mapPersonToRepository() function should be edited and the incoming values matched by ID. A search persons call based on incoming username is made and then the matching user object is retrieved.
Scenario 2: Returning a Default ID as a Value
function mapPersonFromRepository(repositoryPerson) {
	return repositoryPerson['email'];
}

function mapPersonToRepository(modelPerson) {
    	var defaultUserId = 'SOMEVALUEHERE'

    	console.log(persons.listPersonSearchFields())
    	try{
    		var person = persons.searchPerson('email', modelPerson.id);
    		if(person != null) {
    			return person['person-username'];
    		}
	} catch(e){
		console.log(e)
	}
	console.log('Falling back to default person')
	return defaultUserId
}
The above script allows us to search for persons in the repository based on an incoming email value. In cases where a corresponding person is not found in the repository, Hub will return the defaultUserId. To return a default user ID, assign a default value (a user ID) to the var defaultUserId.
PersonListSearchFields
Persons.listPersonSearchFields() allows for the discovery of the searchable fields on a person. Not all fields from a person are searchable and vary between connectors.
function mapPersonFromRepository(repositoryPerson) {
	return repositoryPerson['email'];
}

function mapPersonToRepository(modelPerson) {
    	 console.log(JSON.stringify(persons.listPersonSearchFields()))
	var person = persons.searchPerson('person-email', modelPerson.id);
	return person['person-id'];
}
For example, when using the above Person Reconciliation script/extension on the Jira side in a Jira-Micro Focus ALM/QC integration, the console.log(JSON.stringify(persons.listPersonSearchFields())) line will give you a list of the searchable fields.
In our demo, we got the following values:
Person listSearch Fields: ["person-username","person-email","person-id","person-display-name"]
You can then use one of those available values as part of the persons.searchPerson() script. In the example scripts shown above, we make use of person-id.
Using LDAP or Active Directory
LDAP (Lightweight Directory Access Protocol) and Active Directory can be used to lookup information required to map persons from one system to another. Planview Hub provides a JavaScript API for accessing LDAP and Active Directory as follows:
function mapPersonToRepository(modelPerson) {
	ldap.connect('ldap://subdomain.mycompany.com', 'cn=admin,dc=example,dc=mycompany,dc=com', 'mypassword');
	var results = ldap.search('dc=example,dc=mycompany,dc=com', 'cn='+ldap.escape(modelPerson['id']))
	if (results.length == 0) {
	   throw 'no person found with id='+modelPerson['id'];
	}
	return results[0]['sn'];
}
Looking at the example above, three steps are involved:
- Establishing a connection
- Looking up the appropriate entries using a search
- Returning a value from the search results
The same approach is used for both LDAP and Active Directory.
The Tasktop JavaScript LDAP API is described as follows:
ldap- The globally-visible object providing the LDAP APIldap.connect(connectionUrl, principal, password):void- A means of establishing a connection with a connection URL, user principal and passwordldap.search(base, query, fields):Map[]- A means of searching providing a base name of the context to search, a search query, and an optional list of fields to provide in the search resultsldap.escape(value):String- A means of escaping string literals to use in LDAP search queries or distinguished names
There is no need to close an LDAP connection; LDAP connections are managed implicitly by Hub.
Artifacts returned from the Artifact API are the raw JSON representation of a repository's artifact. These representations may include internal IDs and other fields not mapped to the model. It may be necessary to manually interpret the results of these calls on a per-repository basis to determine the exact information that is returned.
Accessing Web Resources
Extensions may access resources using HTTP. For example, extensions may access a REST API which could provide data necessary for the extension.
Planview Hub provides a fluent JavaScript API for making HTTP requests, inspired by the Java 9 HTTP client API. The API is used as follows:
var response = httpClient.request()
	.uri('http://example.com/my/rest/api')
	.parameter('first-param','first-value')
	.parameter('second-param','second-value')
	.header('my-special-header','header-value')
	.GET().response()

if (response.statusCode() == 200) {
	var responseJson = JSON.parse(response.content());
	// do something with response data
}
HTTP Client API Reference
httpClient- The globally-visible object providing the HTTP client APIhttpClient.request():RequestBuilder- Provides a RequestBuilder objectRequestBuilder.uri(uriString):RequestBuilder- Specifies the URI of the requestRequestBuilder.parameter(key,value):RequestBuilder- Adds a query parameter to the request with the given key and valueRequestBuilder.header(key,value):RequestBuilder- Adds an HTTP header value to the request with the given key and valueRequestBuilder.GET():Request- Creates a Request object for an HTTP GET requestRequest.response():Response- Creates a Response object with the result of the HTTP requestResponse.statusCode():int- Provides the HTTP status code of the responseResponse.content():String- Provides the body of the HTTP response as a stringResponse.headers():Map- Provides the HTTP response headers as a JavaScript object with property names corresponding to HTTP header names, and values as arrays of values of the corresponding HTTP headerRequestBuilder.proxy(hostname, port[, username, password]):RequestBuilder- Specifies an HTTP proxy to be used for this request
Artifacts returned from the Artifact API are the raw JSON representation of a Repository's Artifact. These representations may include internal IDs and other fields not mapped to the model. It may be necessary to manually interpret the results of these calls on a per-repository basis to determine the exact information that is returned.
Example extension Response.headers() return value:
{
	"Transfer-Encoding": [
		"chunked"
	],
	"Server": [
		"Jetty(9.2.13.v20150730)"
	],
	"Vary": [
		"Accept-Encoding, User-Agent"
	],
	"Content-Type": [
		"application/json;charset=UTF-8"
	]
}
Using an HTTP Proxy Server
Extensions can specify an HTTP proxy server with the following API:
var response = httpClient
    .request()
    .proxy("myproxy.mycompany.com", 3128)
    .uri('https://www.example.com')
    .GET()
    .response();
To use a proxy server with BASIC proxy authentication, credentials can be specified as shown below assuming username and password are strings:
var response = httpClient
    .request()
    .proxy("myproxy.mycompany.com", 3128, username, password)
    .uri('https://www.example.com')
    .GET()
    .response();
Good to Know
-
All communication to the proxy server uses HTTP, not HTTPS, so even if an HTTPS connection to the target server is tunneled through the proxy, it is important that the connection to the proxy server is through a trusted network if sending proxy credentials.
-
We recommend storing the proxy password in a confidential key-value store and not hard coding it in the extension because extensions are stored unencrypted in Hub's operational database.
Causing Extensions to Complete With An Error
There are occasions where extensions should complete with an error. In such cases, simply use the JavaScript throw keyword as follows:
if (somethingUnexpected) throw 'some descriptive message'
Such errors will cause processing of an artifact to result in an error with error code CCRRTT-17011E which will display on the Activity screen.
Troubleshooting Extensions
Extension troubleshooting usually involves trial and error. To make the troubleshooting process easier, a global logging function is exposed as follows:
console.log(message)
console.log takes a single argument which is converted to a string.
For example:
function transitionArtifact(context,transitions) {
    if (someUnexpectedCondition) {
        console.log('source artifact: '+JSON.stringify(context.sourceArtifact));
        console.log('target artifact: '+JSON.stringify(context.targetRepositoryArtifact));
        console.log('transitions: '+JSON.stringify(transitions));
        throw 'message describing that something bad happened';
    }
}
The output of console.log goes to the Hub log file at logs/extensions.log
Extensions and State
Extensions should not rely on declared variables to retain state between invocations. Doing so is not supported and has undefined behavior.
For example:
// This is not supported:
var myGlobalState = // some state


function someFunction() {
   if (myGlobalState == someValue) {
     ...
   }
}
Accessing Object Properties
There are two ways to access object properties:
Dot Notation
You can use the dot notation if the property name only contains alpha-numeric and characters that are allowed in JavaScript variables such as '$' or '_'.
For example:
person.email
Bracket Notation
You must use the bracket notation if the property name contains characters that are not allowed in JavaScript variables such as a hyphen.
For example:
person['id']