
Advanced
Introduction
Advanced (Settings) can be accessed by clicking the Advanced tab on the Settings screen.

- Flow External Workflow Changes
- Move Routes Between Integrations
- Import Artifact Pair Information
- Upgrade Backup Files
- Import Configuration
Flow External Workflow Changes
Flowing external workflow changes allows you to specify the integrations that should receive high-fidelity scans to ensure that changes that might have been missed during a regular change detection interval are detected.
Note: Enabling this setting for all integrations may have a negative impact on Planview Hub’s performance.
Move Routes Between Integrations
There may be rare scenarios when you must move routes from an existing integration to another integration. For example, you may have configured Hub incorrectly and mistakenly created multiple integrations which should be combined into one. Or you could be upgrading Micro Focus ALM, which requires moving projects from an instance running an old version of ALM to a server running a newer instance of ALM. Since existing projects are moved to a completely new ALM instance with a different URL, users must create a new repository connection, collection(s), and integration(s) in Hub. Once the new integration is created, existing routes must be migrated to prevent the risk of duplicate artifacts. This feature will allow users to easily migrate routes from an existing integration to a new one.
To move routes from one integration to another, they must both:
- Be synchronize integrations
- Use the same artifact types
- Use the same repository connections (except for Micro Focus ALM connections used in an upgrade scenario)
We recommend stopping both integrations before moving routes so that you can review your mappings and configuration before running.
To use this feature, click Move Routes.

Select your source integration:

Then select your target integration:

Select the routes from the source integration that you'd like to move to the target integration. Once moved, they will no longer exist in the source integration. Click Move in the upper right corner.

Review the pop-up message and if approved, click I understand... and Move. This process may take some time. Progress can be tracked on the Background Jobs tab of the Activity Screen.
Once the move is complete, review your integration configuration, field mappings, etc, before clicking run on the target integration.
Import Artifact Pair Information
Importing artifact pairs allows Hub to import existing artifact pairs that were created by Tasktop Sync. This prevents duplicate artifacts from being created when you switch from using Tasktop Sync to Planview Hub to administer your integrations.
Please contact customer care for additional information on how to use this capability.
Upgrade Backup Files
This feature is not applicable to Planview Hub Cloud and is only available when upgrading from Planview Hub versions 20.1 and later.
Upgrading backup files enables you to download and upload artifact data in cases where integrations were resumed individually during an upgrade. The downloaded data corresponds to artifacts that were modified when migrations were still running. These files capture any synchronization activity that occurred on individually running integrations, so that you can ensure no updates are duplicated if restoring from backup.
Learn more about utilizing this capability here.
Import Configuration
The Import Configuration section allows you to import your entire Hub configuration from an exported configuration file to replace your existing configuration or apply discreet changes to the configuration from an exported configuration history file.
This is useful in scenarios where you'd like to move from one environment to another (e.g., Test to Production), capture your configuration at a certain point in time (e.g., disaster recovery), replicate changes during testing or major upgrades, or copy settings within a Hub instance (e.g., integrations or collections).
- Selective Import imports selected configuration elements from an exported configuration.
- This can be used to transfer settings between different Hub instances, create a backup of your current settings, or import additional settings while preserving your existing ones.
- Full Import and Replace imports a full exported configuration of a Hub instance to replace your existing configuration.
- Apply History File Changes to Configuration (Legacy) imports historical configuration changes that can be applied to your current configuration. See more details here.
Before you begin, review the Export Configuration section below for details on exporting full Hub configurations.
Selective Import
Selective Import allows you to copy specific parts of your Hub configuration between different Hub instances or within the same instance. Common uses include:
- Migrating settings from test to production environments
- Creating copies of existing integrations or collections
- Transferring configurations between different Hub instances
When importing to the same Hub instance, you can keep existing settings alongside imported ones. The system will automatically increment the names of imported items to avoid conflicts. You can then rename or modify these copied elements as needed.
Important: The source and target Hub environments must be running the same version for the import to work successfully.
To import part of your Hub configuration, click Selective Import.
Note: The source environment version must match the target environment version. If the versions do not match, an error will occur upon import.

Select the JSON file with the exported configuration and click Upload.

On the Import Configuration screen, you can select the elements you’d like to import from your exported configuration and select the elements you’d like to retain from your current configuration.

Select Elements to Import
In the Select Elements to Import section, you can select configuration elements from the exported configuration to import into your current configuration.
Dependencies of selected elements will be auto-selected. If there is already a matching dependency in your current configuration, you can unselect it from the list, in which case the existing dependency will be used instead.
Note: Elements from the exported configuration are matched based on the element name and type (e.g., a model named Defects from the exported configuration will match a model named Defects in the current configuration).

Note: Existing repositories will not be auto-selected. We do not recommend selecting repositories as this may result in your settings and credentials being overwritten.
Select Elements to Keep
In the Select Elements to Keep section, you can select the elements from your current configuration that you’d like to retain.
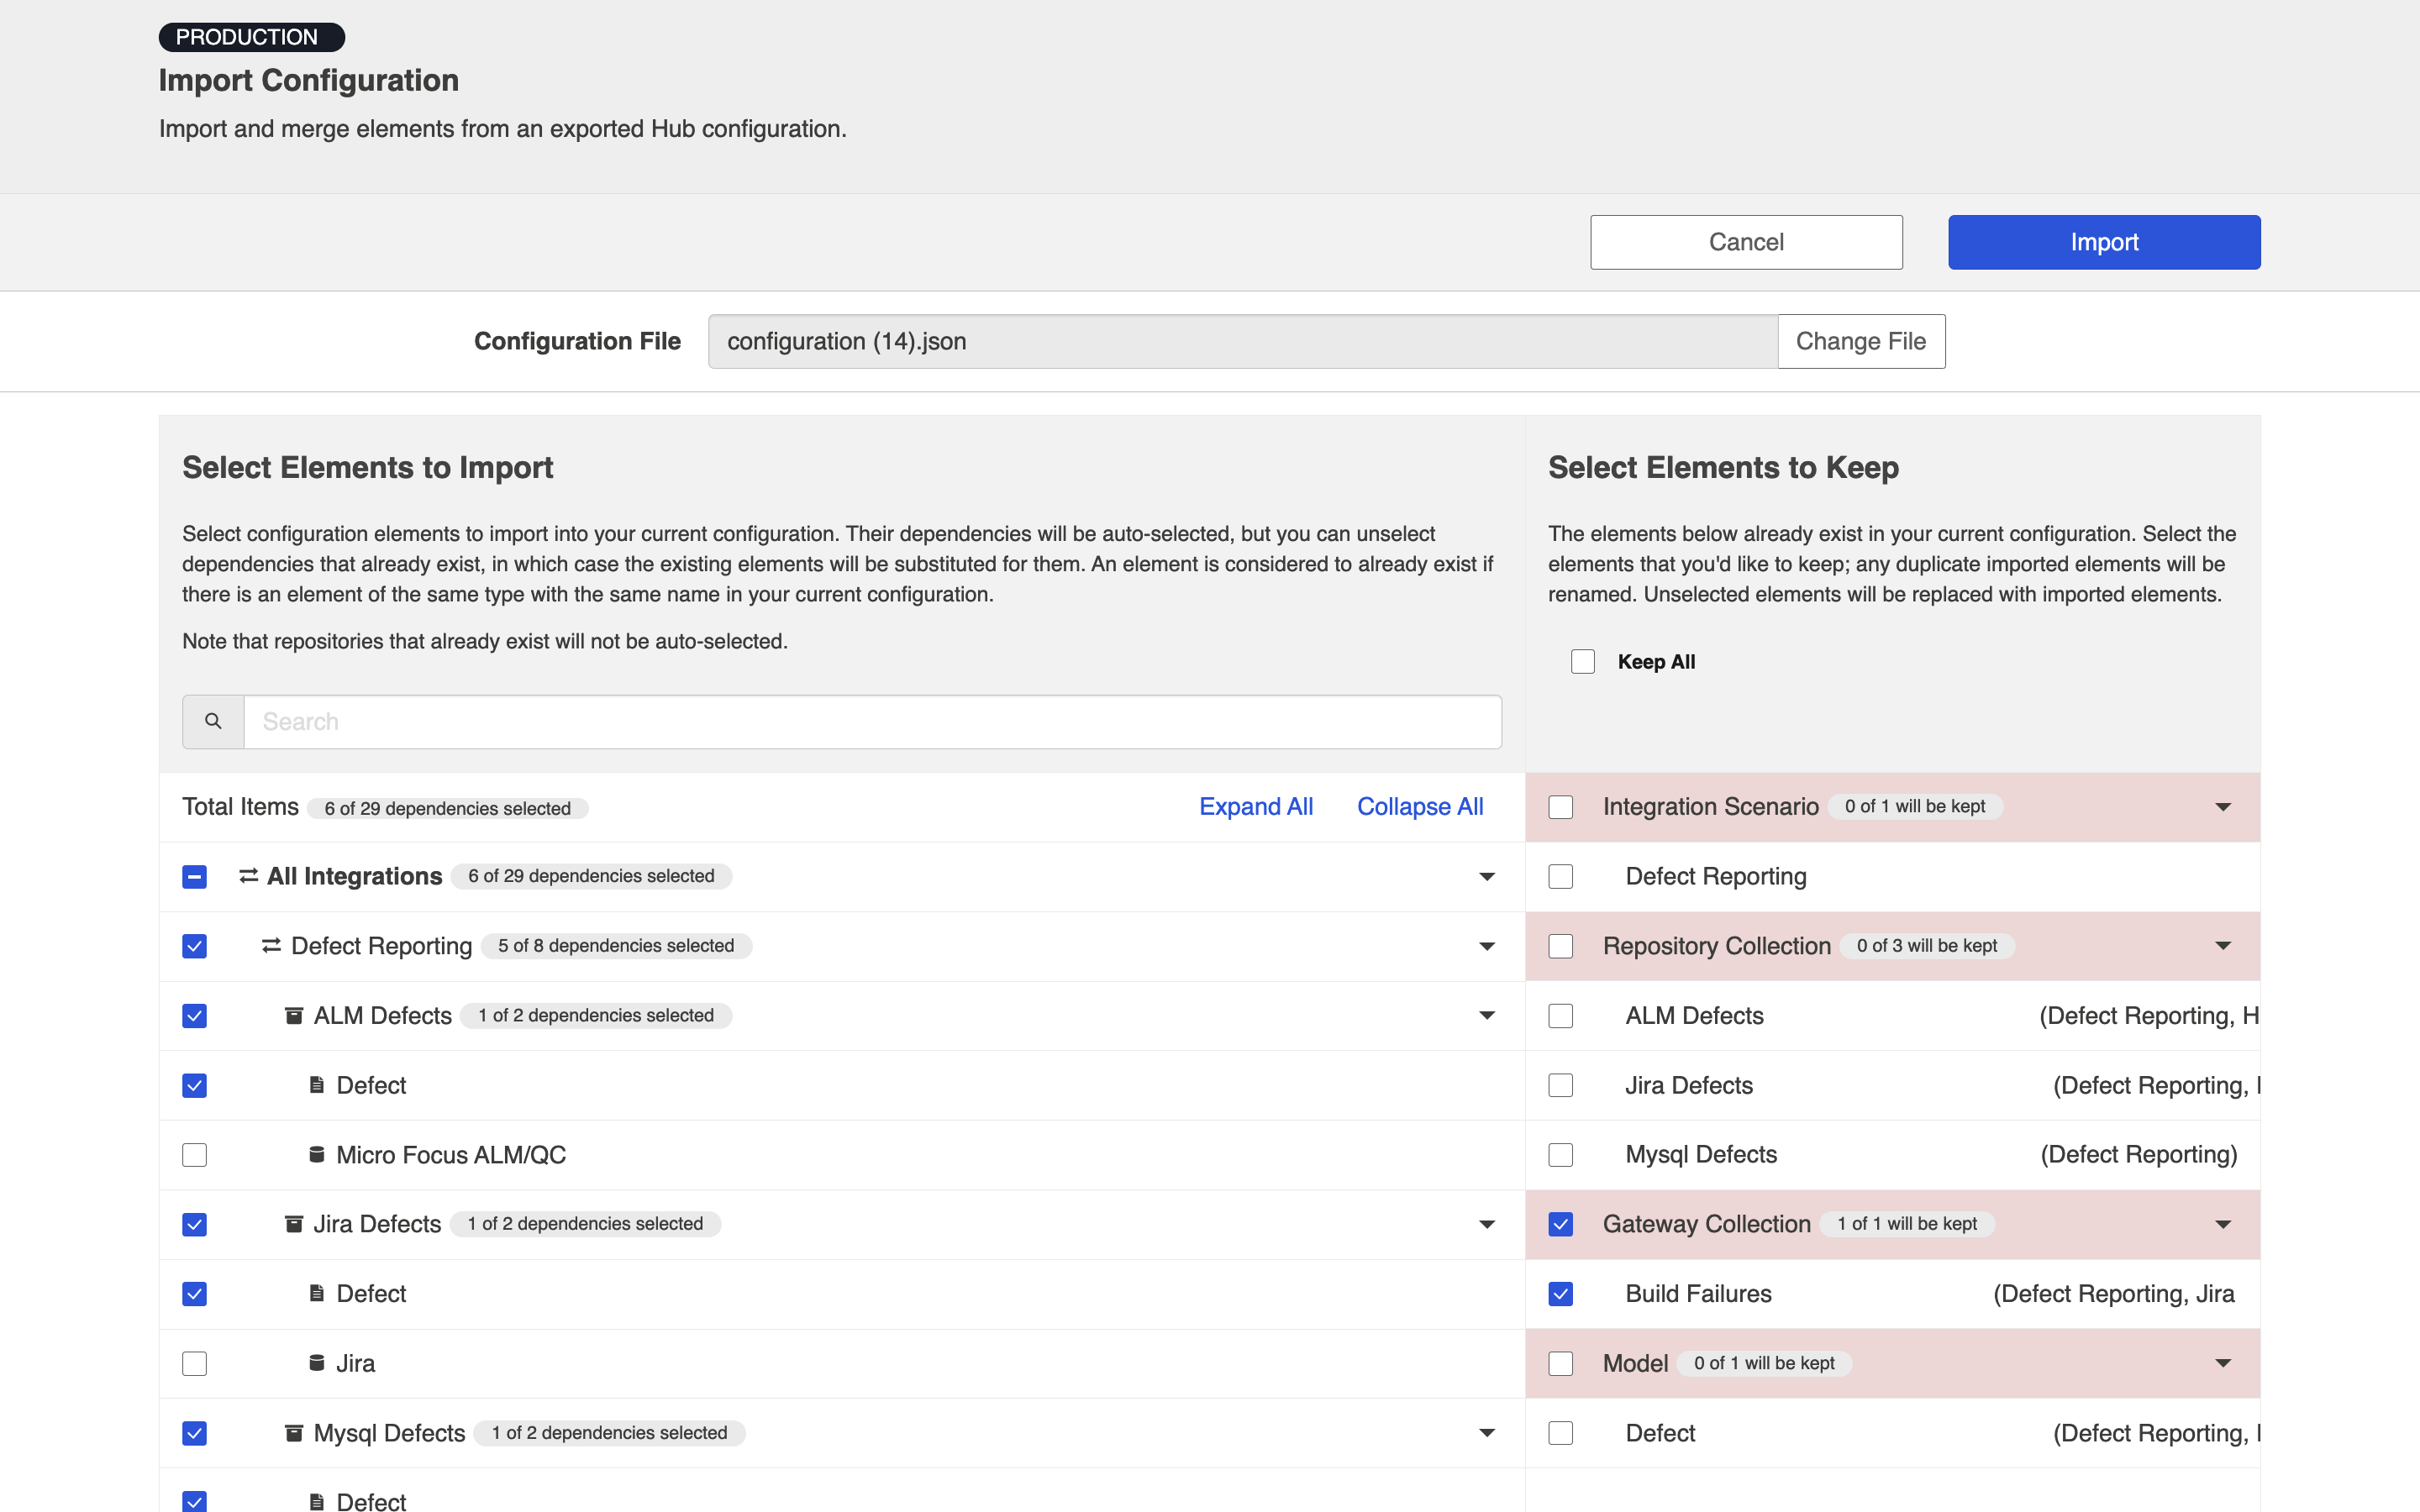
In this section, you’ll see a list of configuration elements from your current configuration that match elements you have selected to import.
Select the elements from your current configuration that you’d like to retain. Any unselected elements will be replaced with imported elements.
Note: If you select an element to retain, the matching element from the imported configuration will be renamed. Imported elements will use the renamed element and existing elements will continue to use the retained element.
After you’ve made your selections, click Import.
Note: When combining elements from the two configurations, it is your responsibility to ensure that the resulting configuration is what you intended. For example, importing and replacing an existing collection will affect the behavior of any existing integrations using that collection. Similarly, importing an integration without the collections it depends on (using existing collections in their place) could result in very different behavior depending on how the collections differ.

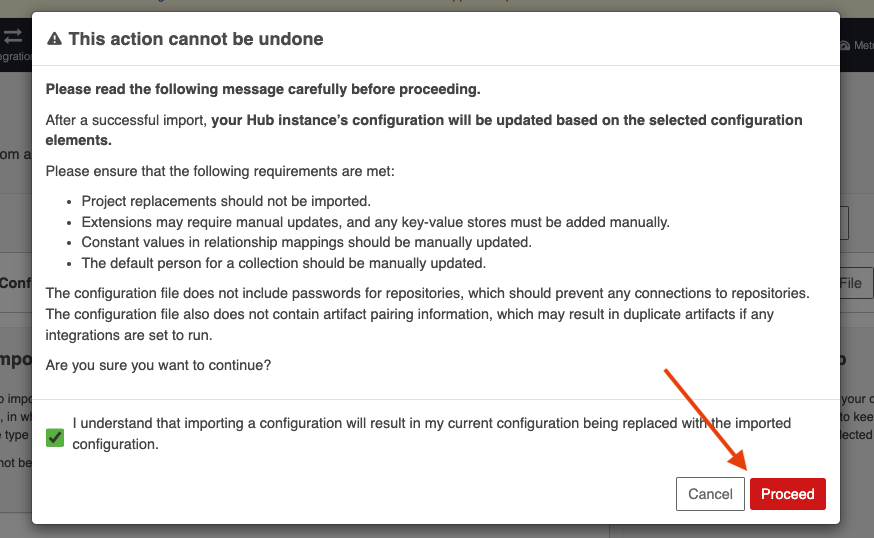
A warning message will appear informing you that your configuration will be updated based on the selected elements.

After acknowledging the warning, click Proceed.
Select the integrations you’d like to stop before importing the configuration. Click Proceed to begin importing the configuration.

Once the import has completed, you'll see a pop-up message indicating that the import was completed successfully.

Note: Repository credentials must be re-entered after importing your configuration. Some Hub functionality will not be available until Hub is able to connect to your repositories.
Full Import and Replace
To import your full Planview Hub configuration, click Import Full.
Note: The source environment version must match the target environment version. If the versions do not match, an error will occur upon import.

Select the JSON file with the exported configuration and click Import.

A warning message will appear informing you that your existing configuration will be replaced with the imported configuration.

After accepting the warning message, your configuration will begin importing. Once the import has completed, you'll see a pop-up message indicating that the import was completed successfully.

If the import fails, you’ll see a pop-up and an error message with details on the failed import.

Note: Repository credentials must be re-entered after importing your configuration. Some Hub functionality will not be available until Hub is able to connect to your repositories.
Export Configuration
The Export Configuration section allows you to export the full configuration of your Planview Hub instance, excluding encrypted data and transaction data. The exported configuration can be used to restore configurations or move configurations between instances.
To export your full Planview Hub configuration, click Export.
Note: If you use this functionality to create a duplicate integration between the same repositories, it will create an unbounded number of duplicate artifacts.

Note: The source environment version must match the target environment version. If the versions do not match, an error will occur upon import.
A JSON file will then be downloaded with your full Hub configuration. This file can then be used for Selective Import or Full Import and Replace.
Credentials will not be included in the exported configuration file and will need to be re-entered upon import.
See the Import Configuration section above for details on importing your exported configuration.