
Micro Focus ALM/QC
Overview
Planview Hub offers integration solutions to flow test artifacts such as test results, test steps, and their associated tests, test runs, test instances, and folder structures.
Please review the sections below to learn more about supported test scenarios using Micro Focus ALM/QC.
Synchronizing Micro Focus ALM/QC Test Steps
Use the instructions below to configure the following integrations:
- ALM Test Steps → ALM Test Steps
Step 1: Connect to your Repository
First, connect to your repository by following the instructions here.
You can learn more about ALM-specific configuration in our Connector Docs.
Step 2: Construct your Model
To flow test steps, you will need to add the Test Steps entity when creating your Test model.
To do this, click + Add Entity and select the Test Steps option.

A Test Steps entity will be added. On the Model Configuration screen, you will then see two panels:
- Test Fields: In the top section, add any fields you'd like to flow on the test (or test run) artifact that are not part of its associated test steps.
- Test Step Fields: In the bottom section, add any fields you'd like to flow that are a part of test steps. You'll see that Hub provides some Smart Fields that are test step specific to help you get started, but you can add any other desired fields by leaving the Smart Field blank.

Here is an example of a very simple Test Model with Test Steps:

You can find general details on how to create a model here.
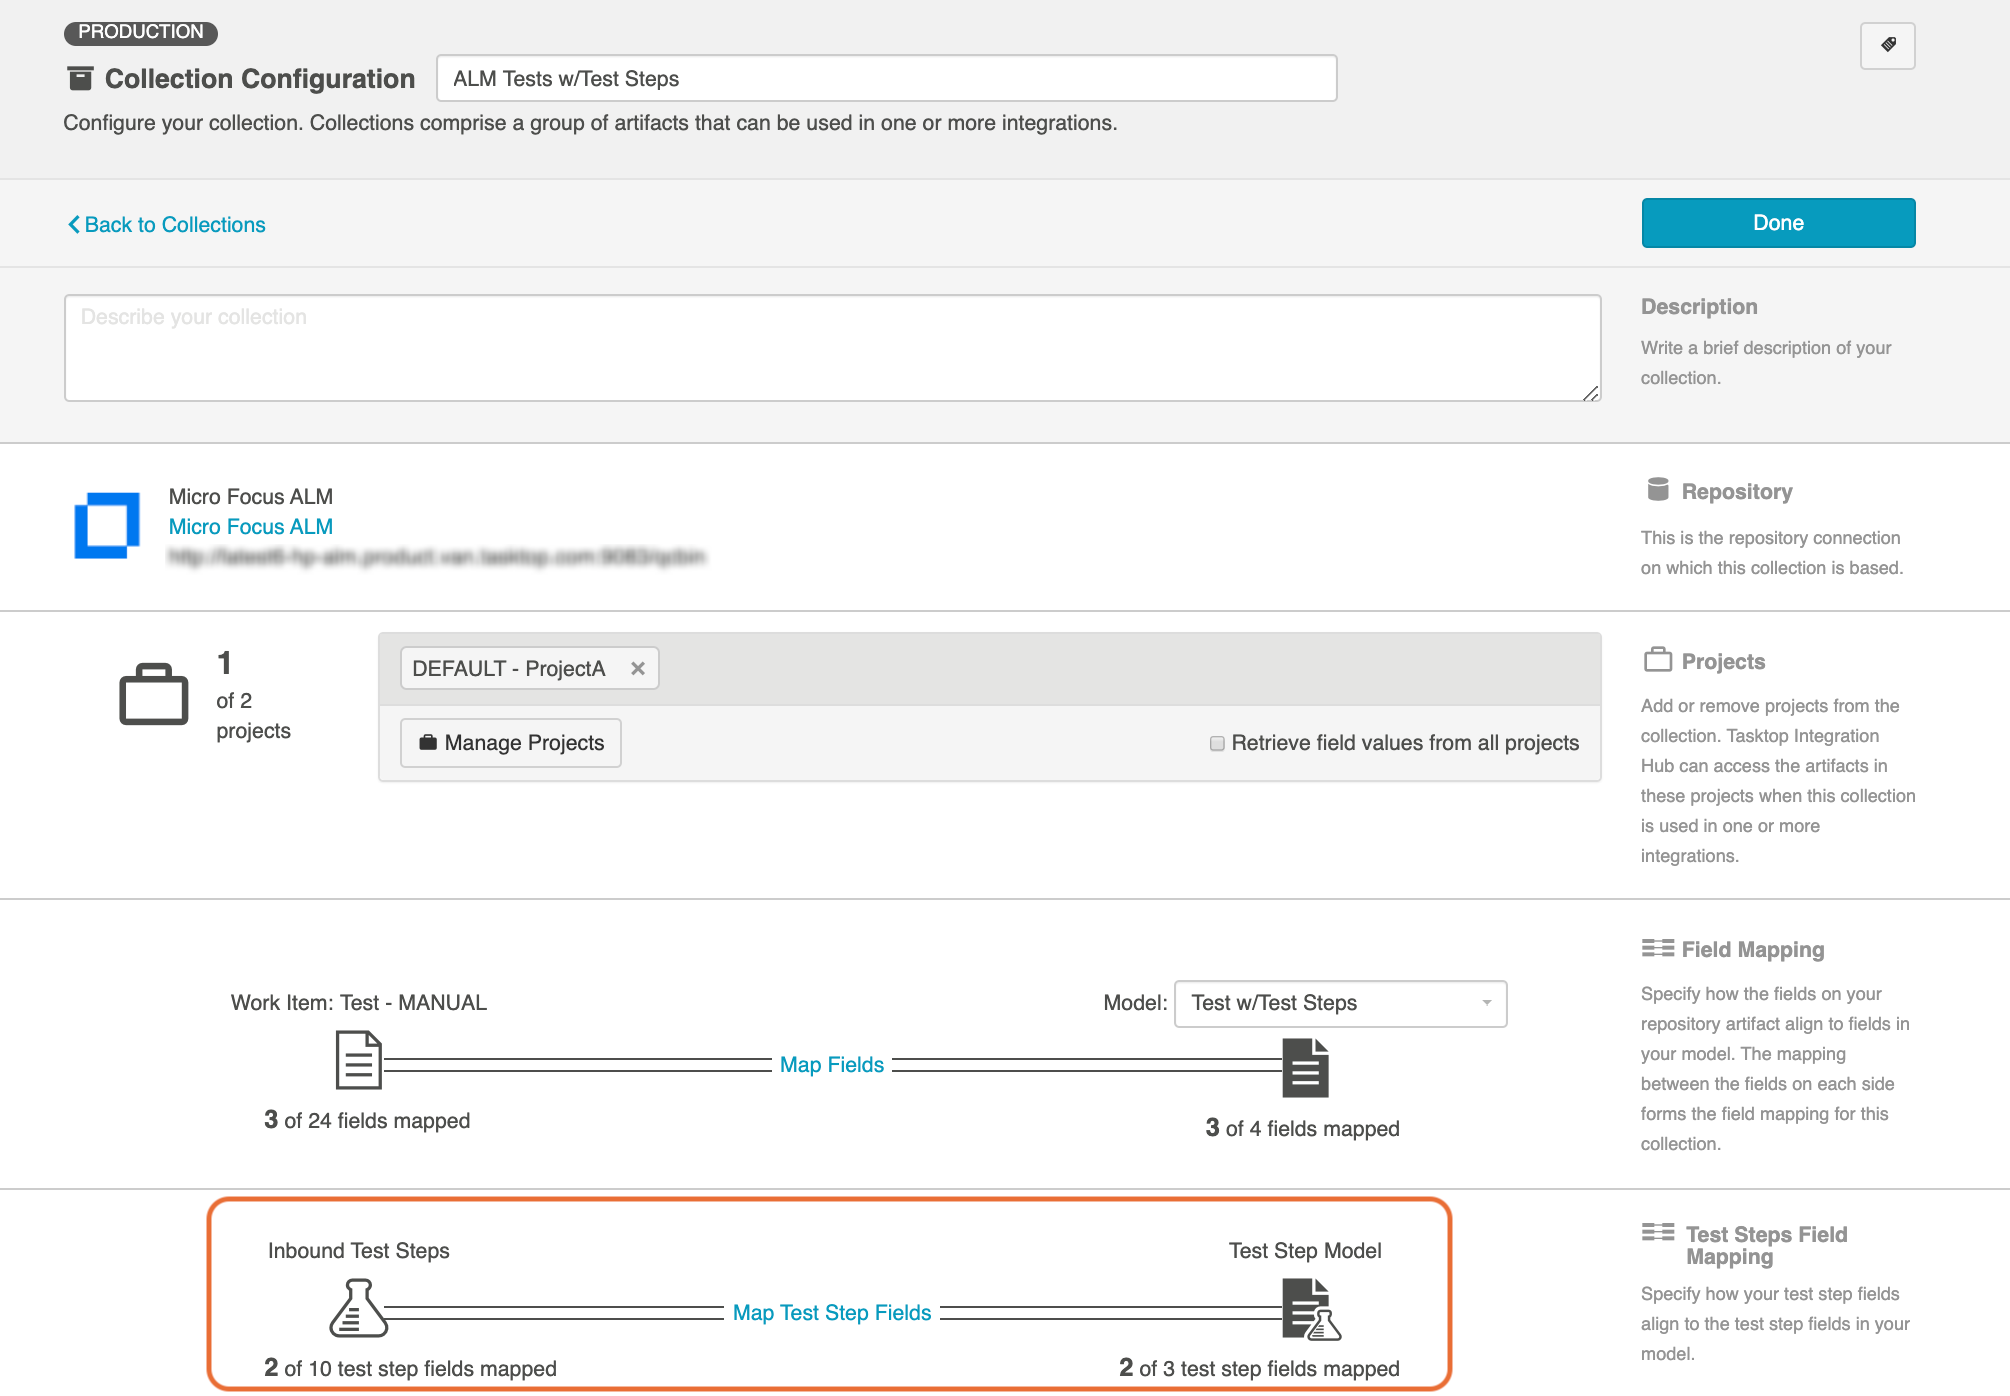
Step 3: Create your Collection
You can find general details on how to create a collection here.
You will see a Map Test Fields sash on your collection if:
- Your model is a Model with Test Steps, and
- Your artifact is an ALM Test, ALM Test Run

The process to map test step fields is very similar to the process on the normal Field Mapping screen. Note that both relationship(s) and other field types for test steps will be mapped on this one sash.
Note: Tests and Test Steps do not require a typical relationship field mapping to link them. We've added behind-the-scenes smarts to couple them for you.
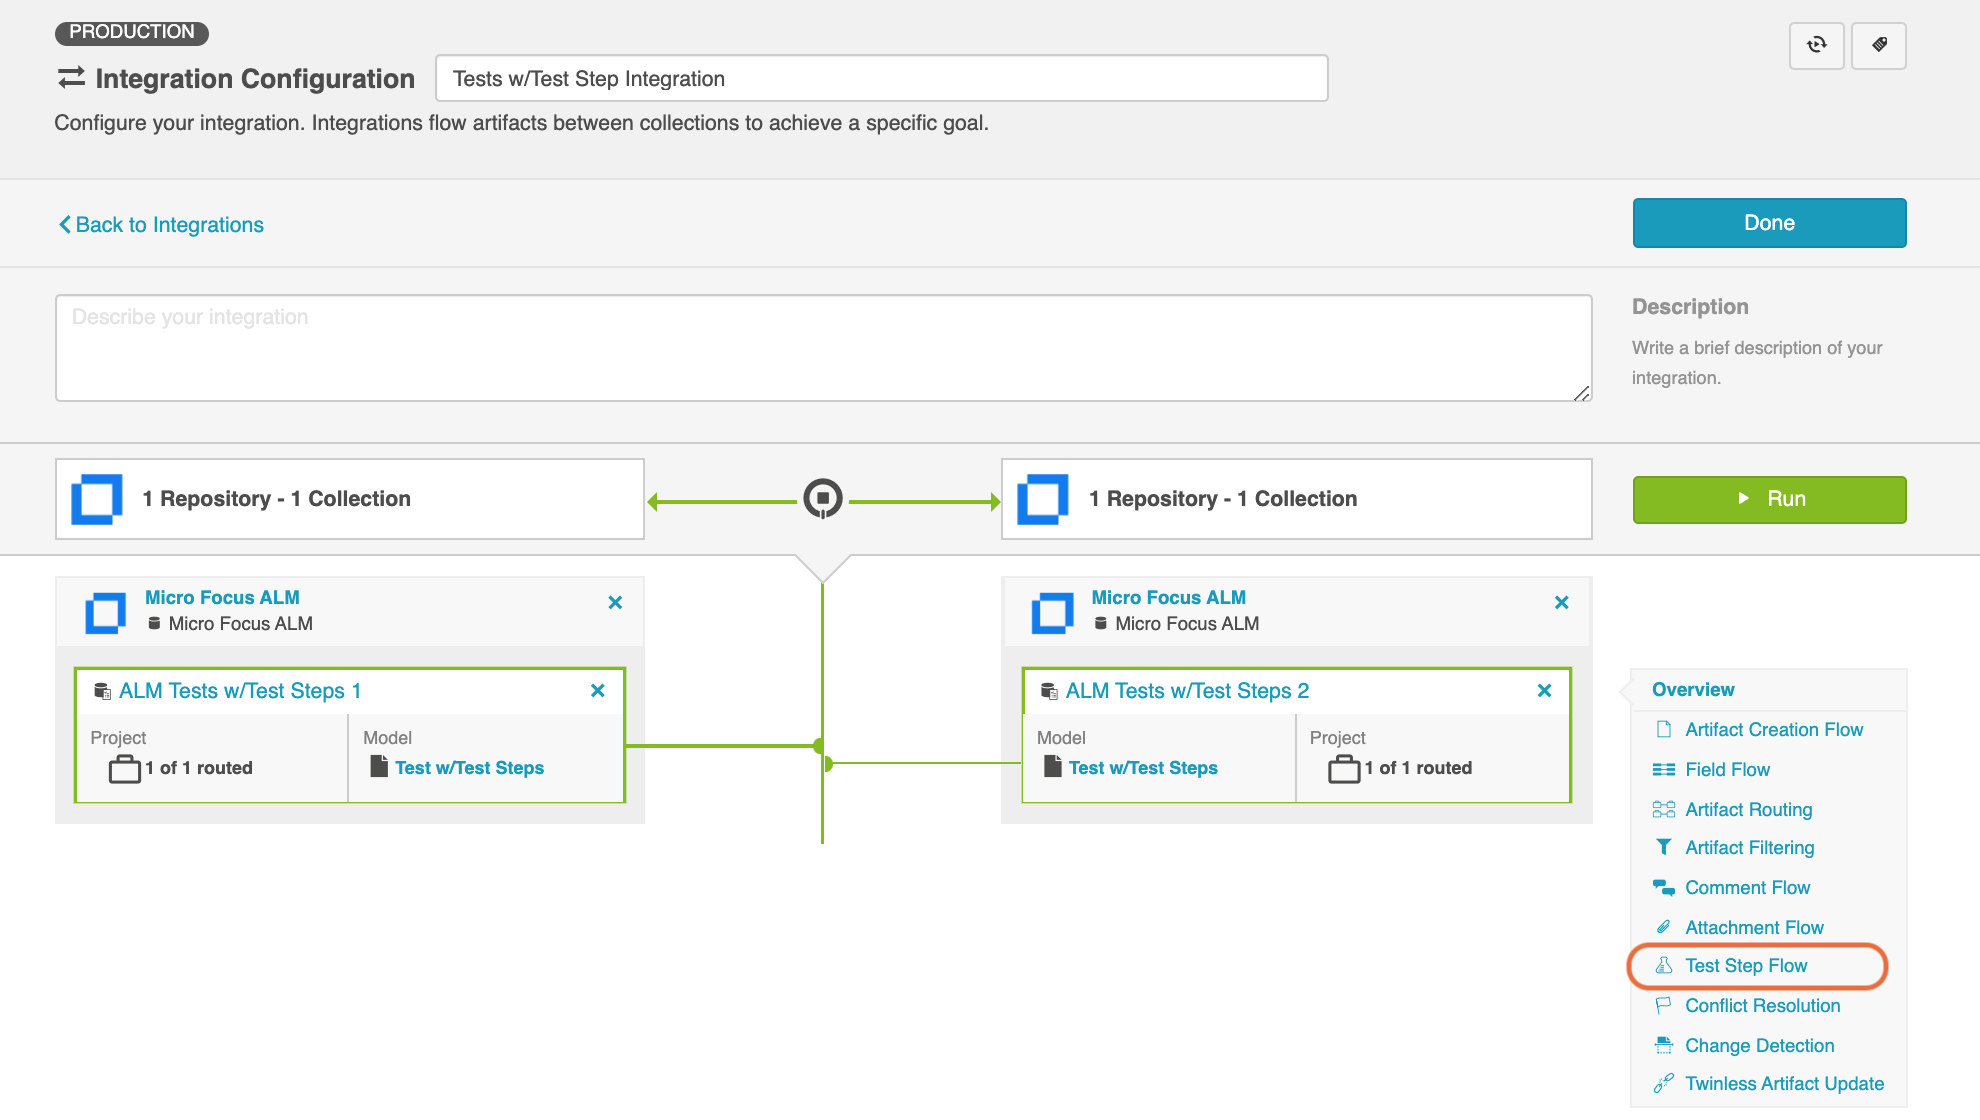
Step 4: Configure your Integration
You can find general details on how to configure an integration here.
In order to see a Test Step Flow link on the integration configuration screen, the following conditions must be met:
- Model is of type 'Model with Test Steps'
- Artifacts in both collections have test steps
- The relevant Hub connectors must support test steps (see Connector Documentation to confirm)

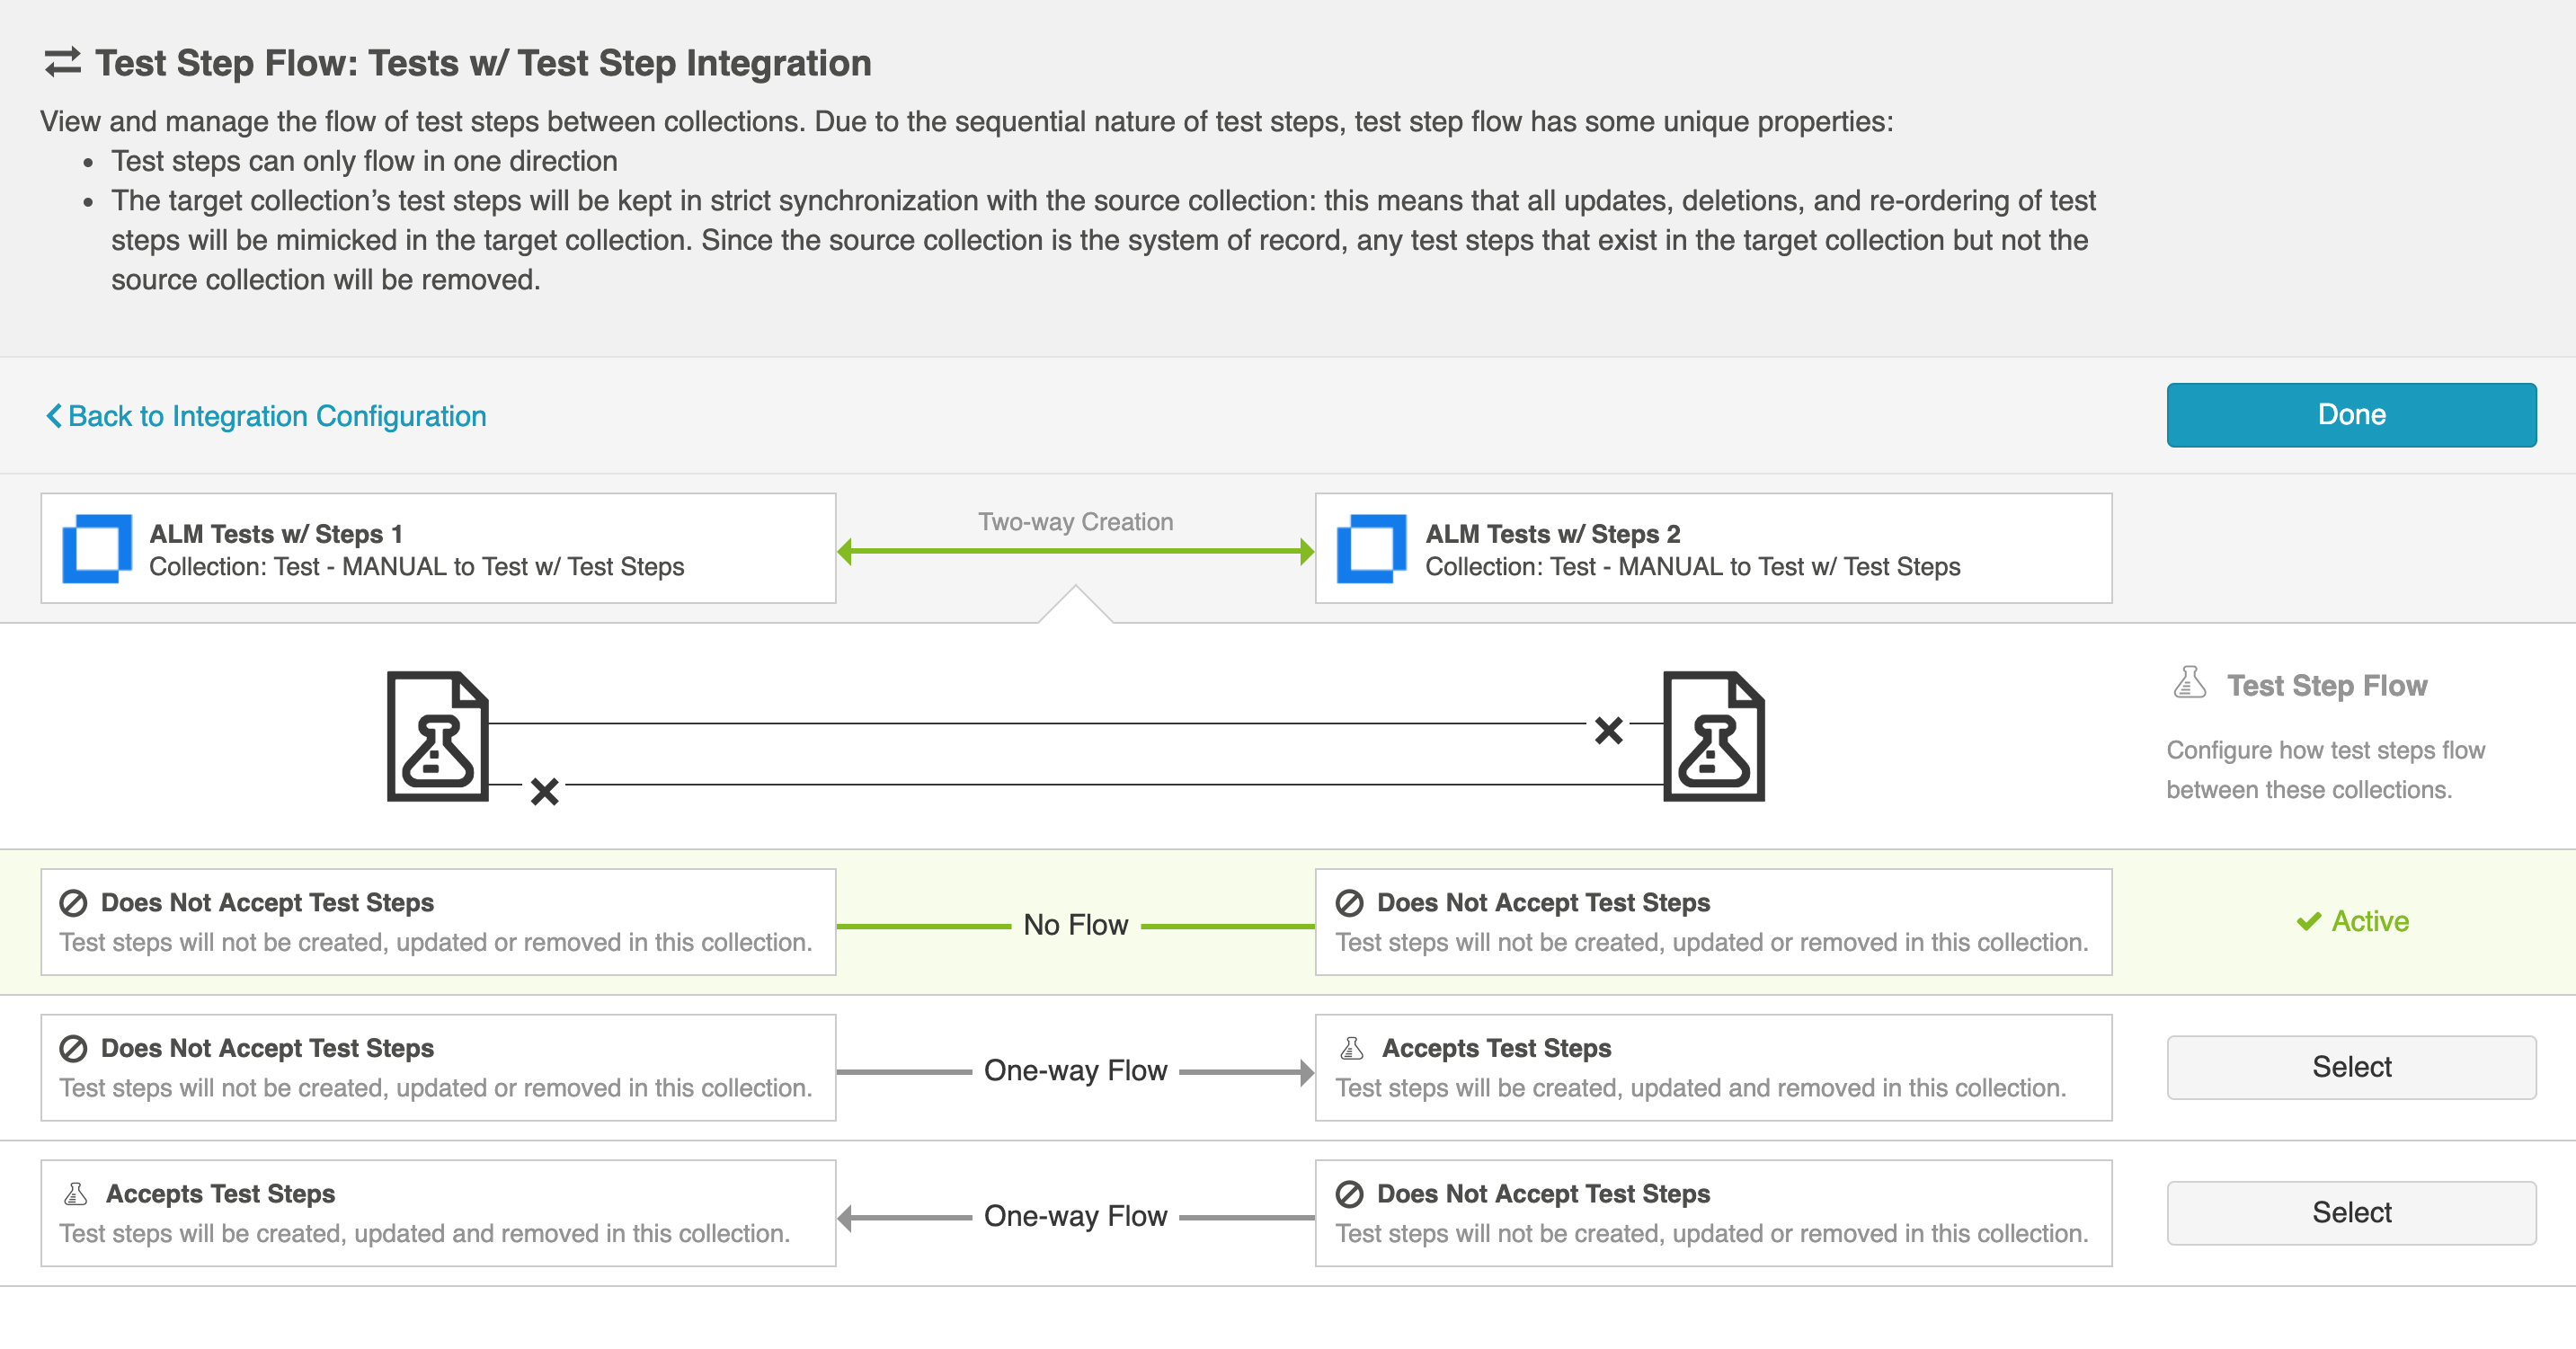
Clicking the link will bring you to the Test Step Flow screen, where you can click Select to choose your desired Test Step Flow style:

Due to the sequential nature of test steps, test step flow has some unique properties:
- Test steps can only flow in one direction
- The target collection’s test steps will be kept in strict synchronization with the source collection: this means that all updates, deletions, and re-ordering of test steps will be mimicked in the target collection. Since the source collection is the system of record, any test steps that exist in the target collection but not the source collection will be removed.
- If the test steps on the target artifact are changed by an end-user, they will be updated by Hub when one of the fields or ordering on the source artifact's test steps is changed.
Note: Comments and attachments are not currently supported on Test Steps.
Synchronizing Micro Focus ALM/QC Test Results
Many organizations have been using Micro Focus ALM (aka Quality Center) for quality management for years. ALM remains popular and continues to play an important role in test management, especially when it comes to manual testing, defect management, and quality reporting.
The challenges for QA teams and leadership are how to restore visibility into coverage, quality, and cost, now that testing data is split across multiple instances.
The method outlined below will enable you to flow test results into Micro Focus ALM from another ALM instance. Due to the architectural specificity of ALM, the methods below cannot be used for other endpoints.
You can watch this demo video to learn more:
Step 1: Connect to your Repository
First, connect to your repository by following the instructions here.
You can learn more about ALM-specific configuration in our Connector Docs.
Step 2: Construct your Model
To flow test steps, you will need to add the Test Steps entity when creating your Test model.
To do this, click + Add Entity and select the Test Steps option.
A Test Steps entity will be added. On the Model Configuration screen, you will now see two panels:
- Test Fields: In the top section, add any fields you'd like to flow on the test (or test run) artifact that are not part of its associated test steps.
- Test Step Fields: In the bottom section, add any fields you'd like to flow that are a part of test steps. You'll see that Hub provides some Smart Fields that are test step specific to help you get started, but you can add any other desired fields by leaving the Smart Field blank.
Here is an example of a very simple Test Model with Test Steps:
You can find general details on how to create a model here.
Converting Model Types
Standard Models can be converted to Test Models simply by choosing Model with Test Steps in the Model Type drop down.
Models with Test Steps cannot be converted back to Standard Models, but this should not present any challenges to integration scenarios. If Test Step Flow is not enabled in the related integrations, the test step fields in the model will simply be ignored.
Step 3: Create your Collection
You can find general details on how to create a collection here.
You will see a Map Test Fields sash on your collection if:
- Your model is a Model with Test Steps, and
- Your artifact is an ALM Test, ALM Test Run, Octane Test, or Octane Manual Run
The process to map test step fields is very similar to the process on the normal Field Mapping screen. Note that both relationship(s) and other field types for test steps will be mapped on this one sash.
Note: Tests and Test Steps do not require a typical relationship field mapping to link them. We've added behind-the-scenes smarts to couple them for you.
Step 4: Configure your Integration
You can find general details on how to configure an integration here.
In order to see a Test Step Flow link on the integration configuration screen, the following conditions must be met:
- Model is of type 'Model with Test Steps'
- Artifacts in both collections have test steps
- The relevant Hub connectors must support test steps (see Connector Documentation to confirm)
Clicking the link will bring you to the Test Step Flow screen, where you can click Select to choose your desired Test Step Flow style.
Due to the sequential nature of test steps, test step flow has some unique properties:
- Test steps can only flow in one direction
- The target collection’s test steps will be kept in strict synchronization with the source collection: this means that all updates, deletions, and re-ordering of test steps will be mimicked in the target collection. Since the source collection is the system of record, any test steps that exist in the target collection but not the source collection will be removed.
- If the test steps on the target artifact are changed by an end-user, they will be updated by Hub when one of the fields or ordering on the source artifact's test steps is changed.
Note: Comments and attachments are not currently supported on test steps.
Micro Focus ALM/QC & Micro Focus ALM Octane
In this integration scenario, a tester creates a set of requirements in ALM Octane. Hub will flow the requirements, along with their fields and sub-entities to ALM, so that the tester in ALM can begin designing running her tests. Hub will then flow the test results and defects back over to ALM Octane to maintain full visibility across the lifecycle.

The goal of this integration scenario is to synchronize the ALM Octane Test artifact with the ALM Test Instance artifact, while including the Test Results and Defects that exist on the Test Instance artifact. To do this, you'll need to configure the following integrations:
- ALM Requirement Folders <> ALM Octane Requirement Folders
- ALM Requirements <> ALM Octane Requirements
- ALM Test Sets -> ALM Octane Test Suites
- ALM Test Instances -> ALM Octane Tests
- ALM Test Runs <> ALM Octane Runs
- ALM Defects <> ALM Octane Defects
See the instructions below to configure this integration scenario.
Connect to your Repositories
First, connect to your repository by following the instructions here.
You can learn more about connector-specific configuration in our Connector Docs.
Set Up your Model
Review general details on creating or reusing a model.
For this integration scenario, you will need to add the following custom fields to your model:
| Smart Field | Label | Type | Field Values |
|---|---|---|---|
| Summary | Summary | String | N/A |
| Description | Description | Rich Text | N/A |
| Formatted ID | Formatted ID | String | N/A |
| Location | URL | Location | N/A |
| Priority | Priority | Single Select | Blocker, Critical, High, Medium, Low |
| Status | Status | Single Select | New, To Do, In Progress, Done |
| Parent Artifact | Parent | Relationship | N/A |
| None | Test Coverage | Relationships | N/A |
| Created | Created | Date Time | N/A |
| Modified | Modified | Date Time | N/A |
| None | Octane ID | String | N/A |
| None | Octane URL | String | N/A |
| None | ALM ID | String | N/A |
| None | ALM URL | String | N/A |
Test Steps
| Smart Field | Label | Type | Field Values |
|---|---|---|---|
| Summary | Summary | String | N/A |
| Action | Action | String | N/A |
| Expected Result | Expected Result | String | N/A |
| Id | Id | String | N/A |
| Status | Status | Single Select | Passed, Failed, Not Completed |
| None | Step Name | String | N/A |
ALM
You will need to add the following custom fields to your ALM instance:
| Name | Type |
|---|---|
| Octane ID | String |
| Octane URL | String |
ALM Octane
You will need to add the following custom fields to your ALM Octane instance:
| Name | Type |
|---|---|
| ALM ID | String |
| ALM URL | String |
Create your Collections
You can learn general details on configuring collections here:
Review the details in the sections below to ensure that any required fields are mapped in your collections.
Micro Focus ALM/QC
For this integration scenario, you'll need to configure the following ALM collections:
Work Item Collections
- ALM Requirements
- ALM Test Instances
- ALM Test Runs
- ALM Defects
Container Collections
- ALM Requirement Folders
- ALM Test Sets
Field Mapping
Map the following ALM fields to the model:
| Collection | ALM Field | Model Field |
|---|---|---|
| ALM Requirements | Name | Summary |
| Description | Description | |
| Creation Date | Created | |
| Formatted ID | ALM ID | |
| URL | ALM URL | |
| Octane ID | Octane ID | |
| Octane URL | Octane URL | |
| ALM Test Instances | Name | Summary |
| Formatted ID | ALM ID | |
| URL | ALM URL | |
|
Octane ID |
Octane ID | |
| Octane URL | Octane URL | |
| ALM Test Runs | Run Name | Summary |
| Test Description | Description | |
| Formatted ID | ALM ID | |
| URL | ALM URL | |
| Octane ID | Octane ID | |
| Octane URL | Octane URL | |
| Tester | Constant Value | |
| ALM Defects | Summary | Summary |
| Description | Description | |
| Priority | Priority | |
| Status | Status | |
| Detected on Date | Created | |
| Formatted ID | ALM ID | |
| URL | ALM URL | |
| Octane ID | Octane ID | |
| Octane URL | Octane URL | |
| Severity | Constant Value | |
| Detected By | Constant Value | |
| ALM Requirement Folders | Name | Summary |
| Description | Description | |
| Creation Date | Created | |
| Octane ID | Octane ID | |
| Octane URL | Octane URL | |
| ALM Test Sets | Name | Summary |
| Description | Description | |
| Open Date | Created | |
| Formatted ID | ALM ID | |
| URL | ALM URL | |
| Octane ID | Octane ID | |
| Octane URL | Octane URL |
Test Step Field Mapping
Map the following ALM fields to the model:
| Collection | ALM Field | Model Field |
|---|---|---|
| ALM Test Runs | Step Name | Summary |
| Description | Action | |
| Expected | Expected Result | |
| Step Id | Id | |
| Status | Status | |
| Step Name | Step Name |
Relationship Specification
Configure the following relationship mappings:
| Collection | ALM Field | Model Field |
|---|---|---|
| ALM Requirement Folders | Parent Folder | Parent |
| ALM Requirements | Test Coverage | Test Coverage |
Micro Focus ALM Octane
For this integration scenario, you'll need to configure the following ALM Octane collections:
Work Item Collections
- ALM Octane Requirements
- ALM Octane Tests
- ALM Octane Runs
- ALM Octane Defects
Container Collections
- ALM Octane Requirement Folders
- ALM Octane Test Suites
Field Mapping
Map the following ALM Octane fields to the model:
| Collection | ALM Octane Field | Model Field |
|---|---|---|
| ALM Octane Requirements | Name | Summary |
| Description | Description | |
| Creation time | Created | |
| ALM ID | ALM ID | |
| ALM URL | ALM URL | |
| Formatted ID | Octane ID | |
| URL | Octane URL | |
| ALM Octane Tests | Name | Summary |
| ALM ID | ALM ID | |
| ALM URL | ALM URL | |
| Formatted ID | Octane ID | |
| URL | Octane URL | |
| Phase | Constant Value | |
| Application modules | Constant Value | |
| ALM Octane Runs | Name | Summary |
| Description | Description | |
| ALM ID | ALM ID | |
| ALM URL | ALM URL | |
| Formatted ID | Octane ID | |
| URL | Octane URL | |
| Release | Constant Value | |
| ALM Octane Defects | Name | Summary |
| Description | Description | |
| Priority | Priority | |
| Phase | Status | |
| Creation time | Created | |
| ALM ID | ALM ID | |
| ALM URL | ALM URL | |
| Formatted ID | Octane ID | |
| URL | Octane URL | |
| ALM Octane Requirement Folders | Name | Summary |
| Description | Description | |
| Creation time | Created | |
| Octane ID | Octane ID | |
| Octane URL | Octane URL | |
| ALM Octane Test Suites | Name | Summary |
| Description | Description | |
| Creation time | Created | |
| ALM ID | ALM ID | |
| ALM URL | ALM URL | |
| Formatted ID | Octane ID | |
| URL | Octane URL | |
| Application modules | Constant Value |
Test Step Field Mapping
Map the following ALM Octane fields to the model:
| Collection | ALM Octane Field | Model Field |
|---|---|---|
| ALM Octane Runs | Actual | Action |
| Description | Expected Result | |
| ID | Id | |
| Result | Status |
Relationship Specification
Configure the following relationship mappings:
| Collection | ALM Octane Field | Model Field |
|---|---|---|
| ALM Octane Requirement Folders | Parent | Parent |
| ALM Octane Requirements | Covering Tests | Test Coverage |
| Parent | Constant Value |
Configure your Integrations
You can learn general details on configuring integrations here:
For this integration scenario, you will need to configure the following integrations:
- ALM Requirement Folders <> ALM Octane Requirement Folders
- ALM Requirements <> ALM Octane Requirements
- ALM Test Sets -> ALM Octane Test Suites
- ALM Test Instances -> ALM Octane Tests
- ALM Test Runs <> ALM Octane Runs
- ALM Defects <> ALM Octane Defects
Review the details in the table below to ensure that your integrations are configured correctly.
| Integration | Integration Type | Artifact Creation Flow | Artifact Routing/Container Mirroring | Test Step Flow |
|---|---|---|---|---|
| ALM Requirement Folders <> ALM Octane Requirement Folders | Container + Work Item Synchronization | Two-way Creation | ALM <> ALM Octane |
N/A |
|
ALM Requirements <> ALM Octane Requirements |
Work Item Synchronization |
Two-way Creation |
ALM <> ALM Octane | N/A |
| ALM Test Sets -> ALM Octane Test Suites | Container + Work Item Synchronization | Two-way Creation | ALM <> ALM Octane | N/A |
| ALM Test Instances -> ALM Octane Tests | Work Item Synchronization |
One-way Creation Octane accepts new artifacts |
ALM -> ALM Octane | N/A |
| ALM Test Runs <> ALM Octane Runs | Work Item Synchronization | Two-way Creation | ALM <> ALM Octane |
One-way Flow ALM accepts test steps |
| ALM Defects <> ALM Octane Defects | Work Item Synchronization | Two-way Creation | ALM <> ALM Octane | N/A |
Functional Limitations
| Category | Limitation | Applicable Repository Version |
|---|---|---|
| Third Party API Limitation |
Test Steps Test Steps are not supported in the Test Instance/Test integration. |
Any supported repository version: |