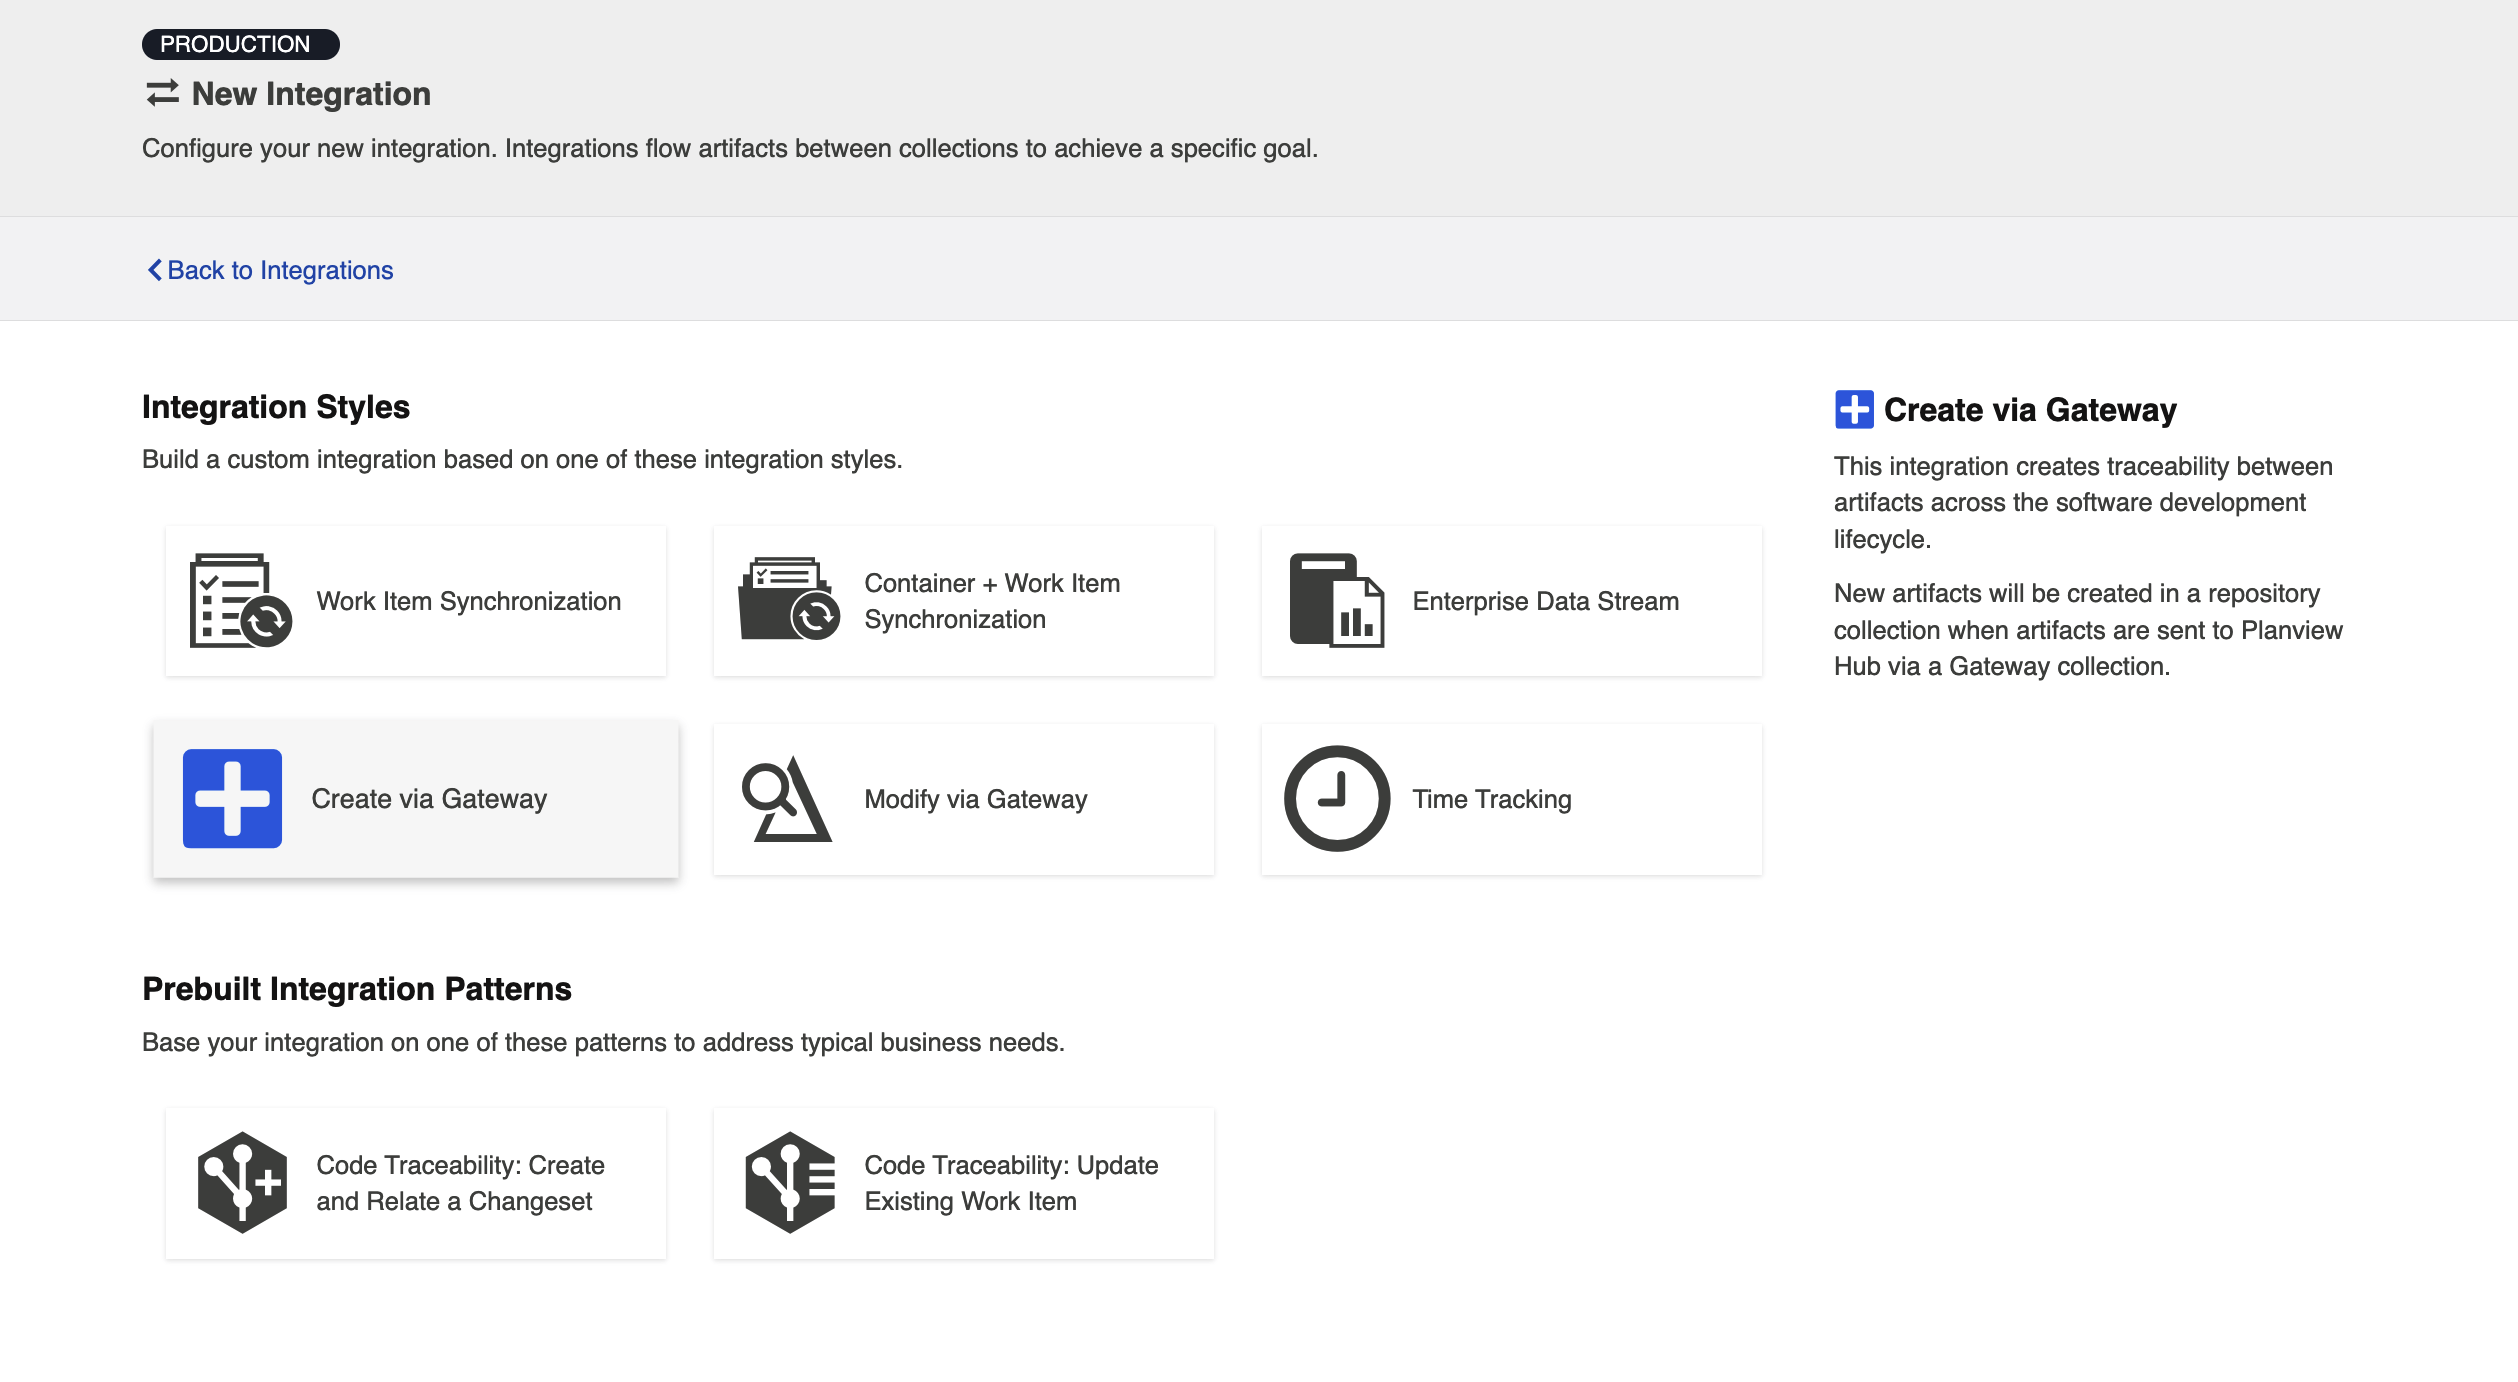
Create via Gateway
The Create via Gateway Integration Template is only available in Editions that contain the Gateway add-on. See the Planview Hub Editions table to determine if your edition contains this functionality.
What is a Create via Gateway Integration?

An integration is quite simply the flow of information between two or more collections. A Create via Gateway Integration, specifically, creates new artifacts in a work item collection or a container collection that connects to a repository, such as Jira, when they are sent to Hub via a Gateway Collection. The Gateway Collection uses an inbound webhook to access event-based information in an external DevOps tool, such as Git or Jenkins.
These types of events are “fire and forget” — they create something new in your repository, but they don’t expect anything back. As such, they don’t mandate a full-blown two way synchronization; a lighter one-way integration can do the trick.
Here are some examples of what you can do with the Create via Gateway integration template:

When you configure a Create via Gateway Integration, you can customize the field flow, artifact routing, and artifact filtering of your integration.
Video Tutorial
Check out the video below to learn how to configure the Create via Gateway Integration Template.
Note: This video assumes that you have already configured your repositories, models, and collections as outlined in the Quick Start Guide.
Use Case and Business Value
The Create via Gateway integration creates traceability between artifacts across the software development lifecycle. New artifacts will be created in a work item (repository) collection or container (repository) collection when artifacts are sent to Hub via a gateway collection. Optionally, these newly-created artifacts can be related to already-existing artifacts in the same repository.
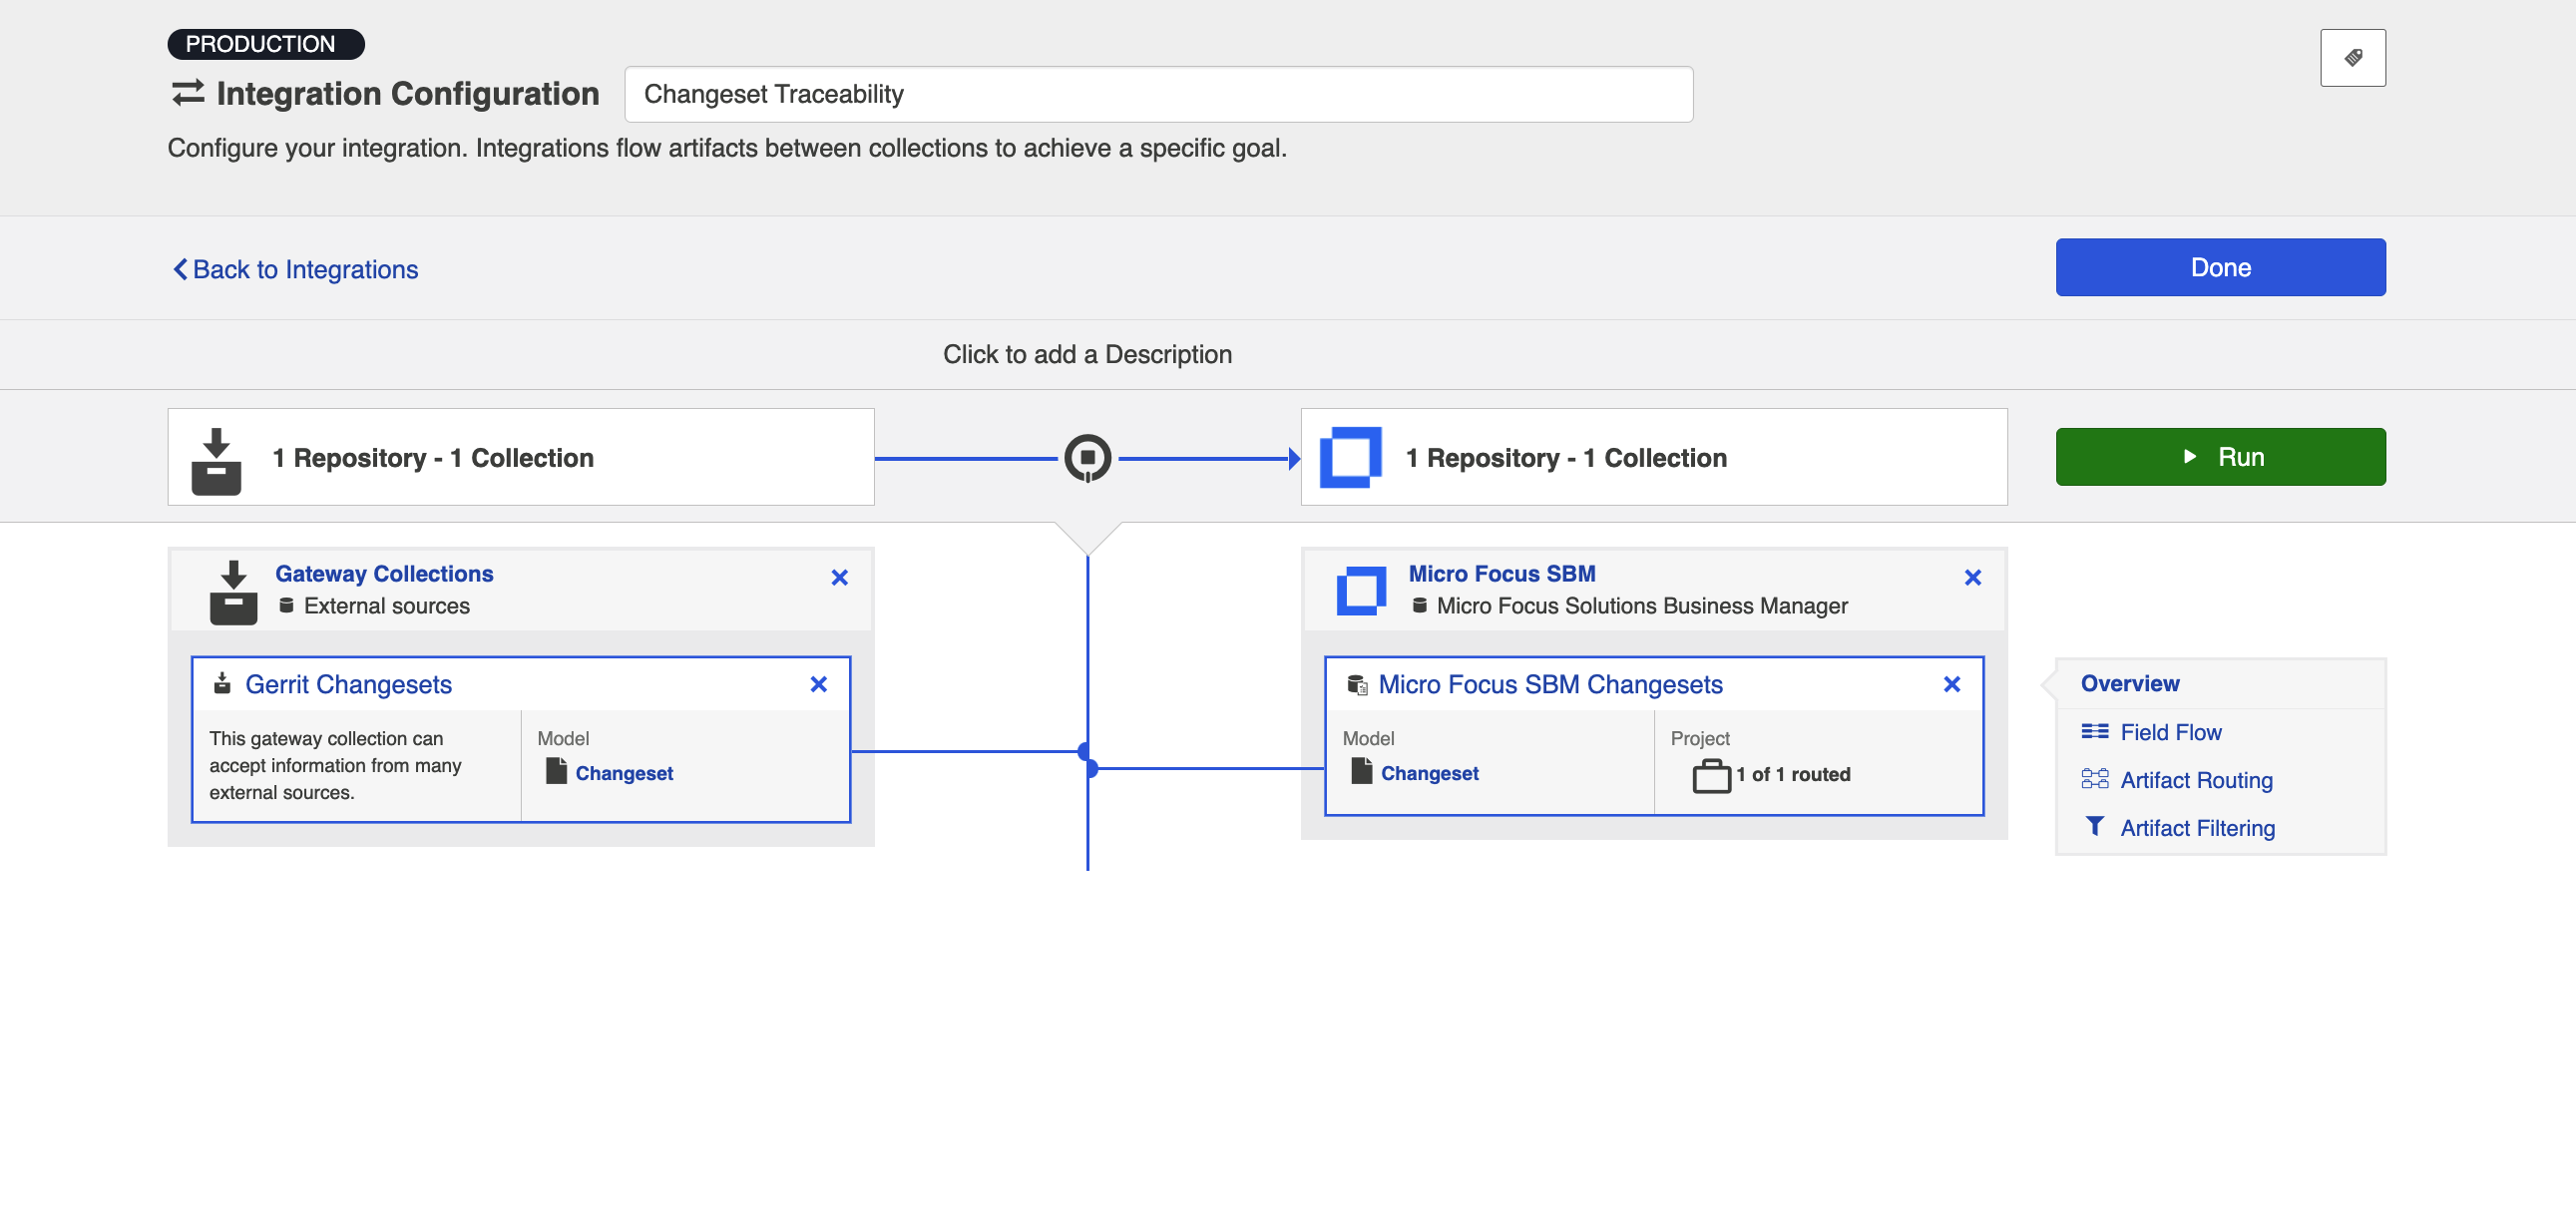
For example, if your development team uses Gerrit for source code management and Solutions Business Manager (formerly Serena Business Manager) for Agile story management, you can set up an integration that would trigger the creation of changesets in SBM whenever changesets were created in Gerrit. And if the changesets in Gerrit identify the stories in SBM to which they pertain, Hub would find the already-existing story in SBM and create a relationship between that story and the newly created changeset in SBM.
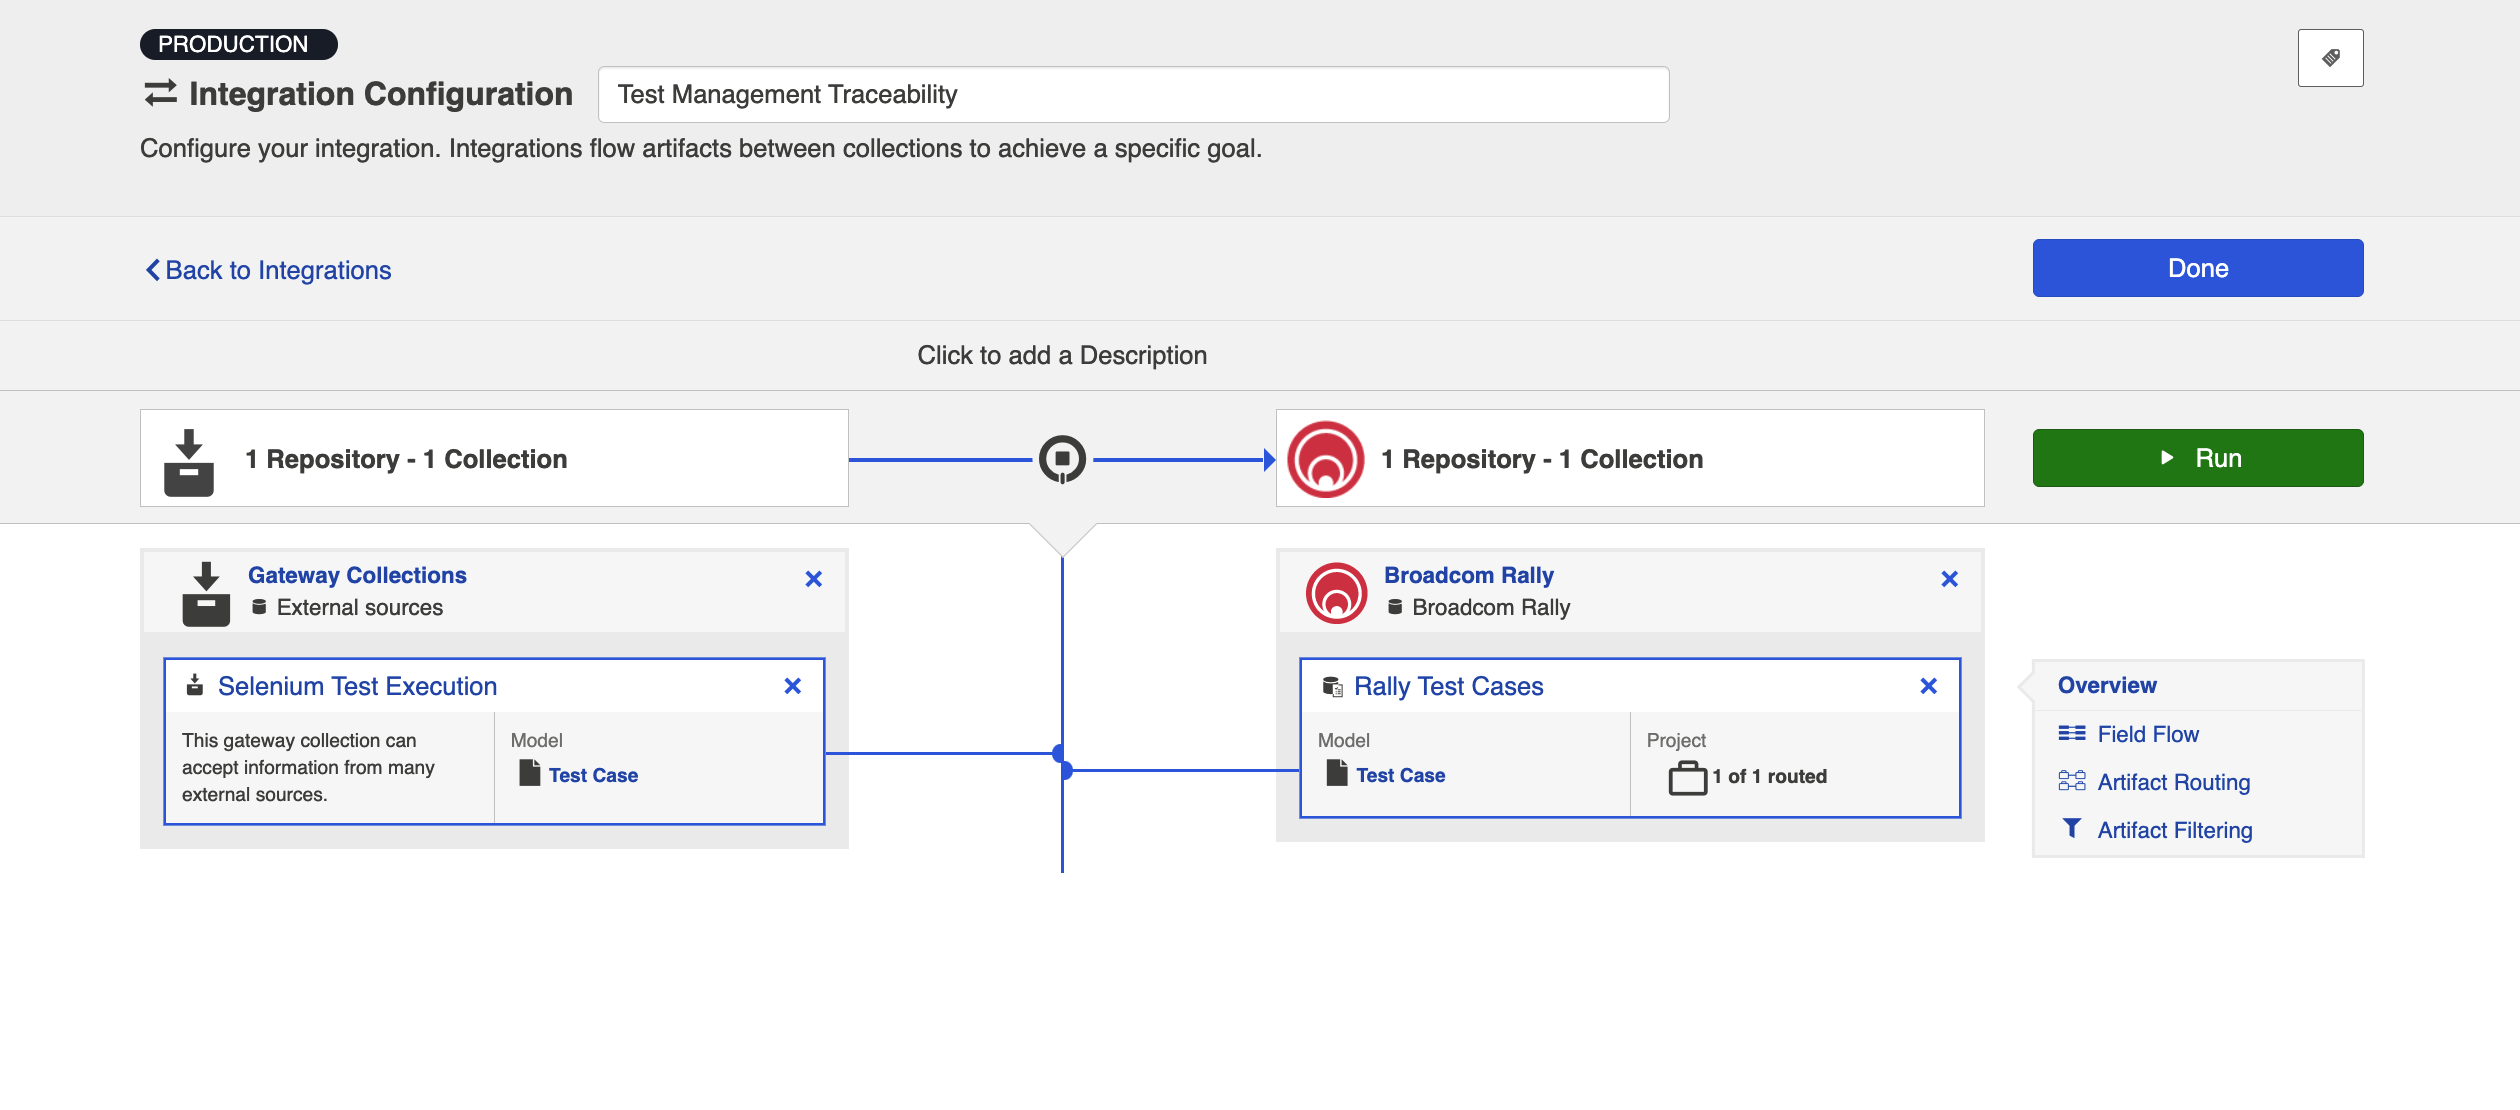
Additionally, if your QA team uses a tool like Selenium for test execution, and a tool like Broadcom Rally for test management, you can set up an integration that would trigger the creation of test results in Broadcom Rally when test results are created in Selenium. And if the test results from Selenium identify the tests in Broadcom Rally which they cover, Hub would find the already-existing test and create a relationship between the two artifacts.
Template Affordances
The Create via Gateway Integration Template allows you to flow artifacts from a single gateway collection into a single work item or container collection that connects to a repository. When a new artifact is sent to Hub via our REST API, an artifact will be created in the target work item or container collection.

Configuring a Create via Gateway Integration
To configure your integration, select Integrations at the top of the screen, then click New Integration.
Select the Create via Gateway template.
Note: Depending on the edition of Hub you are using, you may not see all options shown below.
This will bring you to the New Integration screen.
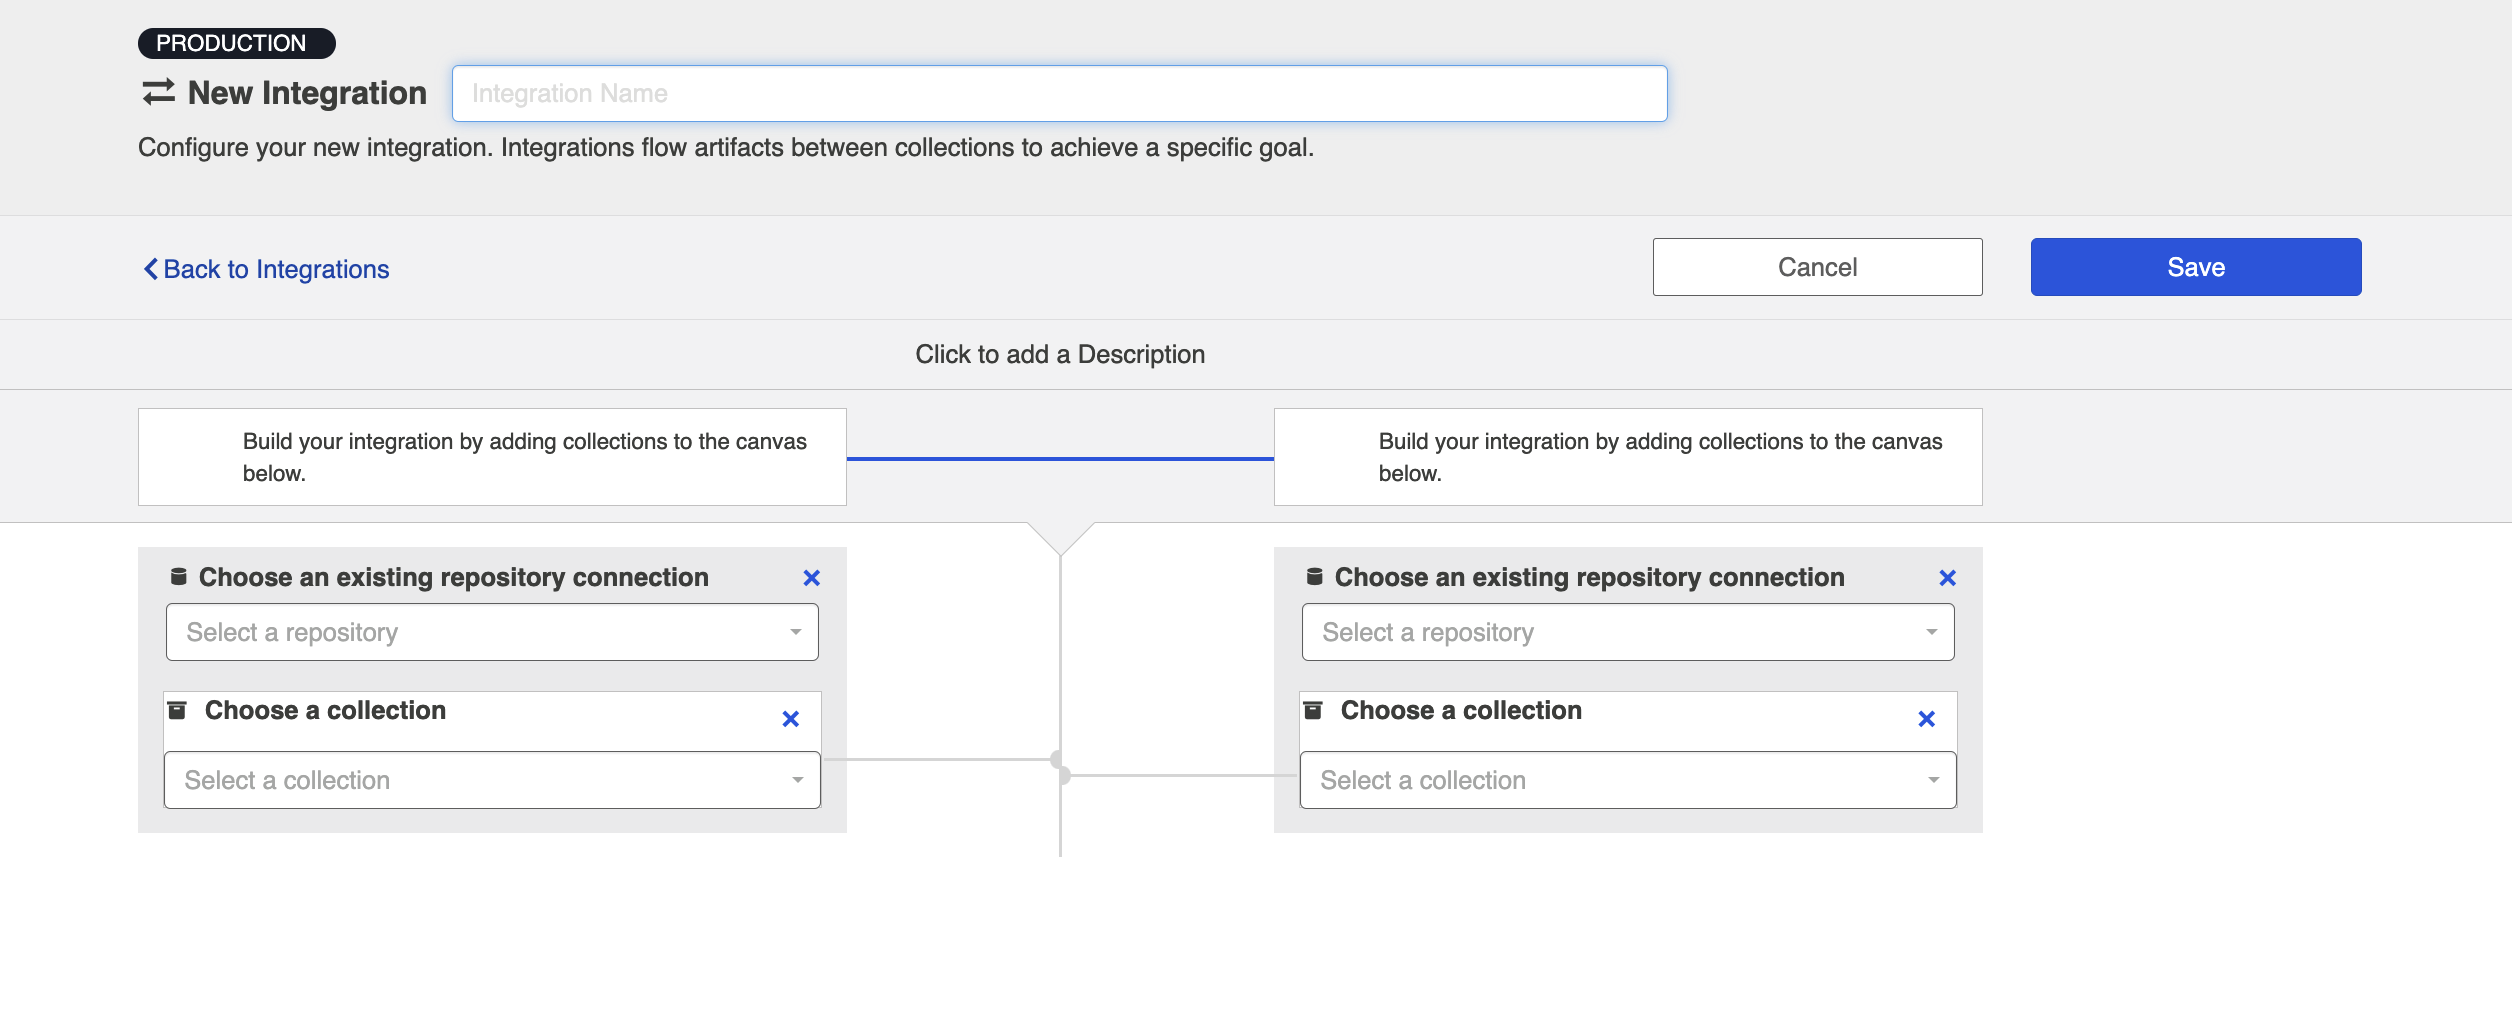
Name your integration and select your repositories and collections.
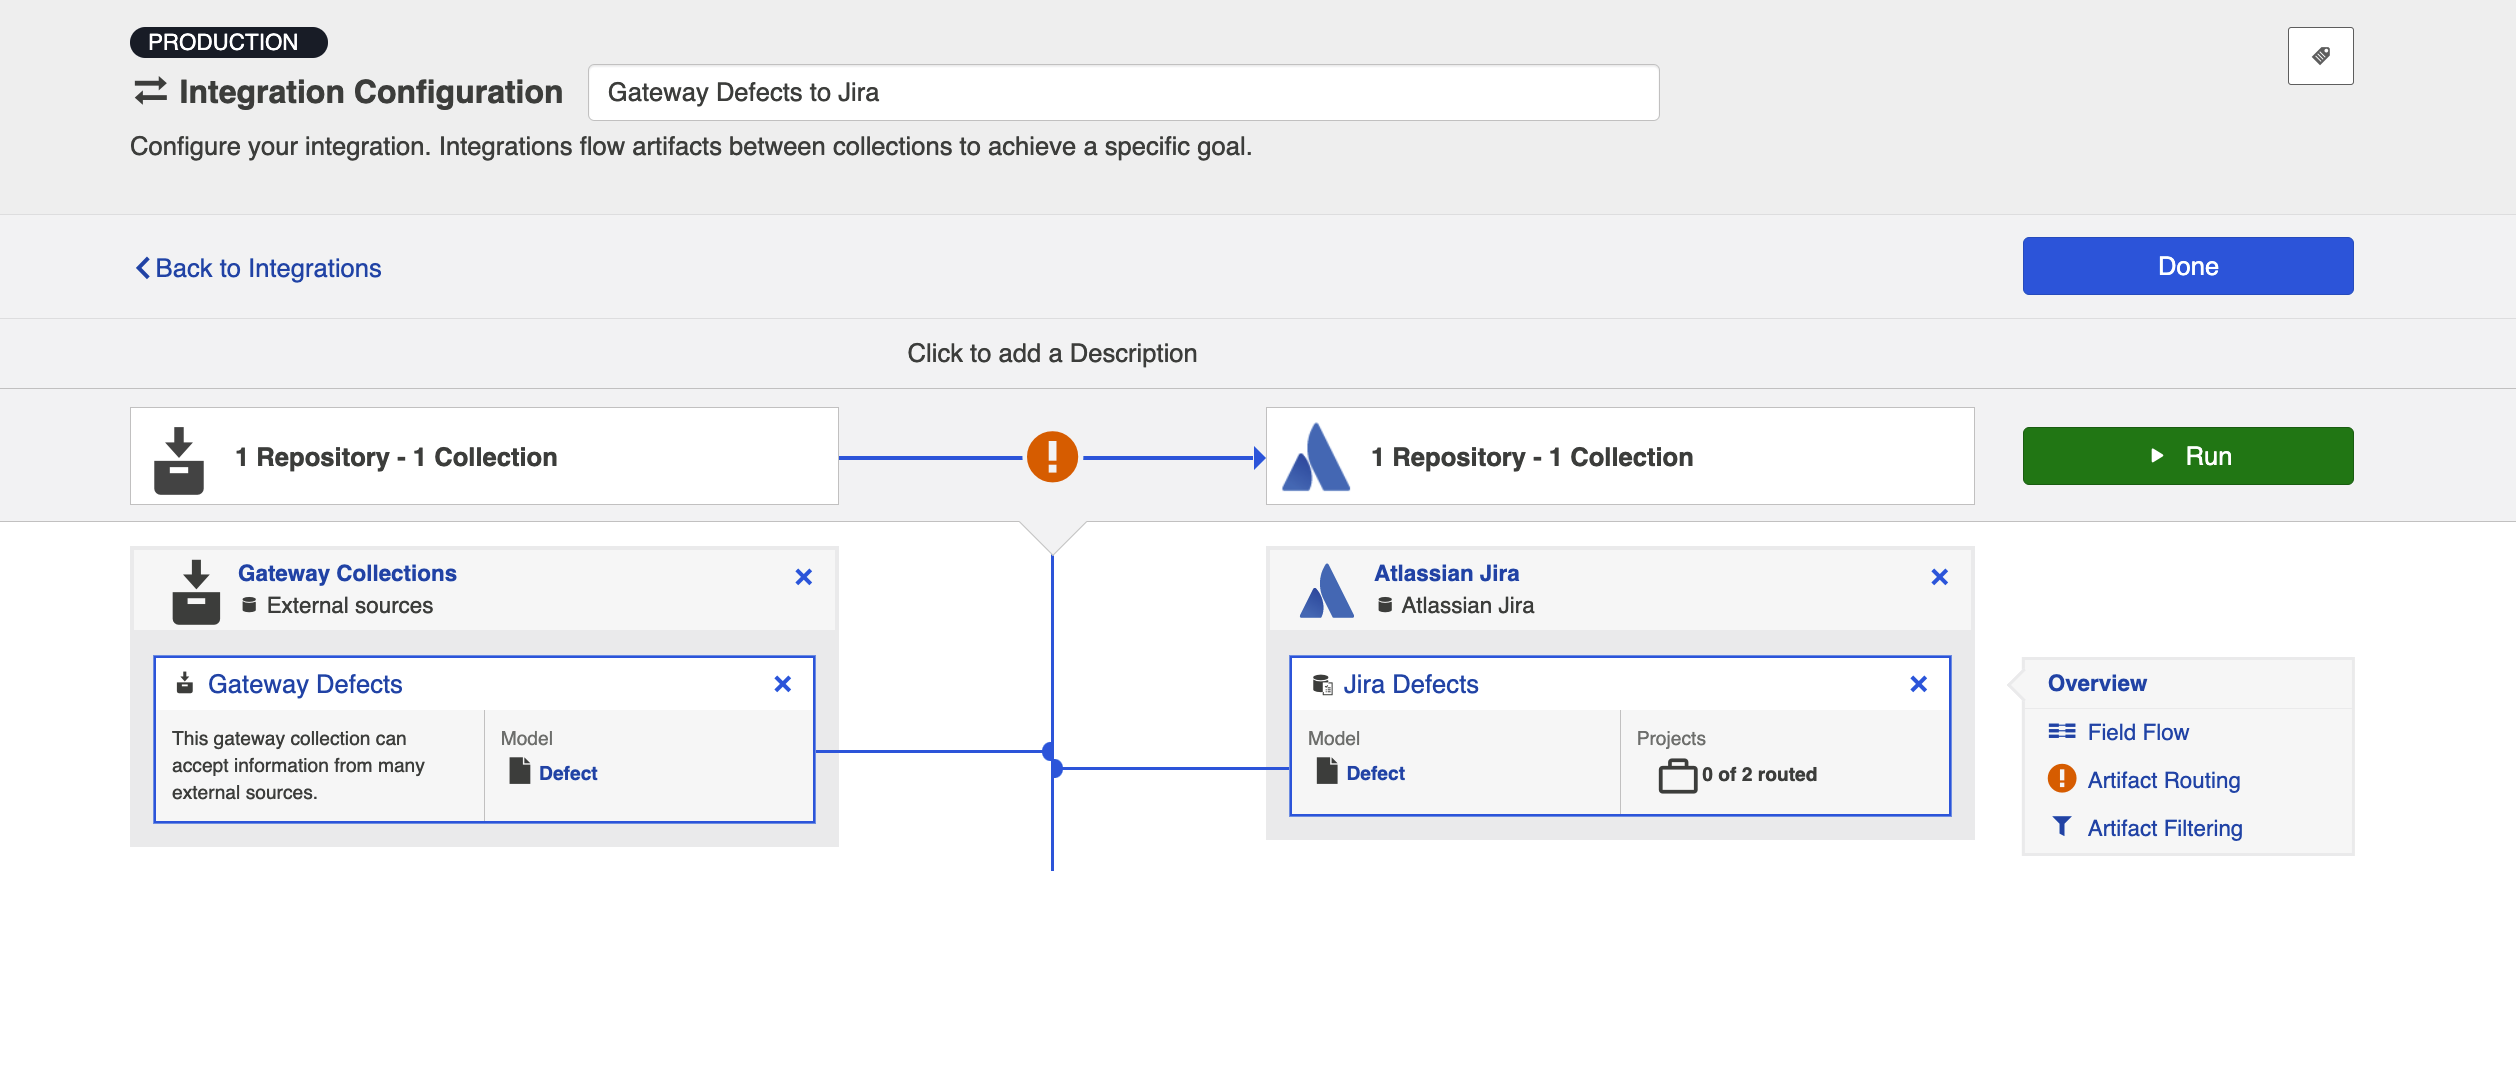
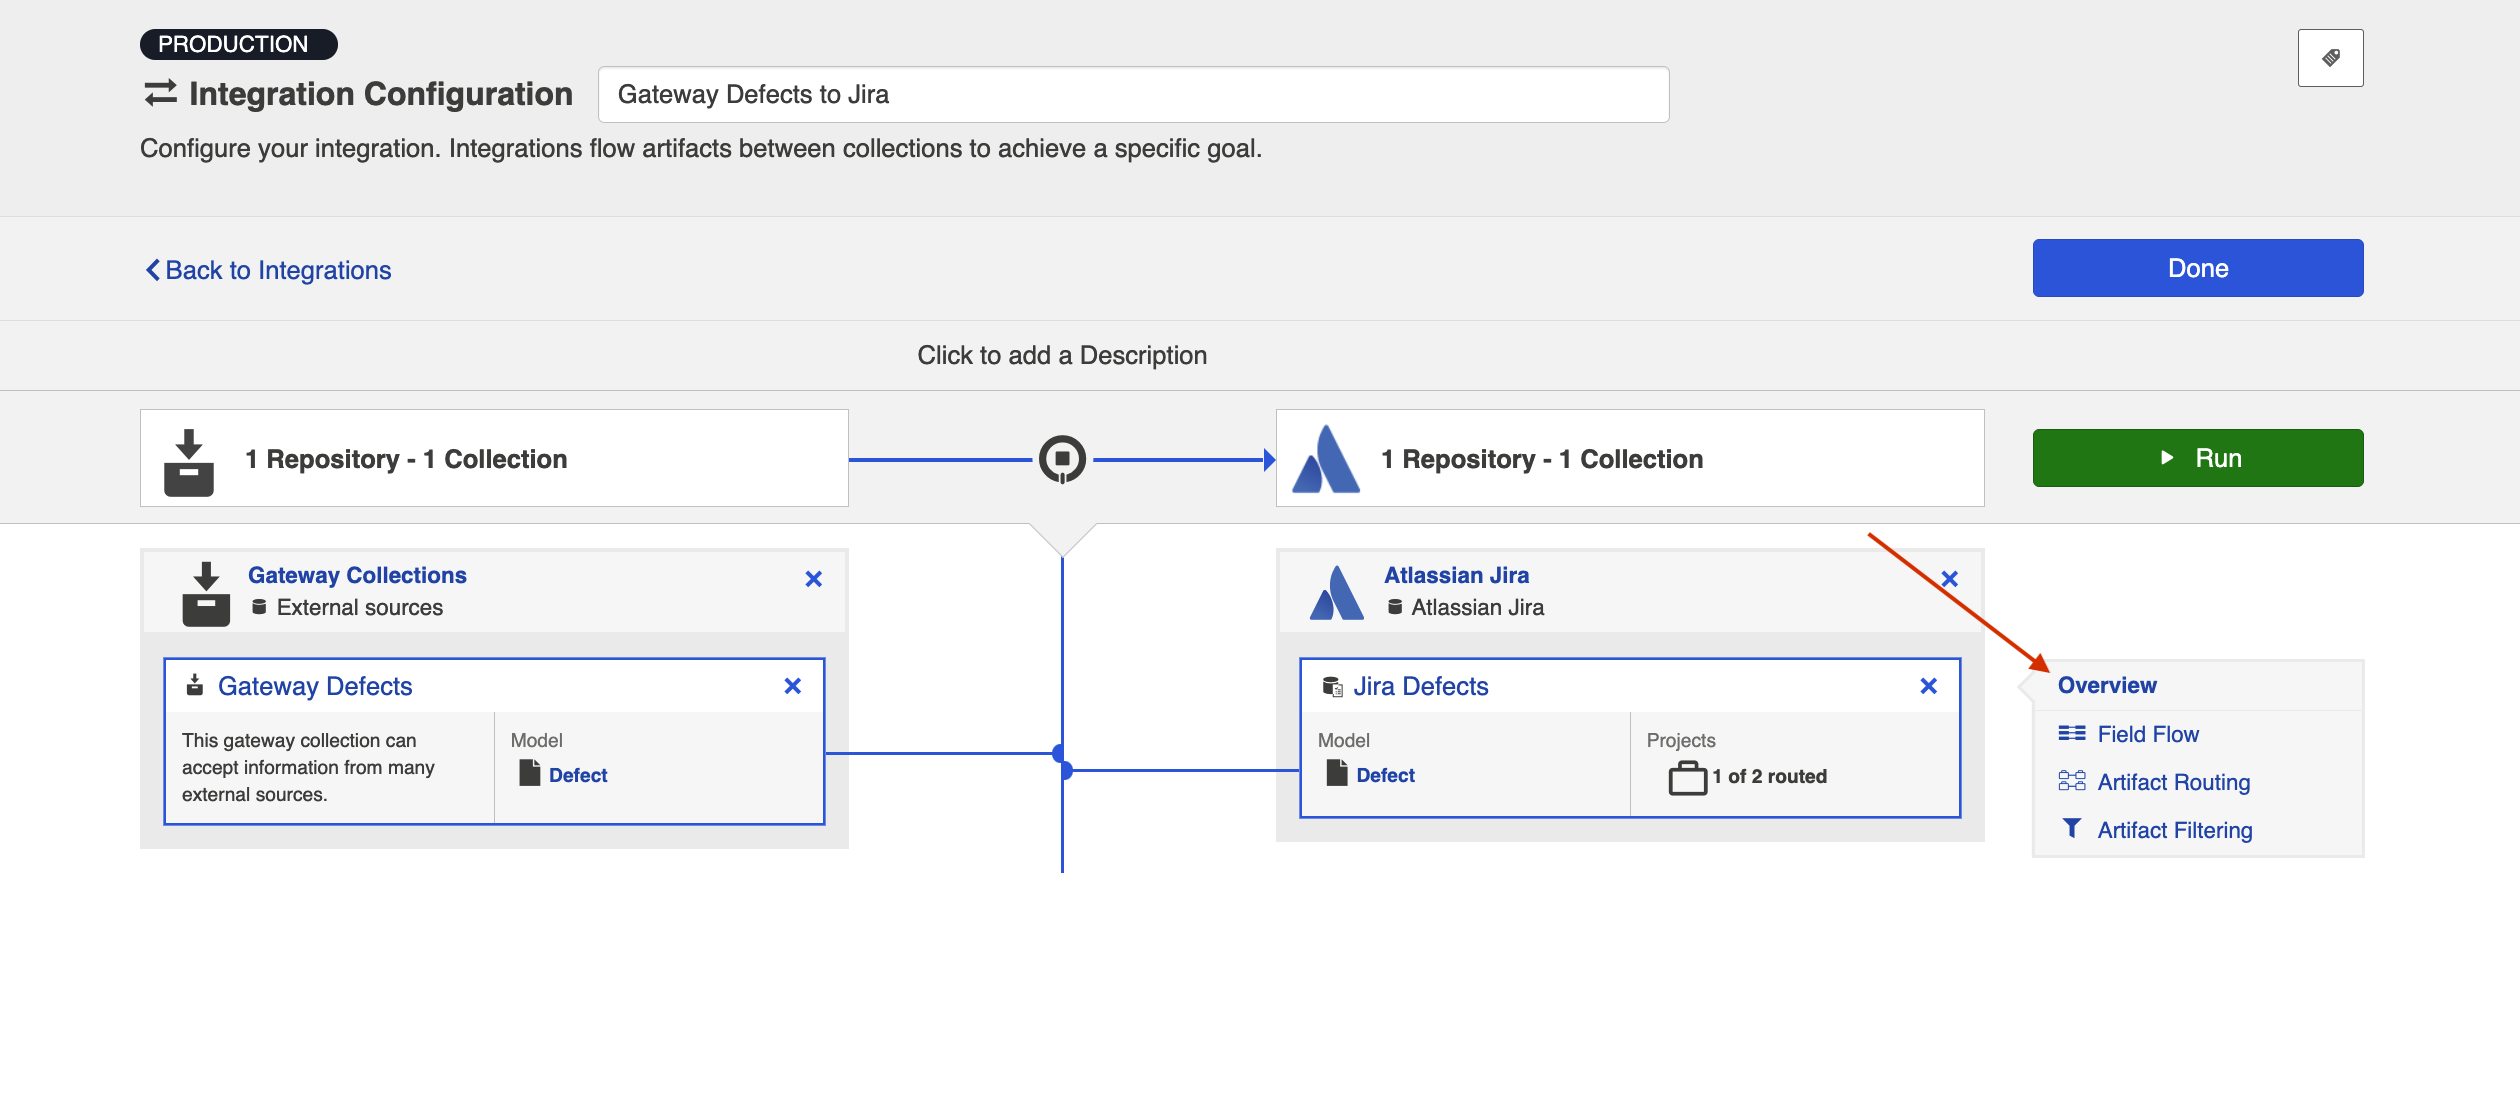
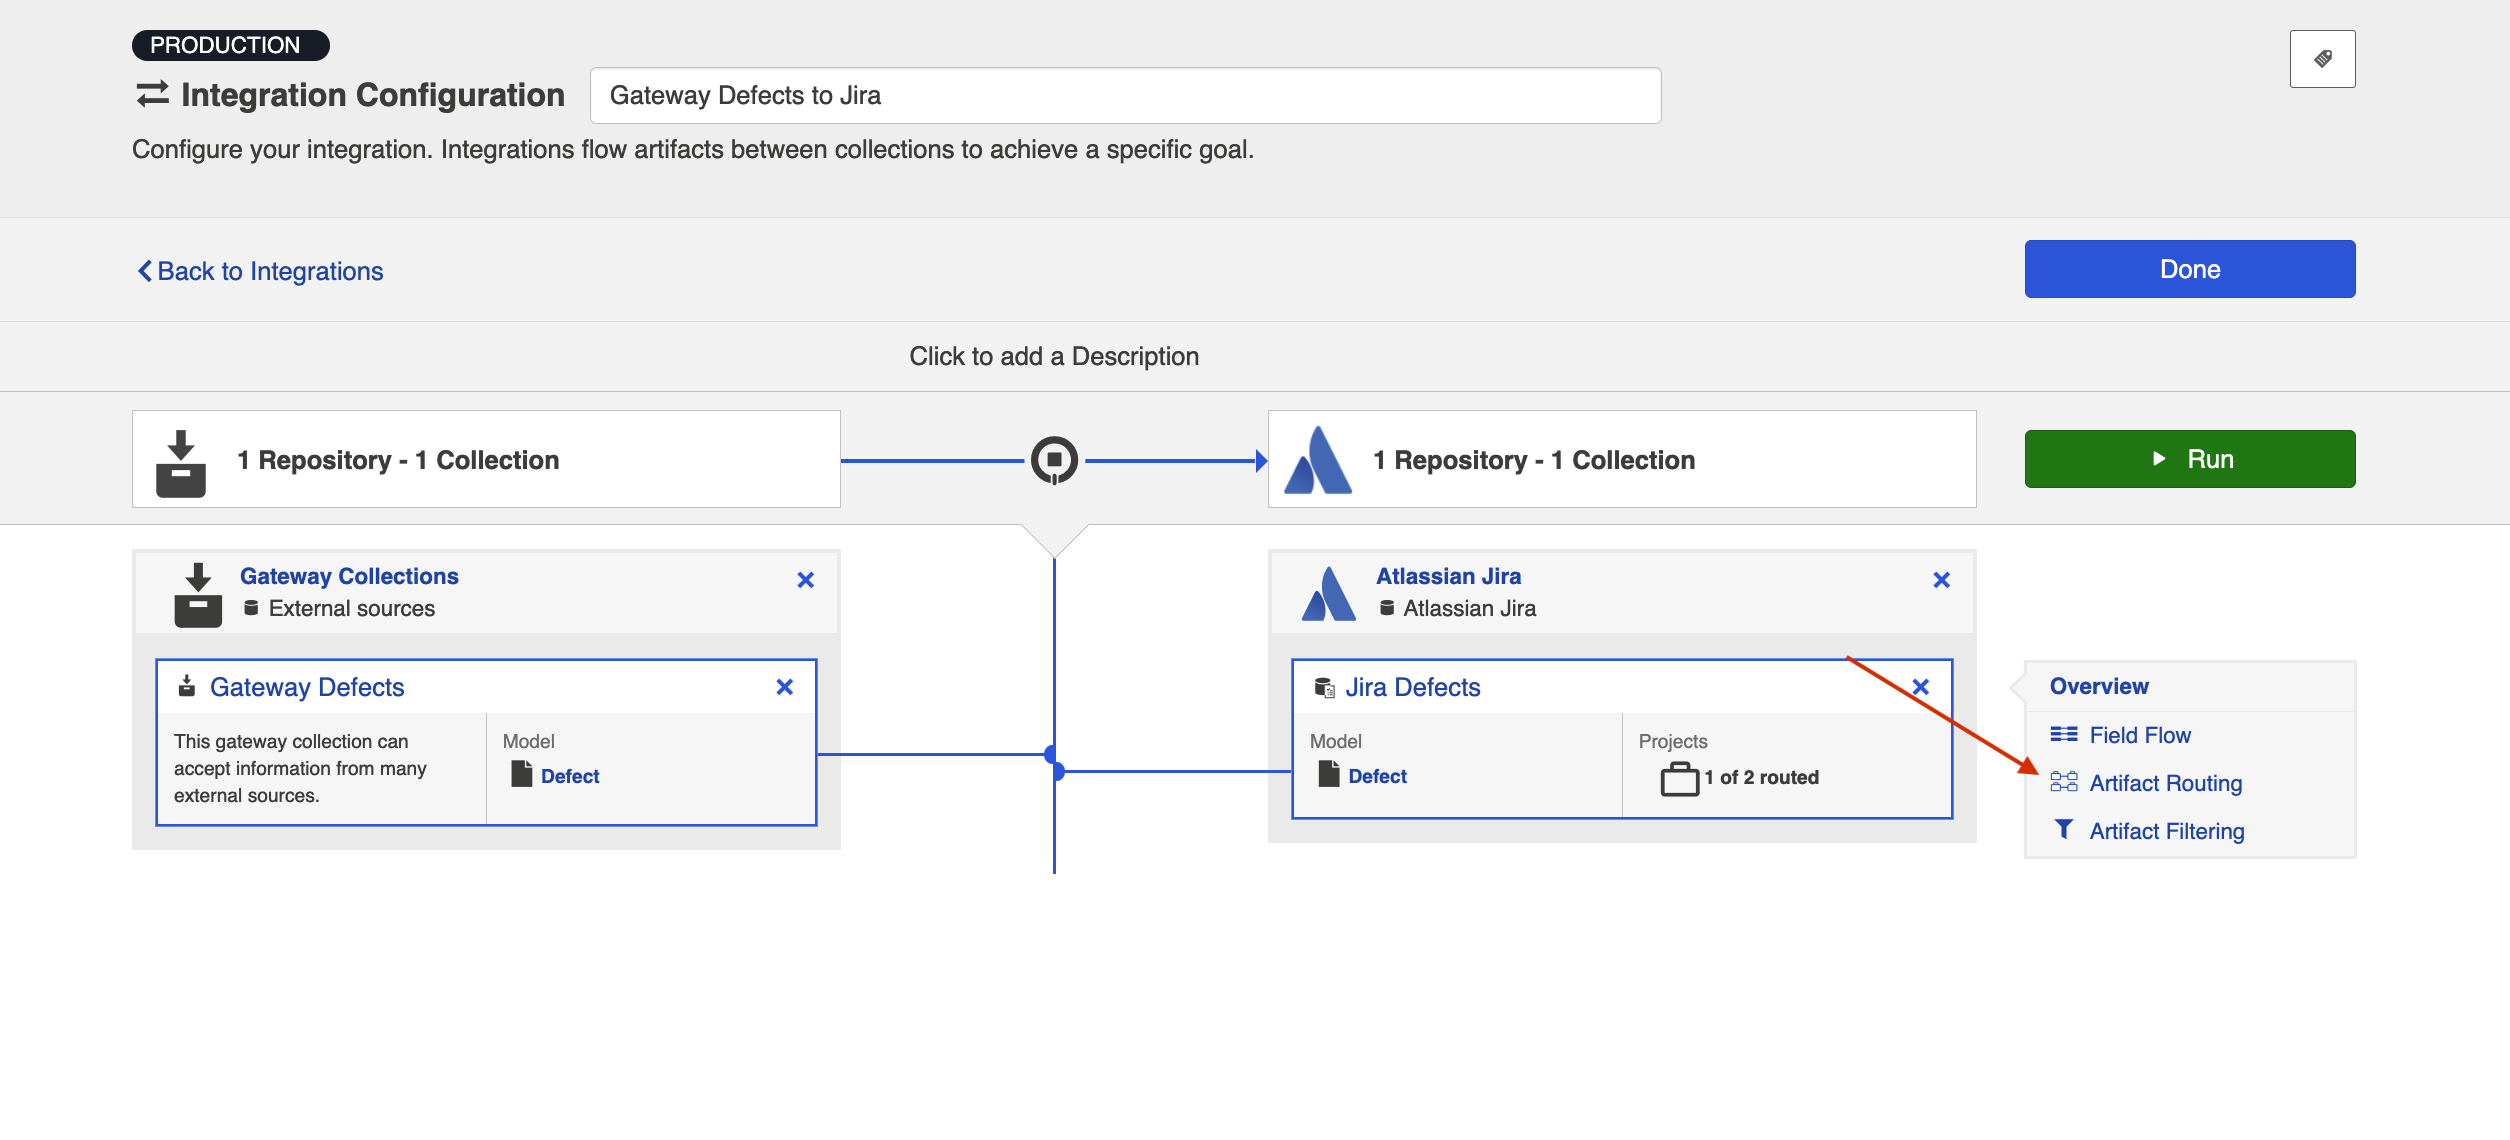
You'll notice a configuration warning next to the Artifact Routing link if you haven't configured your routing yet. Routing is essential, since it tells your integration where (in which project, for example) to create each artifact's twin. You can learn more about Artifact Routing below.
You can click the Overview link on the right side of the Integration screen to get to the Overview screen.
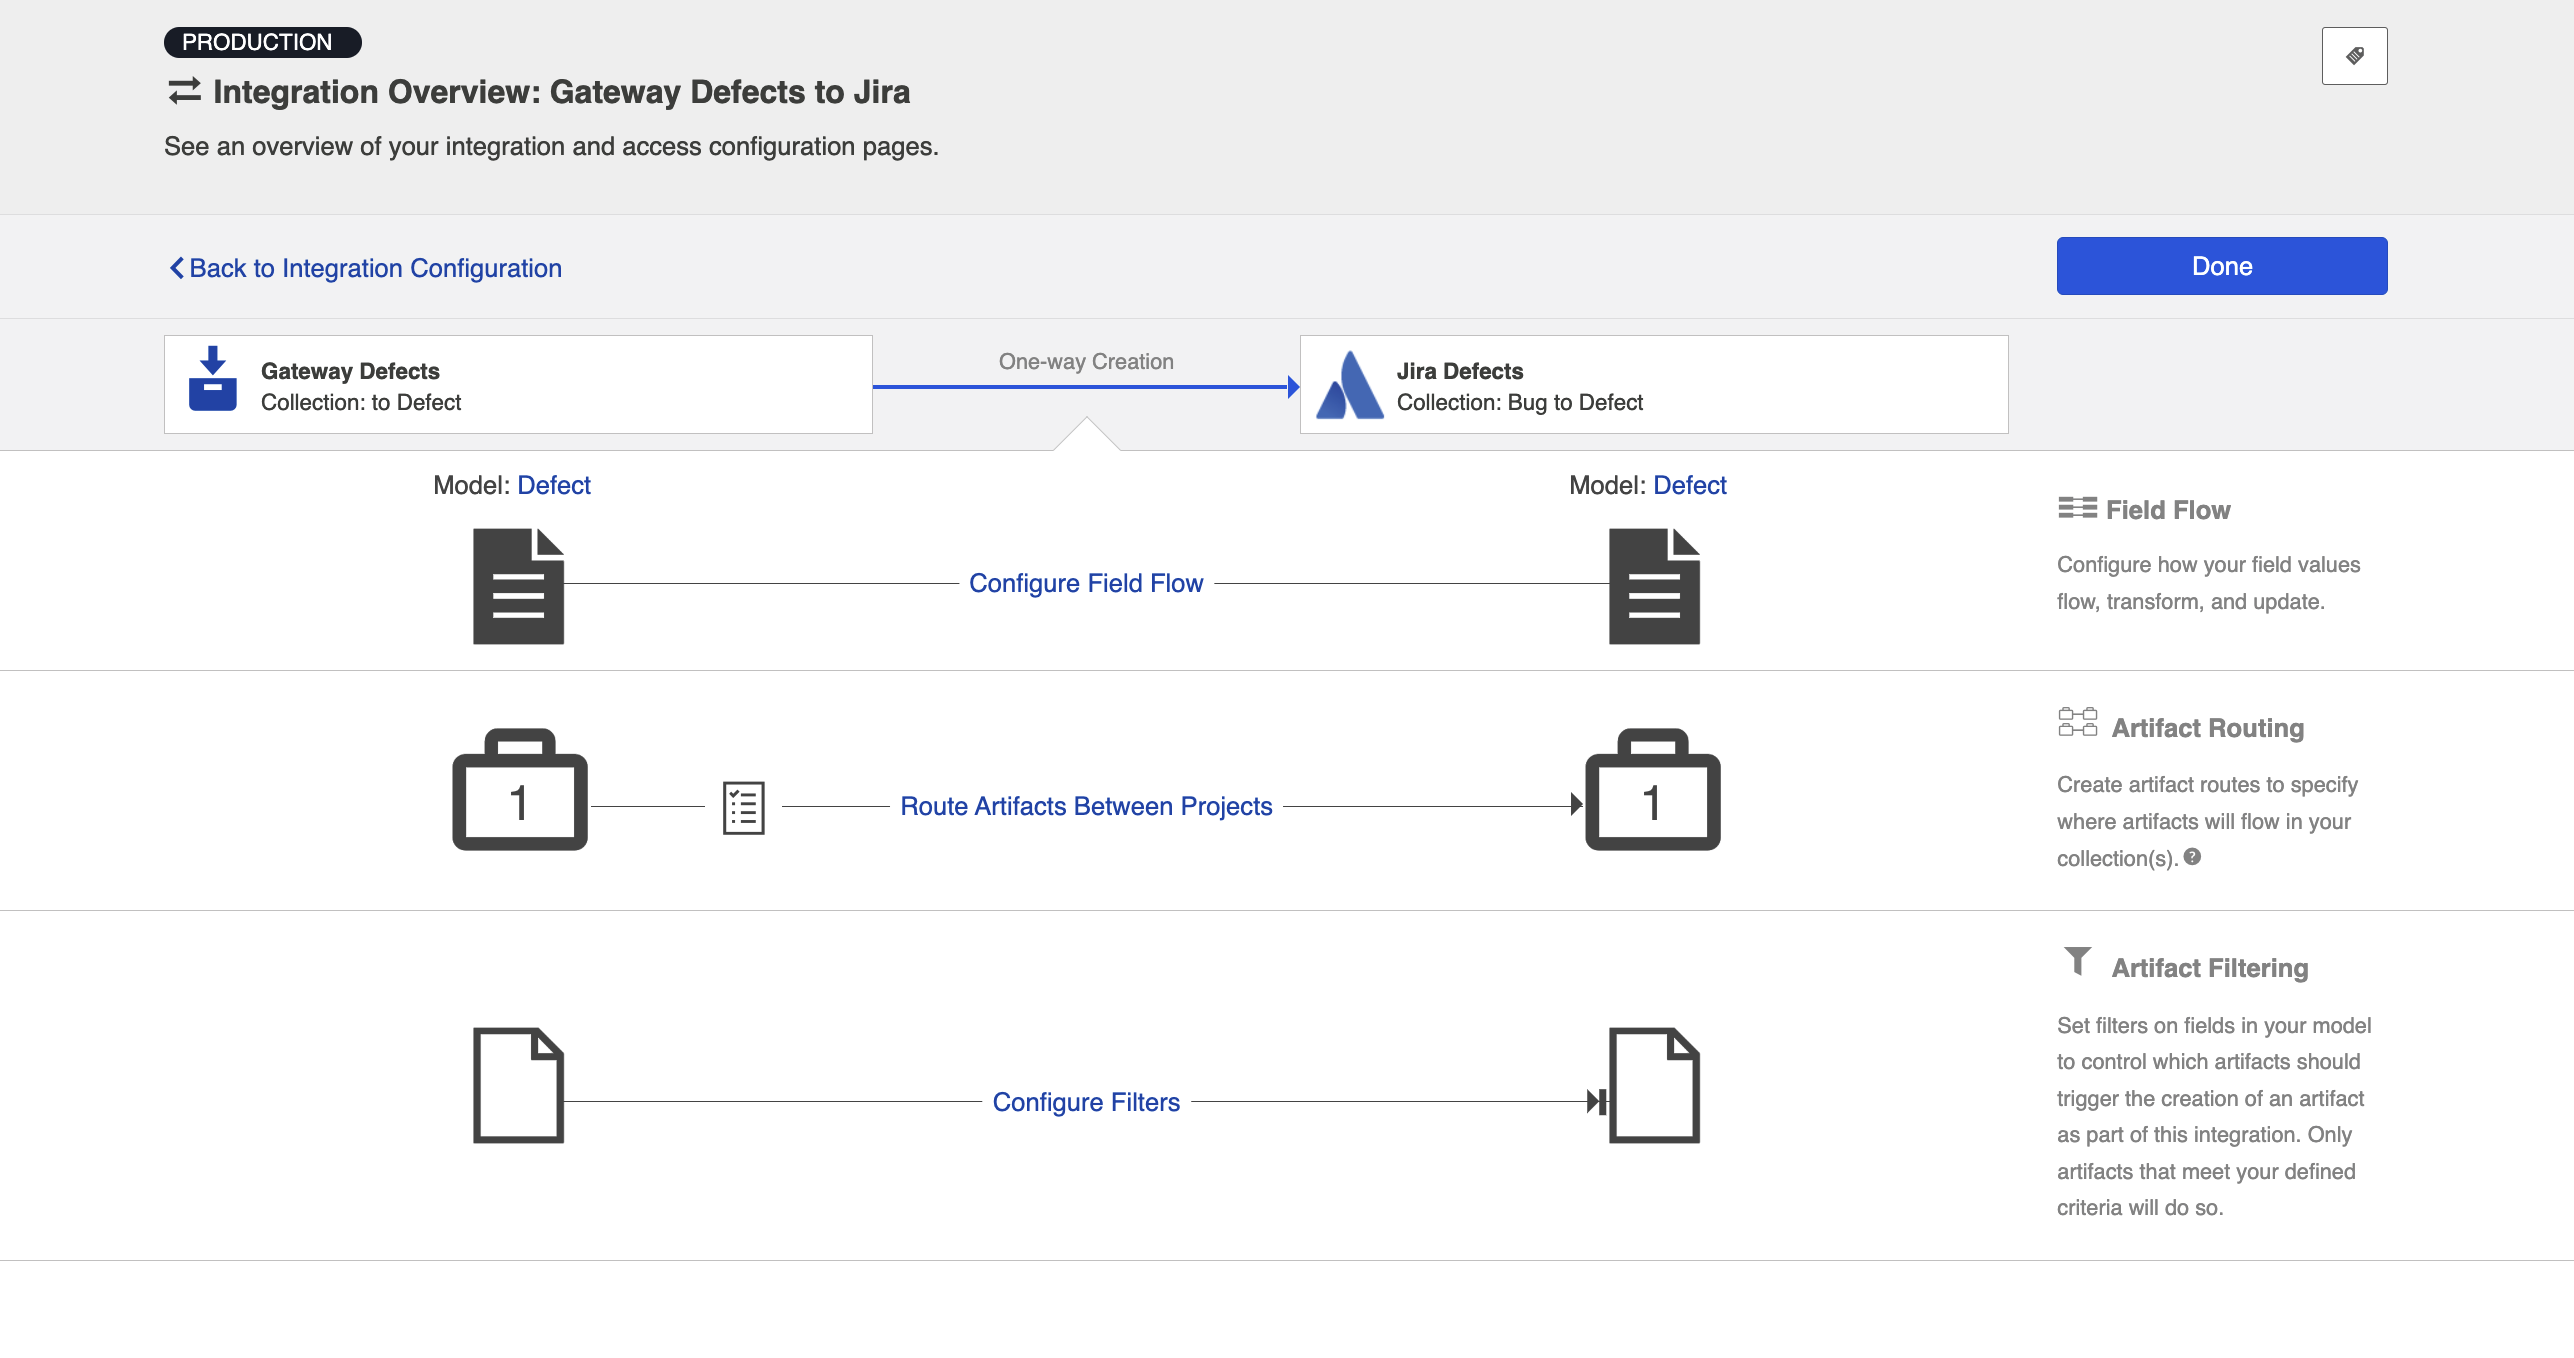
Field Flow
The field flow configured for a given integration specifies which fields should flow in that integration. For Create via Gateway integrations, you can choose to flow a given field (Update Normally) or to not flow a given field (No Update).
To get to the Field Flow screen, click Field Flow on the right pane of the Integration Configuration screen.

You will be directed to the Field Flow screen.
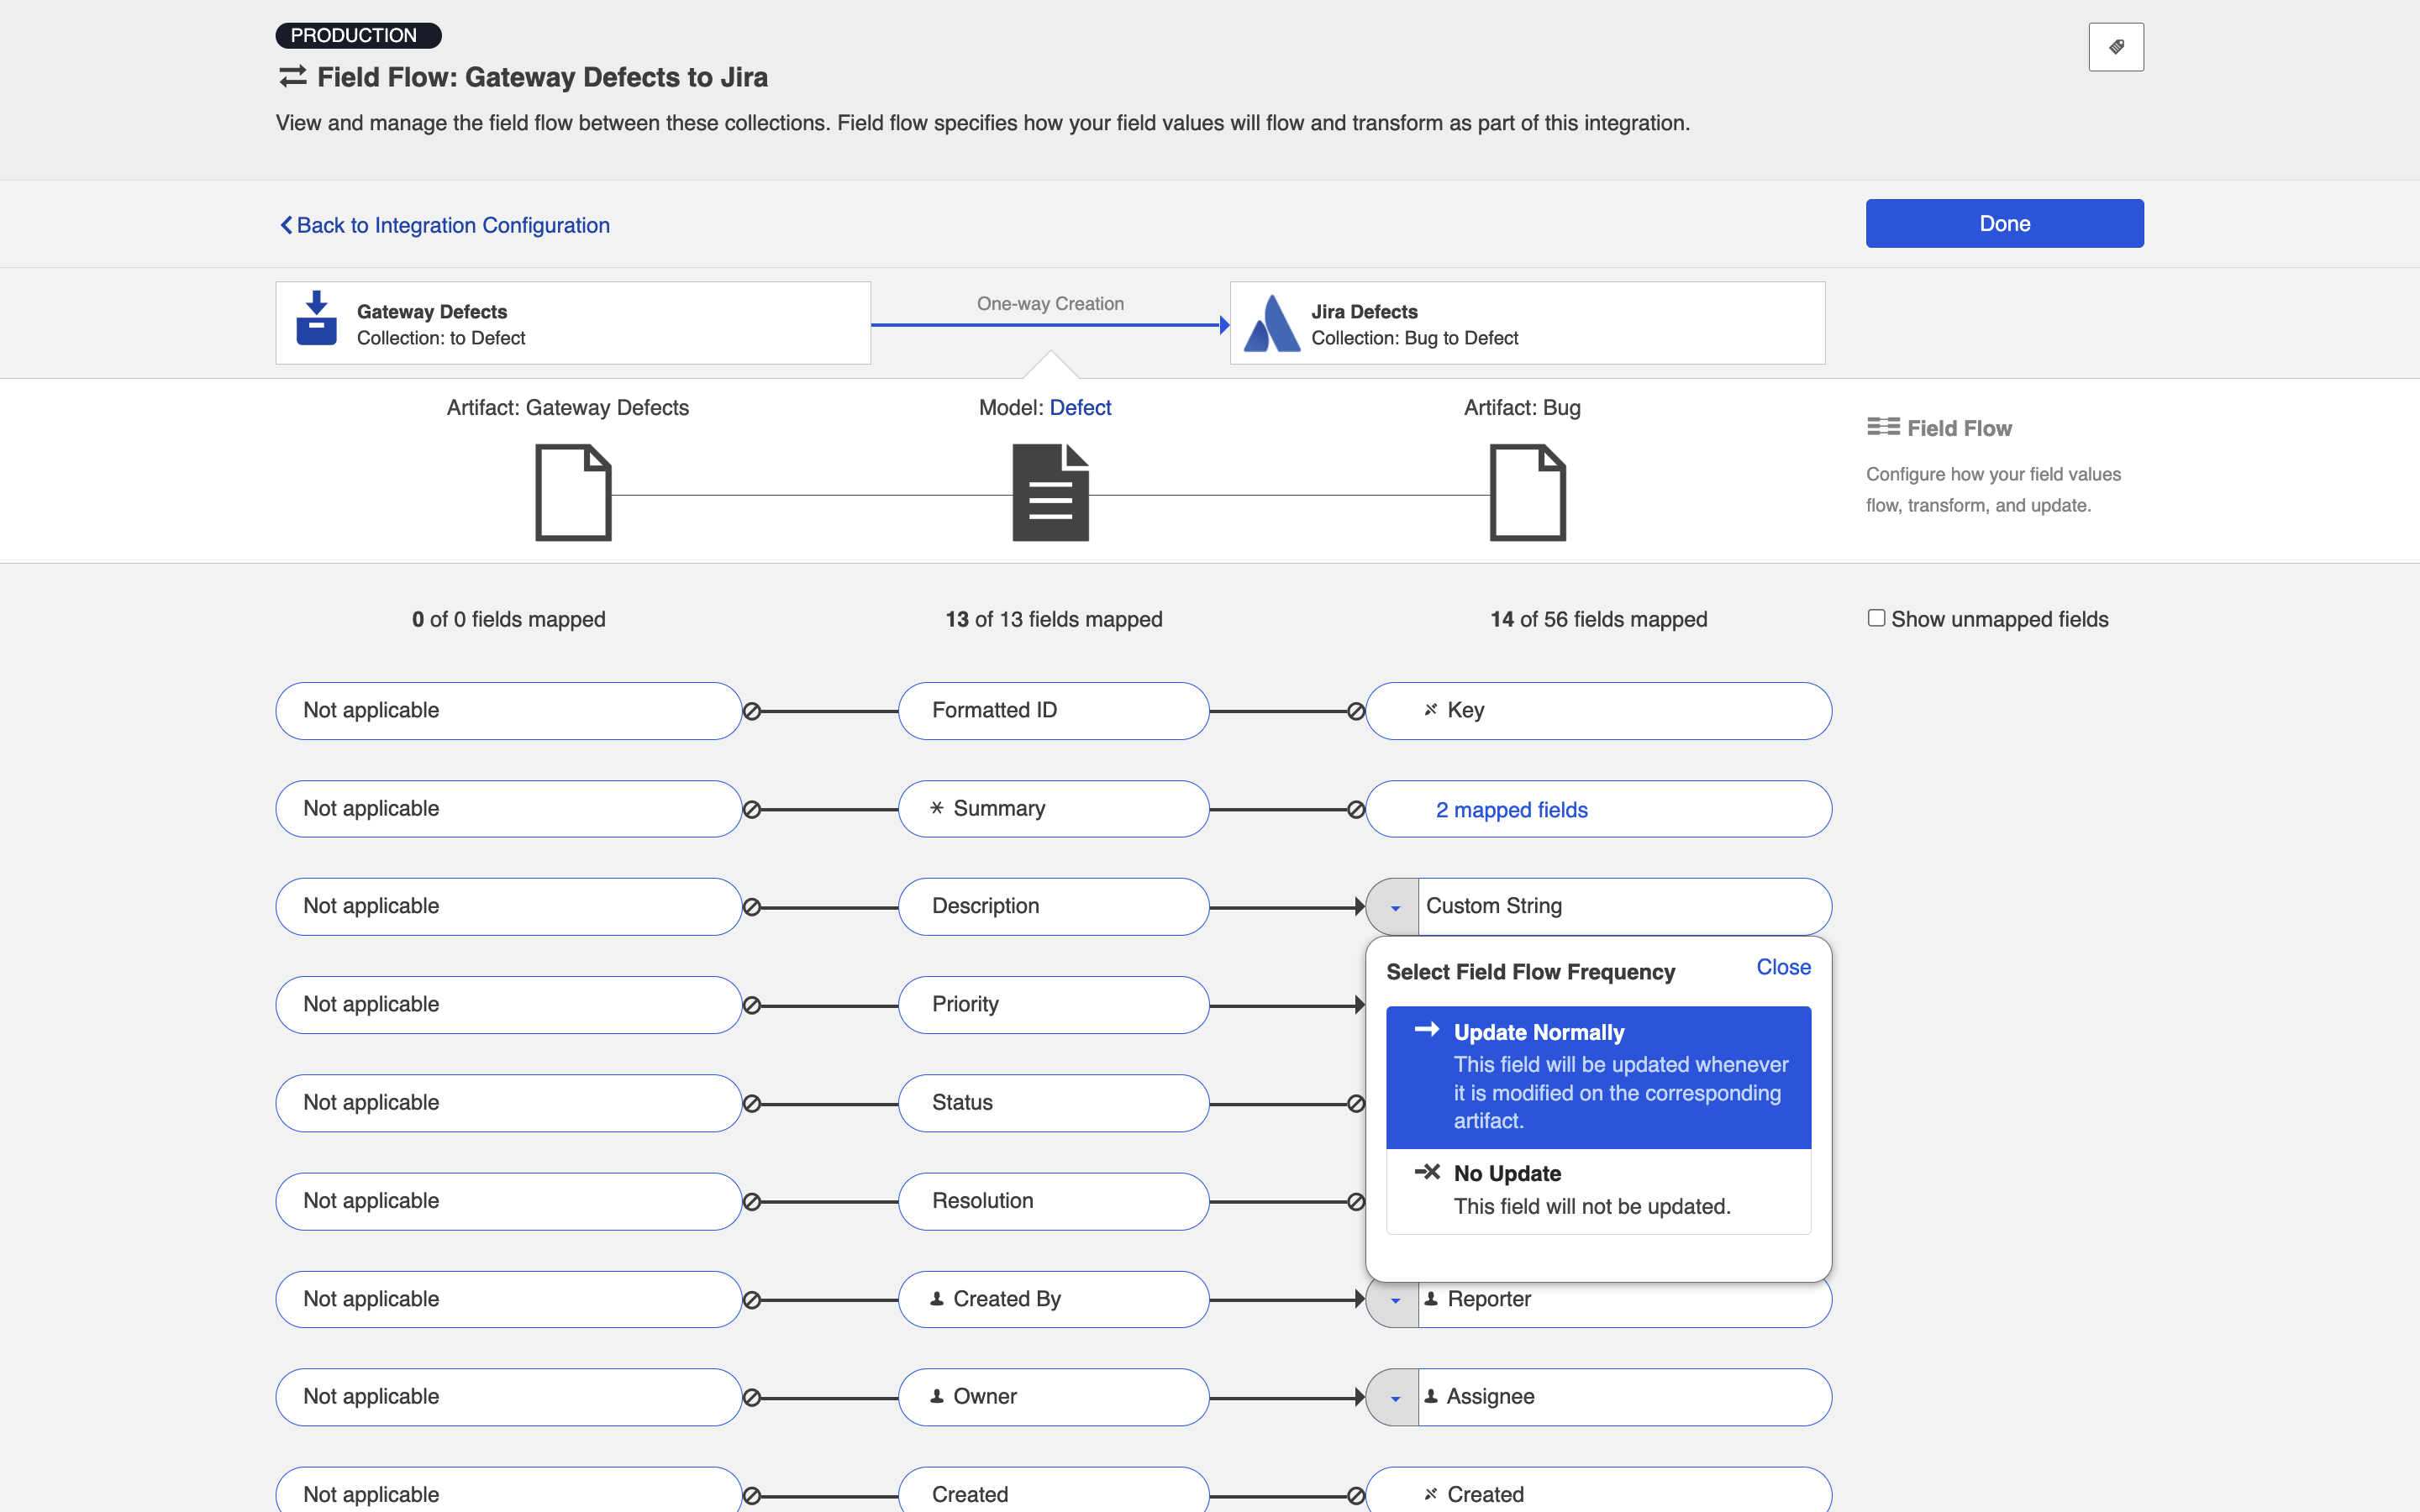
You can choose to flow a field ('update normally') or not flow it ('no update'). You'll notice that field flow goes in one direction only — from the gateway collection into the repository or database collection.
You can see the names of the mapped artifact fields for each collection on the far left and far right, with the model fields displayed in the middle. By default, model fields without mapped repository fields are hidden. You can see all model fields by checking the Show unmapped fields checkbox. Constant values will be identified by a grey box and the constant value icon.
Field Flow Icons
On the Field Flow screen, you will see a number of icons, which will help you understand any special properties or requirements for each field. If you hover your mouse over an icon, you will see a pop-up explaining what the icon means. You can also review their meanings in the legend below:
| Icon | Meaning |
|---|---|
|
|
A constant value will be sent. Note that:
|
|
|
Collection field is read-only and cannot receive data |
|
|
To create artifacts in your collection, this field must be mapped to your model. |
|
|
This is a required field in your model; it must be mapped to your collection. |
|
|
This field will not be updated as part of your integration, due to how you have configured it. This field flow configuration can be changed if you'd like. |
|
|
This field will not be updated as part of your integration because the mapping would be invalid. You do not have the option of changing this. |
|
|
This field will update normally as part of your synchronize integration; this means it will be updated whenever it is modified on the corresponding artifact. |
Artifact Routing

Artifact Routing is needed when artifacts are being created as part of an integration. In addition to knowing the repository in which artifacts should be created, Hub also needs to know which container (i.e., project, module, folder, etc) a given artifact should be created in. Specifying the artifact routing does this.
To configure Artifact Routing, select Artifact Routing on the right pane of the Integration Configuration screen.
Static Artifact Routing
In some cases, all artifacts in a gateway collection are routed to just one project in the target collection. In these instances, you can configure what is known as 'static artifact routing' (also known as 'explicit artifact routing').
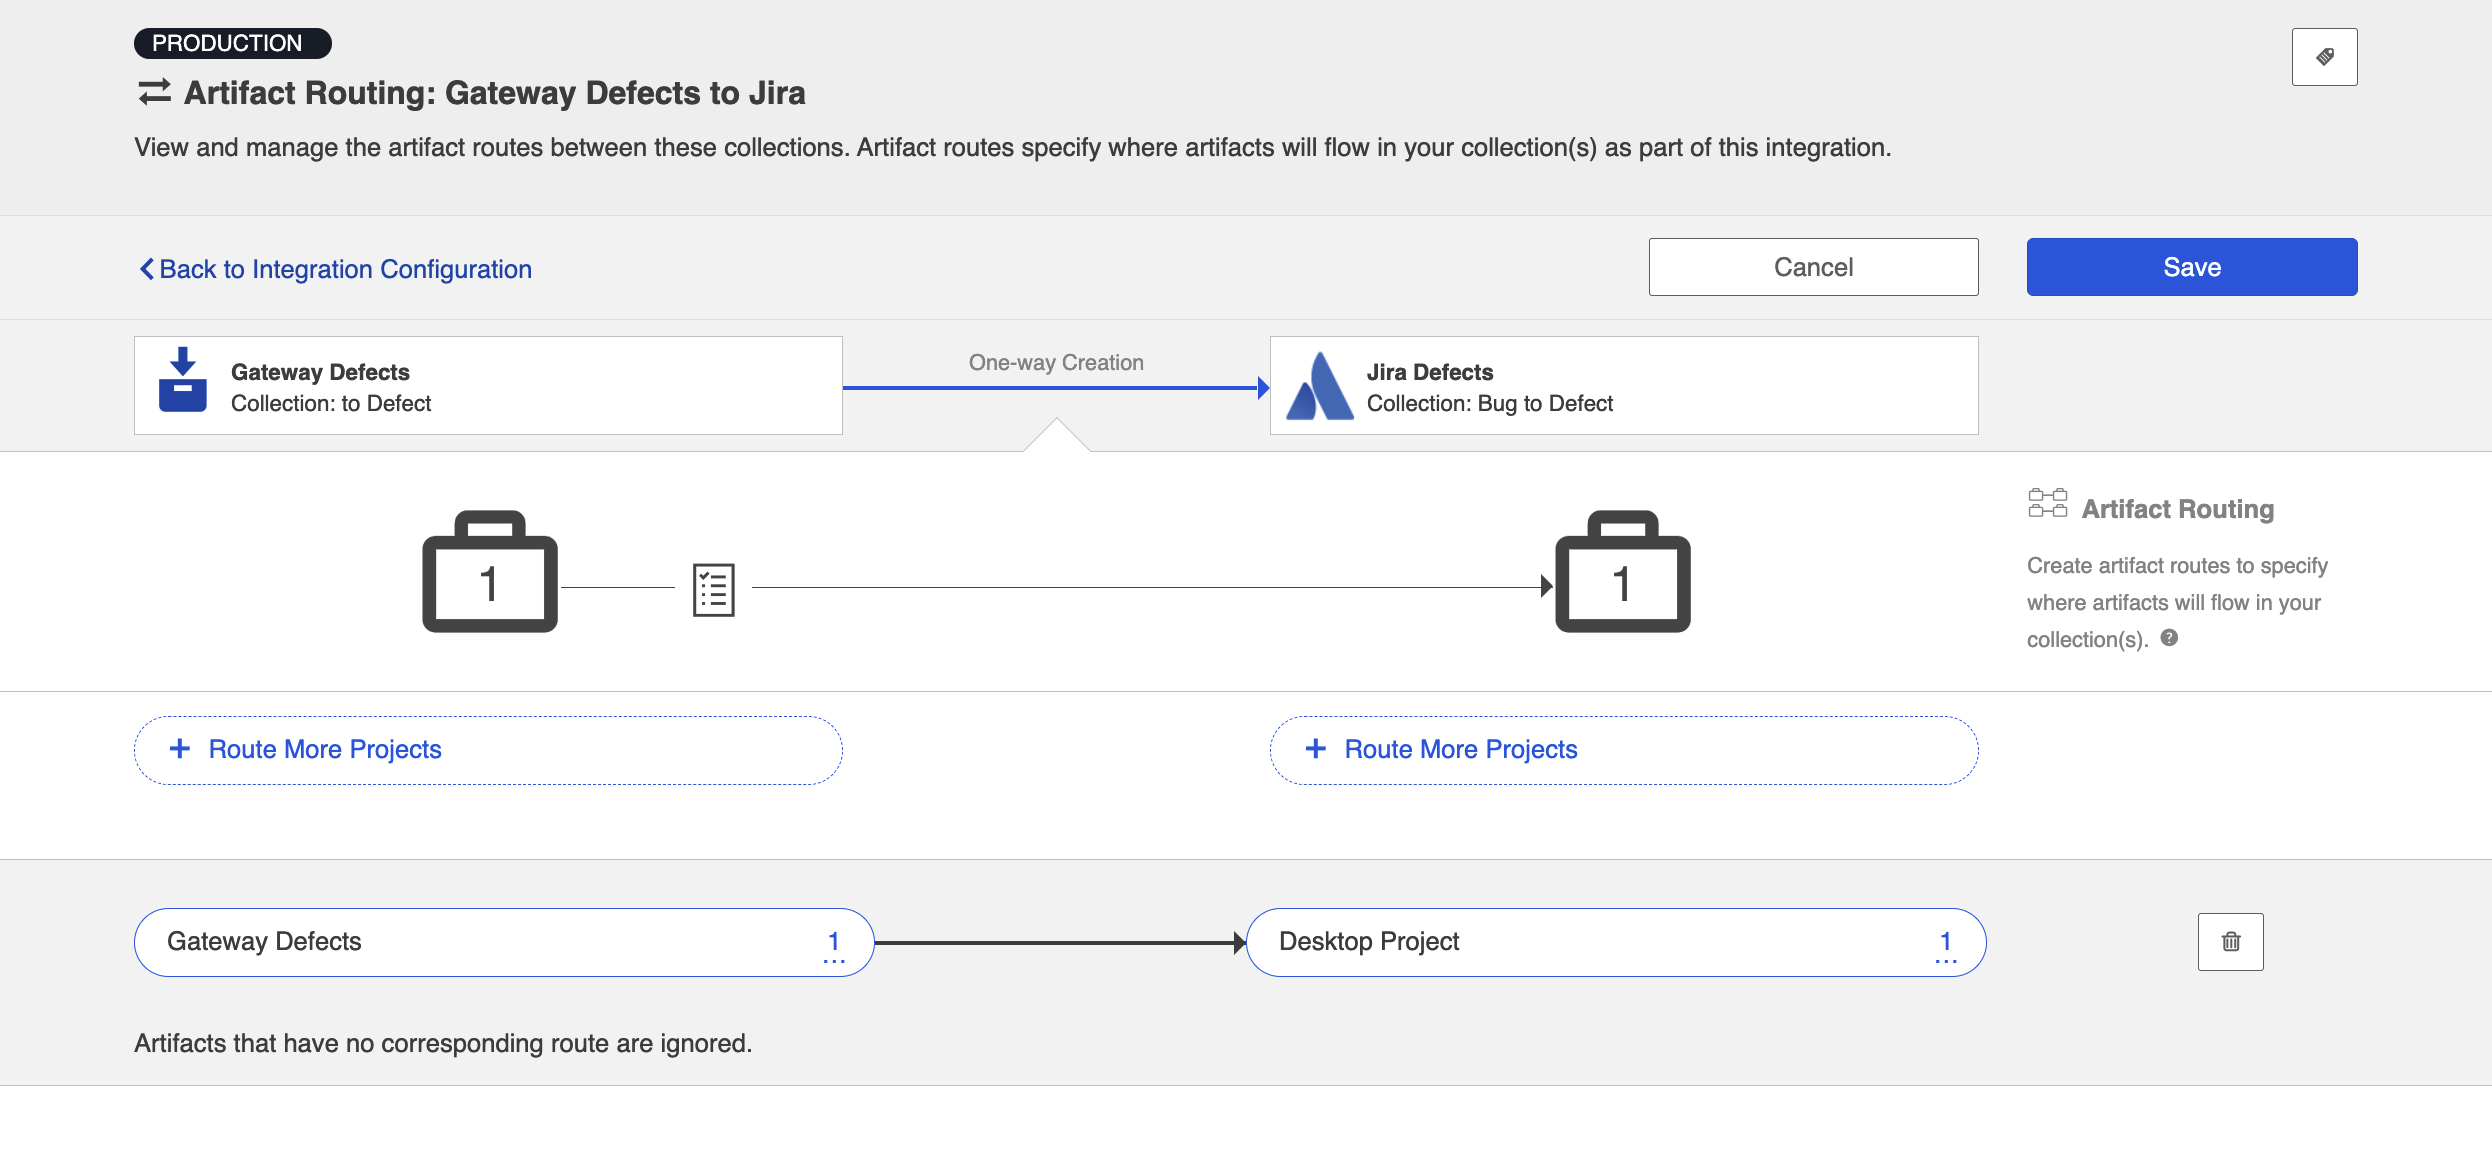
To configure a static artifact route, use the Route More Projects buttons to add projects from your collections to your workspace and connect them using the Connect button.
Note: Static artifact routes can have one or more source projects, but only a single target project.
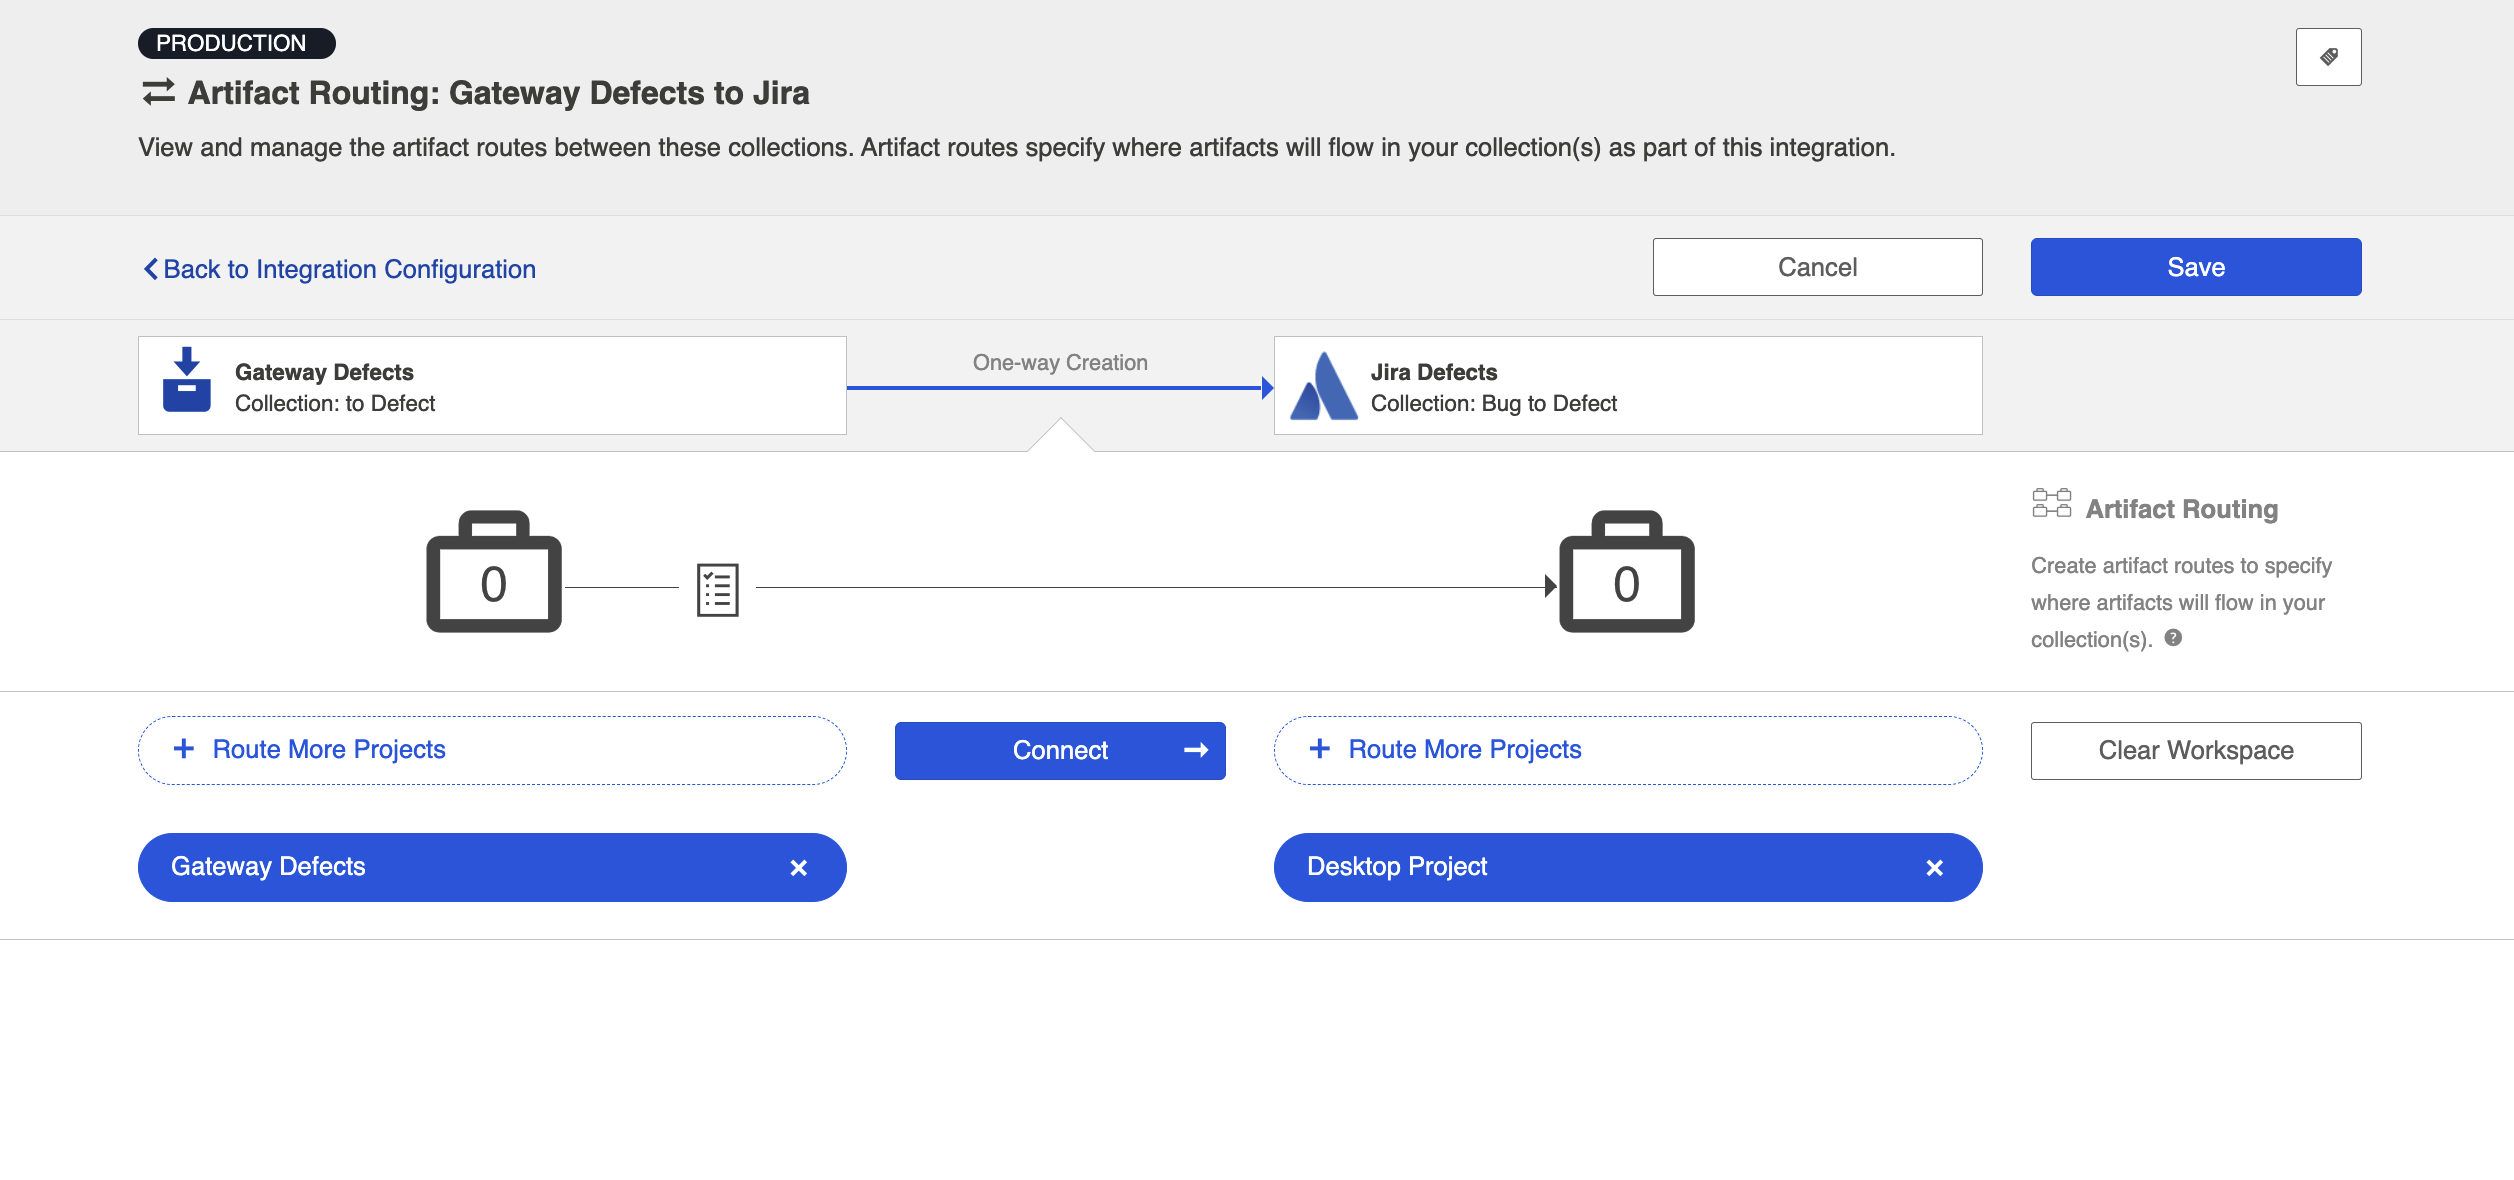
In the example shown below, artifacts from Gateway Defects will be created in the Desktop Project in Jira.
Conditional Artifact Routing
Check out the video below to learn more about Conditional Artifact Routing:
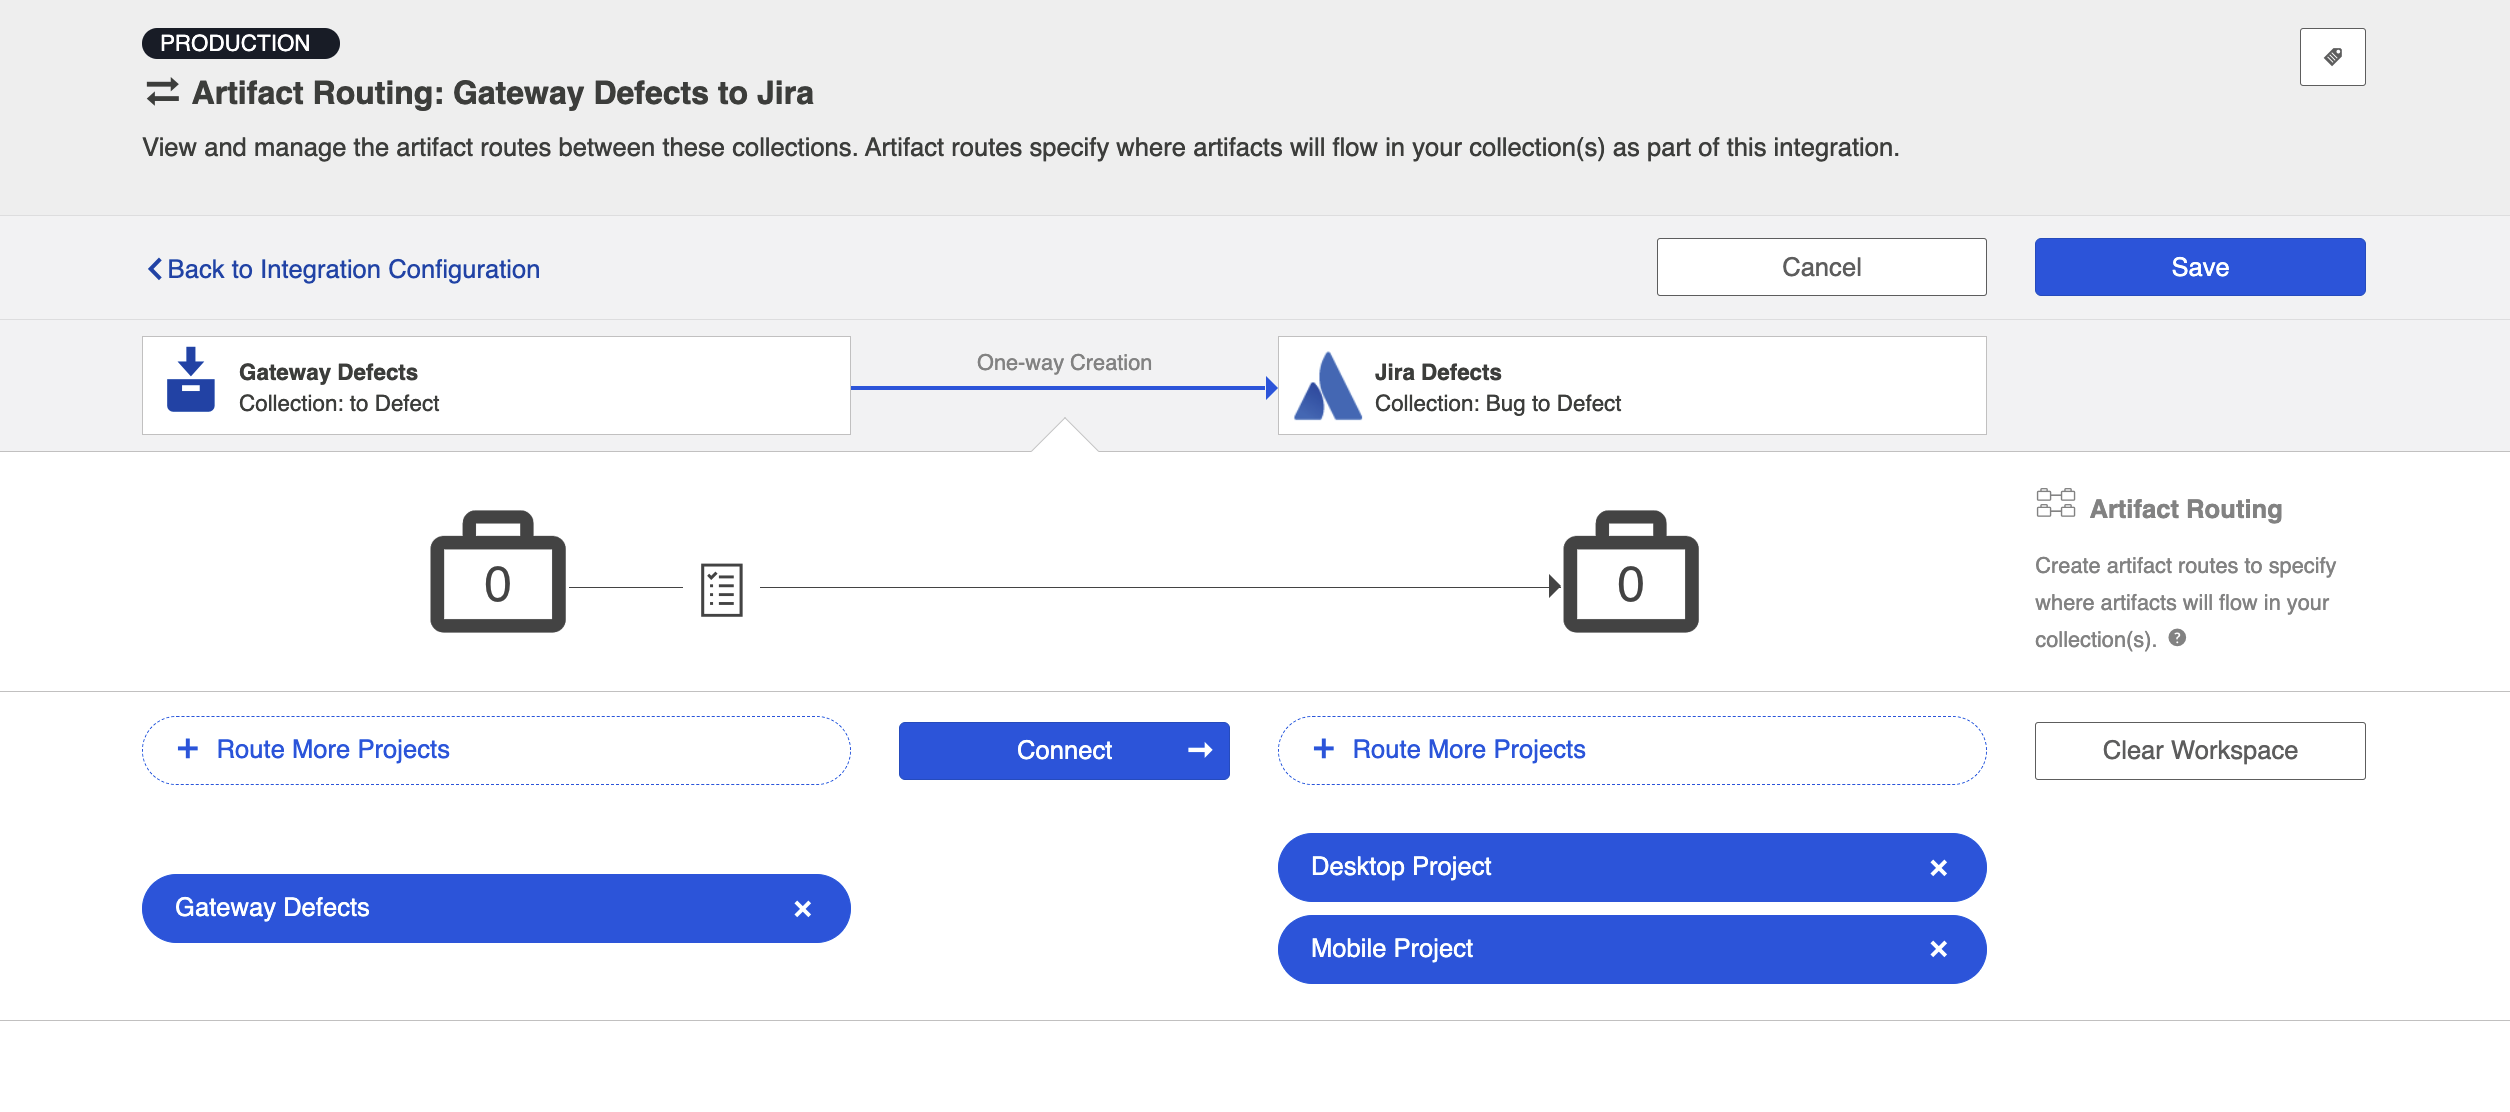
In other cases, you may wish to route your gateway artifacts to multiple projects in the target collection. In this scenario, a field value on the artifact is used to determine which project in the target collection the artifact should route to.
In these instances, you will configure what is known as conditional artifact routing to determine which project each artifact is created in within your target repository. Conditional artifact routing (also known as 'dynamic artifact routing') can be used to inspect a single-select field of an artifact and, depending on its value, to route that artifact to the appropriate project in the target collection.
Conditional artifact routes can have one or more source projects, and always have multiple target projects.

To create a conditional artifact route, use the Route More Projects buttons to add projects from your collections to your working space and connect them using the Connect button.
Notice that after you've created your conditional artifact routing group, you'll be prompted to set the conditions that will define that route.
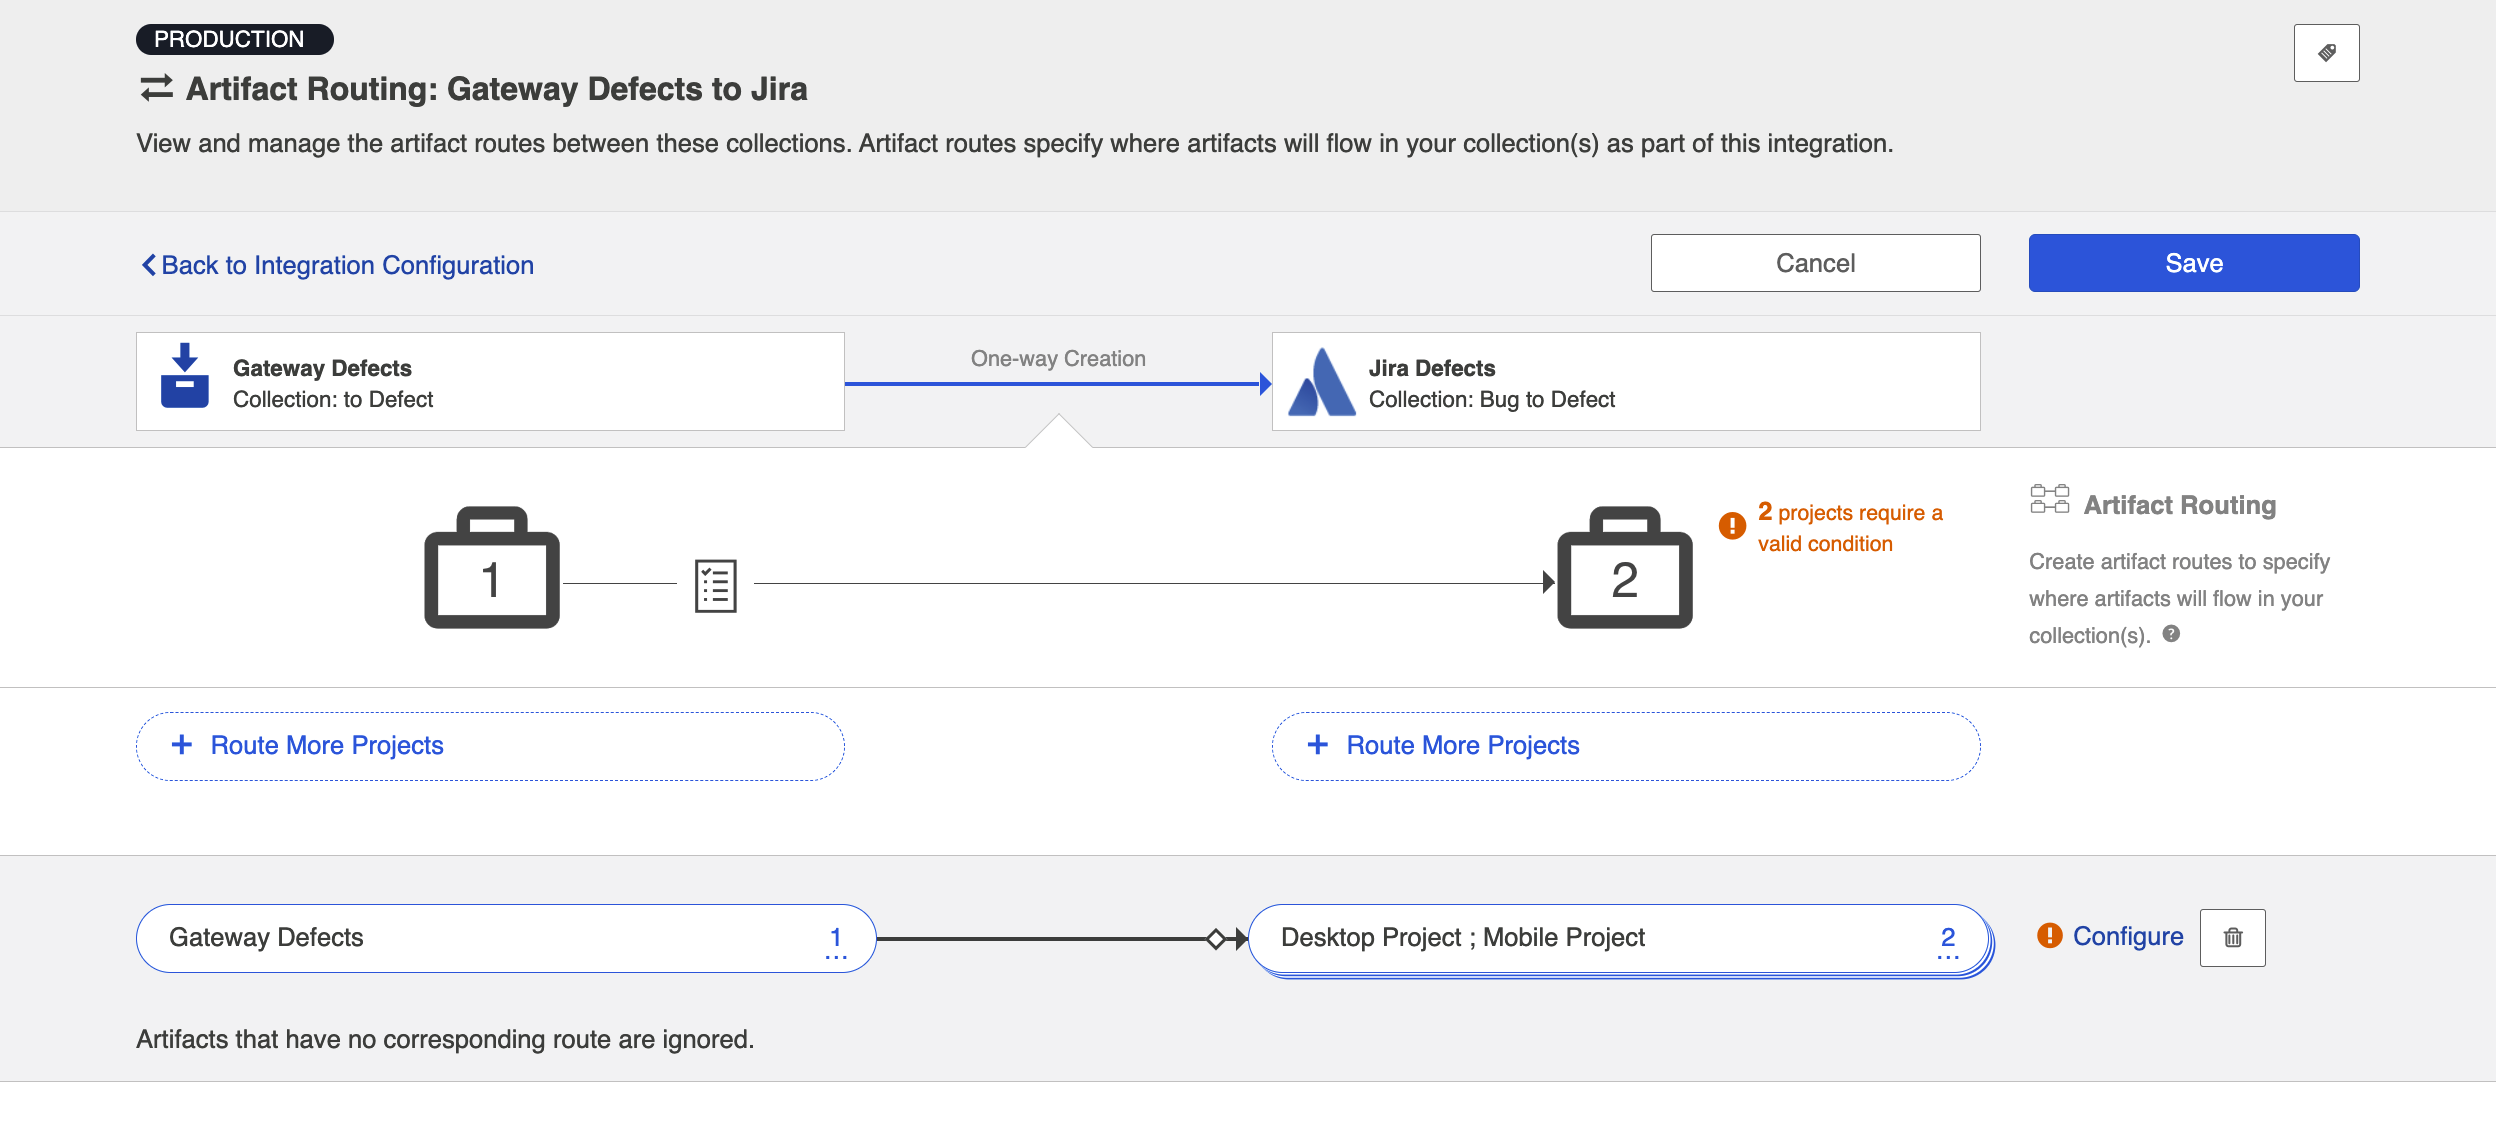
Click Save and then click Configure.
Tip: Clicking ctrl+s on Windows and cmd+s on macOS will save your configuration.
You'll be brought to the Conditional Artifact Routing screen. Here you'll start by selecting the model field on the artifact that you would like to use to determine your artifact route.
Note: Conditional Artifact Routes can only be configured based on single-select fields in your model.
In the example below, the field Application contains the unique values that should determine the project an artifact will be created in in Jira.
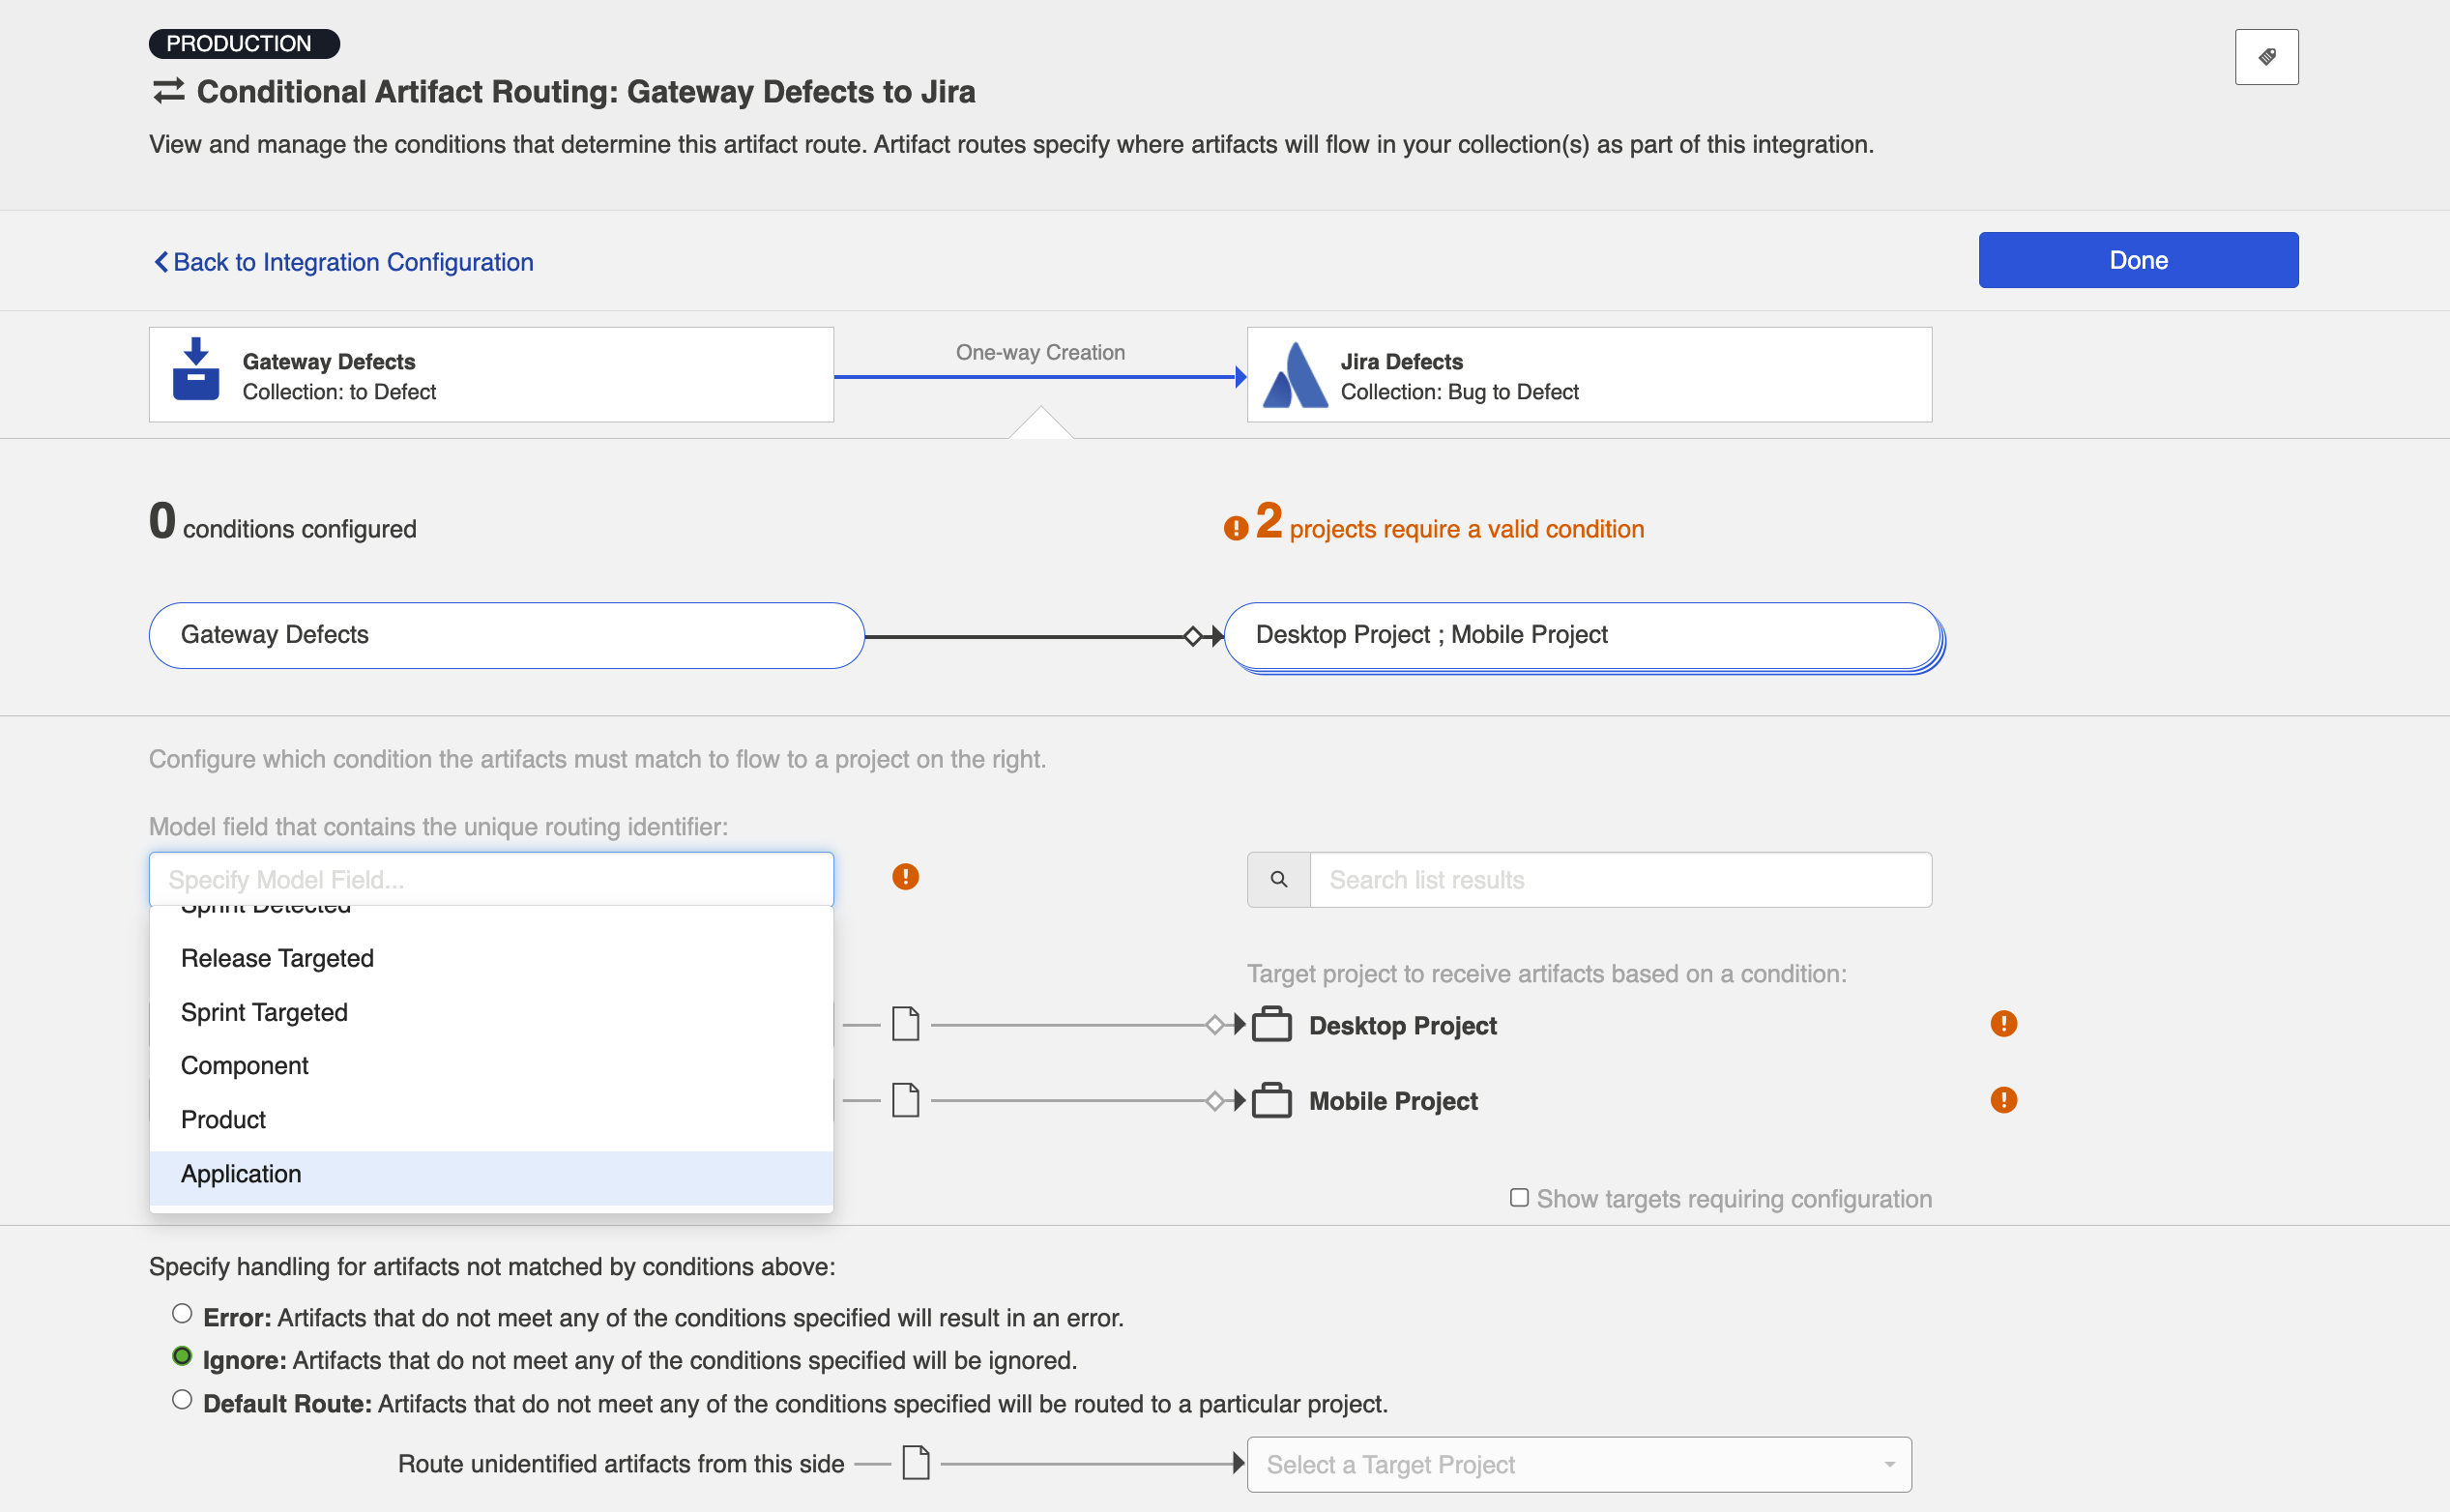
After you select the model field, you can identify one or more value to correspond to each target project. You can also use the Manage Values link to select from a list of values.
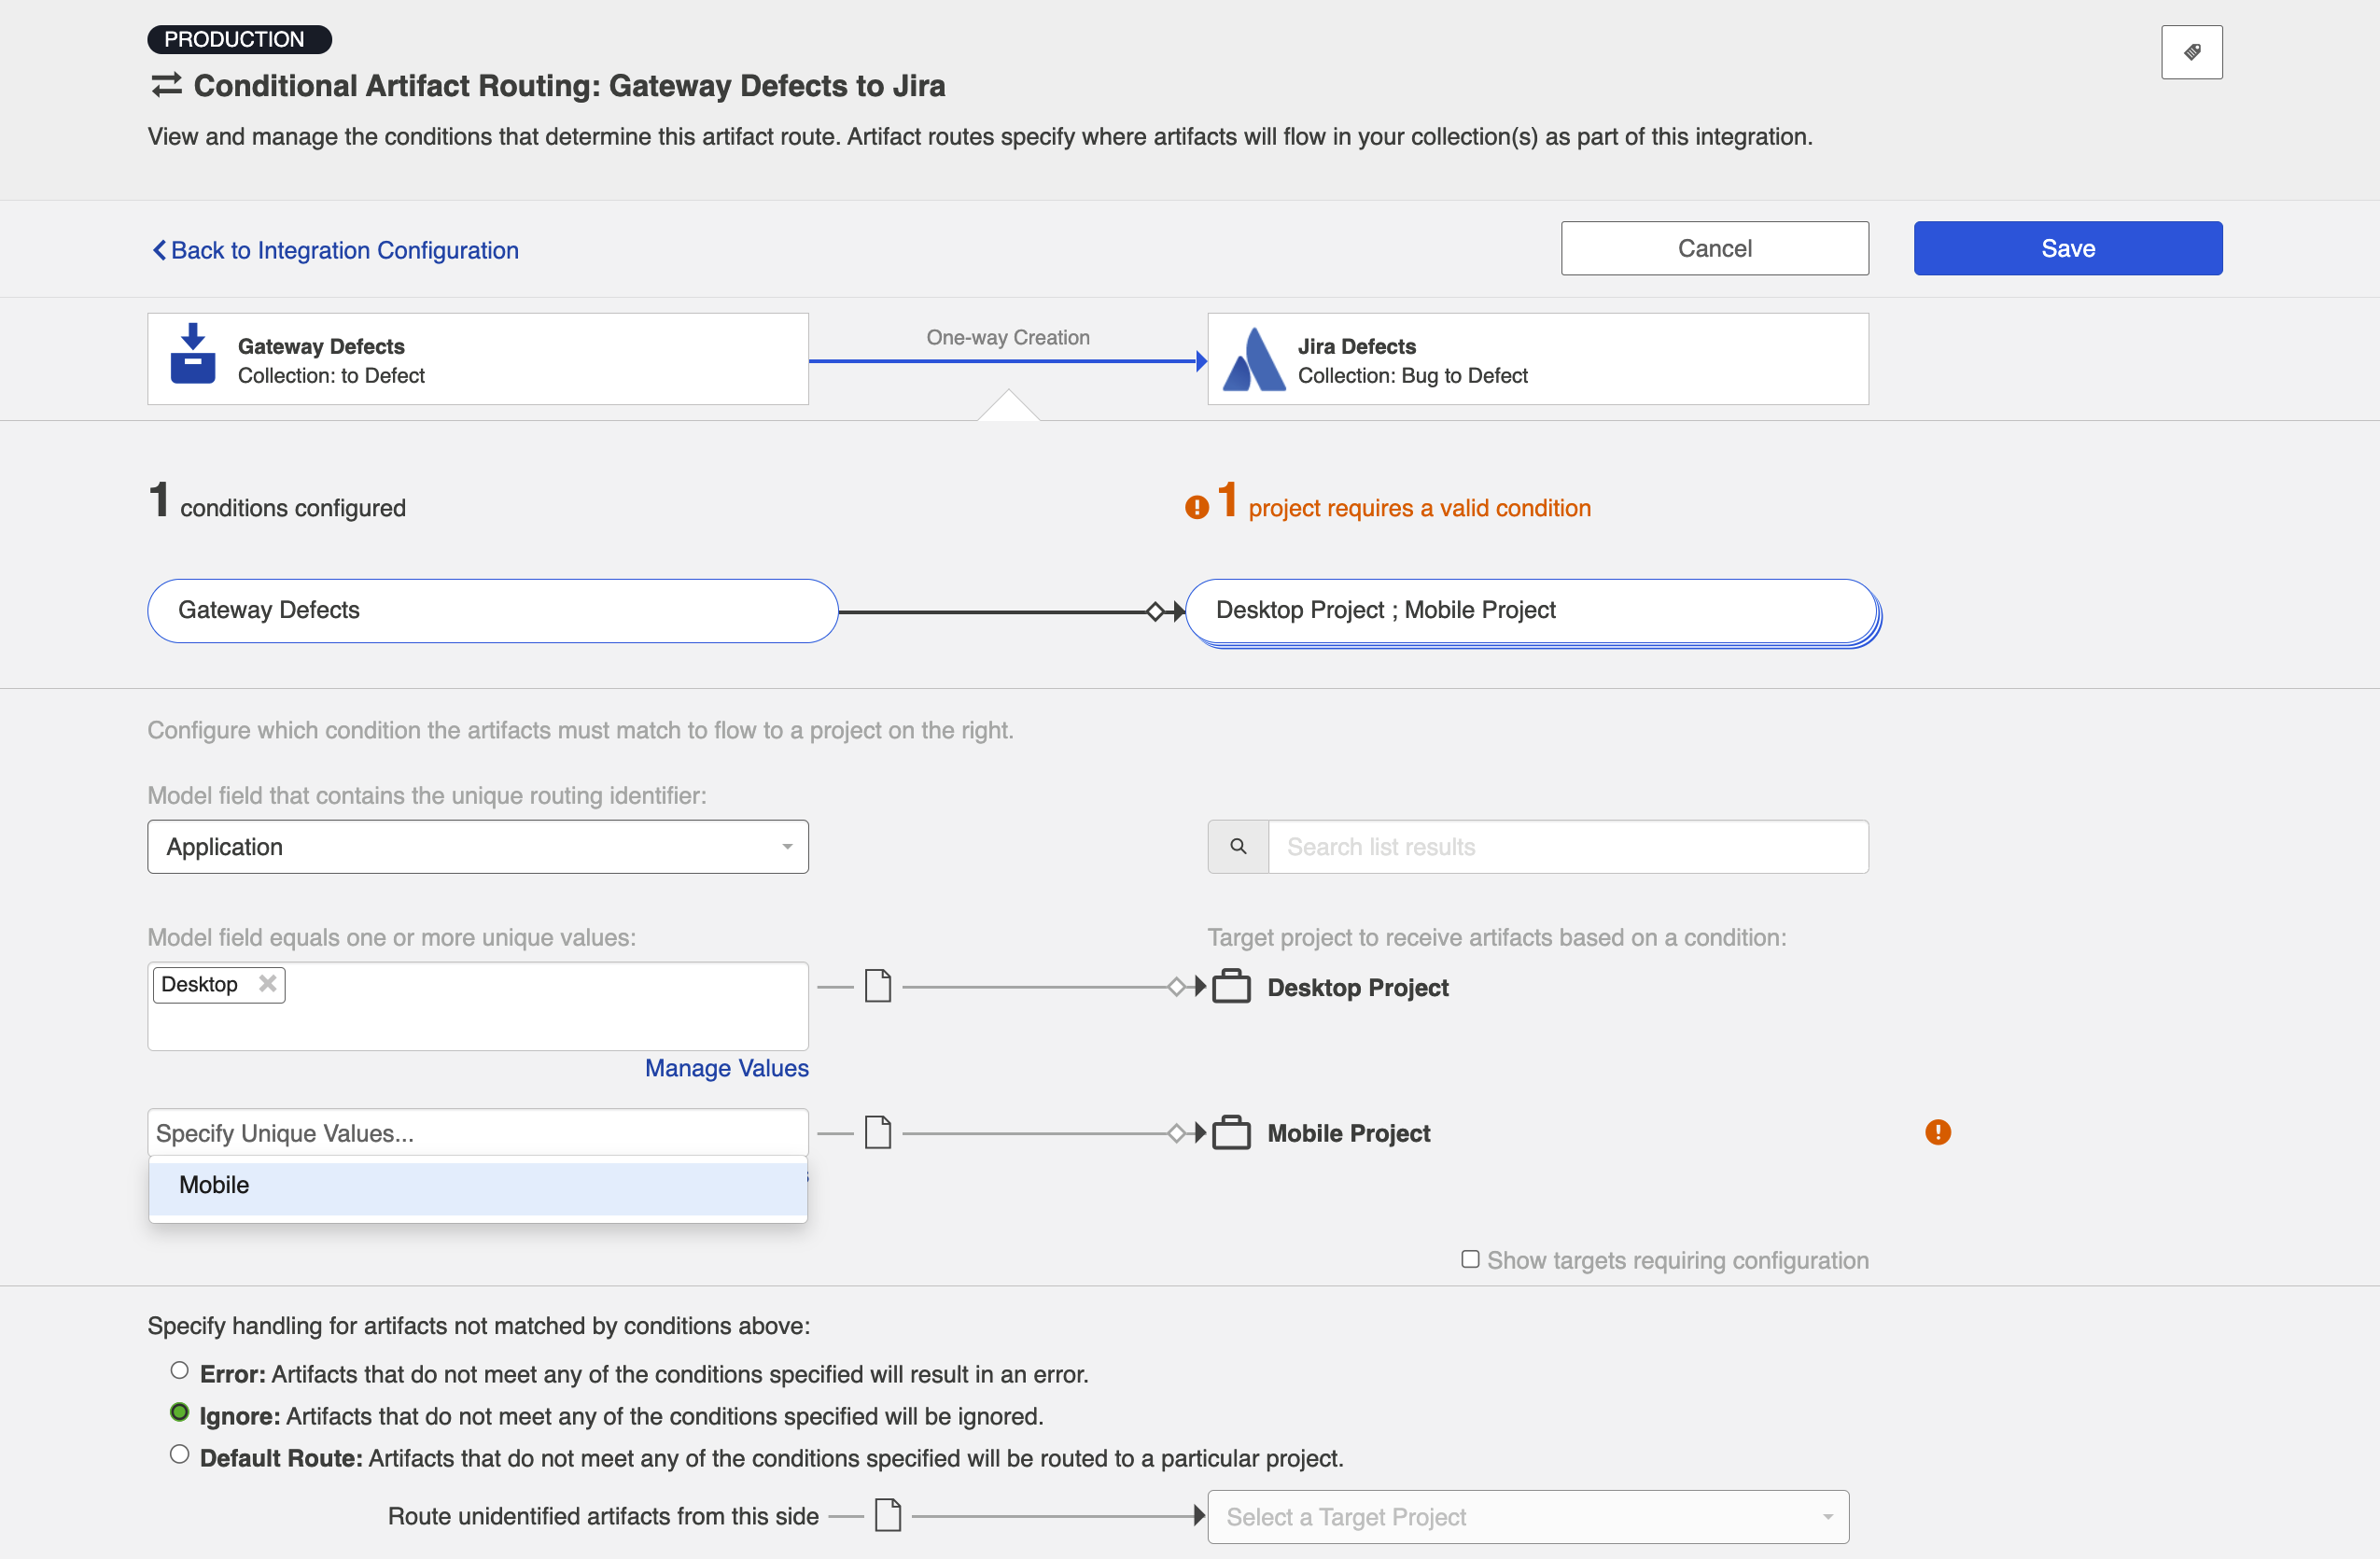
Once you've done this, you'll see your full conditional artifact routing group.
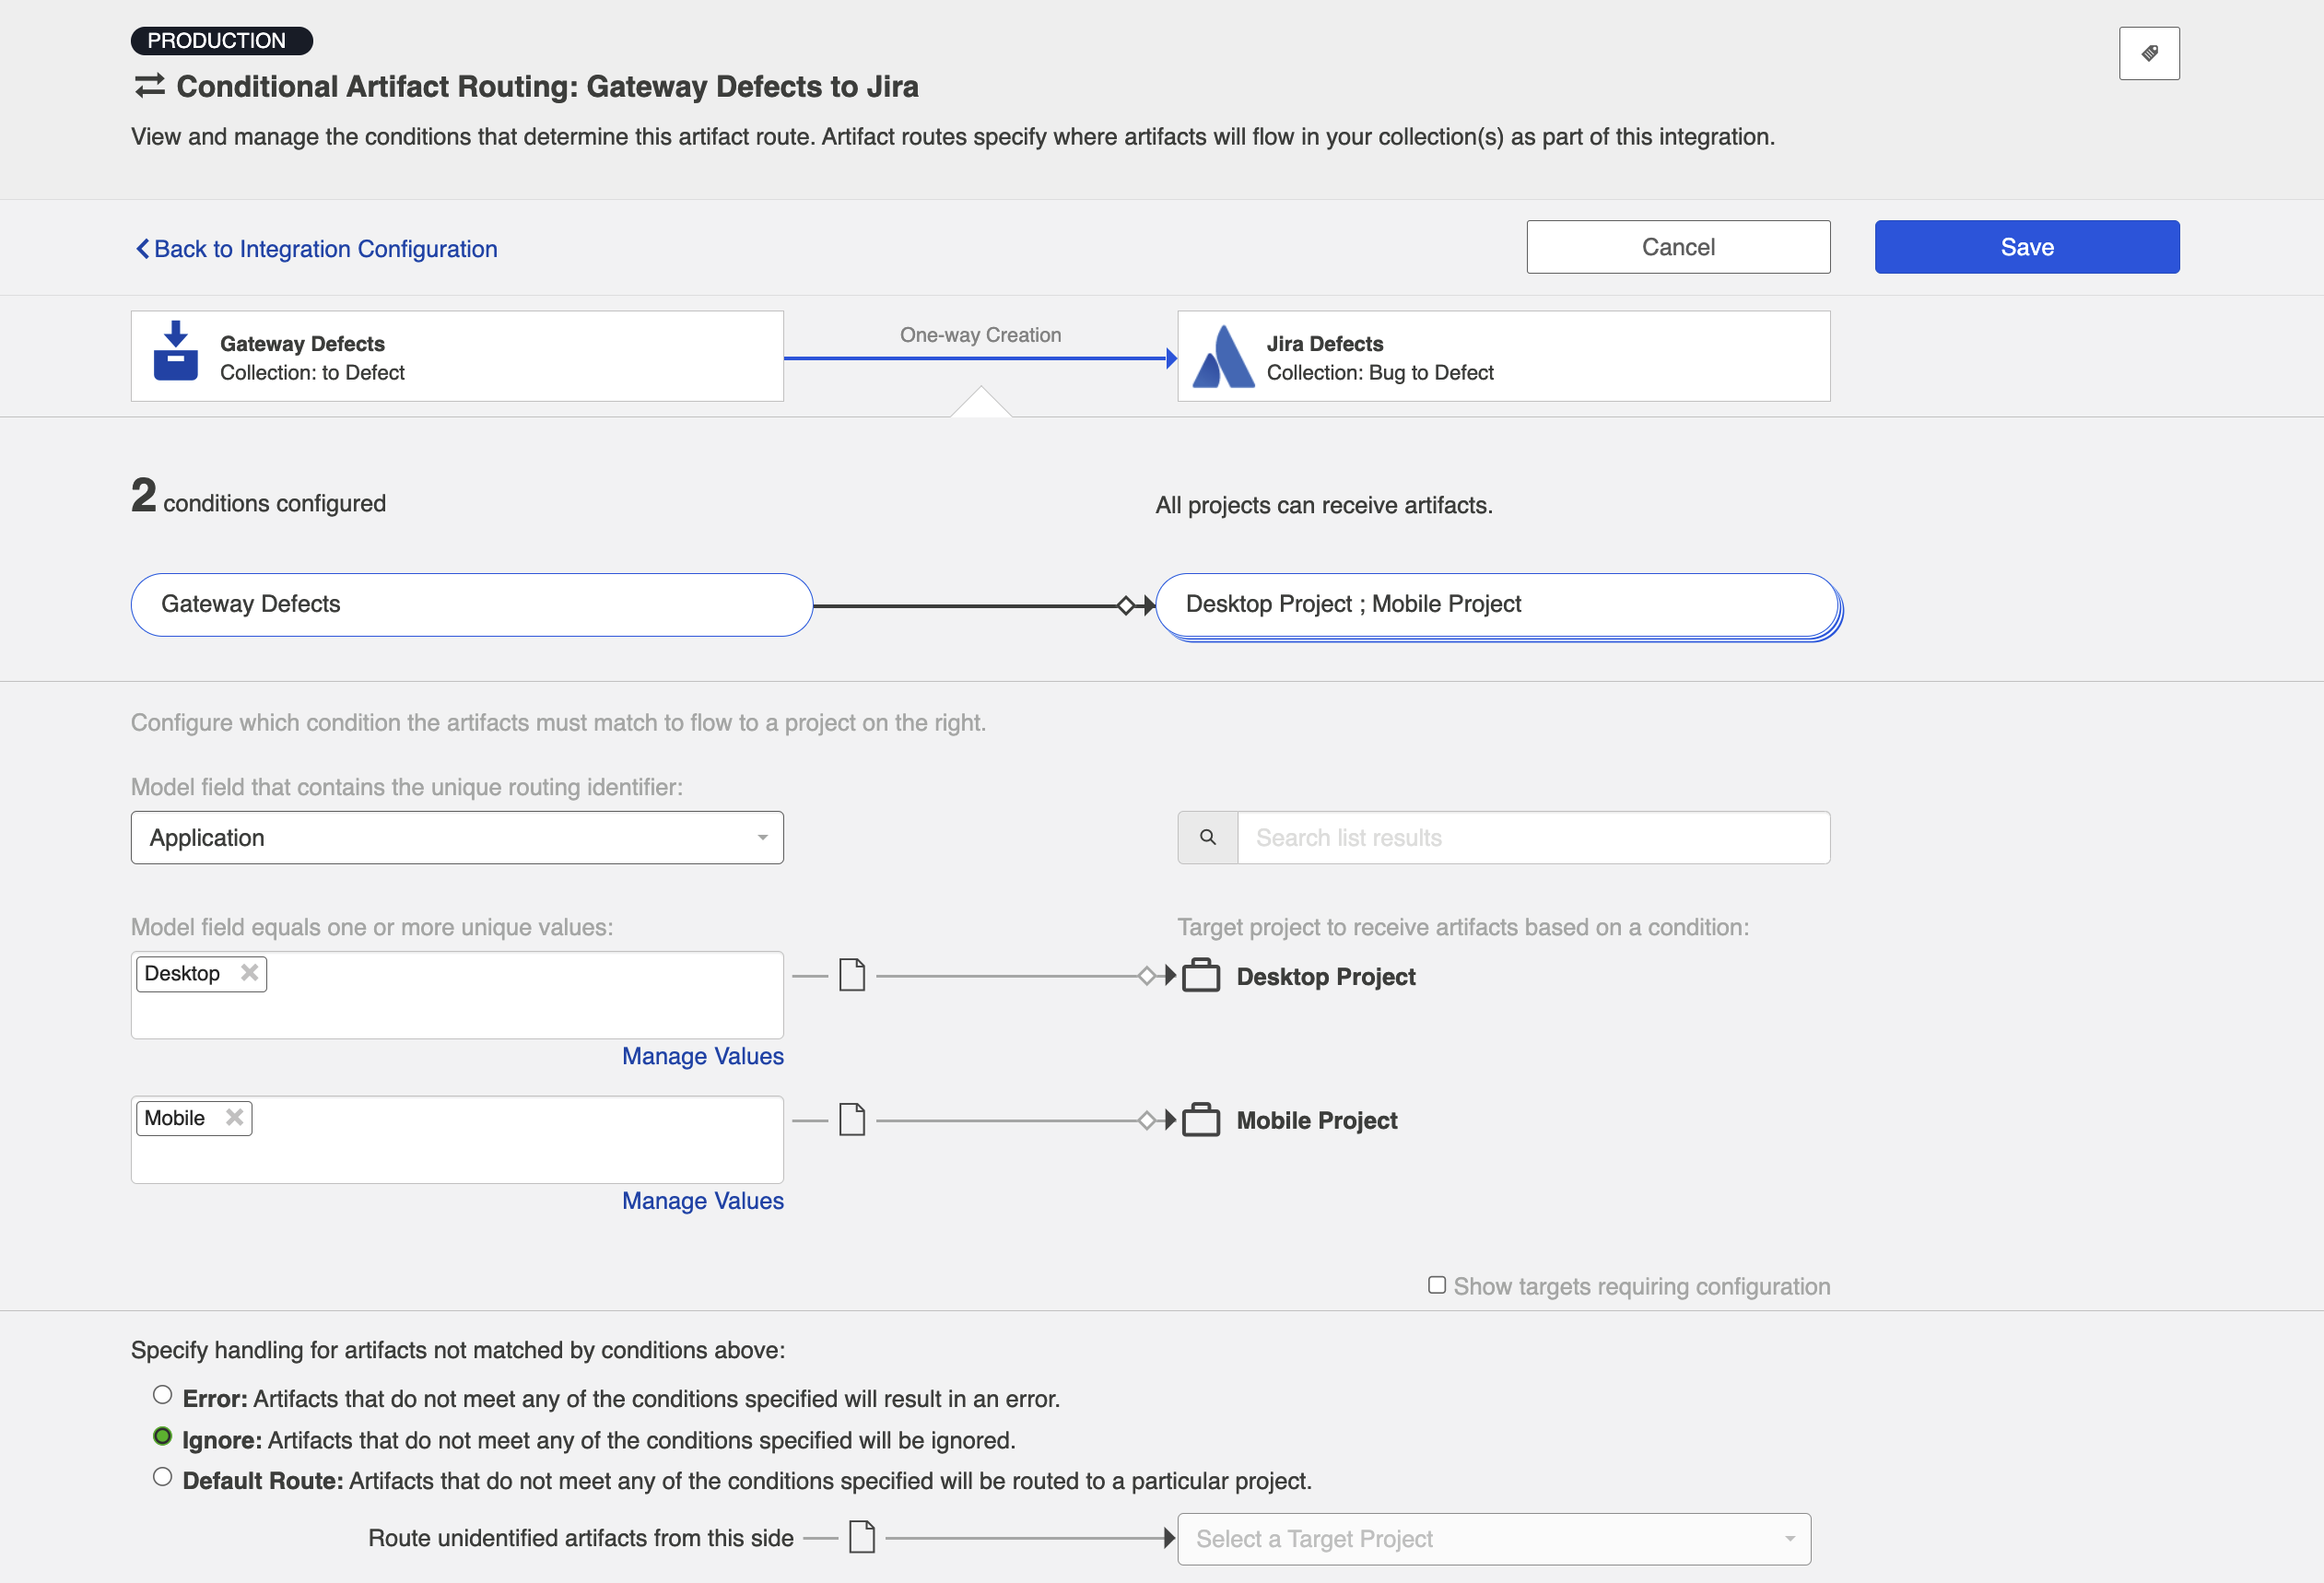
You can also specify how you'd like to handle artifacts that do not meet any of the conditions specified by selecting one of the options provided at the bottom of the screen:

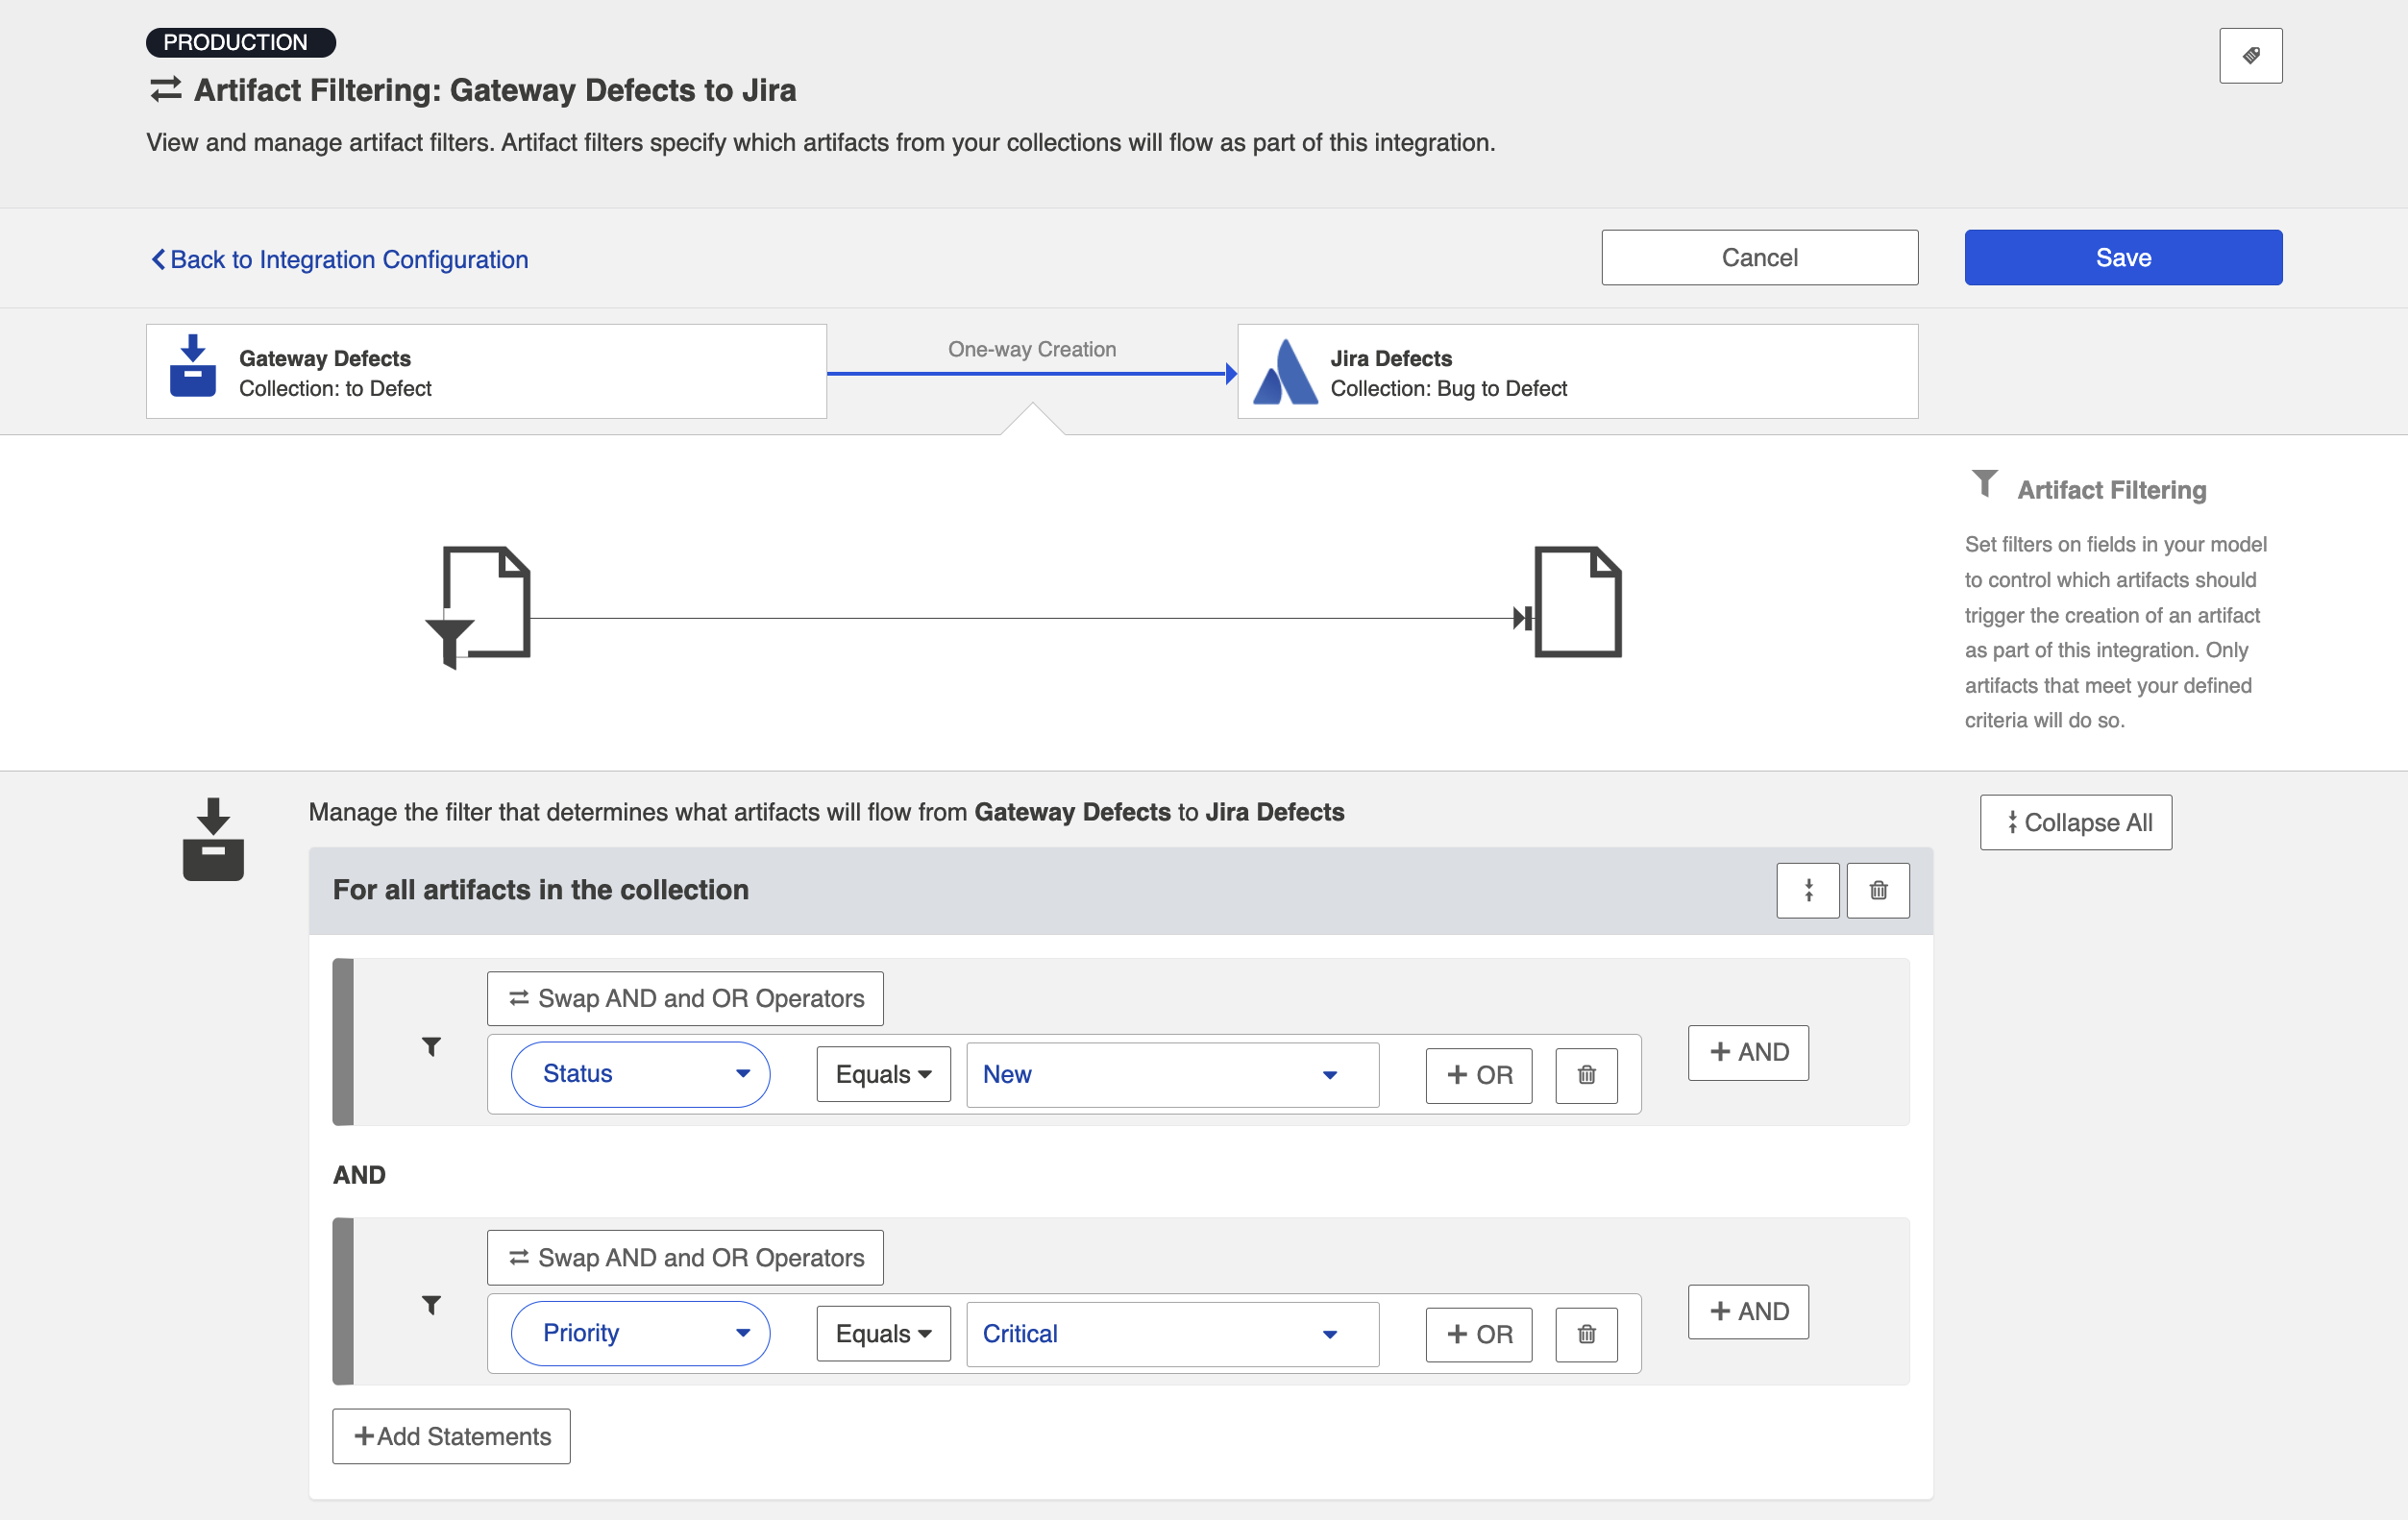
Artifact Filtering
When configuring your integration, you have several options available to refine which artifacts are eligible to flow. The final mechanism available is artifact filtering, which is configured at the Integration level.

Artifact Filtering enables you to set filters in order to limit which artifacts are eligible to flow in an integration.
To use a field for artifact filtering, it must:
- Be a part of your model, and be mapped to the collection you are filtering from
- Be one of the following field types:
- Single Select
- Note that in cases where 'allow unmapped values to flow' is enabled in the model, only fields that are already a part of the model will be considered for artifact filtering
- Multi-Select
- Note that in cases where 'allow unmapped values to flow' is enabled in the model, only fields that are already a part of the model will be considered for artifact filtering
- Date
- Date/Time
- Duration
- String
- Single Select
To configure Artifact Filtering, select Create filters (optional) from the Integration Configuration Overview screen, or select Artifact Filtering from the right pane of the Integration Configuration screen.

This will lead you to the Artifact Filtering Configuration screen, where you can configure one or more criteria for artifact filtering.
Note: You can click the Collapse All button to view an easier-to-read summary of your artifact filtering statements.
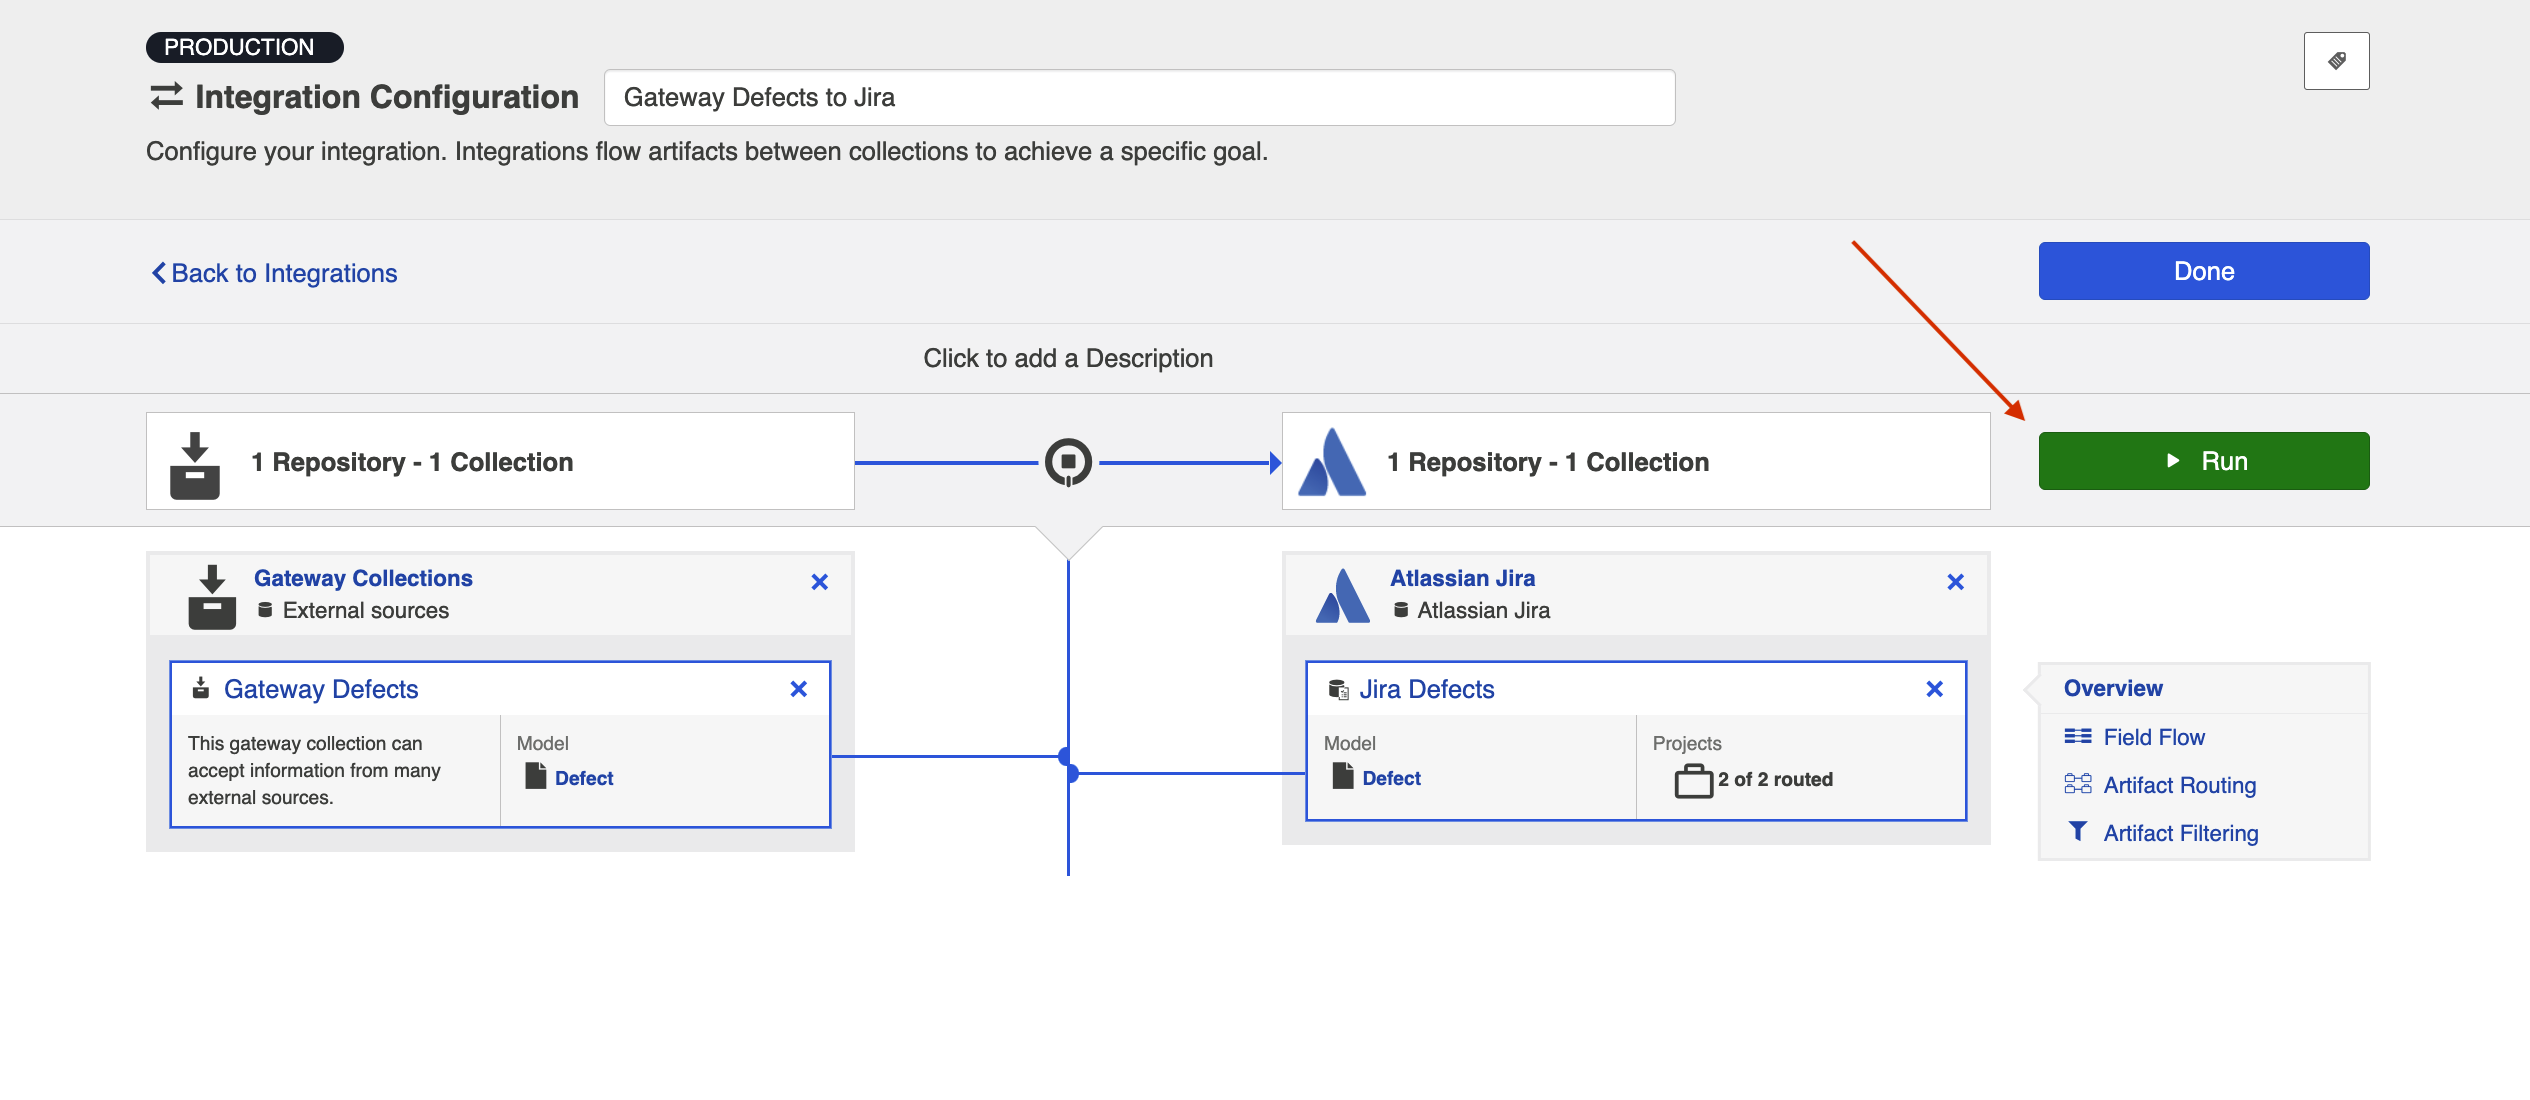
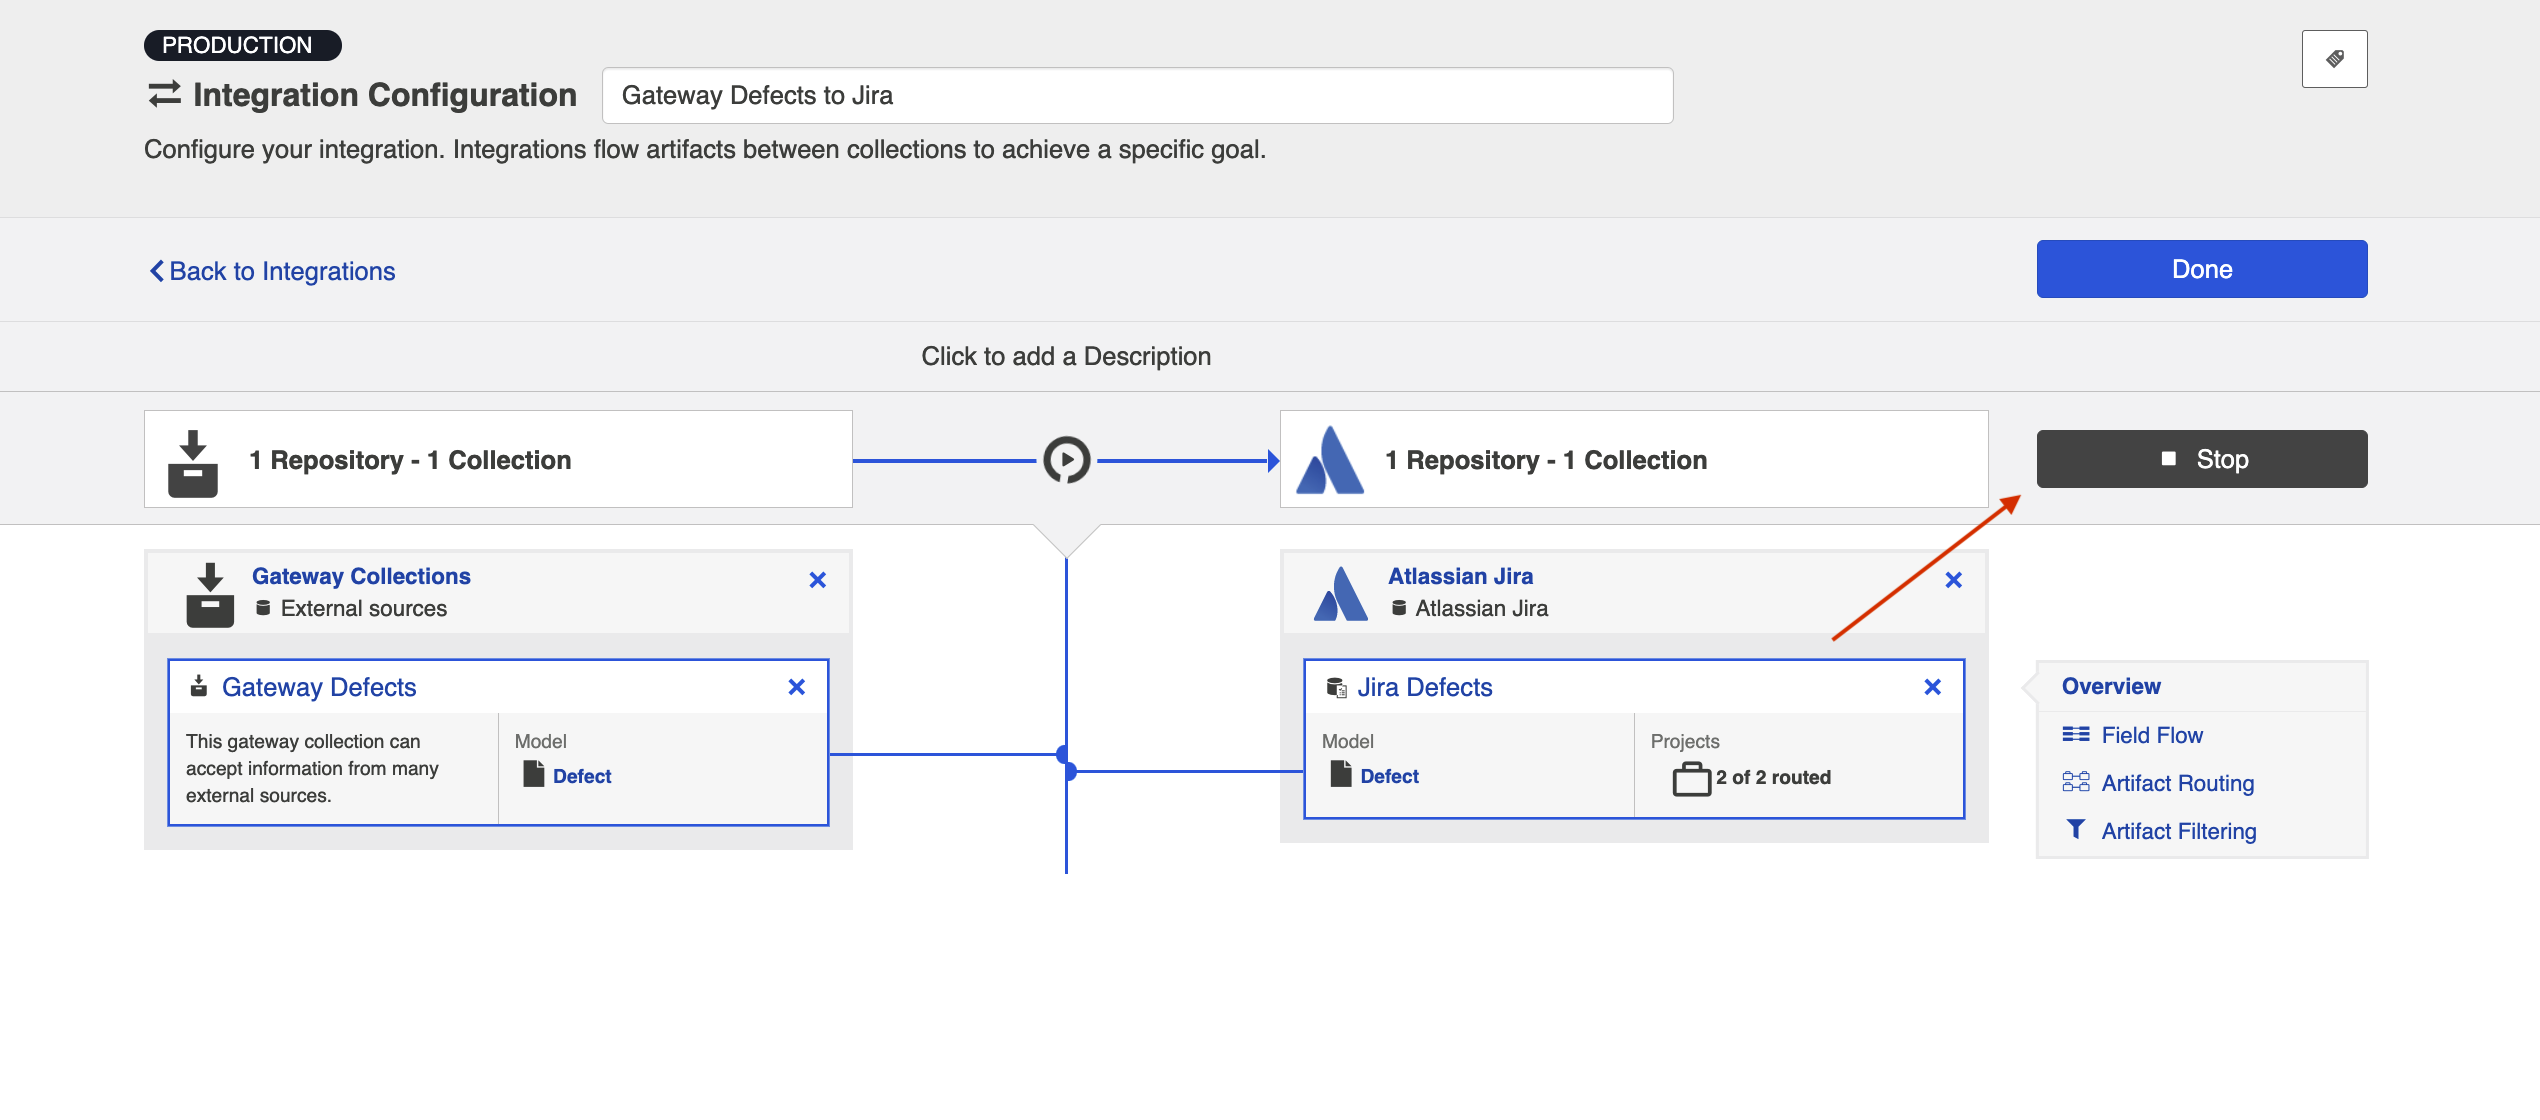
Running your Integration
Note: Please be aware that integrations will trigger changes in your end repositories and that misconfiguration can cause items to be duplicated or modified in unexpected ways. Additionally, there is no 'undo' in Hub or the repositories. If you have any questions, please contact support.
There are two ways to start or stop your integration:
From the Integration Configuration Screen
Simply click the Run button to run the integration, and the Stop button to stop the integration.
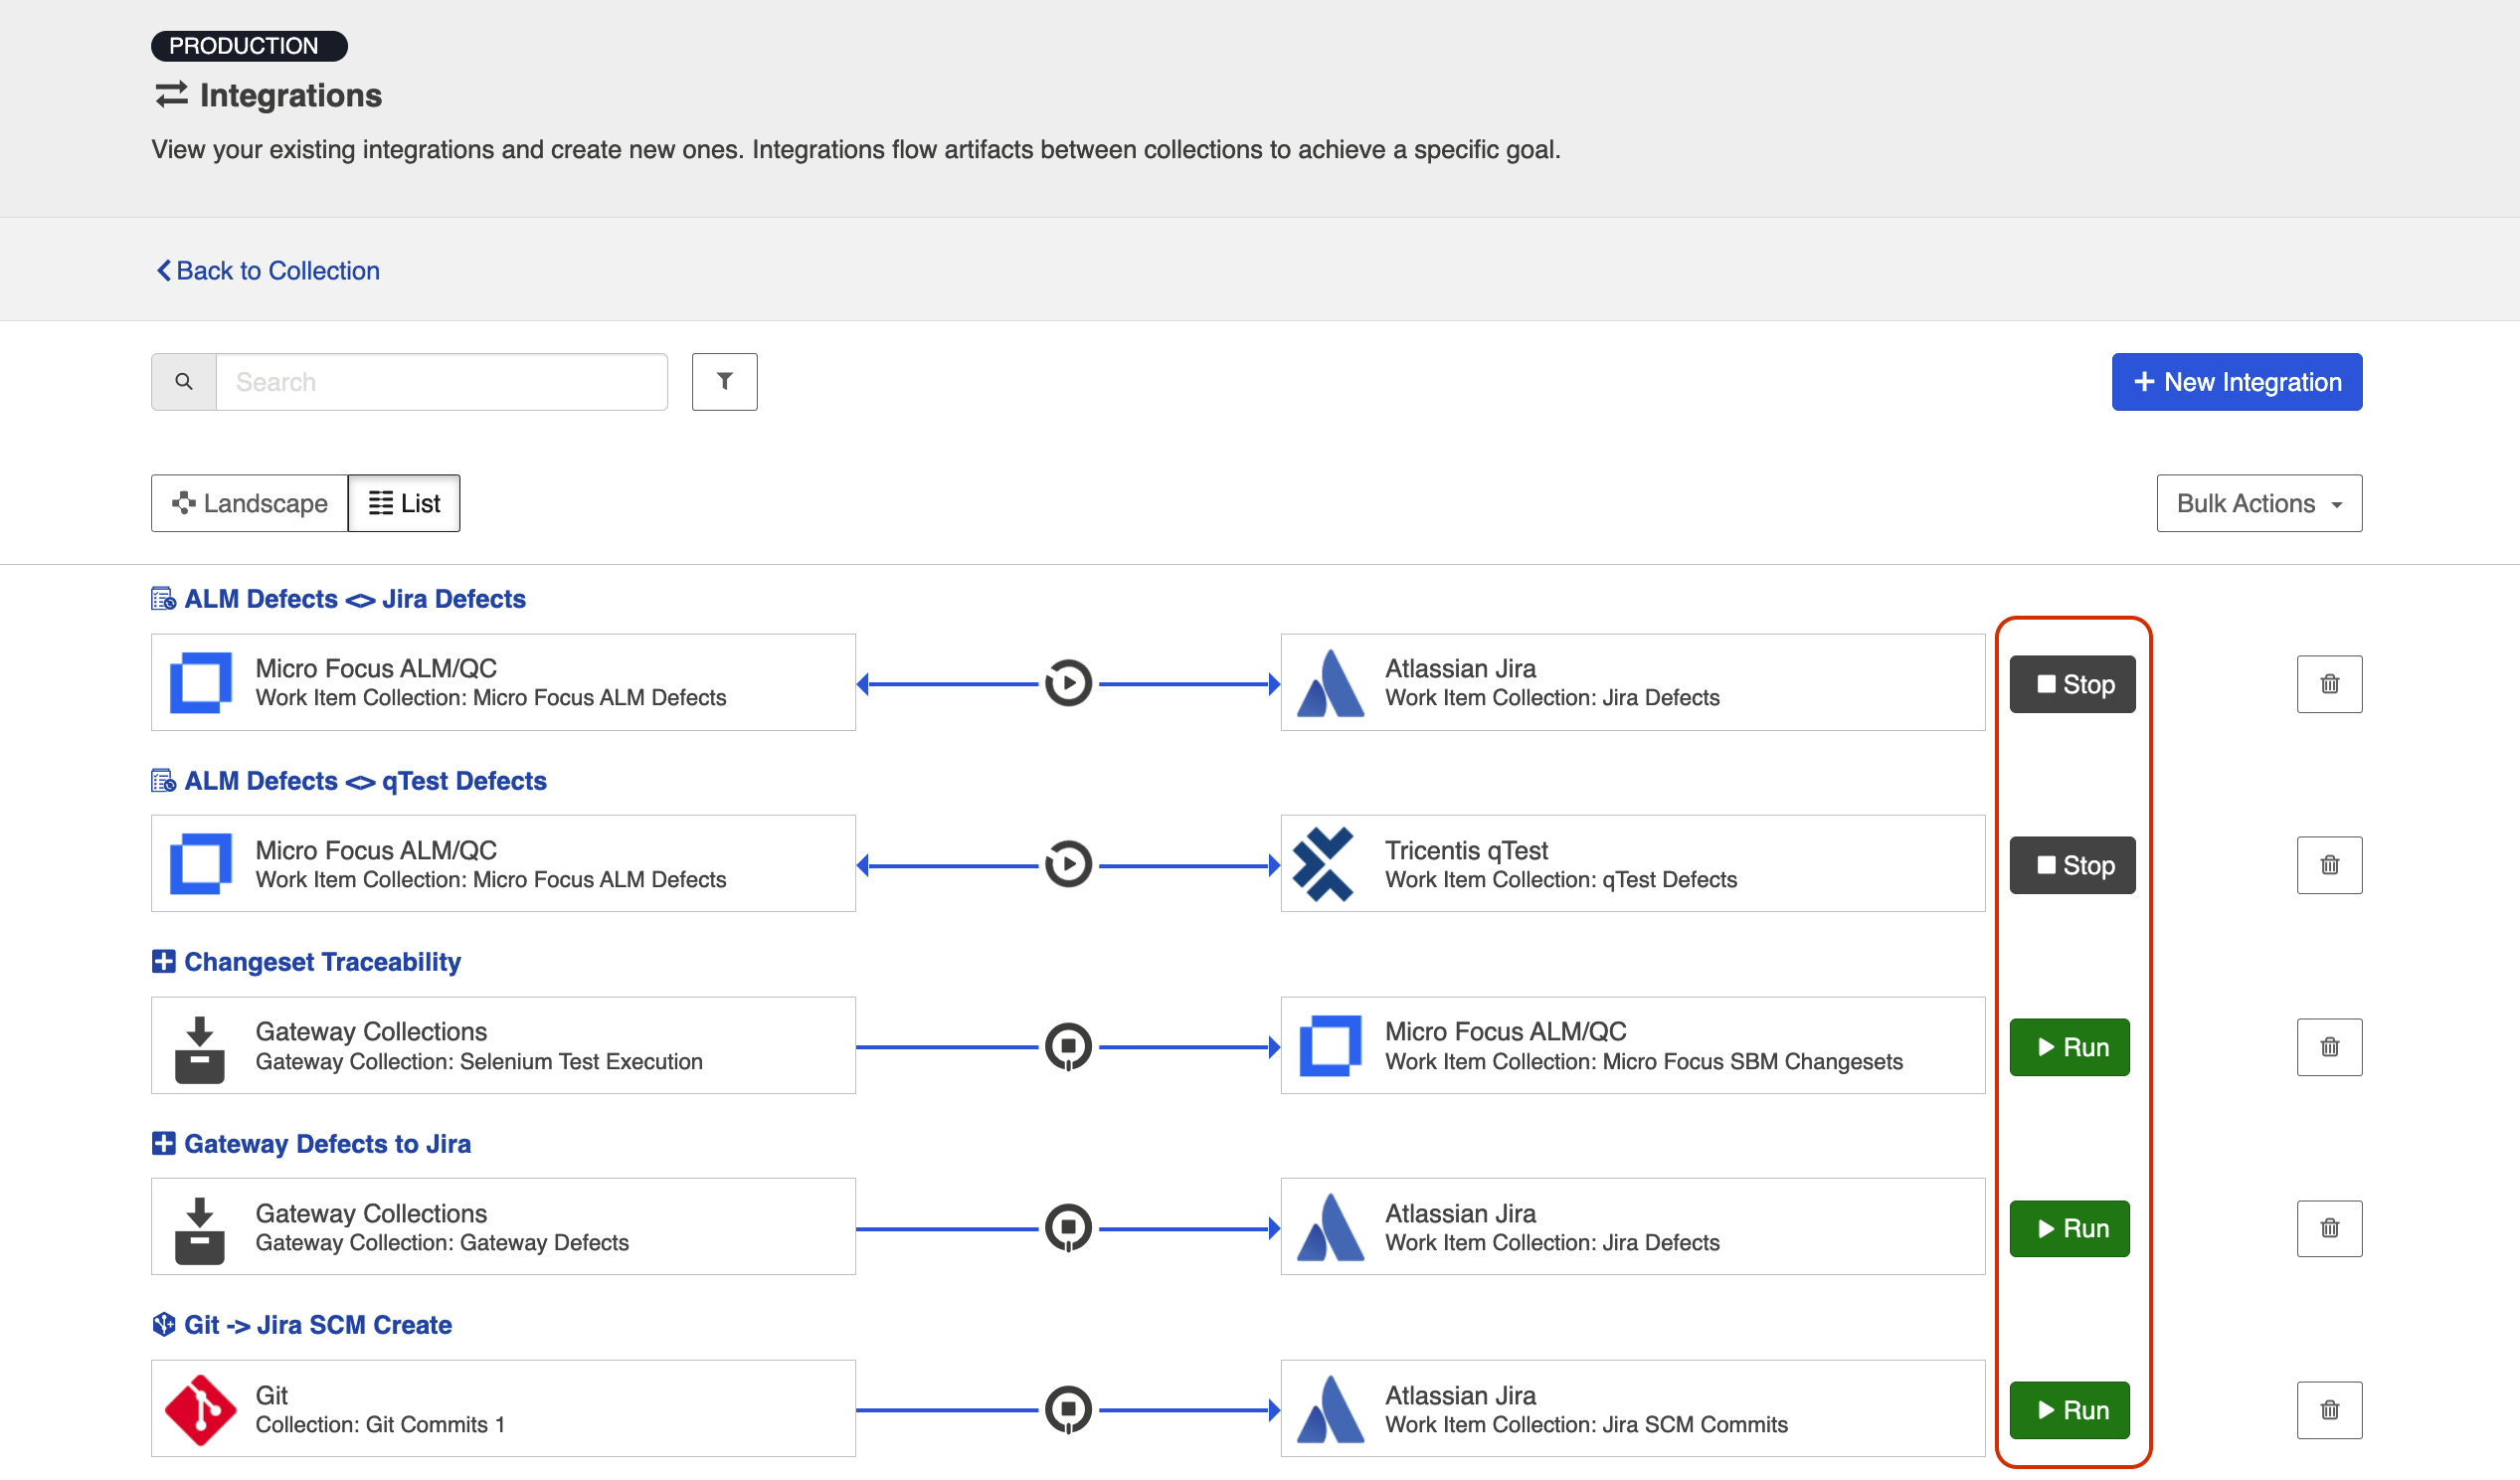
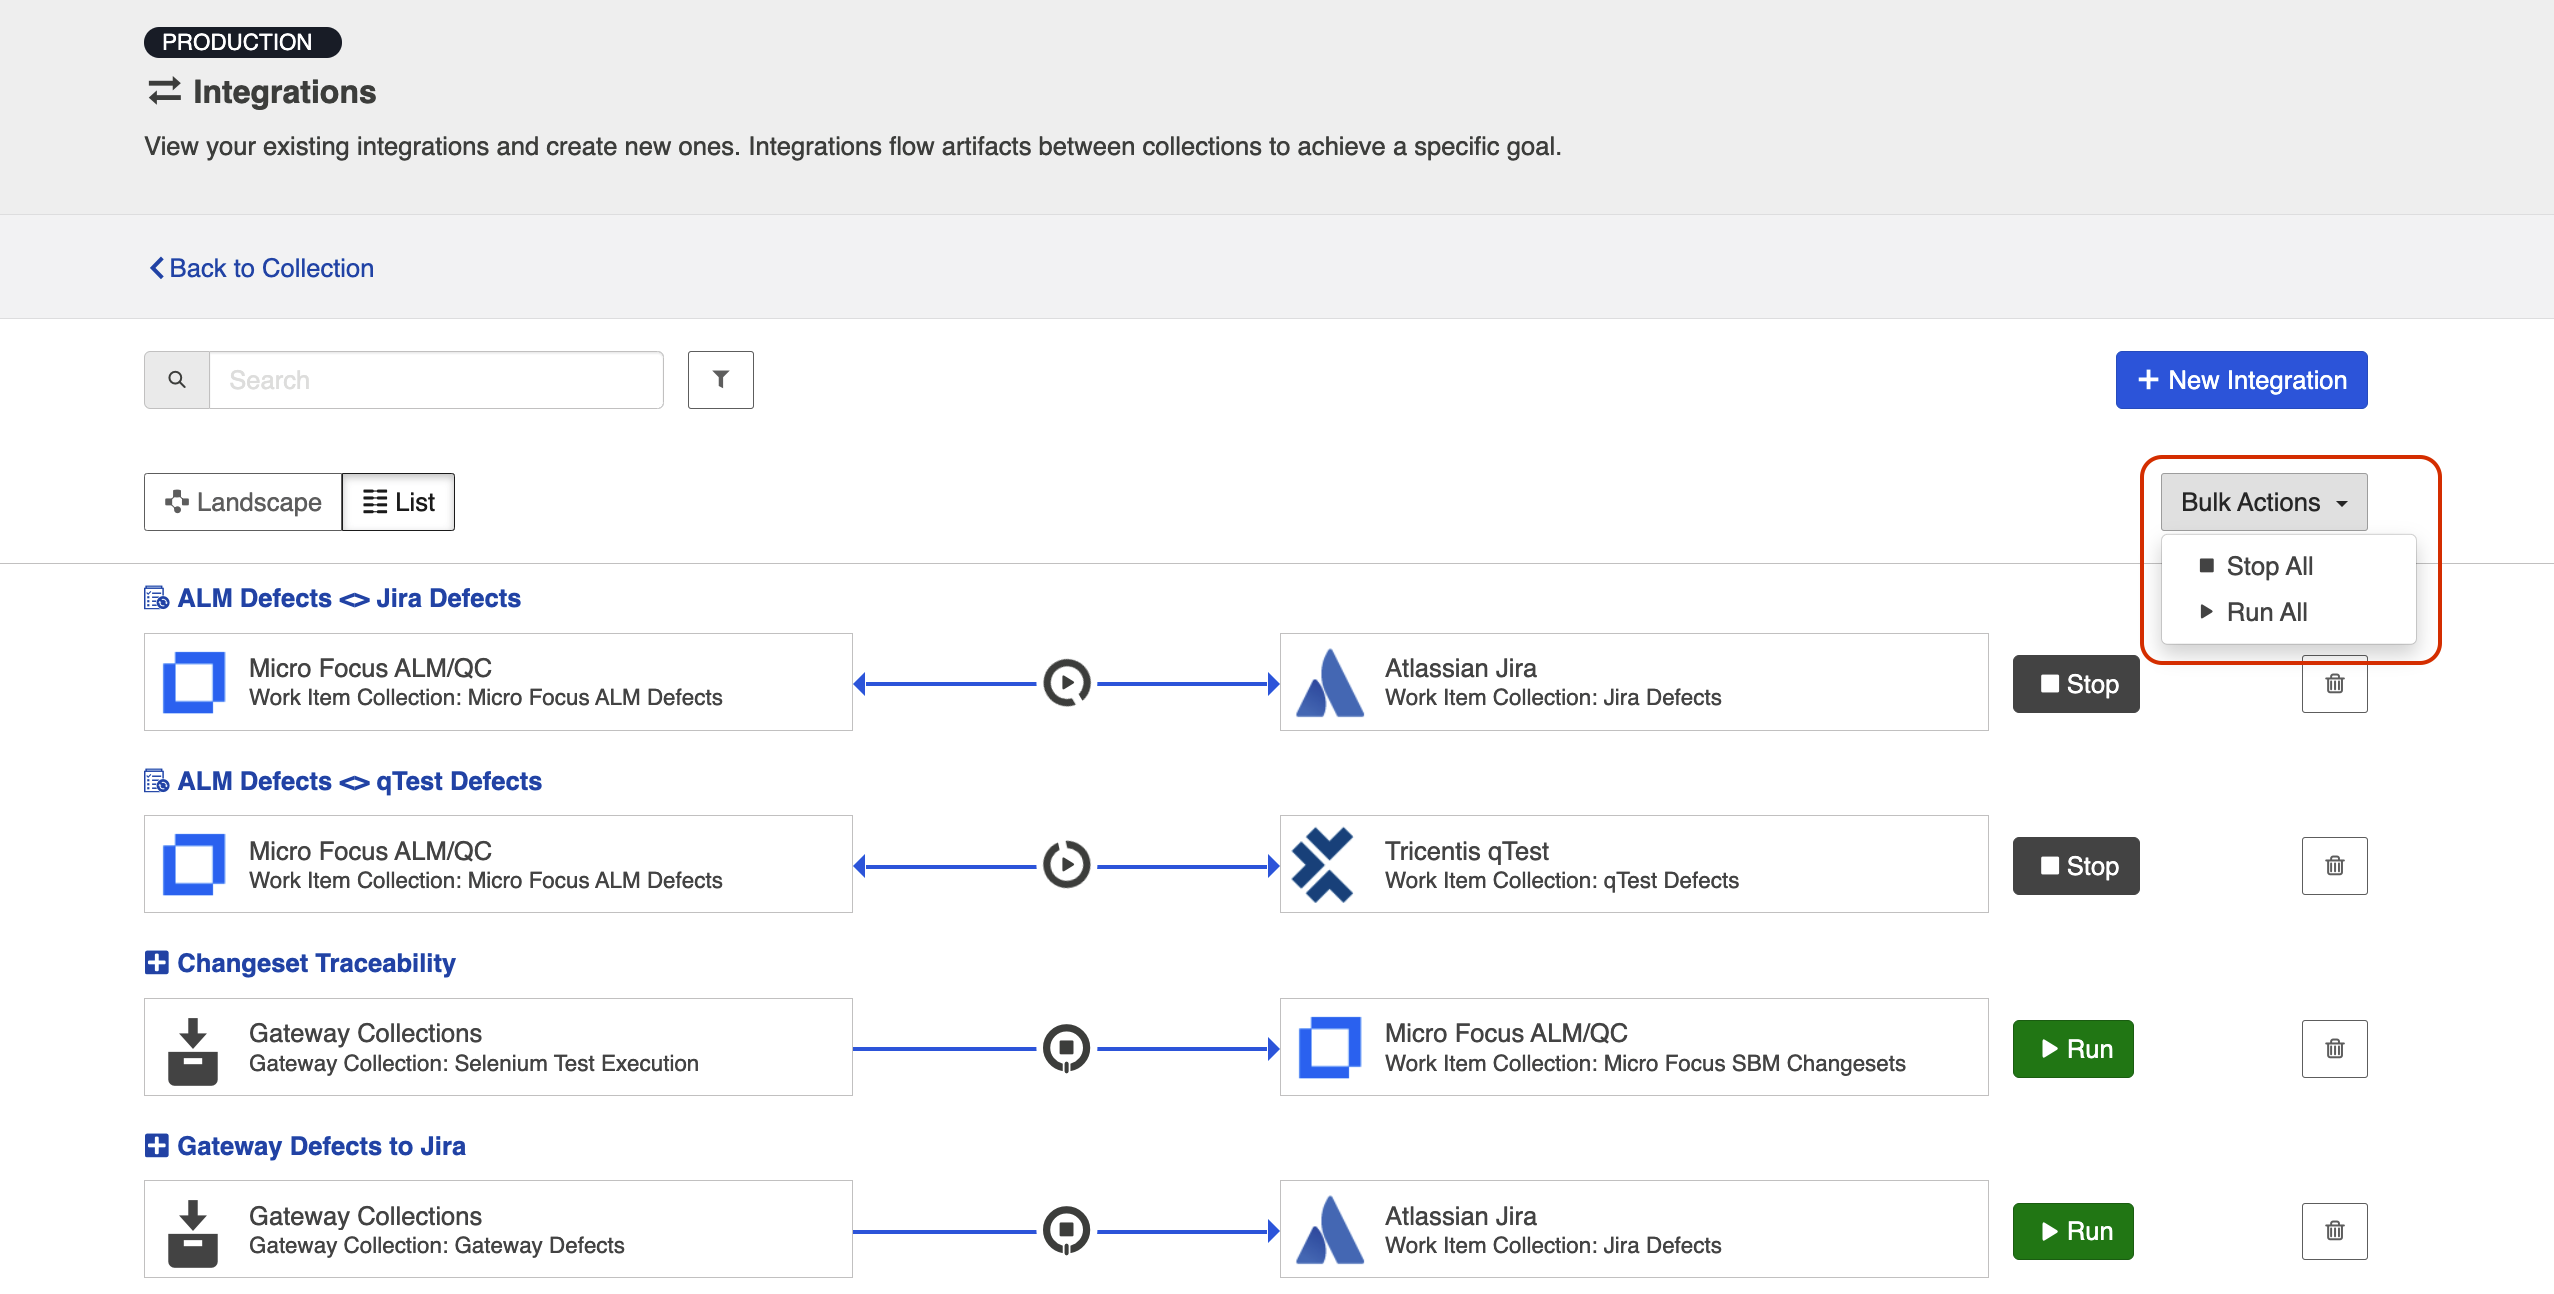
From the Integrations List Page
Click Run or Stop next to each integration you would like to update. You can also use the Bulk Actions button to run or stop all integrations.
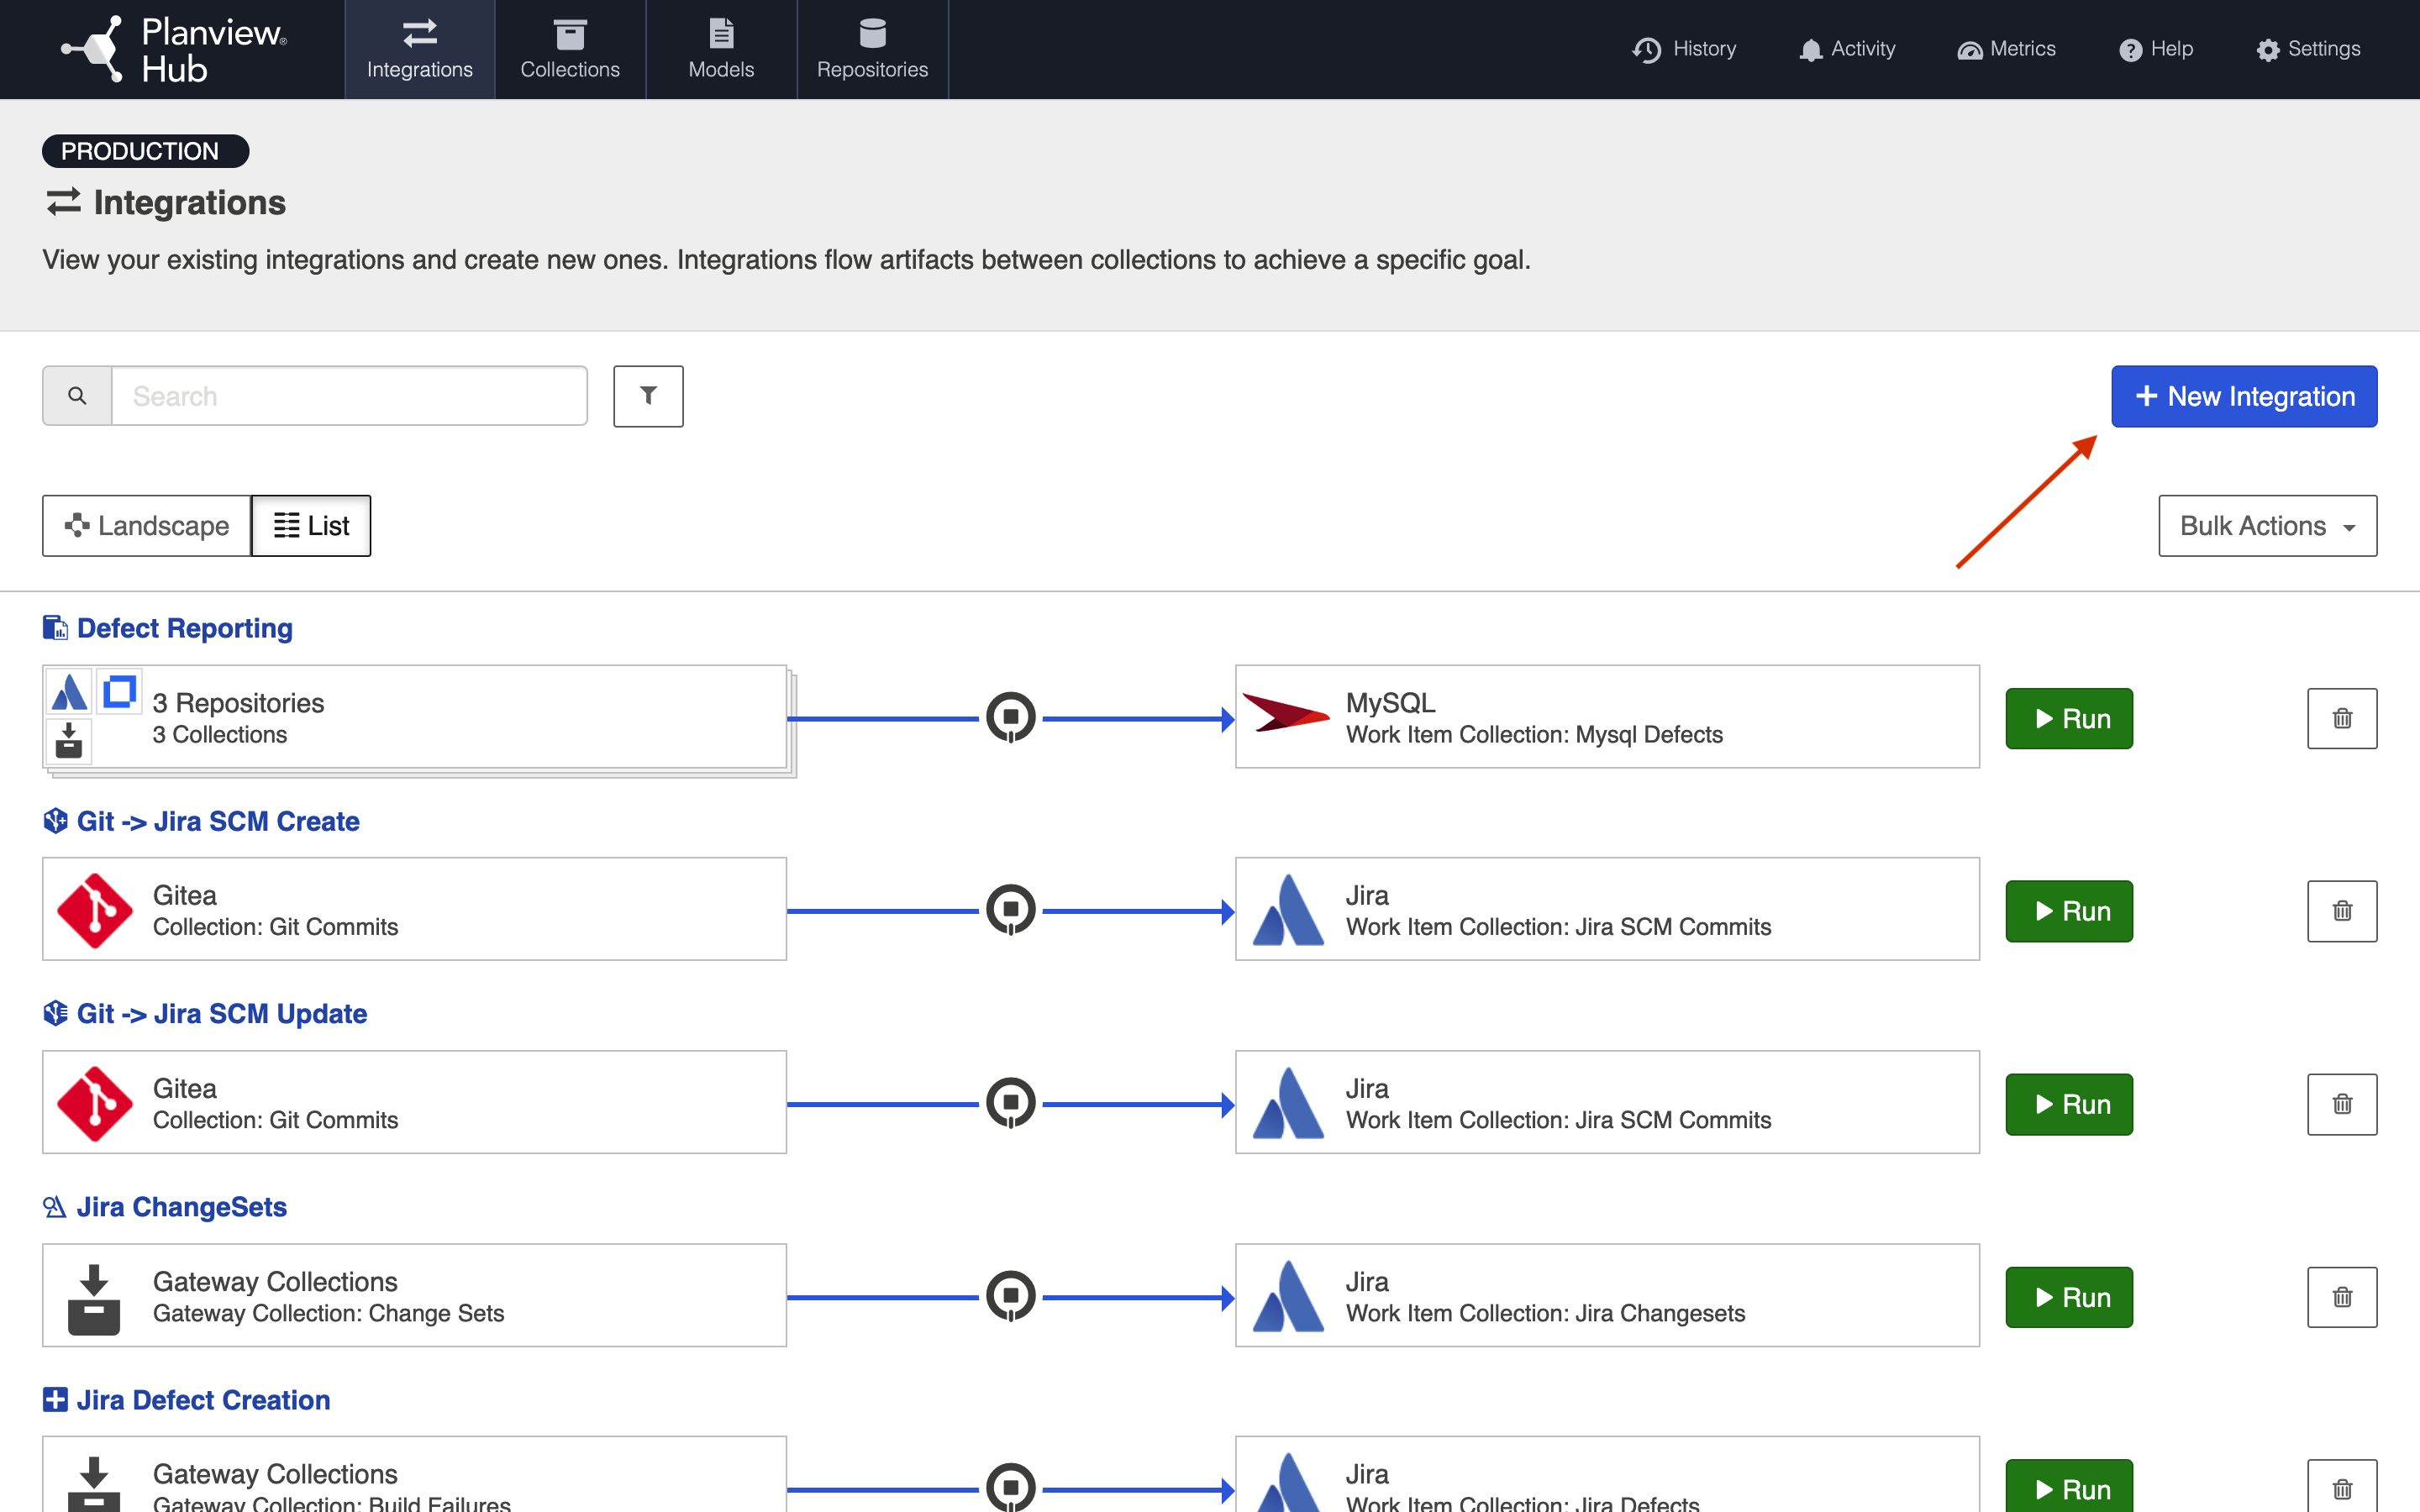
Viewing Your Integrations
See the Planview Hub Editions table to determine if your edition contains Integration Landscape View functionality.
When viewing your integrations, you have the option of viewing them in either Landscape or List mode.
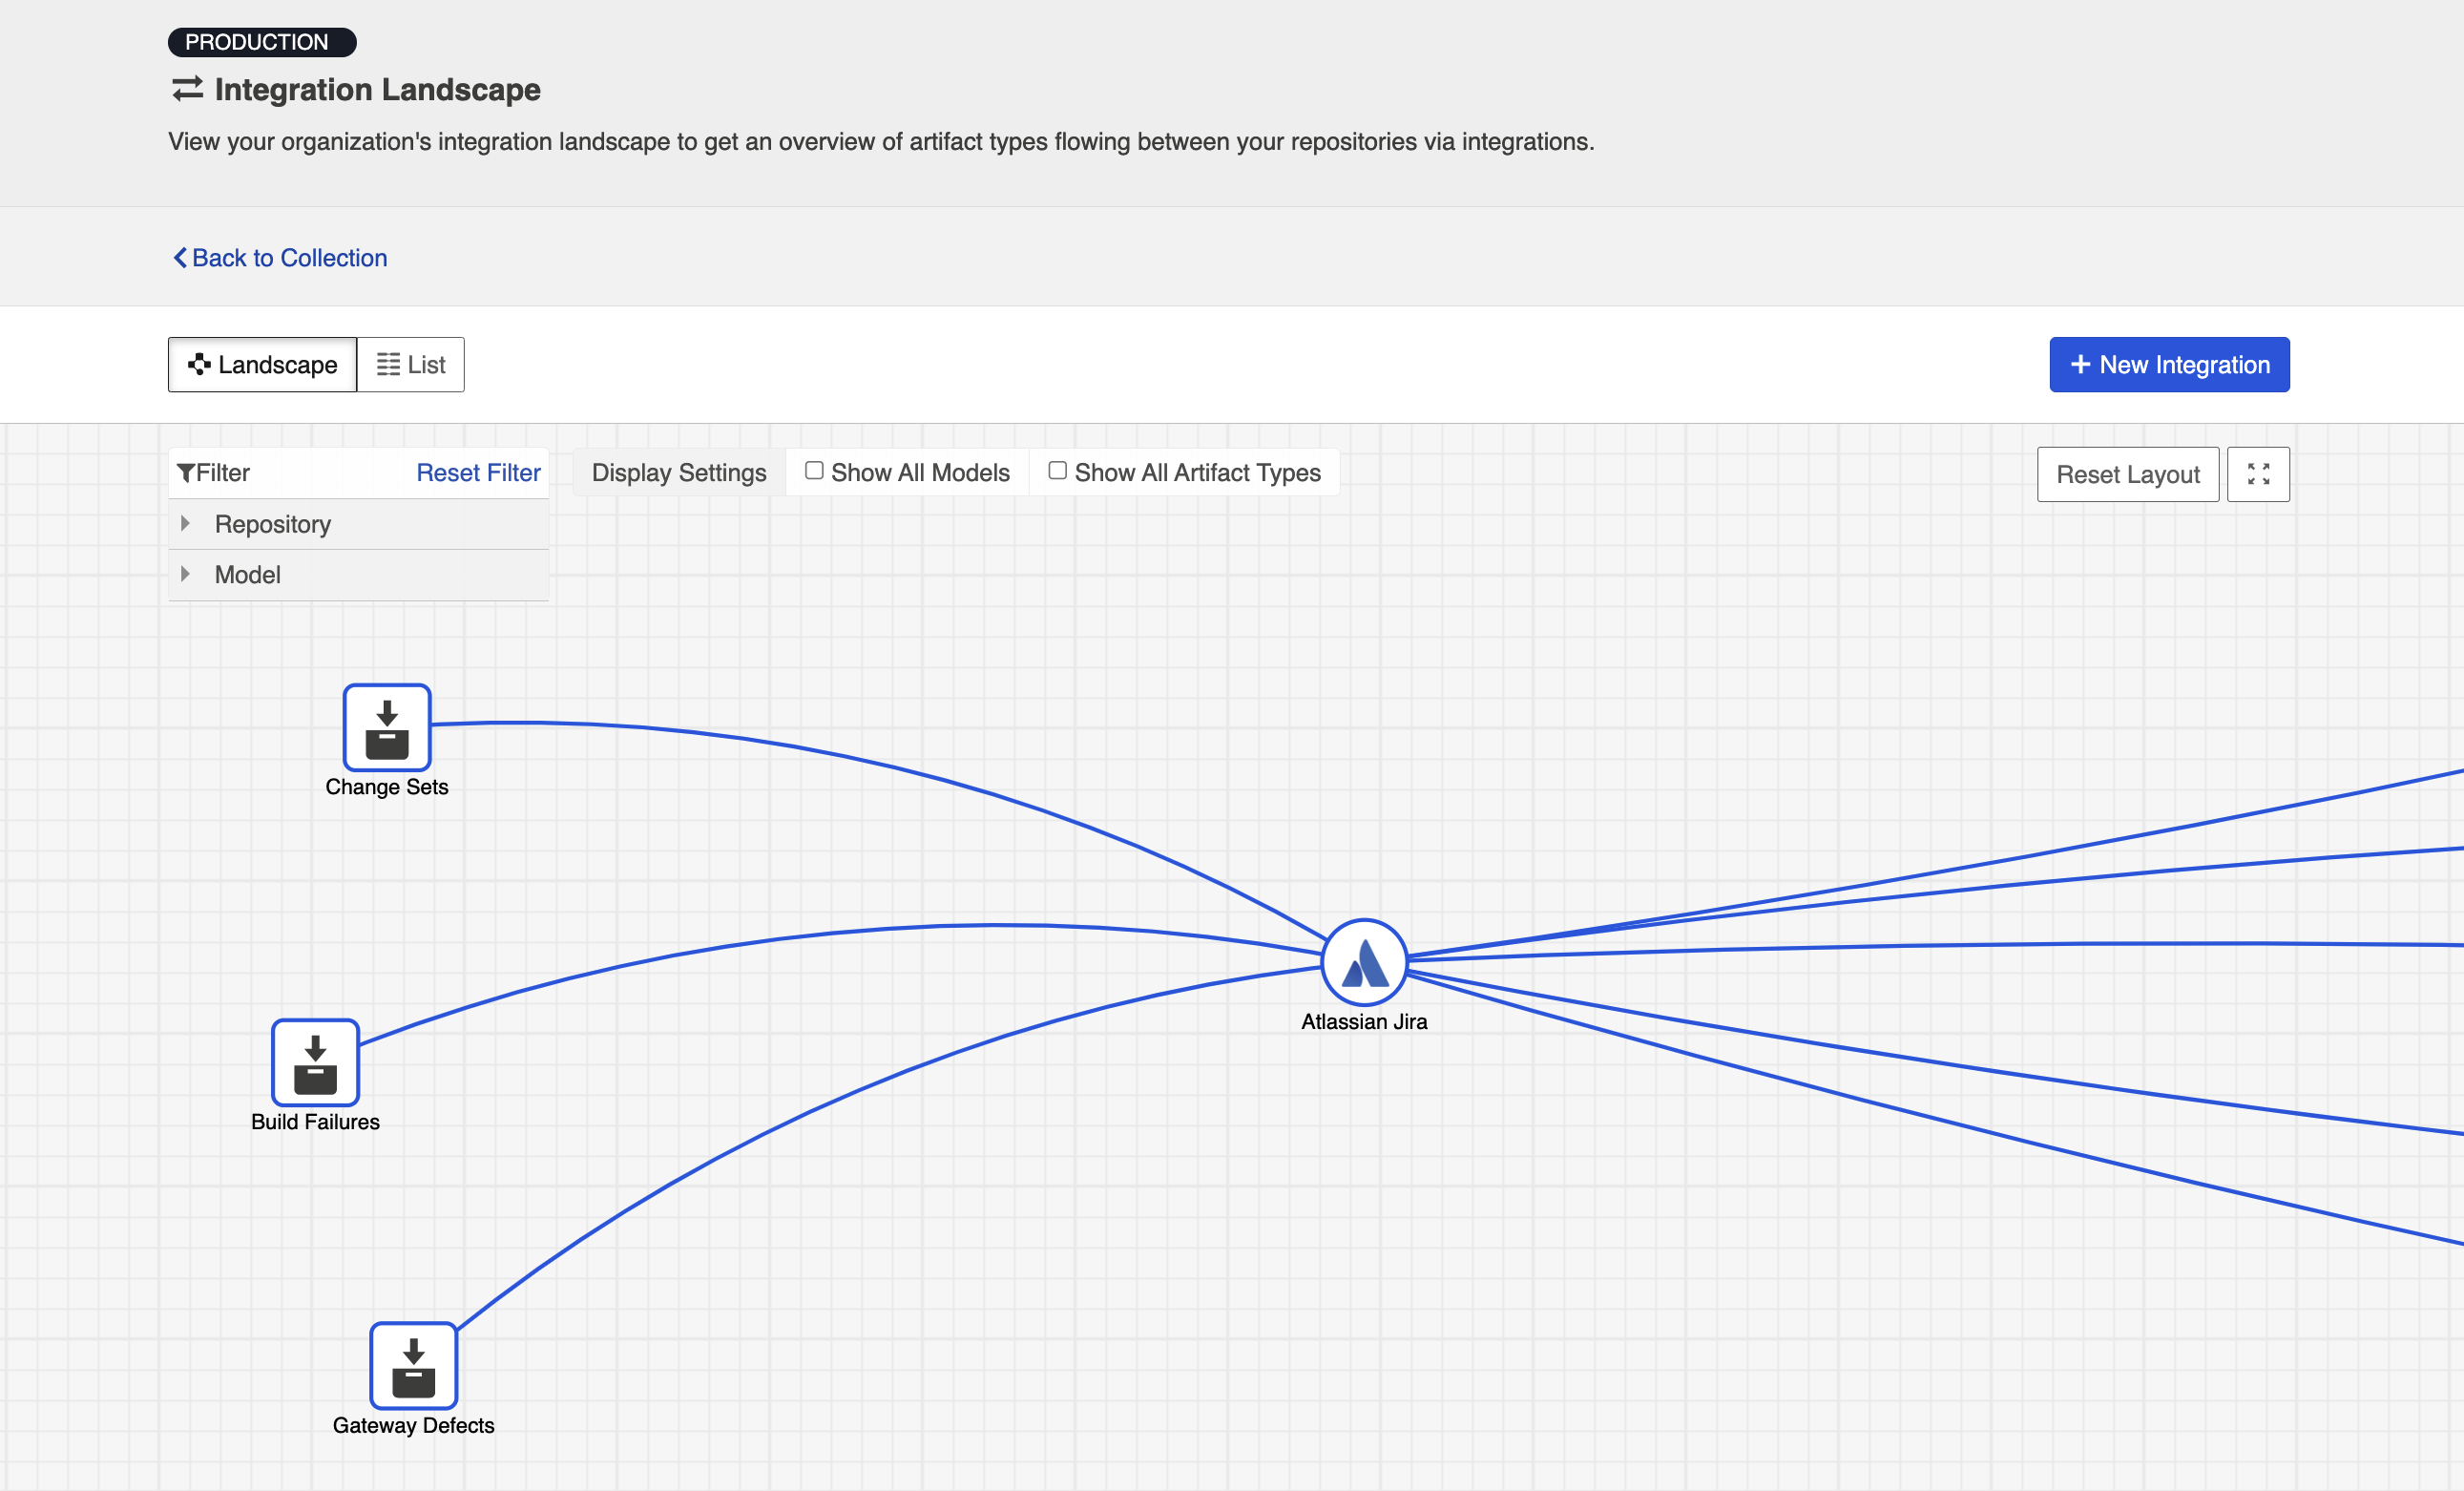
Landscape View
See the Planview Hub Editions table to determine if your edition contains Integration Landscape View functionality.
Learn more about the Integration Landscape view in the video below:
Hub will default to the Landscape View, which enables you to visualize your entire integration landscape and see how your integrations relate to one another. Use our built-in filters to see as little or as much information as you'd like!
Here's a simplified view:
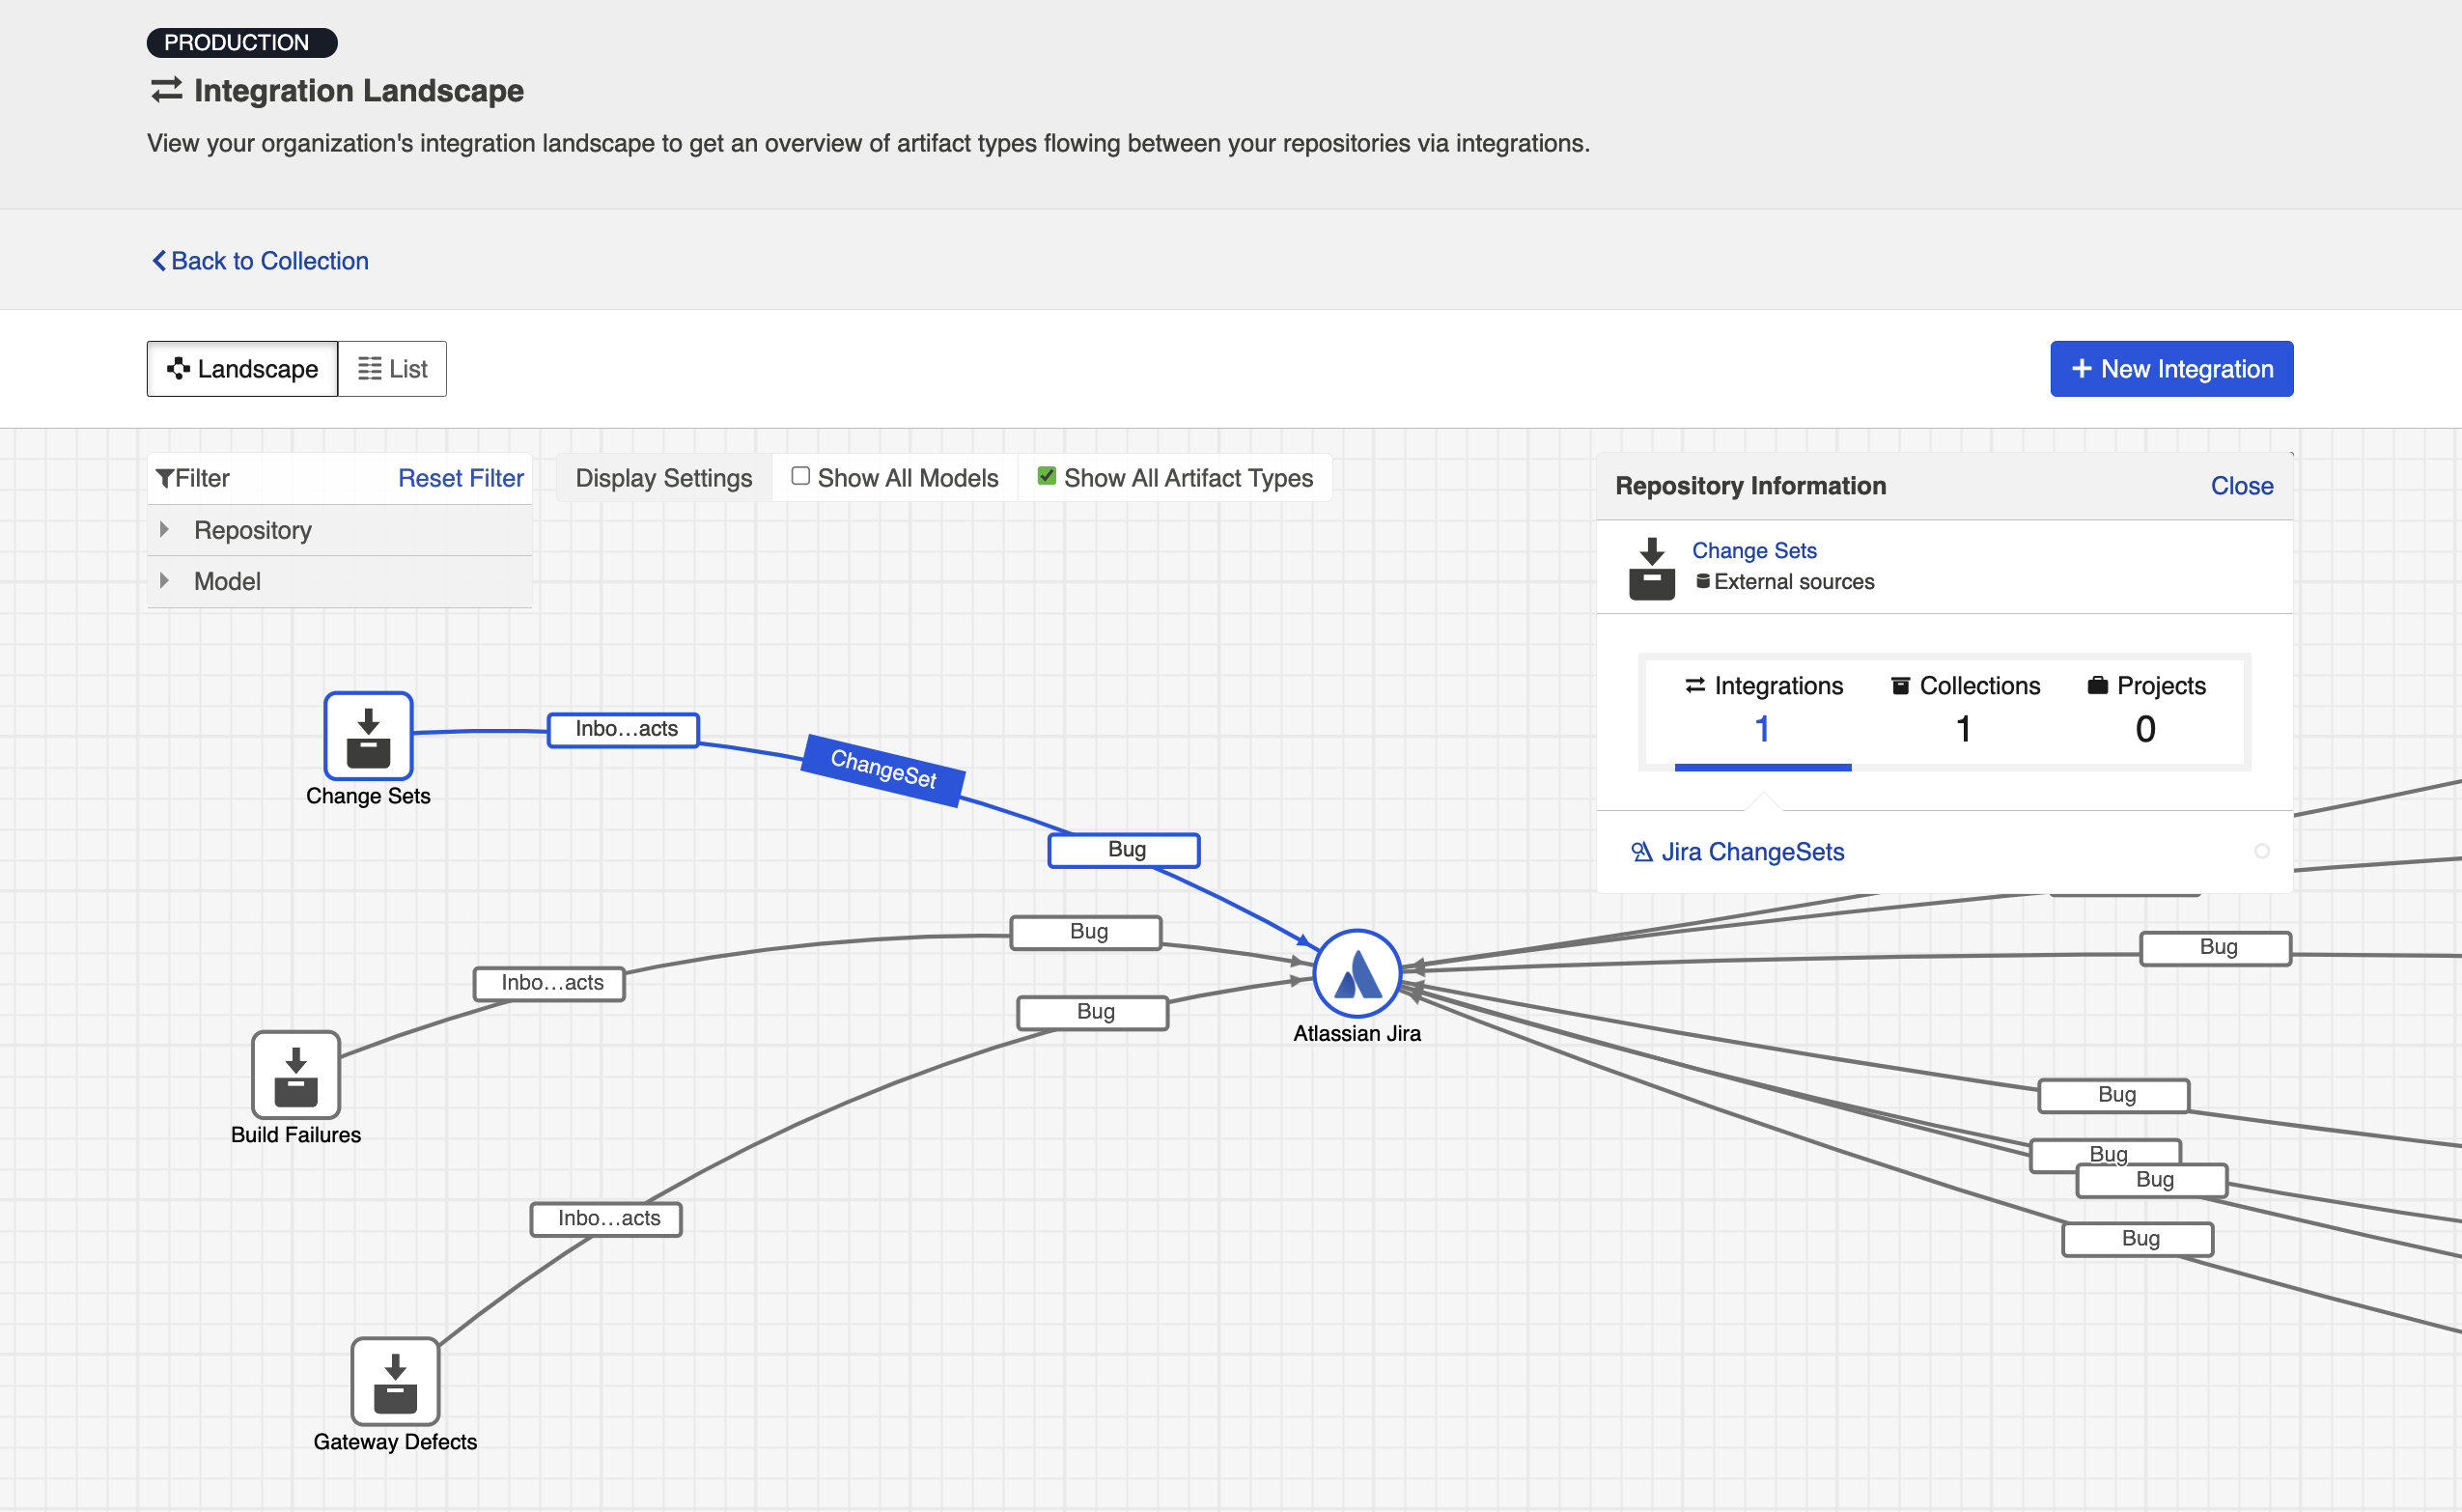
If you'd like to see additional information, you can utilize the filters, or click on a repository node to modify which information is shown.
Some examples of additional information you can see are:
- Models
- Artifact Types
- Artifact Creation Directionality Arrows
- List of all relevant integrations (see this by clicking on the repository node)
- Indicator of whether each integration is running or not
Here's an example of a more detailed view:
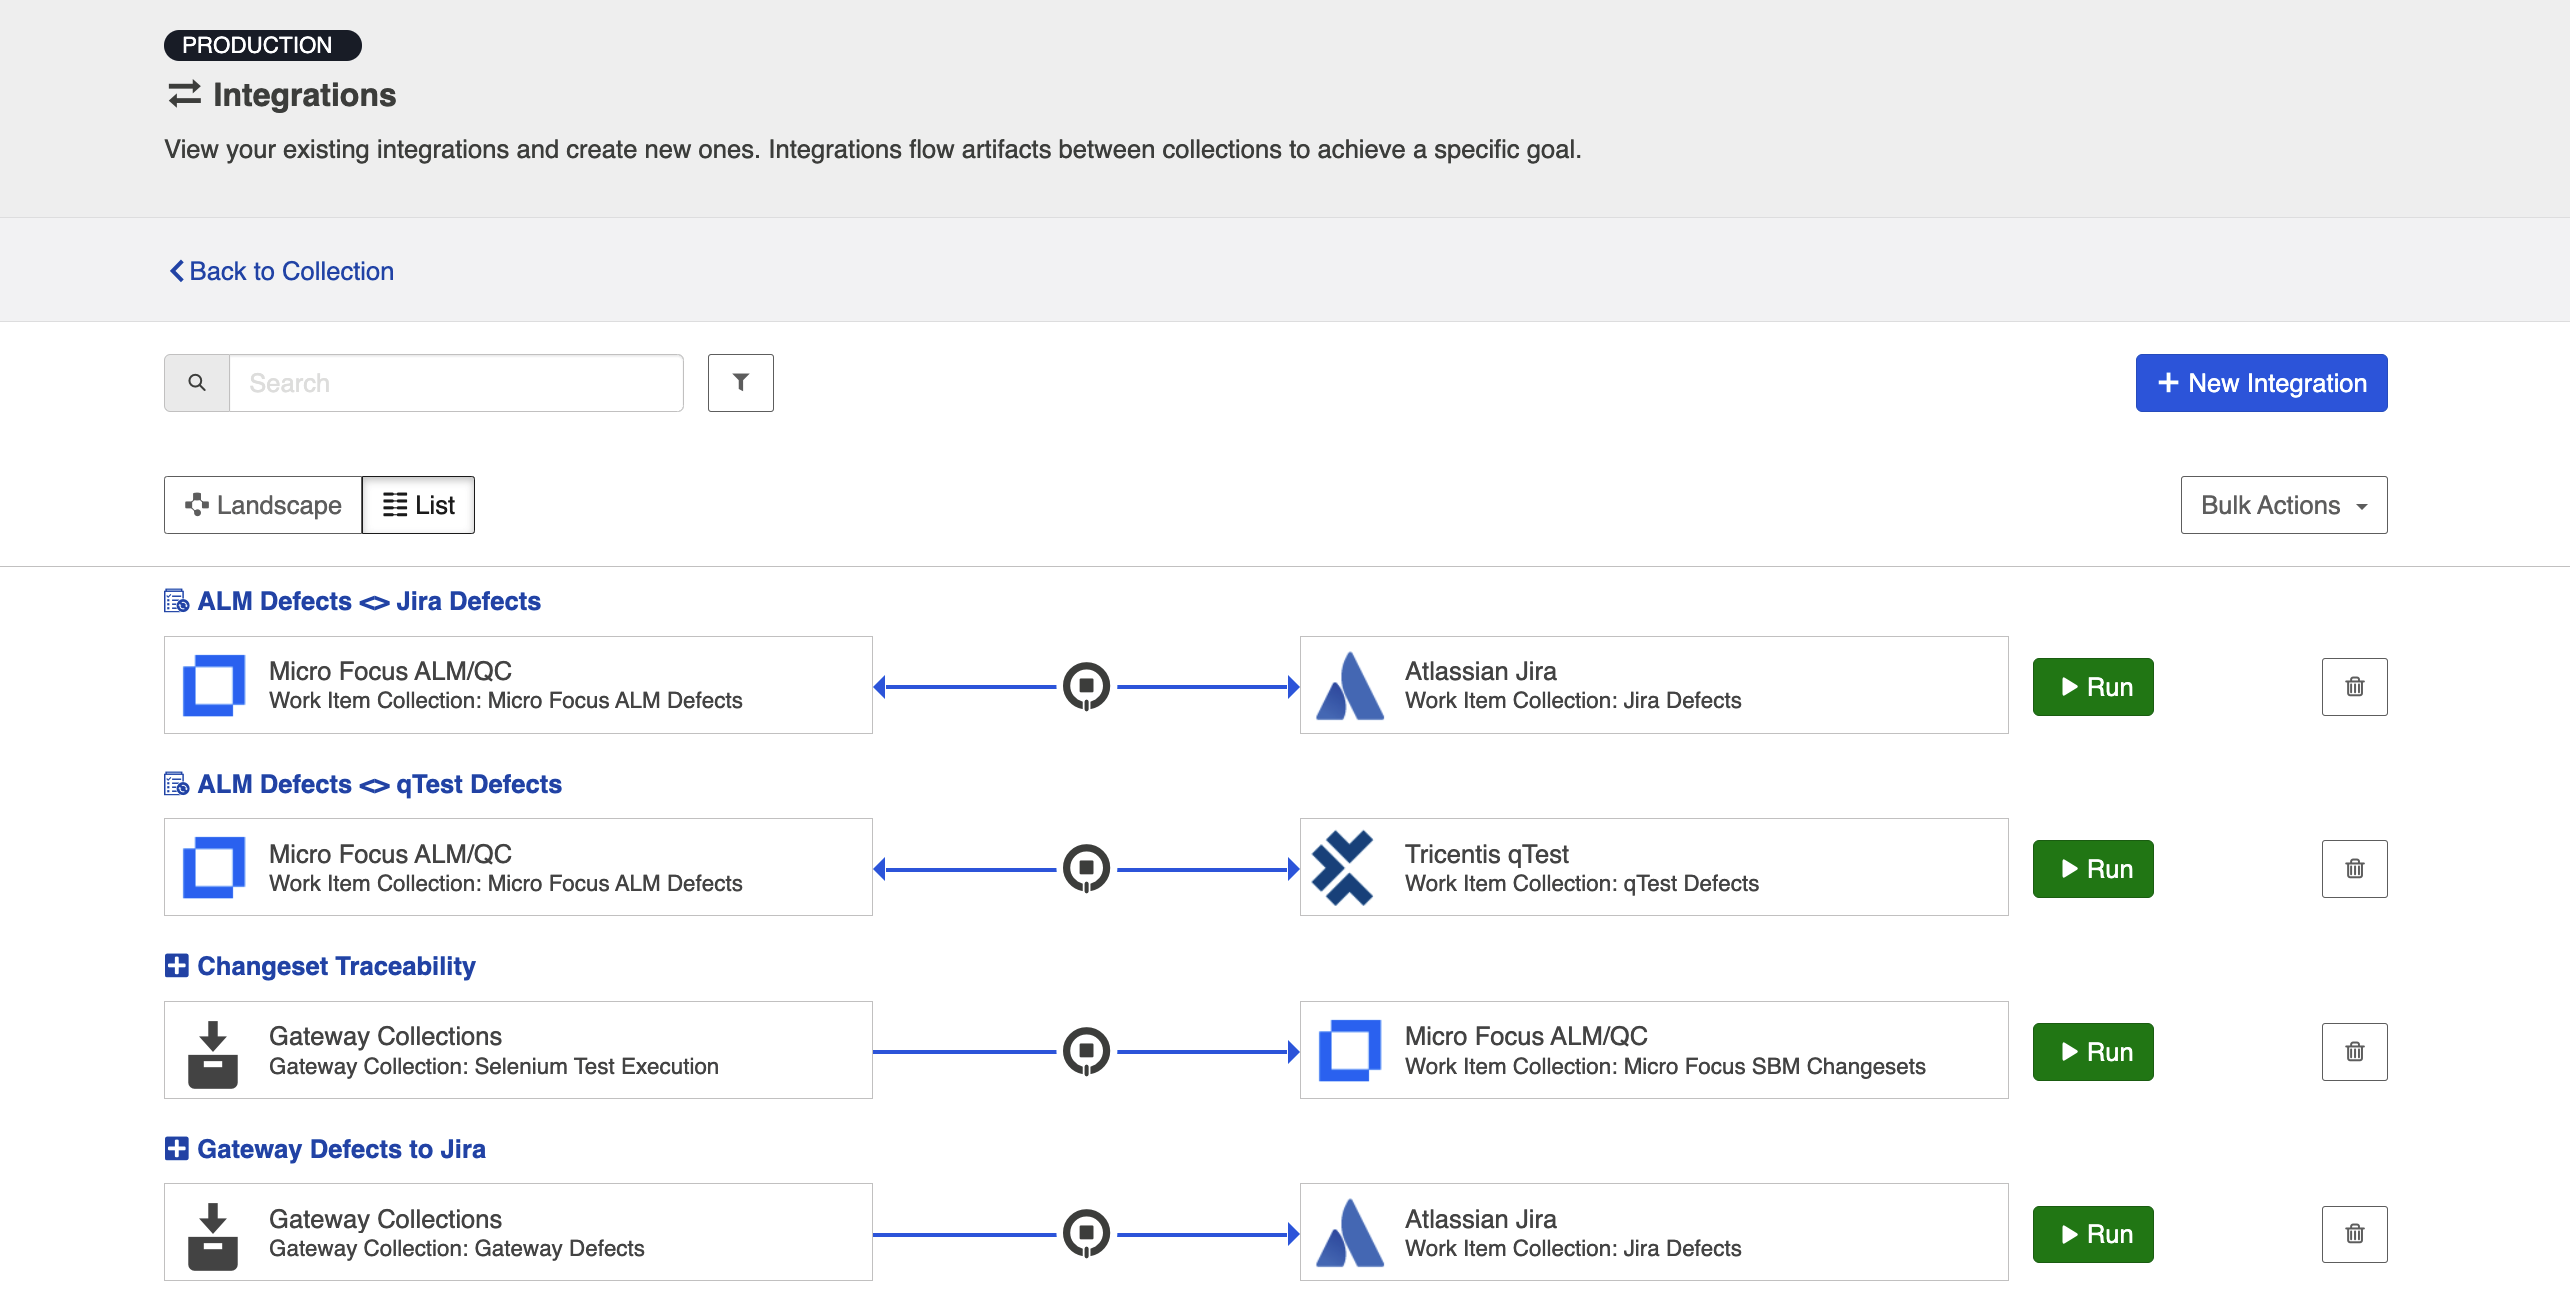
List View
If you'd like, you can toggle to List view, which will show you a list of all integrations you have created.
You can use this view to:
- Start an Integration
- Stop an Integration
- Delete an Integration
- Click into an Integration and modify its configuration
Tips and Tricks
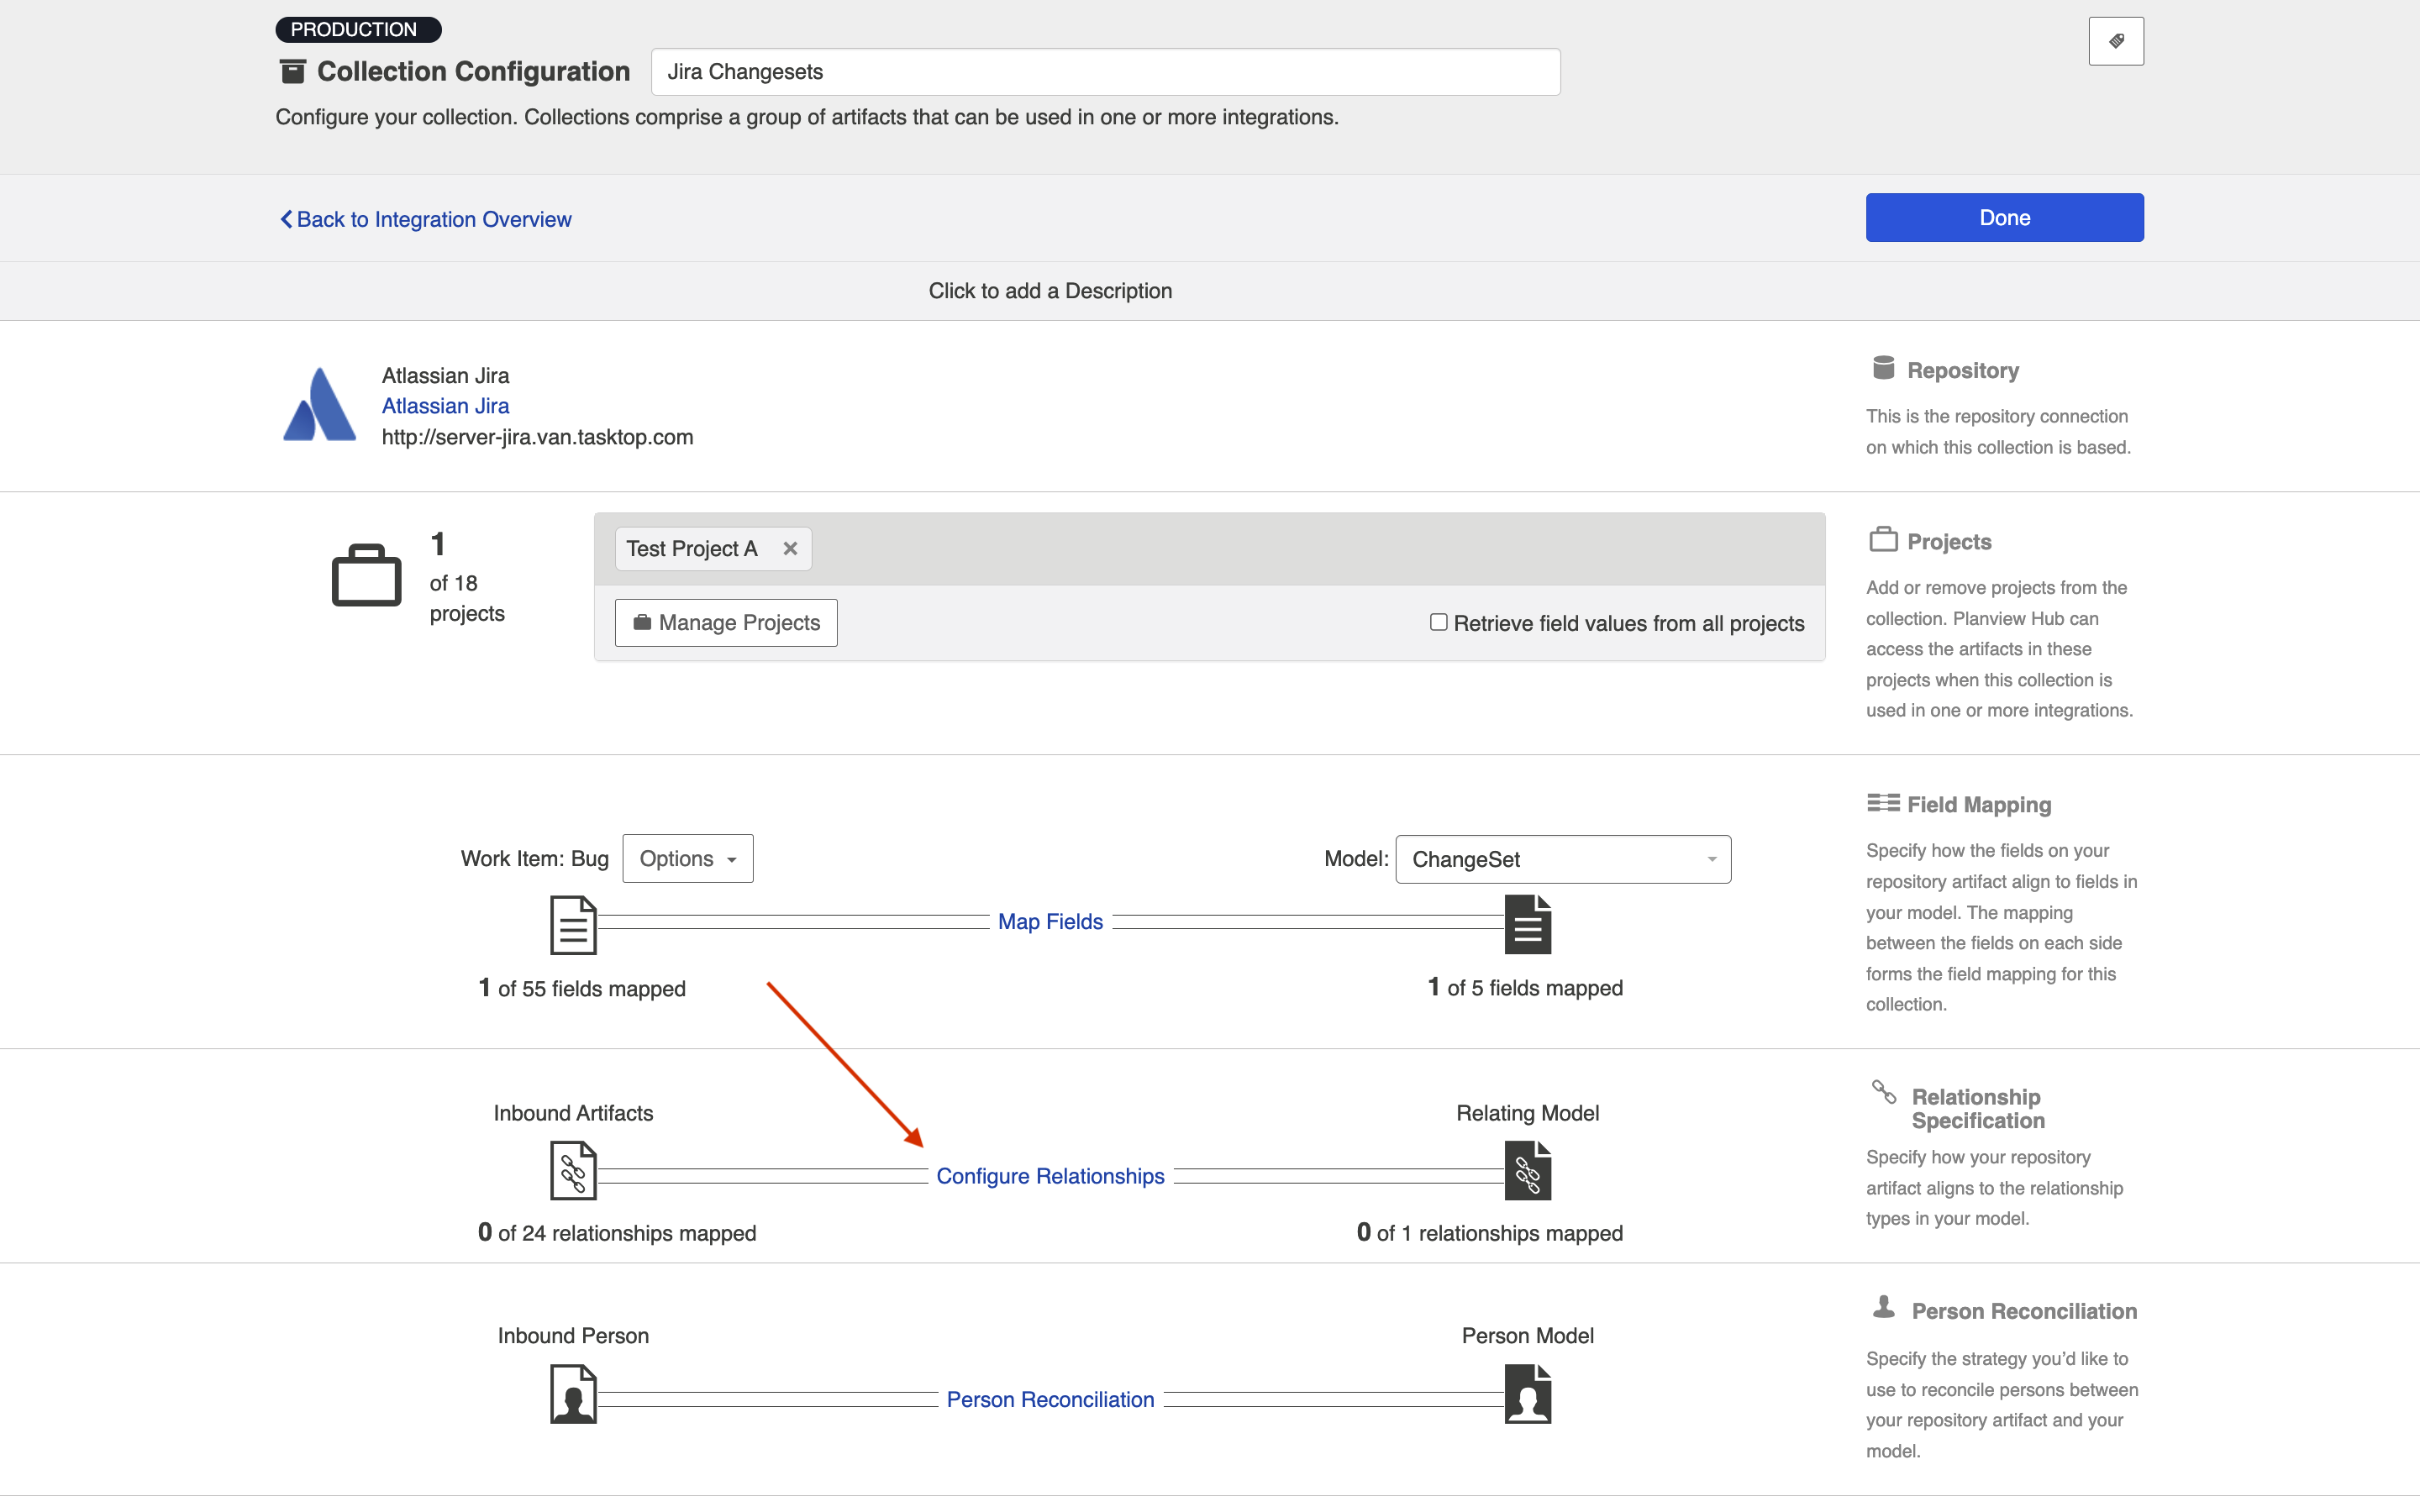
Creating Relationships Between Newly Created Artifacts and Existing Artifacts
If you'd like to create relationships between your newly created artifacts and existing artifacts in the same repository, please follow the additional steps listed below:
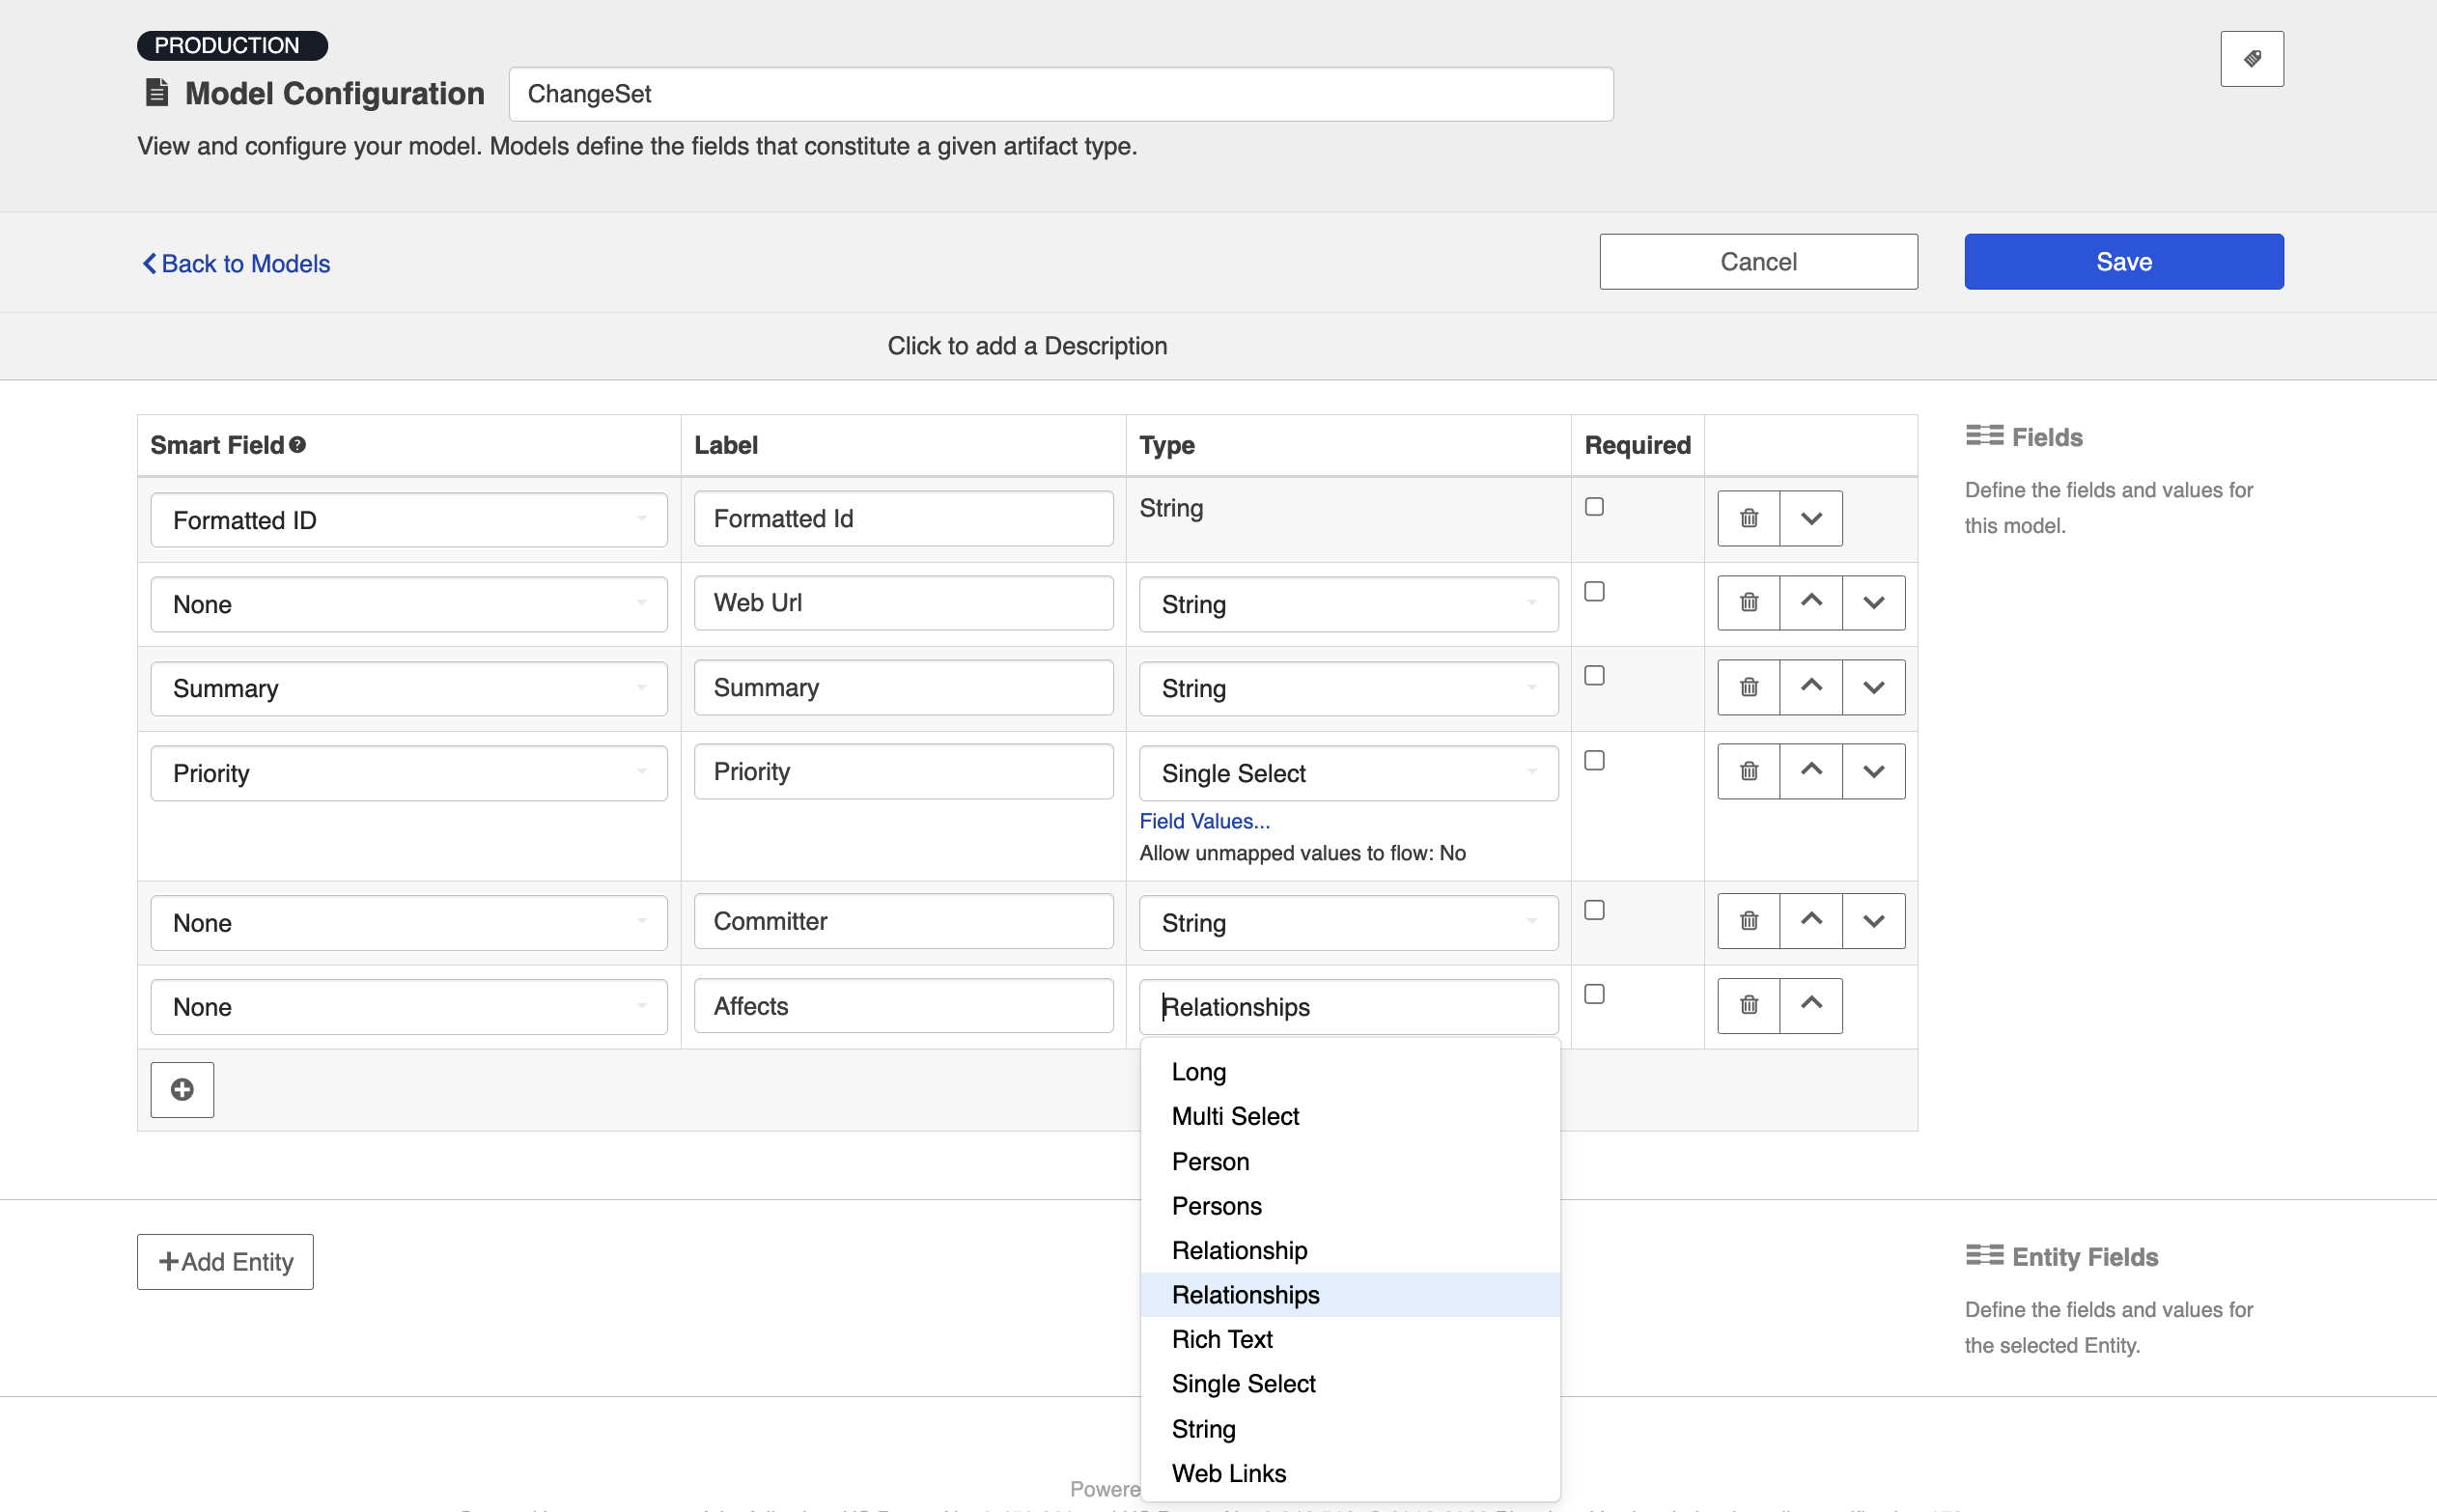
At the Model level: When creating your model, you can create a field that is of type “relationship” or “relationships”. You should use “relationship” when the newly-created artifact can only relate to one other artifact and “relationships” when the newly-created artifact can relate to multiple artifacts.
For example, the relationship field type, “Parent," should generally be singular, as most artifacts usually only have a single parent. However, if the relationship field type is called “Blocks”, it can likely be plural, as one artifact can block many artifacts.
In the use case example described at the top of this page, I want the relationship to be “Affects” because any incoming changeset can affect many stories. So I’ll configure a relationships field.
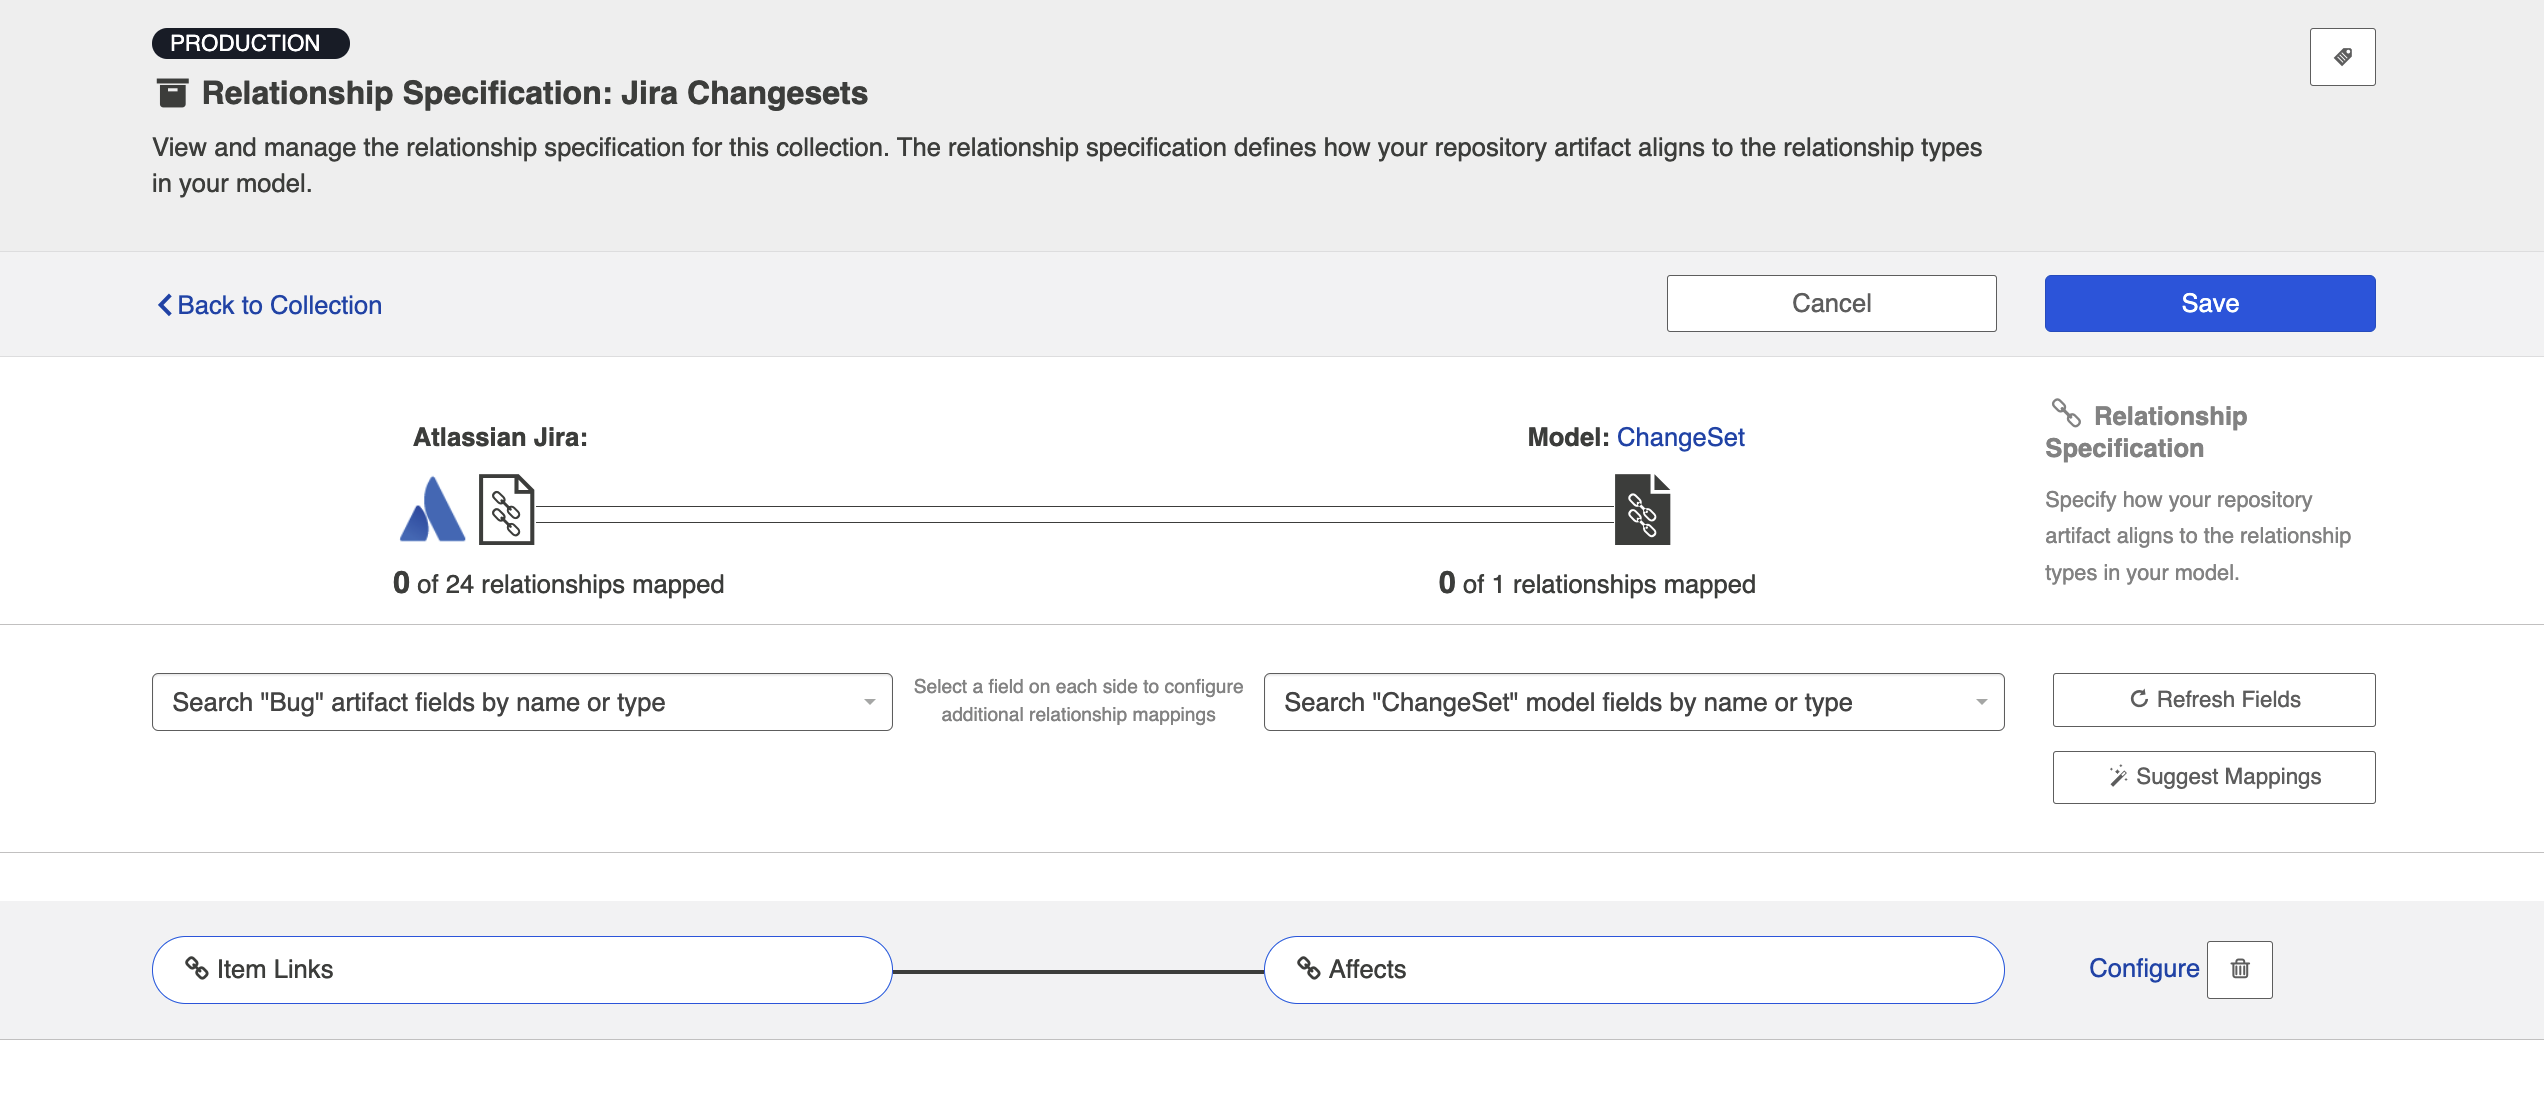
At the Repository Collection level: When creating your repository collection, you will need to map a field in your repository to the relationship(s) field in your model. So, in the same example, if you want the relationship between the new changeset and the existing story to be “affects”, but the relationship is actually called “Item Links” in Jira, you would need to map those two fields. You’ll need to do this for each relationship type configured in your model.
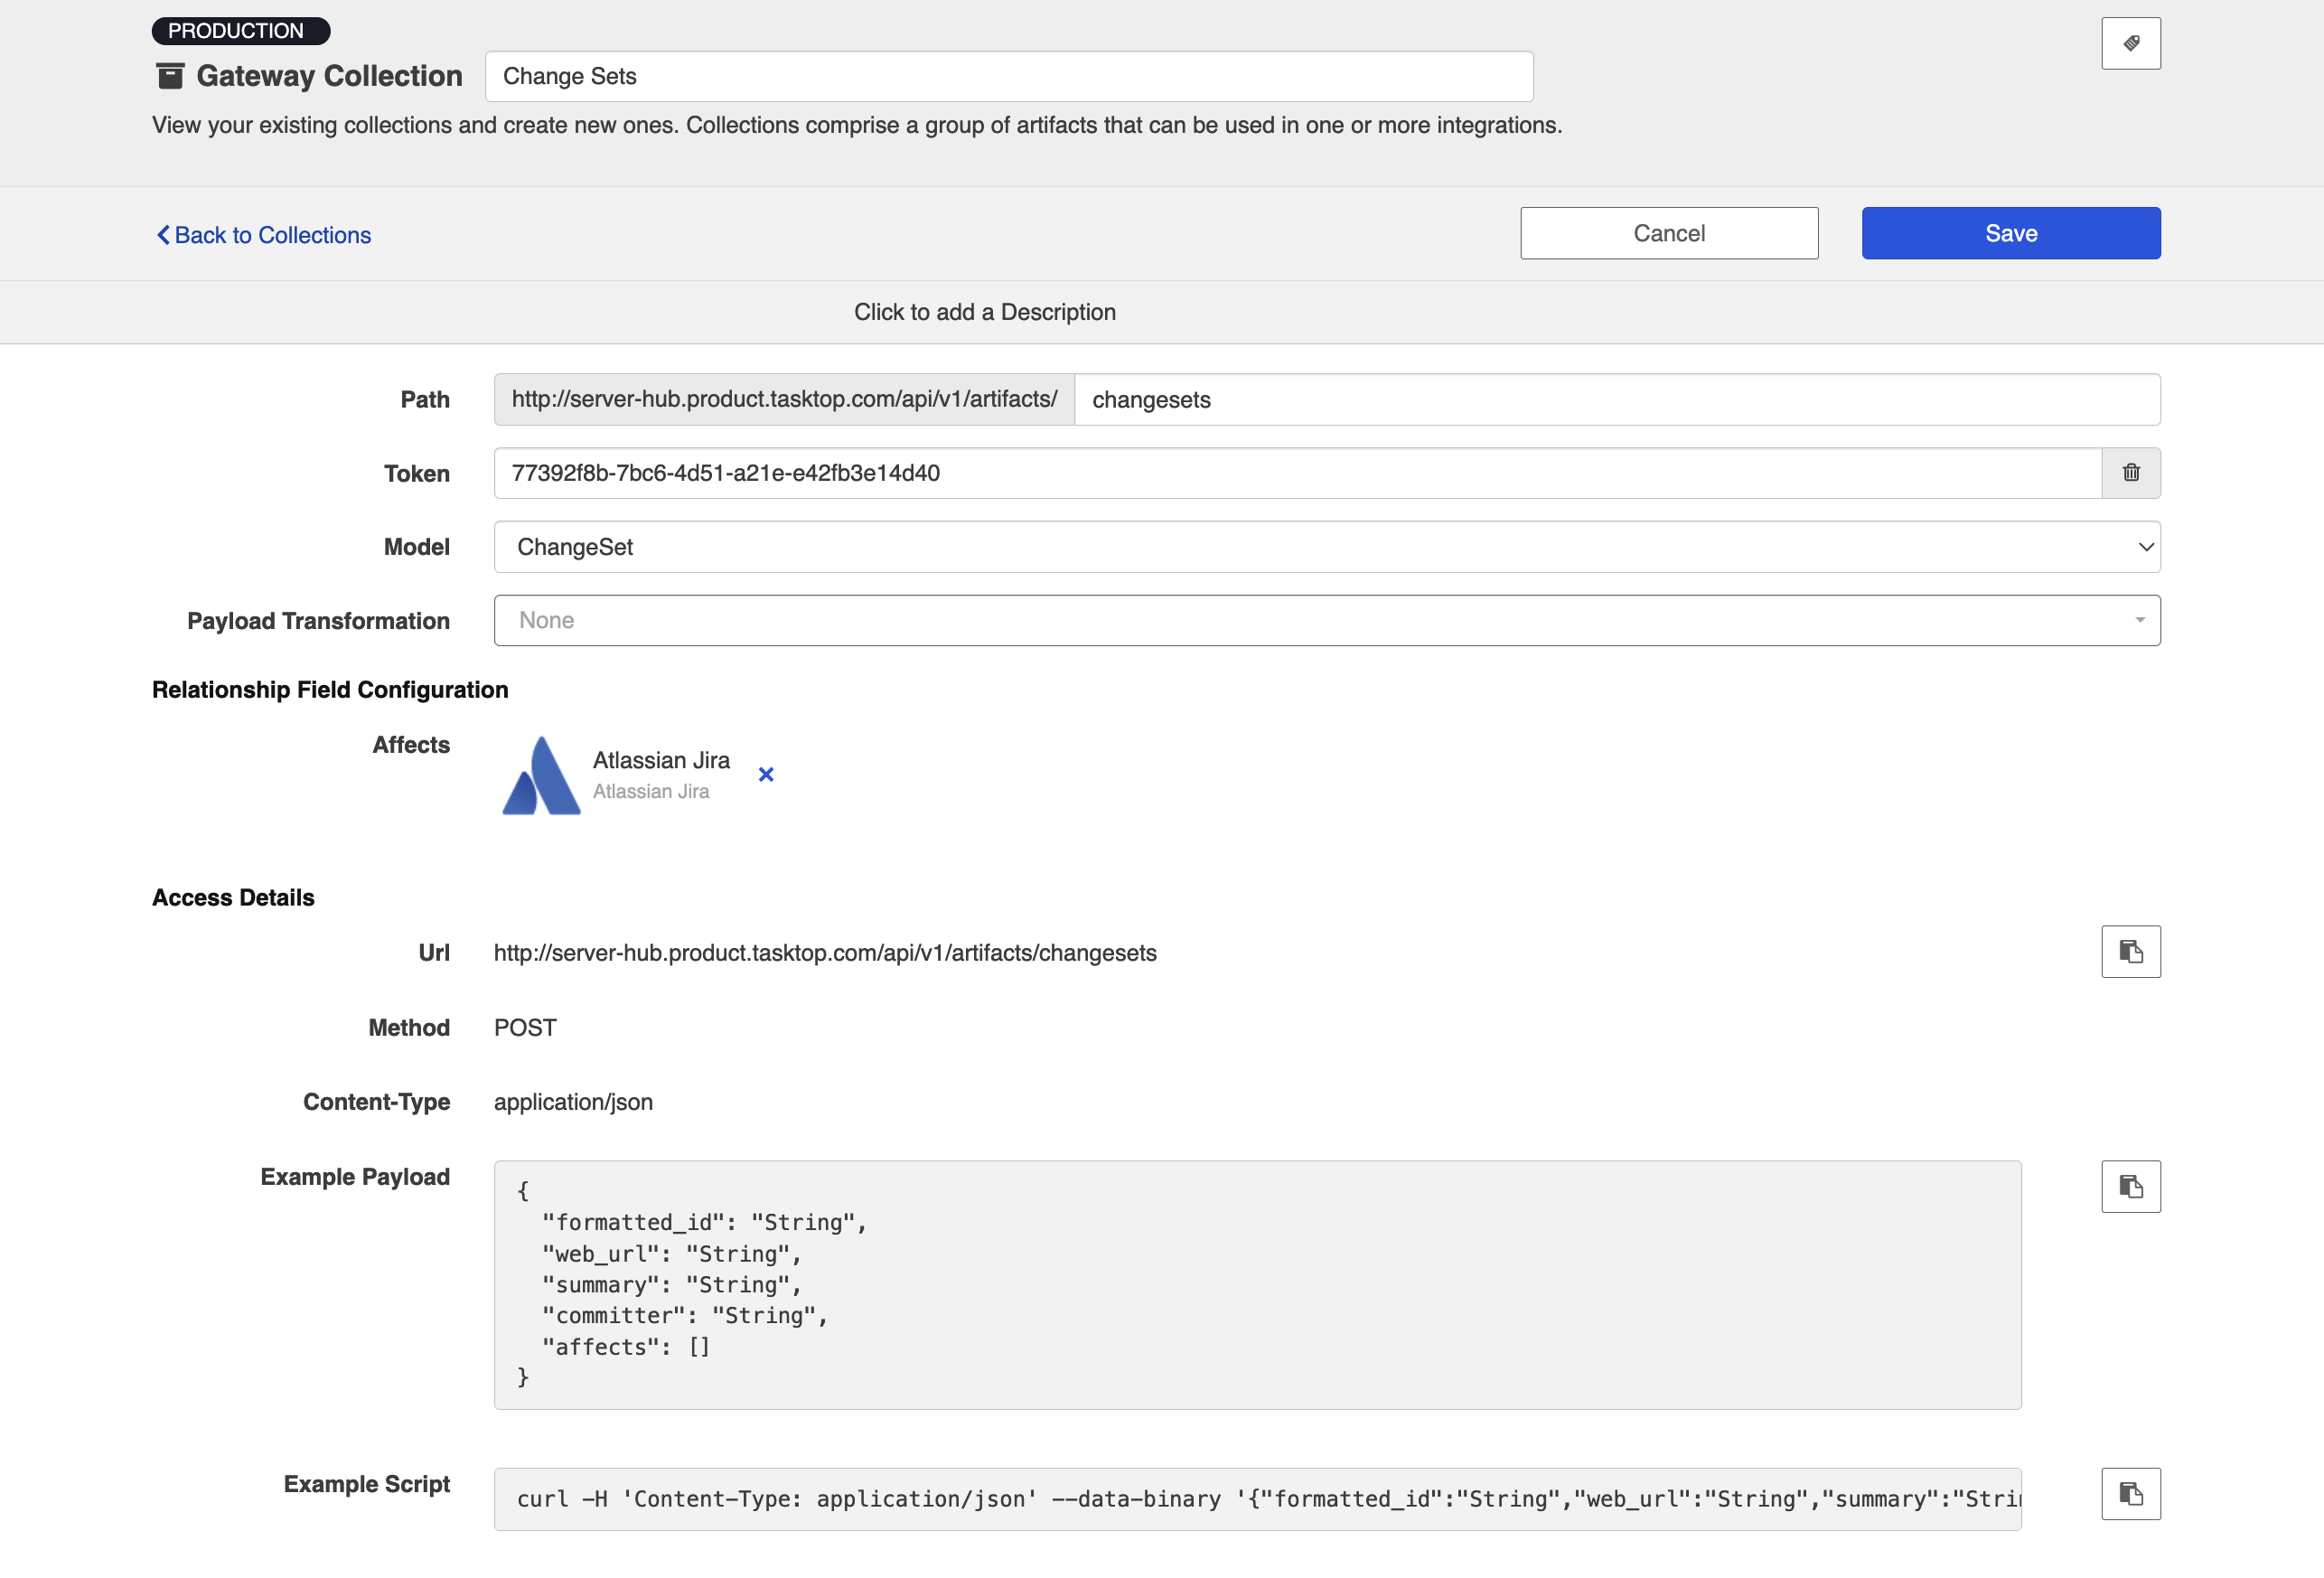
At the Gateway Collection Level: When creating your gateway collection, you will see that for each model field that is of relationship(s) type, you must specify the target repository that contains the related artifact(s). Once this is selected, the information needed for Hub to successfully locate the artifact will be added to the example payload.
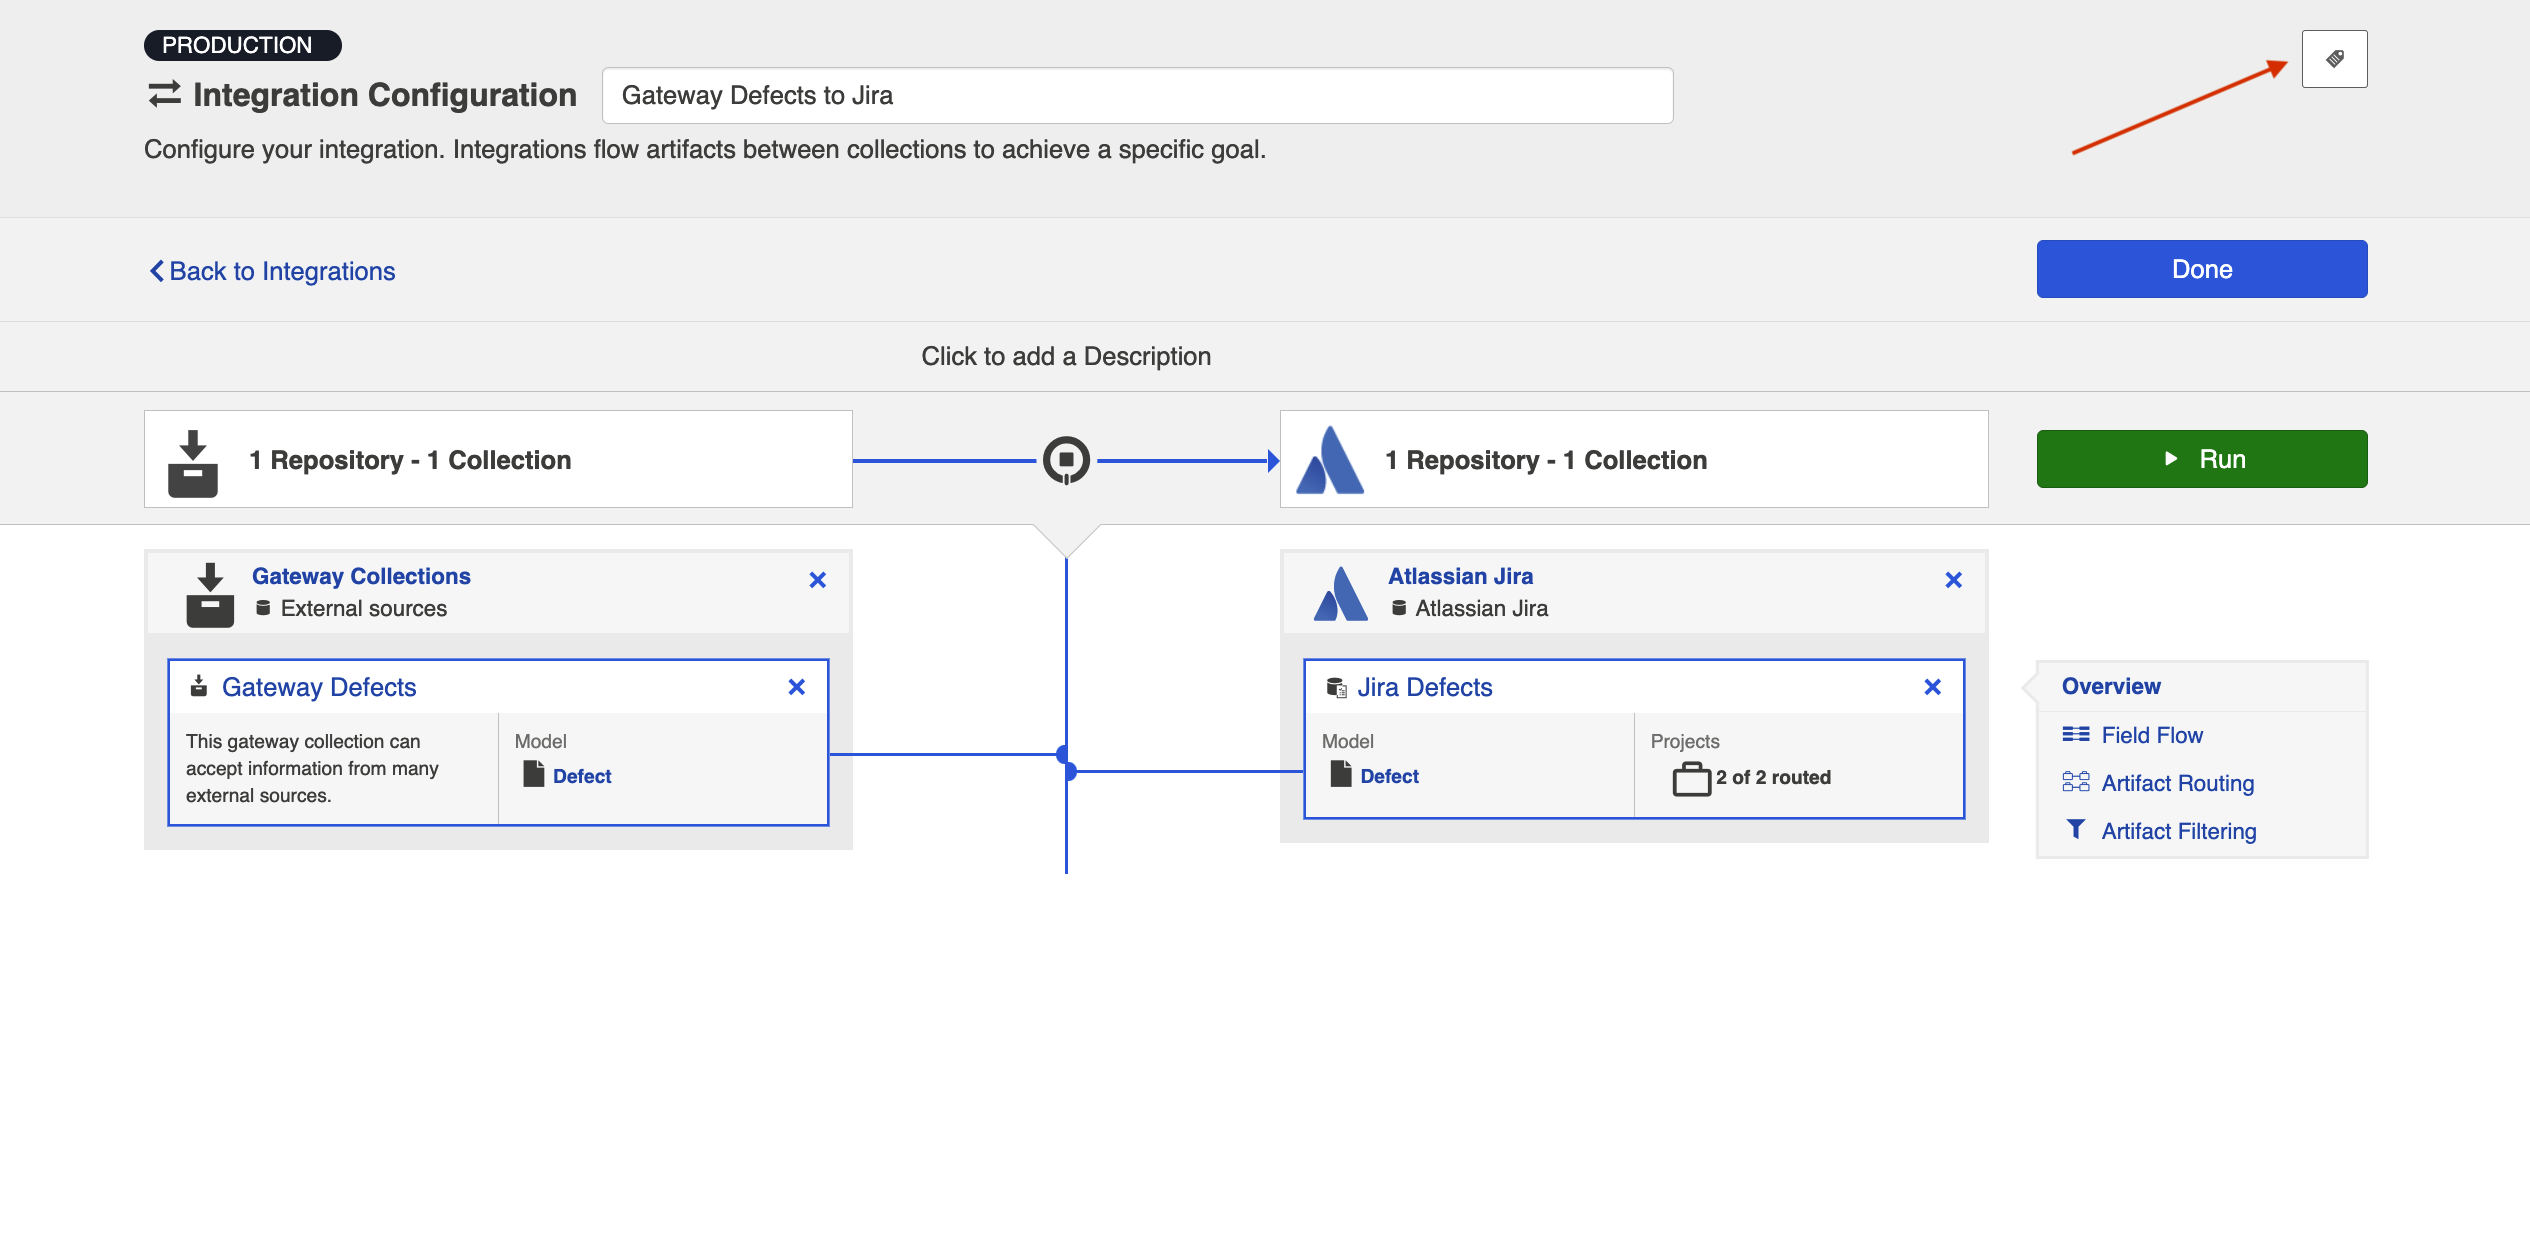
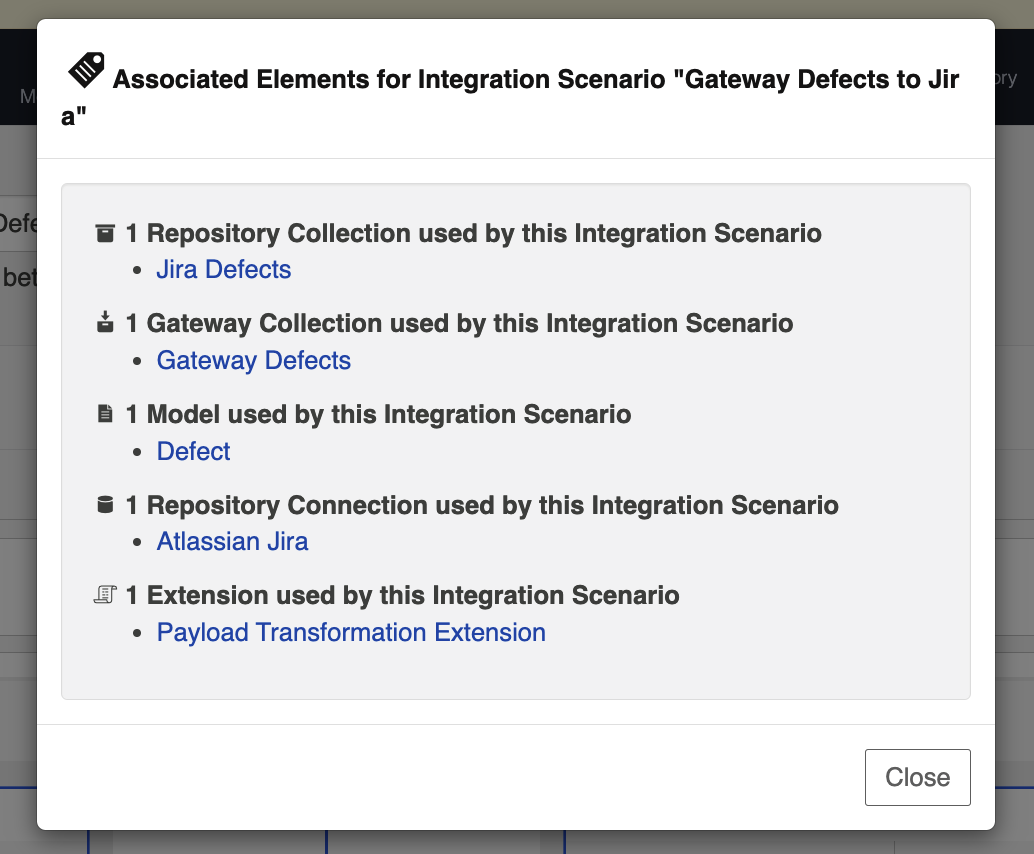
Viewing Associated Configuration Elements
To view associated configuration elements (such as collections or models that utilize the integration you are viewing), click the Associated Elements tag in the upper right corner of the screen.