
Enterprise Data Stream
The Enterprise Data Stream Template is only available in Editions that contain the Enterprise Data Stream add-on. See the Planview Hub Editions table to determine if your edition contains this functionality.
What is an Enterprise Data Stream Integration?

An integration is quite simply the flow of information between two or more collections. An Enterprise Data Stream Integration, specifically, is the flow of information from one or more source collections (either Work Item (Repository) Collections, Container (Repository) Collections, or Gateway Collections) to one central table held in a Work Item (Database) Collection.
When you configure your Enterprise Data Stream Integration, you can customize the field flow, artifact routing, and artifact filtering.
Video Tutorial
Check out the video below to learn how to configure an Enterprise Data Stream Integration.
This video assumes that you have already configured your repositories, models, and collections as outlined in the Quick Start Guide.
Use Case and Business Value
This integration simplifies enterprise reporting by unlocking software lifecycle data from its application tool silos and providing a rich data repository for near real-time analytics. Records will be created in a single database when artifacts from one or more collections are created or changed.
For example, if your organization uses multiple tools for defect discovery and resolution, such as Atlassian Jira and ALM, but would like to report on defects across both of the tools, you could set up an integration that would flow artifacts from your Jira and ALM collections into a single database table. You could then report directly from this aggregated table or, more likely, ETL it into your existing reporting infrastructure.
Template Affordances
The Enterprise Data Stream template allows you to flow artifacts from multiple repository collections and/or gateway collections into a single database collection.

Key Concepts
Before you begin, there are a few concepts it's important to understand when configuring an Enterprise Data Stream Integration.
Data Structures
An Enterprise Data Stream Integration populates a table with rows corresponding to the state of artifacts at a specific point in time. As an artifact changes, new rows are inserted corresponding to the new state of the artifact. The result is that each artifact has a series of rows corresponding to the state of the artifact at each point in time. The rows for all artifacts in a table can be thought of as an event stream.
Note: Hub will examine your repositories for changes as specified in the change detection interval that you have configured. This means that if you have configured the change detection interval to be 1 minute, and a given artifact is changed twice in that minute, you'll only get a single record that reflects both changes.
The database table populated by the Enterprise Data Stream Integration has columns corresponding to fields in the artifact model, as well as some built-in fields that are designed to facilitate reporting. The following is an example of a database table corresponding to a simple defect model:
CREATE TABLE `Defect` (
    `id` BIGINT (19) AUTO_INCREMENT,
    `formatted_id` VARCHAR (1000) NOT NULL,
    `project` VARCHAR (255) NOT NULL,
    `type` VARCHAR (255) NOT NULL,
    `severity` VARCHAR (255) NOT NULL,
    `status` VARCHAR (255) NOT NULL,
    `summary` VARCHAR (1000) NOT NULL,
    `repository_id` VARCHAR (255),
    `repository_url` VARCHAR (255),
    `artifact_id` VARCHAR (255),
    `artifact_url` VARCHAR (255),
    `artifact_event_type` VARCHAR (255),
    PRIMARY KEY (`id`)
);
Database Output
Default Information that Hub will Flow
The following columns represent information that will automatically be flowed to your database table.
| Column | Description |
|---|---|
id*
|
A surrogate key, can be used in reports to uniquely identify a row. |
repository_id*
|
The unique identifier of the connection, can be used in reports to identify a repository connection. |
repository_url*
|
The URL of the repository, can be used in reports to identify a repository. |
artifact_id*
|
An ID of an artifact that is globally unique, can be used in reports to uniquely identify an artifact across repositories and collections. The value of the artifact_id is an opaque value; assumptions should not be made about its structure or content. It should be noted that the artifact_id does not correspond to the id of the artifact as it is represented in the repository itself, but is useful for reporting since it is globally unique. |
artifact_url
|
The URL of the artifact for browser access, can be used in reports to identify an artifact. |
artifact_event_type
|
The type of event for the artifact that caused this entry. It can be used to see if the artifact has been added, changed or removed from the collection. |
*Denotes that this is a required field, meaning that your target database table will need to have a column to store this information.
Note: If you use the Suggest DDL to create your table, all of the fields above will be included. If you are creating your table without that mechanism, you'll need to ensure that a column exists for the required pieces of information and, ideally, for the non-required fields as well. Your database table columns will need to be named as displayed above in either upper or lower case, but with the underscores as displayed.
Ordering of Rows
Though it may appear that rows in the table are inserted an order corresponding to the point in time that changes occurred, the order of rows in the table is not guaranteed. Reports should use a mapped field from the model (such as modified) to determine when a change occurred.
Artifact Event Type
In the artifact event type column of your database table, you'll see either "changed", "removed", or "filtered."
Changed
Changed indicates that either an existing artifact was changed or that a new artifact was added to your collection.
Removed
Removed indicates that a given artifact is in a project that has been removed from the collection. Here is a sample scenario to illustrate this event type:
In this Enterprise Data Stream Integration Project B and C are routed to the database table in my SQL collection at the start of an integration. Artifacts flow and records get written out:


Configuring an Enterprise Data Stream Integration
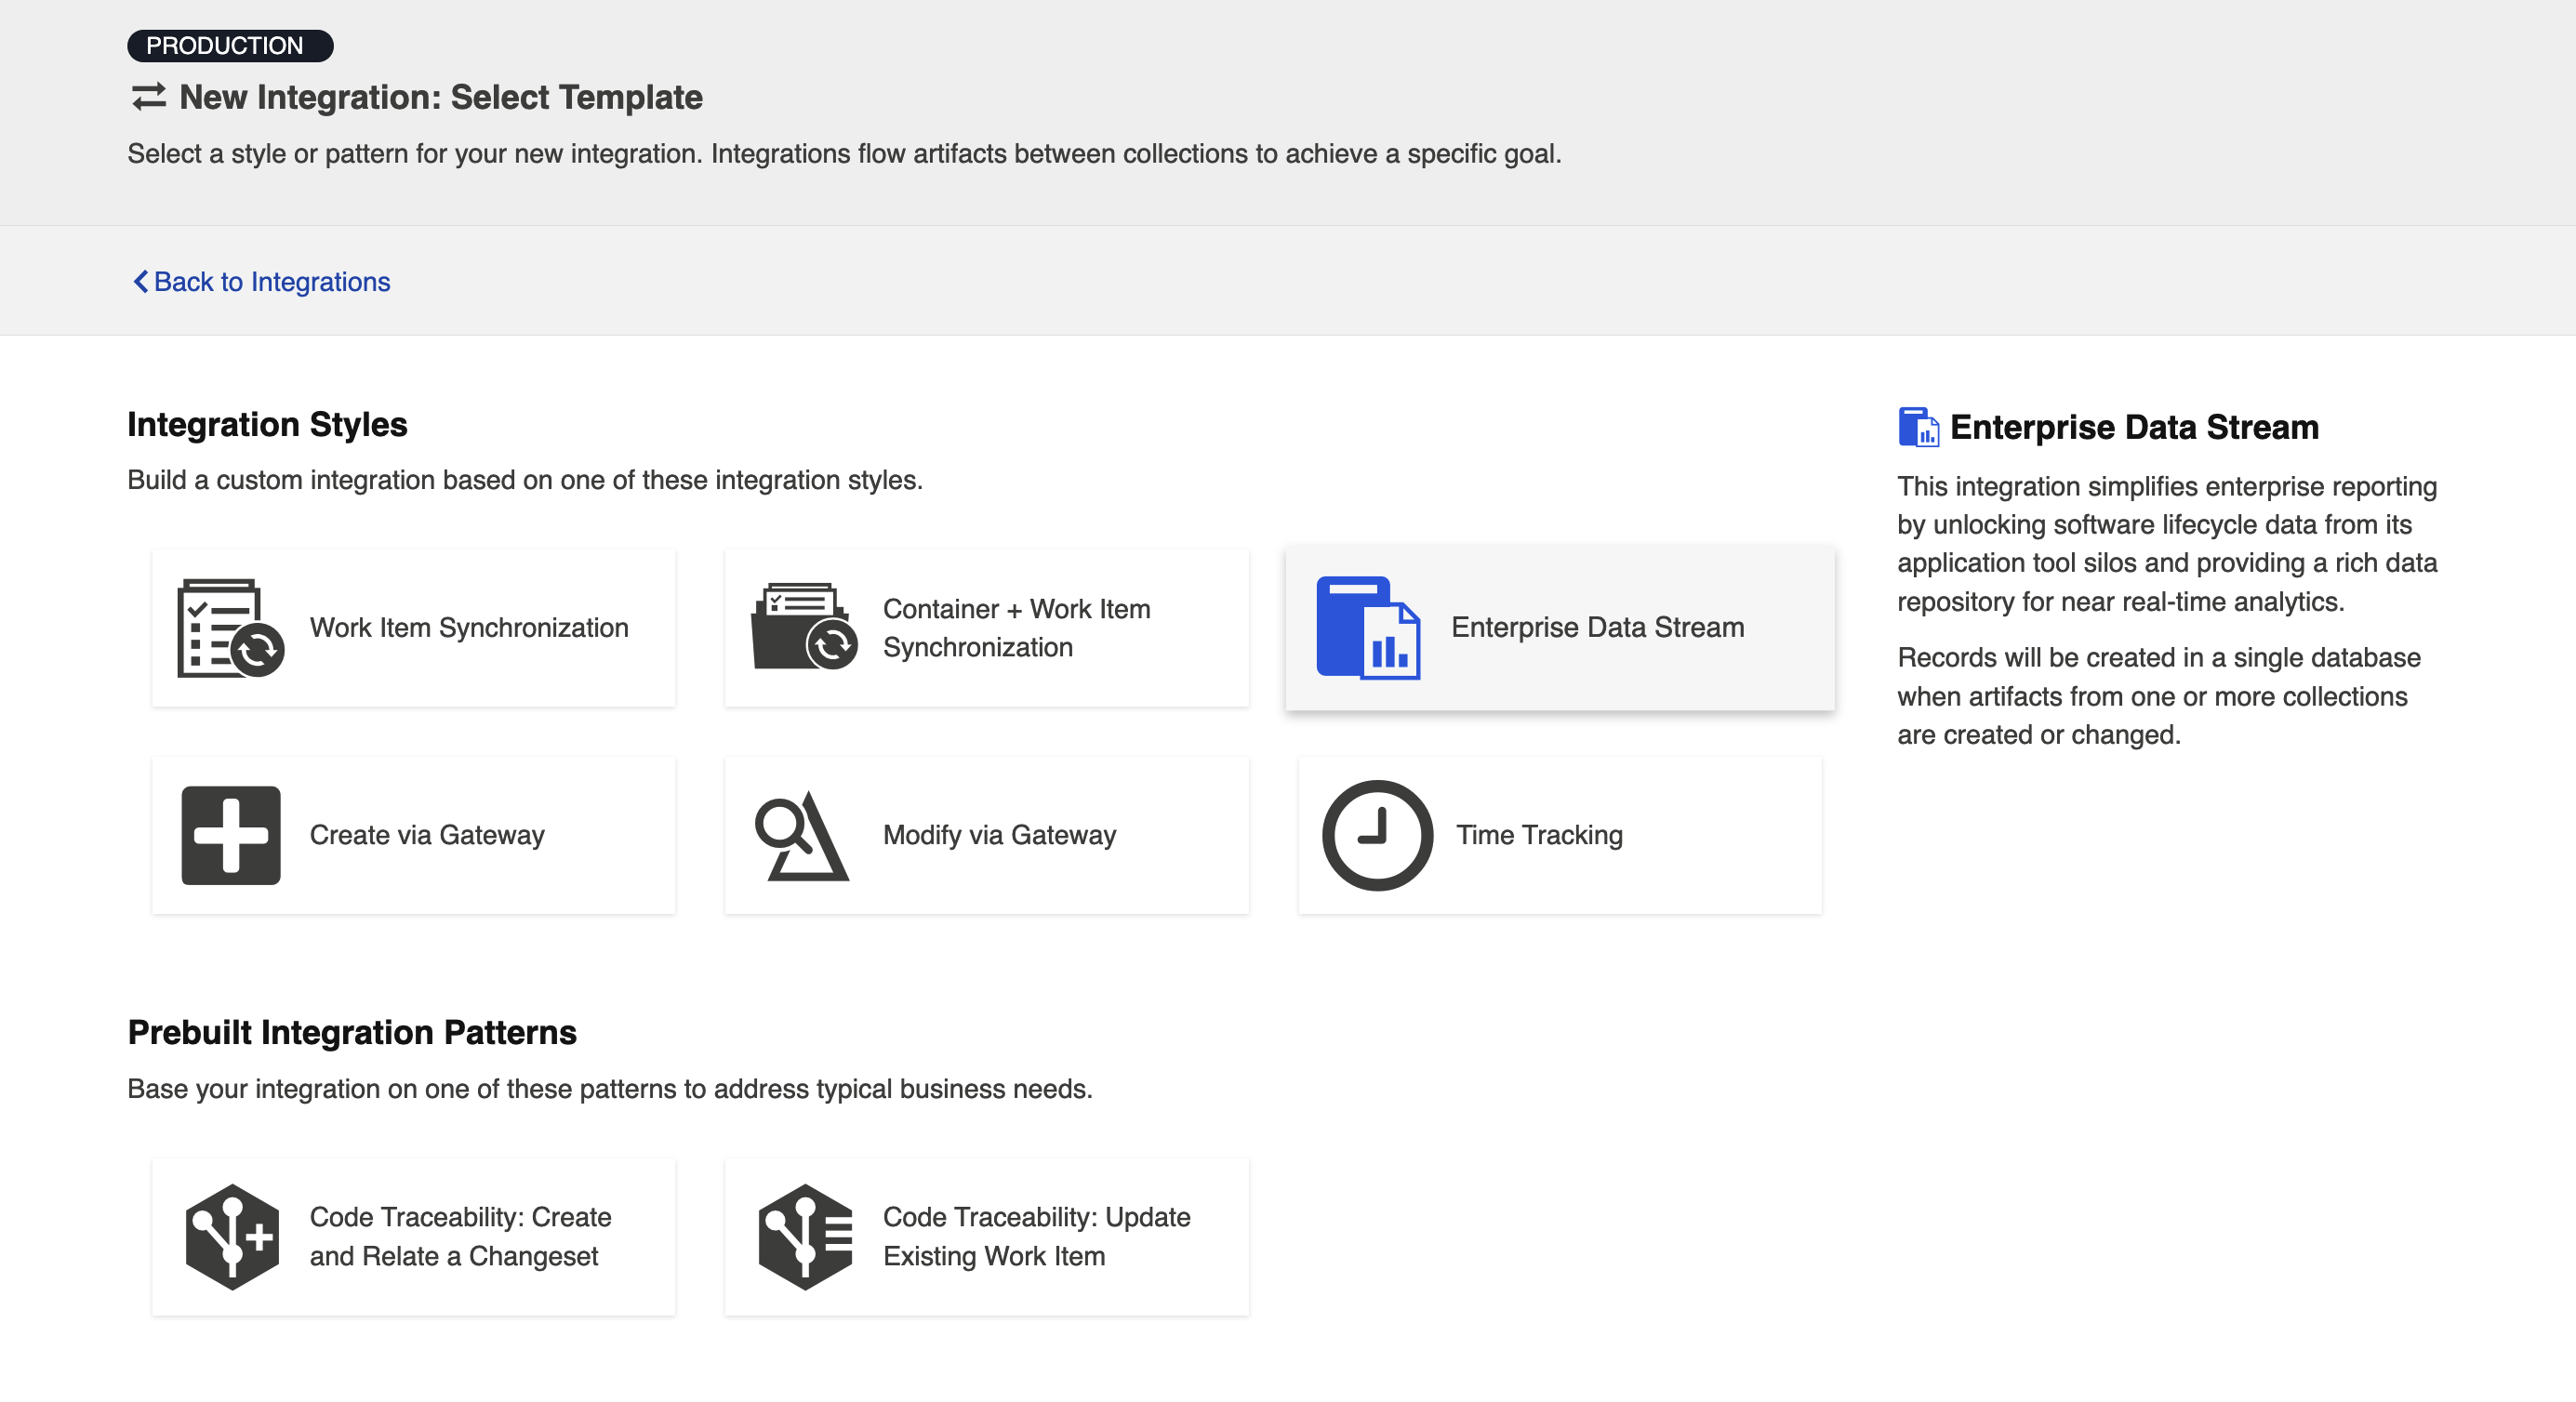
To configure your integration, select Integrations at the top of the screen, then click New Integration.
Select the Enterprise Data Stream template.
Note: Depending on the edition of Hub you are using, you may not see all options shown below.
This will bring you to the New Integration screen:
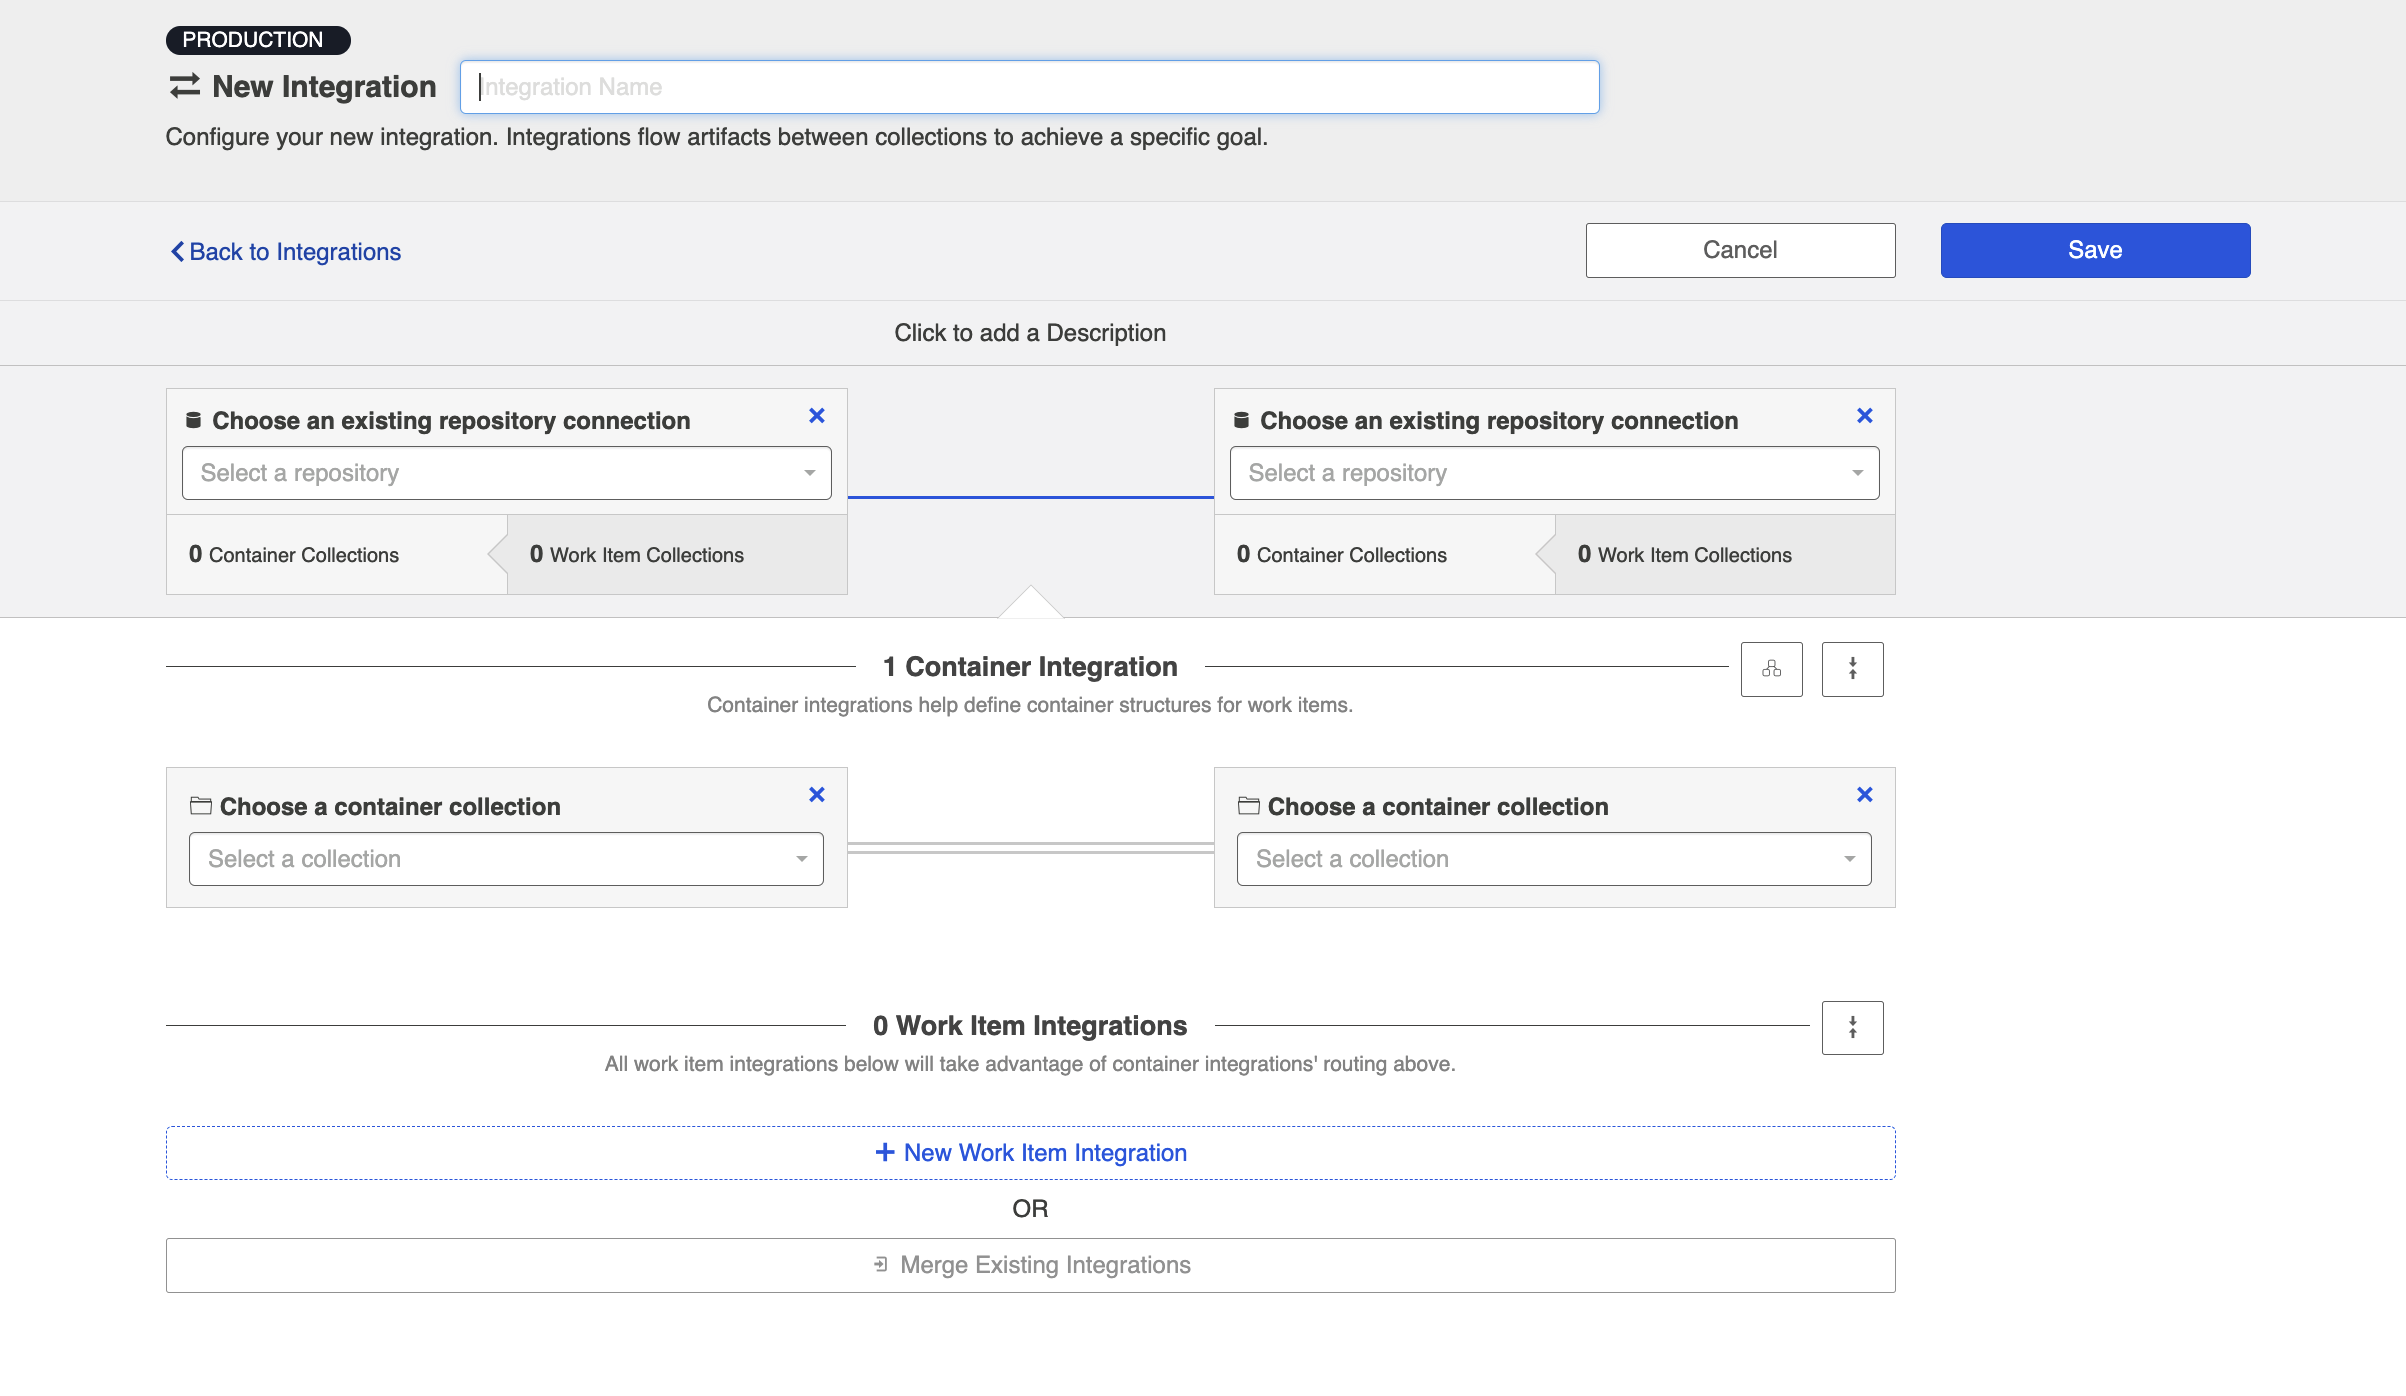
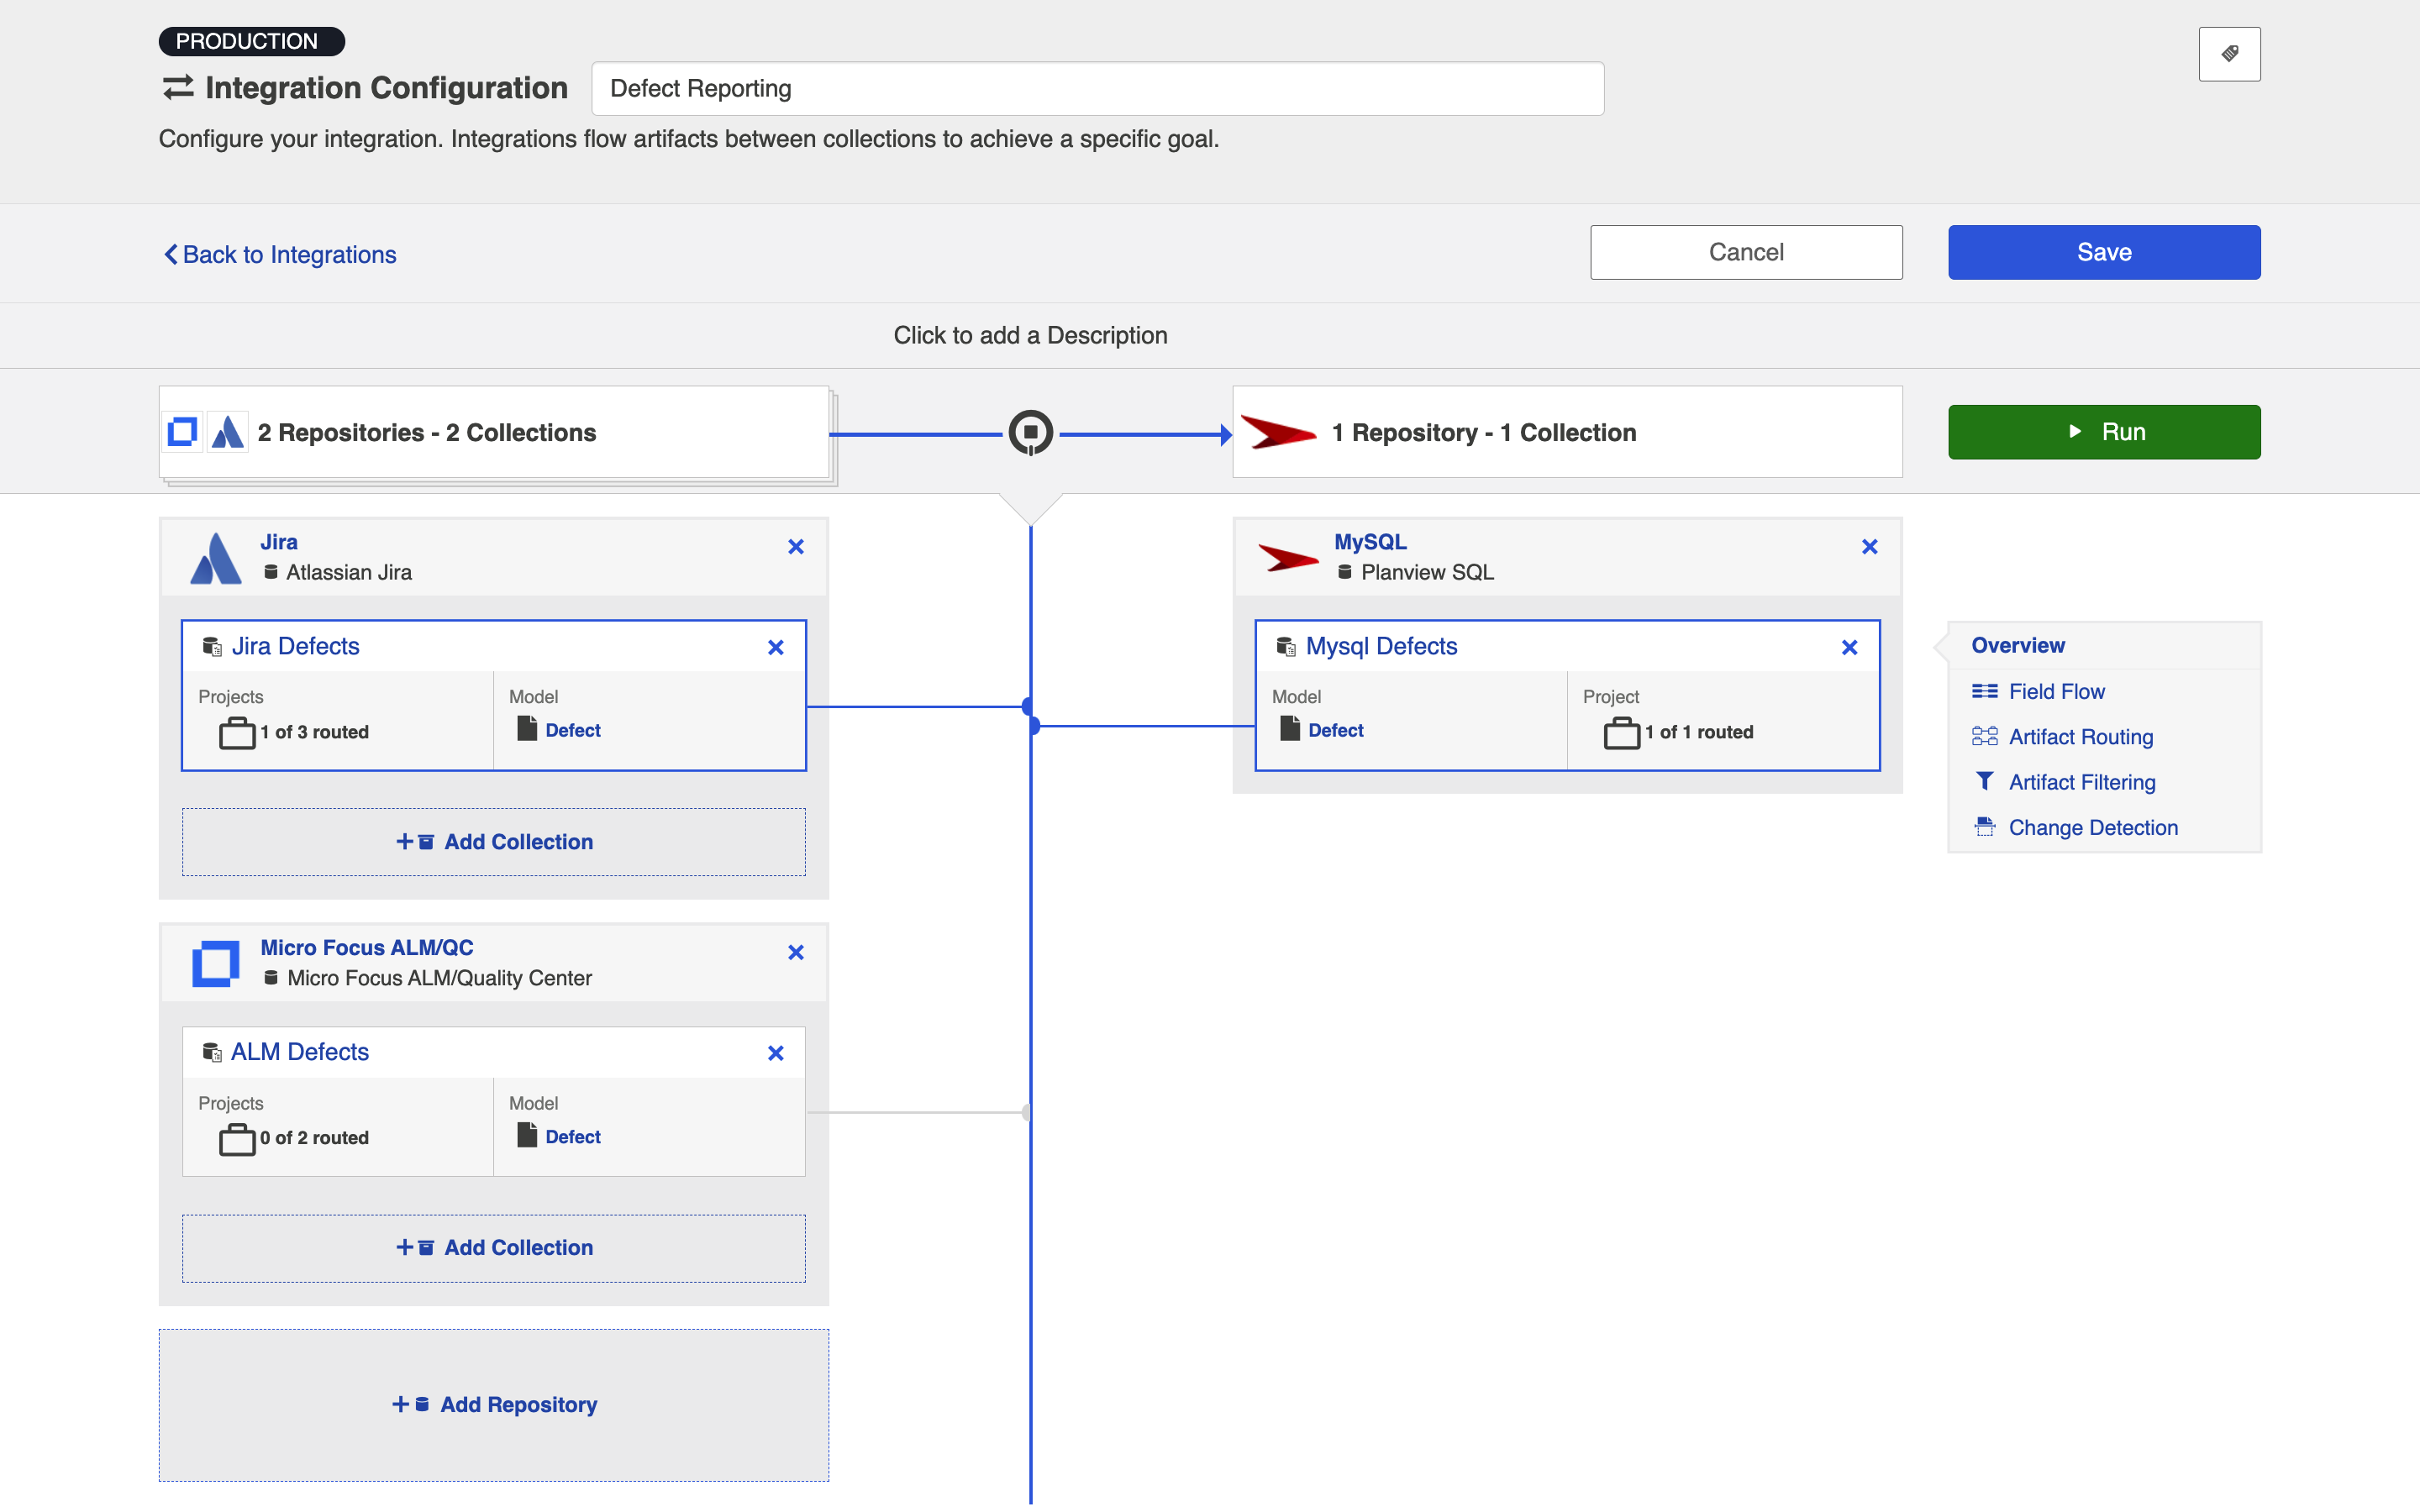
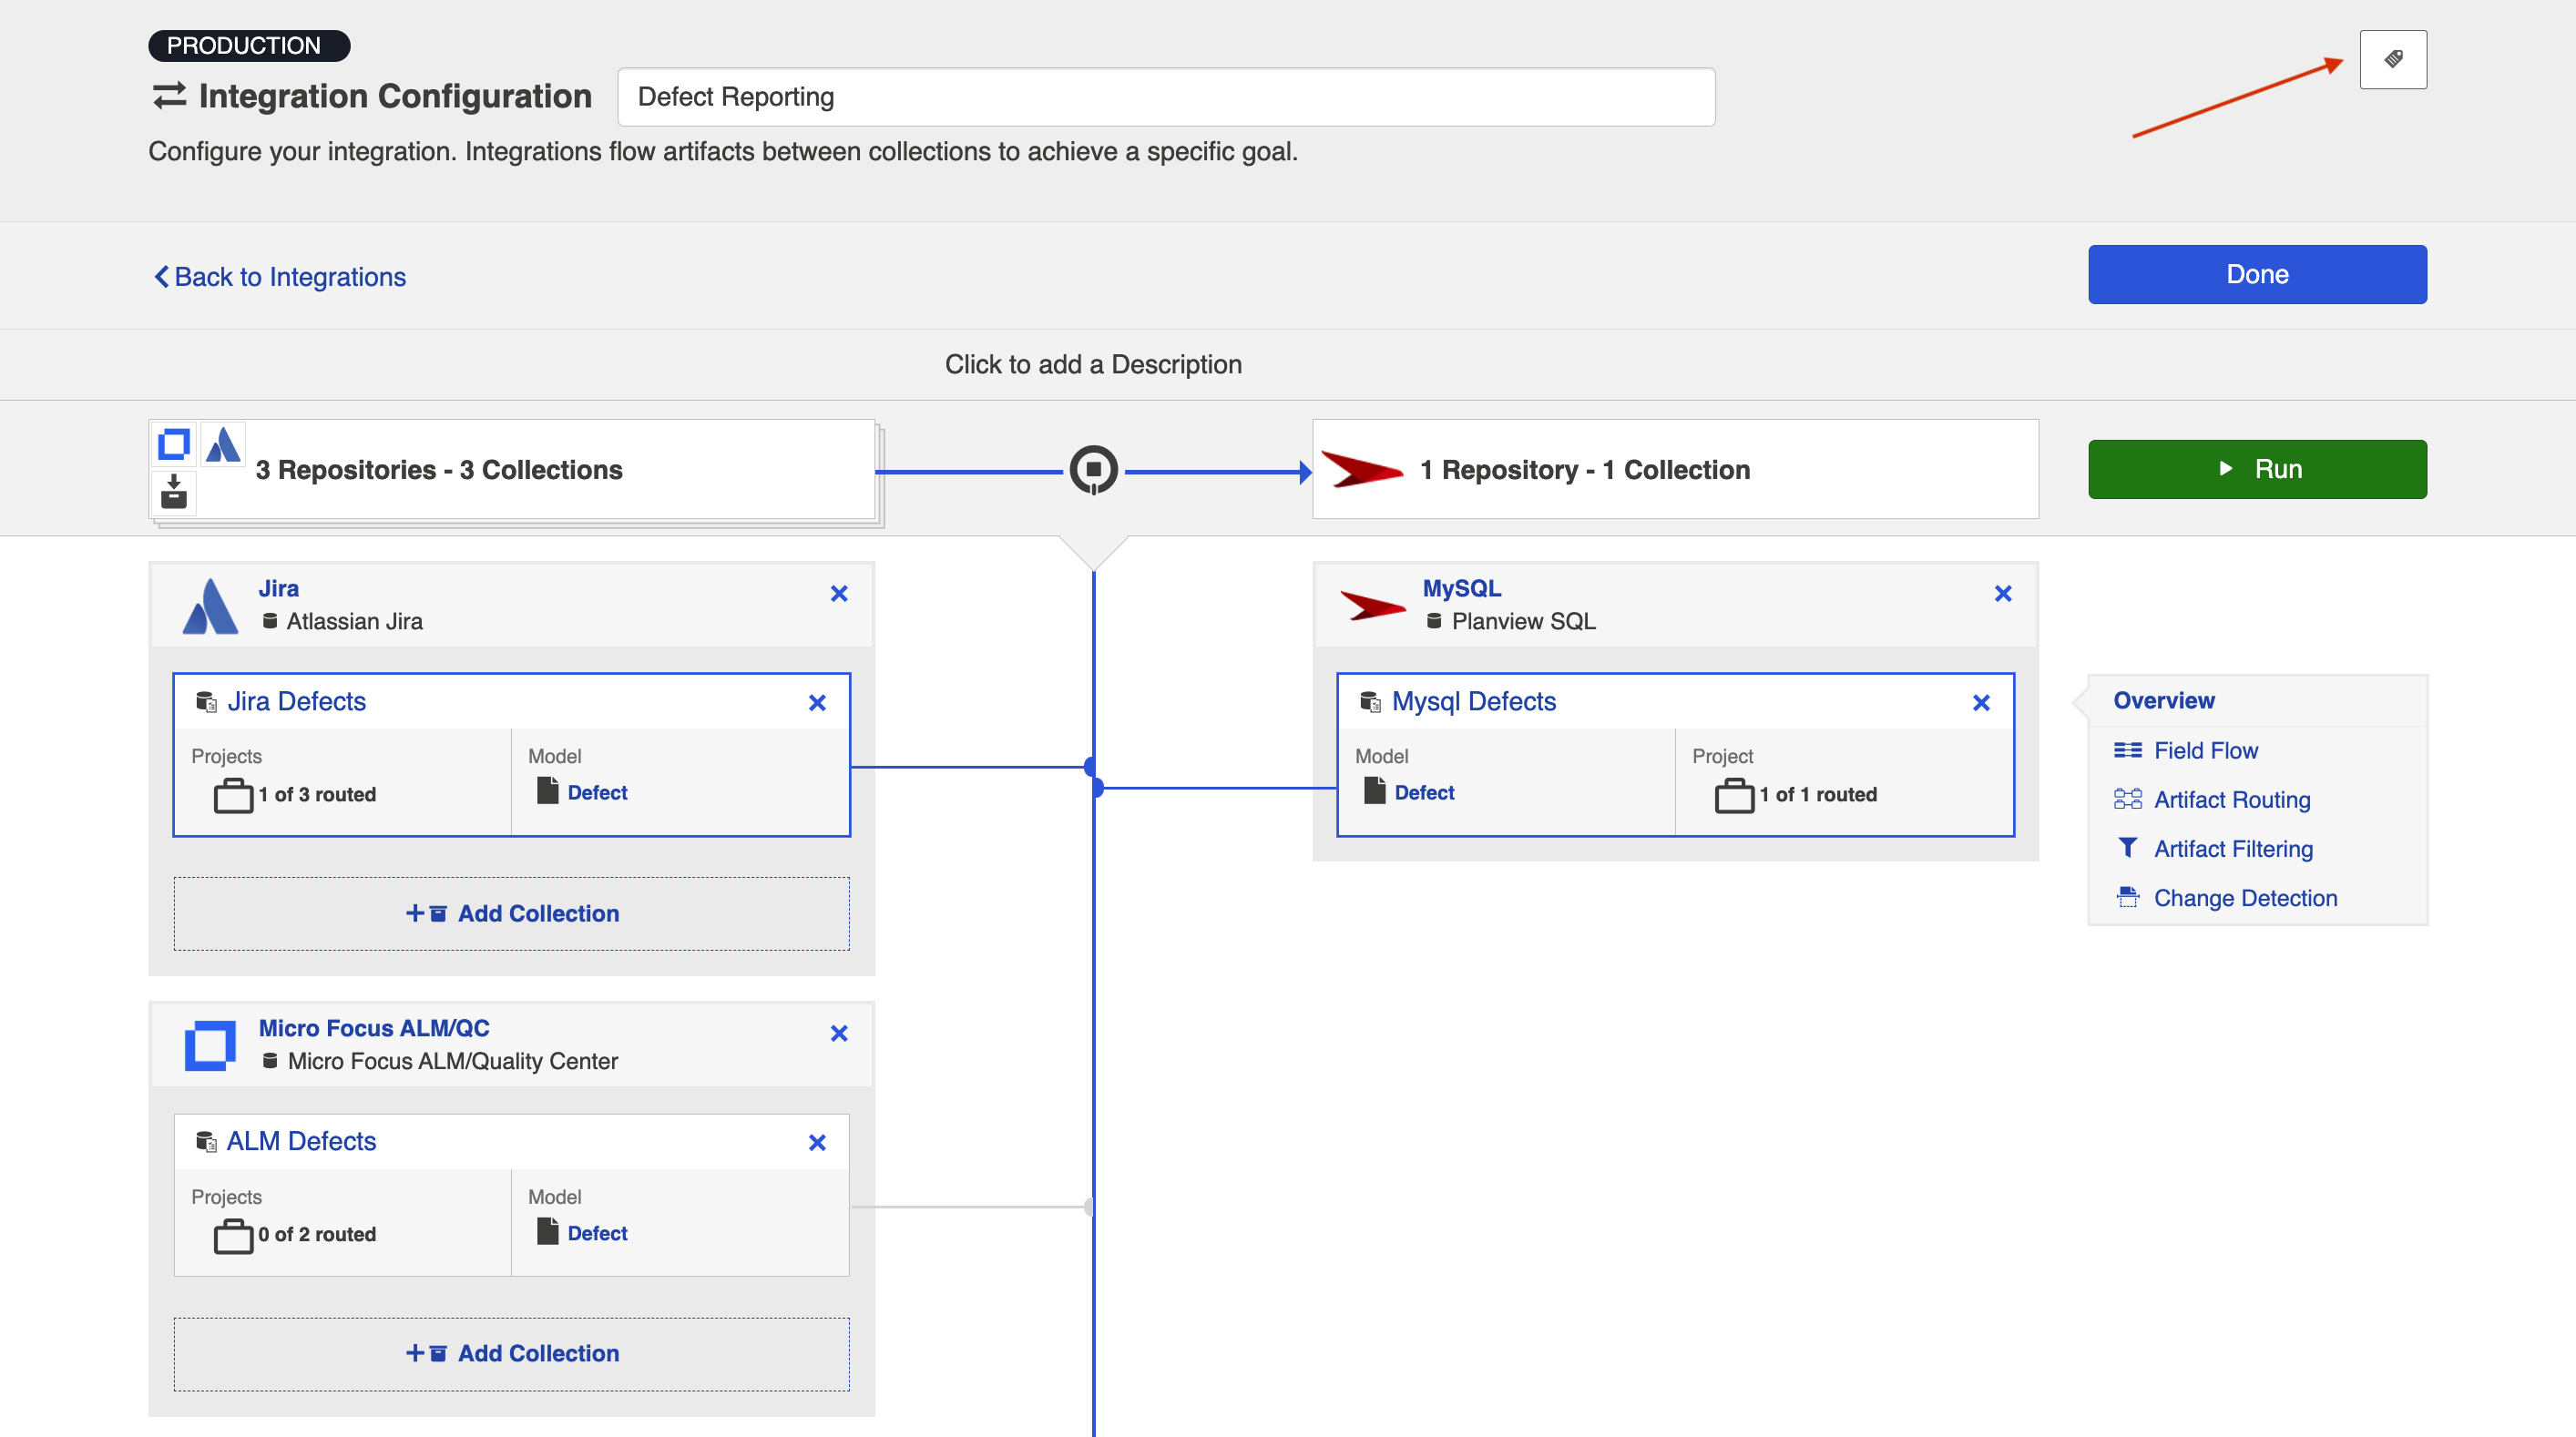
Name your integration and select your repositories and collections.
You can click the Overview link on the right side of the Integration Configuration screen to get to the main display screen (shown in the second screenshot).
Note: The Overview screen will only show two repositories at a time — one source repository and one target repository. If there are multiple source repositories in your integration, make sure the one you are interested in is selected before clicking Overview.

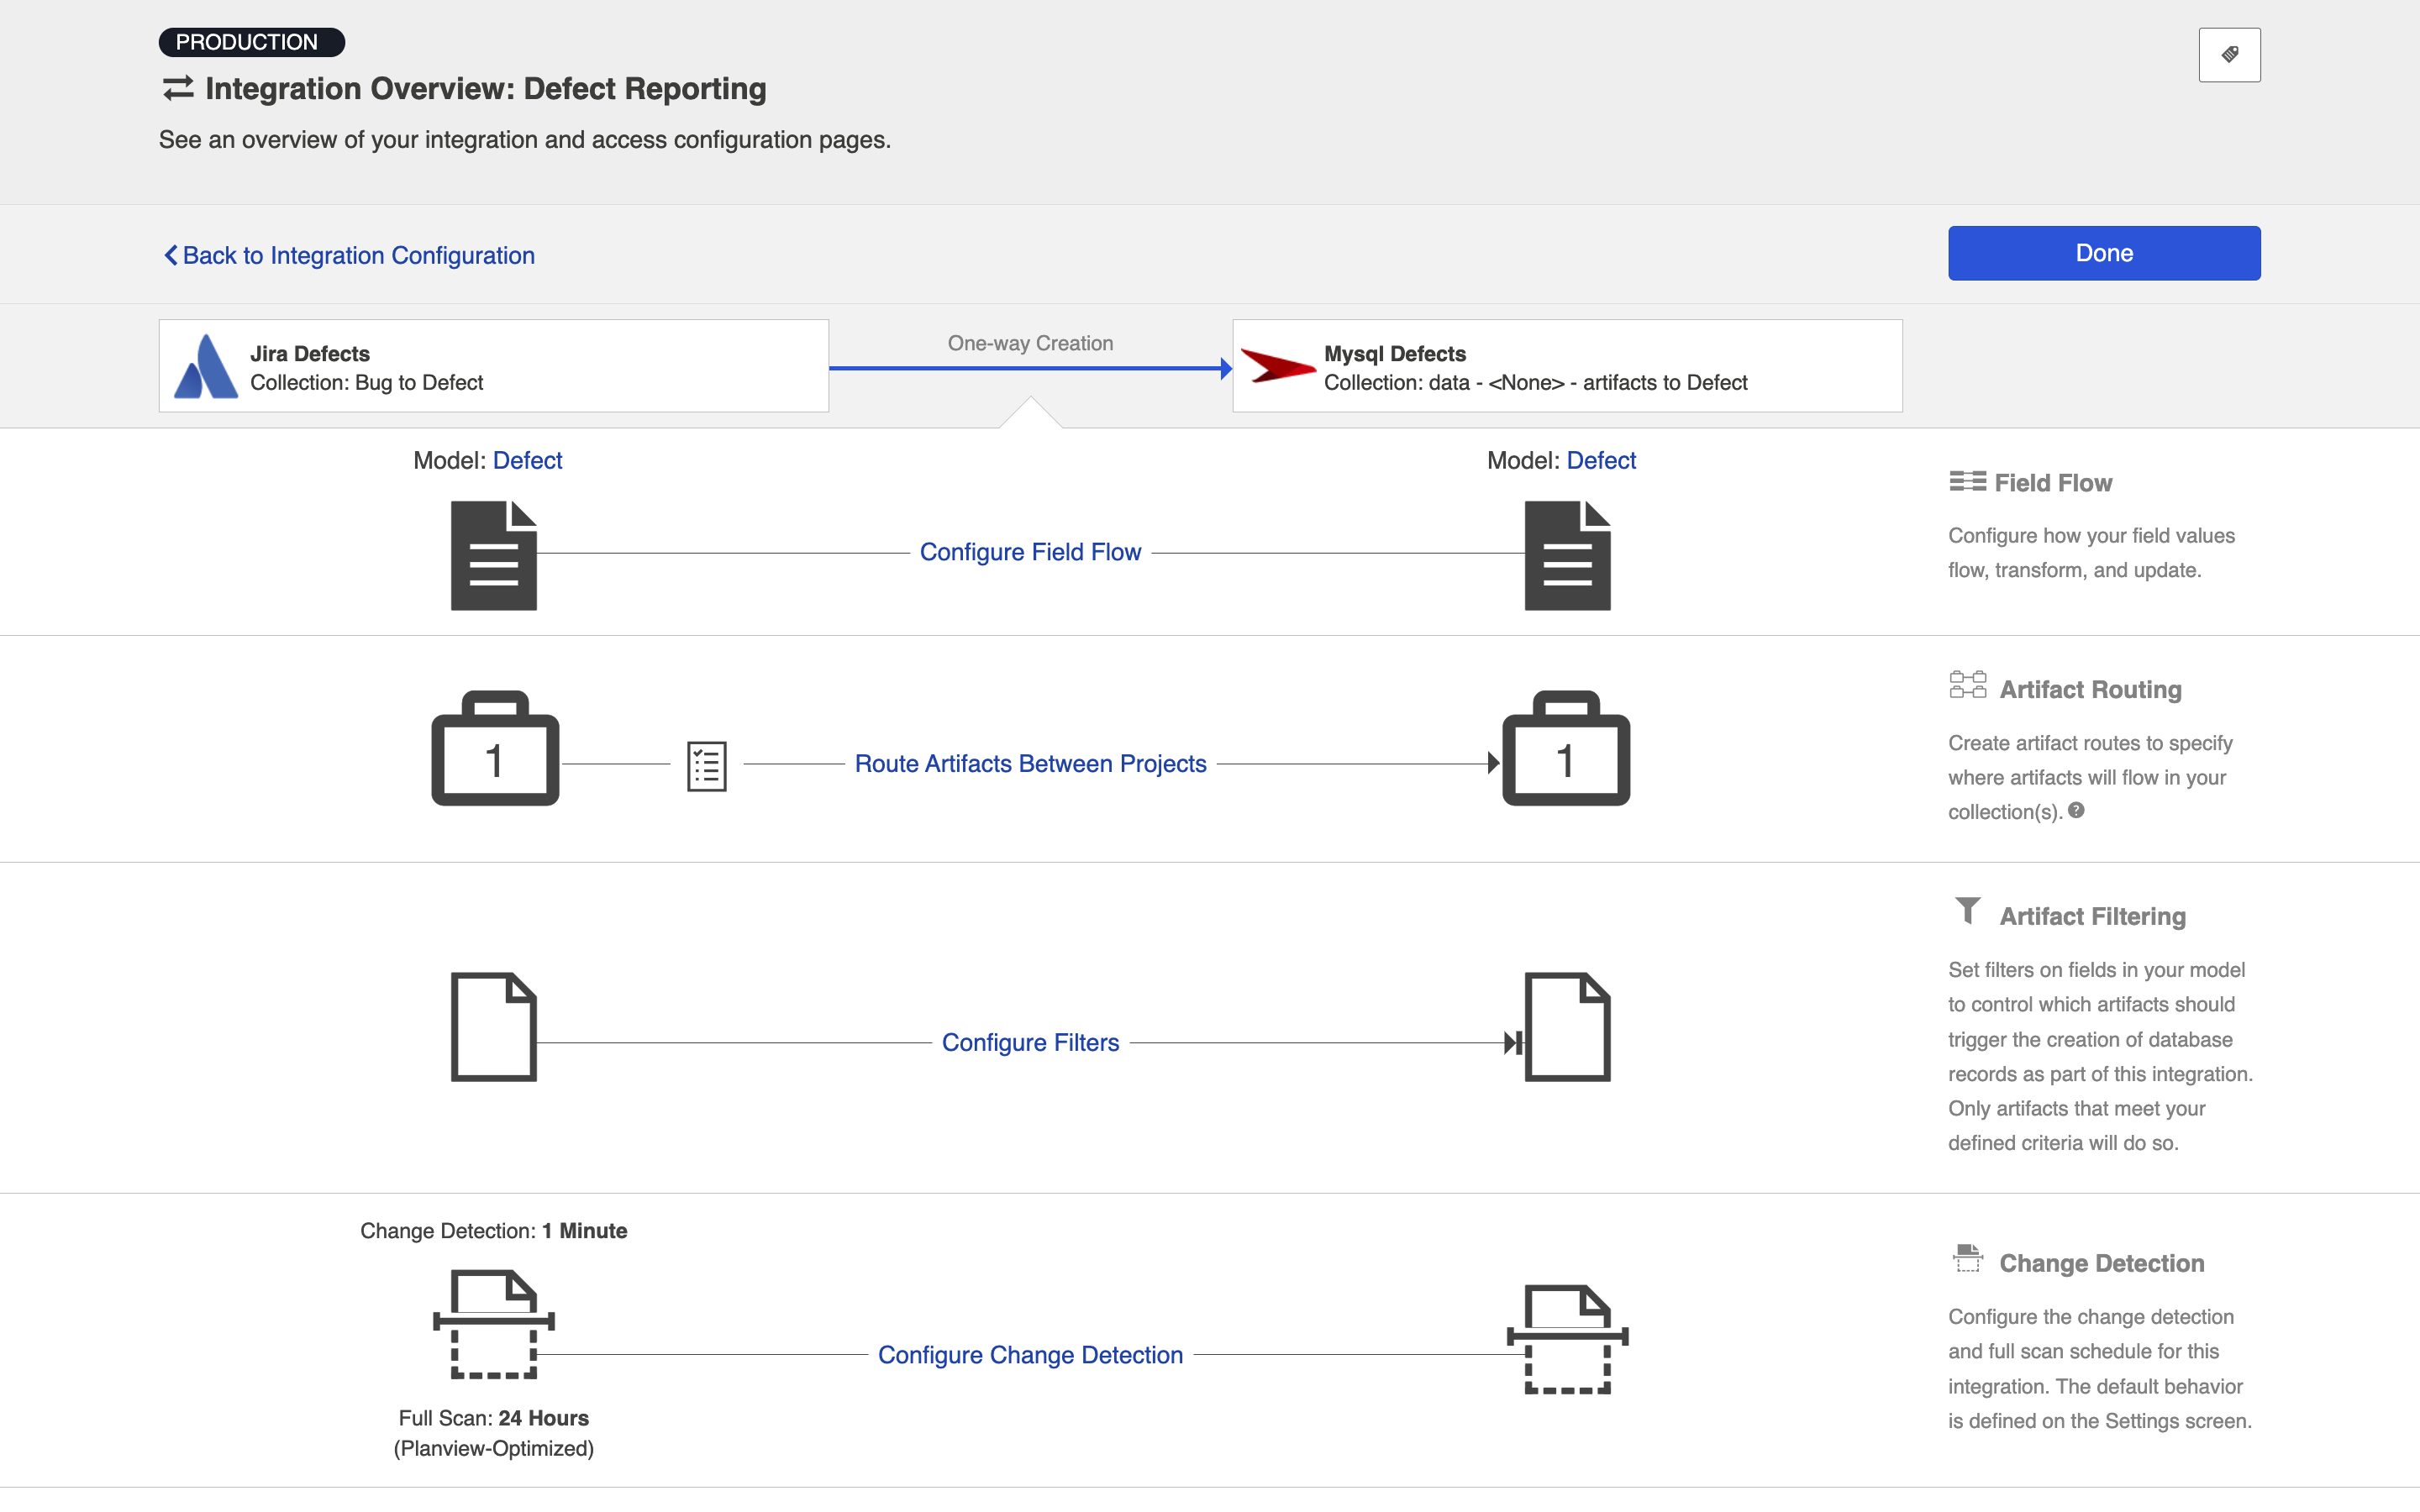
Field Flow
The field flow configured for a given integration specifies which fields should flow in that integration. For Enterprise Data Stream integrations, you can choose to flow a given field (Update Normally) or to not flow a given field (No Update).
To view field flow, select the source repository you are interested in (you will see it highlighted in green once selected), and then click Field Flow.

You will be directed to the Field Flow screen.
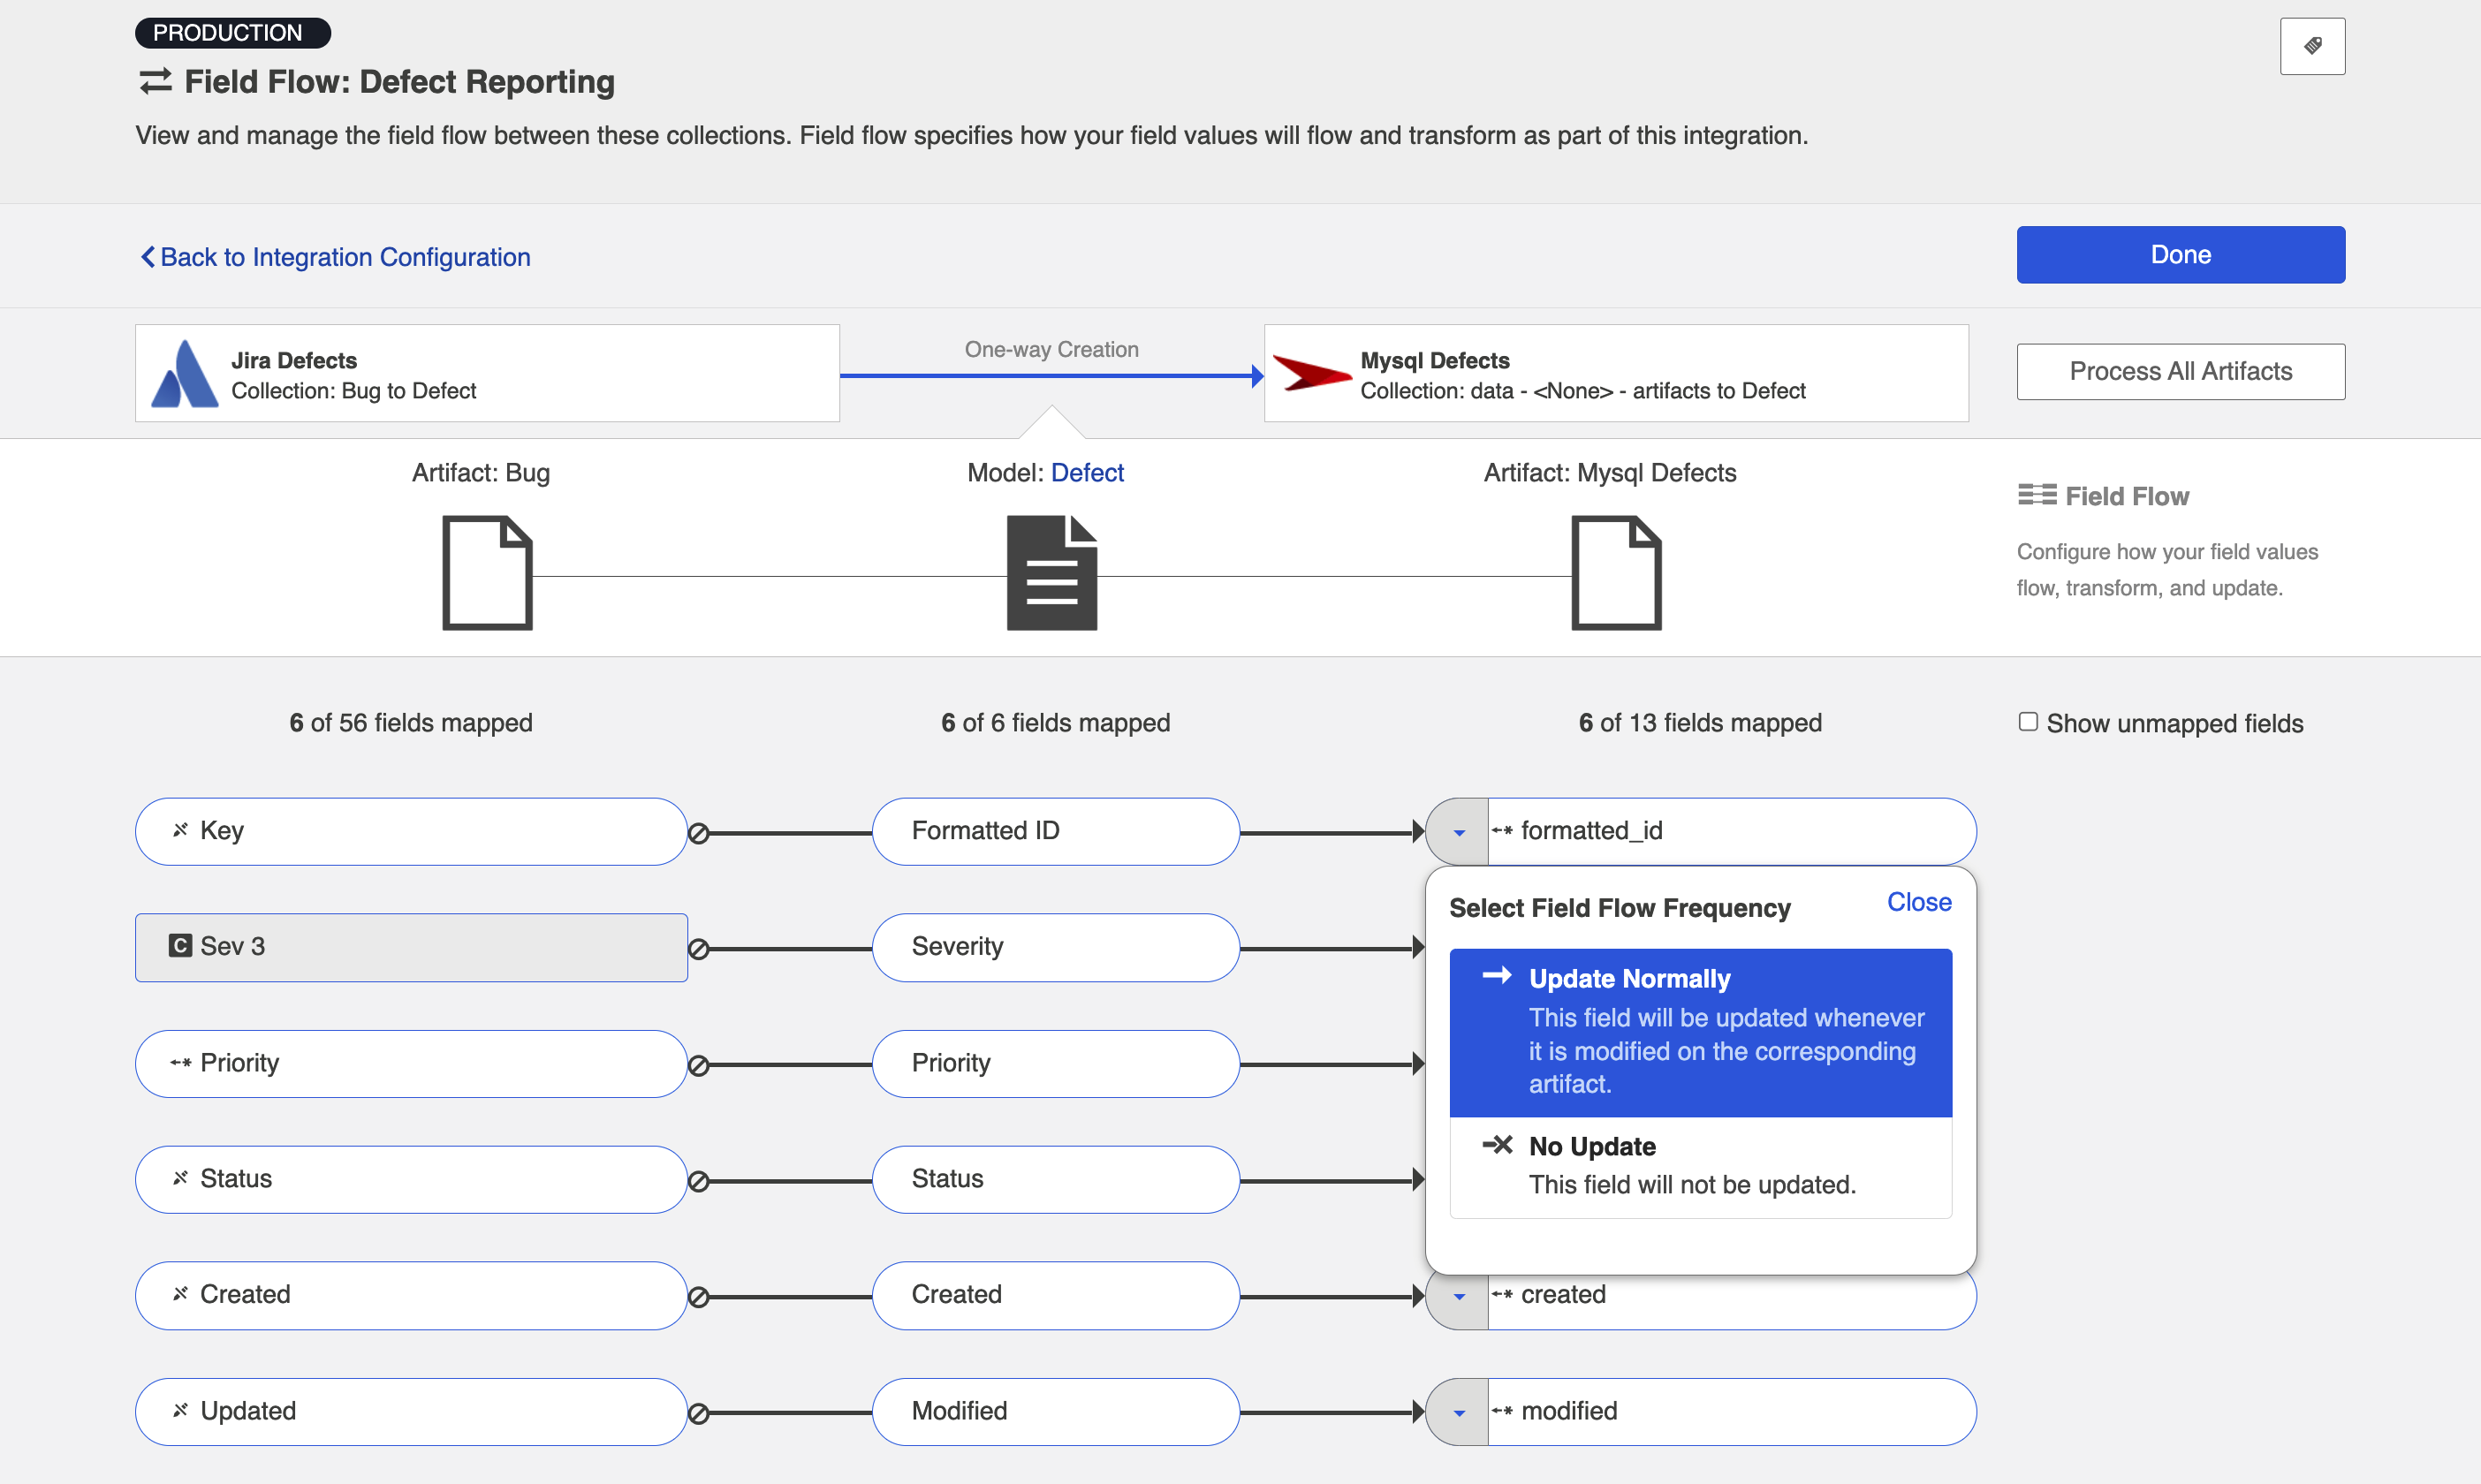
You can choose to flow a field ('update normally') or not flow it ('no update'). You'll notice that field flow goes in one direction only — from the repository or gateway collection into the database collection.
You can see the names of the mapped artifact fields for each collection on the far left and far right, with the model fields displayed in the middle. By default, model fields without mapped repository fields are hidden. You can see all model fields by checking the Show unmapped fields checkbox. Constant values will be identified by a grey box and the constant value icon.
Note: The field flow settings behave a bit differently for Constant Values. This is because constant values exist as part of your Hub configuration, and not on the artifact itself. Therefore, changes in constant values are not detected in the same way that updates made on the actual artifact are detected. If you change the constant value that is linked to your model, your integration will not automatically detect this update and sync it over. The new value will only flow if another field on that artifact is updated.
Artifact Routing
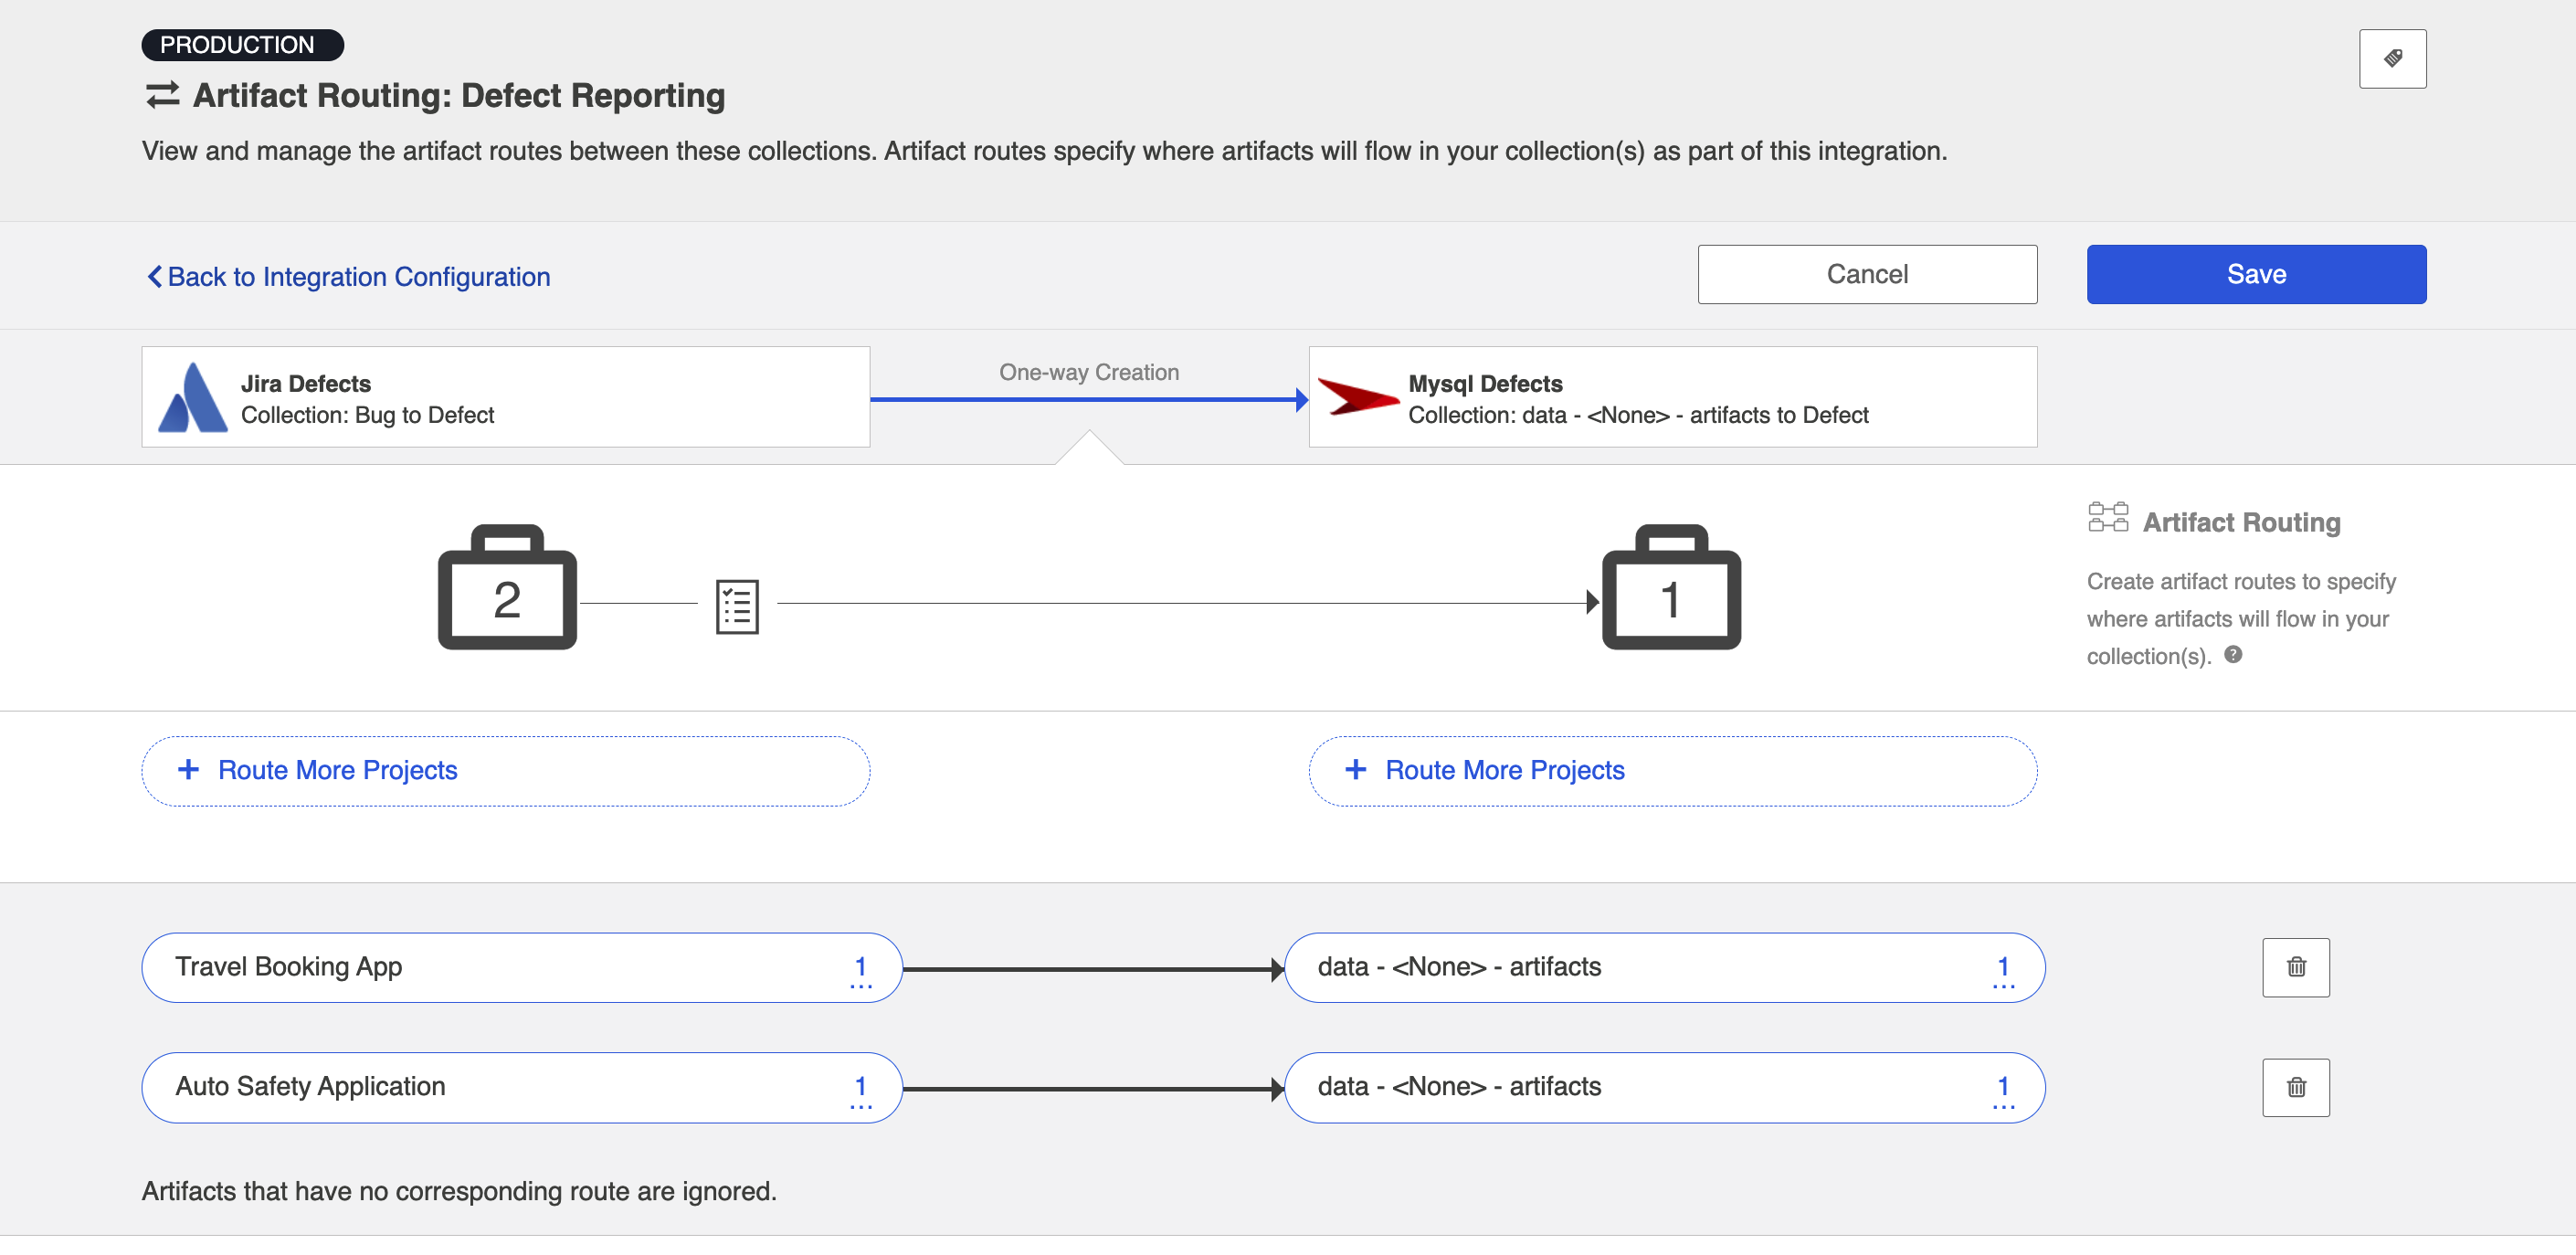
For an Enterprise Data Stream Integration, Artifact Routing is used to specify which projects (or other containers) you would like to participate in your integration. For example, your Jira Bugs collection may contain 10 different projects which are utilized in various integrations. However, for the purpose of your Enterprise Data Stream Integration, you may want only one of those projects to participate. You can specify that project on the Artifact Routing Screen.
To configure Artifact Routing, select the relevant repositories and then click Artifact Routing.

This will bring you to the Artifact Routing screen. You can click Route More Projects to add additional projects to your route.
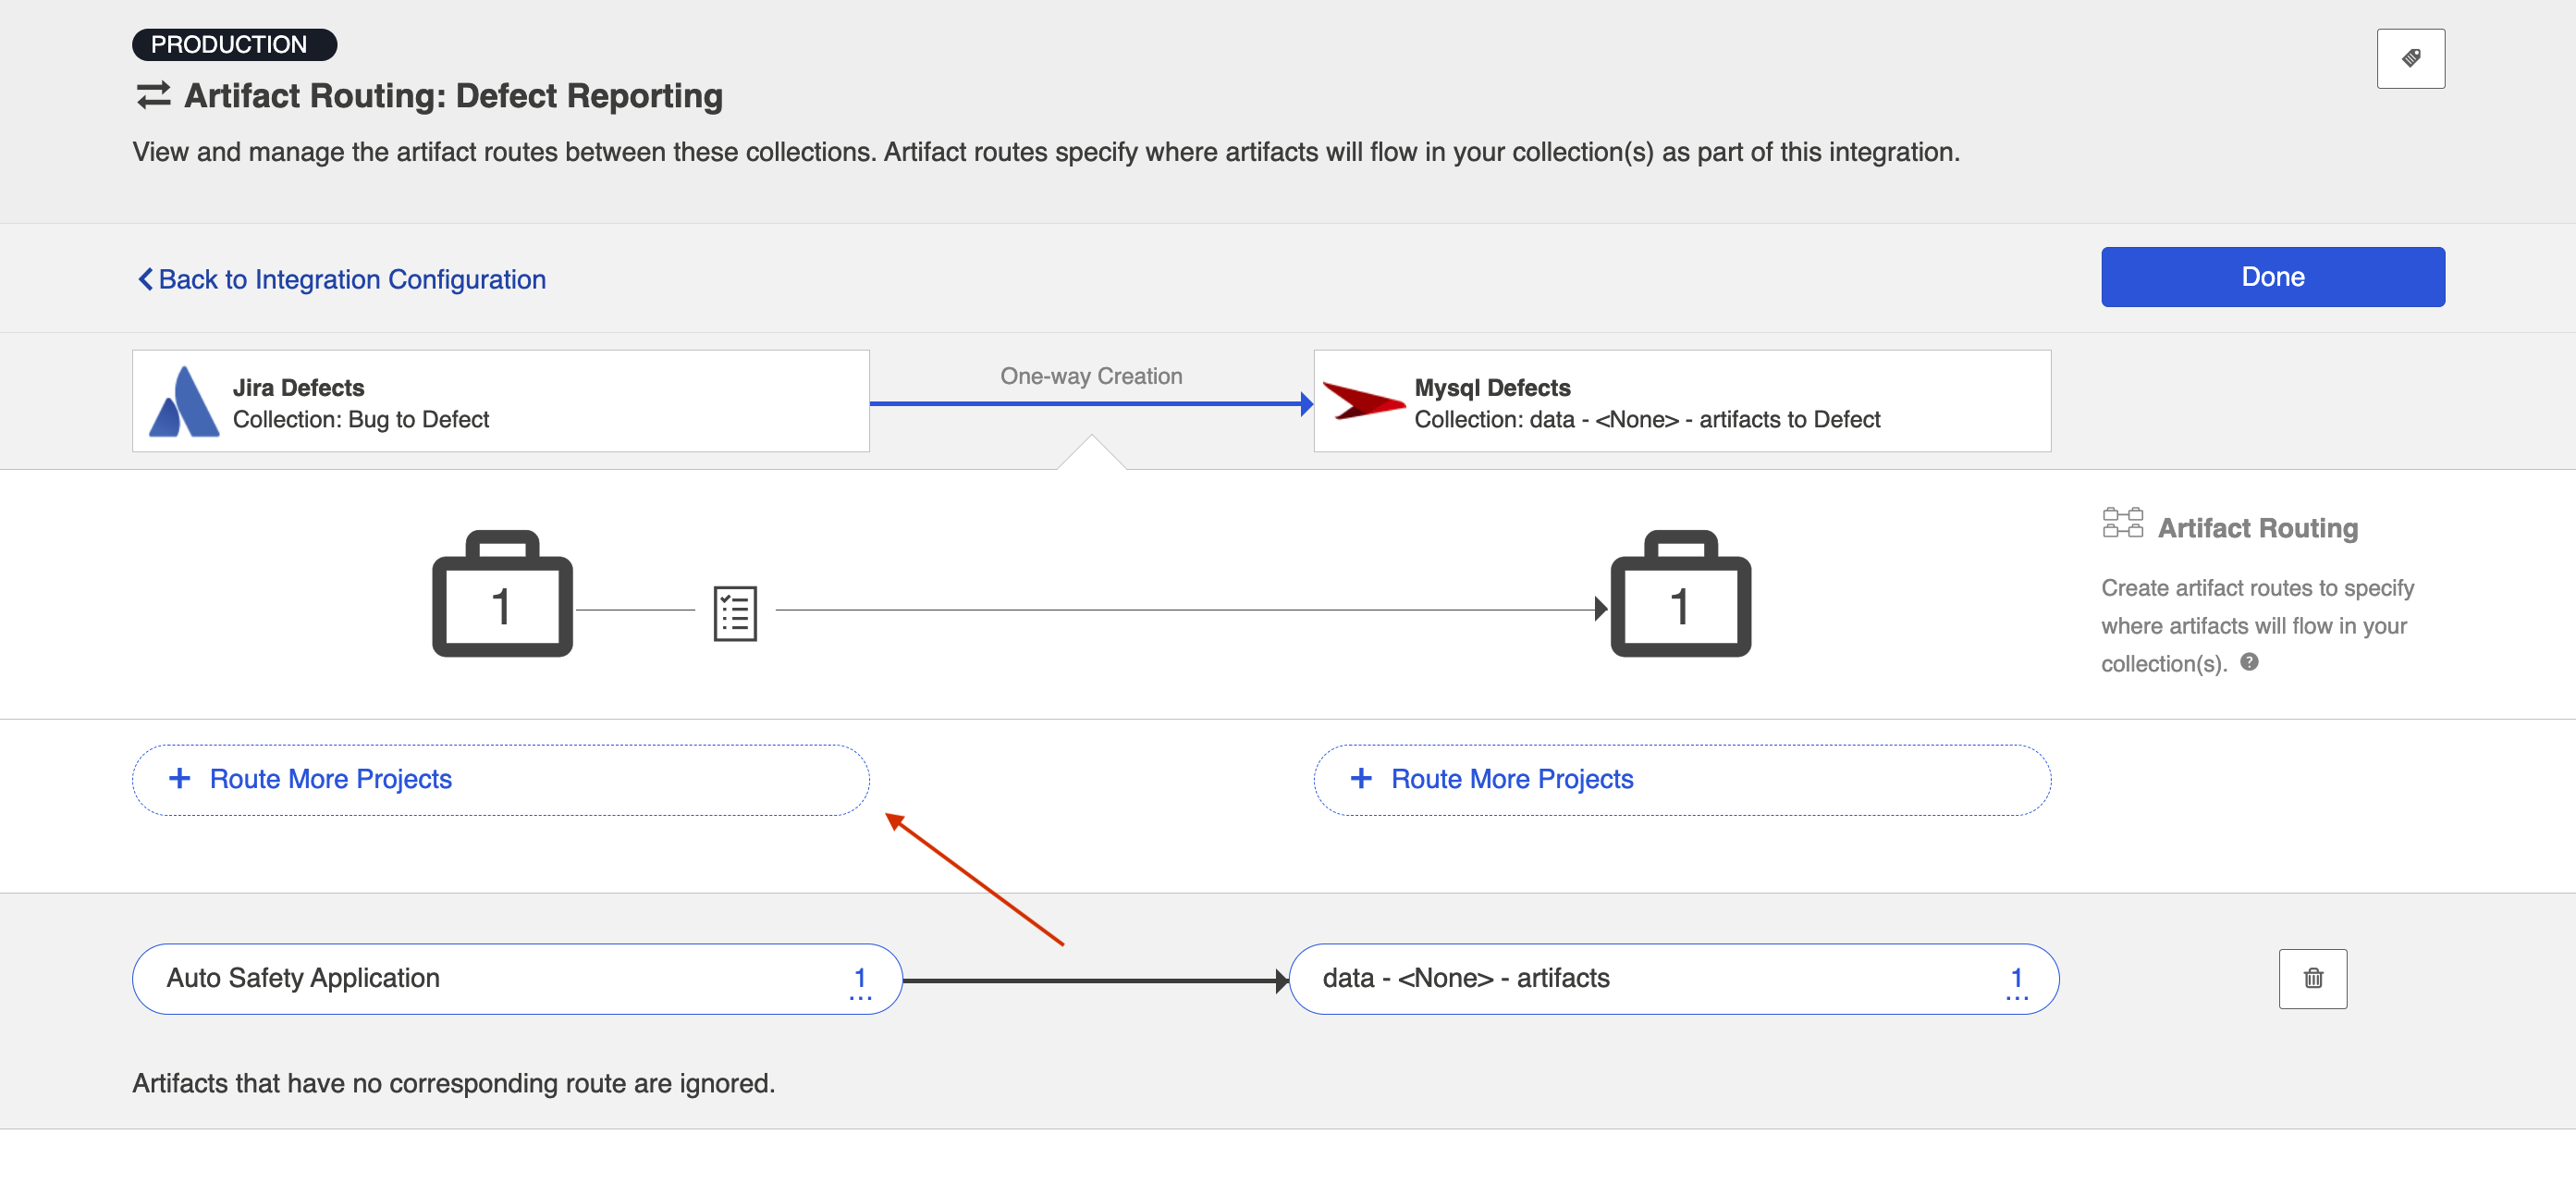
Select the projects you would like to participate in the integration and click Add Selected.
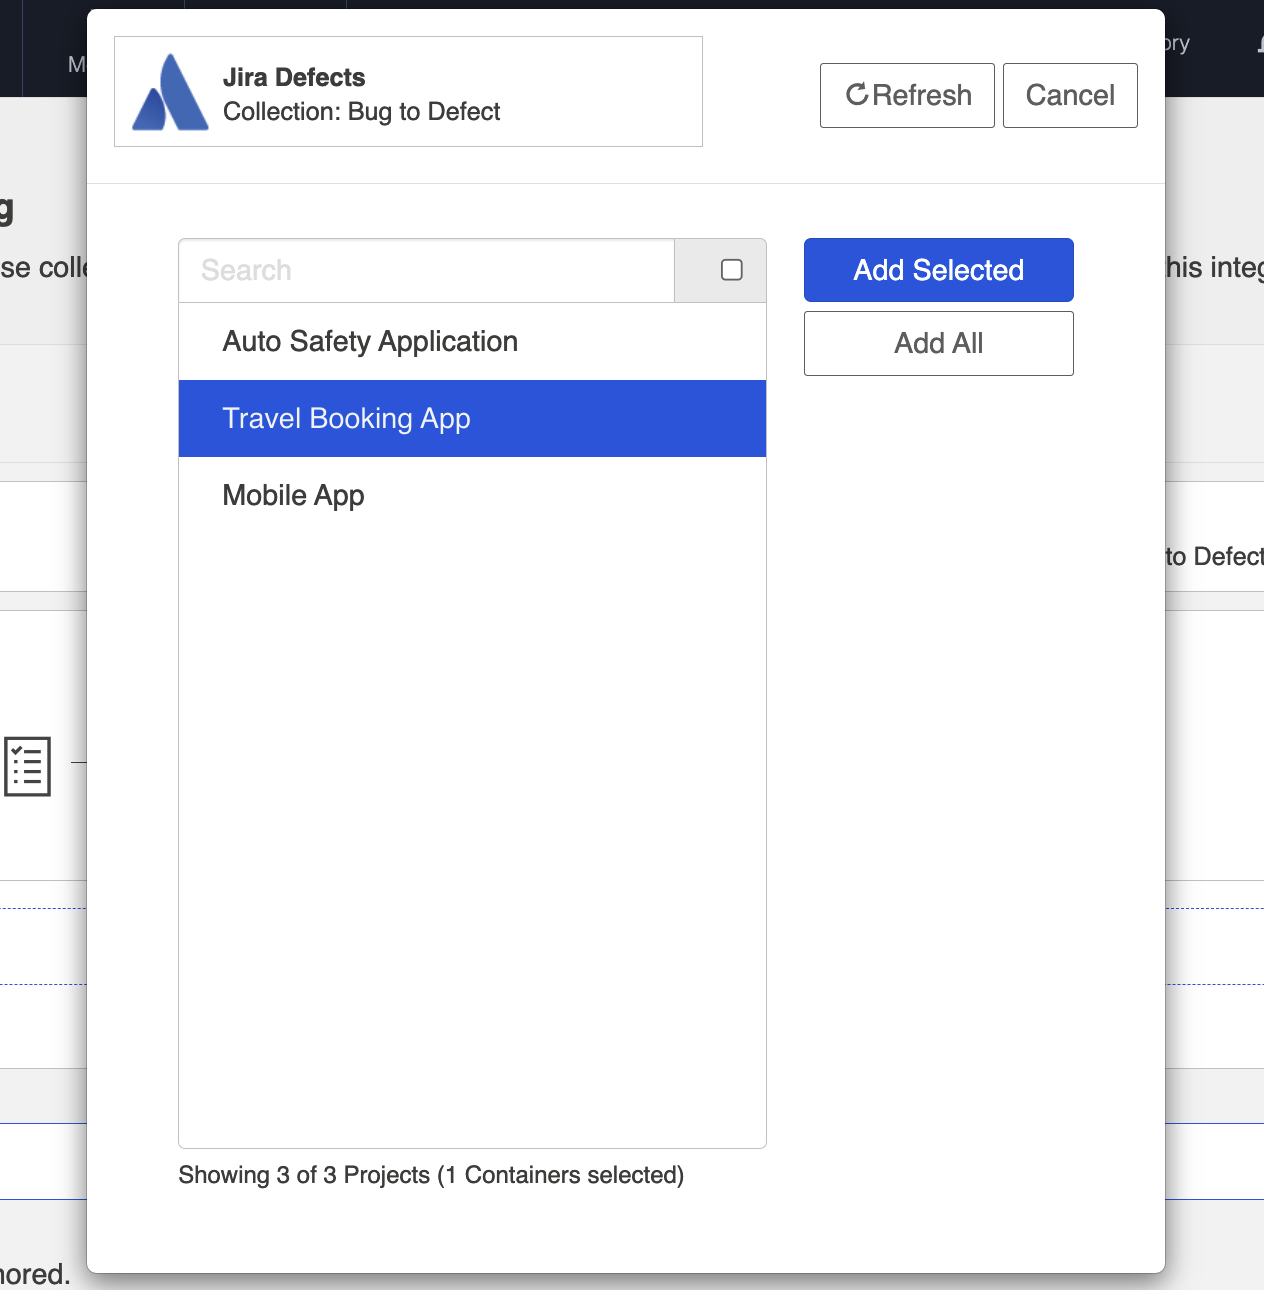
Click Connect.
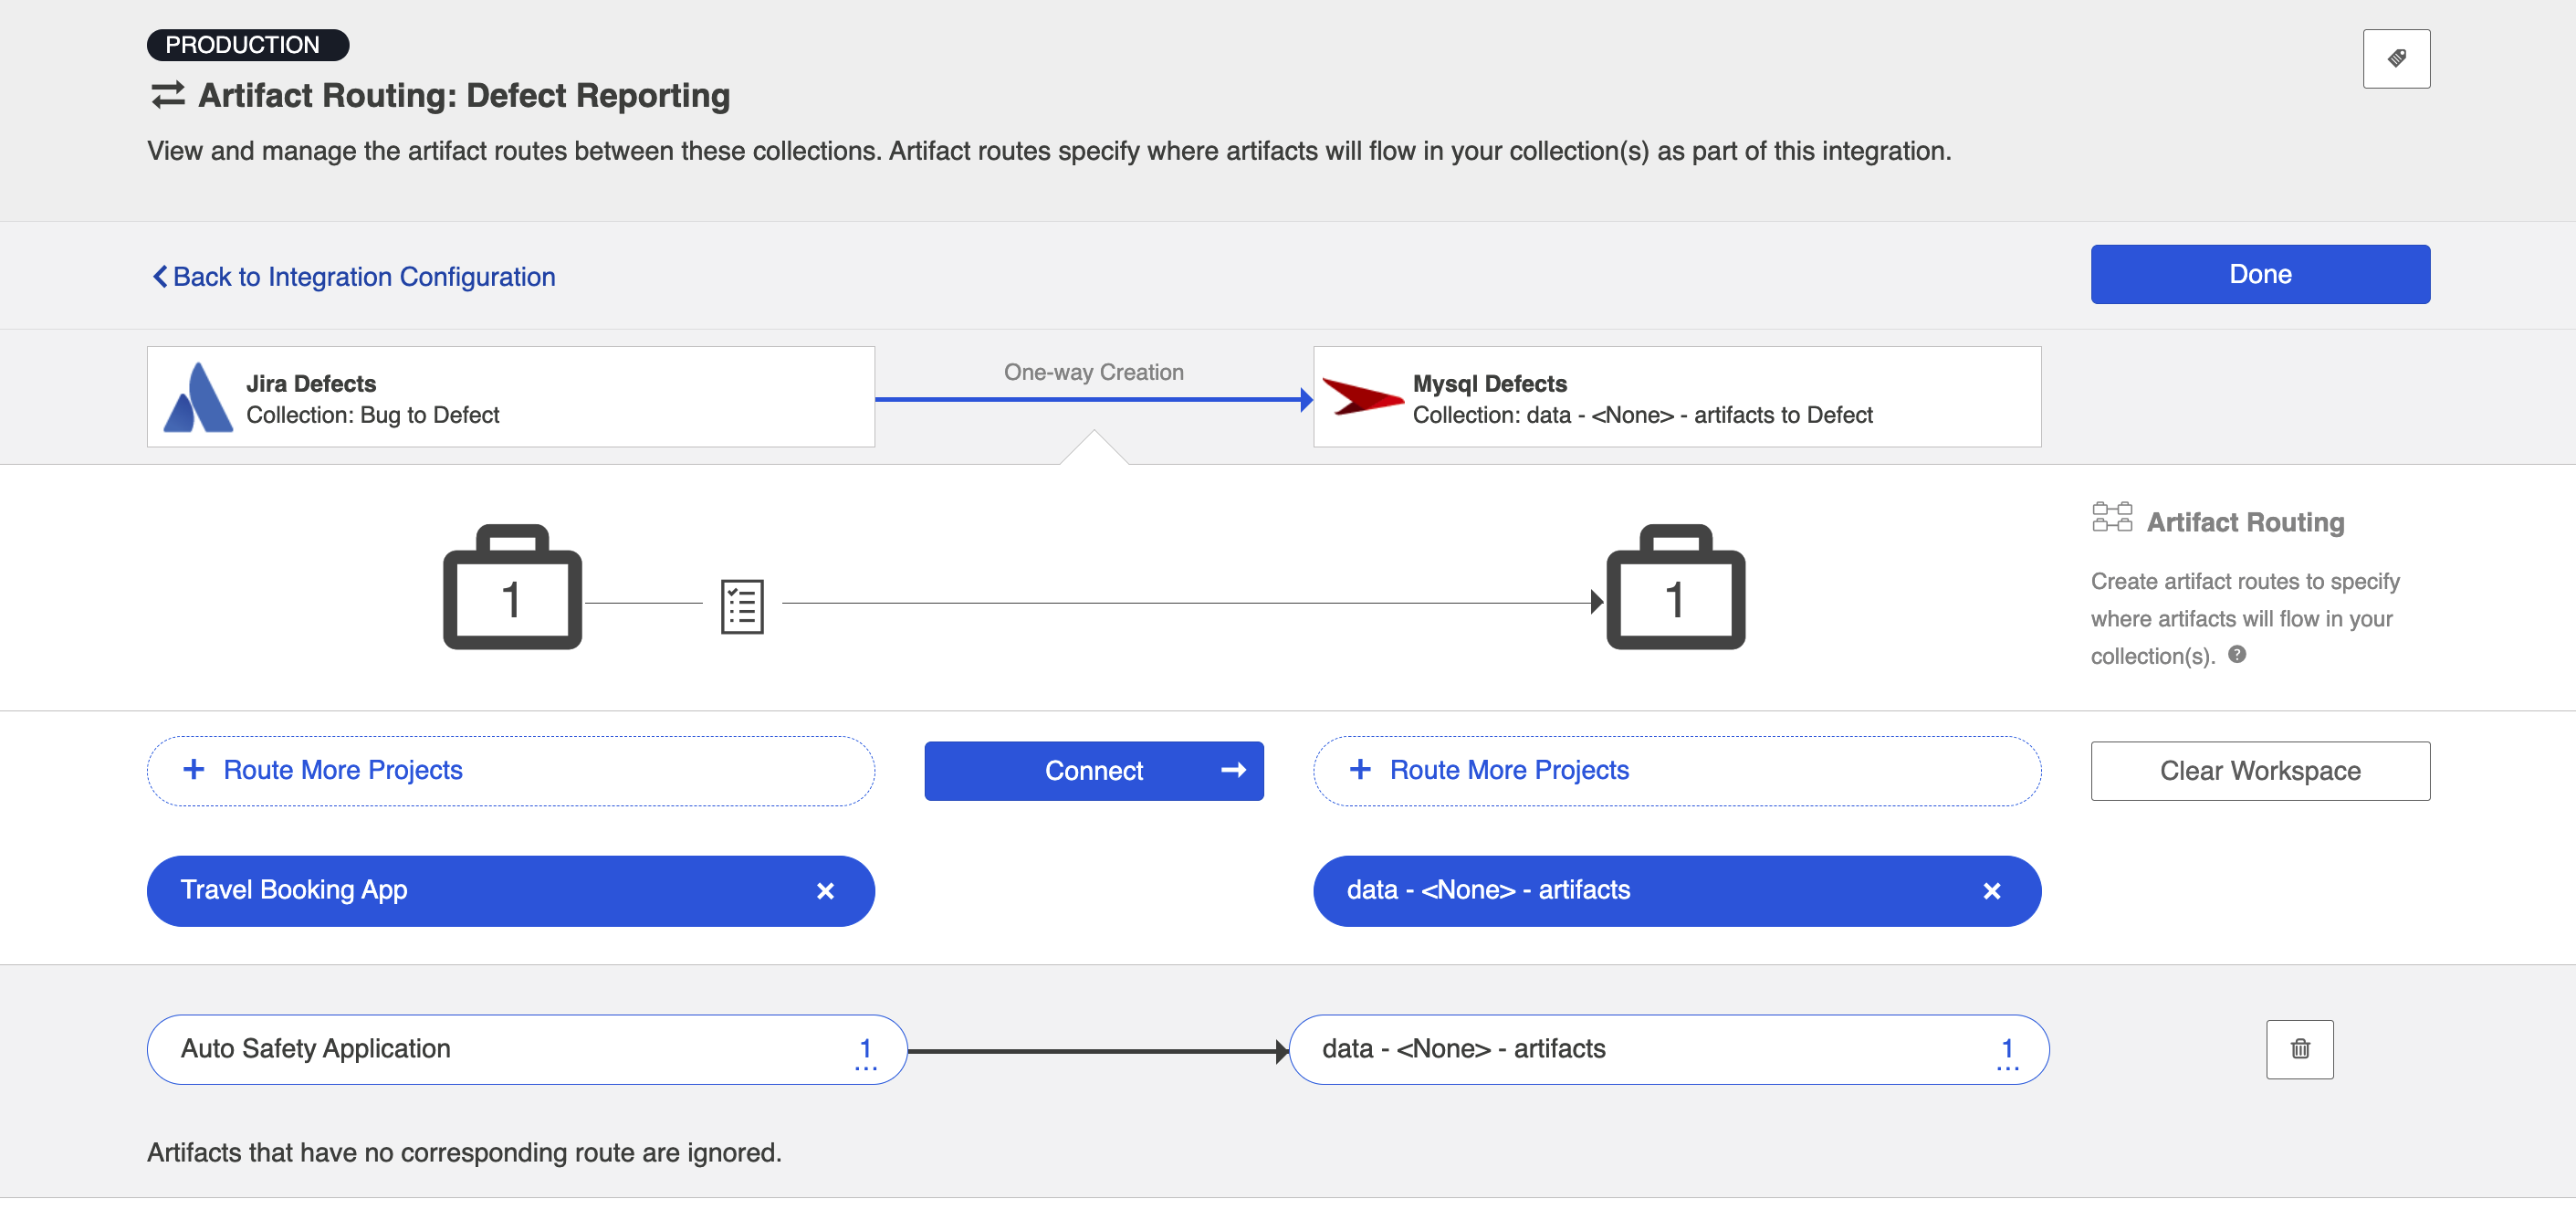
You will see your artifact route on the pane below. Click Save and Done.
Tip: Clicking ctrl+s on Windows and cmd+s on macOS will save your configuration.
Artifact Filtering
When configuring your integration, you have several options available to refine which artifacts are eligible to flow. The final mechanism available is artifact filtering, which is configured at the Integration level. Artifact Filtering allows you to filter which artifacts flow in your integration, based on a field value on that artifact.
To use a field for artifact filtering, it must:
- Be a part of your model, and be mapped to the collection you are filtering from
- Be one of the following field types:
- Single Select
- Note that in cases where allow unmapped values to flow is enabled in the model, only fields that are already a part of the model will be considered for artifact filtering
- Multi-Select
- Note that in cases where allow unmapped values to flow is enabled in the model, only fields that are already a part of the model will be considered for artifact filtering
- Date
- Date/Time
- Duration
- String
- Single Select
Note: You can utilize our transforms to filter based on an 'unsupported' collection field type, if that field is mapped to a supported field type in your model. For example, you could filter based on a Boolean field in your repository, if that boolean field is mapped to a single select field in your model.
Unique Behavior for Enterprise Data Stream
The filtering behavior is somewhat unique when using the Enterprise Data Stream Template:
Though setting filters is meant to limit which artifacts flow in an integration, the impacts of setting filters on an Enterprise Data Stream Template are somewhat unique. Because it would not be ideal to have records in your database output that represent artifacts that have been filtered in an integration, given that these records would be stale and would not denote why a given artifact was not changing over time, it is the case that artifacts that are filtered on an Enterprise Data Stream Integration will still have records written out to the database but will have the "filtered' event type denoted.
Note the following:
- When you set a filter on an Enterprise Data Stream integration, records will not automatically be written out for artifacts that do not meet filtering criteria. When artifacts that should be filtered out change, we'll then write out a record with the "filtered" event type.
- When a once filtered artifact field changes such that it now meets the filter criteria set, records will be written out right away.
- If you relax the filter and more artifacts are now in scope, the now in scope artifacts will only flow when the artifacts themselves change again.
- If an artifact is filtered out of the Enterprise Data Stream Integration, and then its project is removed from the collection, records will be written out for all artifacts in that collection at next full scan and marked as "removed", whether or not they have been filtered out of the integration (This effectively means that the "removed" designation supersedes "filtered" designation.)
- If you add the project back to the collection and routed in the integration, changes to artifacts will create a new record with either the "changed" or "filtered" event type, depending on whether or not the artifact meets the filter criteria.
Configuring Artifact Filtering
To configure Artifact Filtering, select the relevant repository, then click Artifact Filtering from the right pane of the Integration Configuration screen.

This will lead you to the Artifact Filtering Configuration screen, where you can configure your artifact filtering statement(s).
You can either add a statement that will apply to all artifacts in your collection, or to all artifacts within certain projects of your collection.
Apply Filter to All Artifacts in Collection
To apply a filter to all artifacts in the collection, simply click + Add Statements.

Use the drop-down menus to configure your filter fields and values:
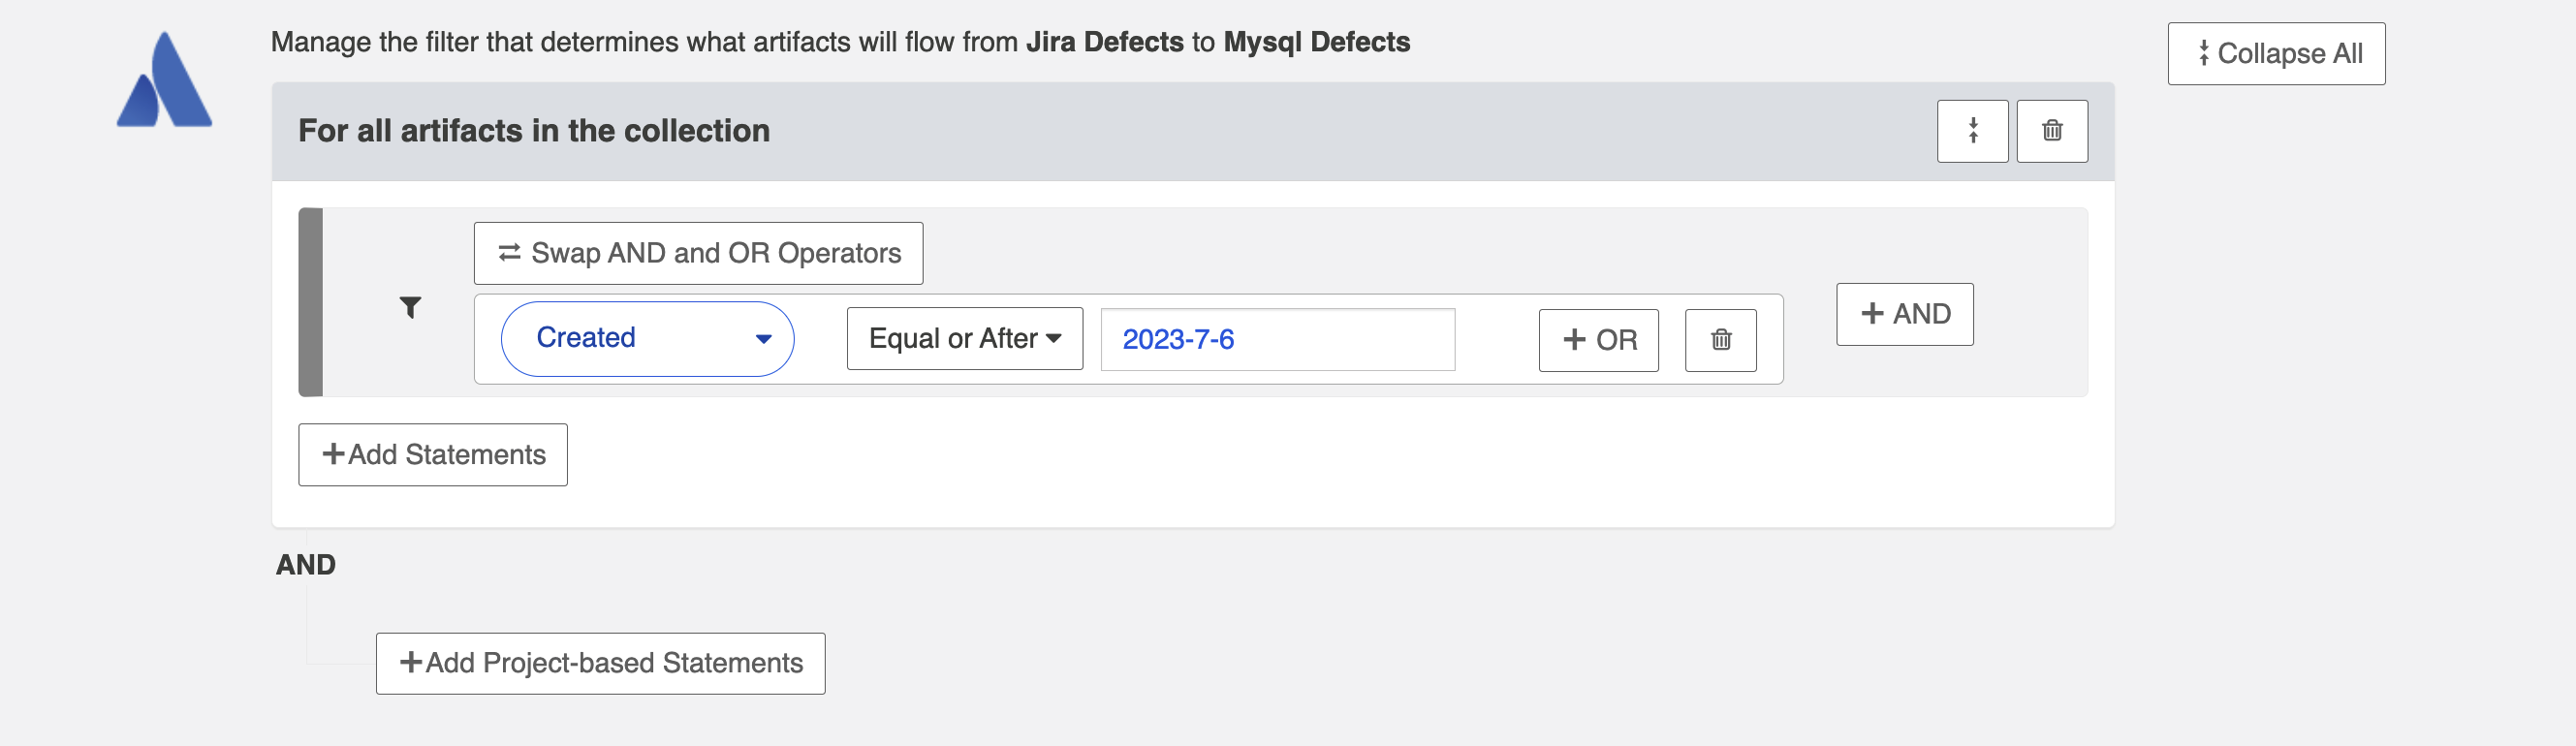
Apply Filter to Artifacts in Certain Projects
To apply a filter to artifacts within a specific project, click + Add Project-based Statements.
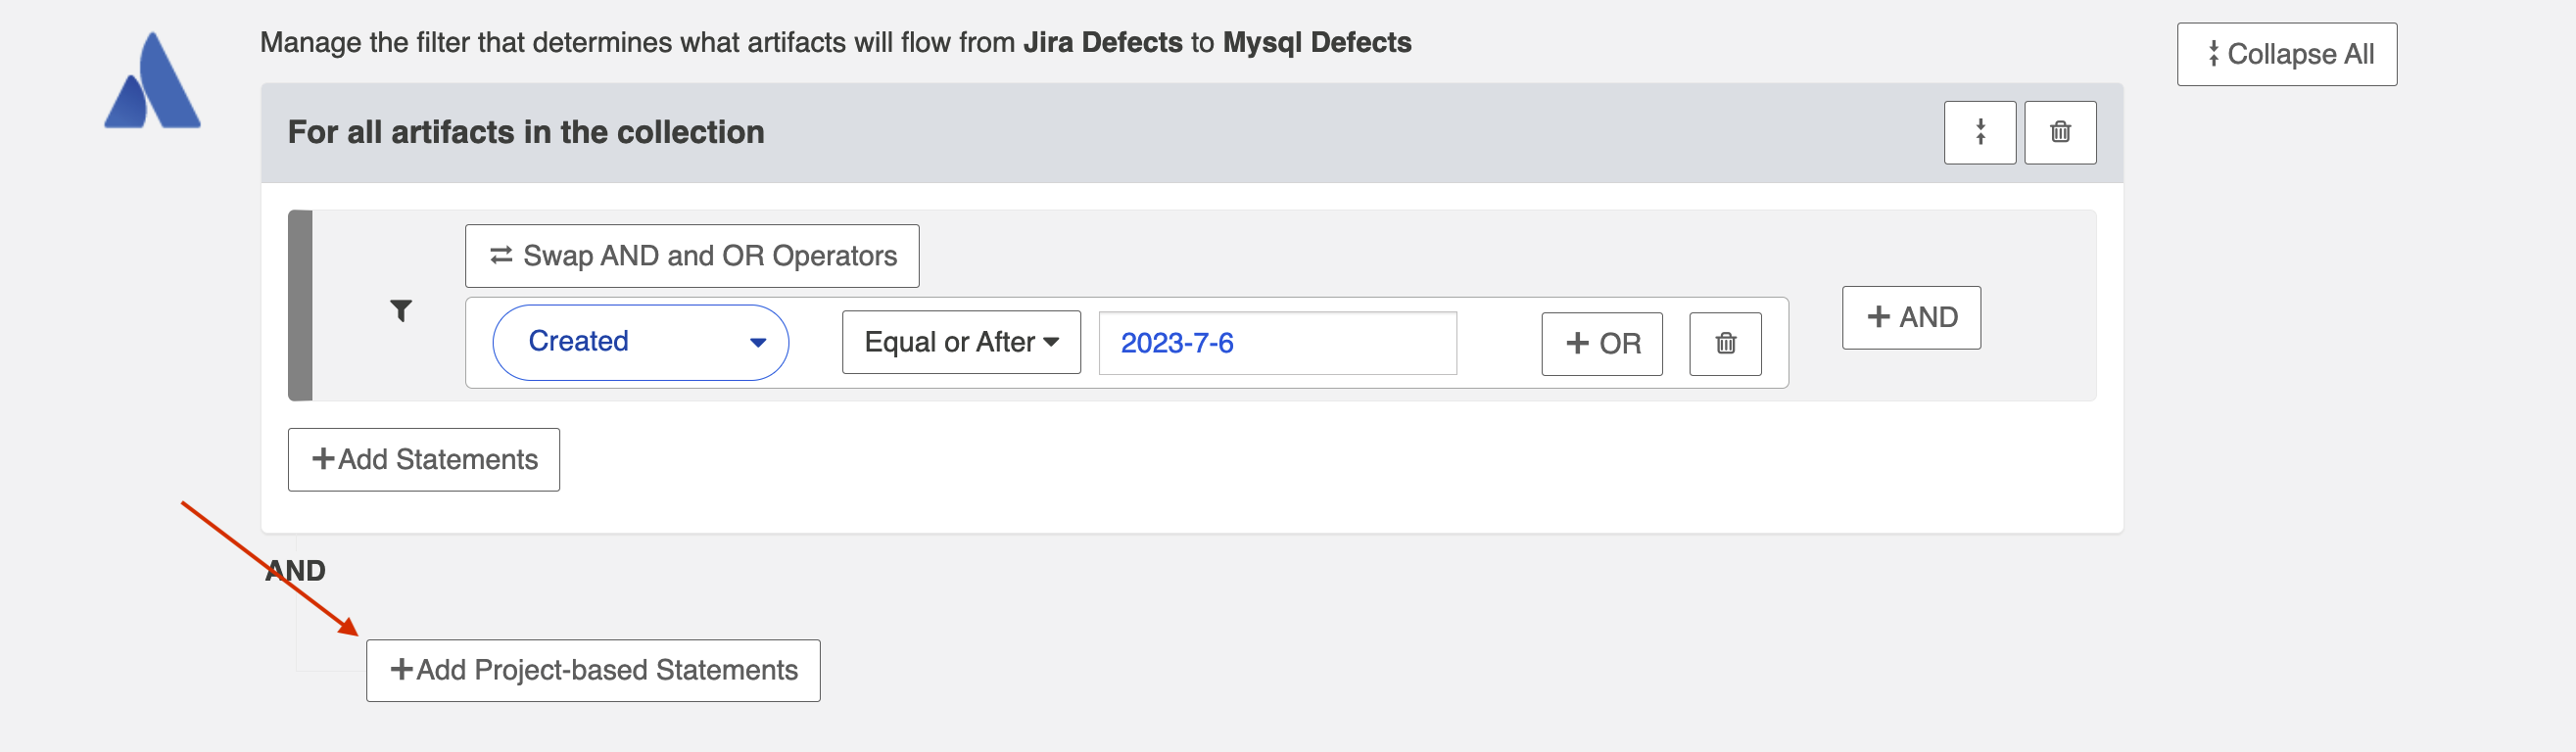
Click + Add Projects to select your project.
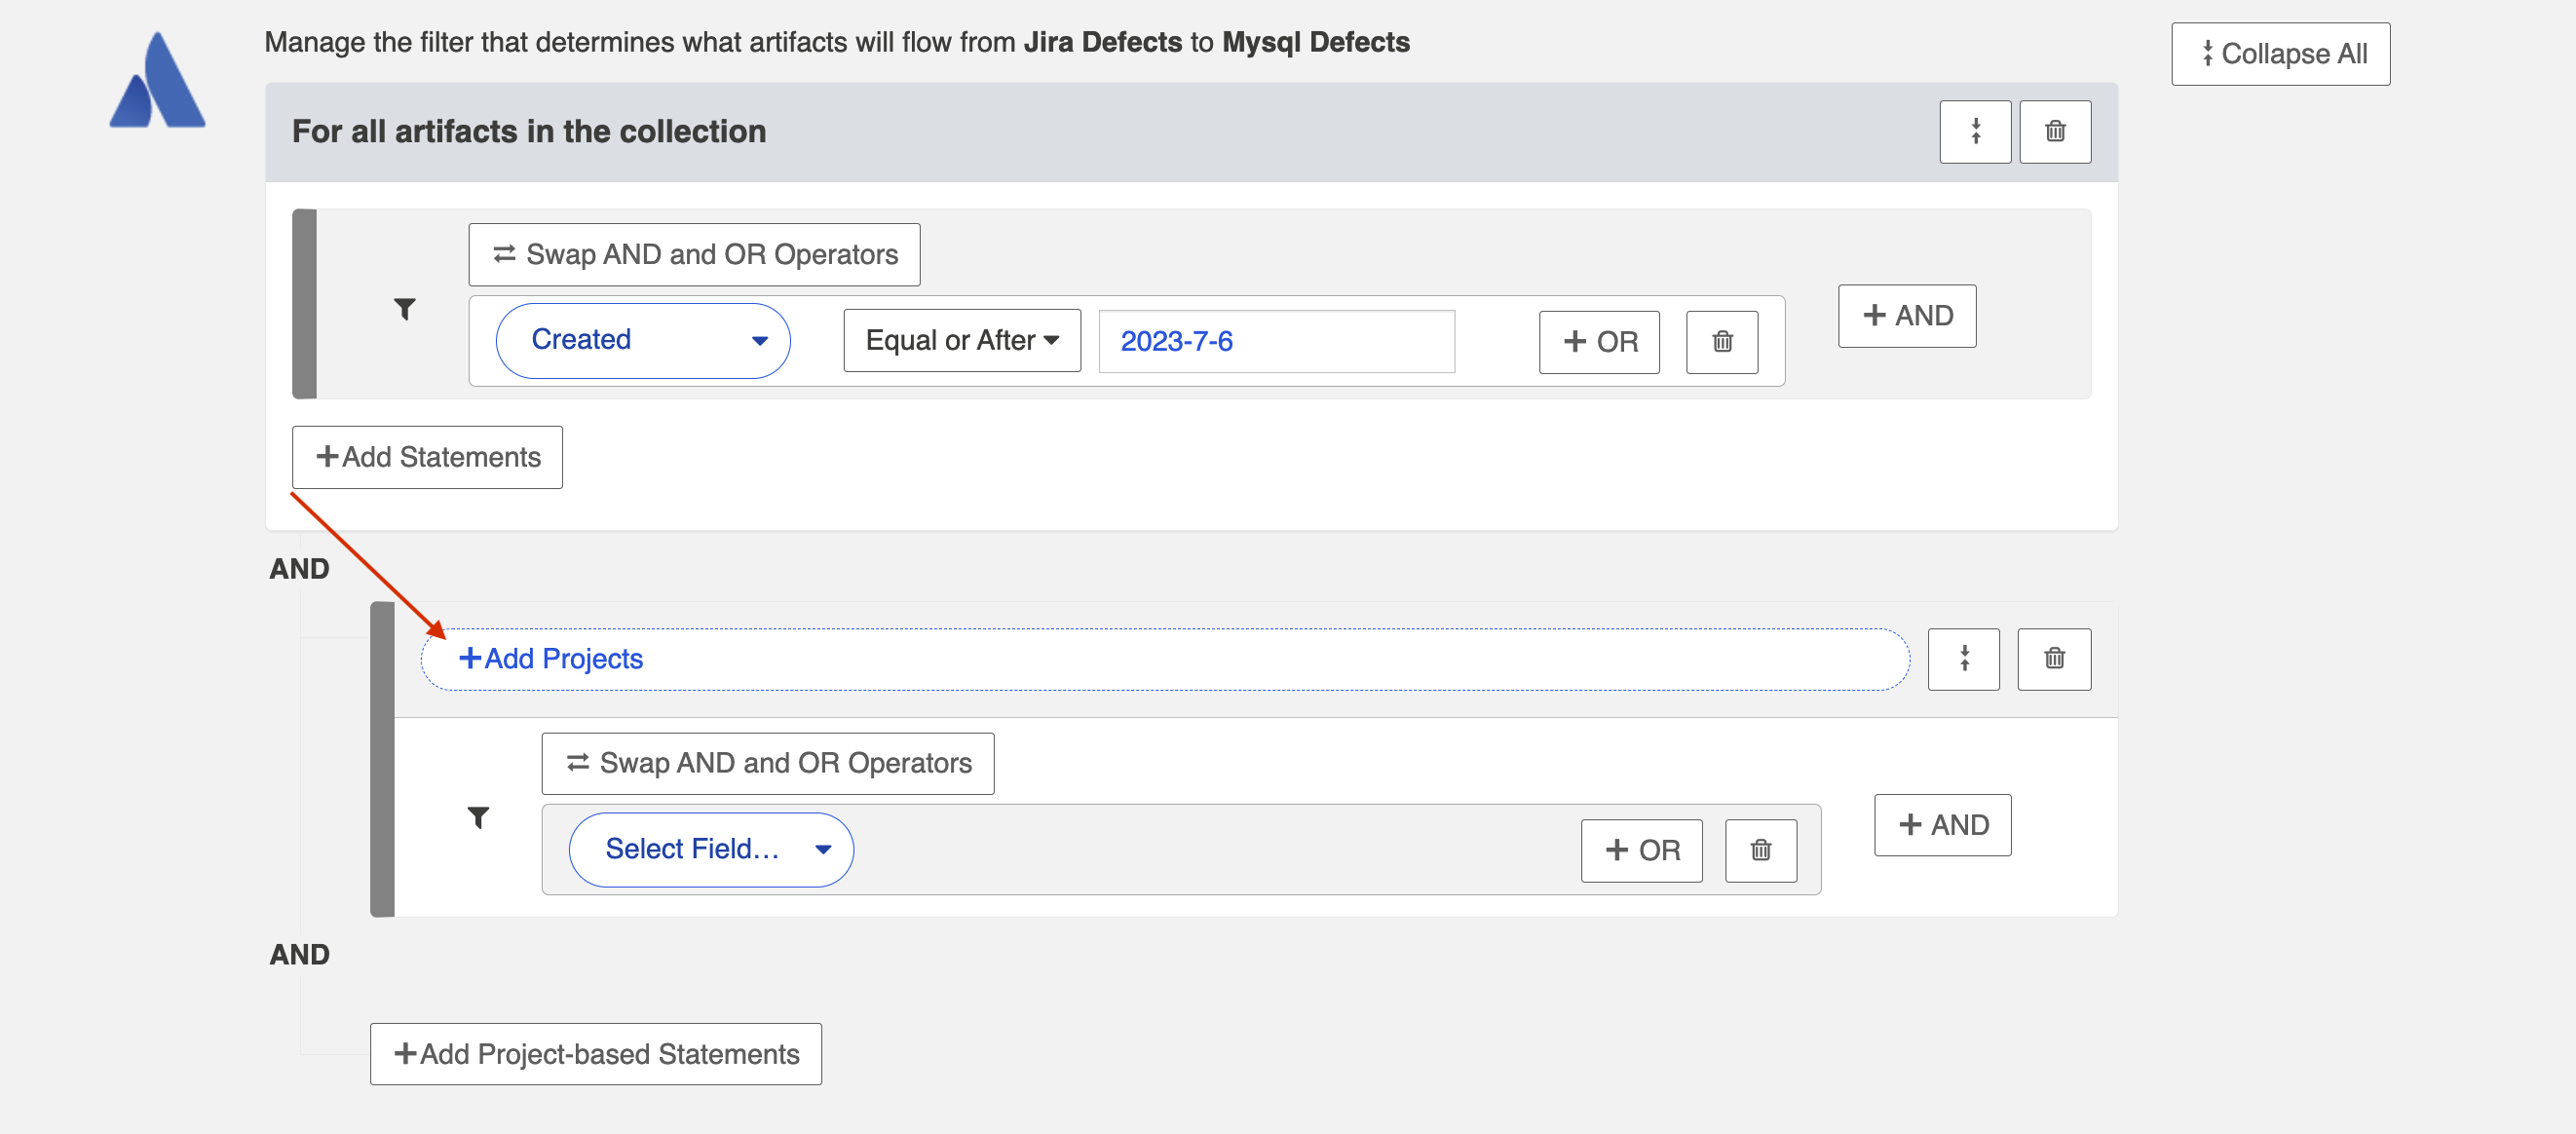
Select the project(s) you'd like your filter to apply to.
Then click Select Field... to begin configuring your filtering statement.
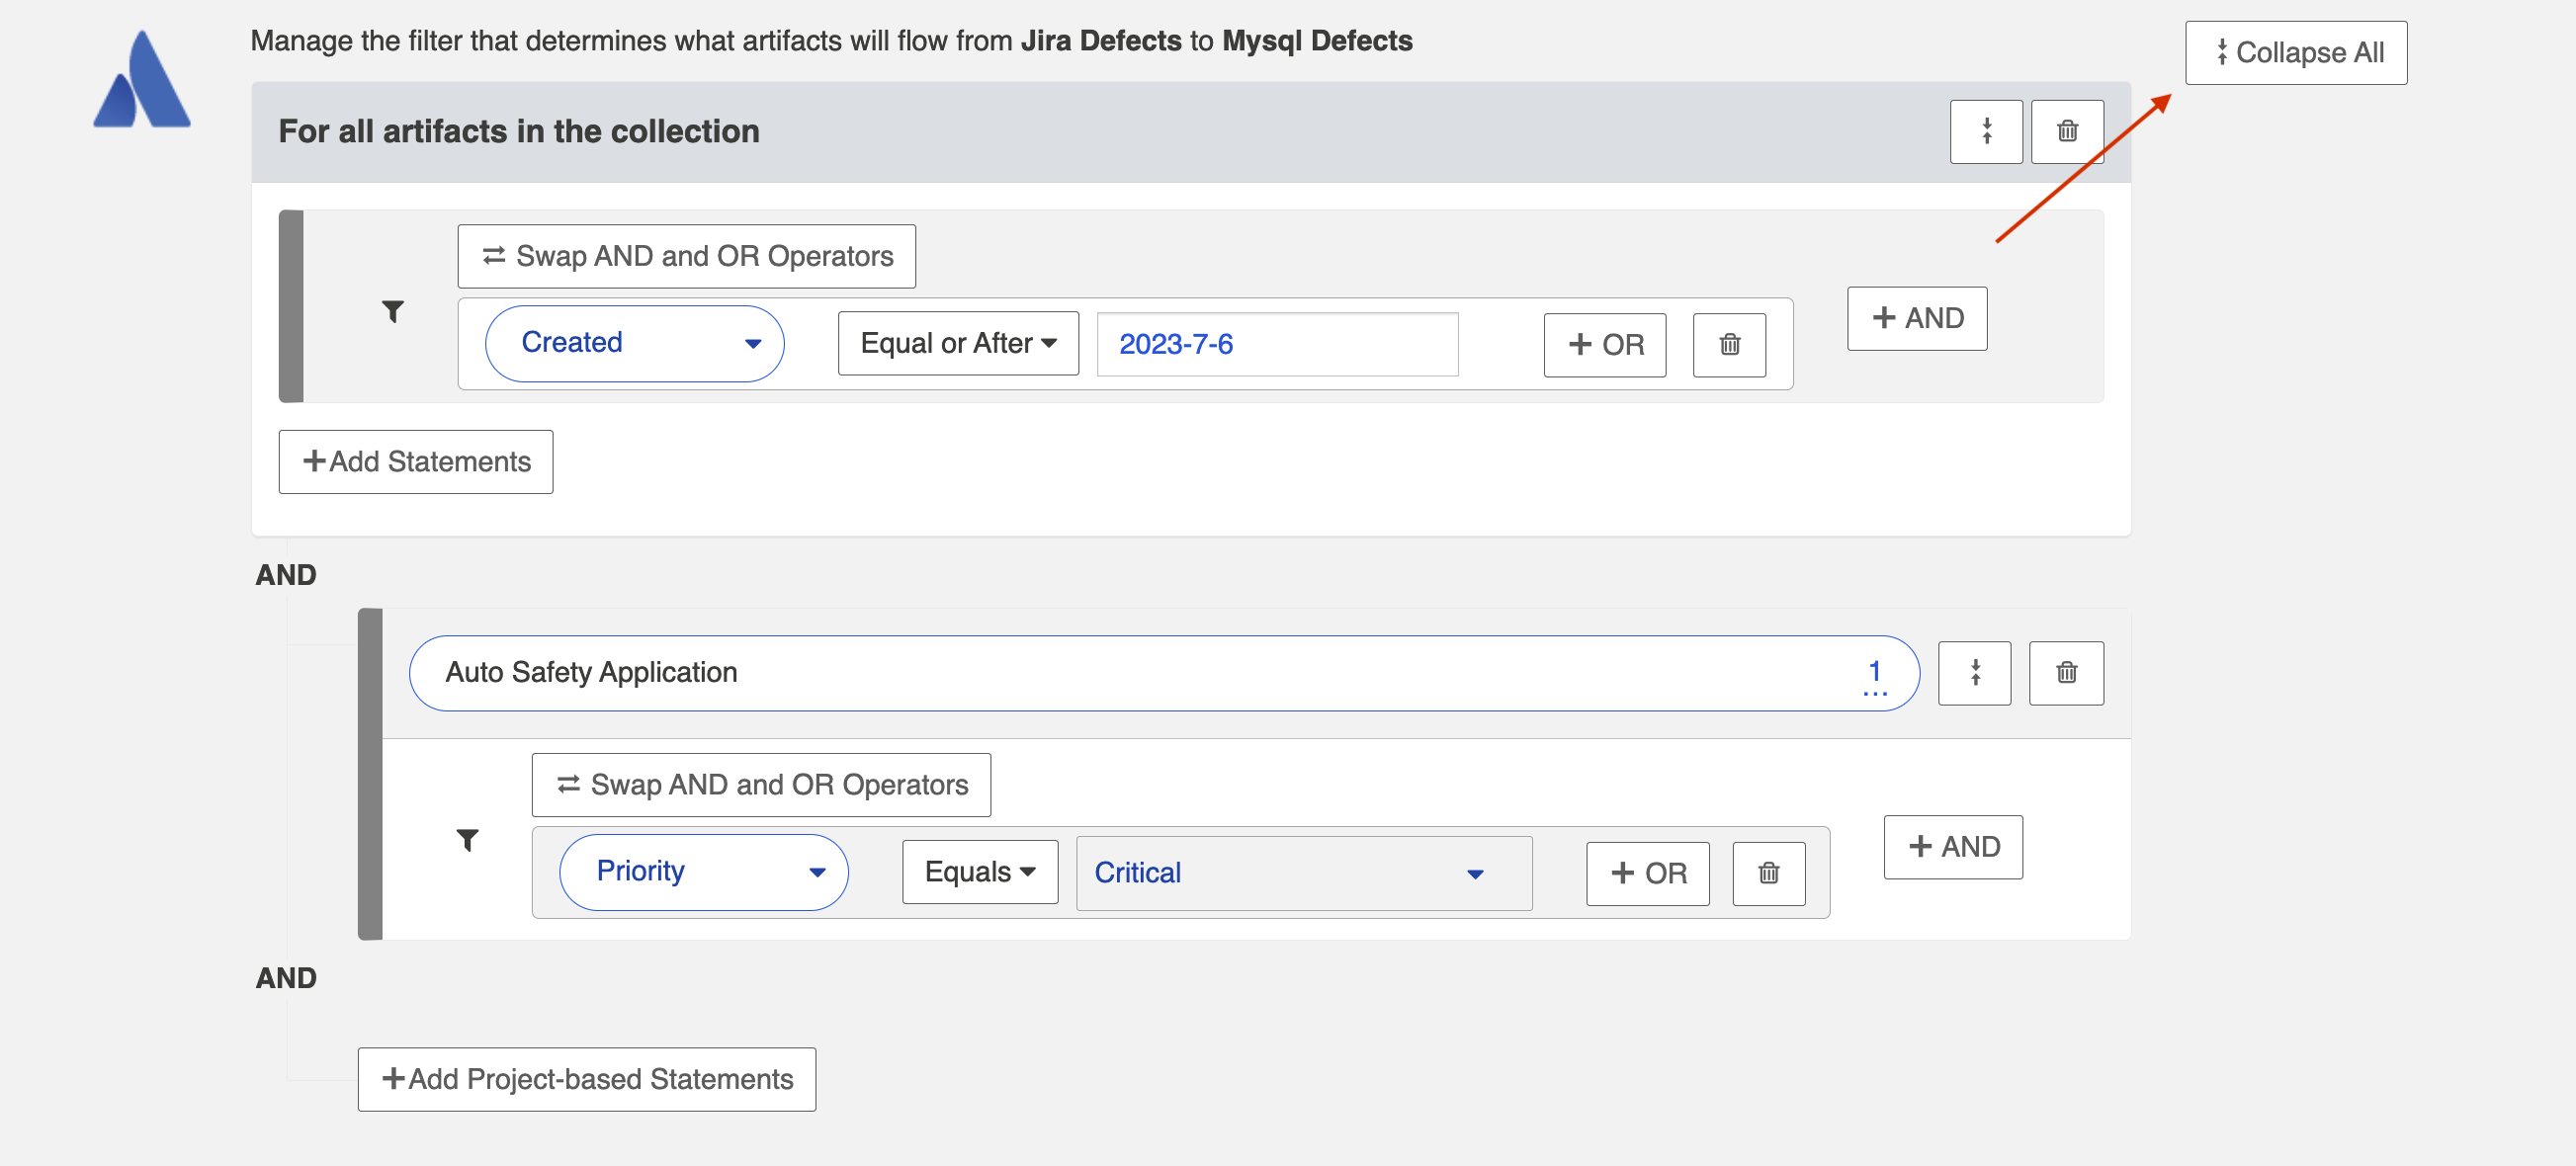
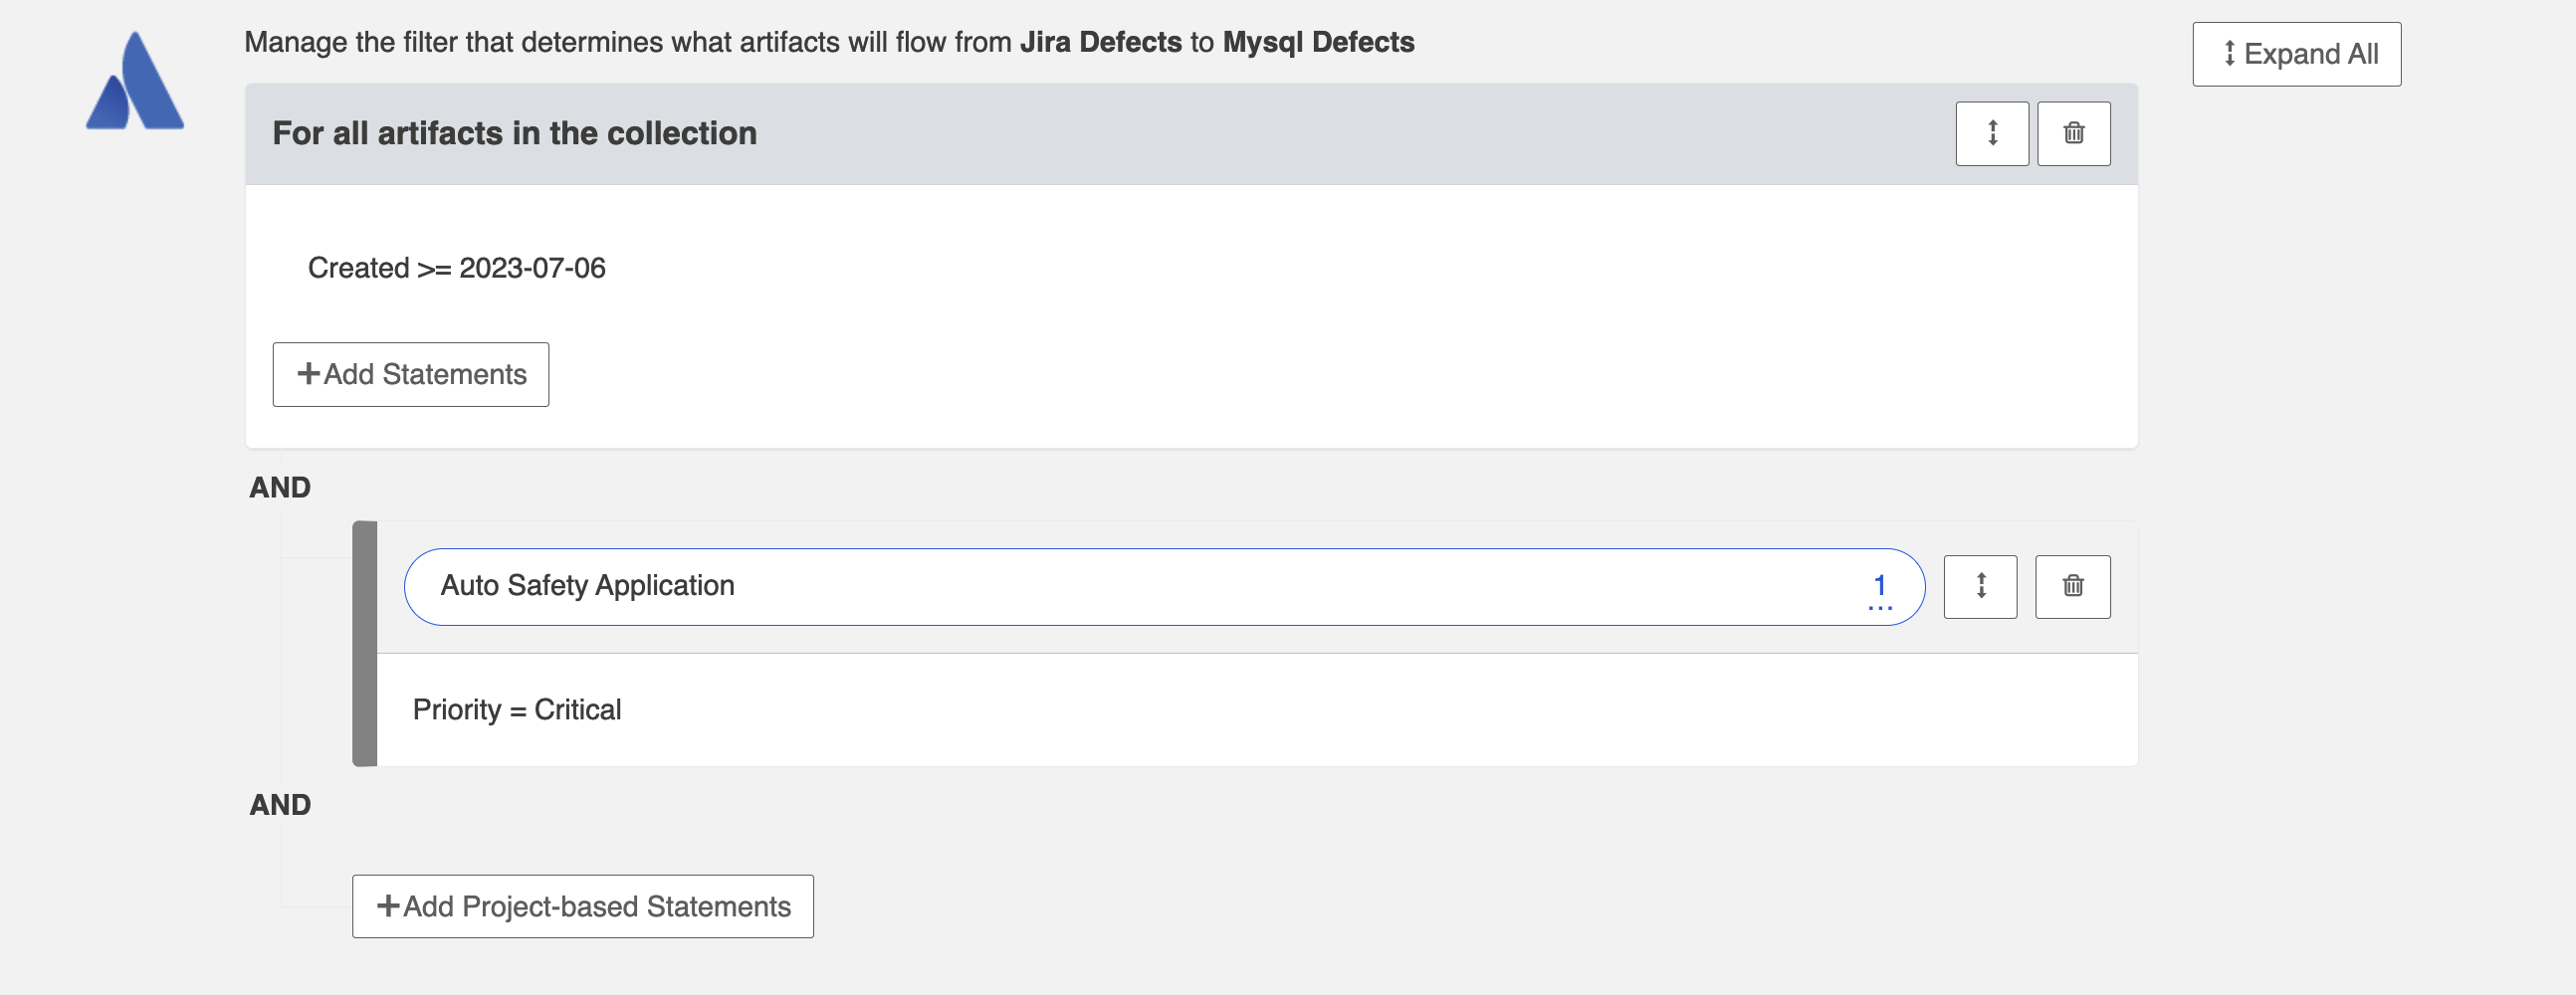
Viewing Artifact Filter Statements
You can click the Collapse All button to view an easier-to-read version of your artifact filtering statements.
Change Detection
Hub's default global change detection settings can be found on the General (Settings) screen. However, if you'd like to override the global defaults, you can configure integration-specific change detection and full scan intervals by clicking the Change Detection link.
The Change Detection Interval is the time between polling requests to detect only changed artifacts. This defaults to 1 minute on the General (Settings) screen, but can be customized as desired.
The Full Scan Interval is the time between polling requests to detect changed artifacts, in which all artifacts of a collection are scanned. Not all changes to an artifact will register as a change. Some repositories do not mark items as changed when (for example) a relationship is added or an attachment has changed. These may not be picked up by regular Change Detection, but will be picked up by a Full Scan. This defaults to 24 hours on the General (Settings) screen, but can be customized as desired.
To configure integration-specific change detection, select the relevant repository, then click the Change Detection link.
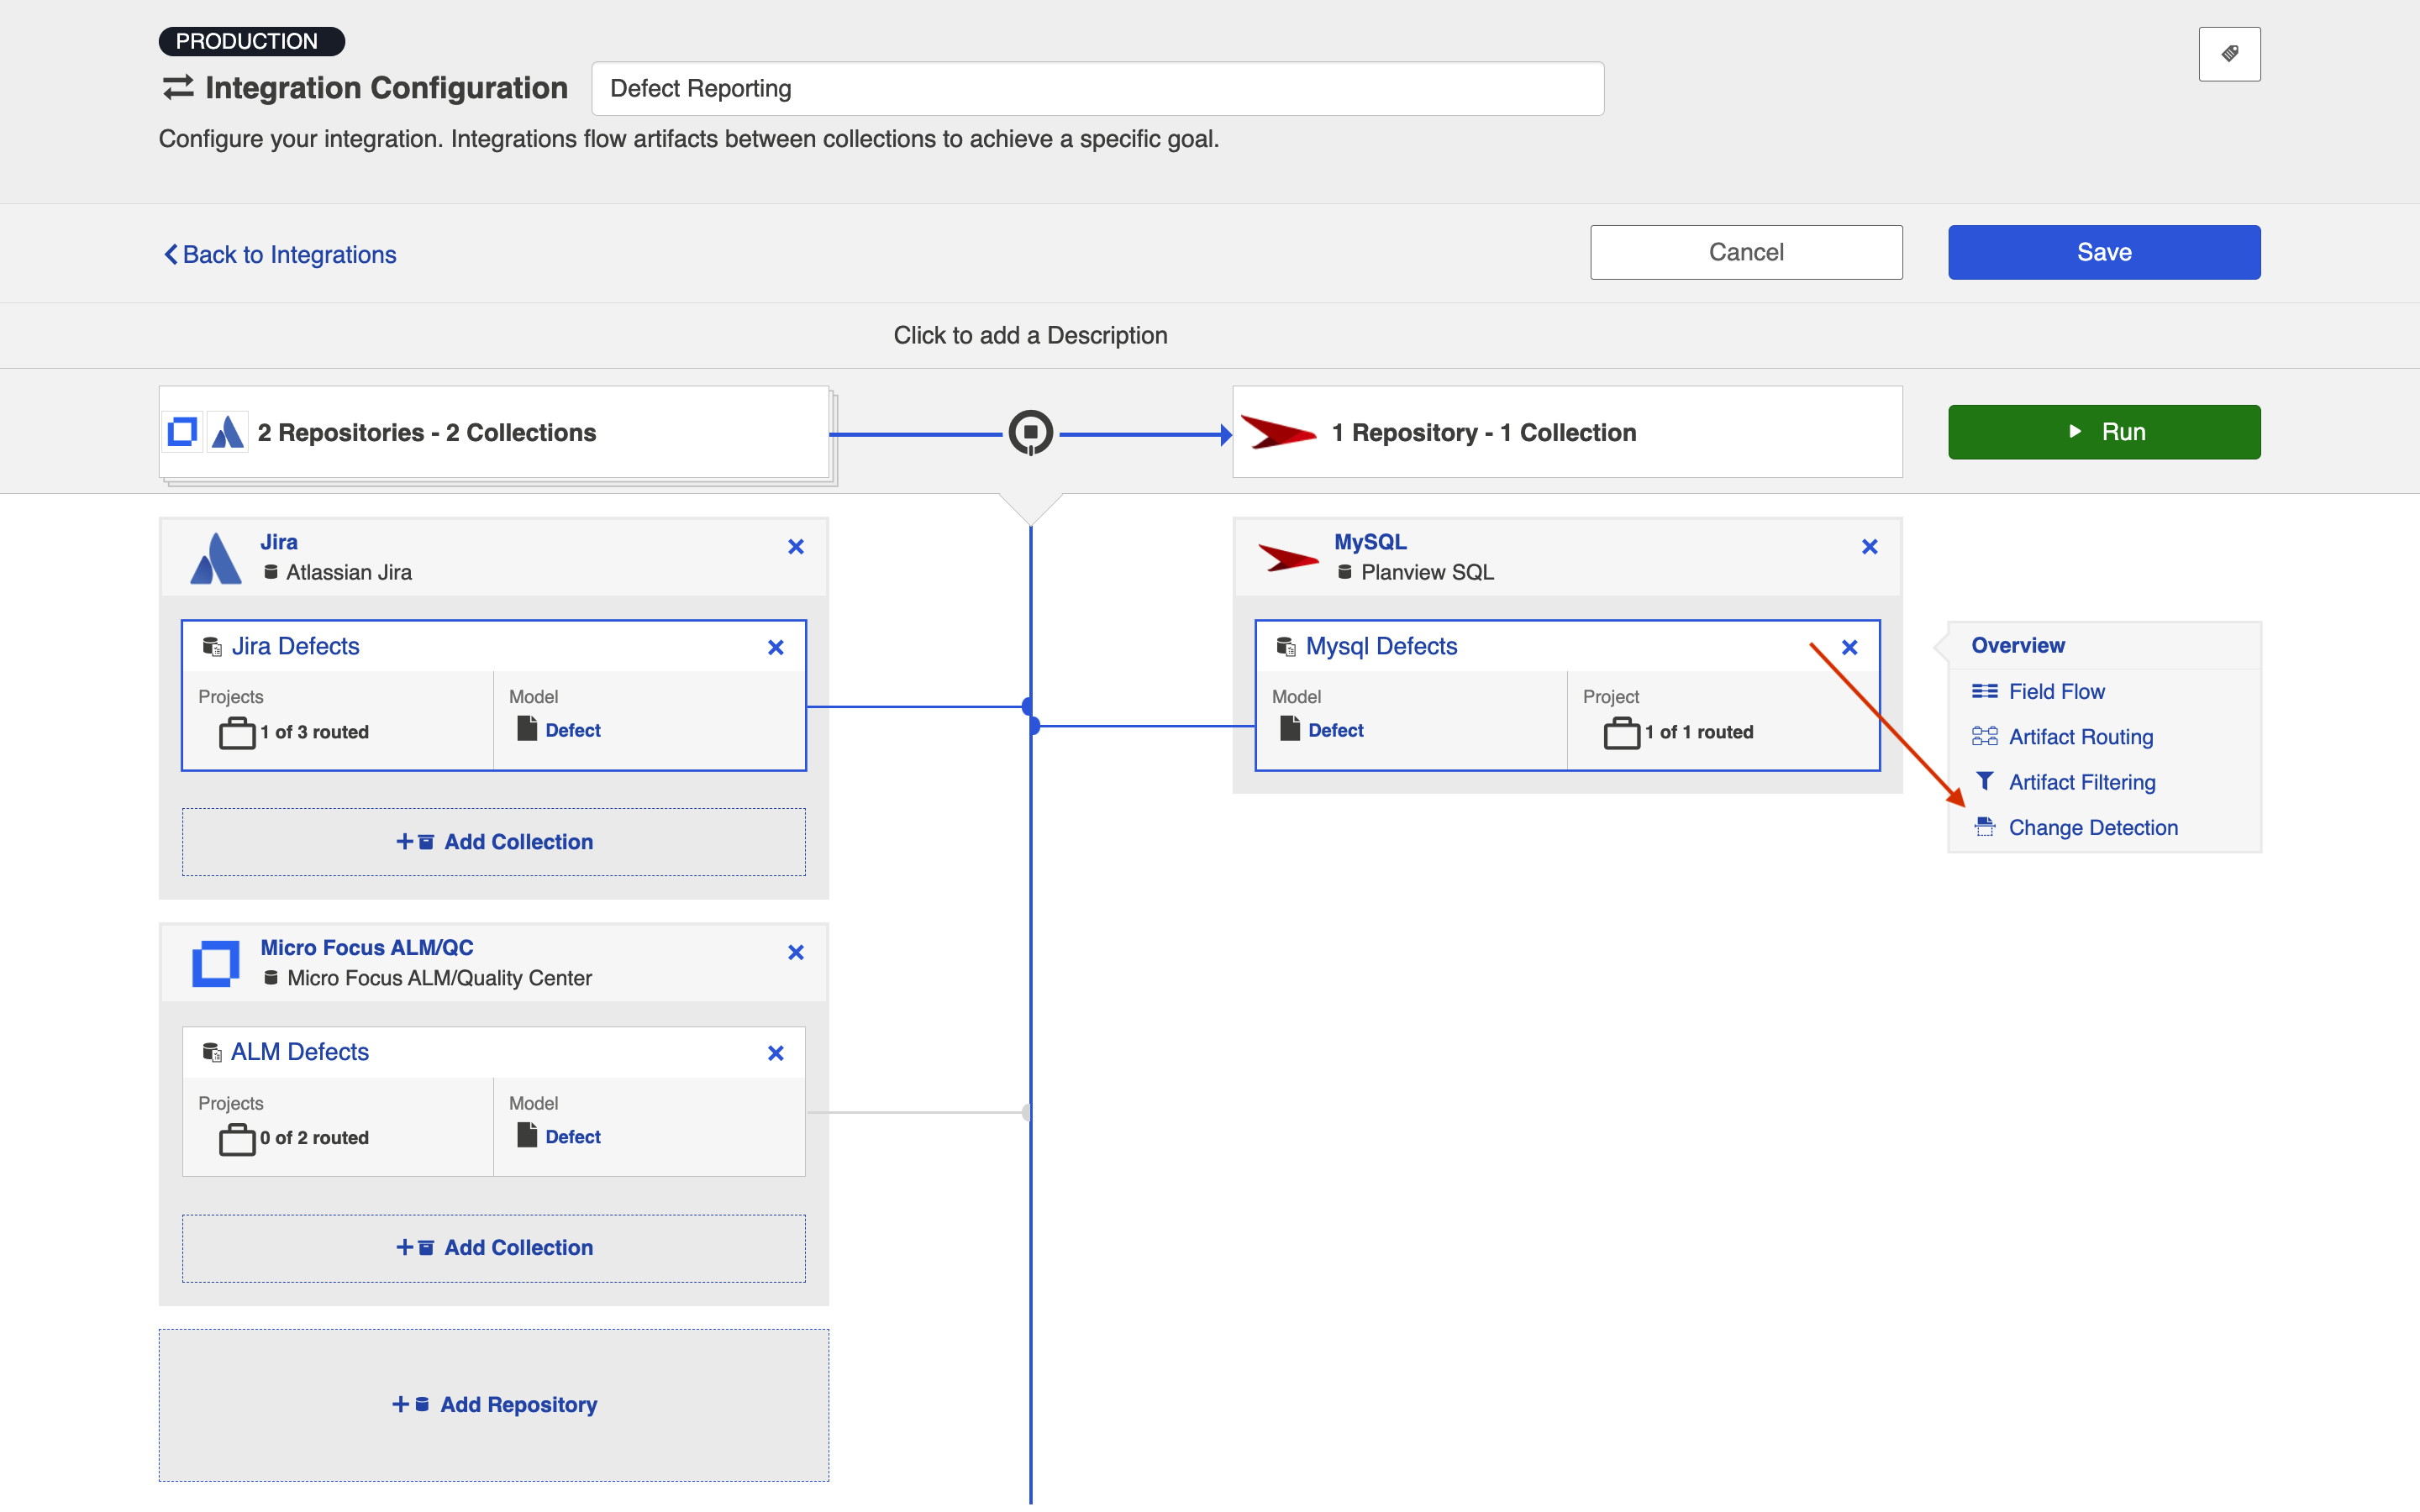
This will bring you to the Change Detection screen, where you can view the current change detection and full scan intervals configured for the selected collection in this integration. These will default to the global intervals configured on the General (Settings) screen.
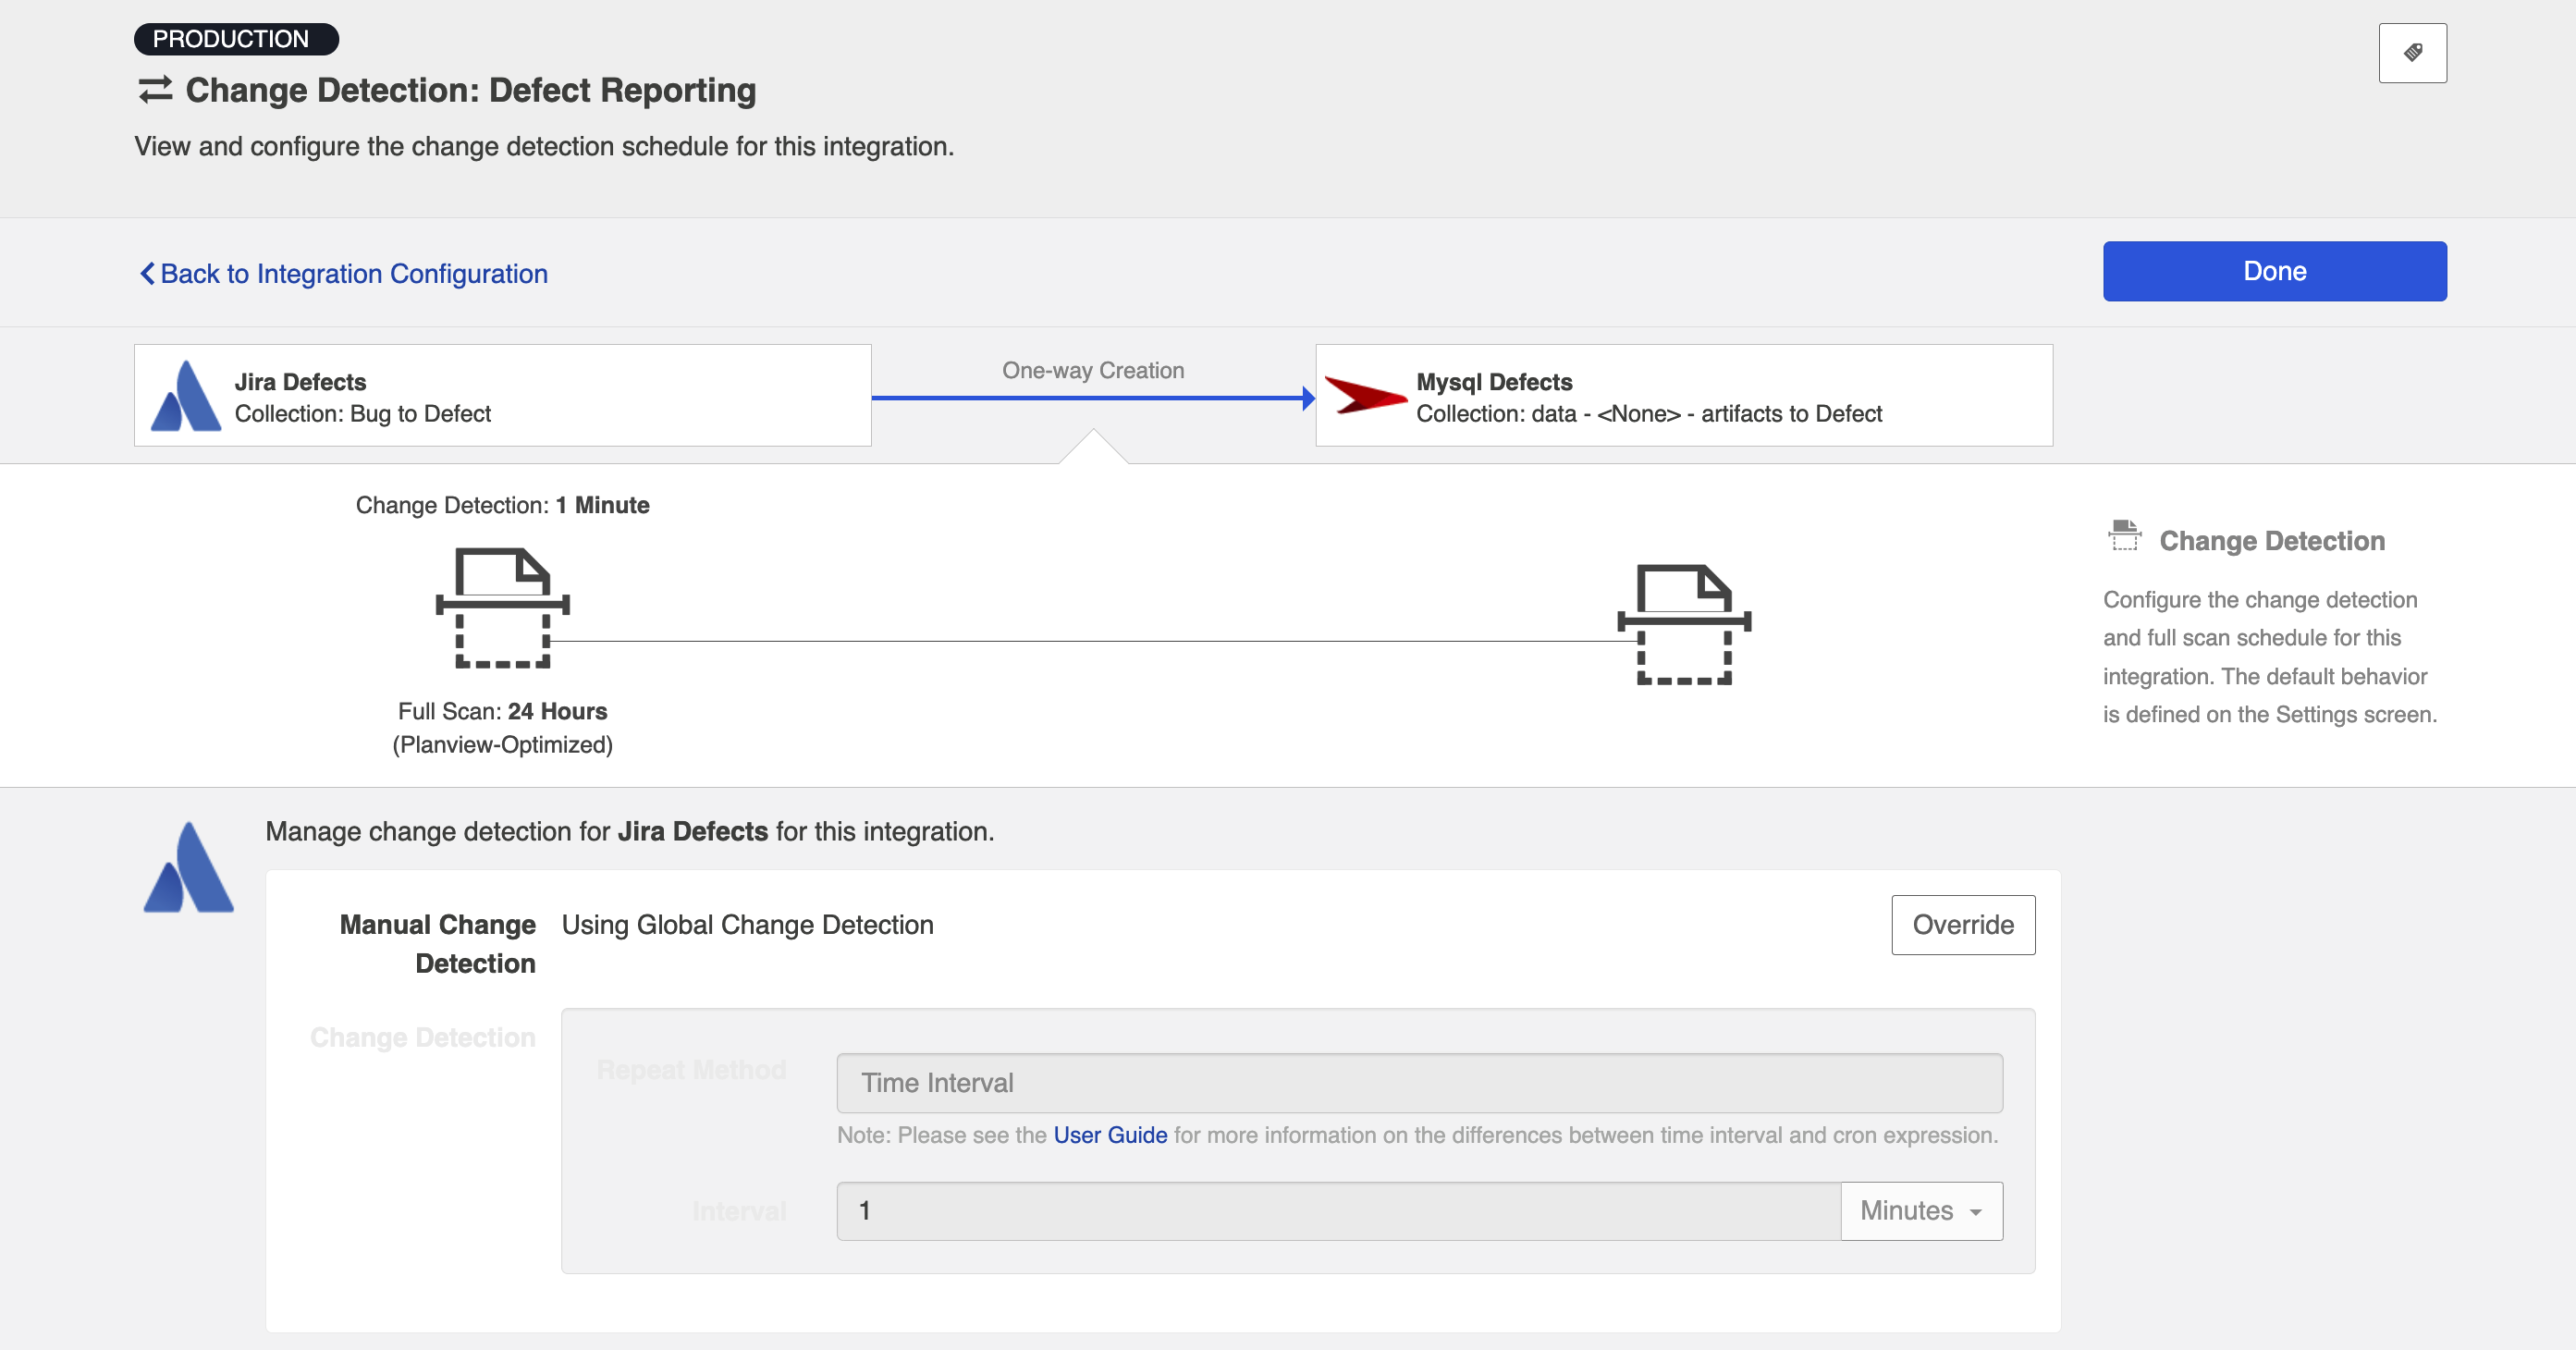
To override the current settings, click the Override button. This will allow you to set a custom change detection interval for the collection within the context of this integration. Note that these custom settings will only impact this integration; they will not impact other integrations that make use of the same collections.
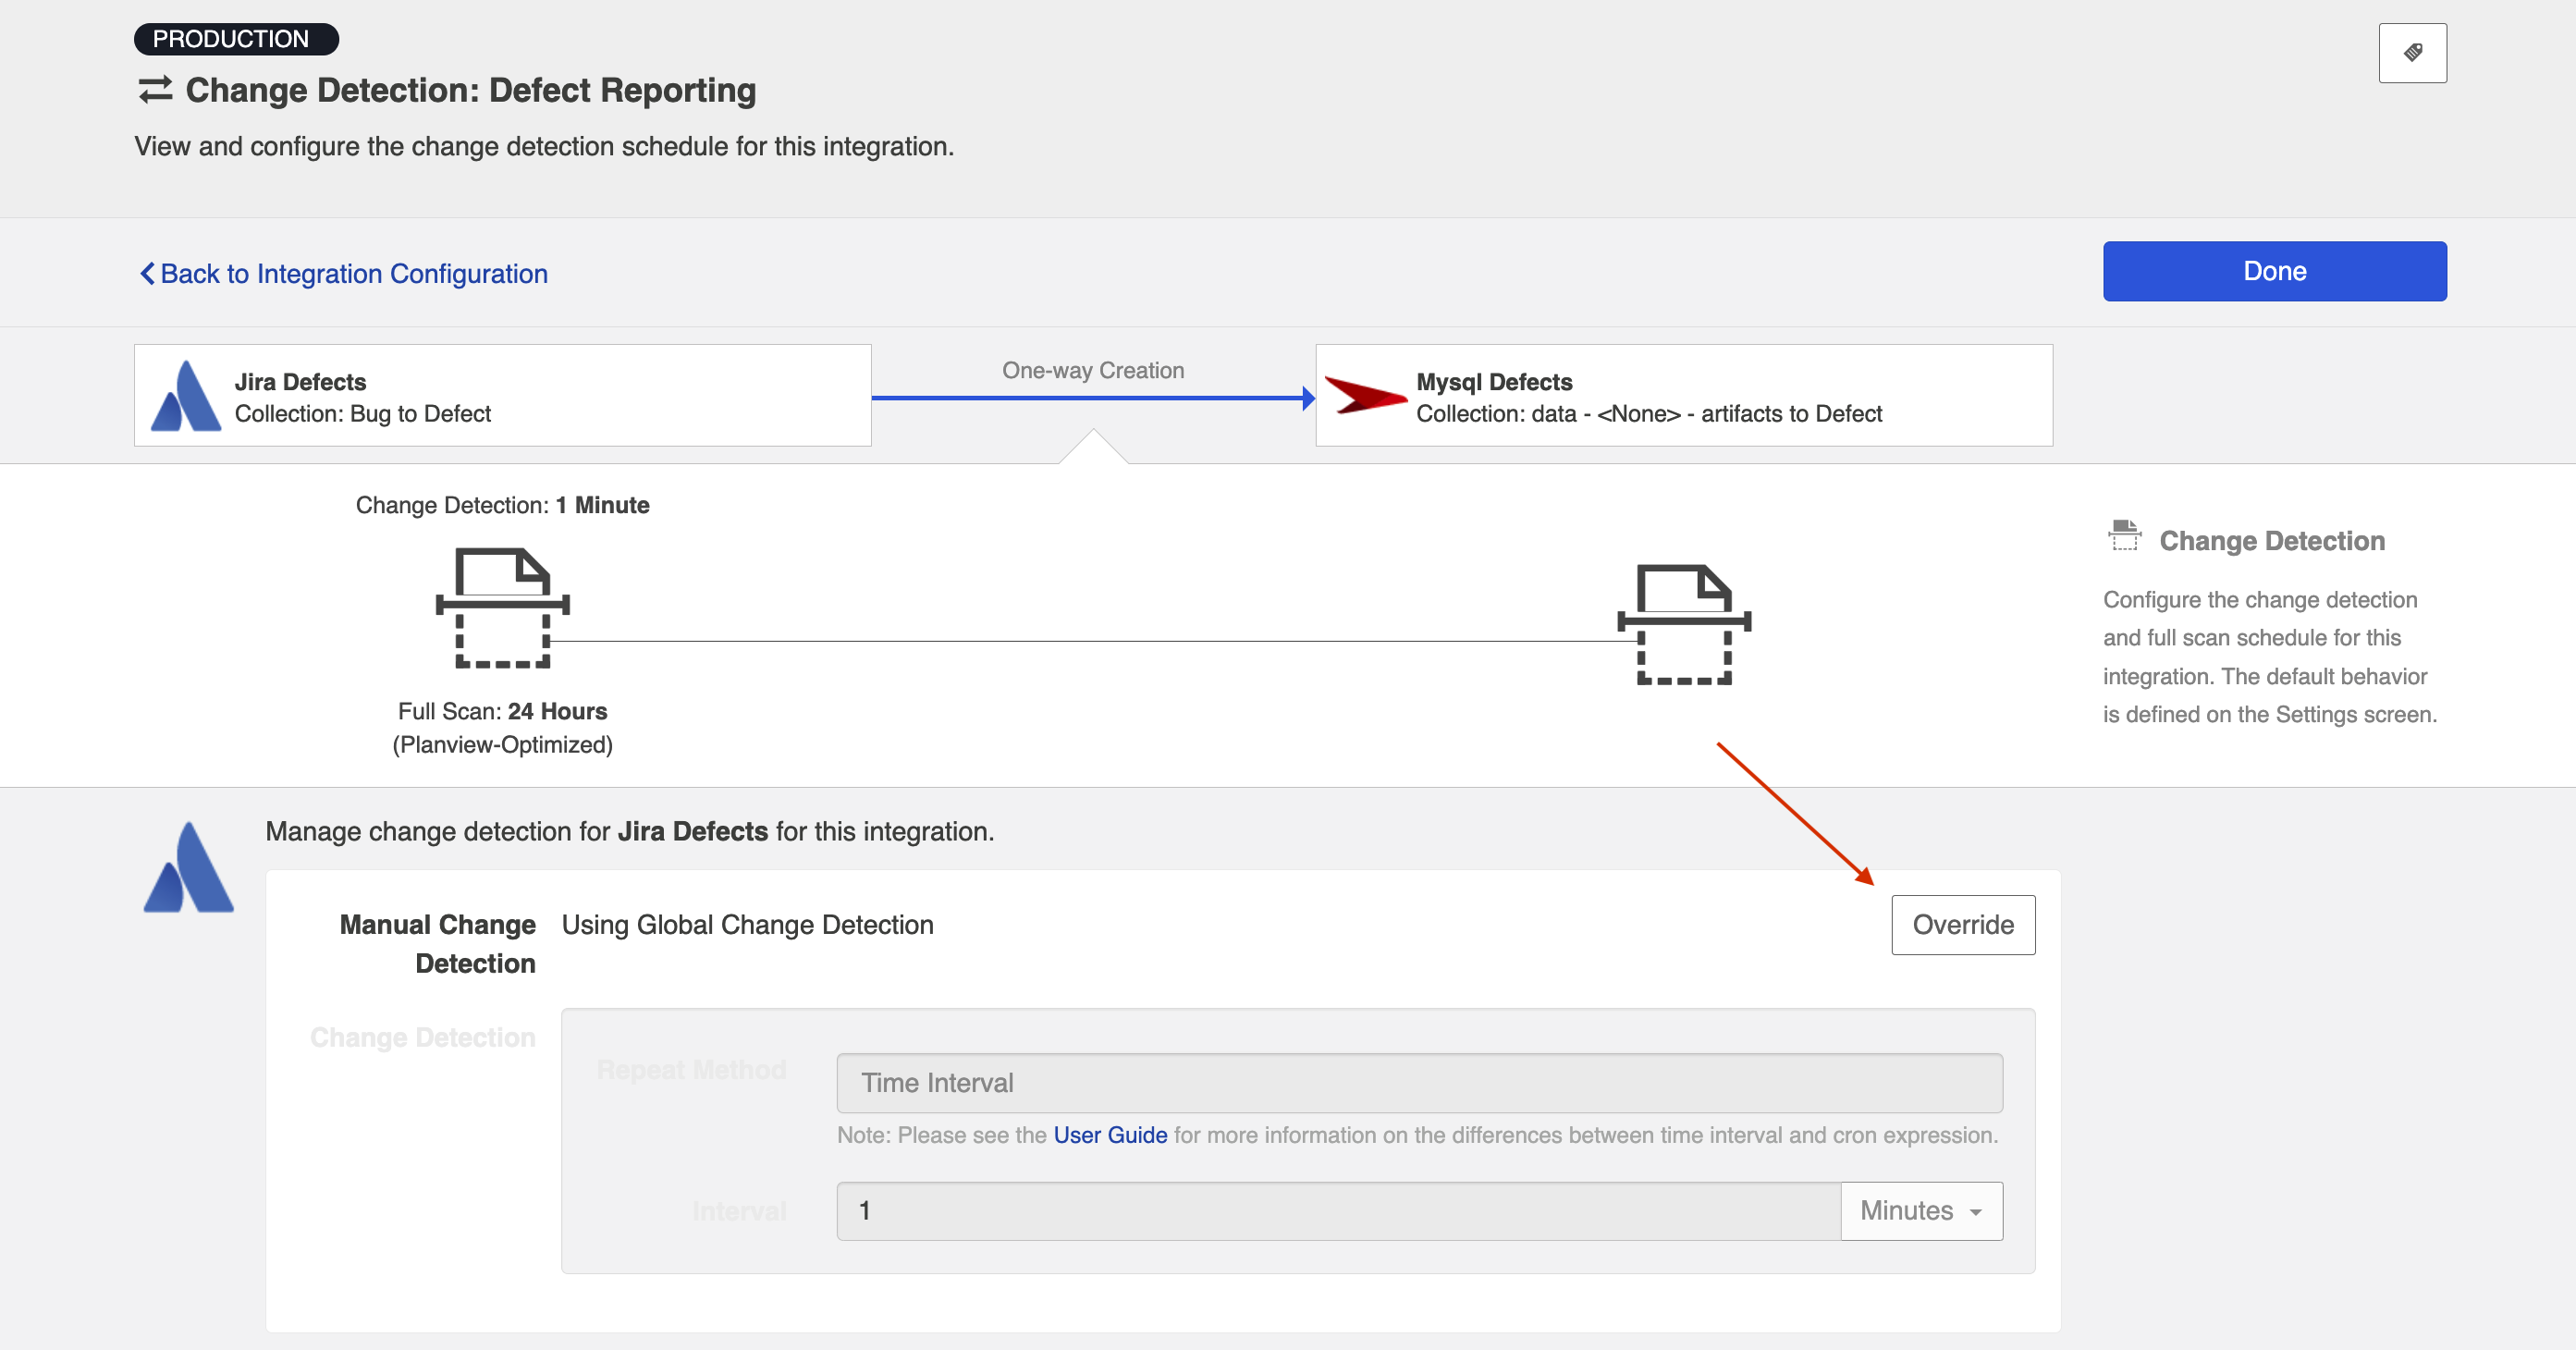
Once you click Override, you will be able to configure custom change detection intervals for the collection within the context of this integration.
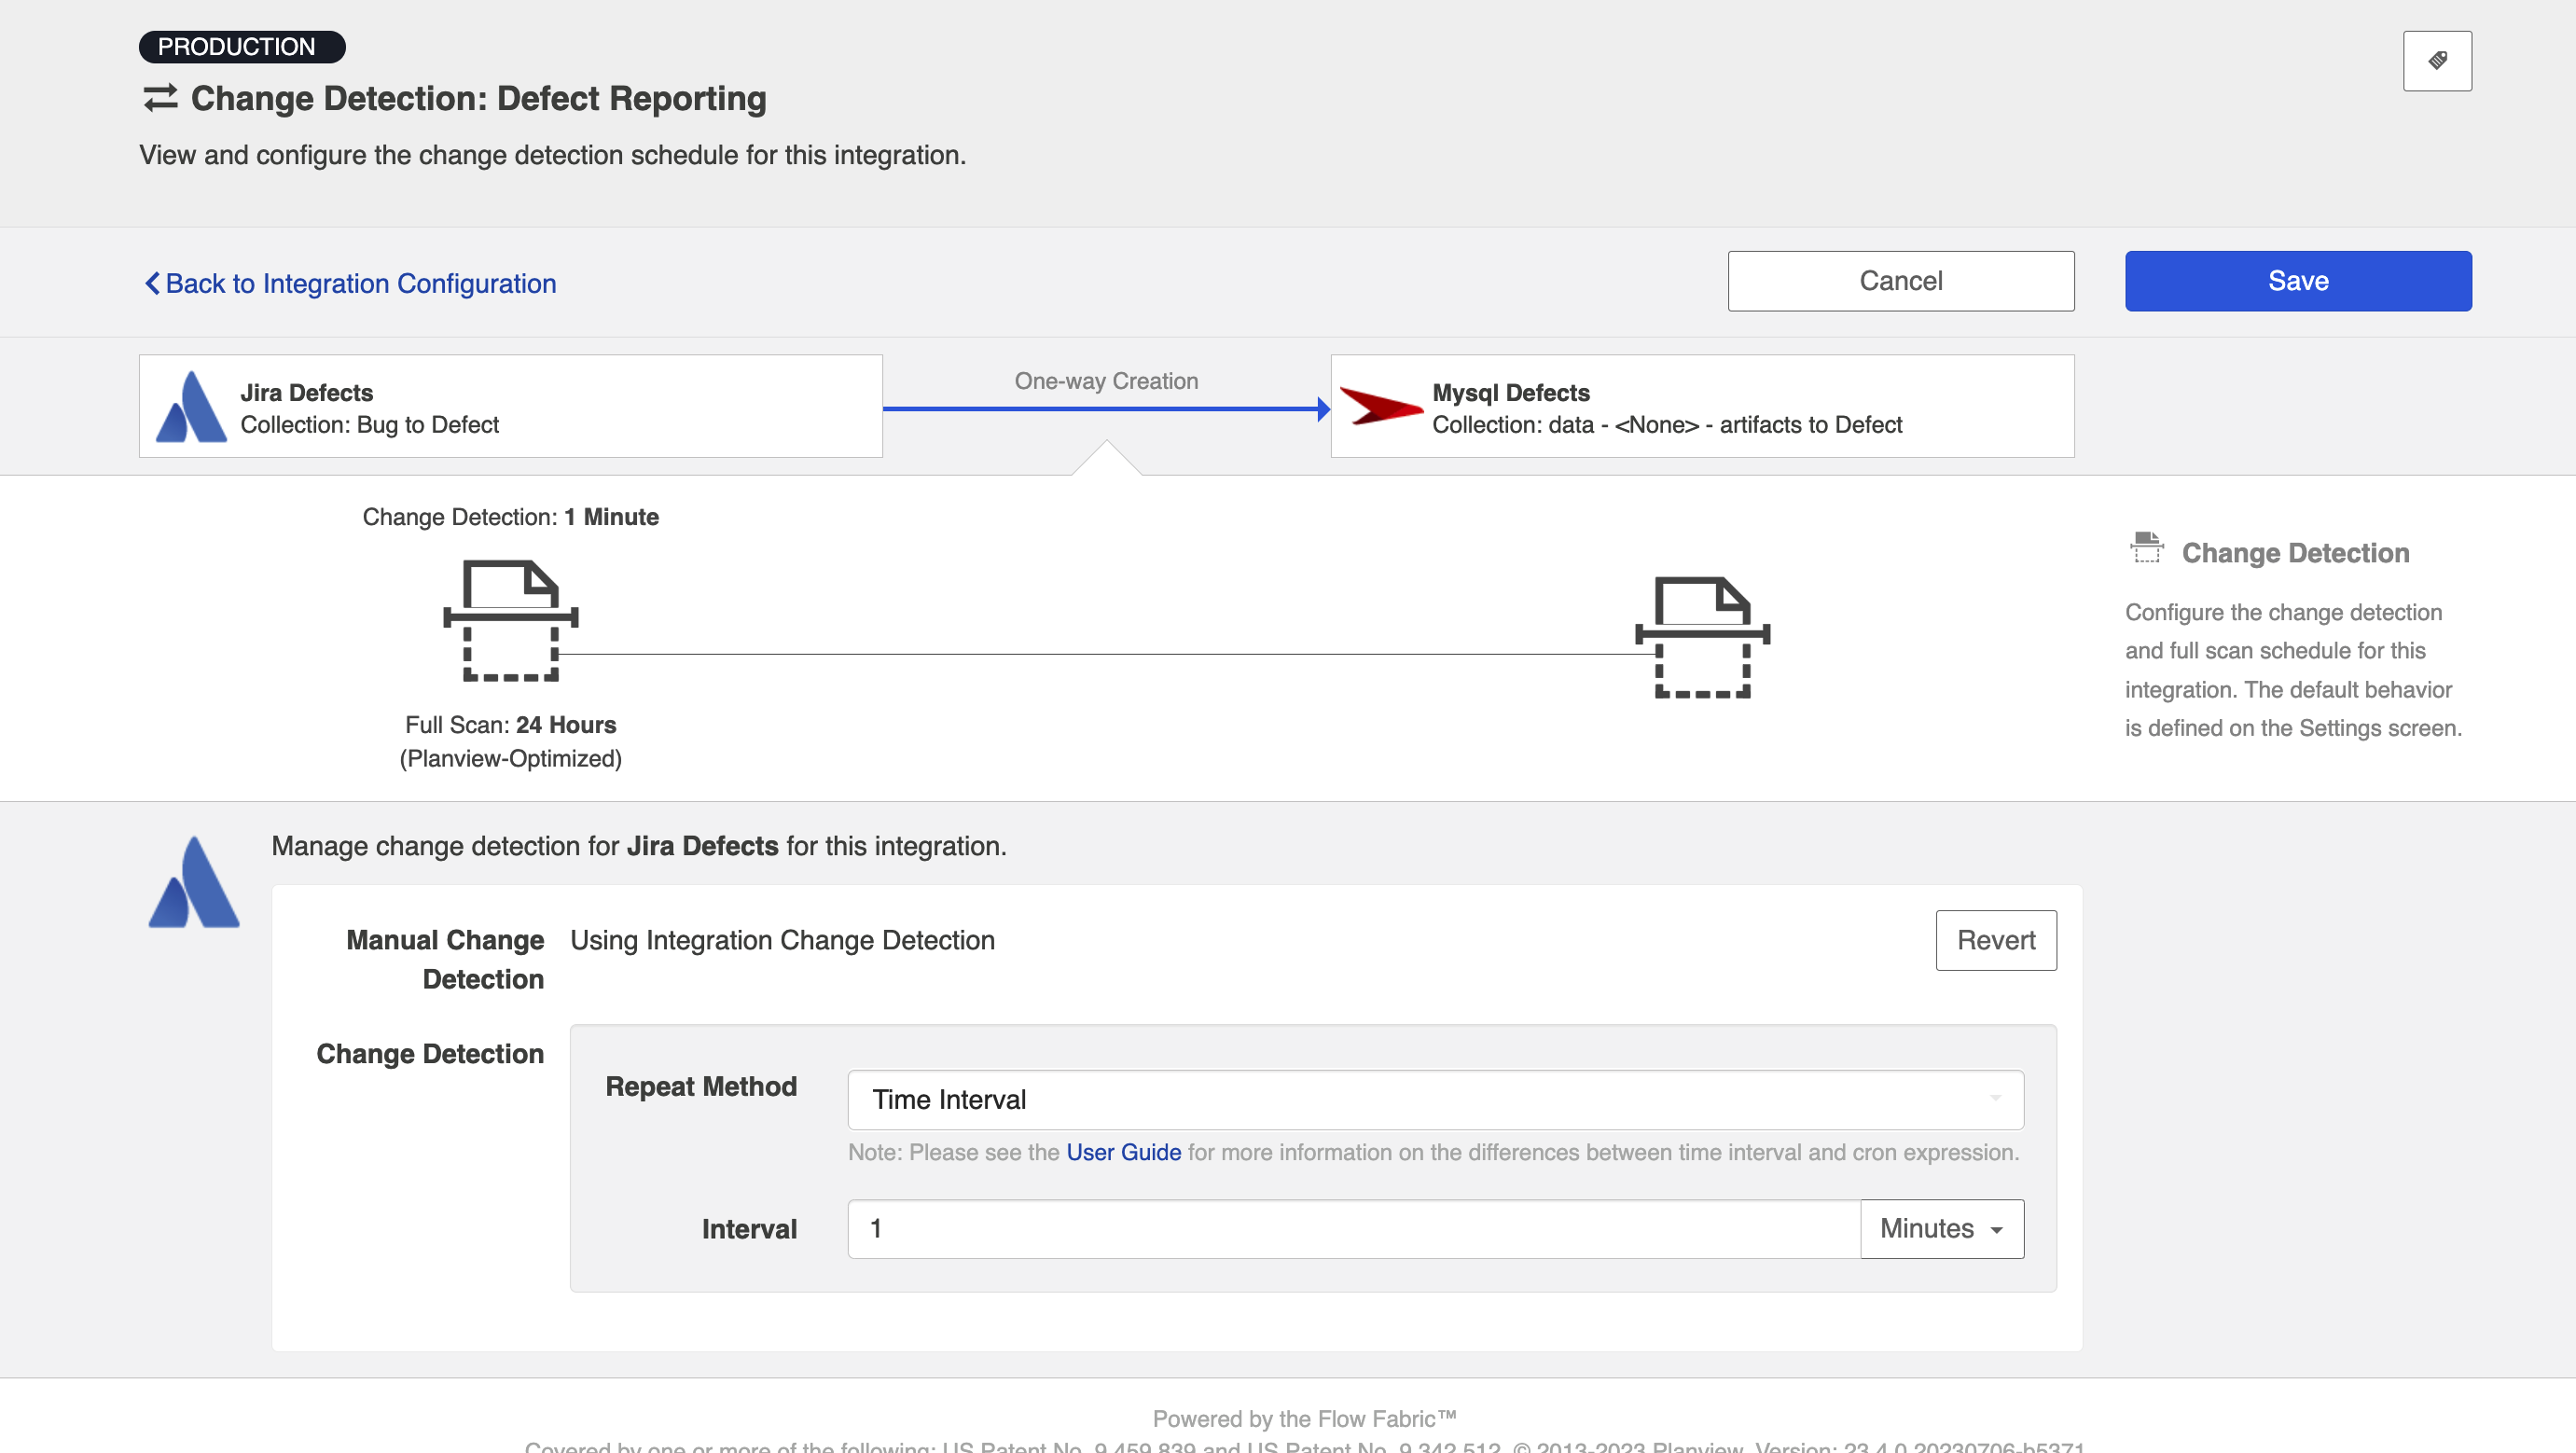
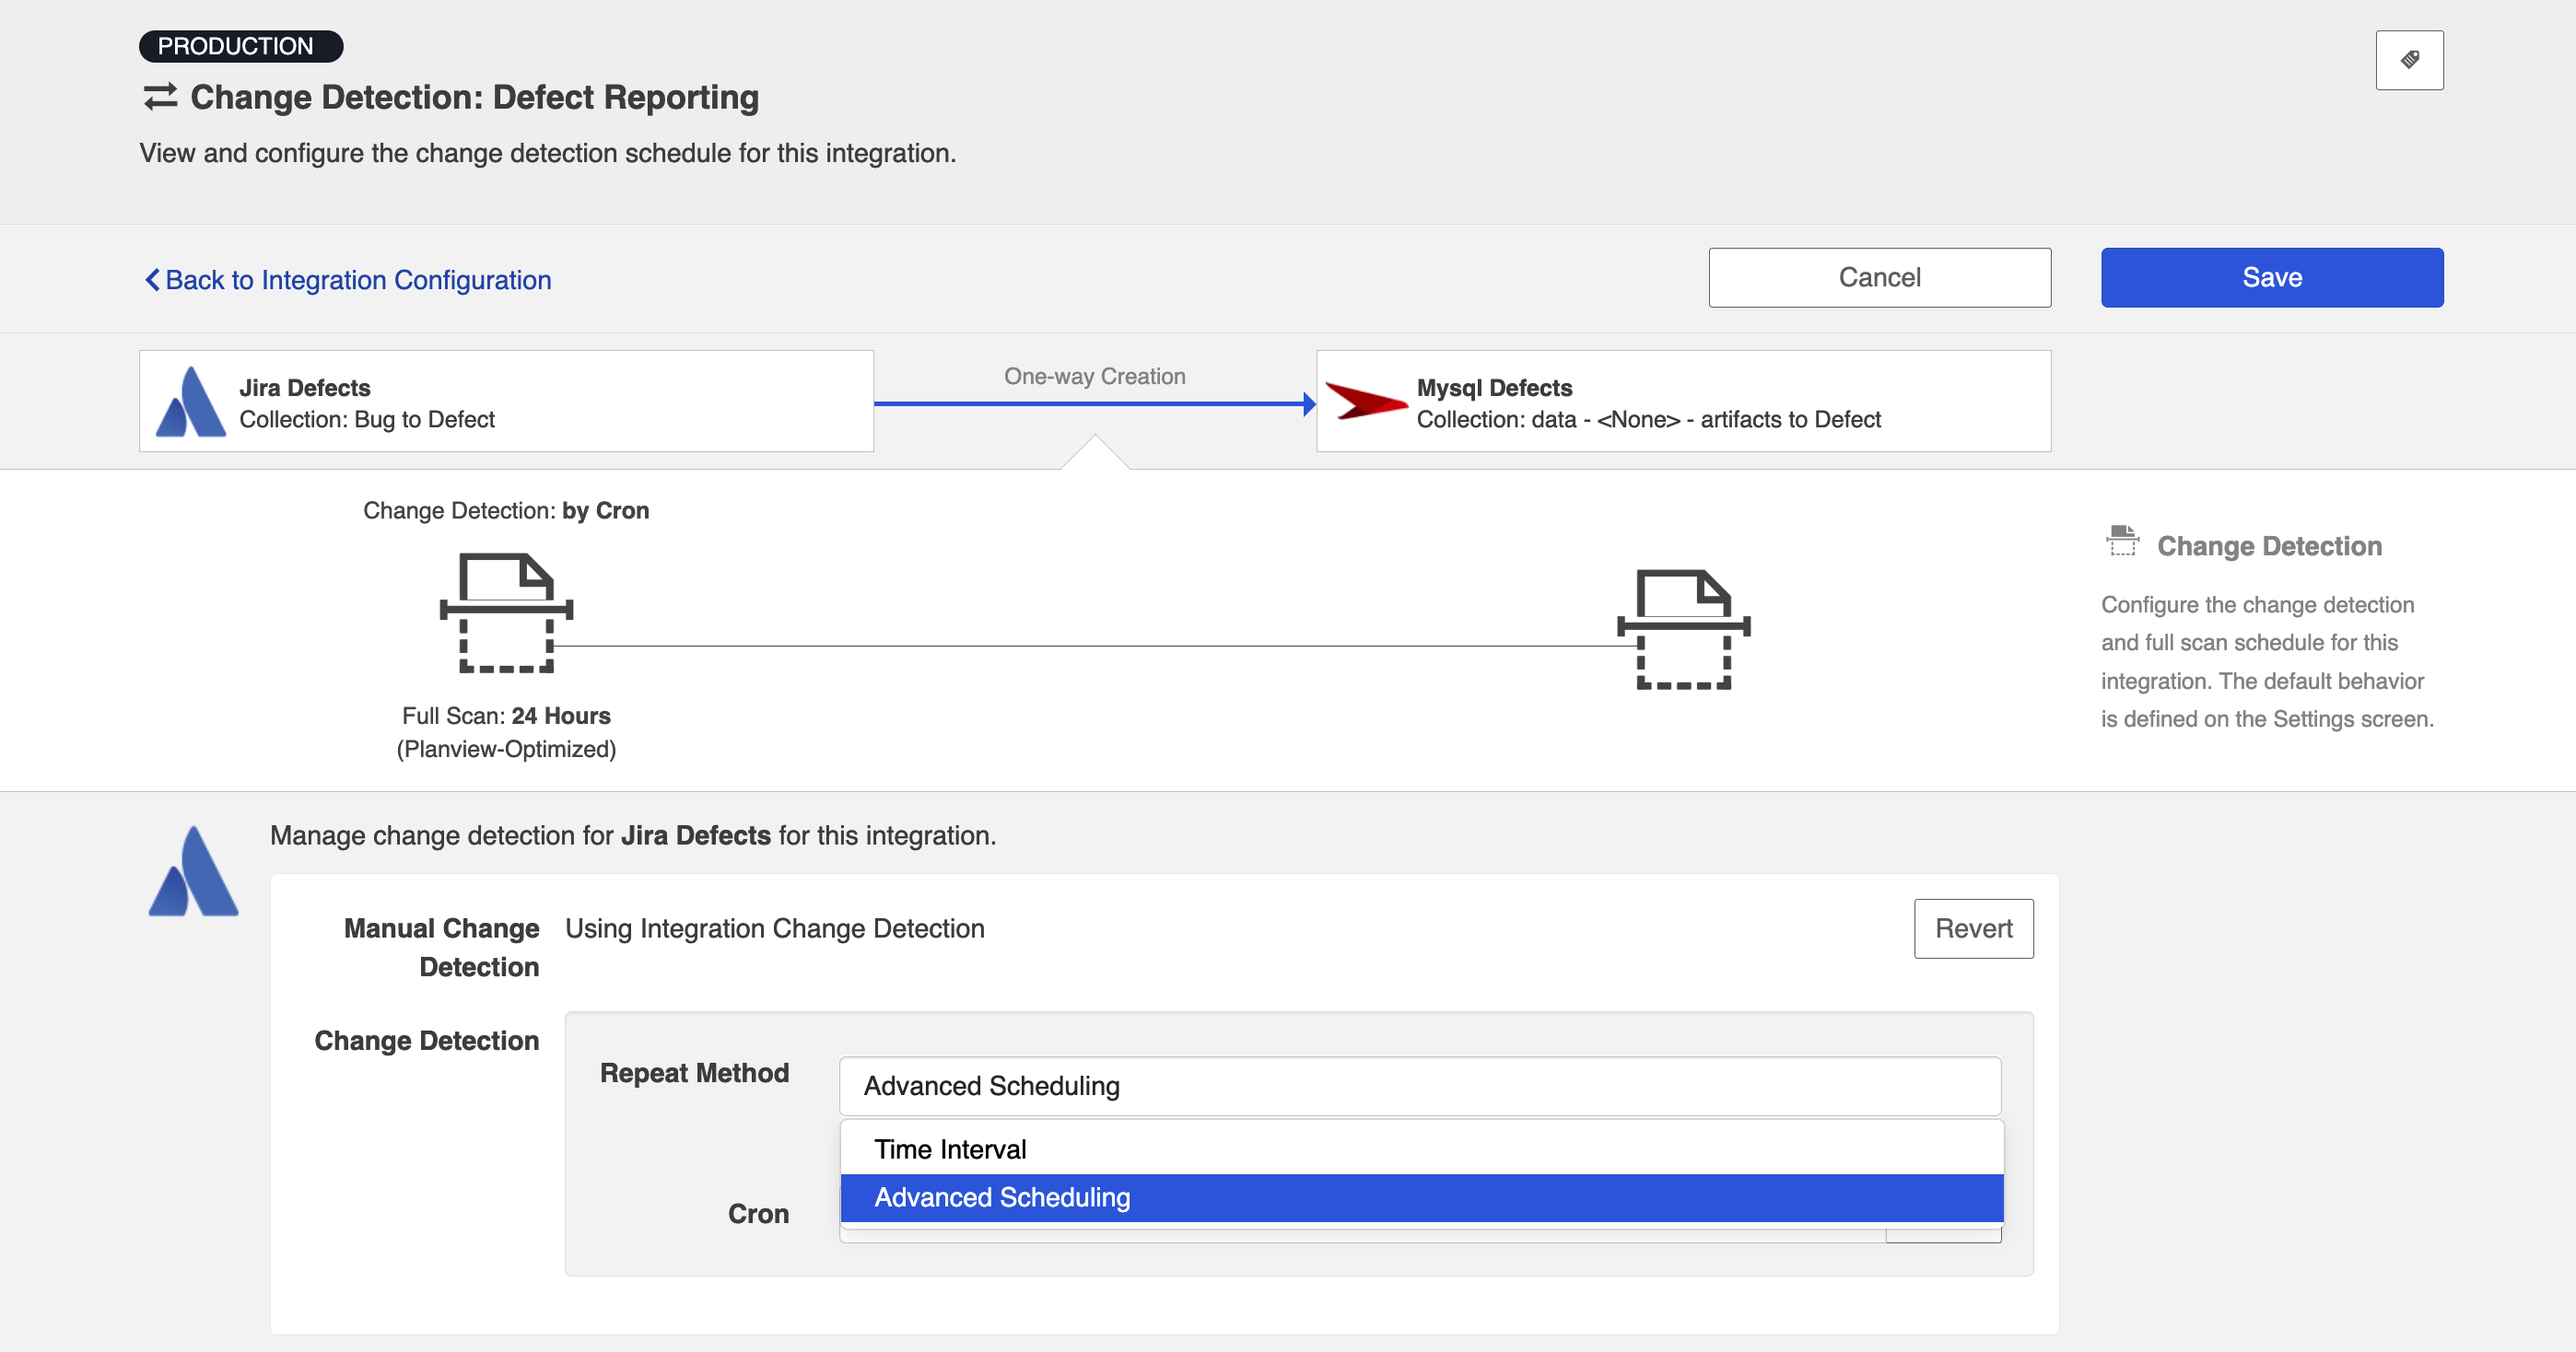
In addition to customizing change detection intervals, you can also schedule change detection using cron expression.
Using cron expression, you can configure complex schedules by running change detection during certain hours of the day, certain days of the week, or specific days of the month. Learn more in our FAQ here.
To utilize cron expression for change detection, select Advanced Scheduling in the Repeat Method field.
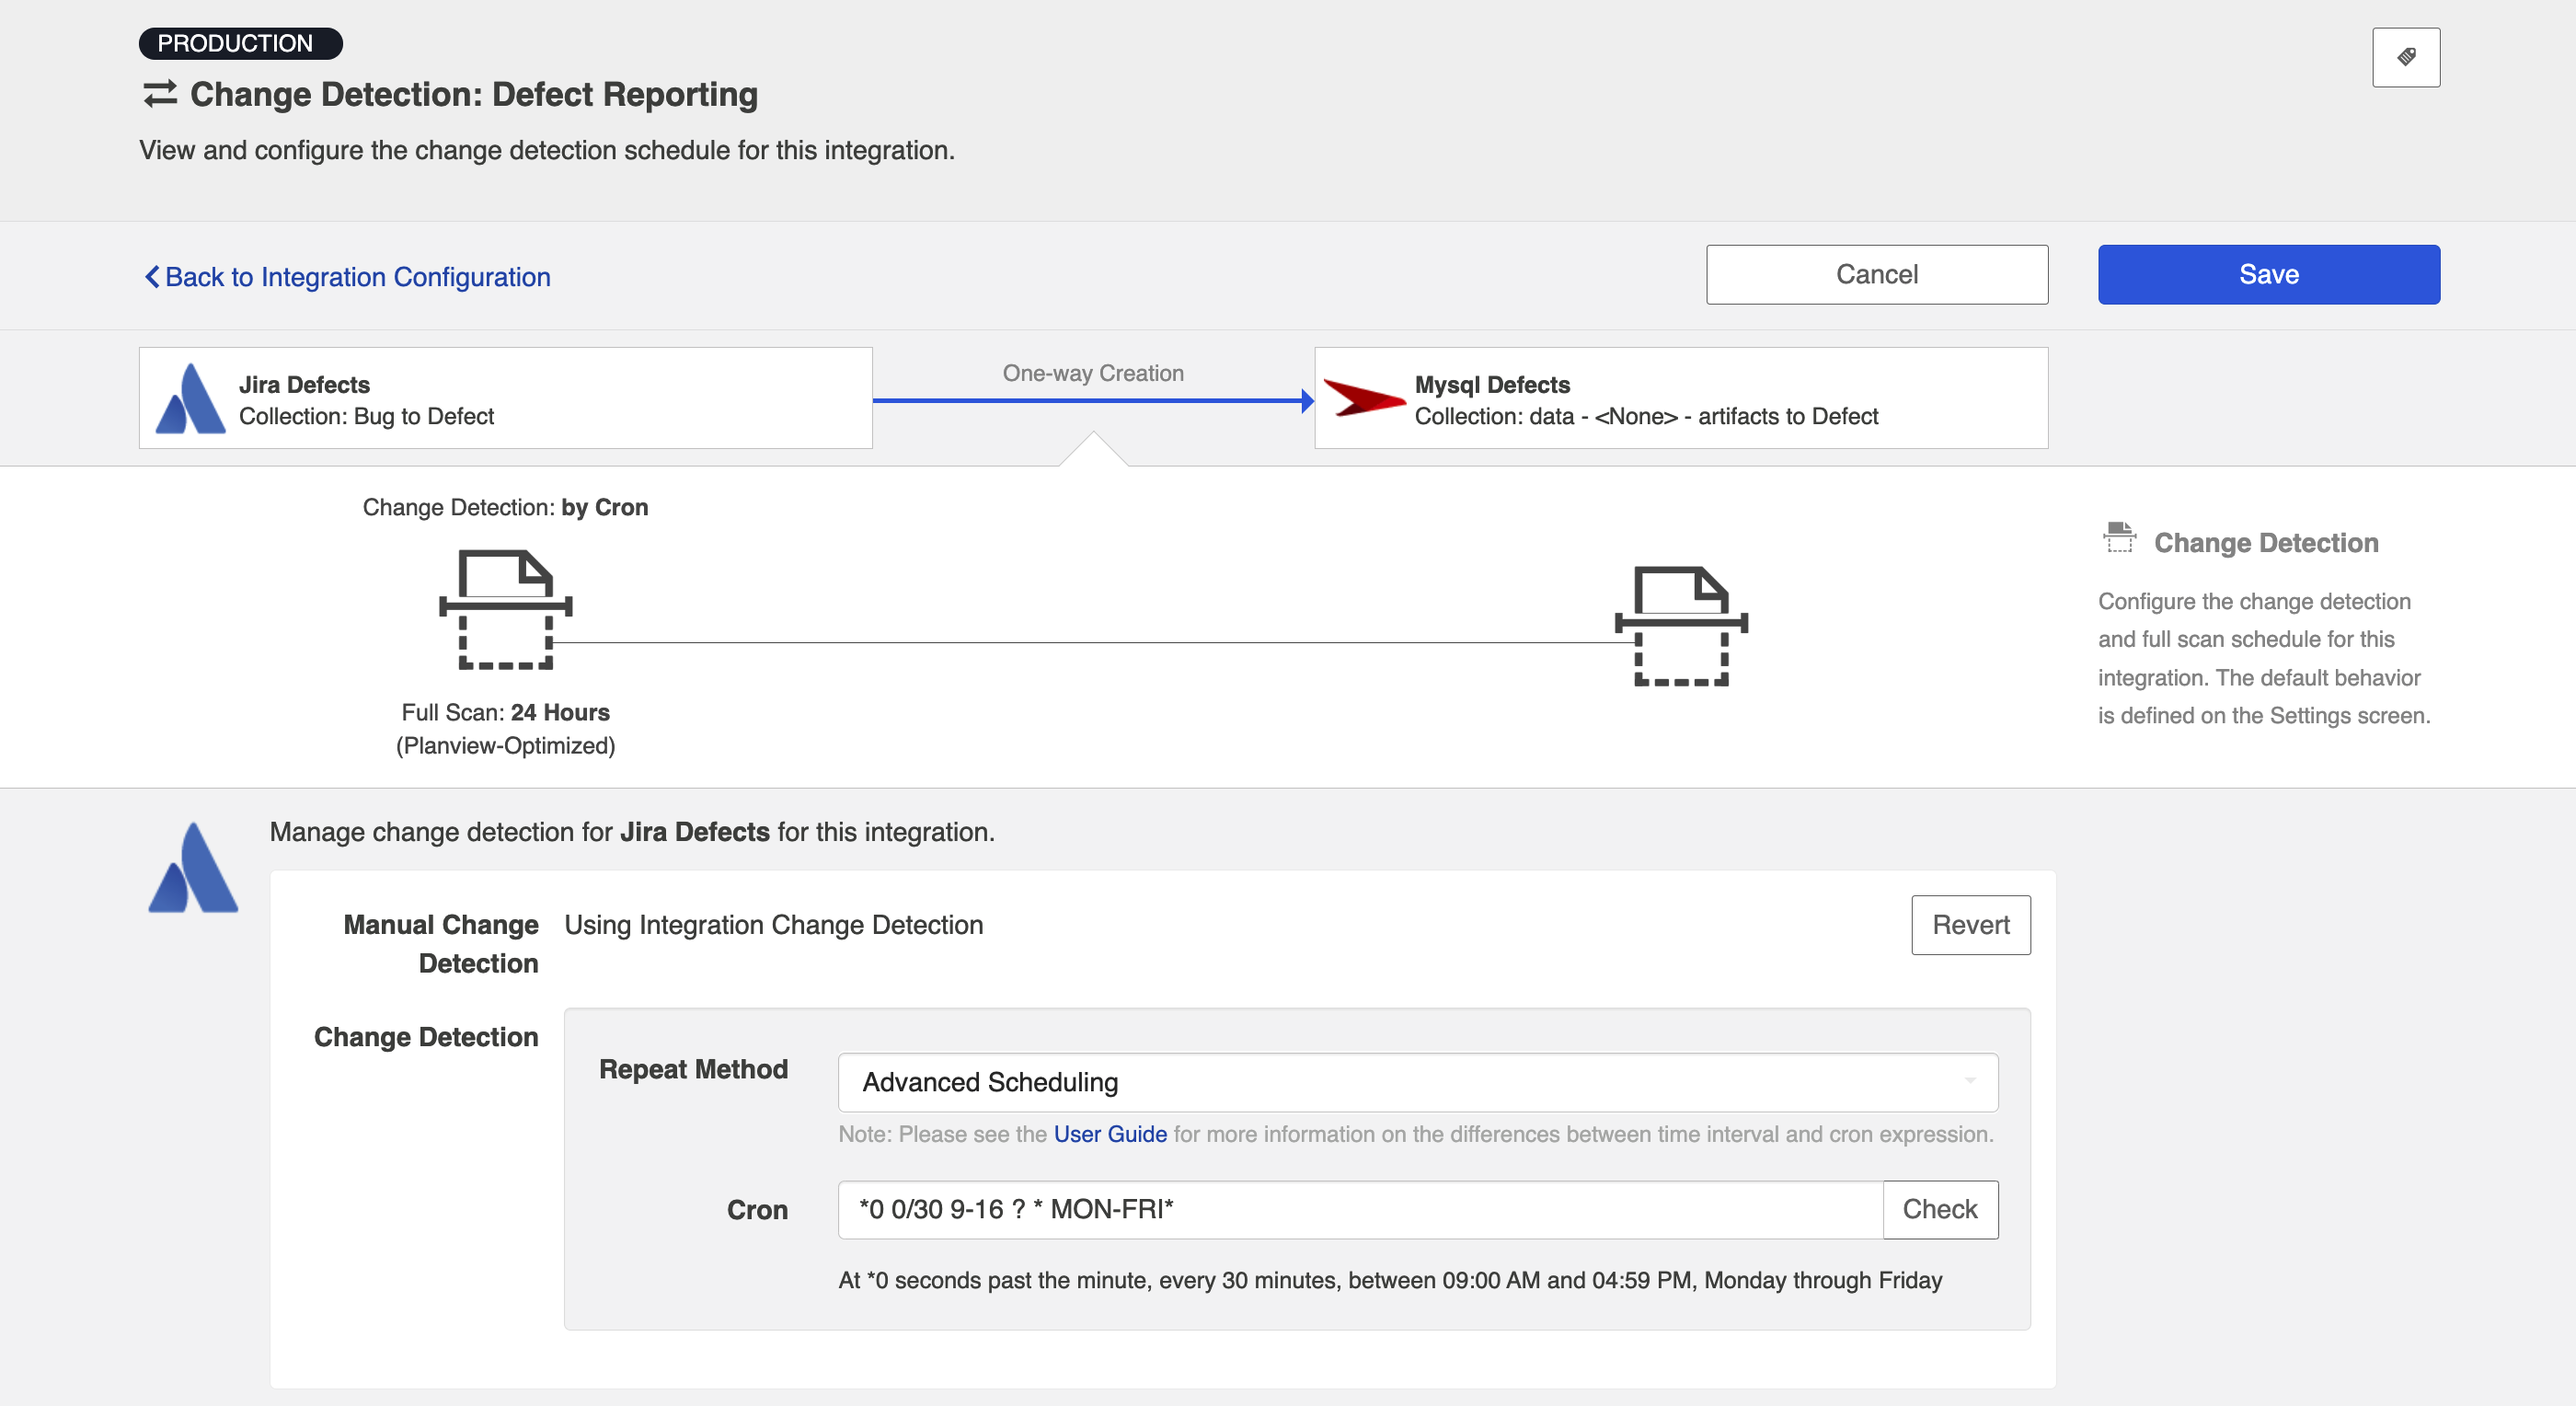
You can then enter the cron expression for your desired scheduling. For example, if you would like to run change detection every 30 minutes from 9am to 5pm from Monday through Friday, it would be written as follows: *0 0/30 9-16 ? * MON-FRI*
To ensure that your cron expression is valid, click the Check button. If valid, a readable form of the cron expression will be displayed. If the cron expression is invalid, an error message will appear.
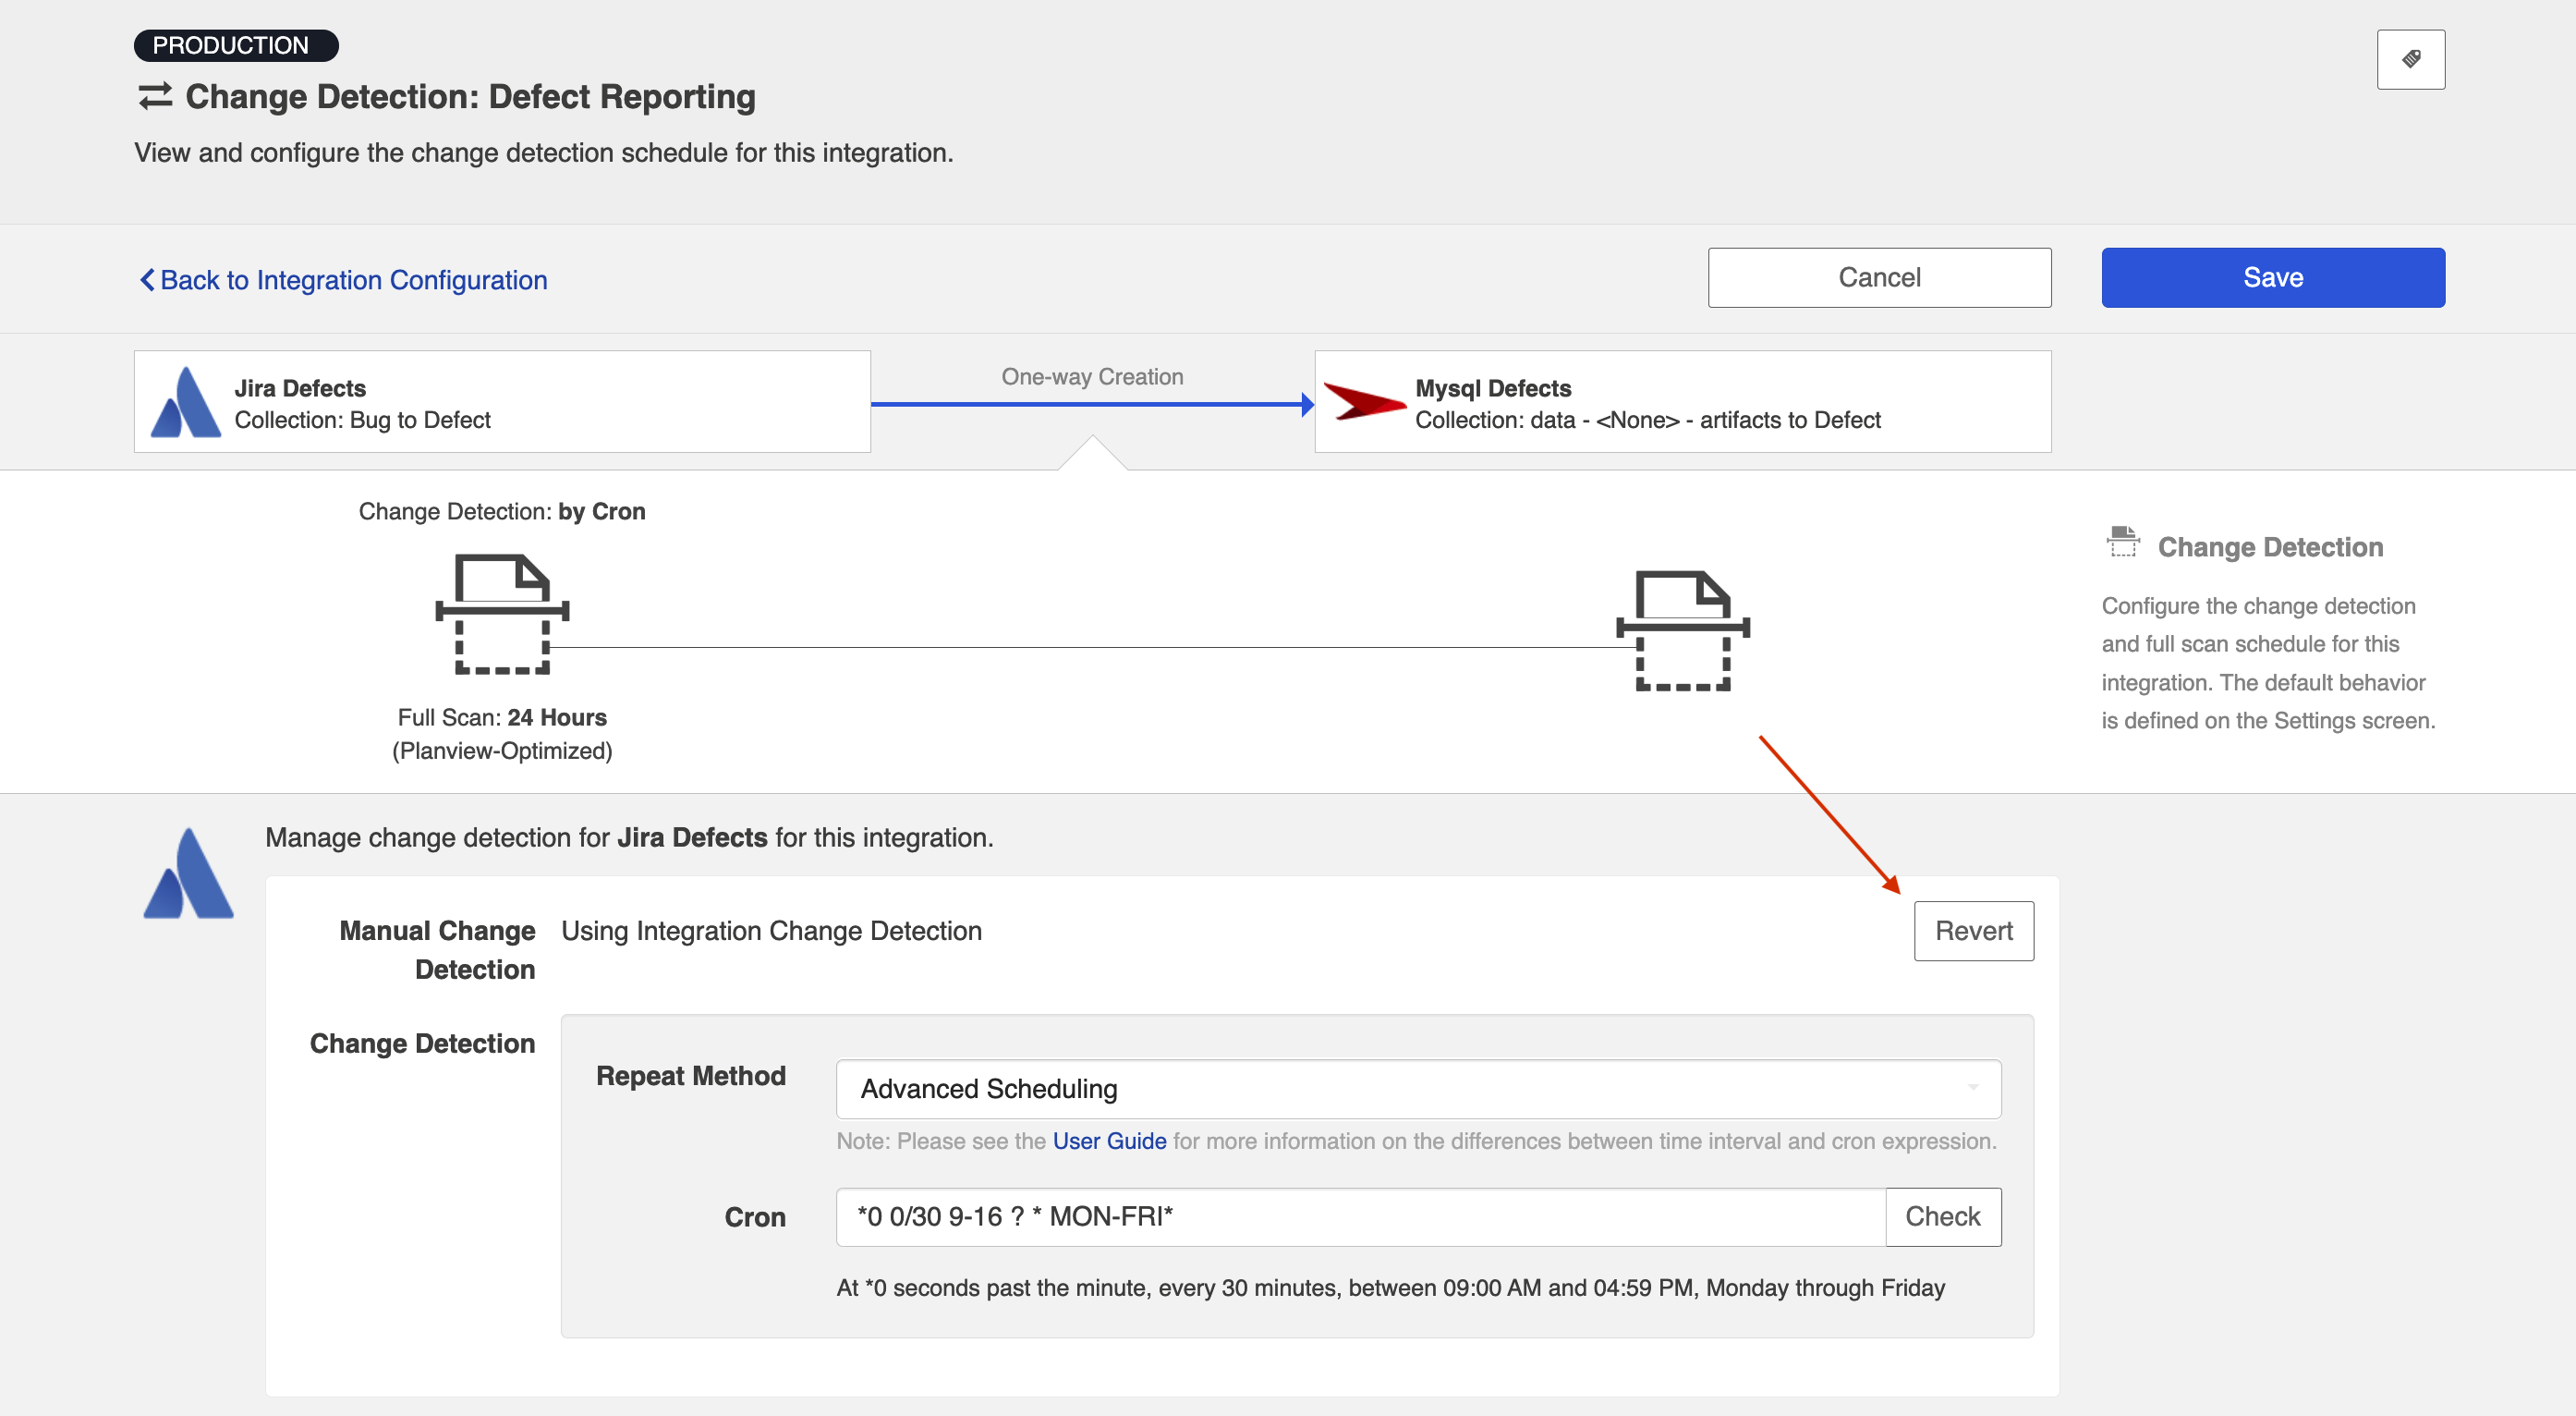
If you'd like to restore the global change detection settings, simply click the Revert button to remove the custom settings.
Once you've updated the change detection settings as desired, click Save and Done to save your changes.

Running your Integration
Please be aware that integrations will trigger changes in your database and that misconfiguration can cause items to be duplicated or updated in unexpected ways. Additionally, there is no 'undo' in Hub or the database. If you have any questions, please customer care.
There are two ways to start or stop your integration:
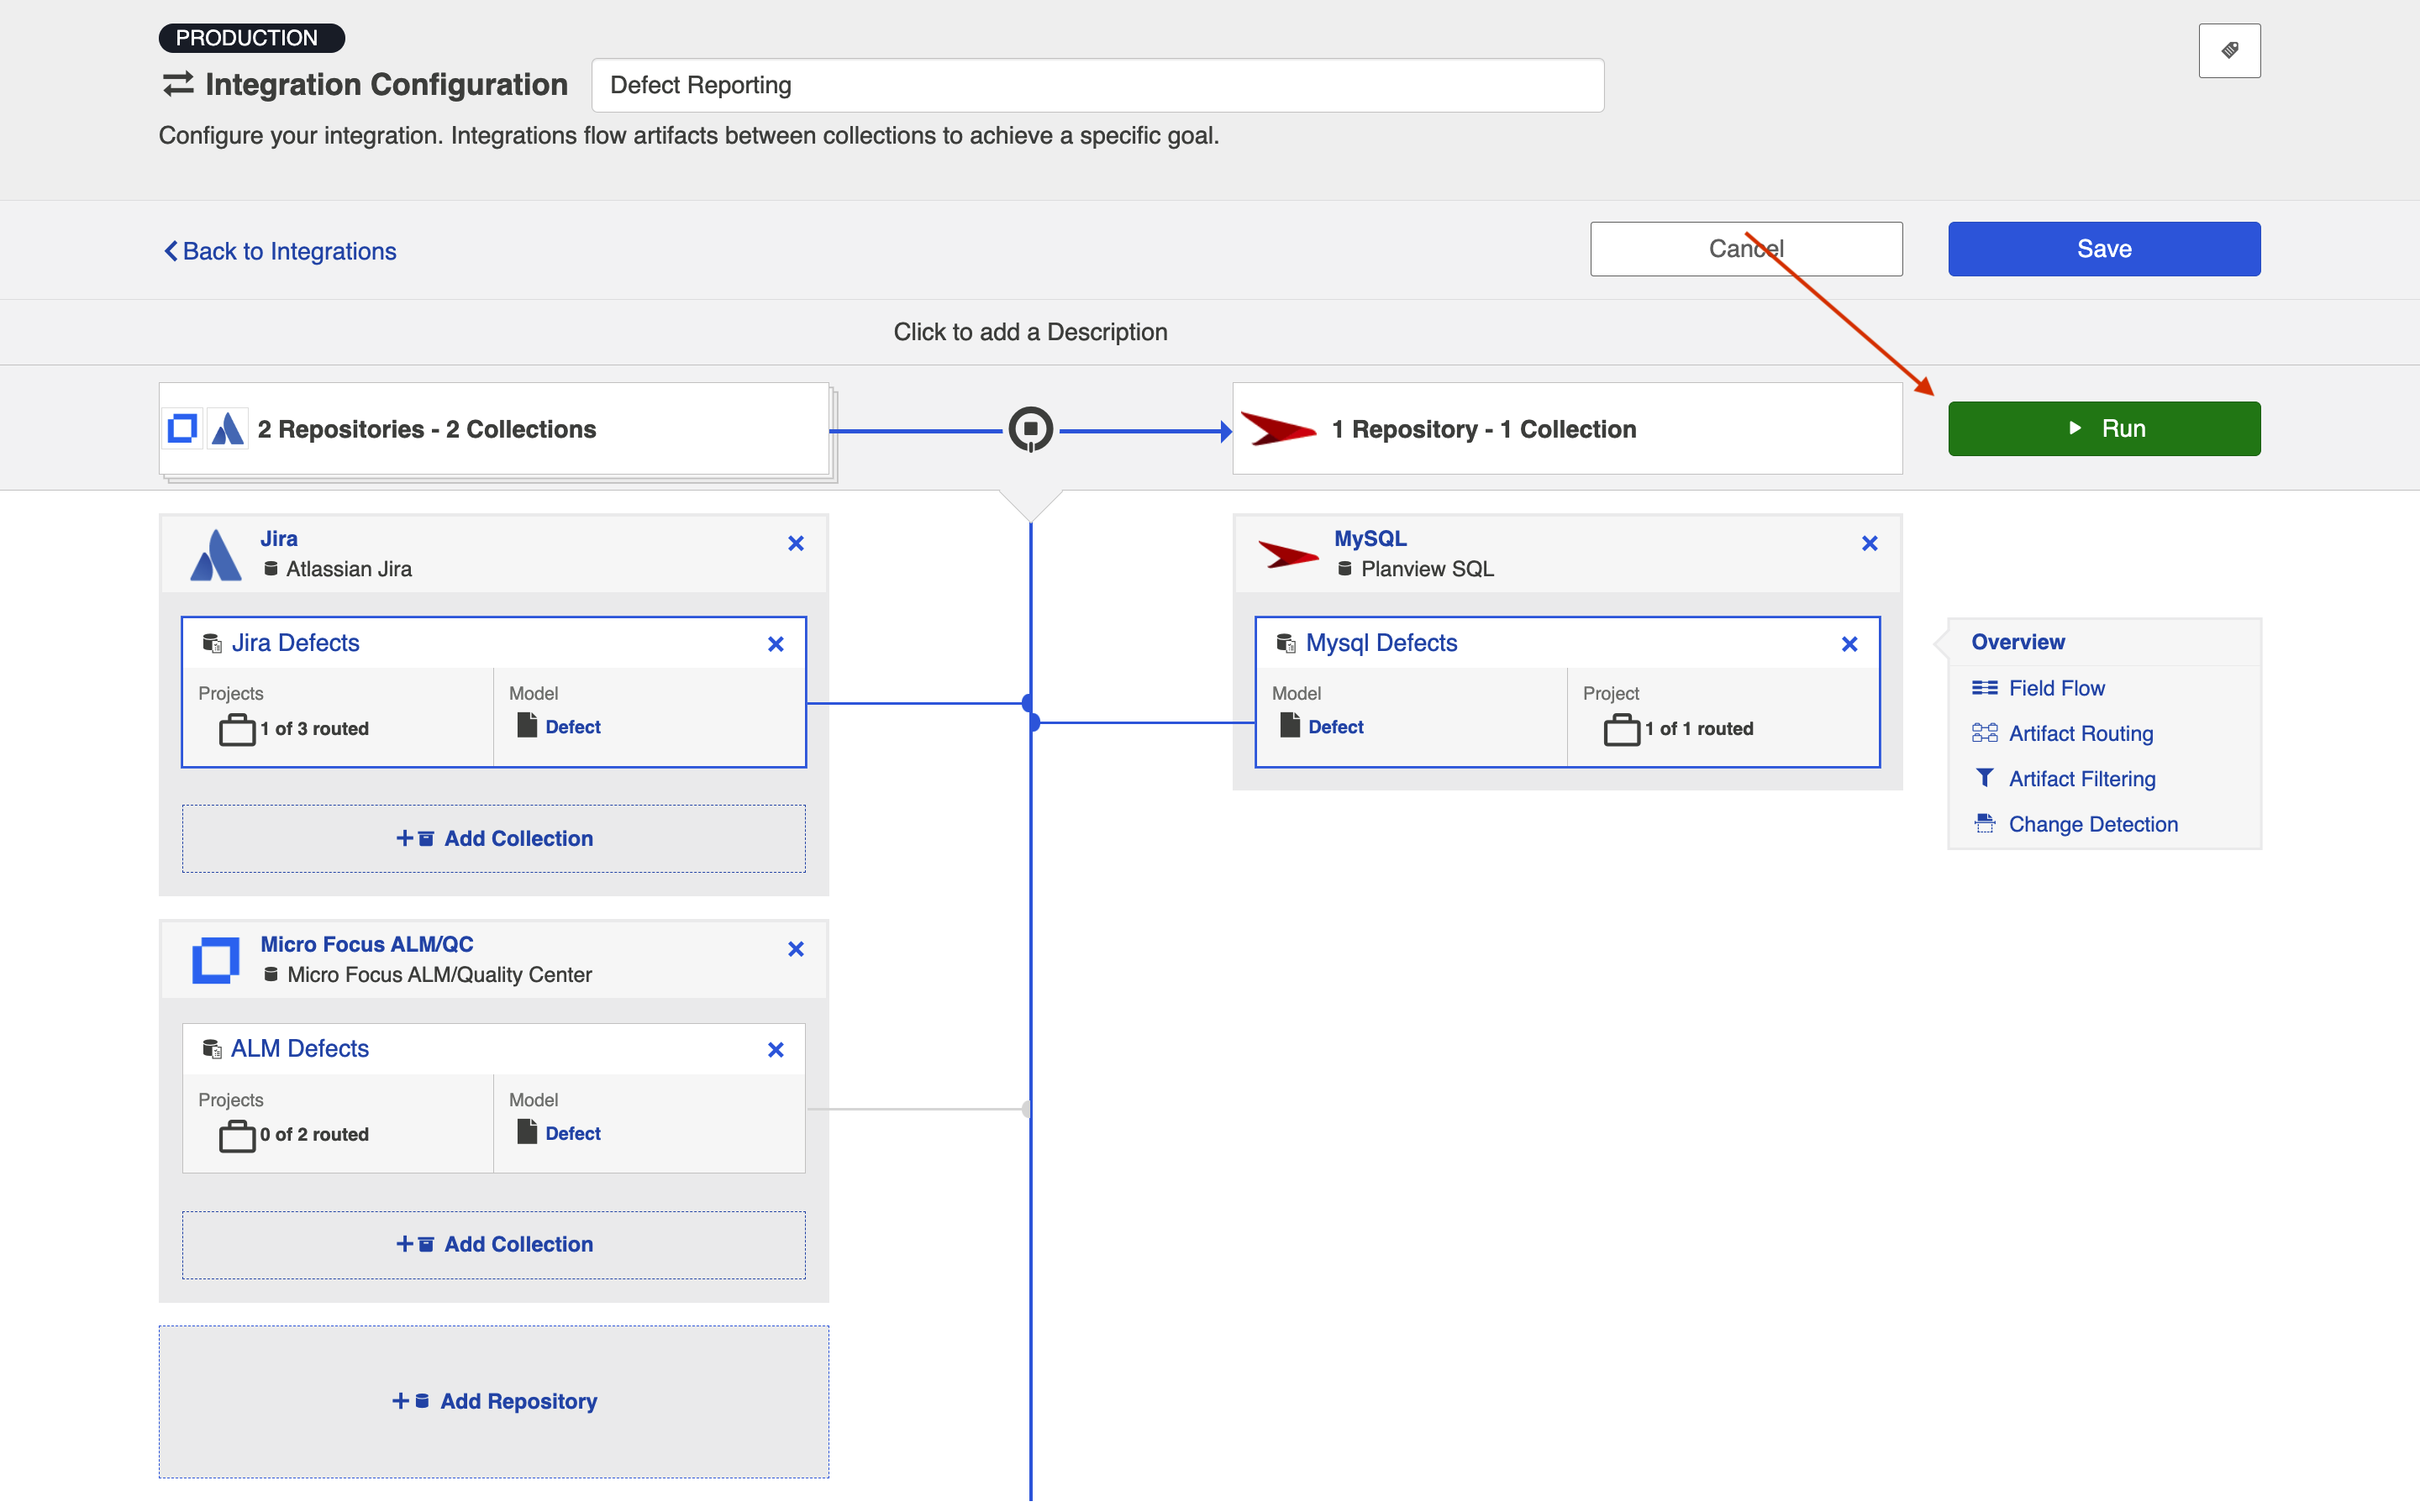
From the Integration Configuration Screen
Simply click the Run to run the integration, and the Stop button to stop the integration.

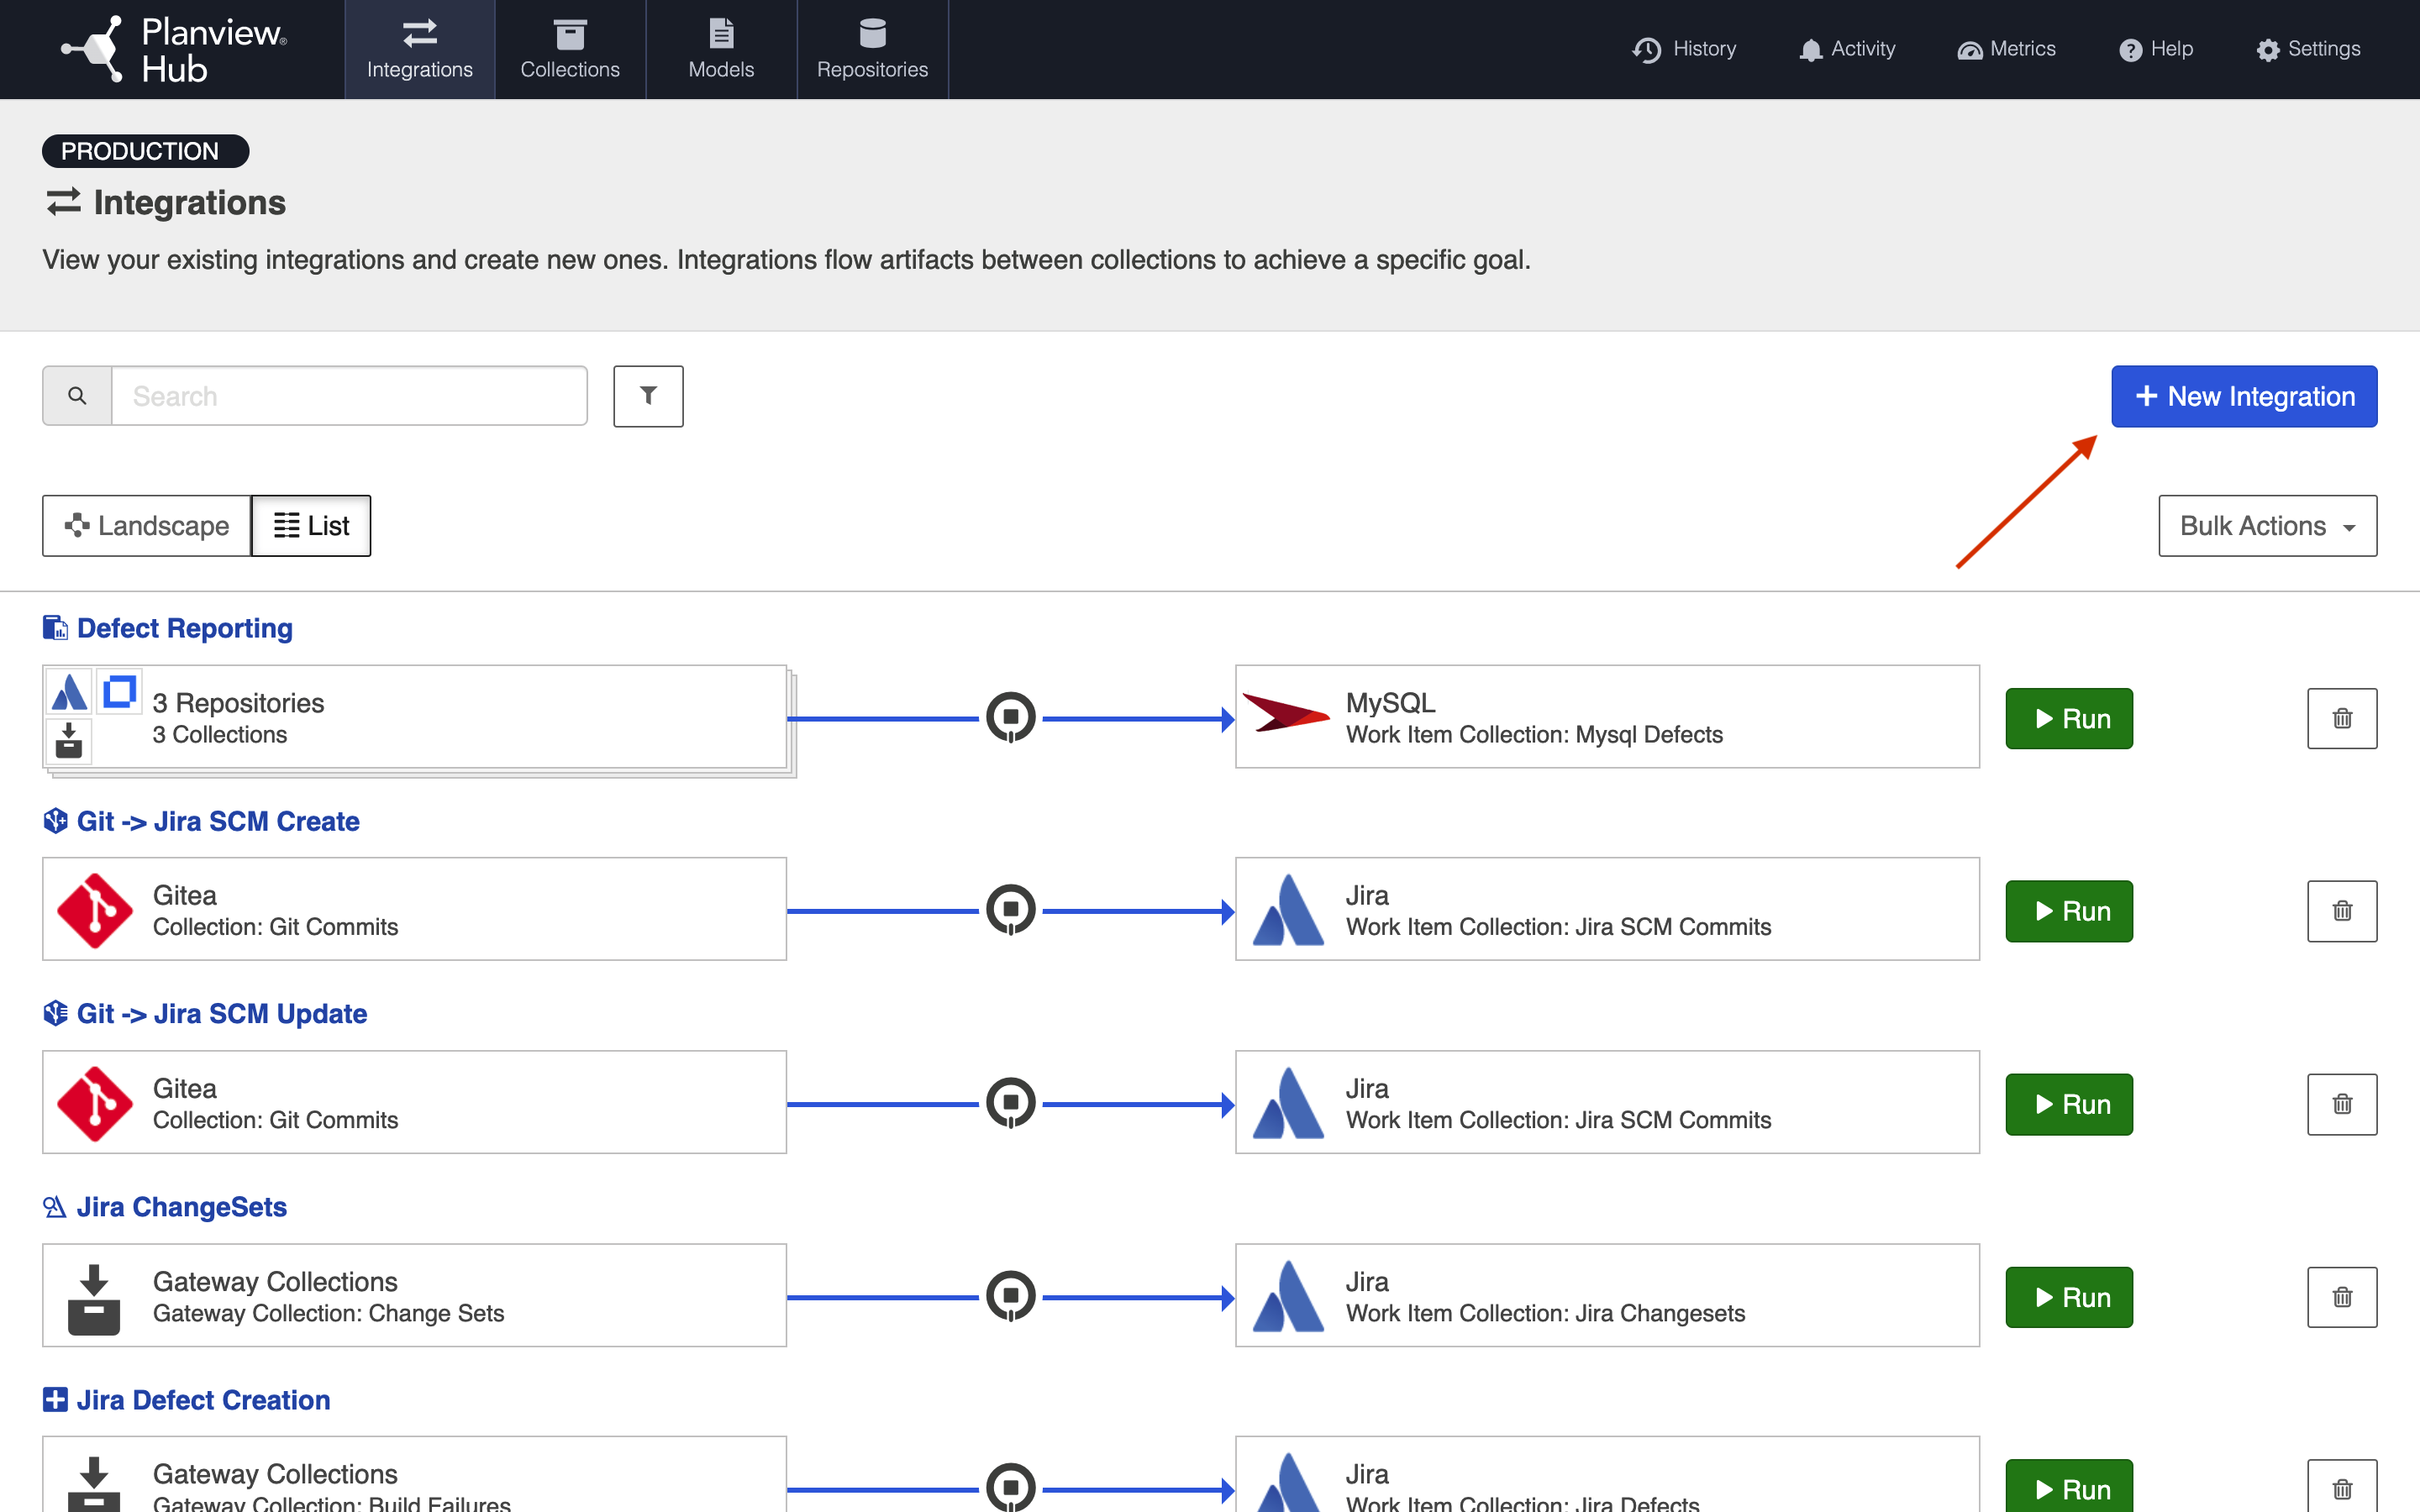
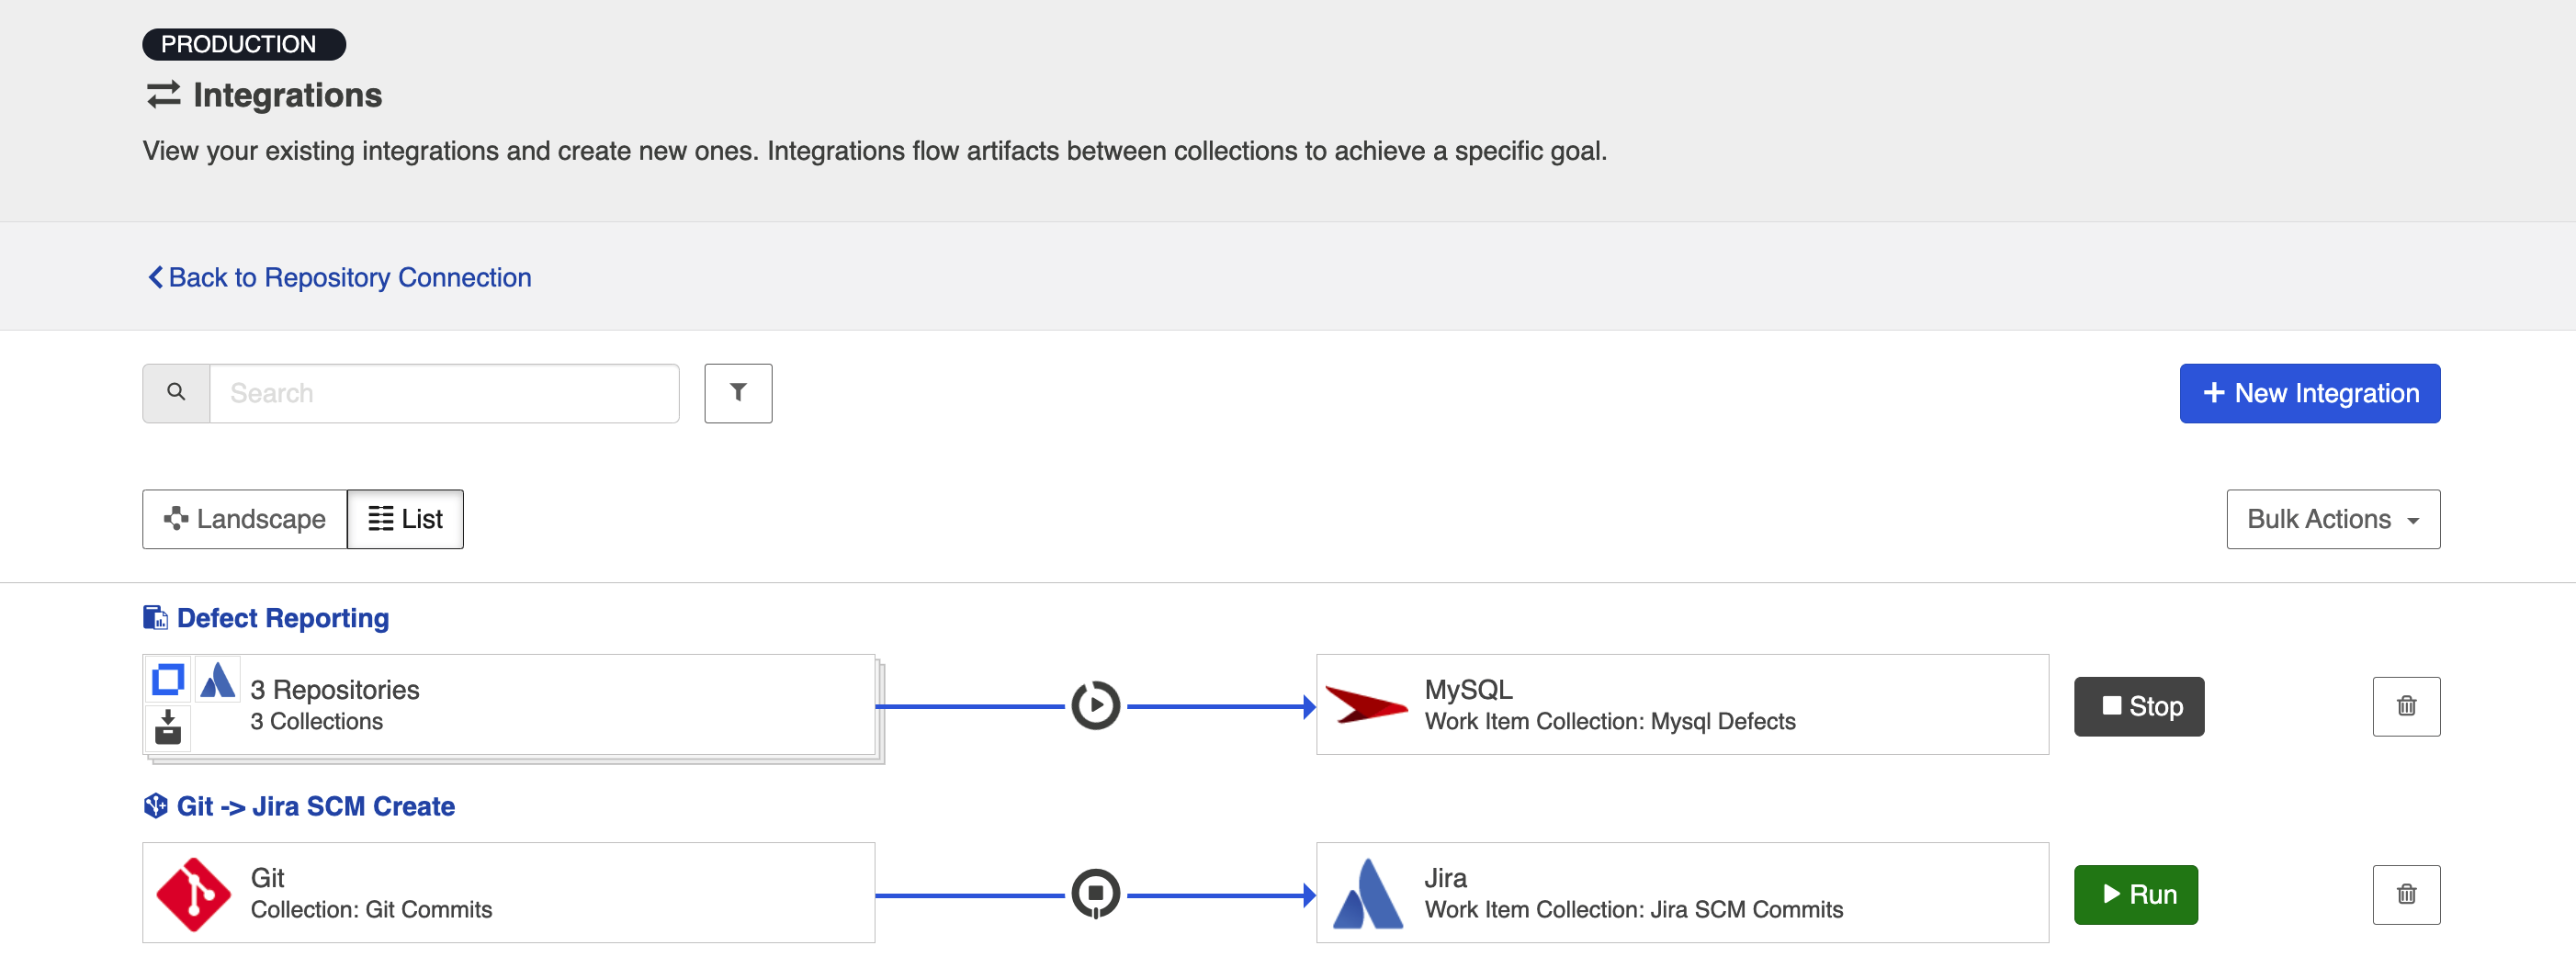
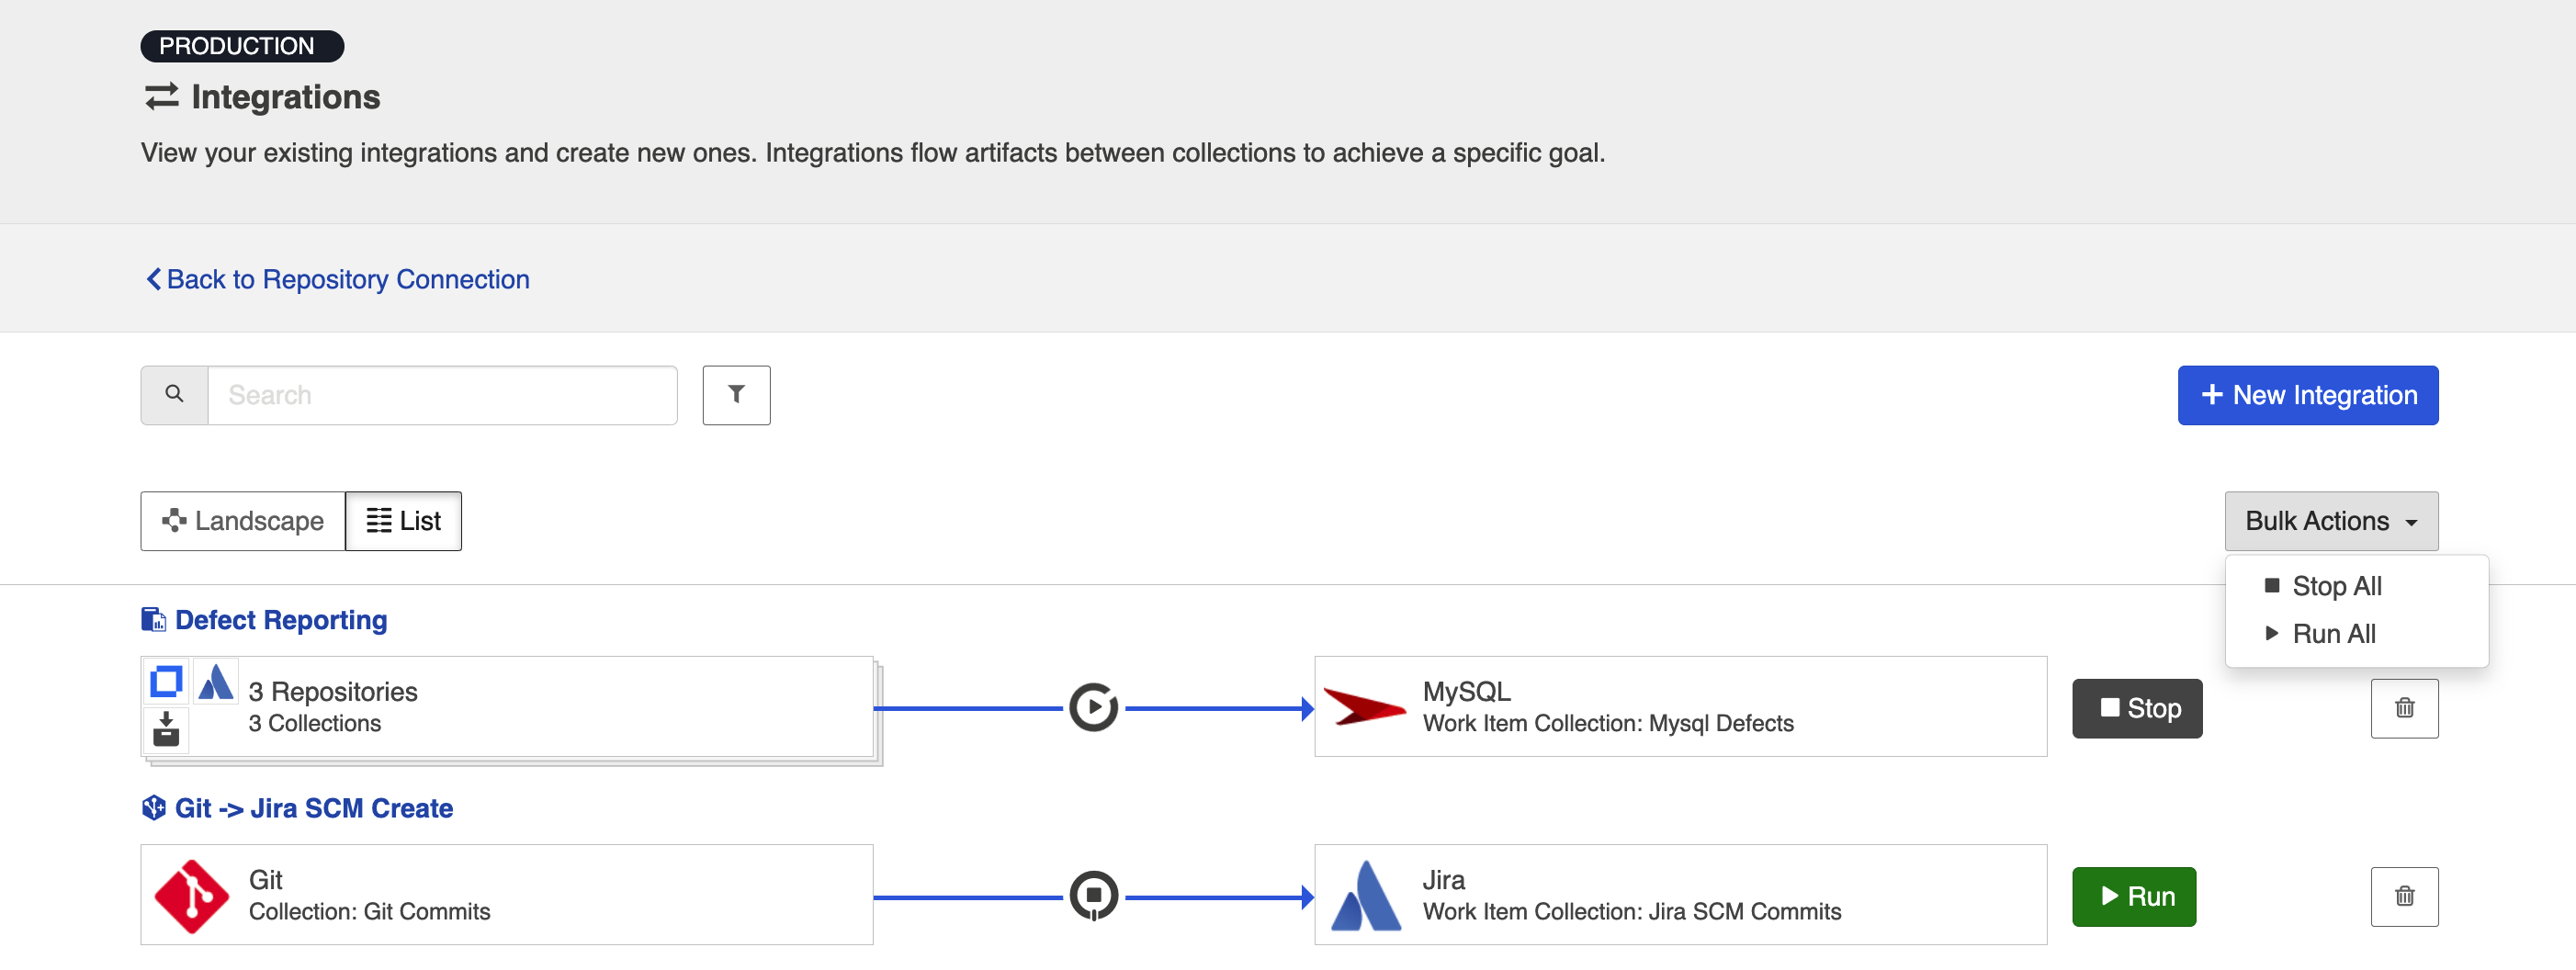
From the Integrations List Screen
Click Run or Stop next to each integration you would like to update. You can also use the Bulk Actions button to run or stop all integrations.
Viewing Your Integrations
See the Planview Hub Editions table to determine if your edition contains Integration Landscape View.
When viewing your integrations, you have the option of viewing them in either Landscape or List mode.
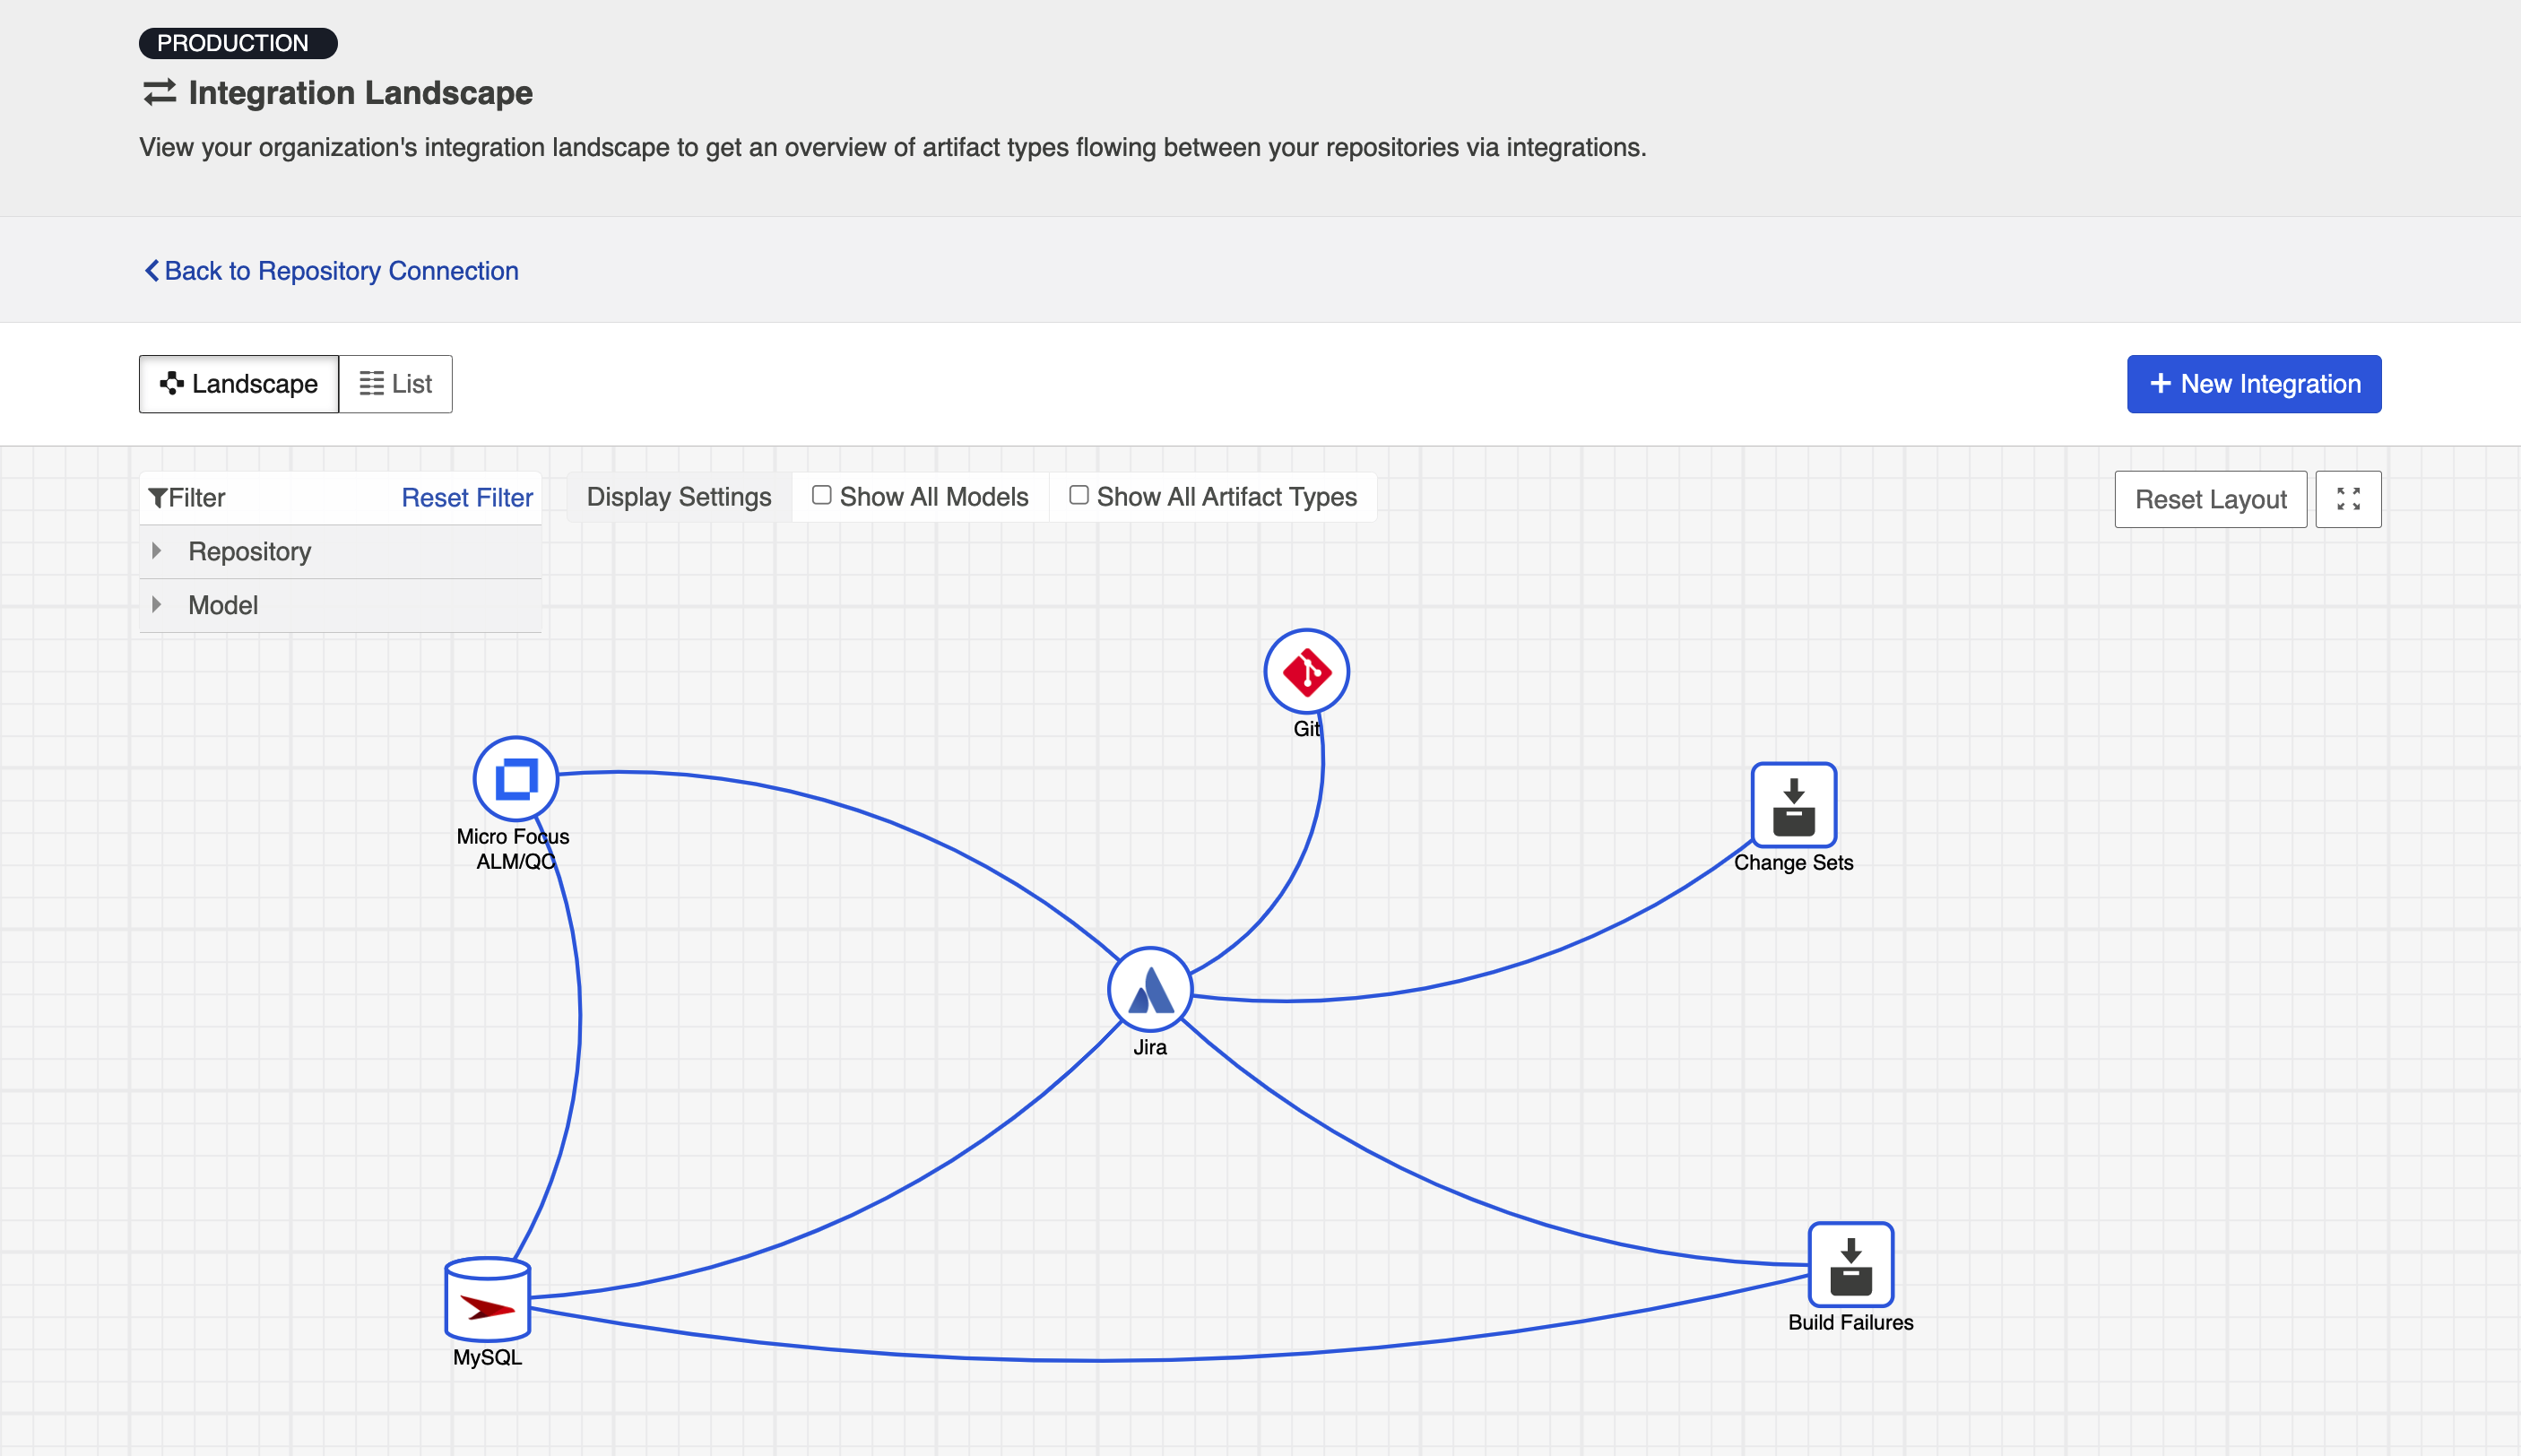
Landscape View
See the Planview Hub Editions table to determine if your edition contains Integration Landscape View functionality.
Learn more about the Integration Landscape view in the video below:
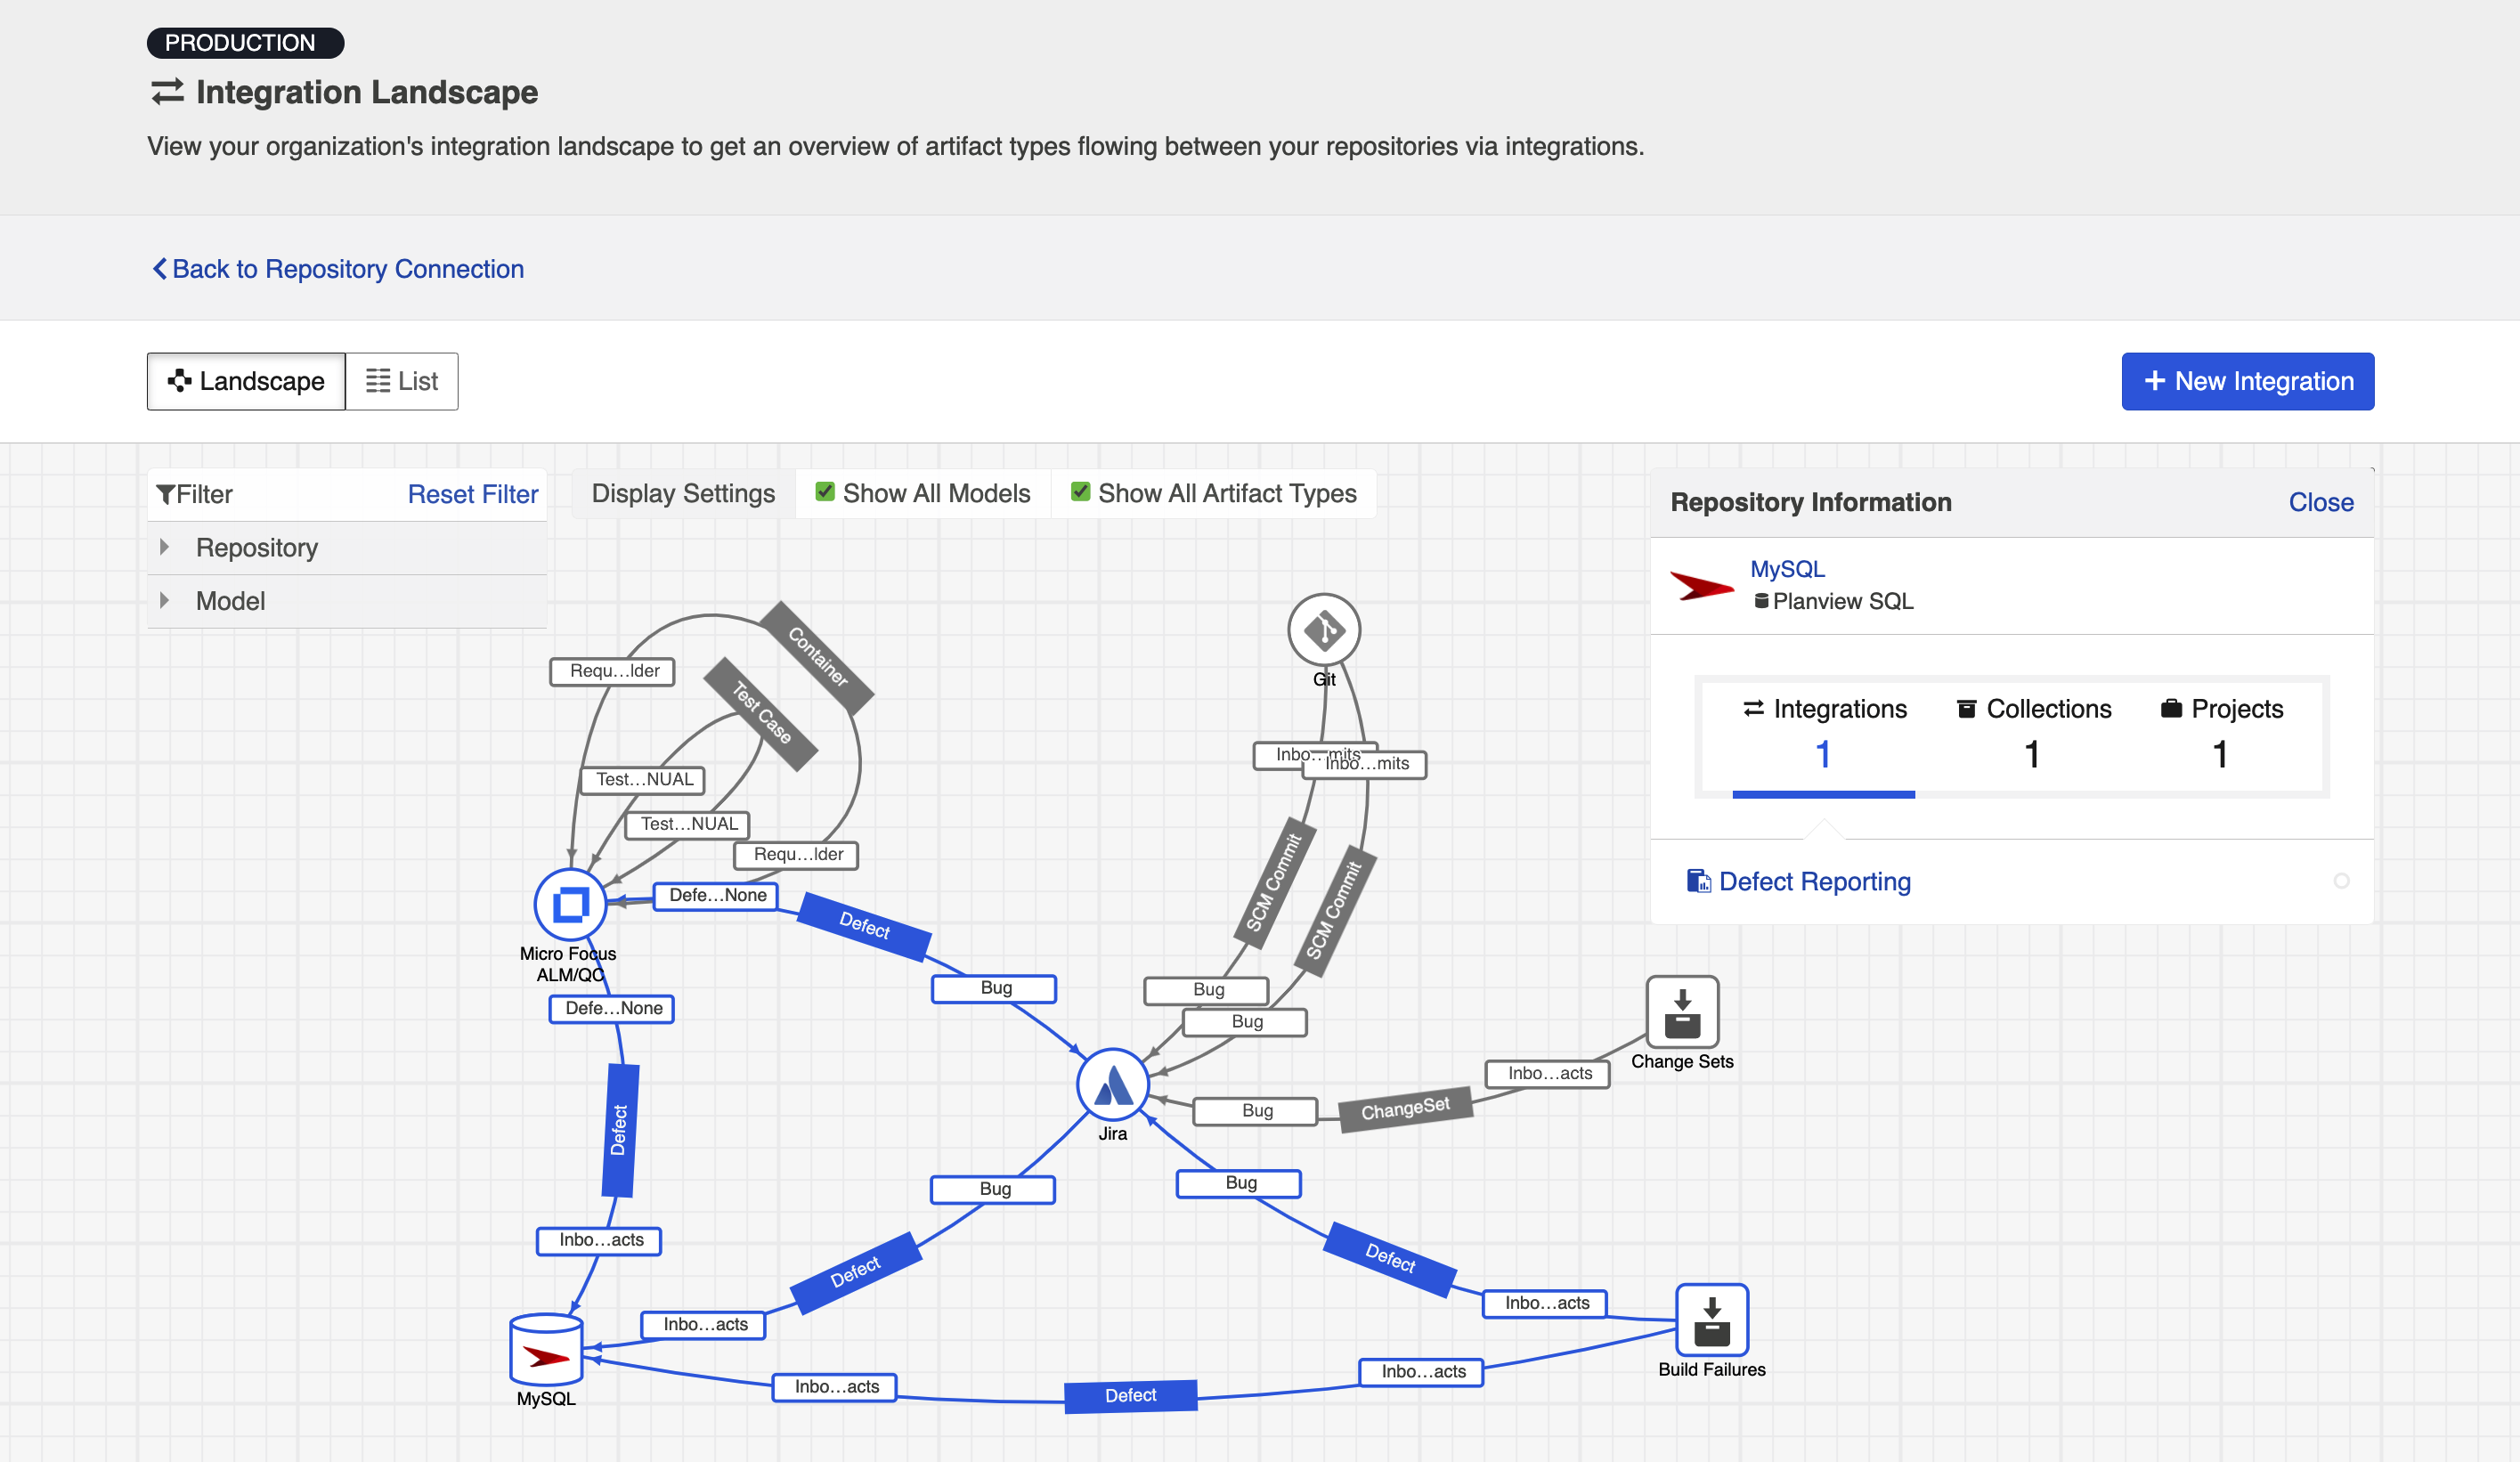
Hub will default to the Landscape view, which enables you to visualize your entire integration landscape and see how your integrations relate to one another. Use our built-in filters to see as little or as much information as you'd like!
Here's a simplified view:
If you'd like to see additional information, you can utilize the filters, or click on a repository node to modify which information is shown.
Some examples of additional information you can see are:
- Models
- Artifact Types
- Artifact Creation Directionality Arrows
- List of all relevant integrations (see this by clicking on the repository node)
- Indicator of whether each integration is running or not
Here's an example of a more detailed view:
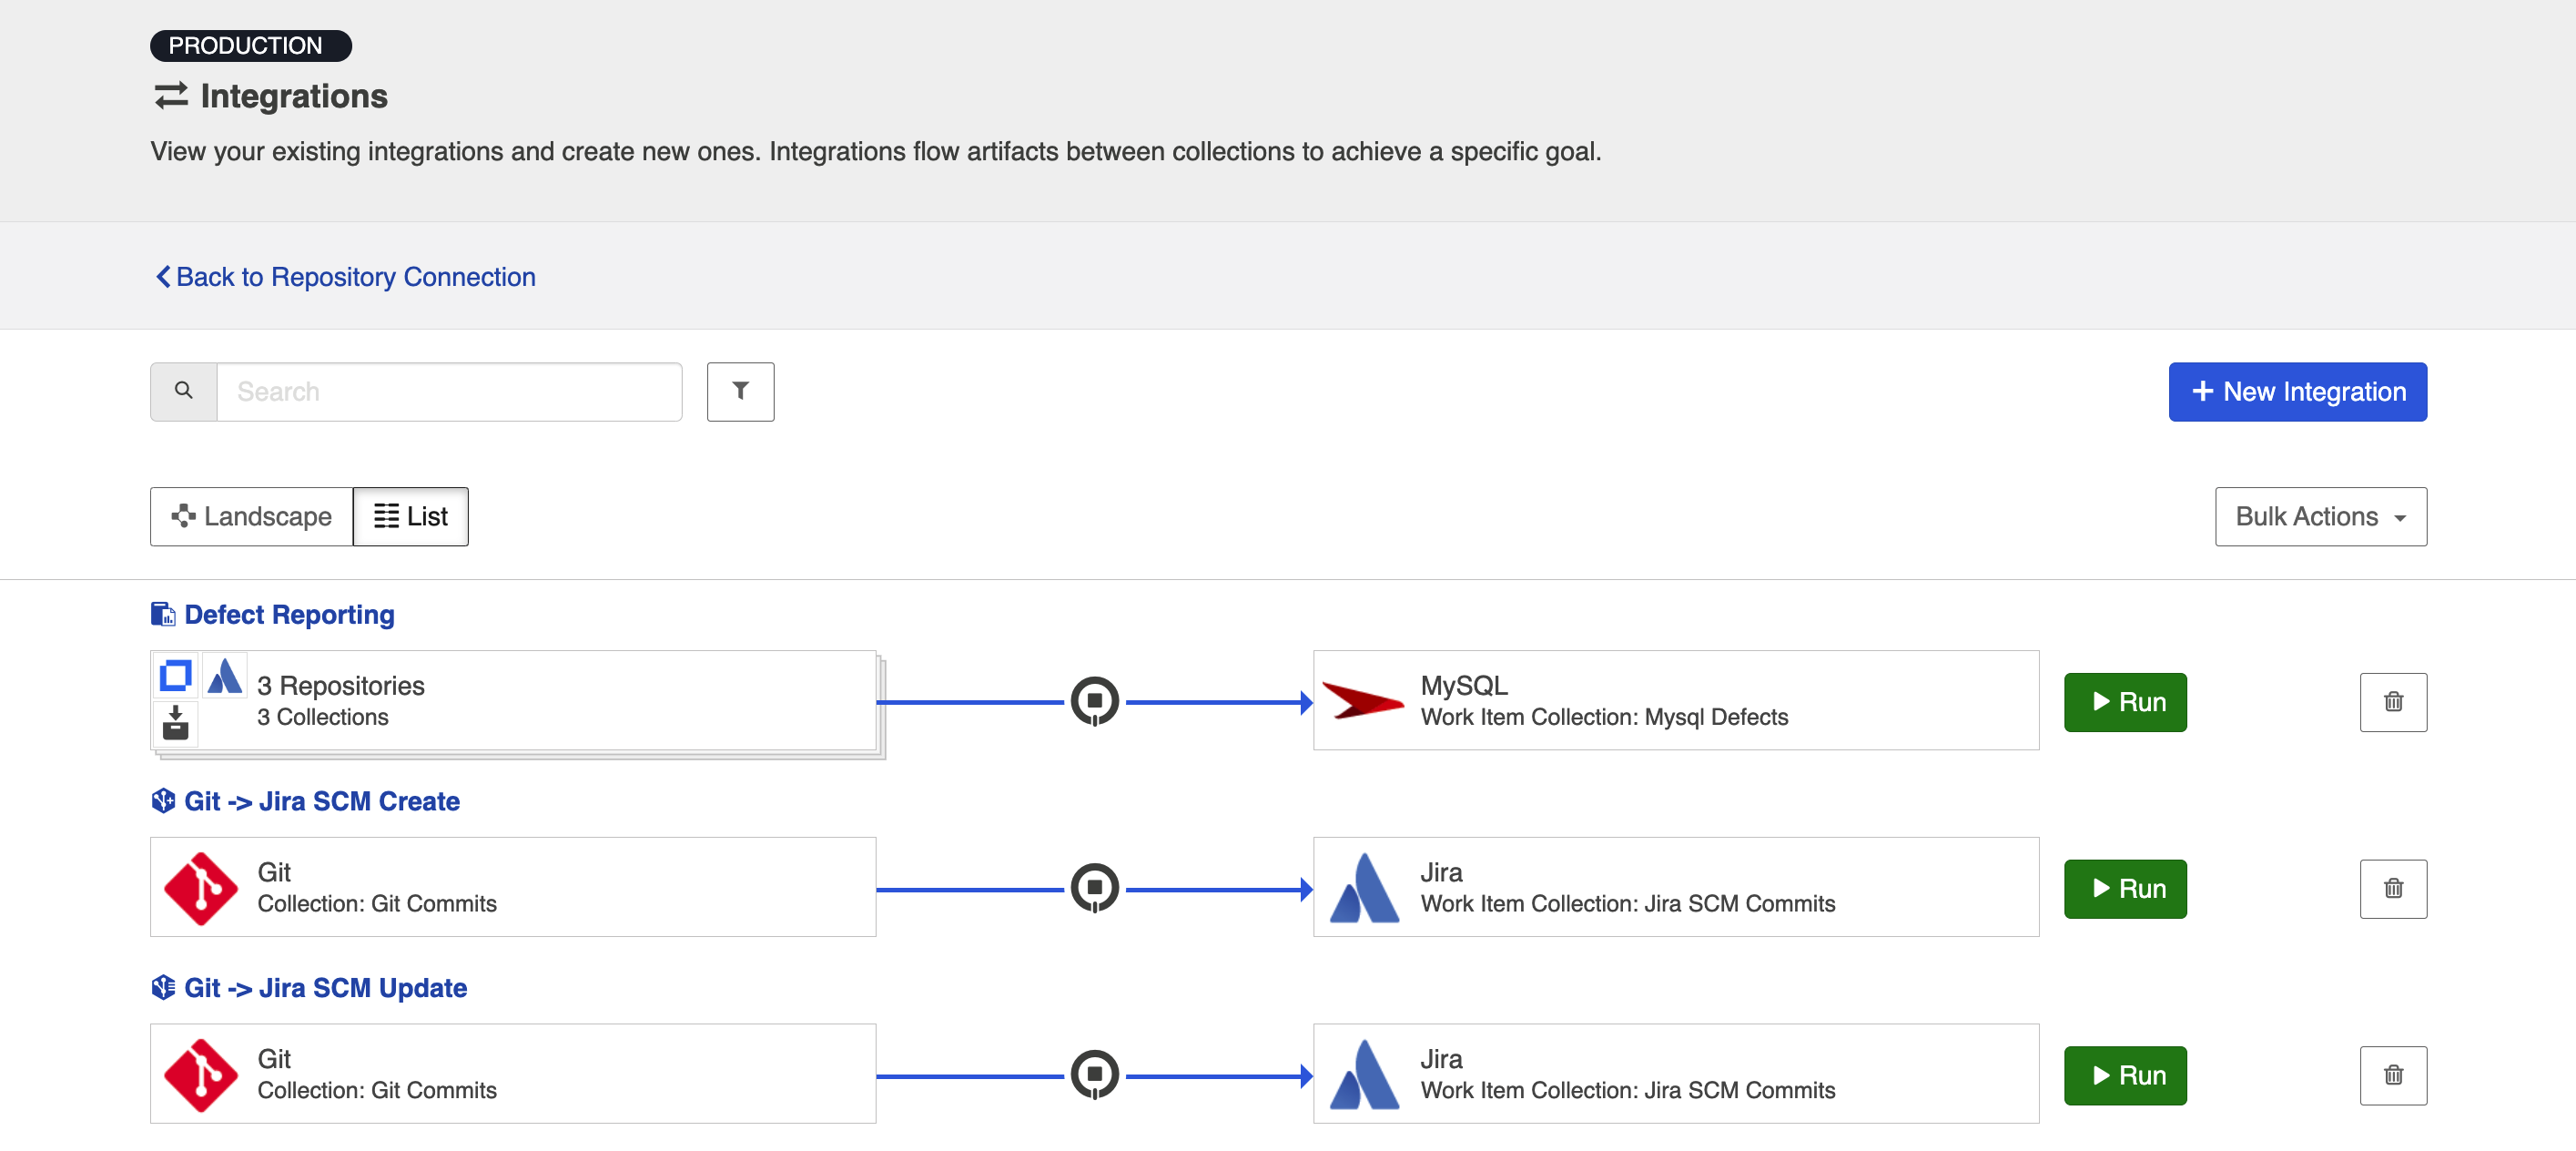
List View
If you'd like, you can toggle to List view, which will show you a list of all integrations you have created.
You can use this view to:
- Start an Integration
- Stop an Integration
- Delete an Integration
- Click into an Integration and modify its configuration
Viewing Associated Configuration Elements
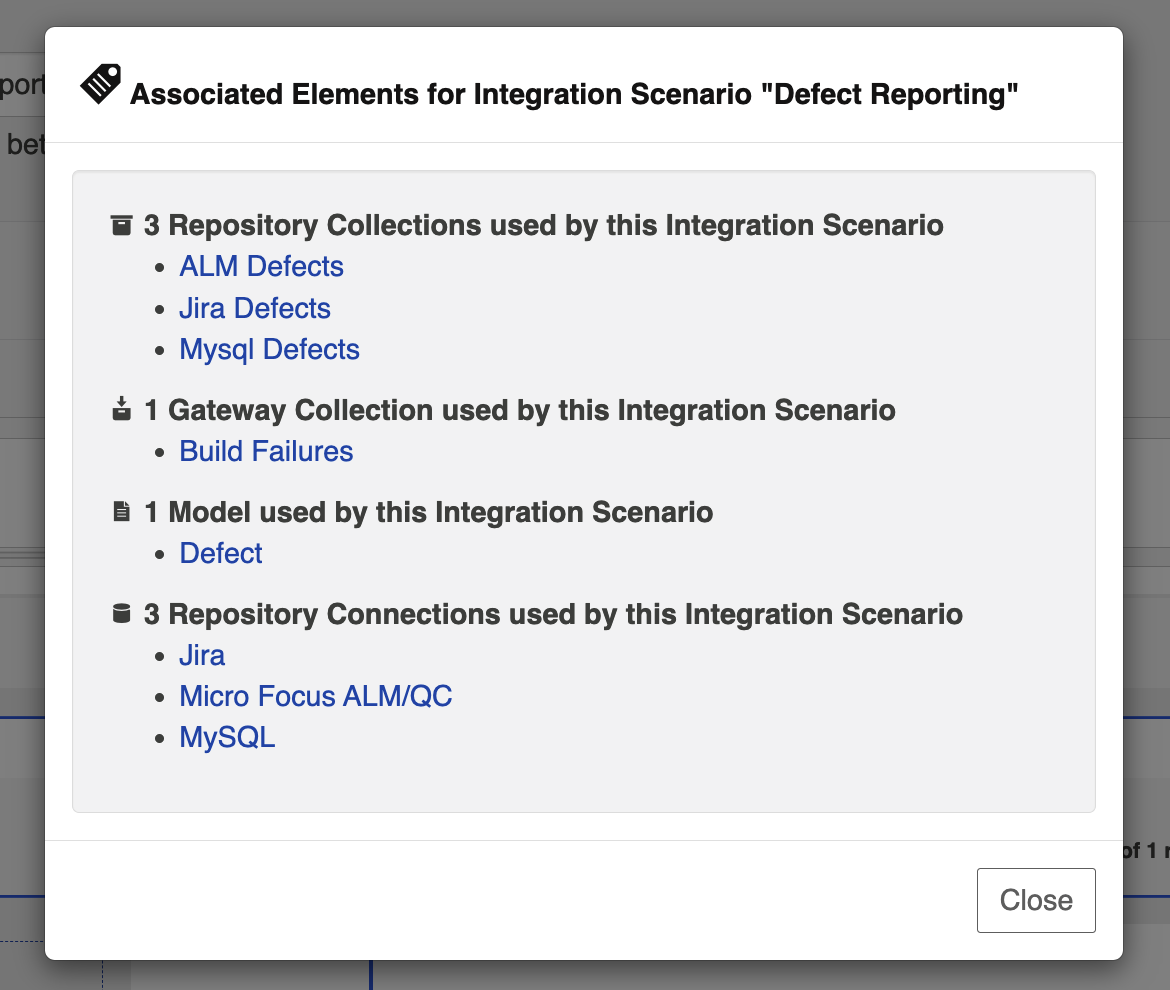
To view associated configuration elements (such as collections or models that utilize the integration you are viewing), click the Associated Elements tag in the upper right corner of the screen.
Reporting
To ETL or Not To ETL?
ETL (Extract, Transform, Load) is a process where data is extracted from a database, transformed to be more suitable for reporting or analytics, and loaded into a database which is normally used for reporting.
The data structures populated directly by Hub are intended to be used as a source for ETL; Some kinds of reports are not easily produced without first performing an ETL process. ETL can also be beneficial for performance of reports.
Some reports are possible without first performing an ETL process. Examples of such reports include Artifact Cycle Time and Defect Count By State By Cycle Time.
Example Reports
The following are examples of some reports that can be driven directly from the database tables populated by an Enterprise Data Stream Integration:
Artifact Cycle Time
Artifact Cycle Time is often a valuable metric to measure as it can help identify areas where efficiencies can be gained and ensure “lean flow”. We have provided a model called “Artifact Cycle Time” and can be used to easily flow the necessary data to your database – enabling you to create a variety of metrics and visualizations based on the cycle time of any artifact type.
Artifact Cycle Time Model
|
Artifact Cycle Time |
|---|
|
Formatted ID |
|
Project |
|
Type |
|
Created |
|
Modified |
|
Severity |
|
Status |
|
Priority |
|
Release |
|
Assignee |
If you use this model, you can easily produce visualizations such as a histogram that can identify the historical trend of cycle times.
Artifact Cycle Time Histogram

SQL
SELECT A.FORMATTED_ID, B.MODIFIED AS StatusOpen, C.MODIFIED AS StatusInProgress, D.MODIFIED AS StatusReadyForTesting, E.MODIFIED AS StatusReadyForVerification, F.MODIFIED AS StatusComplete, G.MODIFIED AS StatusShipped, A.STATUS AS CurrentStatus FROM ARTIFACT A
  LEFT OUTER JOIN ARTIFACT B
    ON B.ARTIFACT_ID = A.ARTIFACT_ID
    AND B.STATUS = 'Open'
    AND NOT EXISTS (SELECT * FROM ARTIFACT WHERE ARTIFACT_ID = A.ARTIFACT_ID AND (MODIFIED < B.MODIFIED OR (MODIFIED = B.MODIFIED AND ID < B.ID)) AND STATUS = B.STATUS)
  LEFT OUTER JOIN ARTIFACT C
    ON C.ARTIFACT_ID = A.ARTIFACT_ID
    AND C.STATUS = 'In Progress'
    AND NOT EXISTS (SELECT * FROM ARTIFACT WHERE ARTIFACT_ID = A.ARTIFACT_ID AND (MODIFIED < C.MODIFIED OR (MODIFIED = C.MODIFIED AND ID < C.ID)) AND STATUS = C.STATUS)
  LEFT OUTER JOIN ARTIFACT D
    ON D.ARTIFACT_ID = A.ARTIFACT_ID
    AND D.STATUS = 'Ready for Testing'
    AND D.MODIFIED > (SELECT MAX(MODIFIED) FROM ARTIFACT WHERE ARTIFACT_ID = A.ARTIFACT_ID AND STATUS IN ('Open', 'In Progress'))
    AND NOT EXISTS (SELECT * FROM ARTIFACT WHERE ARTIFACT_ID = A.ARTIFACT_ID AND (MODIFIED < D.MODIFIED OR (MODIFIED = D.MODIFIED AND ID < D.ID)) AND STATUS = D.STATUS
      AND MODIFIED > (SELECT MAX(MODIFIED) FROM ARTIFACT WHERE ARTIFACT_ID = A.ARTIFACT_ID AND STATUS IN ('Open',  'In Progress')))
  LEFT OUTER JOIN ARTIFACT E
    ON E.ARTIFACT_ID = A.ARTIFACT_ID
    AND E.STATUS = 'Ready for Verification'
    AND E.MODIFIED > (SELECT MAX(MODIFIED) FROM ARTIFACT WHERE ARTIFACT_ID = A.ARTIFACT_ID AND STATUS IN ('Open', 'In Progress', 'Ready for Testing'))
    AND NOT EXISTS (SELECT * FROM ARTIFACT WHERE ARTIFACT_ID = A.ARTIFACT_ID AND (MODIFIED < E.MODIFIED OR (MODIFIED = E.MODIFIED AND ID < E.ID)) AND STATUS = E.STATUS
      AND MODIFIED > (SELECT MAX(MODIFIED) FROM ARTIFACT WHERE ARTIFACT_ID = A.ARTIFACT_ID AND STATUS IN ('Open',  'In Progress', 'Ready for Testing')))
  LEFT OUTER JOIN ARTIFACT F
    ON F.ARTIFACT_ID = A.ARTIFACT_ID
    AND F.STATUS = 'Complete'
    AND F.MODIFIED > (SELECT MAX(MODIFIED) FROM ARTIFACT WHERE ARTIFACT_ID = A.ARTIFACT_ID AND STATUS IN ('Open', 'Ready for Testing', 'Ready for Verification'))
    AND NOT EXISTS (SELECT * FROM ARTIFACT WHERE ARTIFACT_ID = A.ARTIFACT_ID AND (MODIFIED < F.MODIFIED OR (MODIFIED = F.MODIFIED AND ID < F.ID)) AND STATUS = F.STATUS
      AND MODIFIED > (SELECT MAX(MODIFIED) FROM ARTIFACT WHERE ARTIFACT_ID = A.ARTIFACT_ID AND STATUS IN ('Open', 'Ready for Testing', 'Ready for Verification')))
  LEFT OUTER JOIN ARTIFACT G
    ON G.ARTIFACT_ID = A.ARTIFACT_ID
    AND G.STATUS = 'Shipped'
    AND G.MODIFIED > (SELECT MAX(MODIFIED) FROM ARTIFACT WHERE ARTIFACT_ID = A.ARTIFACT_ID AND STATUS IN ('Open', 'Ready for Testing', 'Ready for Verification', 'Complete'))
    AND NOT EXISTS (SELECT * FROM ARTIFACT WHERE ARTIFACT_ID = A.ARTIFACT_ID AND (MODIFIED < G.MODIFIED OR (MODIFIED = G.MODIFIED AND ID < G.ID)) AND STATUS = G.STATUS
      AND MODIFIED > (SELECT MAX(MODIFIED) FROM ARTIFACT WHERE ARTIFACT_ID = A.ARTIFACT_ID AND STATUS IN ('Open', 'Ready for Testing', 'Ready for Verification', 'Complete')))
WHERE NOT EXISTS (SELECT * FROM ARTIFACT WHERE ARTIFACT_ID = A.ARTIFACT_ID AND (MODIFIED > A.MODIFIED OR (MODIFIED = A.MODIFIED AND ID > A.ID)))
  AND (A.ARTIFACT_EVENT_TYPE IS NULL OR NOT A.ARTIFACT_EVENT_TYPE = 'removed')
ORDER BY A.FORMATTED_ID
The example above is designed to handle cases where an artifact is moved into a state more than once. For example, a defect that is moved to “Complete”, subsequently moved back into “In Progress”, then moved to “Complete” again is represented with a row having the second timestamp for the “Complete” status.

Reports can be driven from the results of this SQL query, subtracting dates to produce cycle times for the desired transitions (e.g. “Open” to “Shipped”).
Status values in the SQL above correspond to the values present in the “Artifact” model; repository-specific status values can be mapped to the model values in the corresponding collection field mapping. If status values are added, removed, or changed in the artifact model, then the SQL will have to be modified accordingly.
Defect Count By State By Cycle Time
Defect Count By State By Cycle Time provides a count of defects by cycle time for each status of an artifact.
In this example, the cycle time is measured in days. Cycle time is only measured for status state transitions; Cycle time is not measured for the end state of an artifact.
We provide a basic defect model packaged with our product:
Basic Defect Model
|
Defect Model |
|---|
|
Formatted ID |
|
Project |
|
Type |
|
Created |
|
Modified |
|
Severity |
|
Status |
|
Summary |
|
Summary-to-Description |
|
Related Defects |
|
Description |
If you use this model, you can easily produce visualizations such as a bubble chart that can identify the volume of defects in each cycle time measured in days. This is simply a slightly different view into your overall cycle time.
Cycle Time Volume

SQL
SELECT status, COUNT(artifact_id), cycleTime FROM (
  SELECT A.ARTIFACT_ID AS artifact_id, A.STATUS AS status, SUM(  TIMESTAMPDIFF(SQL_TSI_DAY,A.MODIFIED,B.MODIFIED) ) AS cycleTime FROM DEFECT A
    INNER JOIN DEFECT B ON A.ARTIFACT_ID = B.ARTIFACT_ID
      AND A.ID != B.ID
      AND A.STATUS != B.STATUS
      AND A.MODIFIED <= B.MODIFIED
      AND ((A.ARTIFACT_EVENT_TYPE IS NULL OR B.ARTIFACT_EVENT_TYPE IS NULL)
        OR NOT (A.ARTIFACT_EVENT_TYPE = 'removed' OR B.ARTIFACT_EVENT_TYPE = 'removed')
      )
    WHERE NOT EXISTS (
      SELECT * FROM DEFECT C WHERE C.ARTIFACT_ID = A.ARTIFACT_ID AND C.ID != A.ID AND C.ID != B.ID
        AND C.MODIFIED >= A.MODIFIED AND C.MODIFIED <= B.MODIFIED
        AND ((C.STATUS = A.STATUS OR C.STATUS = B.STATUS) OR (C.STATUS != A.STATUS AND C.STATUS != B.STATUS))
      )
      AND NOT EXISTS (
        SELECT * FROM DEFECT D WHERE D.ARTIFACT_ID = A.ARTIFACT_ID AND B.MODIFIED <= (
          SELECT MAX(MODIFIED) FROM DEFECT D WHERE D.ARTIFACT_ID = A.ARTIFACT_ID AND D.ARTIFACT_EVENT_TYPE = 'removed'
        )
      )
  GROUP BY A.ARTIFACT_ID, A.STATUS
) CT GROUP BY CT.status, CT.cycleTime
ORDER BY CT.status, CT.cycleTime