
Field Mapping
Introduction
After saving your Work Item Collection (Repository), the next step is to map fields from your collection to your model. This will tell Hub how to flow information to and from your collection.
Mapping Fields
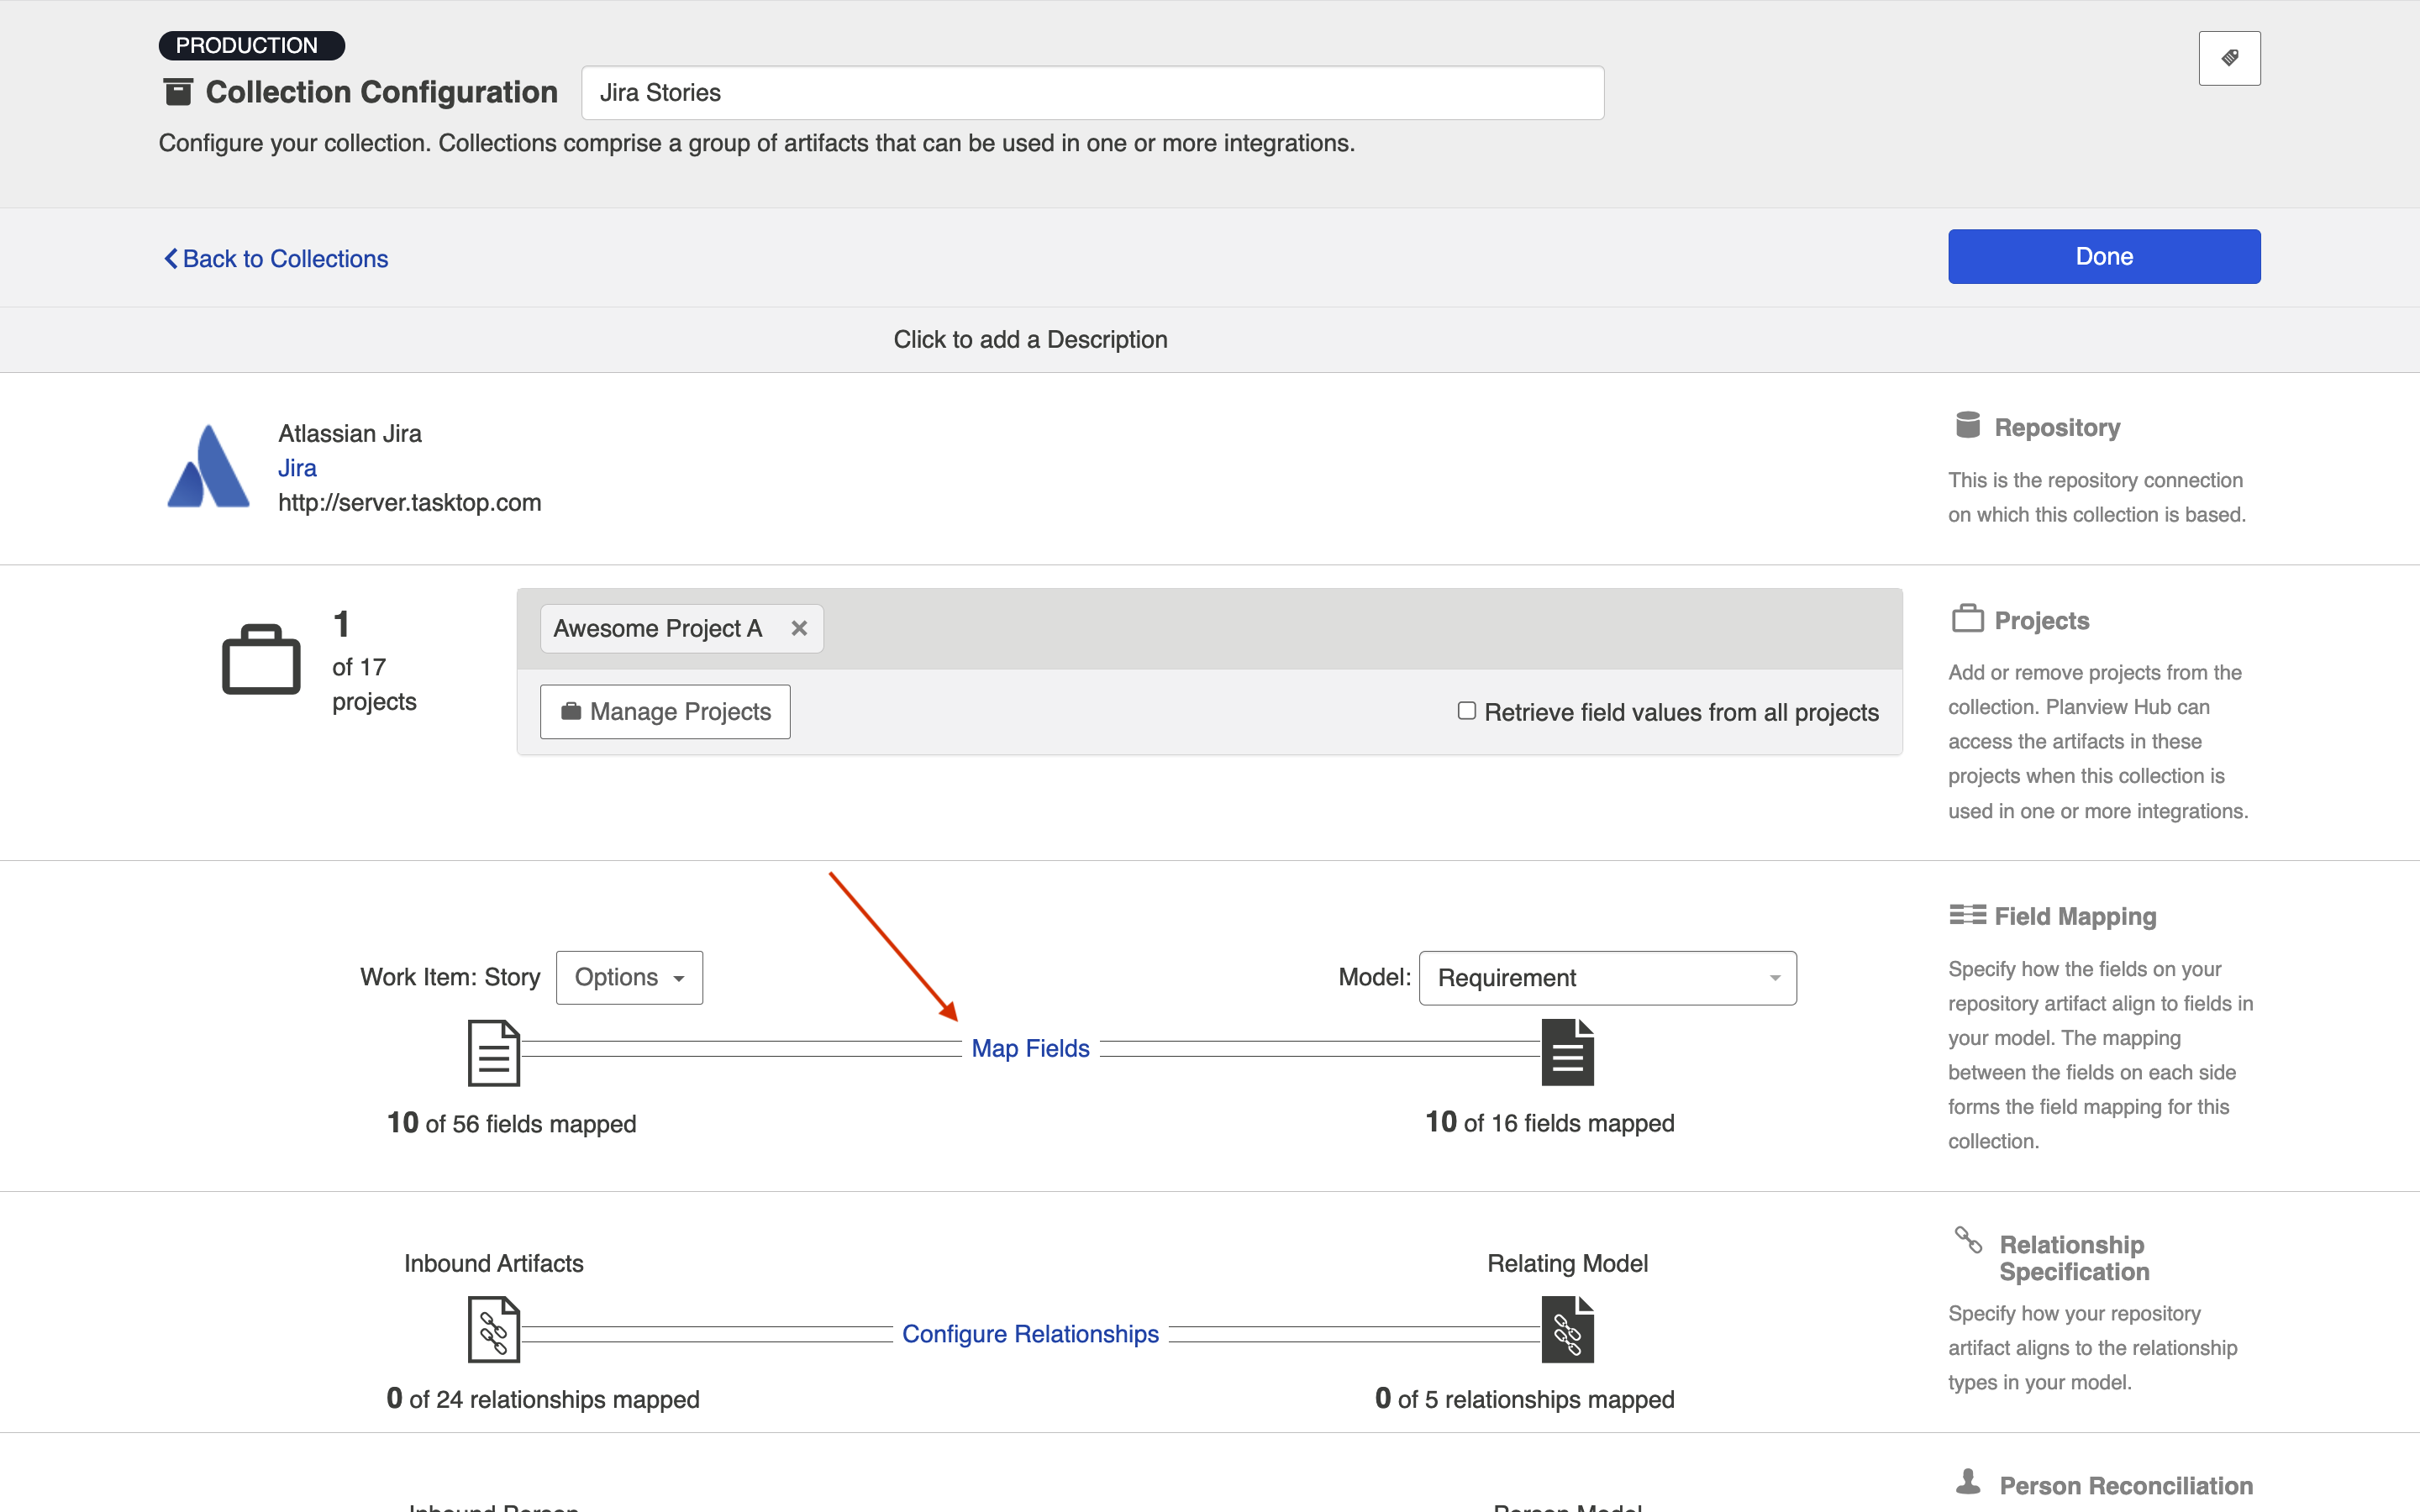
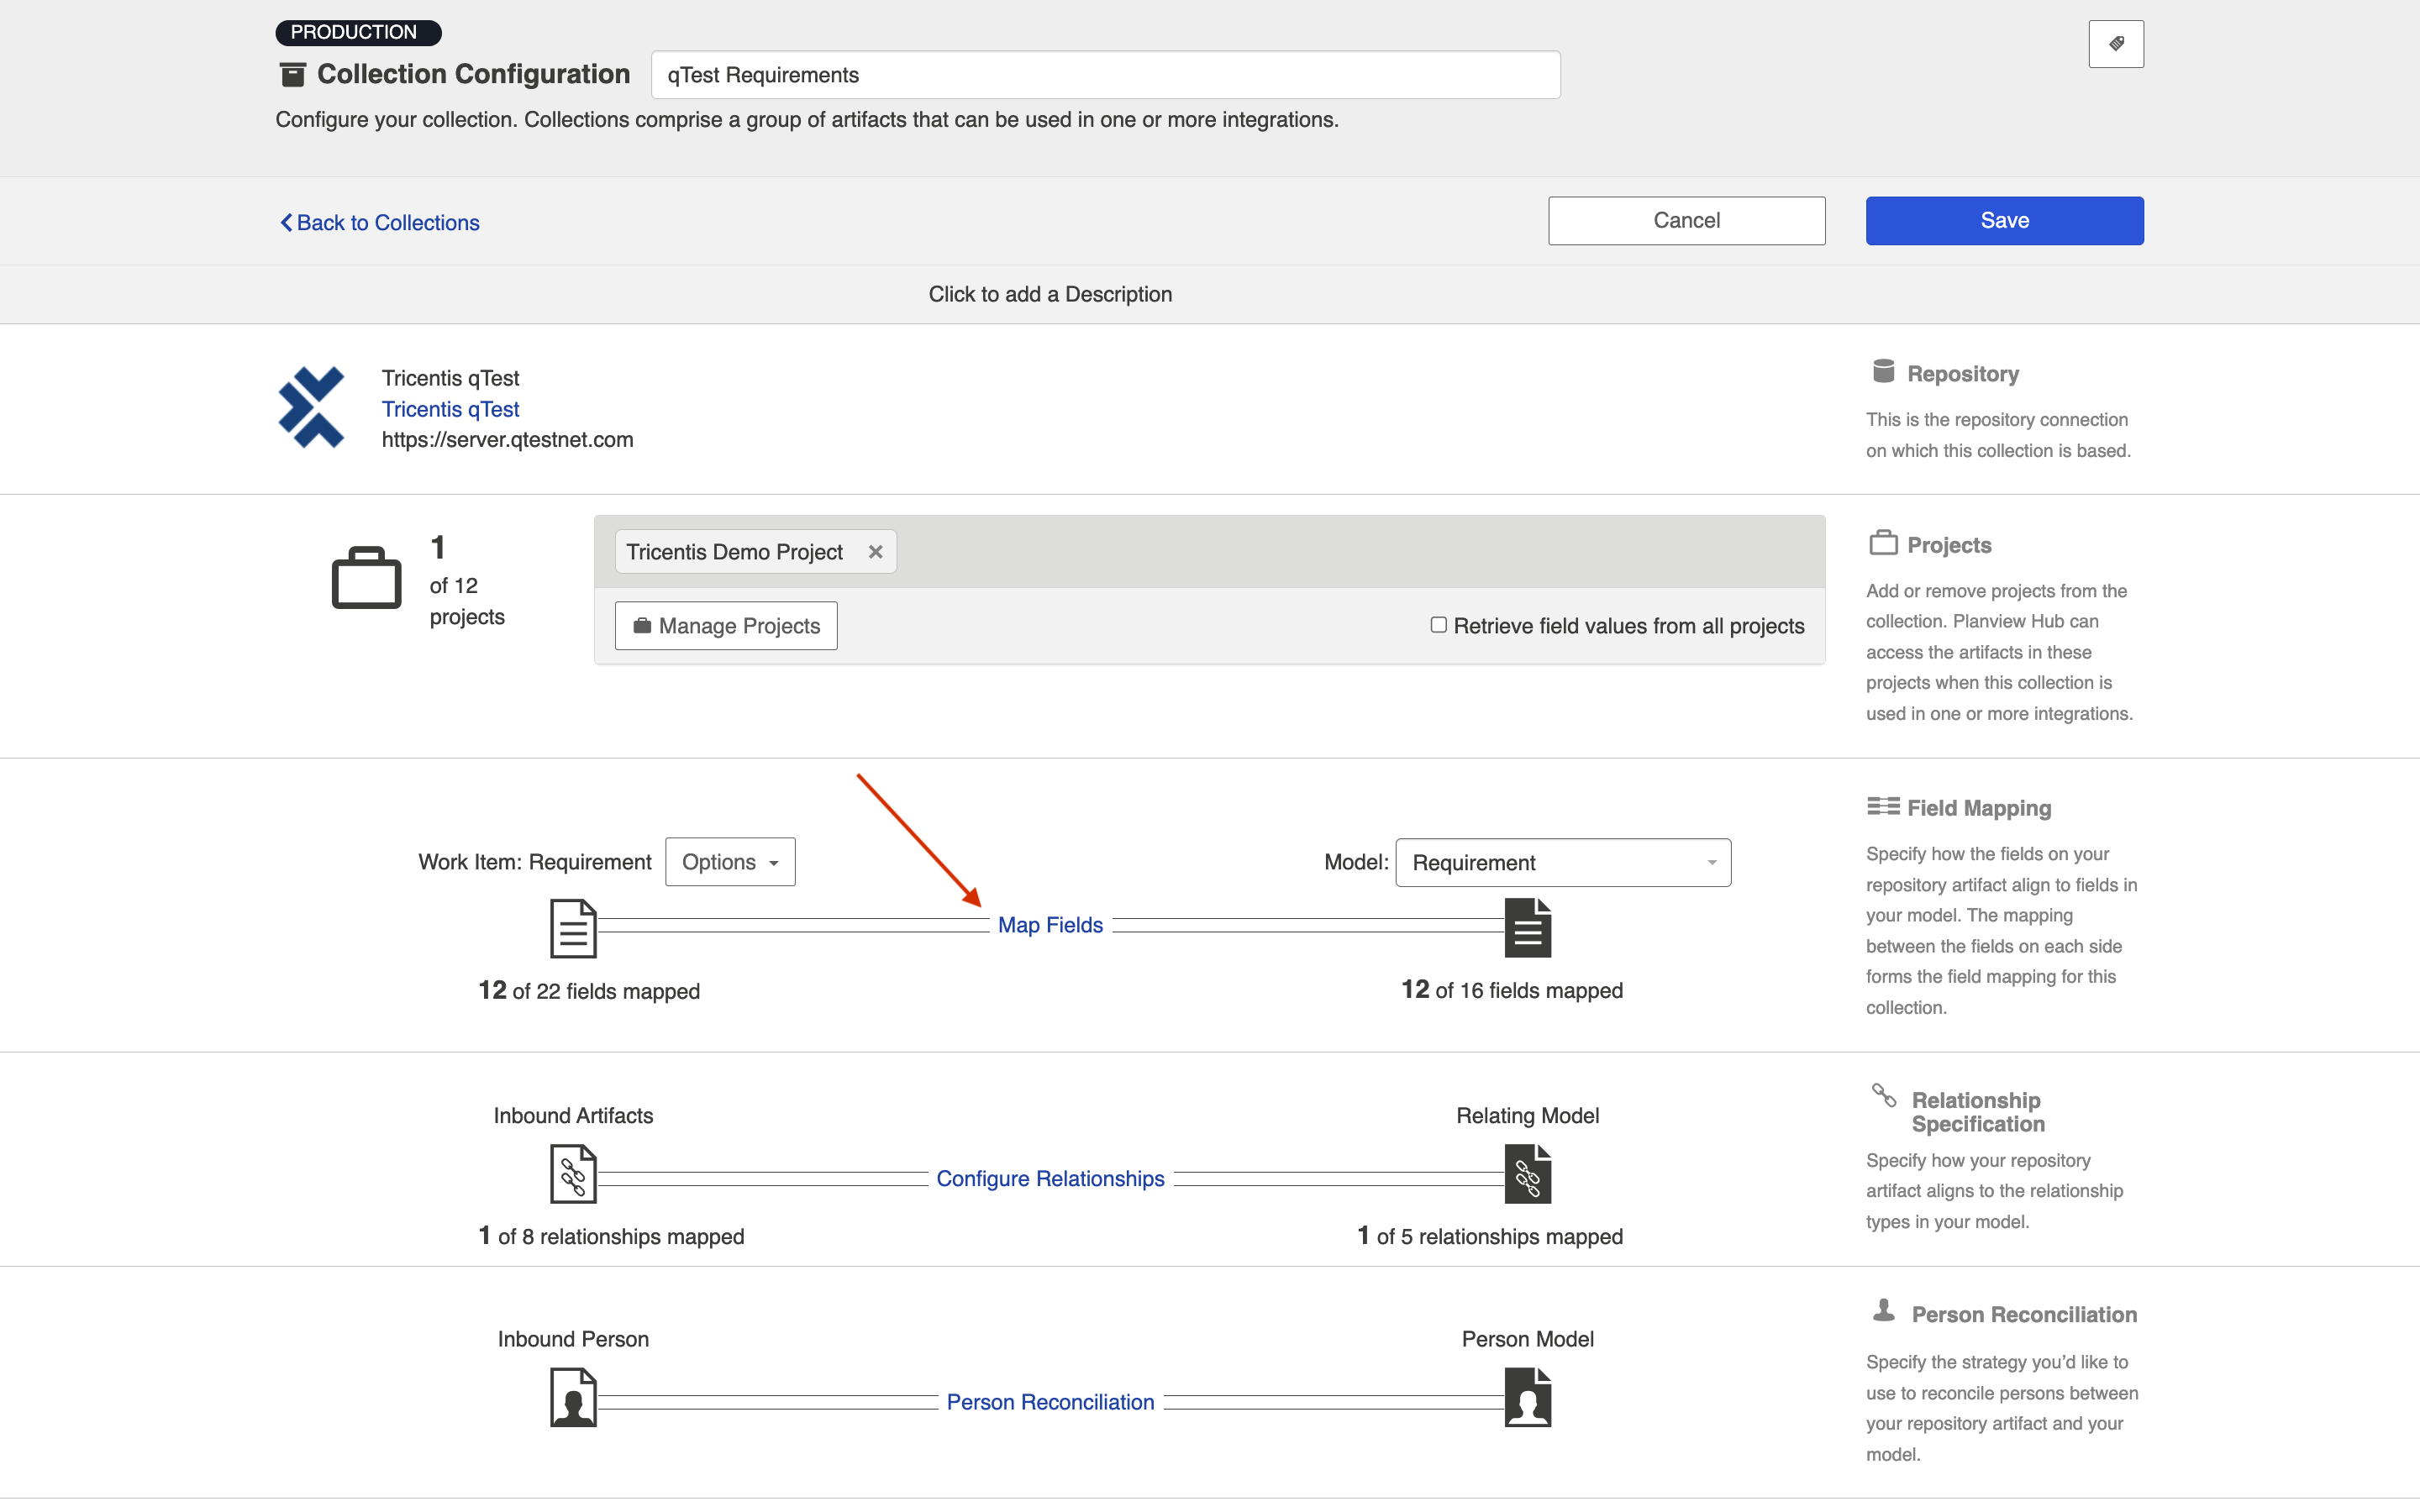
After saving your Work Item Collection (Repository), you'll see that the Map Fields link becomes active.

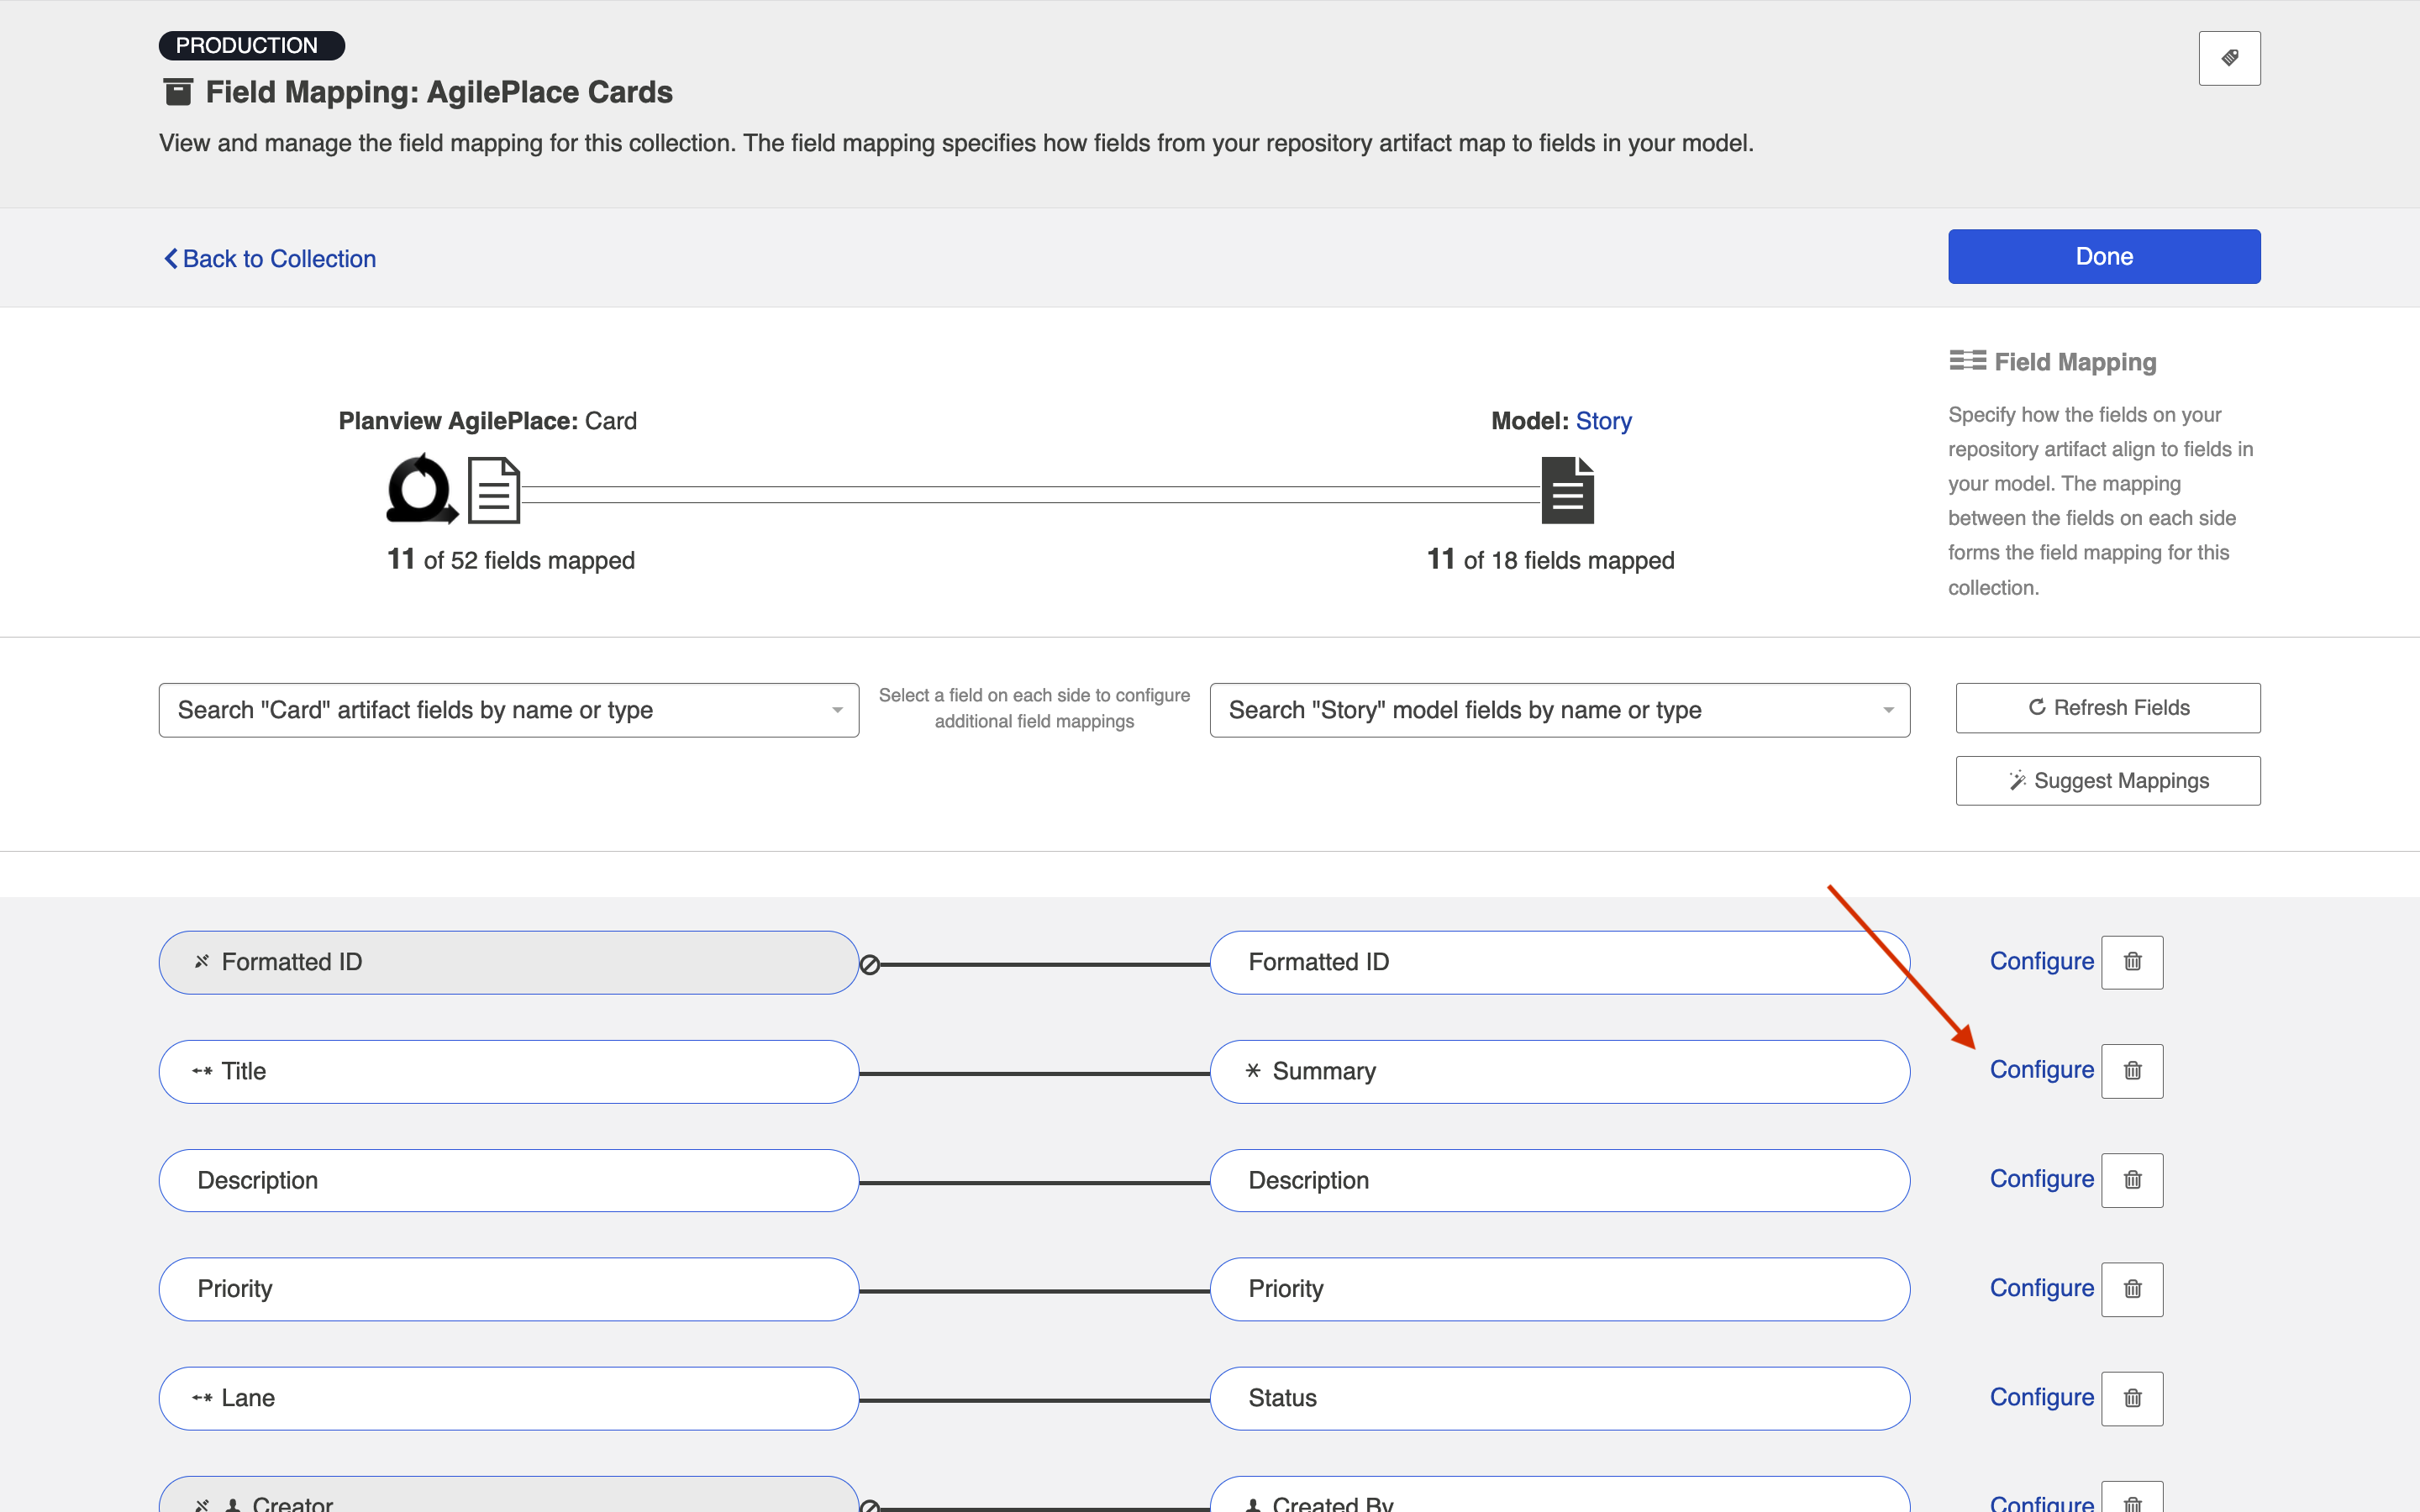
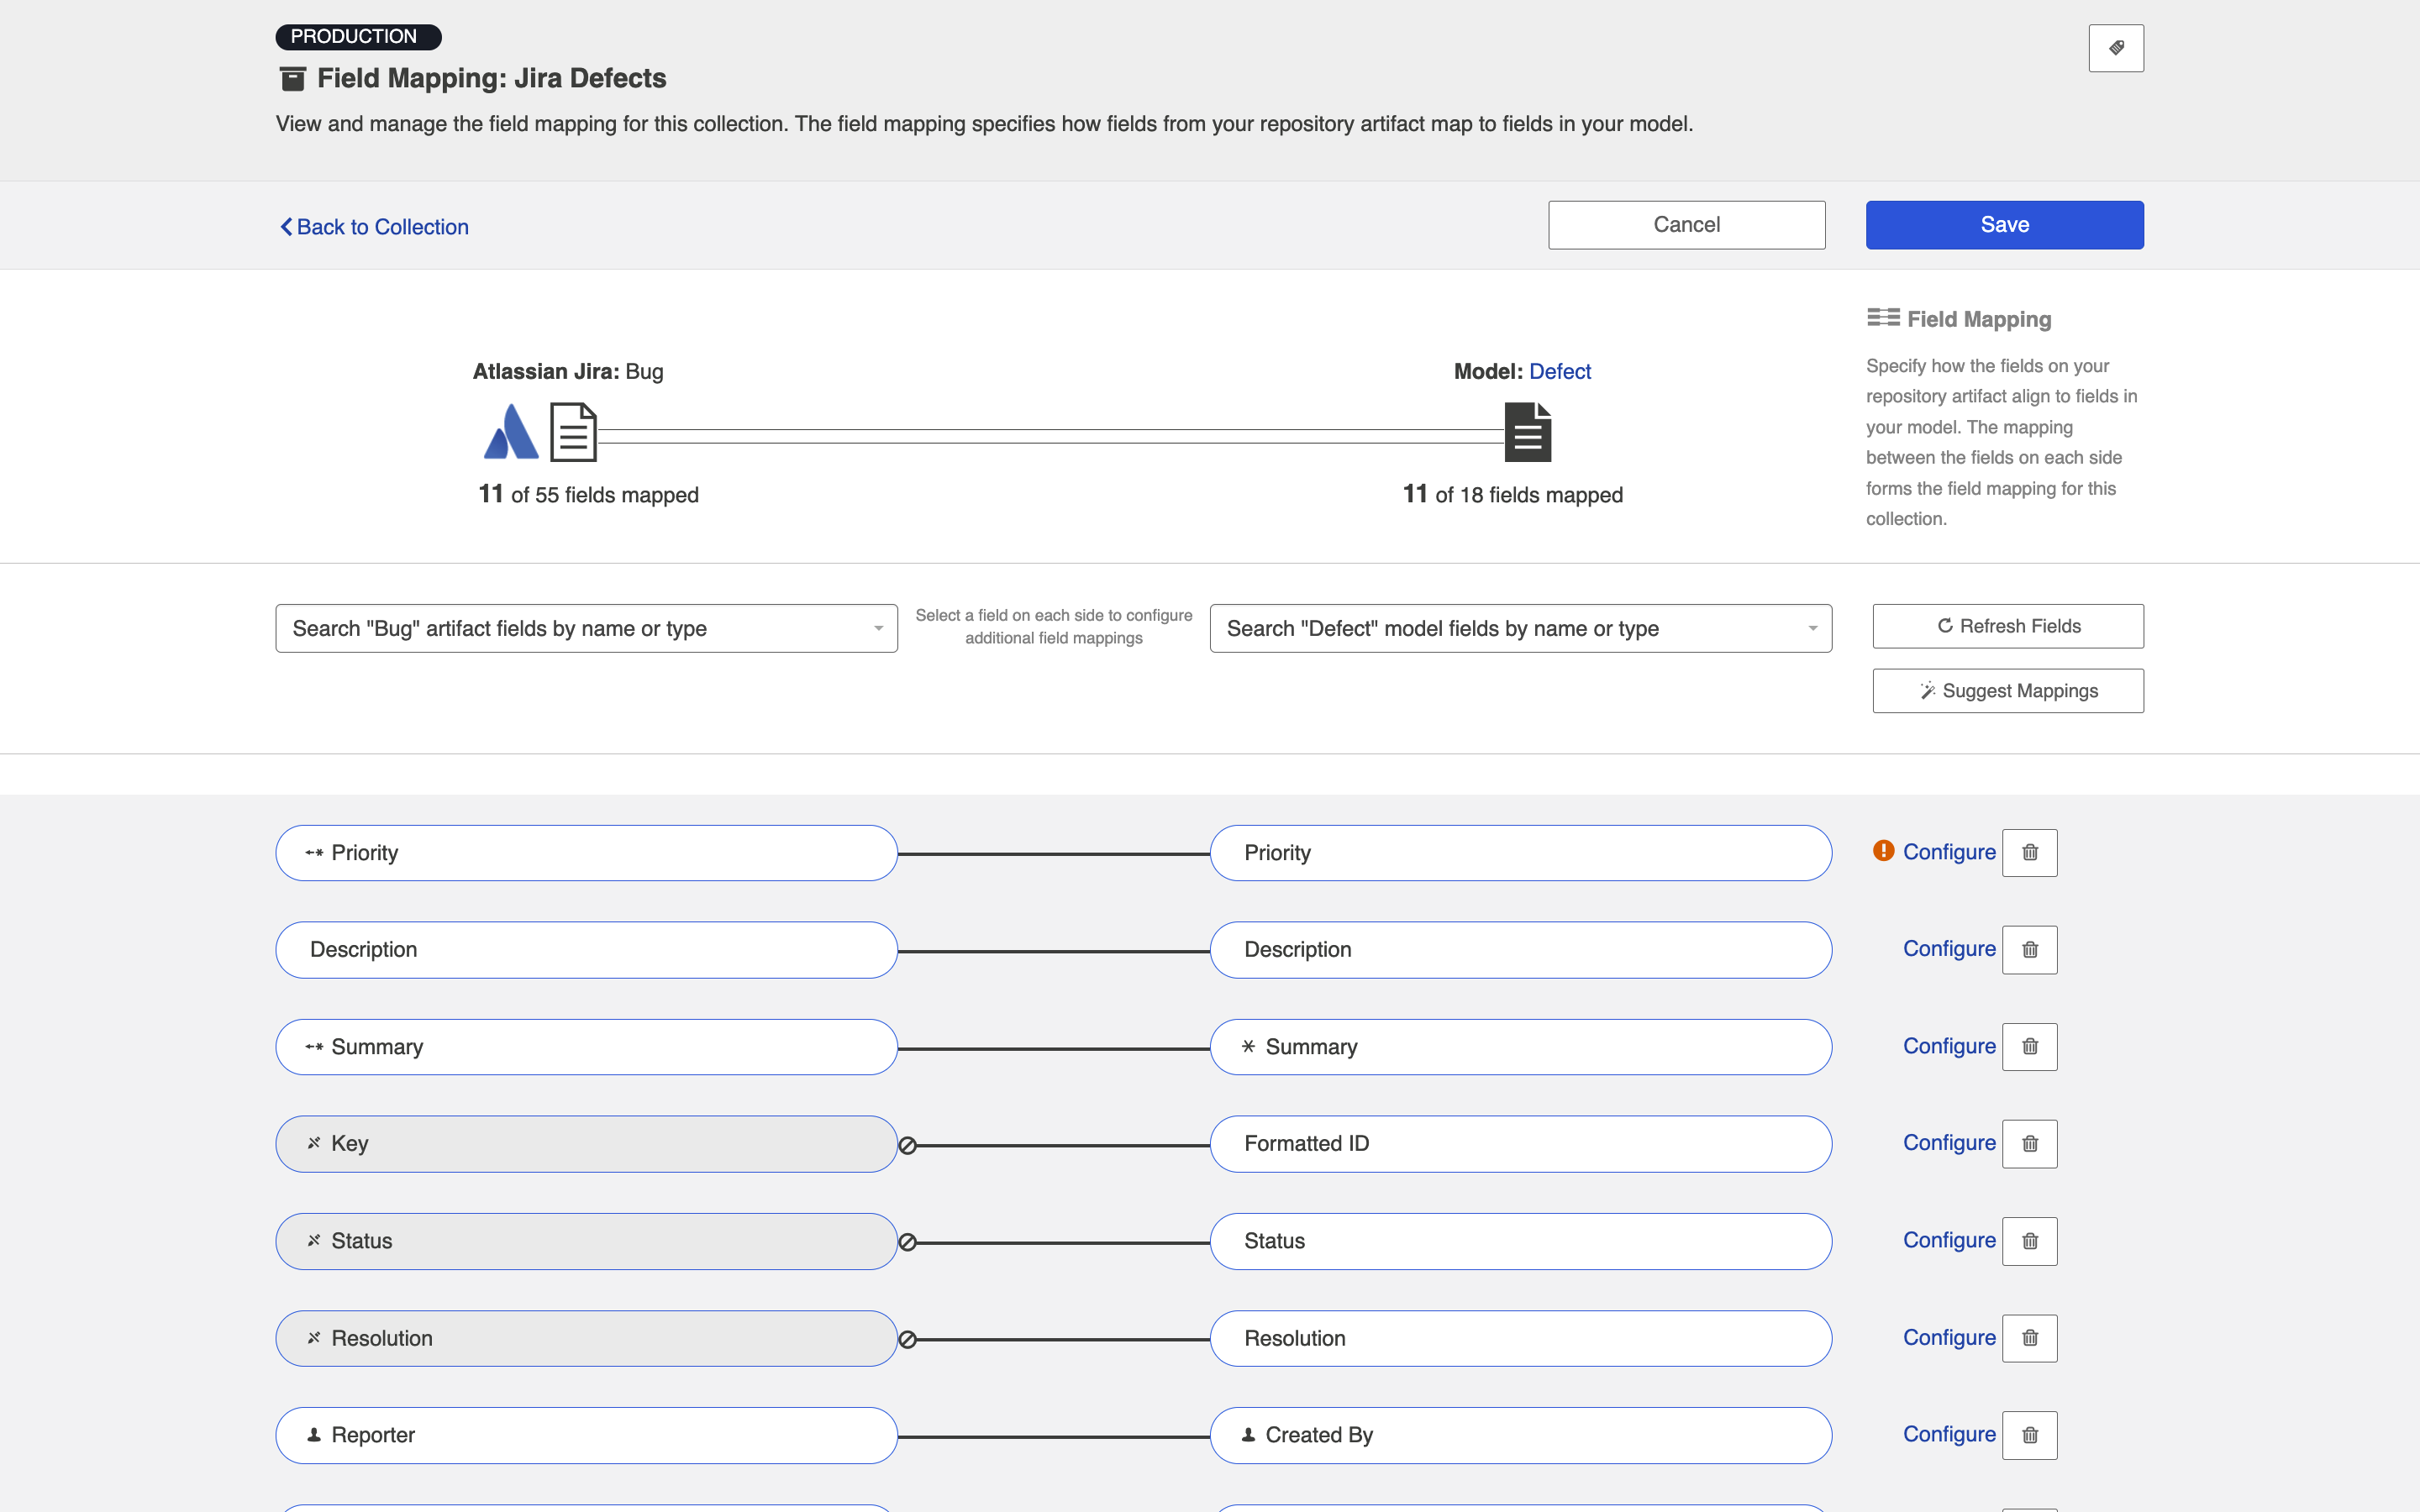
Clicking this link will take you to a drill in page where you can specify how the fields in your model will map to the fields available on the artifact within your repository. Hub will auto-map fields when possible based on the names of fields and the smart field designations that have been set in a given model.
Note: If you need to refresh the fields available for the collection, use the Refresh Fields button in the Hub UI, rather than your browser's refresh button.
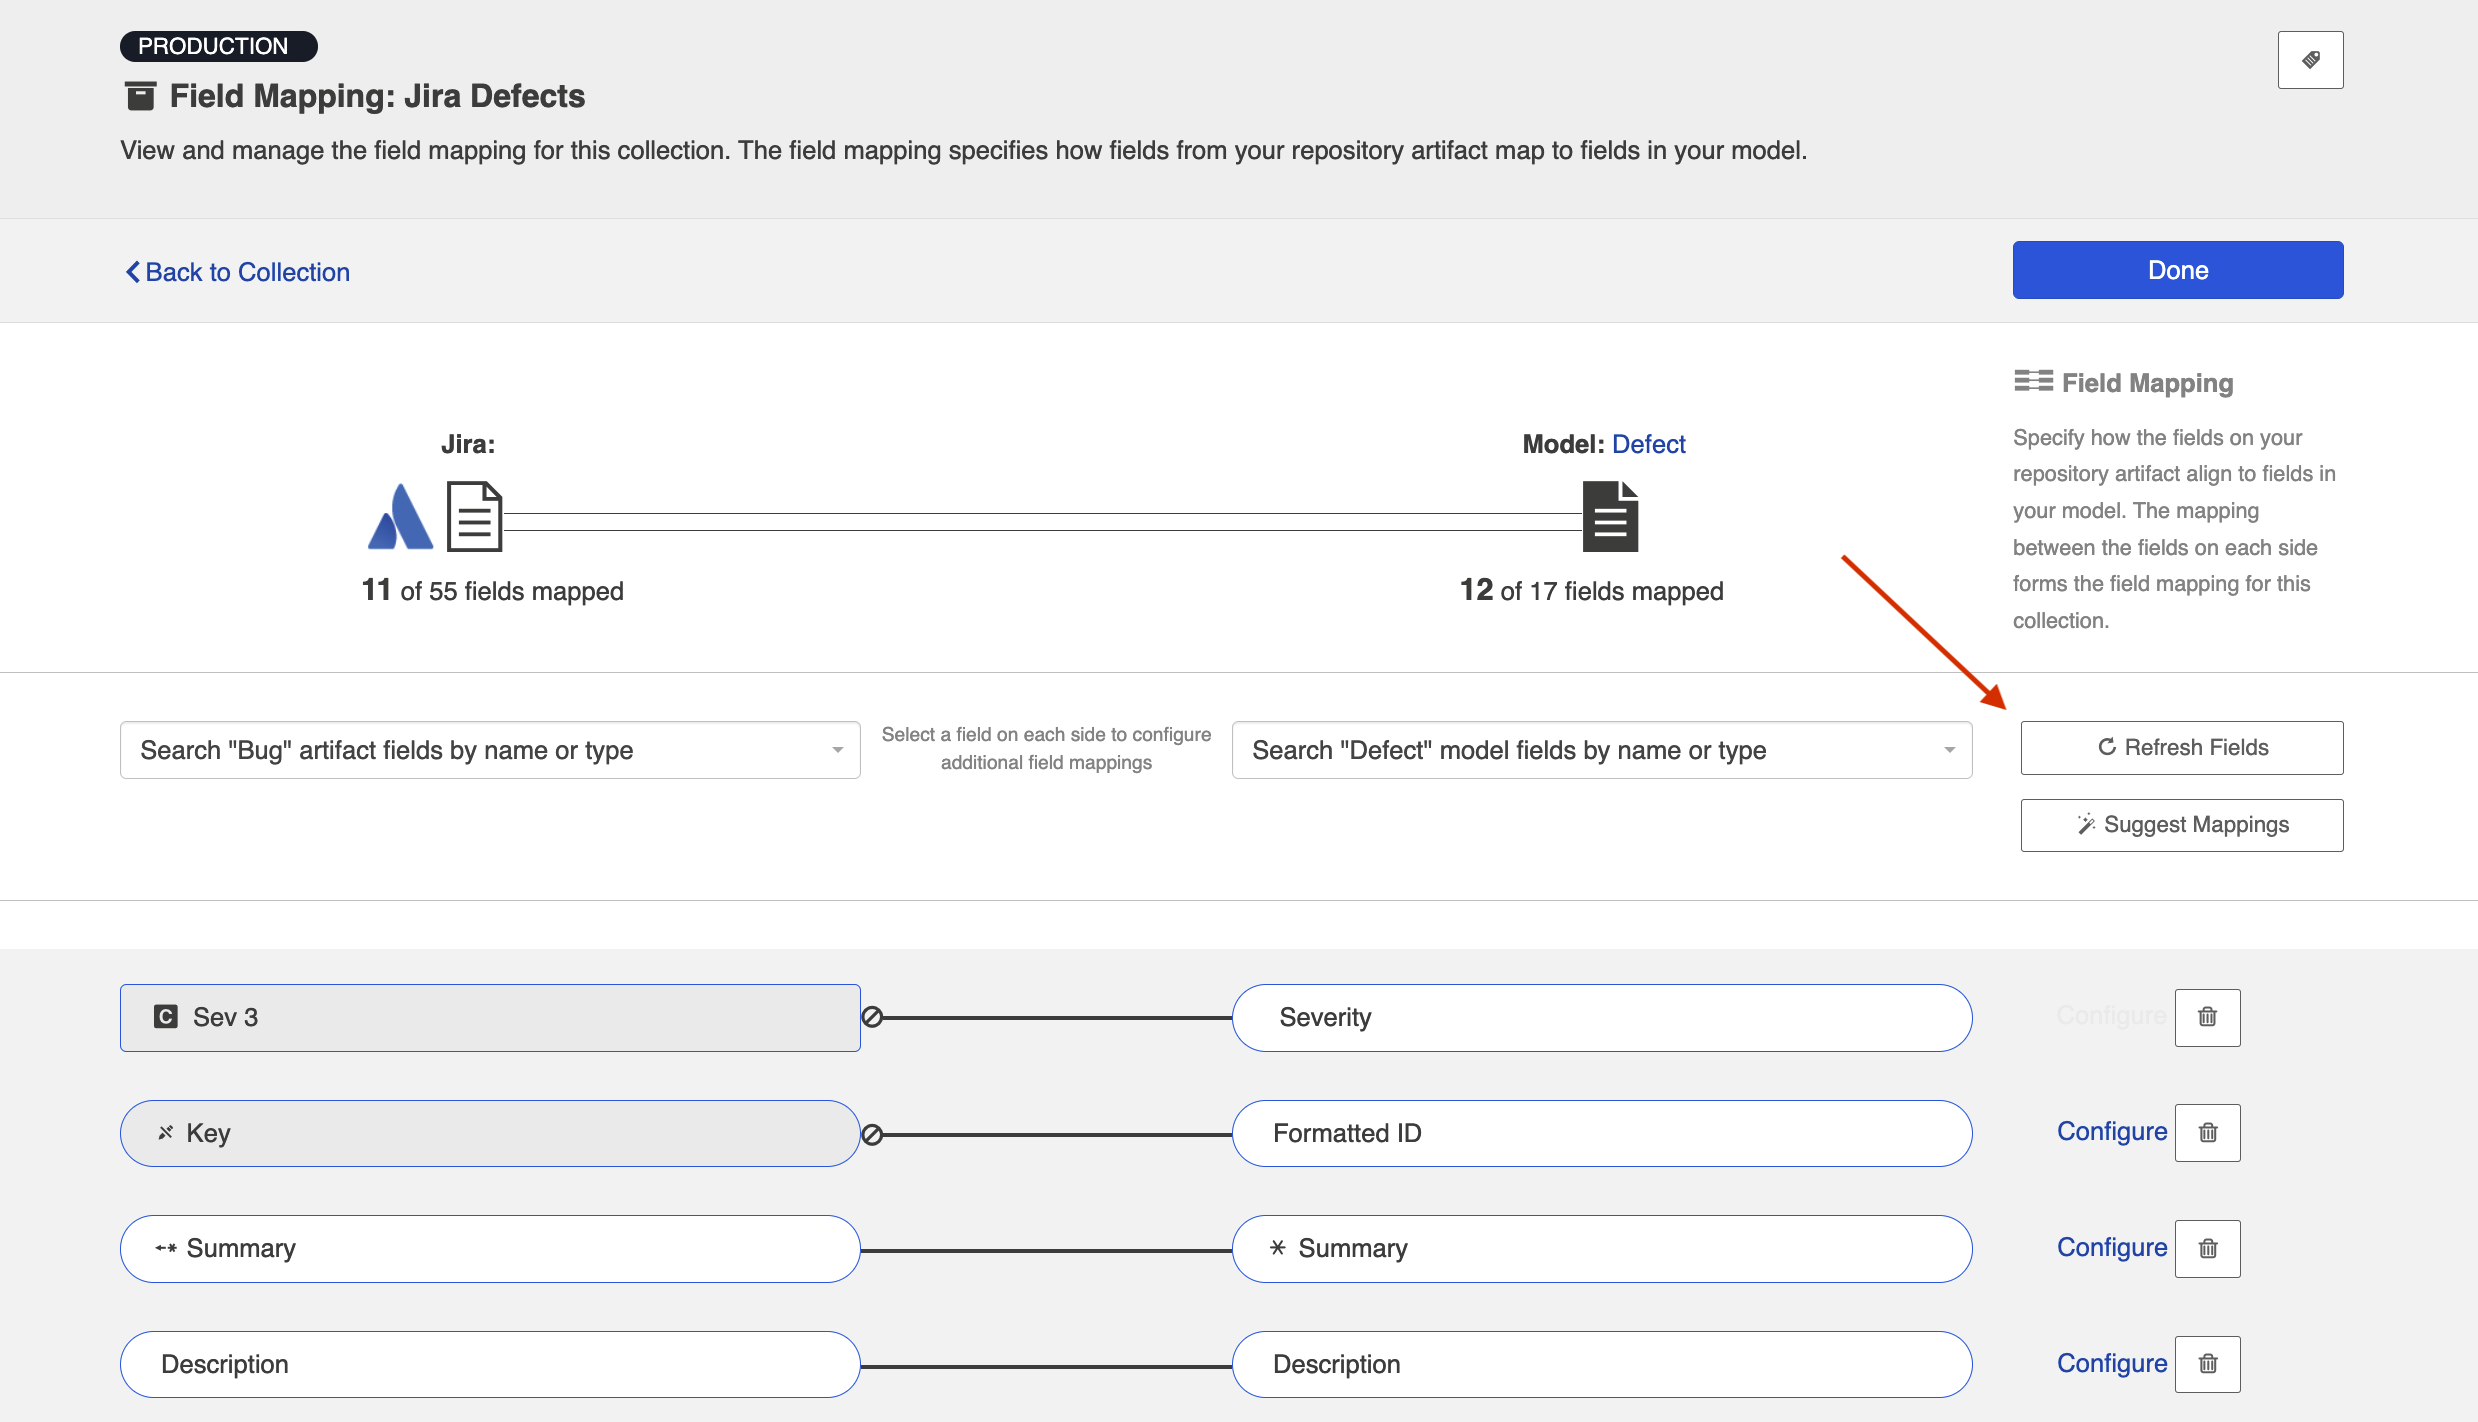
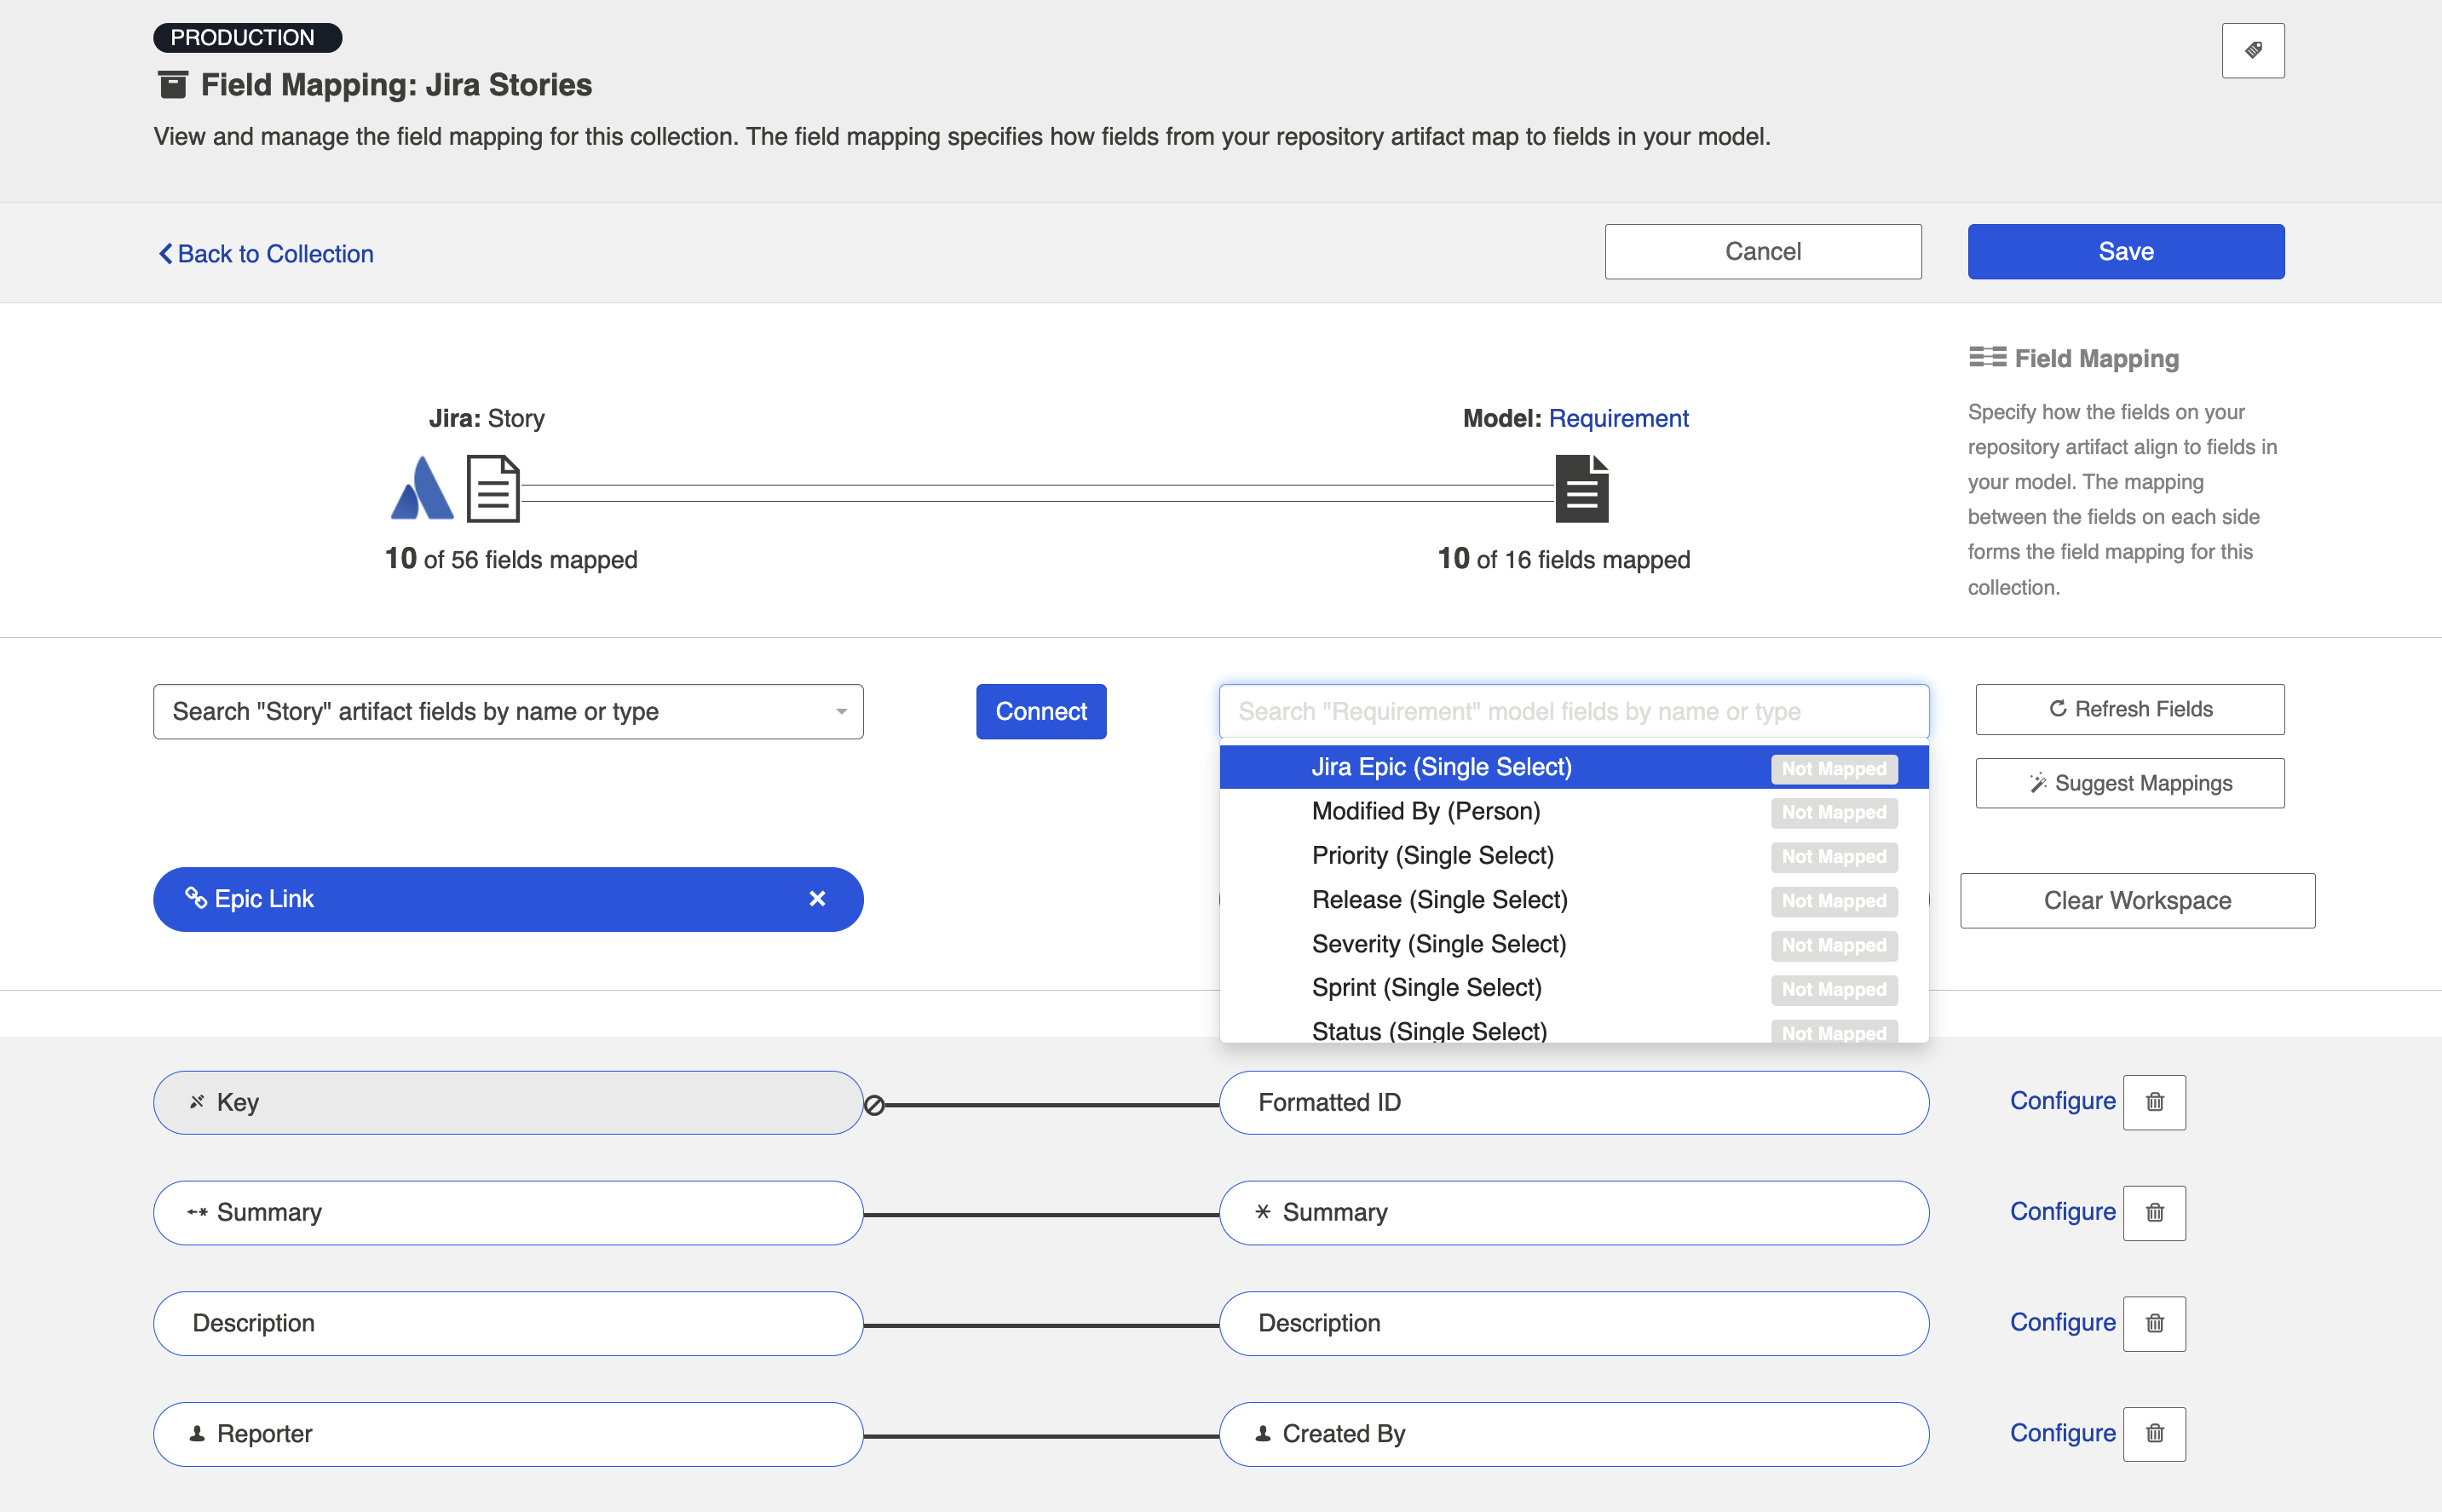
You can map additional fields by using the two drop down boxes:

Transforms
When you map a collection field to a model field, it is necessary to transform the data from the source field to the target field. Depending on the field types, that transform may or may not be possible within Hub.
You can see a table of the available transforms by clicking the Data Transformations Screen link on the Help page.
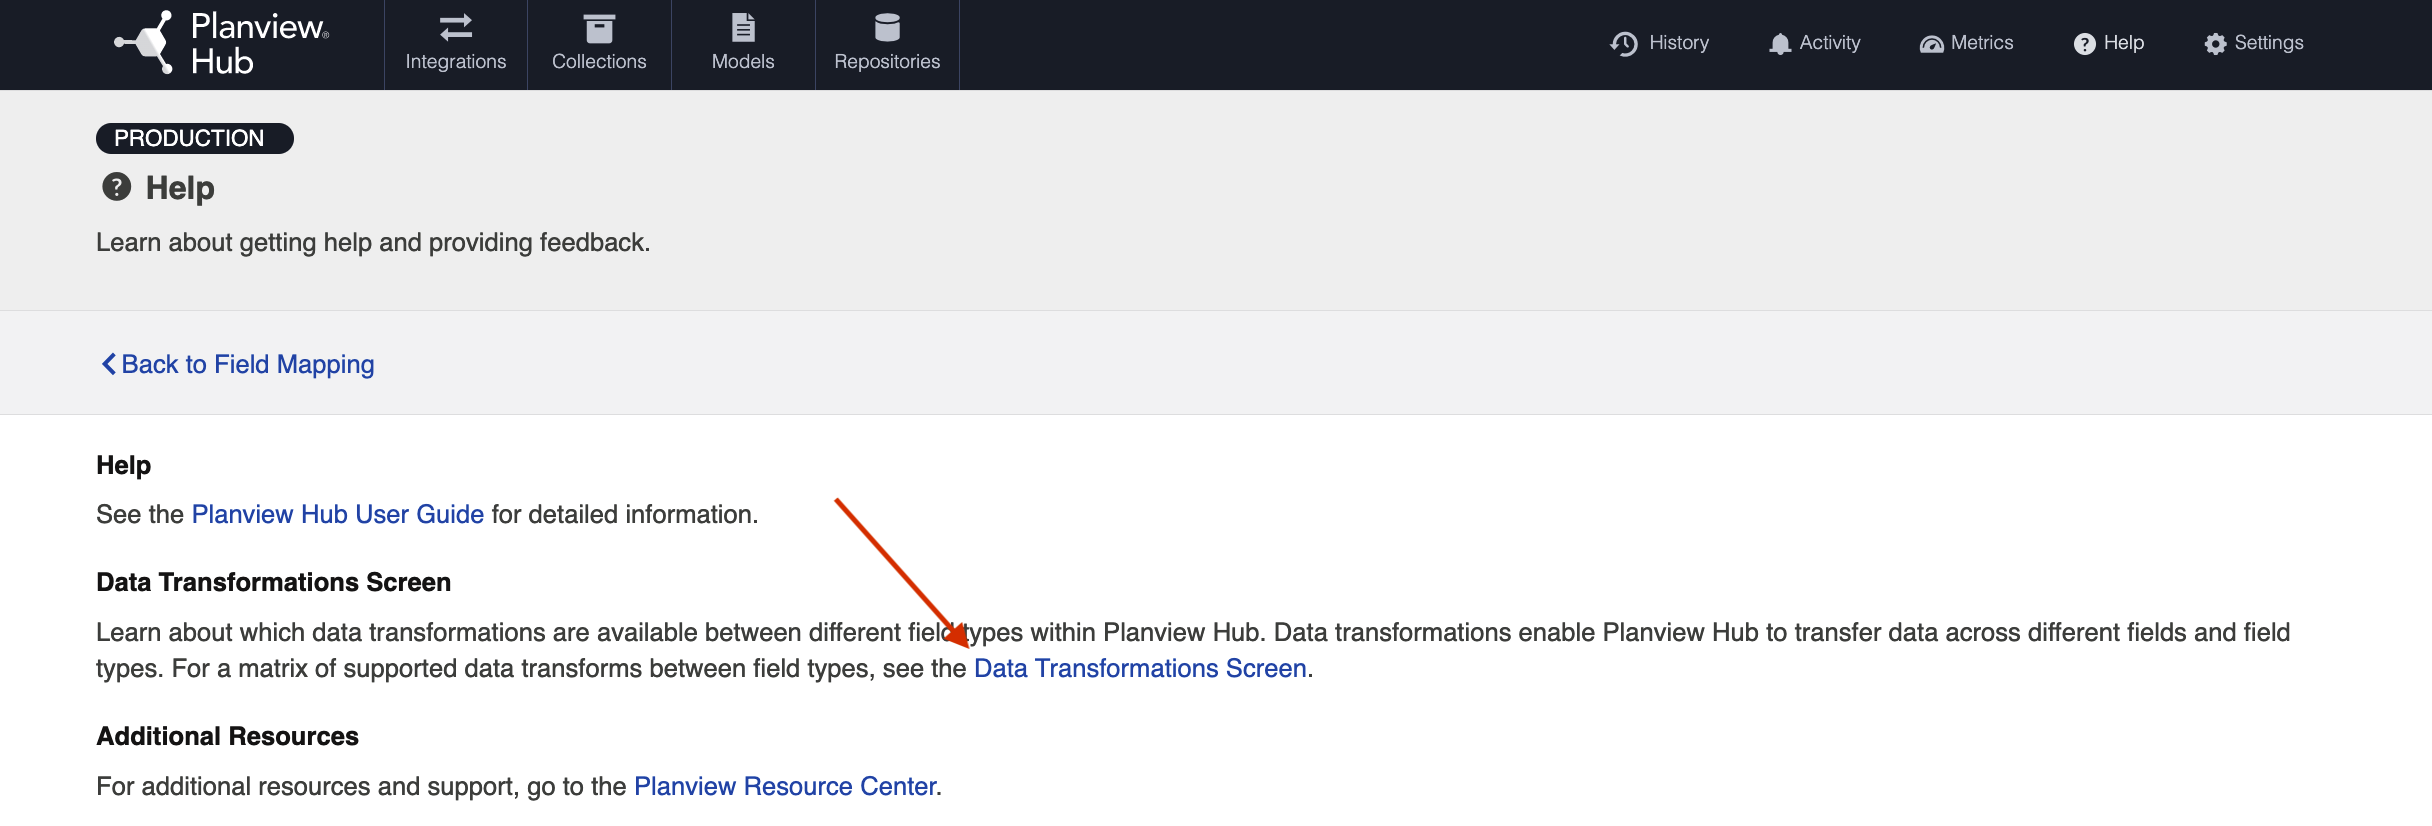
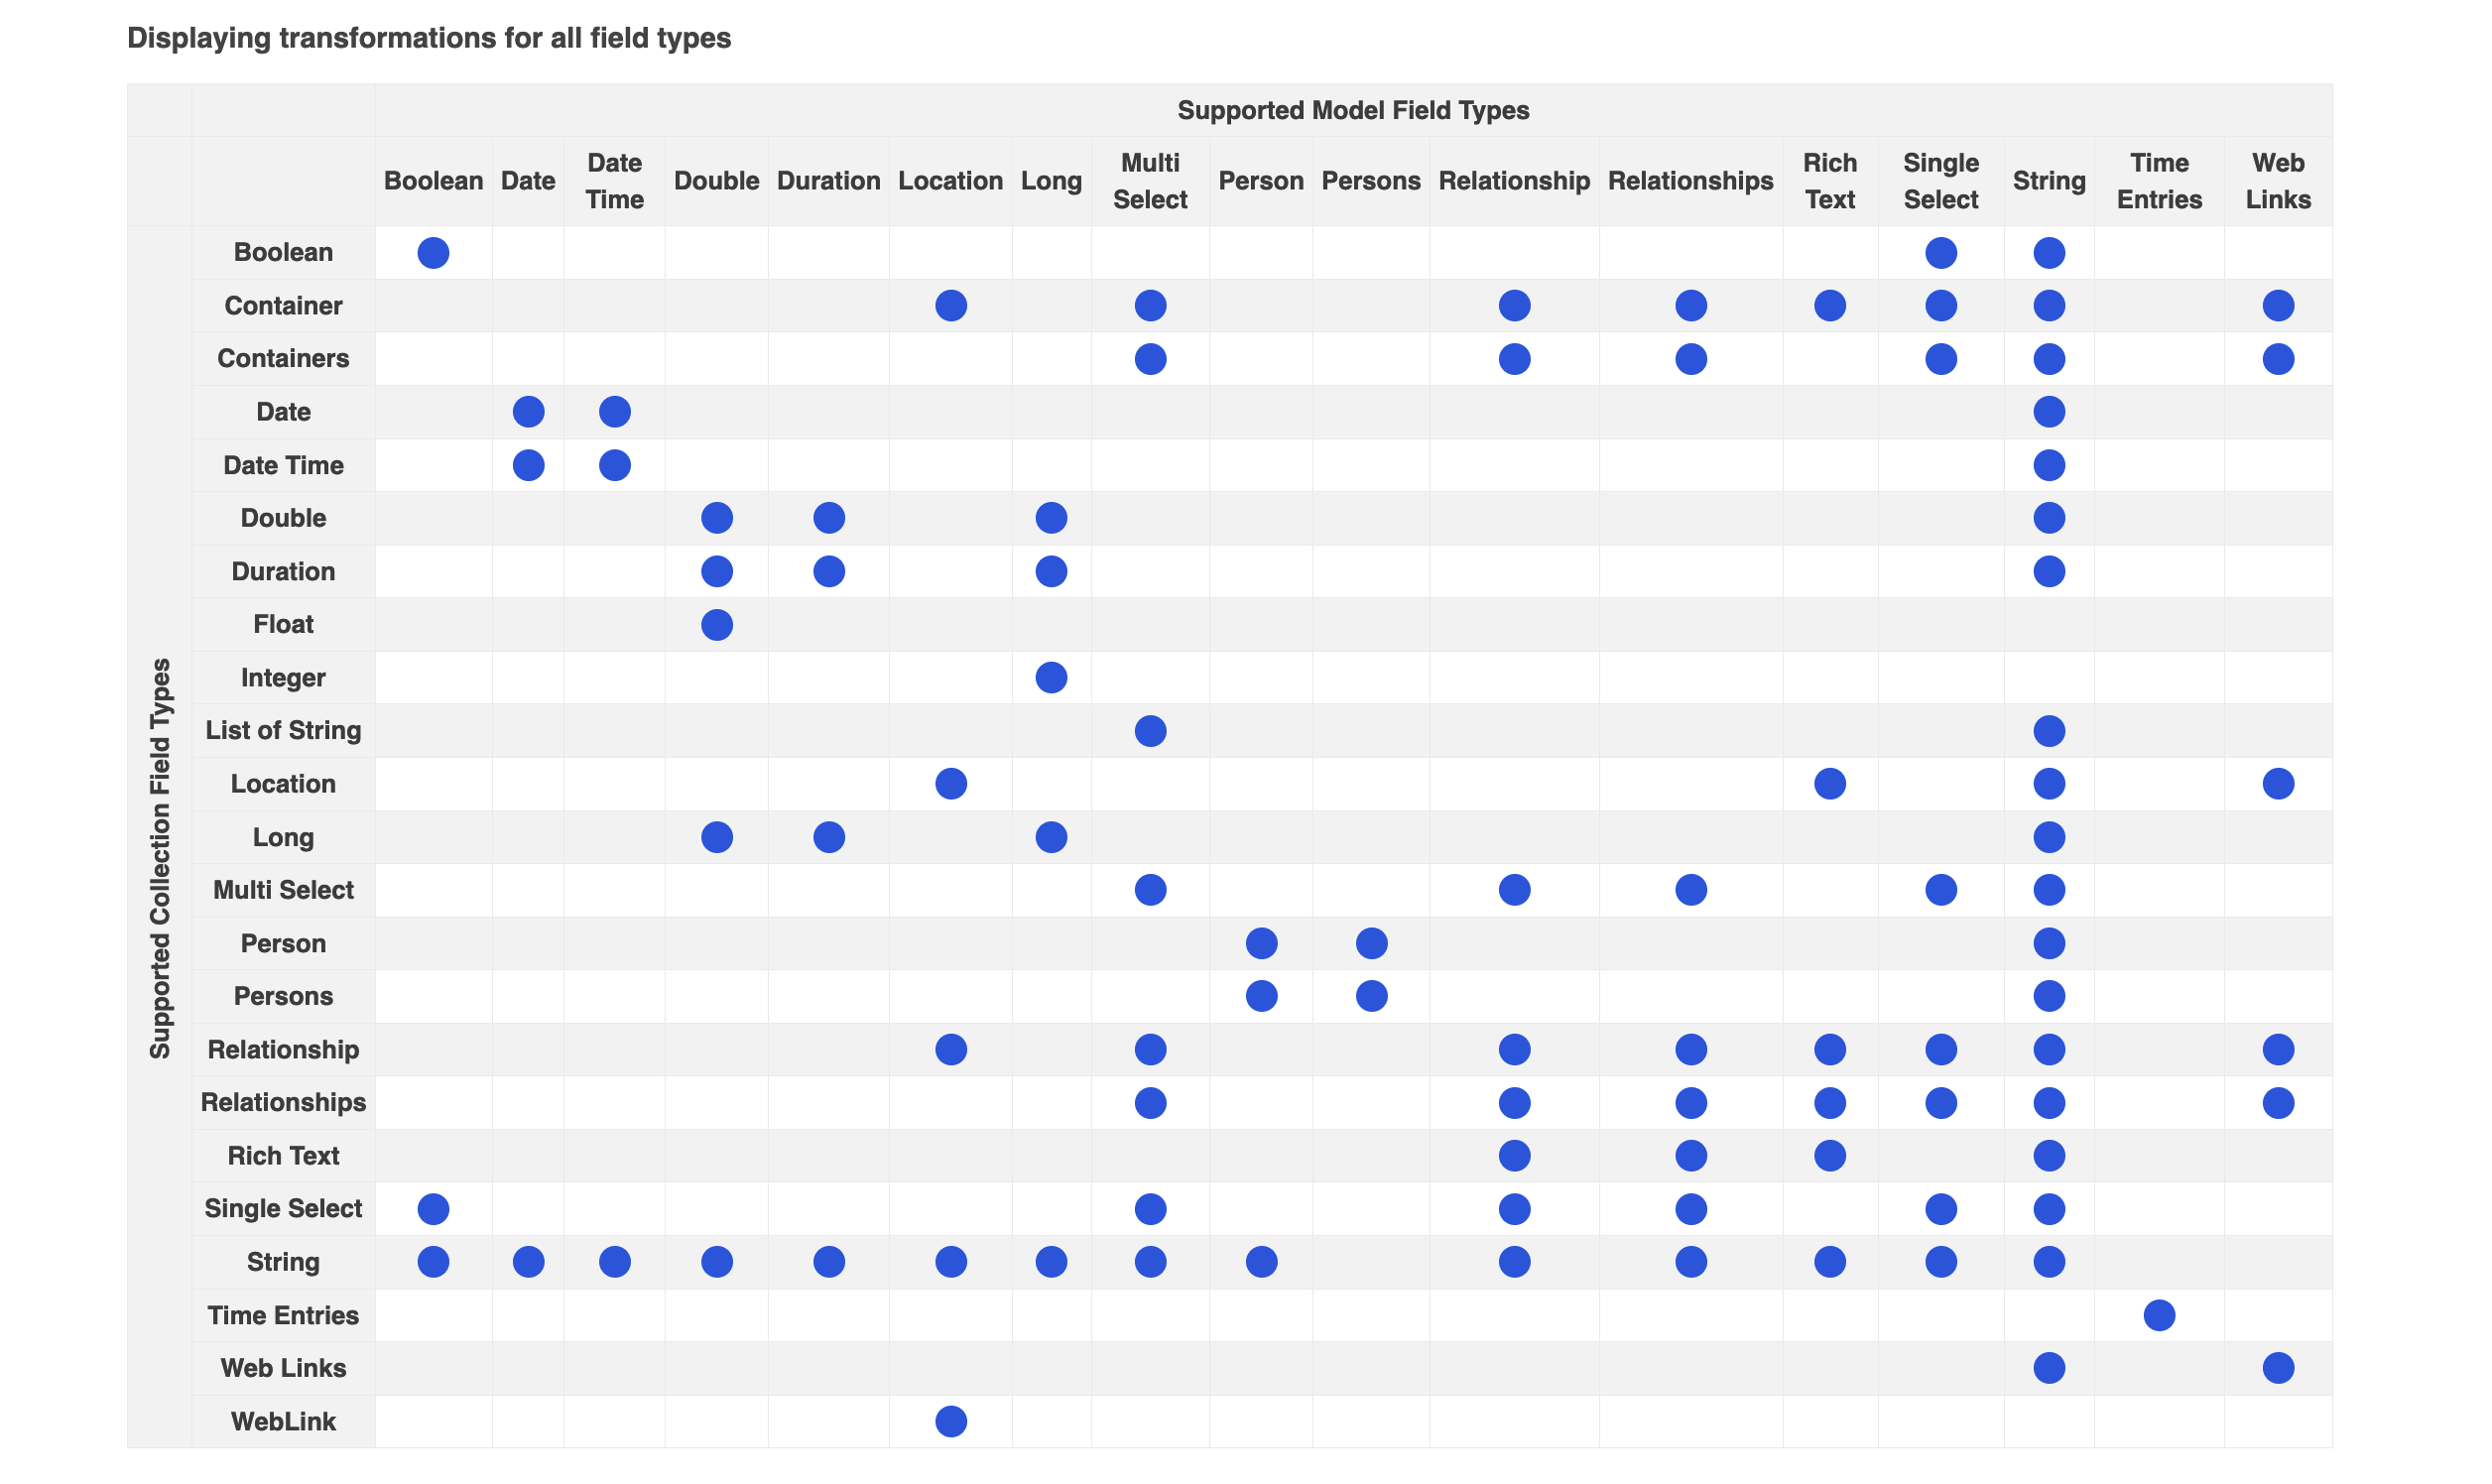
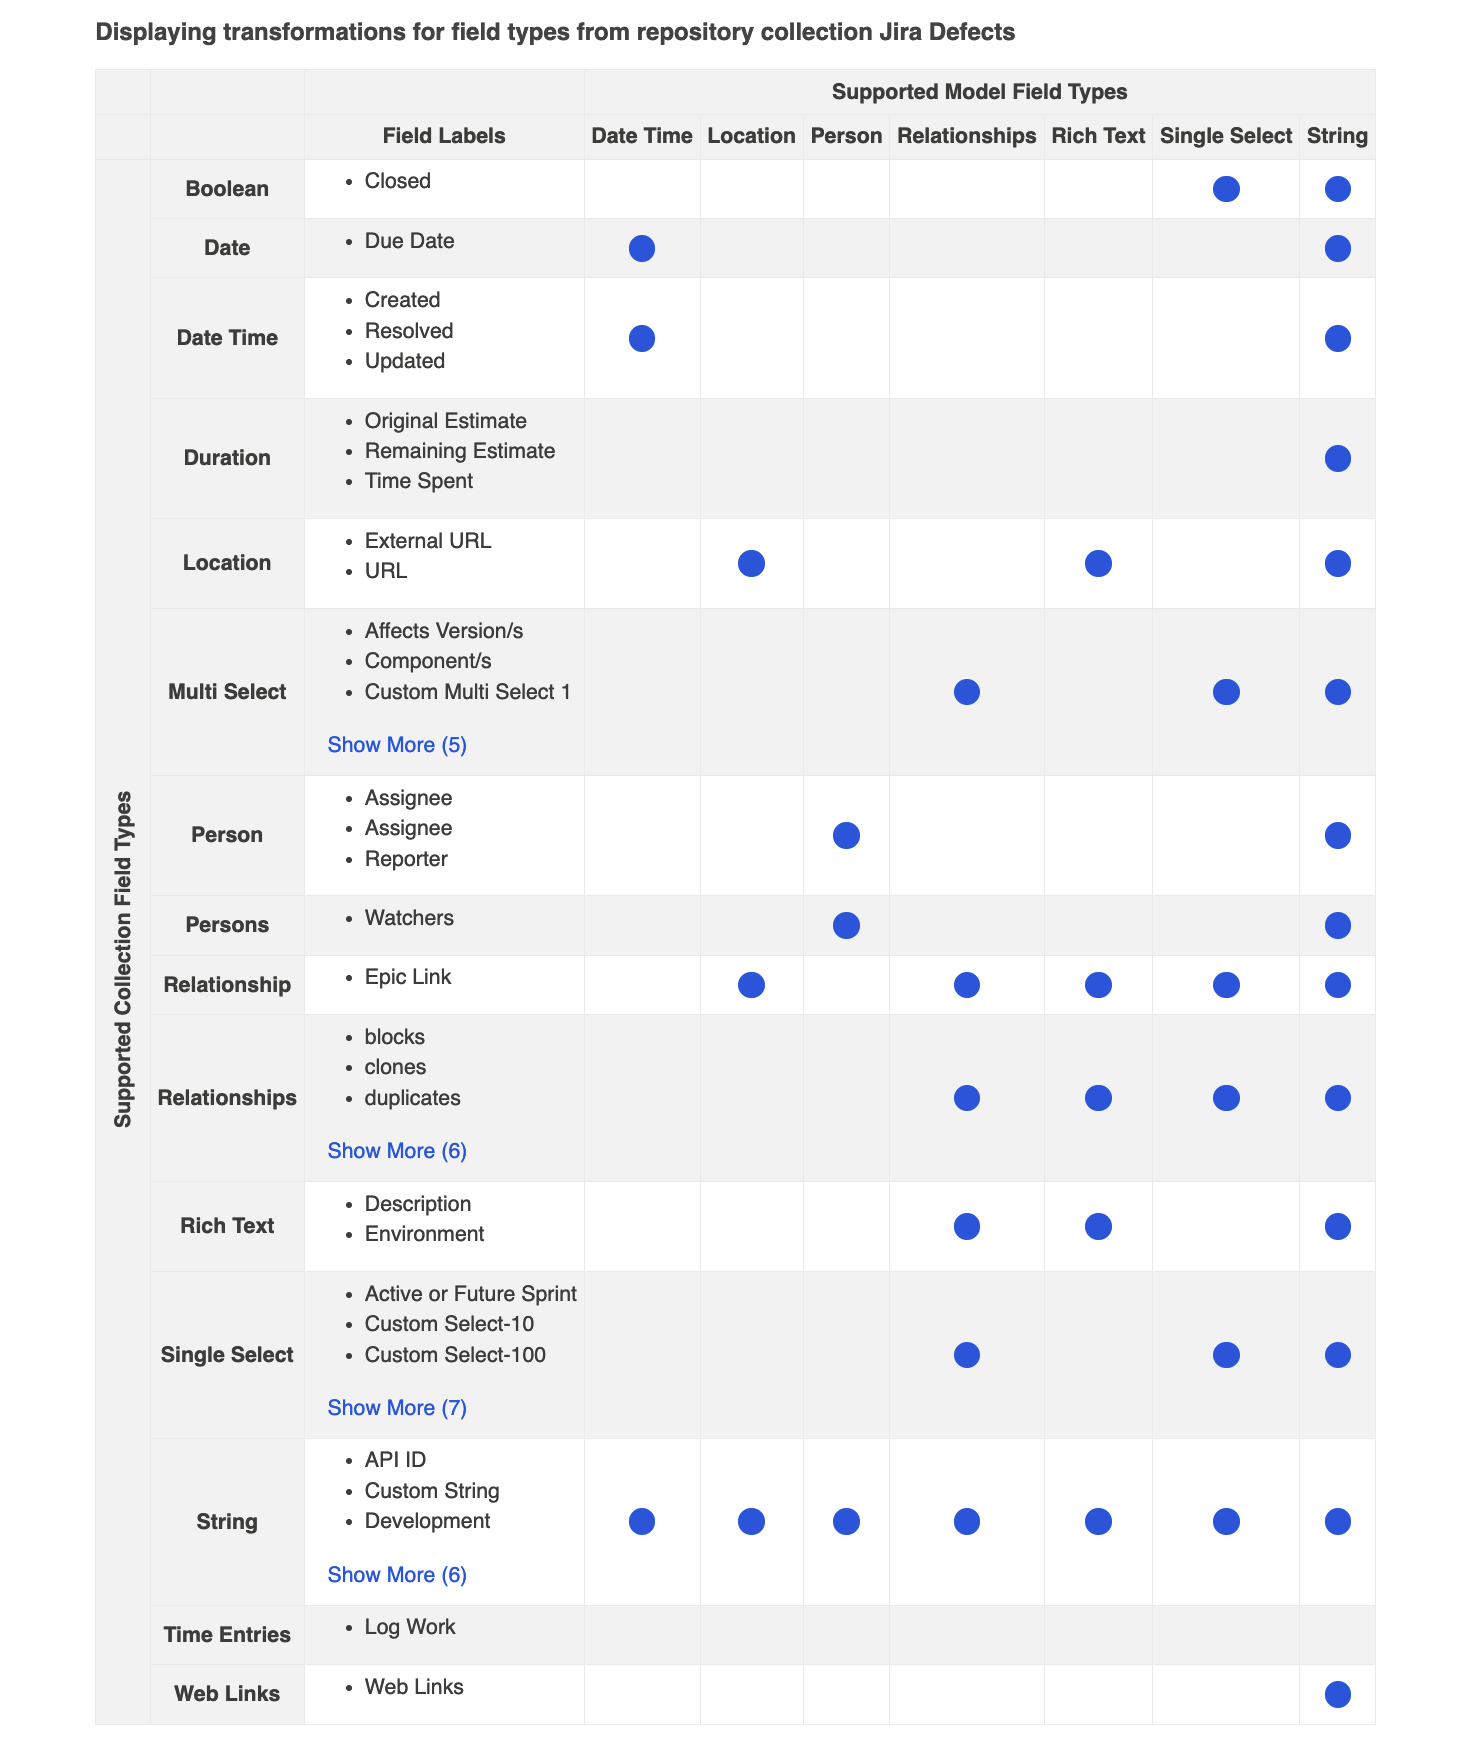
This will lead you to the Field Value Transformations screen. Here, you can see which collection-to-model field type transformations are available.
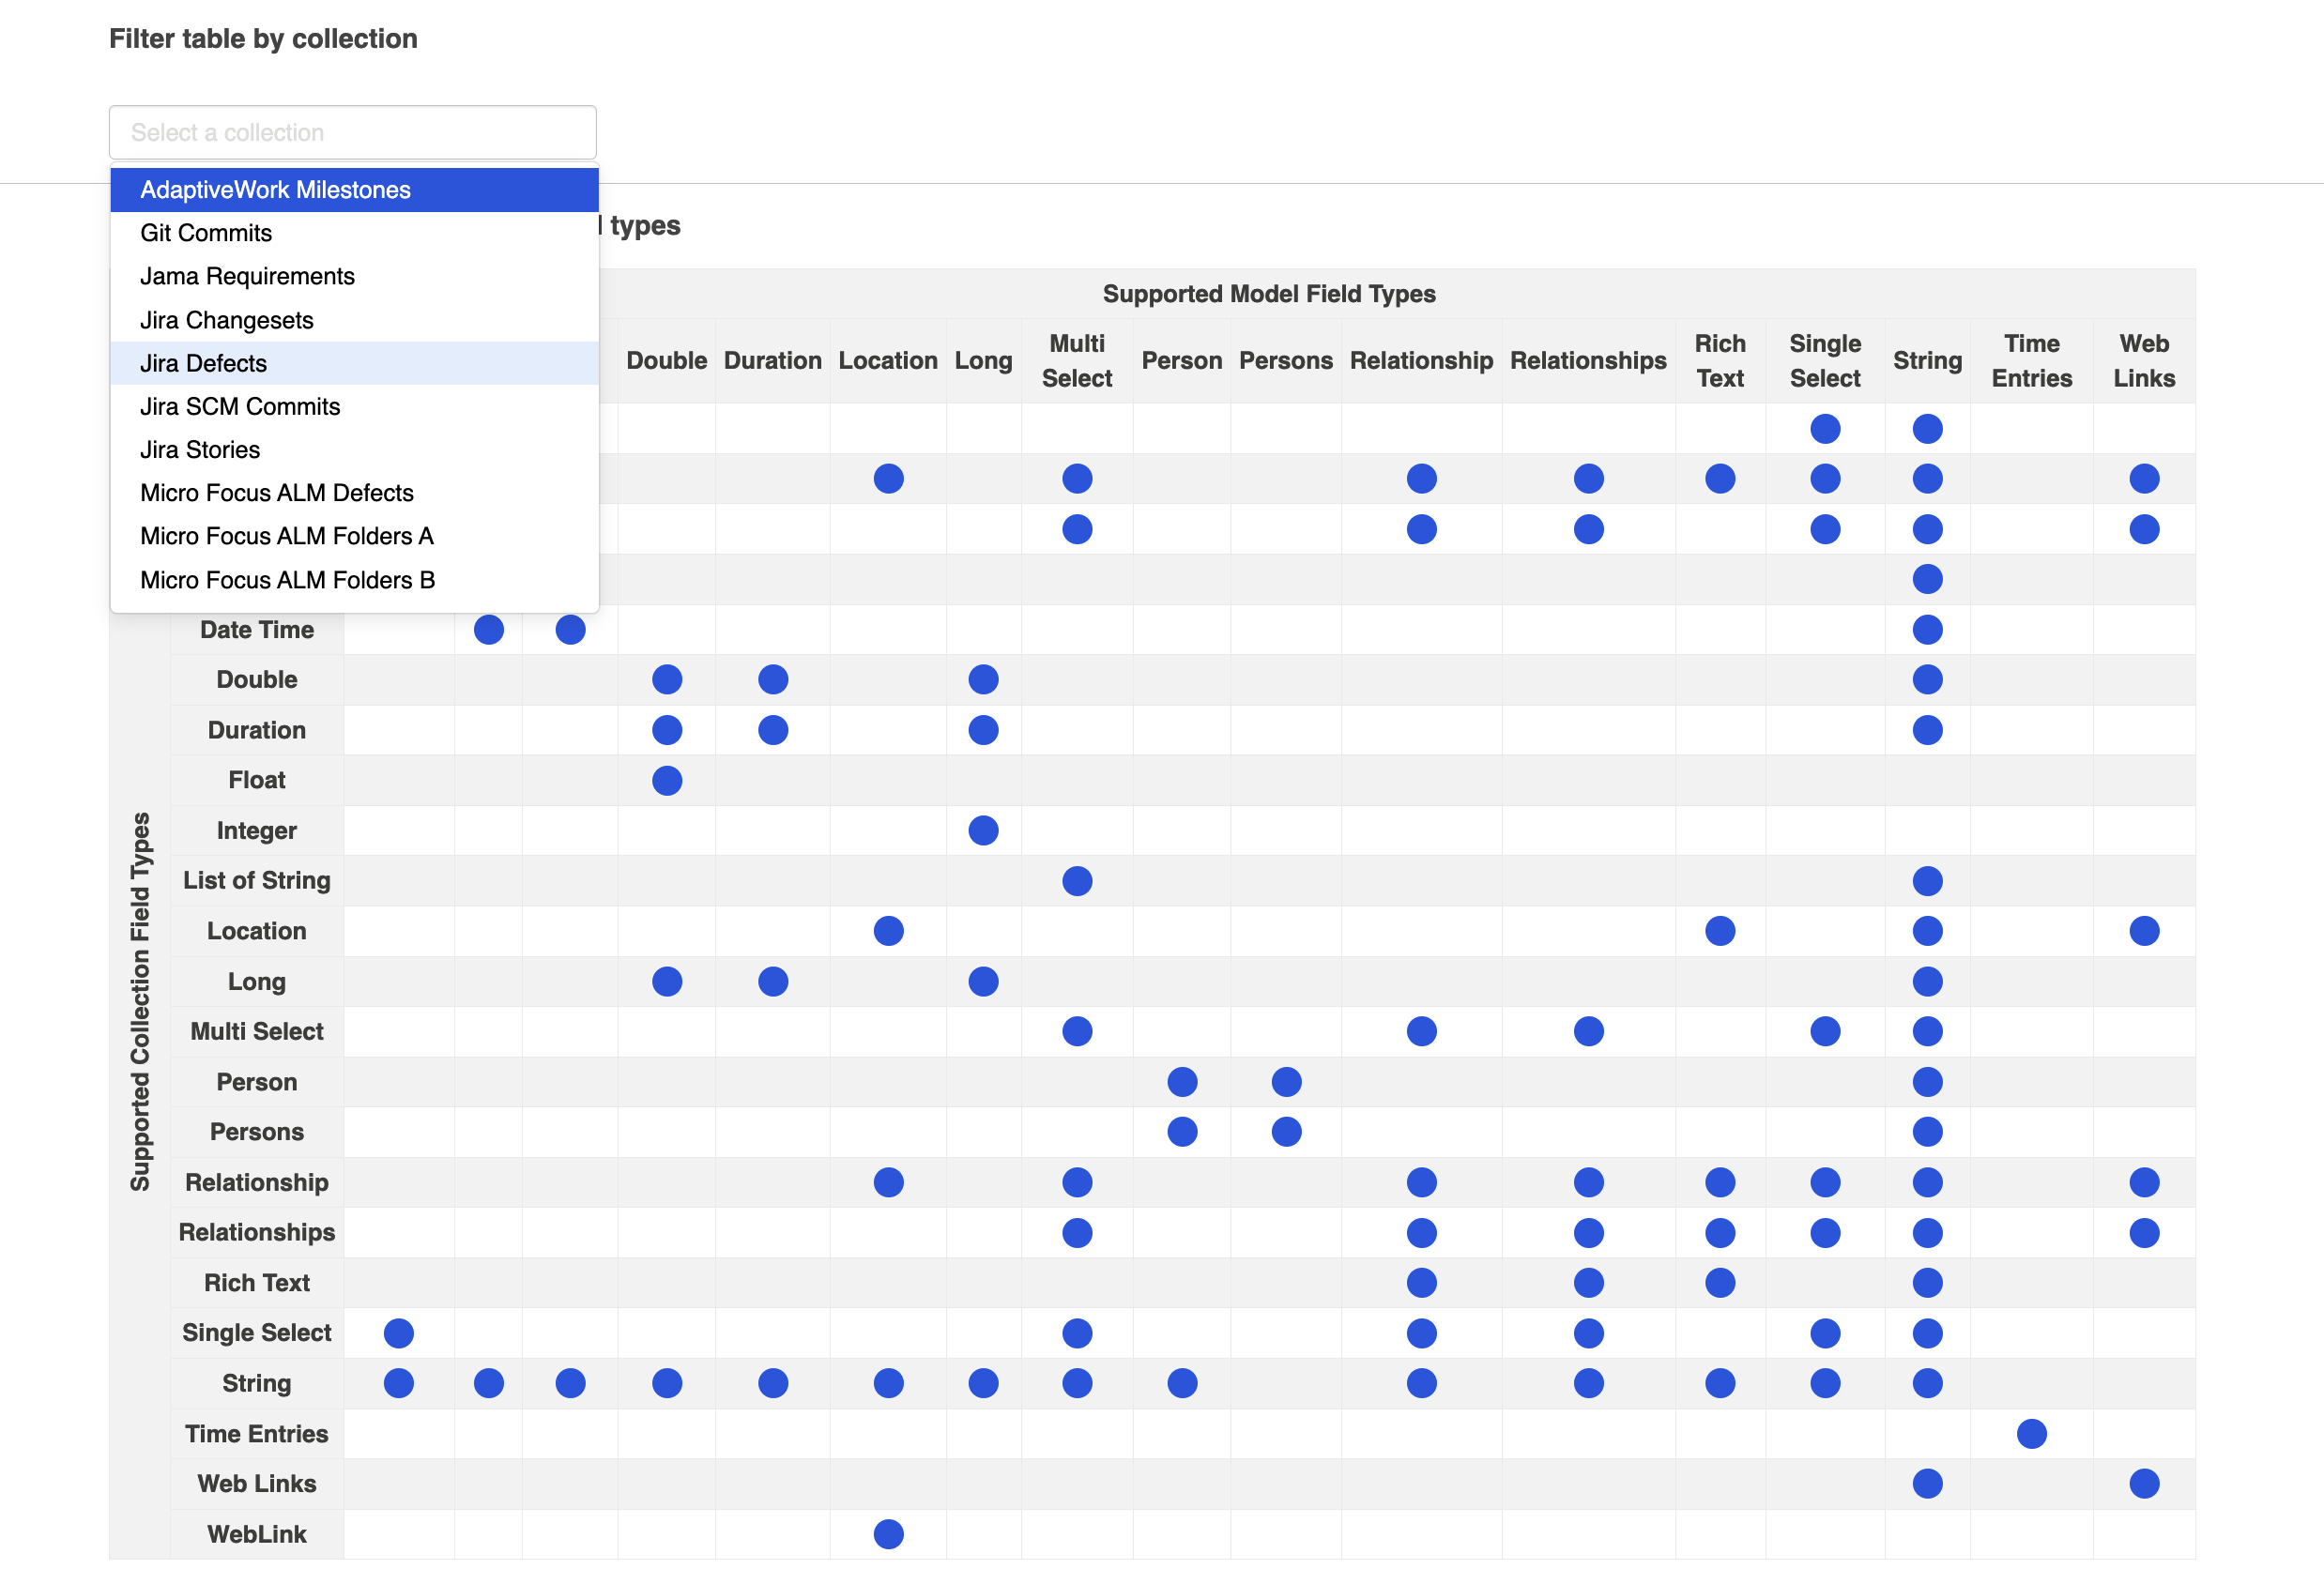
You can even filter by Collection to see the specific field labels and field types for that collection:
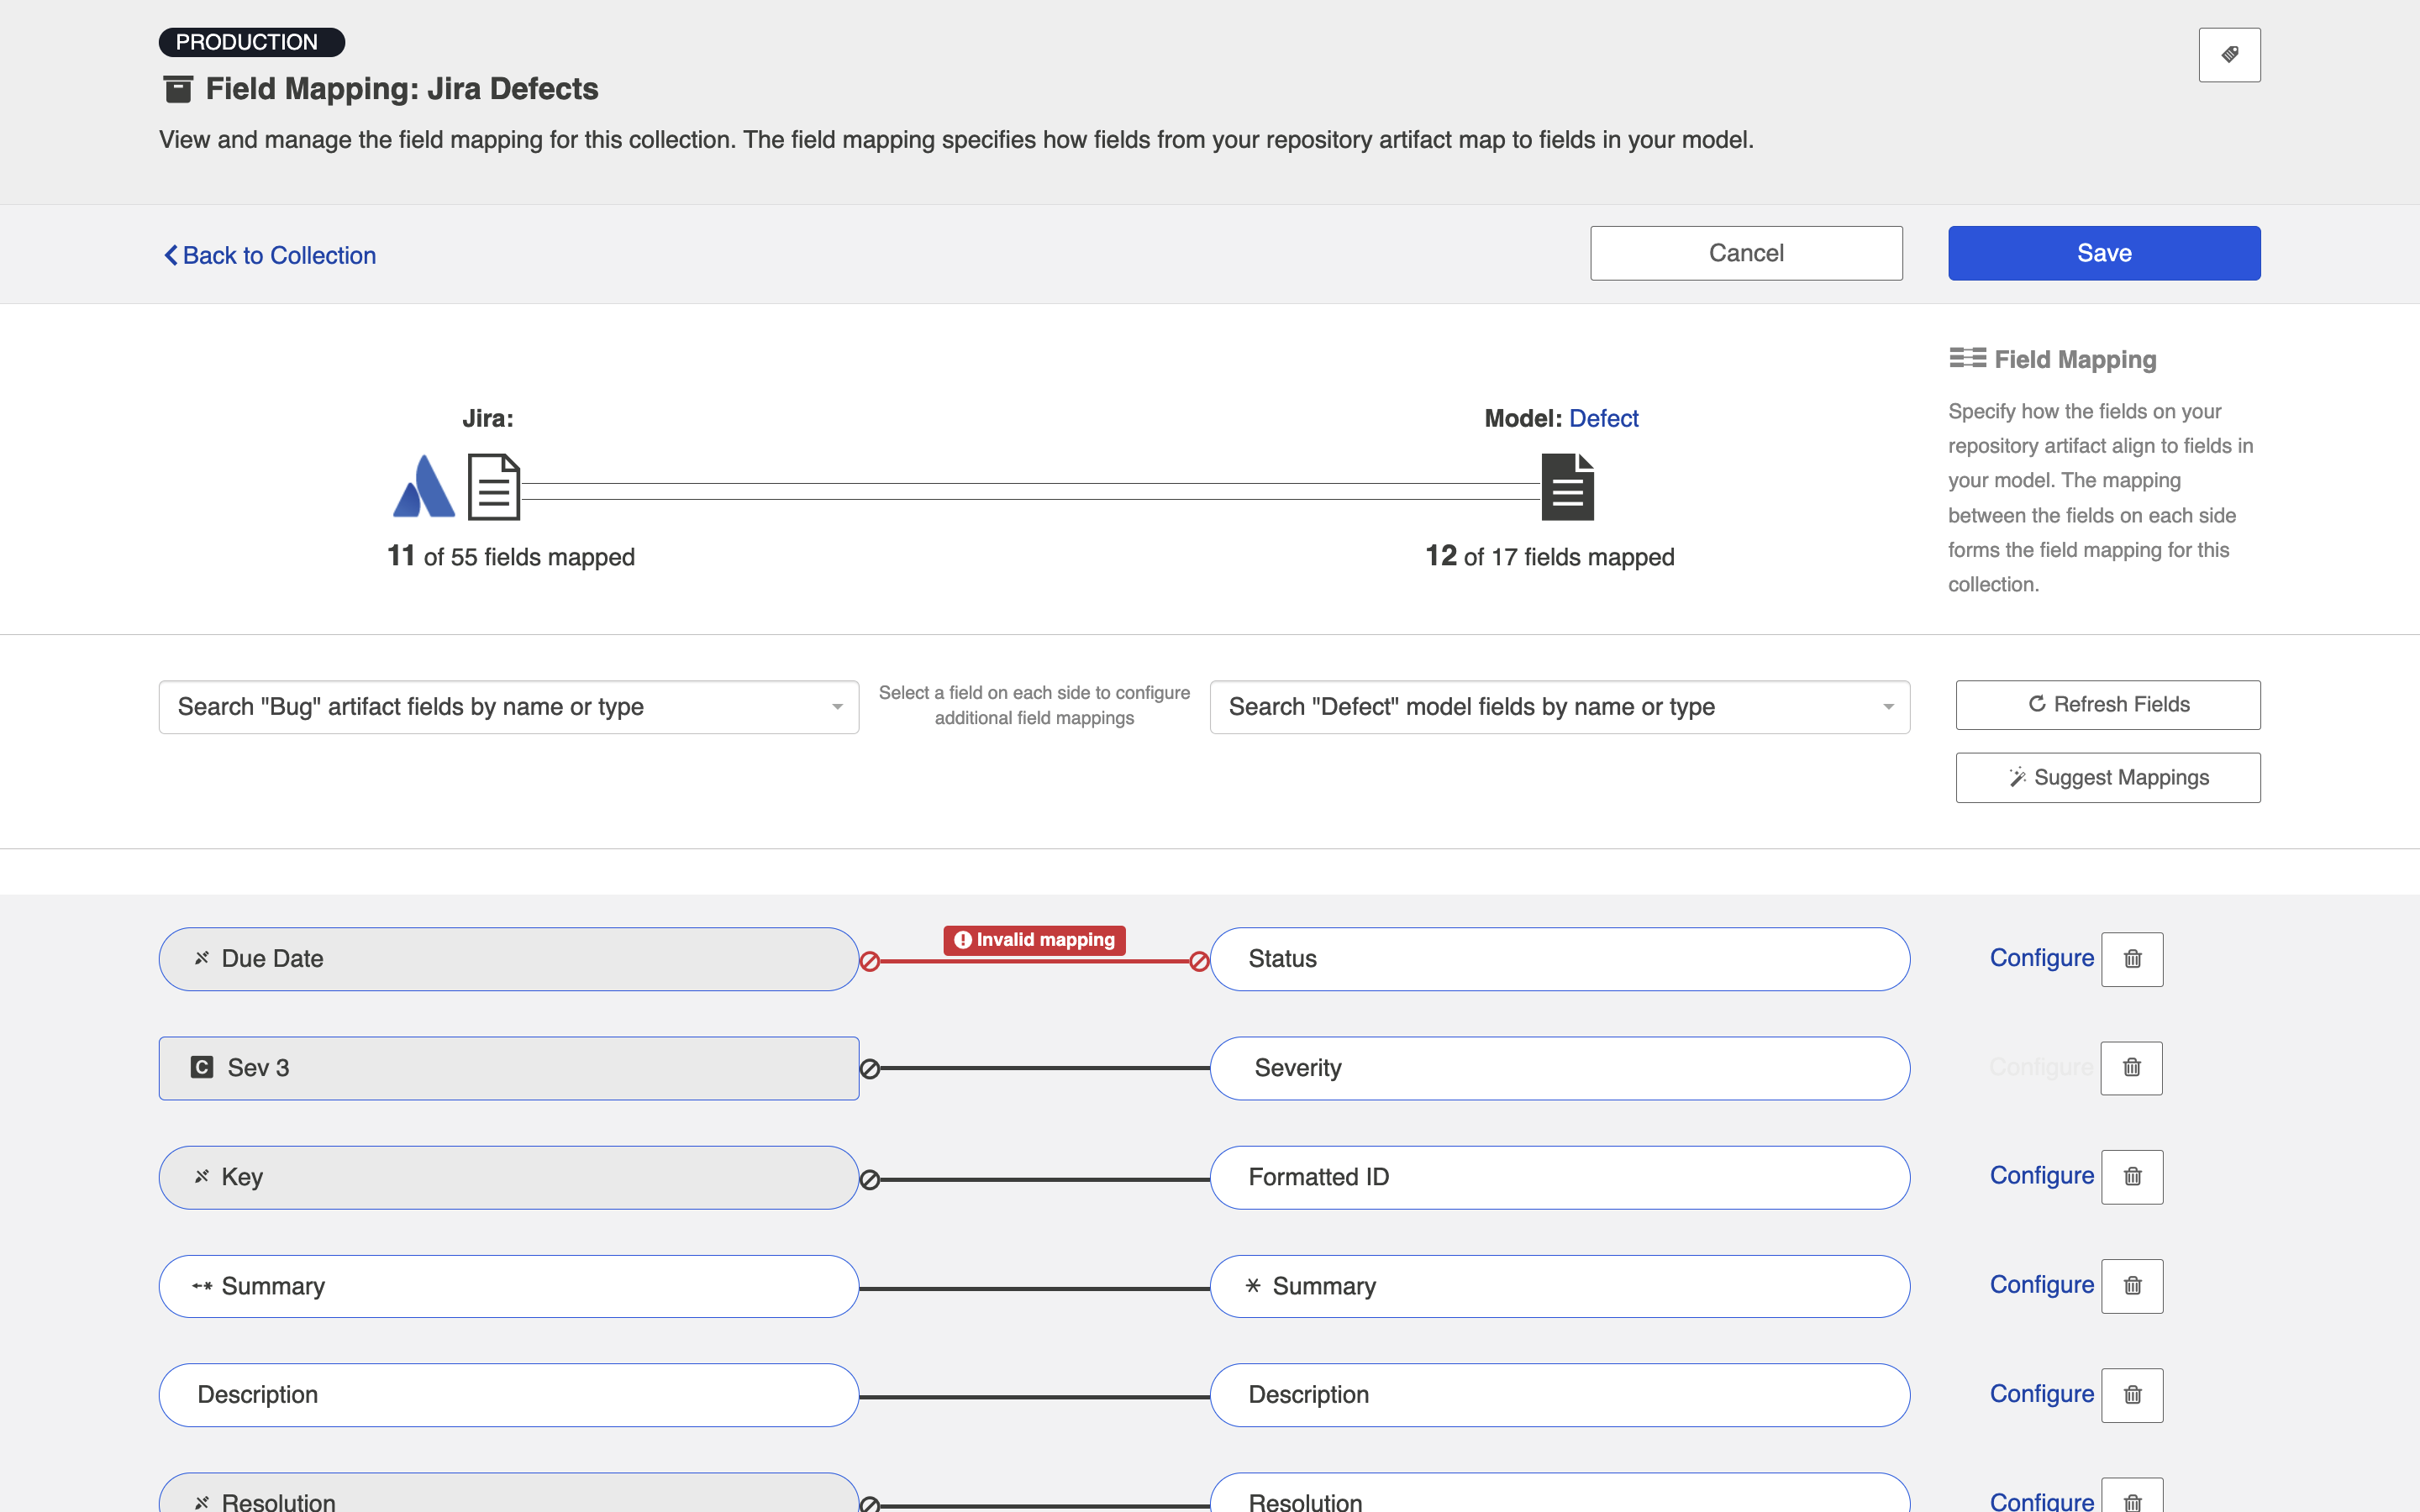
On the Field Mapping screen, if you attempt to map fields that do not have a valid transform between one another (for example, if you map 'due date,' a date field, to 'status,' a single-select field), you will get an 'invalid mapping' warning, and the mapping will not be saved.
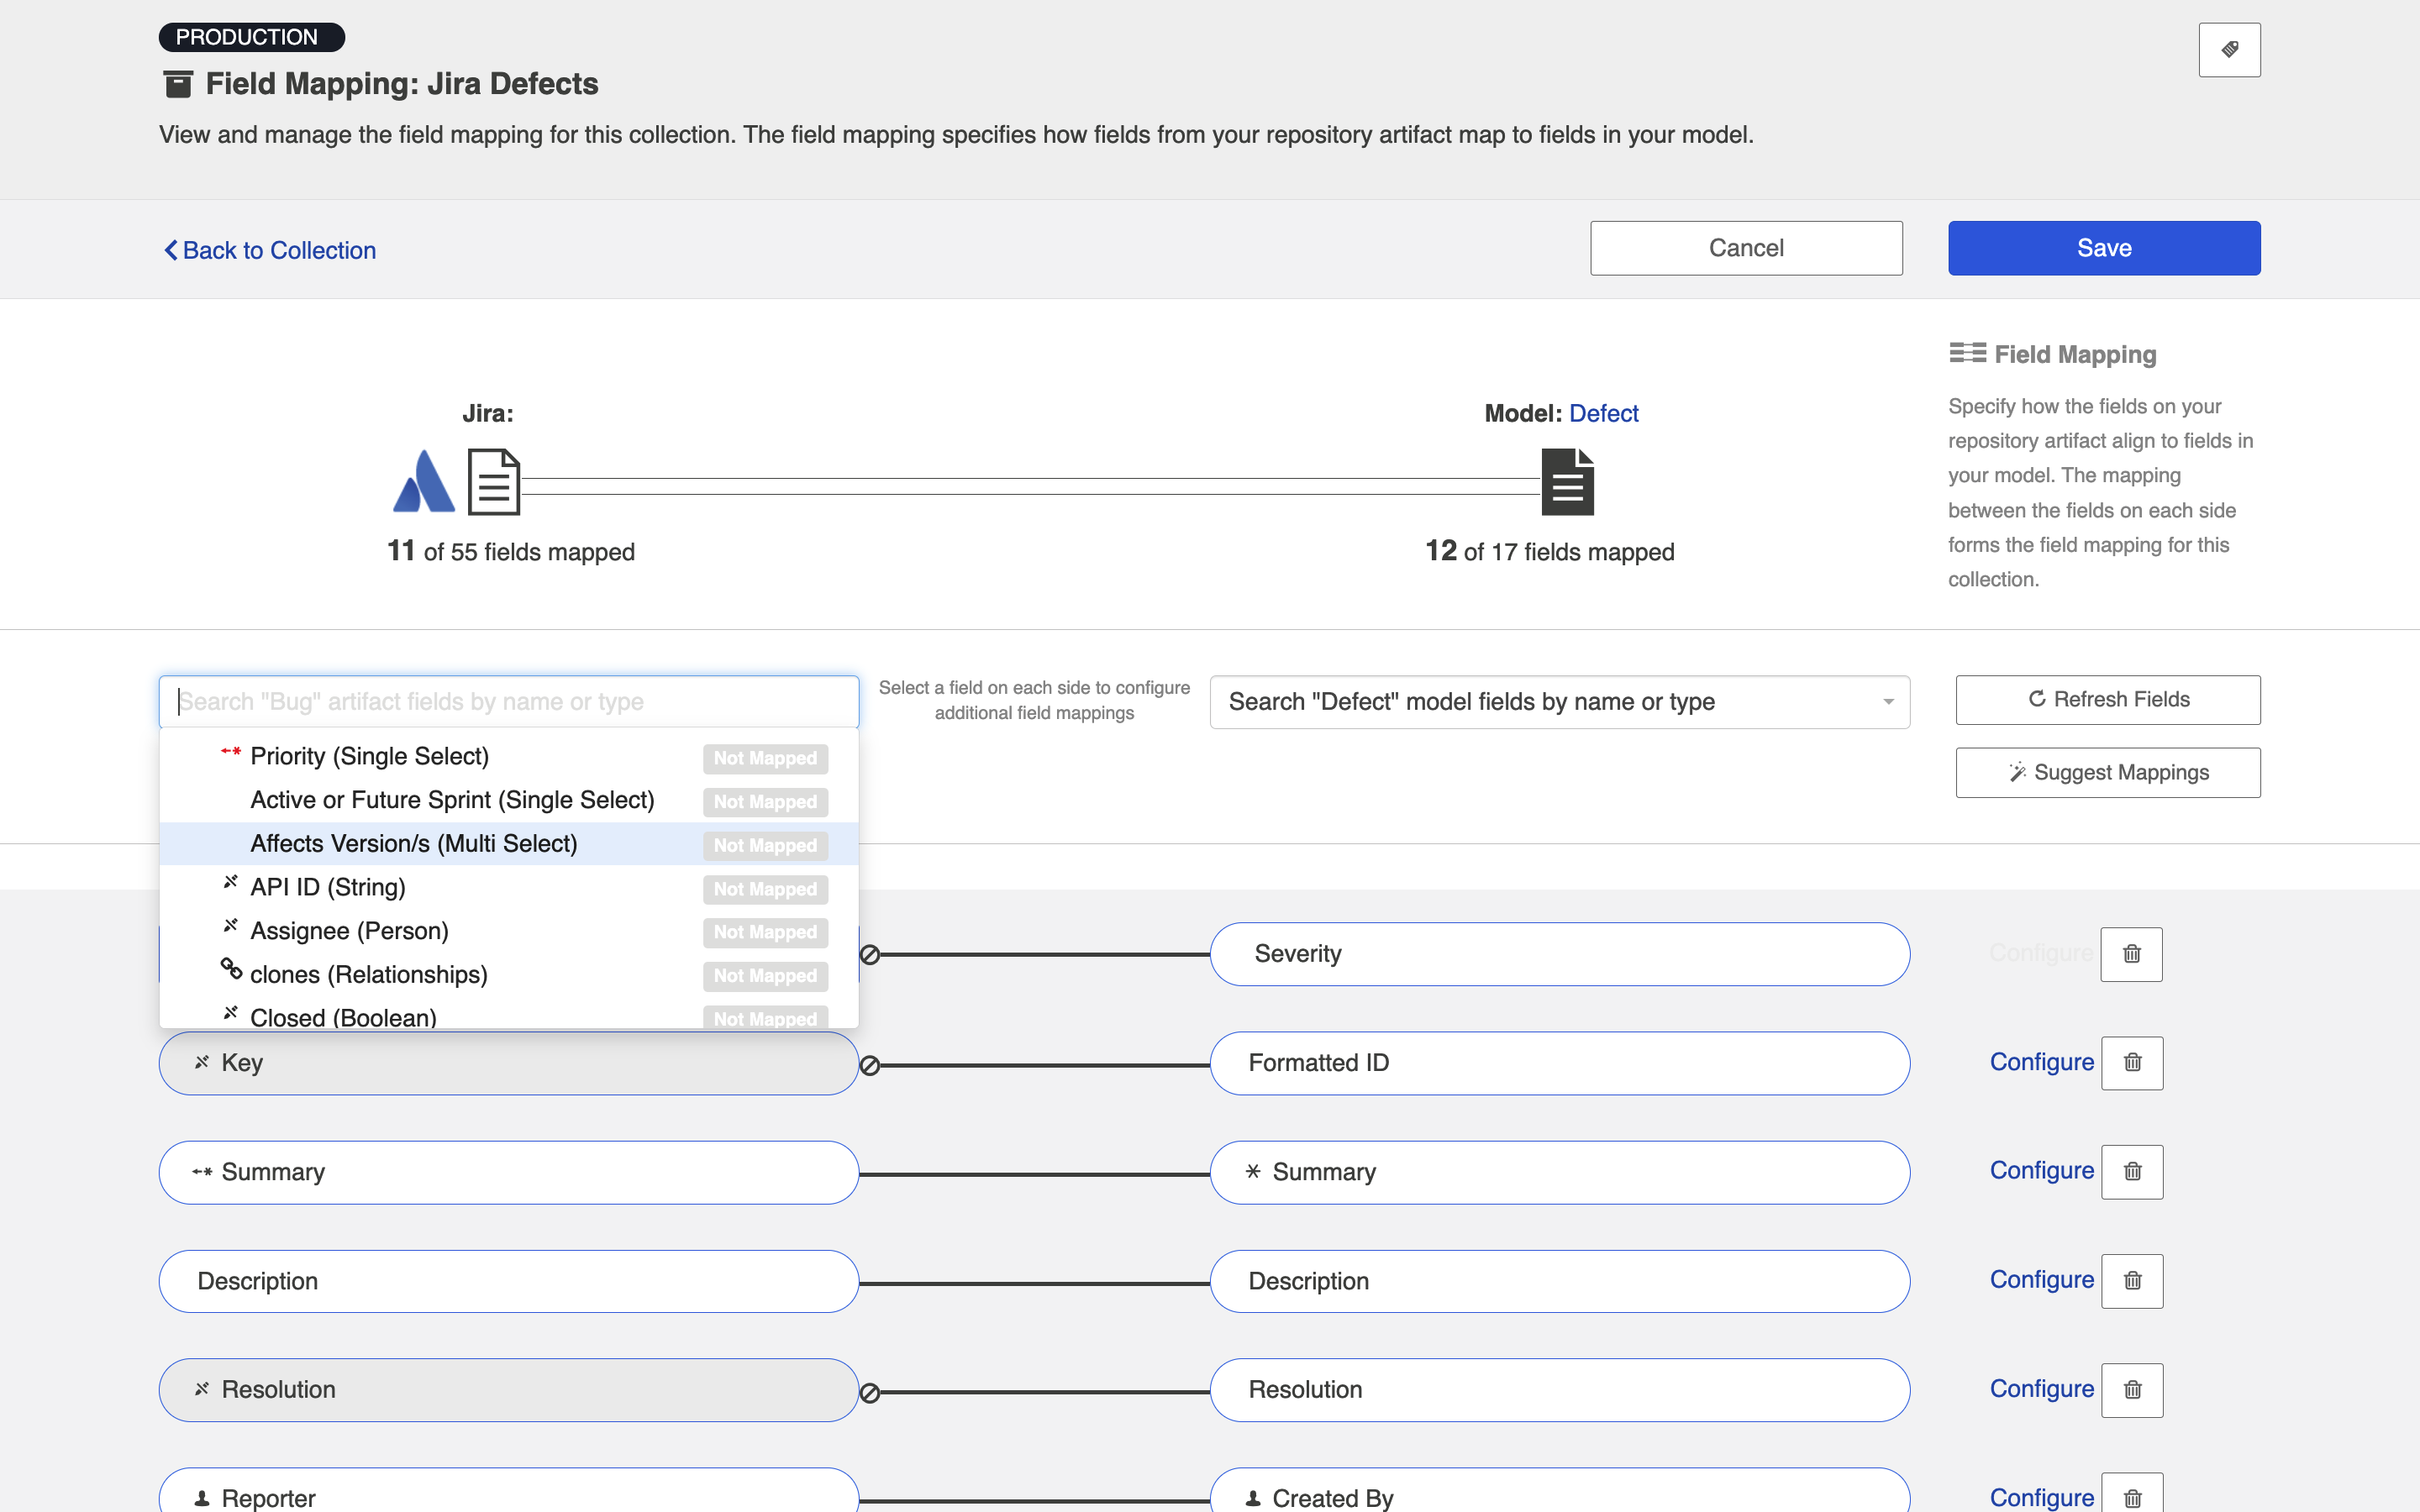
To help troubleshoot, you can review the field type when selecting each value from the drop down menu. This will enable you to ensure that the transform between the two field types is supported.
Field Mapping Icons
On the Field Mapping screen, you will see a number of icons which will help you understand any special properties or requirements for each field. If you hover your mouse over an icon, you will see a pop-up explaining what the icon means. You can also review their meanings in the legend below:
|
Icon |
Meaning |
|---|---|
|
|
A constant value will be sent. Note that:
|
|
|
A state transition will be utilized. Note that:
|
|
|
Repository field is read-only and cannot receive data. |
|
|
To create artifacts in your repository, this field must be mapped to your model. |
|
|
This is a required field in your model; it must be mapped to your collection. |
|
|
This field will not be updated as part of your integration because the mapping would be invalid. You do not have the option of changing this. |
Constant Value Mapping
In some scenarios, either the collection artifact or the model might require that a value be provided for a given field. This value is usually provided by mapping it to the equivalent field in the collection or model. However, sometimes your collection artifact has a field that needs a value that doesn't align with any fields in your model, and sometimes your model might have a required field that doesn't have an equivalent field from the collection artifact. In these cases, you can set a constant value. By doing so, you'll specify the value that you would like to provide for that field.
Constant values can be set for the following field types:
- Boolean
- Date/Date Time
- Double
- Location
- Long
- Multi-Select
- Person
- Rich Text
- Single-Select
- String
Scenario 1: If your repository requires a field for artifact creation, but that field is not a part of your model:
Solution: Set a constant value on the side of the model, to send to your collection.
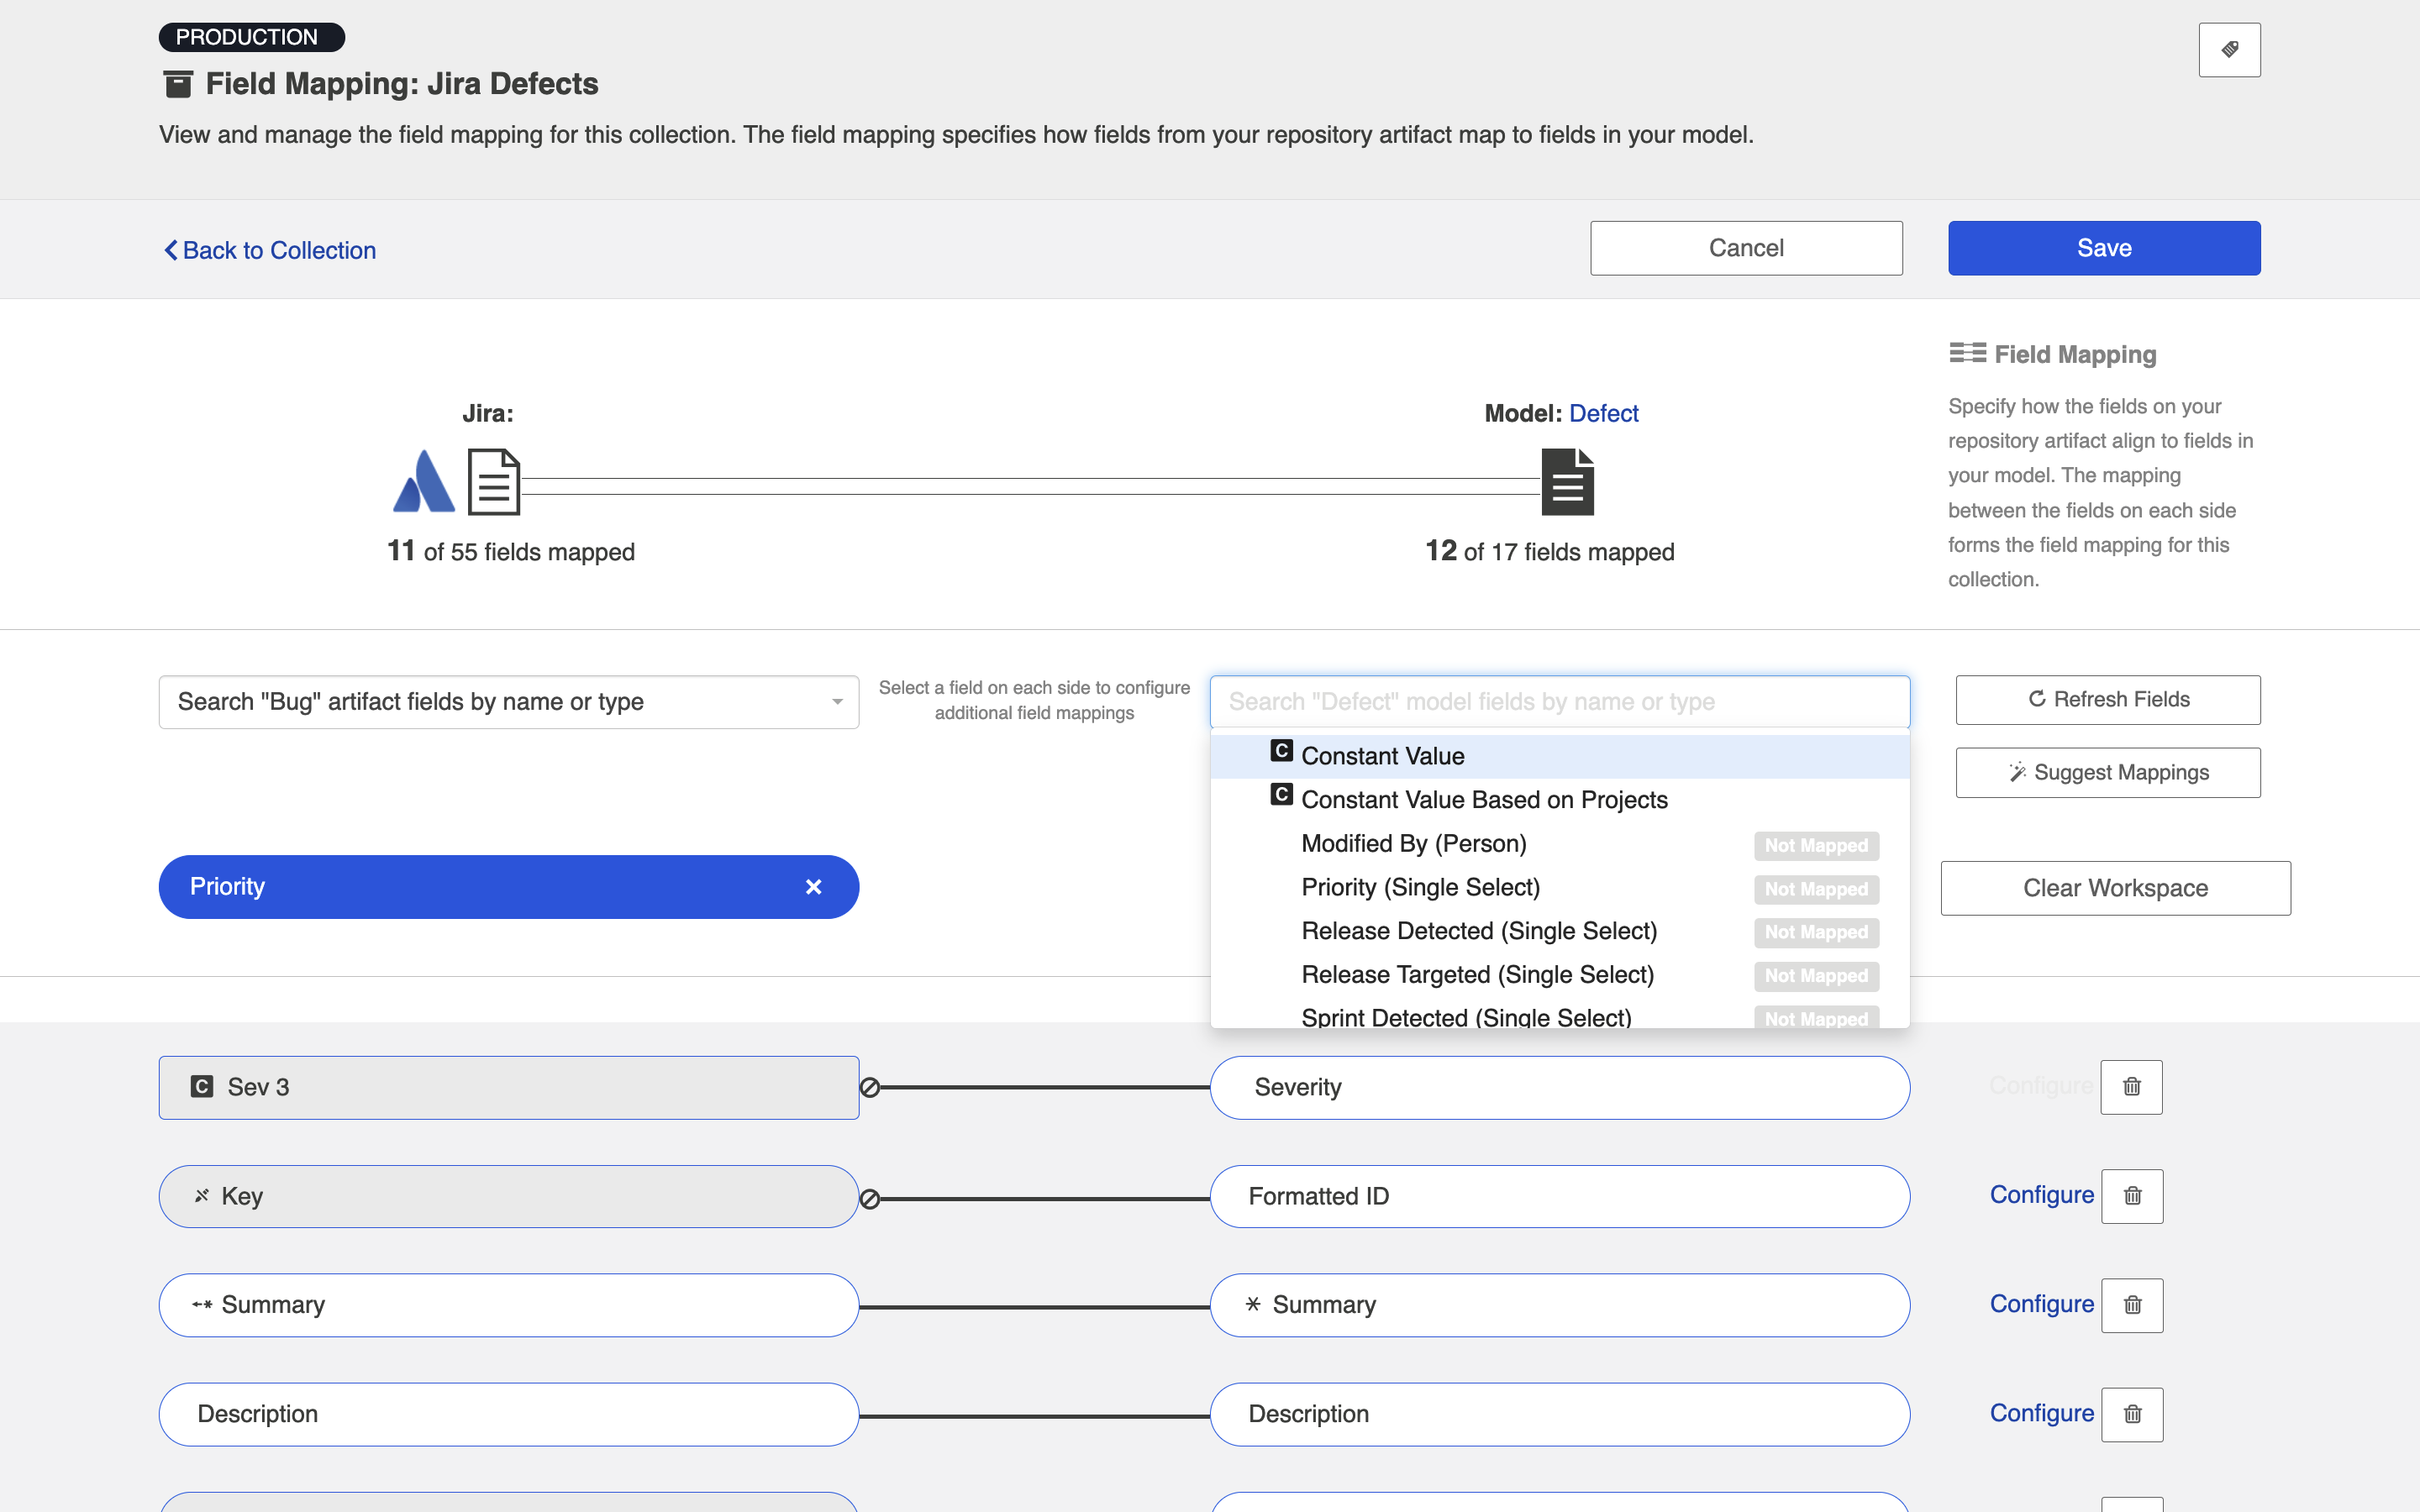
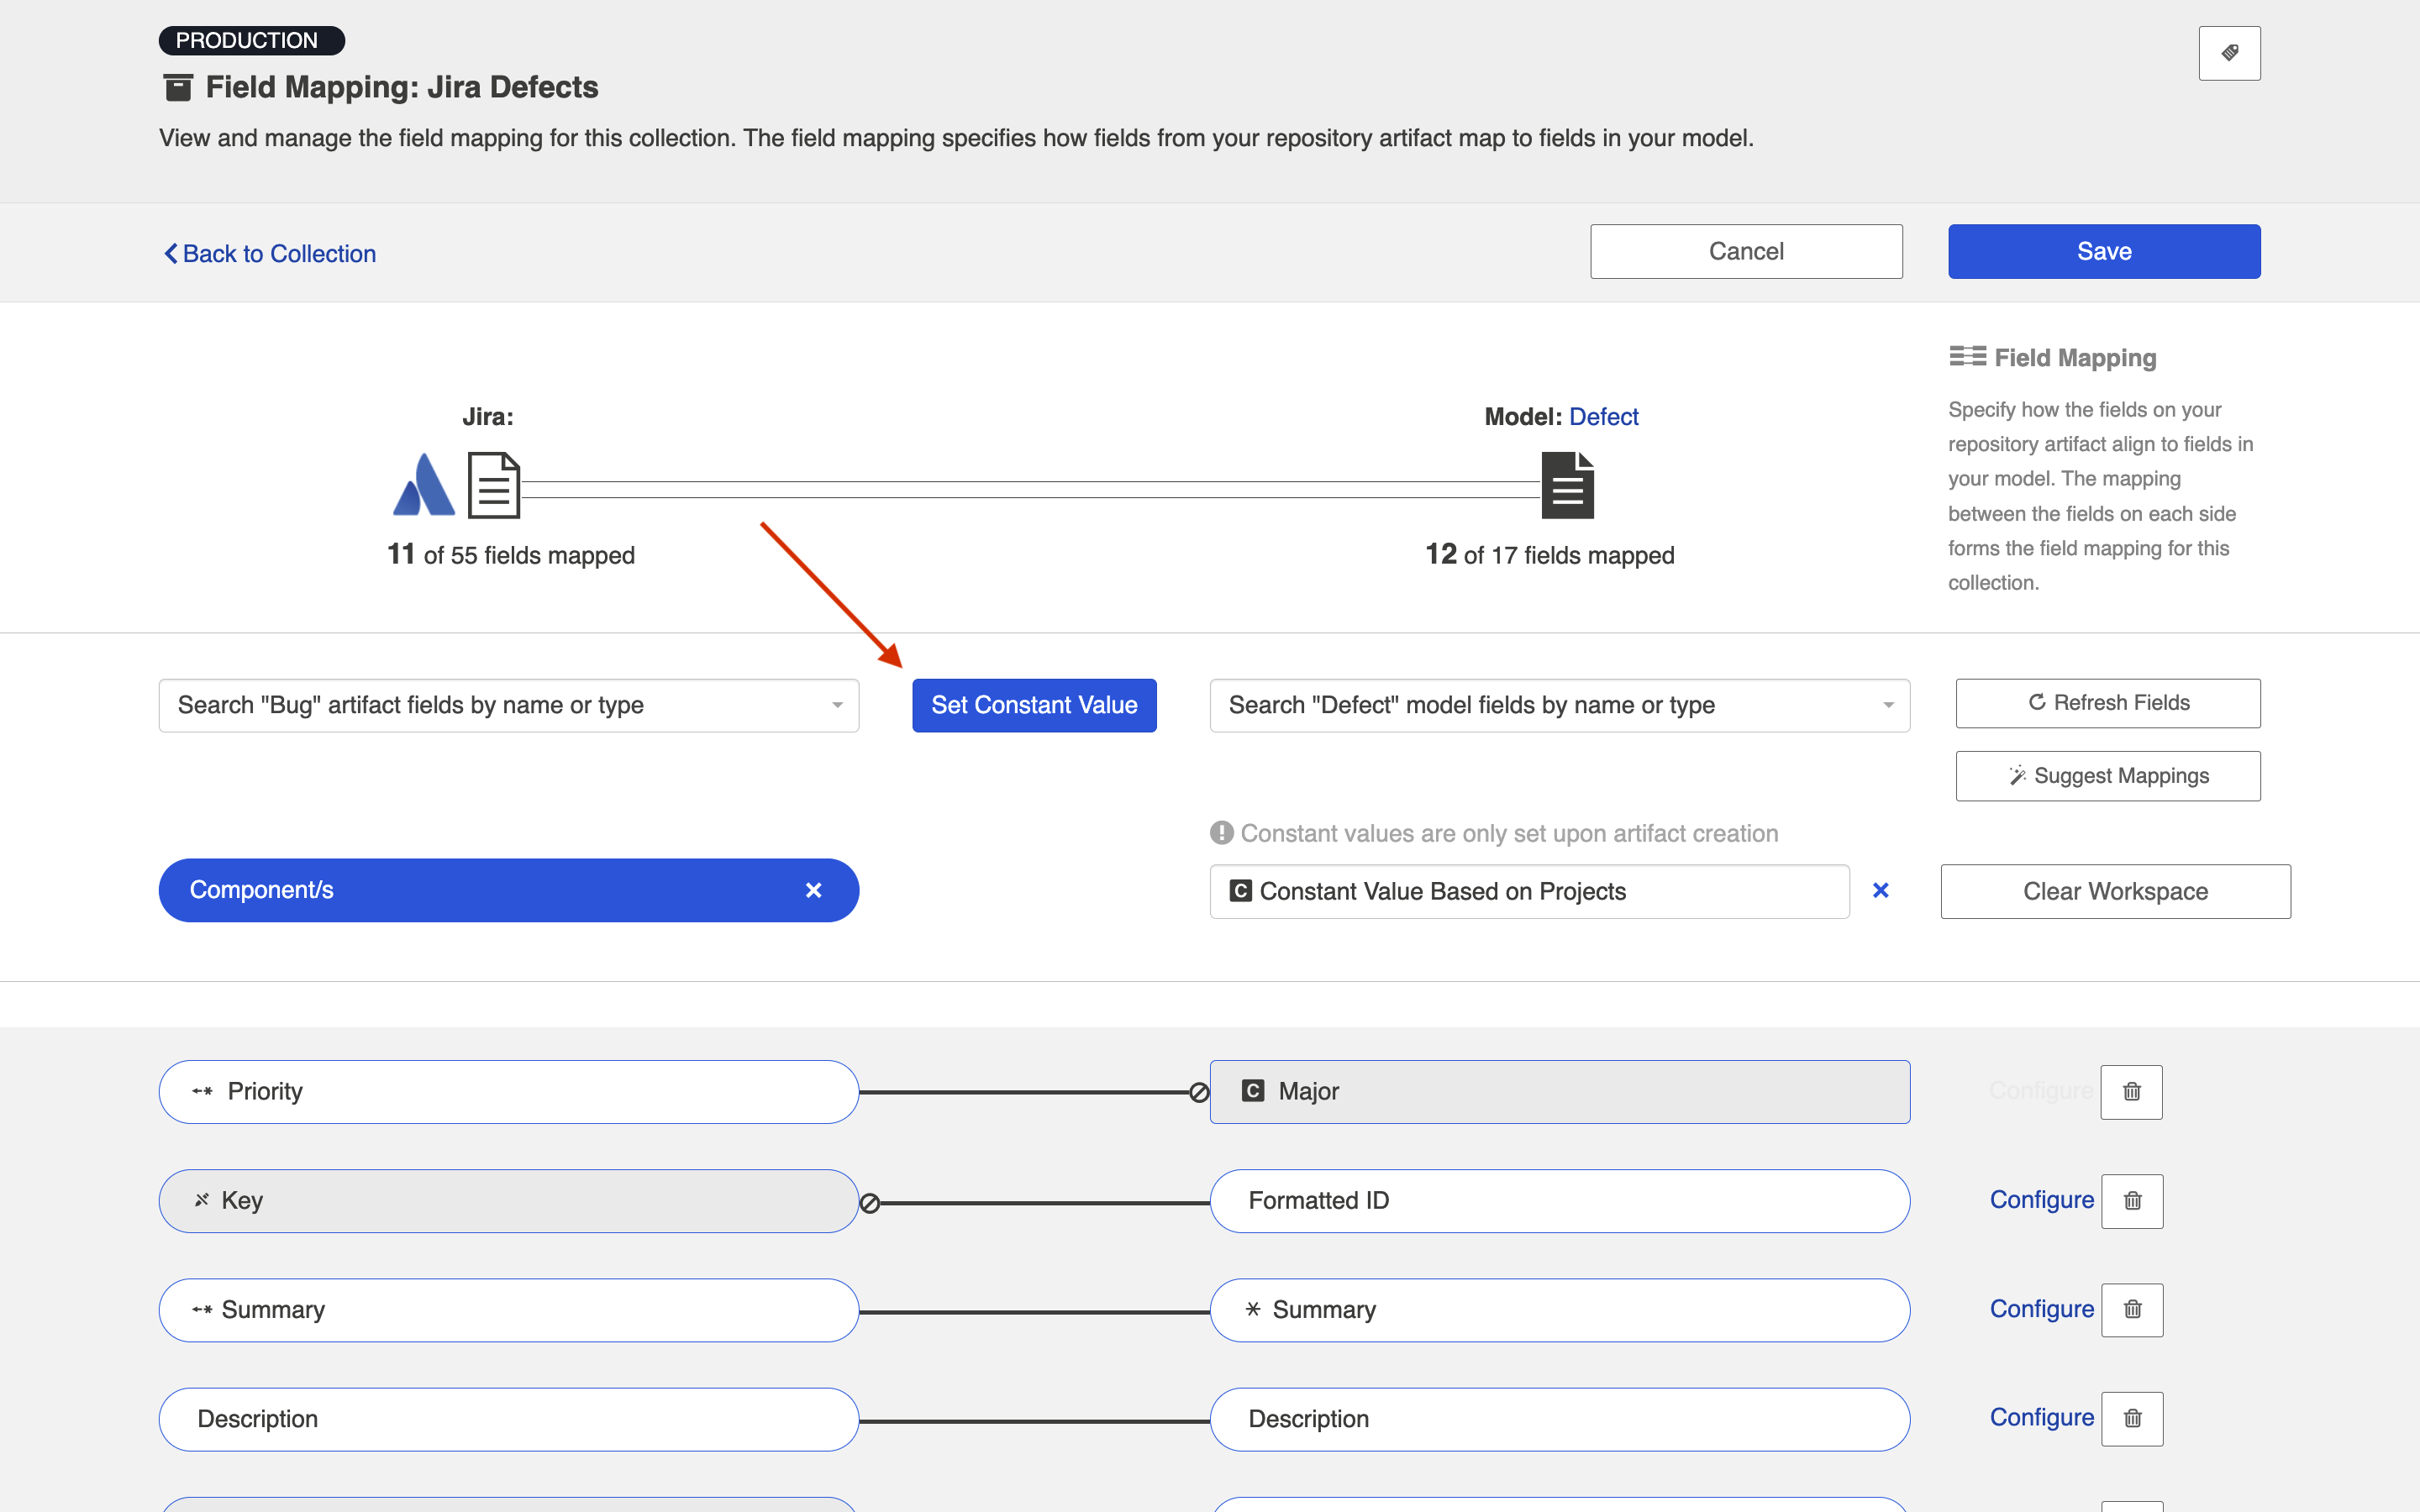
To set a constant value for a field, select Constant Value from the drop down menu on the model side. Enter the value, and then click the Set Constant Value box.
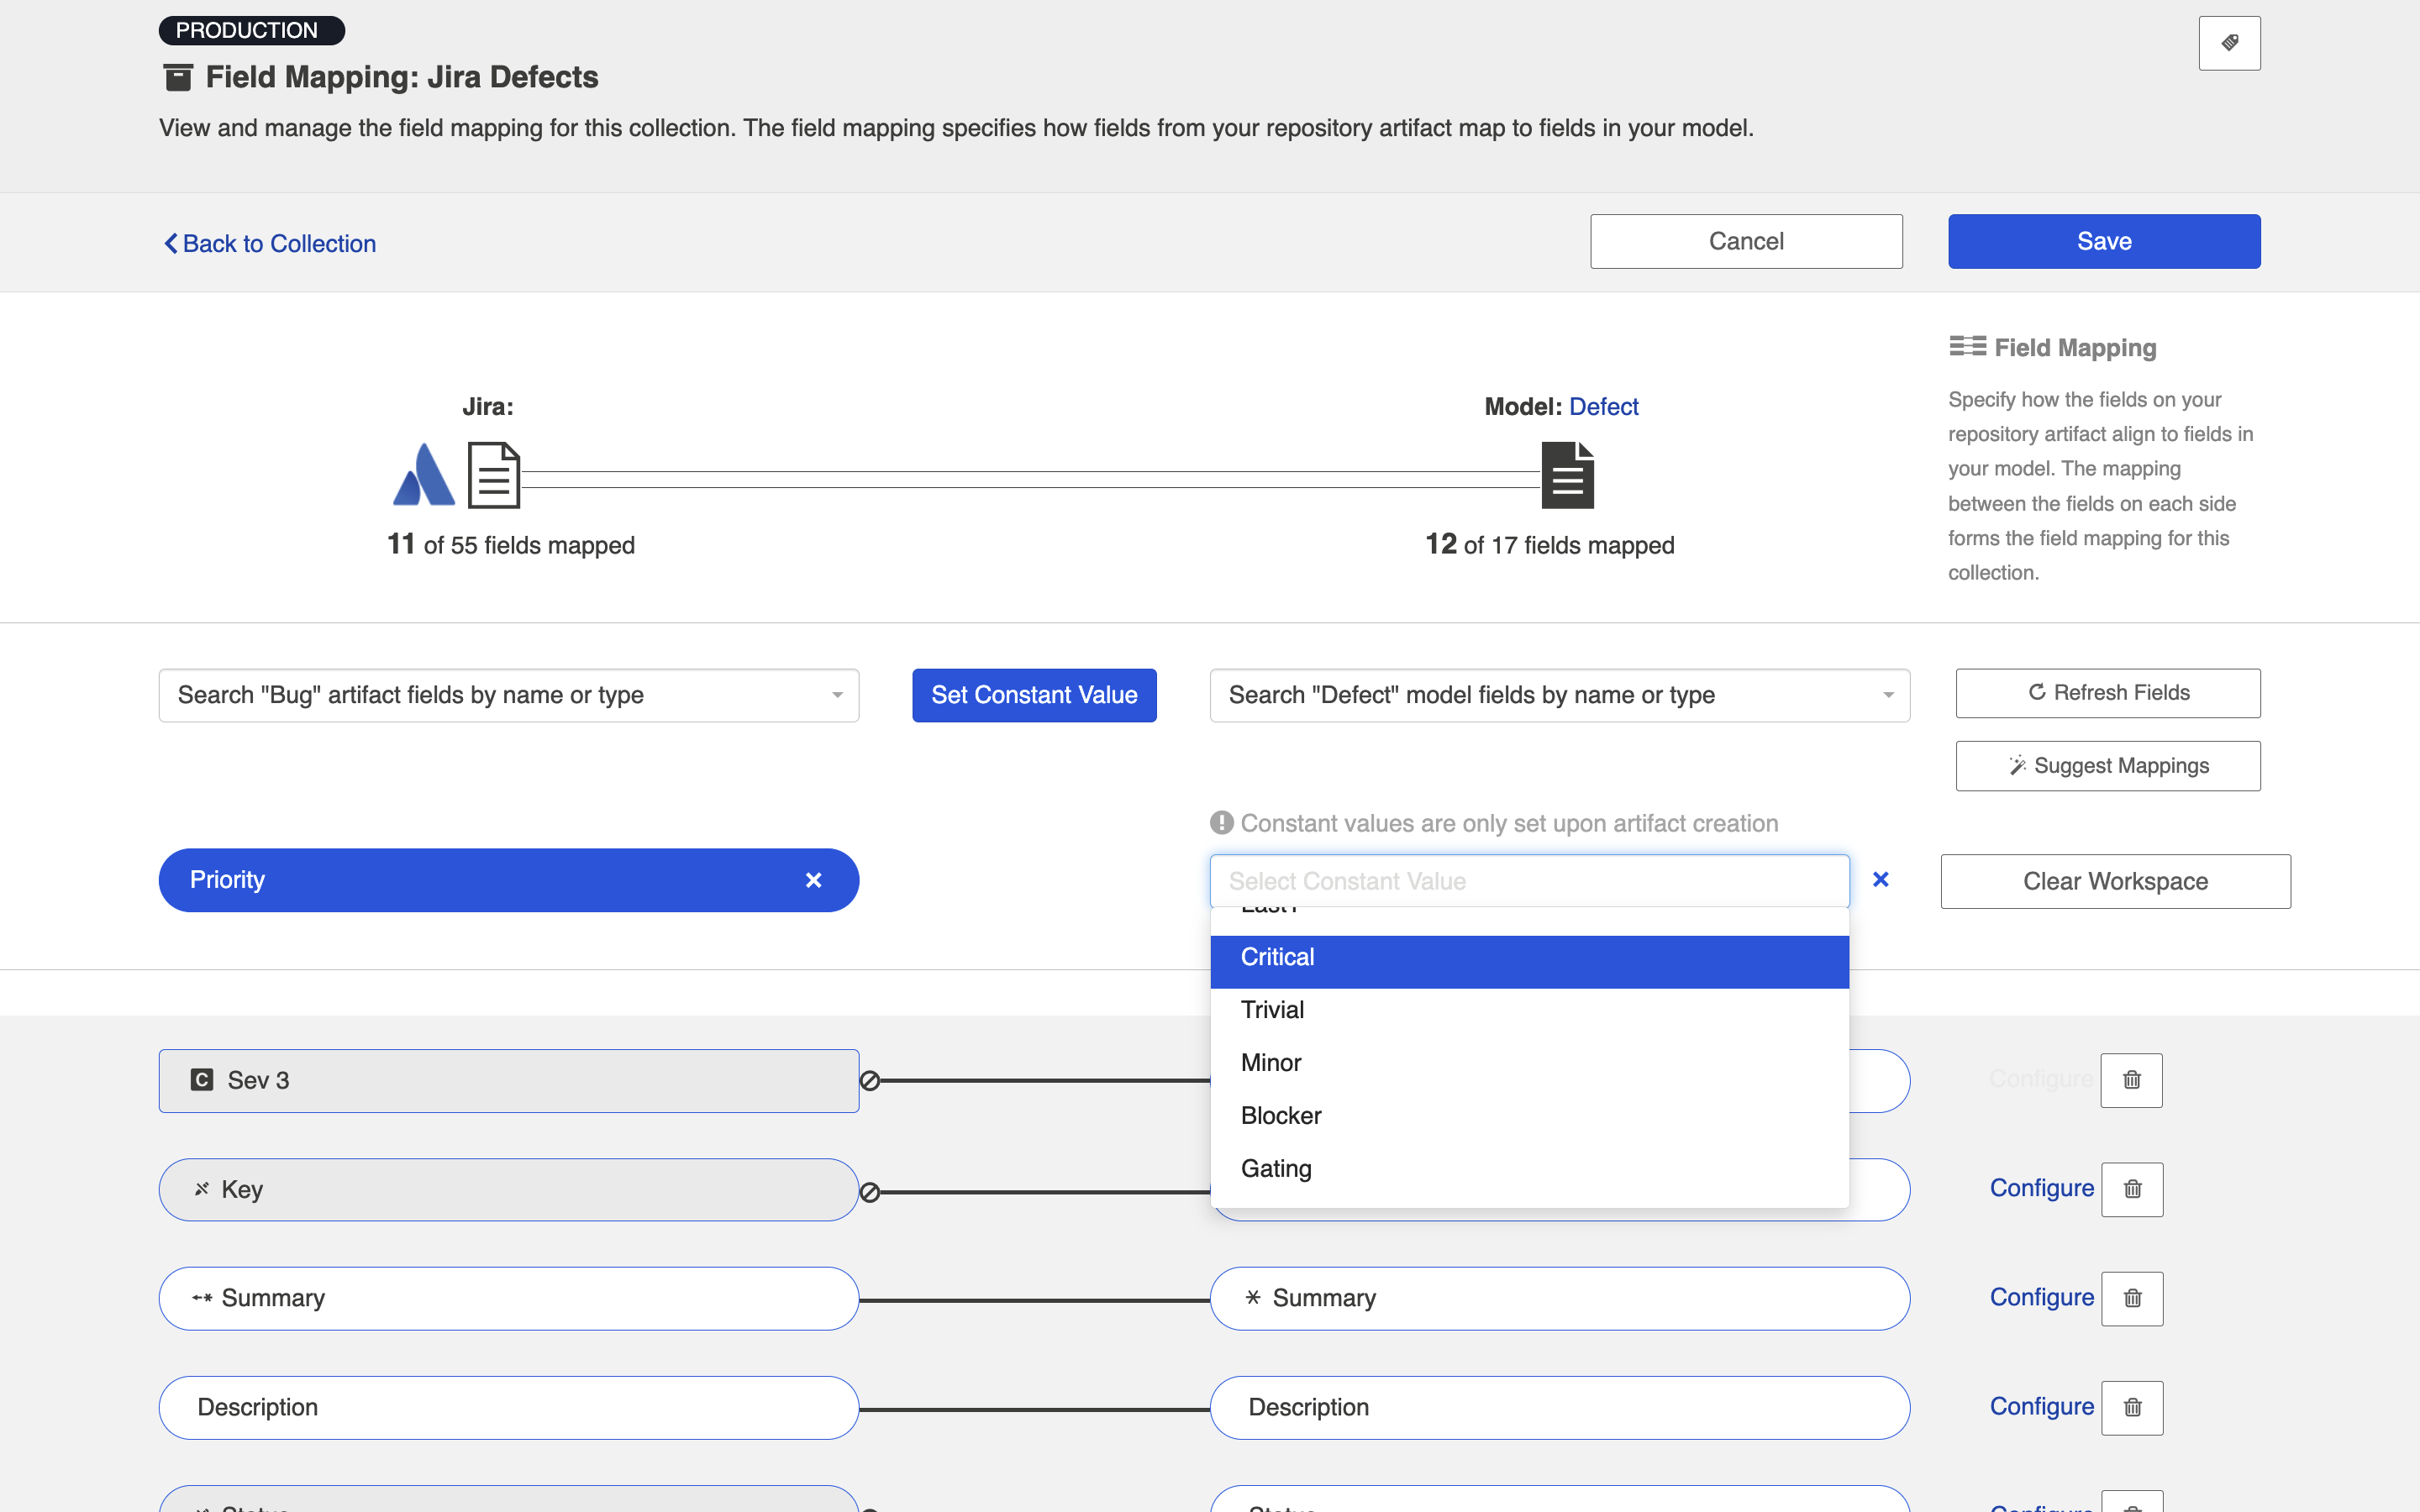
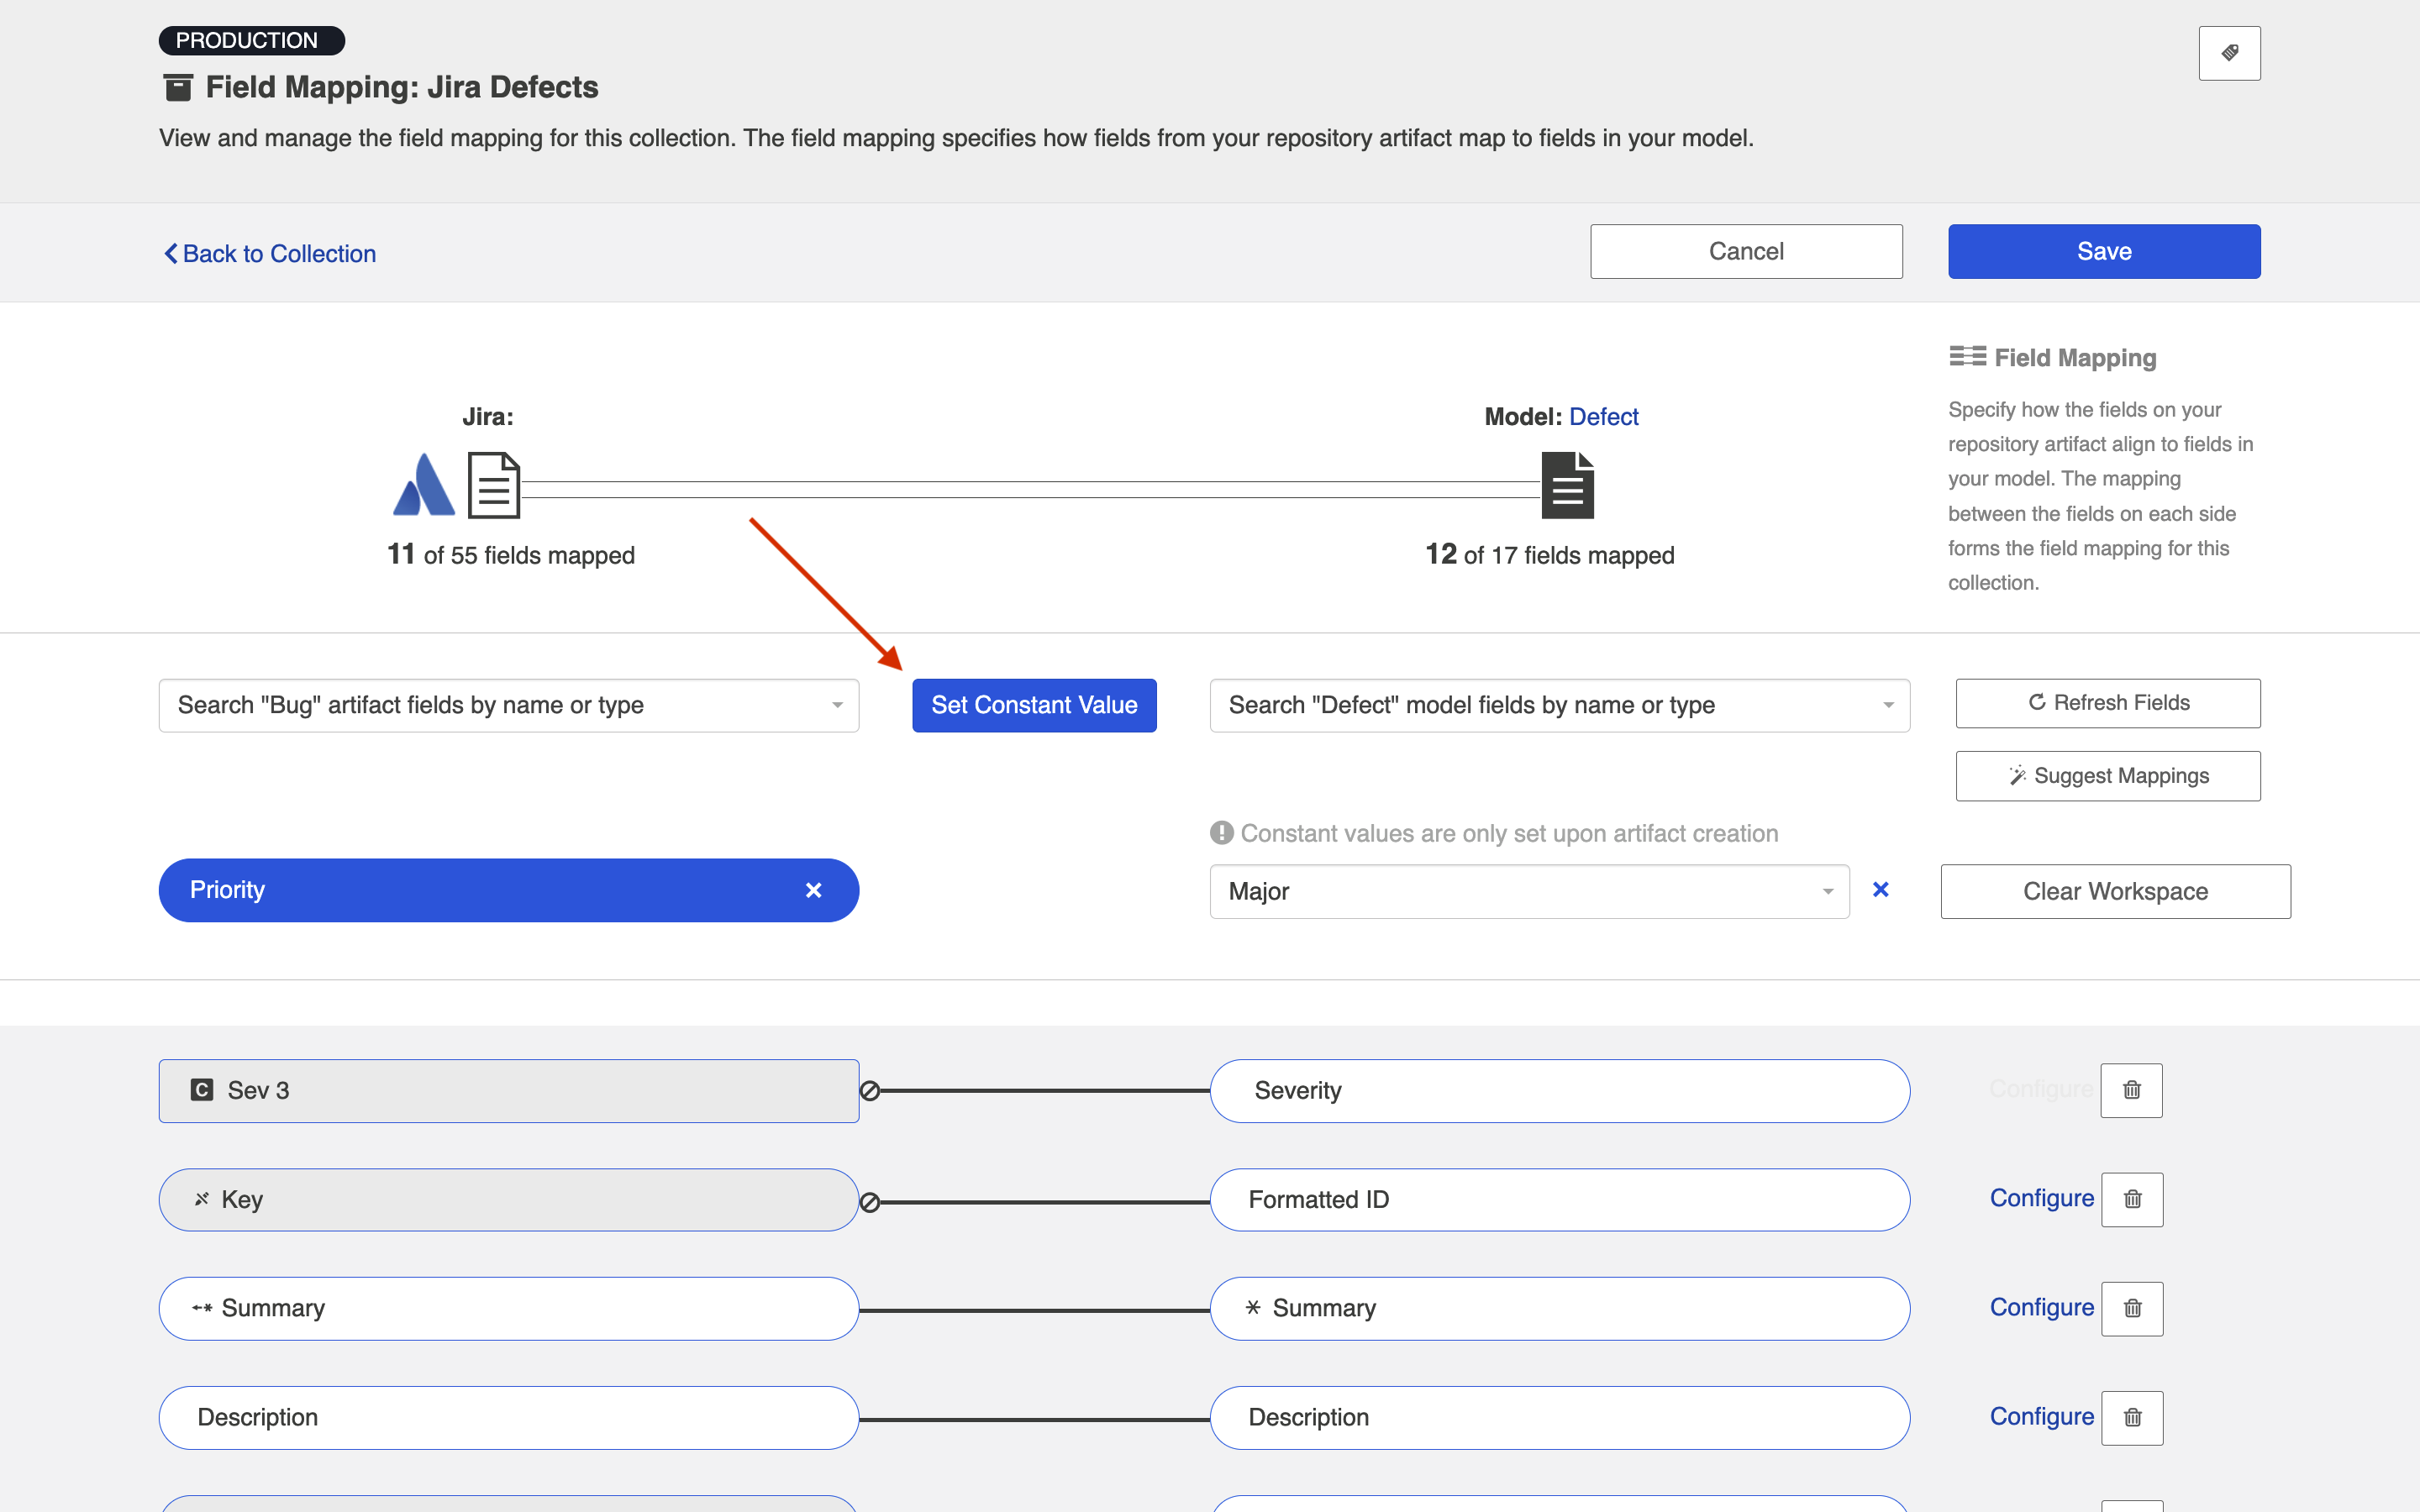
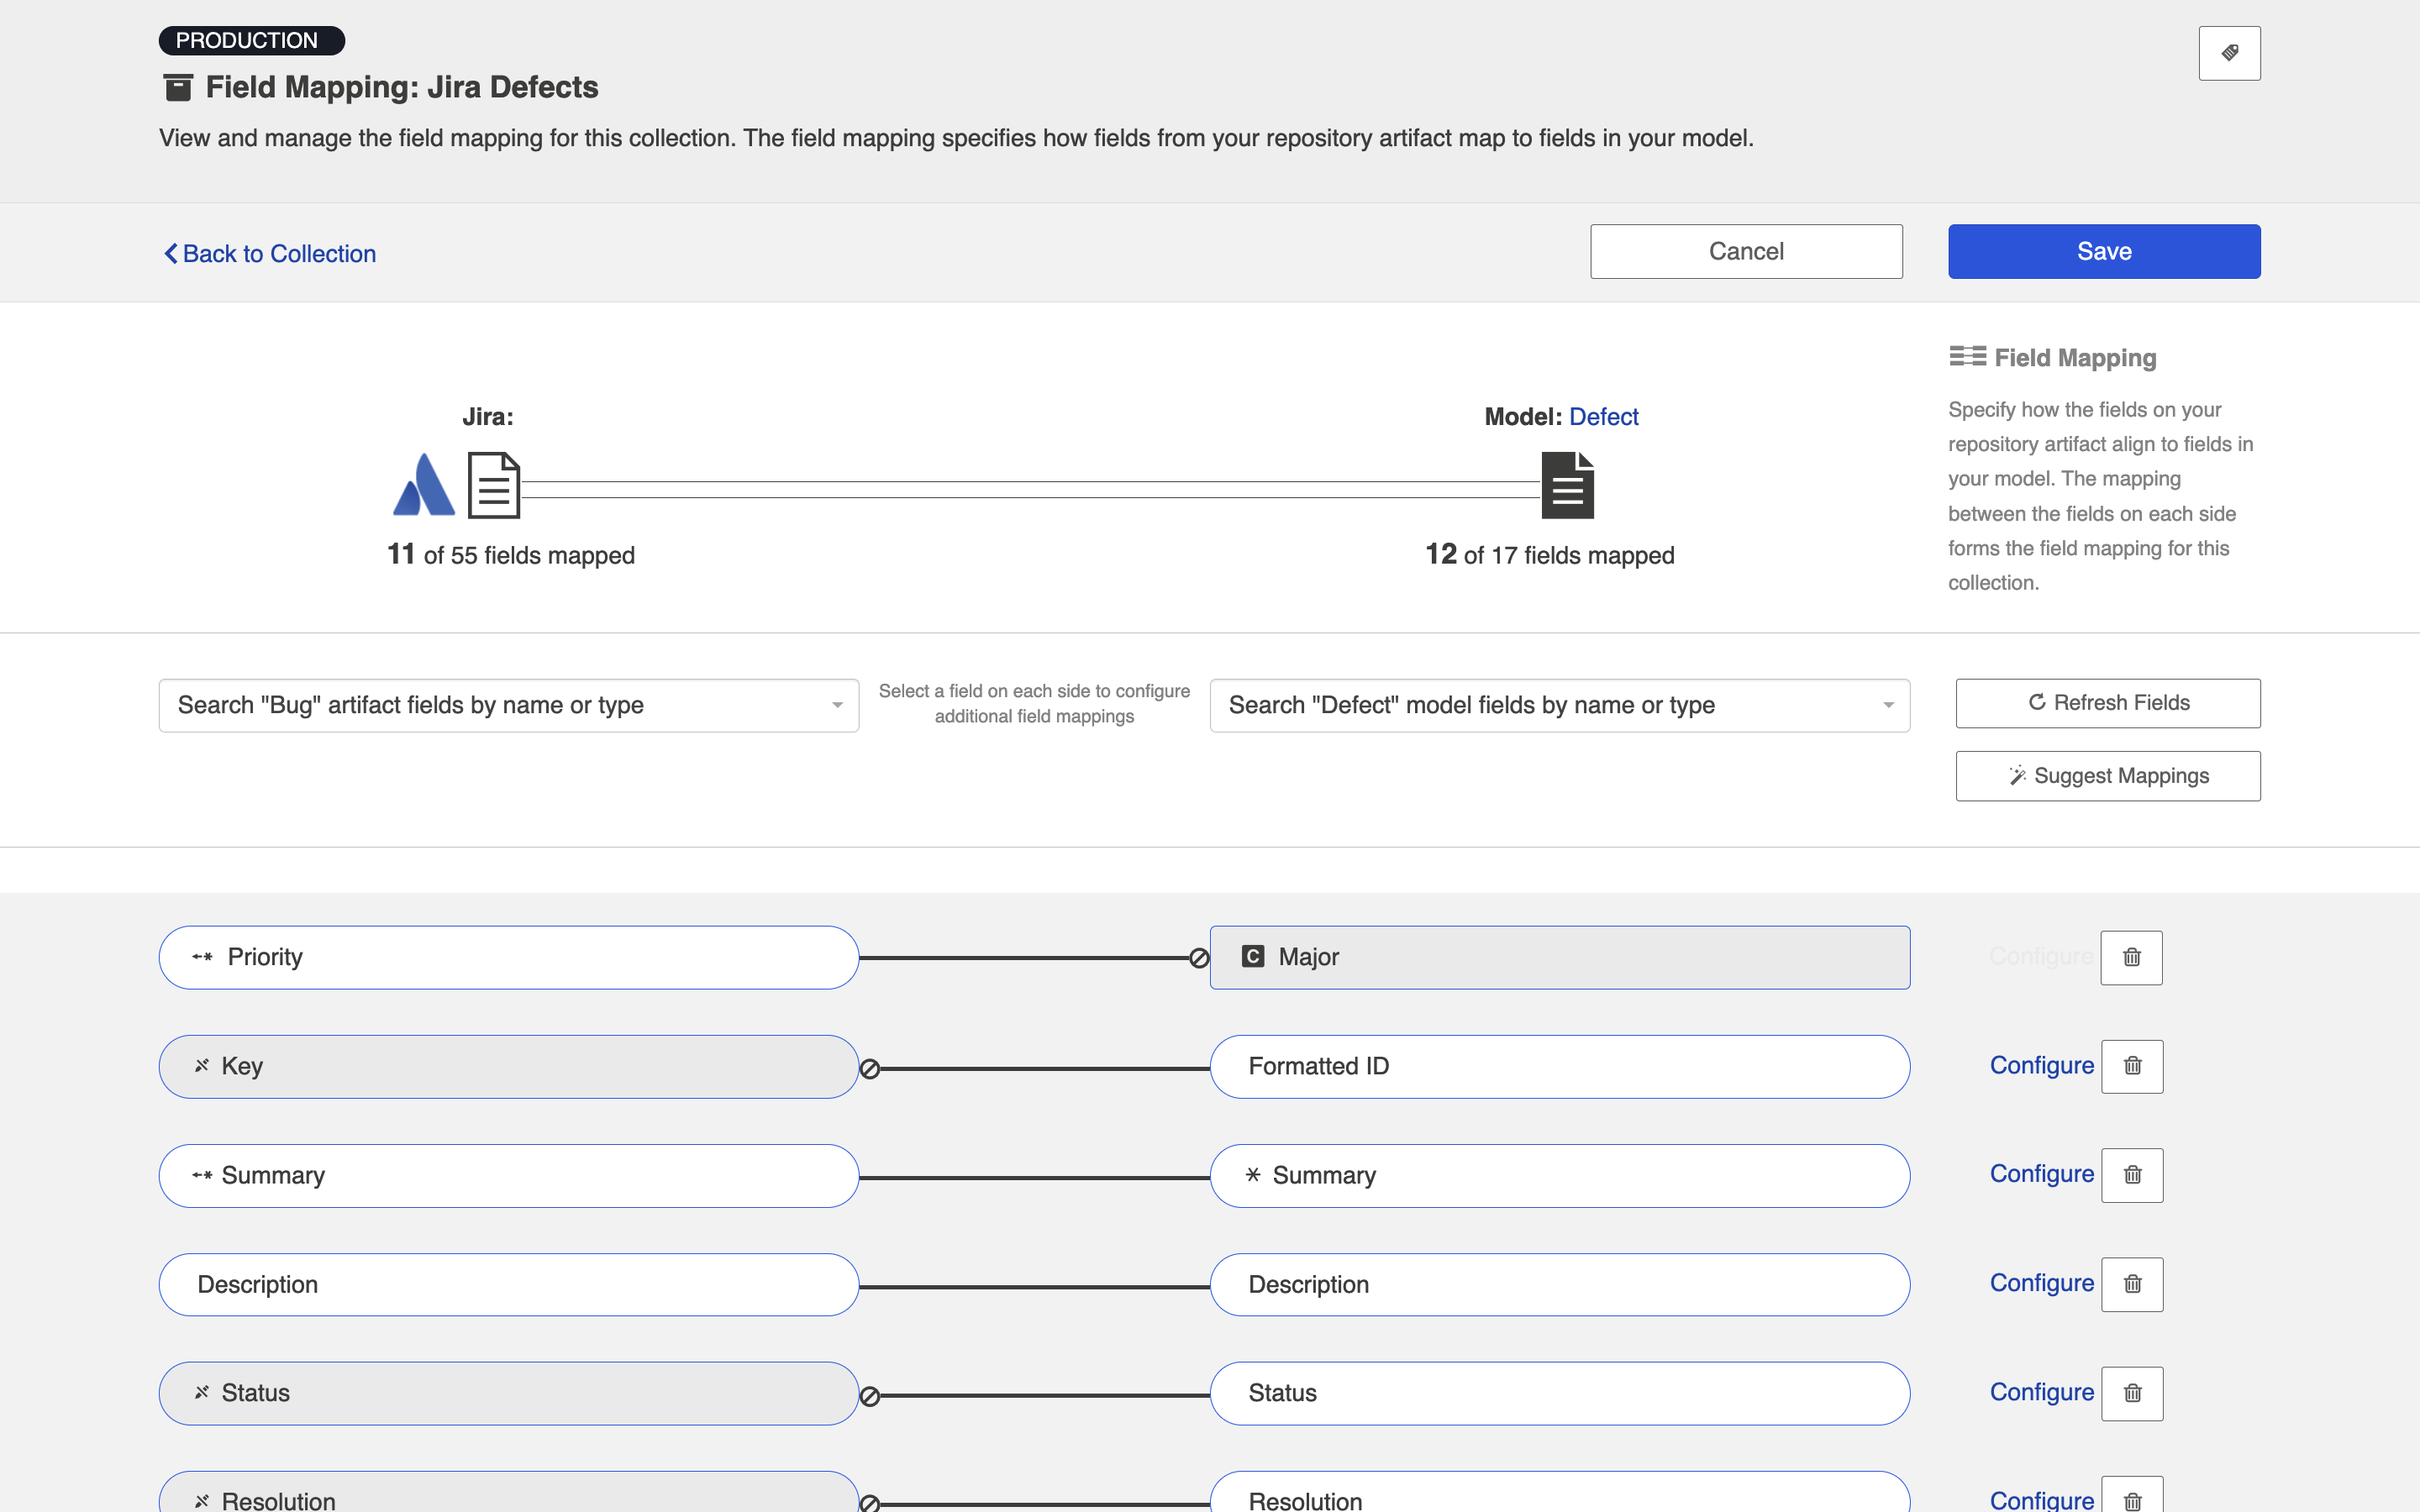
Once the constant value is set, you will notice a few things:
- The pill will be rectangular and grey: this denotes that a constant value has been set.
- The Constant Value icon will be displayed inside the pill.
- The 'prohibited' icon will appear next to the pill. This indicates that no values can be sent to the Constant Value field. The constant value is essentially a dead end, and cannot be linked to a repository or model on the other side.
In the scenario above, any time a new defect is created in Jira, the priority will be set to 'Major.' Jira will not send 'priority' data to any other collections, as 'priority' is not mapped to the model.
Constant Values per Project
If desired, you can also set constant values per project.
You may wish to set a constant value based on project in the following scenarios:
- In order to set a unique value for a specific field, such as release or iteration, depending on the project
- If the values for a single-select field vary across projects
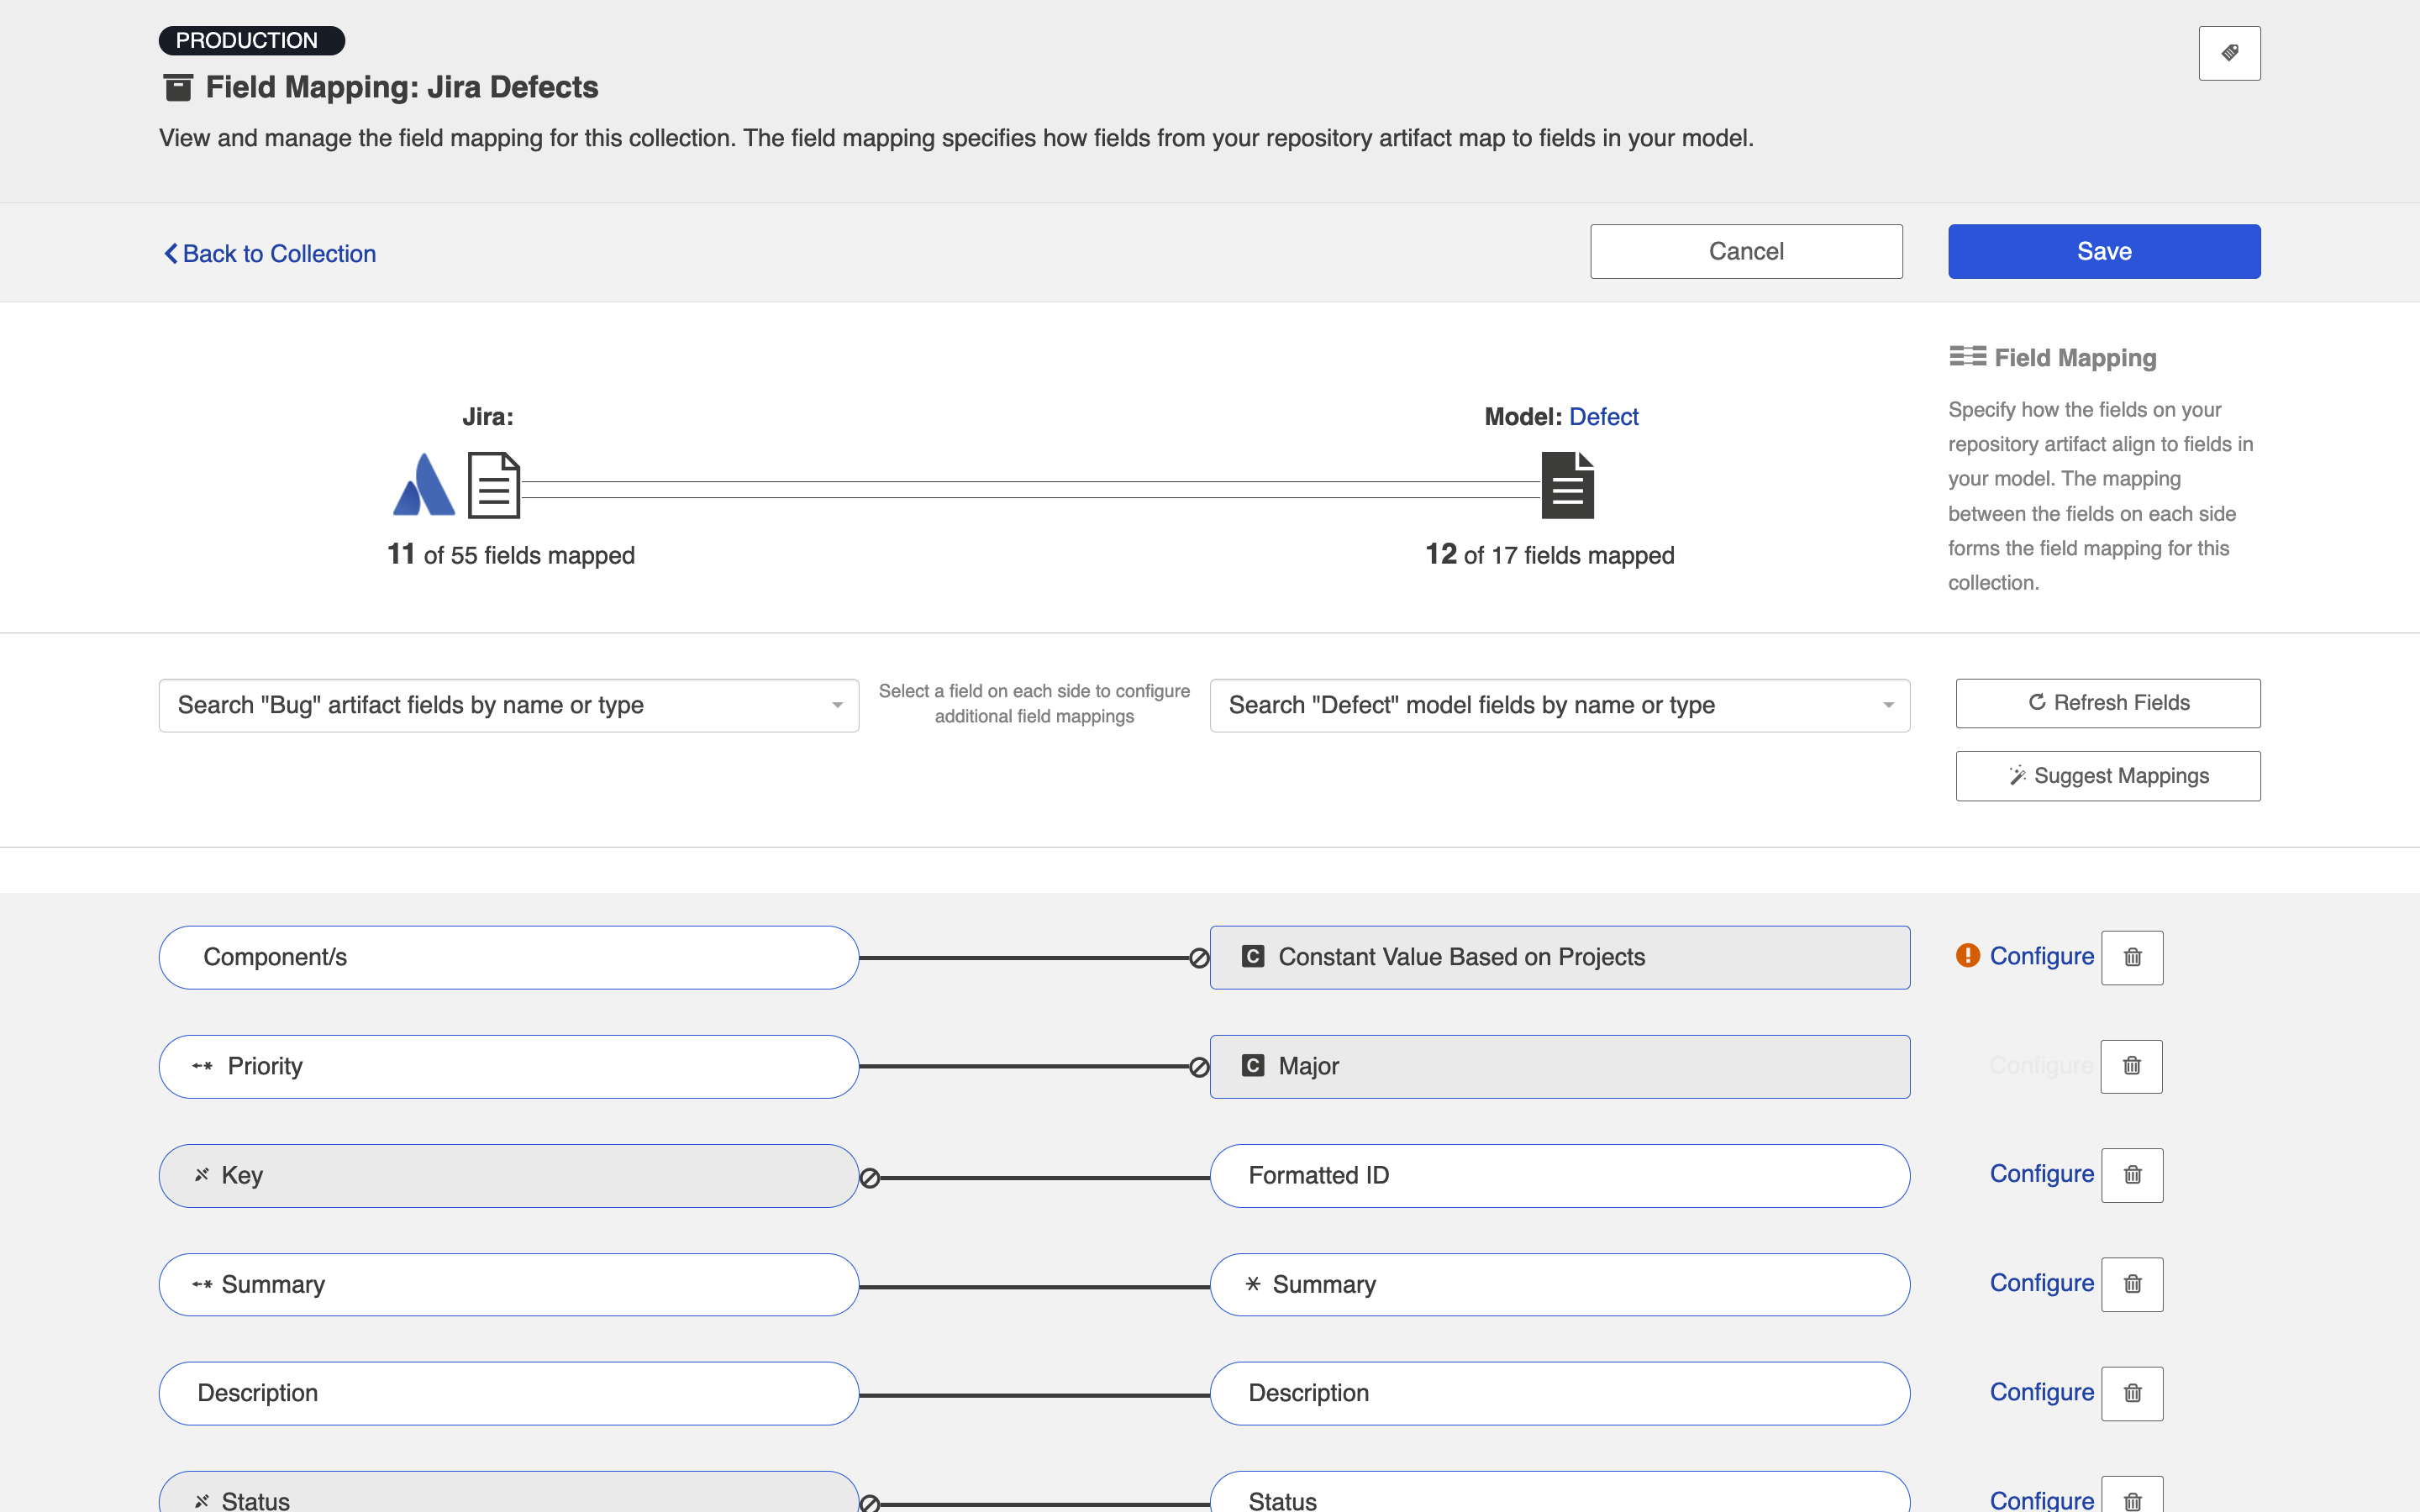
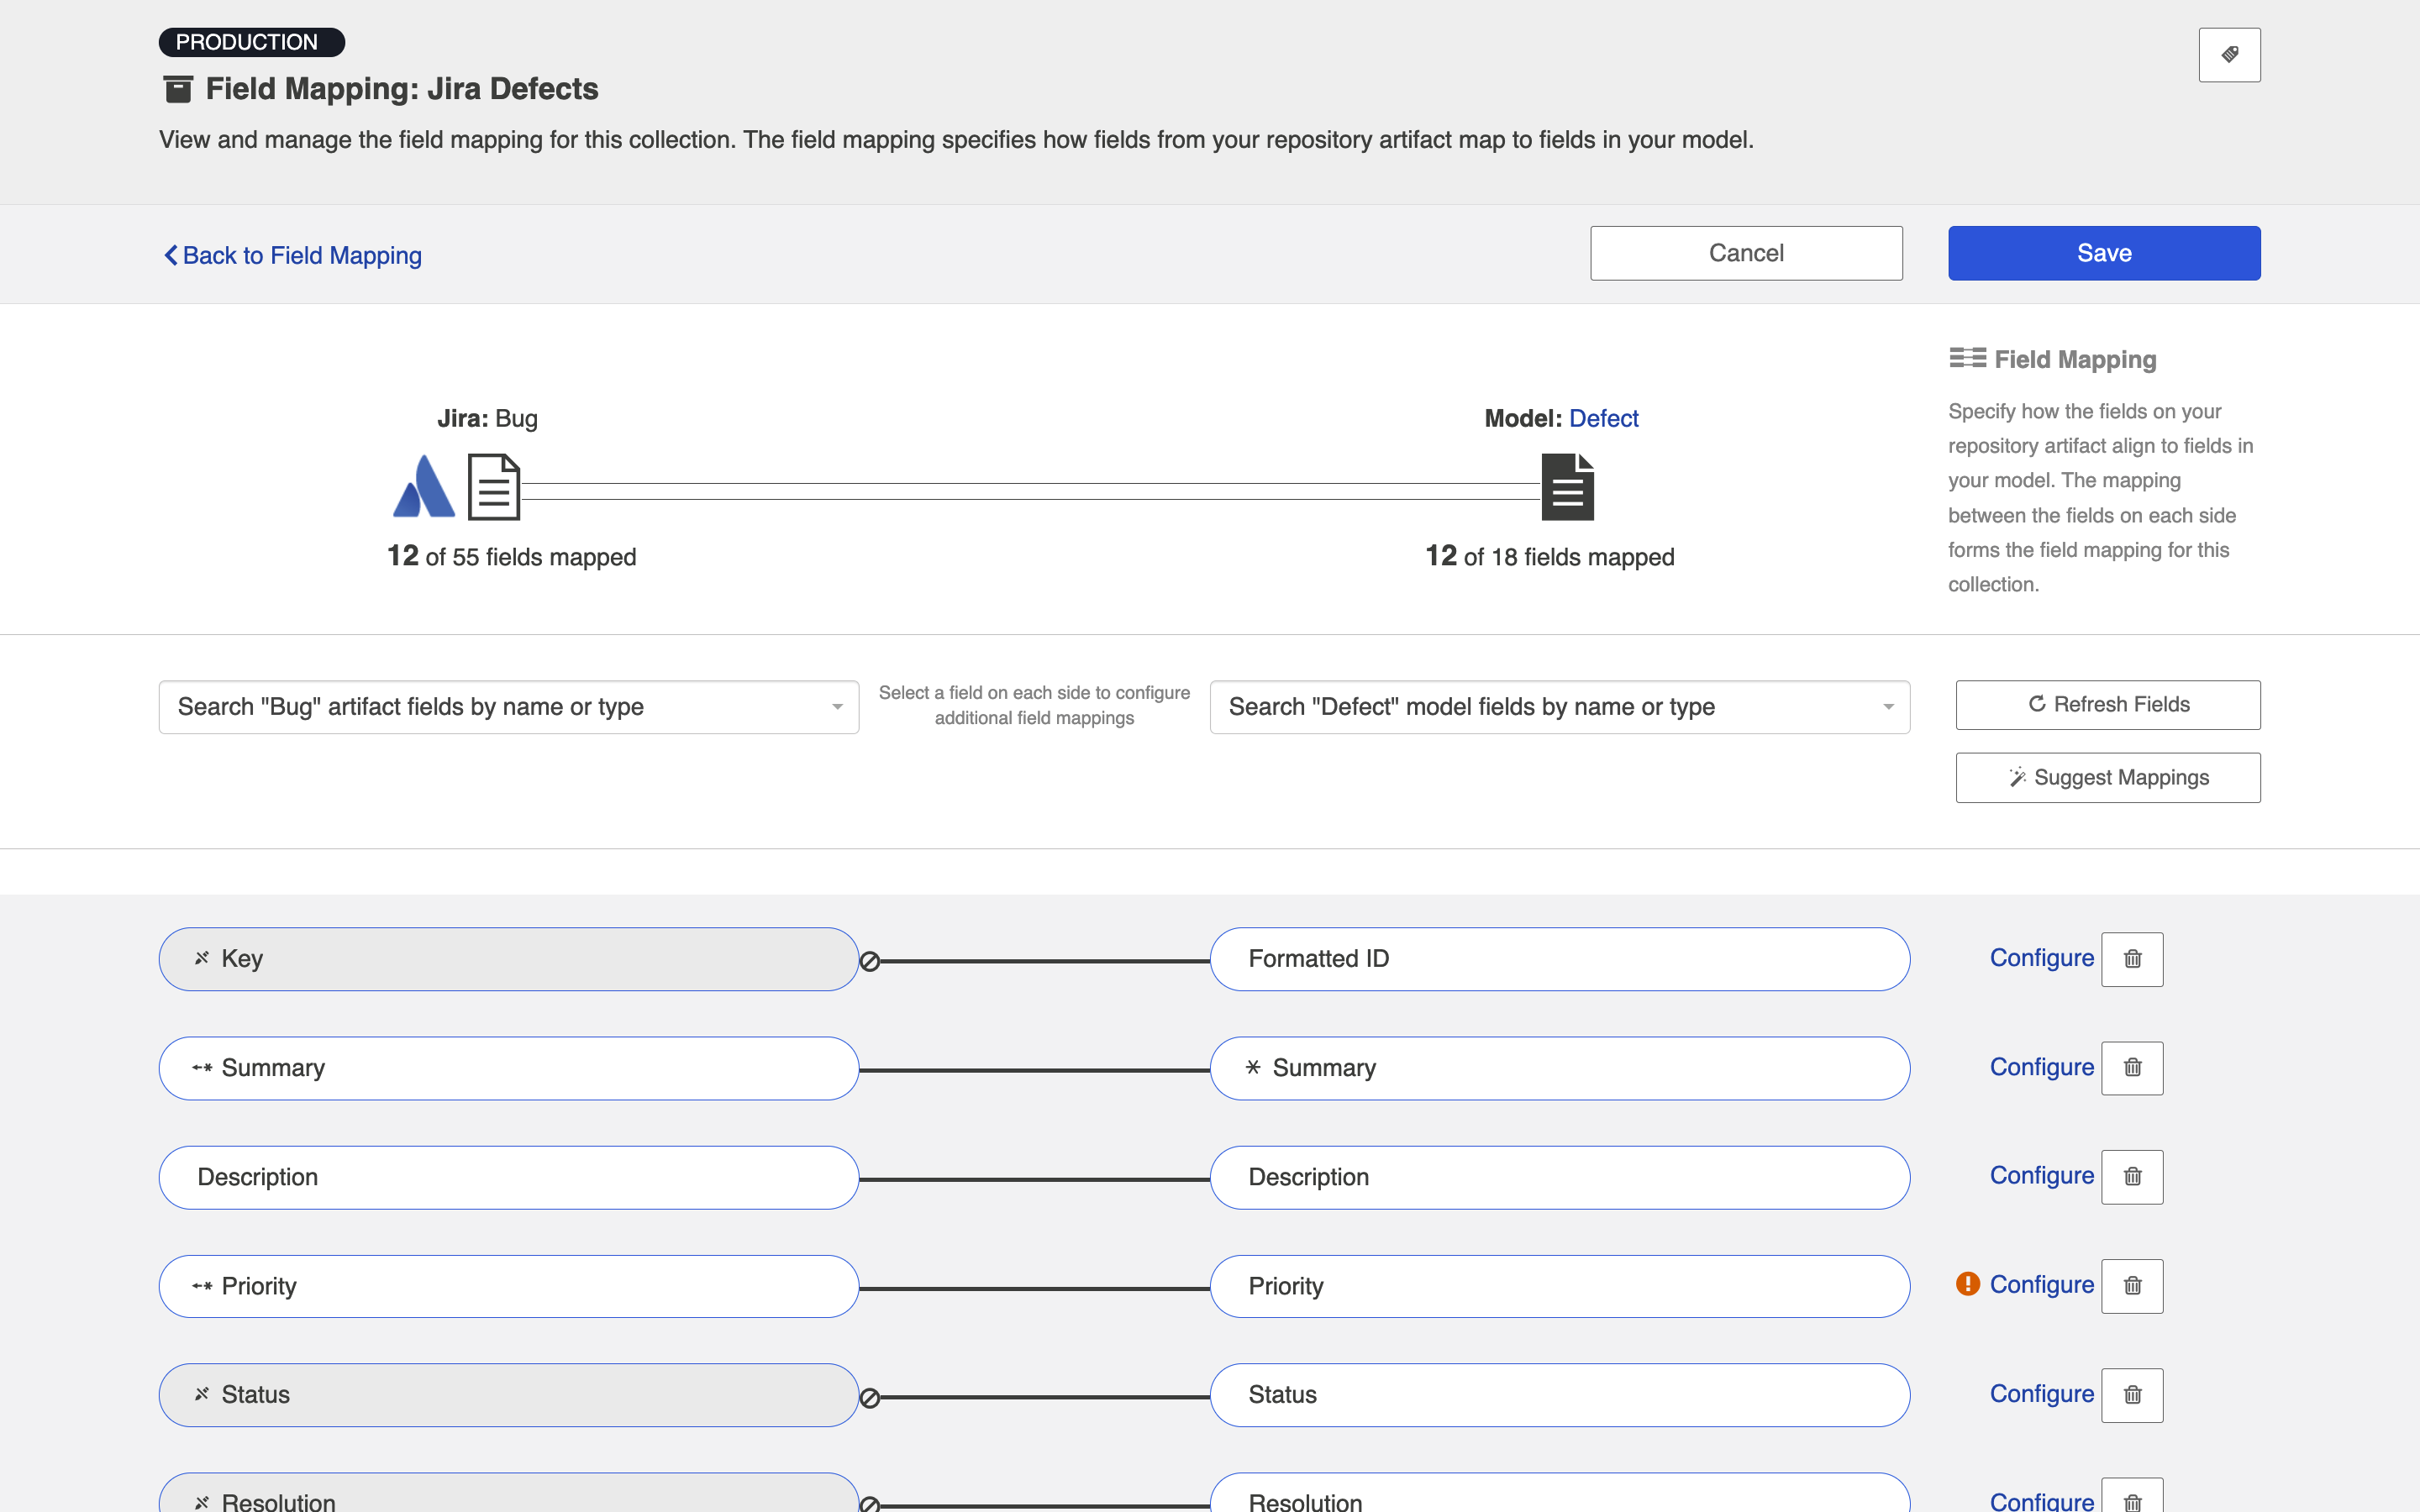
To do this, select Constant Value Based on Projects:
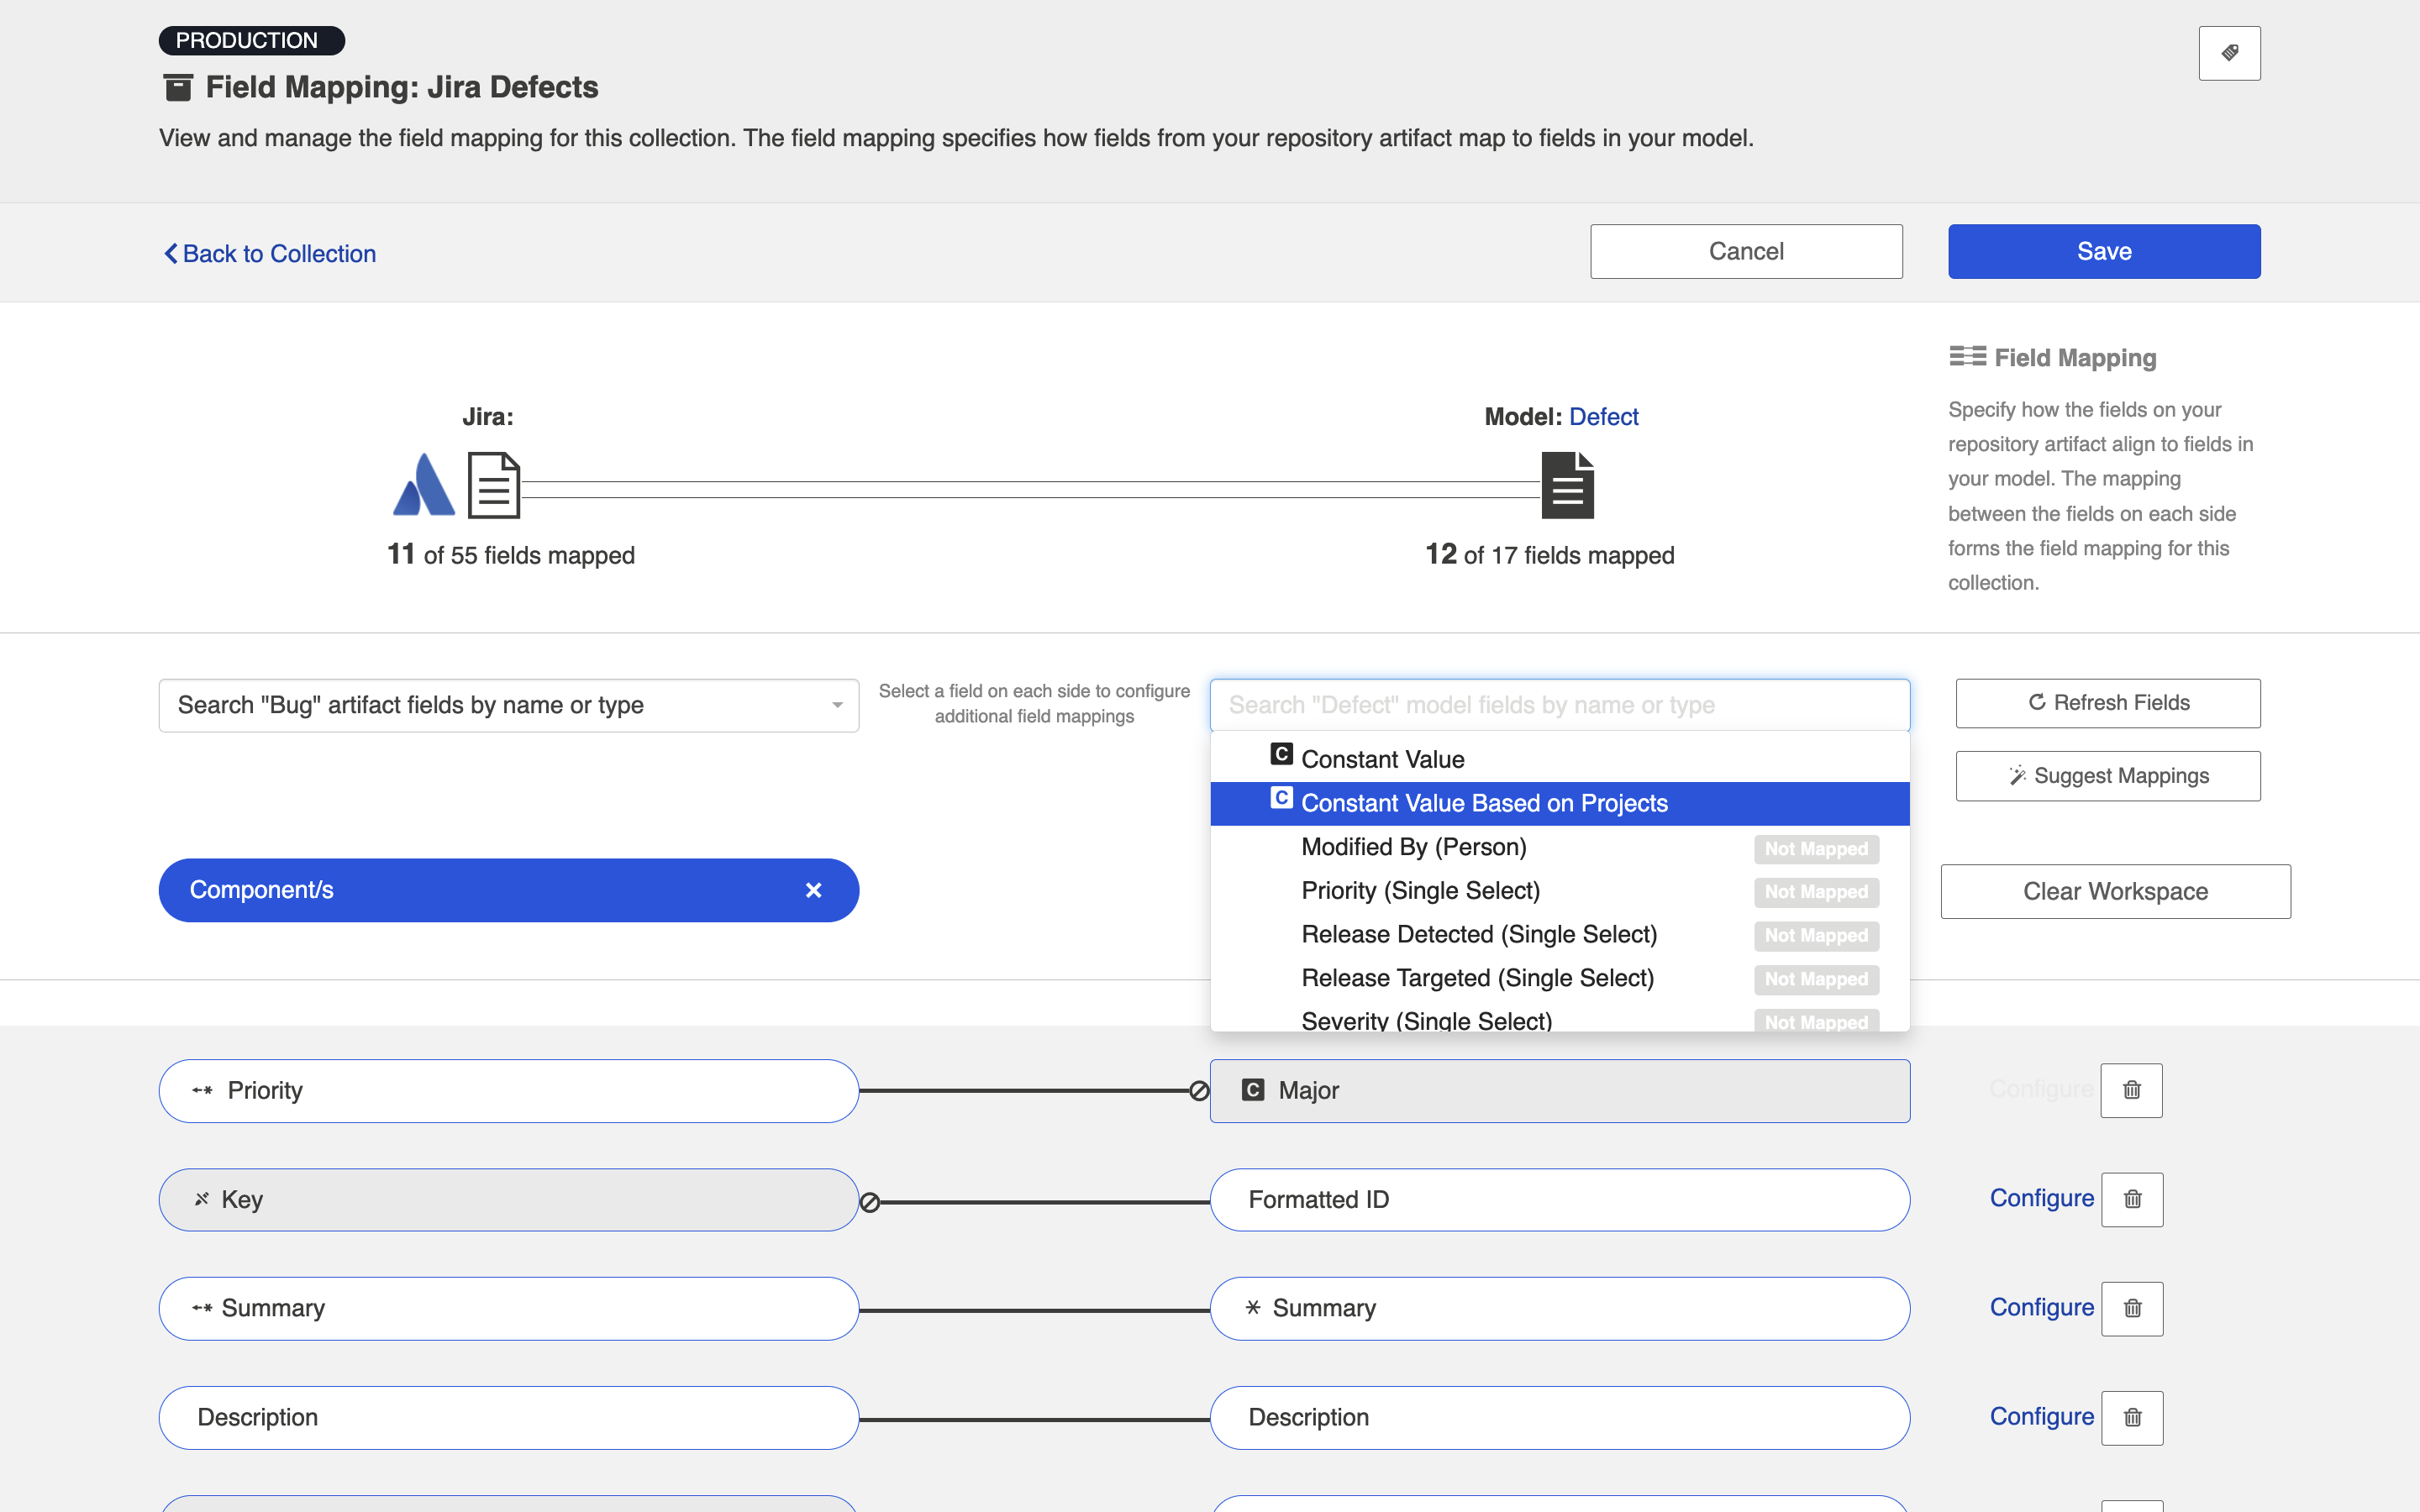
Once selected, you will see an orange exclamation point appear next to the 'Configure' link:
Click Configure to get to the Field Configuration Screen. On this screen, you will be able to set a distinct constant value for each project in your collection:
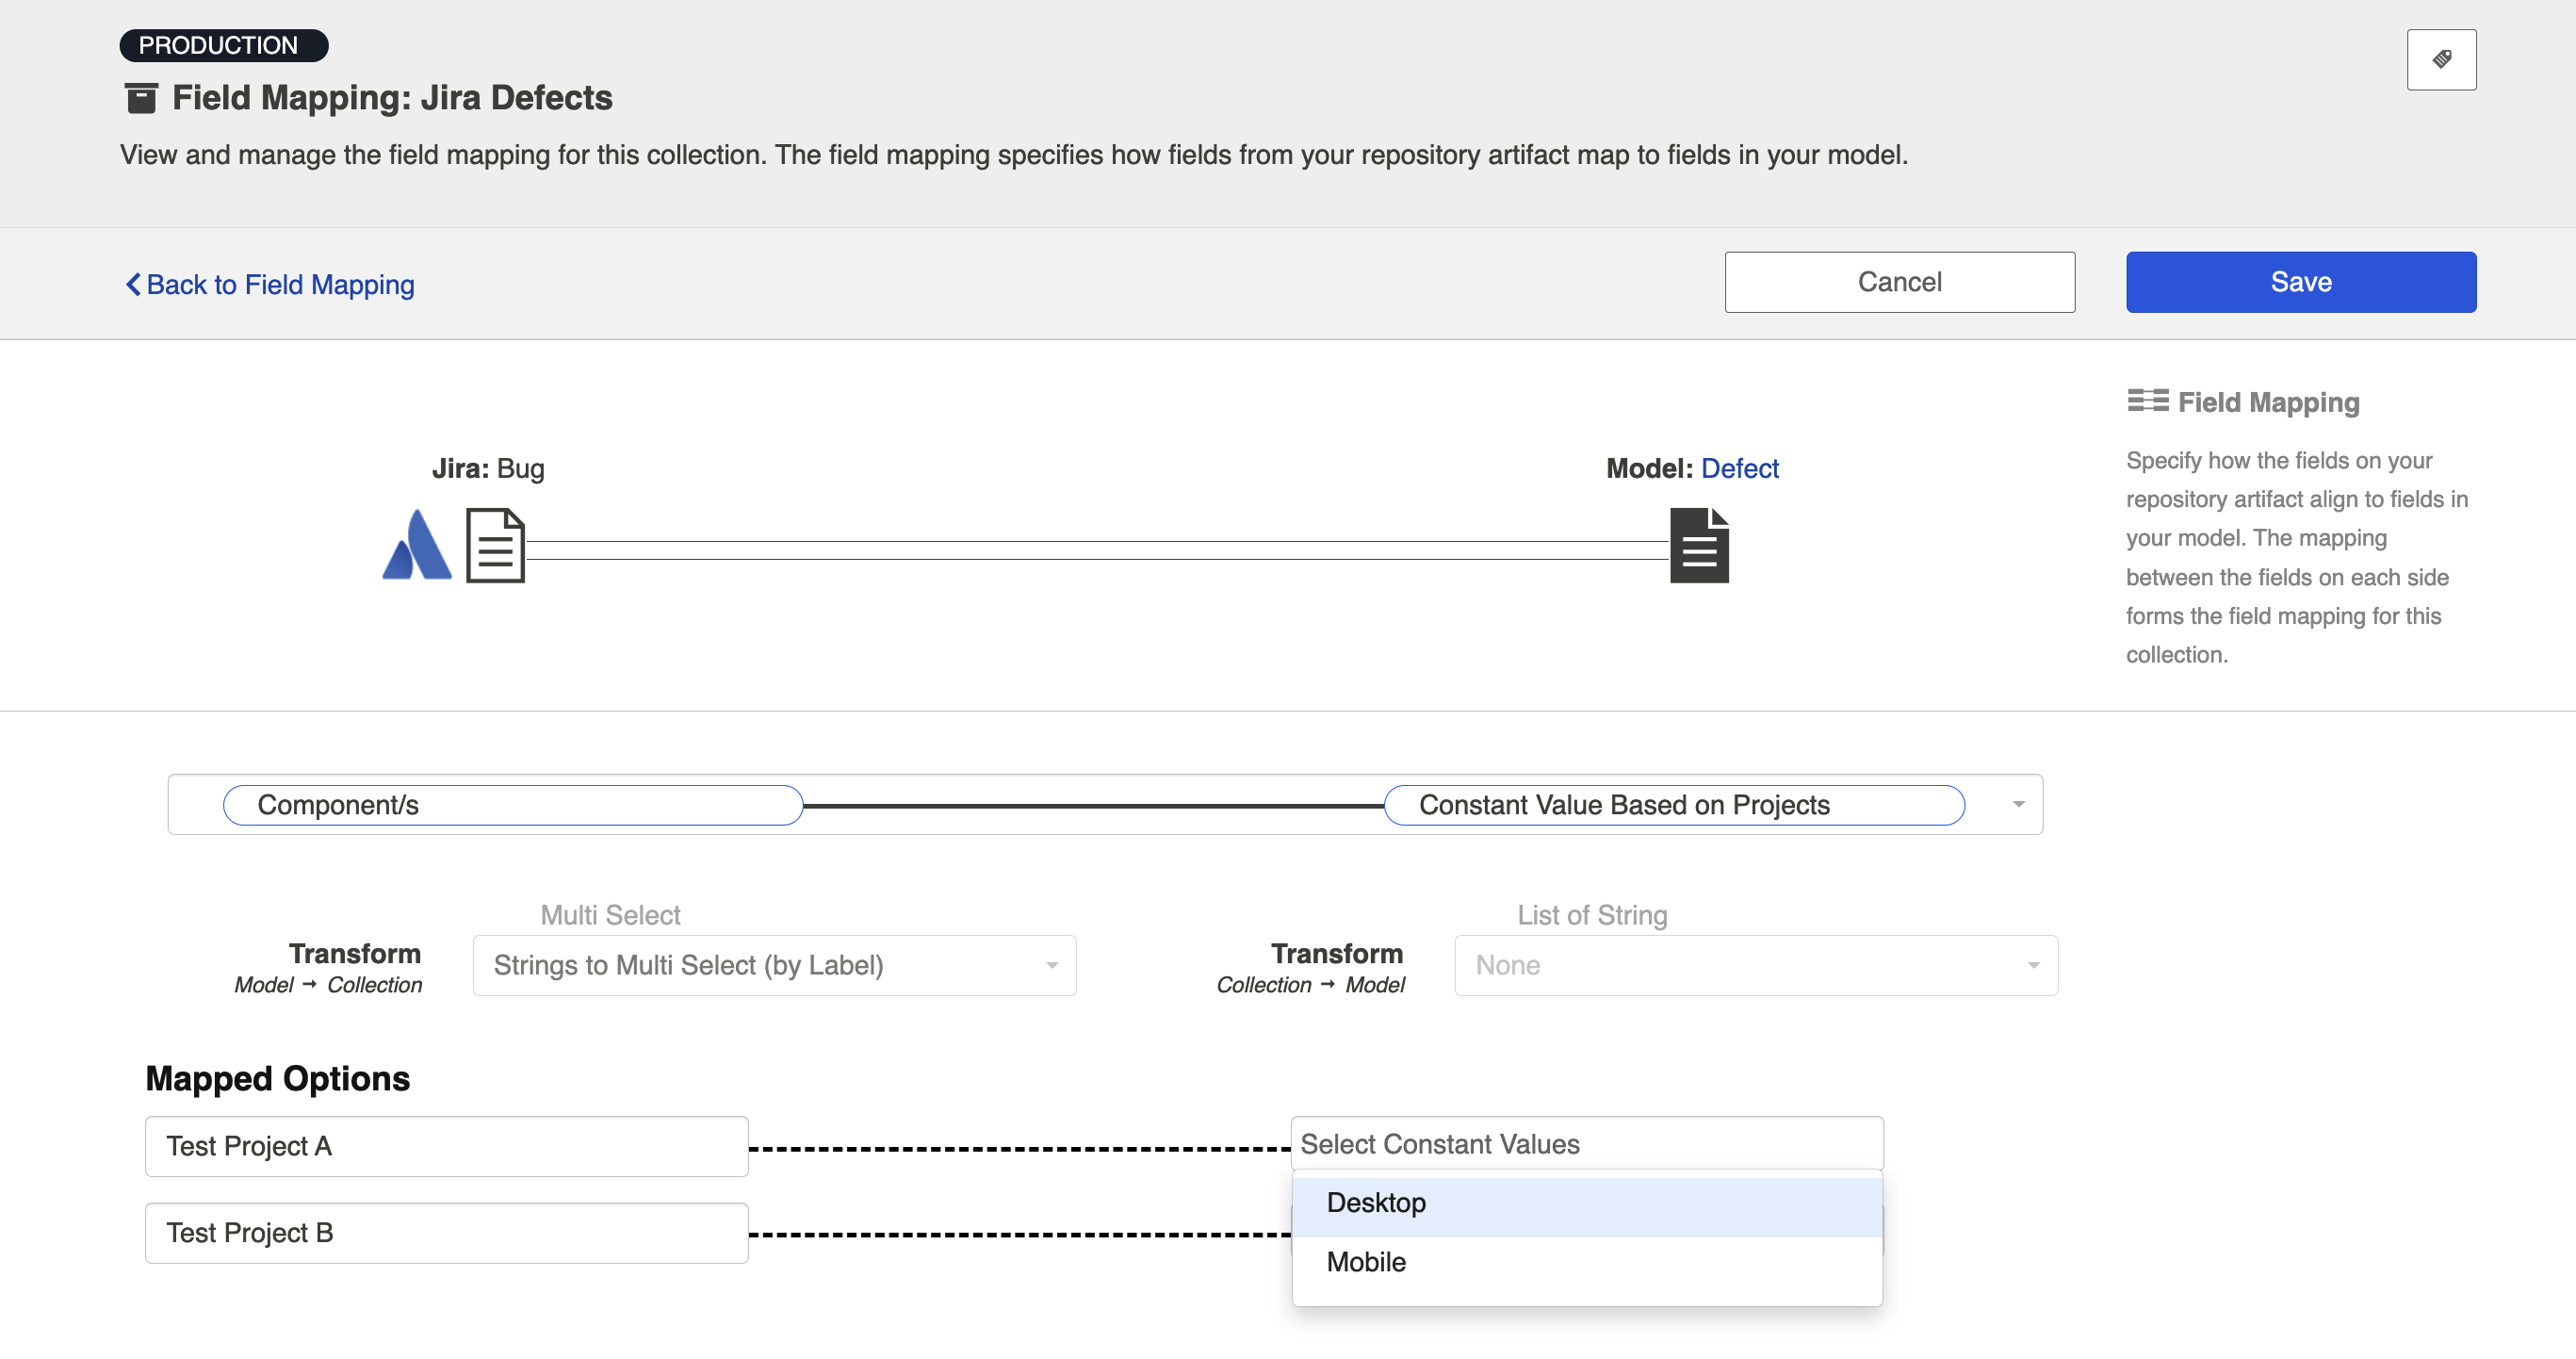
In the screenshot above, a bug created in the Test Project A would have the value Desktop applied to the Component(s) field, while a bug created in the Test Project B would have the value Mobile applied to the Component(s) field.
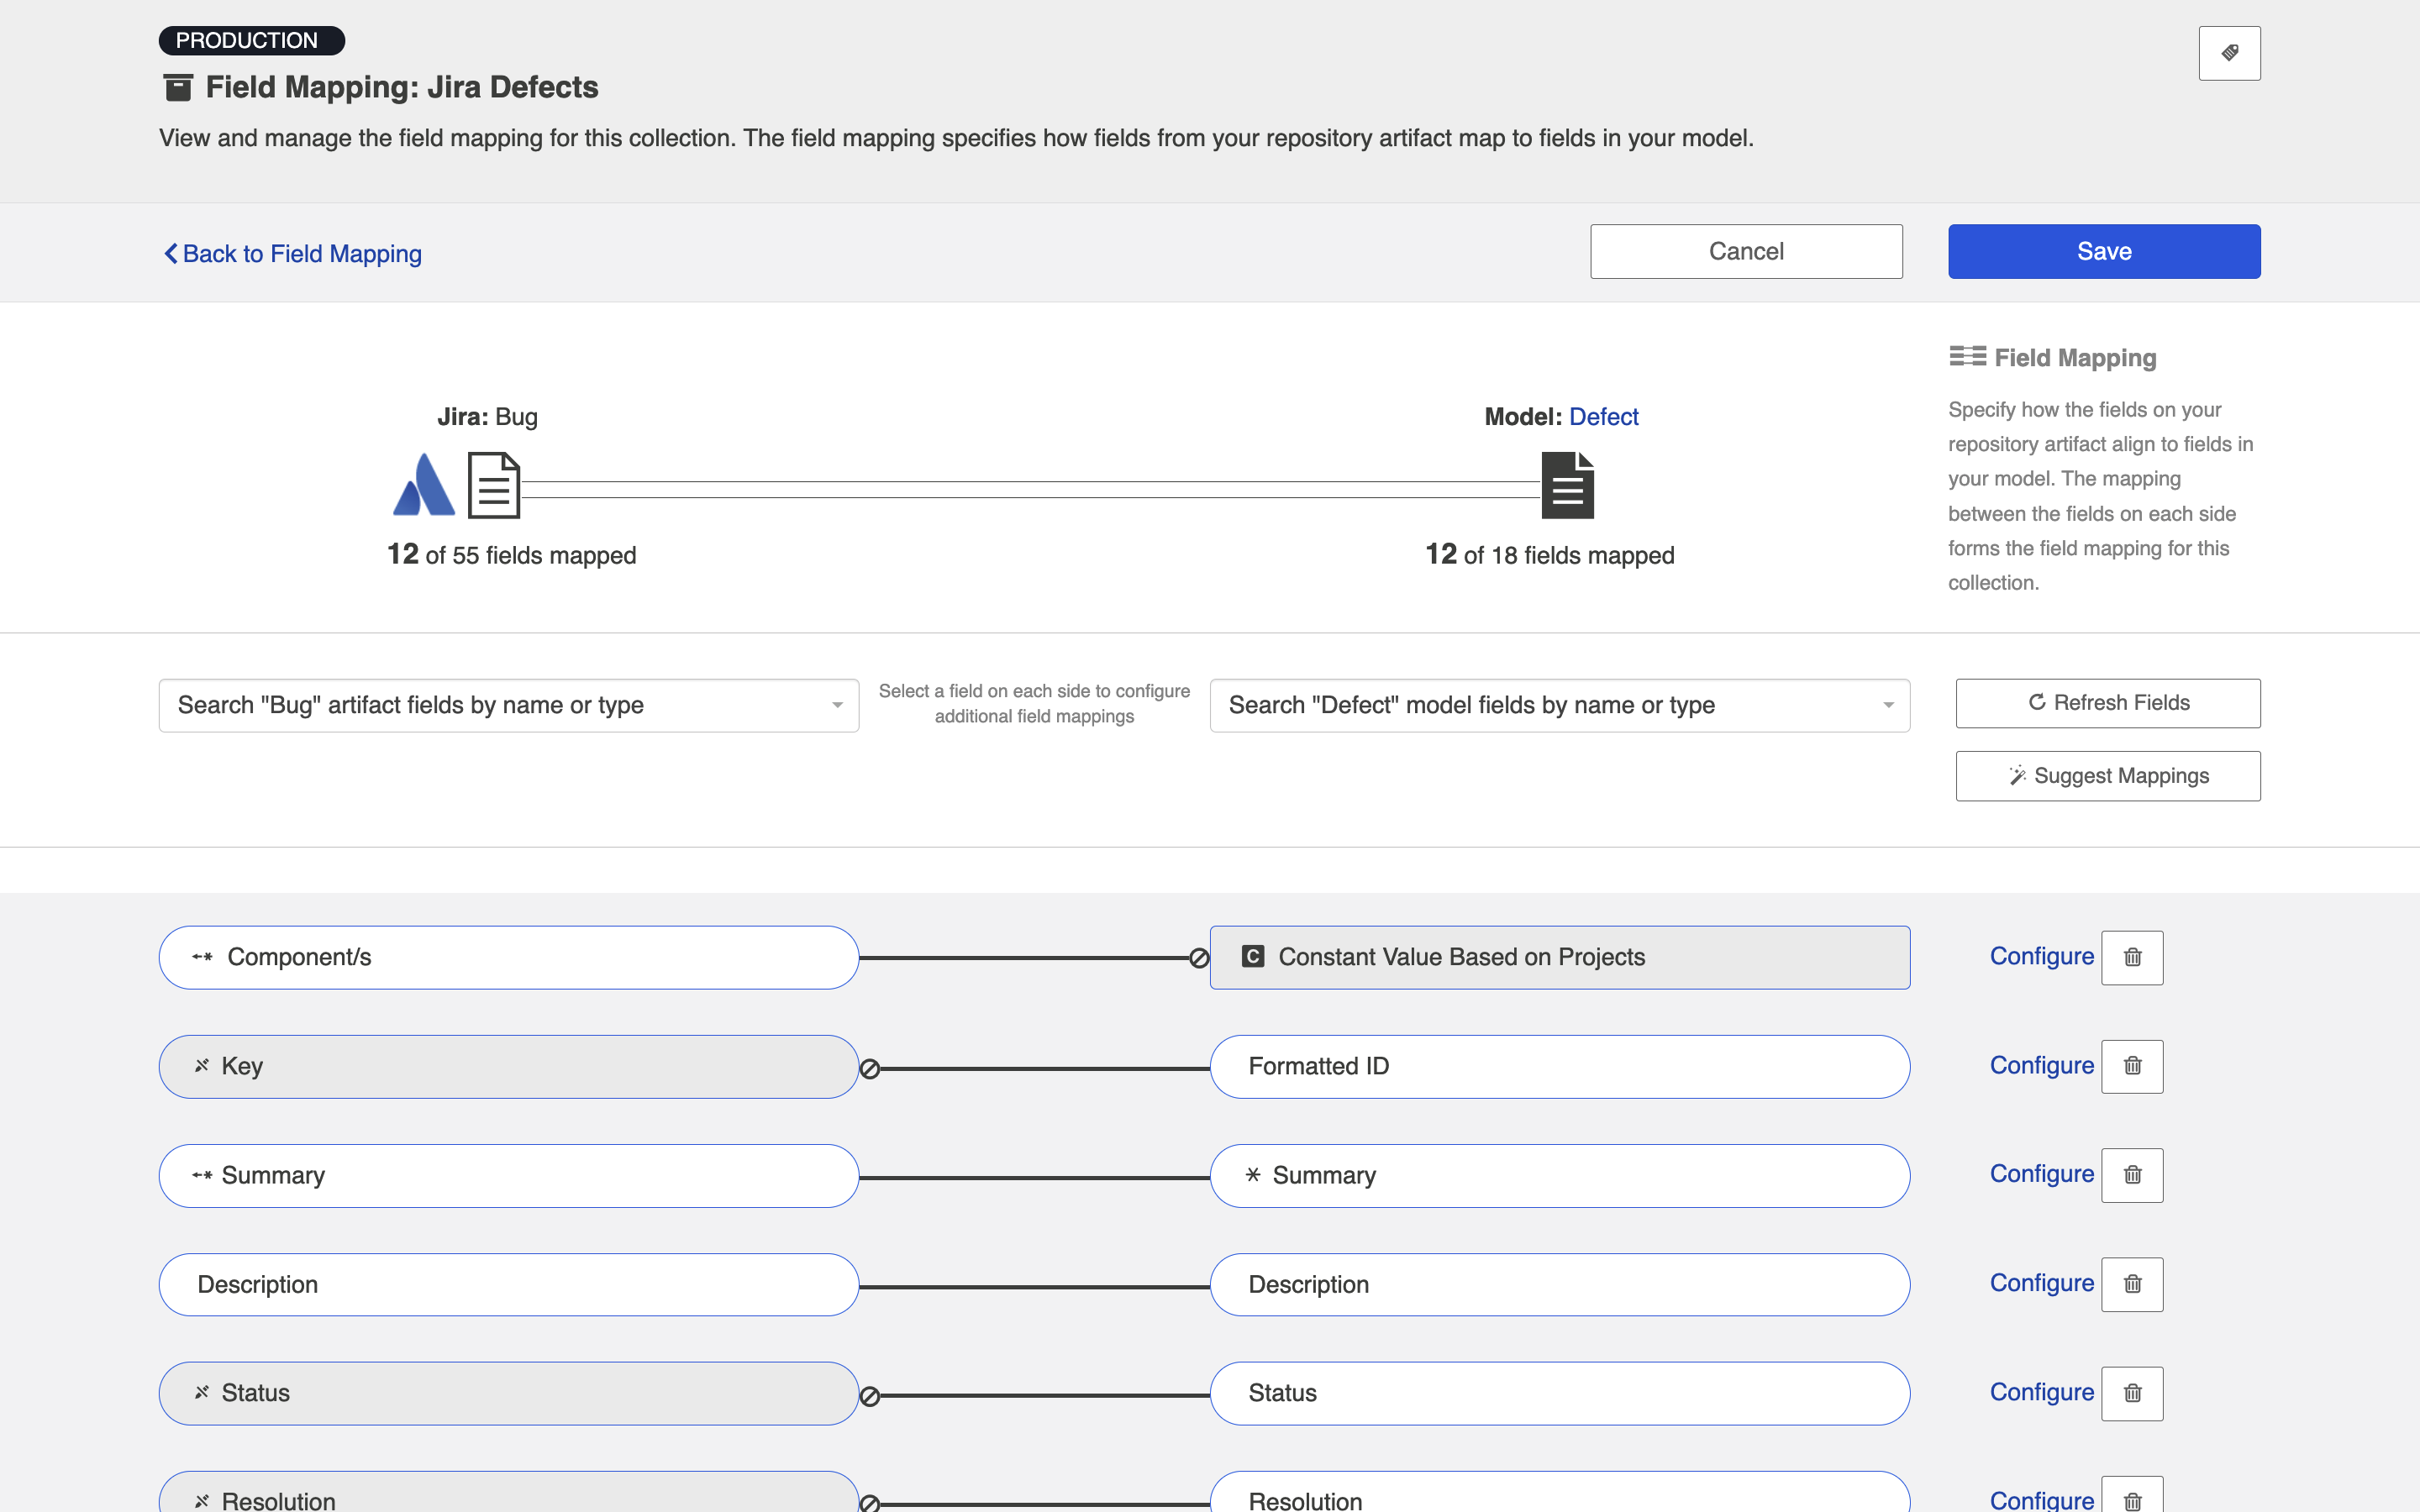
Once the constant value is set, you will notice a few things:
- The pill will be rectangular and grey: this denotes that a constant value has been set.
- The Constant Value icon will be displayed inside the pill.
- The 'prohibited' icon will appear next to the pill. This indicates that no values can be sent to the Constant Value field. The constant value is essentially a dead end, and cannot be linked to a repository or model on the other side.
Note: Sometimes, a single-select field in your collection will not return any values to be selected in in the UI. In cases when this is true, and when the artifact will accept new values for that field, you will see a text input in which you can configure a constant string value (instead of the traditional drop-down list for a single-select).
Scenario 2: If your model requires a field, but the repository utilized in your collection does not have that field:
Solution: Set a constant value on the collection side to send to your model. This means that any time your source collection creates a corresponding artifact in a target collection, the field will automatically be set to the constant value in the target repository.
To set a constant value for a field, select Constant Value from the drop down menu on the collection side. Enter the value, and then click the Set Constant Value box.
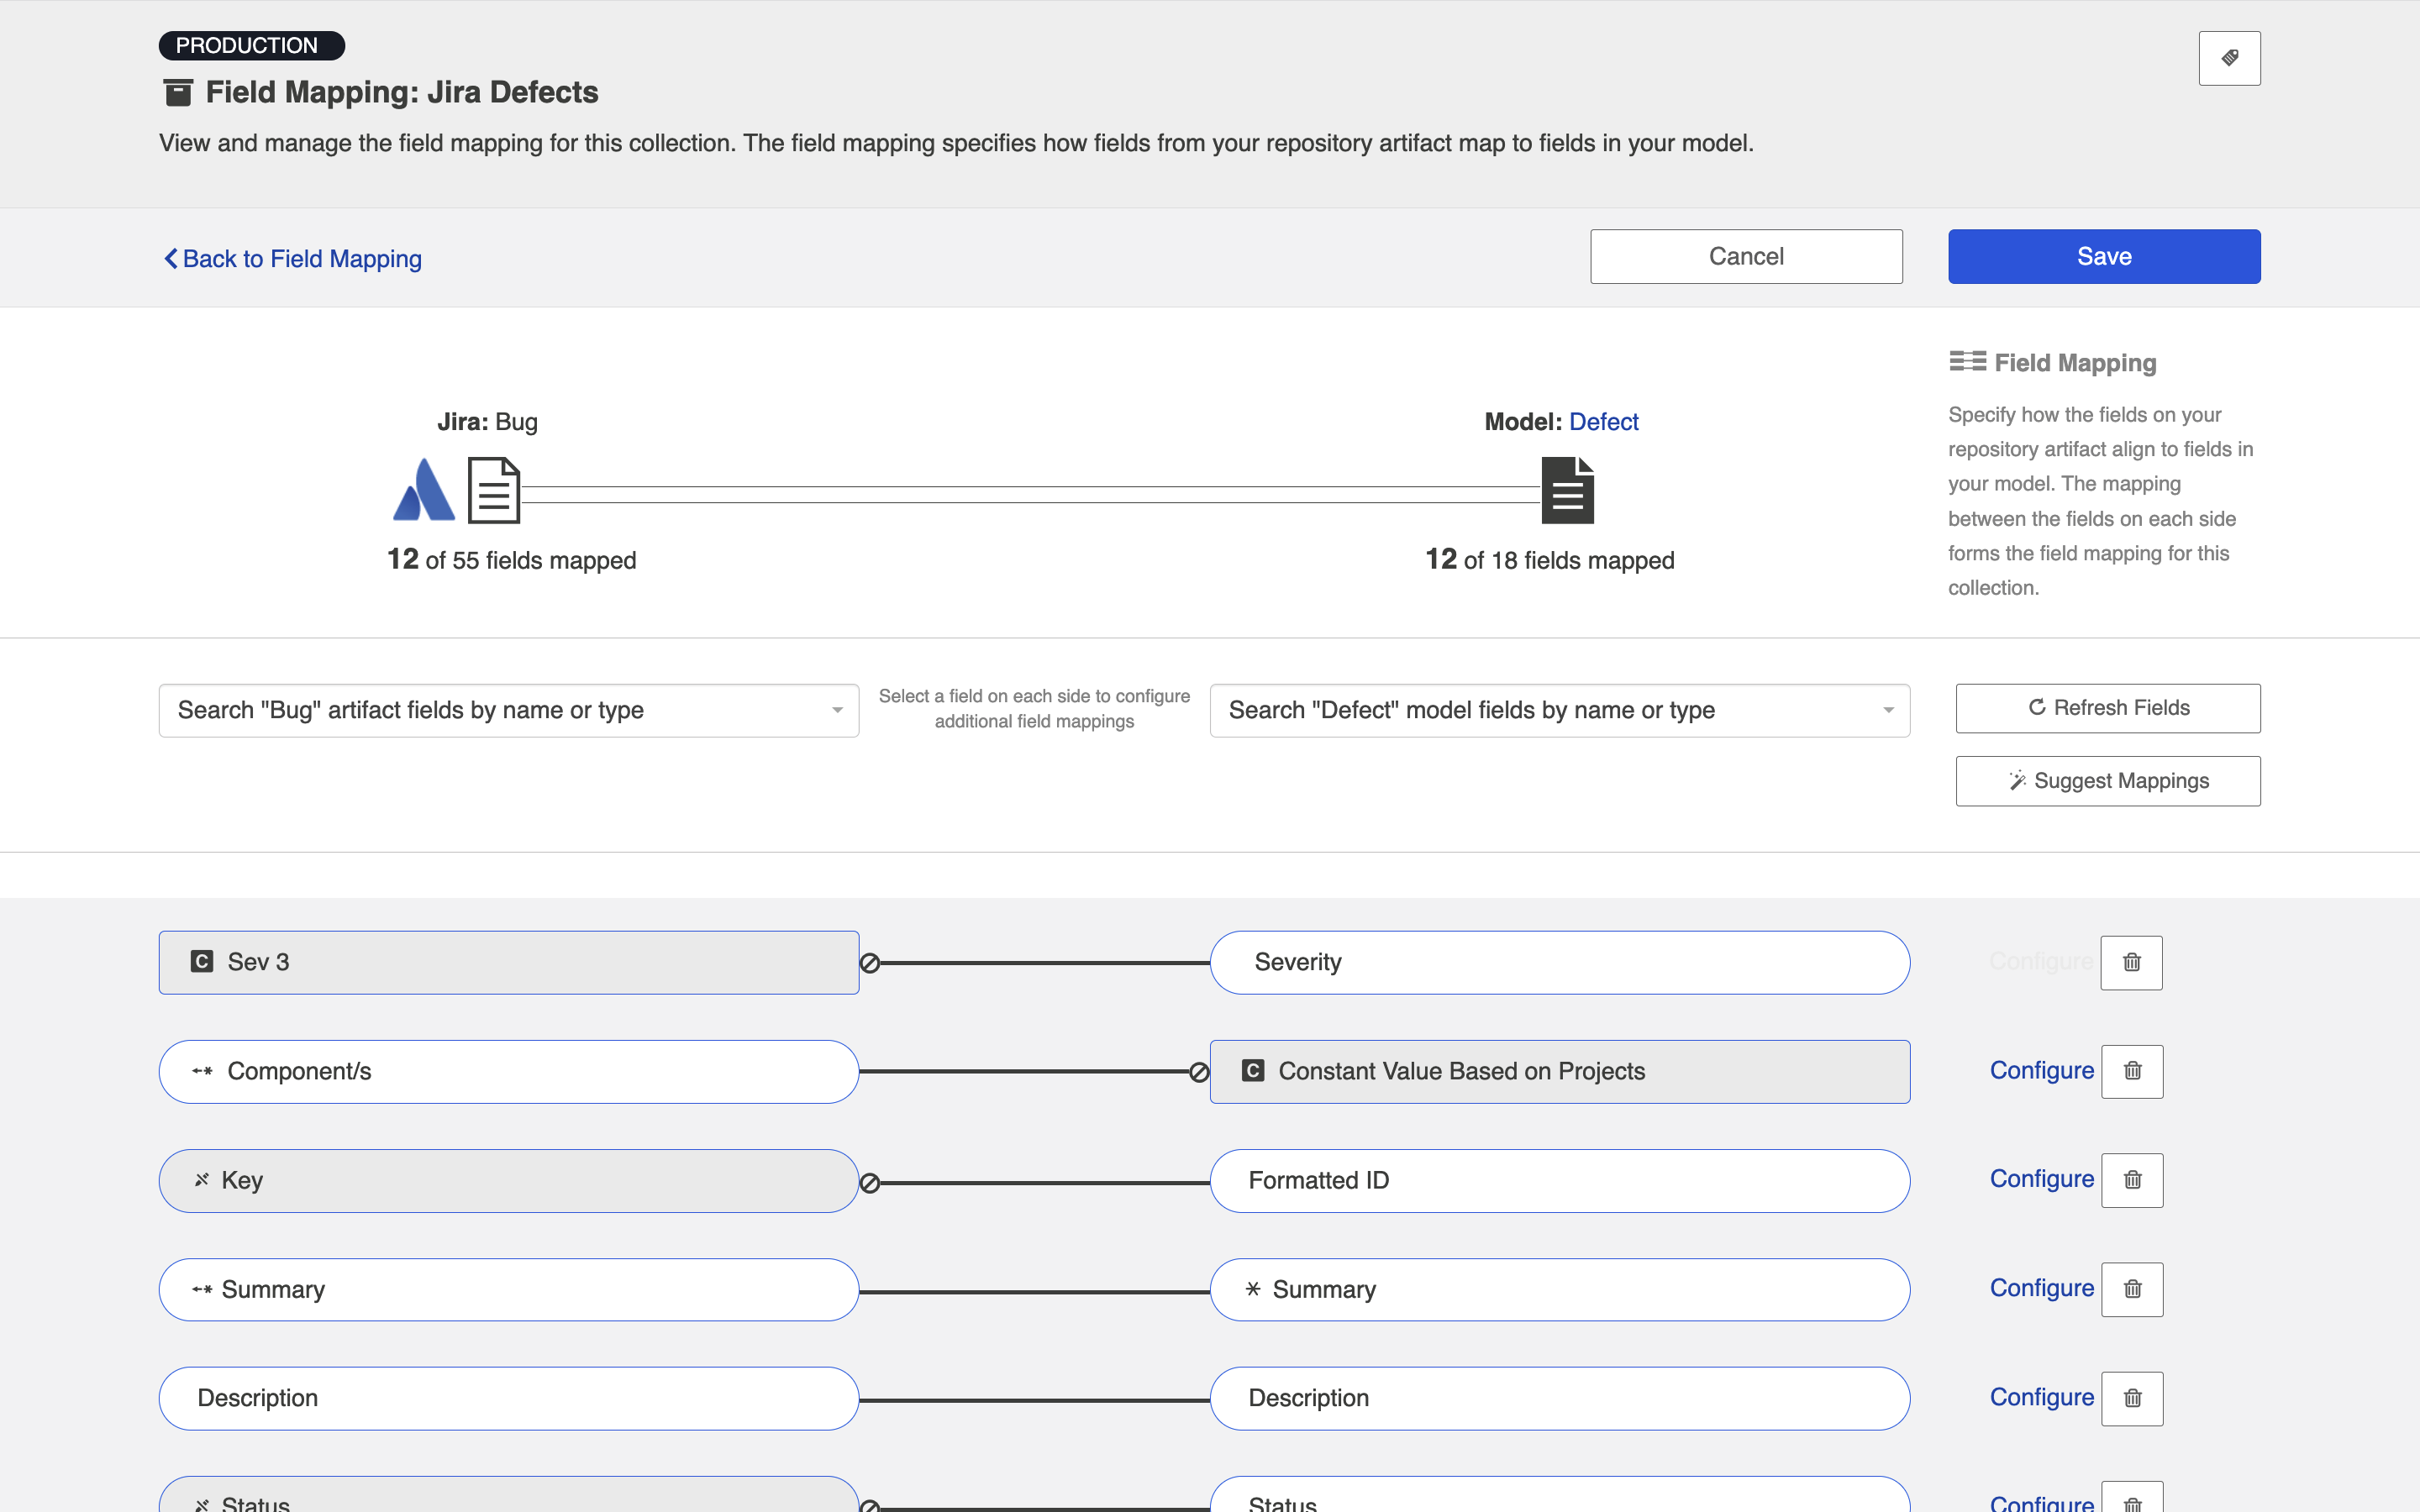
Once the constant value is set, you will notice a couple of things:
- The pill will be rectangular and grey: this denotes that a constant value has been set.
- The Constant Value icon will be displayed inside the pill.
- The 'prohibited' icon will appear next to the pill. This indicates that no values can be sent to the Constant Value field. This makes sense, because in this example your repository did not have a 'severity' field to begin with.
In the example above, any defects that flow from Jira to a target repository will populate the 'Severity' field in the target repository with a value of 'Sev 3.'
Field Configuration
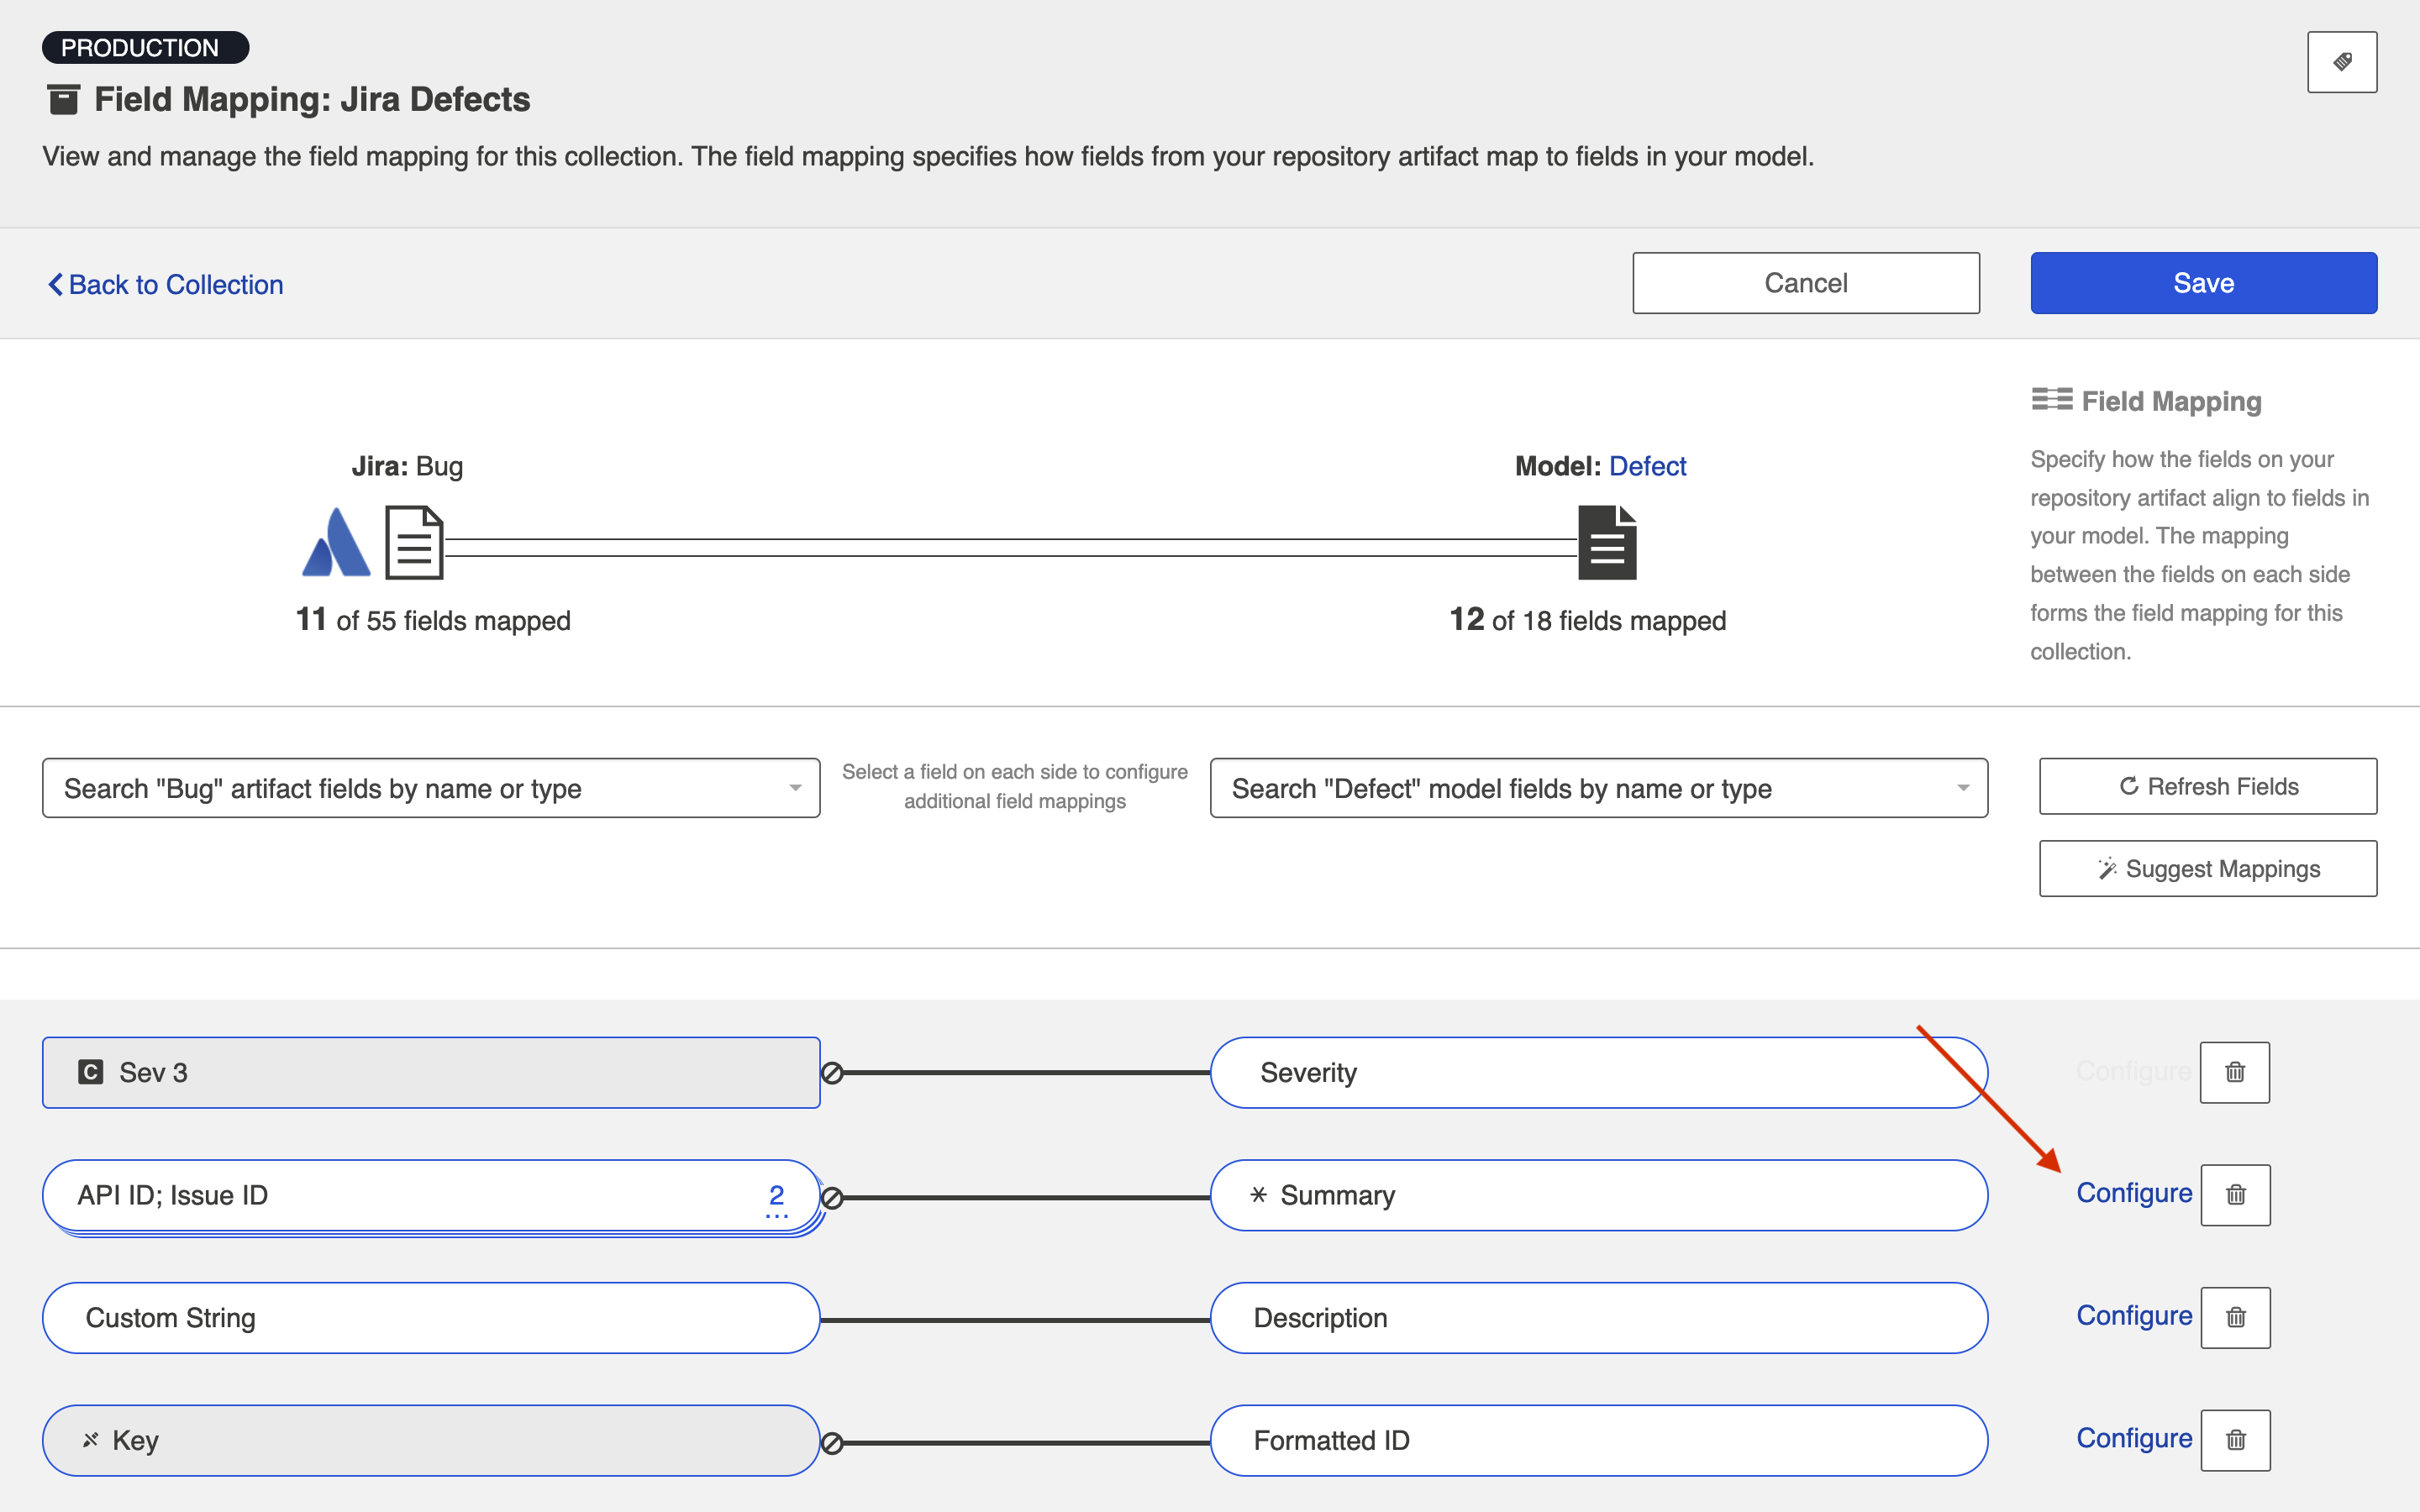
Once your collection-to-model field mapping is complete, your next step is to configure each field. Hub will generally auto-configure these for you, but in certain cases (such as single-selects and multi-selects), additional configuration may be needed. In scenarios where the integration cannot run successfully without additional configuration, you will see an orange configuration warning next to that field.
To review and update an individual field's configuration, click the Configure link to its right. This will lead you to the Field Configuration screen:
Transforms
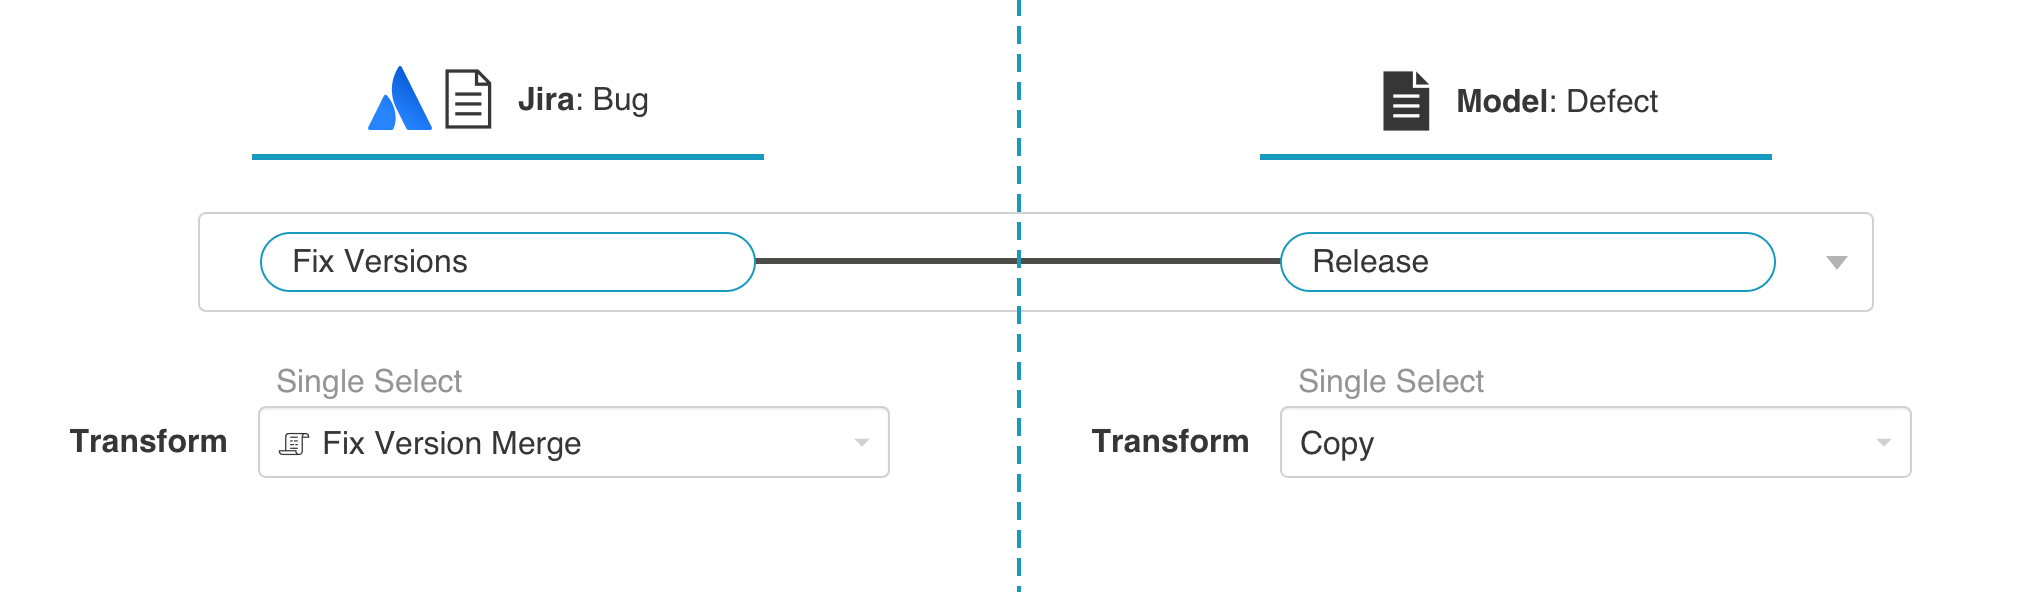
The Field Configuration screen is where you can configure your transforms and value mappings.
Similar fields in different repositories often come in different formats, resulting in the need for values to be transformed to their proper format before flowing to the target repository. This screen allows you to configure how different types of fields will translate from one repository to the other.
You can learn more about Supported Transforms on the Field Mapping page.
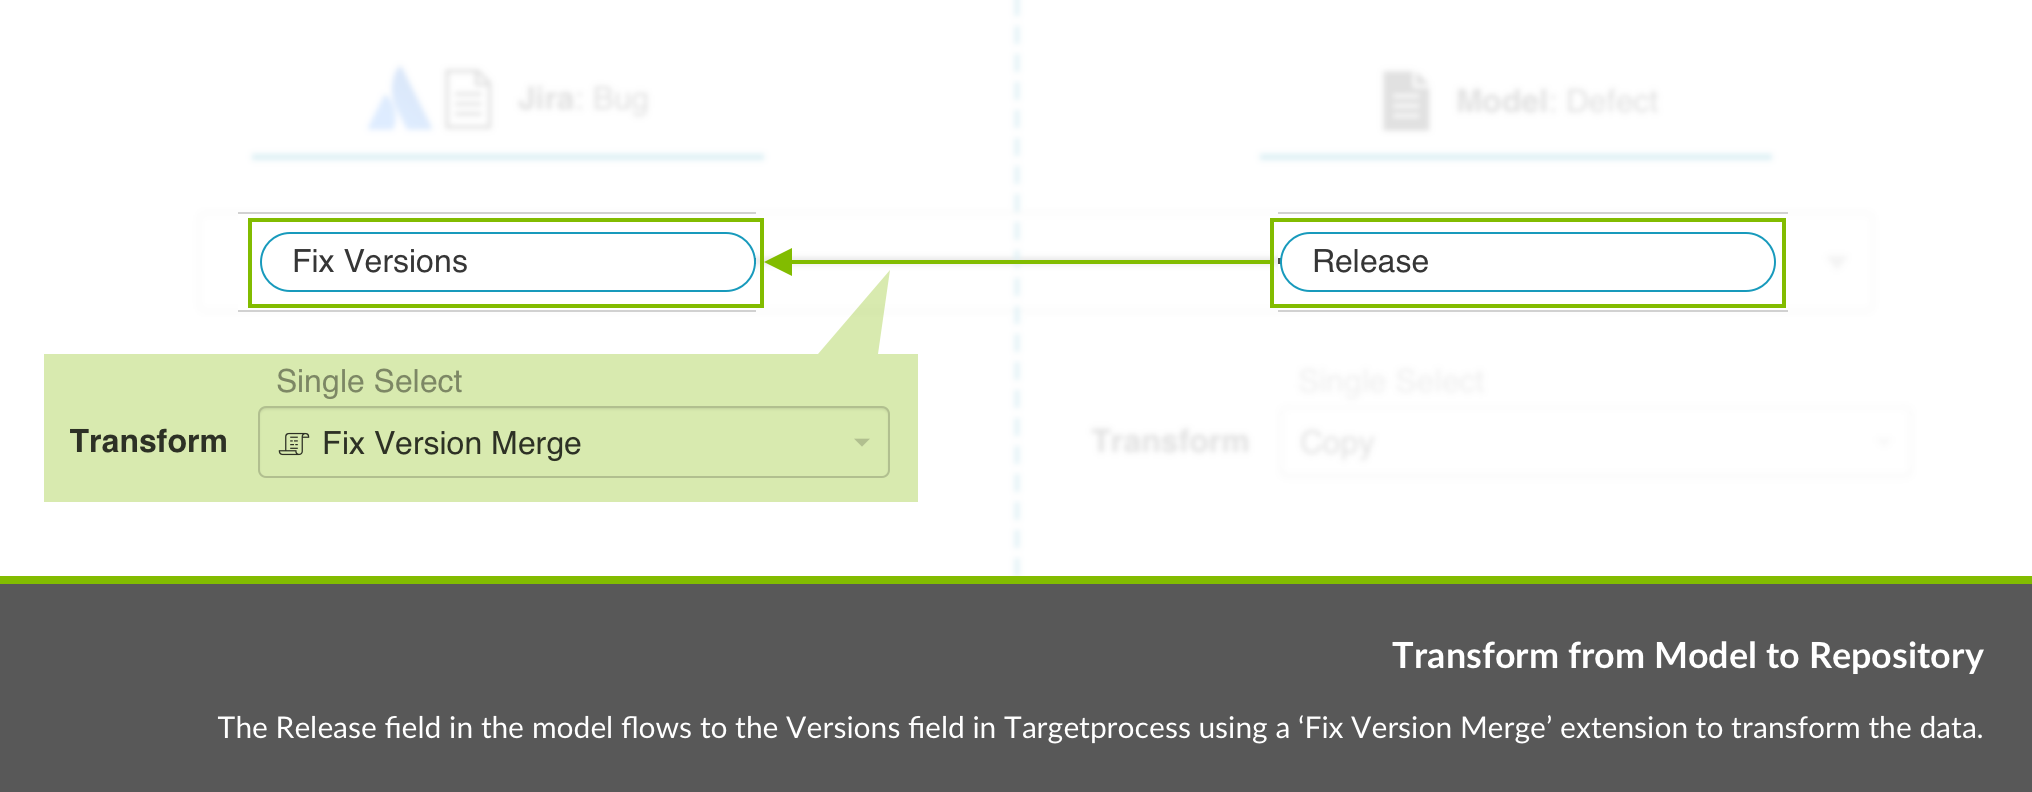
The transform on the left will impact how data flows into your repository (from your model), and the transform on the right will impact how data flows into your model (from your repository).
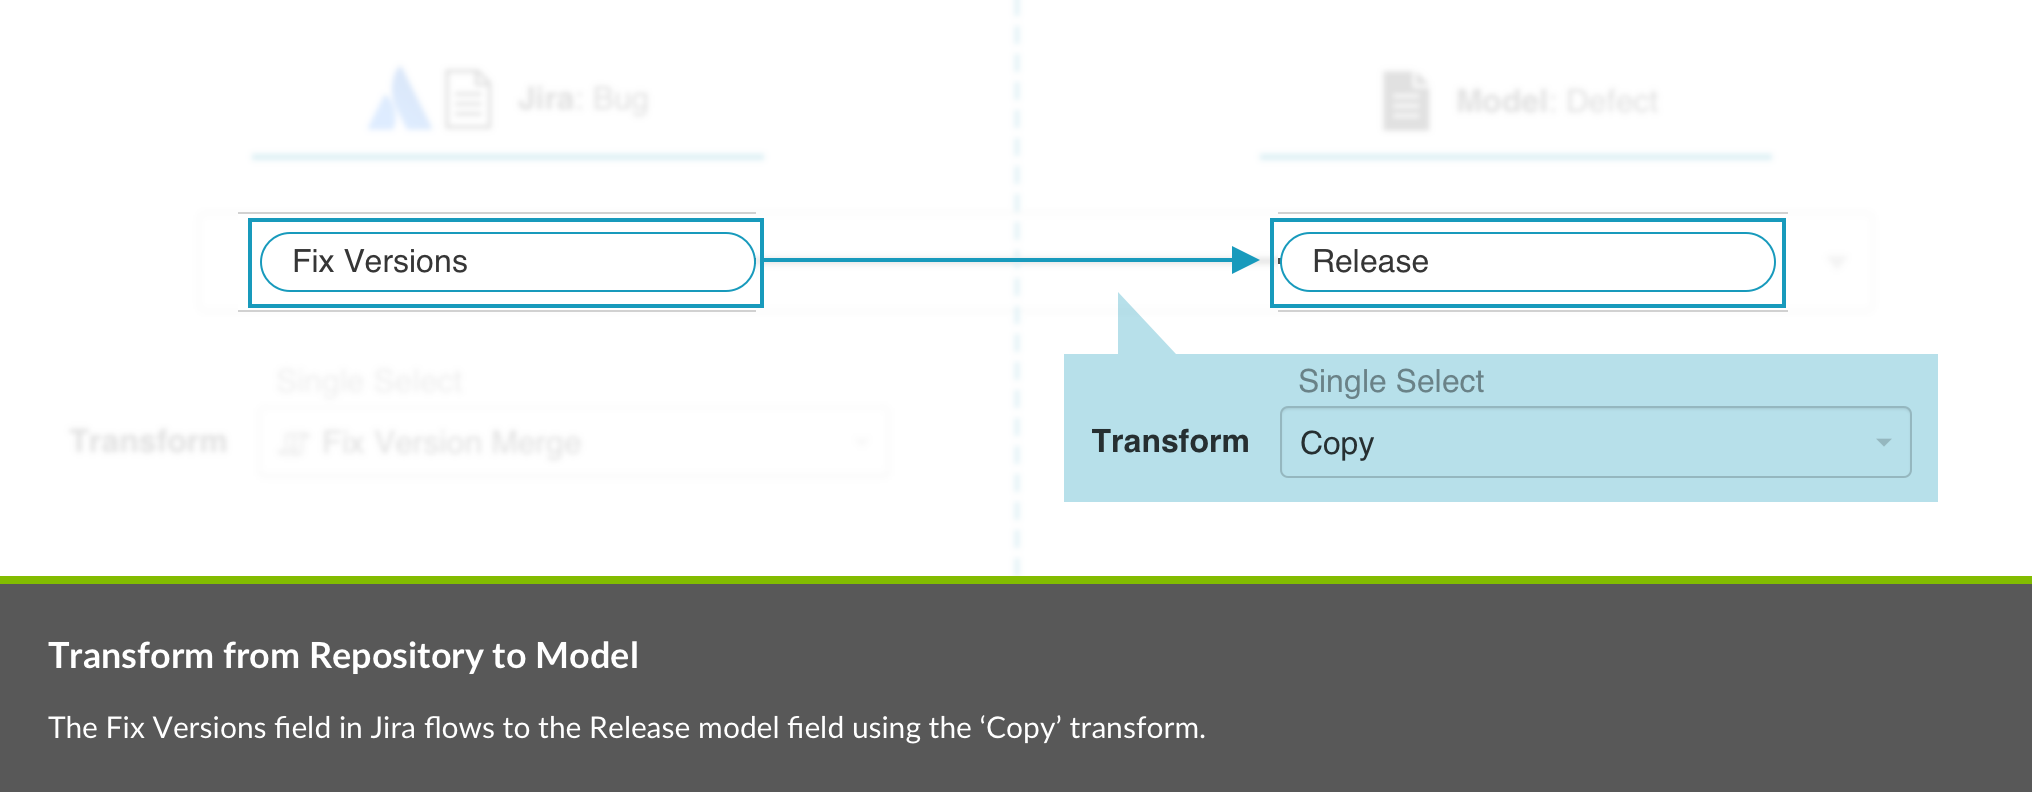
Here are some examples of available transforms:
- Copy: A copy of the value from the source field will flow to this field. The value sent will over-write whatever was previously held in that field.
- Append: A copy of the value from the source field will flow to this field. Values that existed previously will remain, with the new value appended to the end. This transform is typically utilized within the context of a Modify via Gateway Integration.
- Concatenate: Multiple (rich text or string) fields from the source artifact will be concatenated into a single (string) field on the target artifact. Learn more in the section below.
- Note: This transform is only available for rich text and string field types.
- Extract Path Segment: The source (string or rich text) field will be separated using a delimiter, and the selected value will flow to the target (string or rich text) field. Learn more in the section below.
- None: No value will flow from the source field to this field.
- (Field Type) to (Field Type), for example 'Formatted String to Rich Text': In some cases, you may need to transform the data from one field type (such as a Formatted String) to another field type (such as Rich Text). In this scenario, your transform will function similarly to the 'copy' transform. It will overwrite whatever values were previously held in that field with the new (transformed) value sent from the source field.
- Note that for transforms for multi- field types (i.e., multi-select, containers, relationships, etc), where appropriate, the values will be listed out and separated by a comma. For example, a "Containers to ID" transform will flow all container IDs, each separated by a comma, to a string field.
- Rich Text to Literal String and Literal String to Rich Text: While 'rich text to formatted string' strips the text of any code and outputs a human-readable string, 'rich text to literal string' outputs raw rich text data, preserving the rich text markup (for example, flowing '<b>bold</b>,' rather than 'bold'.
- Location to Web Link (Summary as Label): Some transforms allow Hub to perform some behind-the-scenes magic. For example, the 'Location to Web Link (Summary as Label)' transform will flow a location (i.e., the URL for an artifact) to a Web Link field, using the Summary field on that source artifact as the label for that hyperlink.
- Custom Data Transformations: If you have configured a Custom Data Transformation extension, you can apply it on this screen:
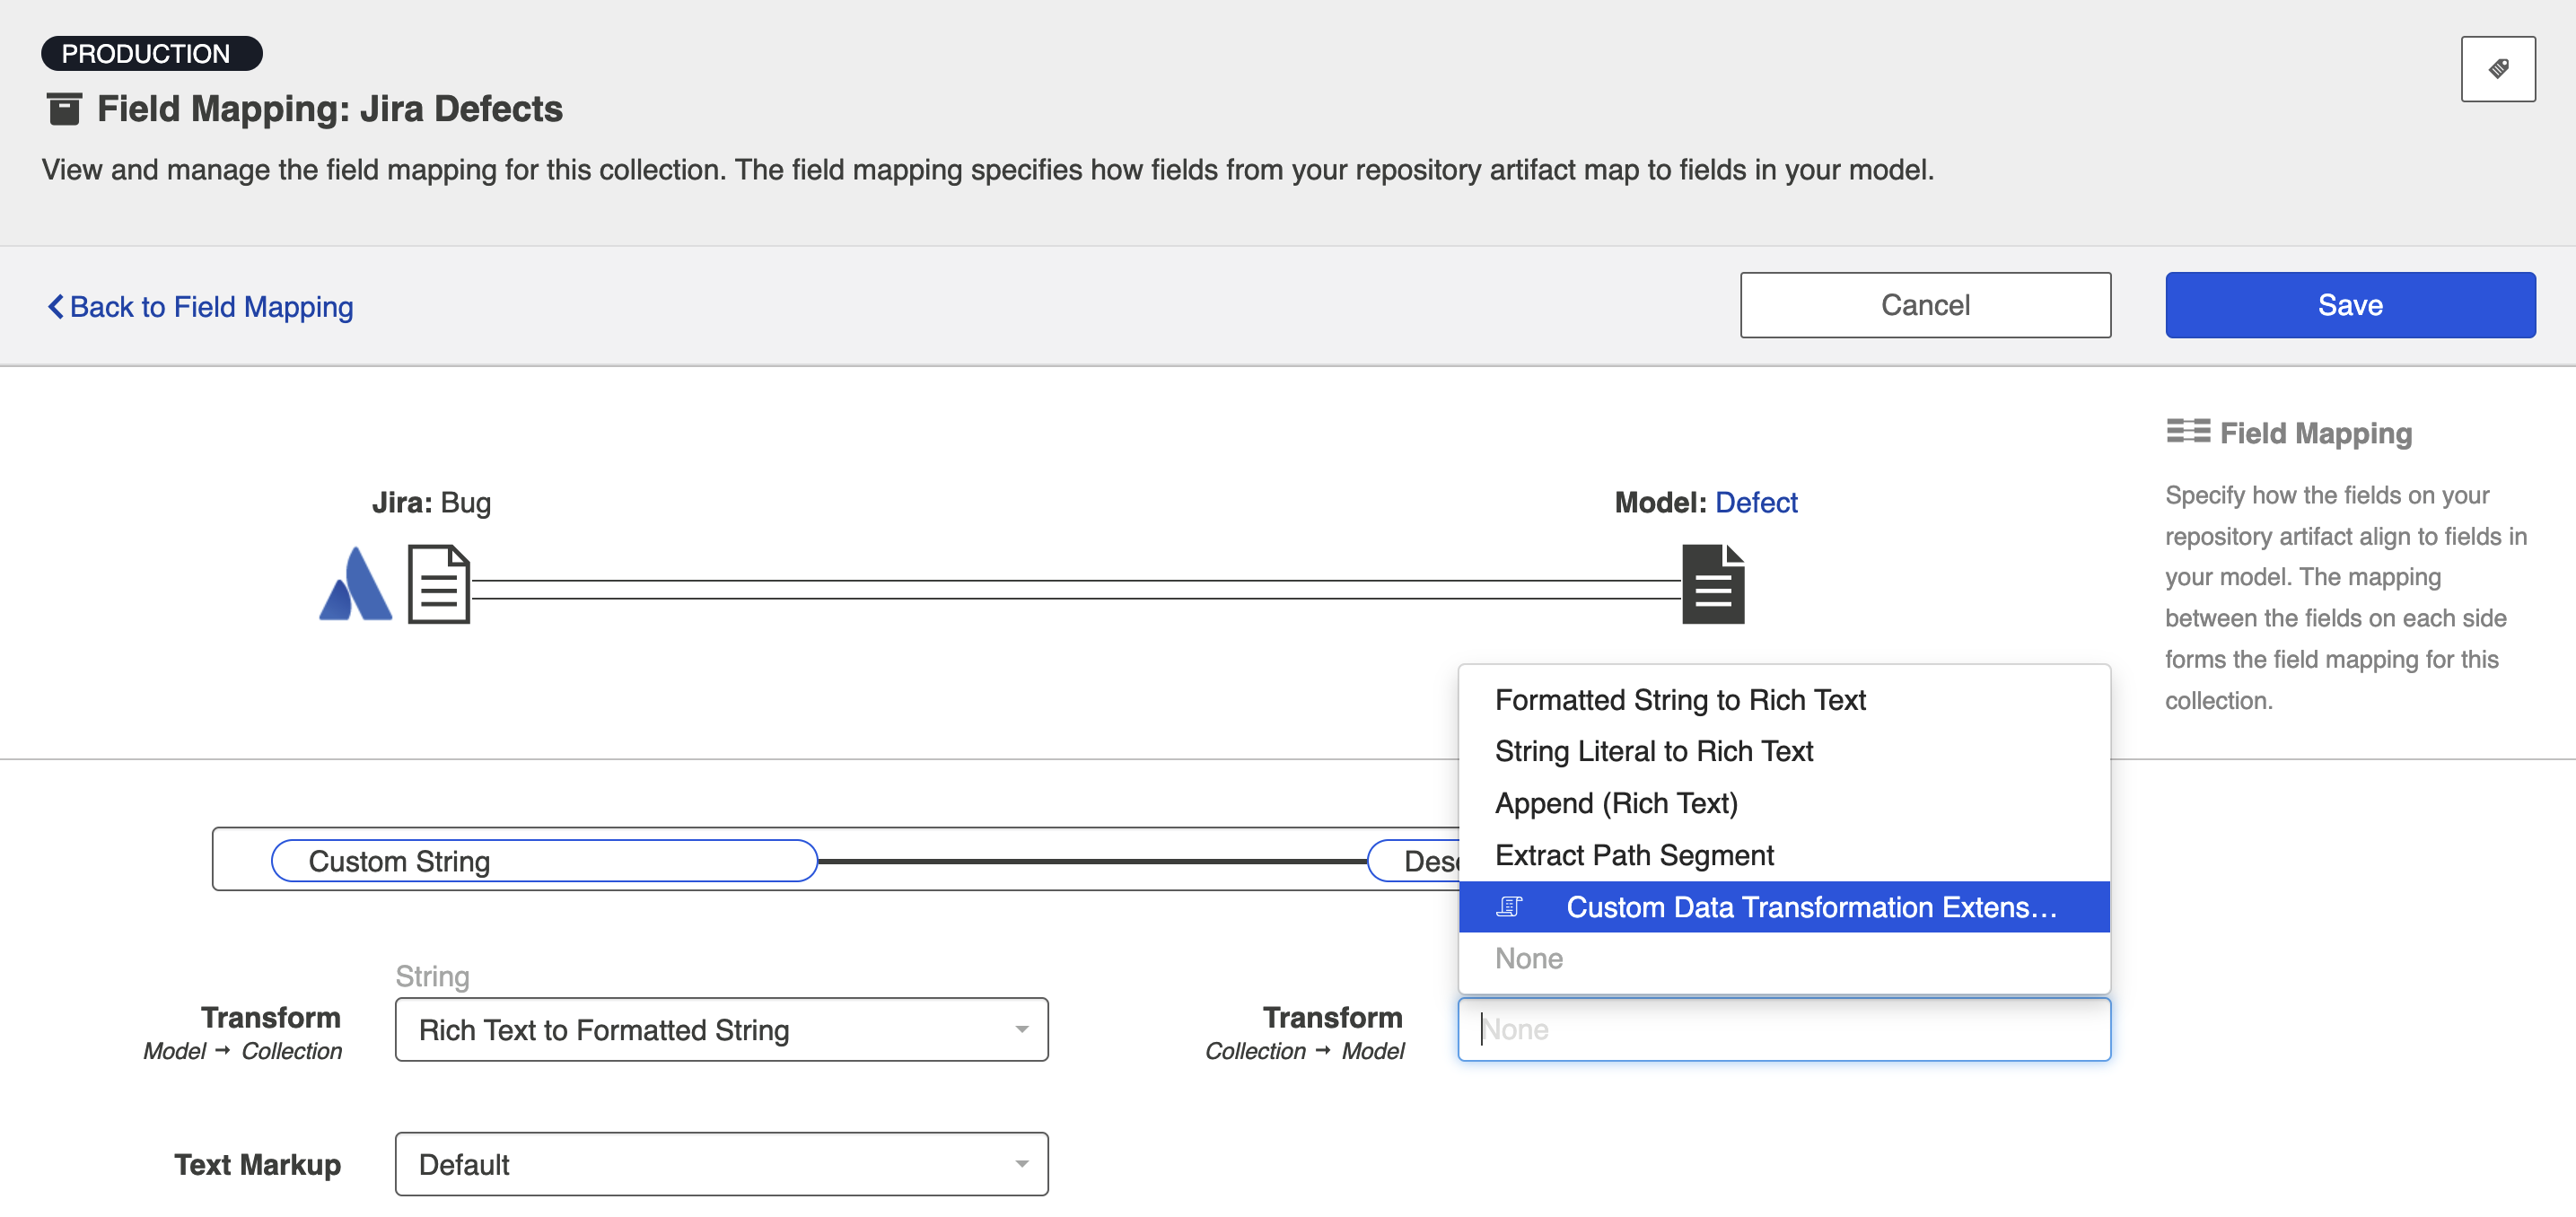
In most scenarios, the default setting will be appropriate, and you will not need to modify anything here.
Concatenate
This transform can be used to concatenate multiple (rich text or string) fields on a source artifact into a single (string) field on a target artifact. The concatenated values will then flow from the model to the chosen field on the target artifact.
To configure a concatenate transform, click Configure on the Field Mapping screen.
Note: The concatenate transform will only be available if multiple (rich text or string) fields are mapped to a single (string) field.
On the Field Mapping screen, you'll see the source fields entered in the concatenate text box.
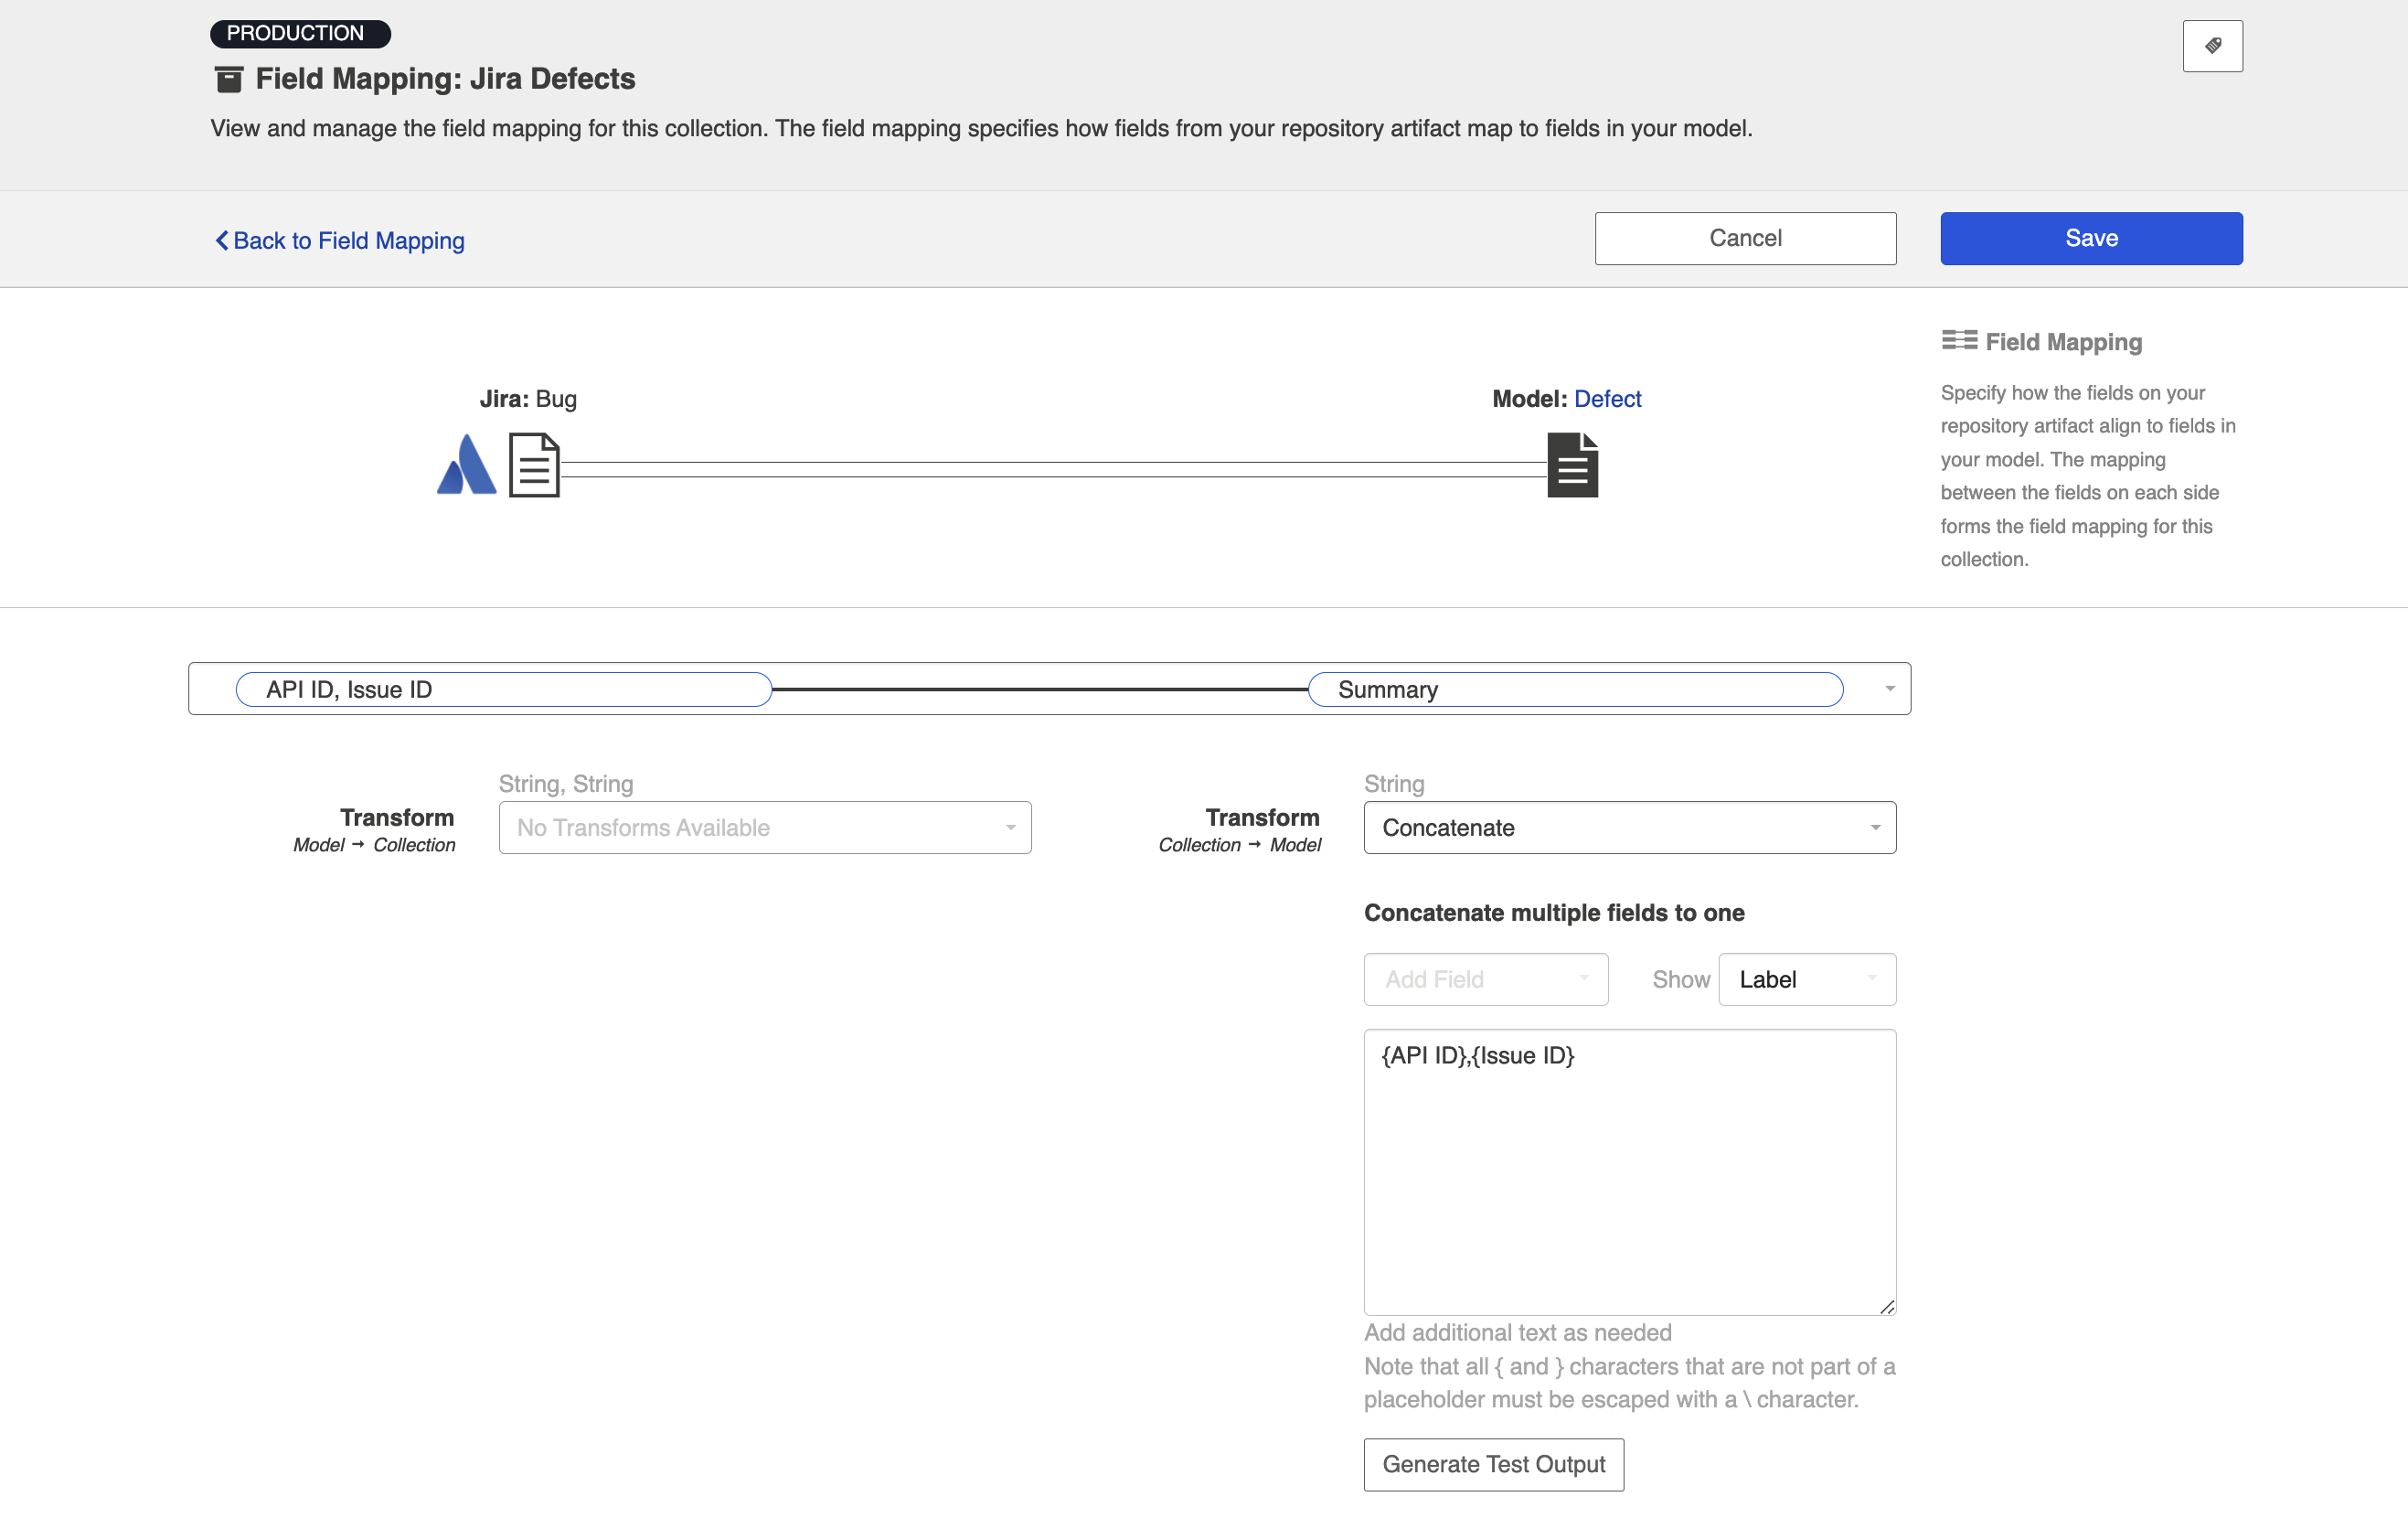
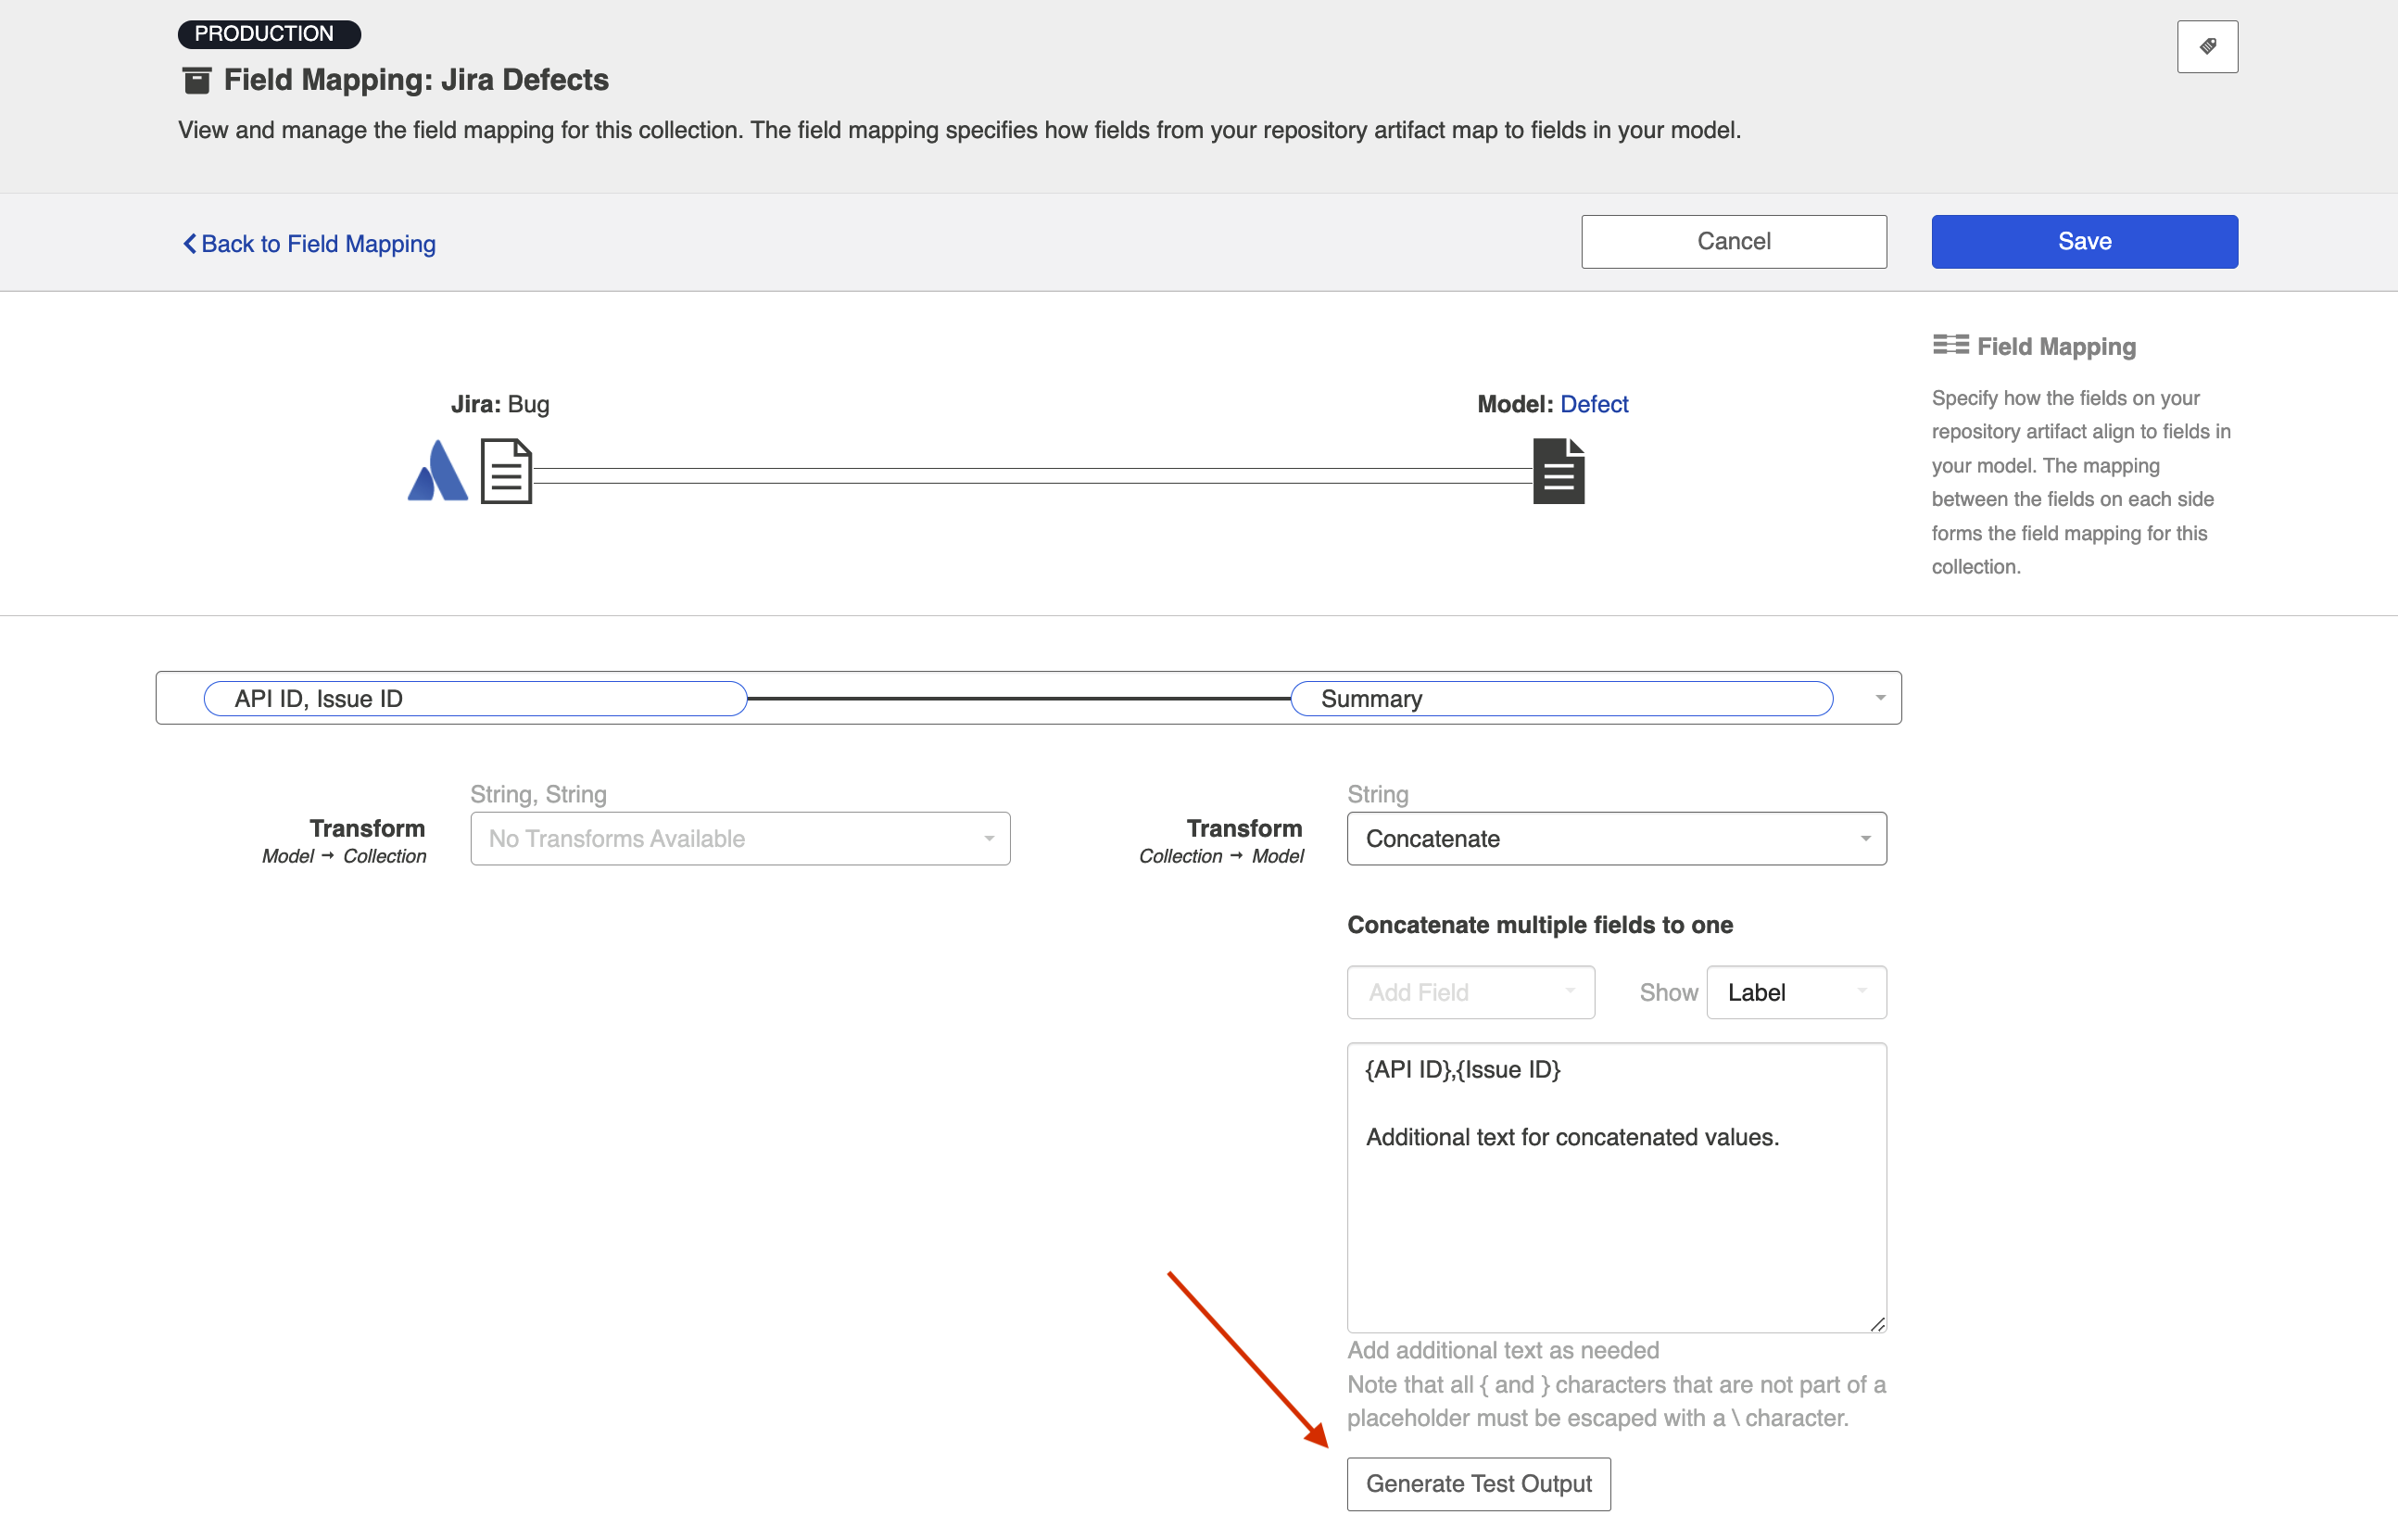
In the concatenate text box, you can format the fields as you'd like and add additional text.
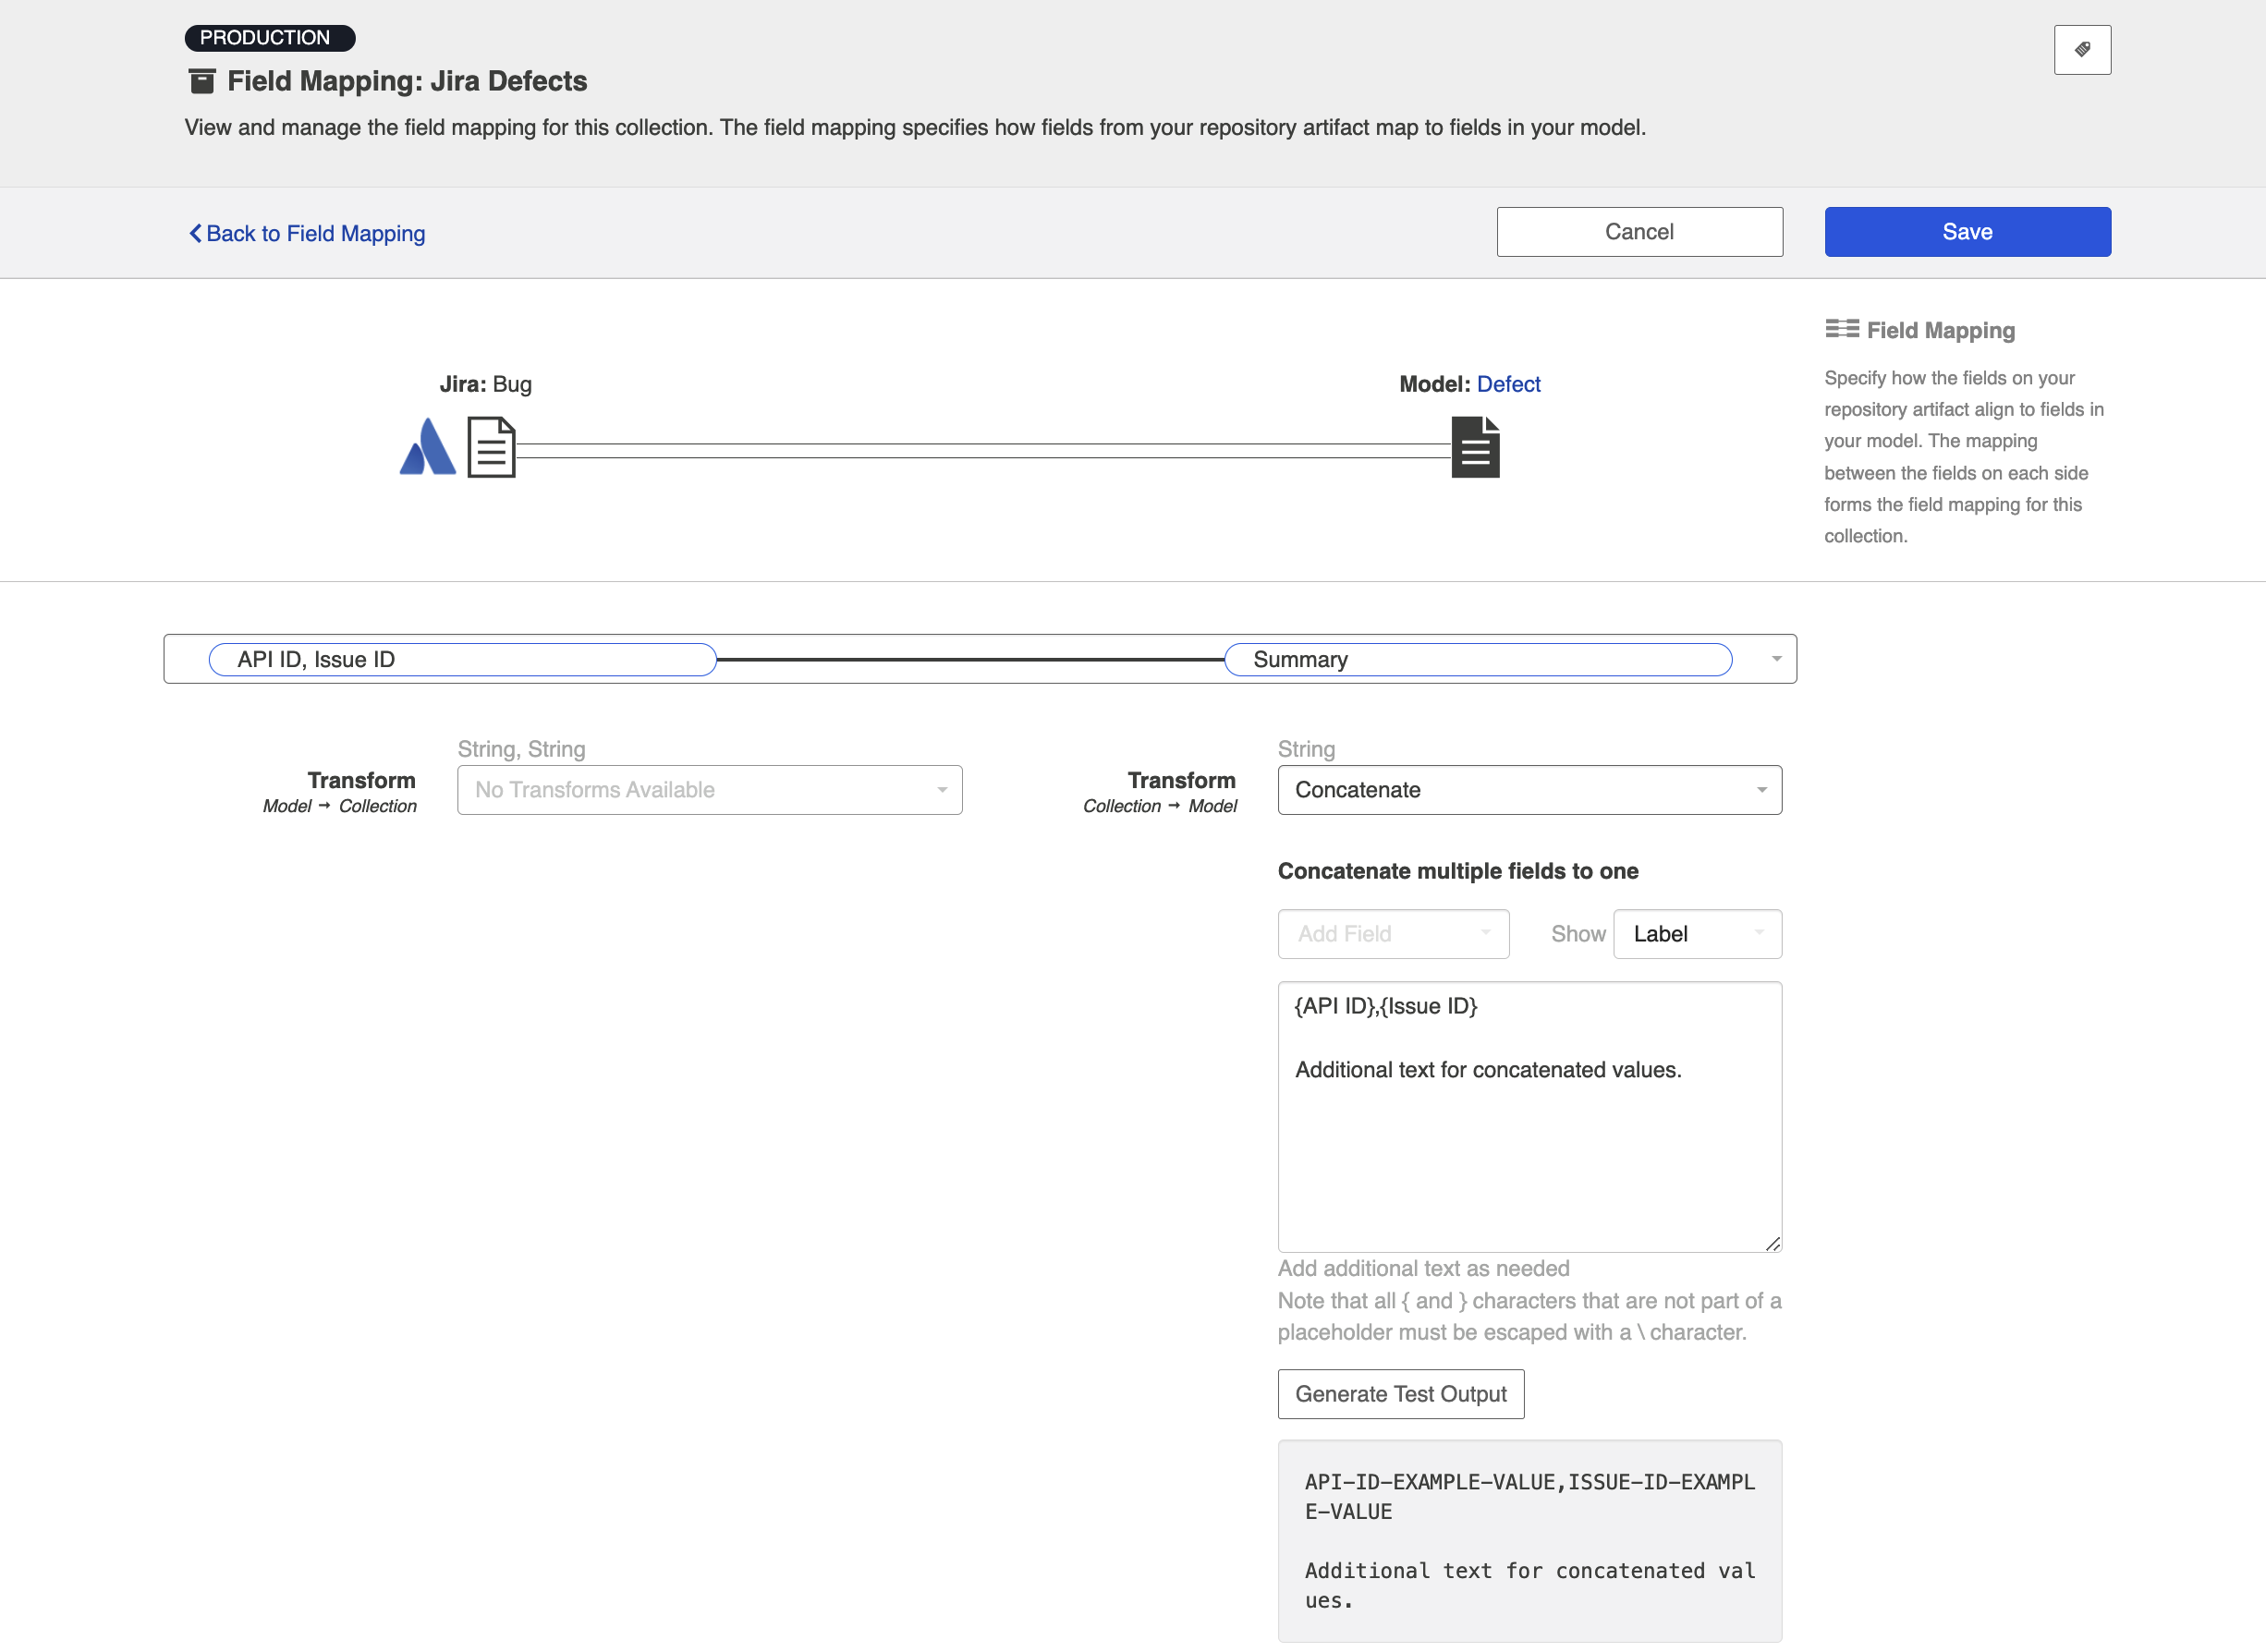
For a preview of the concatenated values, click Generate Test Output.
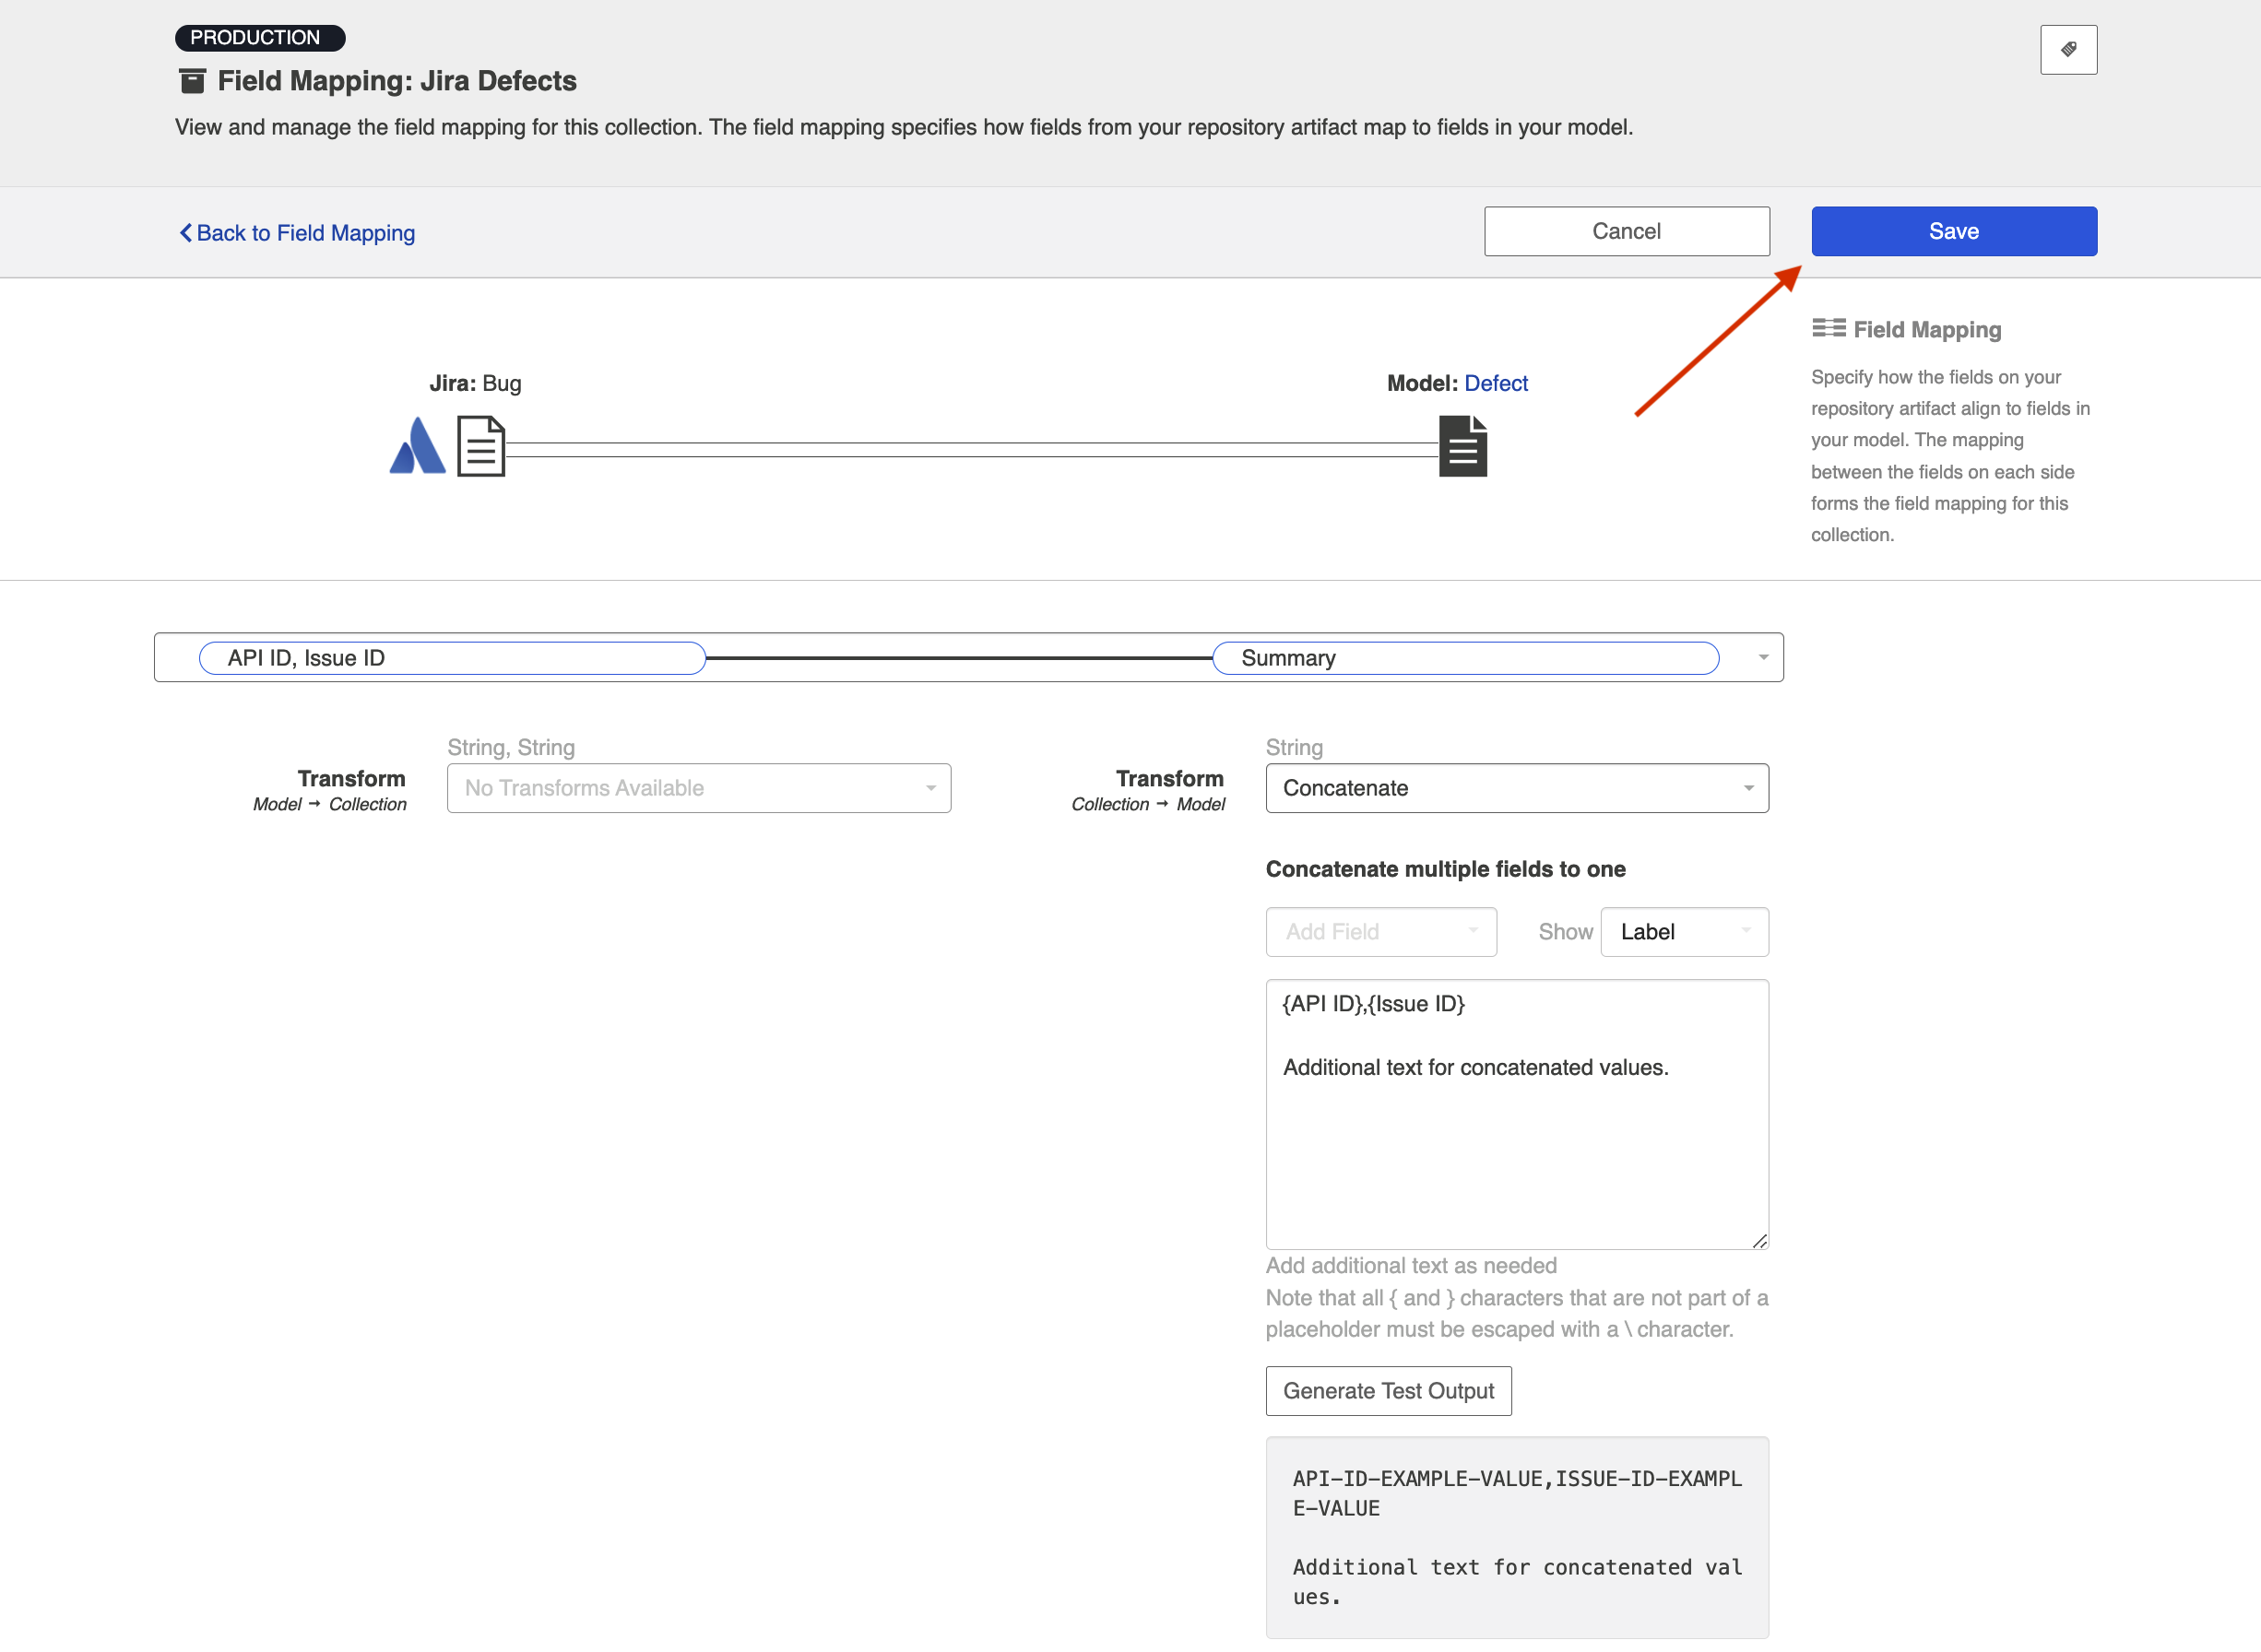
To save the transform, click Save.
Extract Path Segment
This transform can be used to separate a path on a source field into individual values. The selected value will then flow from the model to the chosen field on the target artifact.
To configure this transform, click Configure on the Field Mapping screen.
Note: The transform will only be available if a (rich text or string) field is mapped to a single (rich text or string) field.
On the Field Mapping screen, select the Extract Path Segment transform from the dropdown.
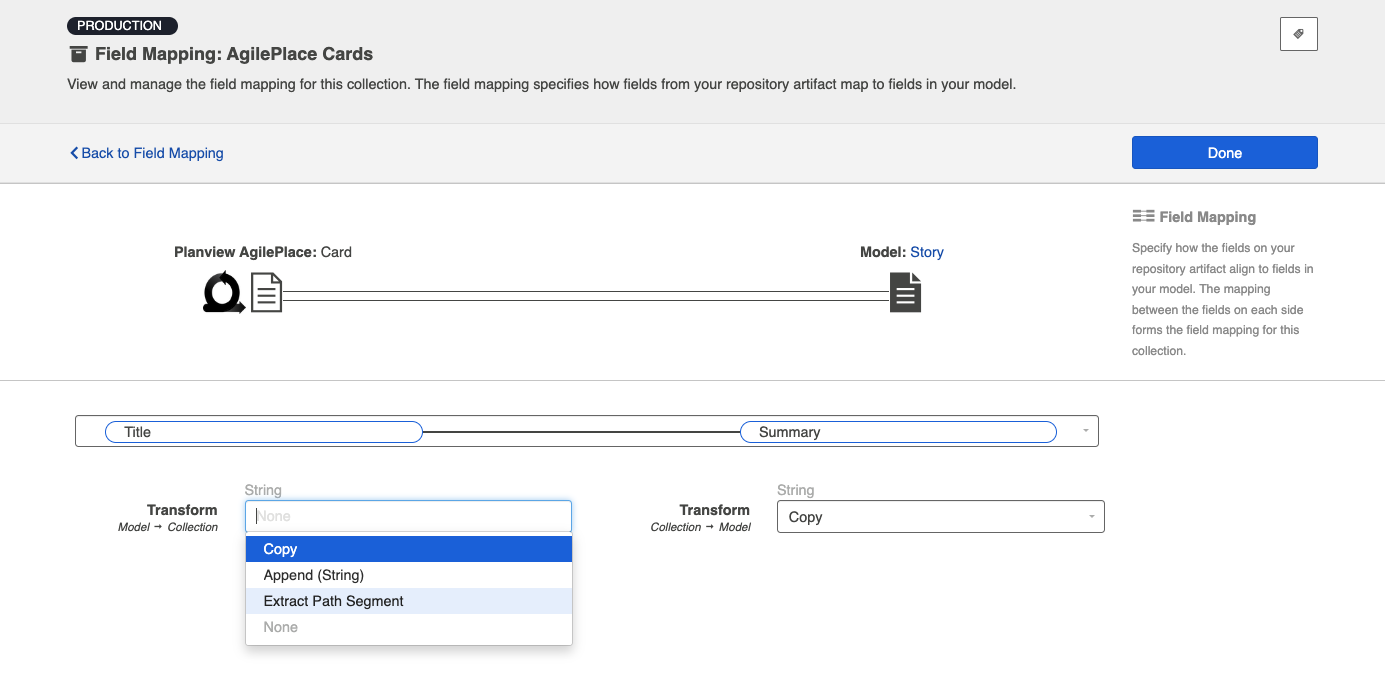
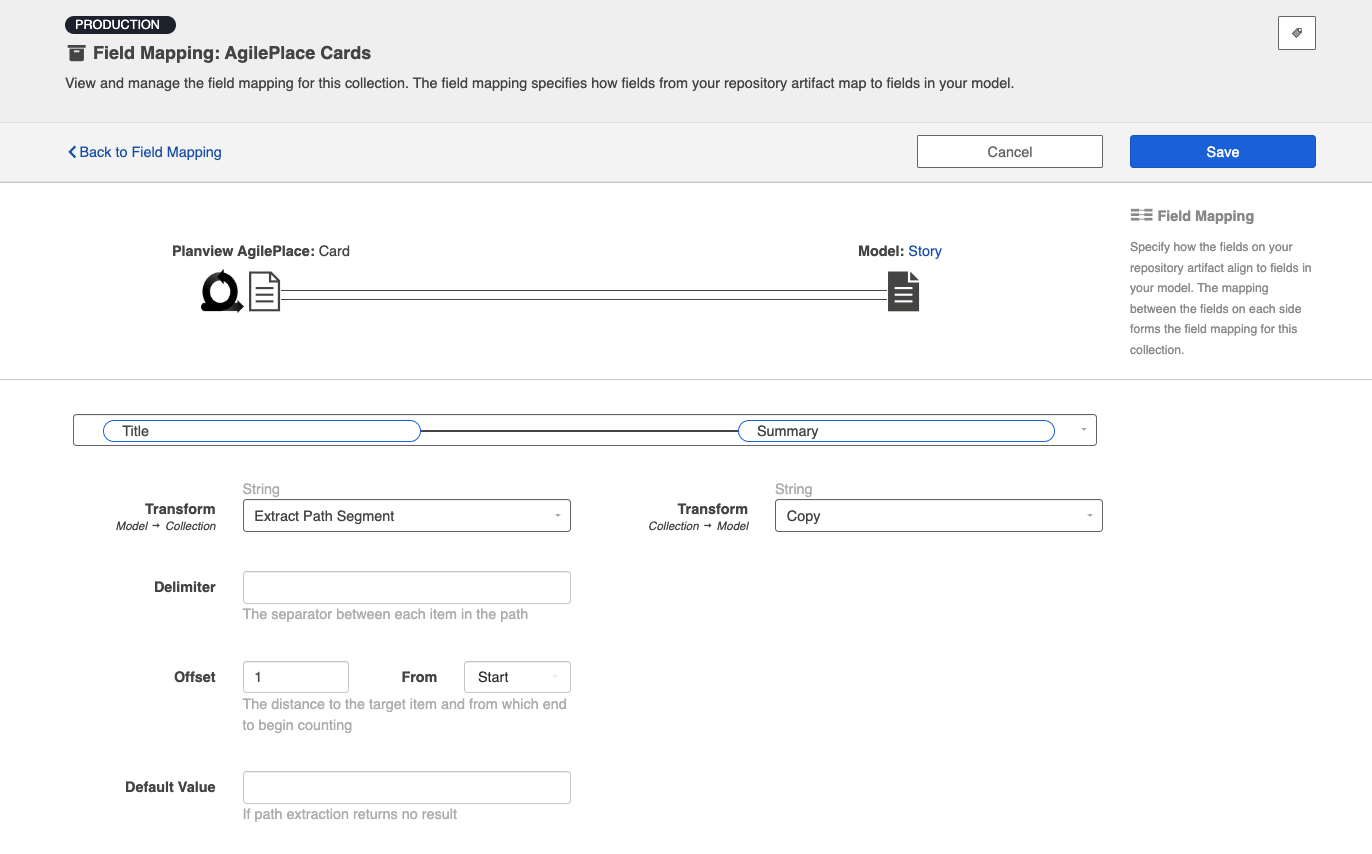
After selecting the transform, you’ll see several fields:
- Delimiter: This is the value used to separate each item in the path.
- This field is not case-specific and allows special characters.
- A path with a starting delimiter is treated the same as one starting with the item itself (e.g., /item1/item2/item3 is the same as item1/item2/item3).
- Offset: This indicates how many spaces to count to the target item.
- This field cannot be set to less than 1 or the default value will be applied.
- The count begins at 1 and counts the number of items, not delimiters.
- From: This indicates from which end to begin counting items.
- Default Value: This is the value that will be used if the path segment extraction does not return a result.
- This field is not required and can be left empty.
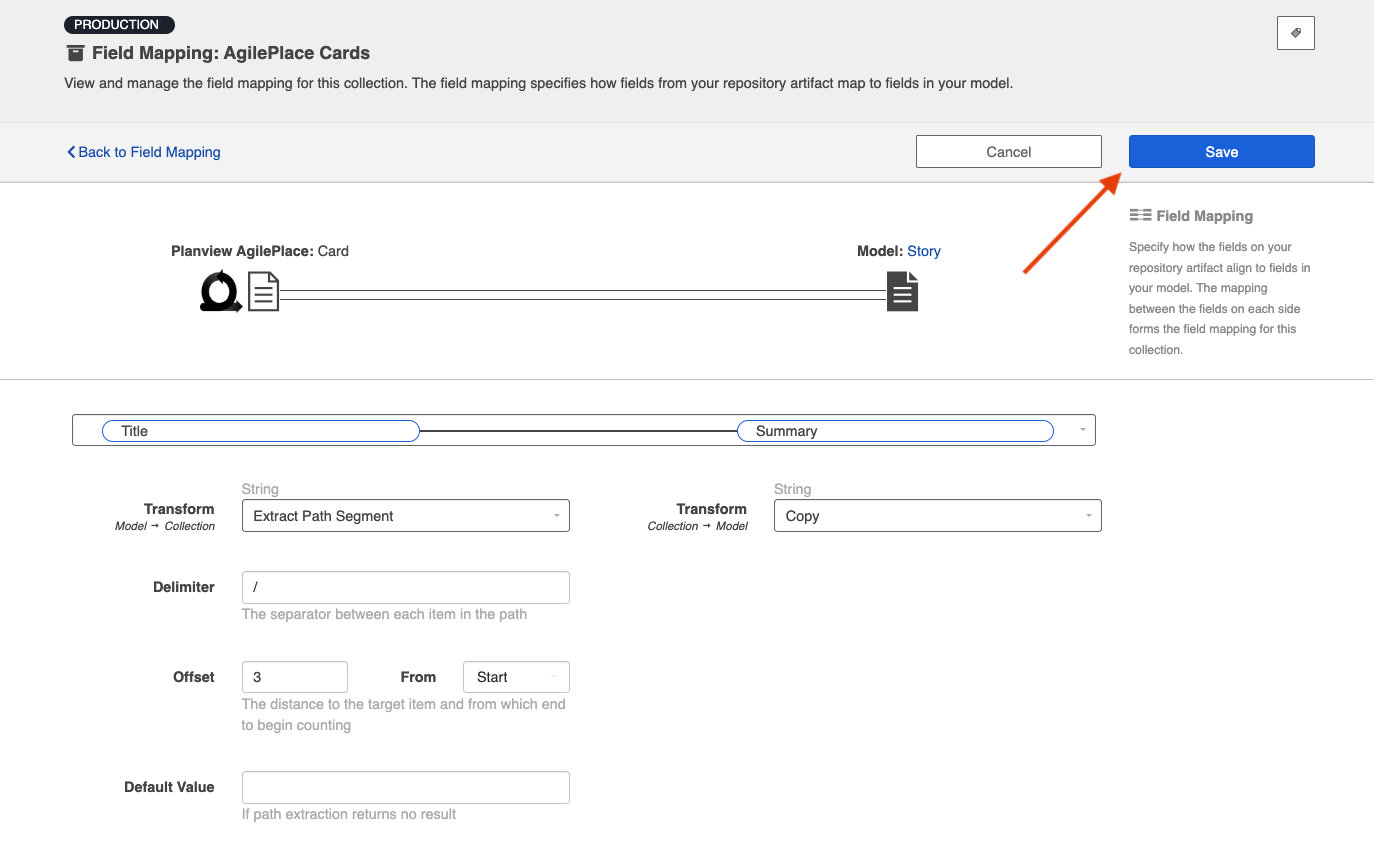
After configuring the transform, click Save.
Examples:
To understand how this transform works, let’s take a look at a couple of examples.
In our first example, the path on the source field is /item1/item2/item3, with “/” used as the delimiter.
- If the offset is set to 1 from the Start, you would count 1 item from the beginning of the path. In this case, the extracted segment would be item1.
- If the offset is set to 2 from the End, you would count 2 items from the end of the path. In this case, the extracted segment would be item2.
In the next example, the path on the source field is item1///item2, with "/" used as the delimiter.
- If the offset is set to 2 from the Start, you would count 2 items from the start of the path, including any empty items. In this case, the extracted segment would be an empty value.
- If the offset is set to 4 from the End, you would count 4 items from the end of the path, including any empty items. In this case, the extracted segment would be item 1.
Relationship(s) to Single/Multi Select
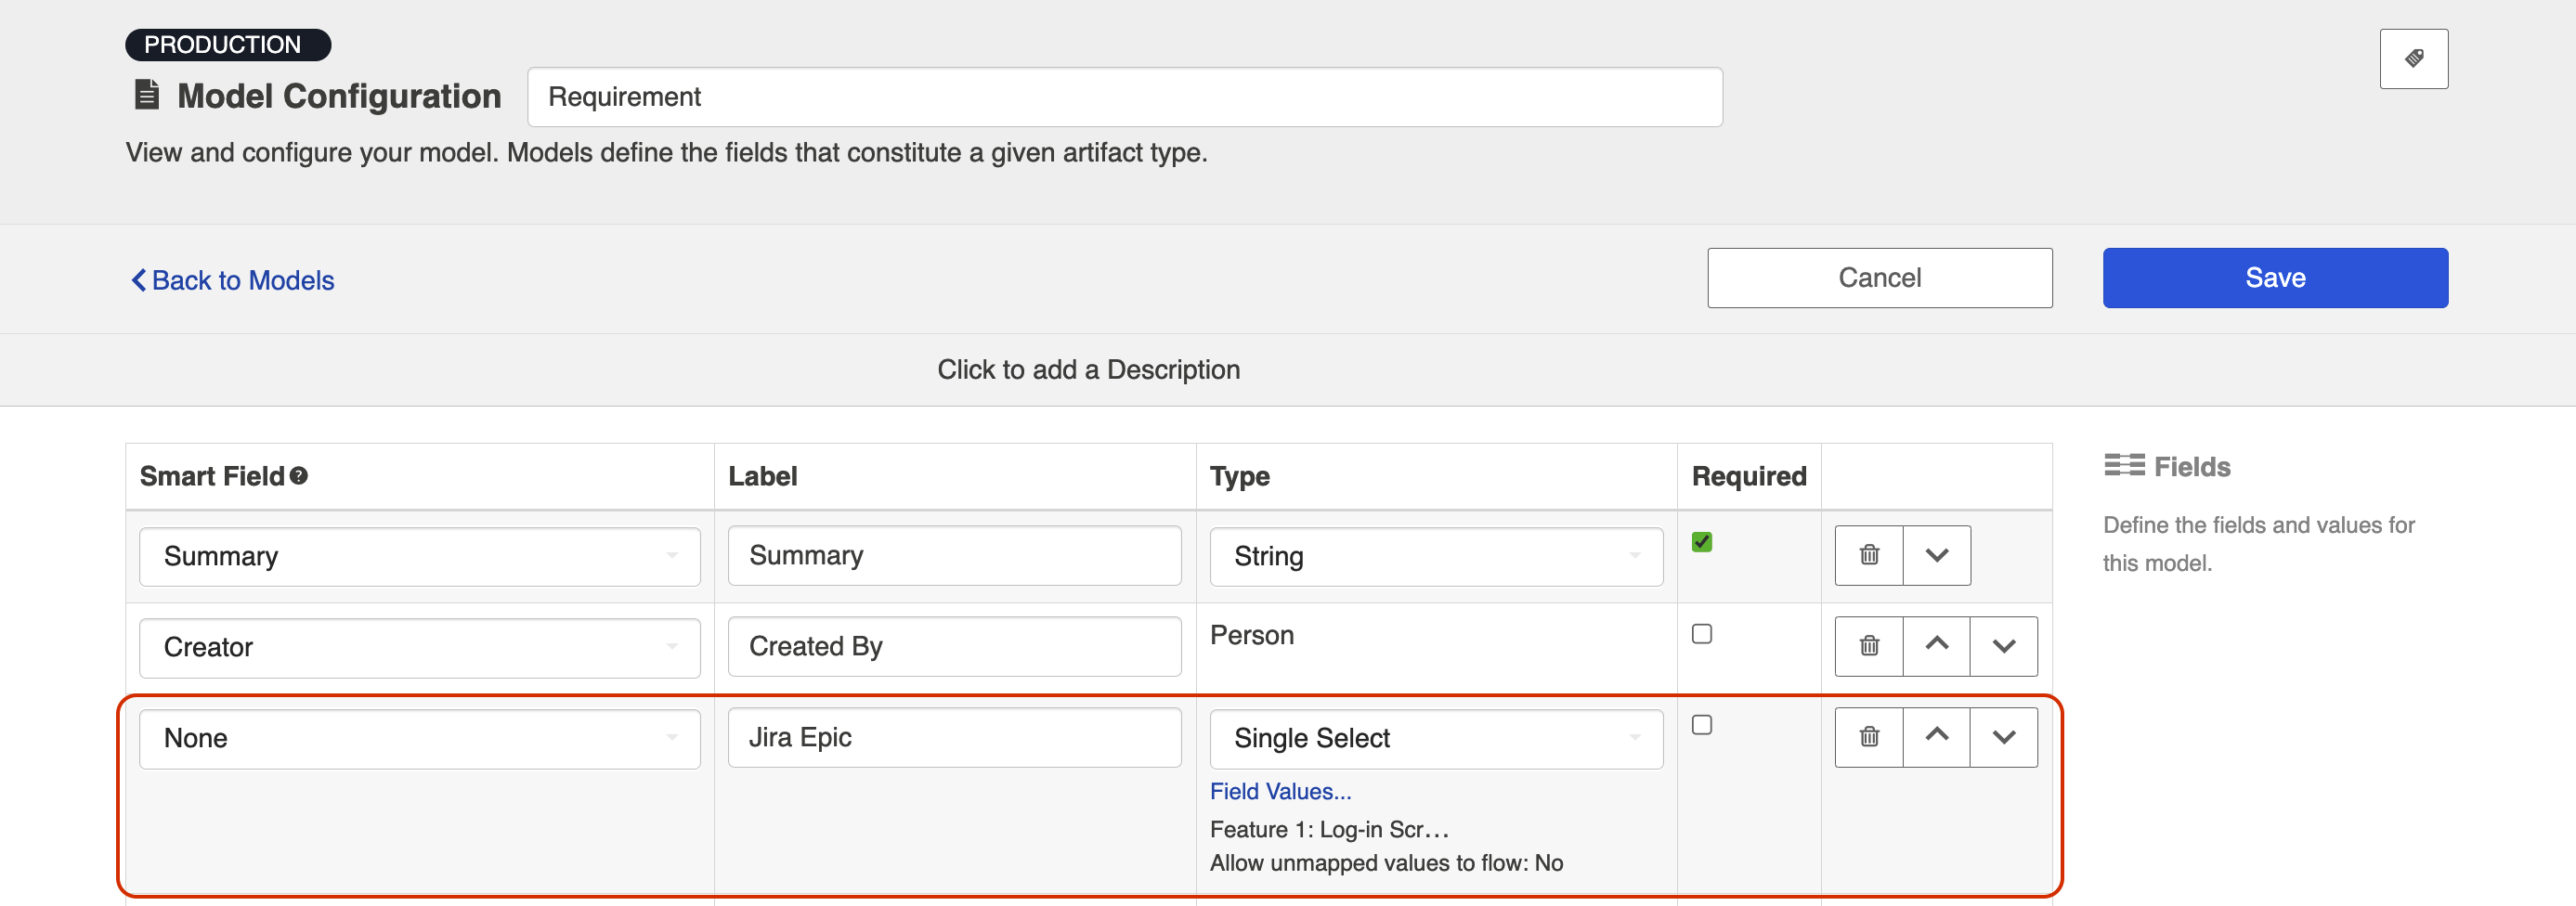
If desired, you can map a relationship(s) field on your source artifact to a single-select or multi select field on your target artifact. For example, you may wish to write the Epic Link (relationship) field in Jira to a custom single-select field in qTest.
To configure this transform, you must map the relationship(s) field in your source collection to the single-select (or multi select) field in your model.
Note: Please ensure that your model includes a corresponding single-select (or multi select) field for the mapping.
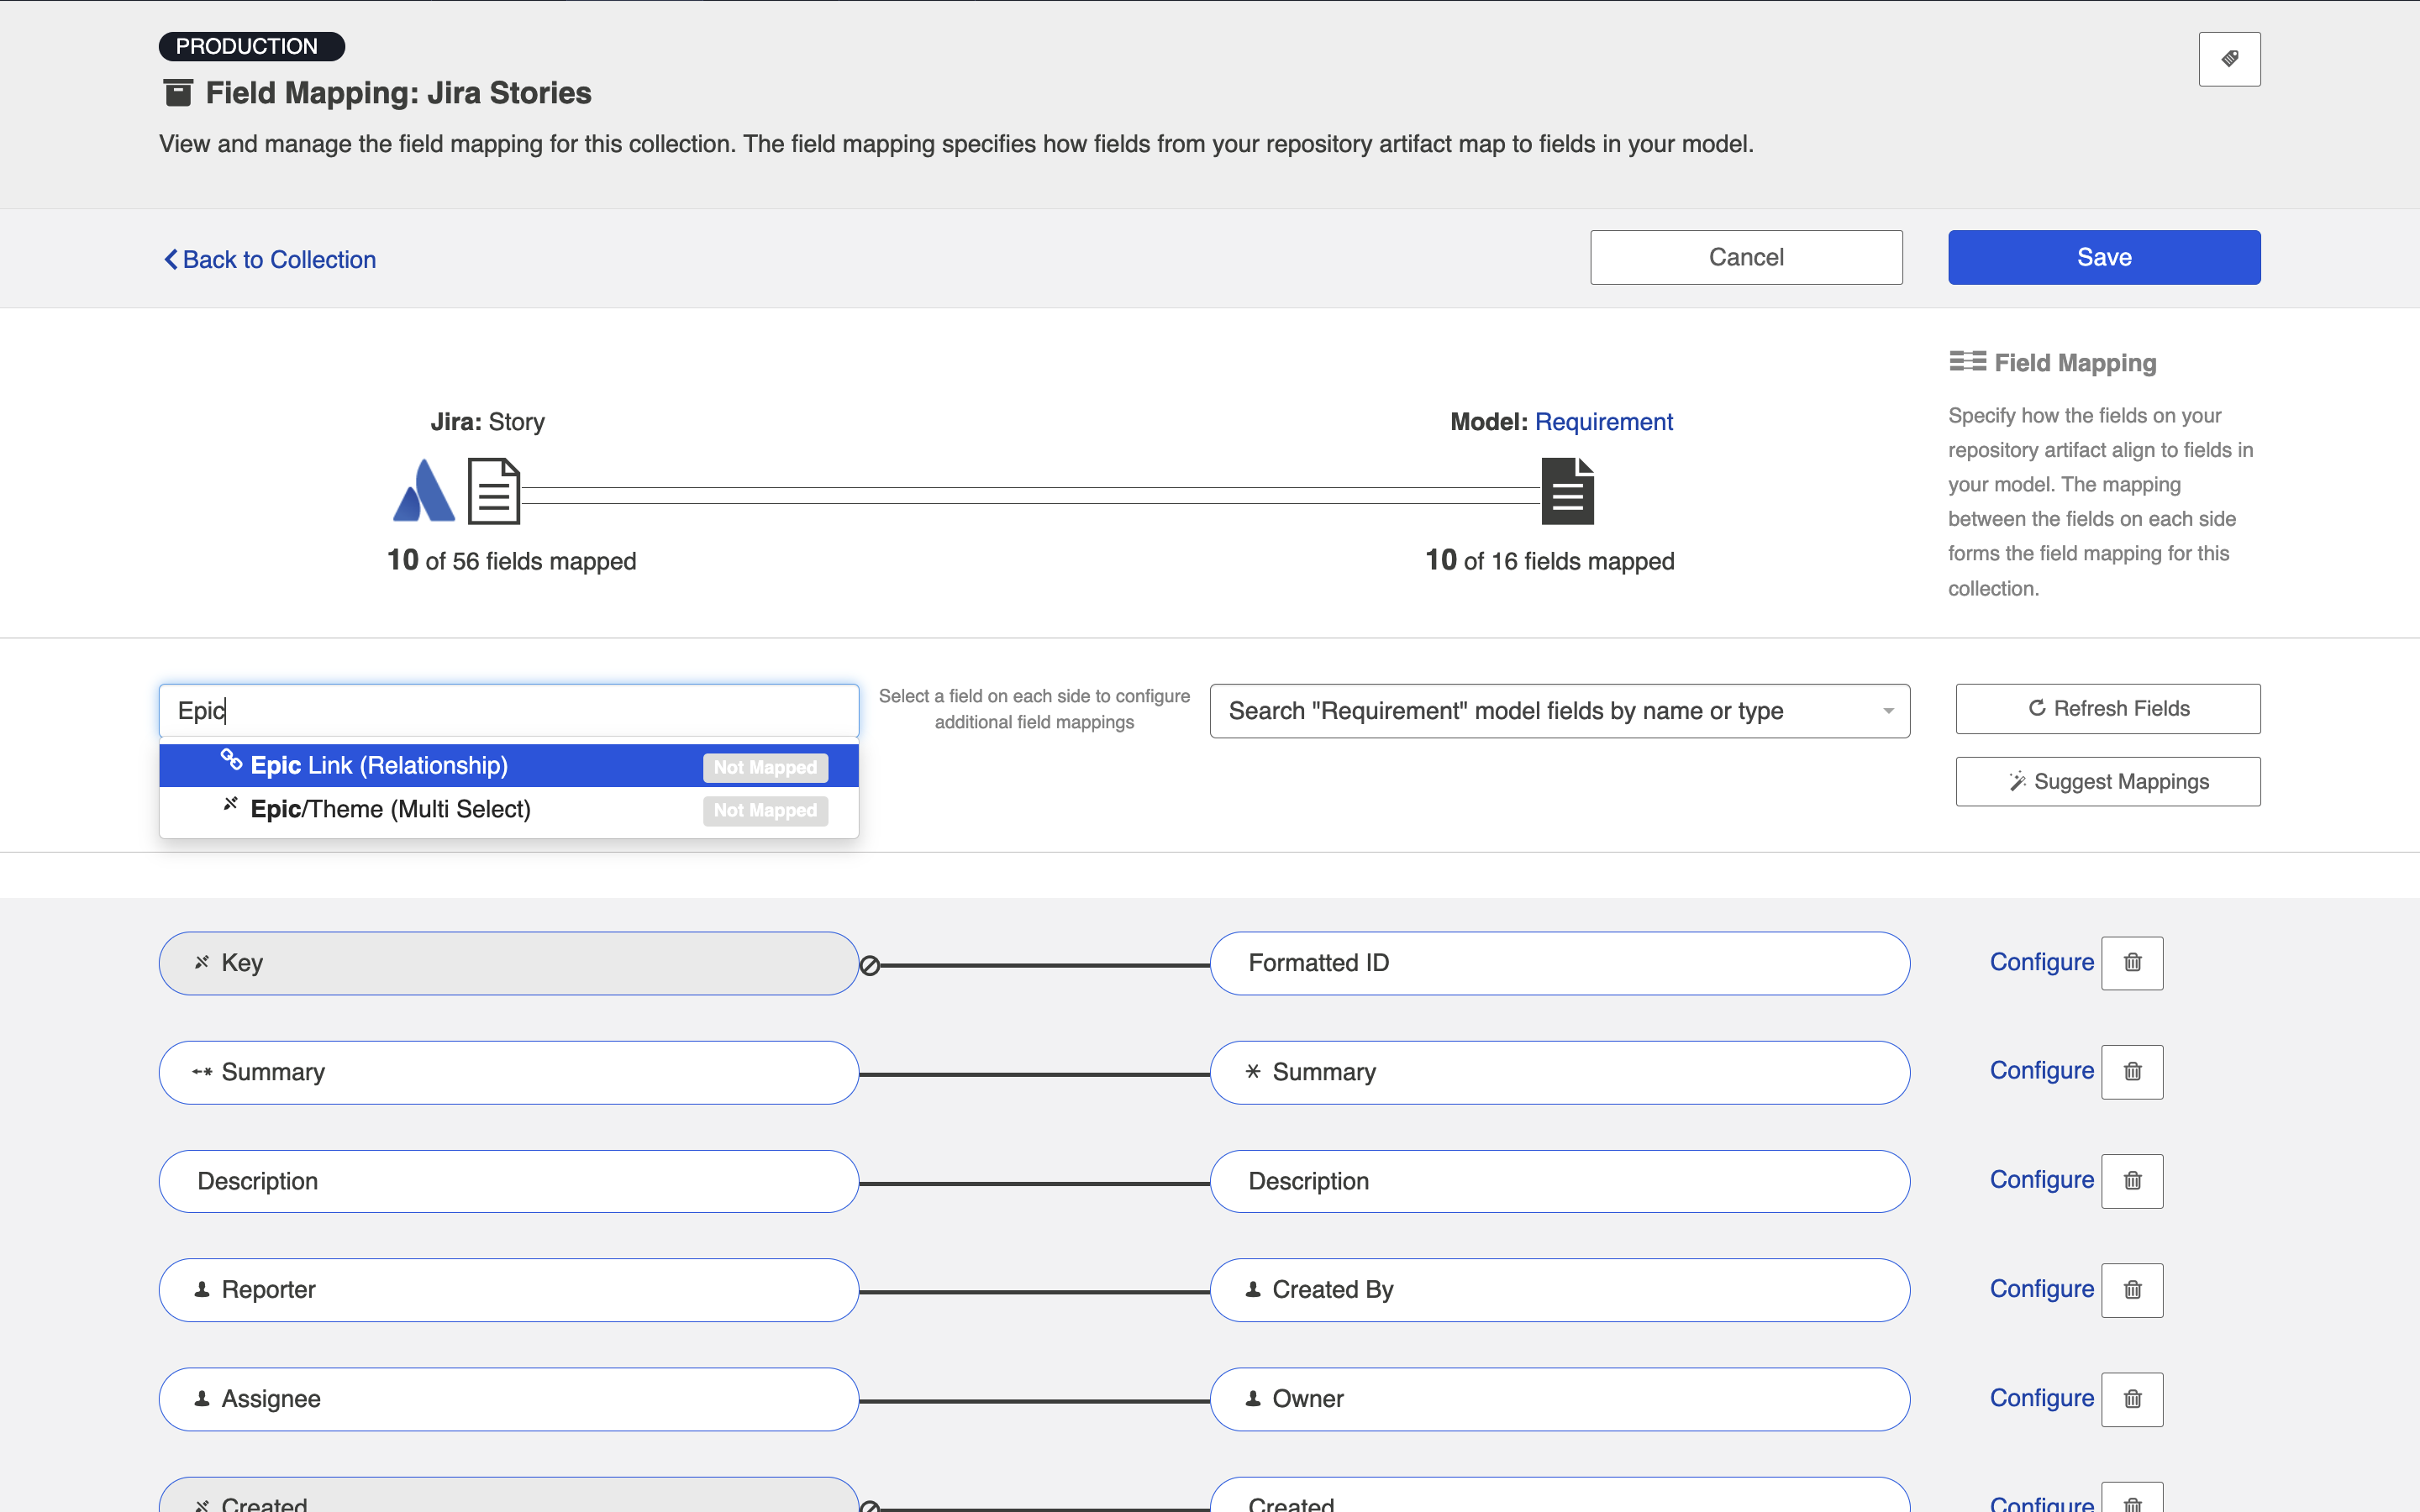
In the source collection, click Map Fields.
Create a mapping from the collection's relationship(s) field to your model's single-select (or multi select) field.
Once the fields are mapped and saved, click the Configure link on the right side of the mapping.
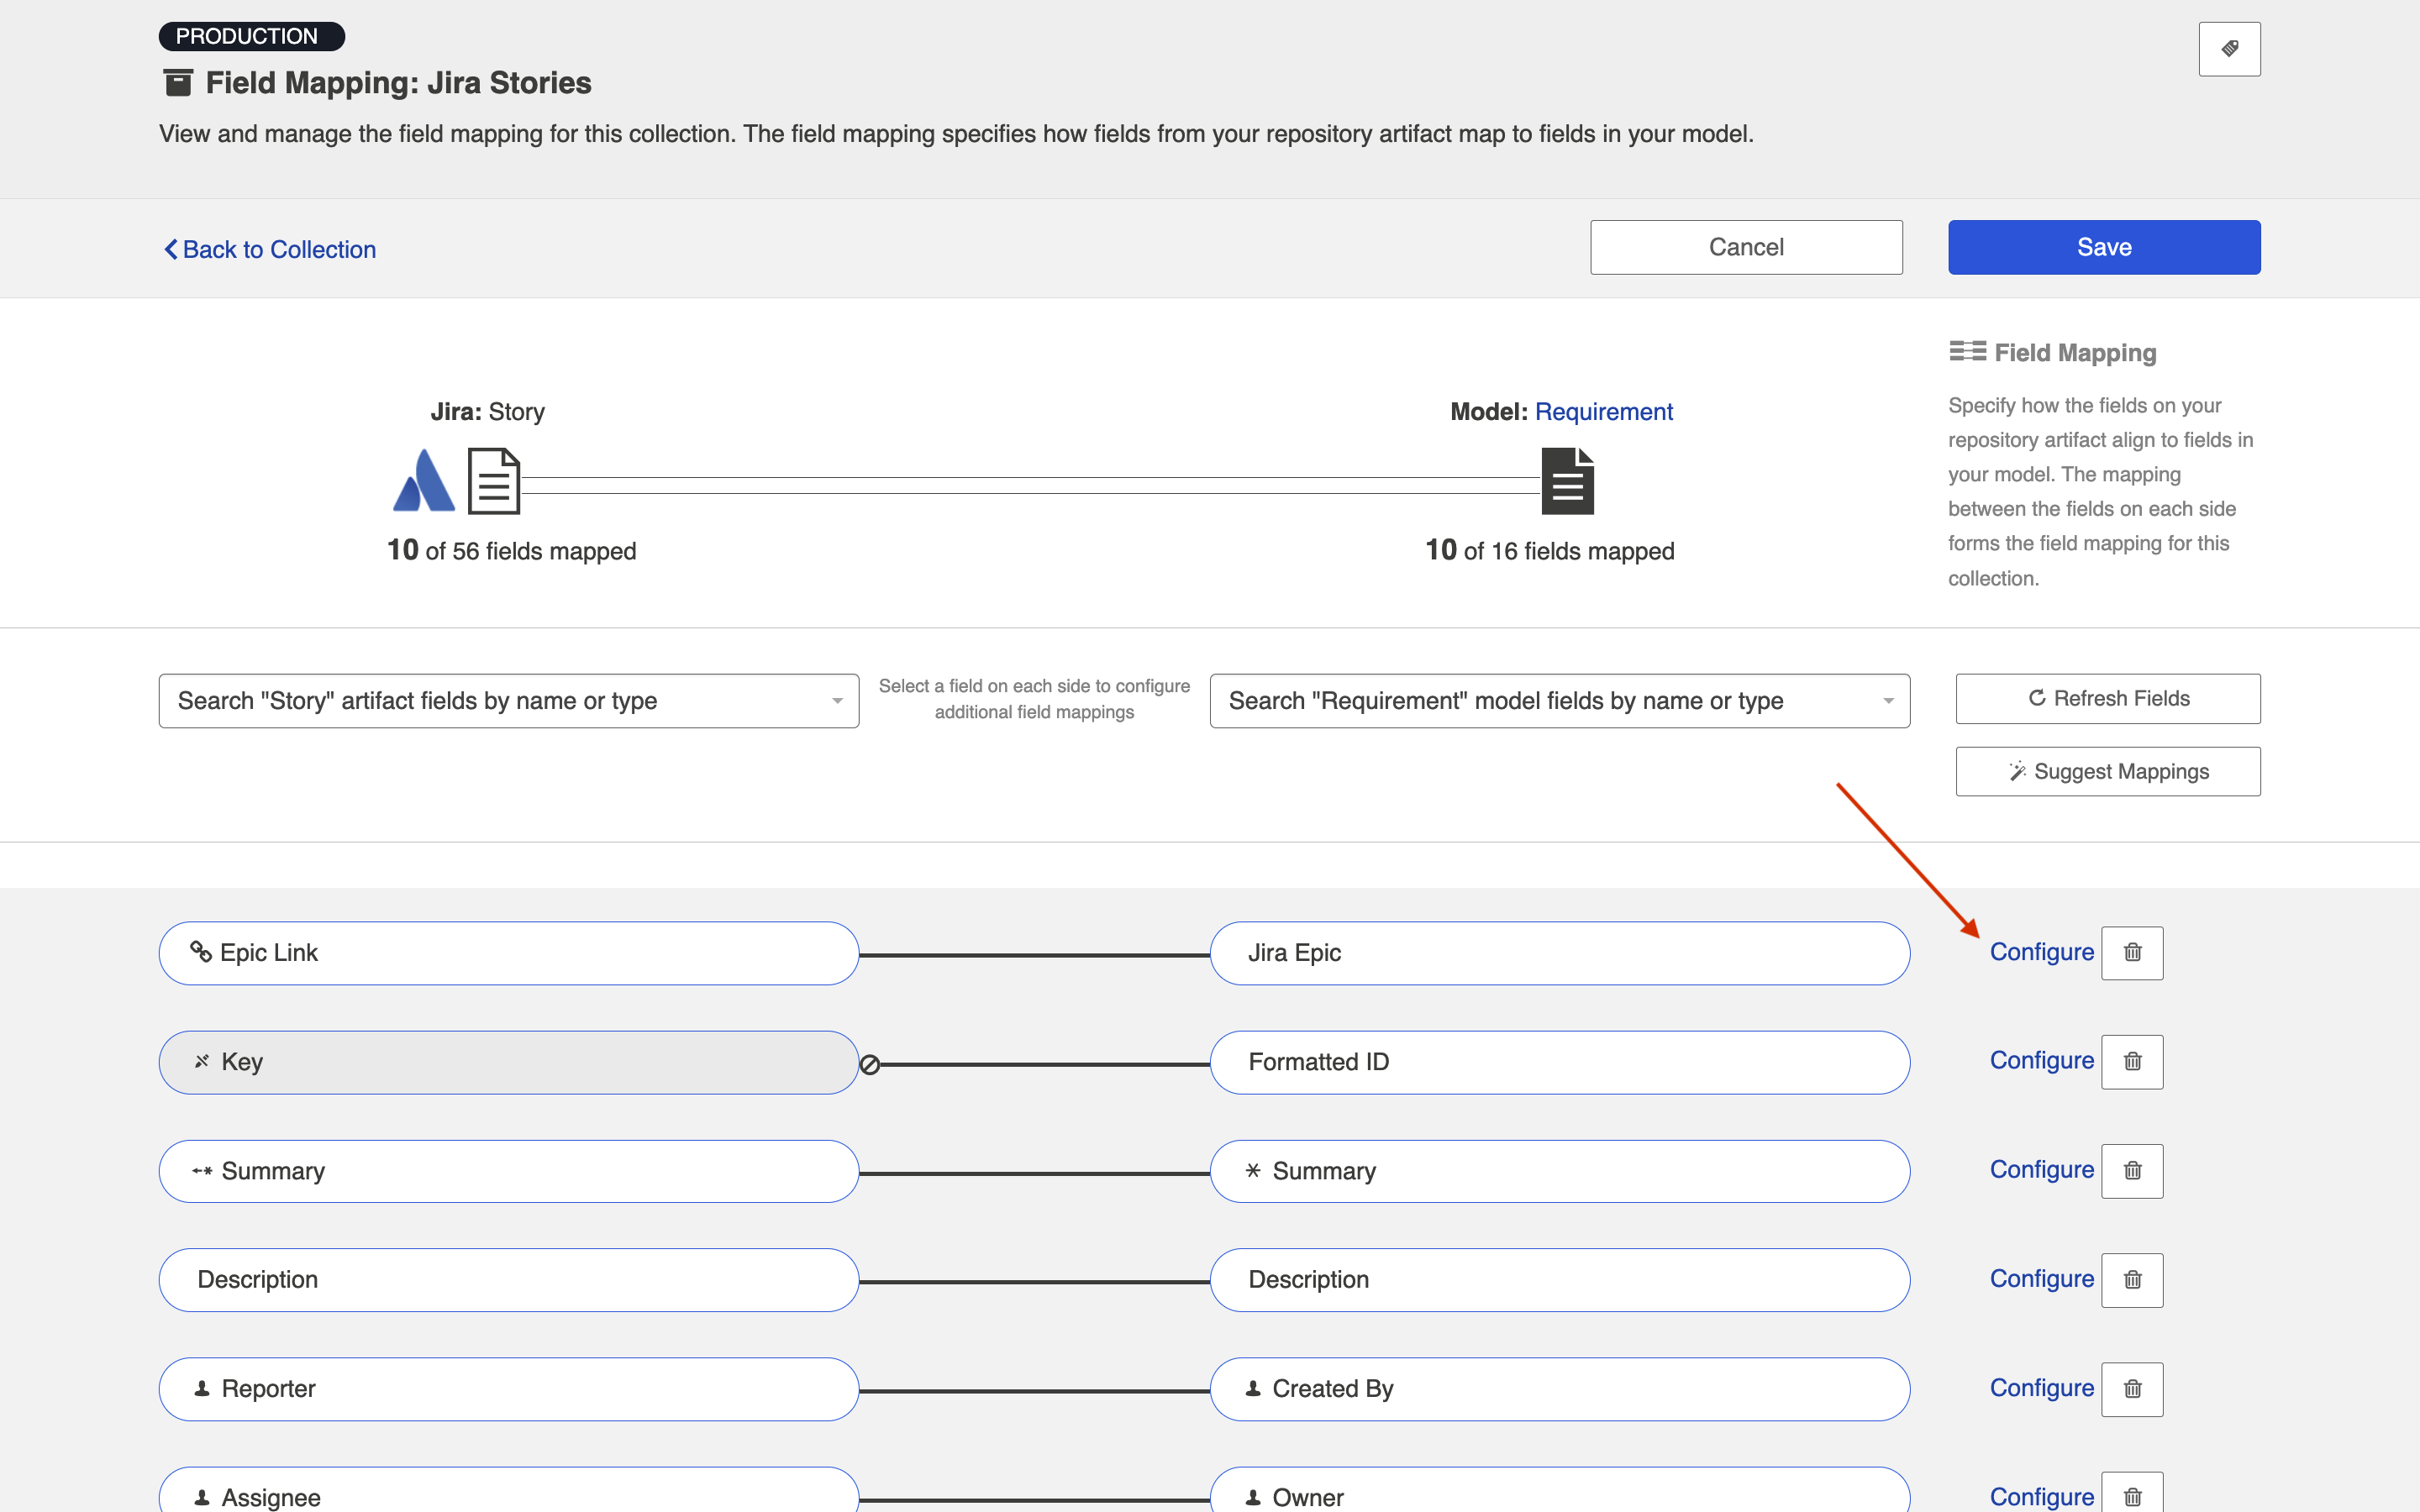
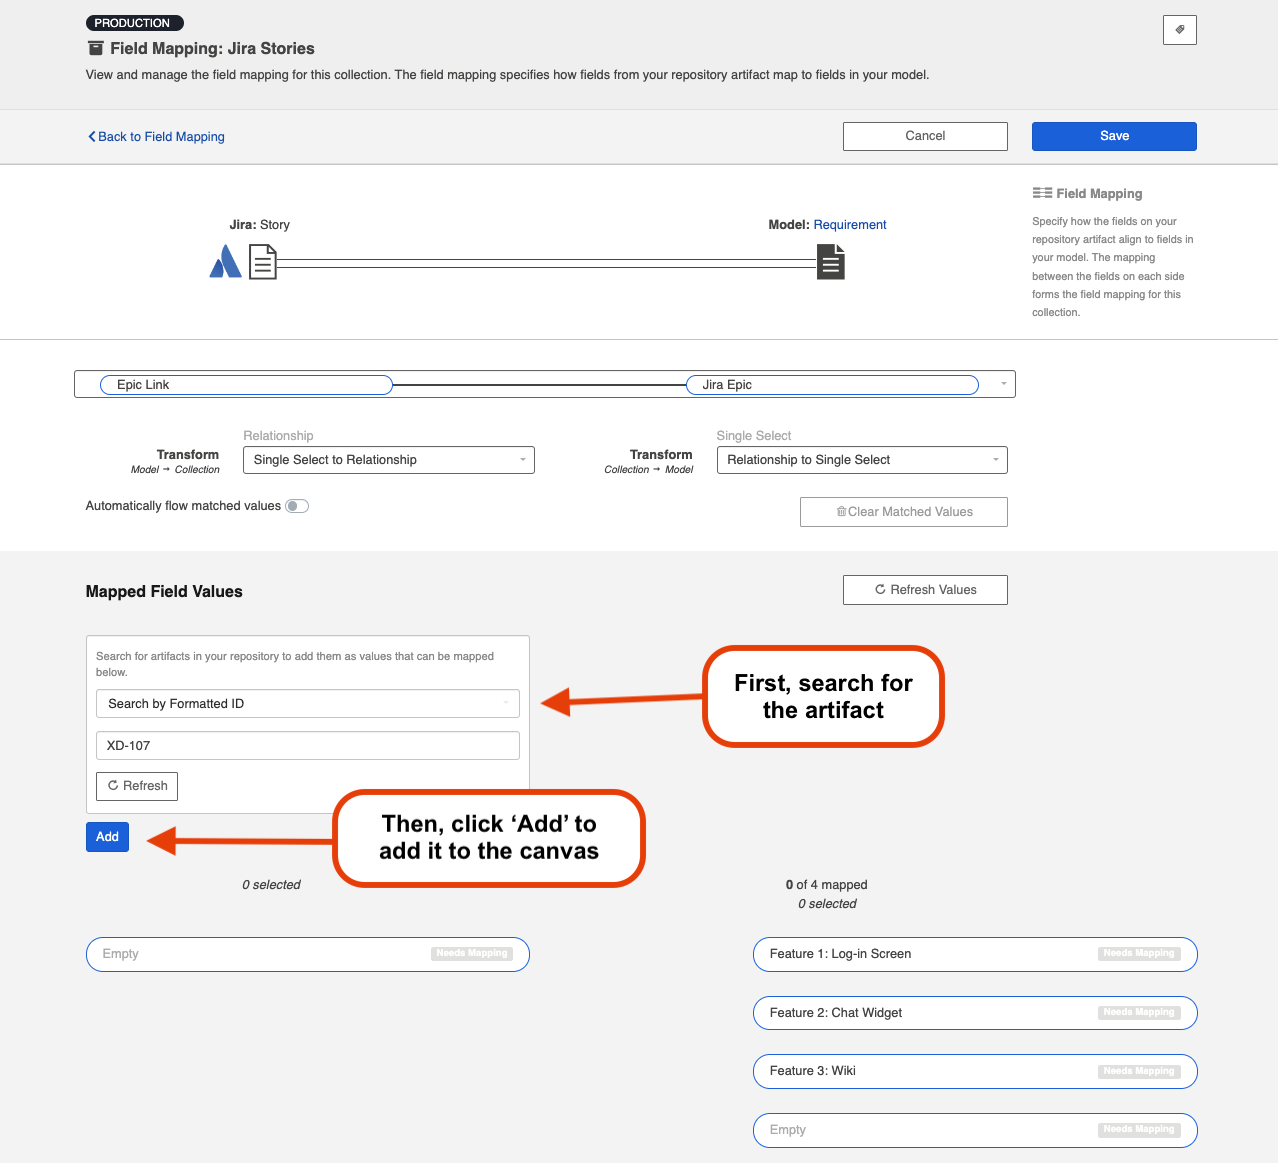
Here, you can search for the related artifacts by Formatted ID or Summary (if your repository has implemented query language that supports Summary search and the OR operation), and click Add to add them to your canvas.
Note: if the artifact you are looking for has recently been created in your repository, click the Refresh button to refresh the Hub artifact cache.
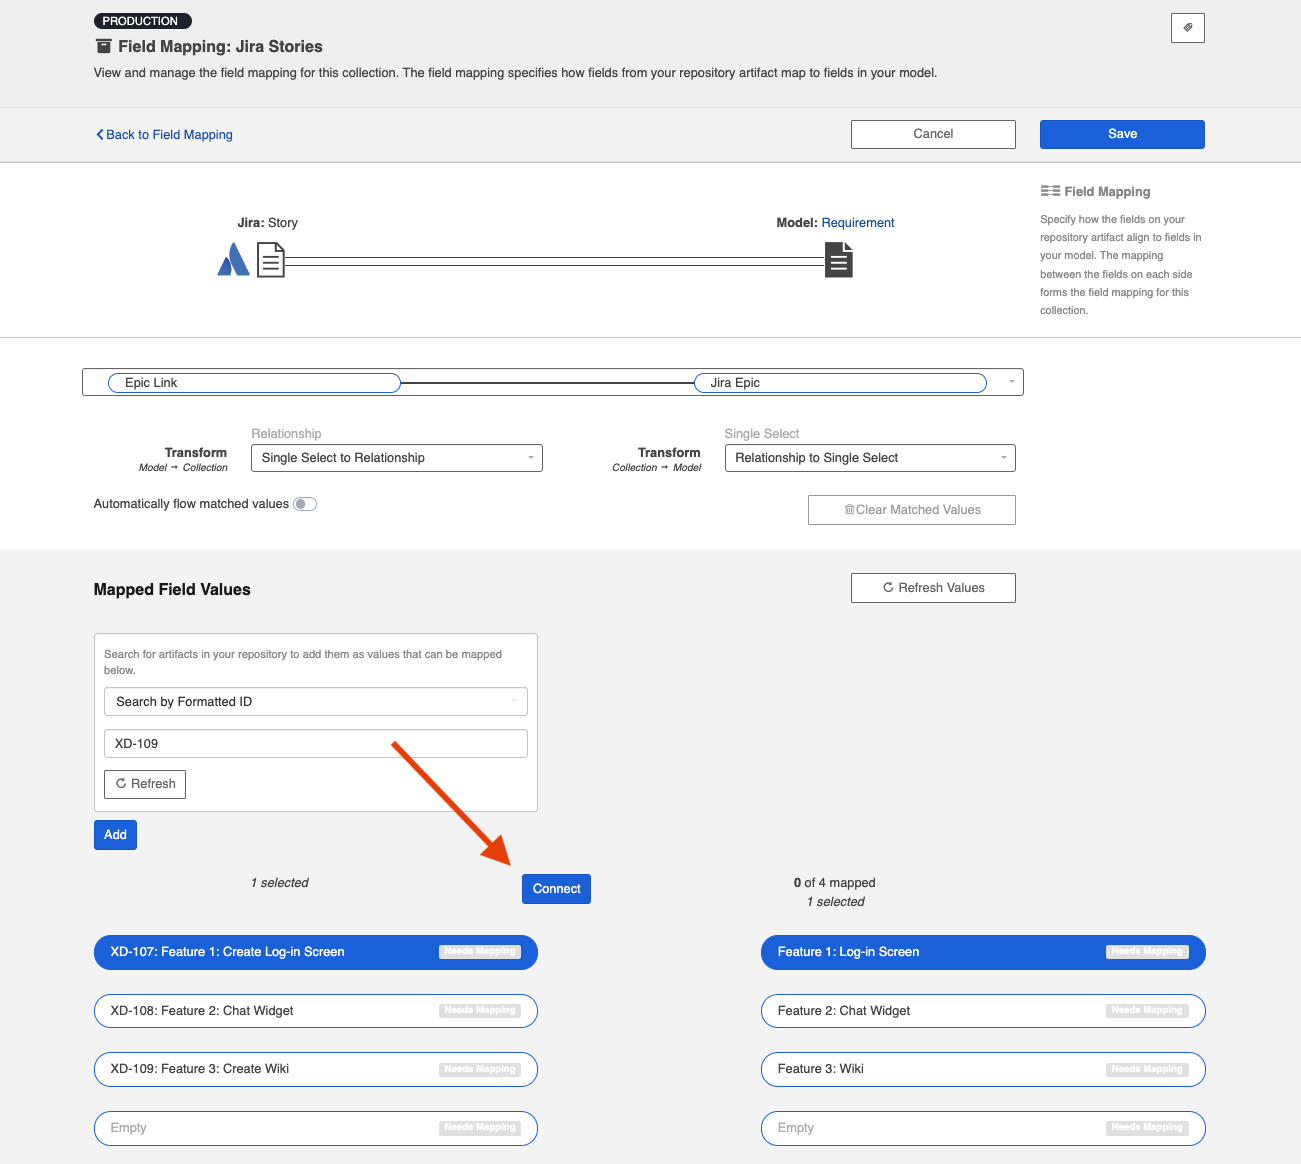
Once the related field values (e.g., Epics) are added to the canvas, map them to the available single-select fields in your model.
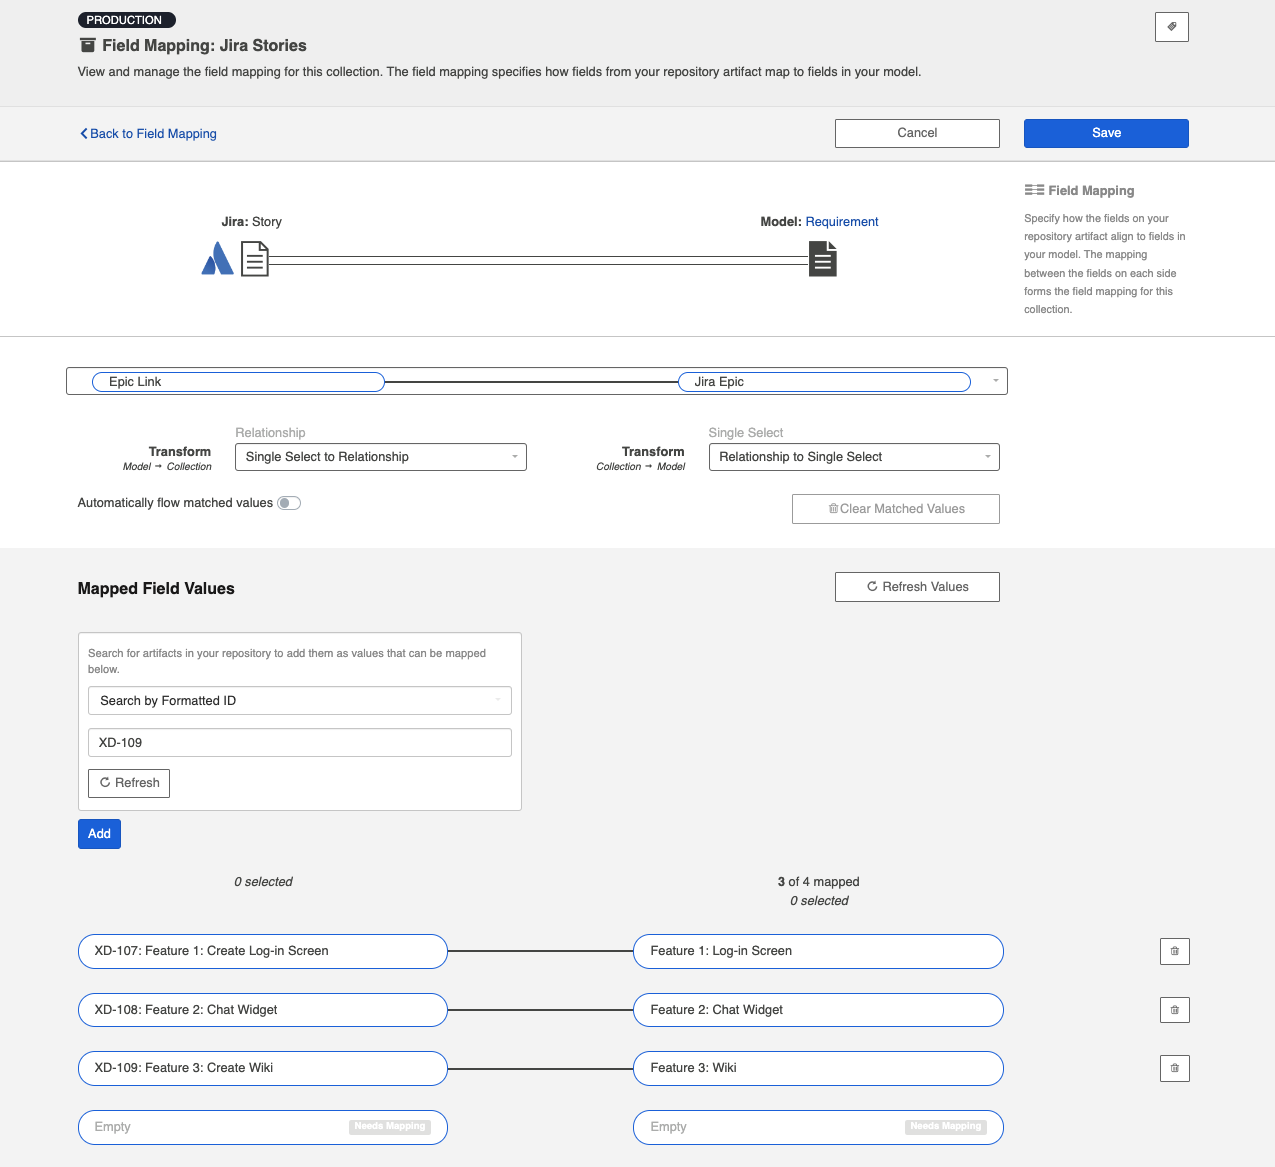
Click Save and Done.
Then, navigate to your target collection.
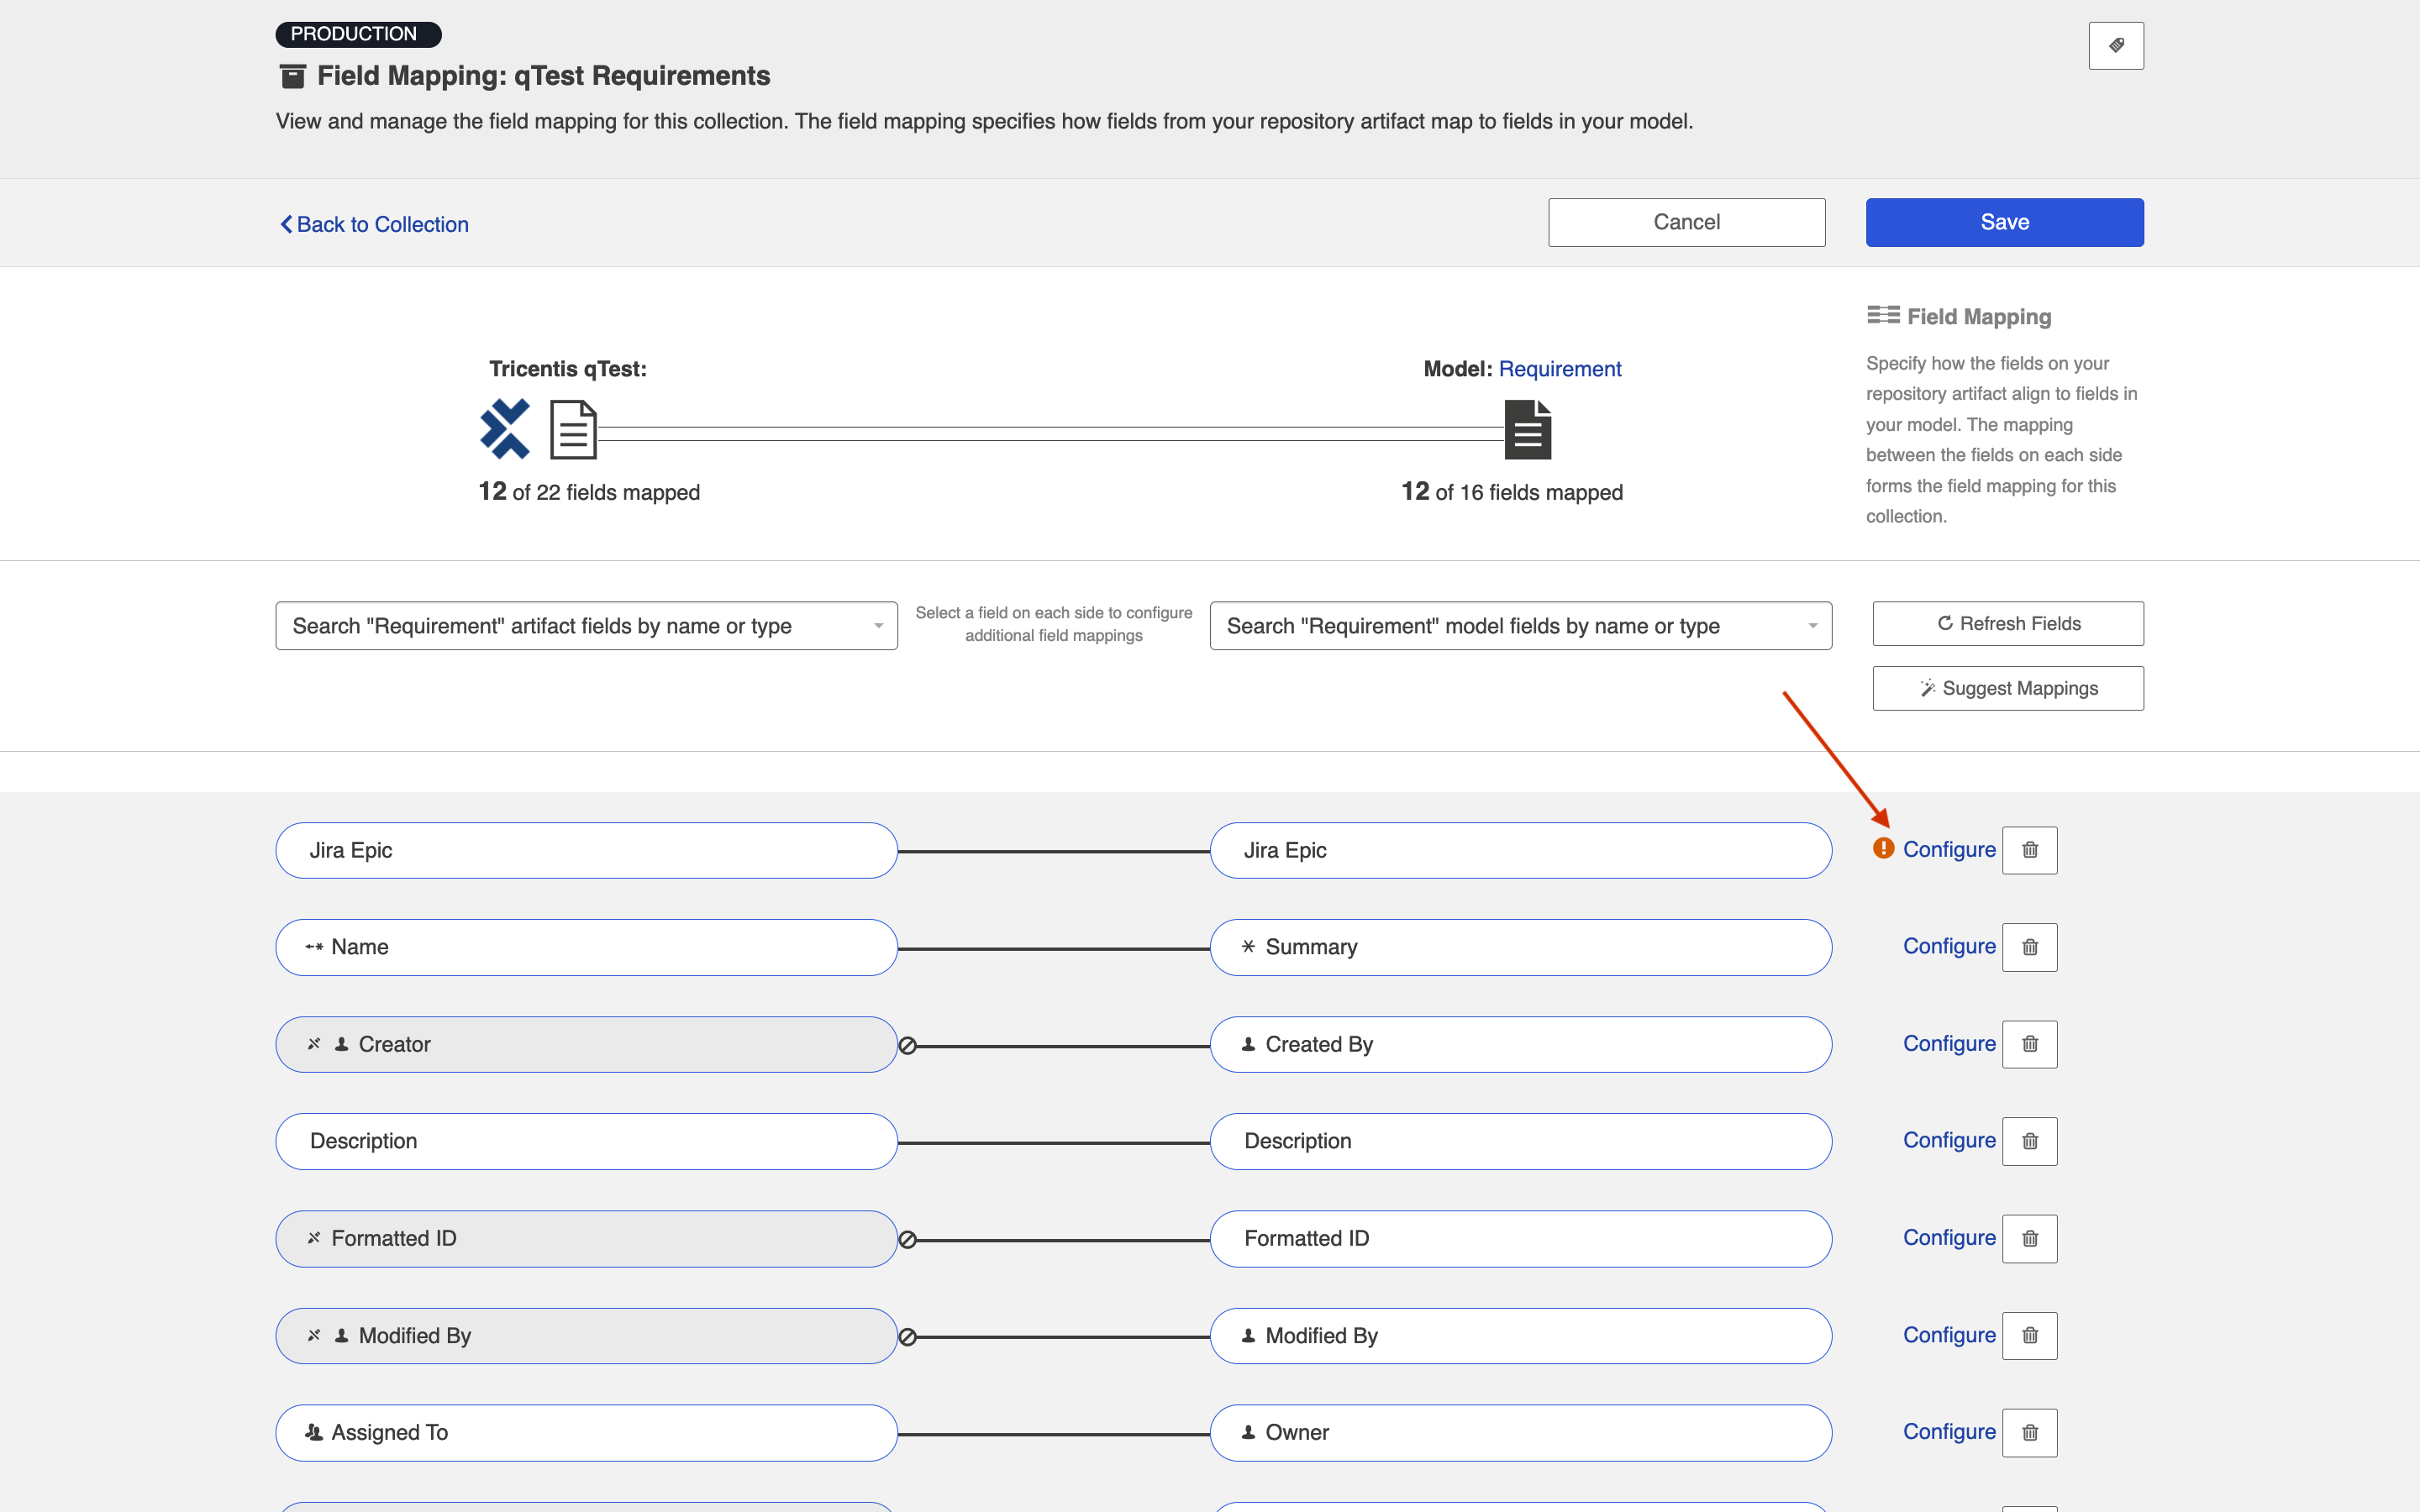
Map the target collection field to the single-select (or multi select) field in your model.

Click Configure to map the field values.

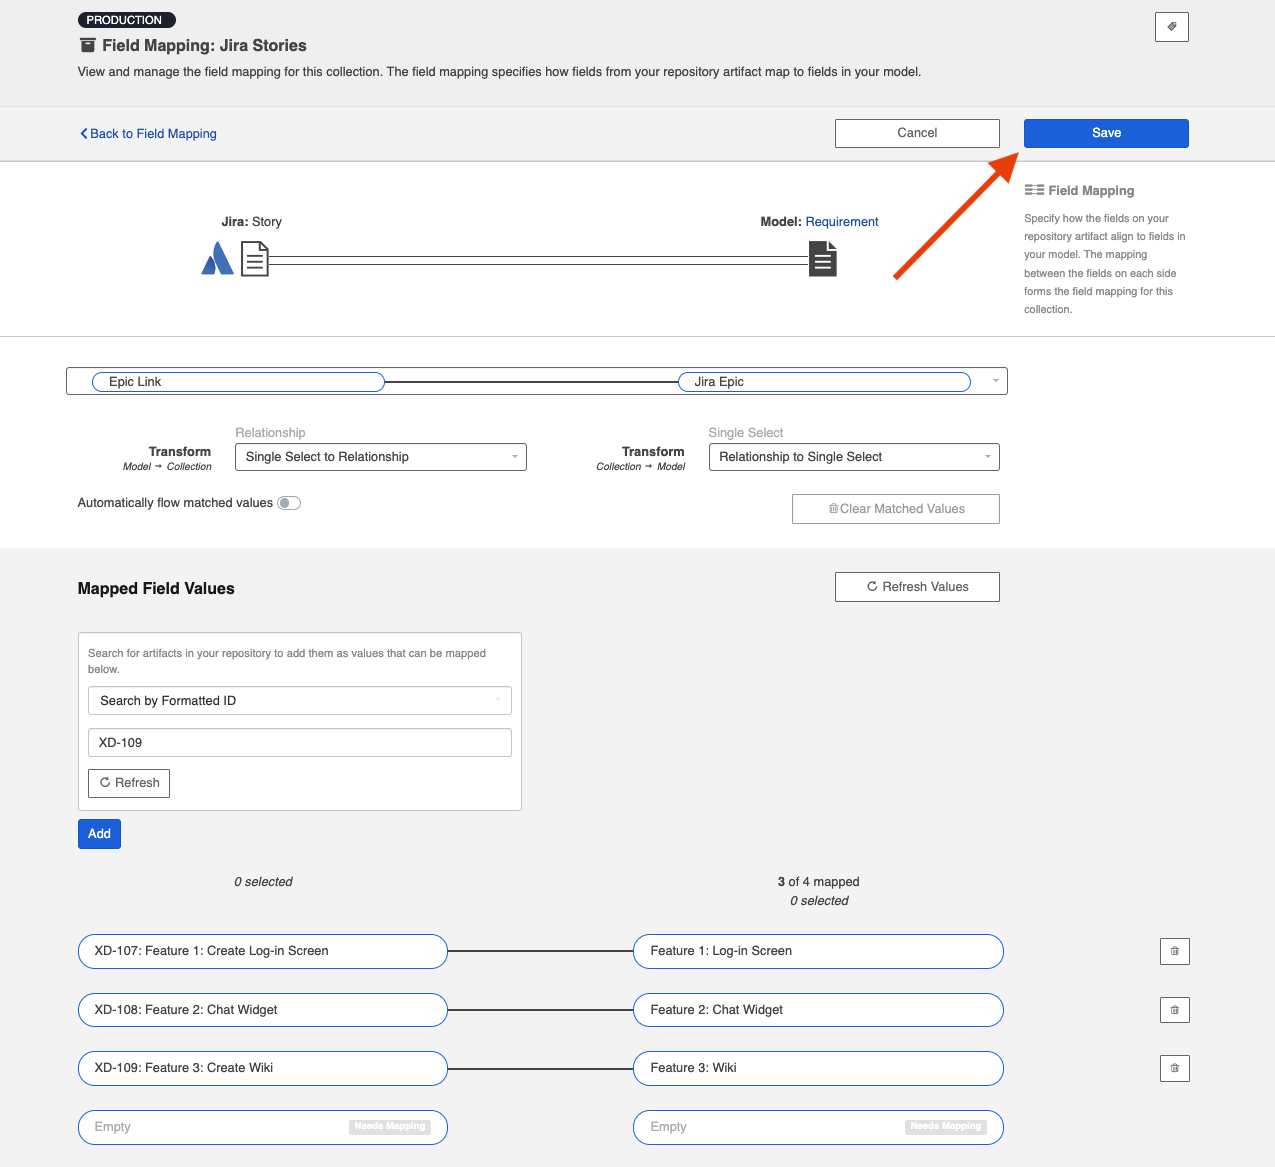
Once you've configured your integration, your completed Integration Field Flow will look like this:

When you run your integration, the single-select (or multi select) in your target repository will be updated based on the Epic Link (relationship) in your source repository.
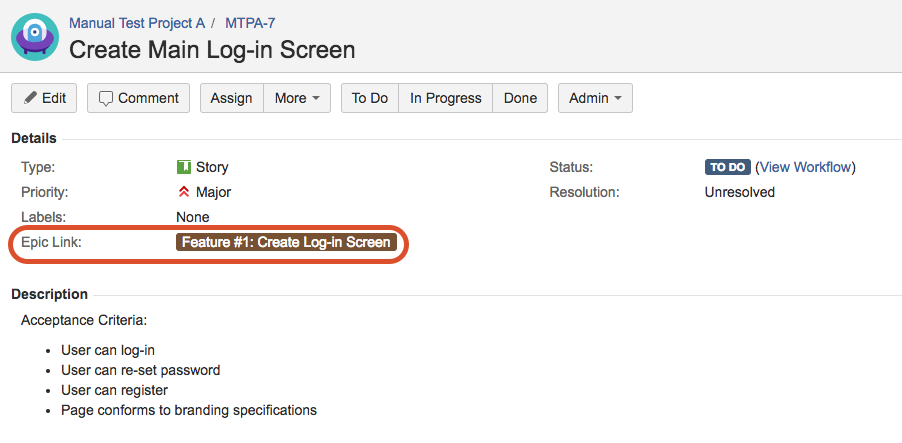
Here's the original user story in Jira. You can see that its Epic Link (a relationship to an associated Epic artifact) has flowed to the Jira Epic field (a single-select field) on the qTest requirement:

Automatically flow matched values
If you’d like to automatically match and flow unmapped values to exact summary string values, you can enable the Automatically flow matched values toggle.
Note: This feature is only available for connectors that have implemented Query language that supports Summary search and the OR operation.
To enable this feature, click Configure on a relationship(s) to single/multi select mapping.

Then, enable the Automatically flow matched values toggle.

Once toggled, a pop-up message will appear with a warning on enabling this setting.

After confirming the message, select the projects and artifact types that contain the artifacts that you'd like to link through the relationship field.
Note: You may notice a warning icon next to the toggle. This warning indicates that the field is not configured to allow unmapped fields to flow through the model. To resolve this issue, check the Allow unmapped values to flow box for the single/multi select field in your model. If this does not resolve the issue, ensure that the single/multi select field mapping on the target collection has the Auto-map by label box checked.

Once you've selected the projects and artifact types, click Save and Done.

After enabling this setting, a long-running search process will begin, which may impact integration performance. This process will then run on a 12 hour interval, unless triggered by a change in the configuration scope or by clearing matched values.
If you see an error indicating that Hub cannot find a match for your option, you may need to repopulate the summary cache.
To do this, click Clear Matched Values.
Note: As indicated above, clearing matched values will trigger a long-running search process, which may impact integration performance. Please proceed with caution when clearing matched values.

Rich Text (Text Markup)
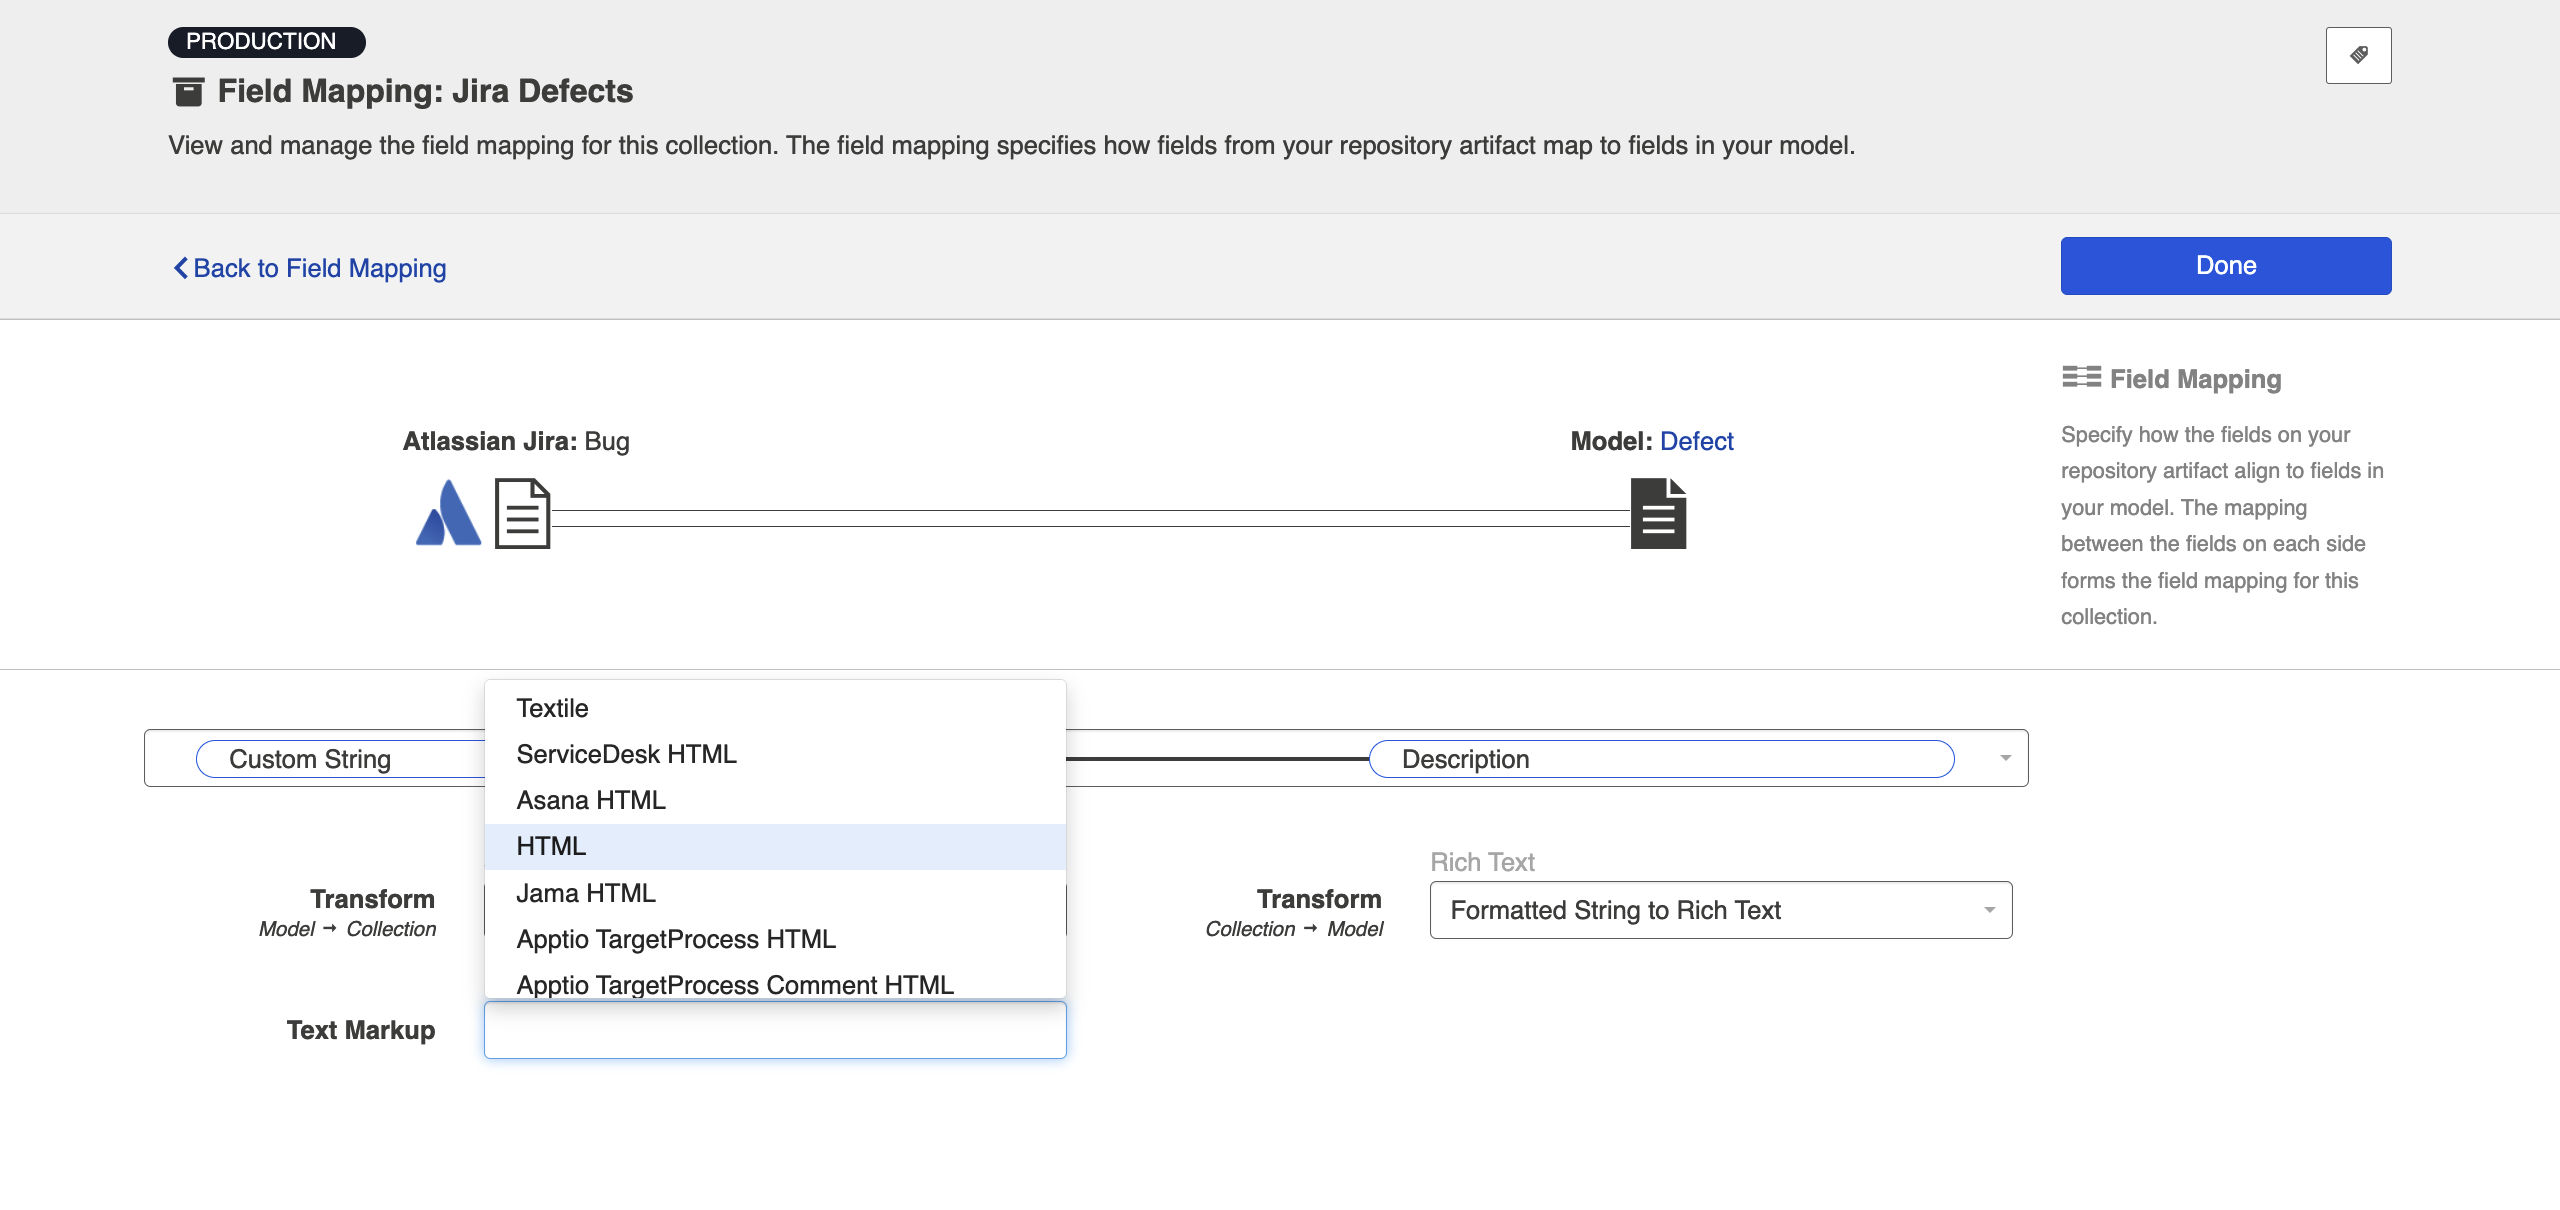
In order to ensure that rich text fields are formatted properly between repositories, the text markup language must be set appropriately. The good news is that Hub's default text markup configuration should cover most rich text scenarios.
You'll notice that the Text Markup field is automatically set to 'default.' You can leave this as-is for the majority of integration scenarios.
However, there may be cases where you'd like to customize the text markup language used. For example, you could be using a plug-in like JEditor - Rich Text Editor for Jira, which causes your repository to utilize an unexpected rich text markup language.
In cases like this, you can customize the desired text markup language. You'll see a wide range of text markup options available on this screen. Search for the one you need and select it here. The language selected will impact both how data flows into and out of the collection for that specific field.
Single- and Multi-Select Fields
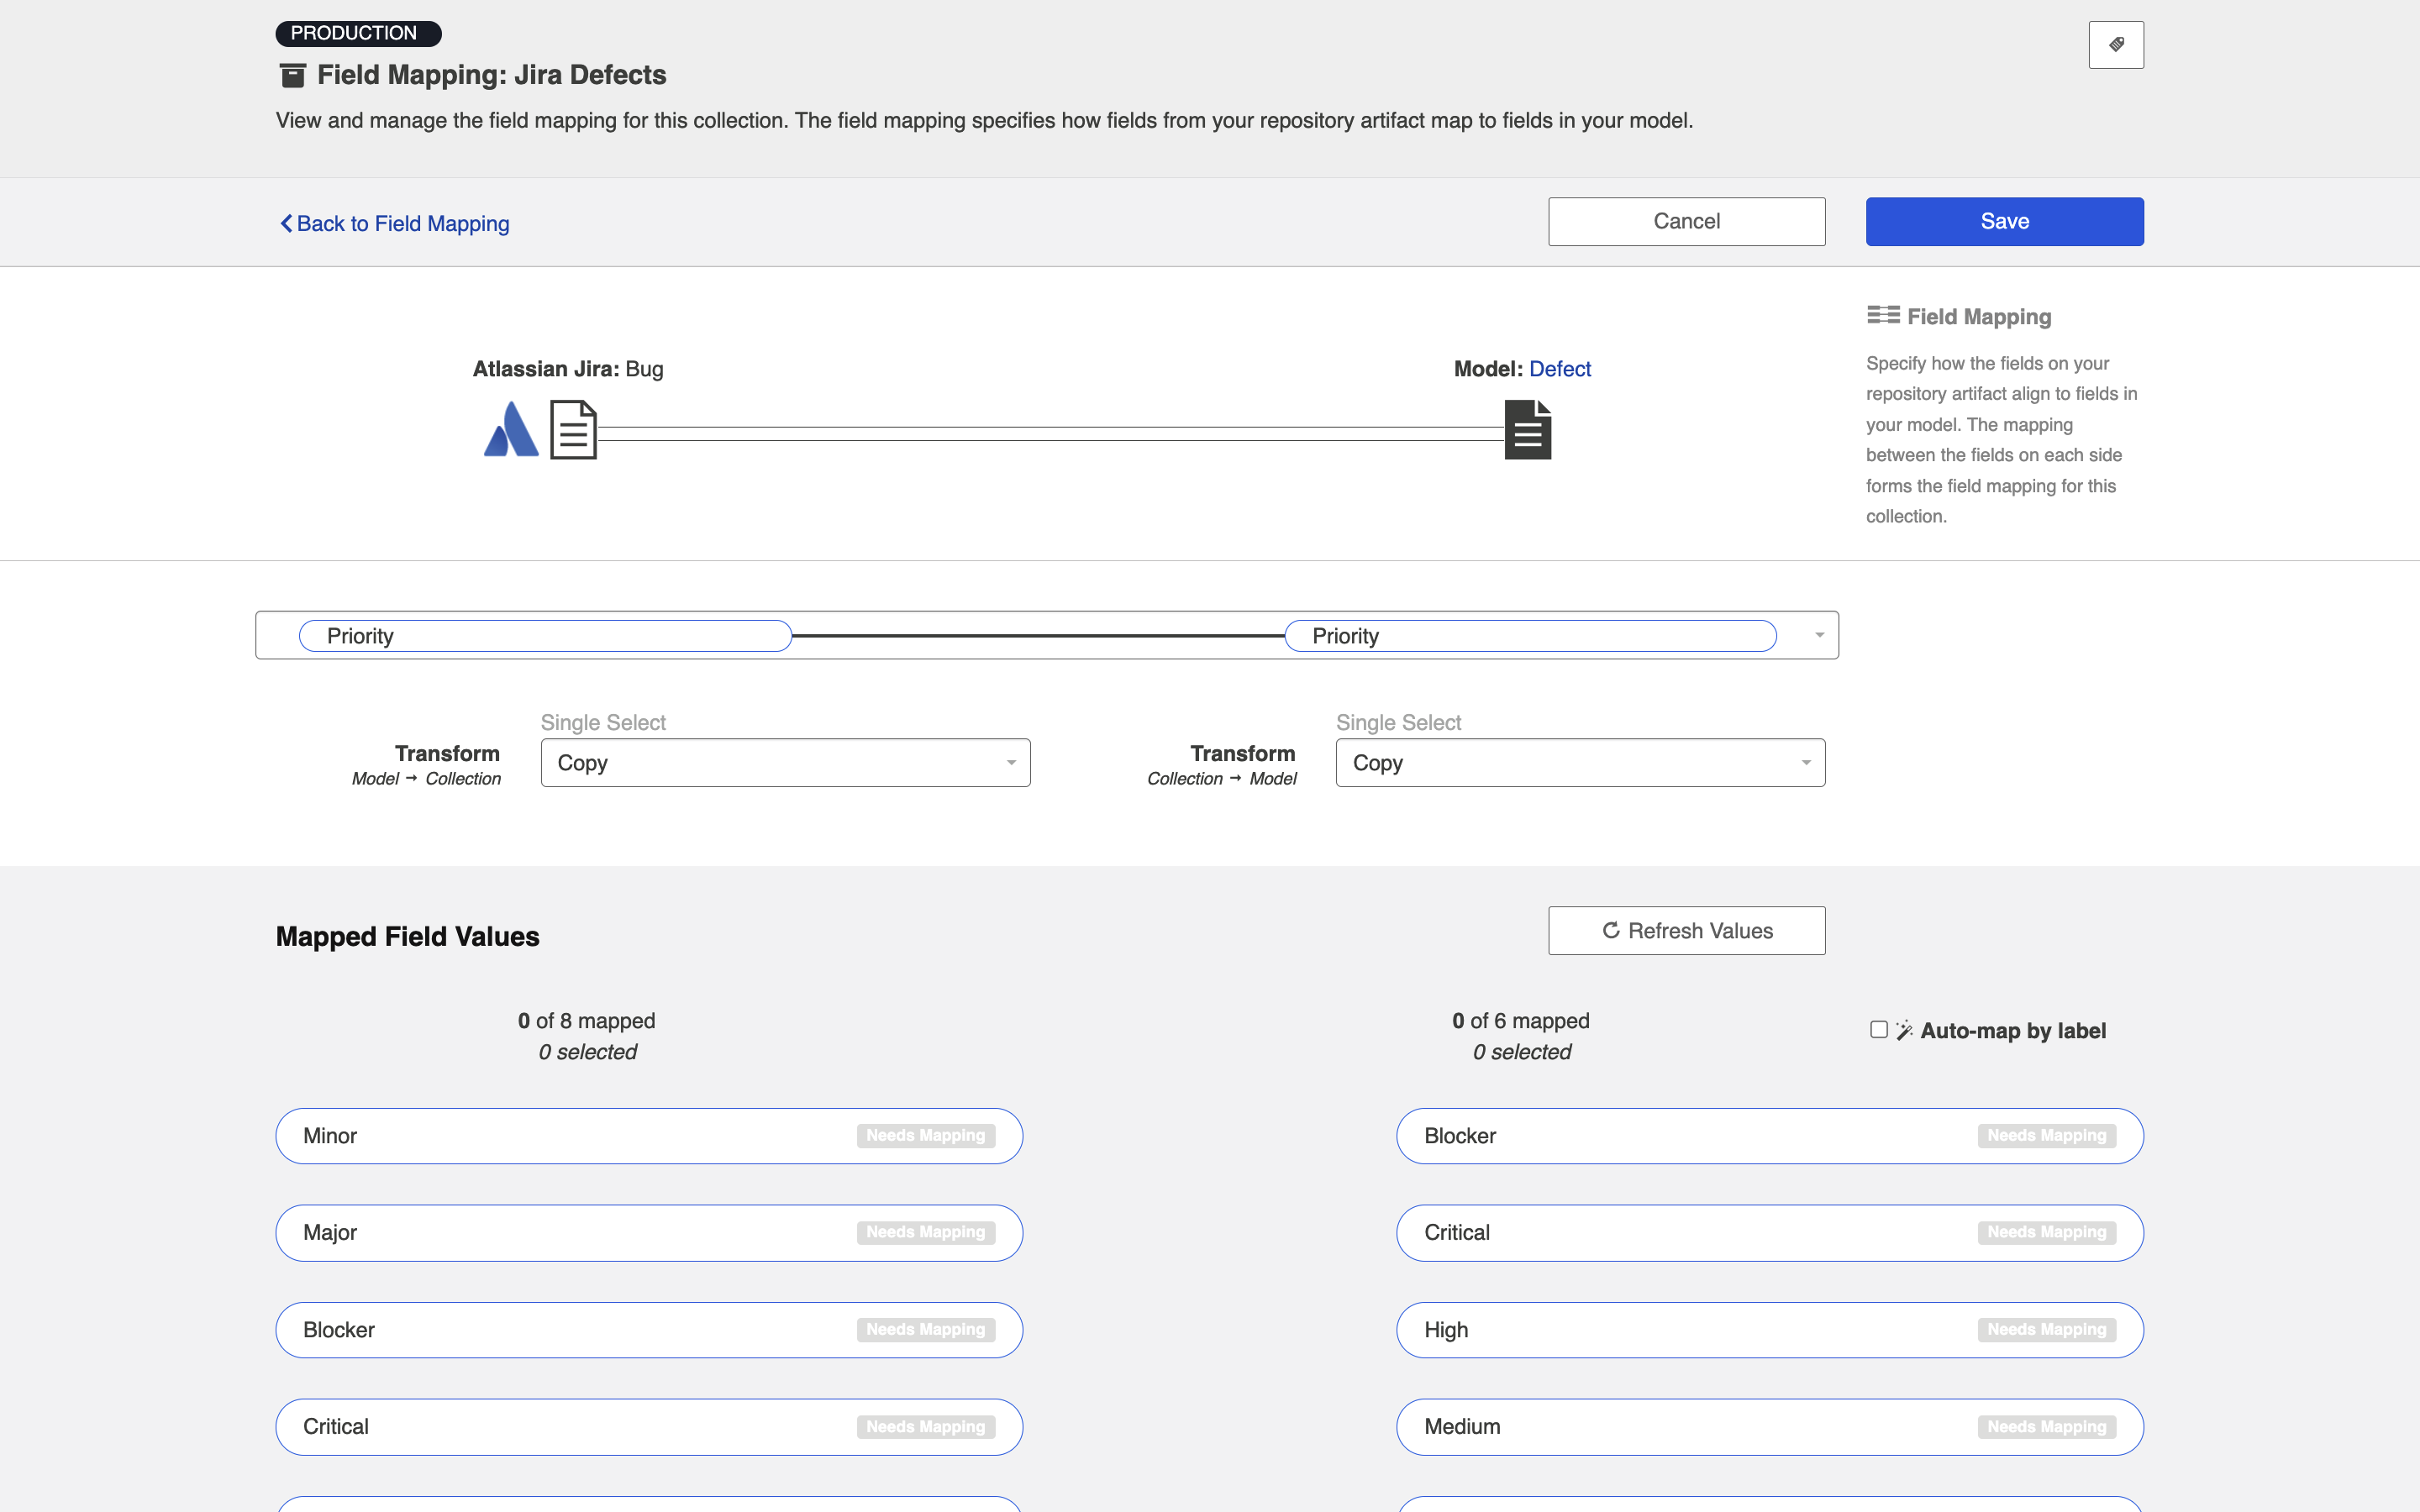
When flowing single- and multi-select fields, Hub will need to know how to translate different field values between repositories. To handle this, Hub offers an easy-to-use field value mapping canvas on the Field Configuration screen.
If your field values have not yet been mapped, you'll notice an alert next to the Configure link on the Field Mapping screen:
Once you click Configure, you will be lead to the Field Configuration screen. Please review the sections below in order to learn which selections to make on this screen.
Transforms for Single- and Multi-Selects
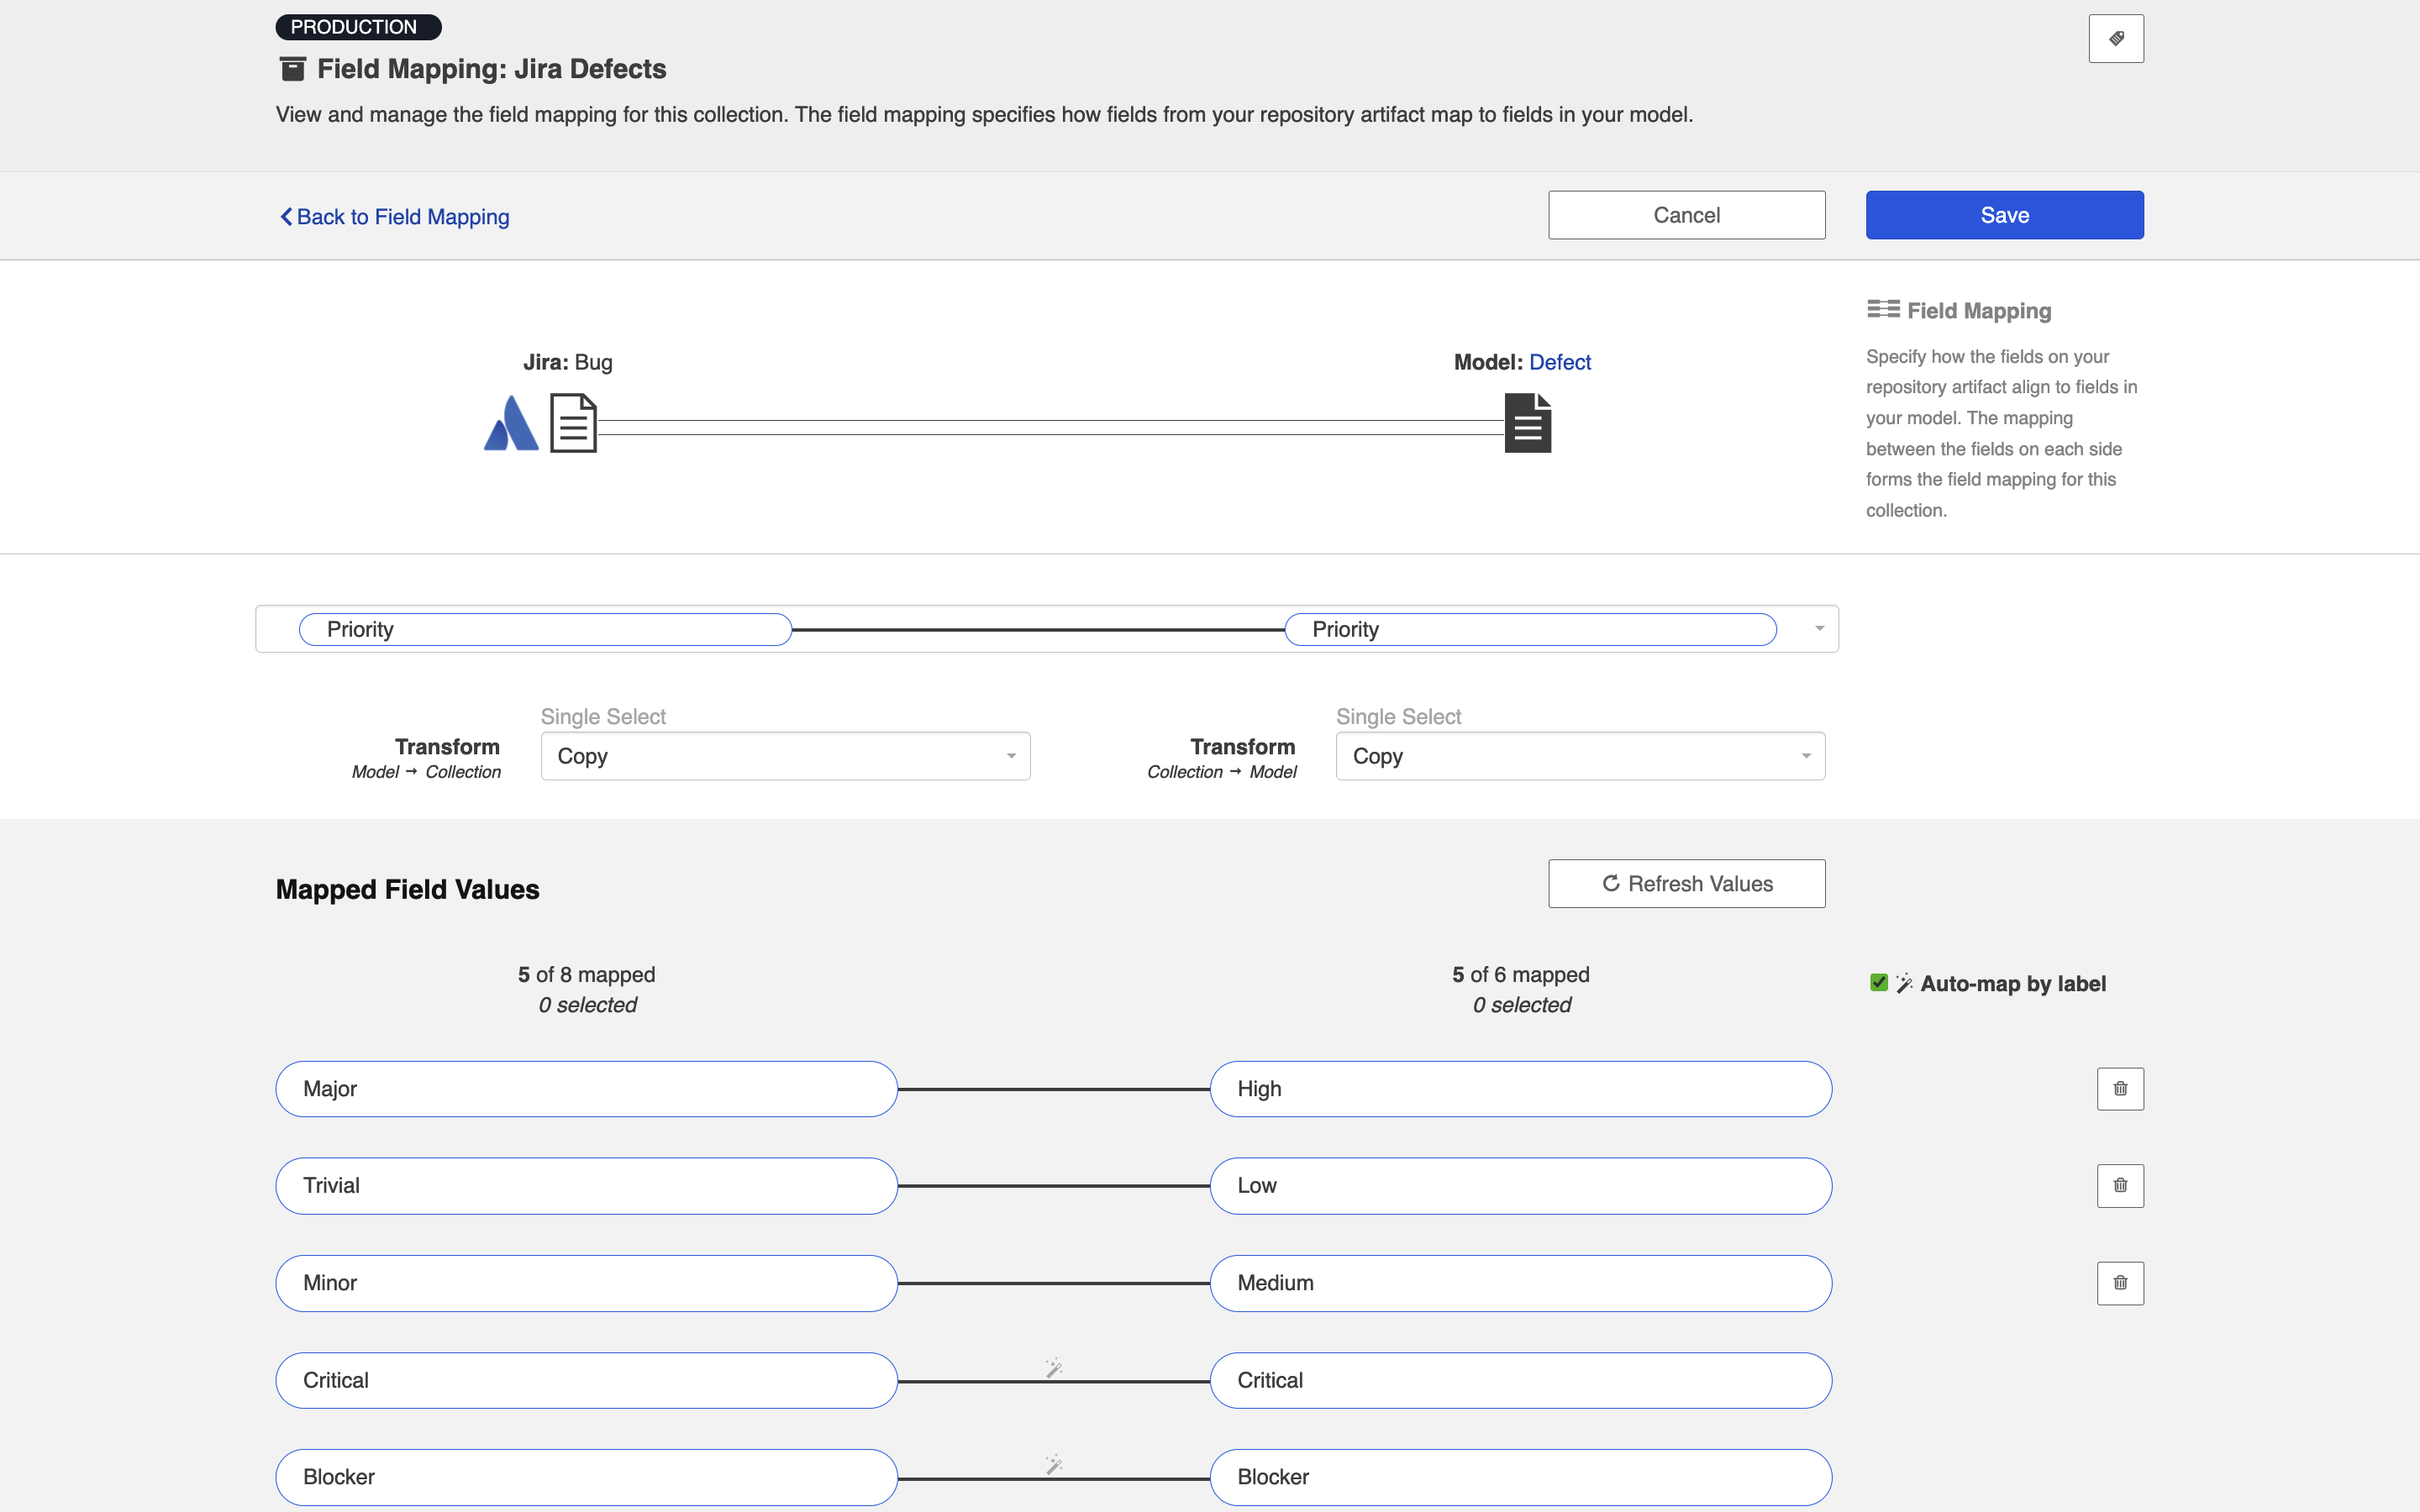
In most single- and multi-select field scenarios, you will configure your transform as 'copy' on both the collection and on the model side. This means that the model will pass an identical copy of its value to the collection, and vice versa. This should be the default setting.
Field Value Mapping
If the Auto-map by label box is checked, Hub will use its built-in smarts to pre-map some of the field values for you based on their labels. If you'd like, you can click the trash can icon next to each mapping to remove the mapping, and then manually re-map them.
To complete the field value mapping, select the values in the collection and in the model that you would like to map to one another, and then click Connect. This process enables to the model to act as a 'translator' between two different collections which may have different sets of values for a single- or multi-select field.
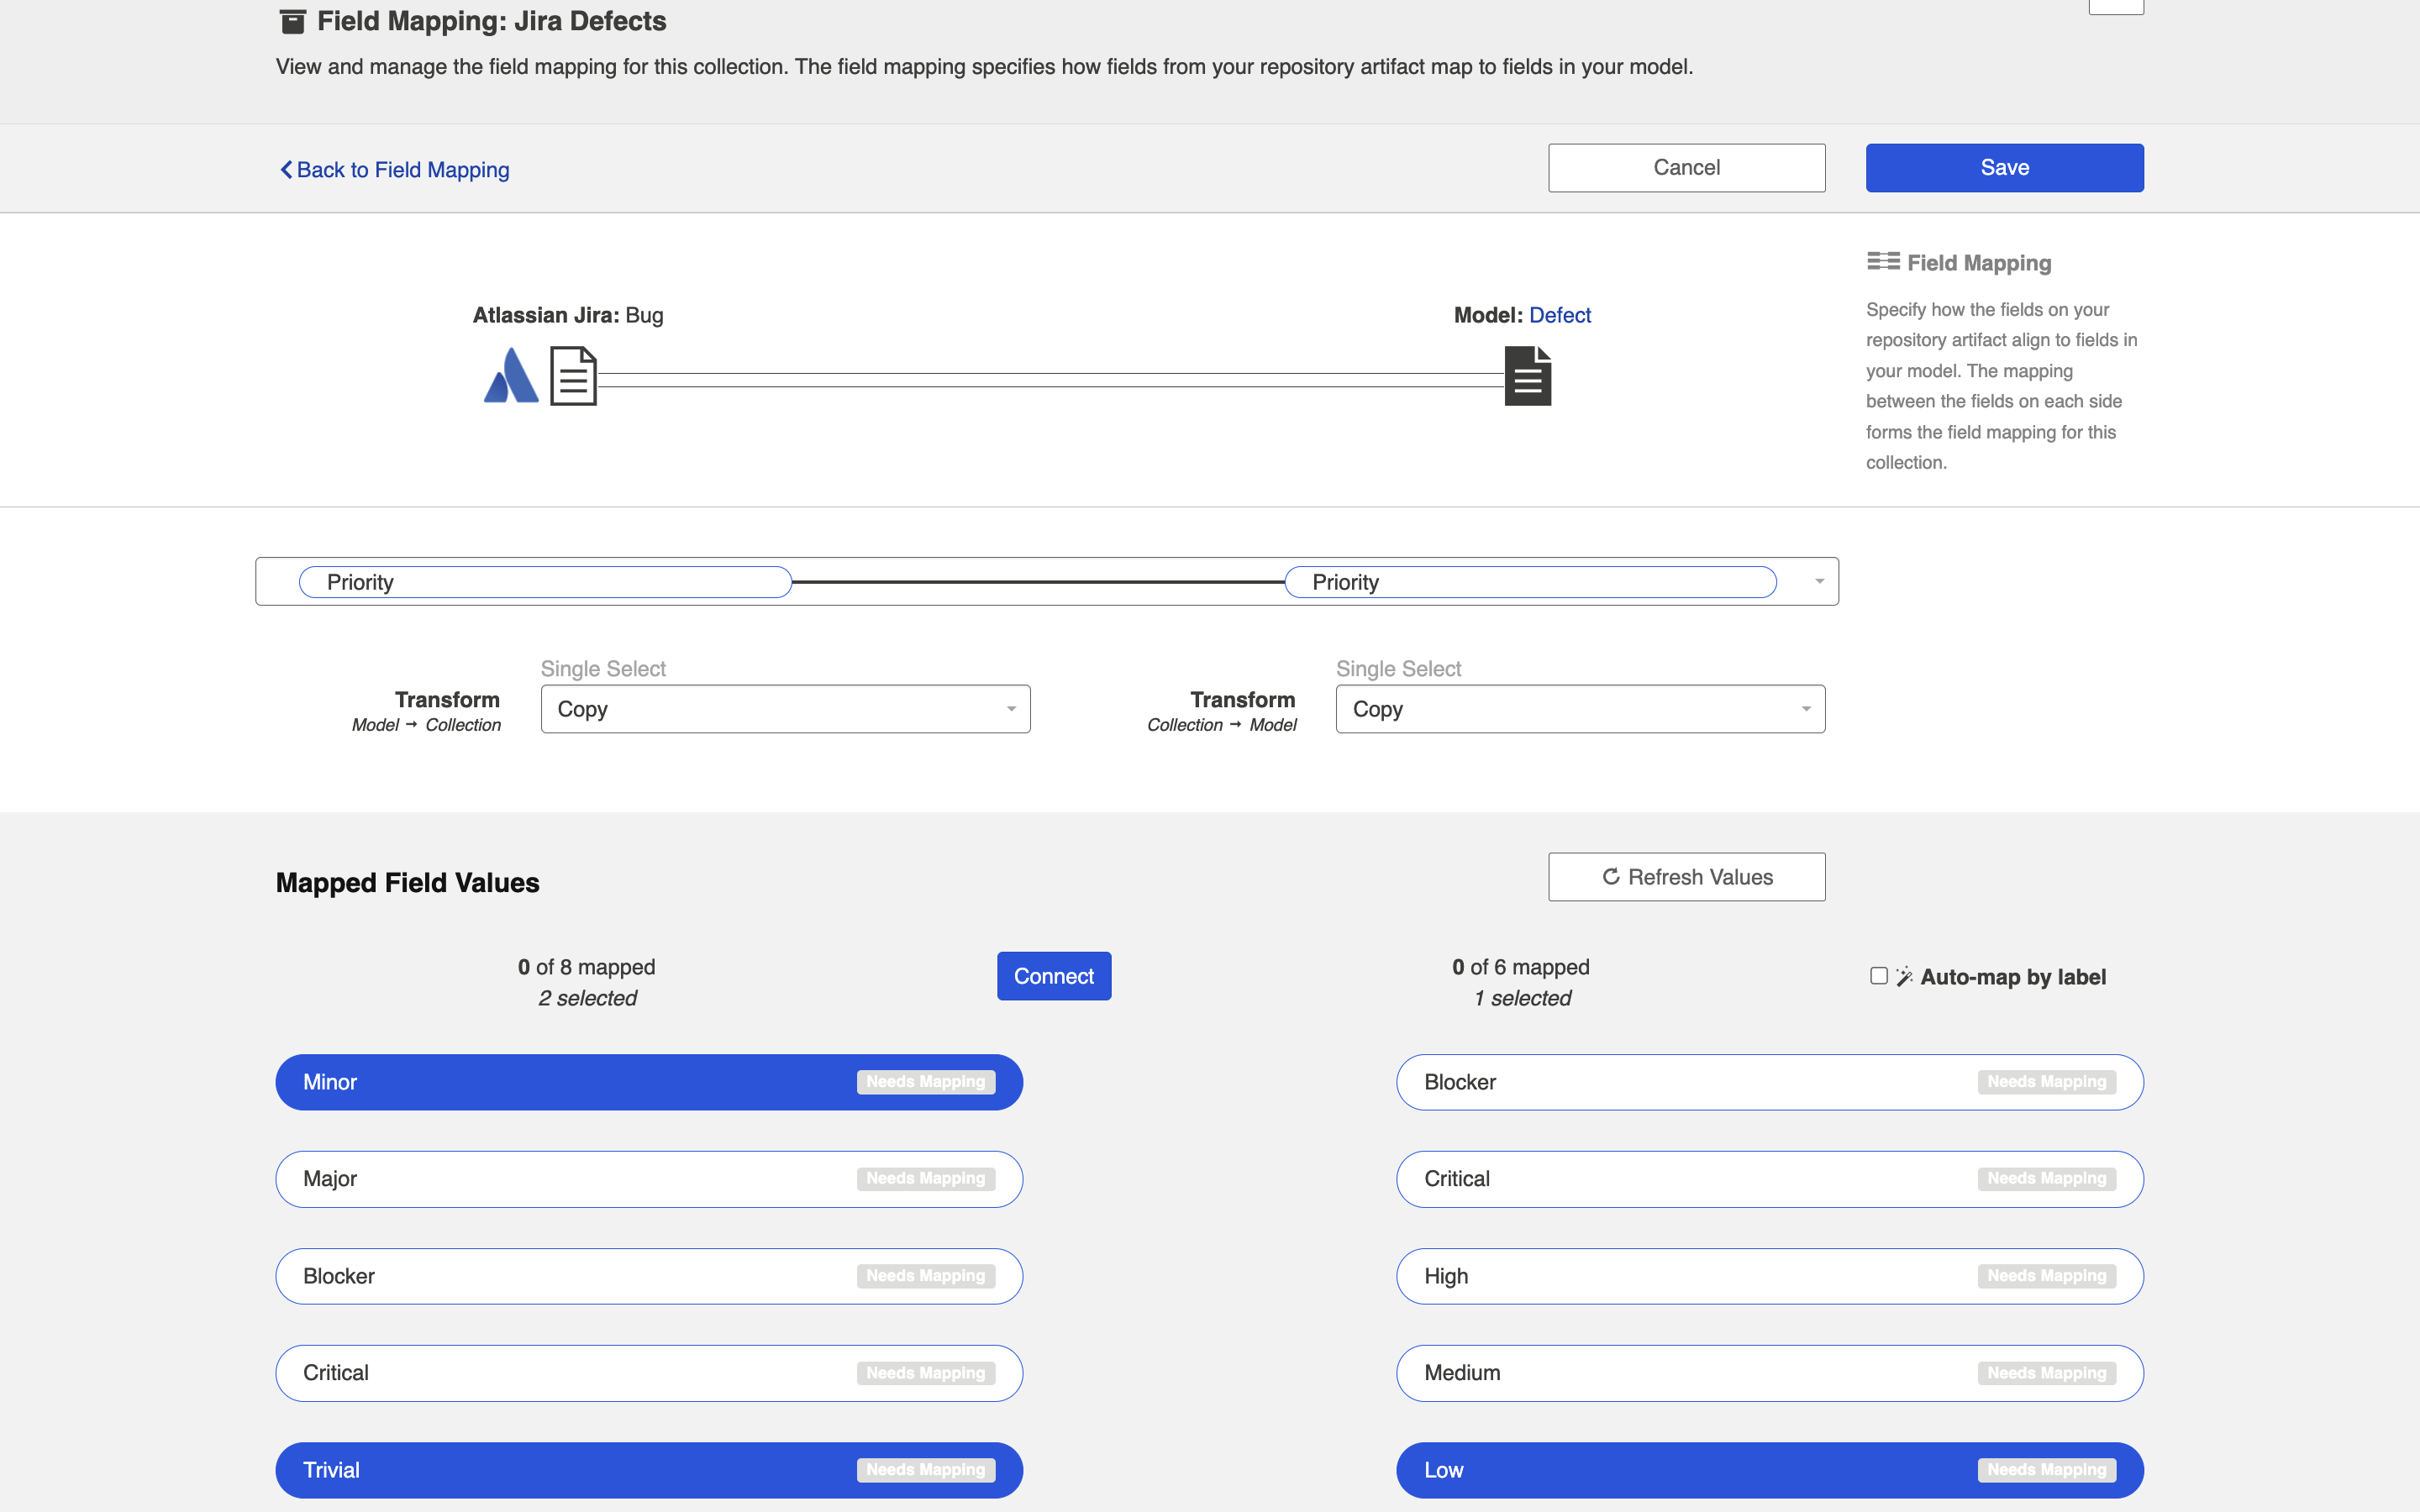
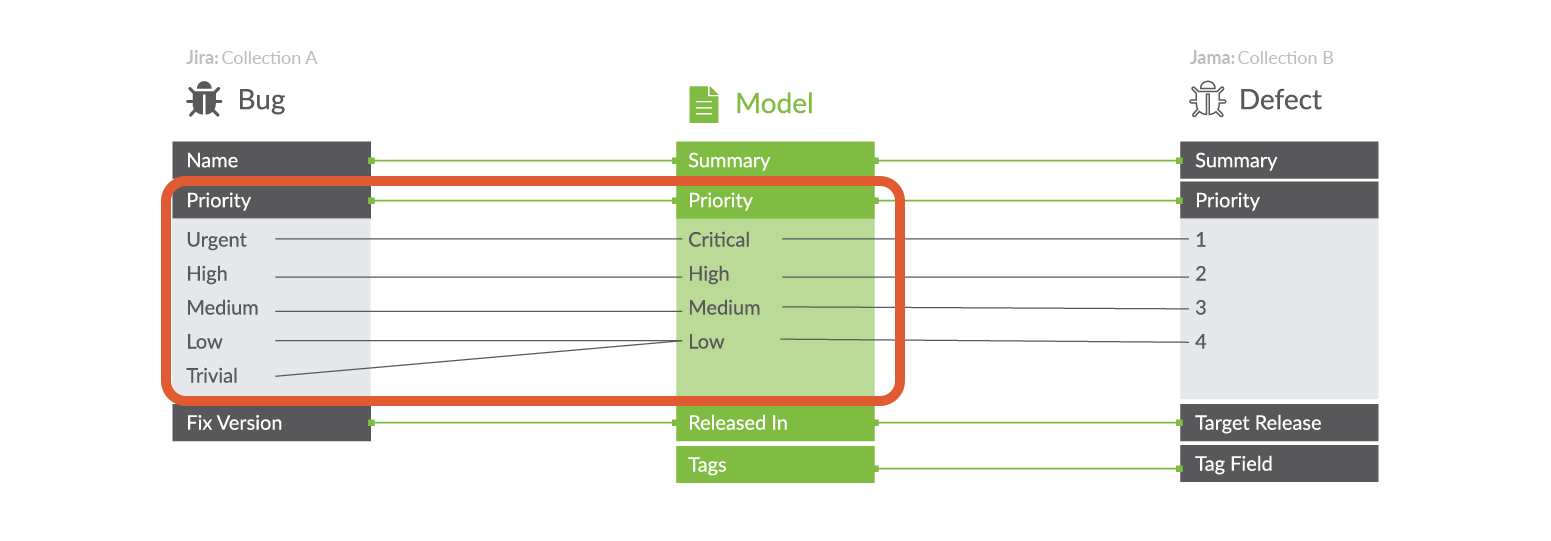
When you map multiple collection values to a single model value, you will find that one value on the collection side is listed in brackets. This indicates which value will be written when the mapped model value is flowed to that field. In the scenario below, if the model passes a 'low' priority value to your collection, that artifact will default to a priority status of 'minor,' rather than 'trivial.' You can modify the default value by clicking the arrow icon on the collection field pill.
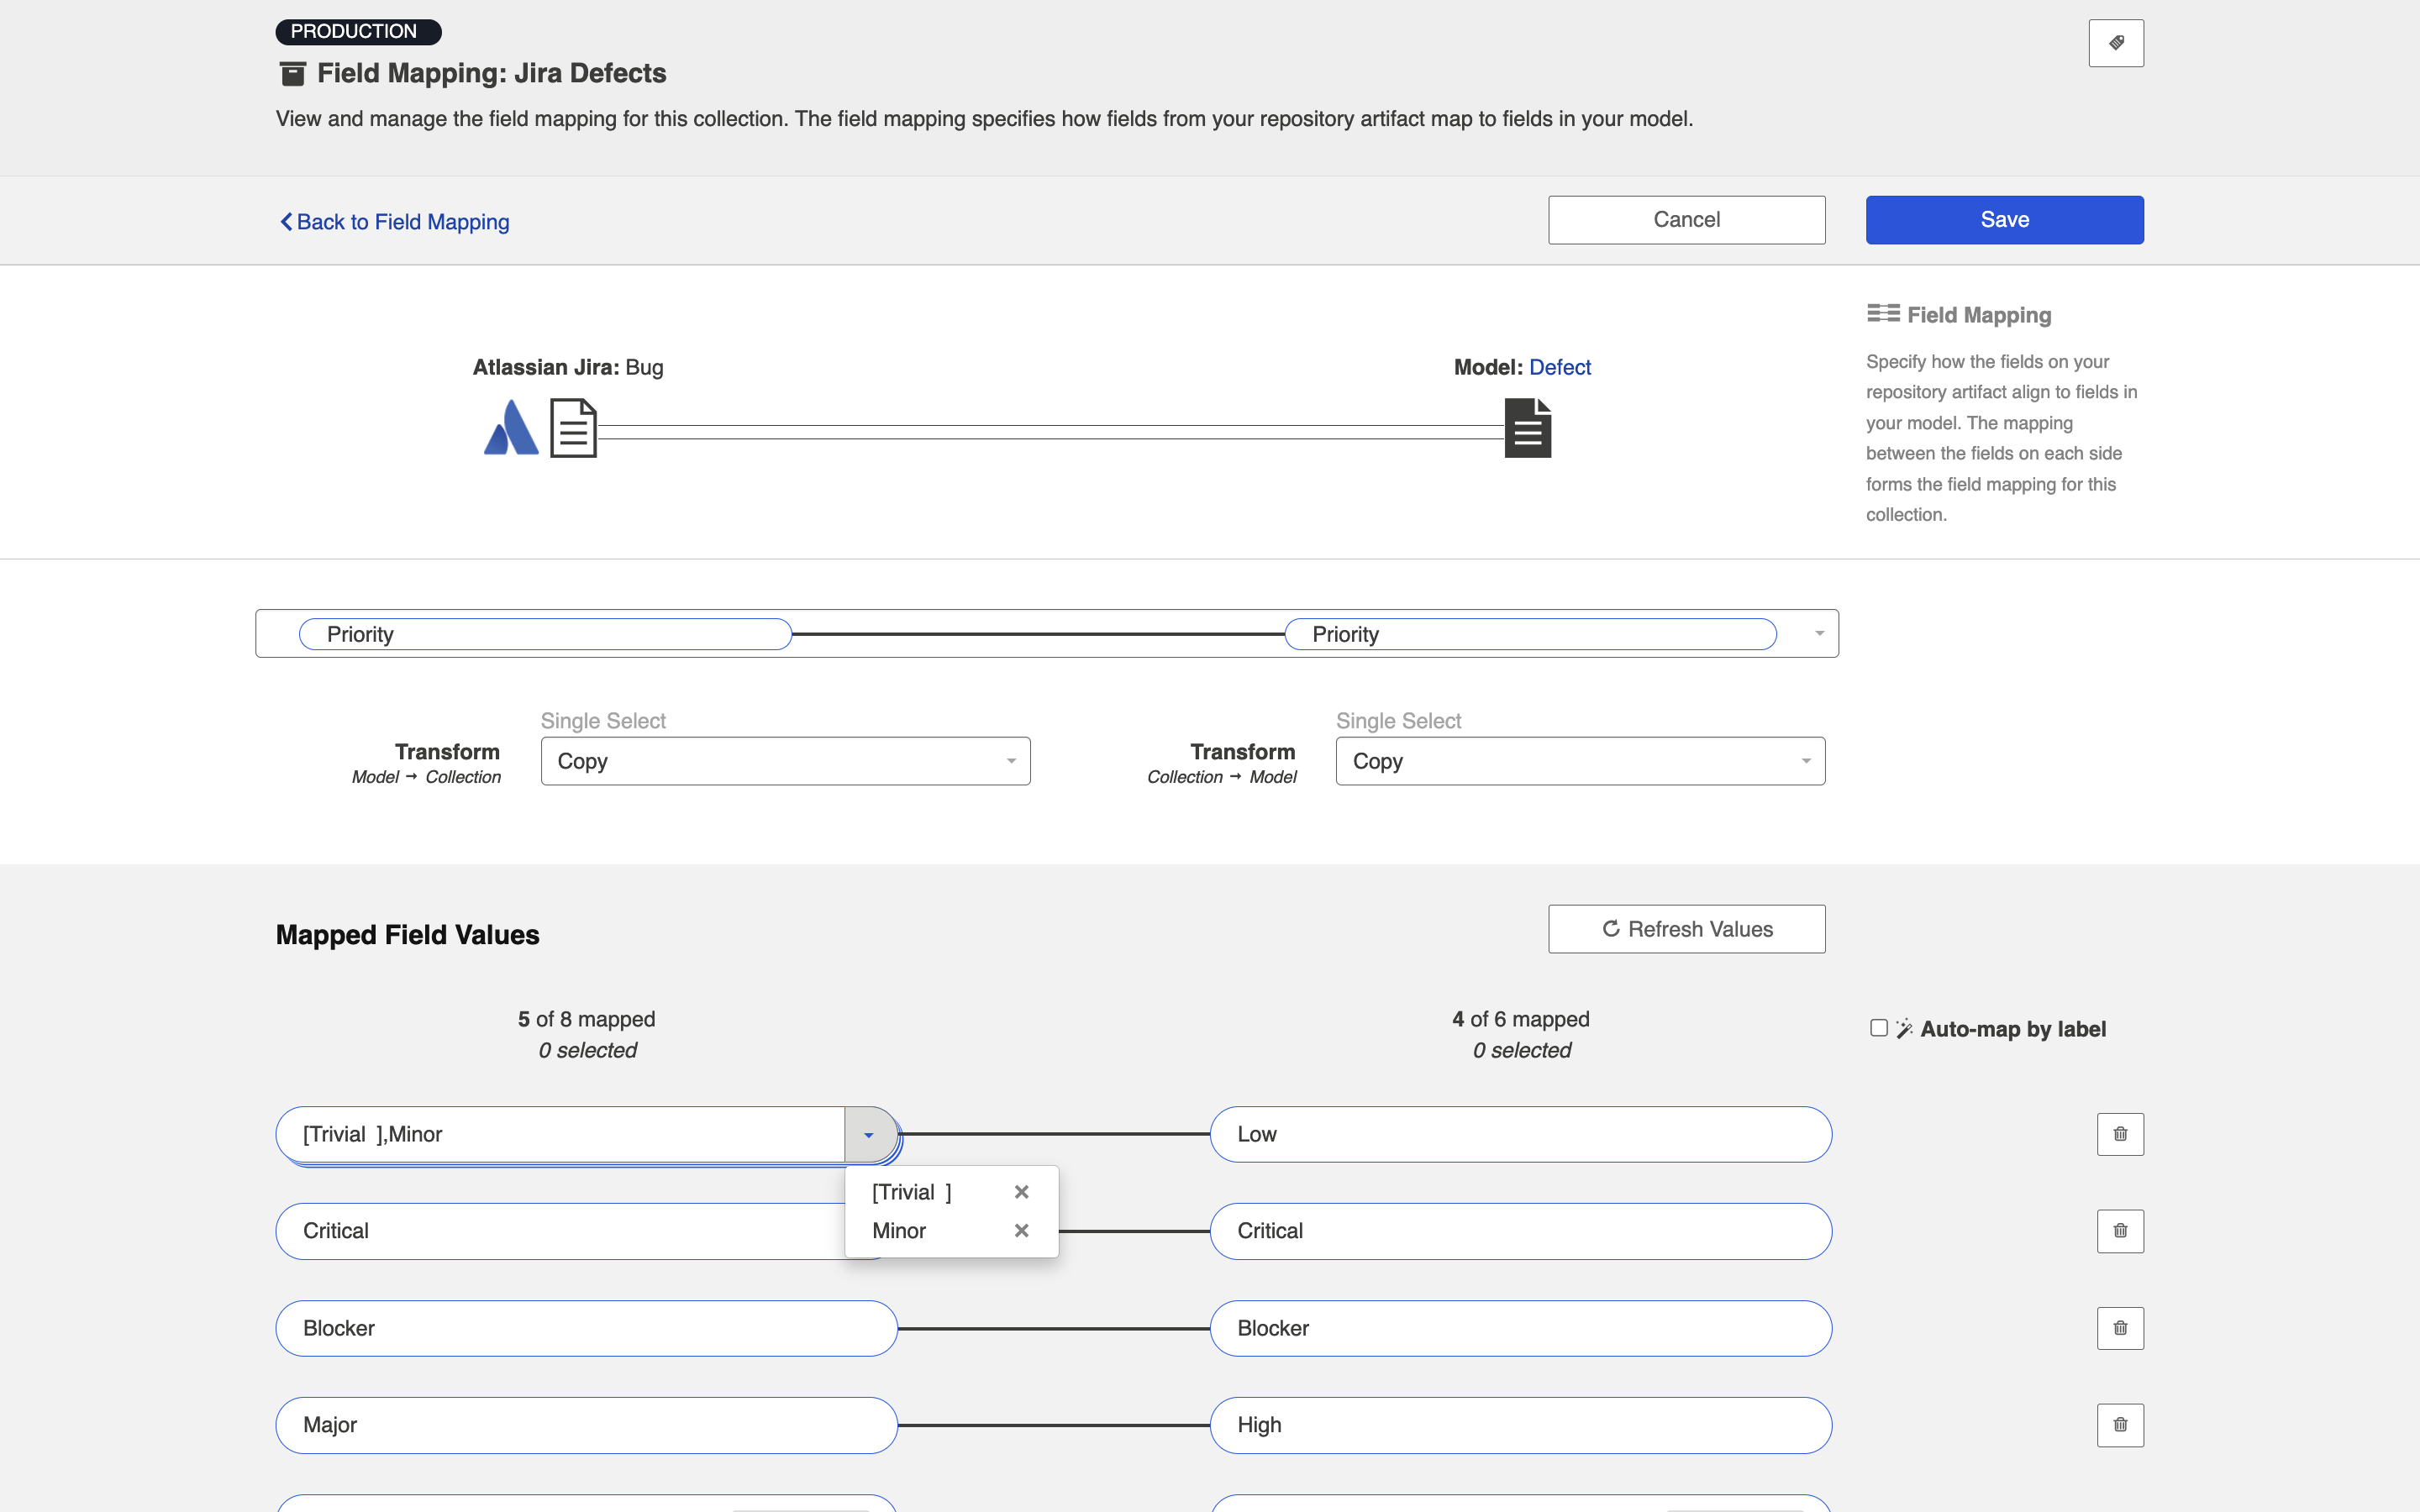
Note: If your model allows unmapped values to flow for the field you are configuring, you will see an indication of both the number of values that are explicitly mapped to your model, and the number of values that have been 'accepted' by your model. The values that have been 'accepted' are those unmapped values which have been allowed to flow as part of your integration. Note that in most scenarios, the recommended setting is not to allow unmapped values to flow. However, allowing unmapped values to flow can make sense in a few specific scenarios, such as an Enterprise Data Stream integration or in single select to string transforms, where there are many options available and you don't desire any normalization of the data flowing through.
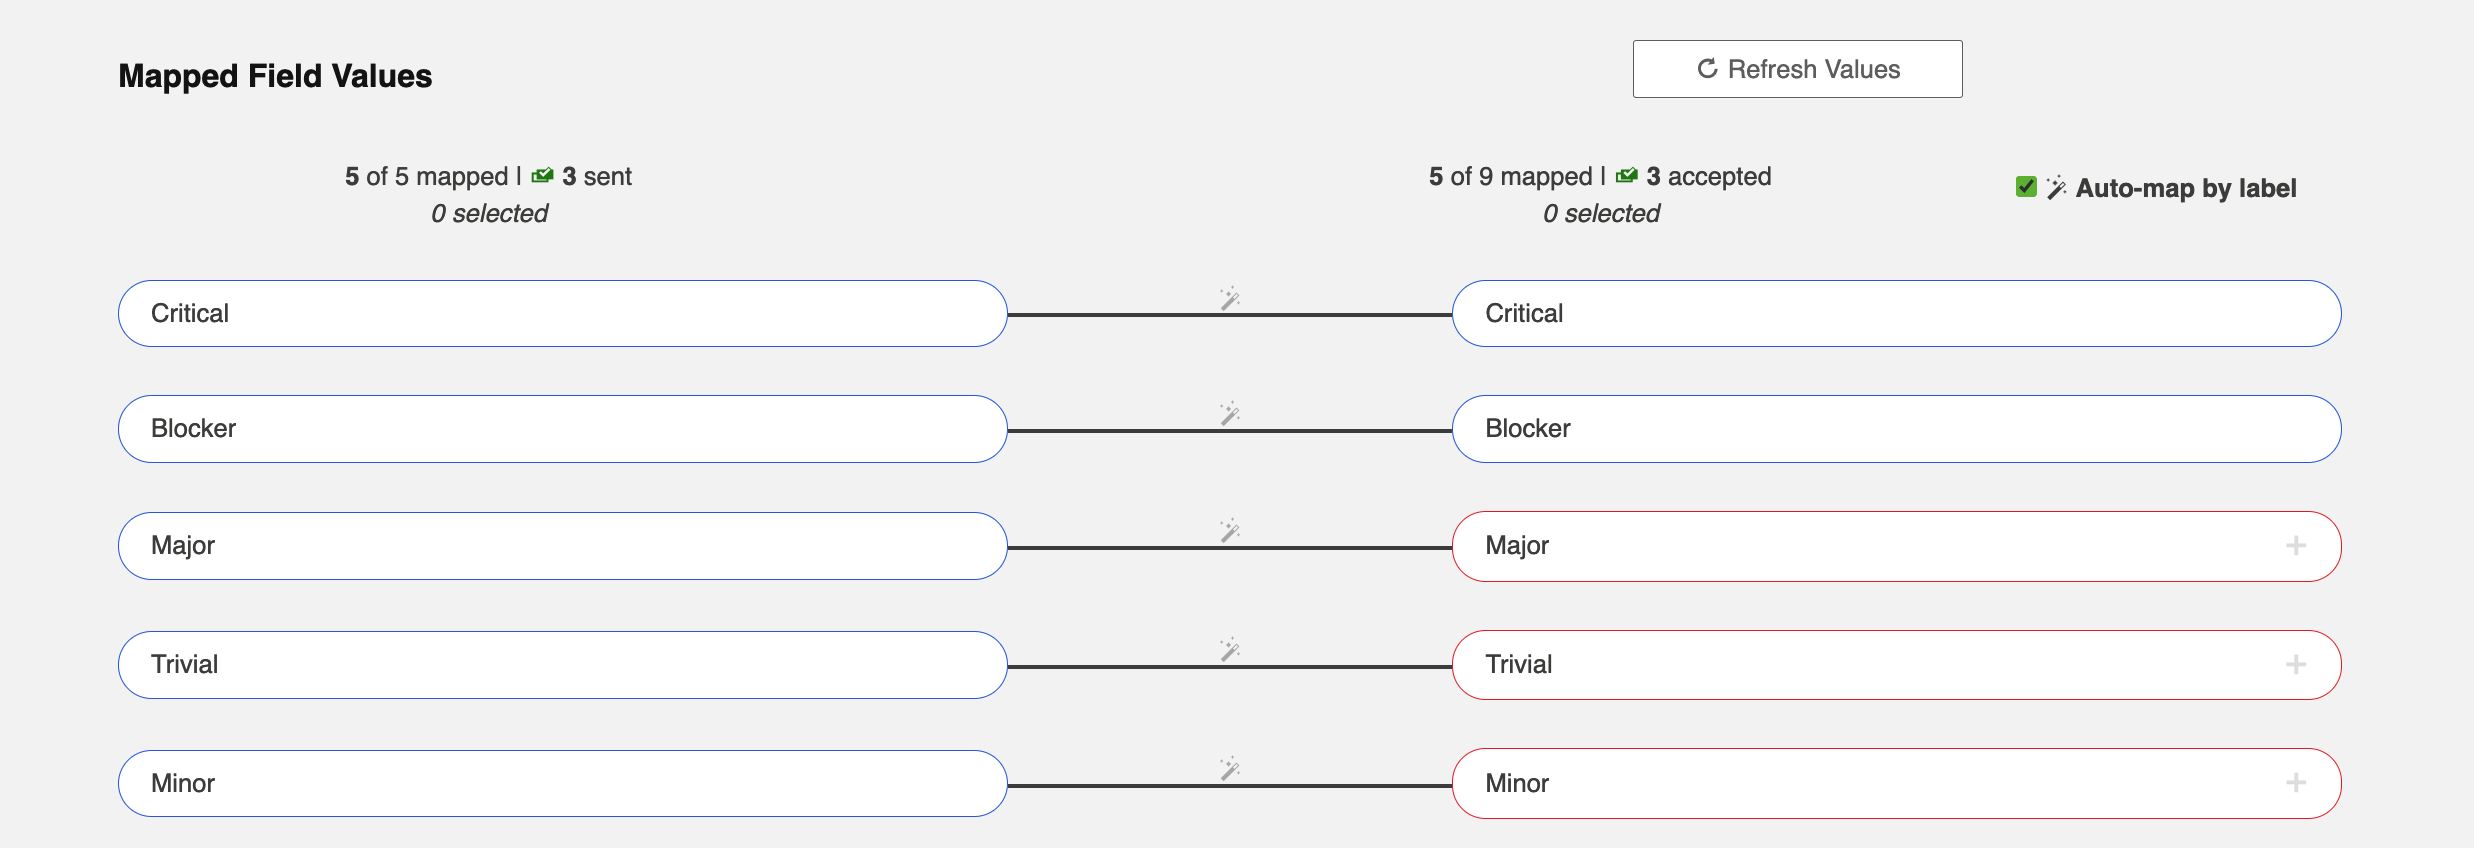
Default Field Value Mapping
You can set a default field value for any unmapped value by going to the bottom of the Field Mapping screen and clicking Select Default Value. From the dropdown menu, you can select your default value, and any unmapped value will be set to this value.
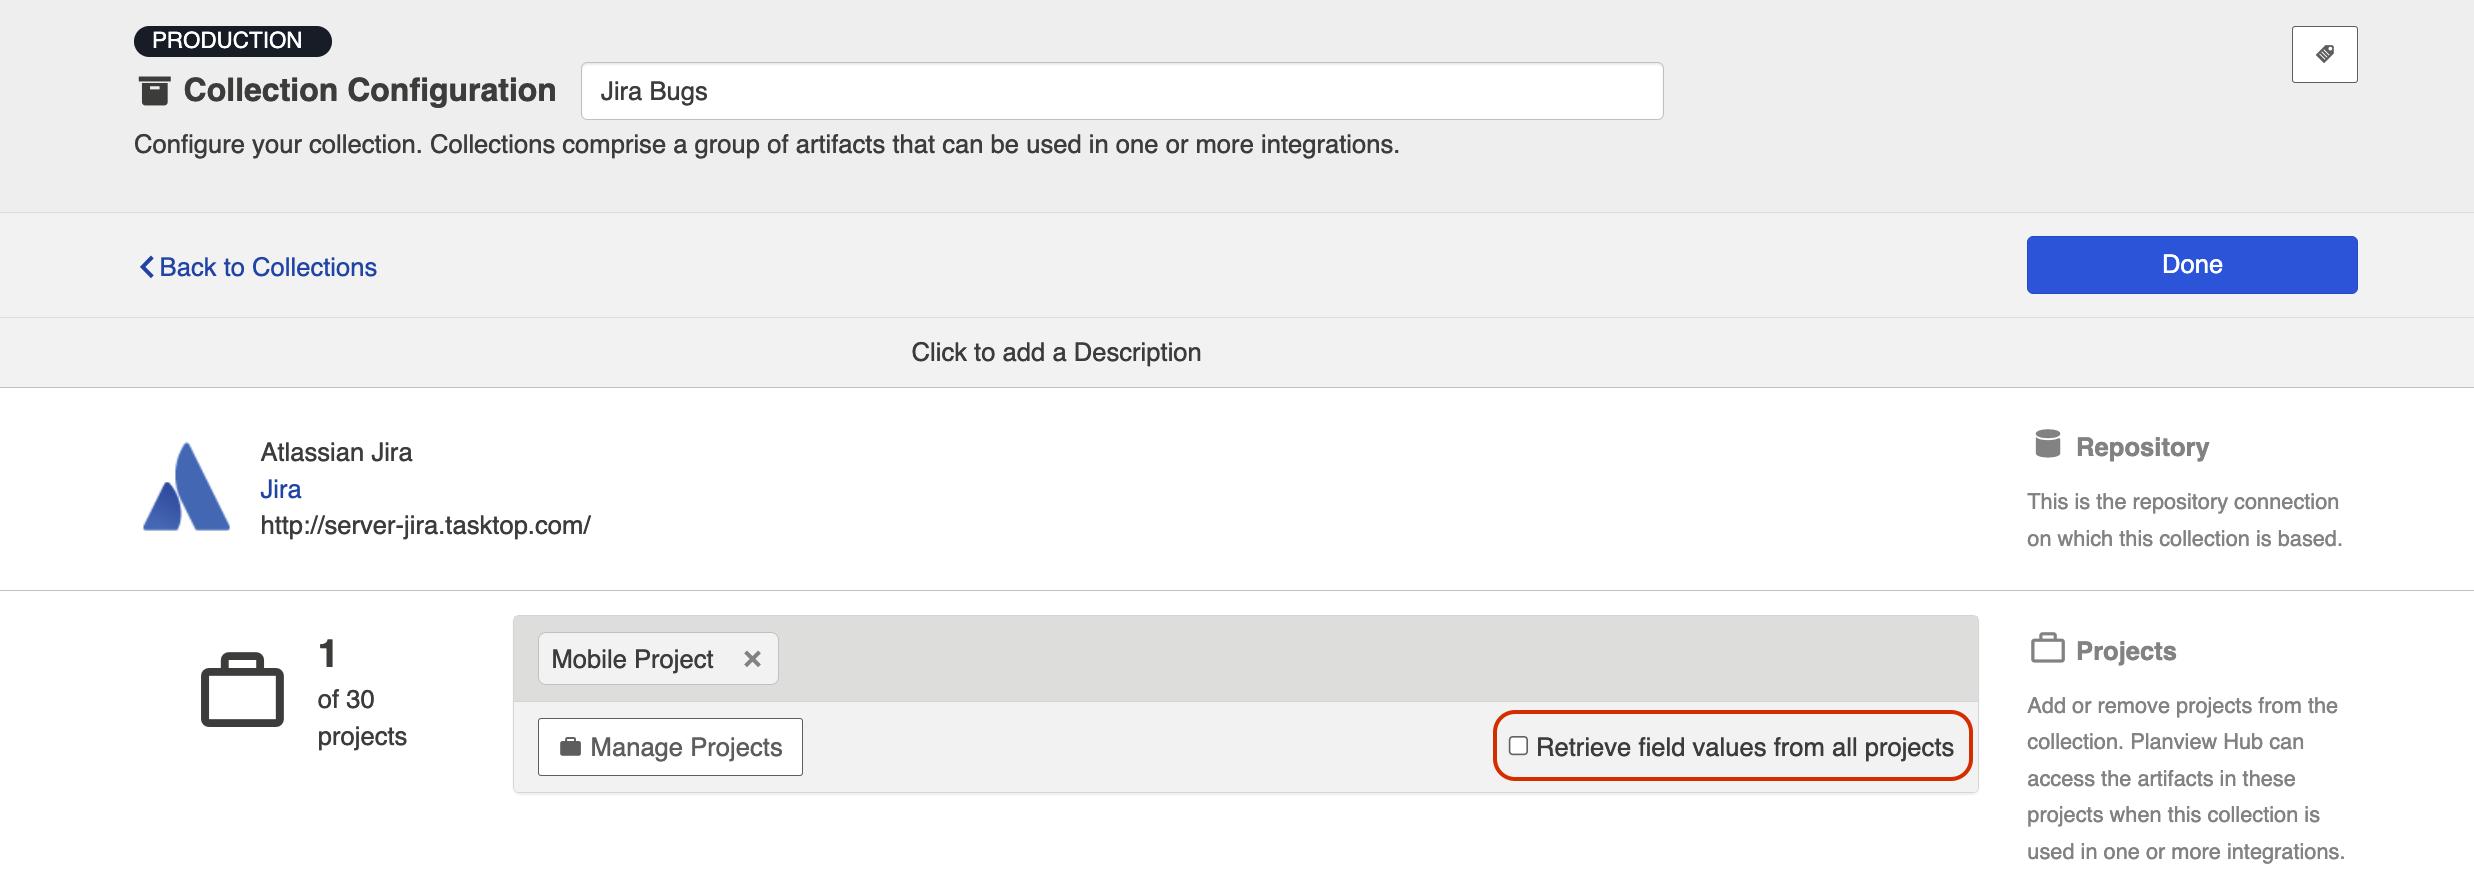
If Field Values Vary by Project
By default, Hub retrieves field values from one sample project for mapping. In rare cases where values vary between projects, check the Retrieve field values from all projects box on the Collection configuration screen to retrieve all possible values. Be aware that retrieving values from all projects can take some time.
Specific Use Cases
There are a few specific scenarios that will require additional configuration
State Transitions
Some repositories require that a state transition be performed in order to update the value of certain fields (for example, when an artifact must move from a status of New to In Progress to Closed, but cannot move directly from New to Closed). If this is the case, you'll notice that the transform on the left for this field defaults to None. That is because Hub is unable to update that field, unless a state transition has been configured in Hub.
If you'd like to configure state transitions for that field, make sure that the field is mapped to the model, and then manually update the transform on the repository side (on the left) to Copy. Once the transform is updated, you'll see that the Configure State Transition link appears.
You can learn more about how to configure the state transition on the State Transitions page.

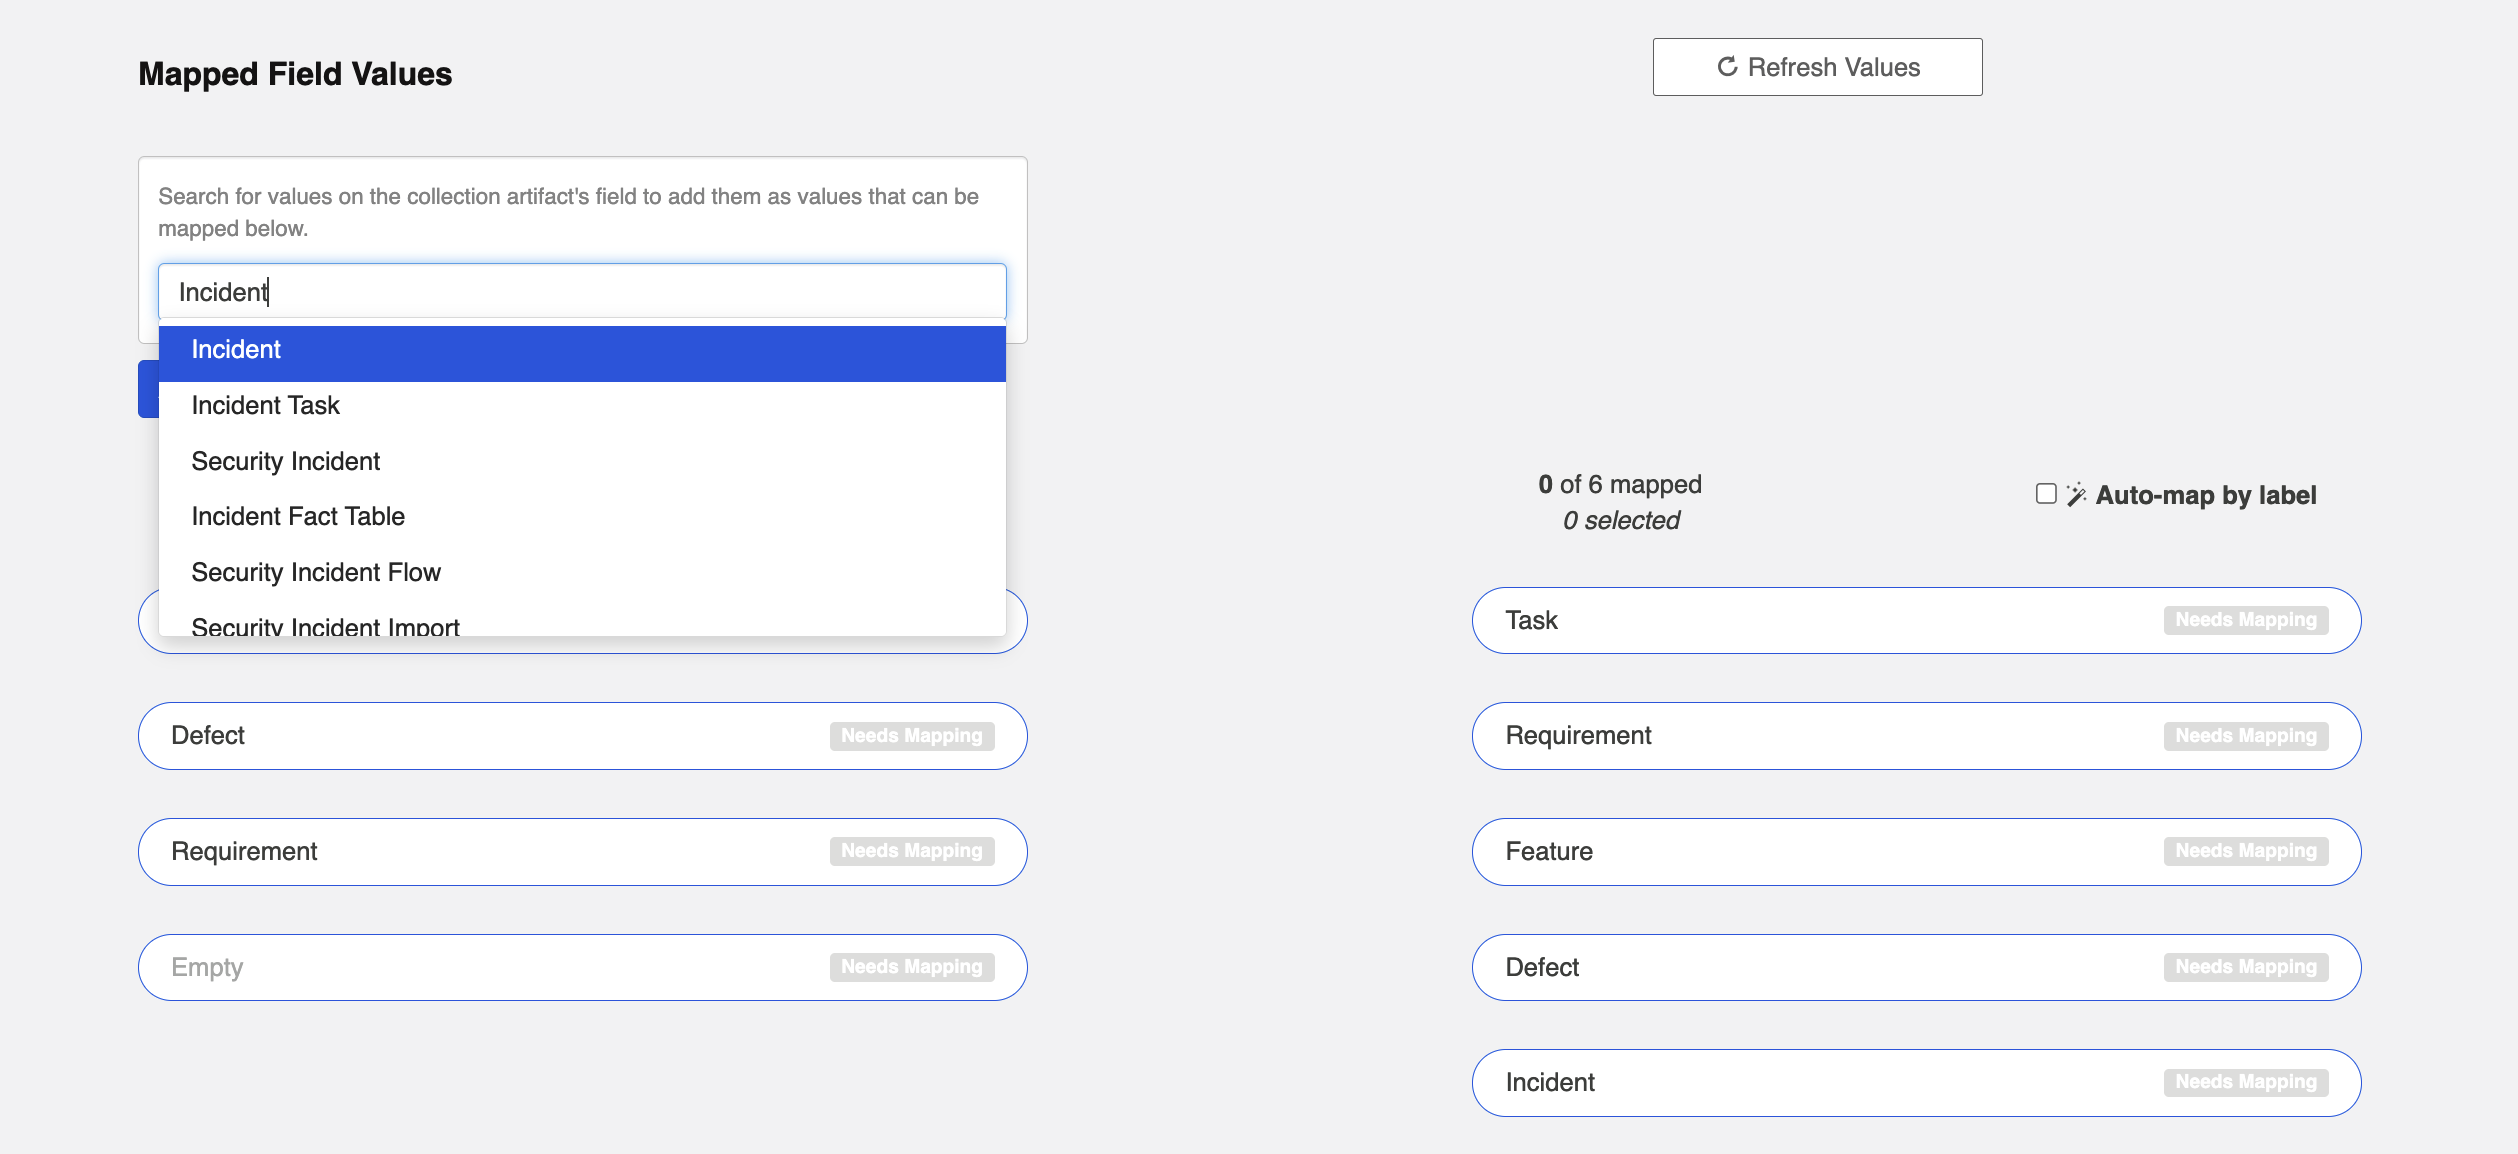
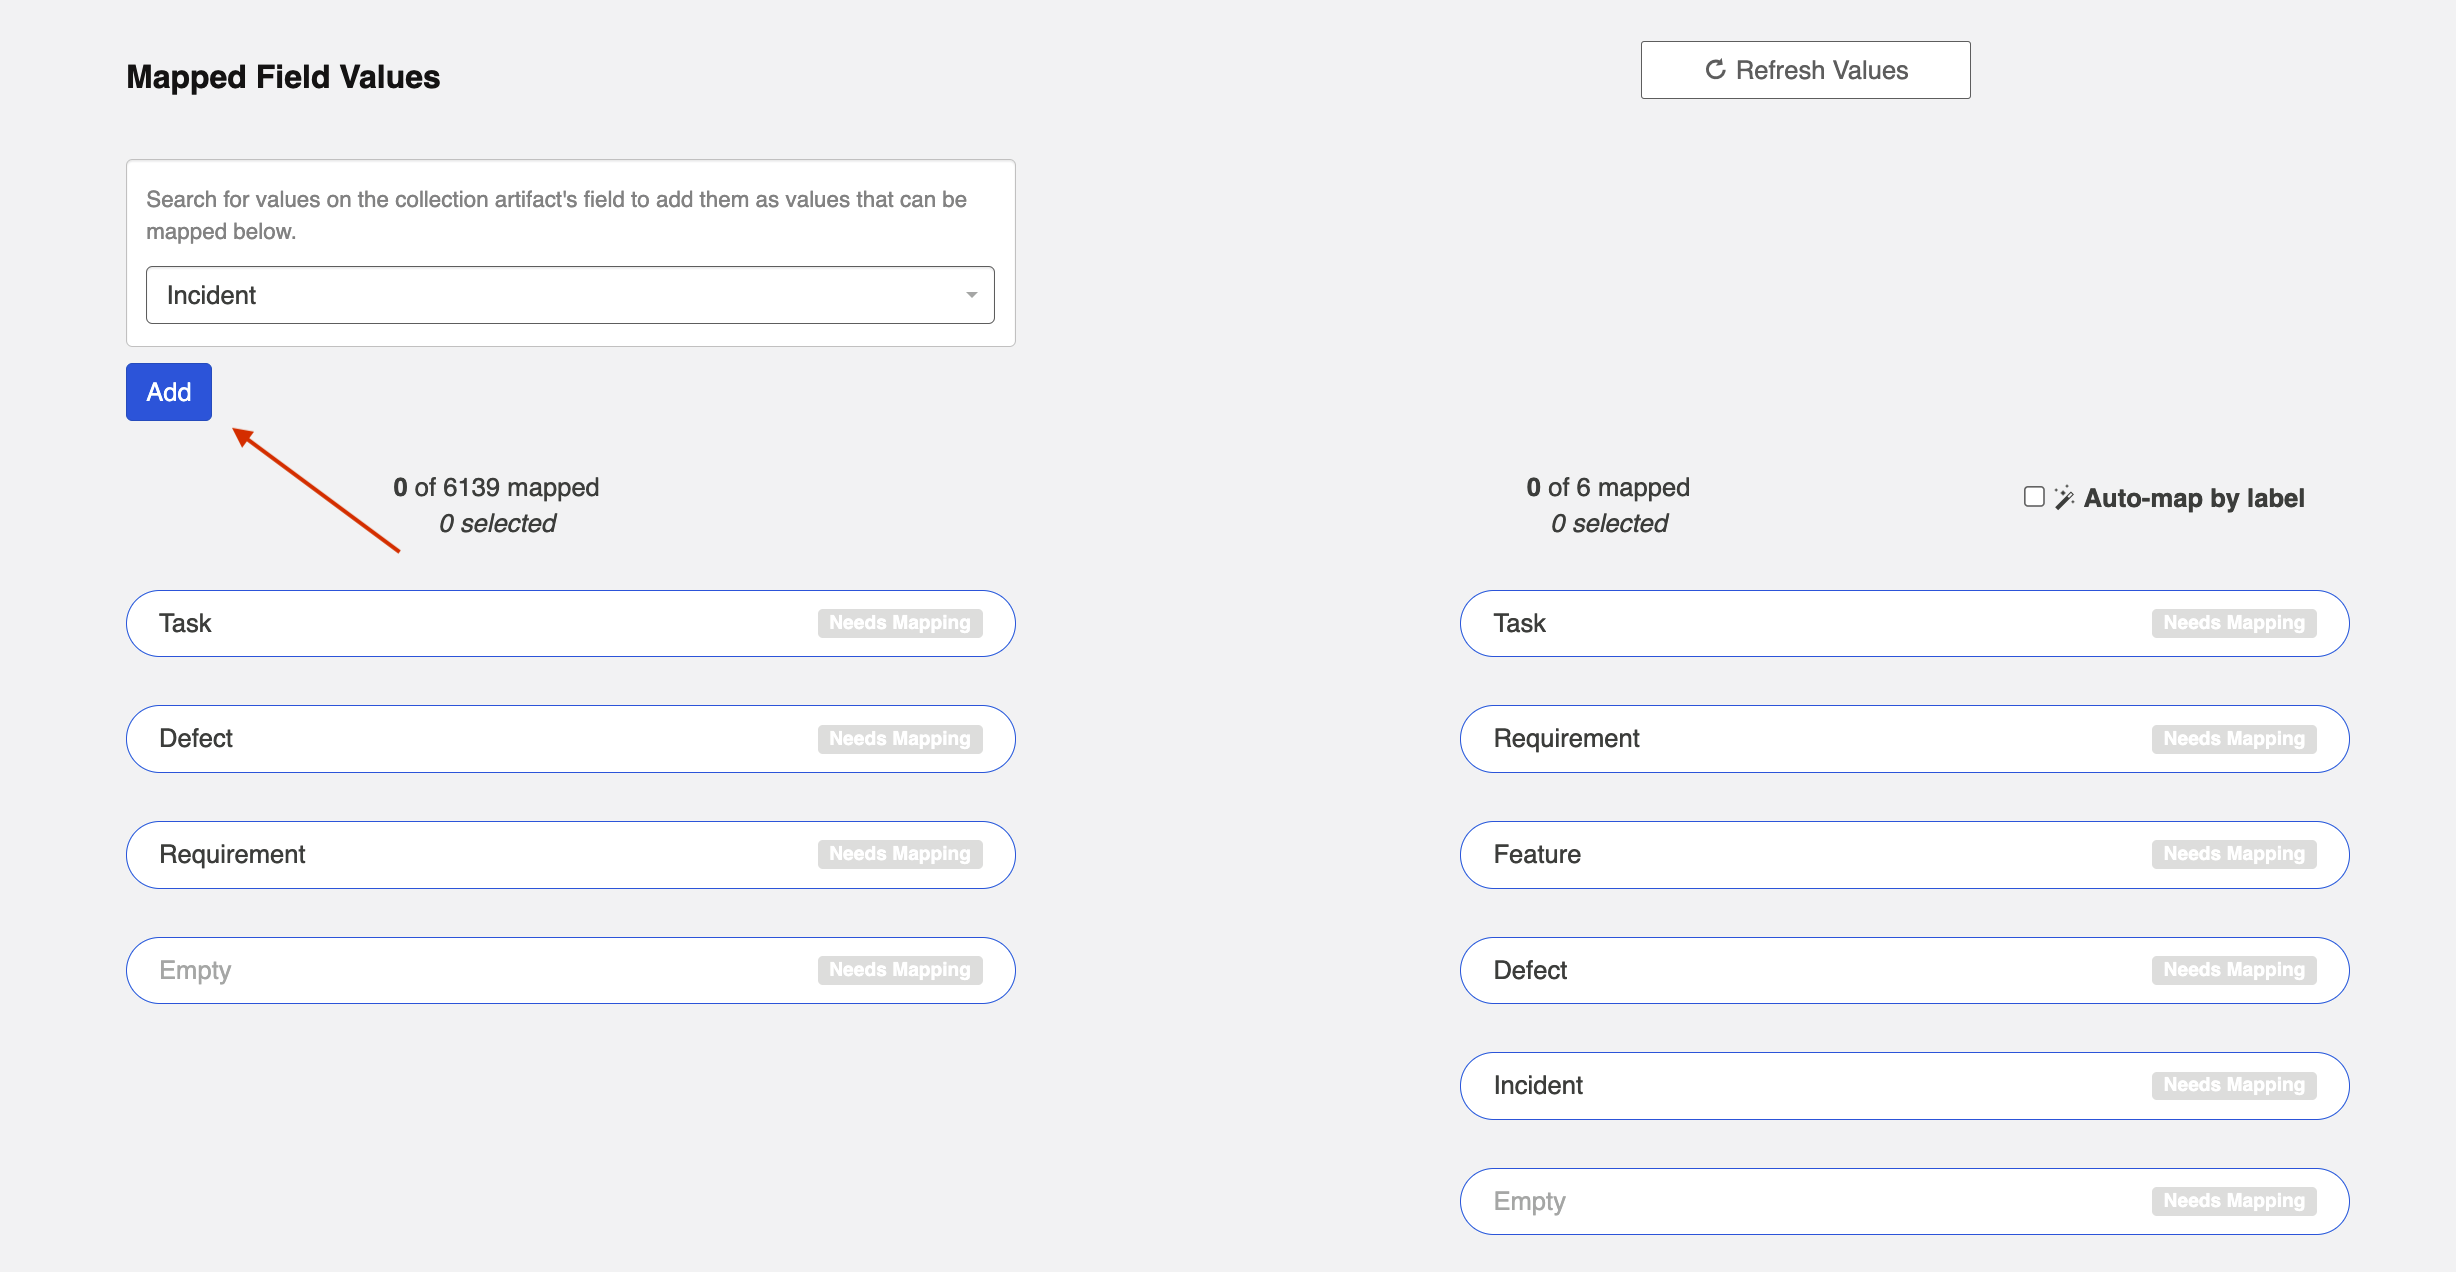
Single- or Multi-Select Fields with 25+ Possible Values
If you are mapping a single- or multi-select field that contains over 25 values, you will notice that a search box appears. This is to aid in performance and usability of the Field Configuration screen when mapping a large number of values.
Simply search for the field value you would like to map, and then click Add. This will add it to the mapping canvas, so that you can map those values as you normally would.

Next Steps
Once you have completed your Field Mapping and Field Configuration, your next step will be to review your collection's Relationship Specification.