Container + Work Item Synchronization
What is an Integration?

An integration is quite simply the flow of information between two or more collections. When you configure your integration, you can customize the field flow, artifact routing, artifact filtering, as well as enable or disable comment flow or attachment flow.
What is a Container + Work Item Synchronization?
The Container + Work Item Synchronization template enables you to flow your folder structure from one repository to the other, along with any corresponding work items (such as defects, requirements, etc) that are contained within that structure. The term folder is used loosely, and can refer to many container types, such as folders, modules, or packages.
Template Affordances
The Container + Work Item Synchronization template allows you to flow containers and their contained work items between two repositories. The integration will consist of two container collections and two (or more) work item collections from the same repositories.

Configuring a Container + Work Item Synchronization Integration
Once you have your base repositories and collections set up, you can configure integrations to synchronize the artifacts in those collections.
In this scenario, we'll show you how to configure an integration that flows containers (folders) along with the work items (requirements) contained within them, from a source repository to a target repository.
To configure your integration, select Integrations at the top of the screen, then click + New Integration.
Select the Container + Work Item Synchronization integration template.
Note: Depending on the edition of Hub you are using, you may not have all options shown here.
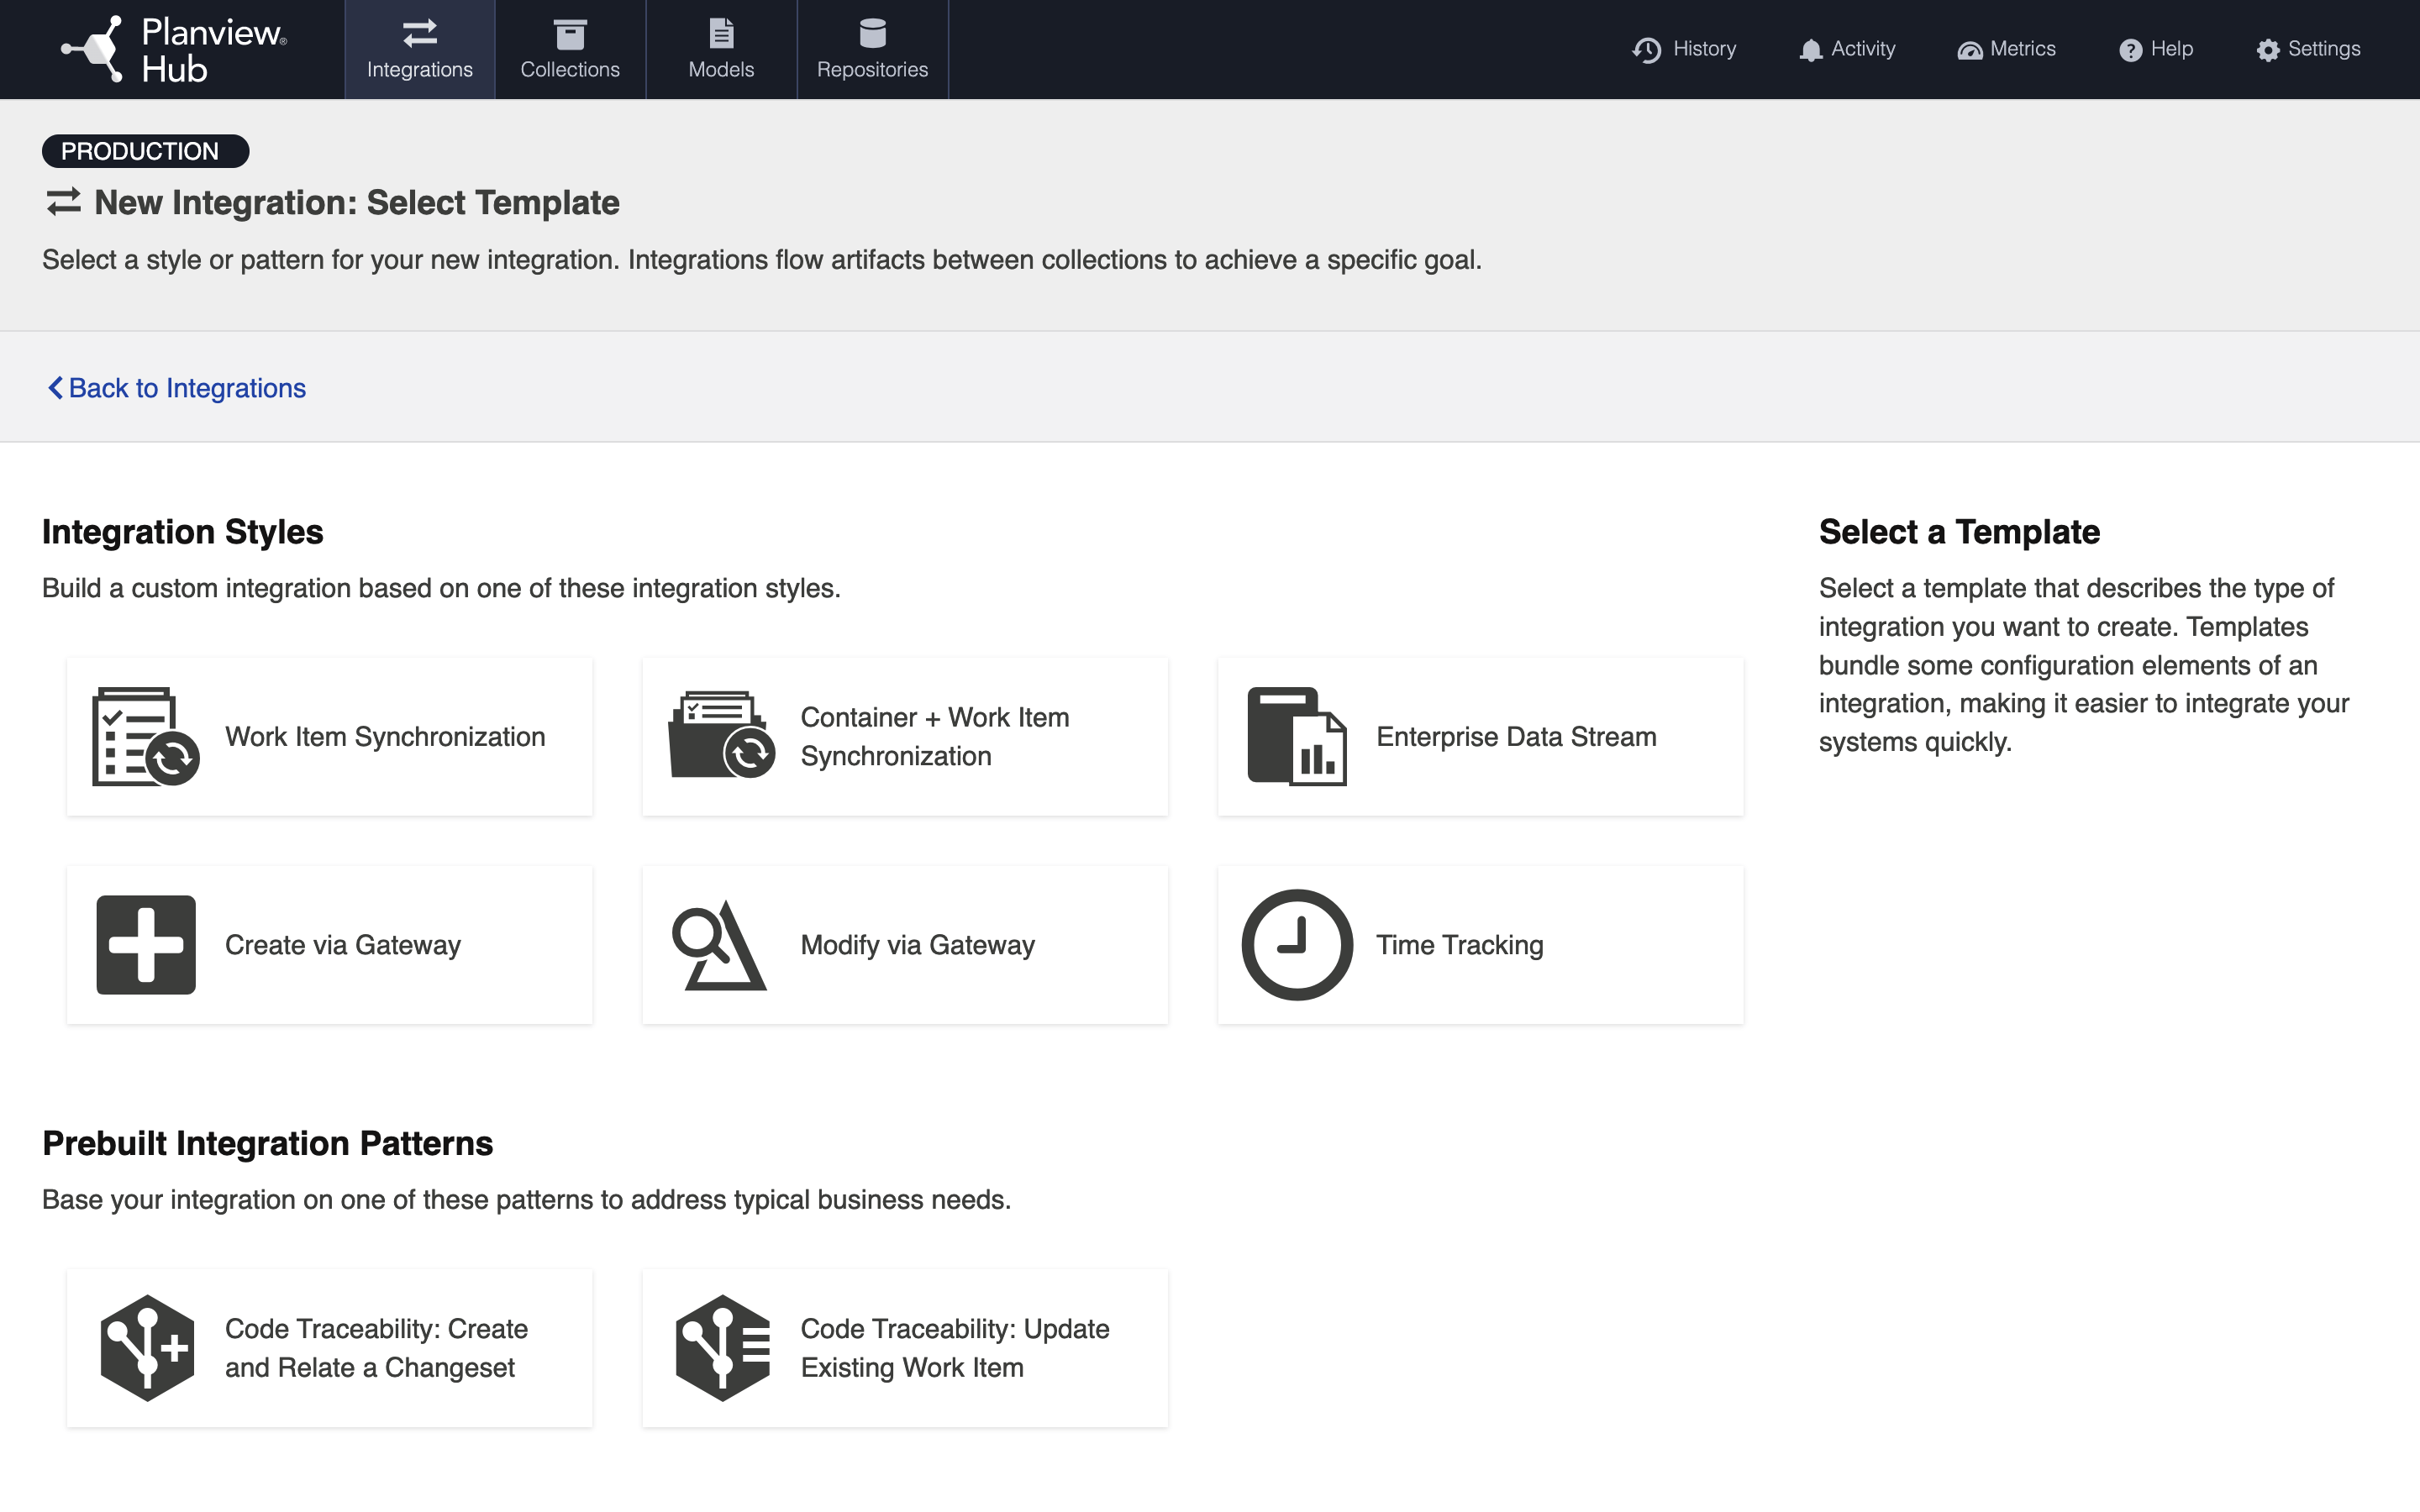
This will bring you to the New Integration screen:
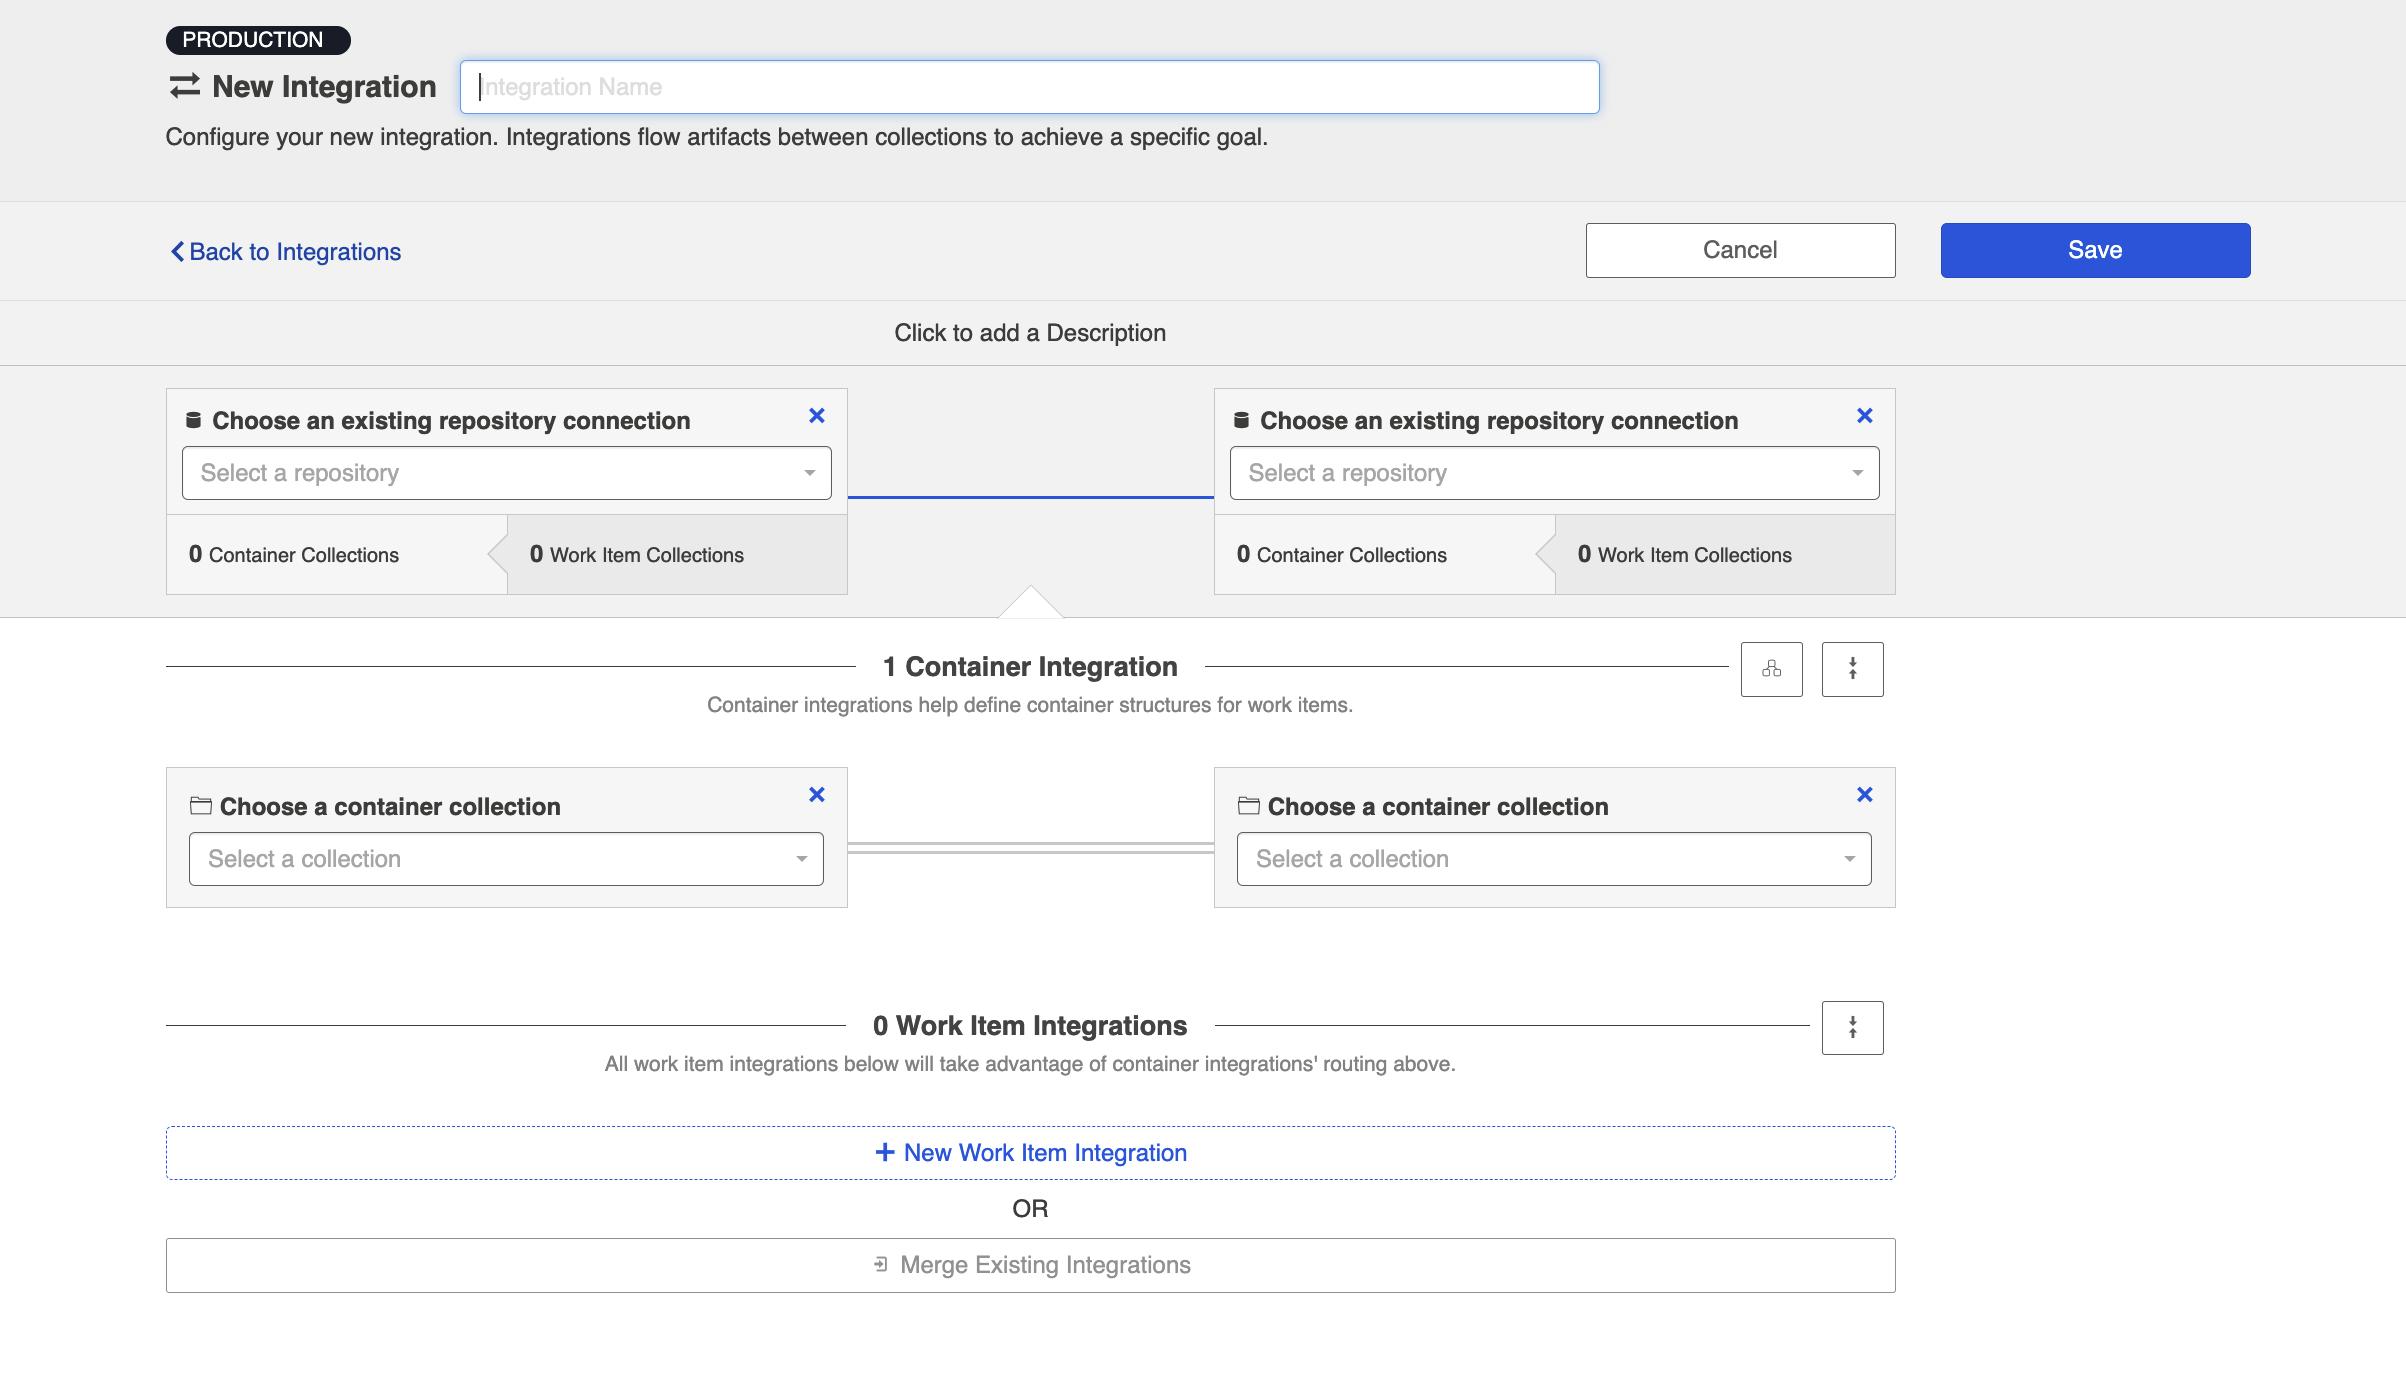
Name your integration and select your repositories and container collections, and then click Save.
Tip: Clicking ctrl+s on Windows and cmd+s on macOS will save your integration.
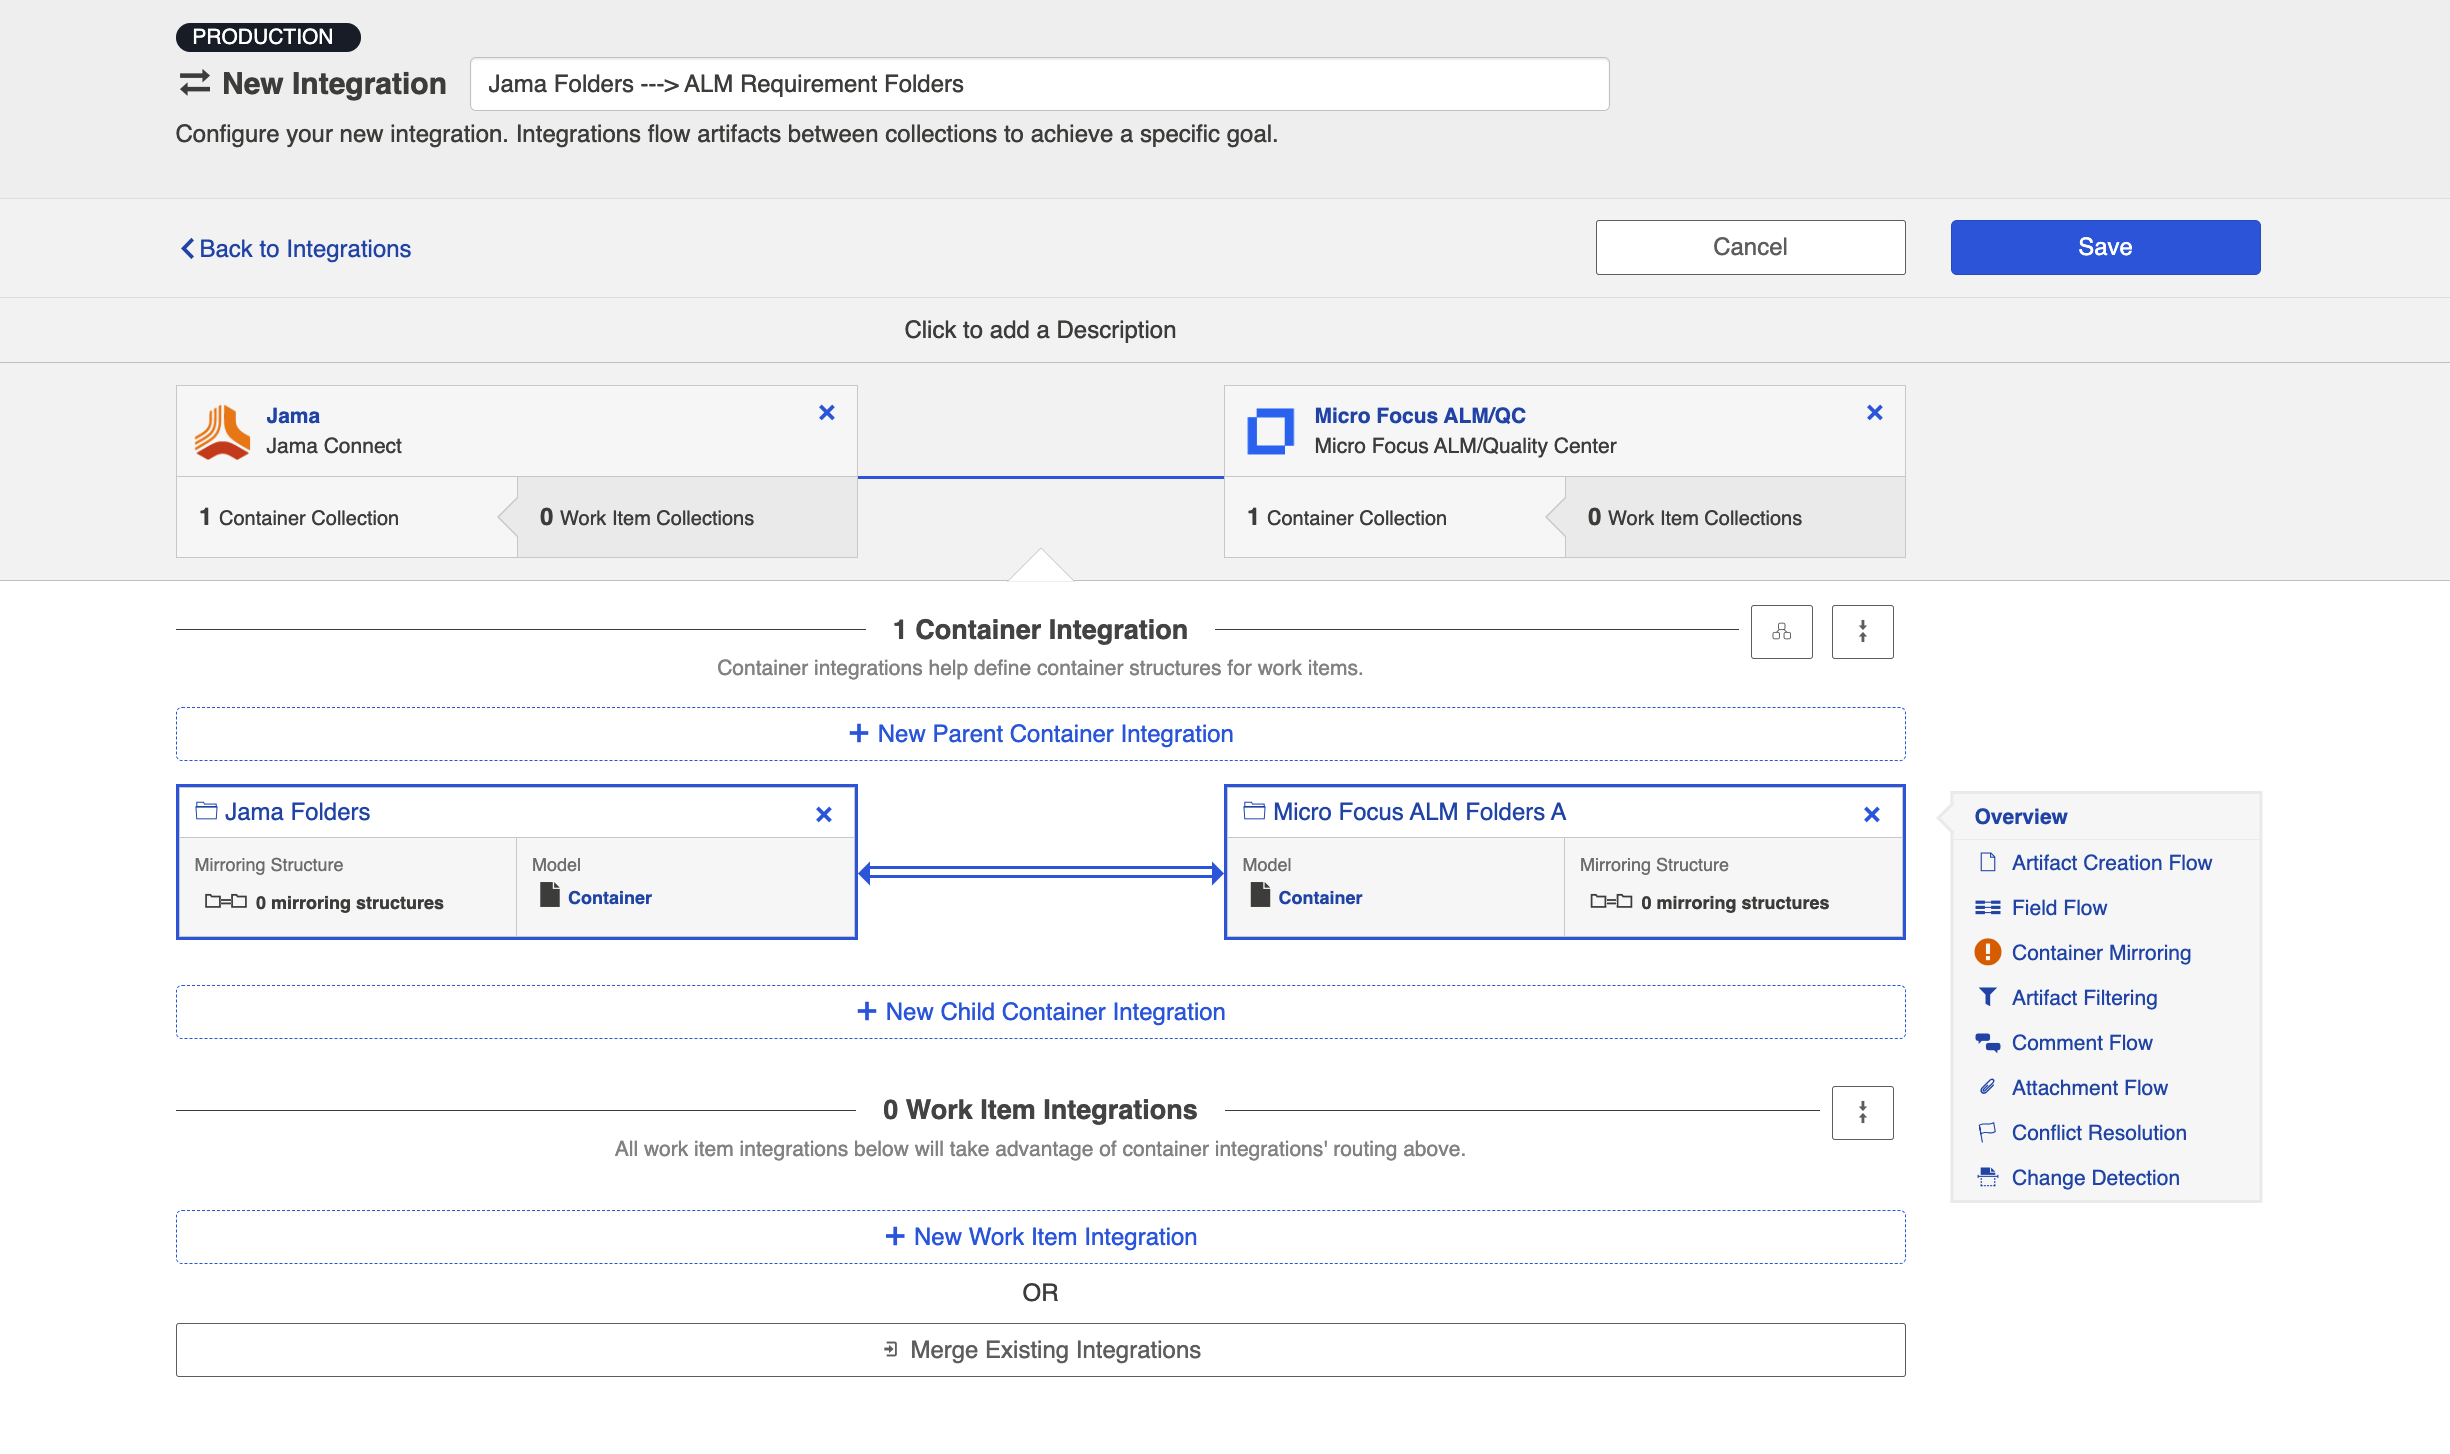
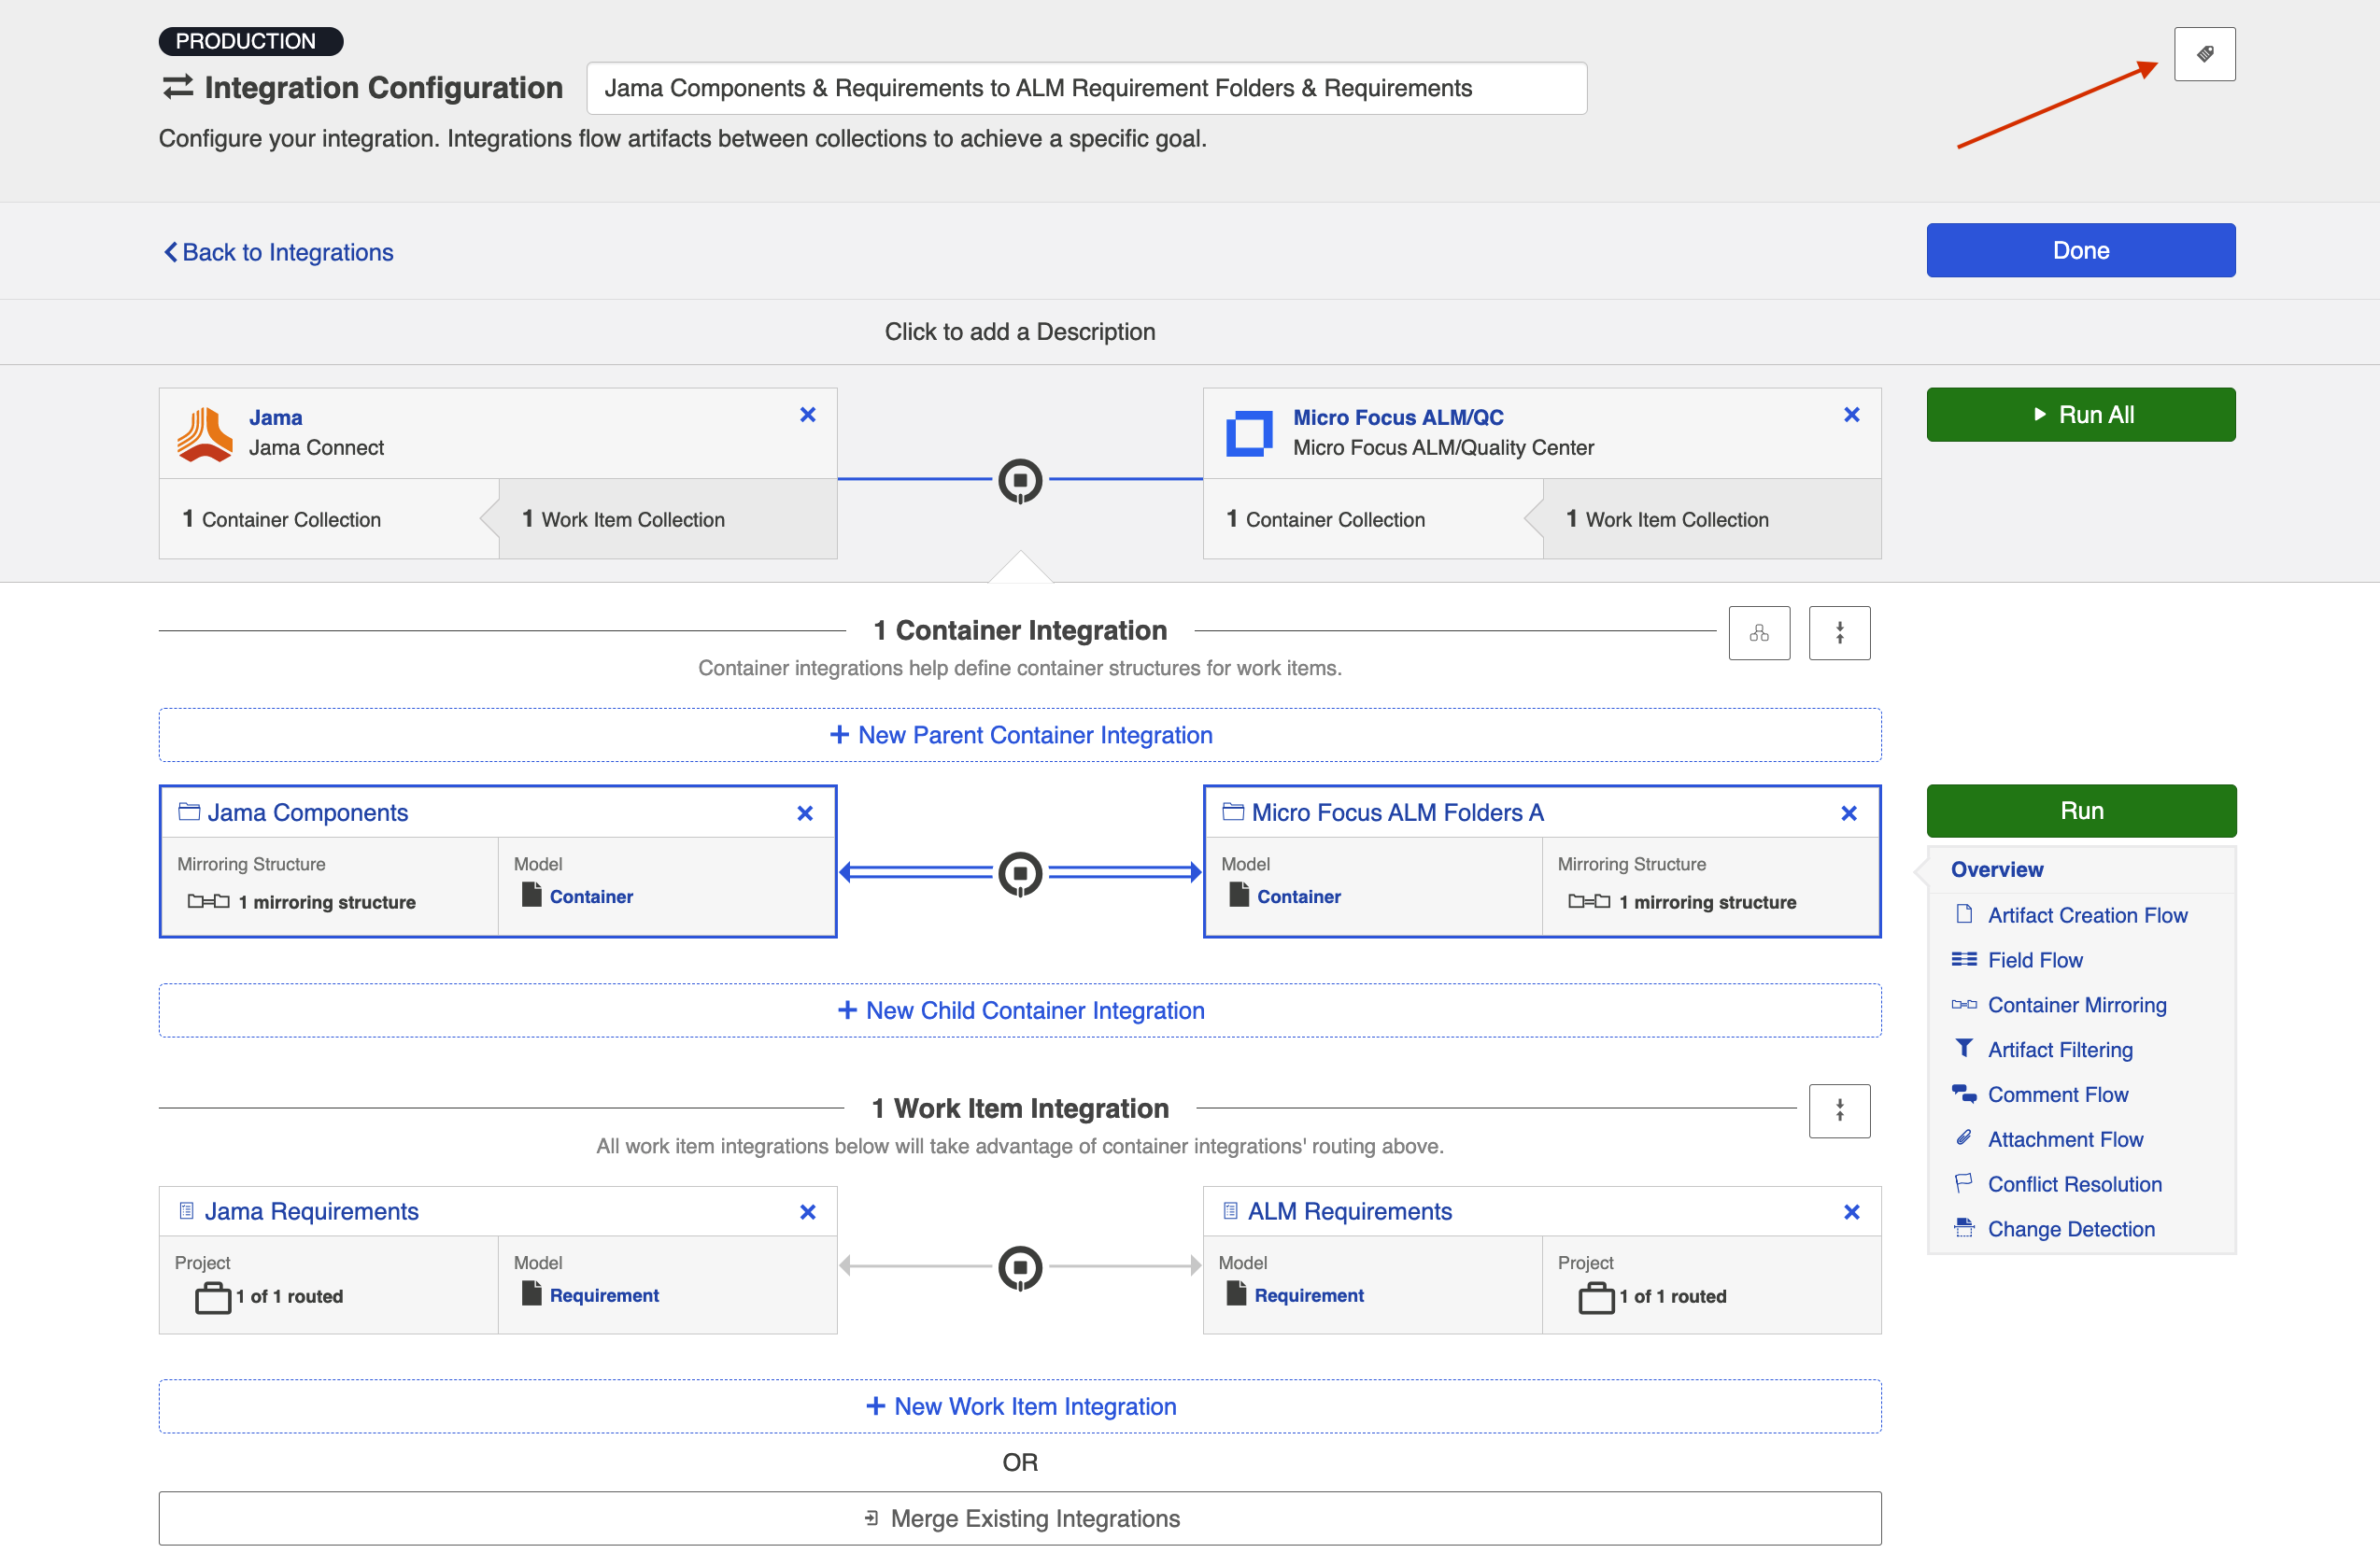
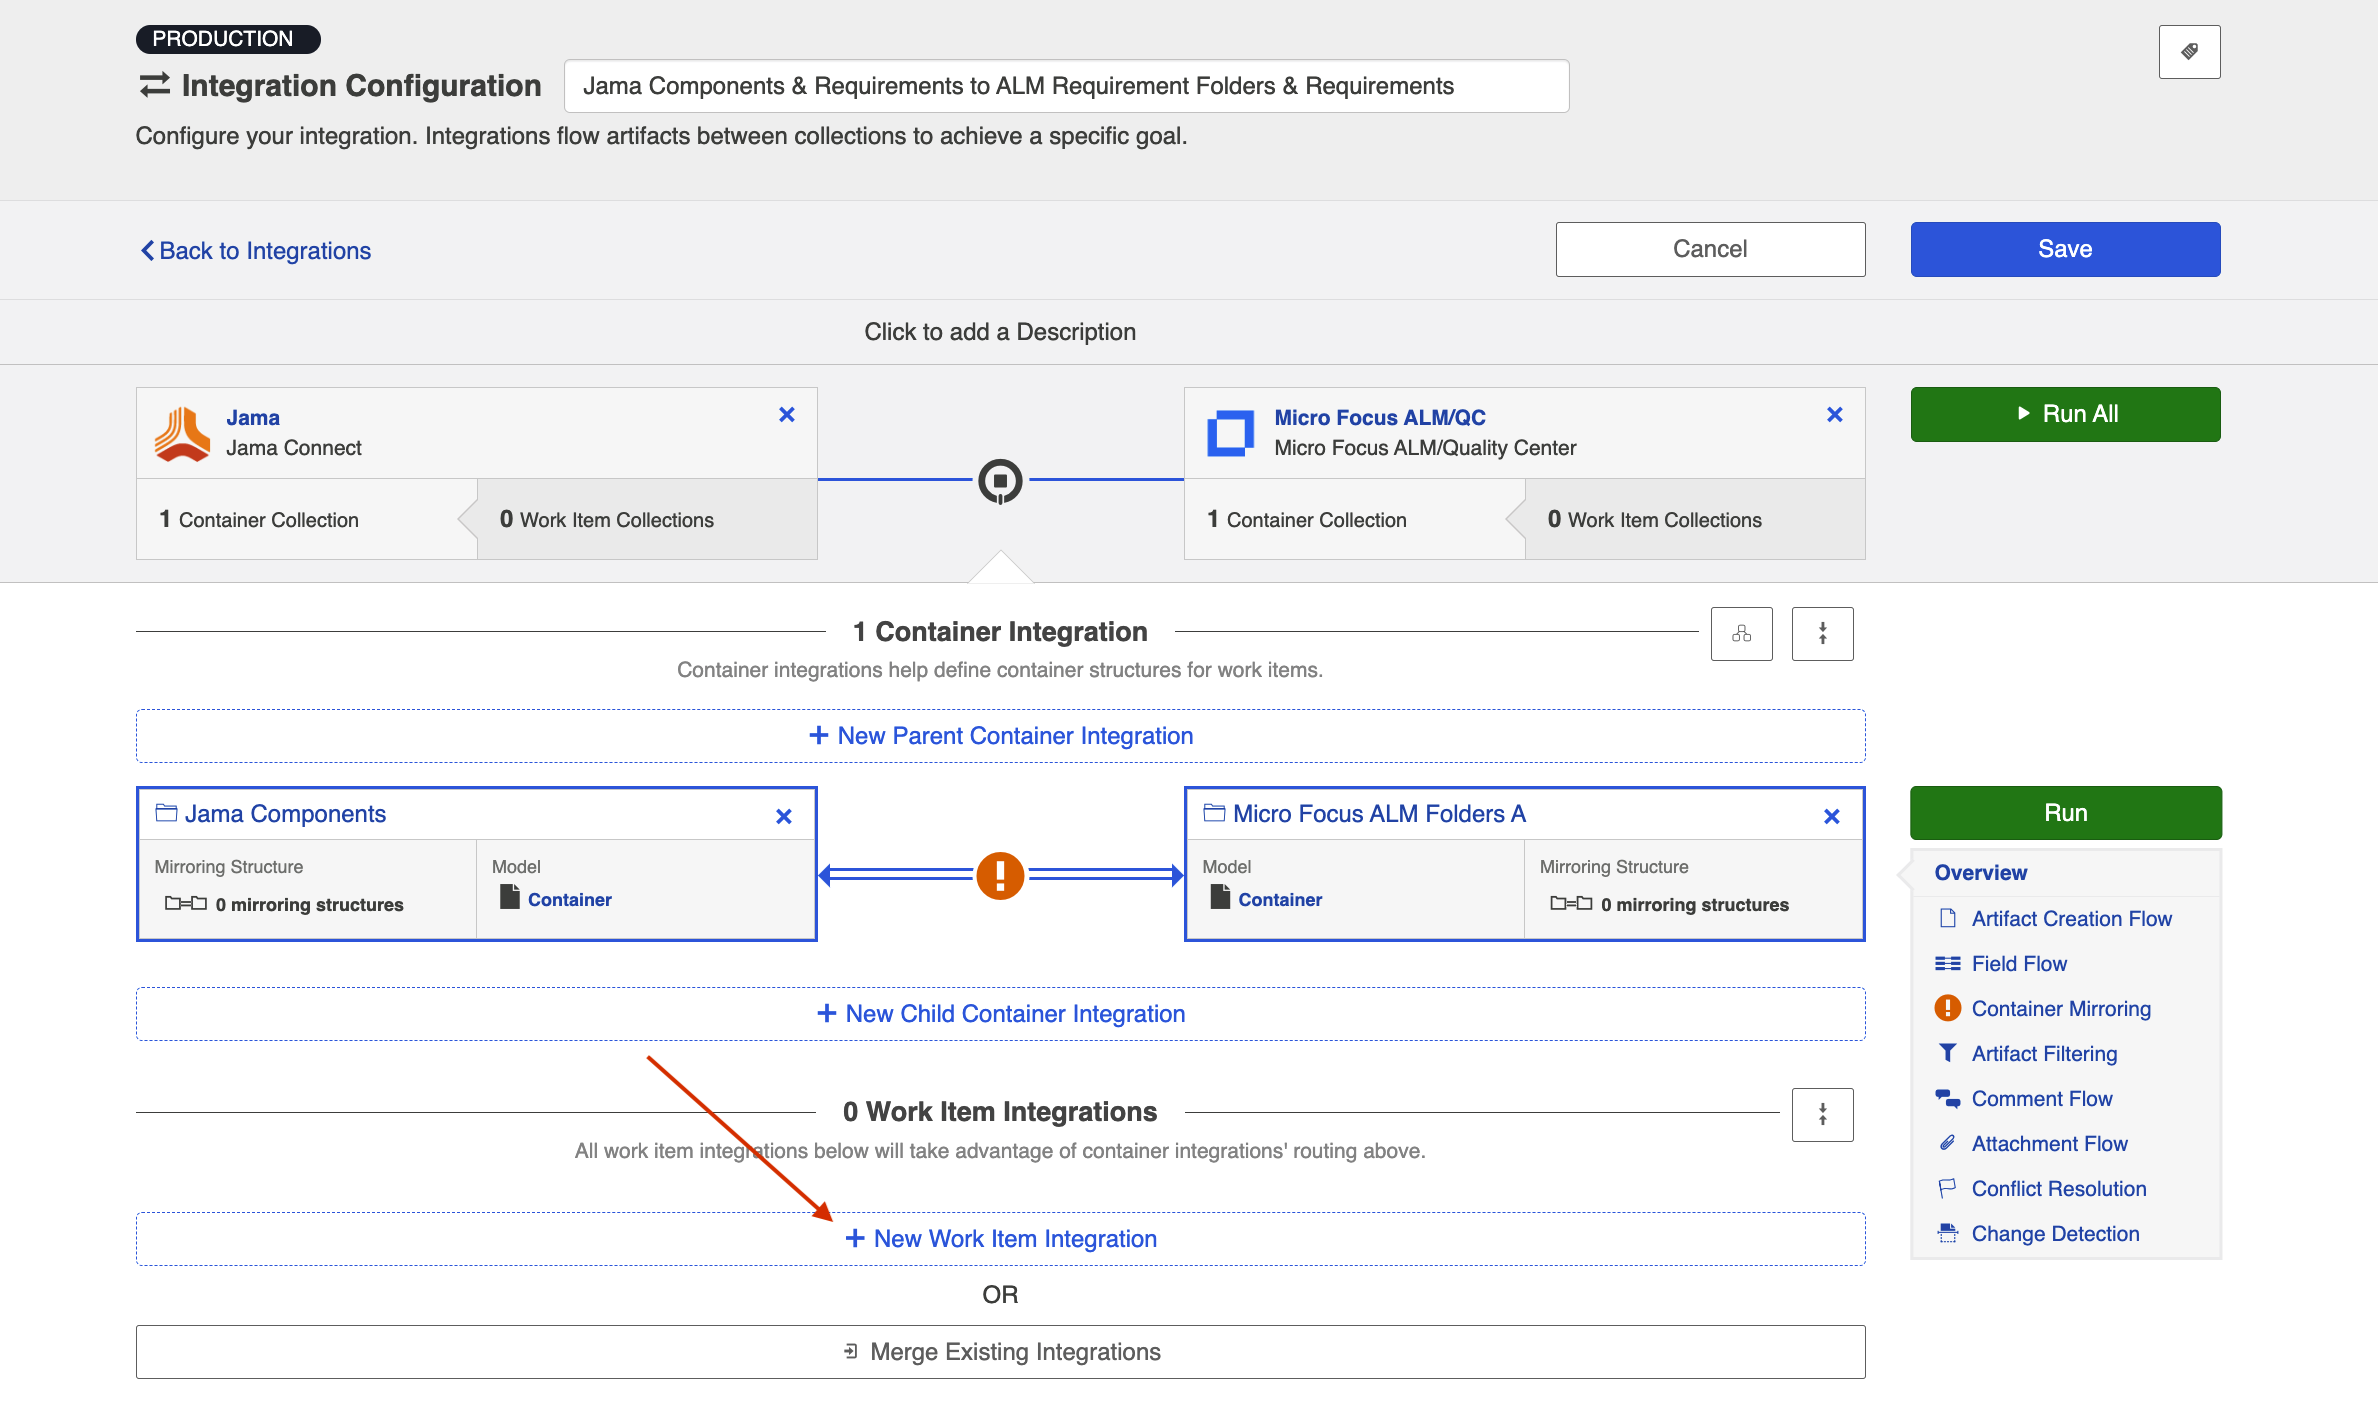
You can click the Overview link on the right side of the Integration Configuration screen to get to the main display page.
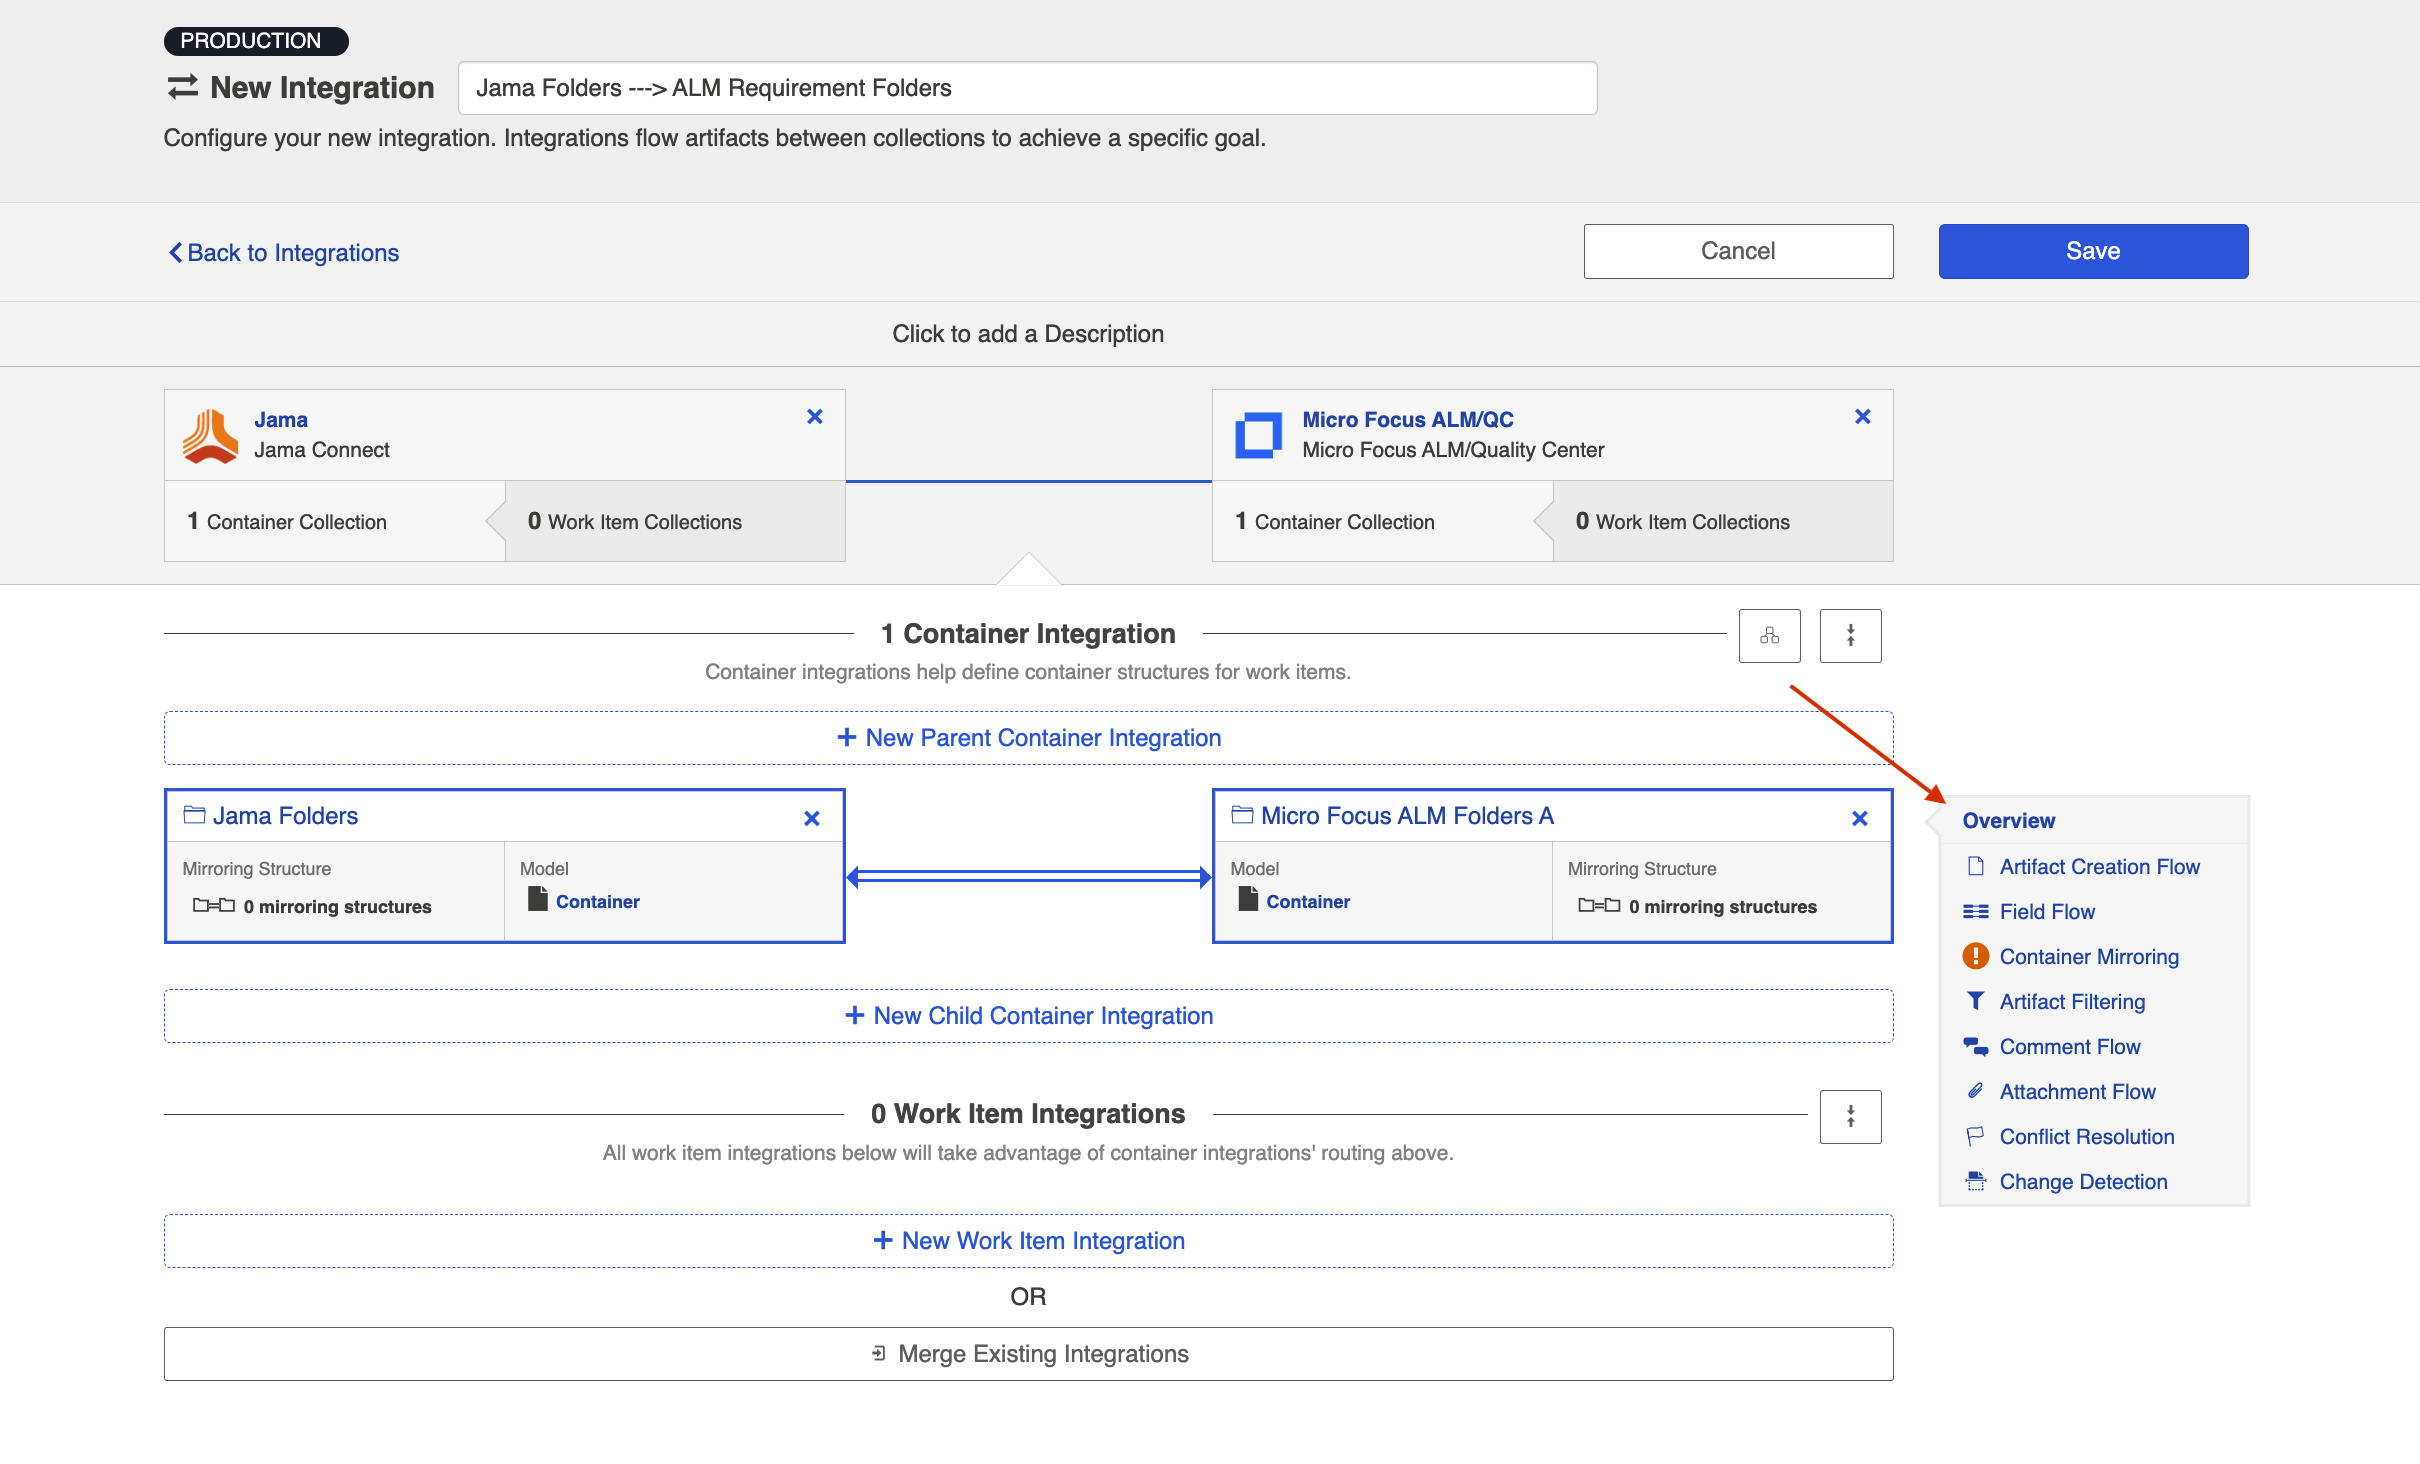
From this page, you can configure many different components of your work item synchronization.
Configuring your Container Integration is very similar to configuring a Work Item Synchronization. Please refer to that page for details, while taking note of the key differences outlined below.
Artifact Creation Flow
This process is the same as it is for a Work Item Synchronization. Refer to the Artifact Creation Flow page for details.
Field Flow
Similar to a Work Item Synchronization, you can click Field Flow to configure how fields will flow in your Container Integration. Typically, container integrations will flow significantly fewer fields than a work item integration.
From the Field Flow screen, you can see the names of the mapped repository fields for each collection on the far left and right, with the model fields displayed in the middle. By default, model fields without mapped repository fields are hidden. You can see all model fields by toggling the Show unmapped fields checkbox. Constant values will be identified by a gray box and the constant value icon.
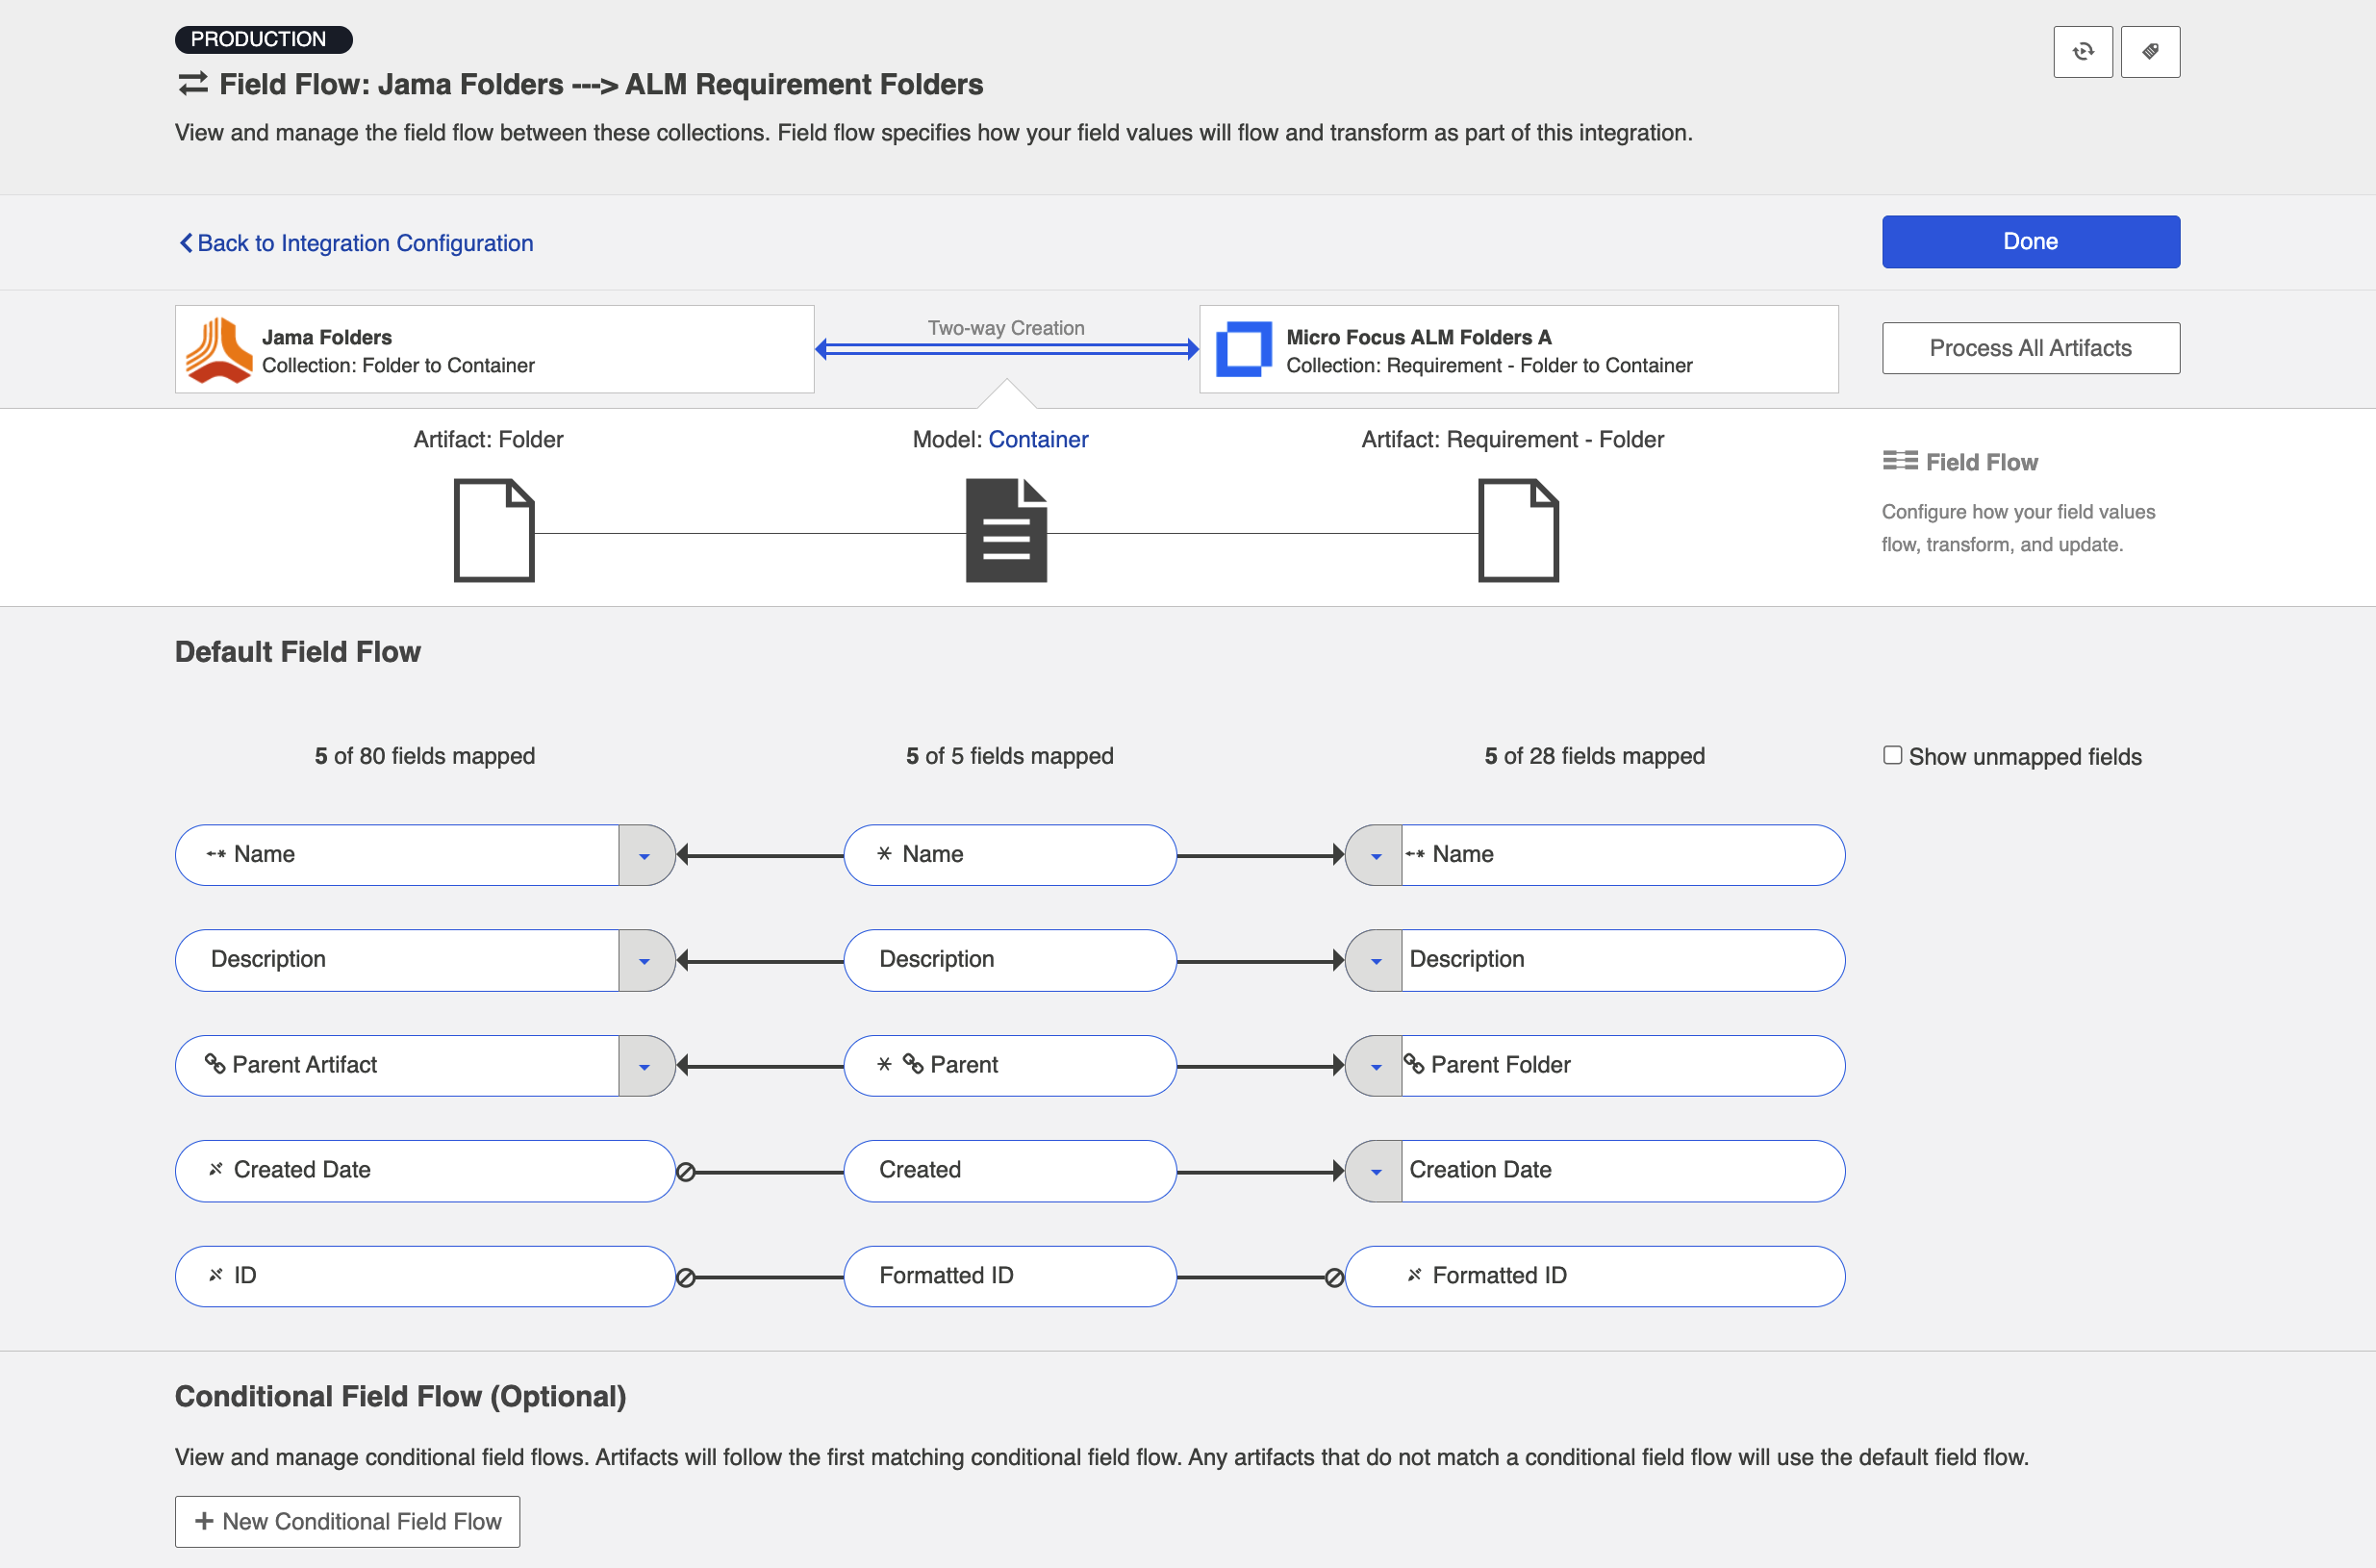
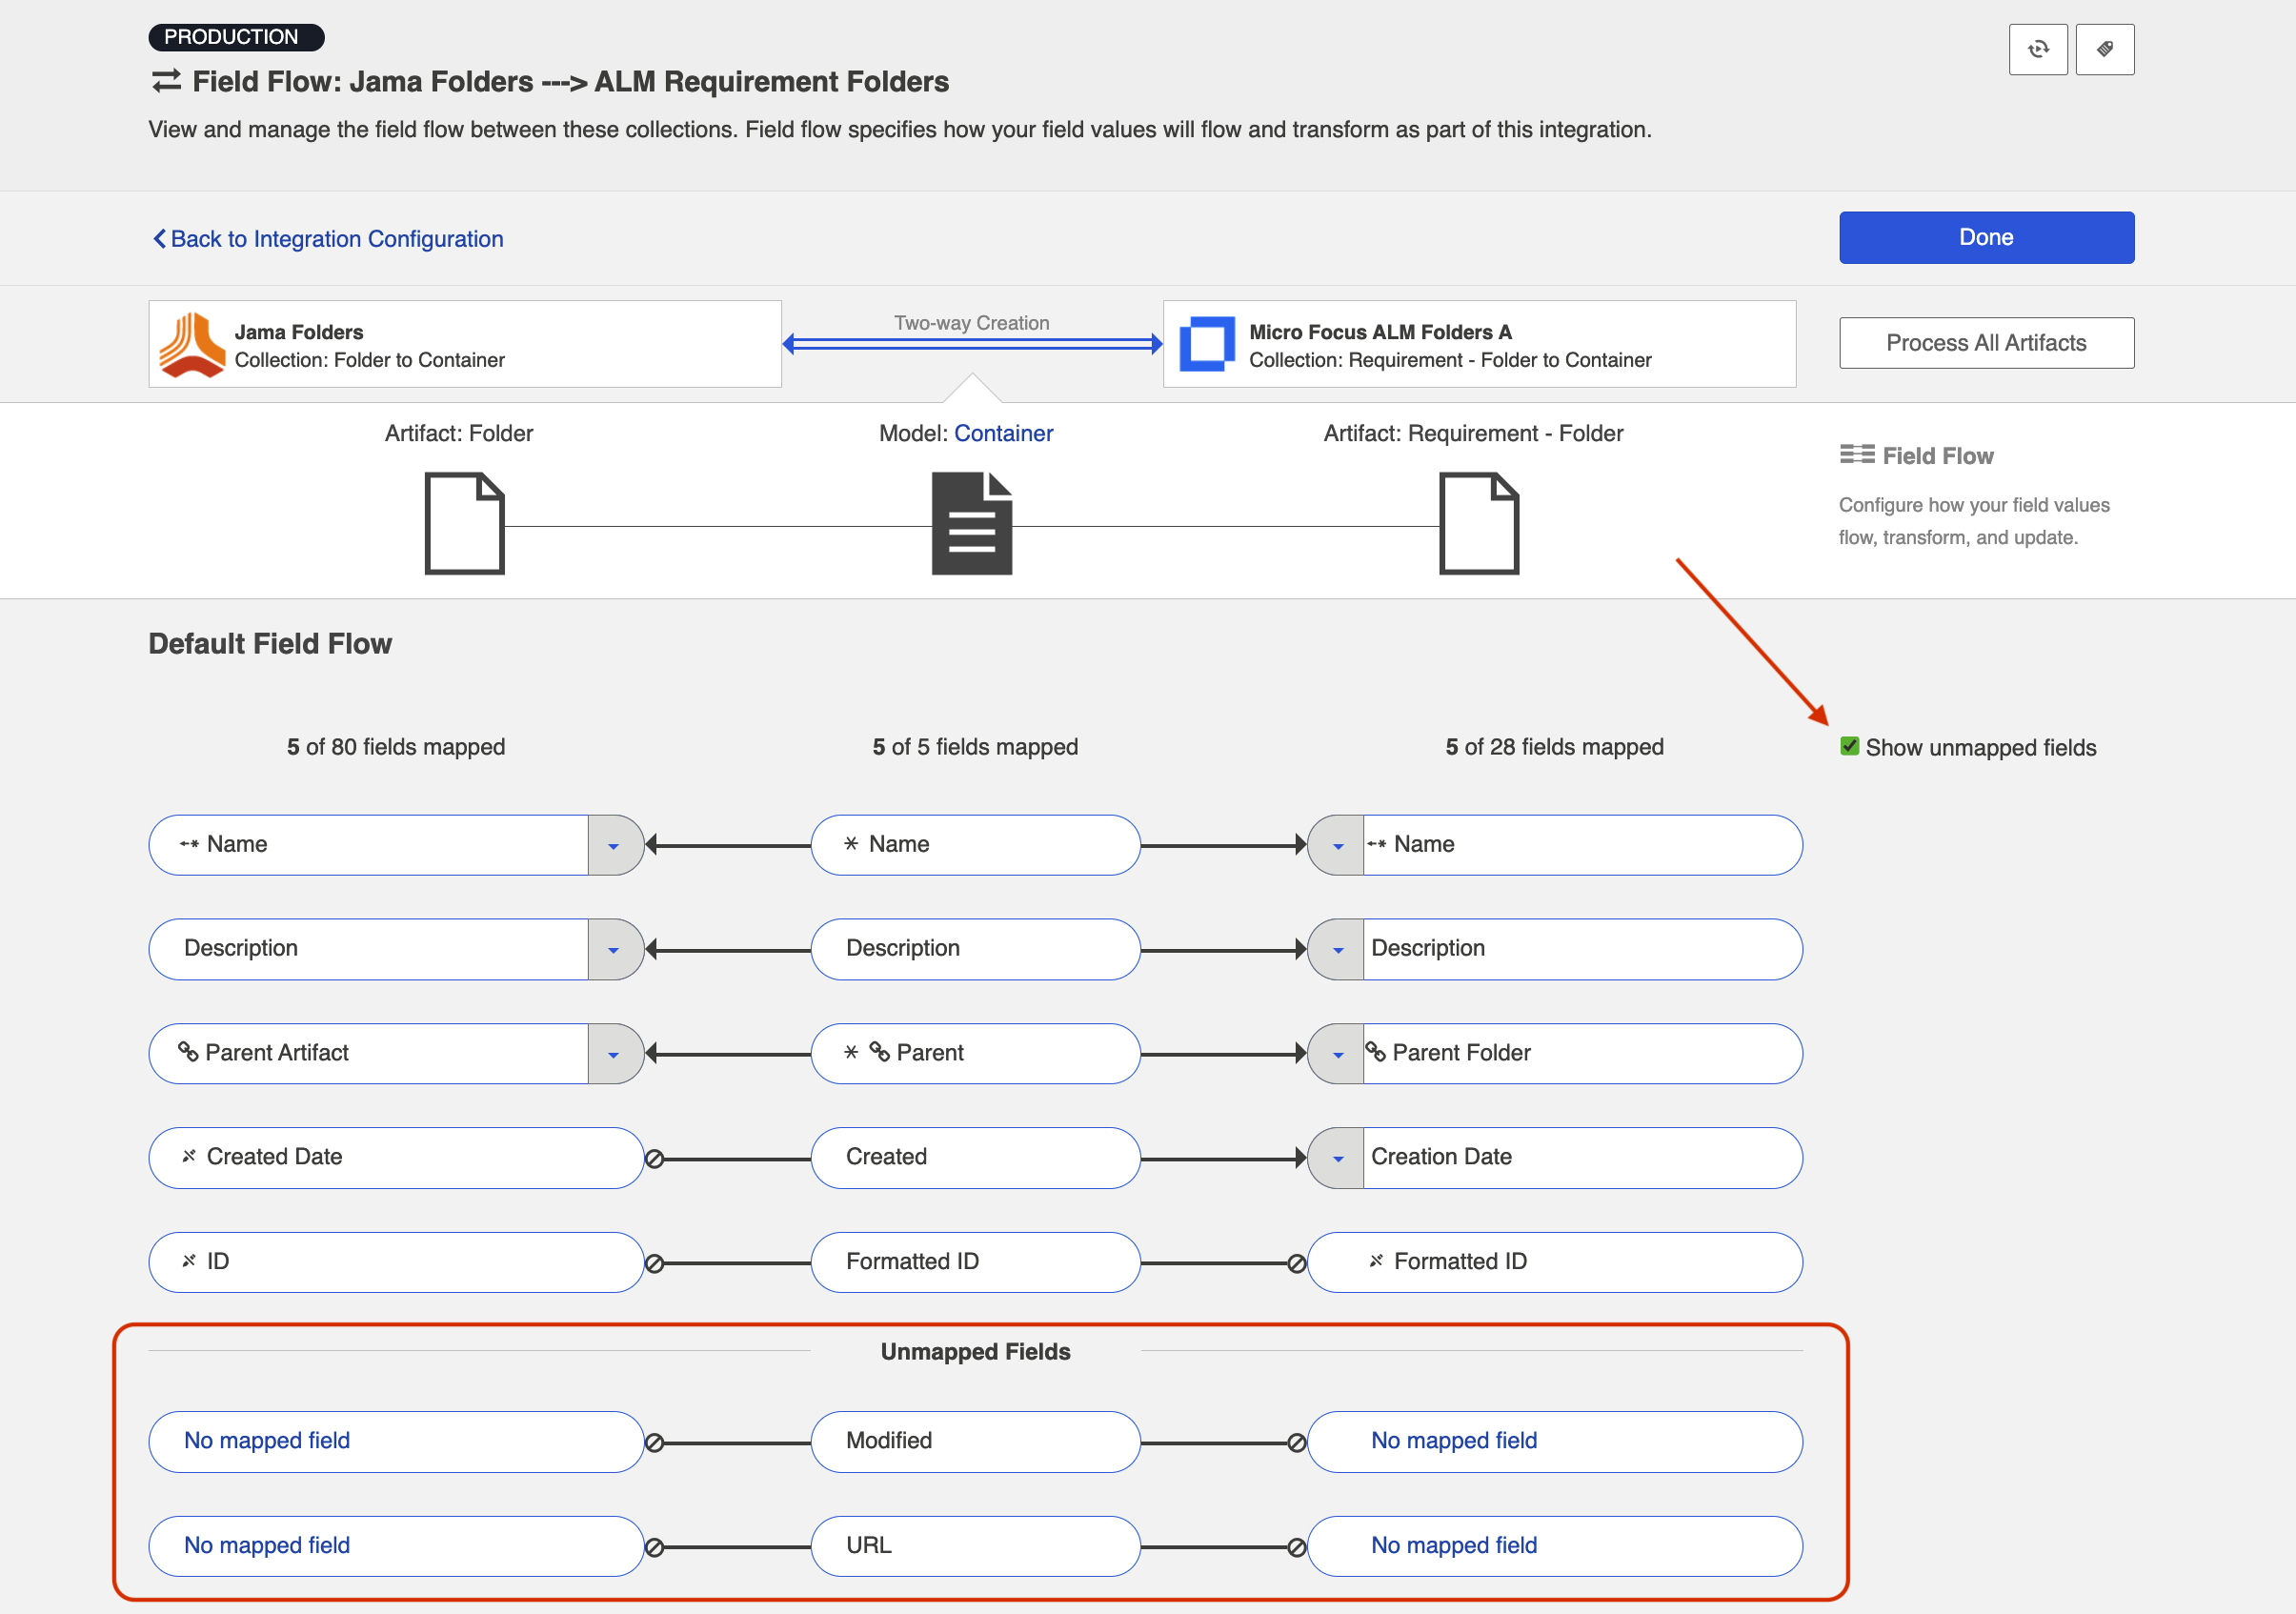
You may also notice a warning reminding you to map the parent field in each container collection. Doing so will ensure that nested containers flow to your target collection along with the appropriate hierarchical structure.
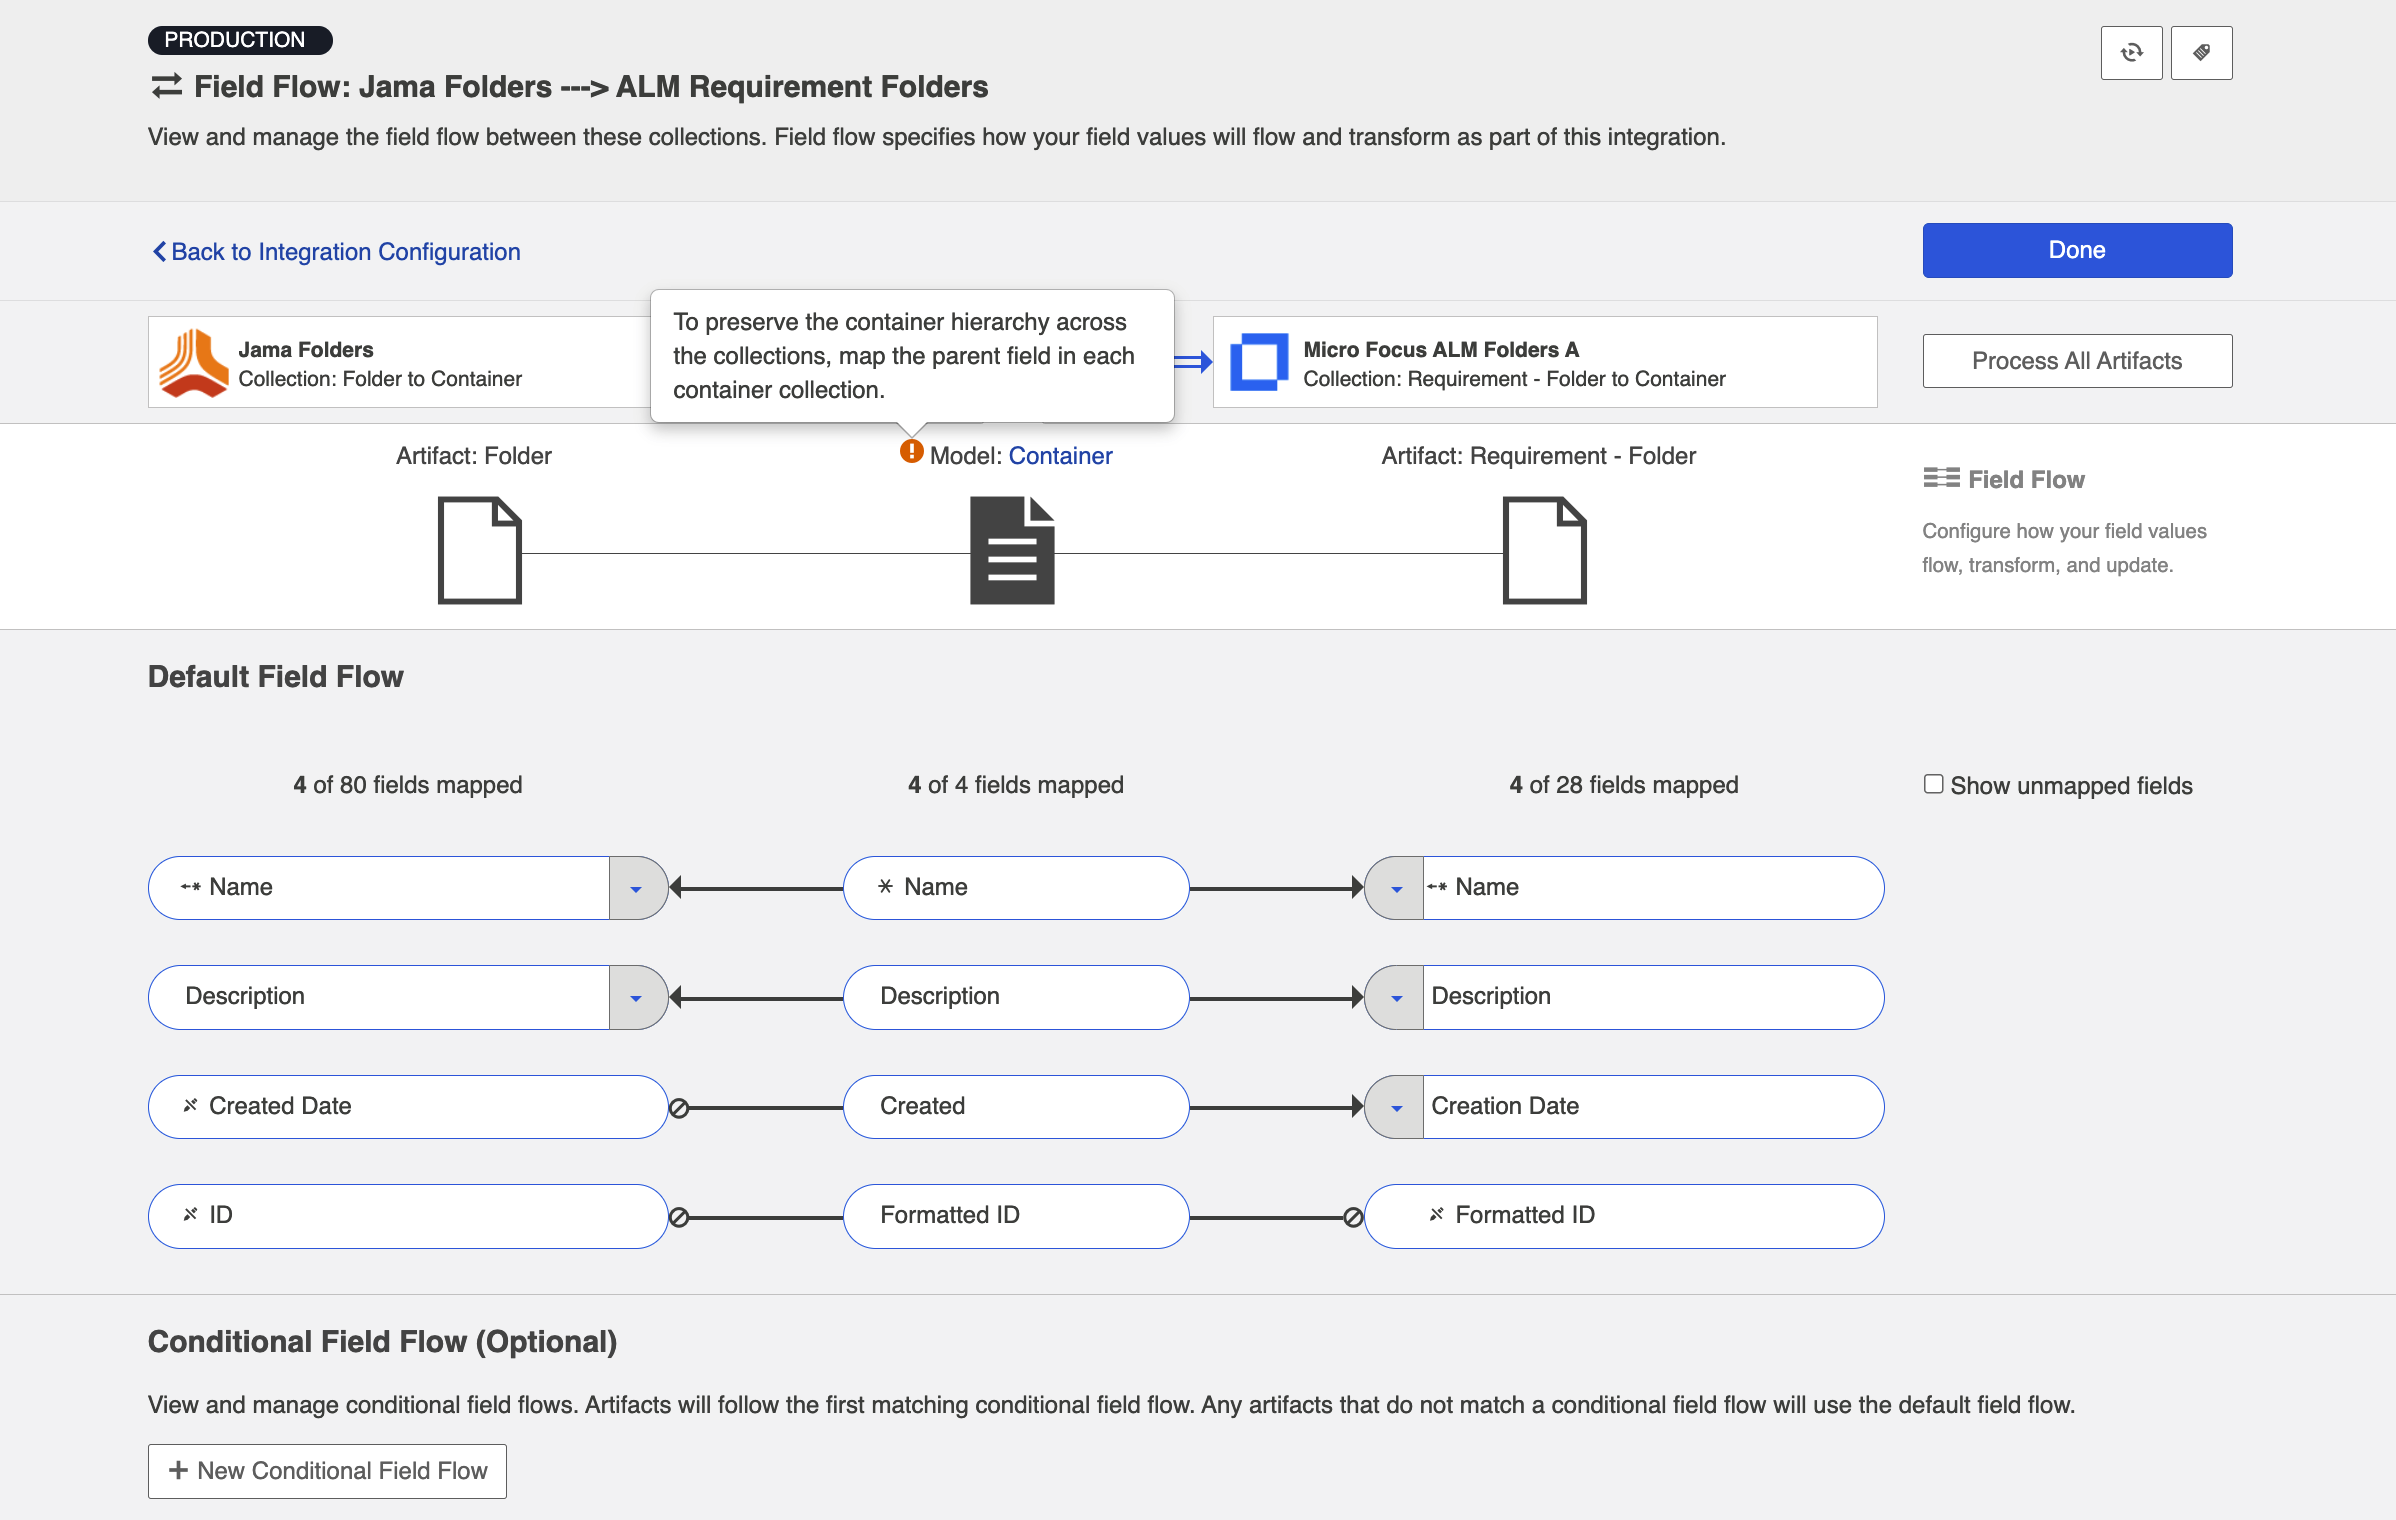
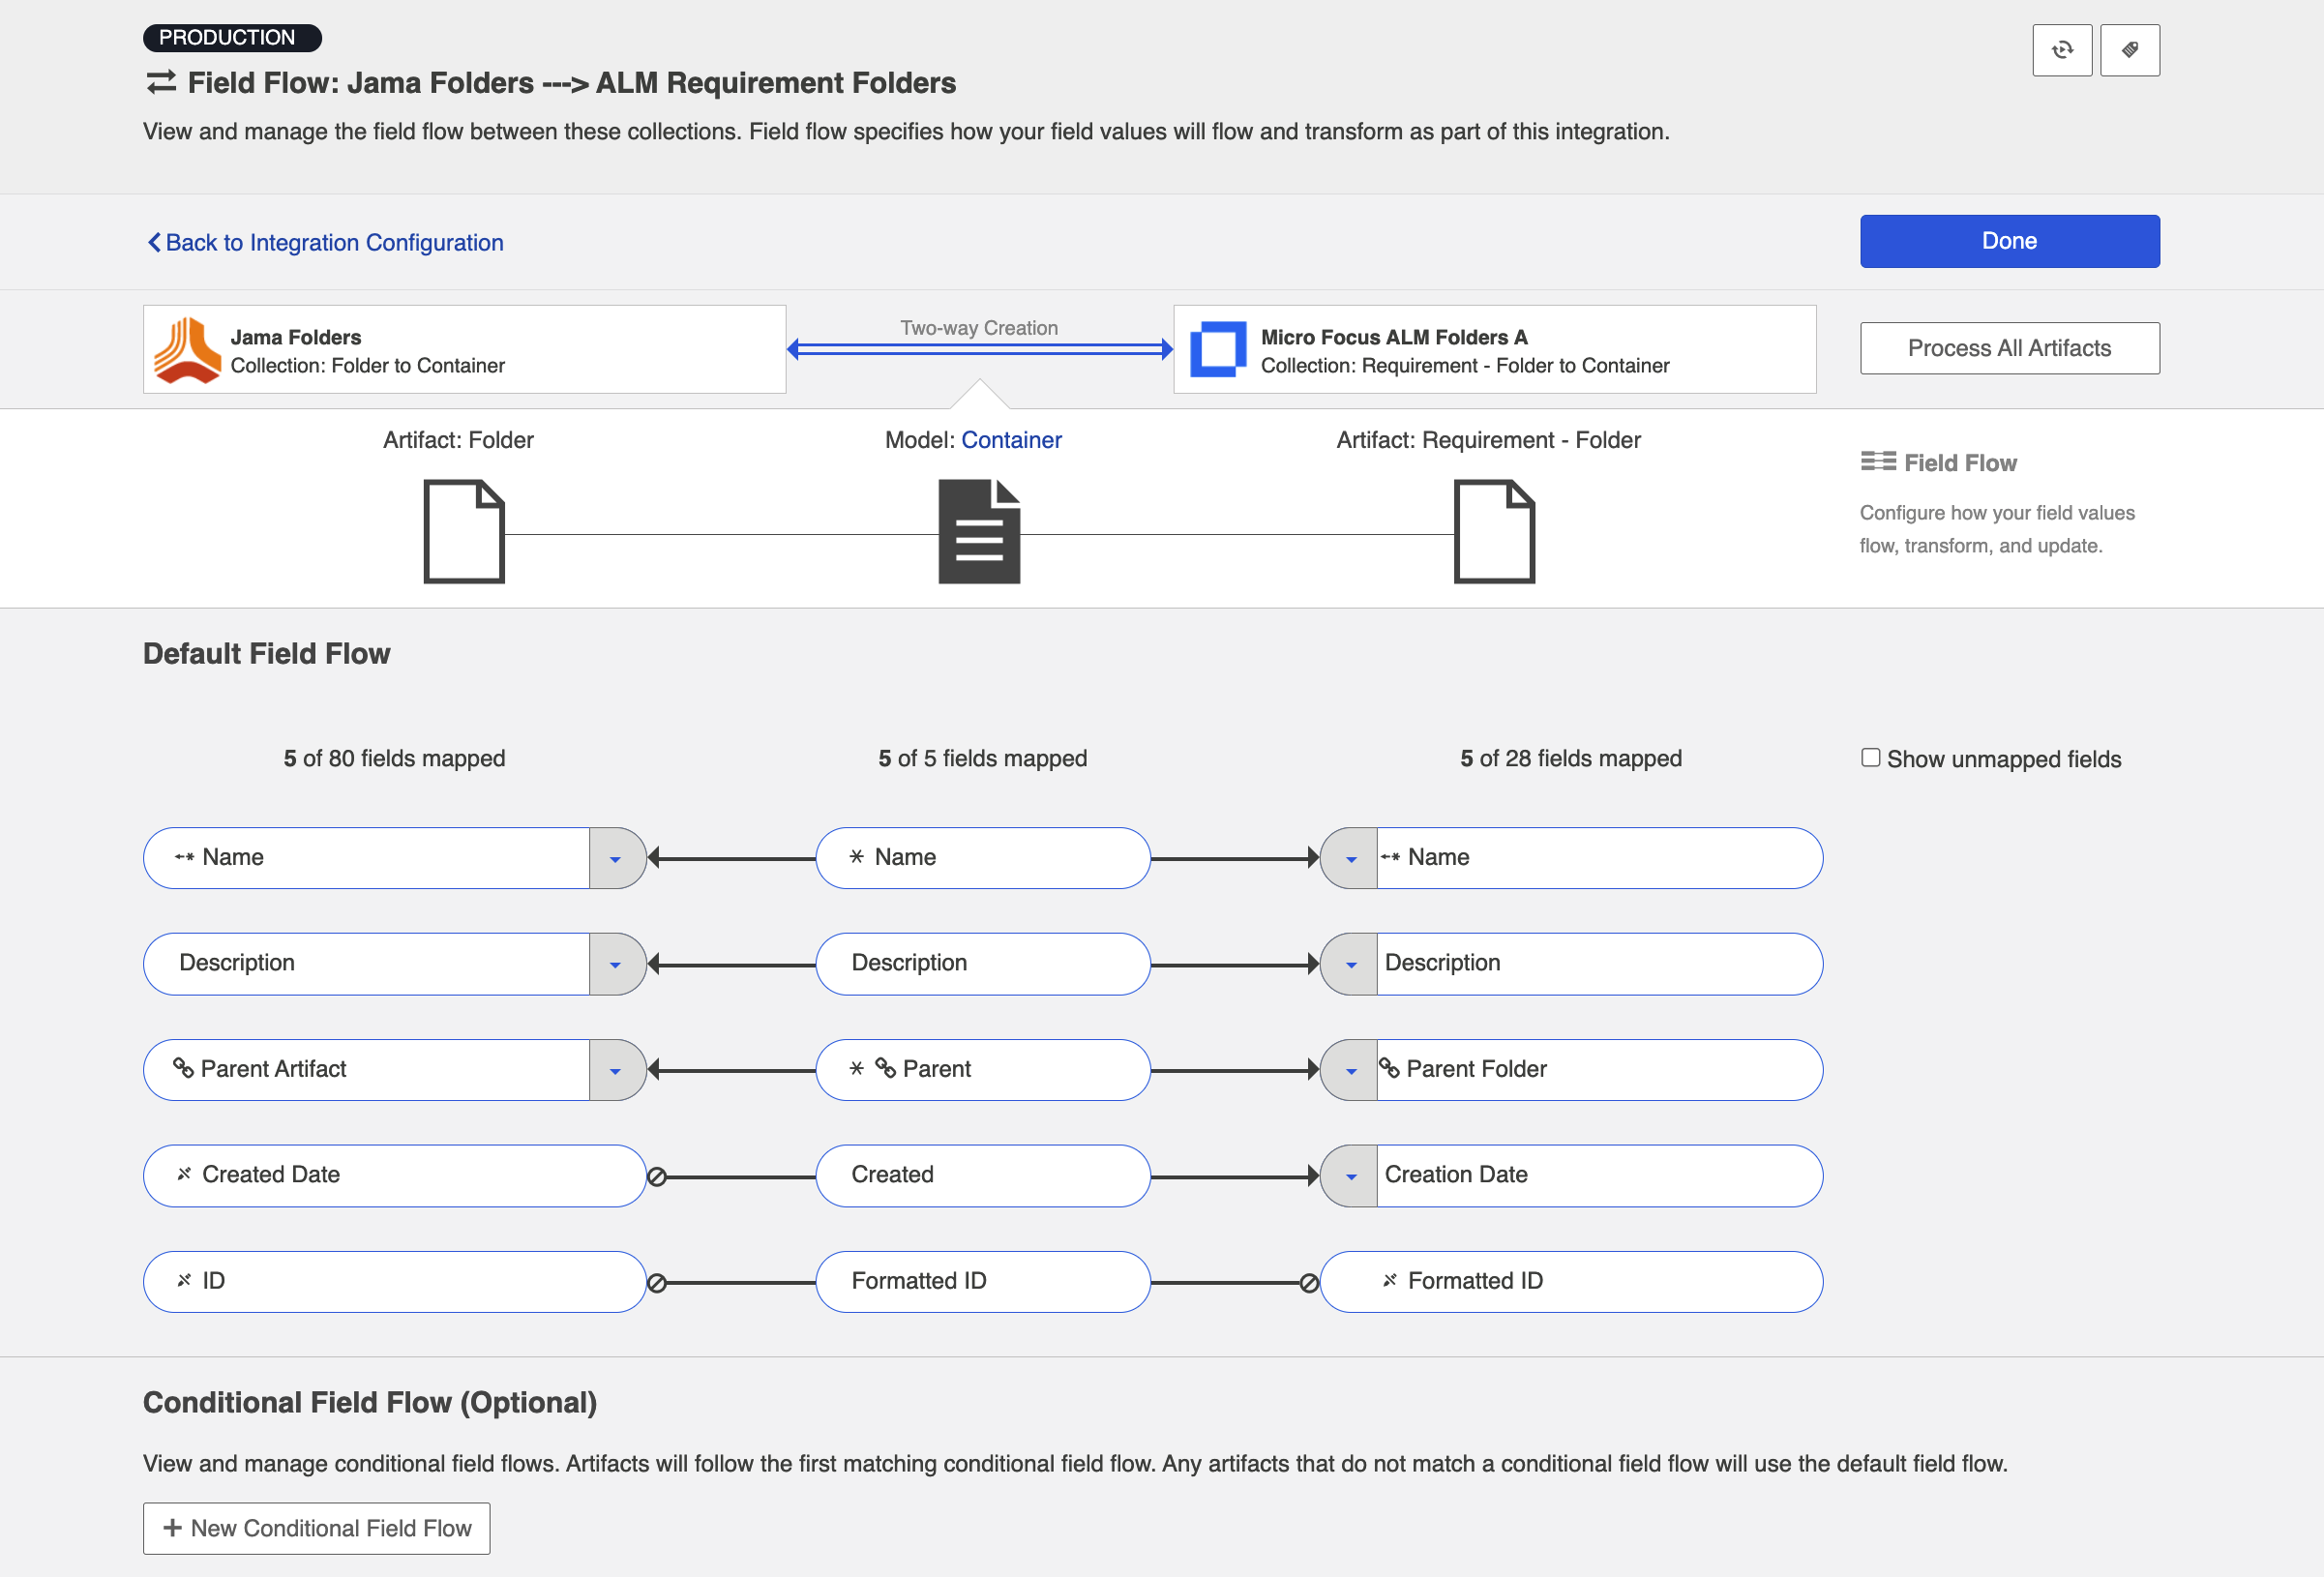
Once you map the Parent field in each collection appropriately, you'll see that the warning disappears.
Container Mirroring
Container Mirroring is similar to the concept of Artifact Routing (within a Work Item Synchronization), but it has some key differences.
On the Container Mirroring screen, you'll see the hierarchical organizational structure contained within each collection. Select the desired top level container on each side. Once joined, Hub will know to mirror the container structure underneath in the target collection.
Note: The container structure underneath the top level container will not display in Hub unless those container levels can also serve as 'top level containers' for the purposes of mirroring.
Unlike Artifact Routing, Container Mirroring pairs must be one-to-one.

In the example above, any folders contained within the Online Store Requirements project in Jama will create corresponding folders in the Online Store Requirements project in Micro Focus ALM, and vice versa.
Once you've completed mapping your mirrored pairs, you'll see them in the grey sash below:
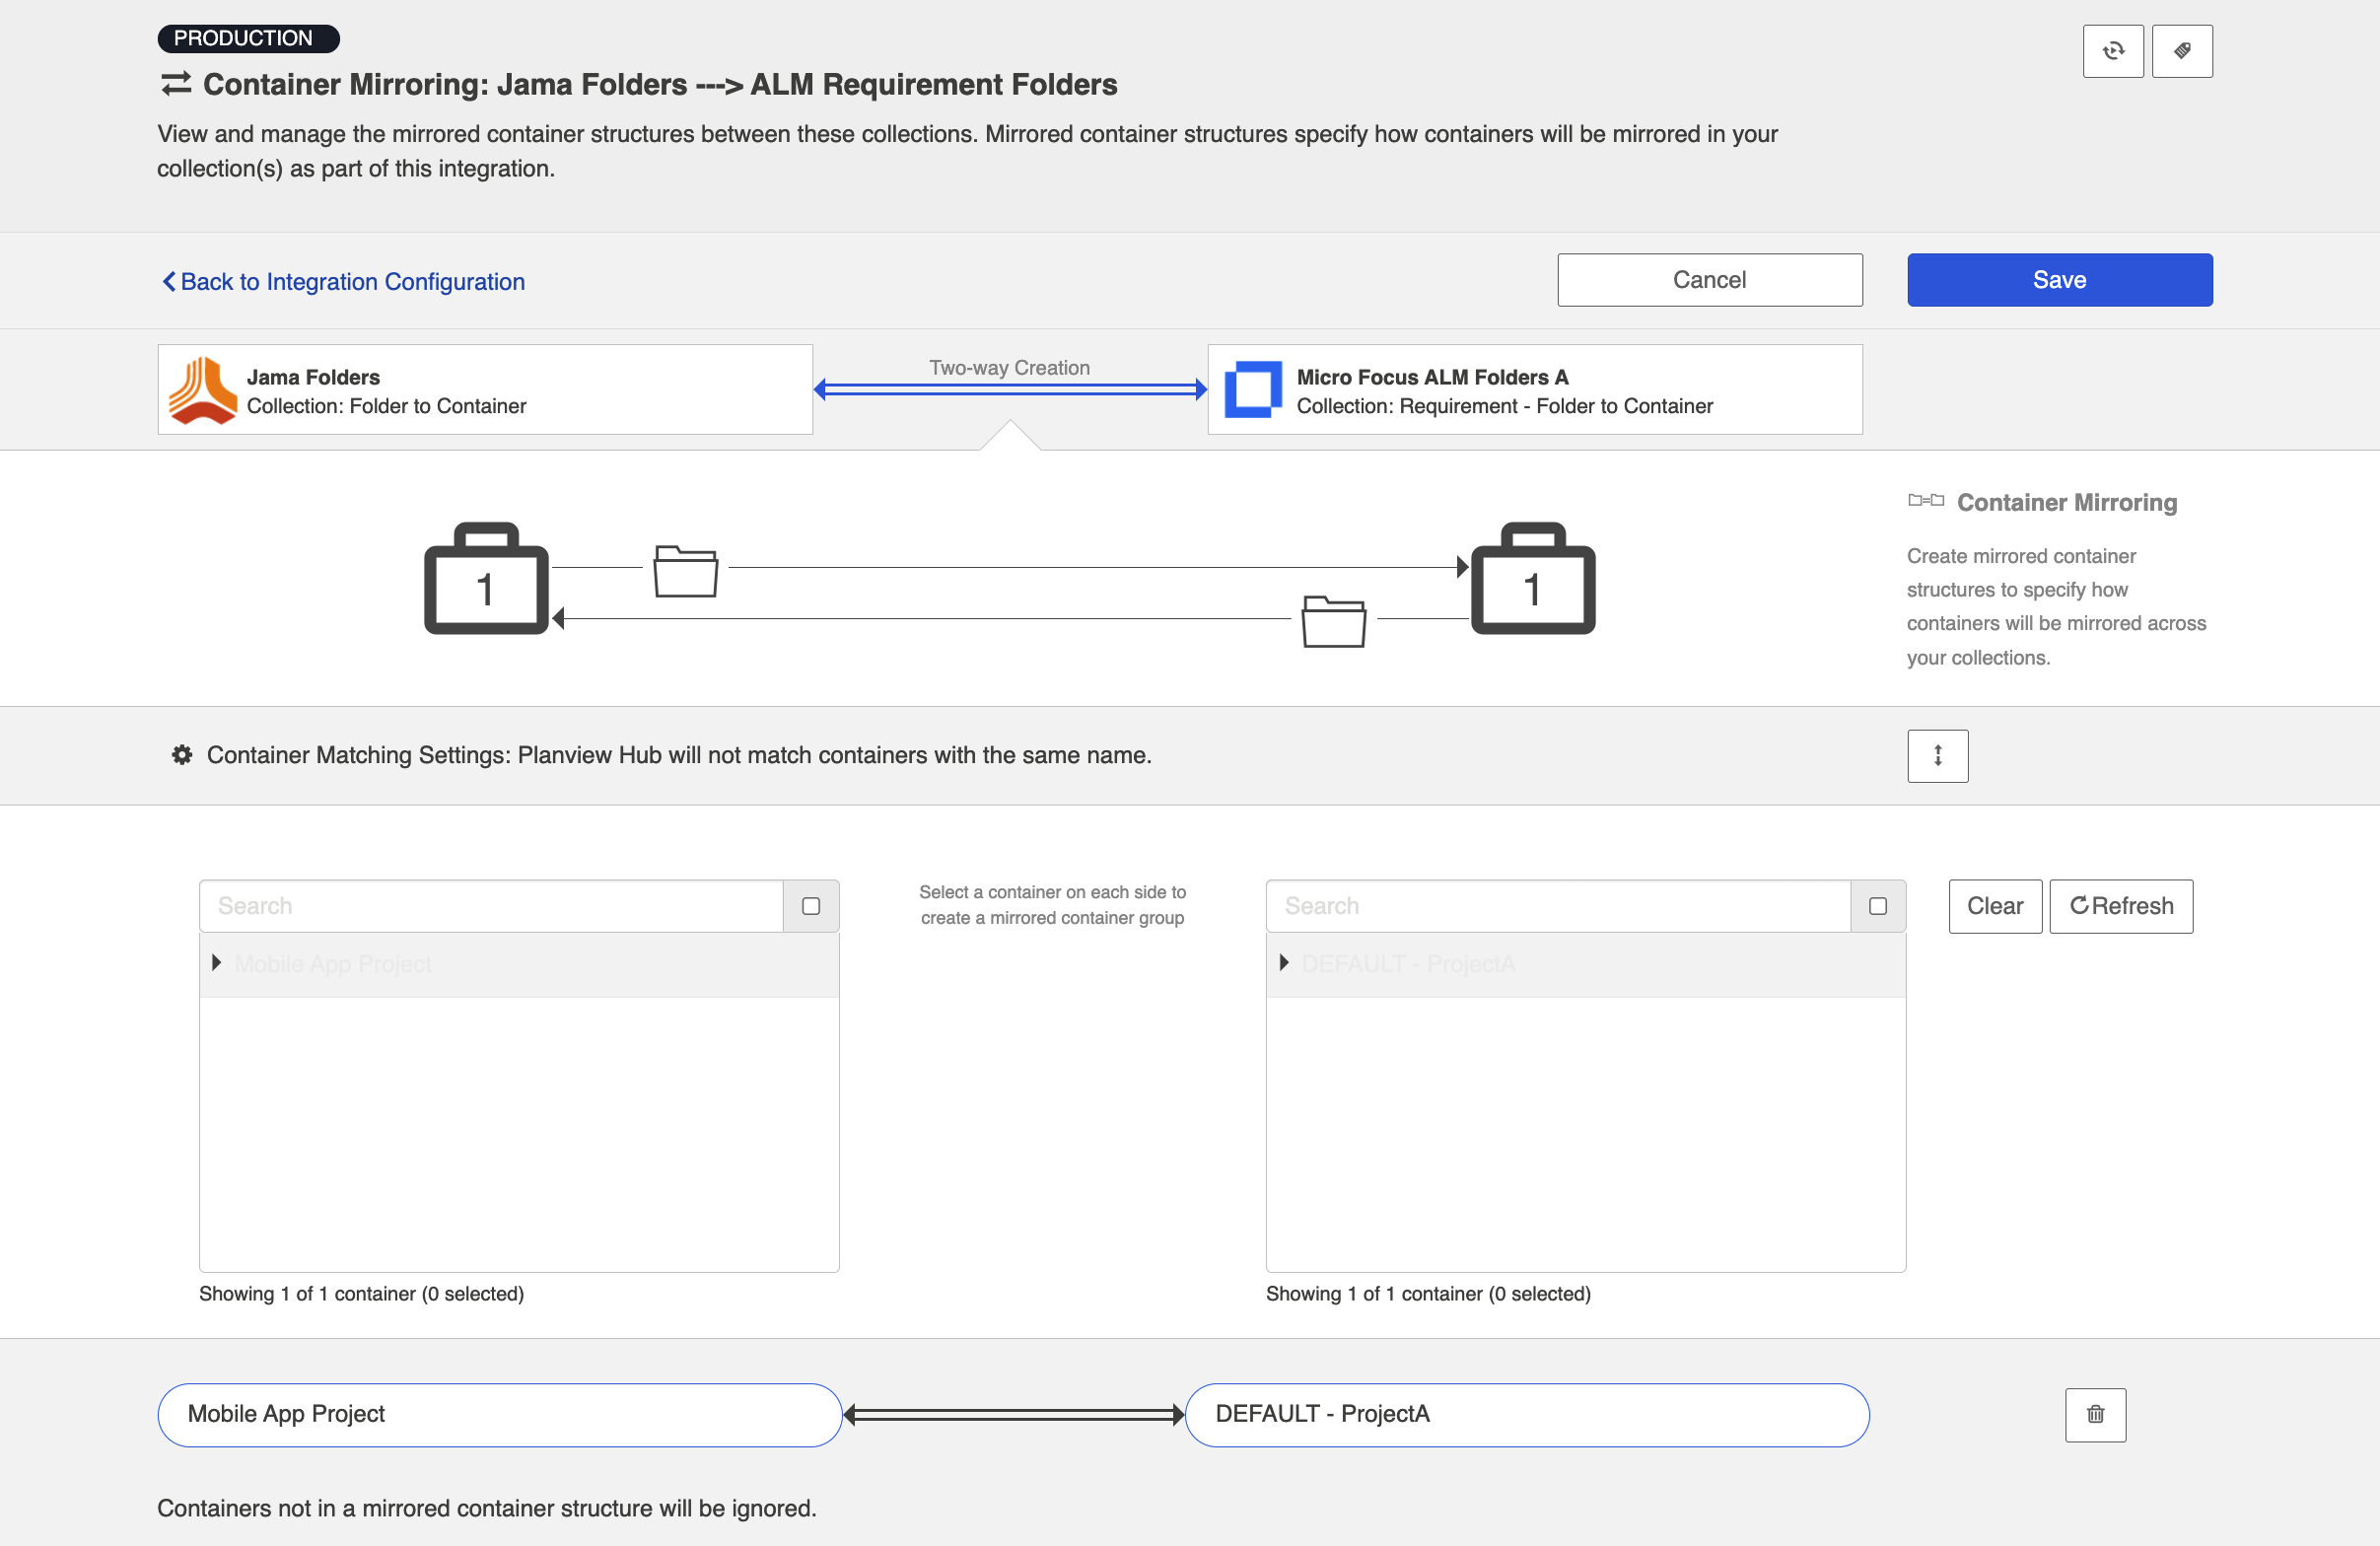
You'll also notice a Container Matching Settings sash.
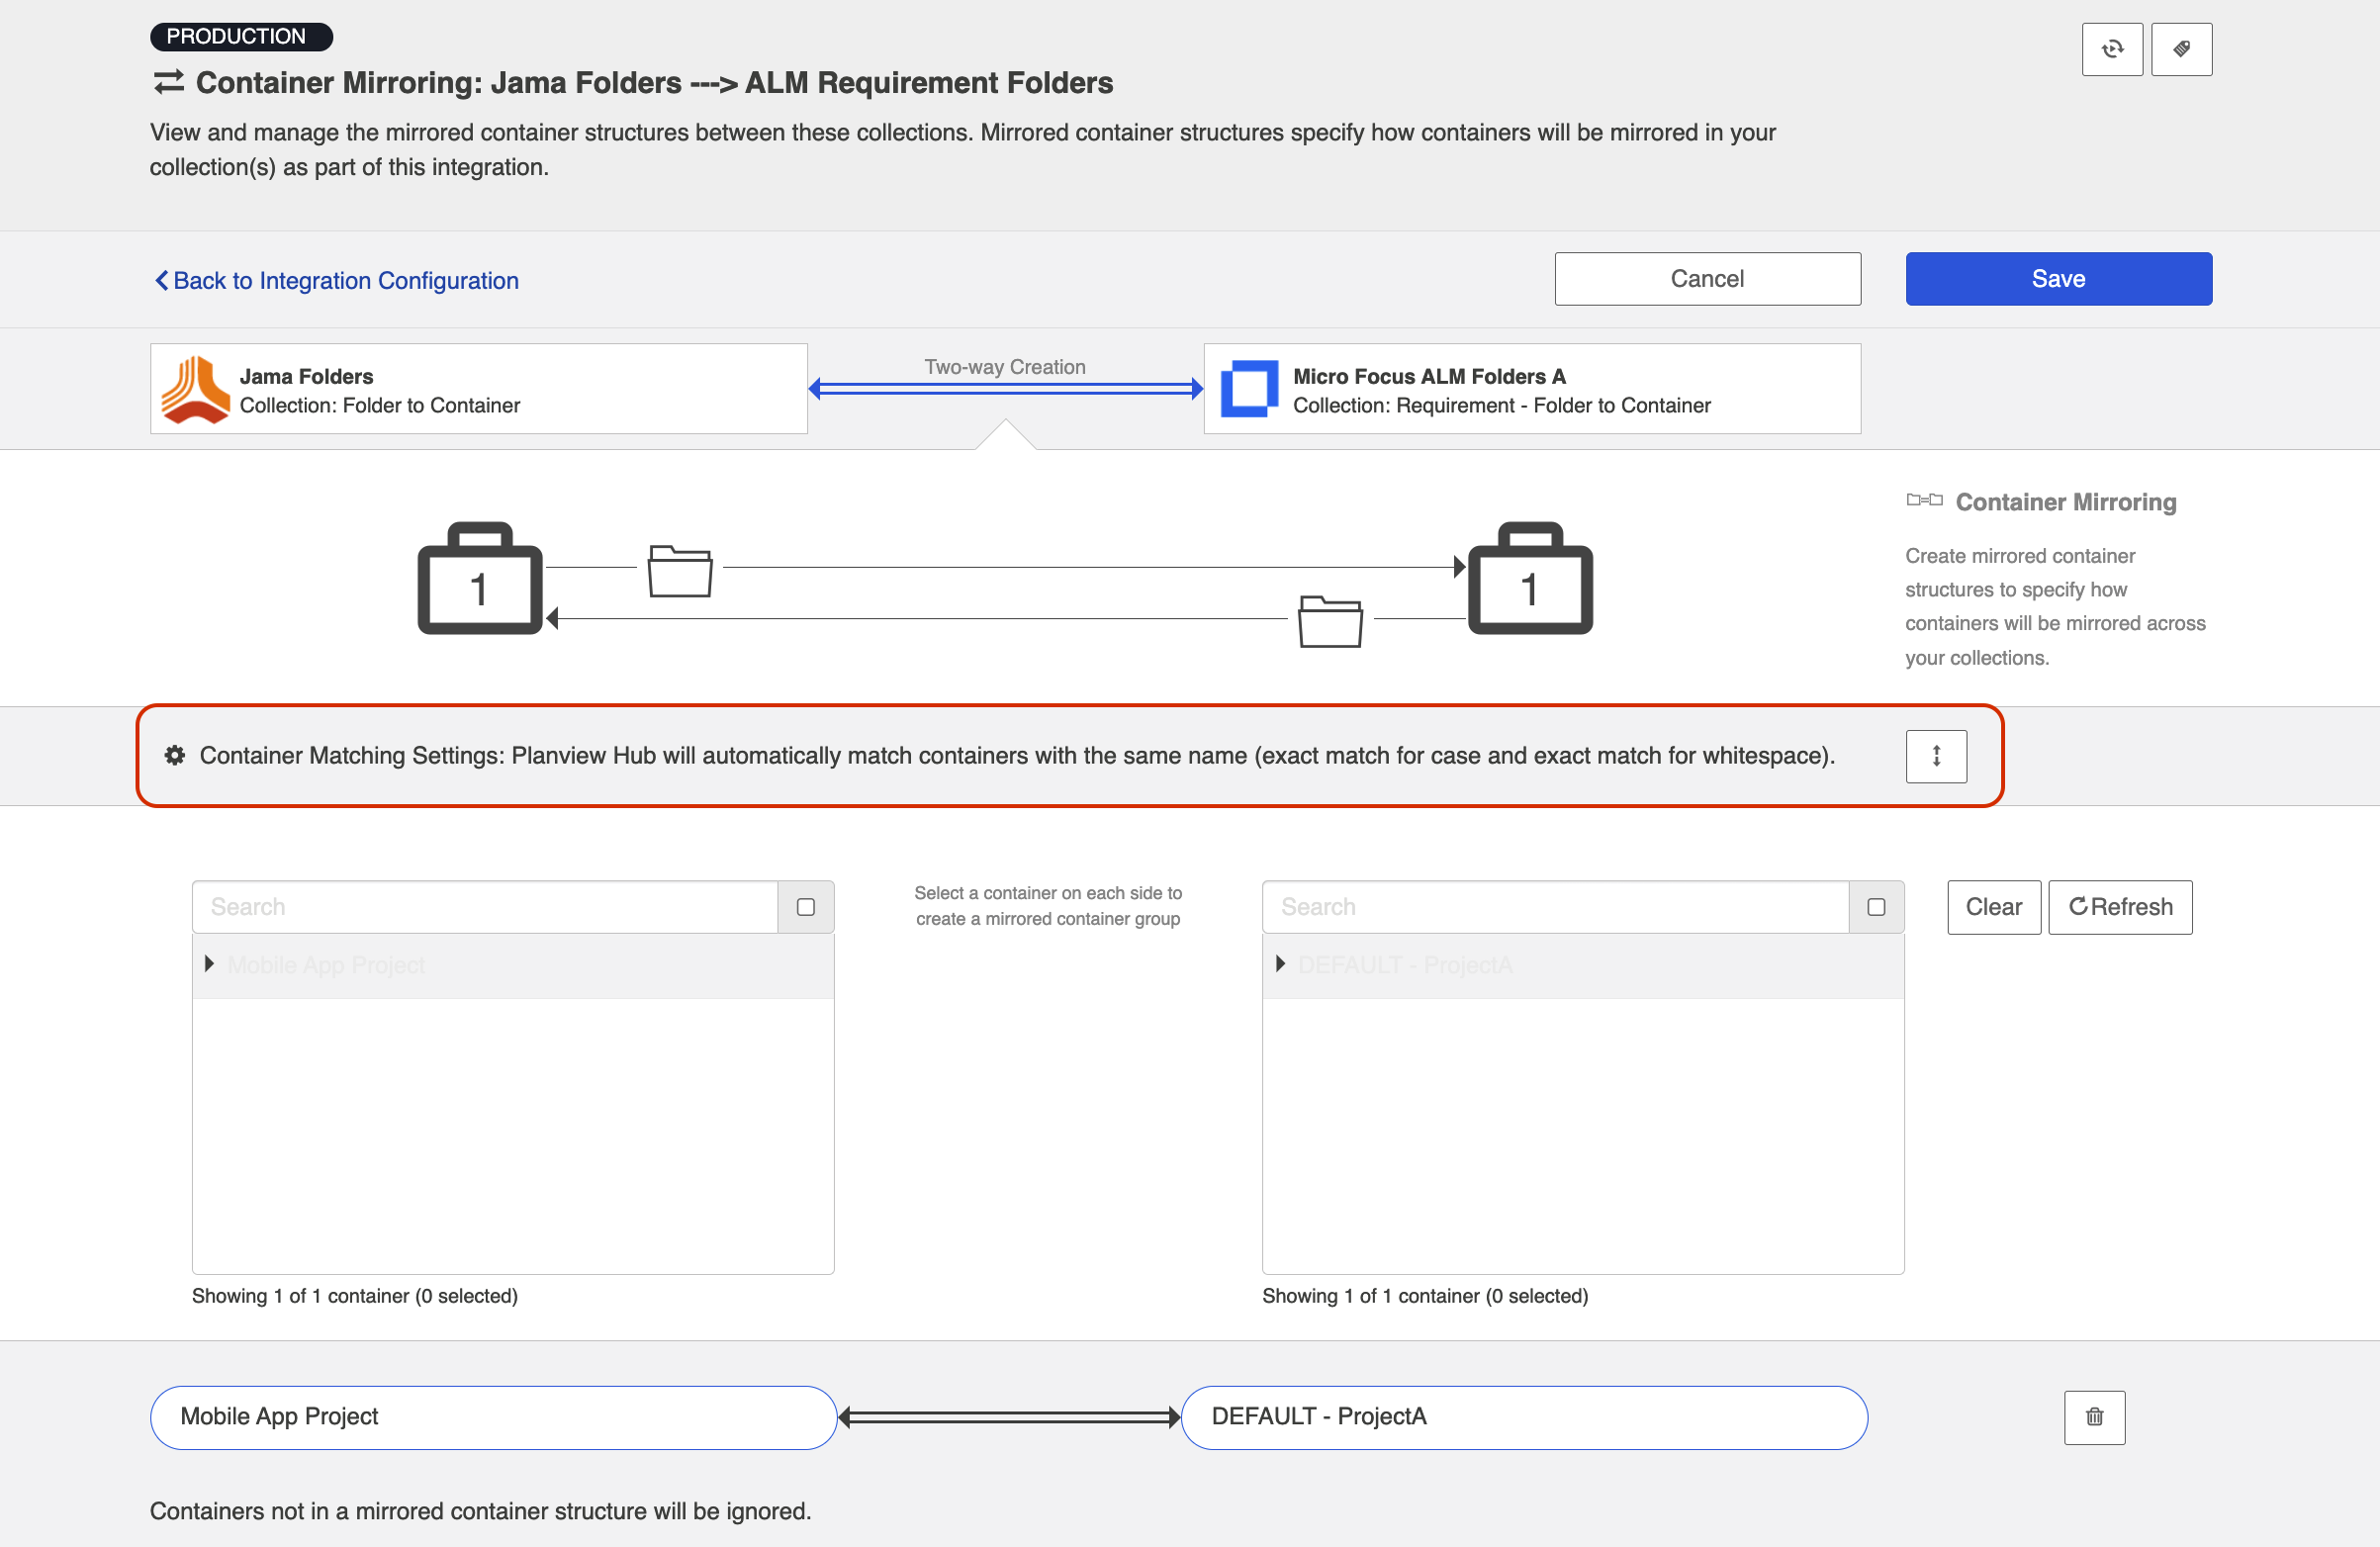
Click the expand button to configure your Container Matching settings.
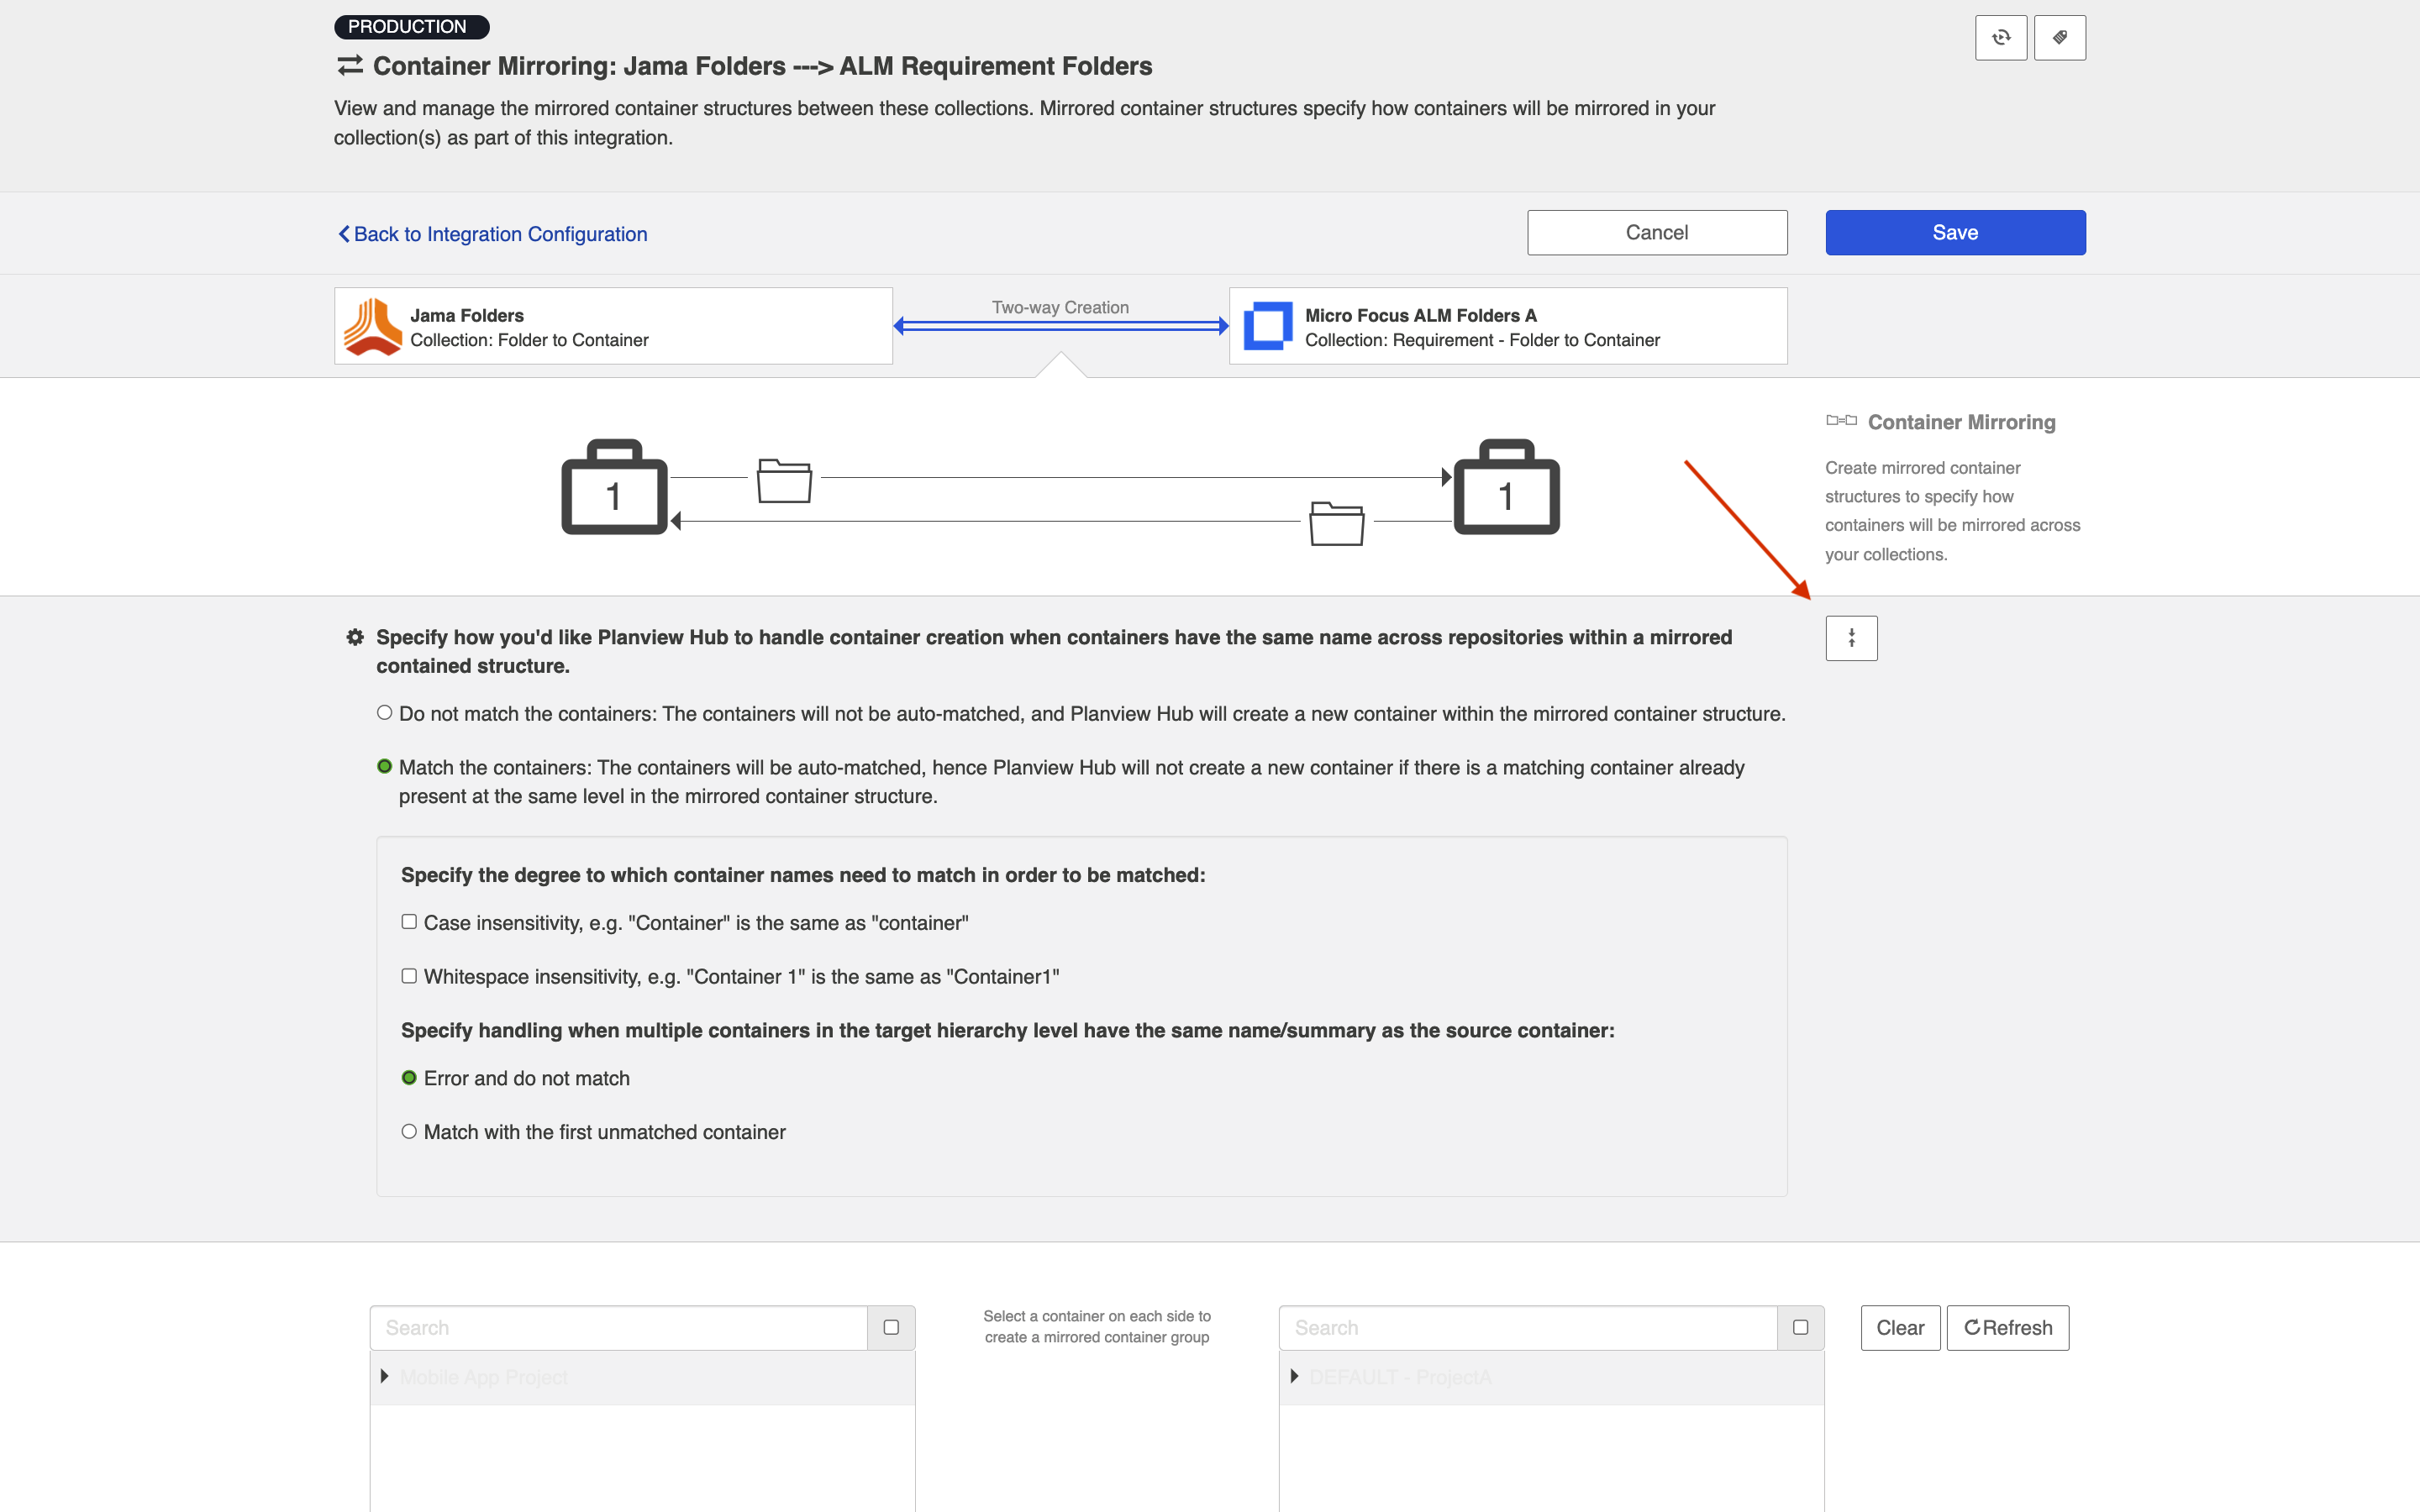
If you choose to match the containers, Hub will proactively find any existing containers that have the same name (summary) across collections (so long as they are in the same level of the mirrored container structure) and match them. When Hub matches two containers:
- No new container will be created in the target repository, as a matched container already exists.
- Any work items contained within the matched containers will route to one another, unless the corresponding work item integration's artifact routing overrides that route.
- Any sub-containers beneath the matched containers will mirror one another.
- An event of type, associated artifacts, will be displayed on the Activity screen indicating that the two containers were matched.
You will also be able to specify whether you'd like your matching strategy to be case sensitive or whitespace sensitive, and to specify how Hub should handle situations where there are multiple containers in the target hierarchy level that have the same name/summary as the source container.
When configuring a new integration, the container matching settings will default to match the containers with error and do not match selected.
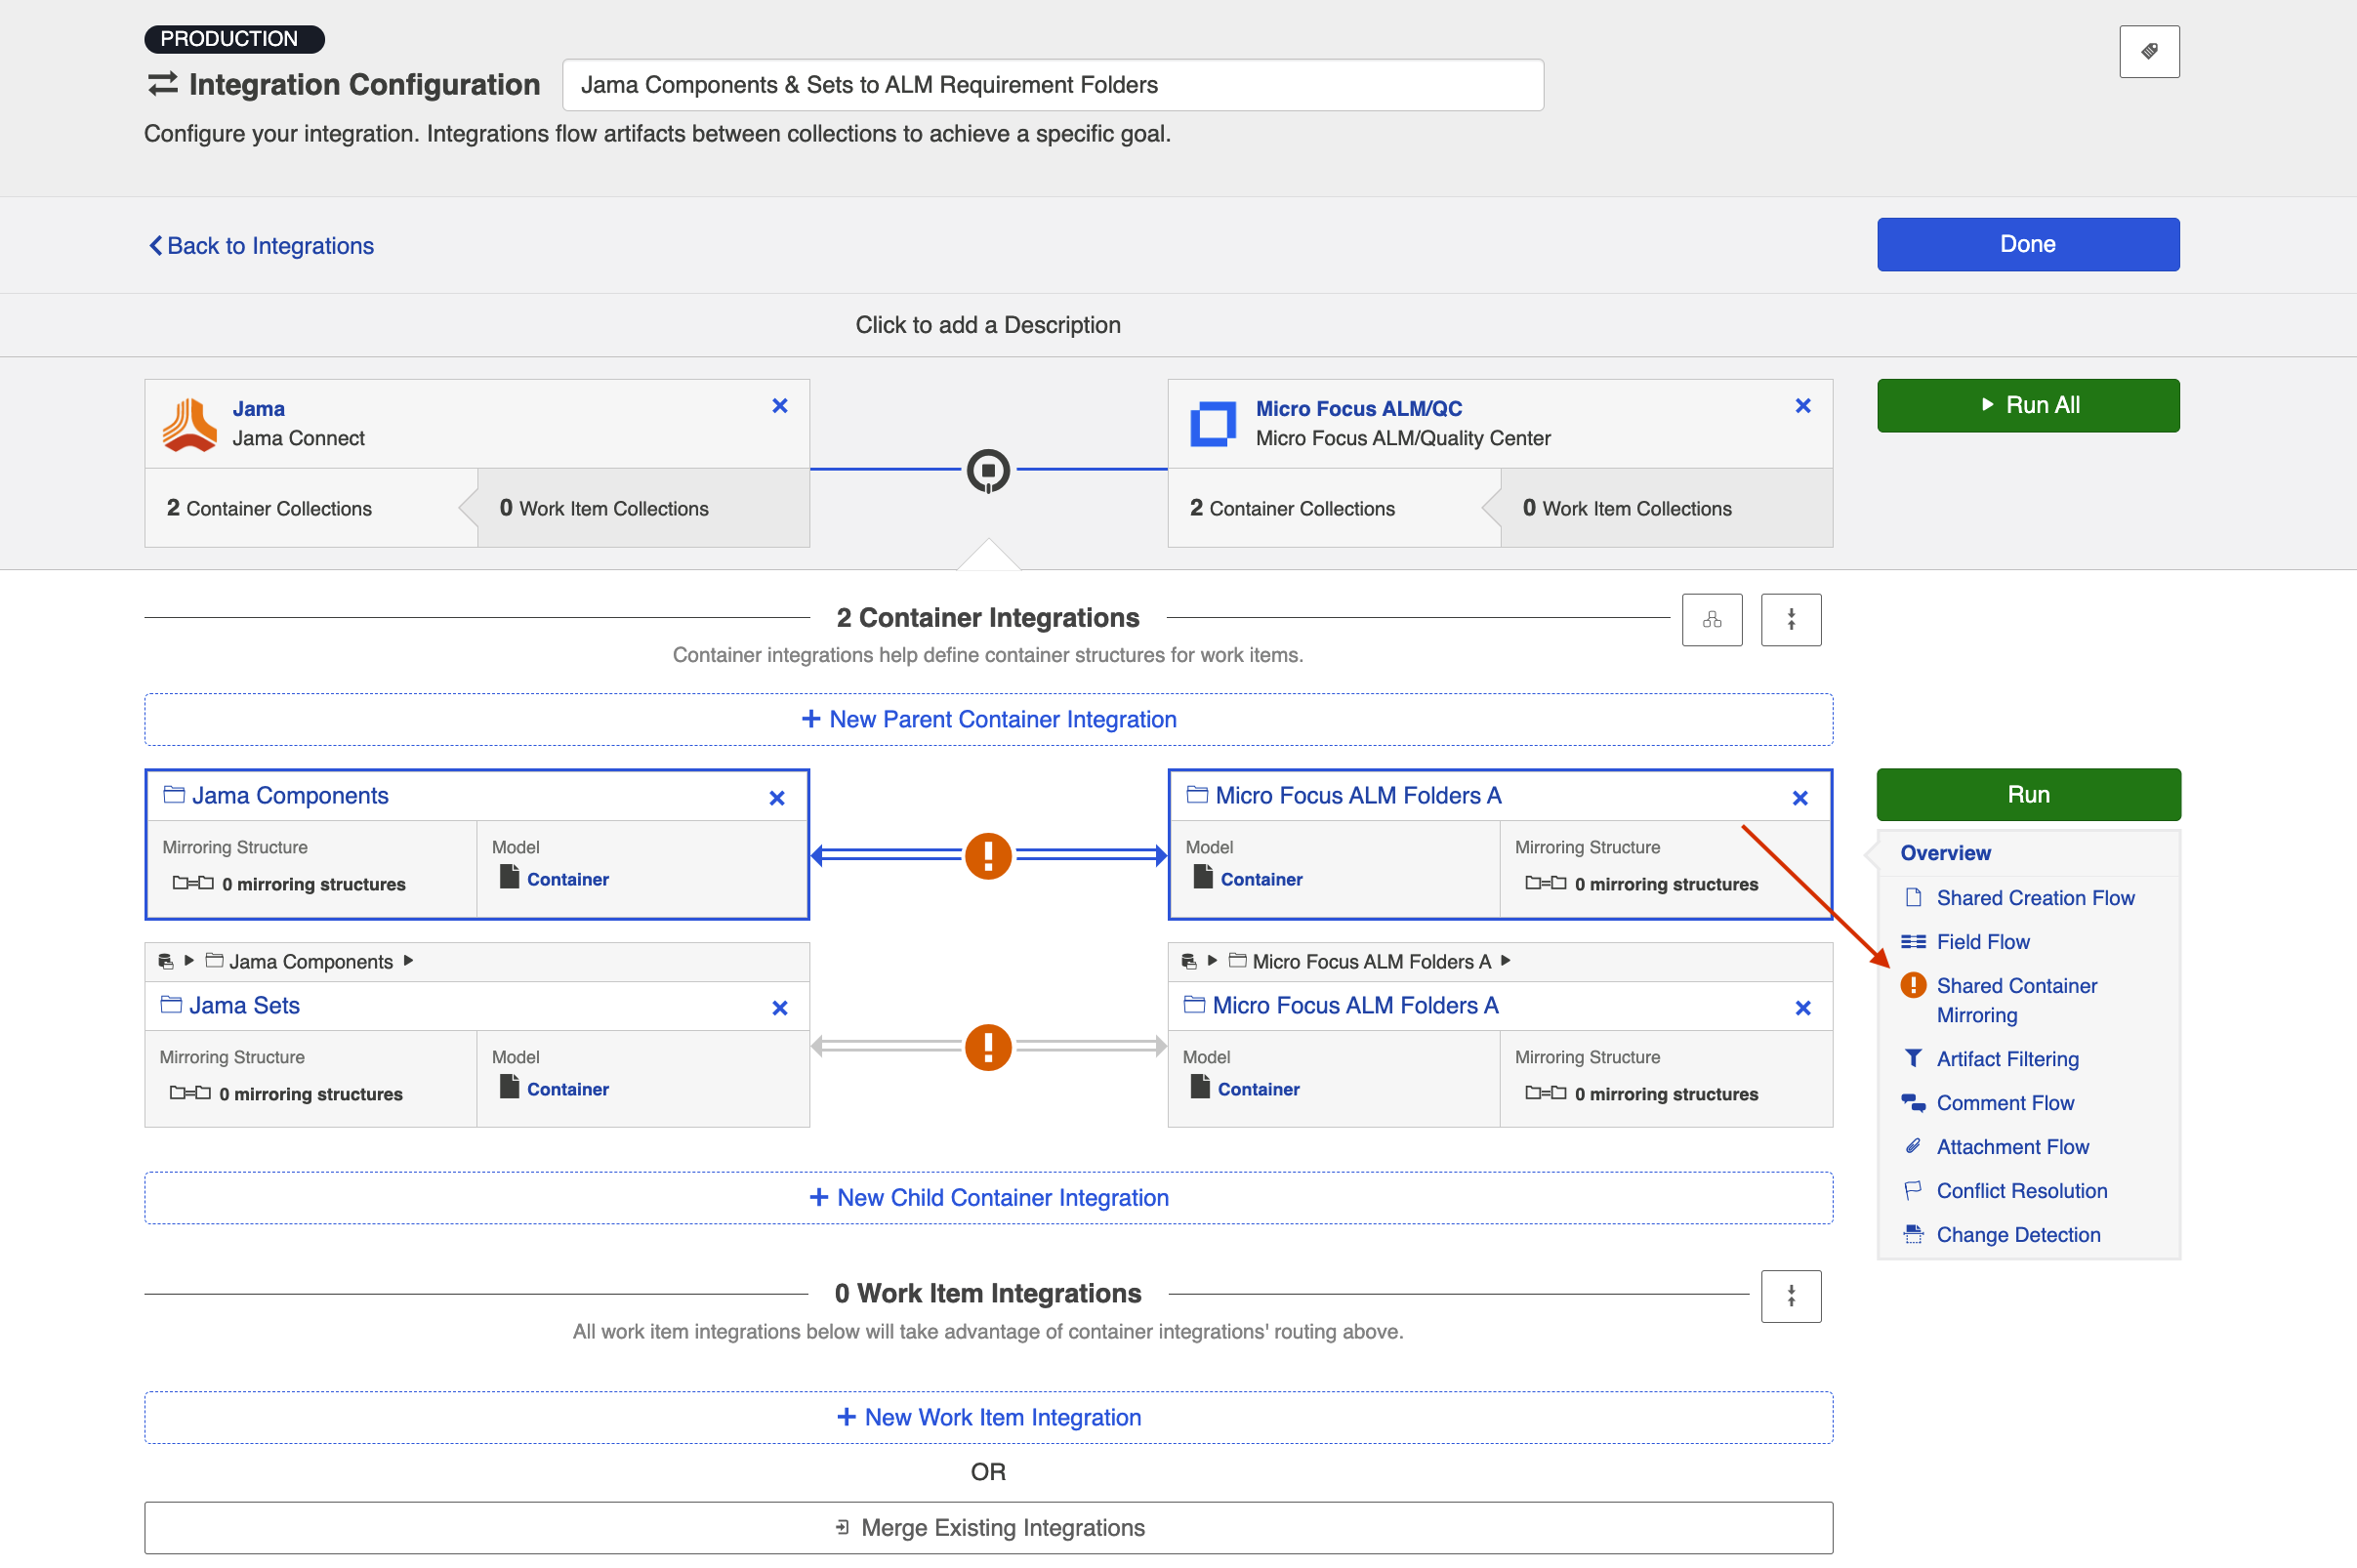
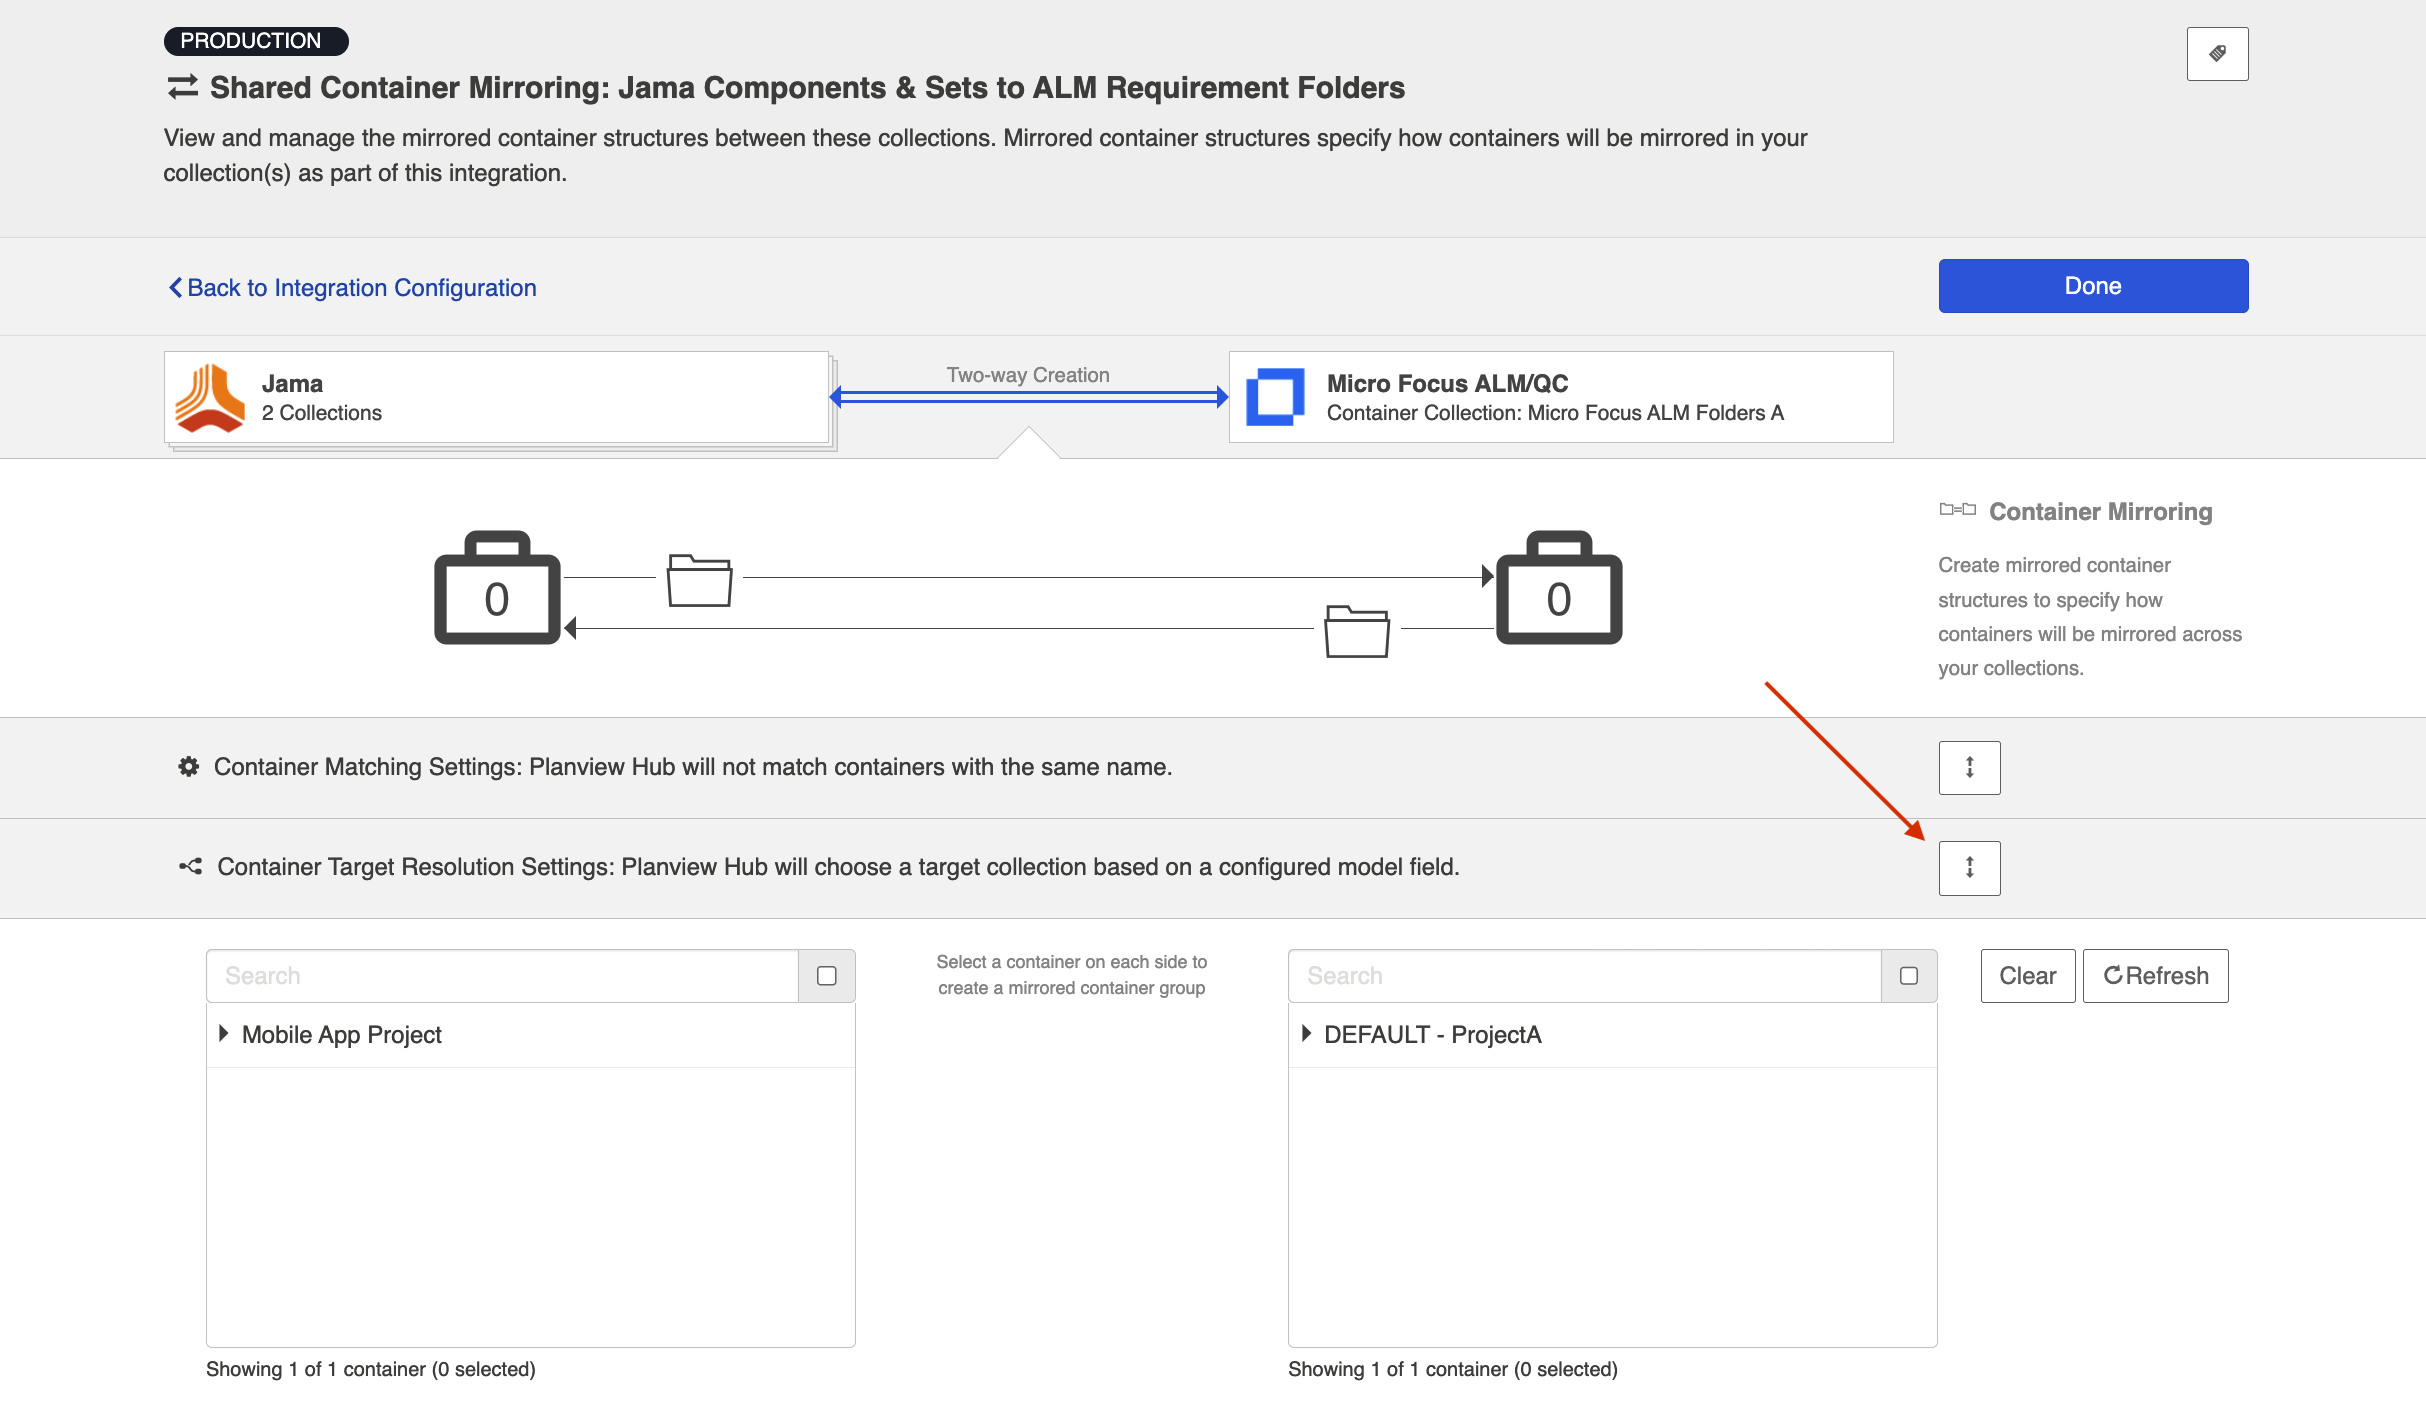
Shared Container Mirroring
If your container integration has mismatched hierarchical structures (e.g., Jama has components, sets, and folders and ALM only has groups of nested folders), you can synchronize several types of containers to one type of container using the shared container mirroring configuration option.
To configure shared container mirroring, set up a container integration where the same collection type is reused in multiple levels of the integration.
You’ll then see the Shared Container Mirroring link on the Integration Configuration screen.
The Shared Container Mirroring screen is similar to the Container Mirroring screen, with the exception of Container Target Resolution Settings. This setting will appear if artifact creation flow is configured to flow away from containers sharing a type.
Note: If this setting appears on the Shared Container Mirroring, it must be configured for artifacts to flow in your integration.
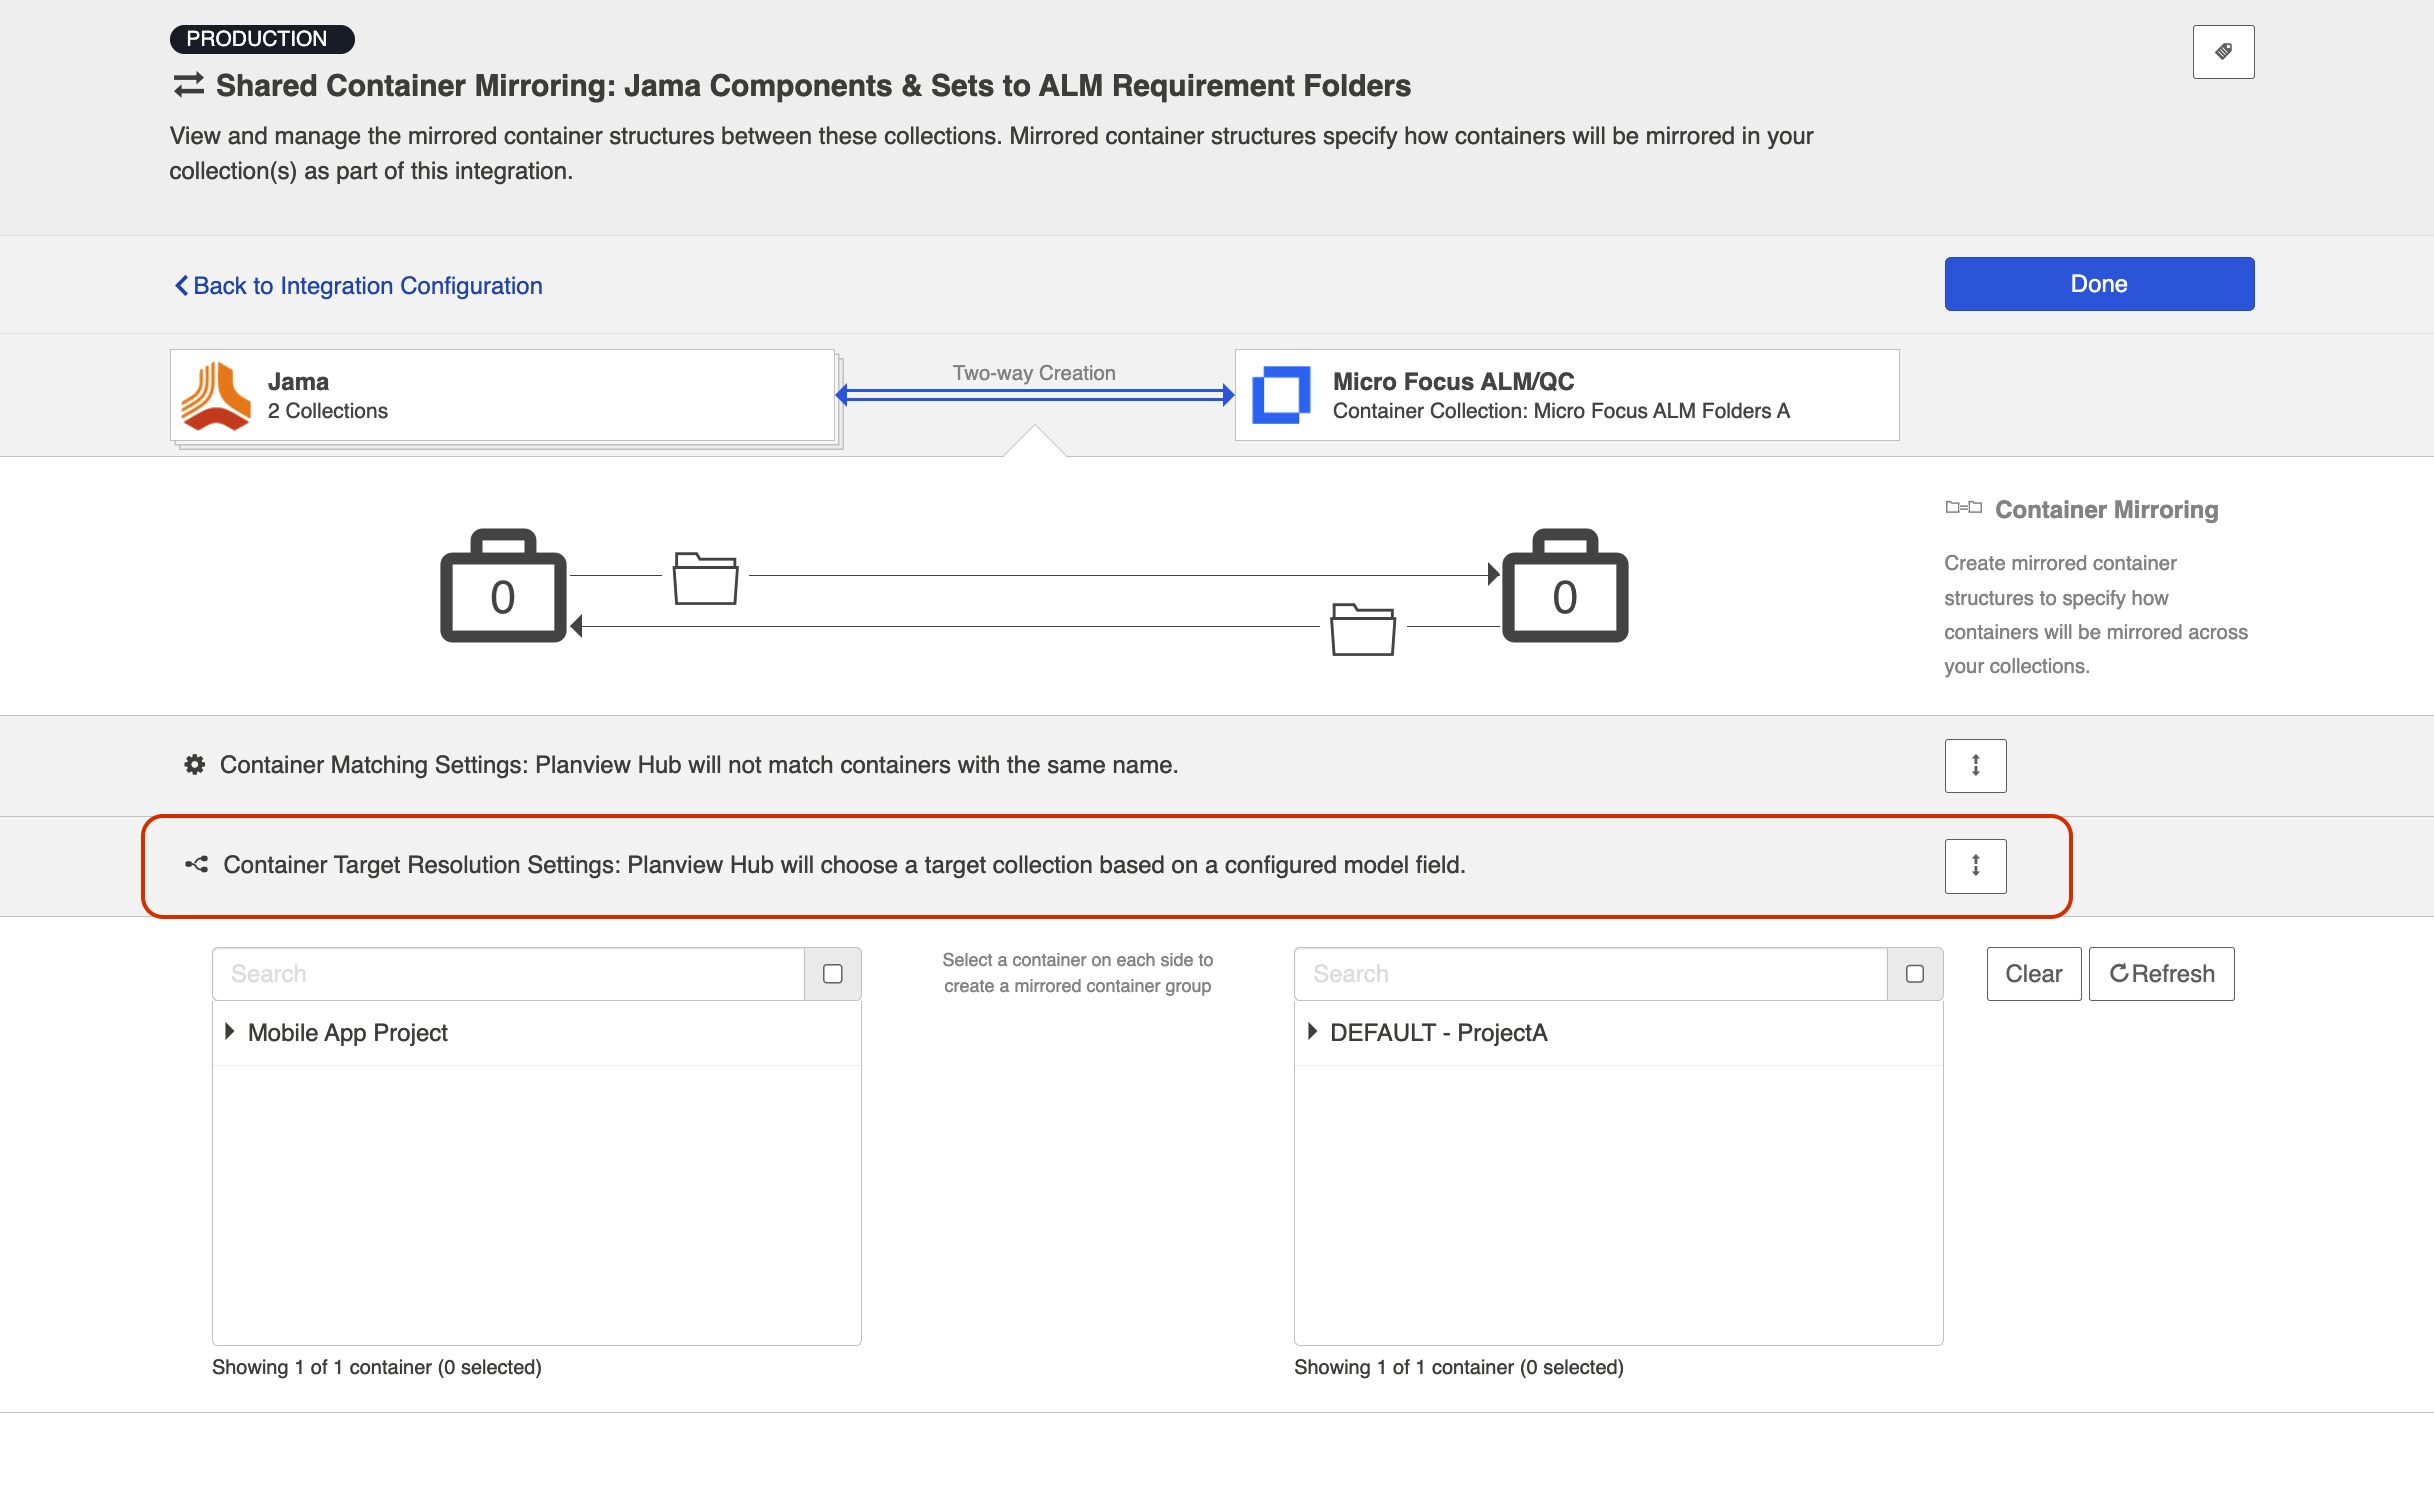
Click the expand button to configure your Container Target Resolution settings.
Note: When configuring a new integration, the container target resolution settings will default to error unless otherwise specified.
To configure container target resolution settings, select a model field and choose which collection to flow into based on values for the selected field.
Note: The model field must be a single select field and must have options configured in the model. The selected model field must also be mapped bidirectionally.

If the model doesn't contain a single select field, you'll notice a warning next to the model field dropdown.
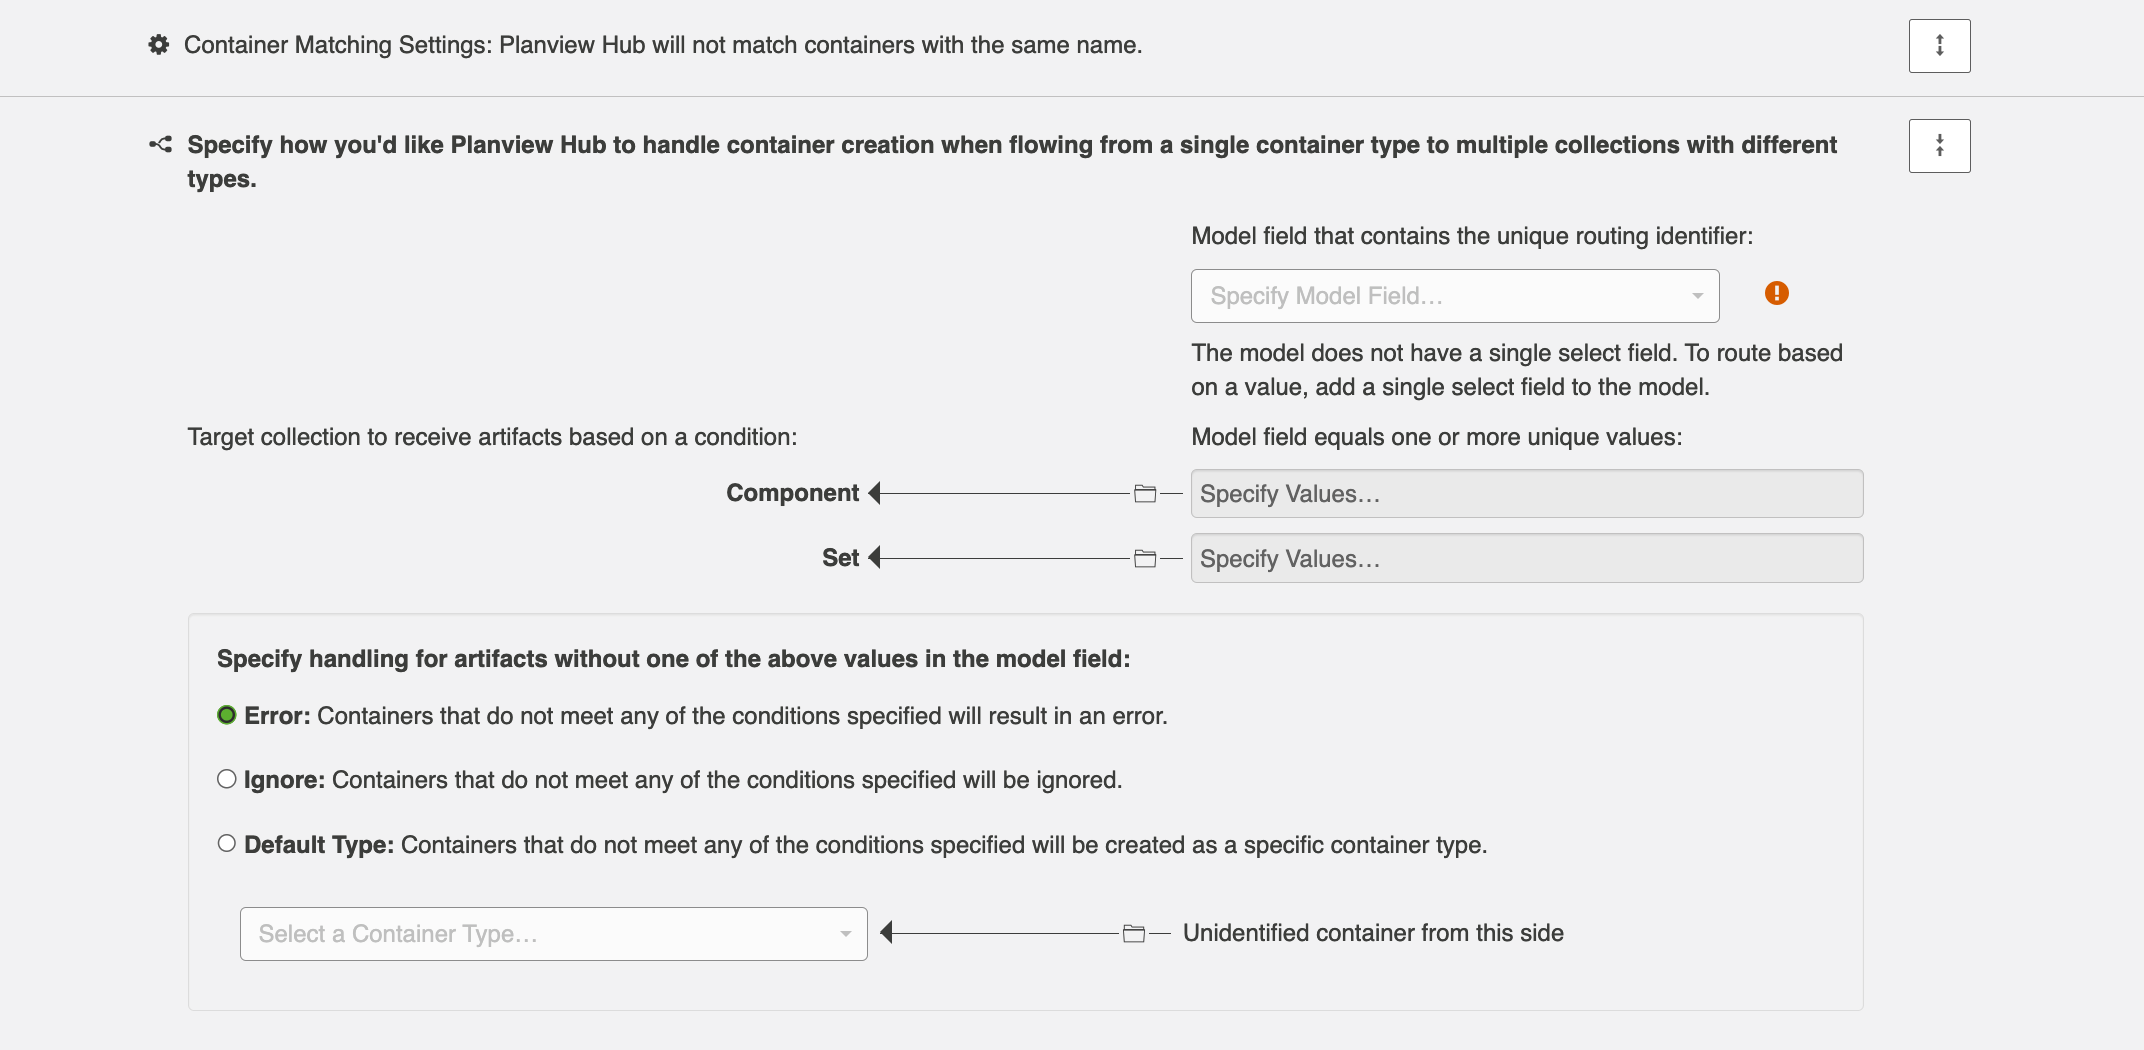
Once a single select value is added to the model, you'll see that the warning disappears.
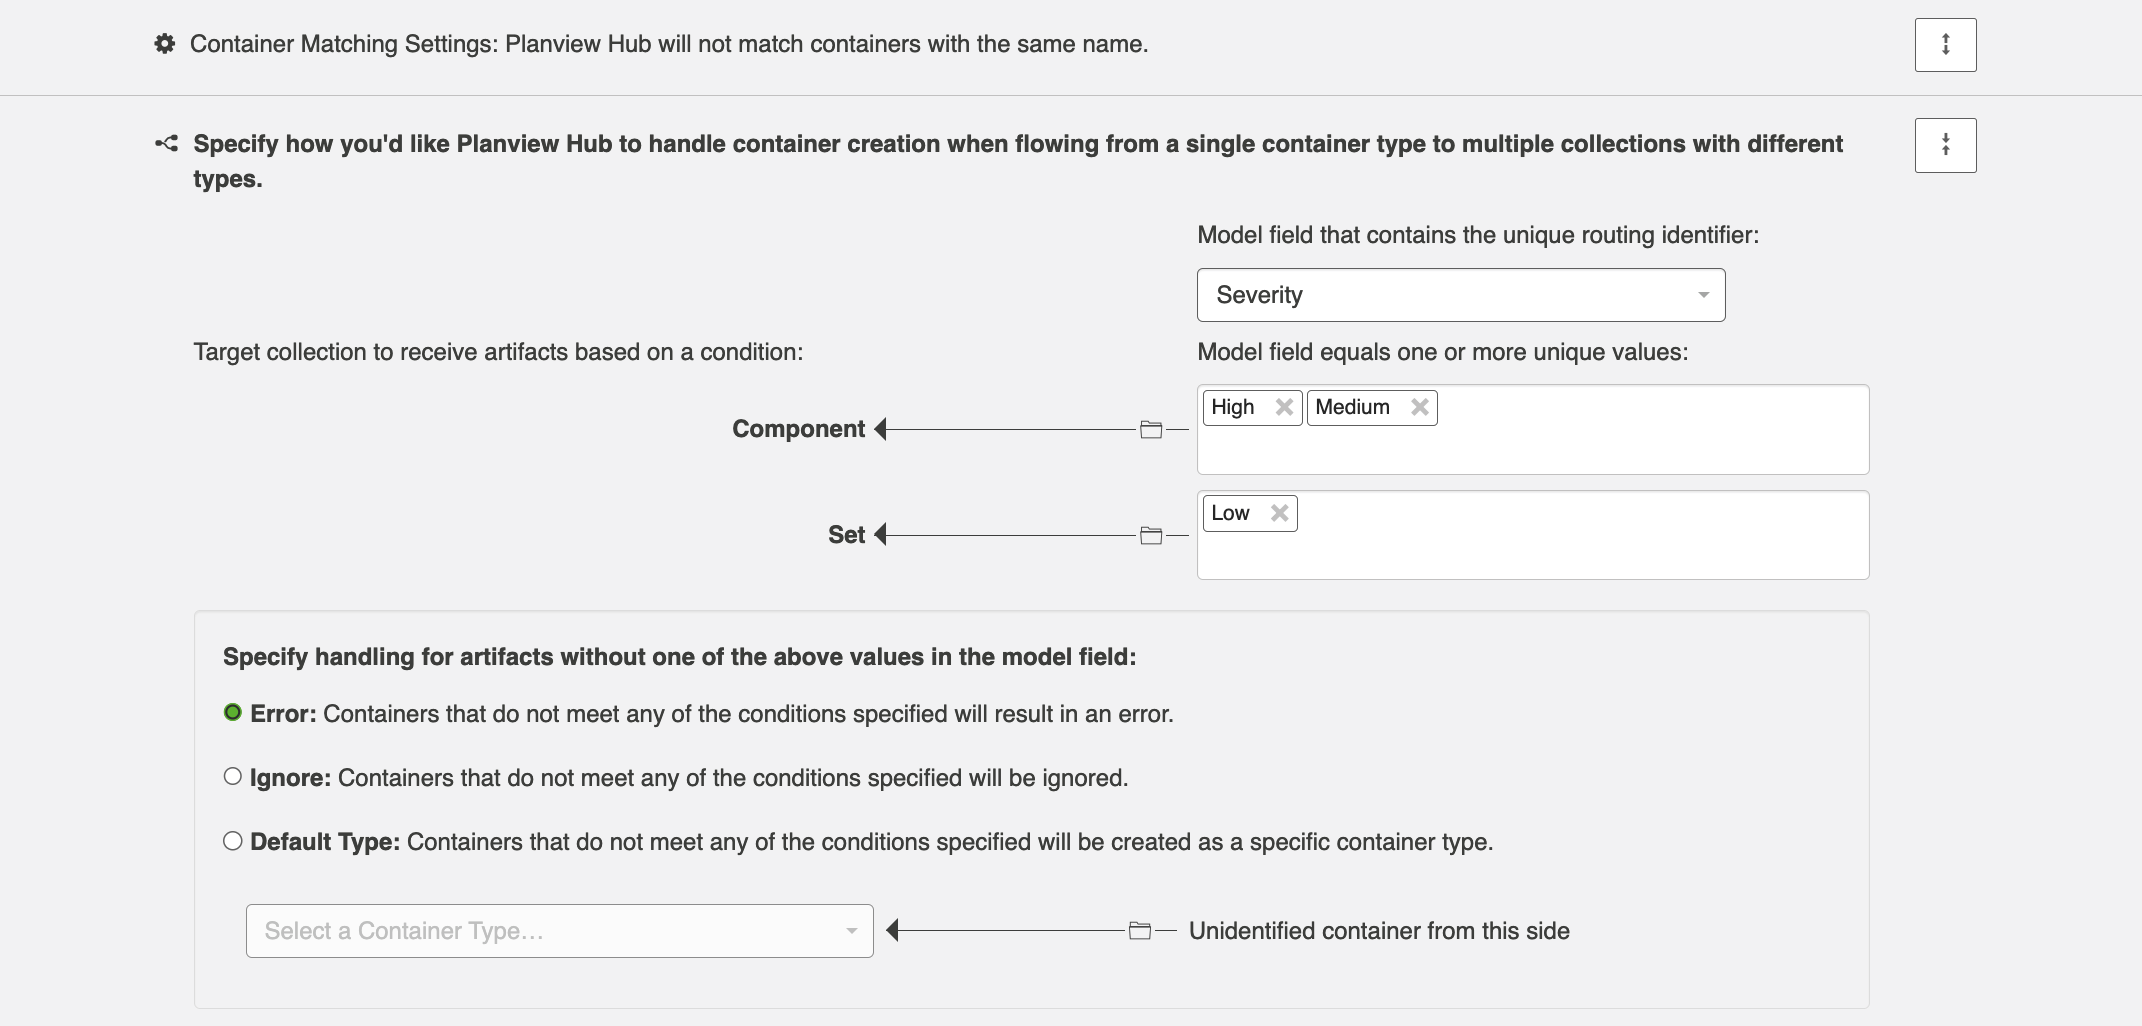
You'll also see that you can specify handling for artifacts without one of the selected values in the model field. You can select from the following options:
- Error: Containers that do not meet any of the specified conditions will result in an error.
- Ignore: Containers that do not meet any of the conditions specified will be ignored.
- Default Type: Containers that do not meet any of the conditions specified will be created as a specific container type.
Note: When the target resolution field is configured, it’s best to set the field once on a new container item so that it flows to the correct type the first time. Toggling the field to switch the type later on may lead to errors.
Artifact Filtering
This process is the same as it is for a Work Item Synchronization. Refer to the Artifact Filtering page for details.
Comment Flow
This process is the same as it is for a Work Item Synchronization. Refer to the Comment Flow page for details.
Attachment Flow
This process is the same as it is for a Work Item Synchronization. Refer to the Attachment Flow page for details.
Conflict Resolution
This process is the same as it is for a Work Item Synchronization. Refer to the Conflict Resolution page for details.
Change Detection
This process is the same as it is for a Work Item Synchronization. Refer to the Change Detection page for details.
Configuring your Work Item Integration(s)
To add your Work Item Integration(s), you have two options:
- Creating a new Work Item Integration from this screen
- Importing an existing Work Item Integration
Creating a New Work Item Integration
To create a new Work Item Integration, click + New Work Item Integration.
You will be prompted to select the existing work item collections you'd like to add to the integration.
To add a work item collection to the integration, it must:
- Be from the same repositories as the container integration above
- Include work item types that can take advantage of container mirroring (for example, in the scenario below, we will not be able to add a Micro Focus Defects collection, since only requirements can be routed to Micro Focus requirements folders)
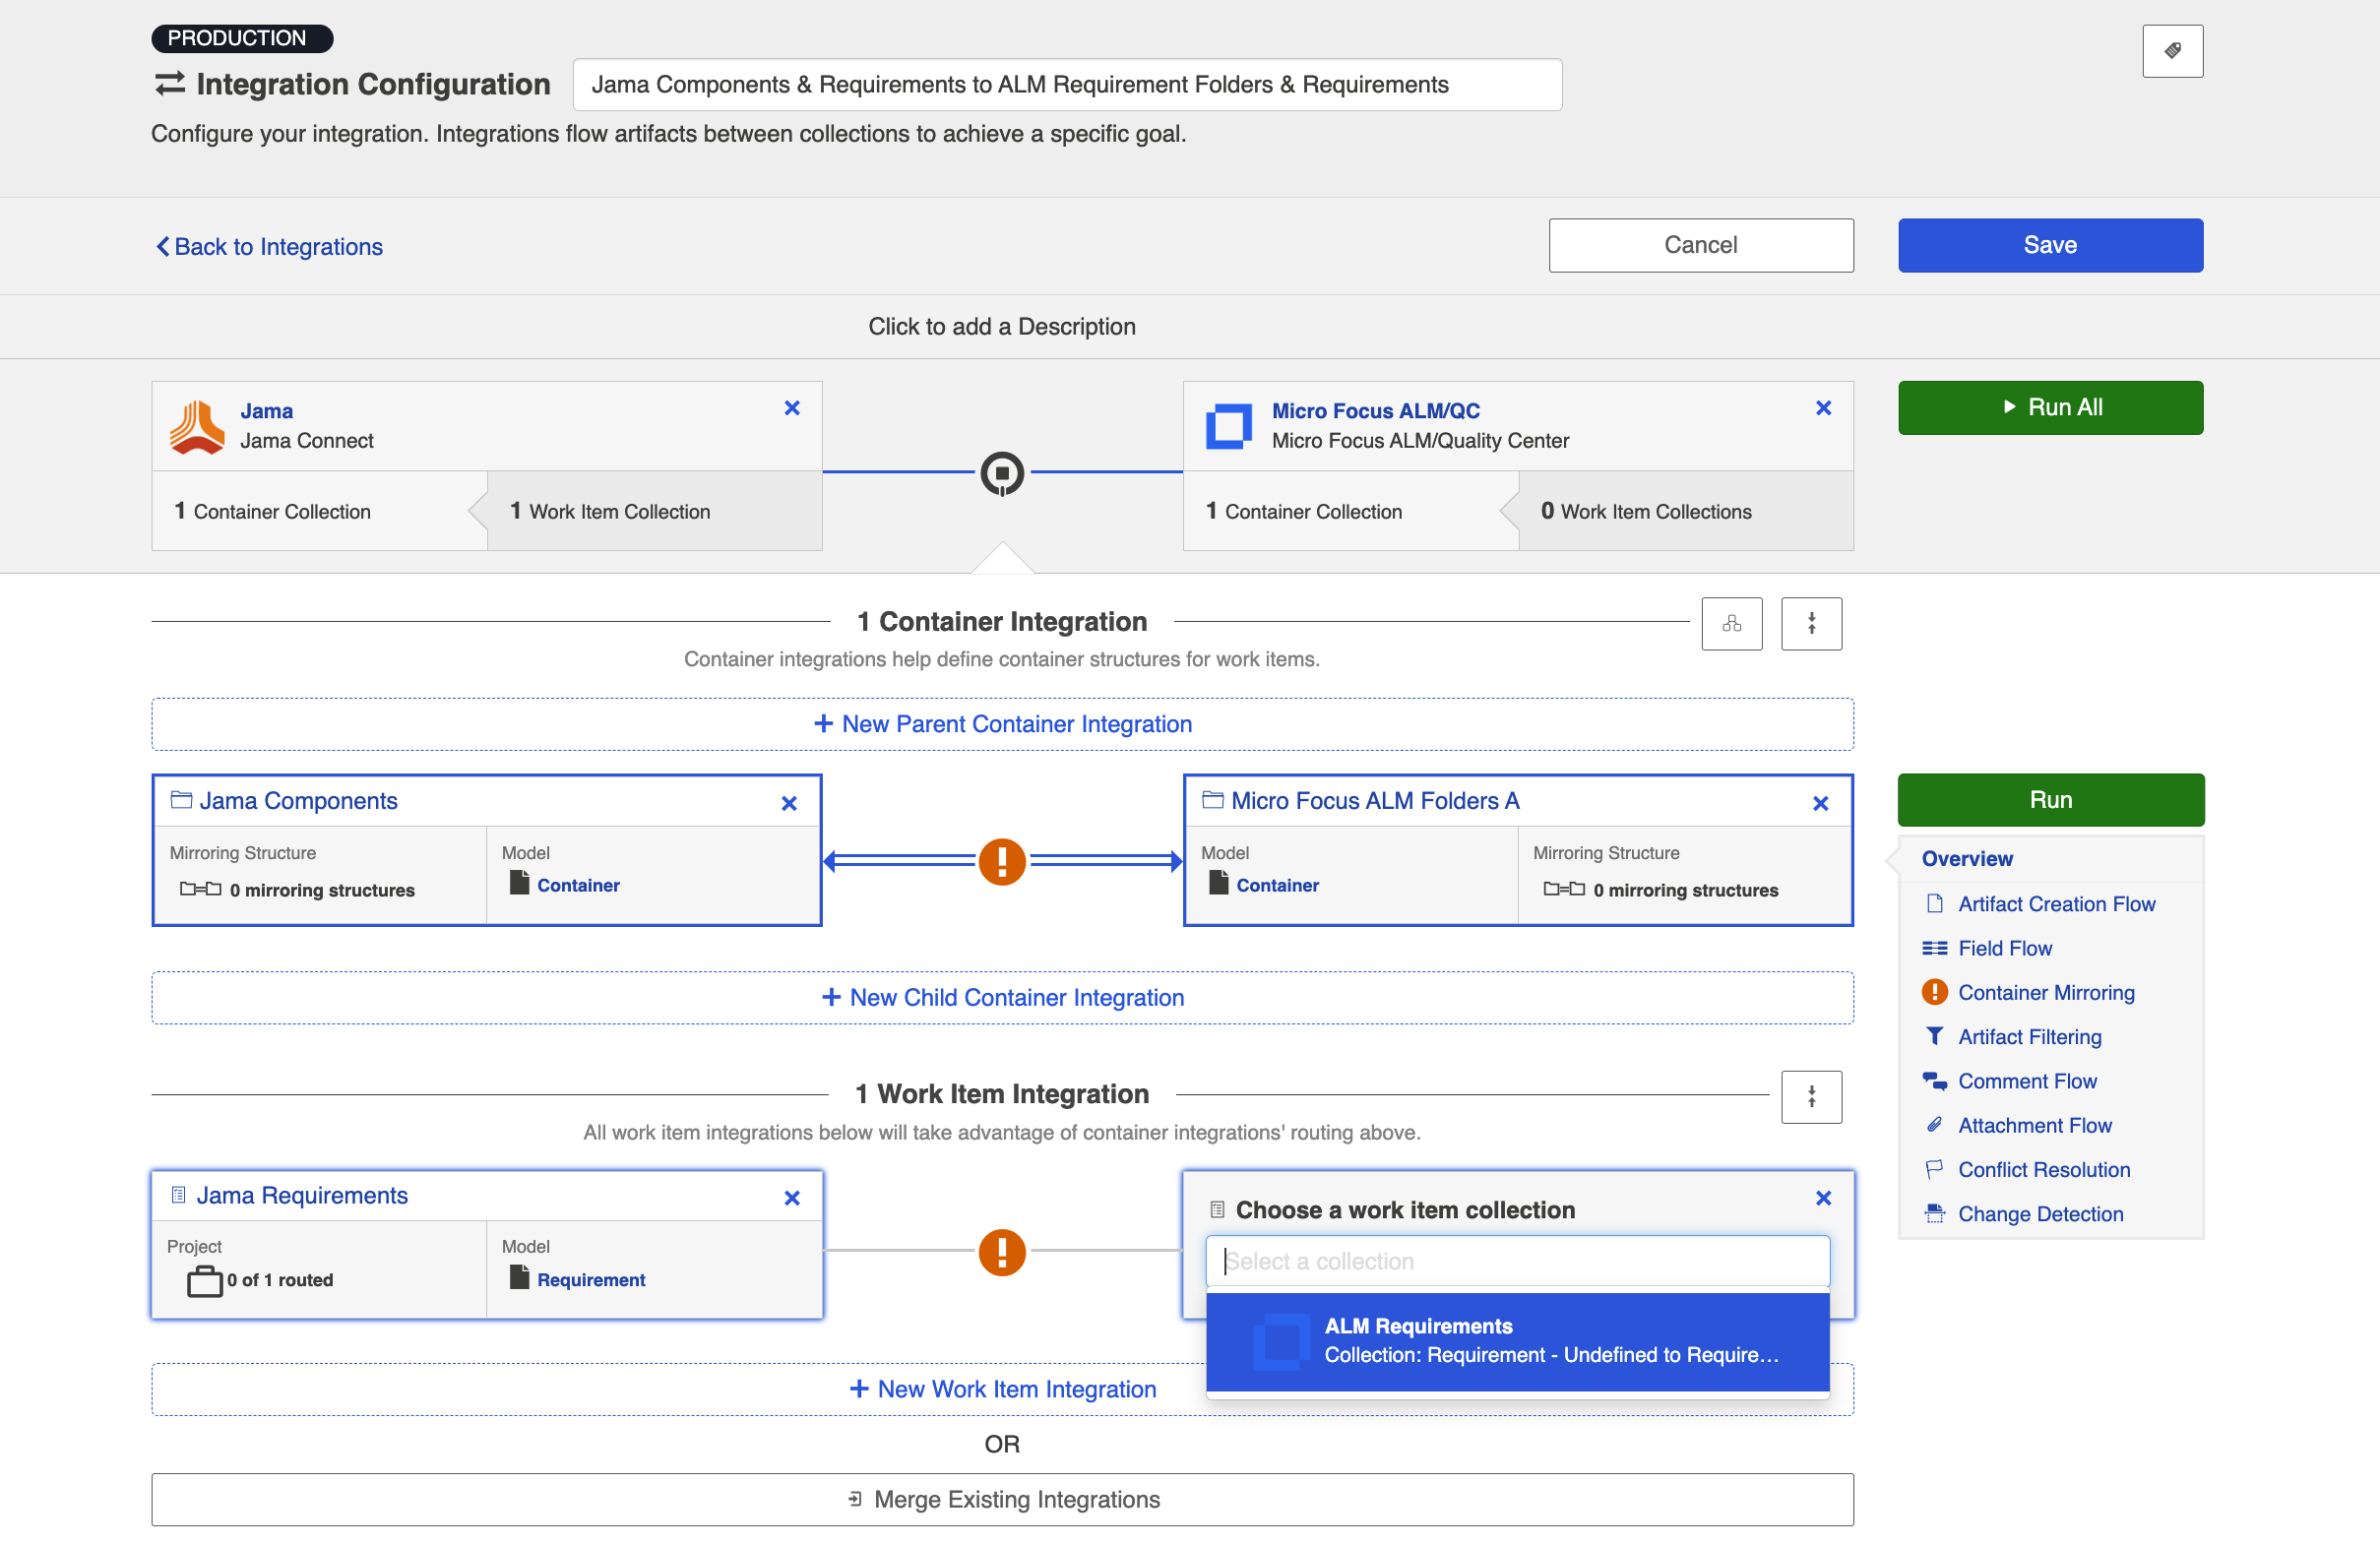
Once added, click Save.
In general, you will configure this in the exact same way you configure a normal Work Item Synchronization, with just a couple of key differences with regard to Artifact Routing outlined in the Artifact Routing Section, below. Please refer to the Work Item Synchronization page for details on all other aspects of configuration.
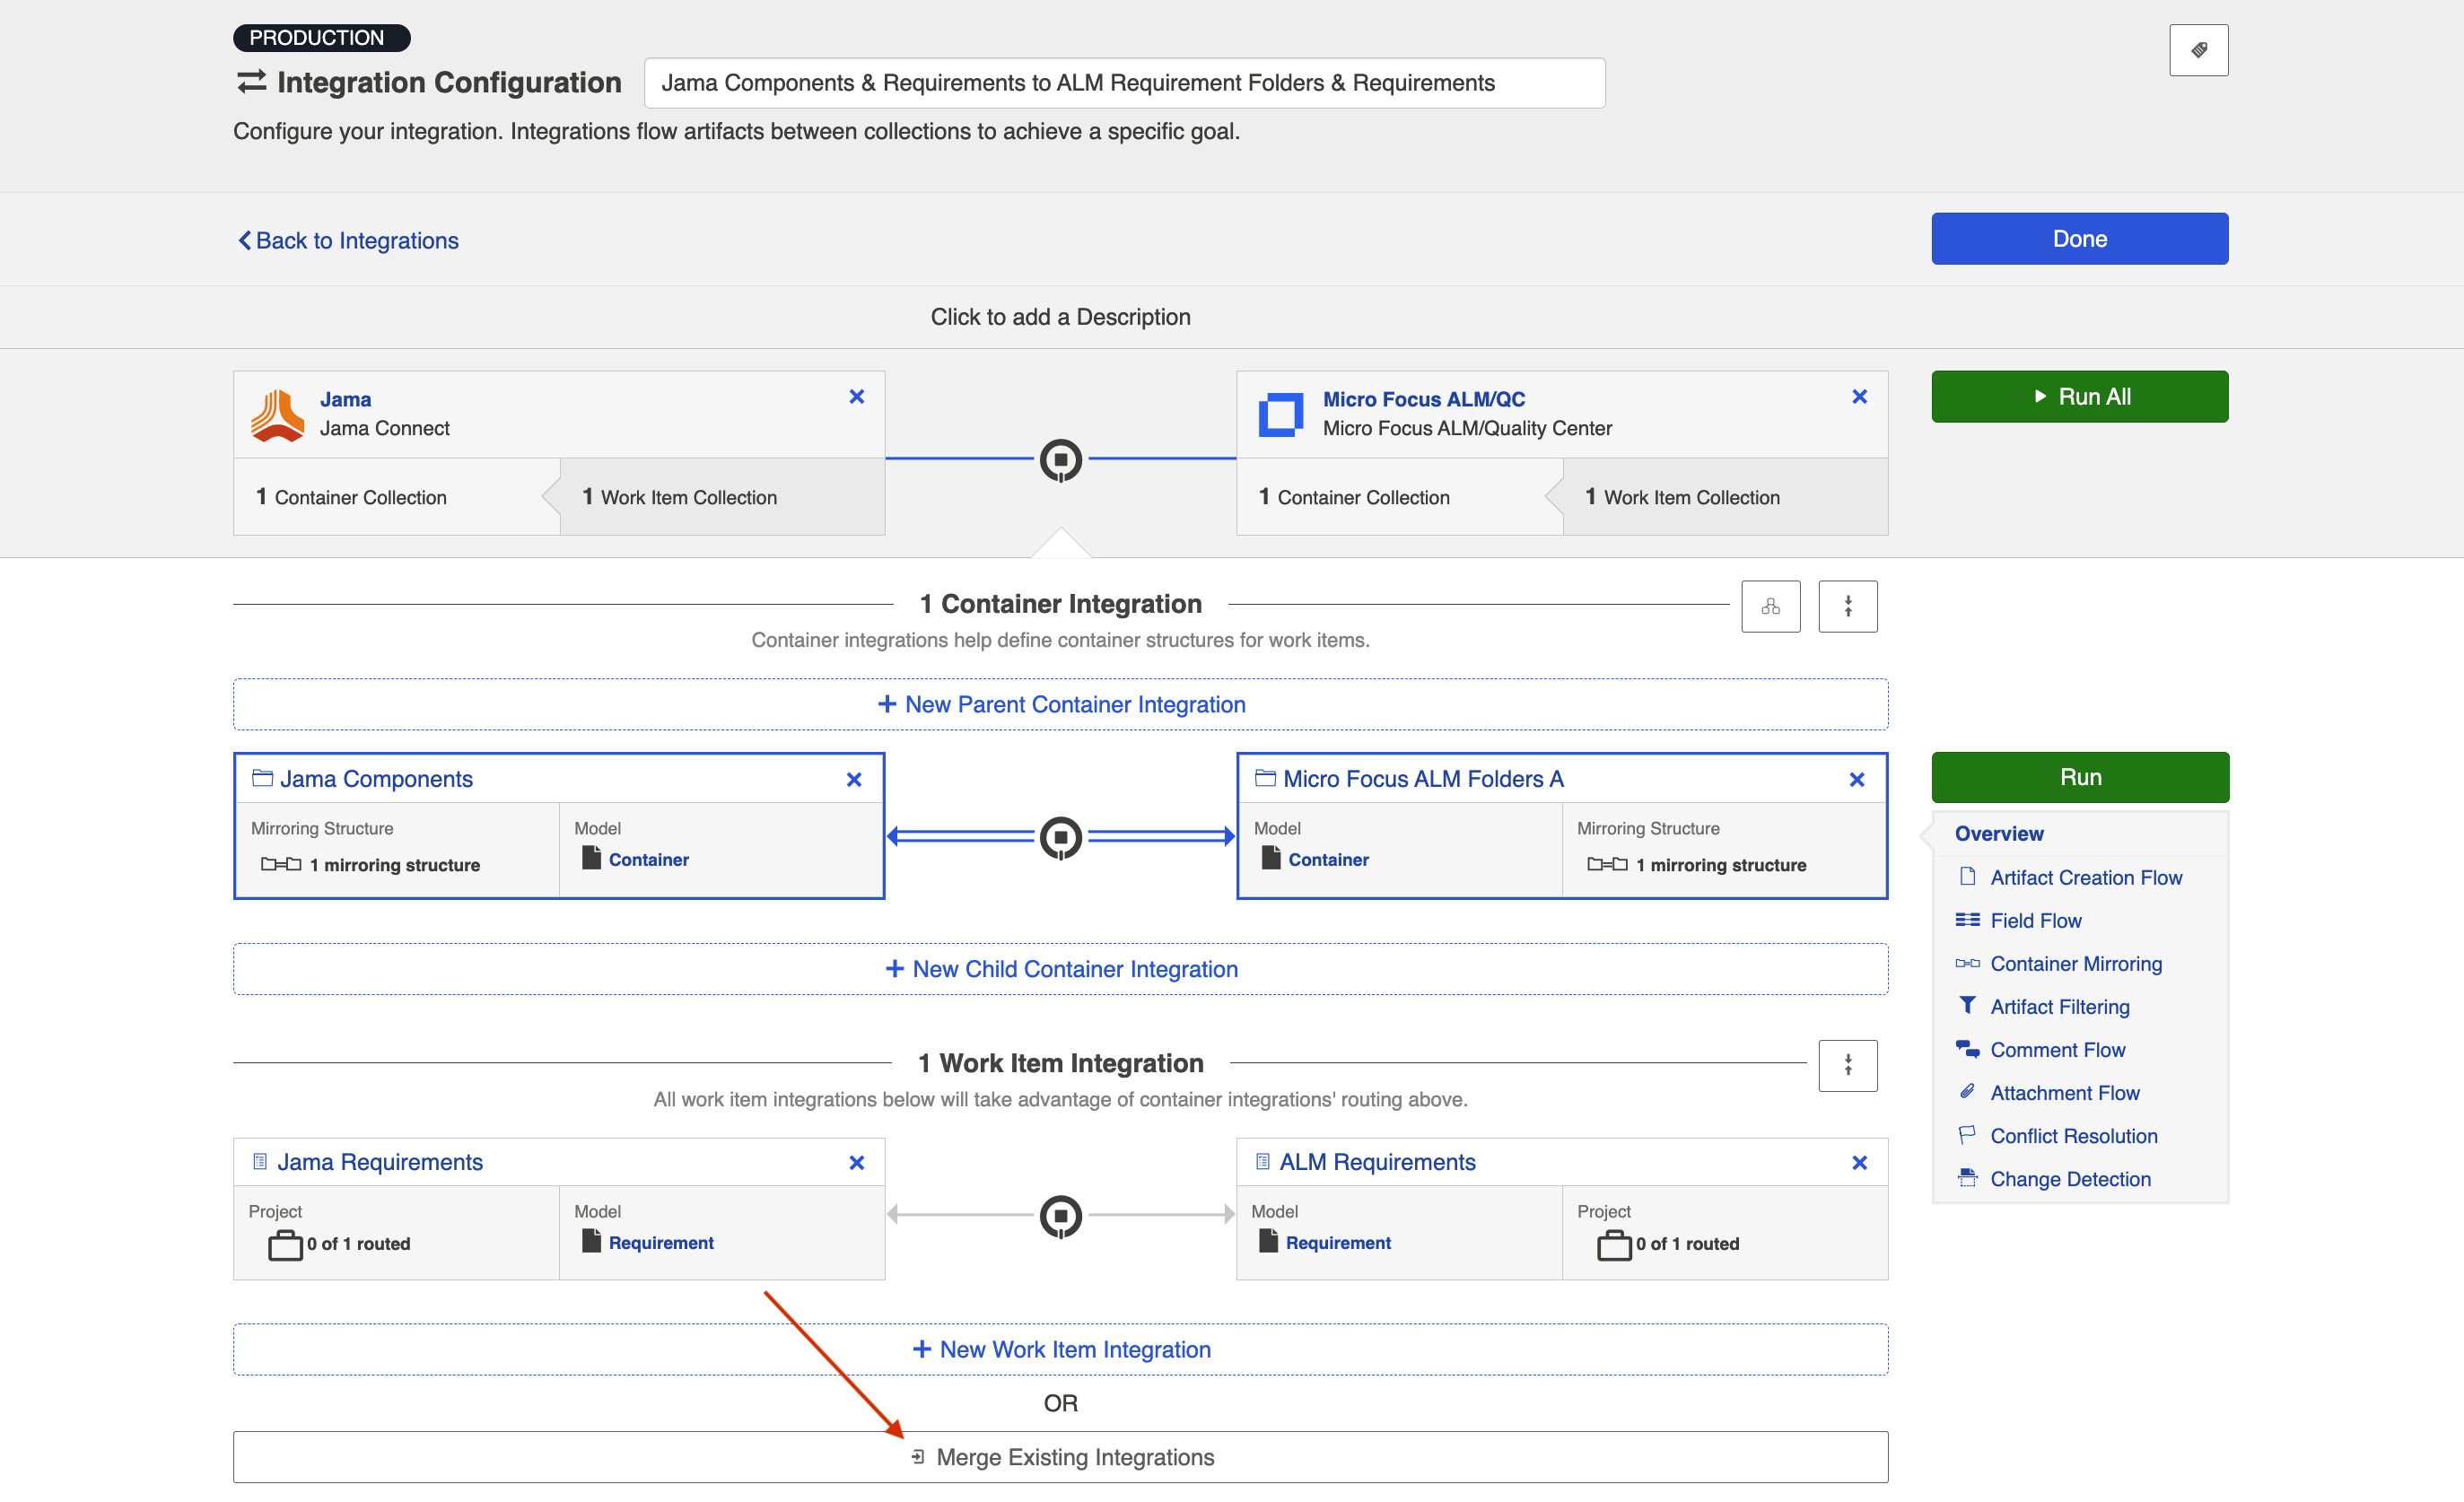
Merging an Existing Work Item Integration
If you've already configured a Work Item Synchronization that you'd like to run as part of this integration, you can add it by clicking Merge Existing Integrations.
Note: Once you merge your integration, it will cease to exist as an independent integration. You will only be able to access and configure it from this Work Item + Container Mirroring integration.
To merge an existing integration, it must:
- Be from the same repositories as the container integration above
- Note: The order matters (i.e., if the work item integration reverses which repository is on the left vs. right side, an error will occur). For this reason, it is very important to ensure that integrations are created consistently with regard to which repository is on each side.
- Include work item types that can take advantage of container mirroring (e.g., in the scenario below, we will not be able to add a Micro Focus Defects integration, since only requirements can be routed to Micro Focus requirements folders).
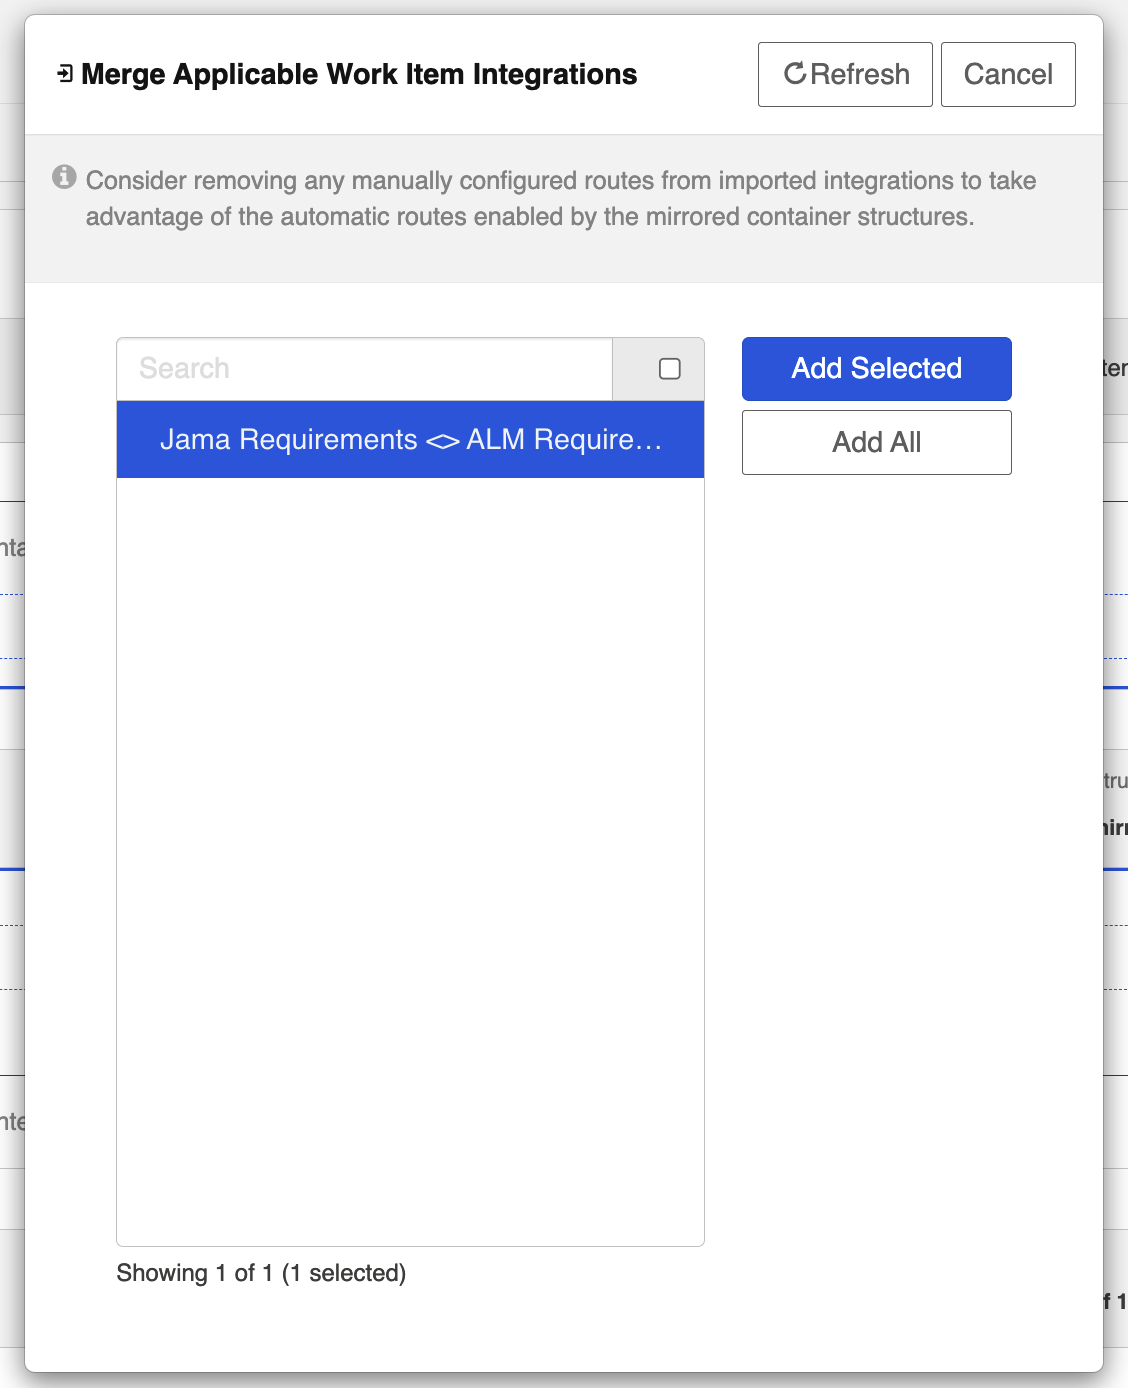
When merging an existing integration, consider removing any manually configured routes from that imported integration to allow it to take advantage of the automatic routes enabled by the mirrored container structures.
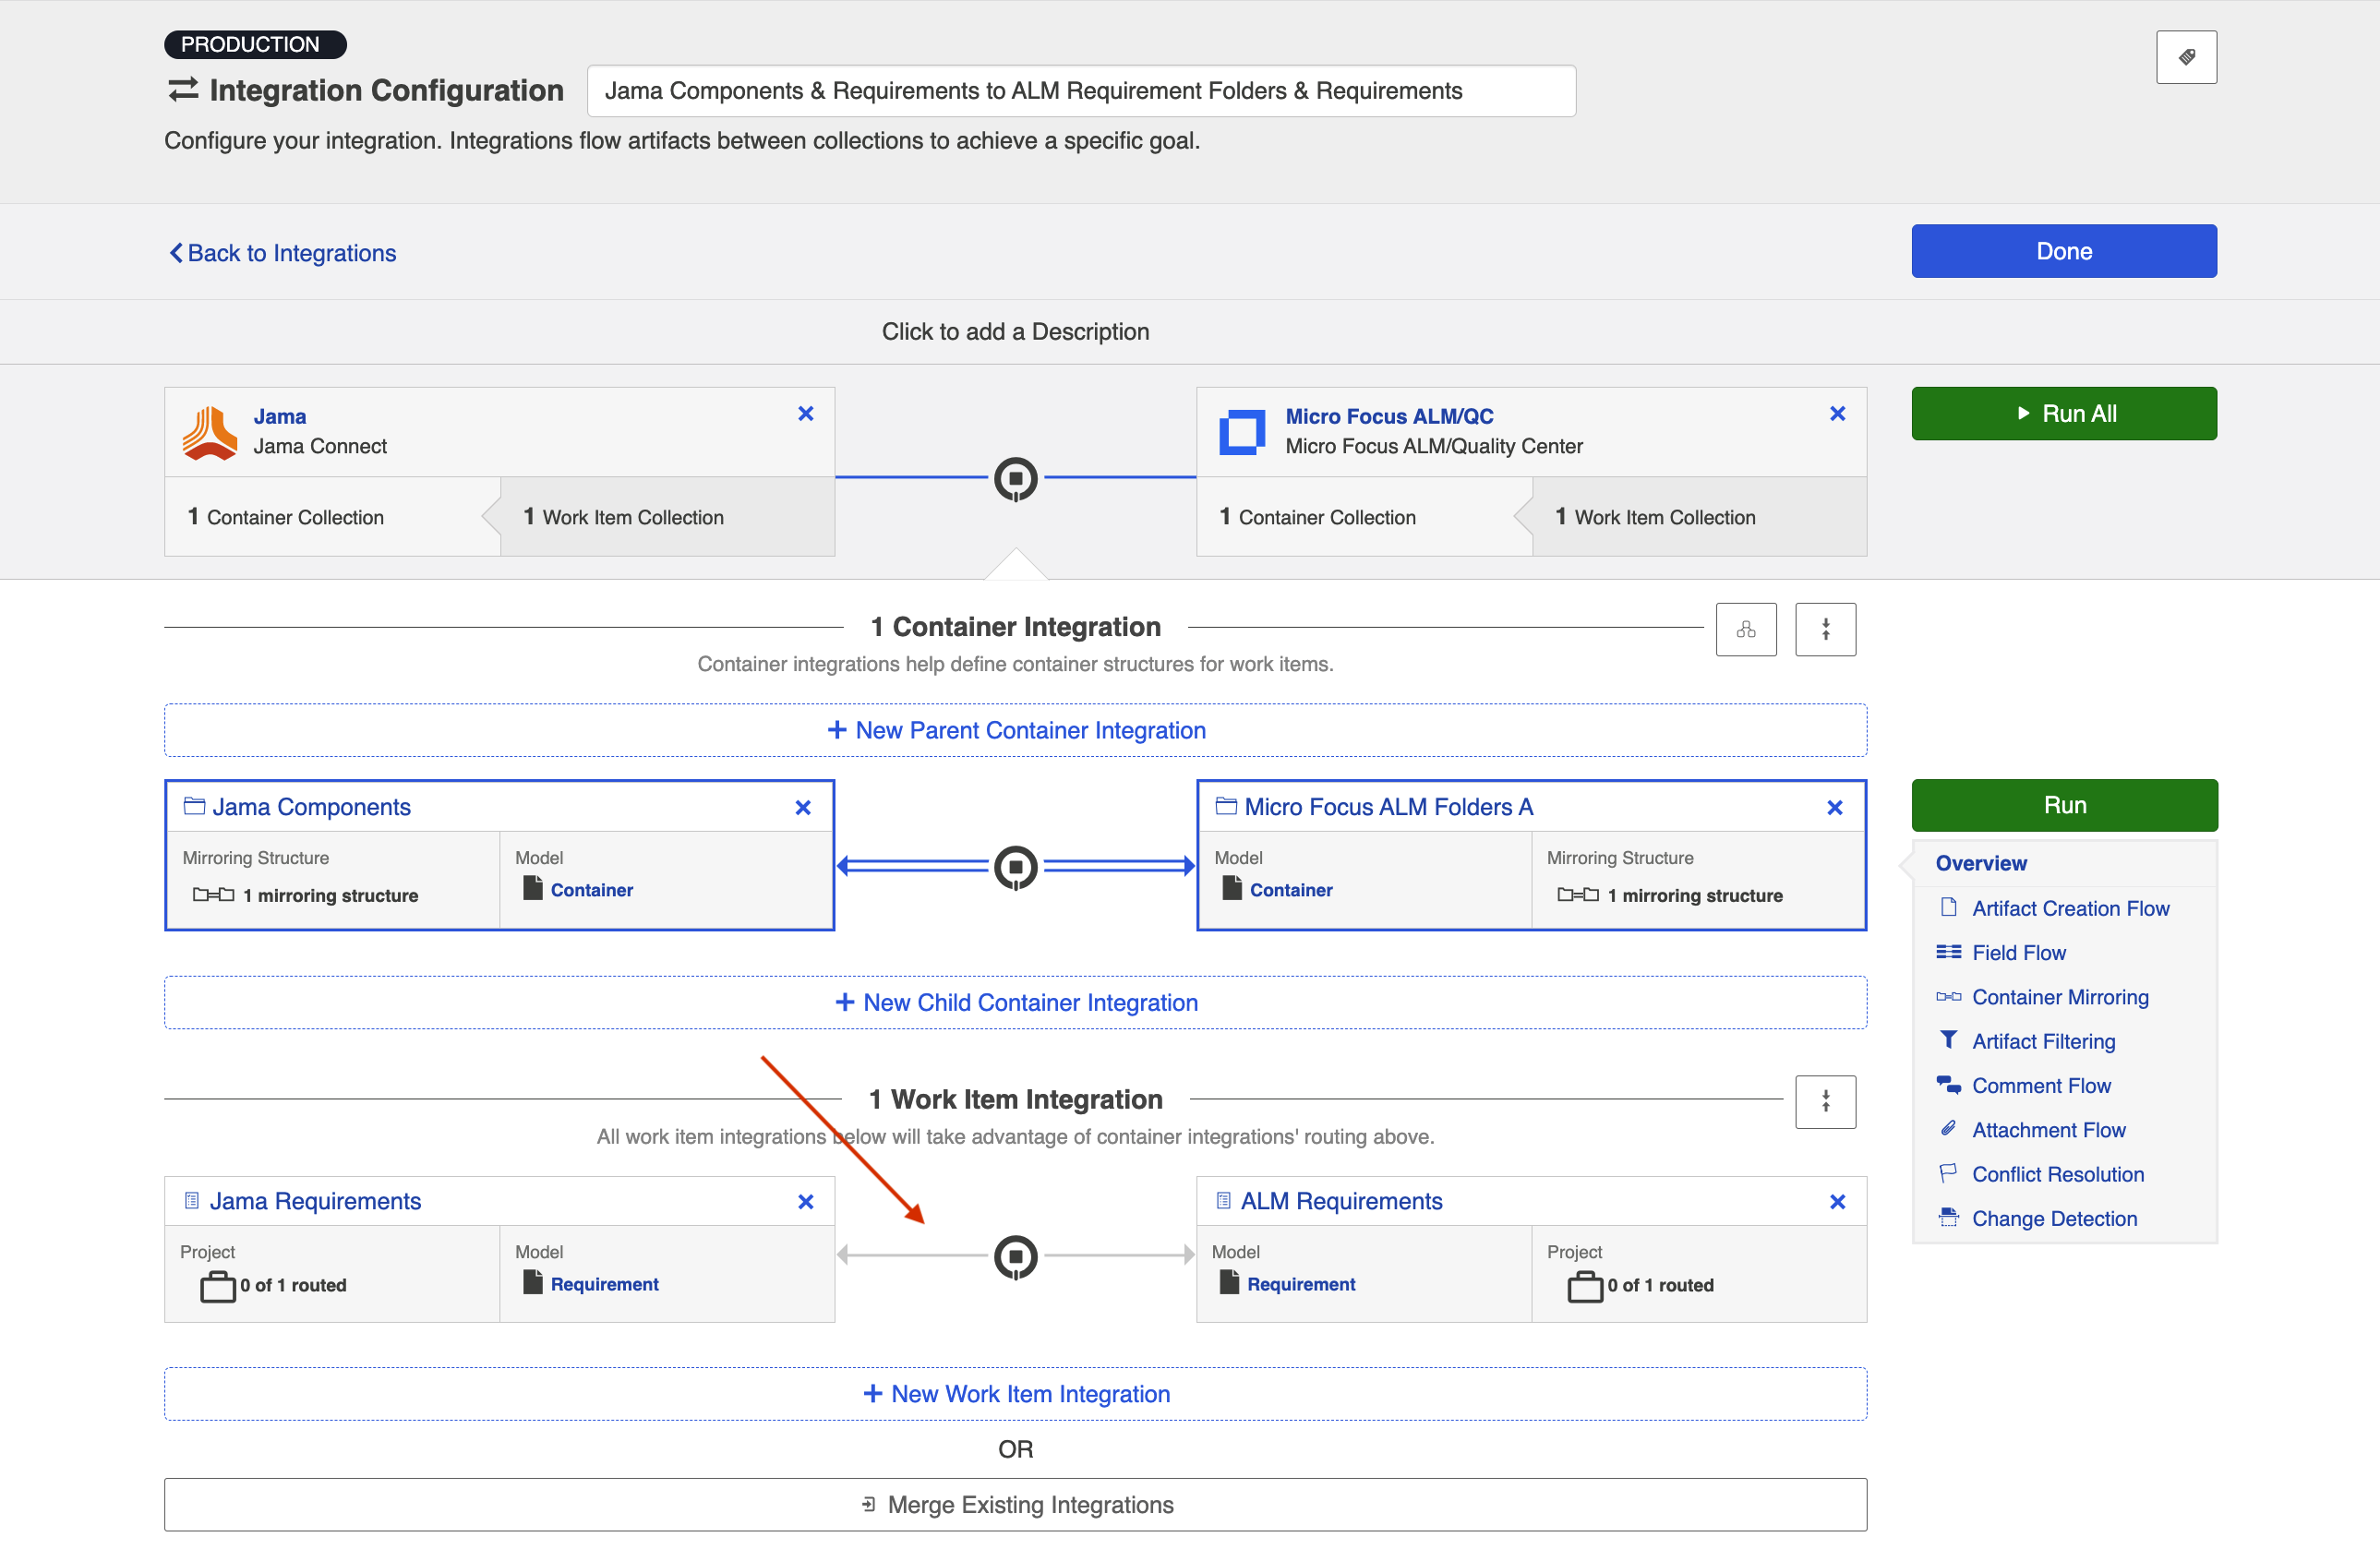
After clicking Add Selected, you'll see that integration added to the Integration Configuration screen.
Note: If you'd like to detach the integration, follow the steps outlined in the Detaching a Work Item Integration section below. Do not click the x's in the upper right corner of each collection, as this will remove those collections (along with any associated configuration, such as Artifact Routing) from the integration permanently. Since the merged Work Item Synchronization only exists as part of the Container + Work Item Synchronization, any changes you make to that integration here will be permanent.
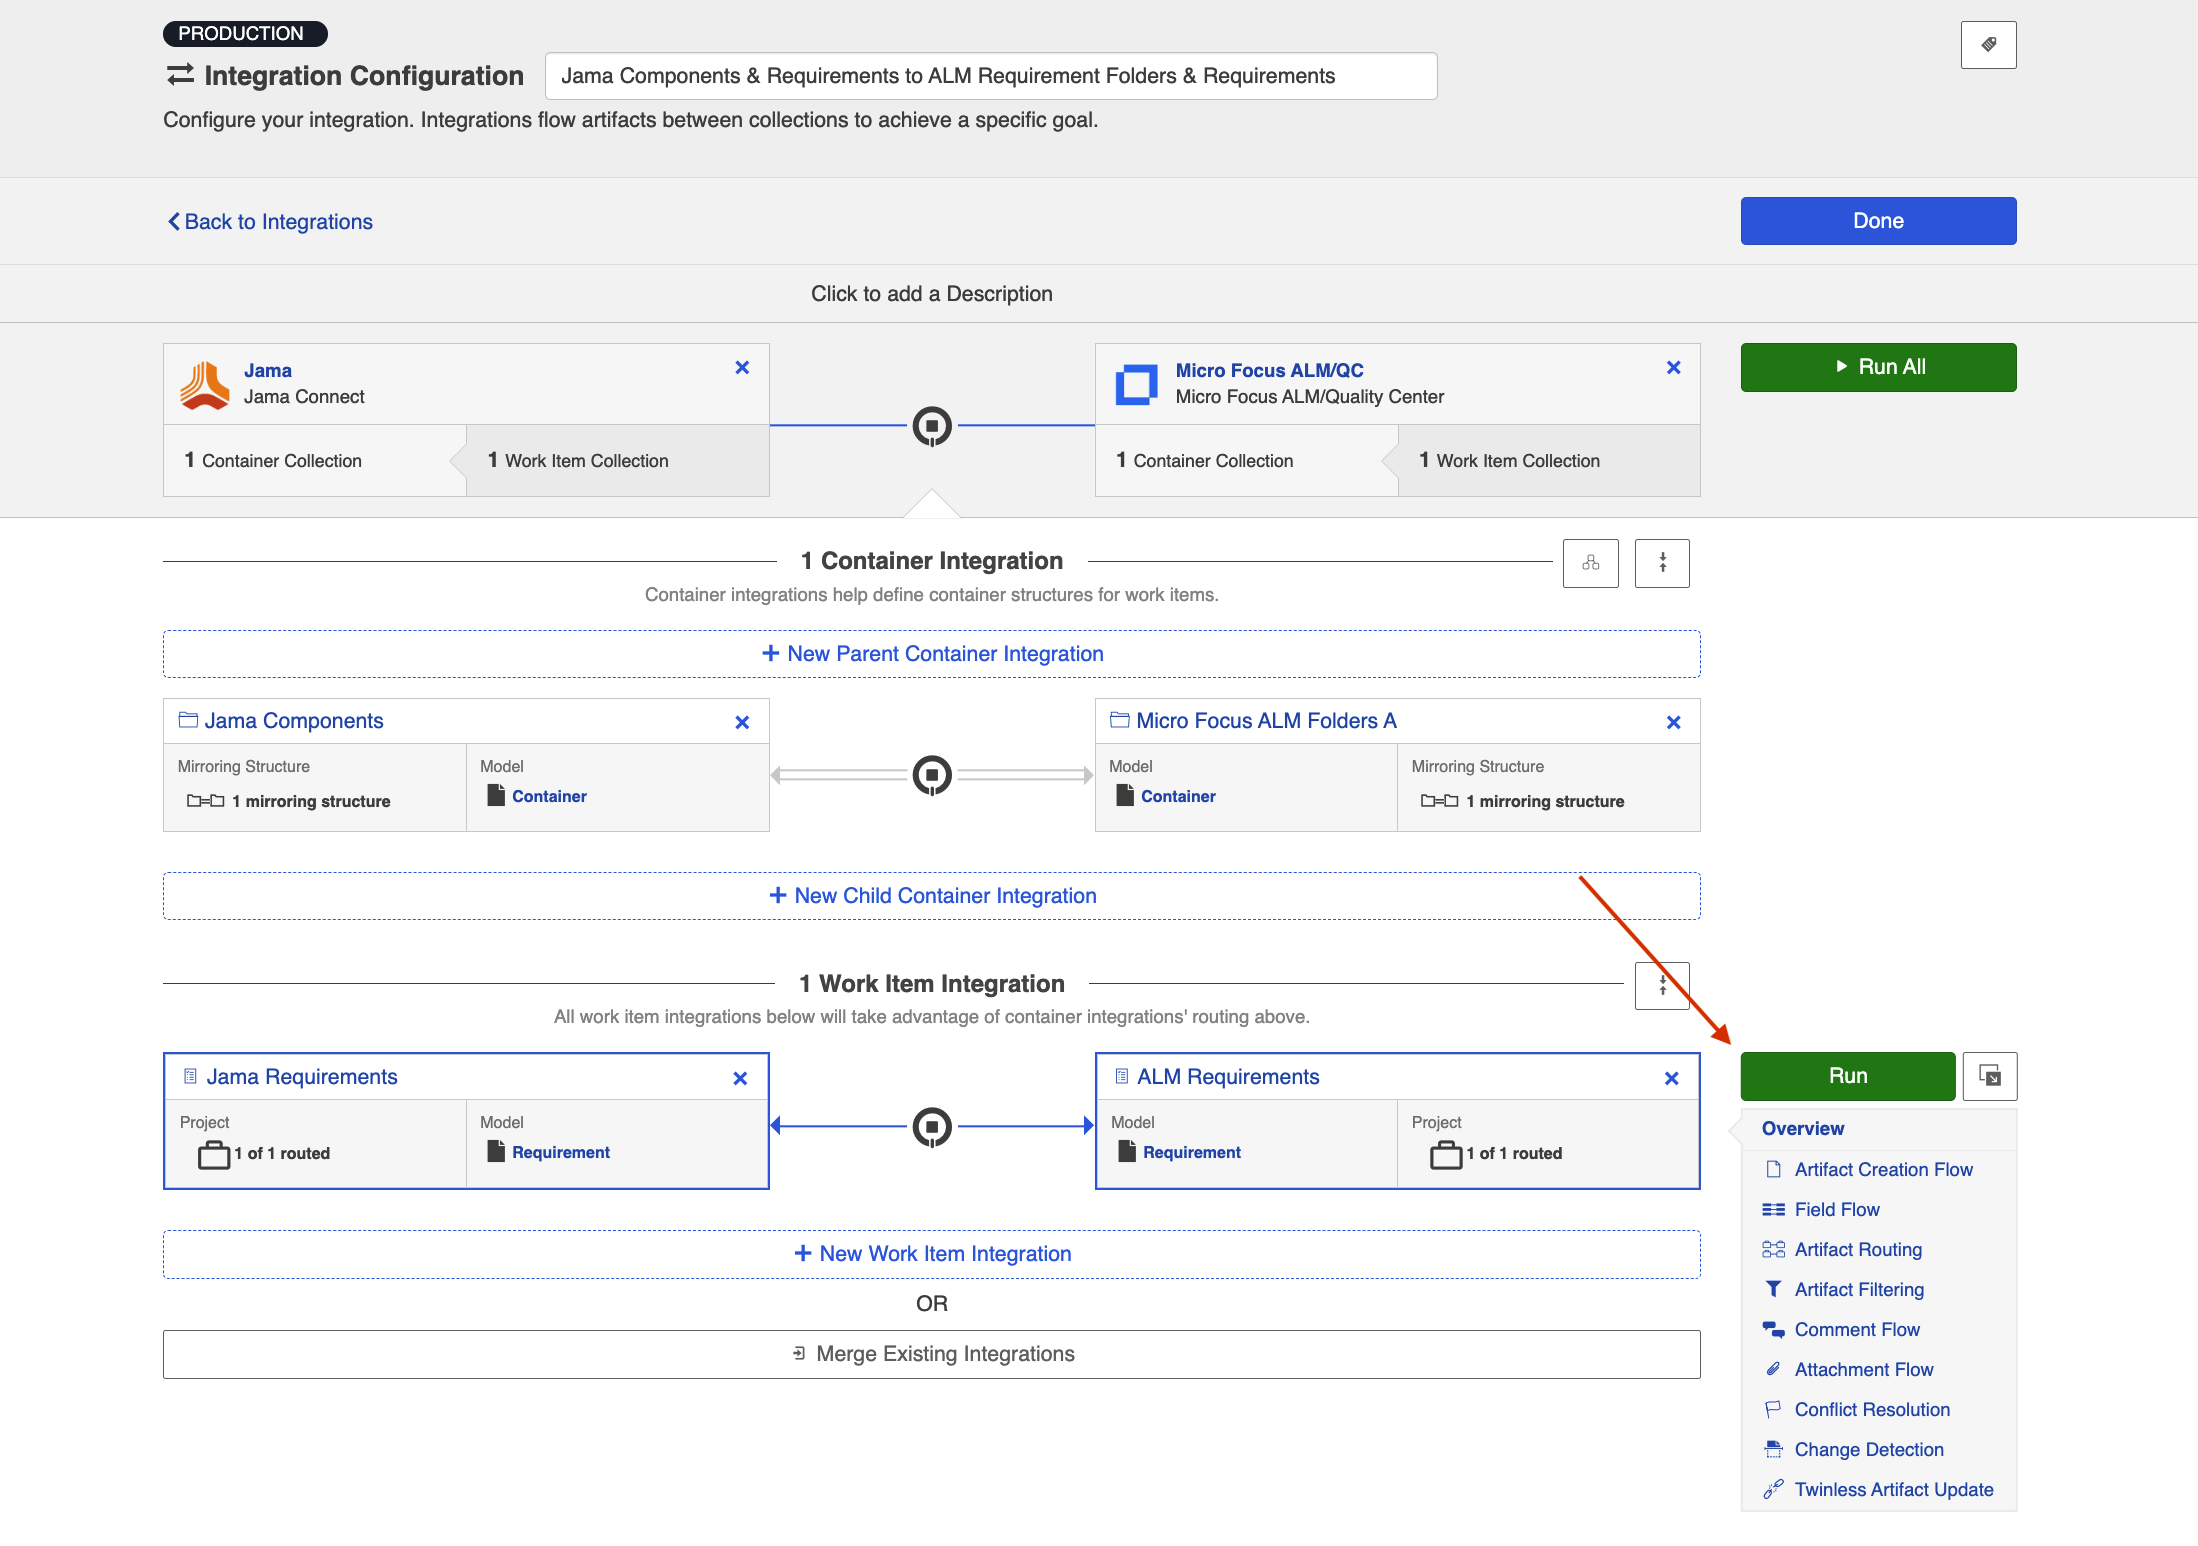
Activating the Configuration Pane
To activate the configuration pane for the integration you'd like to modify, highlight the integration by clicking its arrow. This will enable the configuration links for that particular integration.
Detaching a Work Item Integration
If you'd like to detach a Work Item Integration (so that it exists as an independent integration, accessible from the Integrations List page, rather than as part of this Work Item + Container Mirroring Integration), make sure the configuration pane for that integration is enabled (see steps above).
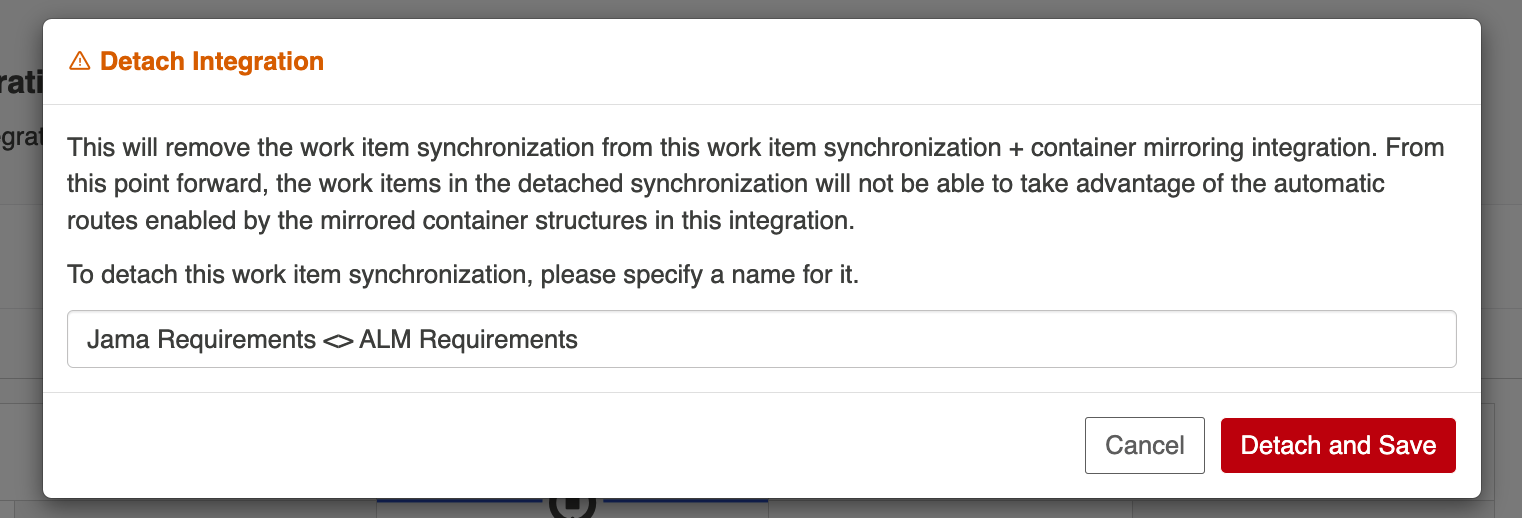
Next, click the Detach button.
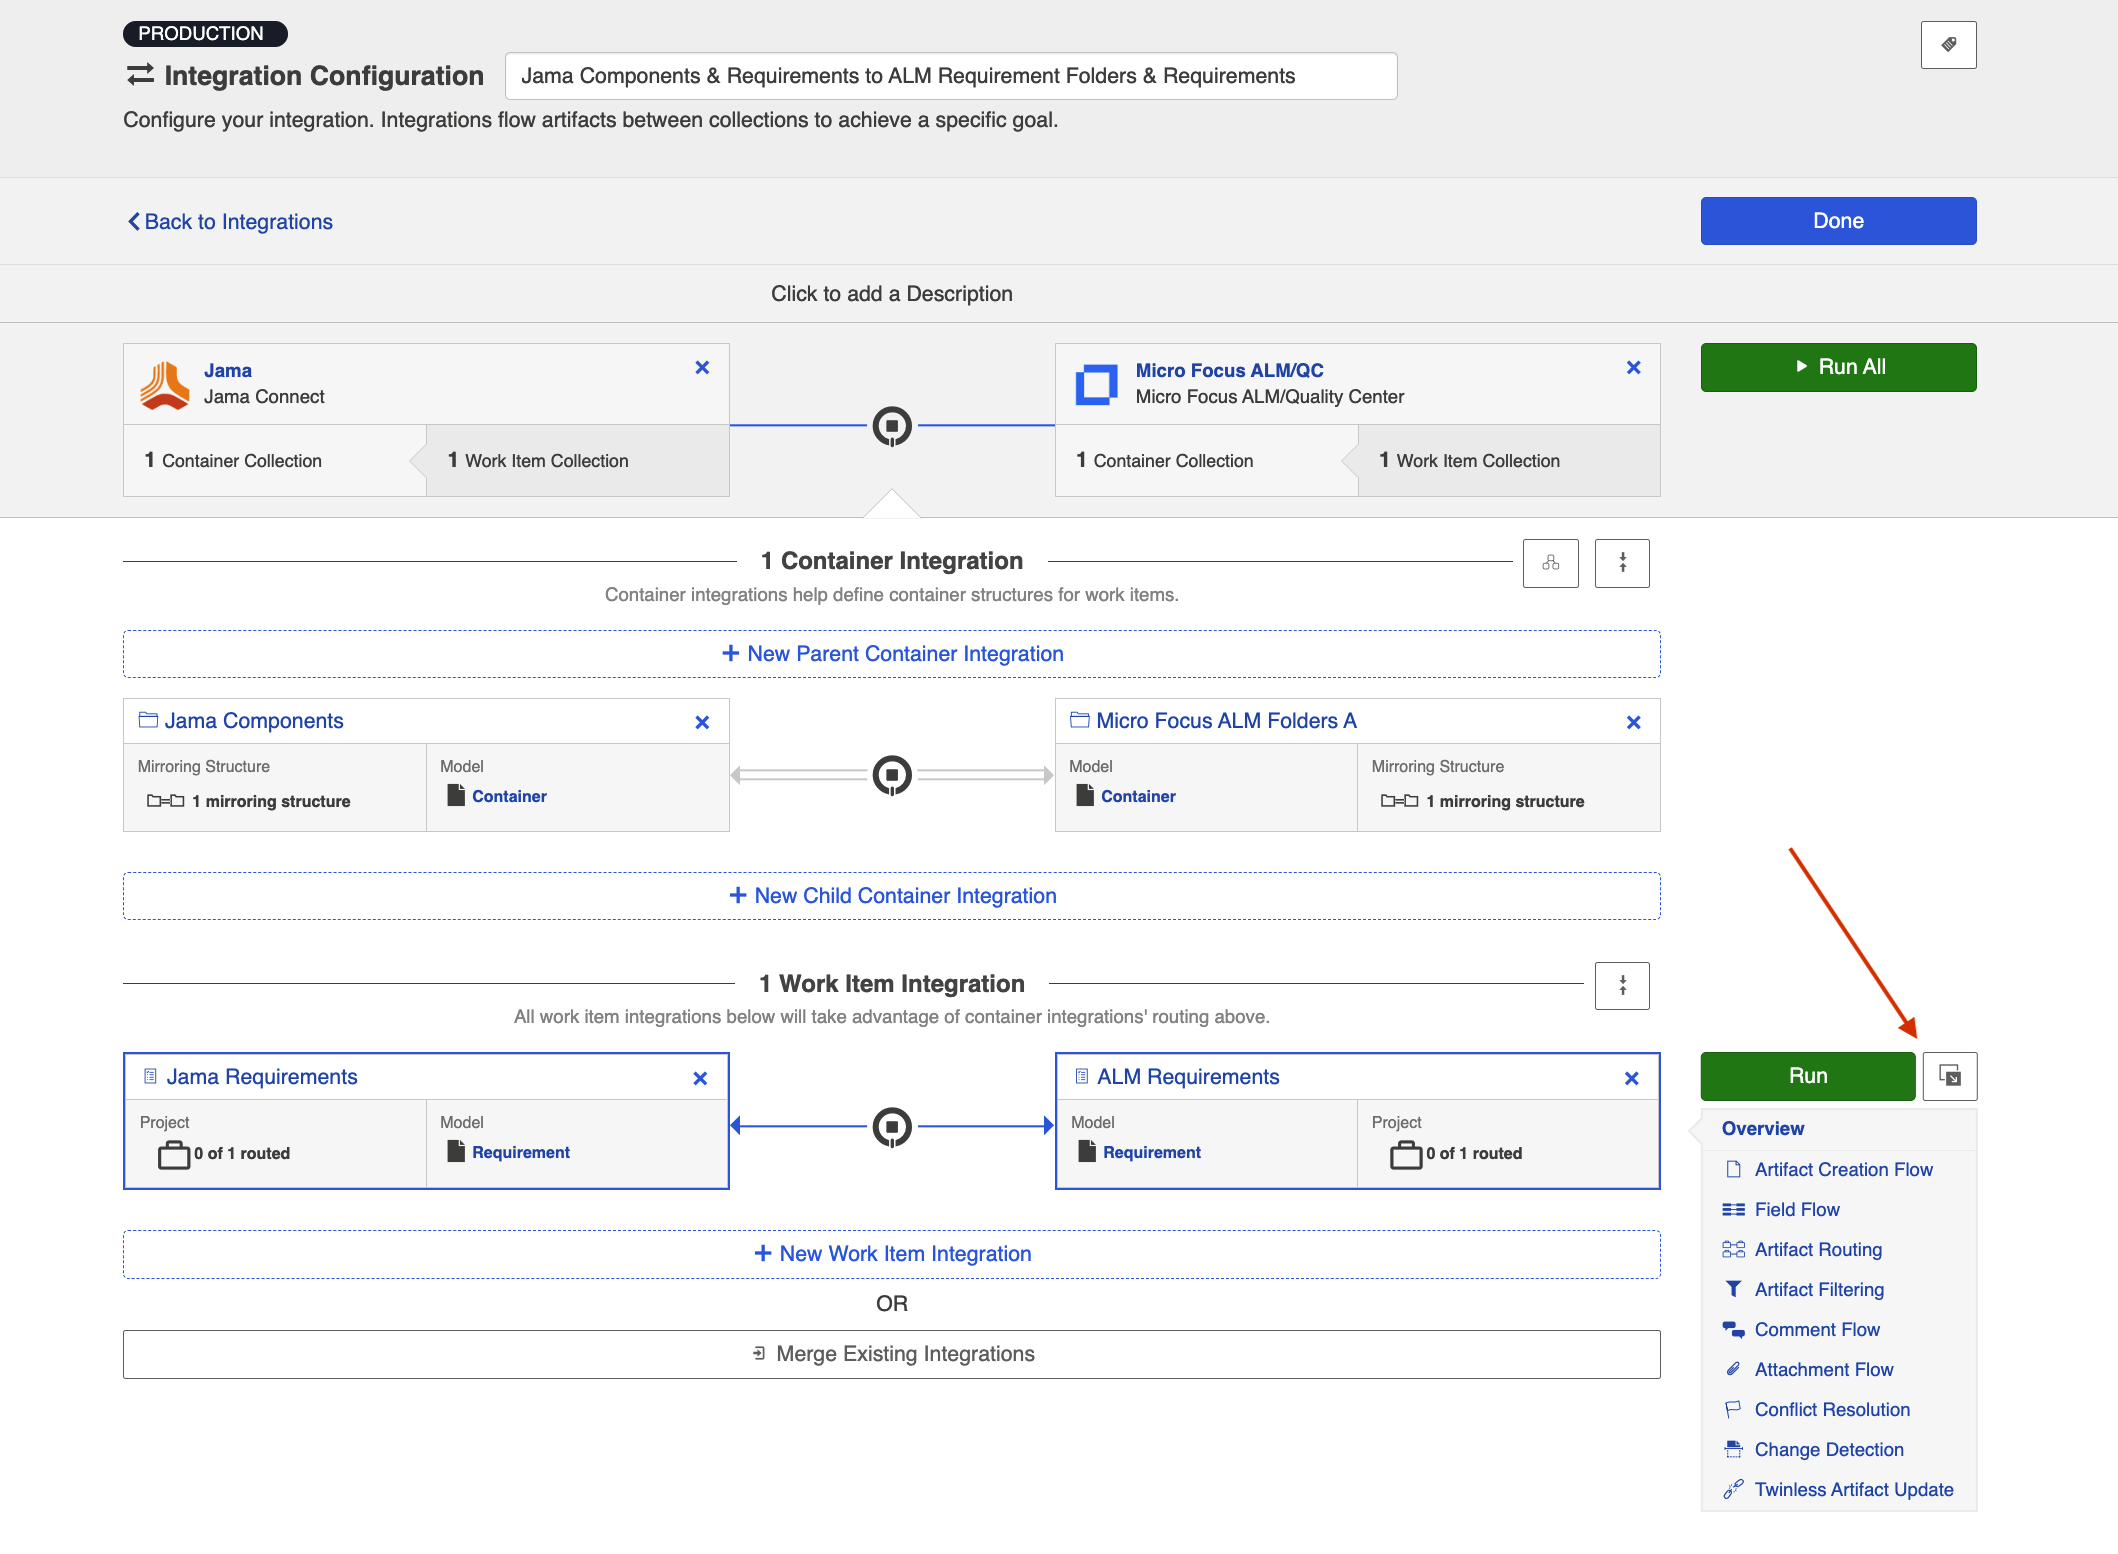
You will be prompted to name your integration:
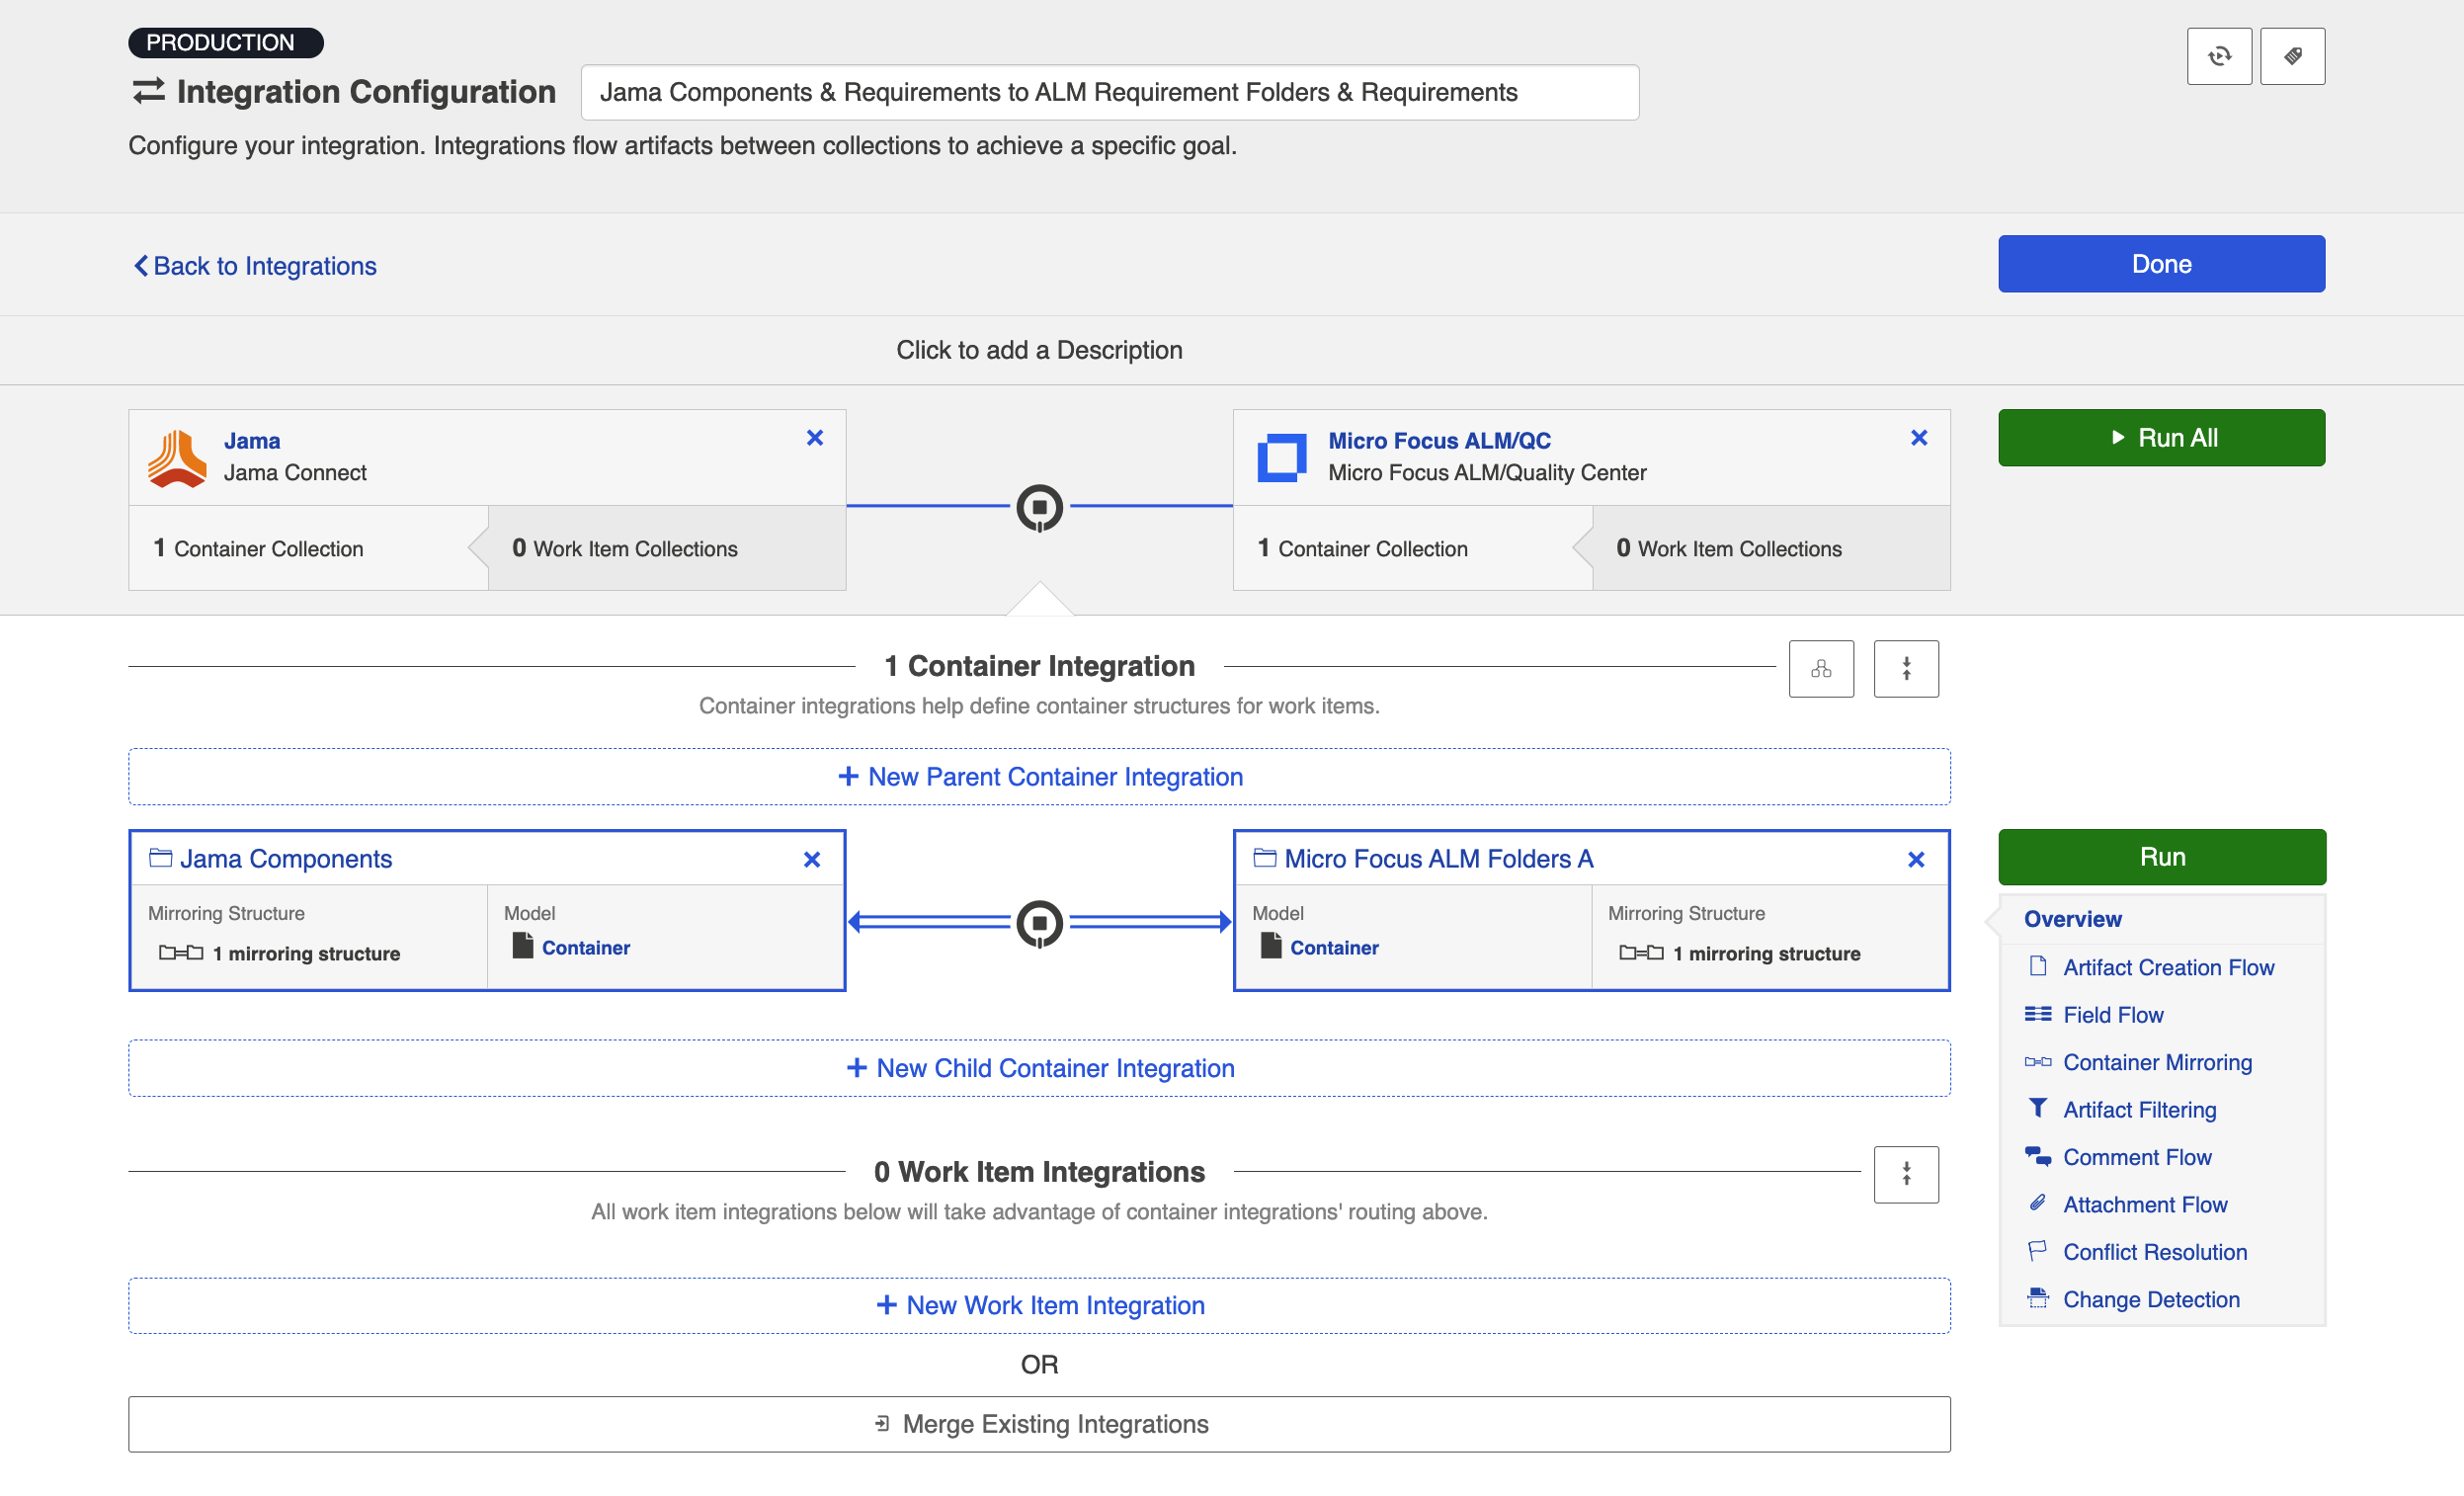
You'll notice that the integration is no longer included as part of this Container + Work Item Synchronization:
You'll also notice that you can now access that integration from the Integration List view:

Configuration
In general, configuration for the Work Item Integration contained within your Container + Work Item Synchronization will be very similar to configuration for a typical Work Item Synchronization, with the exception of a few key differences, outlined below. Please refer to the Work Item Synchronization page for details on all other aspects of configuration.
Artifact Routing
On the Artifact Routing screen for your Work Item Integration, you will see a reference to the existing Container Mirroring configuration that was set up as part of the Container Integration.
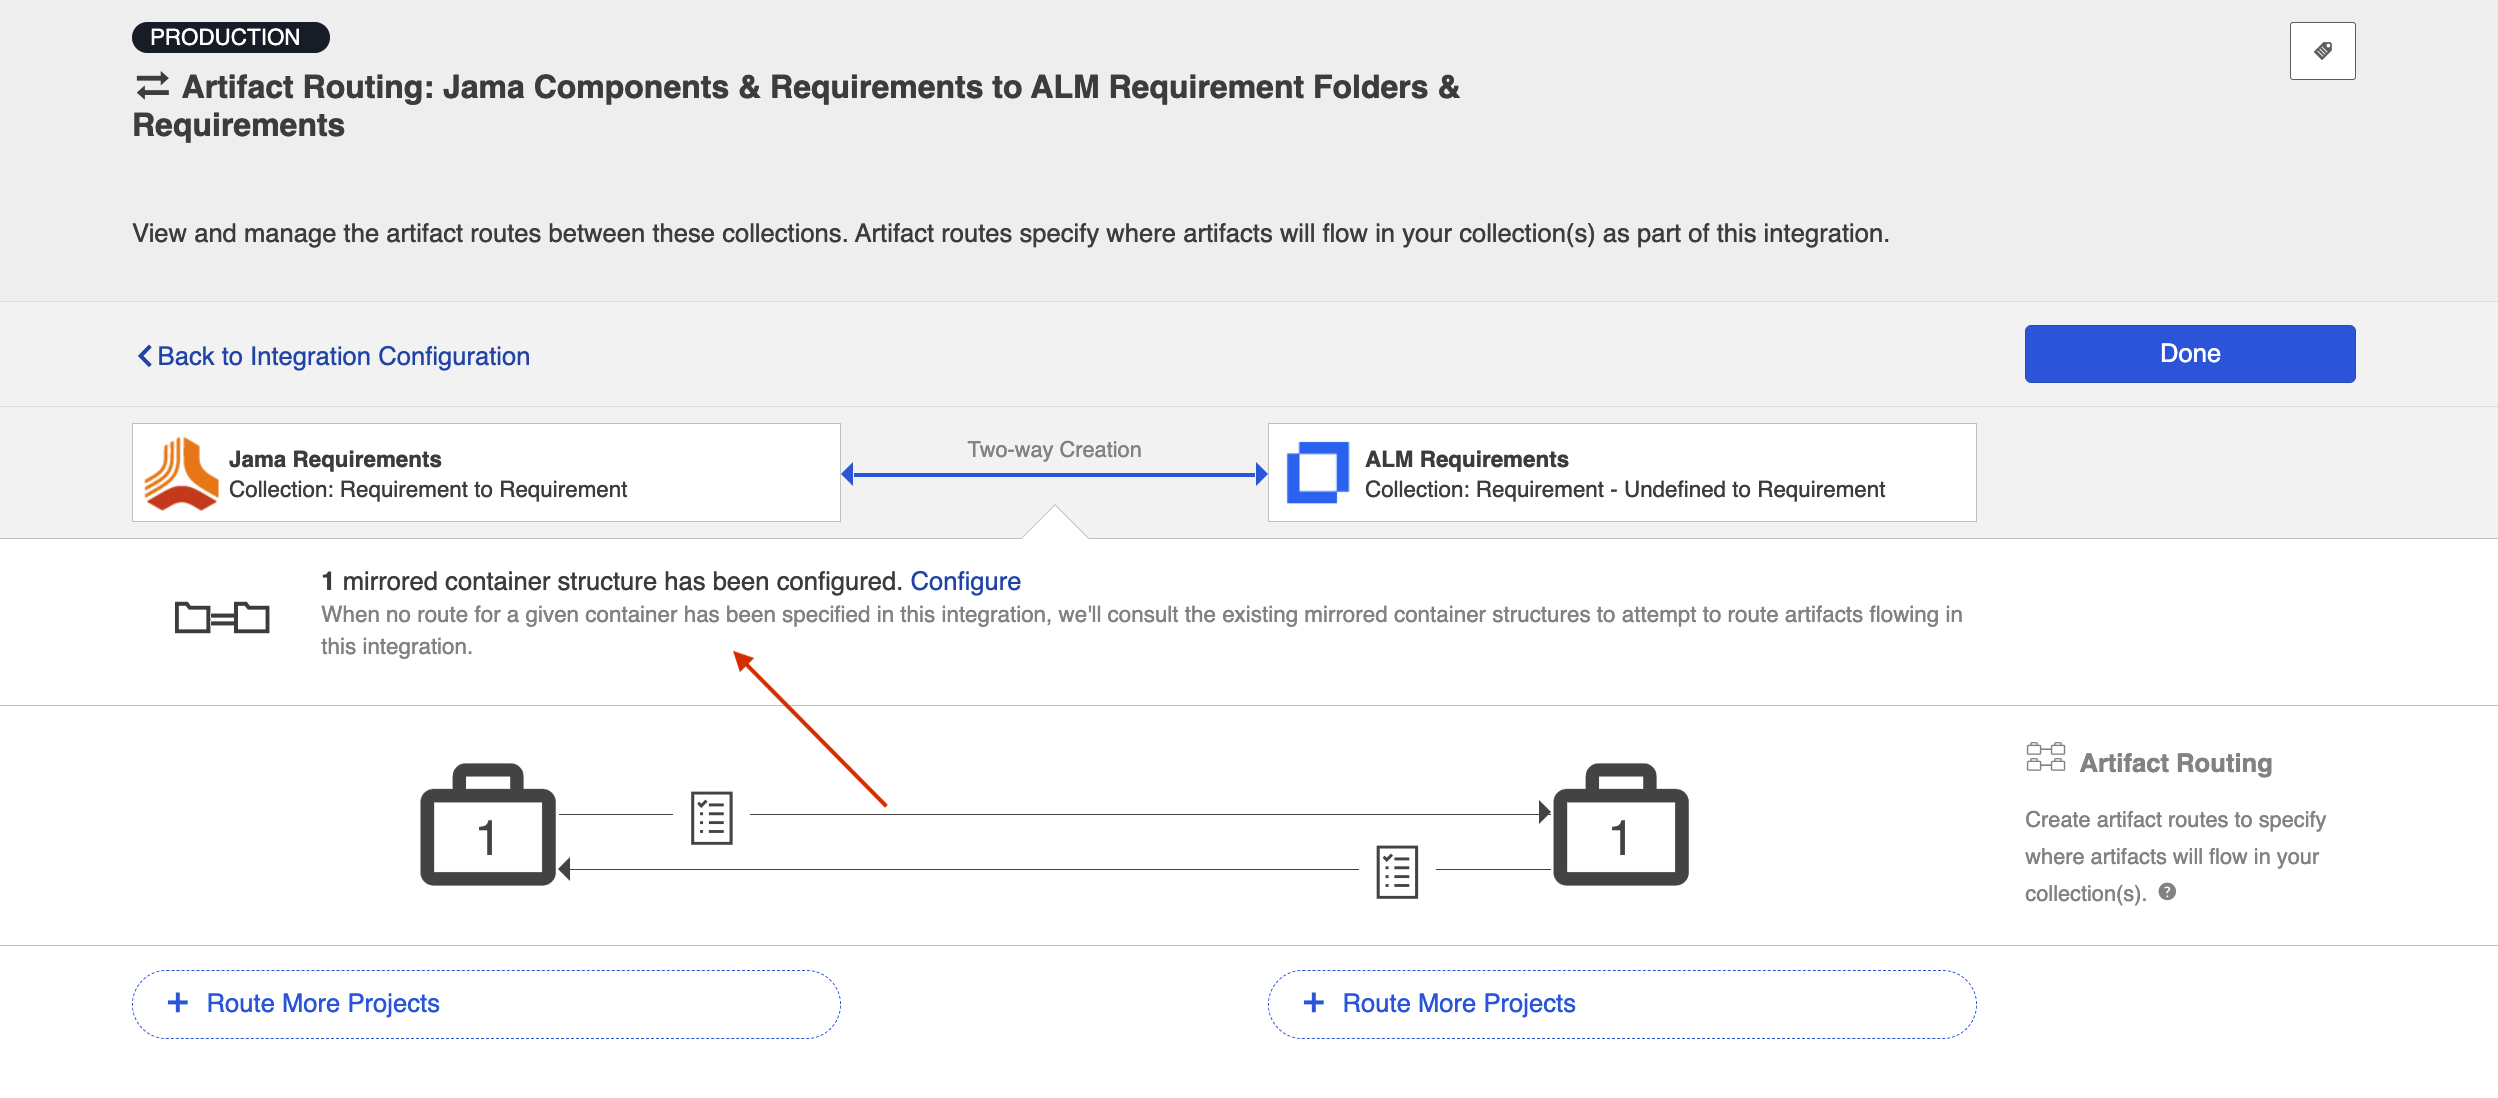
Where applicable, your work items will flow in accordance with the Container Mirroring that has been configured. In addition to the routing that is inherited based on Container Mirroring, Artifact Routing can be configured on this page to determine where work items will flow with regard to containers not included in the Container Mirroring structure. If you configure Artifact Routing that contradicts the Container Mirroring configuration, the Artifact Routing configuration will take precedence when determining how work items will flow.
Note: If you would like your artifact routing to match your container mirroring, but to only flow artifacts from a subset of those containers, that use case cannot be accommodated from the Artifact Routing screen here. To satisfy this use case, you will need to detach your work item integration from the Container + Work Item Synchronization. Once detached, you can configure Artifact Routing for the independent work item integration to successfully limit the containers utilized.
Running your Integration
Please be aware that integrations will trigger changes in your end repositories and that misconfiguration can cause items to be duplicated or modified in unexpected ways. Additionally, there is no undo in Hub or the repositories. If you have any questions, please contact customer care.
Since your Container + Work Item Synchronization technically consists of several independent, but interconnected integrations, you can select Run All to run all integrations at once, or choose to run integrations independently.
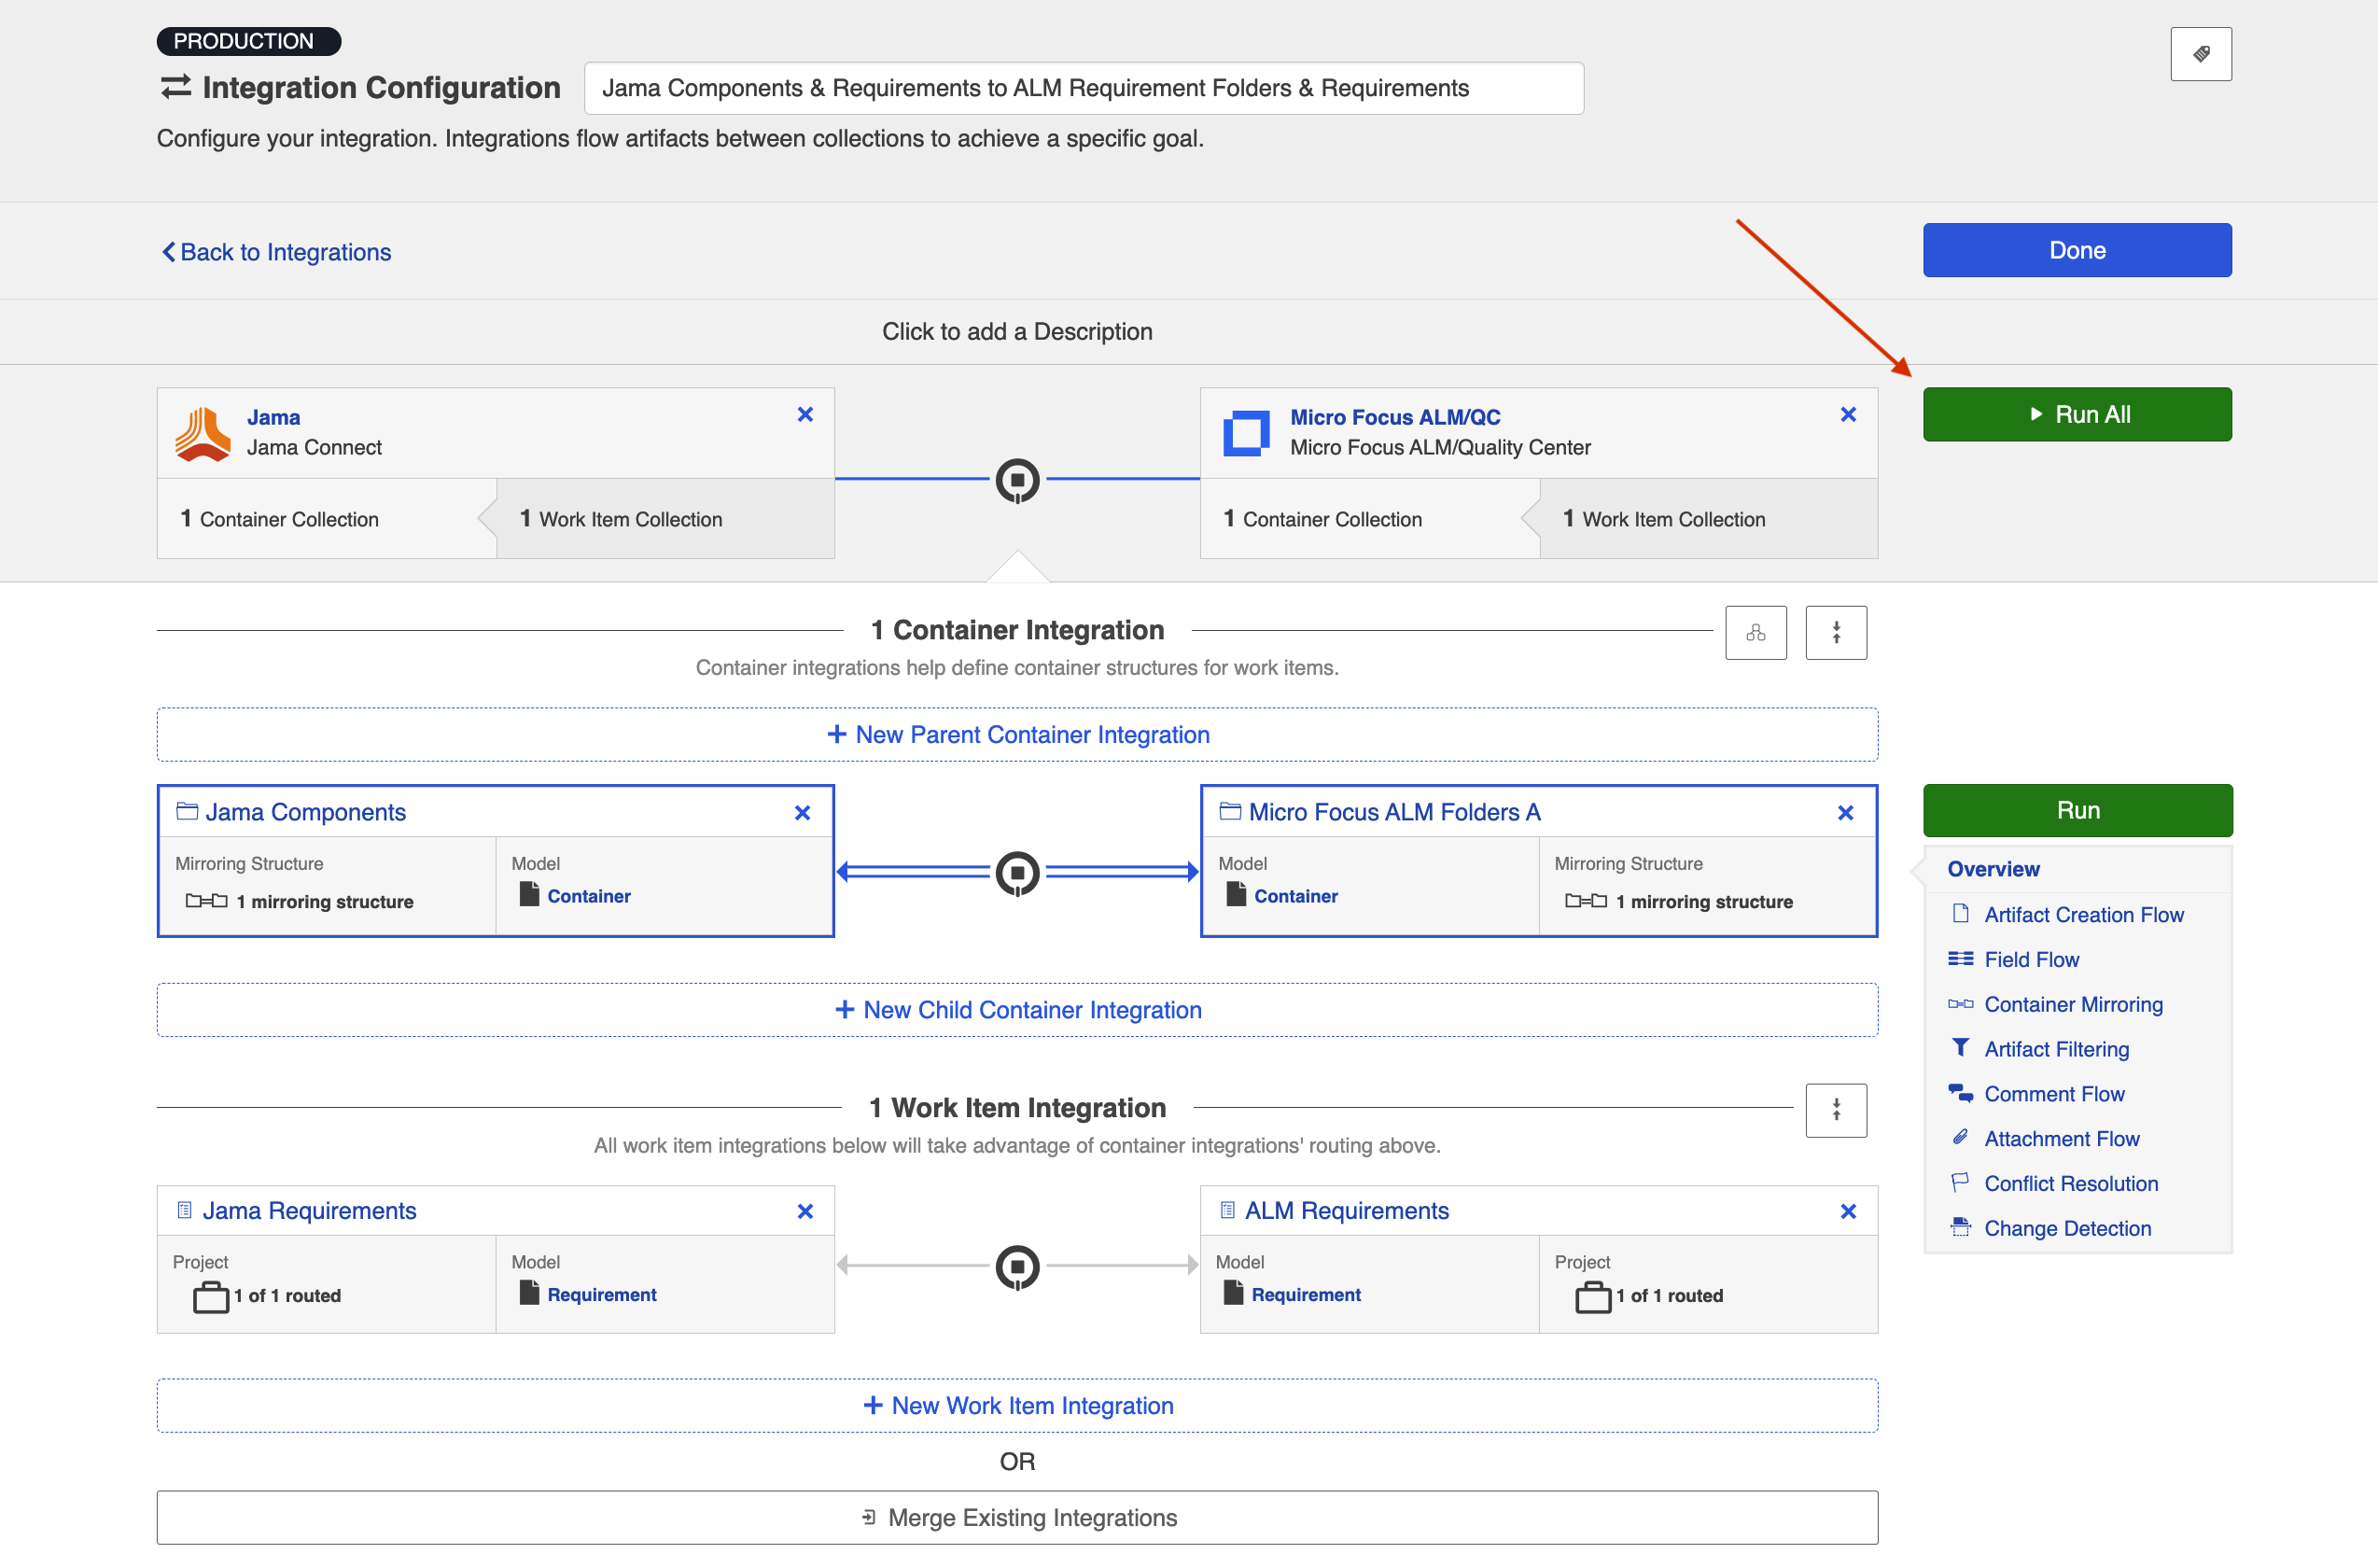
If for any reason you'd like to run an integration individually, activate that integration's configuration pane by clicking on its arrows, and then click Run.
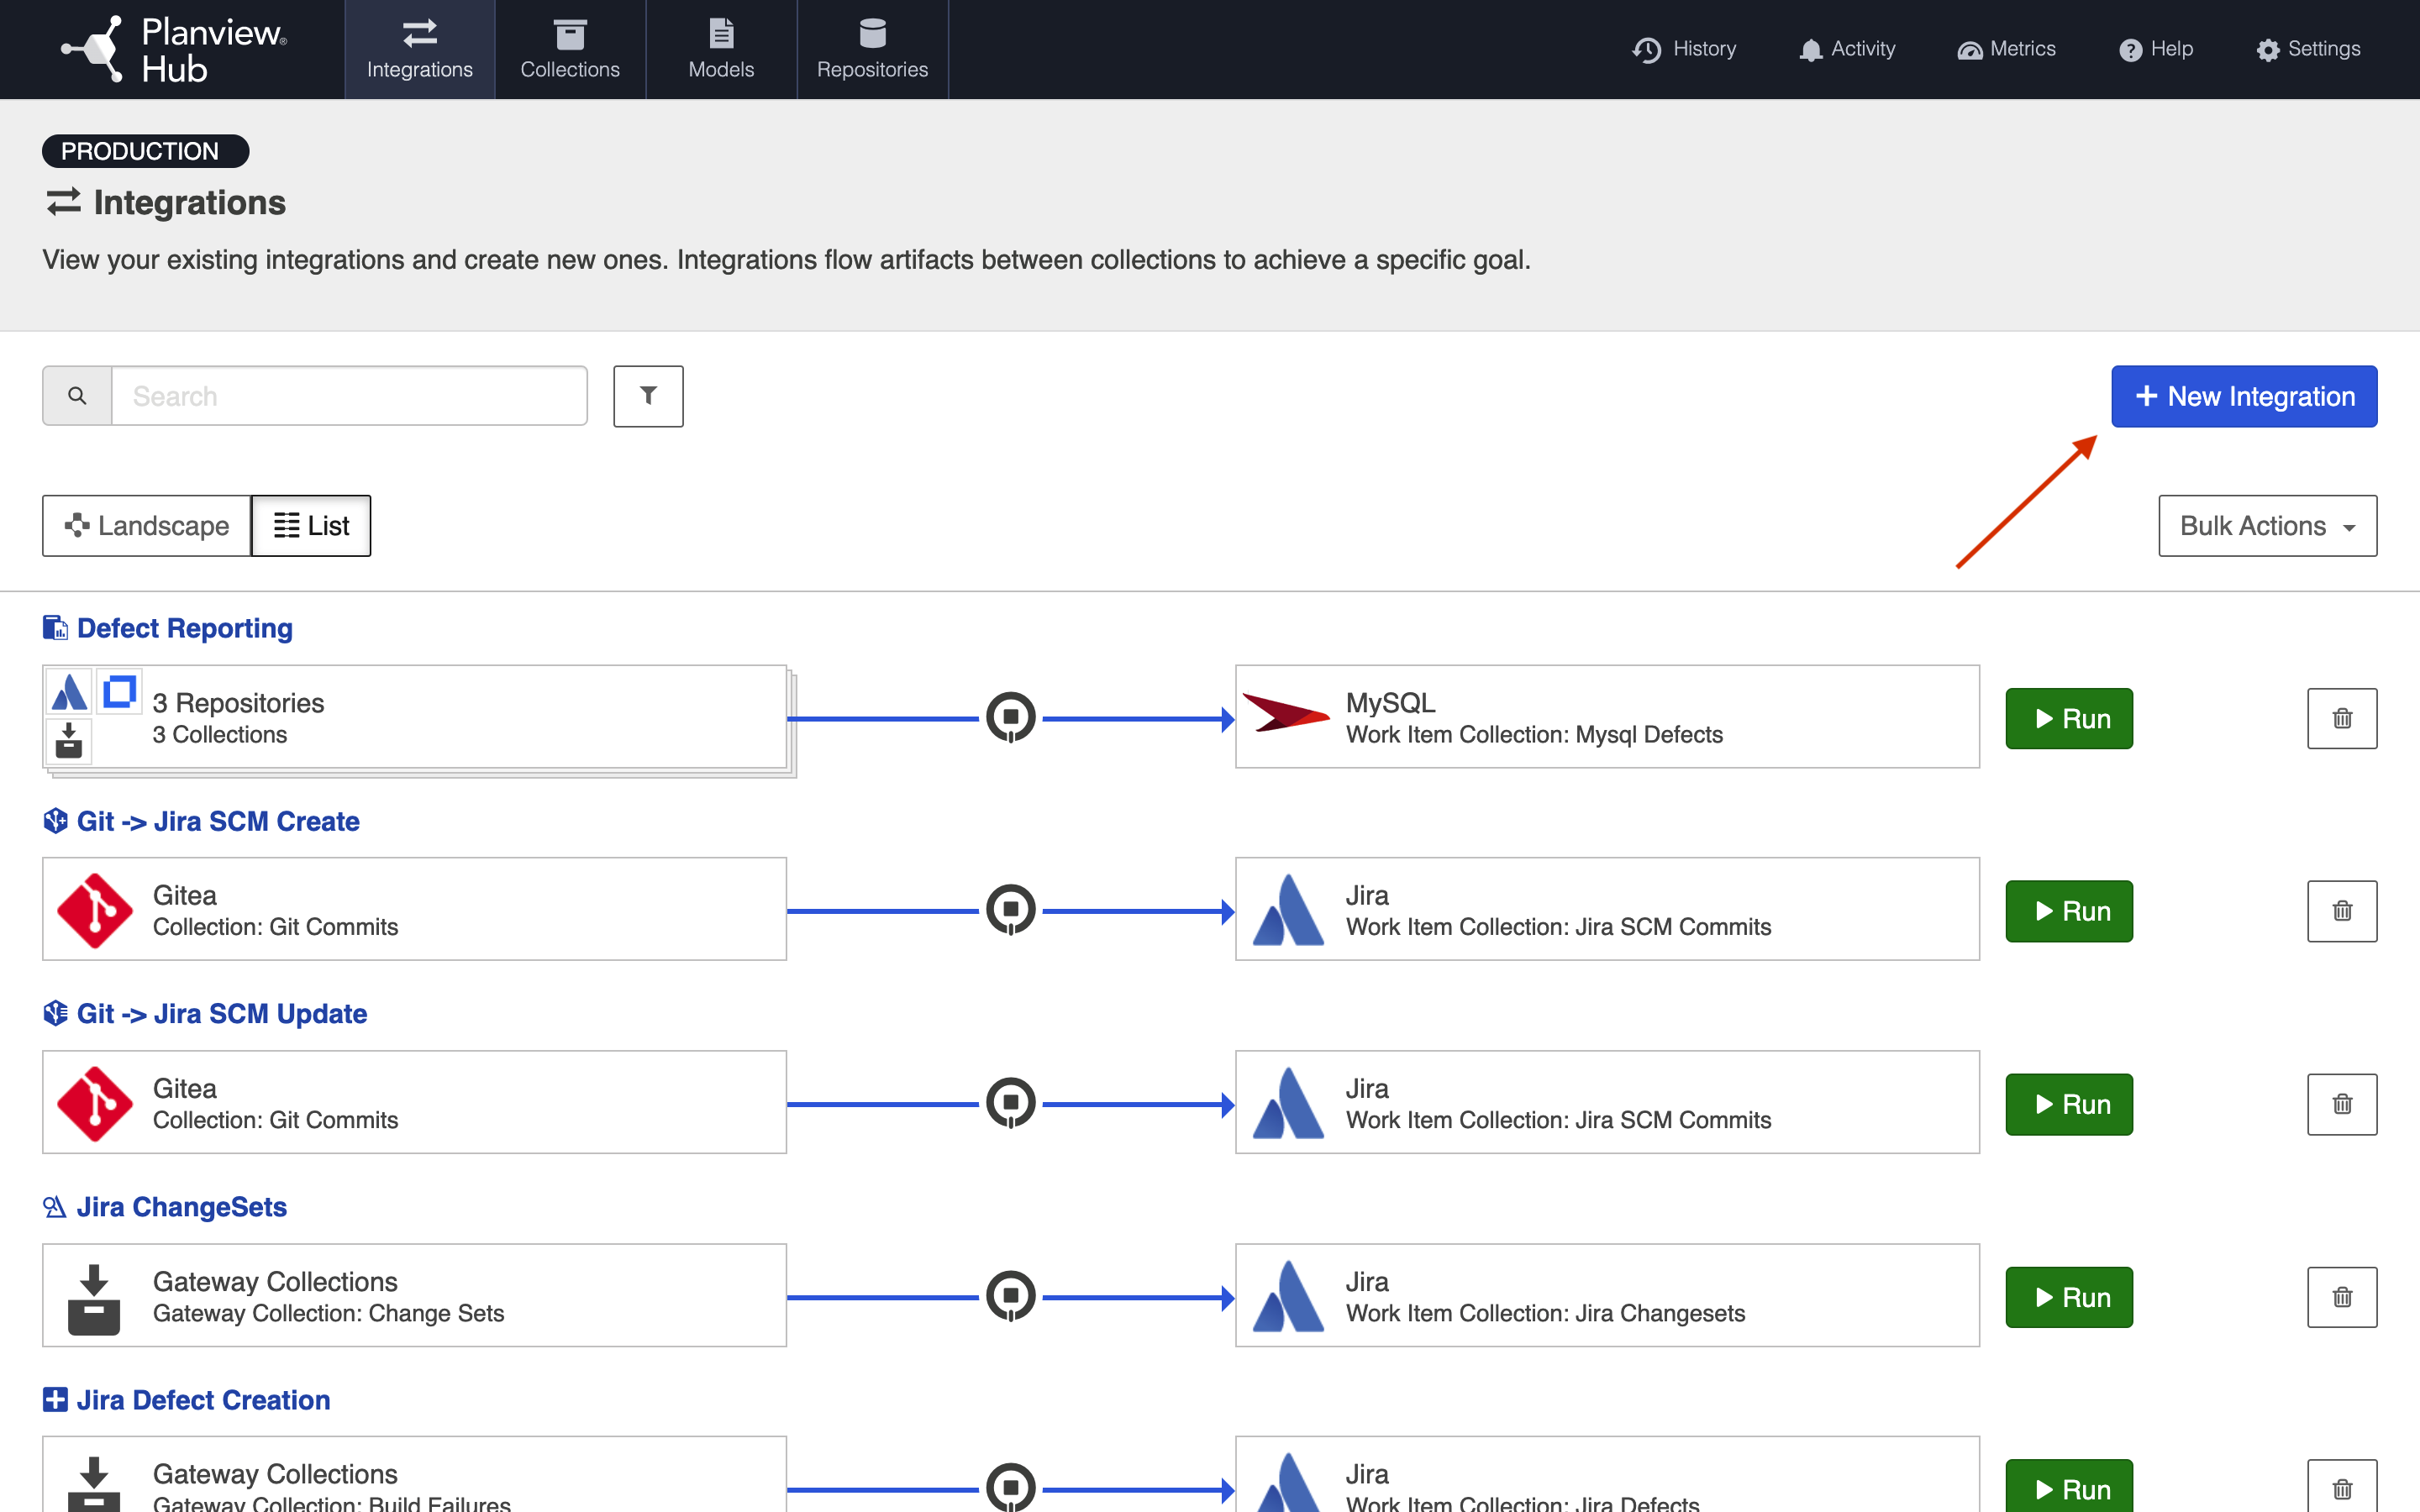
You can also view and run your integration(s) from the Integration List screen. On this screen, your integration will defaulted to the expanded view, where you can run each integration individually:

If you'd like to Run All, you can collapse the view and then click Run All:


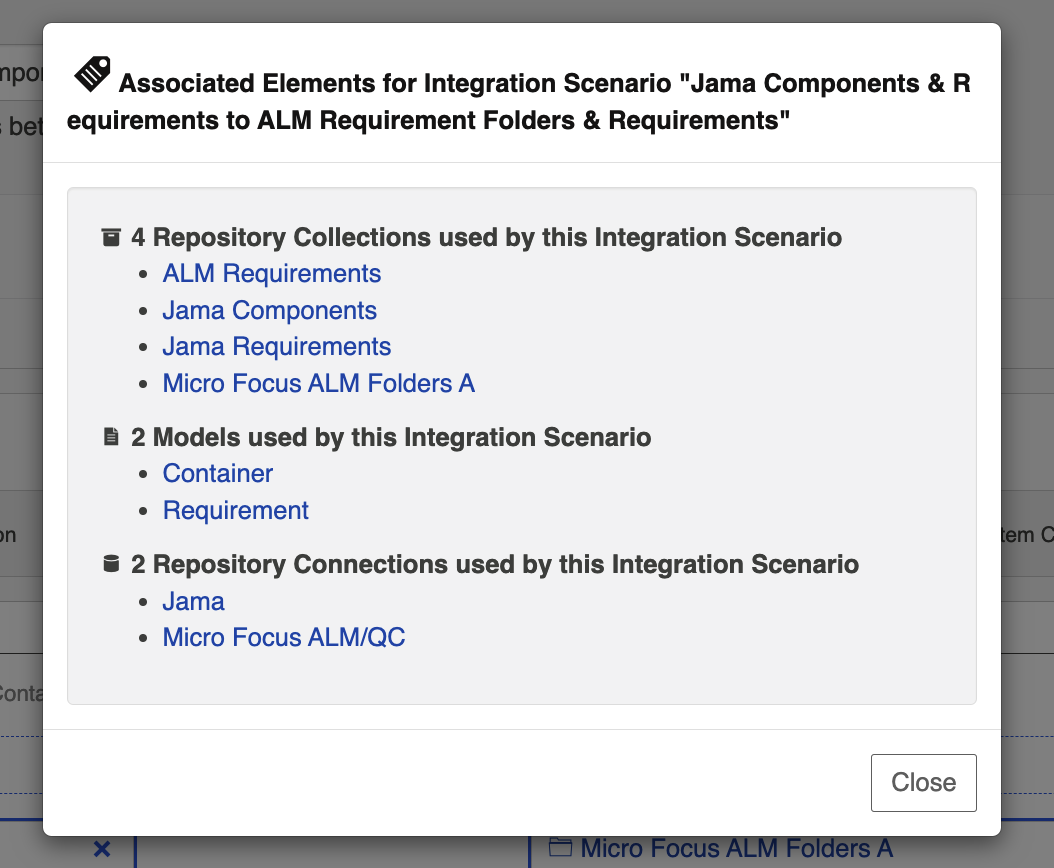
Viewing Associated Configuration Elements
To view associated configuration elements (such as collections or models that utilize the integration you are viewing), click the Associated Elements tag in the upper right corner of the screen.