
Time Tracking
What is a Time Tracking Integration?
This integration template is only available to repositories that support time tracking.
| Supported Repository | Supported Hub Version | |
|---|---|---|
 |
Planview Portfolios | Planview Hub: 19.3 and later |
|
Planview PPM Pro |
Planview Hub: 20.1 and later | |
| Planview AdaptiveWork | Planview Hub: 22.4 and later |
An integration is quite simply the flow of information between two or more collections.
A Time Tracking integration simplifies time tracking across an organization by allowing developers and project managers to record, view, and approve time entries in their preferred systems. Time entries will be created in an organization's primary time tracking system (e.g., Planview Portfolios) when it is logged against given artifacts in another system (e.g., Jira).
Hub offers two configuration options for one-way time aggregation into the repository:
- A one-to-one scenario, where Worklogs from Jira issues flow to the corresponding Planview repository primary structure. For example, if you are synchronizing Jira Epics ↔ Planview PPL level artifacts, then time submitted on the Jira Epic will flow to the corresponding Planview PPL level artifact.

- A roll-up scenario, where Worklogs on Jira child issues (such as Stories or Defects) roll-up and flow to their corresponding parent Epic in the Planview repository.

To configure an integration scenario for Planview Portfolios, Planview PPM Pro, or Planview AdaptiveWork, please see the instructions below.
Configuring a Time Tracking Integration
Note: Time tracking integrations can be configured using the Planview PPM Pro and Planview AdaptiveWork repositories. However, in the example below, you will see configuration details for setting up a Planview Portfolios time tracking integration. Configuration details may vary depending on the repository.
Work Item Synchronization
To flow worklogs from Atlassian Jira to Planview Portfolios, you will first need to create a Work Item Synchronization integration to enable synchronization between base artifacts (e.g., Stories, Defects, or Epics) in Jira collections and Portfolios collections.
To configure a Work Item Synchronization for your collections, please follow the instructions outlined here.
Additionally, it is important that you configure an artifact reference ID (a string field on the Jira artifact that holds its Portfolios twin's artifact ID) by following the instructions listed here.
Example Work Item Synchronizations:
- Atlassian Jira Stories <> Planview Portfolios Stories
- Atlassian Jira Defects <> Planview Portfolios Defects
- Atlassian Jira Epics <> Planview Portfolios Epics
Time Tracking Integration
Once you have configured your Work Item Synchronization, your next step will be to create a time tracking integration to flow the Worklog information.
Repository Connection
To create a time tracking integration, you will first need to configure your repository connection.
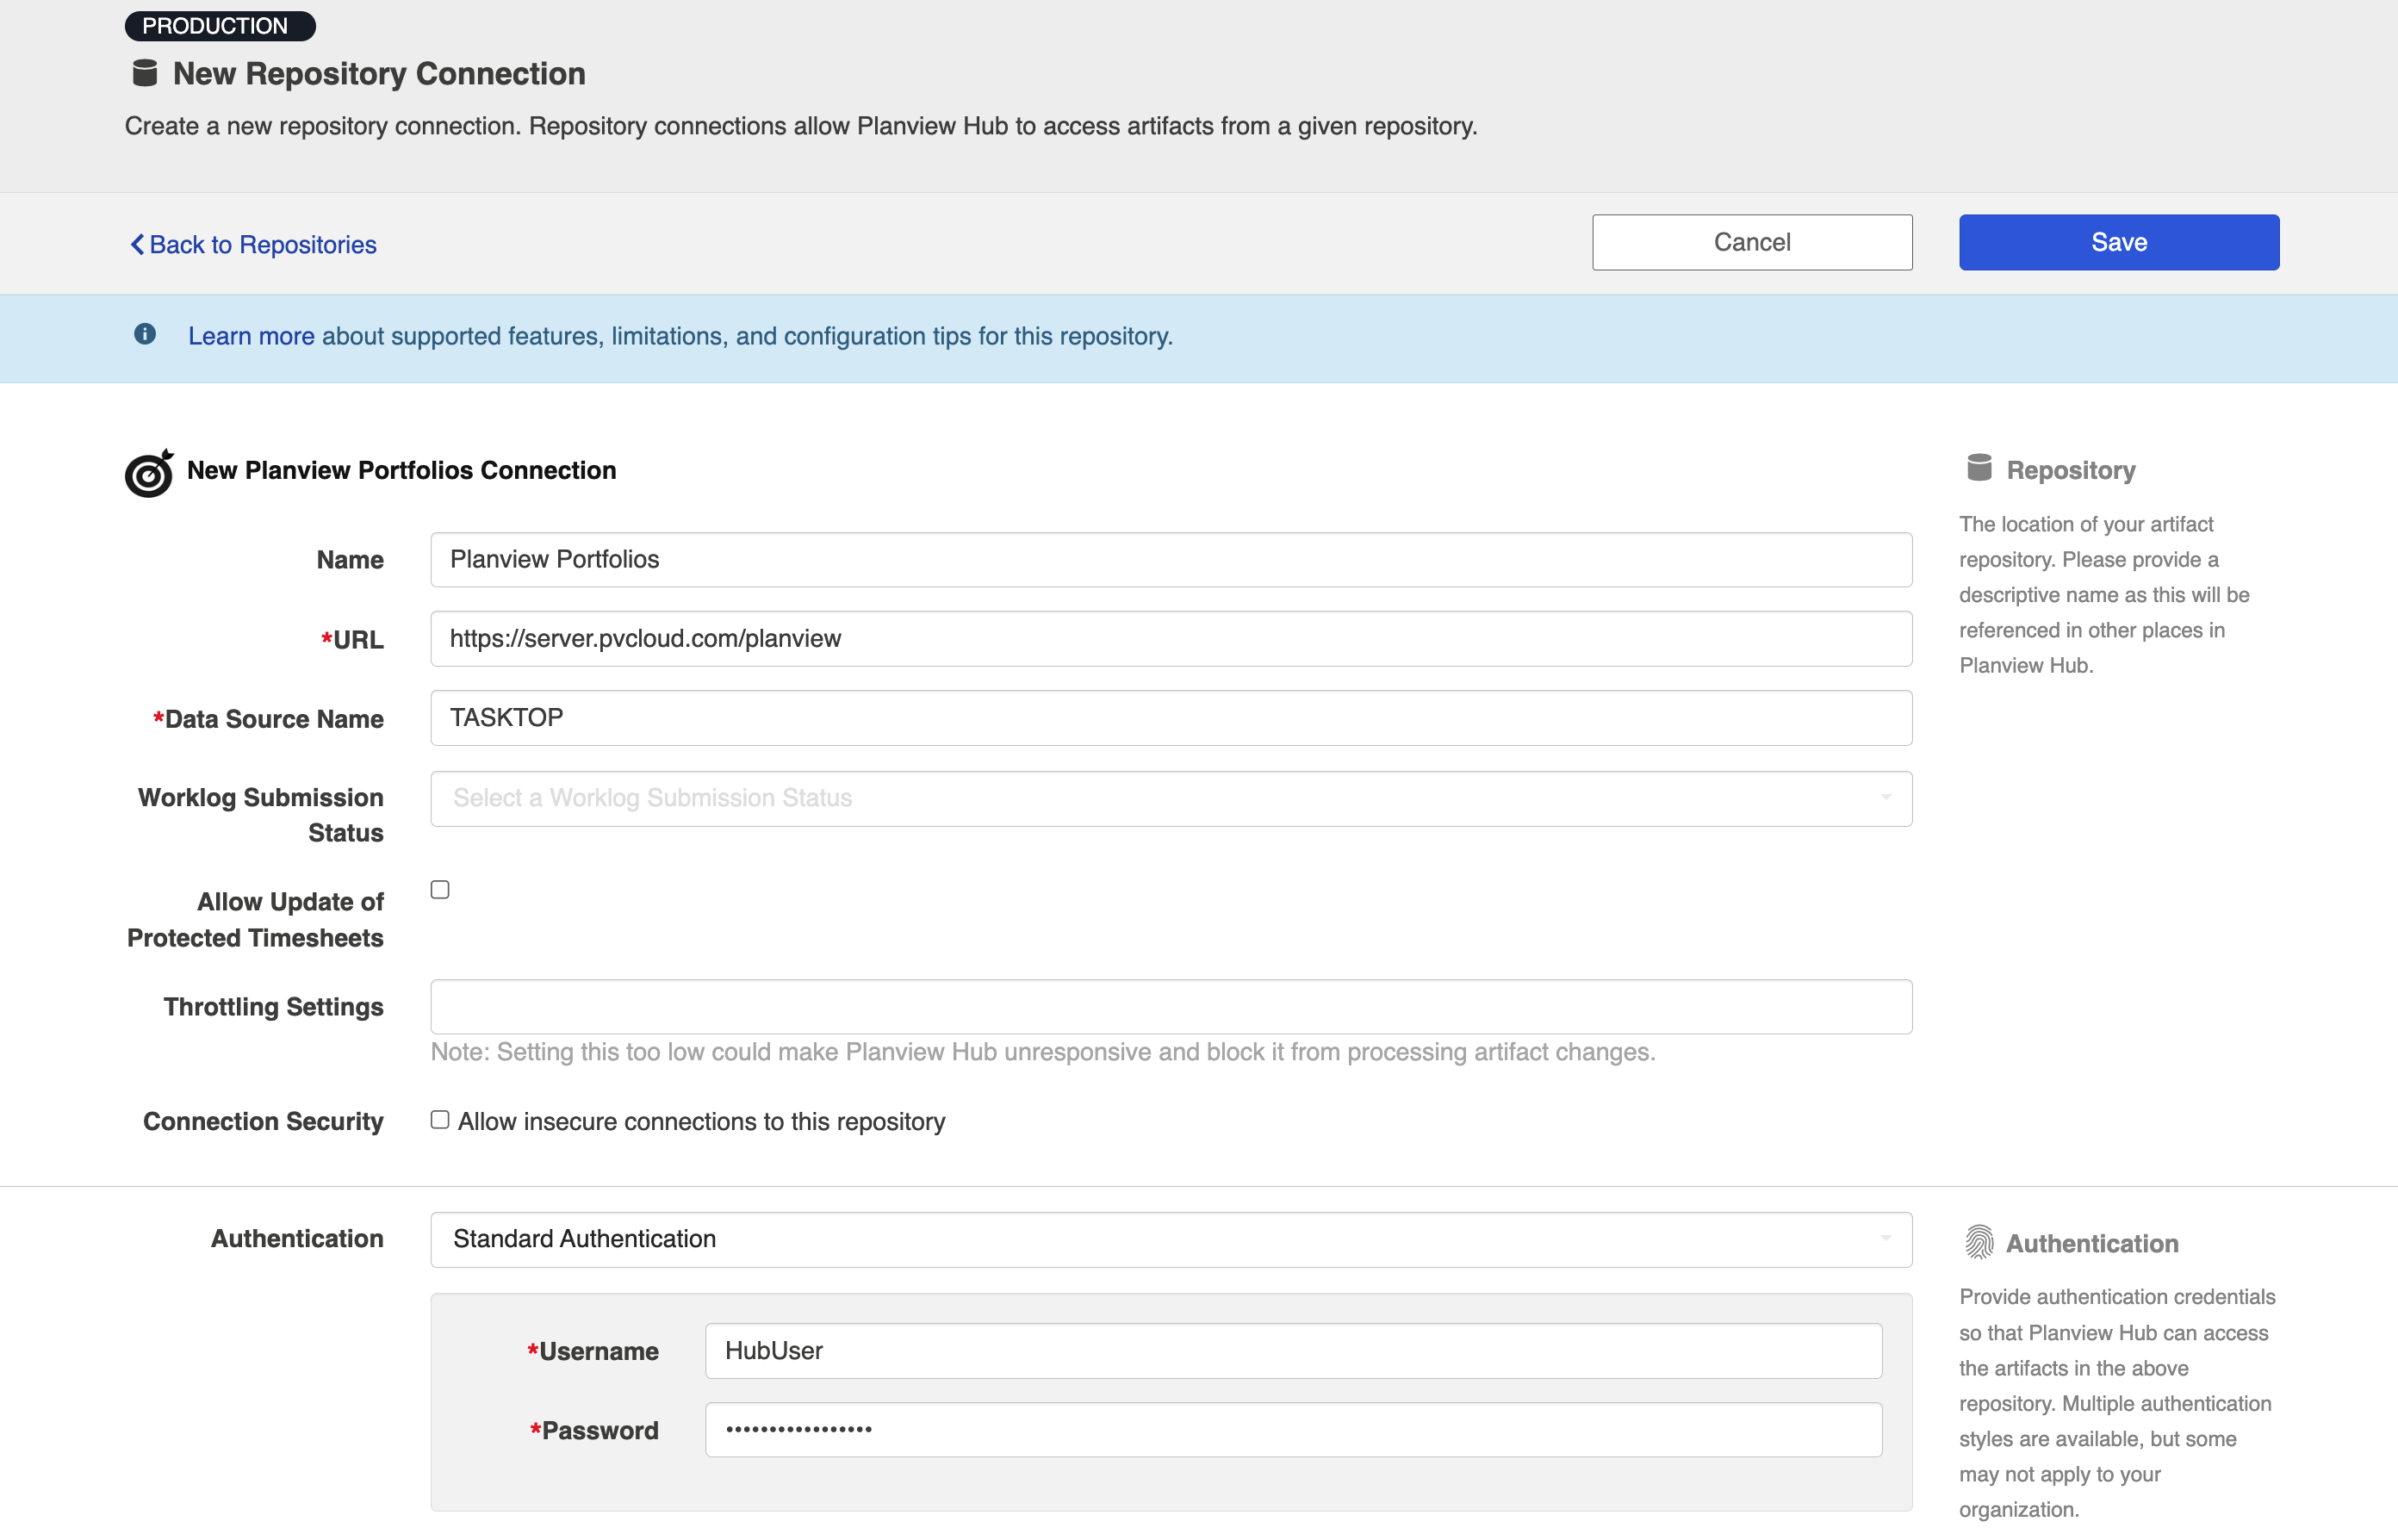
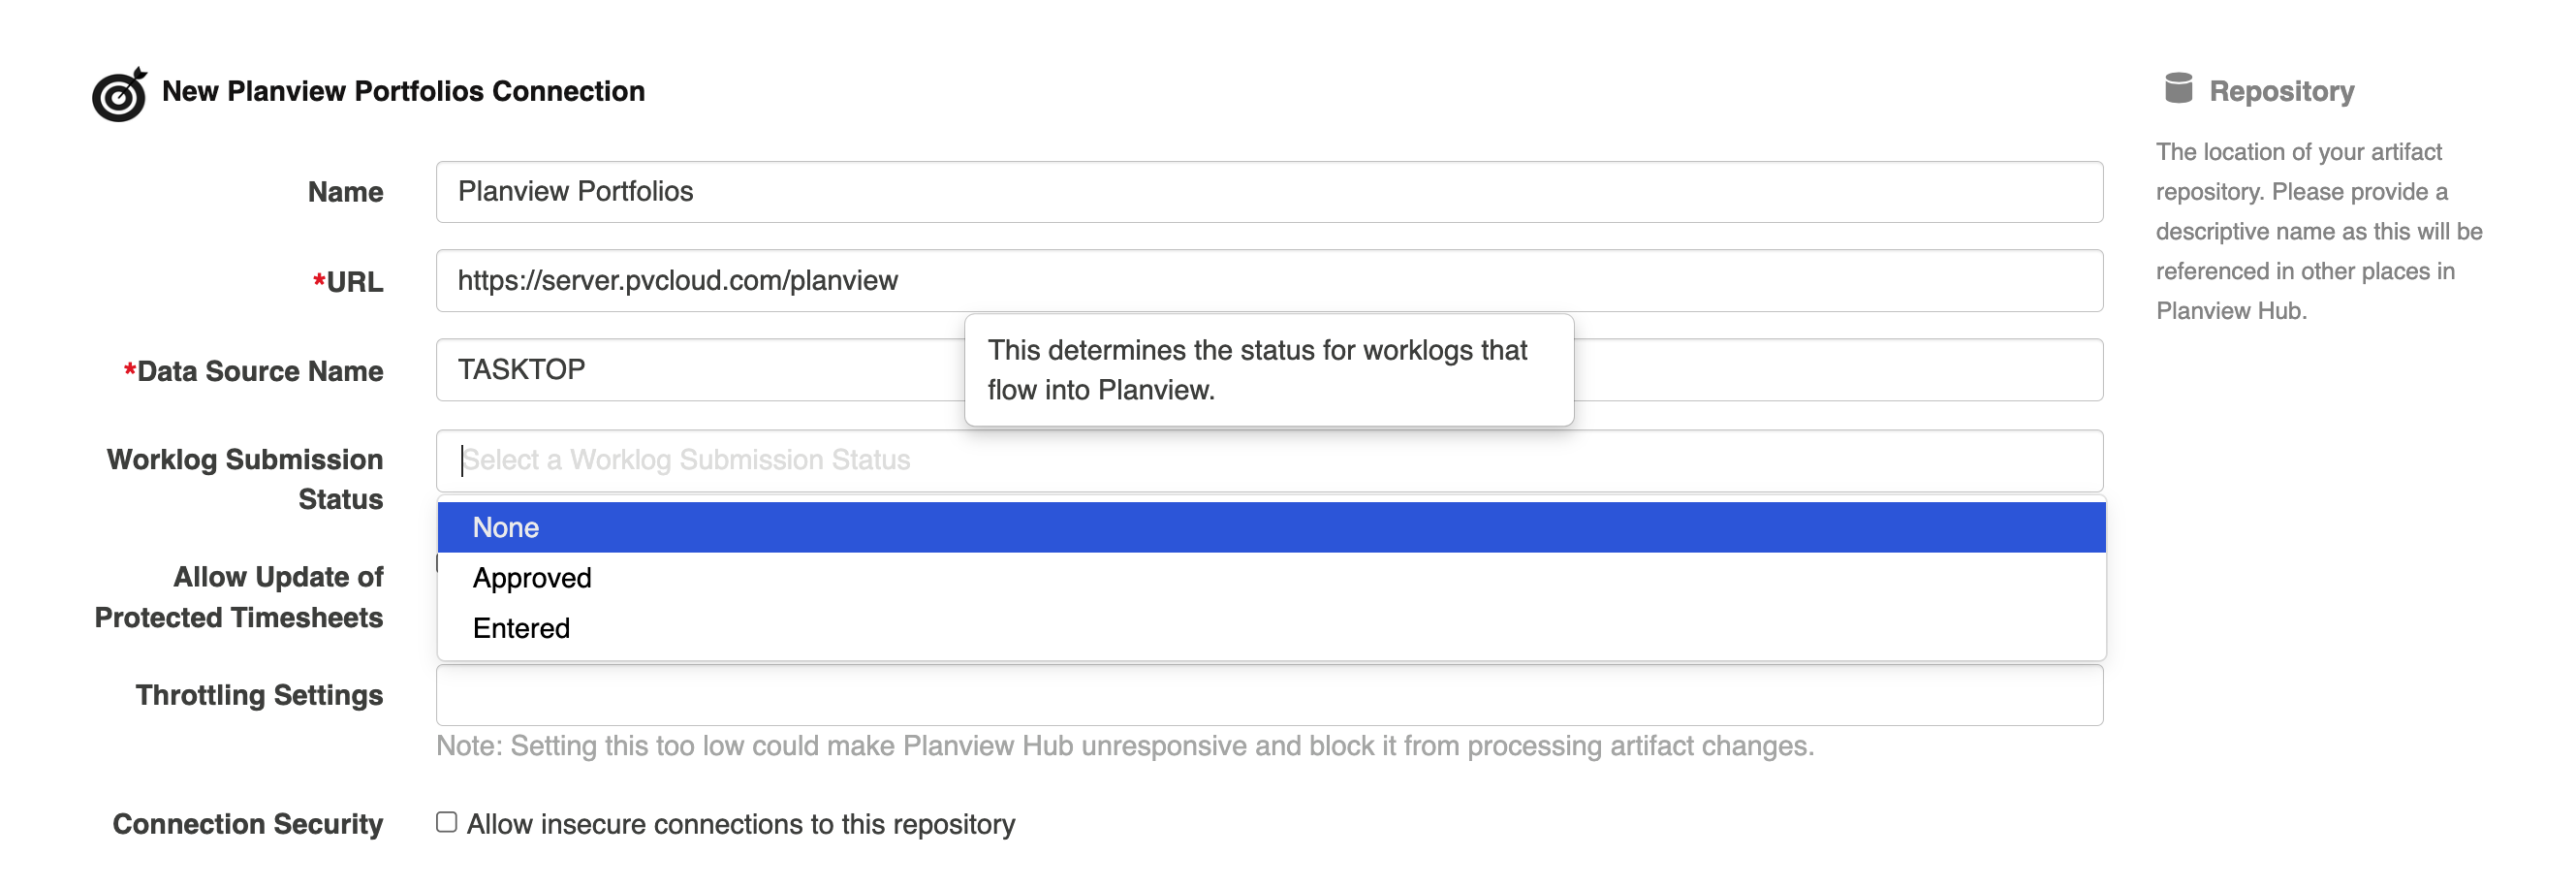
Note: The Worklog Submission Status field is only applicable to Planview Portfolios. If you are configuring a Planview PPM Pro or Planview AdaptiveWork time tracking integration, this field is not applicable and will not appear on your repository connection screen.
Upon configuring your Planview Portfolios repository connection, you will see a Worklog Submission Status field. This field dictates the state that Worklogs created in Planview Portfolios via Hub integration will be in — Entered or Approved.
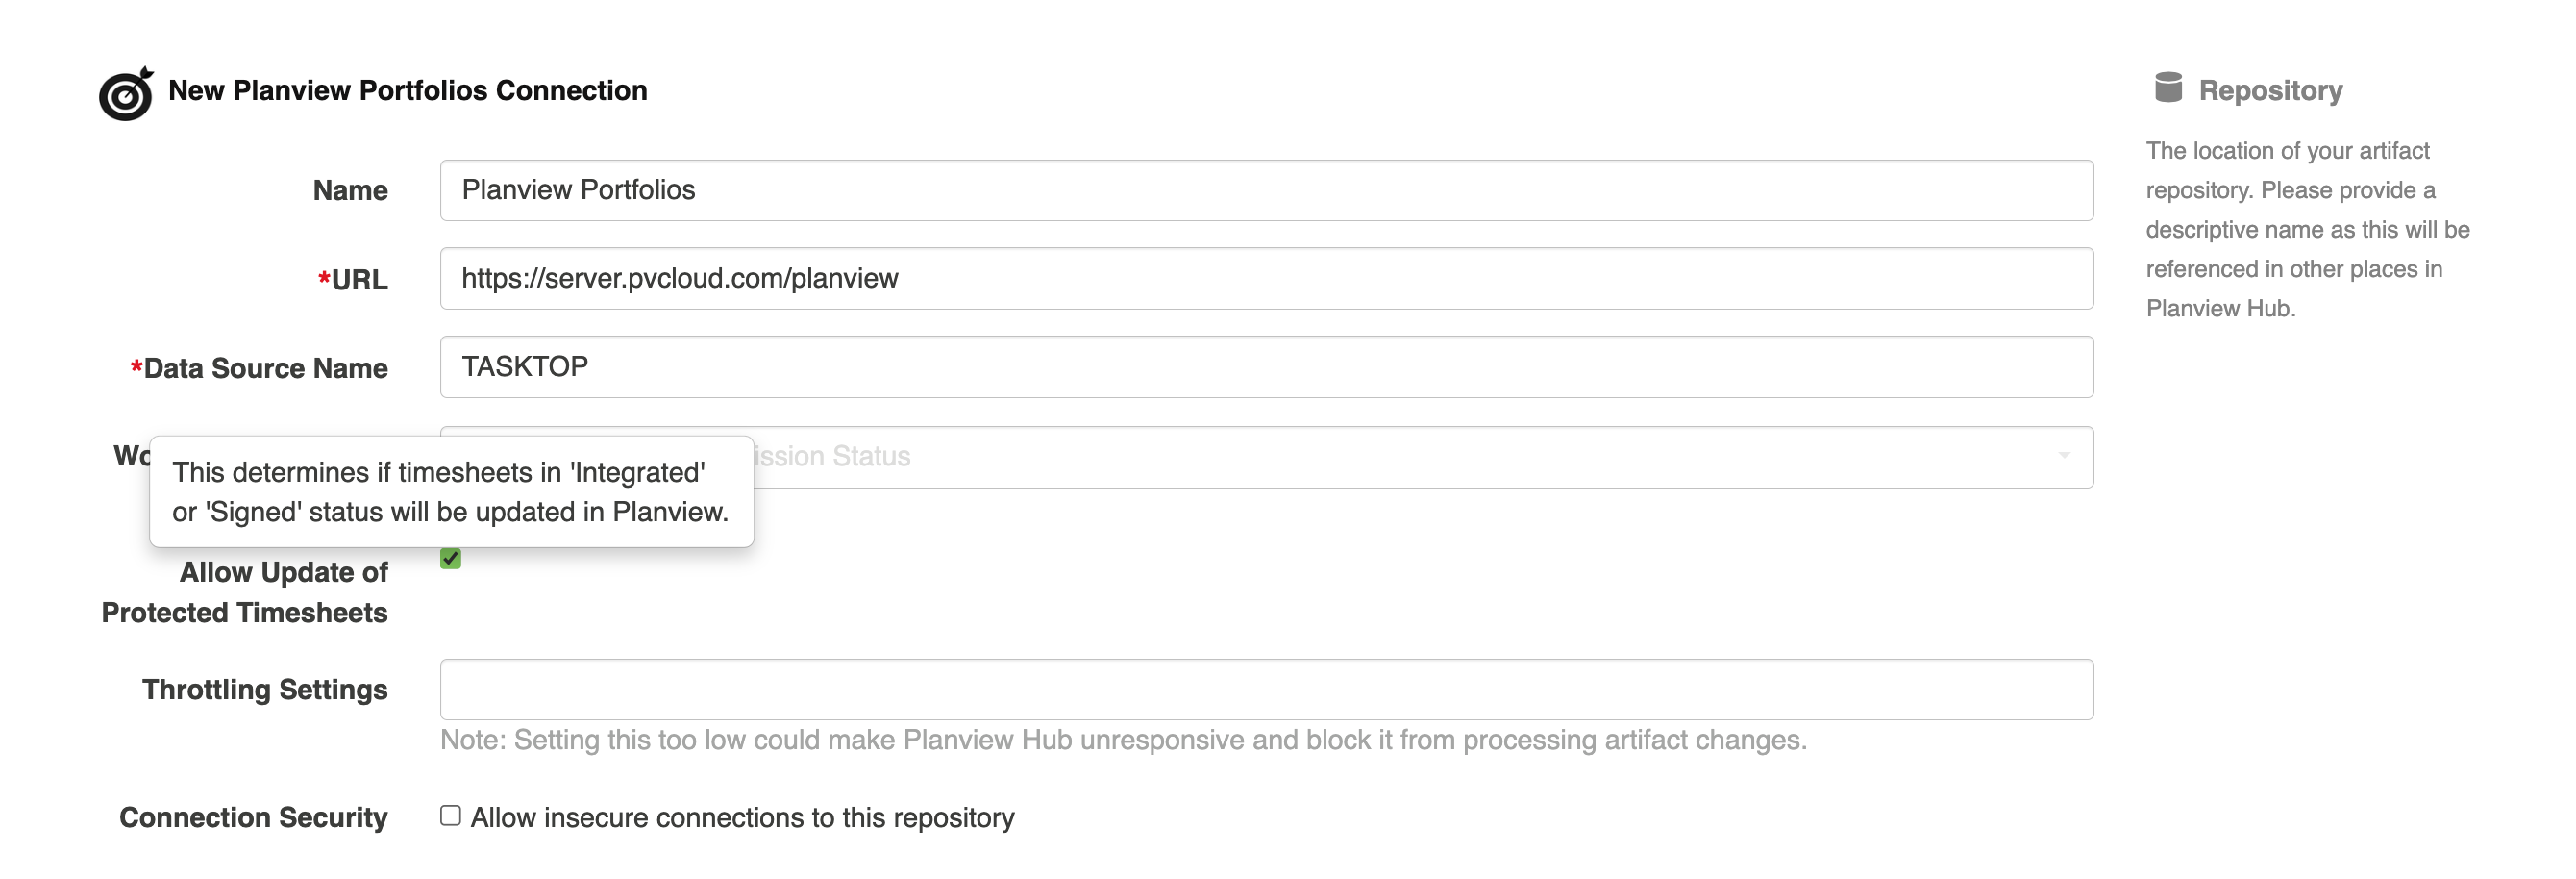
Note: The Allow Update of Protected Timesheets field is only applicable to Planview Portfolios. If you are configuring a Planview PPM Pro or Planview AdaptiveWork time tracking integration, this field is not applicable and will not appear on your repository connection screen.
Upon configuring your Planview Portfolios repository connection, you will also see an Allow Update of Protected Timesheets checkbox field. When checked, this field will allow users to skip worklog validation in Planview Portfolios and update timesheets that are in Signed or Integrated status.
If this field is unchecked, Planview Portfolios will not allow any Signed or Integrated timesheets to be modified.
Model
After you have configured your repository connection, your next step will be to create your model.
To create your model, please follow the instructions outlined here.
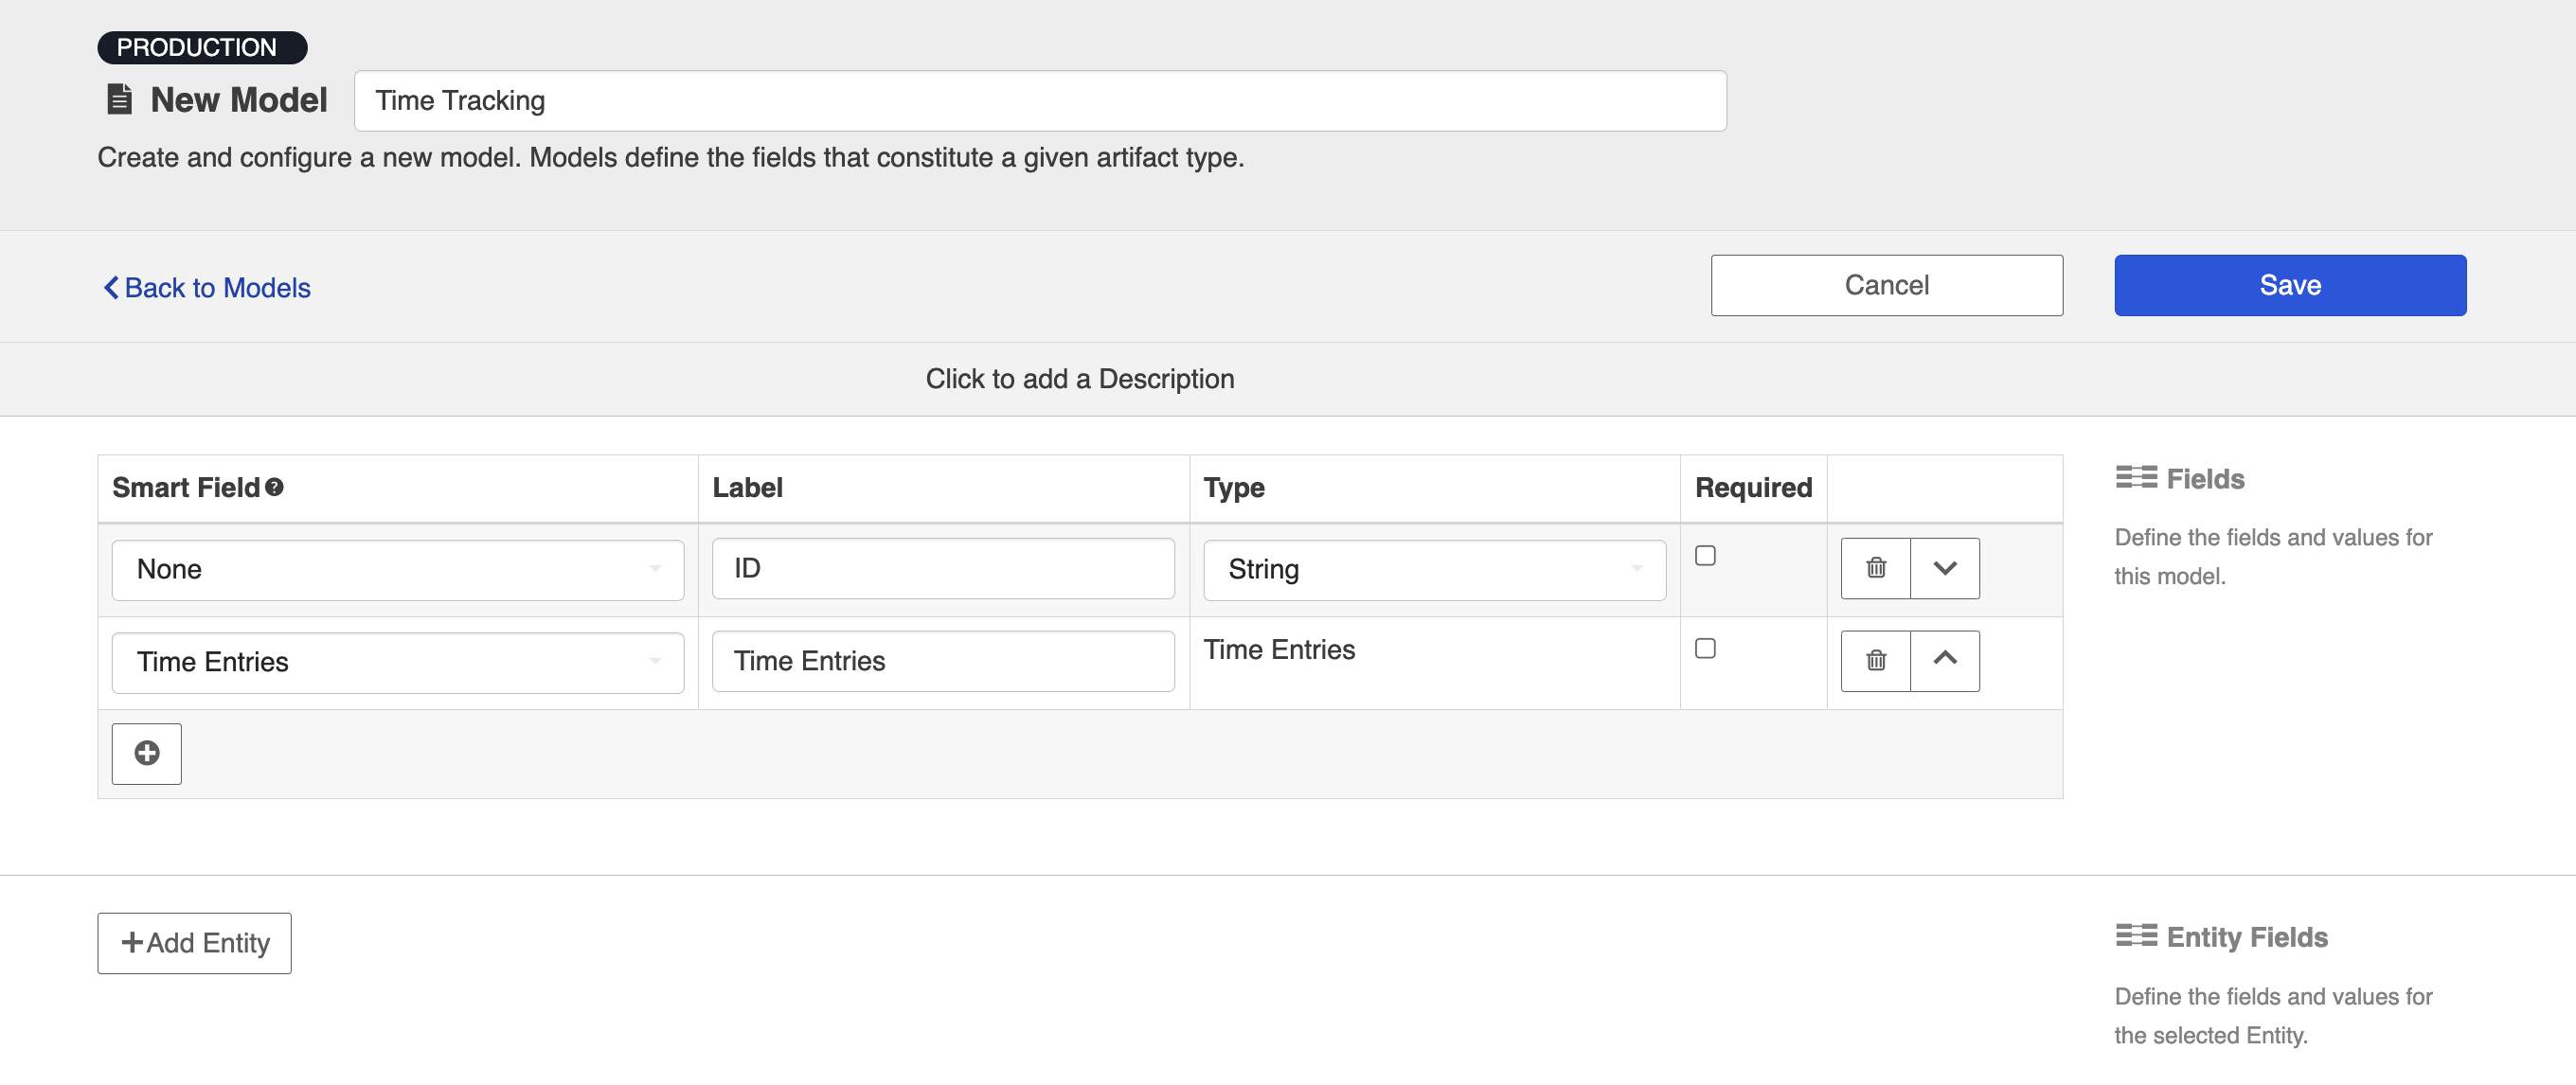
Your model will contain two fields:
| Field Name | Field Type | Smart Field? | Purpose |
|---|---|---|---|
| ID | String | No |
This is the field on the Jira artifact that will hold the ID of the Planview artifact that time will be written to. |
| Time Entries | Time Entries | Yes | This contains the Worklog/time data. |
If you encounter errors upon running your integration, you may also need to add the Time Entries entity to your model (as shown below).
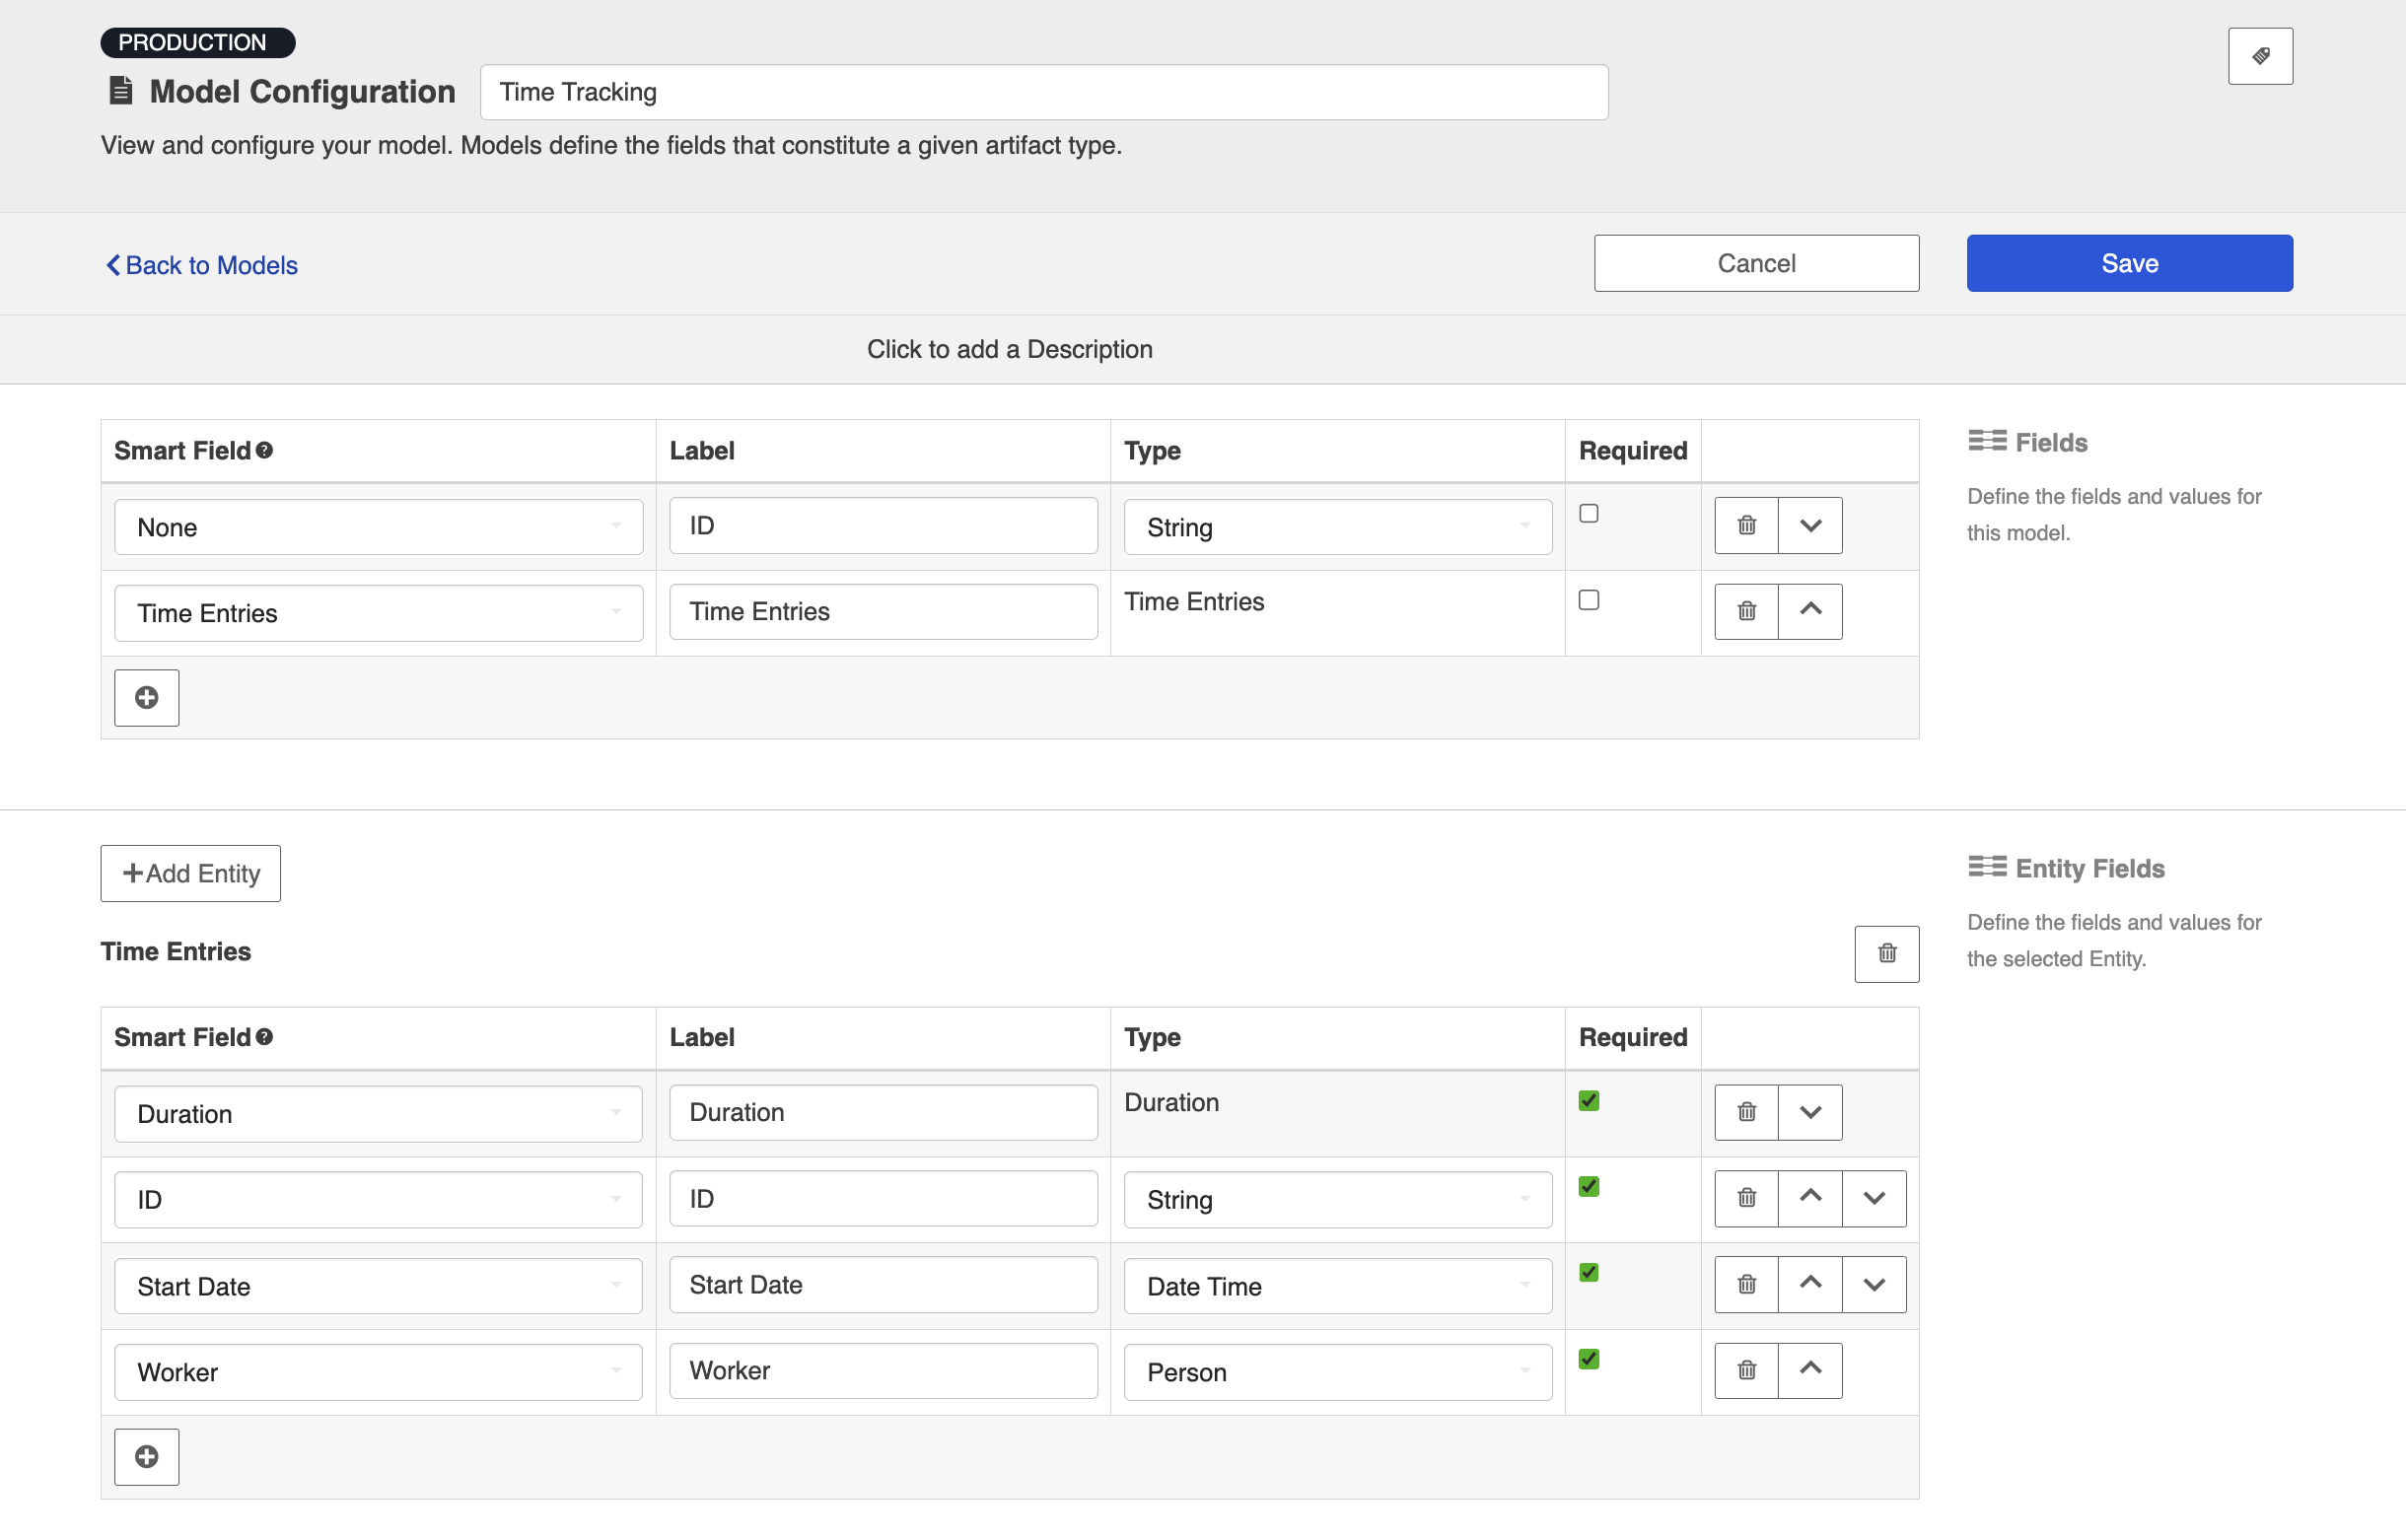
Your entity will contain four fields:
| Field Name | Field Type | Smart Field? |
|---|---|---|
| Duration | Duration | Yes |
| ID | String | Yes |
| Start Date | Date Time | Yes |
| Worker | Person | Yes |
Collection
Next, configure your Jira and Planview collections by following the instructions here. Please note the additional details below.
Jira Collection
One-to-One Scenario
If you are flowing Worklogs on the artifact that is participating in your synchronization integration (i.e., if you are synchronizing stories, and the worklogs exist on those stories), follow the steps below:
- Map the Log Work field in Jira to the Time Entries smart field in the Model.
- Map the Jira field that holds the corresponding Planview artifact's ID reference to the ID field in the model. This will be the "Key" that you select when configuring your integration.
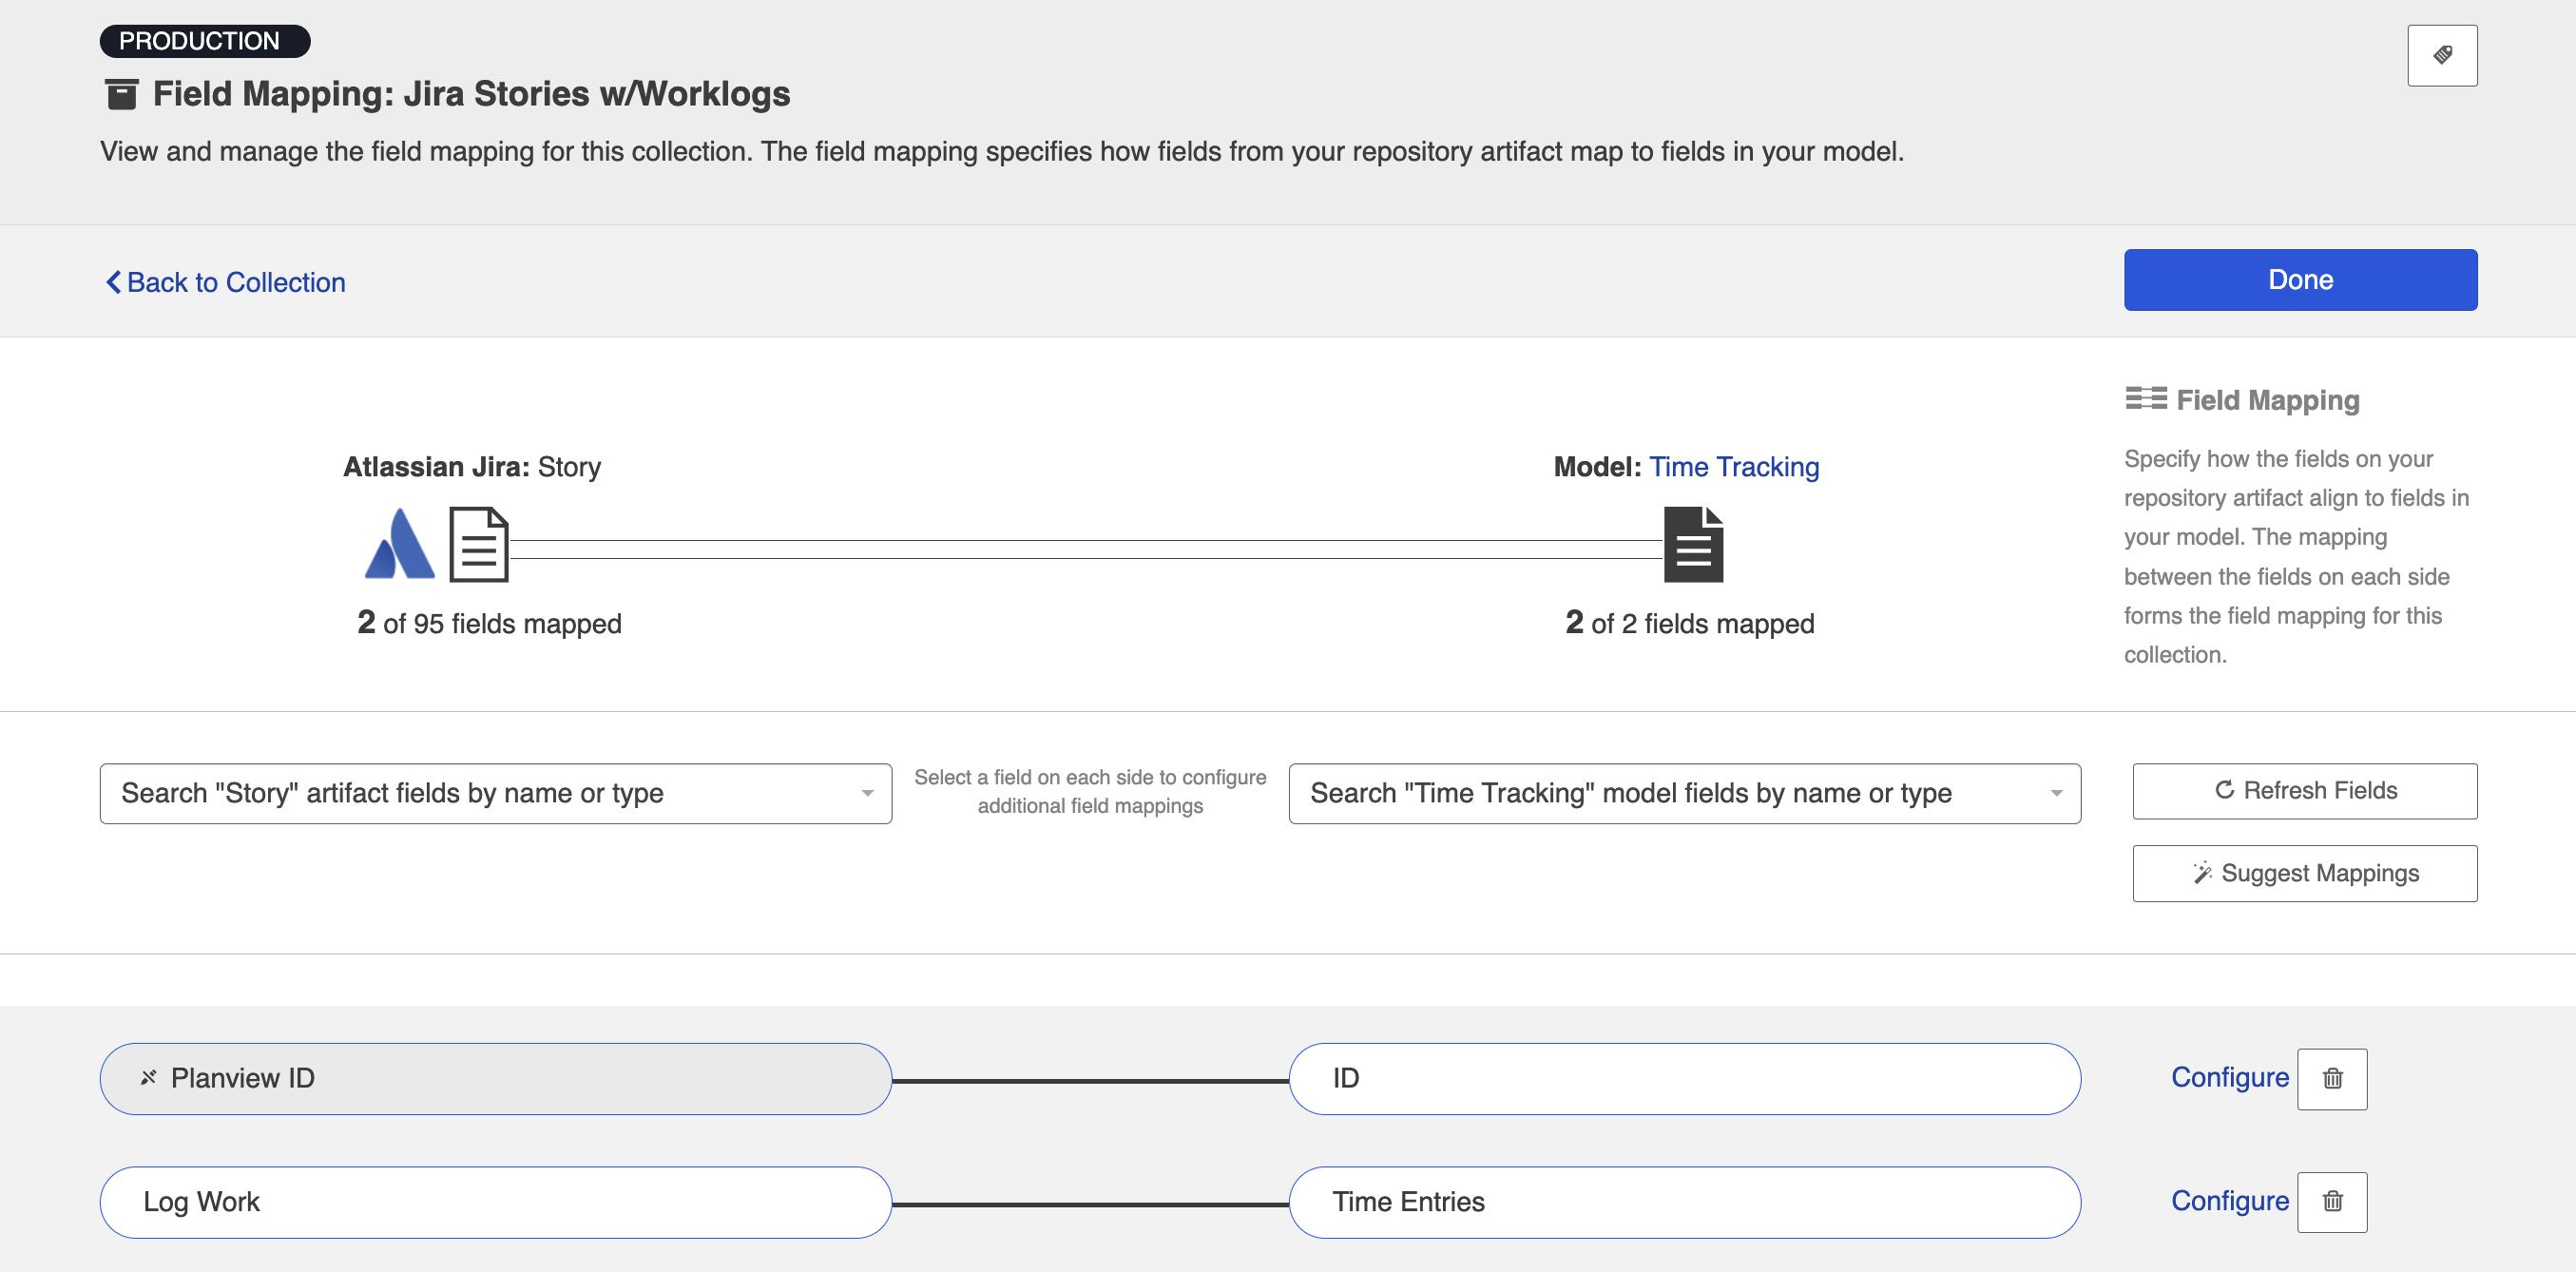
If you are flowing Worklogs on an artifact that is a child artifact of the artifact participating in your synchronization integration (i.e., if you are synchronizing Jira epics, but flowing worklogs on Jira stories or defects that are a part of those epics), follow the instructions below.
On the collection for the artifact containing the Worklogs (i.e., Jira Stories):
- Map the Log Work field in Jira to the Time Entries smart field in the model (just as in the one-to-one scenario).
- Next, map the Epic Link (relationship field) from the Jira Story/Defect to the ID field on the model (string).
- Use an extension to retrieve the field from the parent Jira artifact which contains the Planview ID. This is the transform you set on the right.
- Set the transform on the left to None.

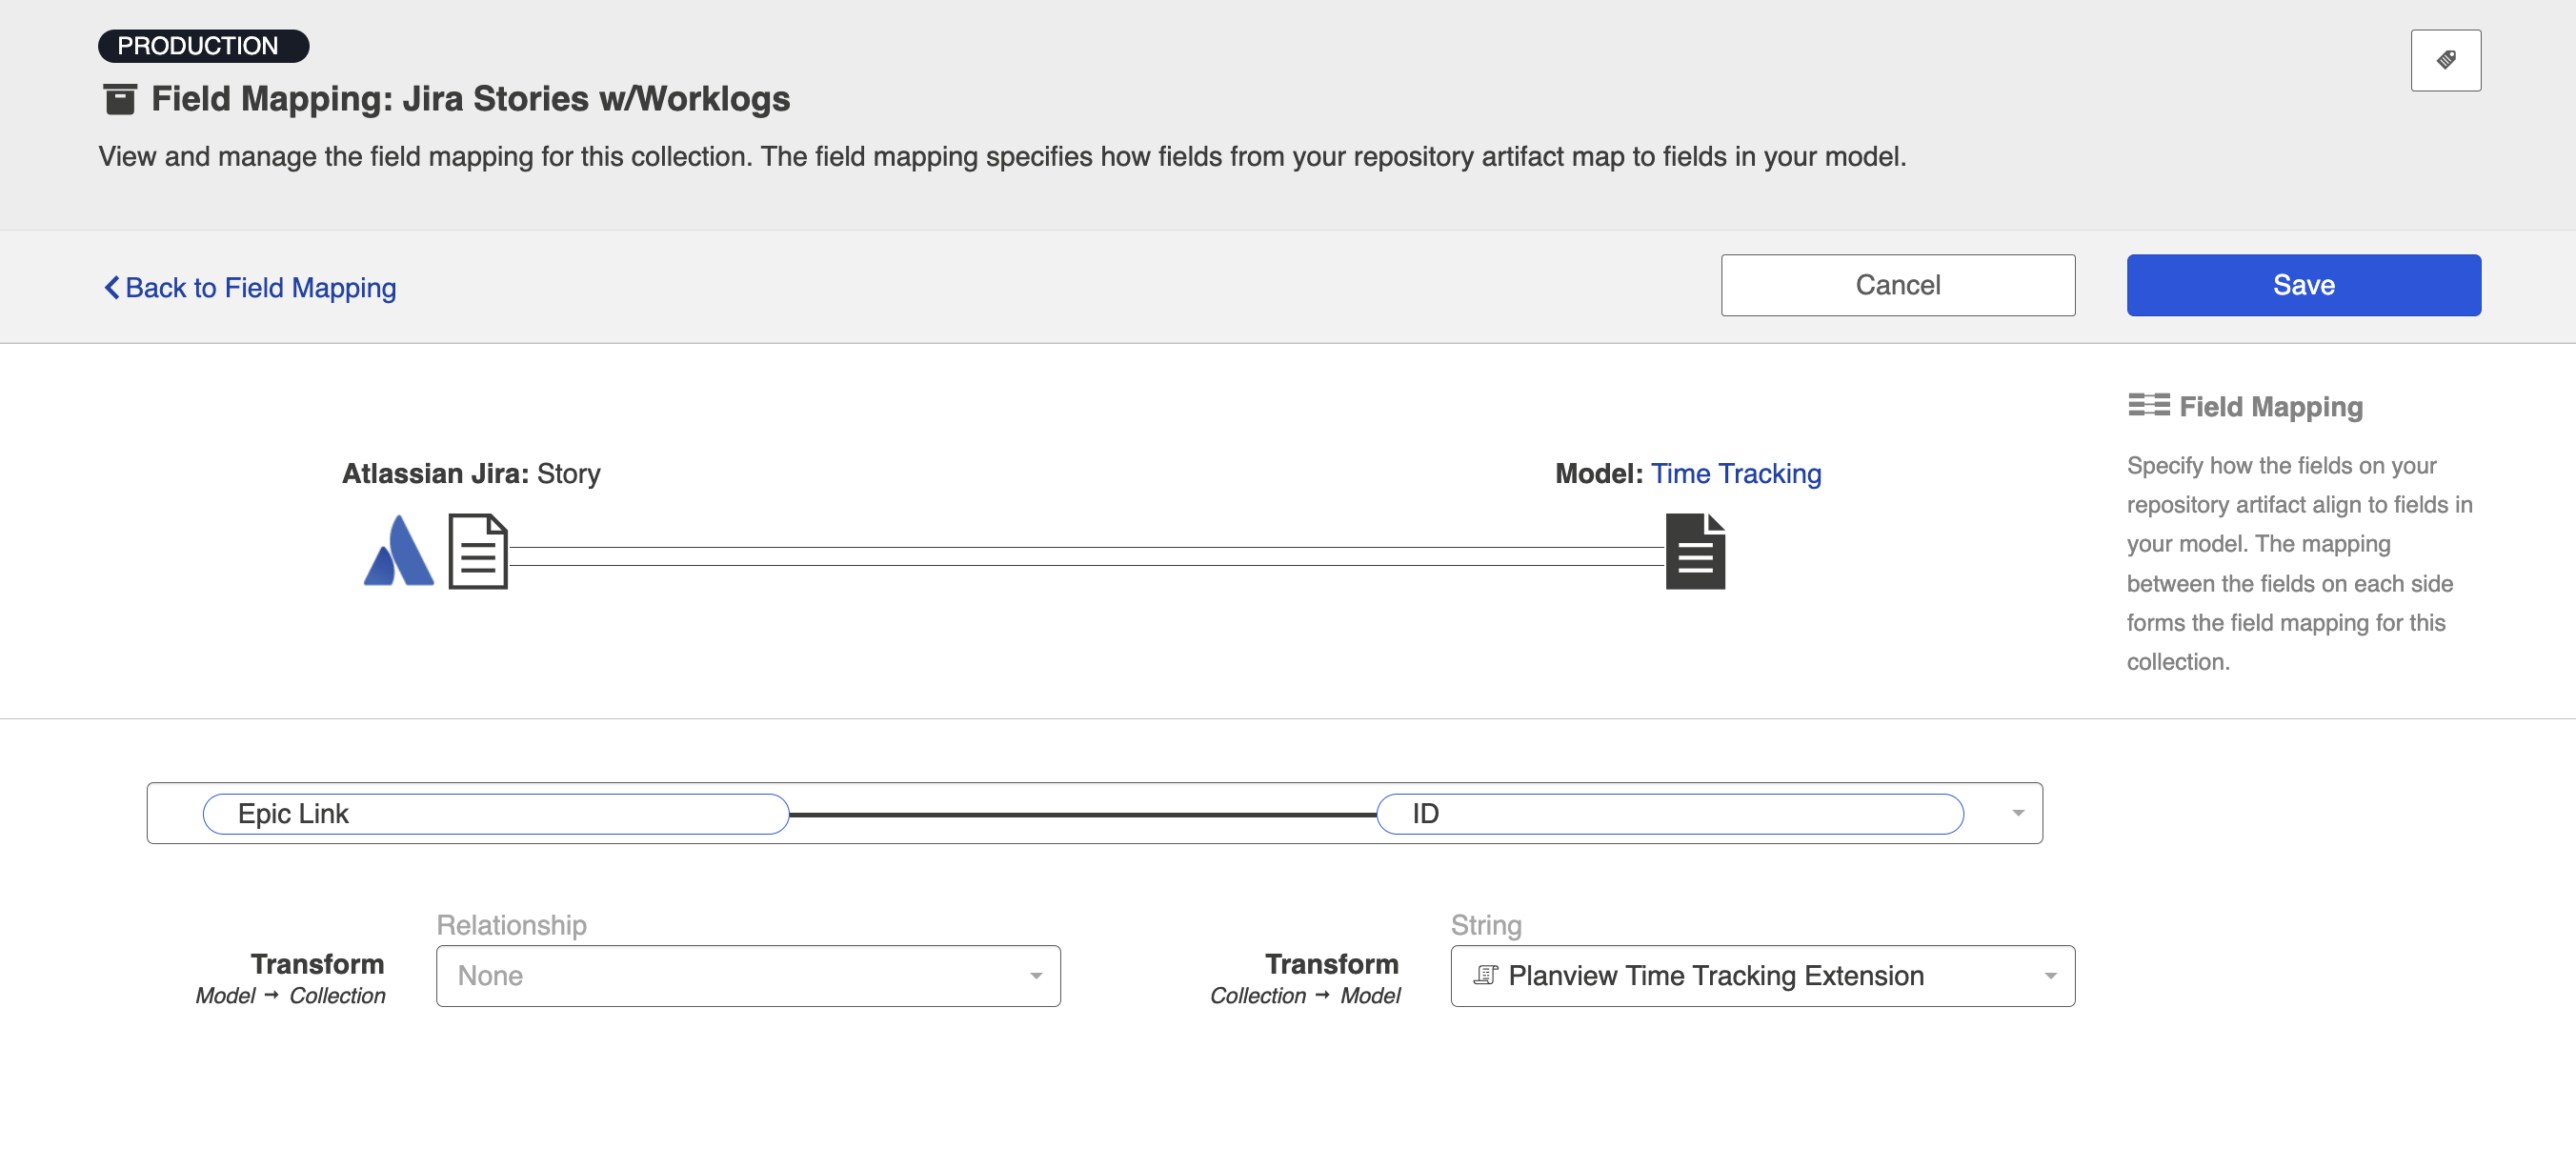
Example Time Tracking Extension
var inputTypes = 'Relationship';
var outputTypes = 'String';


function transform(context, input) {

  if(!input){
      return undefined
  }
  var parent = artifacts.retrieveArtifact(input) //Retrieve parent Epic

  var pvID = parent['customfield_10107'] //Get the Planview ID from the custom field. Note, this field ID is the specific field on the Jira epic that holds the Planview ID.

  return pvID
}
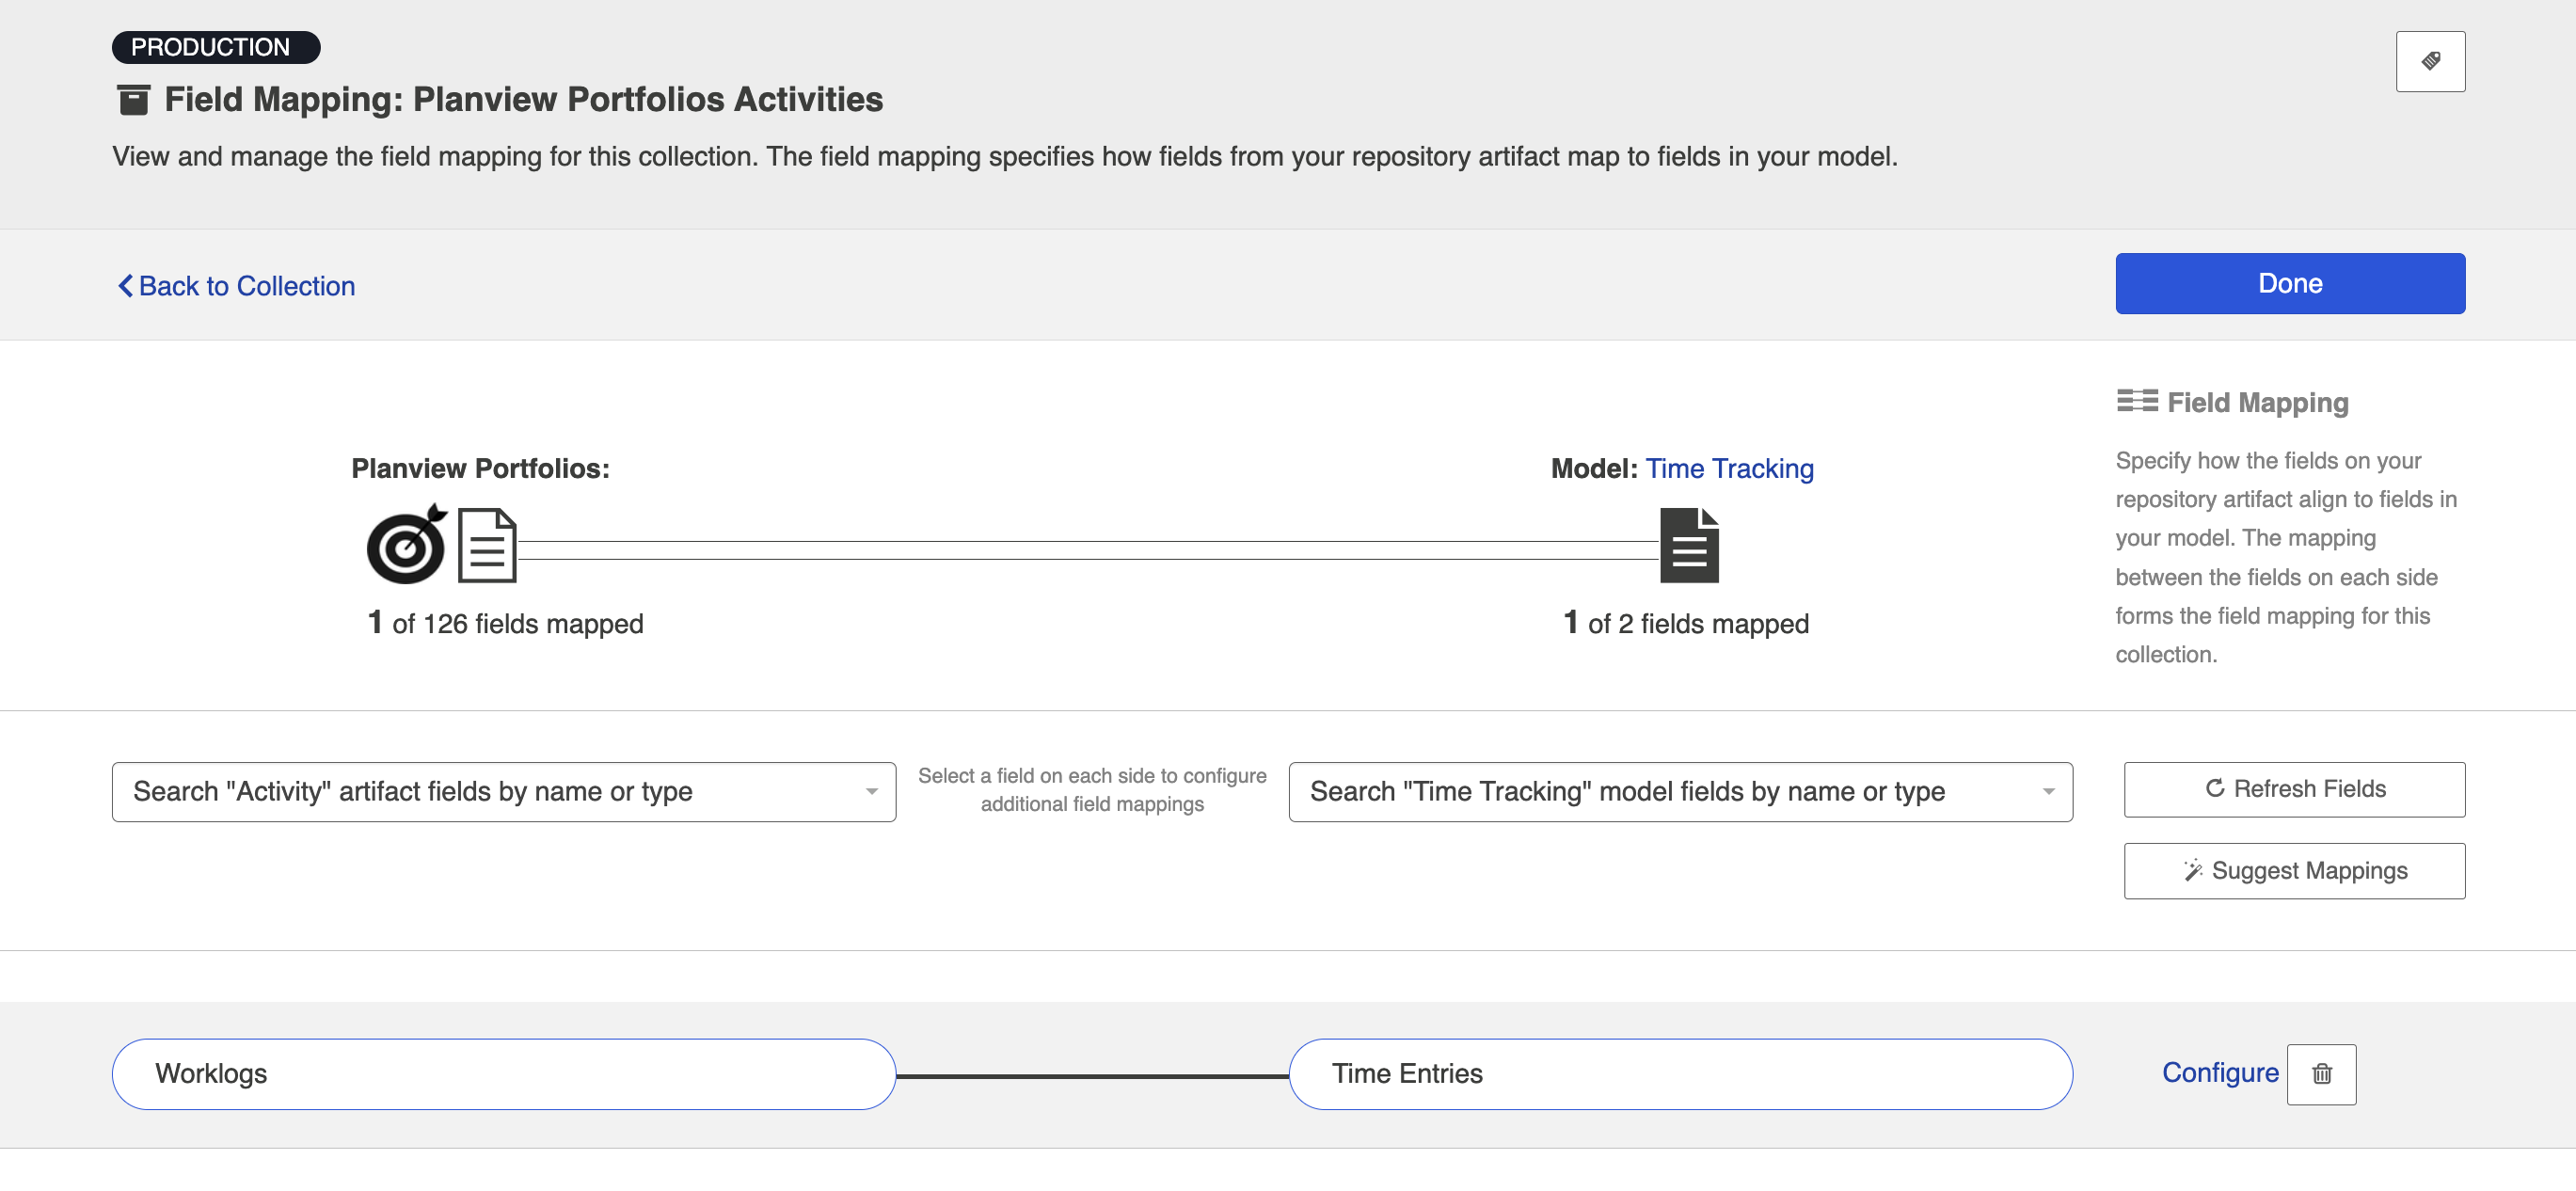
Portfolios Collection
- Map the Time Entries field in the model to the Worklogs field in Portfolios.
That's it! You don't need to map the ID field in the model, as searching by the seq-ID field in Portfolios is already built into the integration.
Integration
Your final step will be to configure your integration; you can find general guidelines on how to configure an integration here.
Please read the time tracking-specific details below before beginning. Note that this integration template is one-way: from the source collection on the left to the target collection on the right. The main use case supported by Hub is time aggregation one-way from Atlassian Jira to Planview Portfolios. For this reason, we do not recommend that end users adjust time within the Planview Portfolios repository, as this can lead to unexpected results.
Configuring your Integration
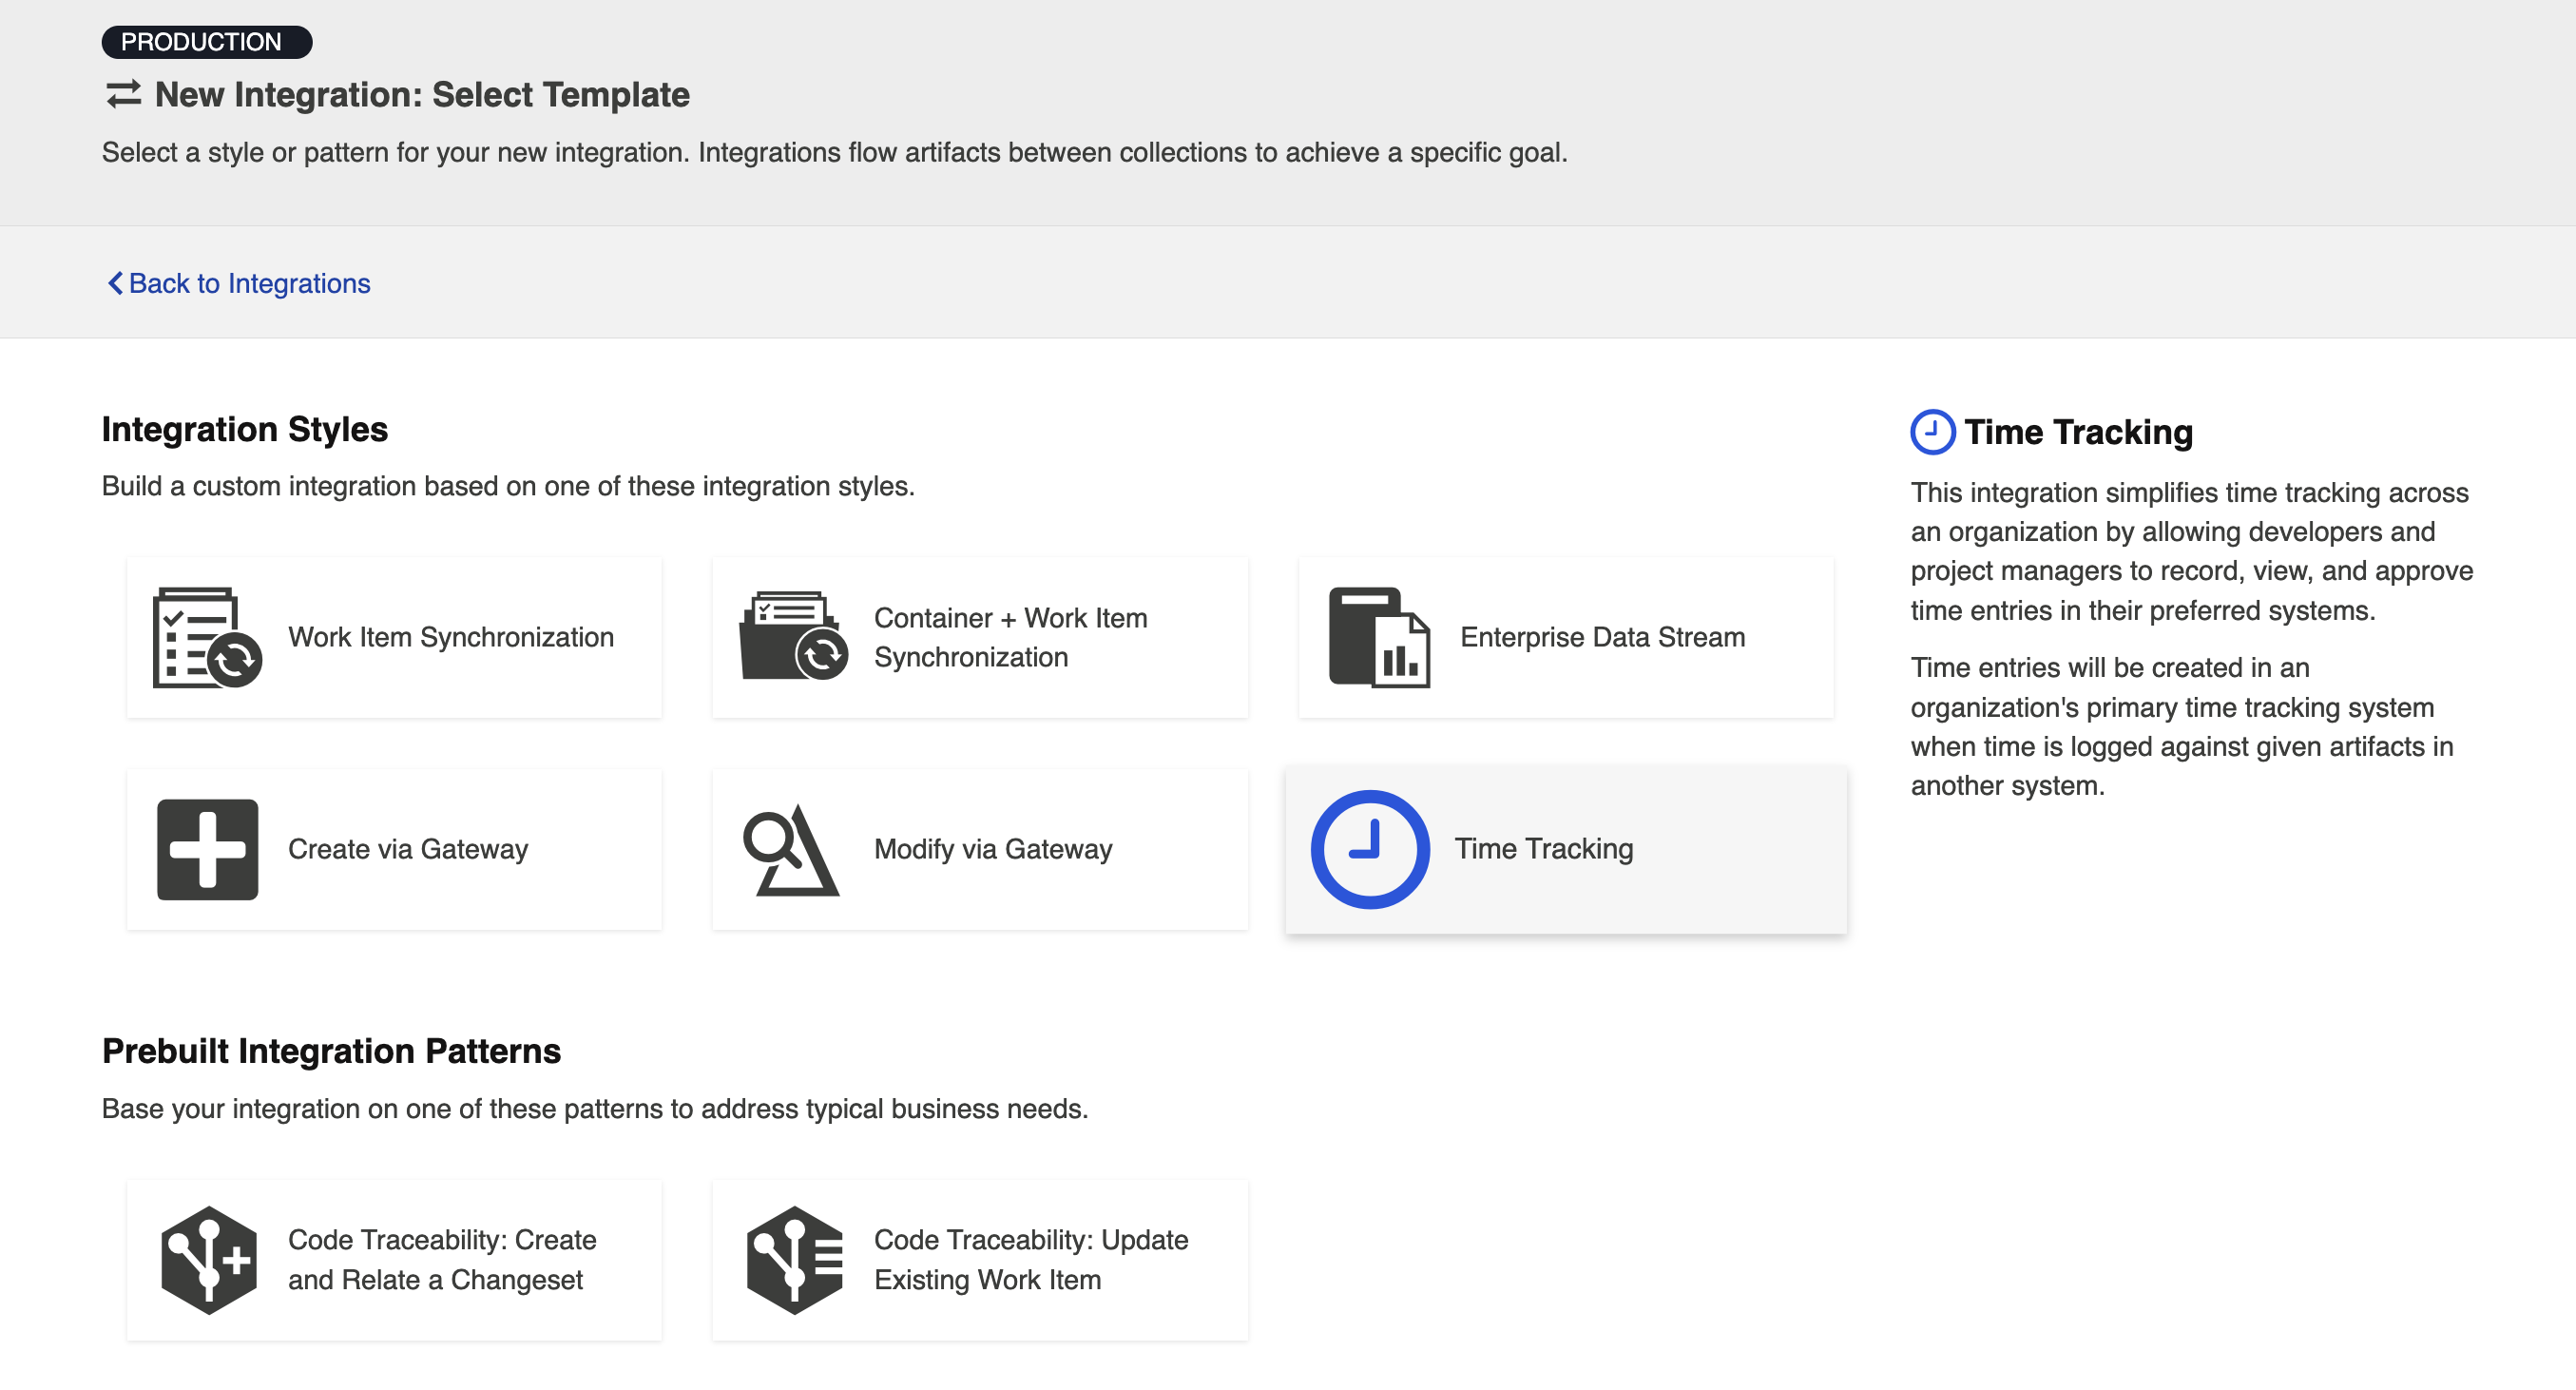
Upon configuring your integration, select the Time Tracking template.
After selecting the Time Tracking template, the New Integration screen will appear.

Select your repositories and collections.

You can click the Overview link on the right side of the Integration screen to get to the main display page.

From this page, you can configure many different components of your time tracking integration.

Field Flow
On the Field Flow screen, you can configure how your field values will flow, transform, and update between each collection.

Before you configure how your field values will flow, you will need to tell Hub which model field holds the key indicating the Planview ID. In both scenarios, the key should be the ID field on the model.

Artifact Filtering
Once you have completed your field flow configuration, your next step will be to review and configure Artifact Filtering.
Artifact Filtering enables you to set filters on an integration in order to limit which artifacts are eligible to flow in your integration.

Time Entry Filtering
After you have completed your Artifact Filtering, your next step will be to review and configure Time Entry Filtering.
On the Time Entry Filtering screen, you can set filters to control which time entries should flow as part of your integration. Only time entries that meet your defined criteria will flow.
Note: Time Entry Filtering is only supported if the connector's start date for Worklogs is a date and not a date-time.

Note: If a Worklog is logged for a date prior to the filter date, it will not flow. If this Worklog is updated to a date after the filter date, it will then flow. It is recommended to not remove a filter or move the filter date earlier if there are existing Worklogs. If the existing Worklogs are edited, it may cause negative time errors.
Change Detection
Once you have finished updating your Time Entry Filtering, your next step will be to review and update your Change Detection settings.
On the Change Detection screen, you can set custom change detection and full scan intervals for your integration. Change Detection and Full Scan intervals define how frequently Hub will search for updates made to artifacts in each repository.
Note: The settings configured here will override the default global change detection settings configured on the Settings screen.

Once you've configured your settings, click Save at the top of the screen, and then Done.
This will bring you back to the Integration Configuration screen.
That's it! You have configured your time tracking integration. You are now ready to run your time tracking integration.
You can learn more about Jira and Planview-specific configuration in our Connector Docs.
Best Practices
| Category | Description | Applicable Hub Versions | Applicable Repository Versions |
|---|---|---|---|
|
Best Practice |
Worklog Submission Status Though each use case is unique, we generally recommend selecting Approved as the Worklog Submission Status to reduce risk that time data will be updated in the Planview repository. Since the time tracking integration is one-way (from Jira to the Planview repository), we discourage users from adjusting time entries in the Planview repository once they have synchronized to reduce risk of data irregularities. |
Planview Hub: 19.3 and later |
Any supported repository version: |
|
Best Practice |
Worklog Submission Status Since the Worklog Submission Status is set at the repository level, we suggest utilizing the same time submission status across the entire Planview repository for consistency of practice and ease of technical implementation. If your use case requires that some worklogs are created with entered status while others are created with approved status, multiple integrations may be required. If doing so, take extra caution to ensure duplicate worklogs are not created across integrations. |
Planview Hub: 19.3 and later |
Any supported repository version: |
|
Best Practice |
Person Reconciliation If the resources on the Planview repository and Jira side have a common denominator such as a shared e-mail address, the owner of the worklog will be matched automatically via Hub's built-in algorithm. However, if the users/resources do not share a common e-mail or username across repositories, we recommend a custom person reconciliation extension. |
Planview Hub: |
Any supported repository version: |