Tips and Tricks
The following sections contain information and best practices for common Work Item Synchronization use cases:
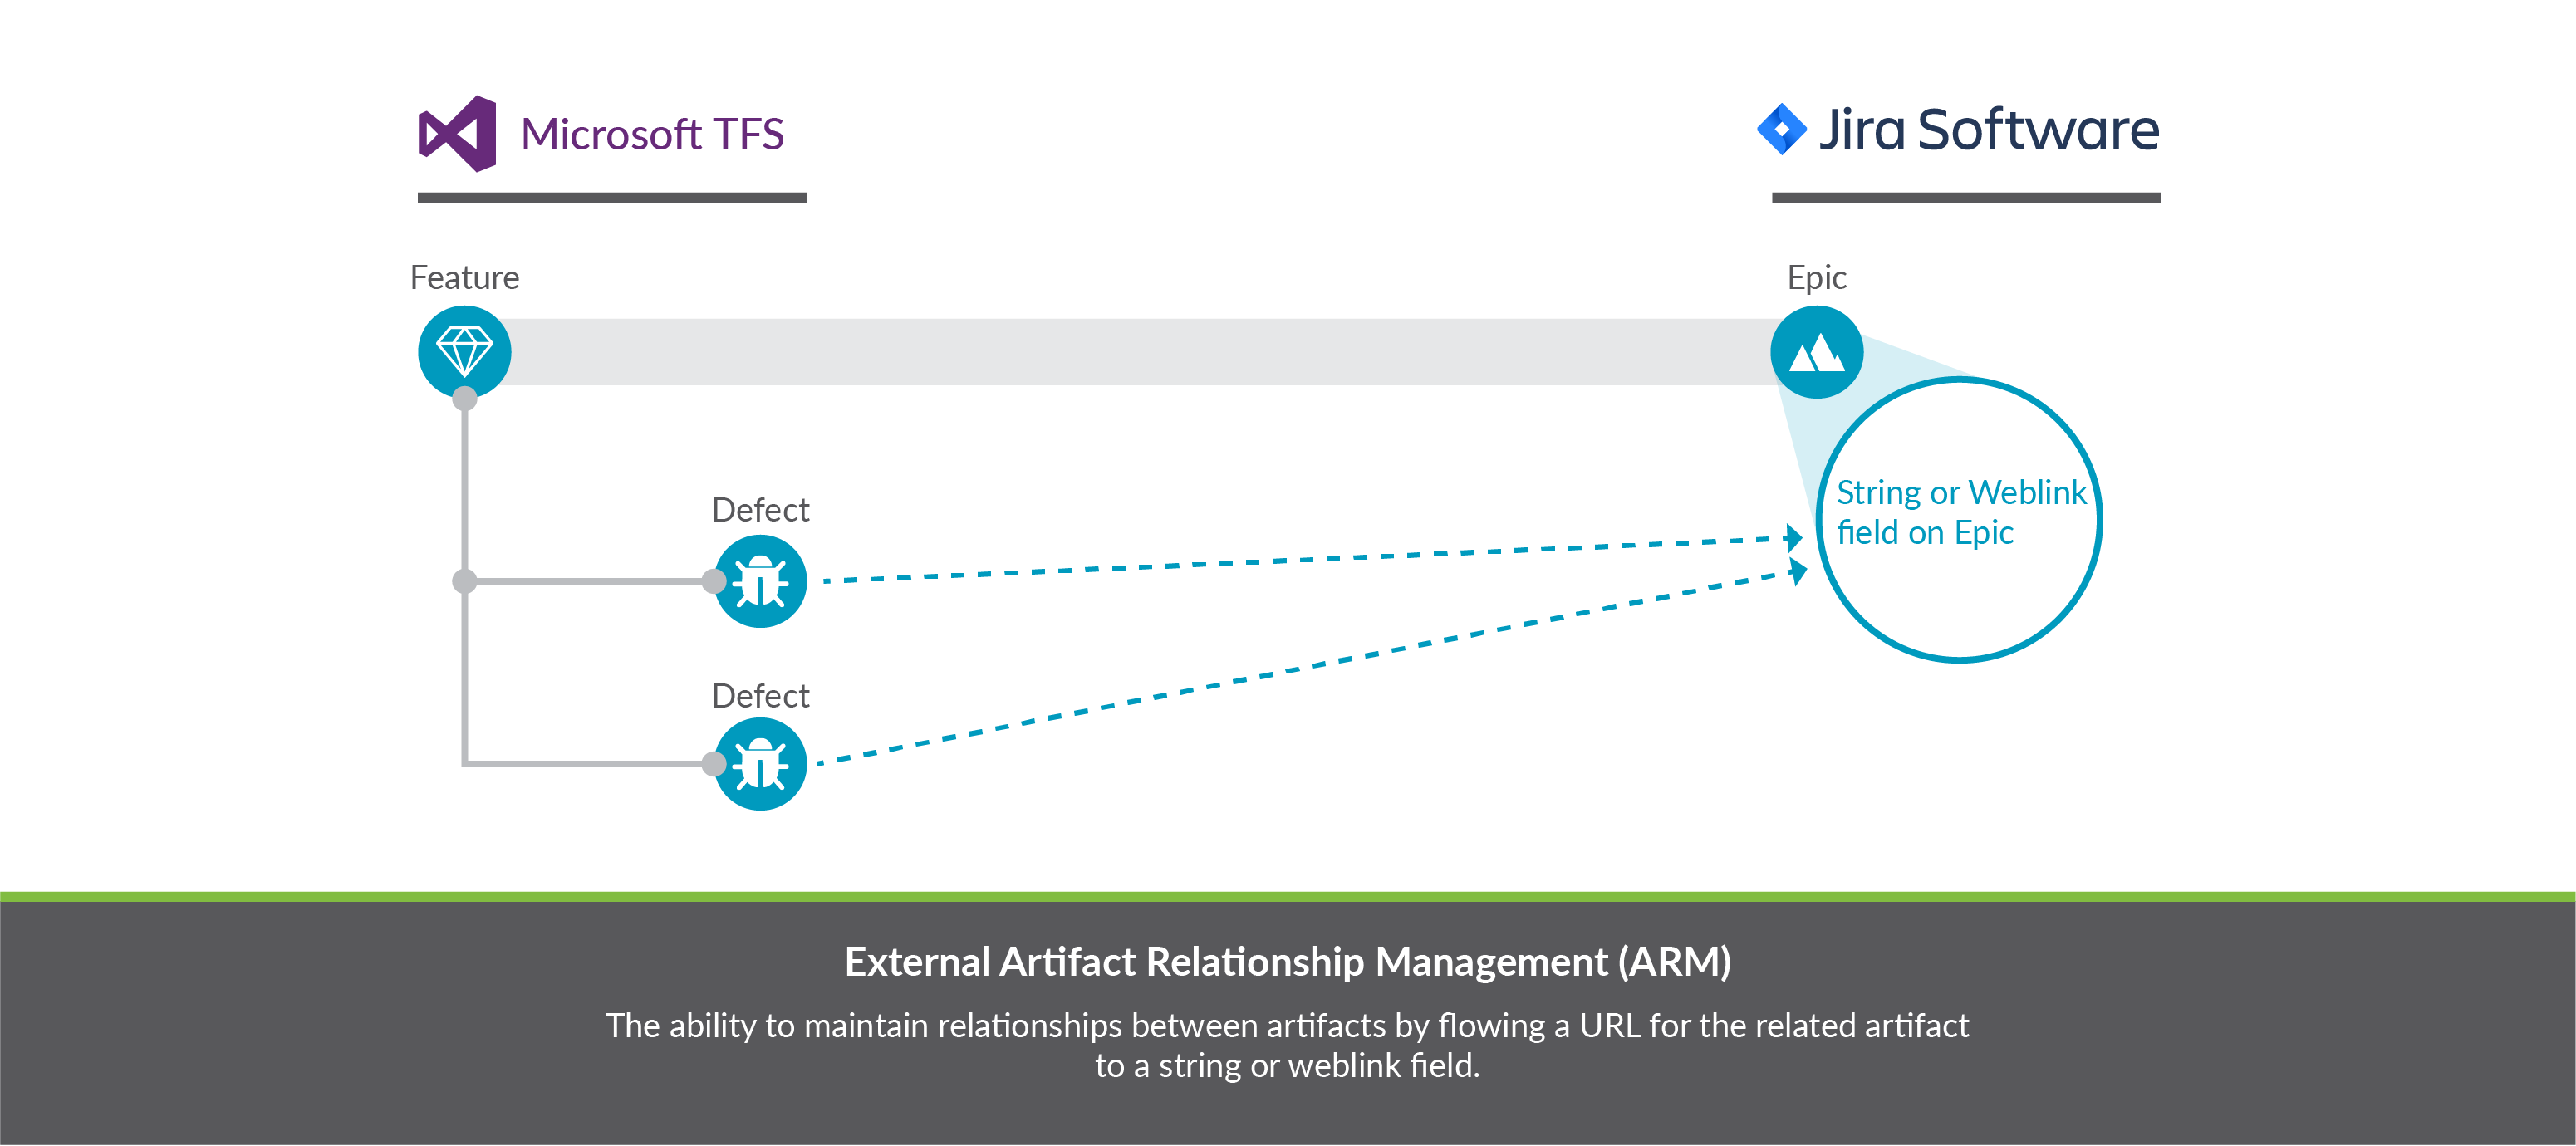
- Synchronizing Relationships: Planview Hub affords you the ability to not only flow various artifacts between your collections but also to mirror the relationships between those artifacts. This page will explain how to configure both Internal Artifact Relationship Management (ARM) and External Artifact Relationship Management (ARM). Internal ARM refers to the ability to flow artifacts and their internal relationships from your source repository to your target repository. External ARM refers to a more lightweight approach that allows you to flow links to related artifacts in your source repository to a string or weblink field on your target artifact.
- Synchronizing an Artifact ID or URL Reference: To provide traceability, Planview Hub allows you to flow the ID or URL for the source artifact to a string or weblink field on the target artifact, thus enabling you to easily navigate between the two. The section below explains how to configure that scenario.
Synchronizing Relationships
Planview Hub affords you the ability to not only flow various artifacts between your collections, but also to mirror the relationships between those artifacts. This is referred to as Artifact Relationship Management (ARM). There are two types of ARM: Internal ARM and External ARM. We will outline both types below.
Synchronizing Internal Relationships
Below, we'll outline an Internal ARM scenario where we flow Microsoft Azure DevOps (formerly Microsoft TFS) features to Jira epics, in addition to the defects that block them, all while preserving the relationships between the artifacts within each internal system.

Here's how to configure this scenario in Hub:
First, confirm that both repositories support relationships in our Connector Documentation.
- To flow these artifacts along with their relationships, we will need to configure two integrations (and four collections):
- Microsoft Azure DevOps Features ↔ Jira Epics, with 'blocked by' relationship field mapping
- Microsoft Azure DevOps Defects ↔ Jira Defects
- First, configure your Feature ↔ Epics Synchronize Integration
- Ensure that your model includes a 'blocked by' relationships field
- Note: In general, we recommend using the 'relationships' field type in your model, rather than 'relationship,' especially in cases where you may want to map a 'relationship' field in one repository to a 'relationships' field in your other repository.
- On each Collection, click 'configure relationship types,' and map the 'blocked by' model field to the appropriate relationship field ('affected by' in ADO and 'is blocked by' in Jira).
- On the Field Flow screen, you will see the two relationship types mapped to one another.
-

-
- Ensure that your model includes a 'blocked by' relationships field
- Next, configure your Defect ↔ Defect Synchronize Integration as you normally would.
- Run both integrations. You will see your epics and features, and your defects, as well as their relationships to one another successfully flow as part of your integration.
Note: If you are configuring an integration between different collections of the same repository (i.e., to flow artifacts from one project in Jira to another project in Jira), the best practice is to create two separate repository connections in Hub for the source repository and the target repository. This will eliminate errors encountered in Hub related to relationship fields.
Synchronizing External Relationships
If you'd like a more lightweight approach, you can configure the scenario below to flow the URL of the related artifact in the source repository to a weblink or string field in the target repository. This is what we refer to as External ARM (Artifact Relationship Management).
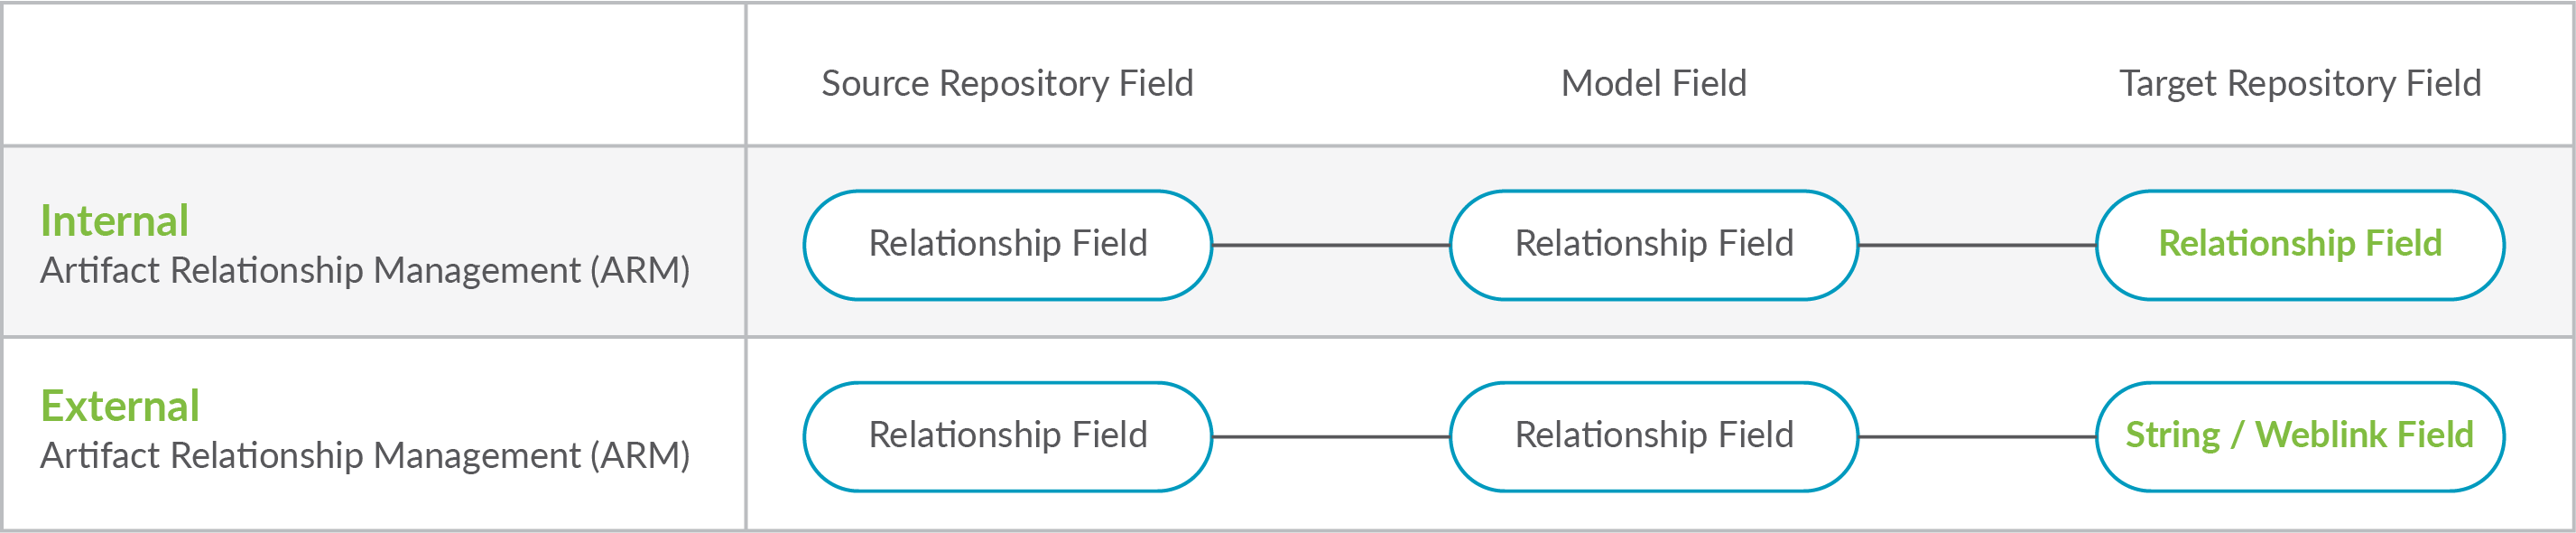
Both internal ARM and external ARM are configured the same way with regard to the source collection: A relationship field in the source collection is mapped to a relationship field in the model.
The crucial difference is how the target collection is configured:
- For internal ARM, that relationship field in the model is then mapped to a relationship field in the target collection.
- For external ARM, that relationship field in the model is then mapped to a string field or weblink field in the target collection.
To configure External ARM in Hub, follow the instructions below:
First, confirm that both repositories support the following in our Connector Documentation:
For the source repository:
- Relationship field types are supported
- The related artifact type (whose URL you would like to flow) is supported, and provides a unique URL
For the target repository:
- String fields or weblink fields are supported
Instructions
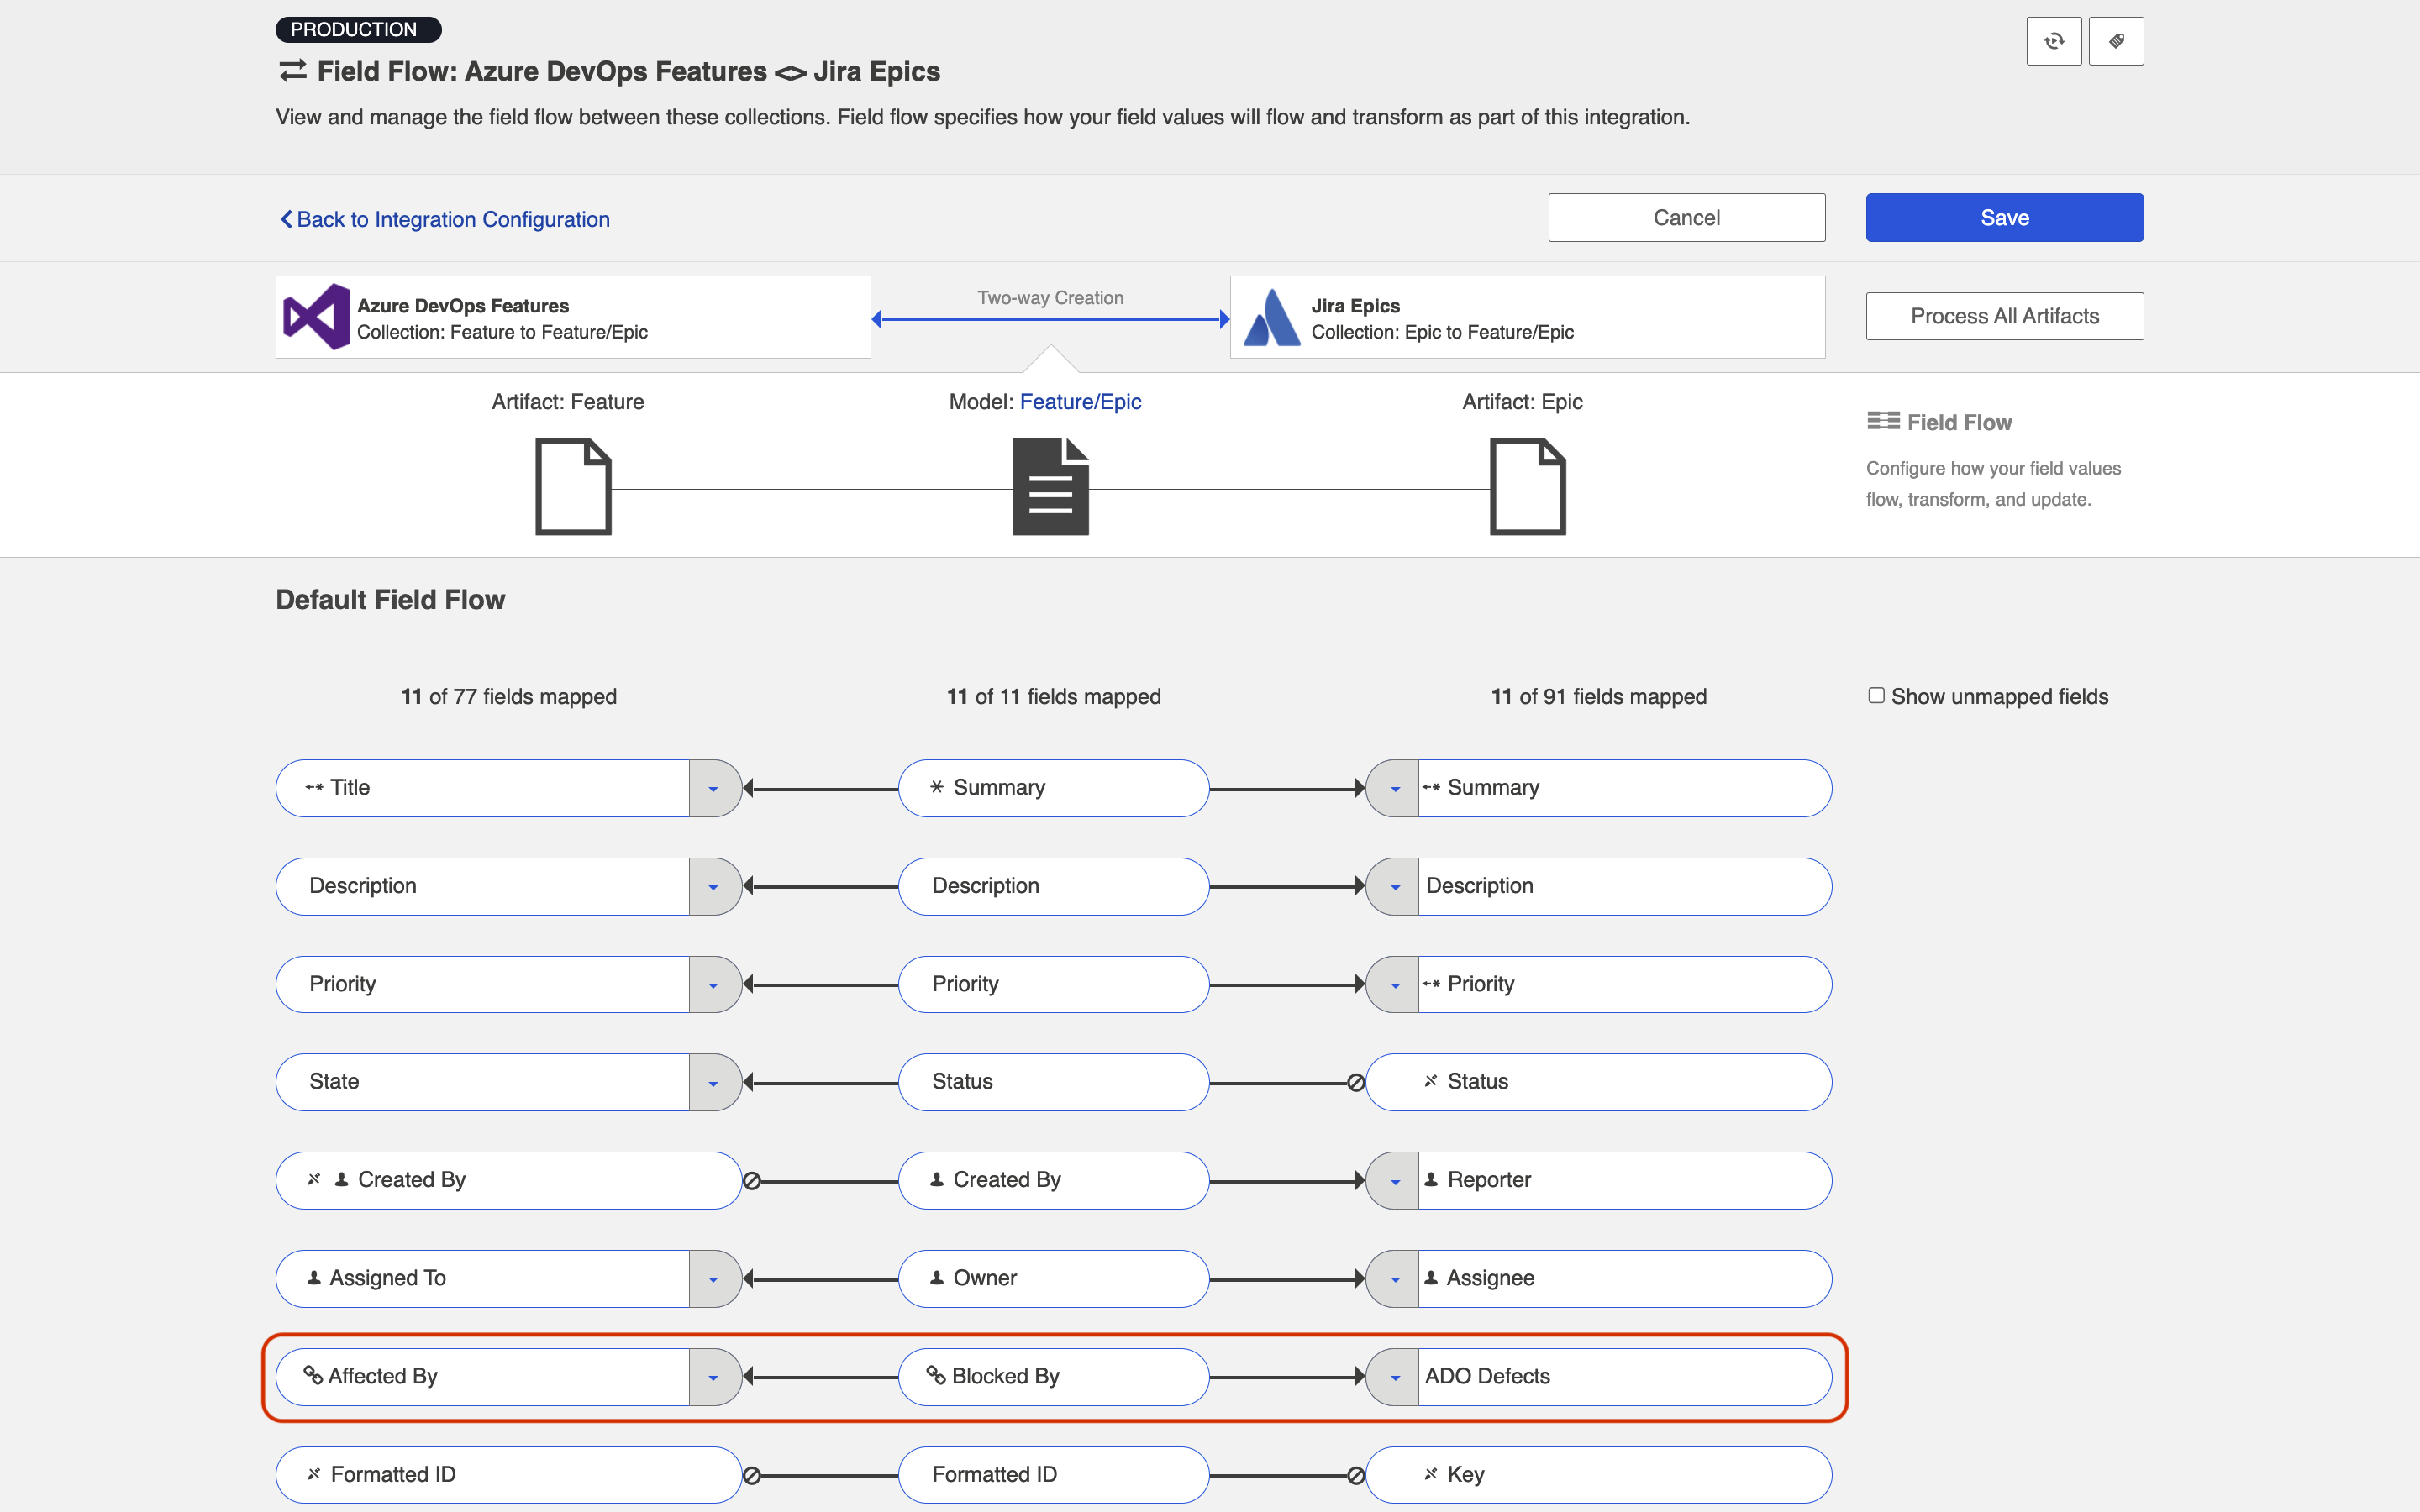
- Here, our goal will be similar to the goal in the Internal ARM section: to flow Microsoft Azure DevOps Features to Jira Epics. For any ADO Features that have related ADO Defects, instead of creating a related defect in Jira, we'd like to flow the URL for each defect to a custom string field on the Jira Epic.
- In this scenario, we will only configure 2 collections (Microsoft Azure DevOps Features and Jira Epics), and 1 integration (Microsoft Azure DevOps Features → Jira Epics), in contrast to the internal ARM scenario, which required two integrations. A second integration is not needed here, because we are not creating target defects in Jira. Rather, we are flowing the URL of the source defect to a custom field on the Jira Epic.
- To configure this scenario, create a synchronize integration for your main artifact type.
- In this example, we will flow Microsoft Azure DevOps Features to Jira Epics.
- On the source collection (Azure DevOps Features), configure a relationship mapping for the relationship type you'd like to flow.
- In this example, we will map "Affected by" relationship field to our 'blocked by' relationship field in the model.
- On the target collection (Jira Epics), configure a mapping between the string or weblink field that you'd like to receive the URL, and the relationship field in the model that was mapped in the prior step.
- In this example, we will map the Jira custom string field, "ADO Defects" to the "blocked' relationship field in the model.
- You'll see that your field flow for the integration looks like this:
- When we run our integration, we will see that Microsoft Azure DevOps Features create Epics in Jira, AND that the related defects in Microsoft Azure DevOps flow their URLs to the Web Links field on the Jira Epic.
Synchronizing an Artifact ID or URL Reference
Imagine this scenario: You are flowing defects between two repositories: Jira and Jama. You'd like to have a way to know the ID, or URL, of the source artifact in Jira when viewing its target artifact in Jama (and vice versa). This will provide traceability between the source artifacts and the artifacts that have been created in your target repositories via your integration.
To set this up, you will need to configure two different field mappings in each collection:
- You will need to specify which field to pull the source artifact's ID (or URL) from
- You will need to specify which field to use to store the source artifact's ID (or URL), in your target repository
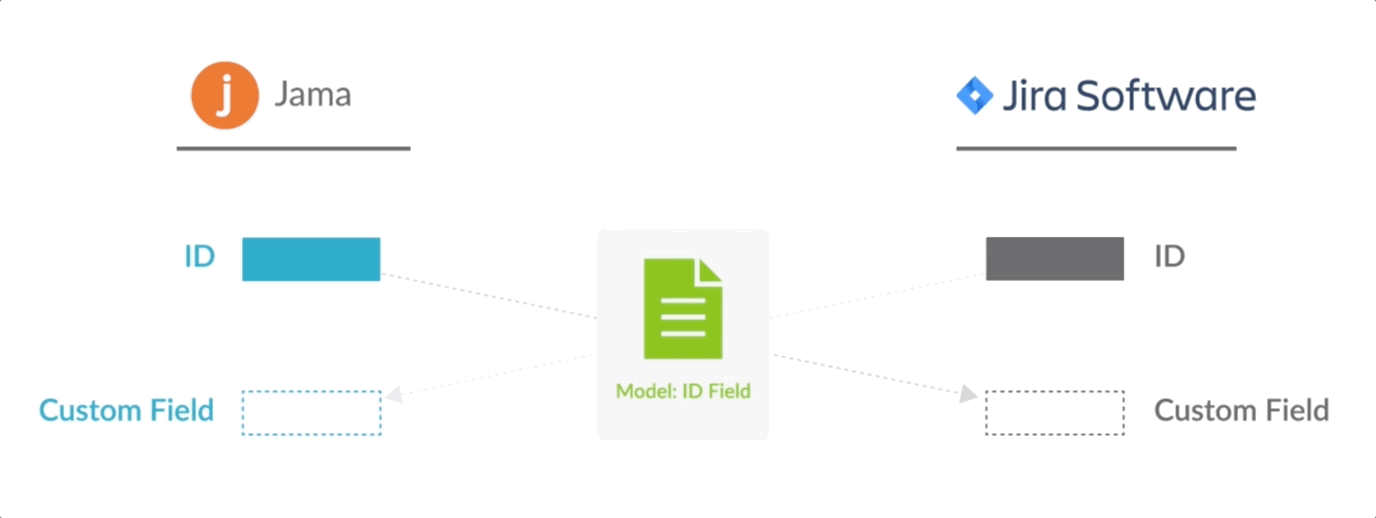
In the diagram above, you can see that Jira is flowing its ID field to a custom field in Jama, and that Jama is flowing its ID field to a custom field in Jira. In order to set up this integration, you will need to configure your model to accept that ID field. We'll walk through how to do that below.
The instructions below will walk you through how to set up this configuration for the ID field, but the same instructions will also apply for location/URL:
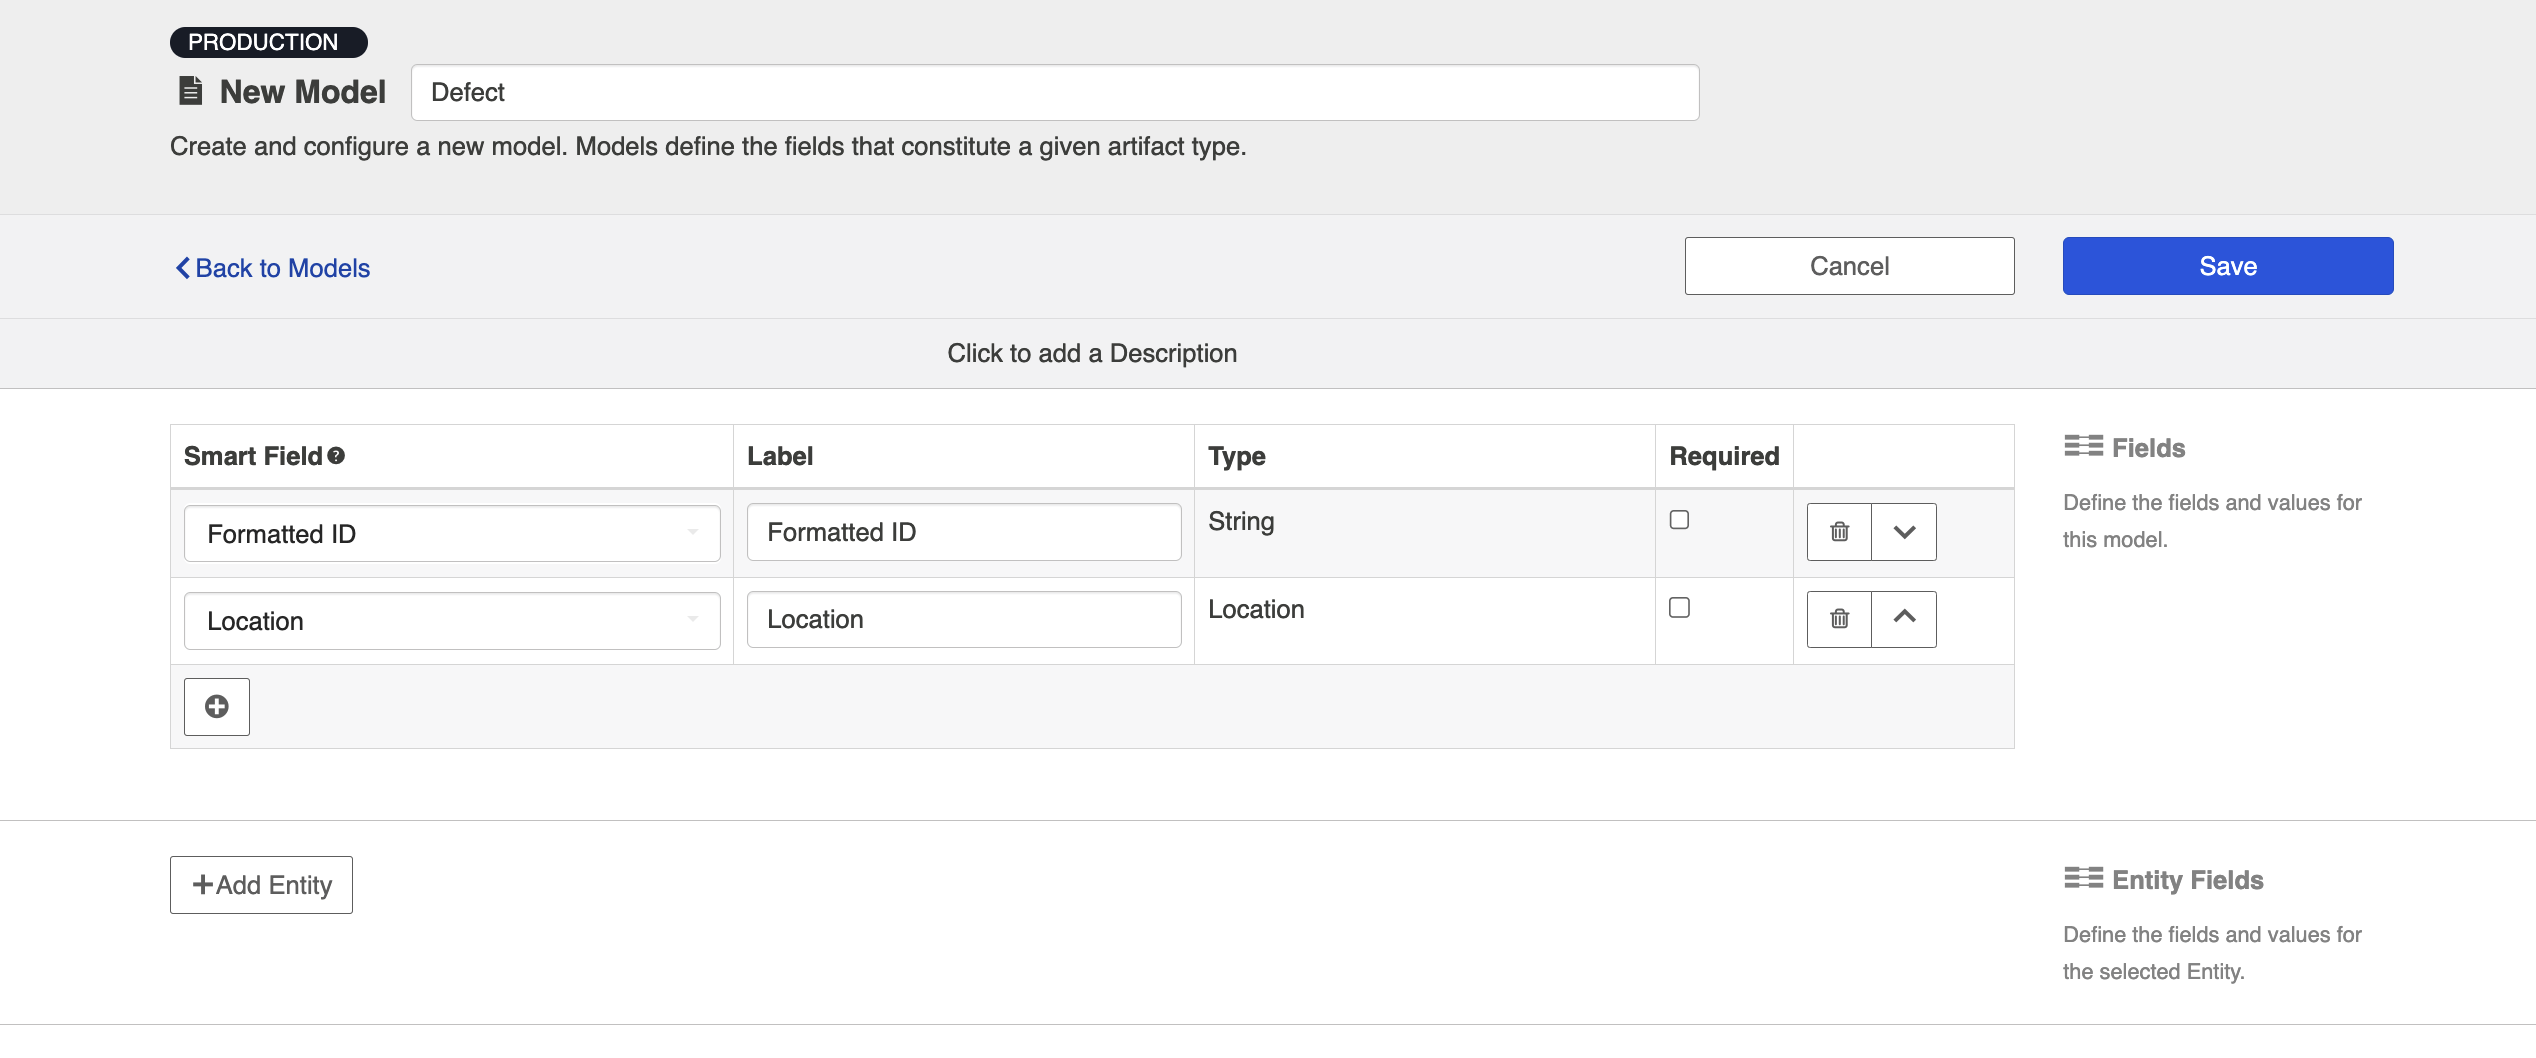
- Go to the Model that you are utilizing in the integration. Ensure that your model includes the Formatted ID field. We've also shown the 'Location' field below, for reference, as a similar process can be followed to flow the source artifact's URL to a field on the target artifact, for traceability.
- Go to the Collections screen for each of your repositories, and set up mapping to tell the integration where to pull the ID from:
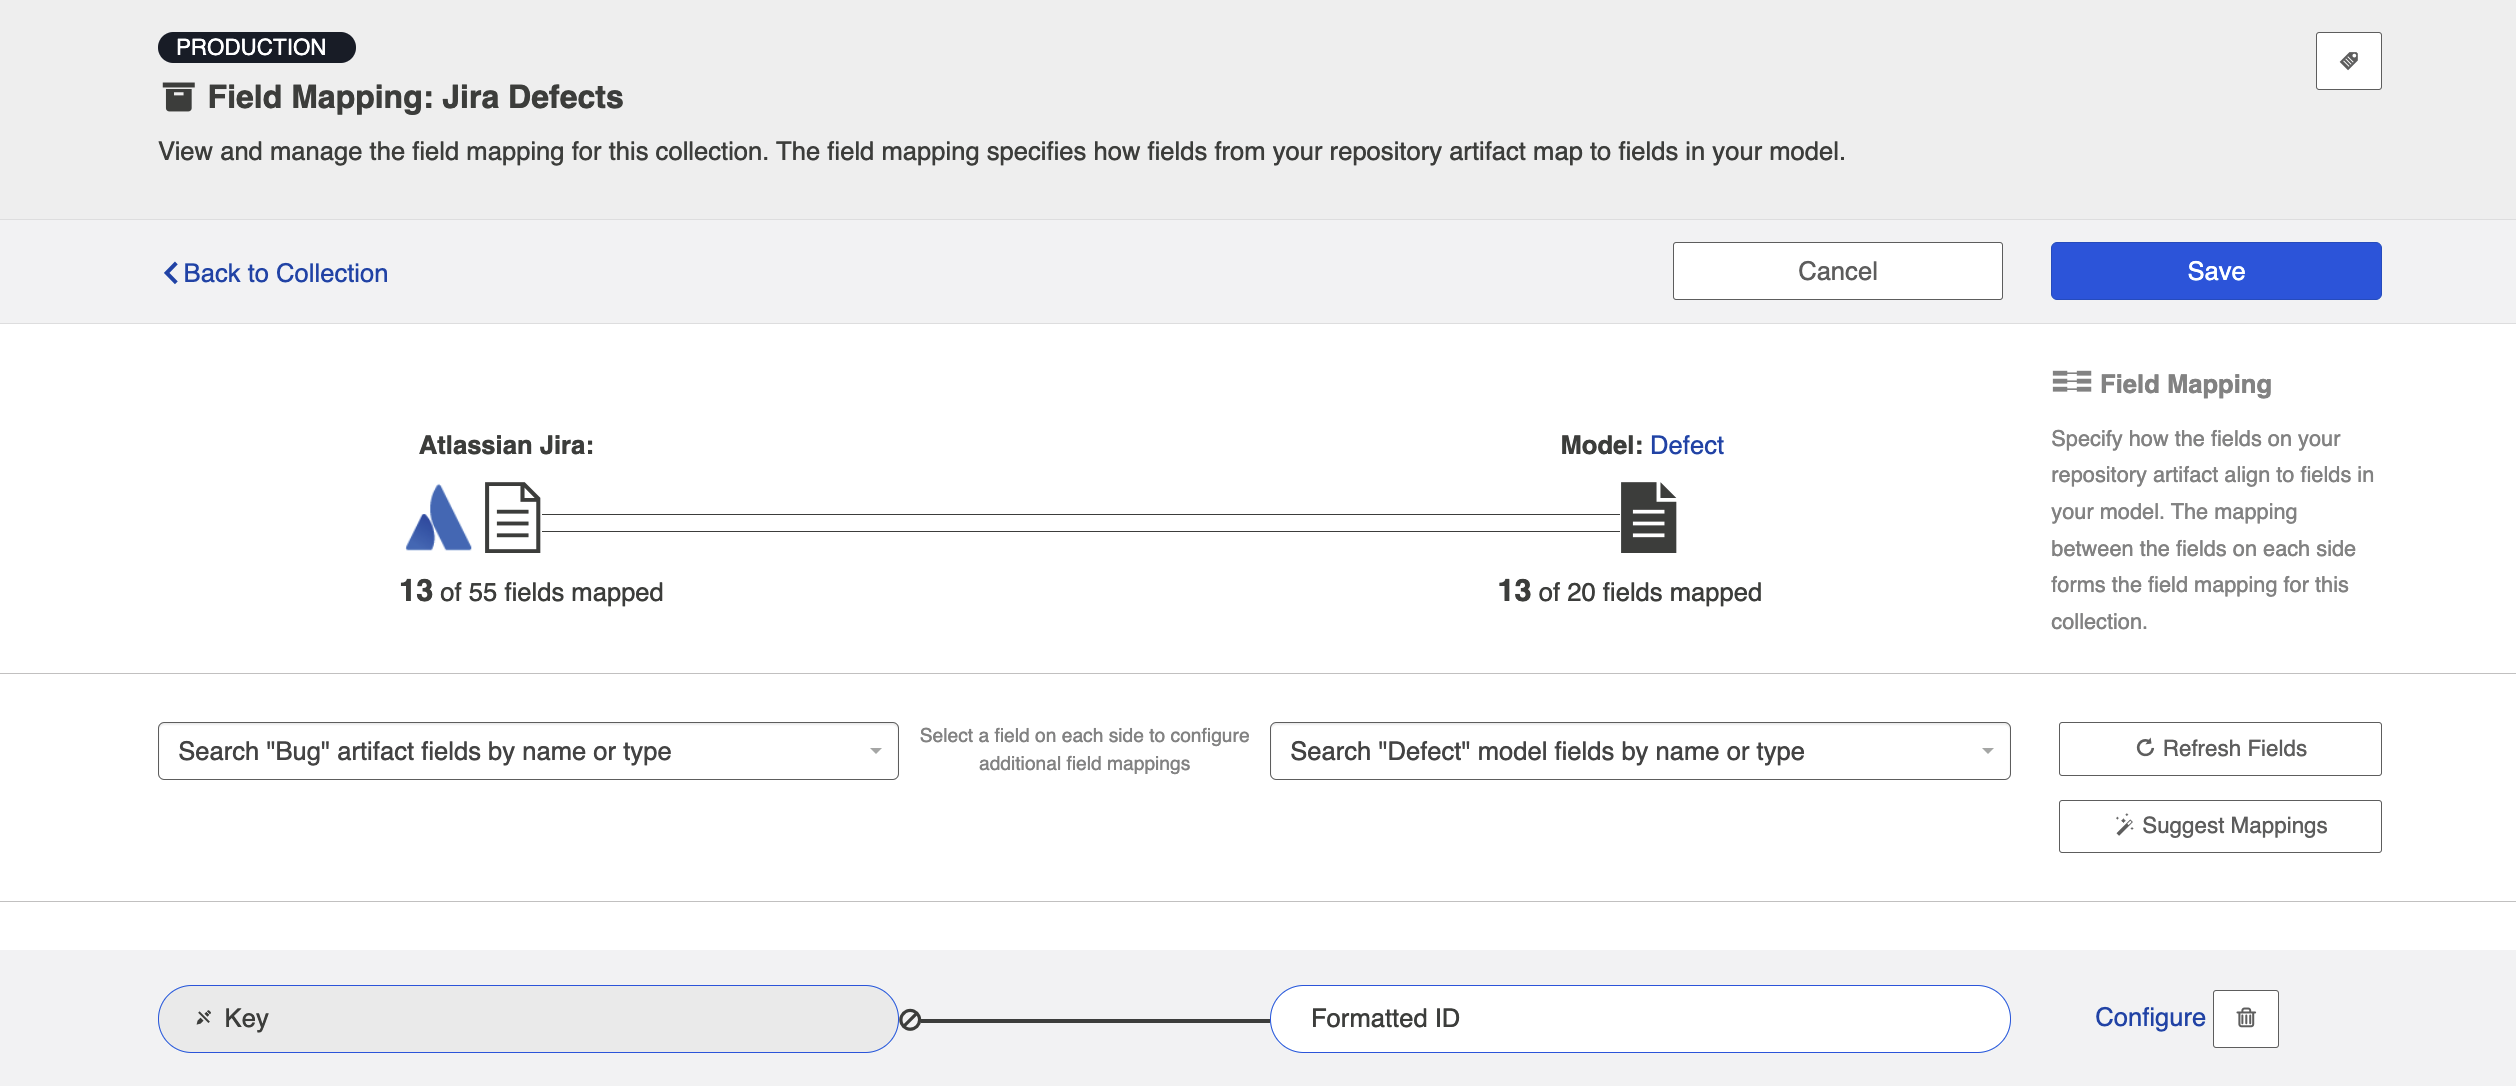
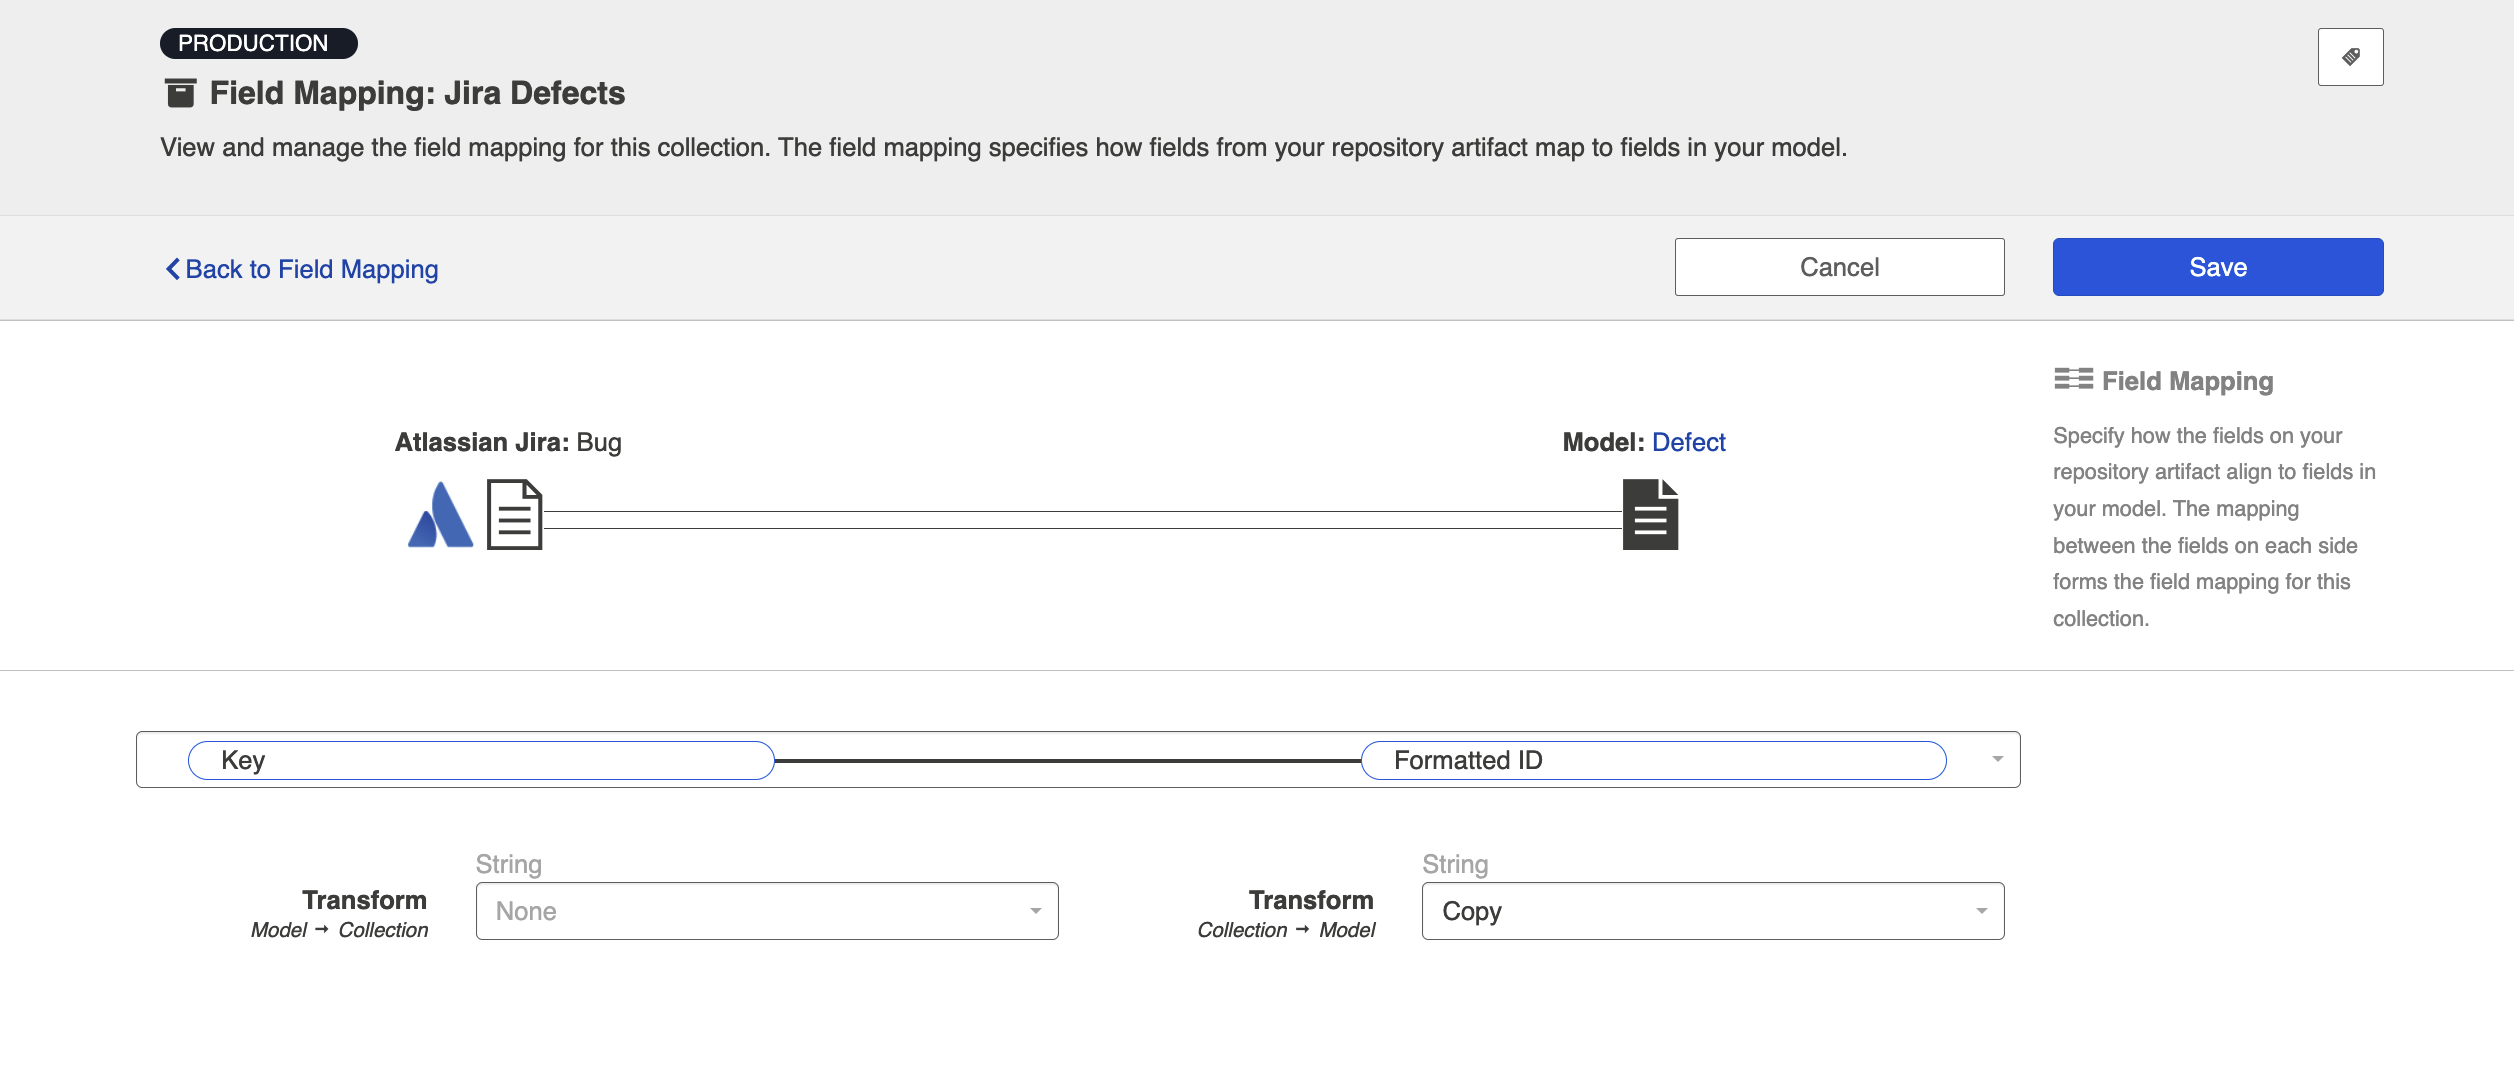
- Map the Formatted ID model field to the corresponding field in your repository. This is the field that the collection will take the ID data from. Note that Formatted ID is called 'Key' in Jira, but may be referred to using a different name in a different repository (i.e., 'issue ID')
- Click 'Configure' next to your mapping, and confirm that your Transforms are configured as shown below. The transform on the left should be 'None' and the transform on the right should be 'Copy.' This will tell the collection to send data from the Key field in your repository to the model, but not vice versa.
- Repeat these steps in your other repository.
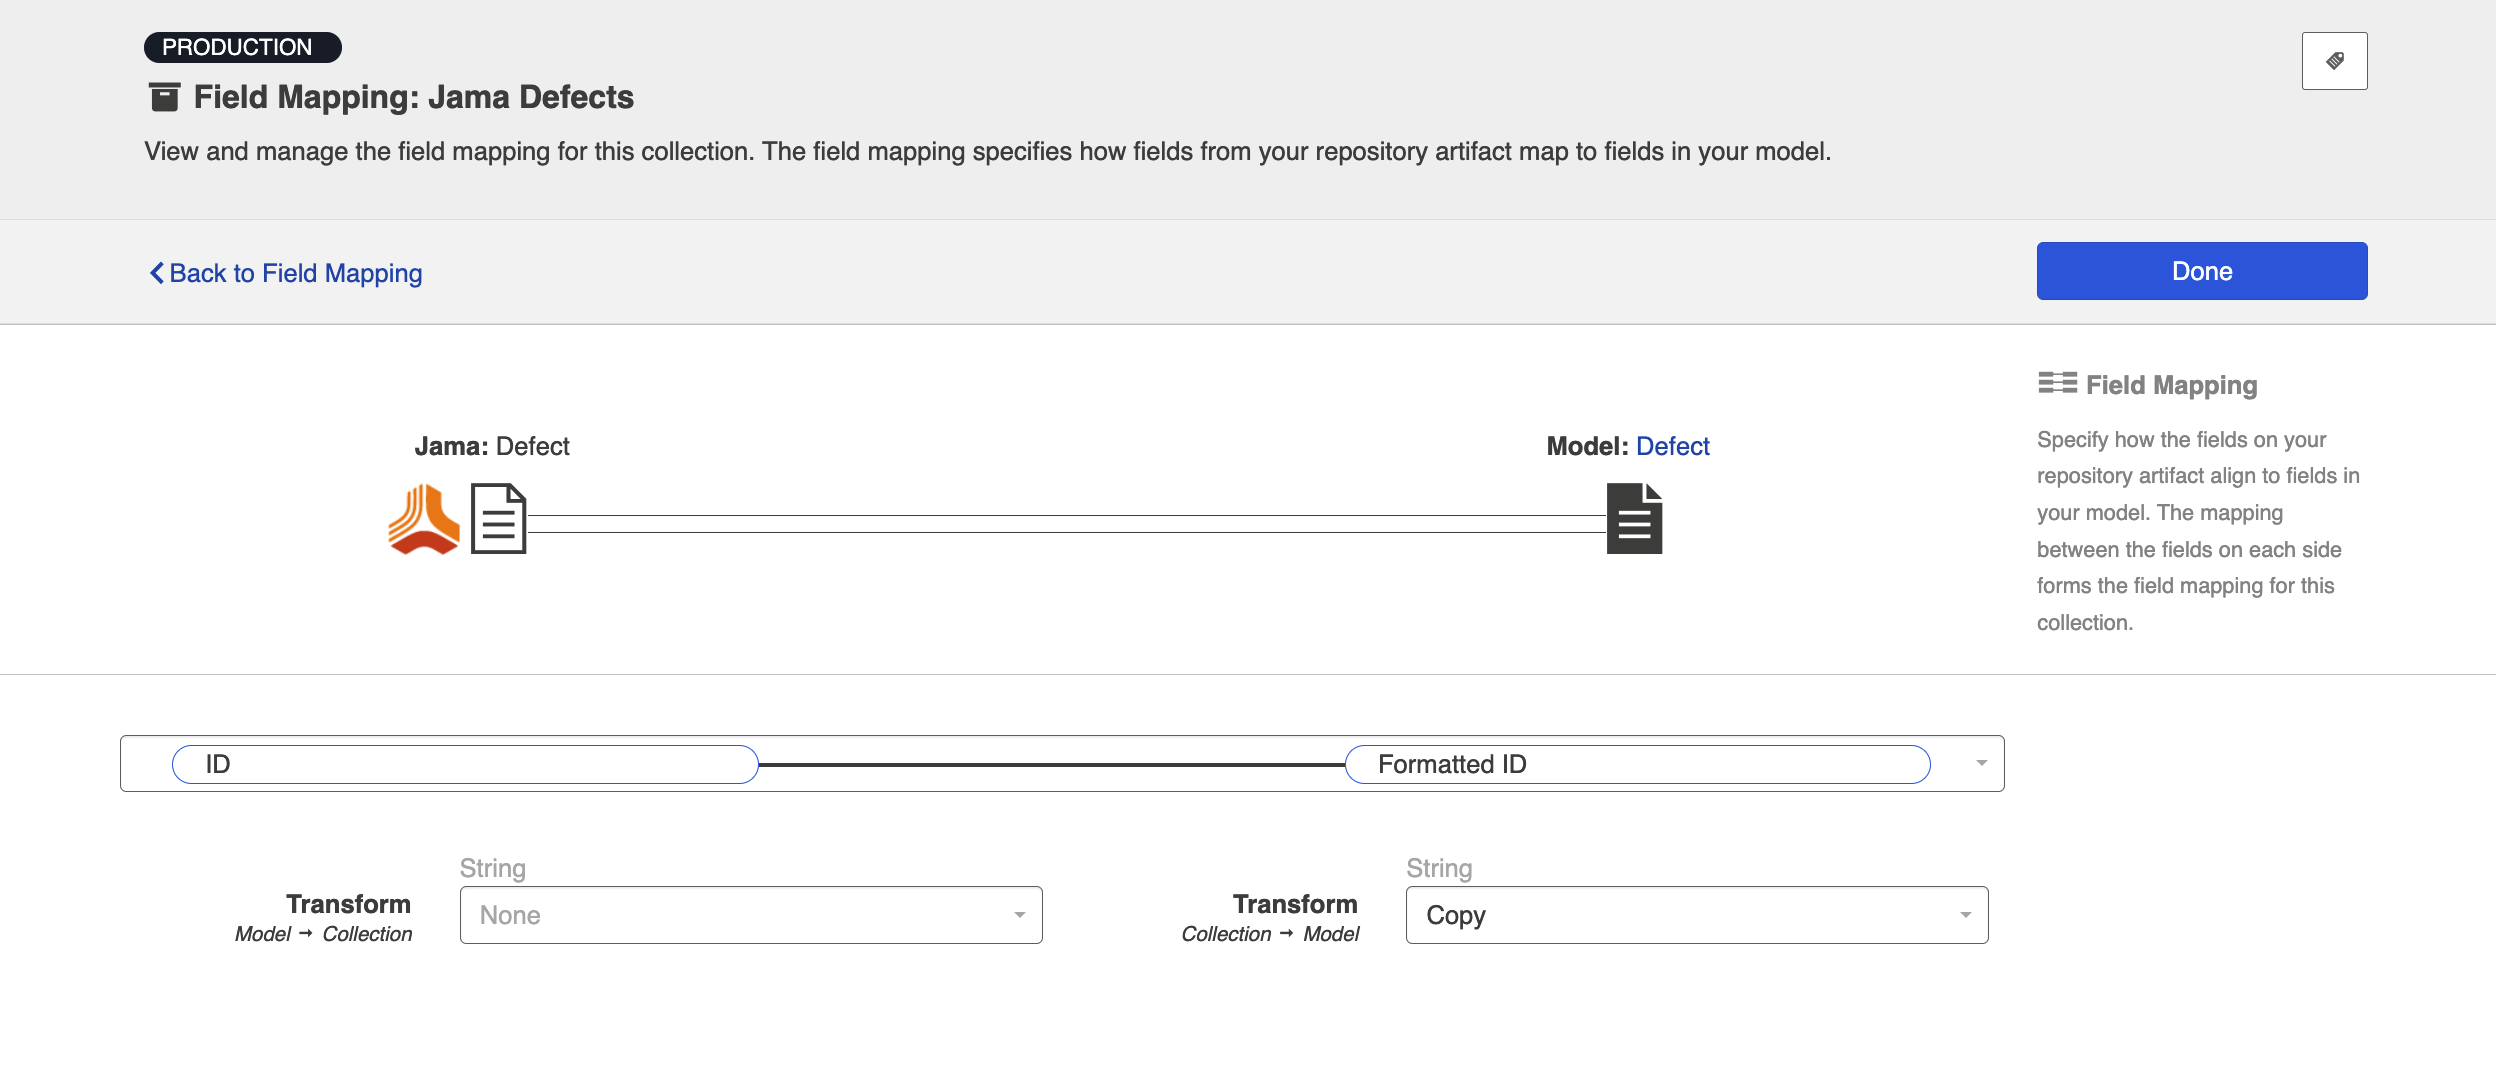
- Here is how the mappings should look in each repository, for your source fields:
-
-
- Map the Formatted ID model field to the corresponding field in your repository. This is the field that the collection will take the ID data from. Note that Formatted ID is called 'Key' in Jira, but may be referred to using a different name in a different repository (i.e., 'issue ID')
- Now that our model is able to acquire ID data from each source repository, let's tell it where to store that data in the corresponding target repository. To do this, you will set up an additional mapping in each Collection:
- Navigate to one of your Collections.
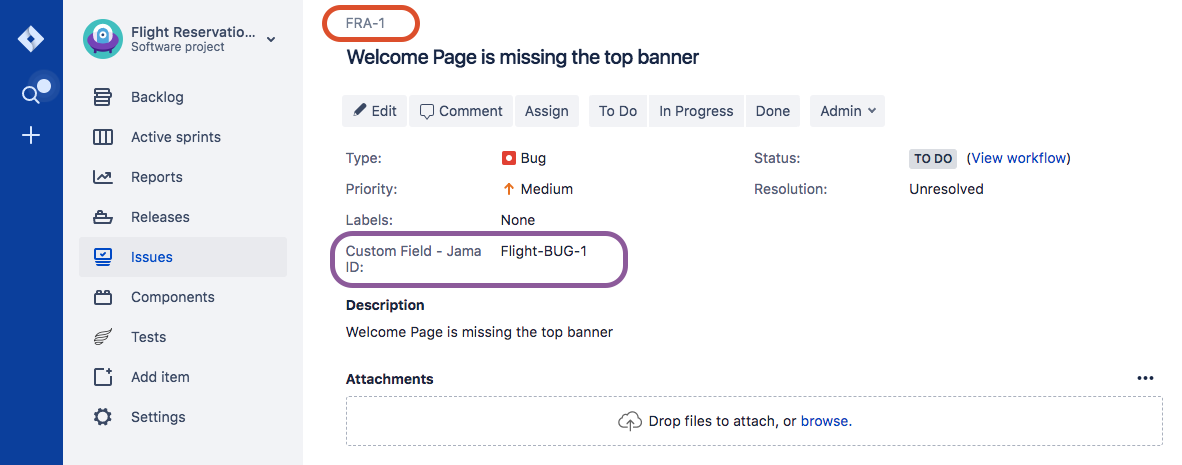
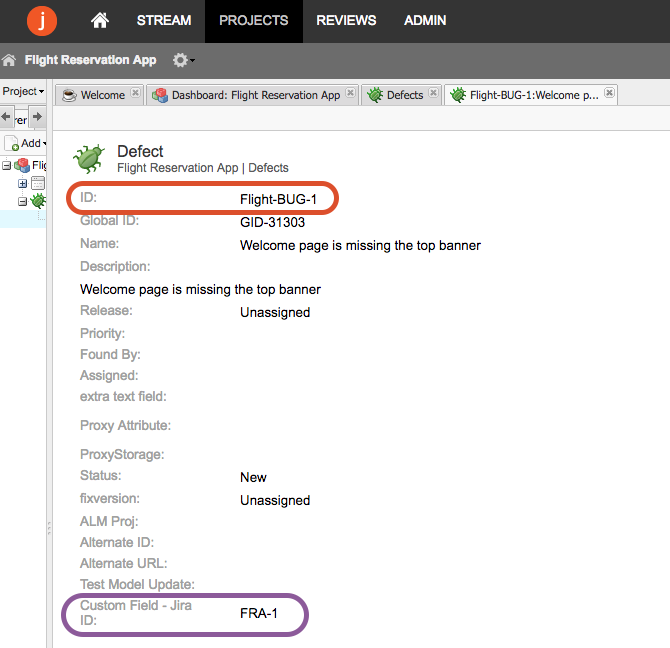
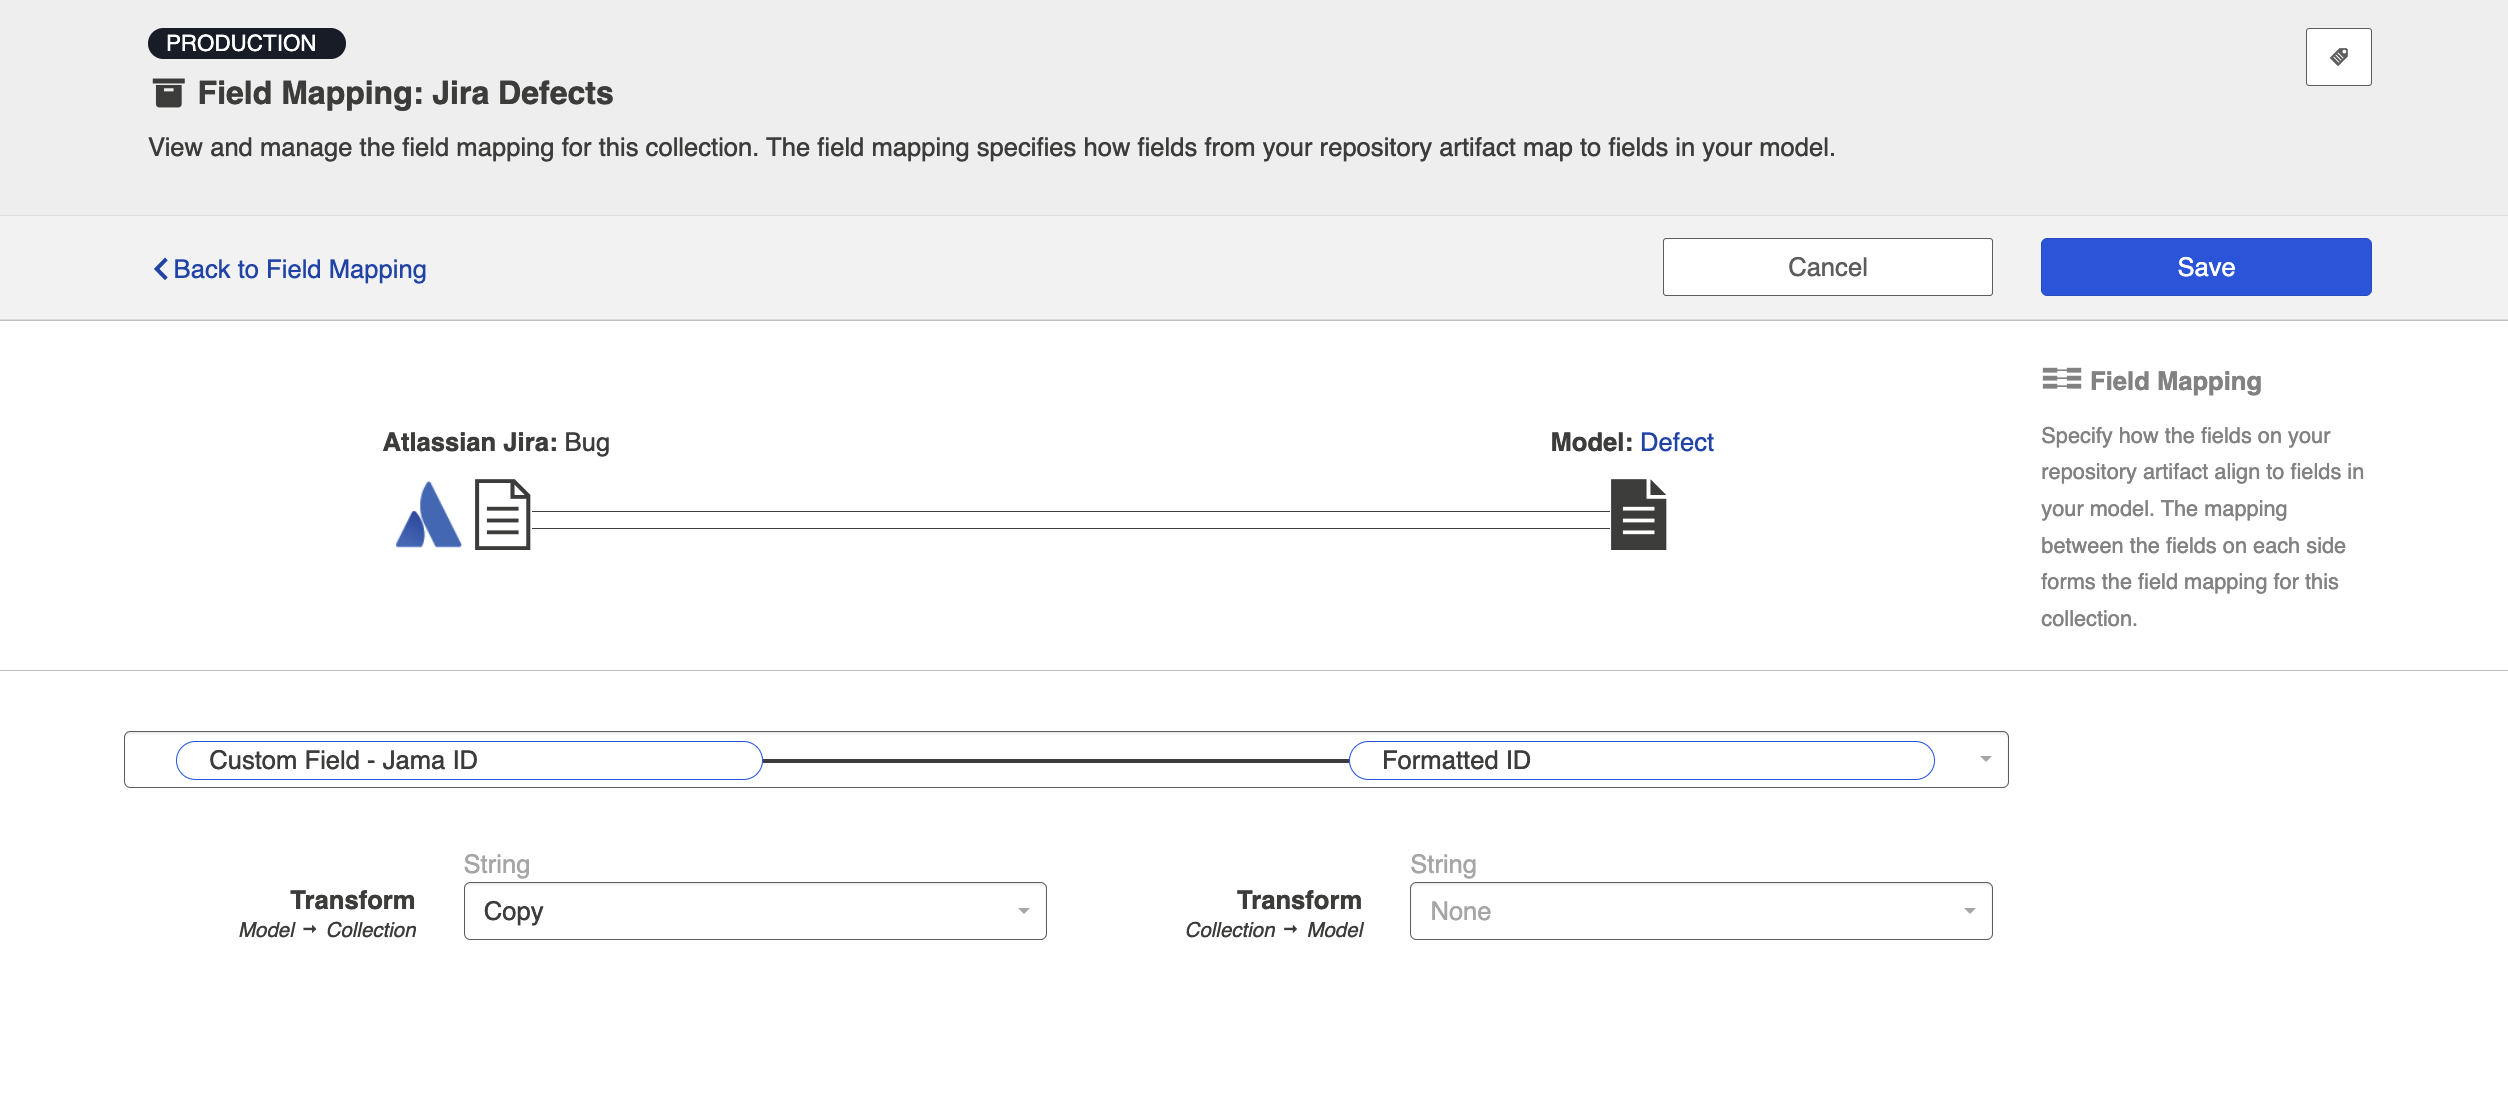
- Map the Formatted ID model field to your repository once more, this time to determine where you would like to store this data in your target repository. The field mapping page will tell you that this is a 'duplicate,' but that is ok!
-
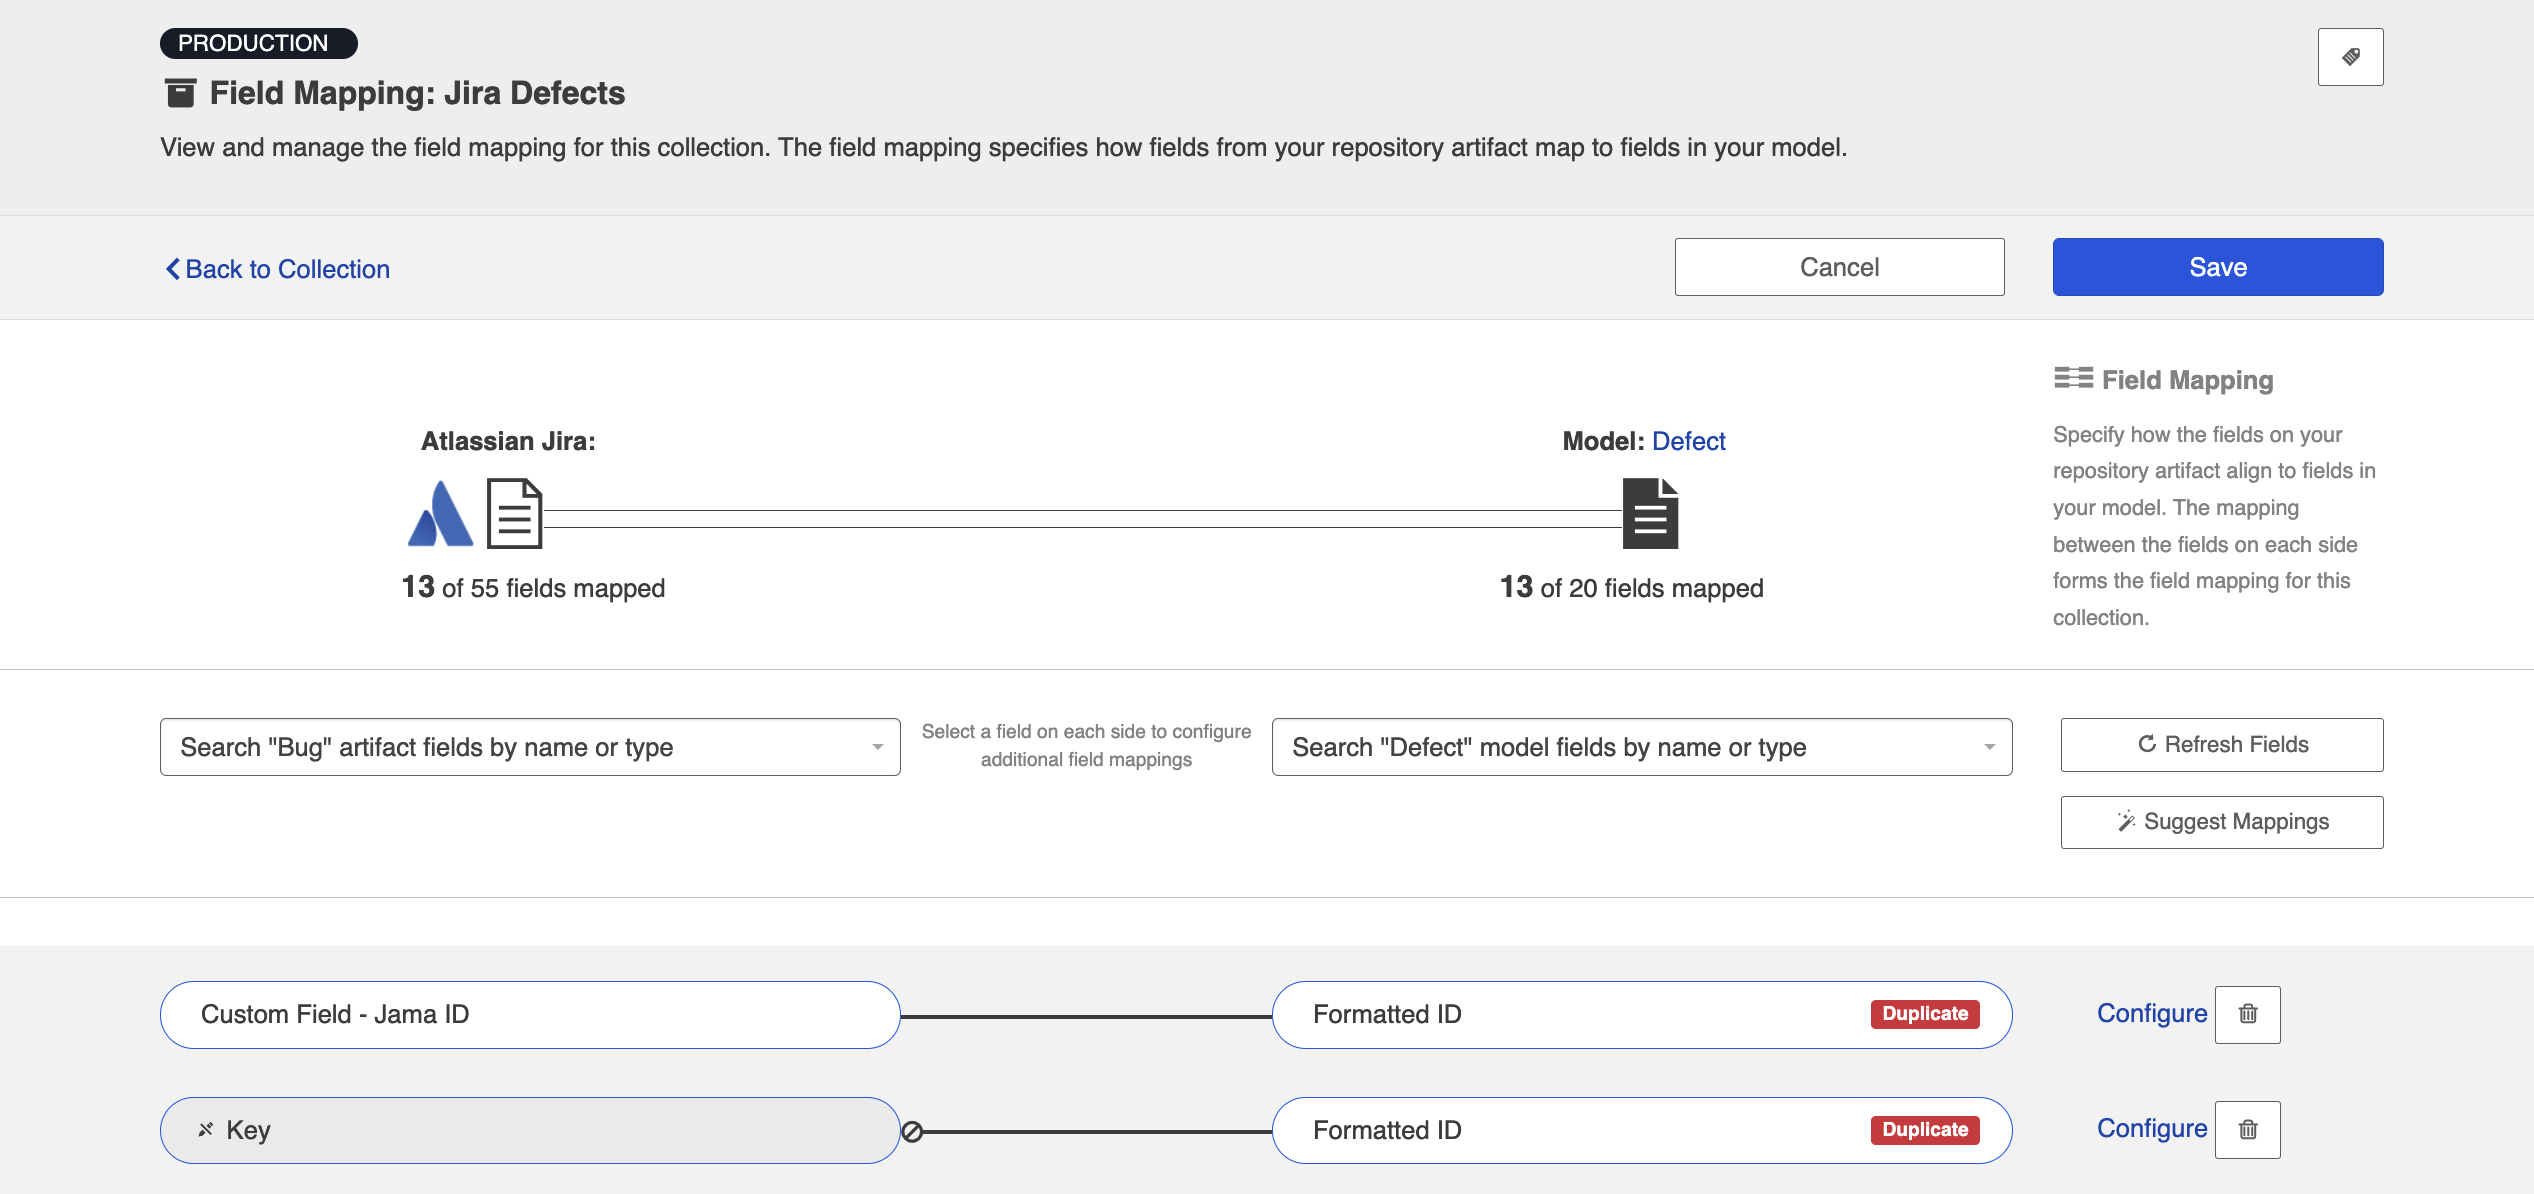
- In the image above, we have mapped 'formatted ID' to a custom field in Jira called 'Custom Field - Jama ID'. This is the field that the Jama Formatted ID data will flow to in Jira.
- Note: Do not click 'Save' yet. If you do, you will get an error. Continue to the next step below.
-
- Click 'Configure' on the new mapping, and configure as shown below. This will tell the collection to take data from the model and send it to the 'Description' field, but not vice versa.
-
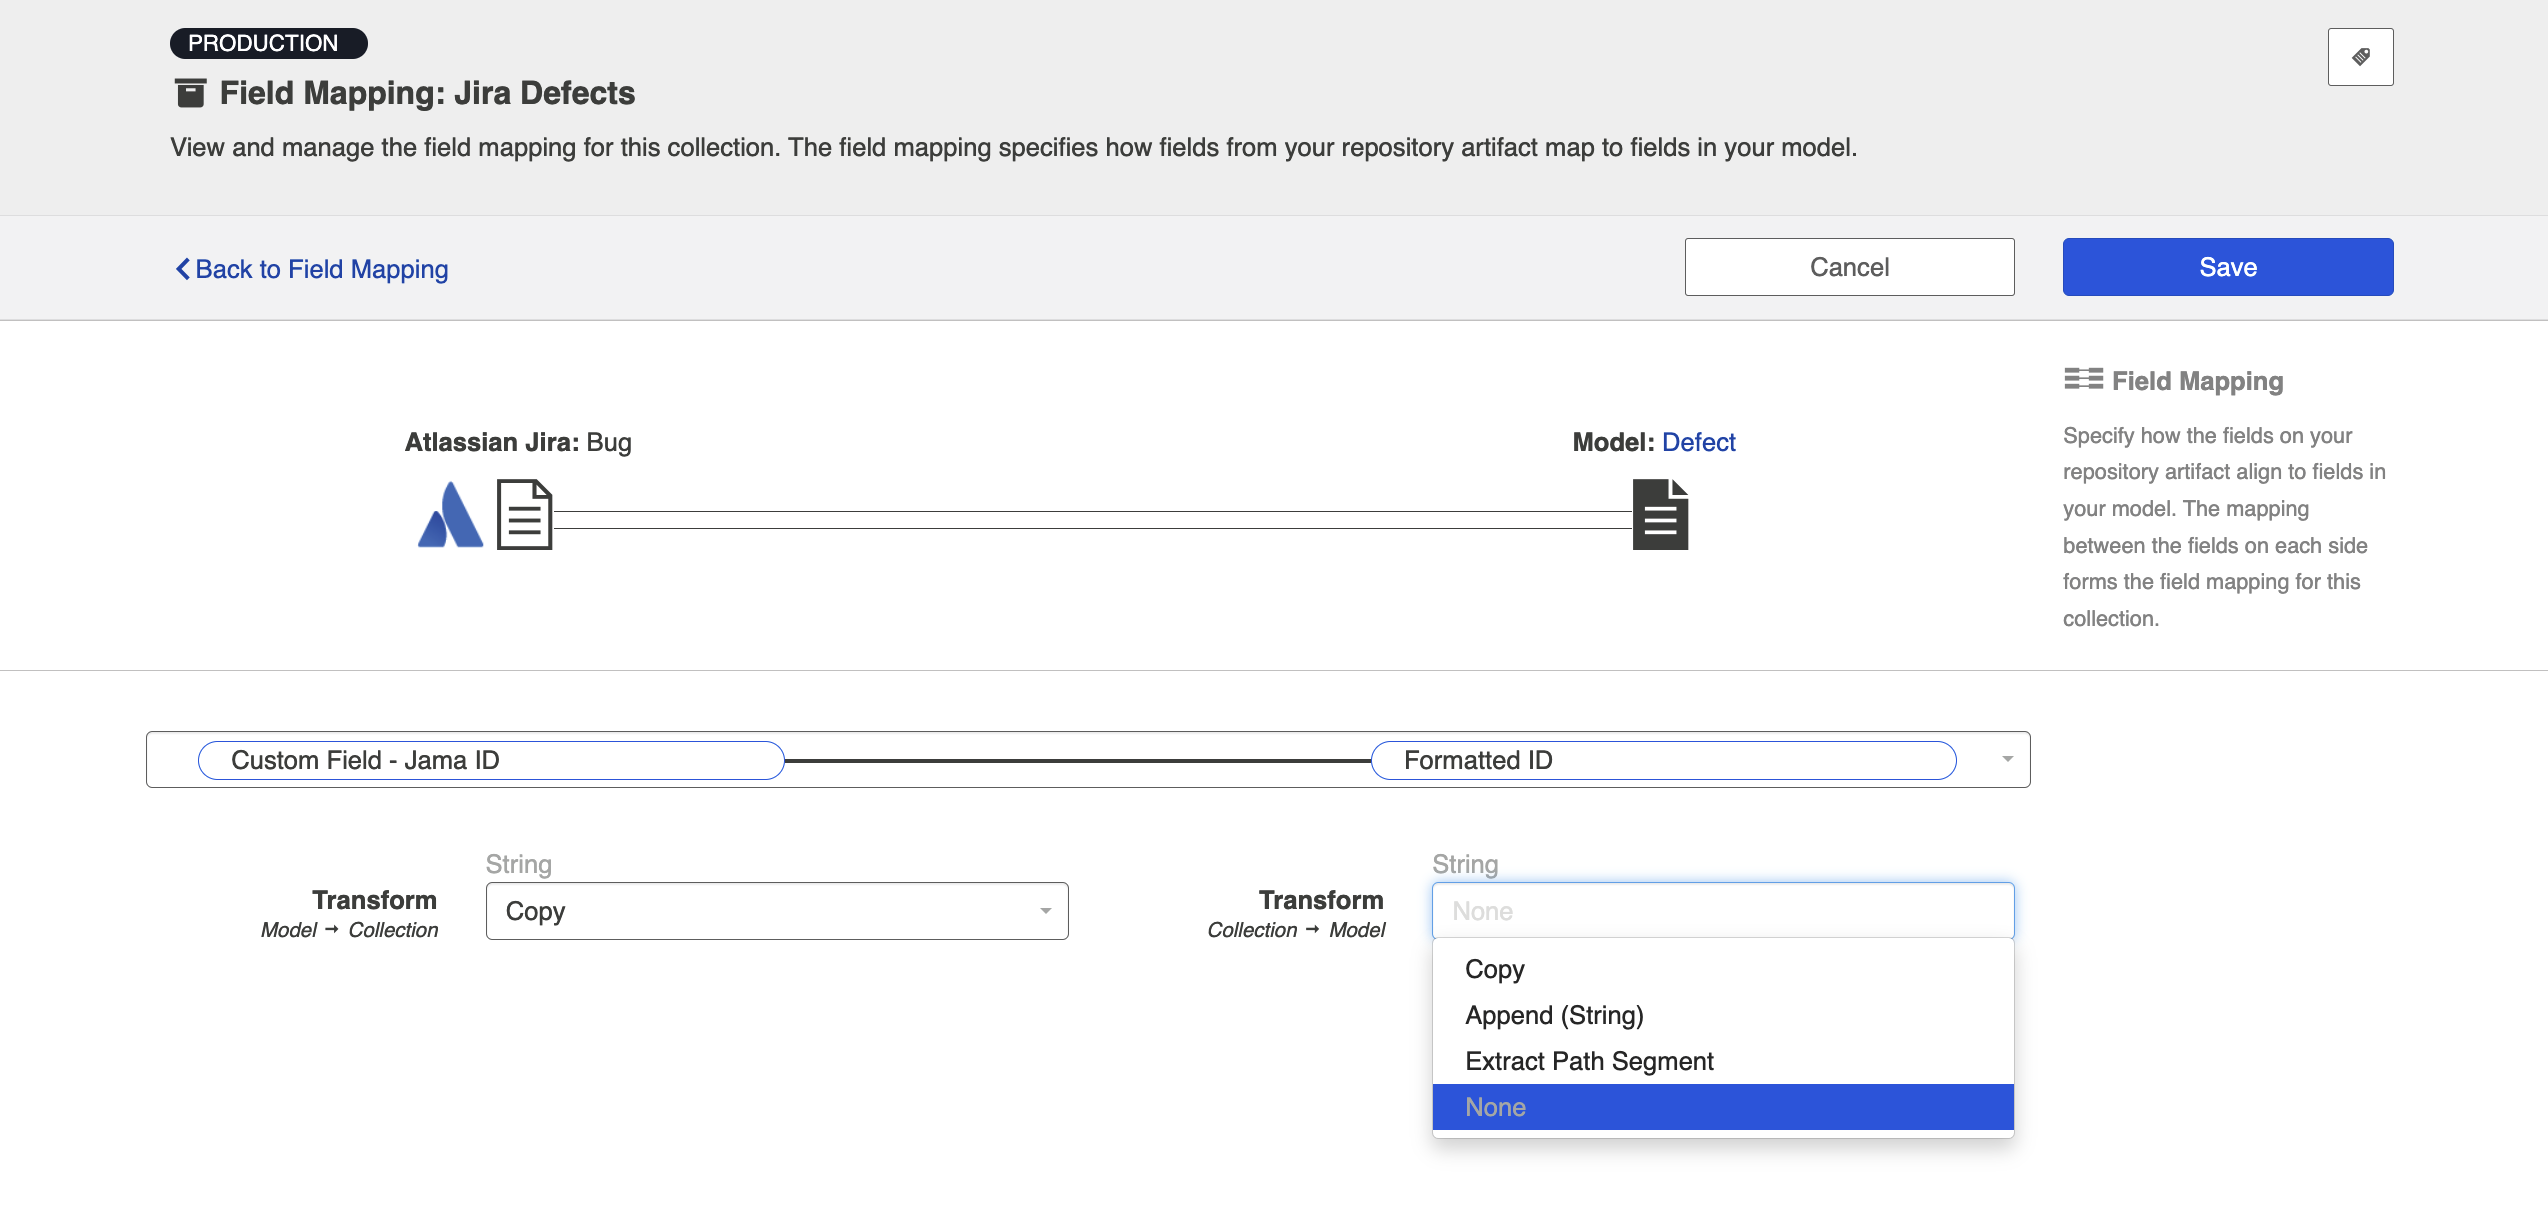
- Note: The transform on the left may be 'Copy,' 'Formatted String to Rich Text,' or some other transform depending on the field types of the repository field and model field. However, the important thing is that the transform on the right (on the model side) be set to 'None.' This ensures that data will only flow into the repository field, rather than out of it.
-
- Save your mapping and collection.
- Repeat these steps on your other collection.
- Here is how your transforms should look in each collection, for your target fields:
-

-
- When you run the integration, the ID of the source artifact will now flow to a field on the target artifact (and vice versa), as specified in your field mapping: