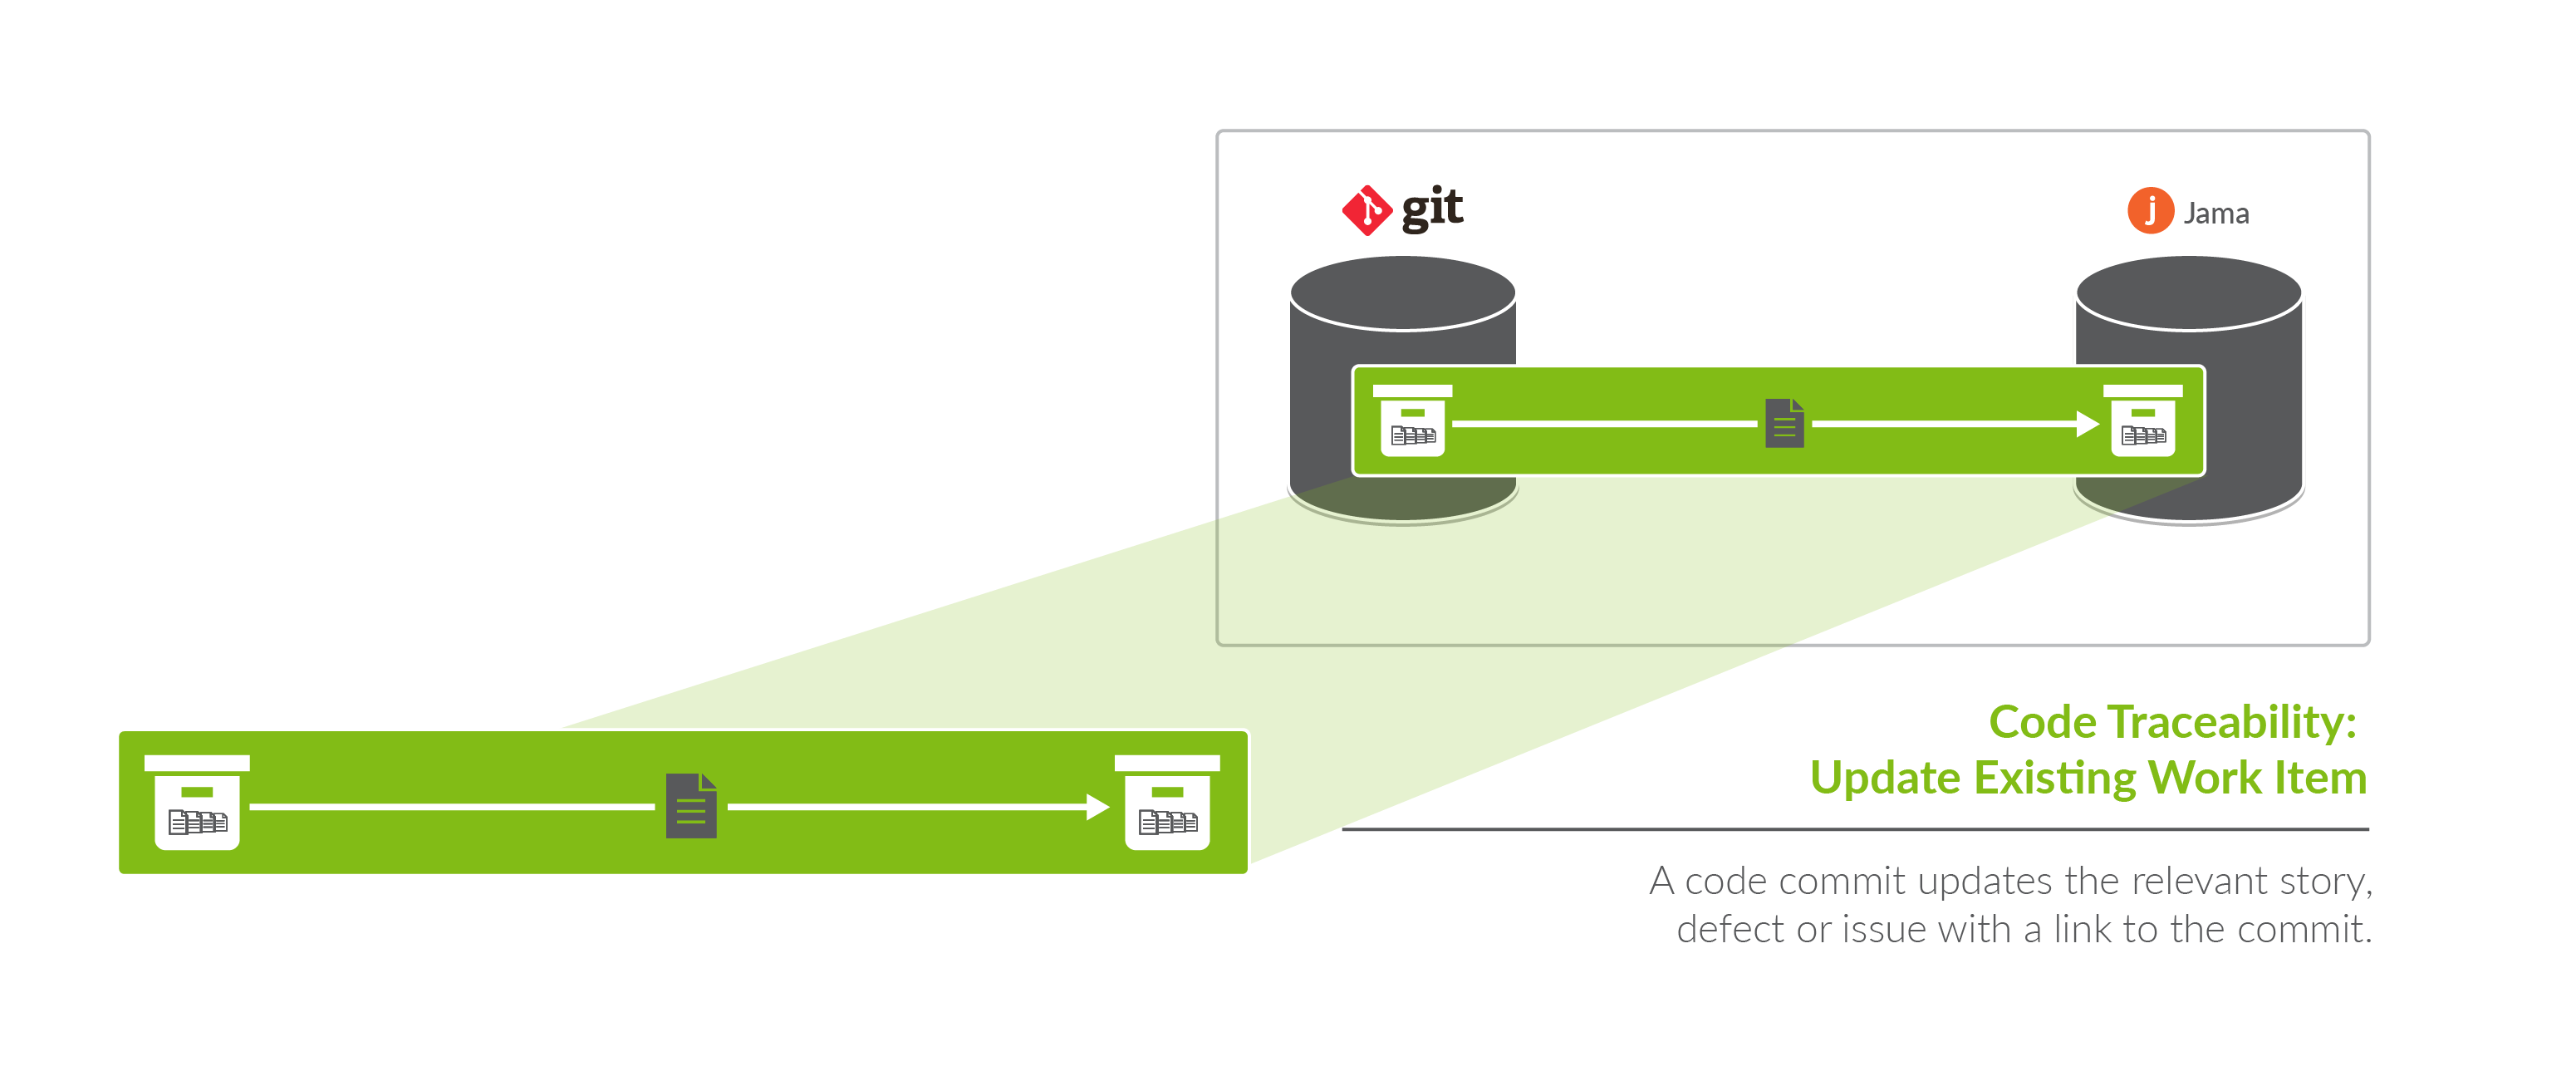
Code Traceability: Update Existing Work Item
What is a Code Traceability: Update Existing Work Item Integration?
This integration template is only available in editions that have access to the Git repository.
An integration is quite simply the flow of information between two or more collections.
A Code Traceability: Update Existing Work Item integration, specifically, flows information from an outbound only collection (such as Git Commits) to a field on an existing artifact in a work item collection (such as Jama Codes).
These types of events are “fire and forget” - they create something new in your repository, but they don’t expect anything back. As such, they don’t mandate a full-blown two way synchronization; a lighter one-way integration can do the trick.
Here are some examples of what you can do with the Code Traceability: Update Existing Work Item integration:
- Flow Git code commit information to a custom field on a Jama code artifact
- Flow code commit information from Git hosting services such as Bitbucket, Gerrit, and more to a custom field on an associated requirement, defect, or epic in an Agile Planning or Requirements Management tool
When you configure your Code Traceability: Update Existing Work Item integration, you can customize the field flow, artifact filtering, and change detection configuration of your integration.
Use Case and Business Value
The Code Traceability: Update Existing Work Item template allows developers working in Source Control Management tools, such as Git, to flow data from code commits to an Agile Planning tool, such as Jira, to record information from the commit message directly on the related defect or feature.
As part of the integration,
- Changesets, commit messages, or code reviews from an SCM tool, such as Git, will flow information to a field on an artifact in a Requirements Management Planning tool, such as Jama
Template Affordances
The Code Traceability: Update Existing Work Item template allows you to flow artifacts in one direction: from your outbound only collection (i.e., your Gti Commits collection) to your work item collection (i.e., your Requirements Management artifacts).

Before you Begin
Before you begin configuring your integration, you must configure your repository, model, and collections. Please review instructions below for each step
Repository Configuration
Please review the following pages to learn how to configure your repository:
- Standard Repository Connection
- Please review the Git Connector page in our Connector Docs for additional details on configuring the Git repository. This will serve as the source repository in your integration.
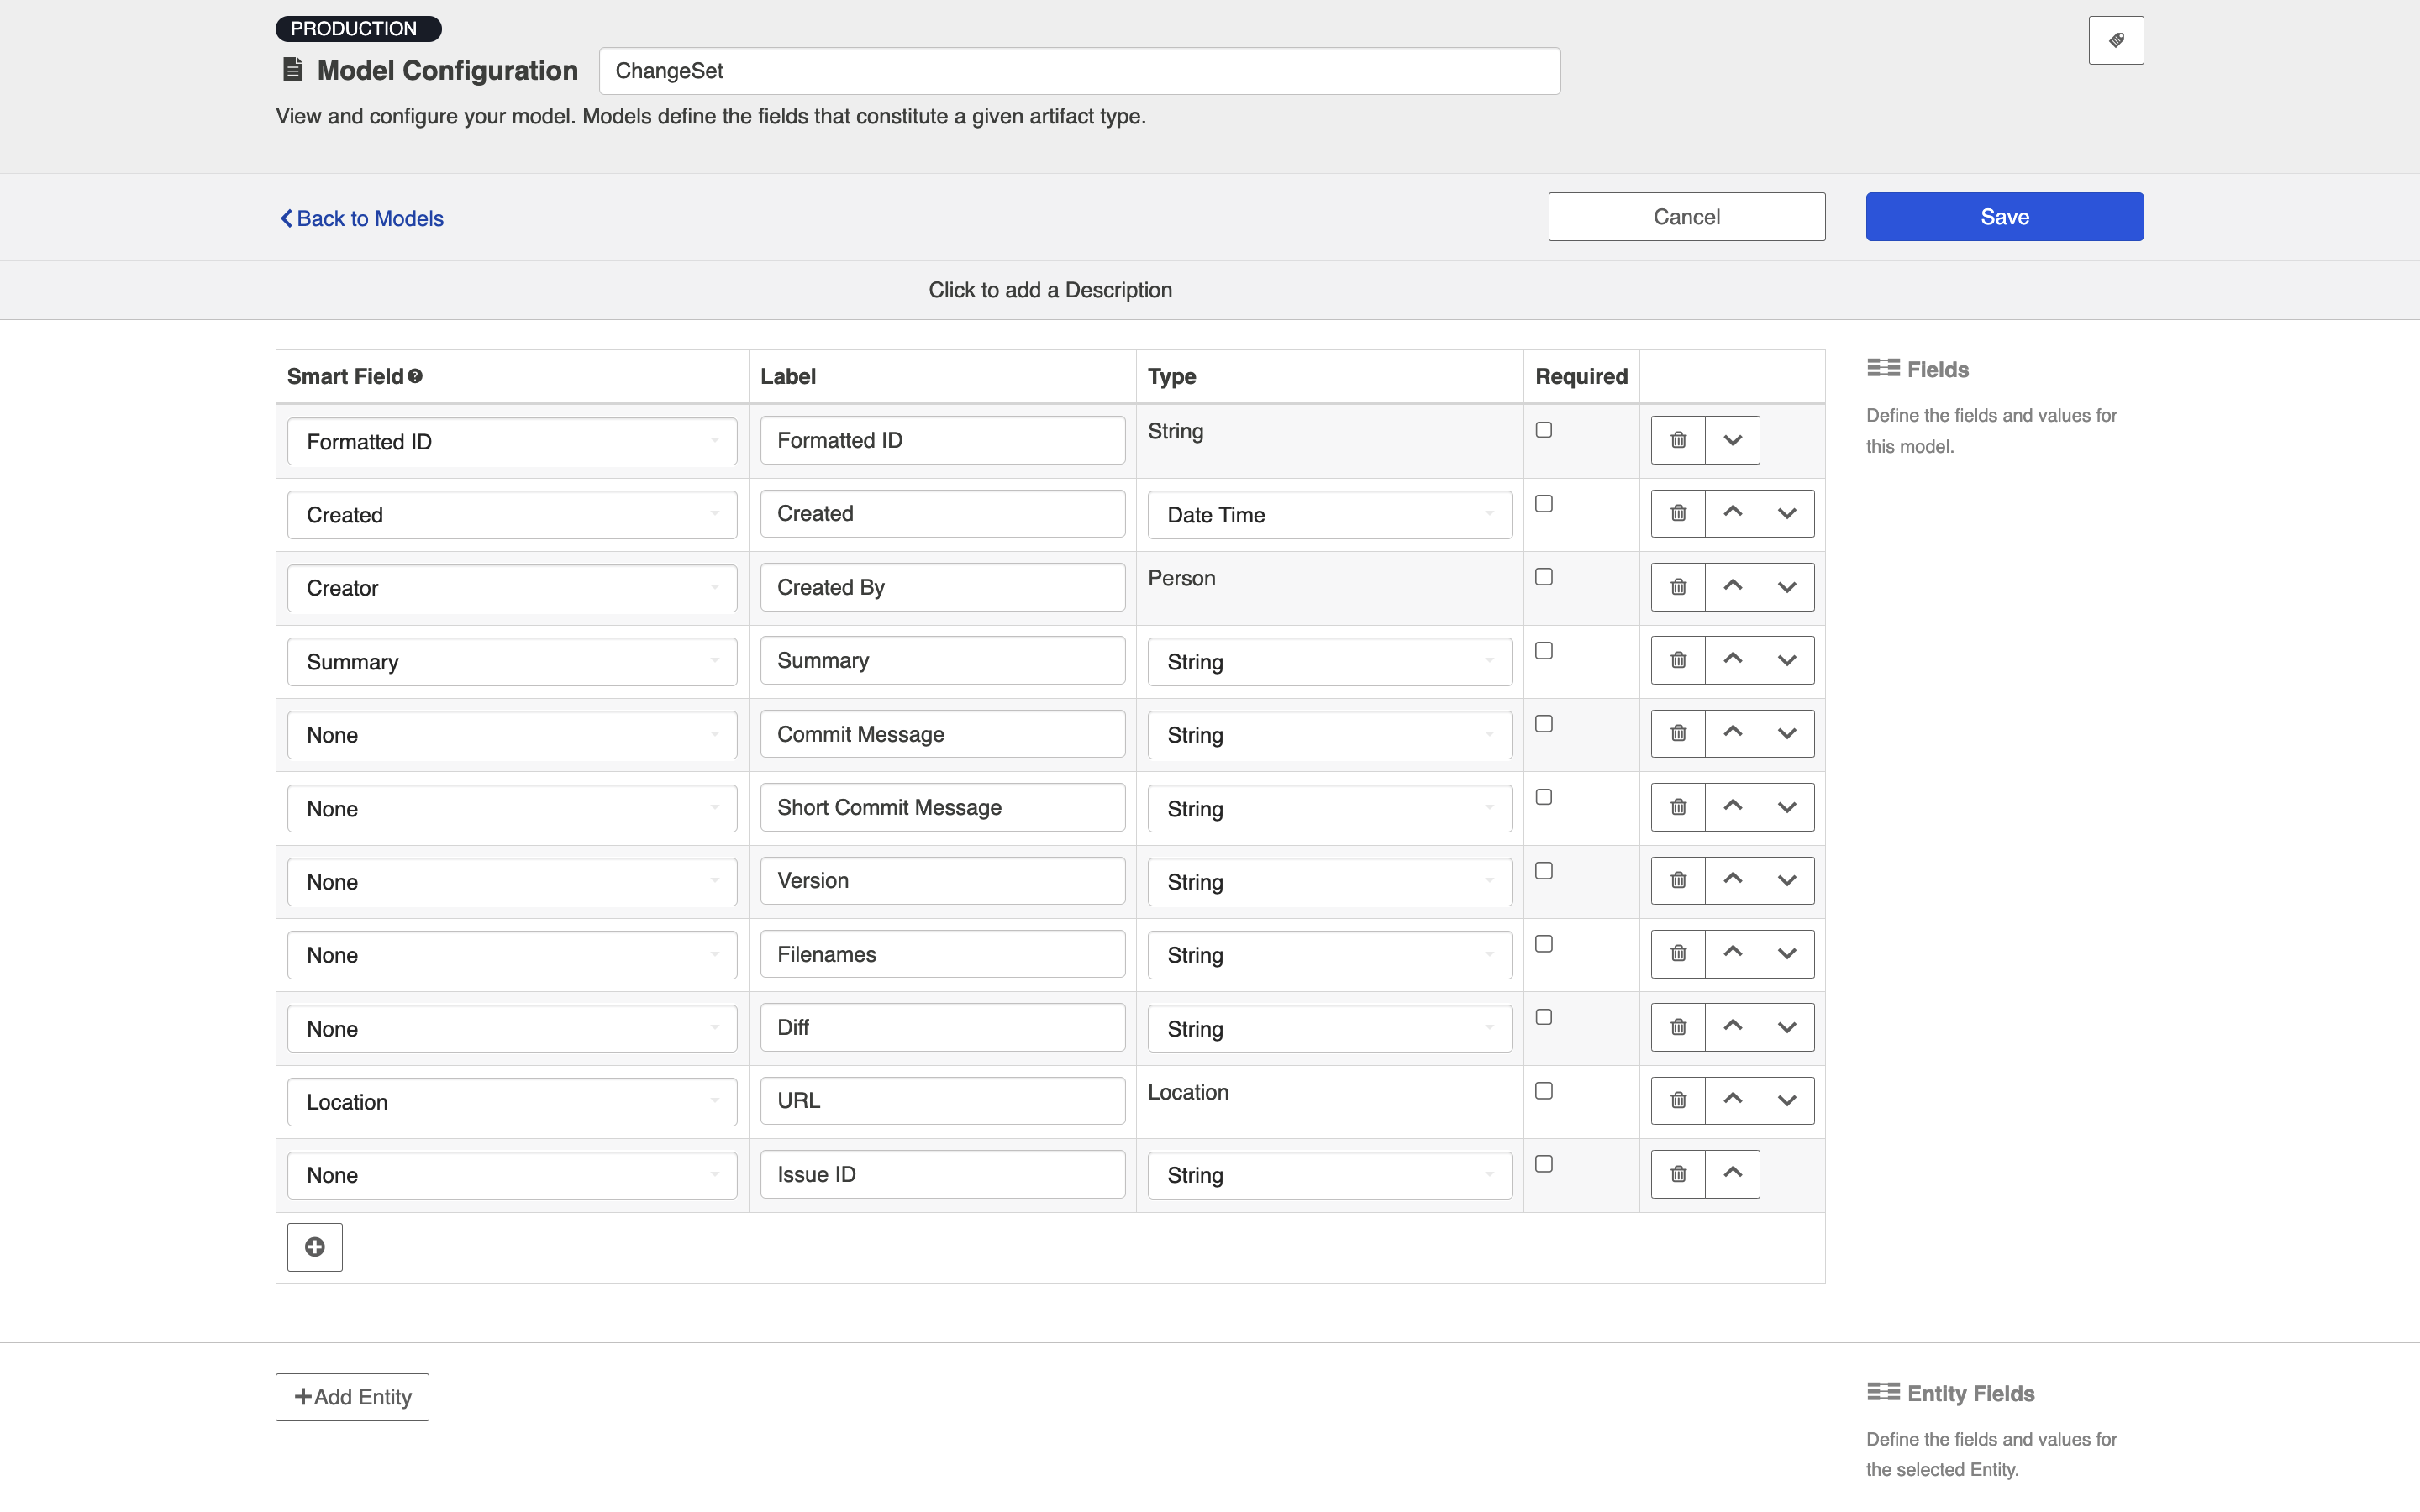
Model Configuration
You can learn more about configuring your model here: Step 2: Create or Reuse a Model
Below is our recommended ChangeSet model configuration:
Collection Configuration
To configure your source and target collections, please review the instructions below.
- To configure your source collection (i.e., your Git collection): Outbound Only Collection
- To configure your target collection (i.e., your Jama or Jira collection): Work Item Collection (Repository)
- Please also review additional notes below
For your target collection,
- Ensure you are using the same model as your source collection (i.e., the ChangeSet model)
Configure the following mappings:
|
Source Repository (Git) |
Model |
Target Repository (i.e., Jama or Jira) |
|---|---|---|
|
URL |
URL |
Web Link |
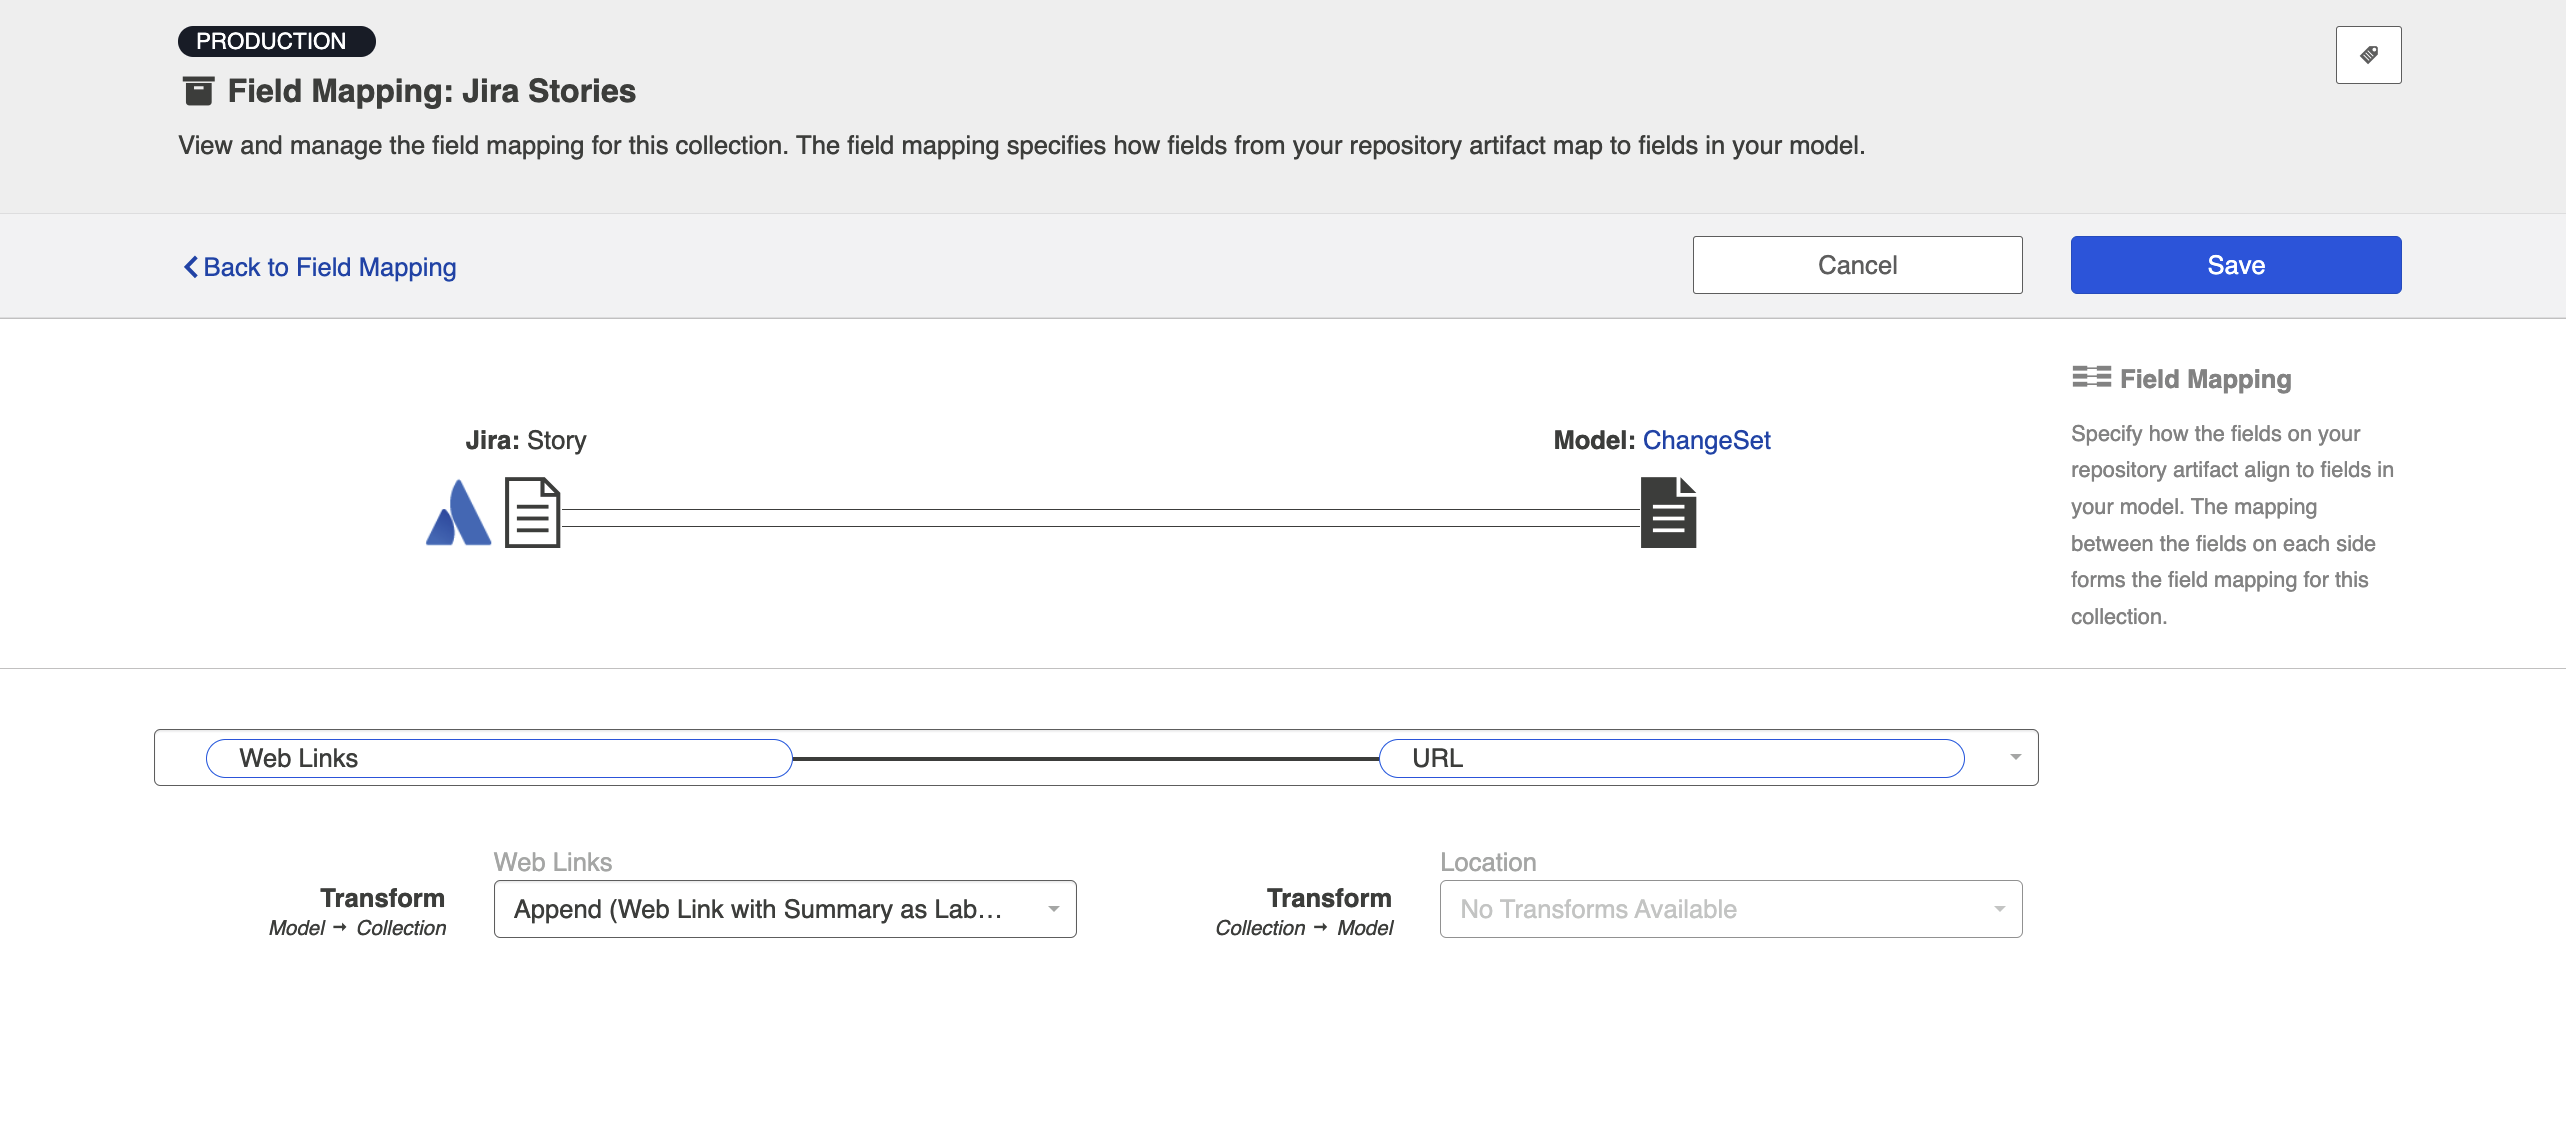
Configuring Commit Links
To flow a Git commit link to the artifact in the target repository, you must map the URL model field to the string, rich text, URL, or Web Link field in your target repository. If your target repository supports web links with labels, you'll see that you can configure a 'Location to Web Link (Summary as Label)' or 'Append (Web Link with Summary as Label)' transform. In most cases, you will want to select 'Append (Web Link with Summary as Label),' as this will allow you to flow a link to each related commit, with each link using that commit's 'short commit message' (summary) as its label.
Important Note about Field Updates
Since this integration type will update existing artifacts in your target repository, be aware that any field mappings configured in your Field Flow will update fields on that existing artifact. As such, you should ensure that only fields that you'd like to update are set to flow. For example, you likely will not want to overwrite the summary or description fields in your target collection. Most likely, the only fields of concern will be the field that you are flowing the commit link to (i.e., the URL or Web Link field).
Configuring a Code Traceability: Update Existing Work Item Integration
Now that you have all of your base components (i.e. repositories, models, and collections) set up, you can configure an integration to synchronize the artifacts in your collections.
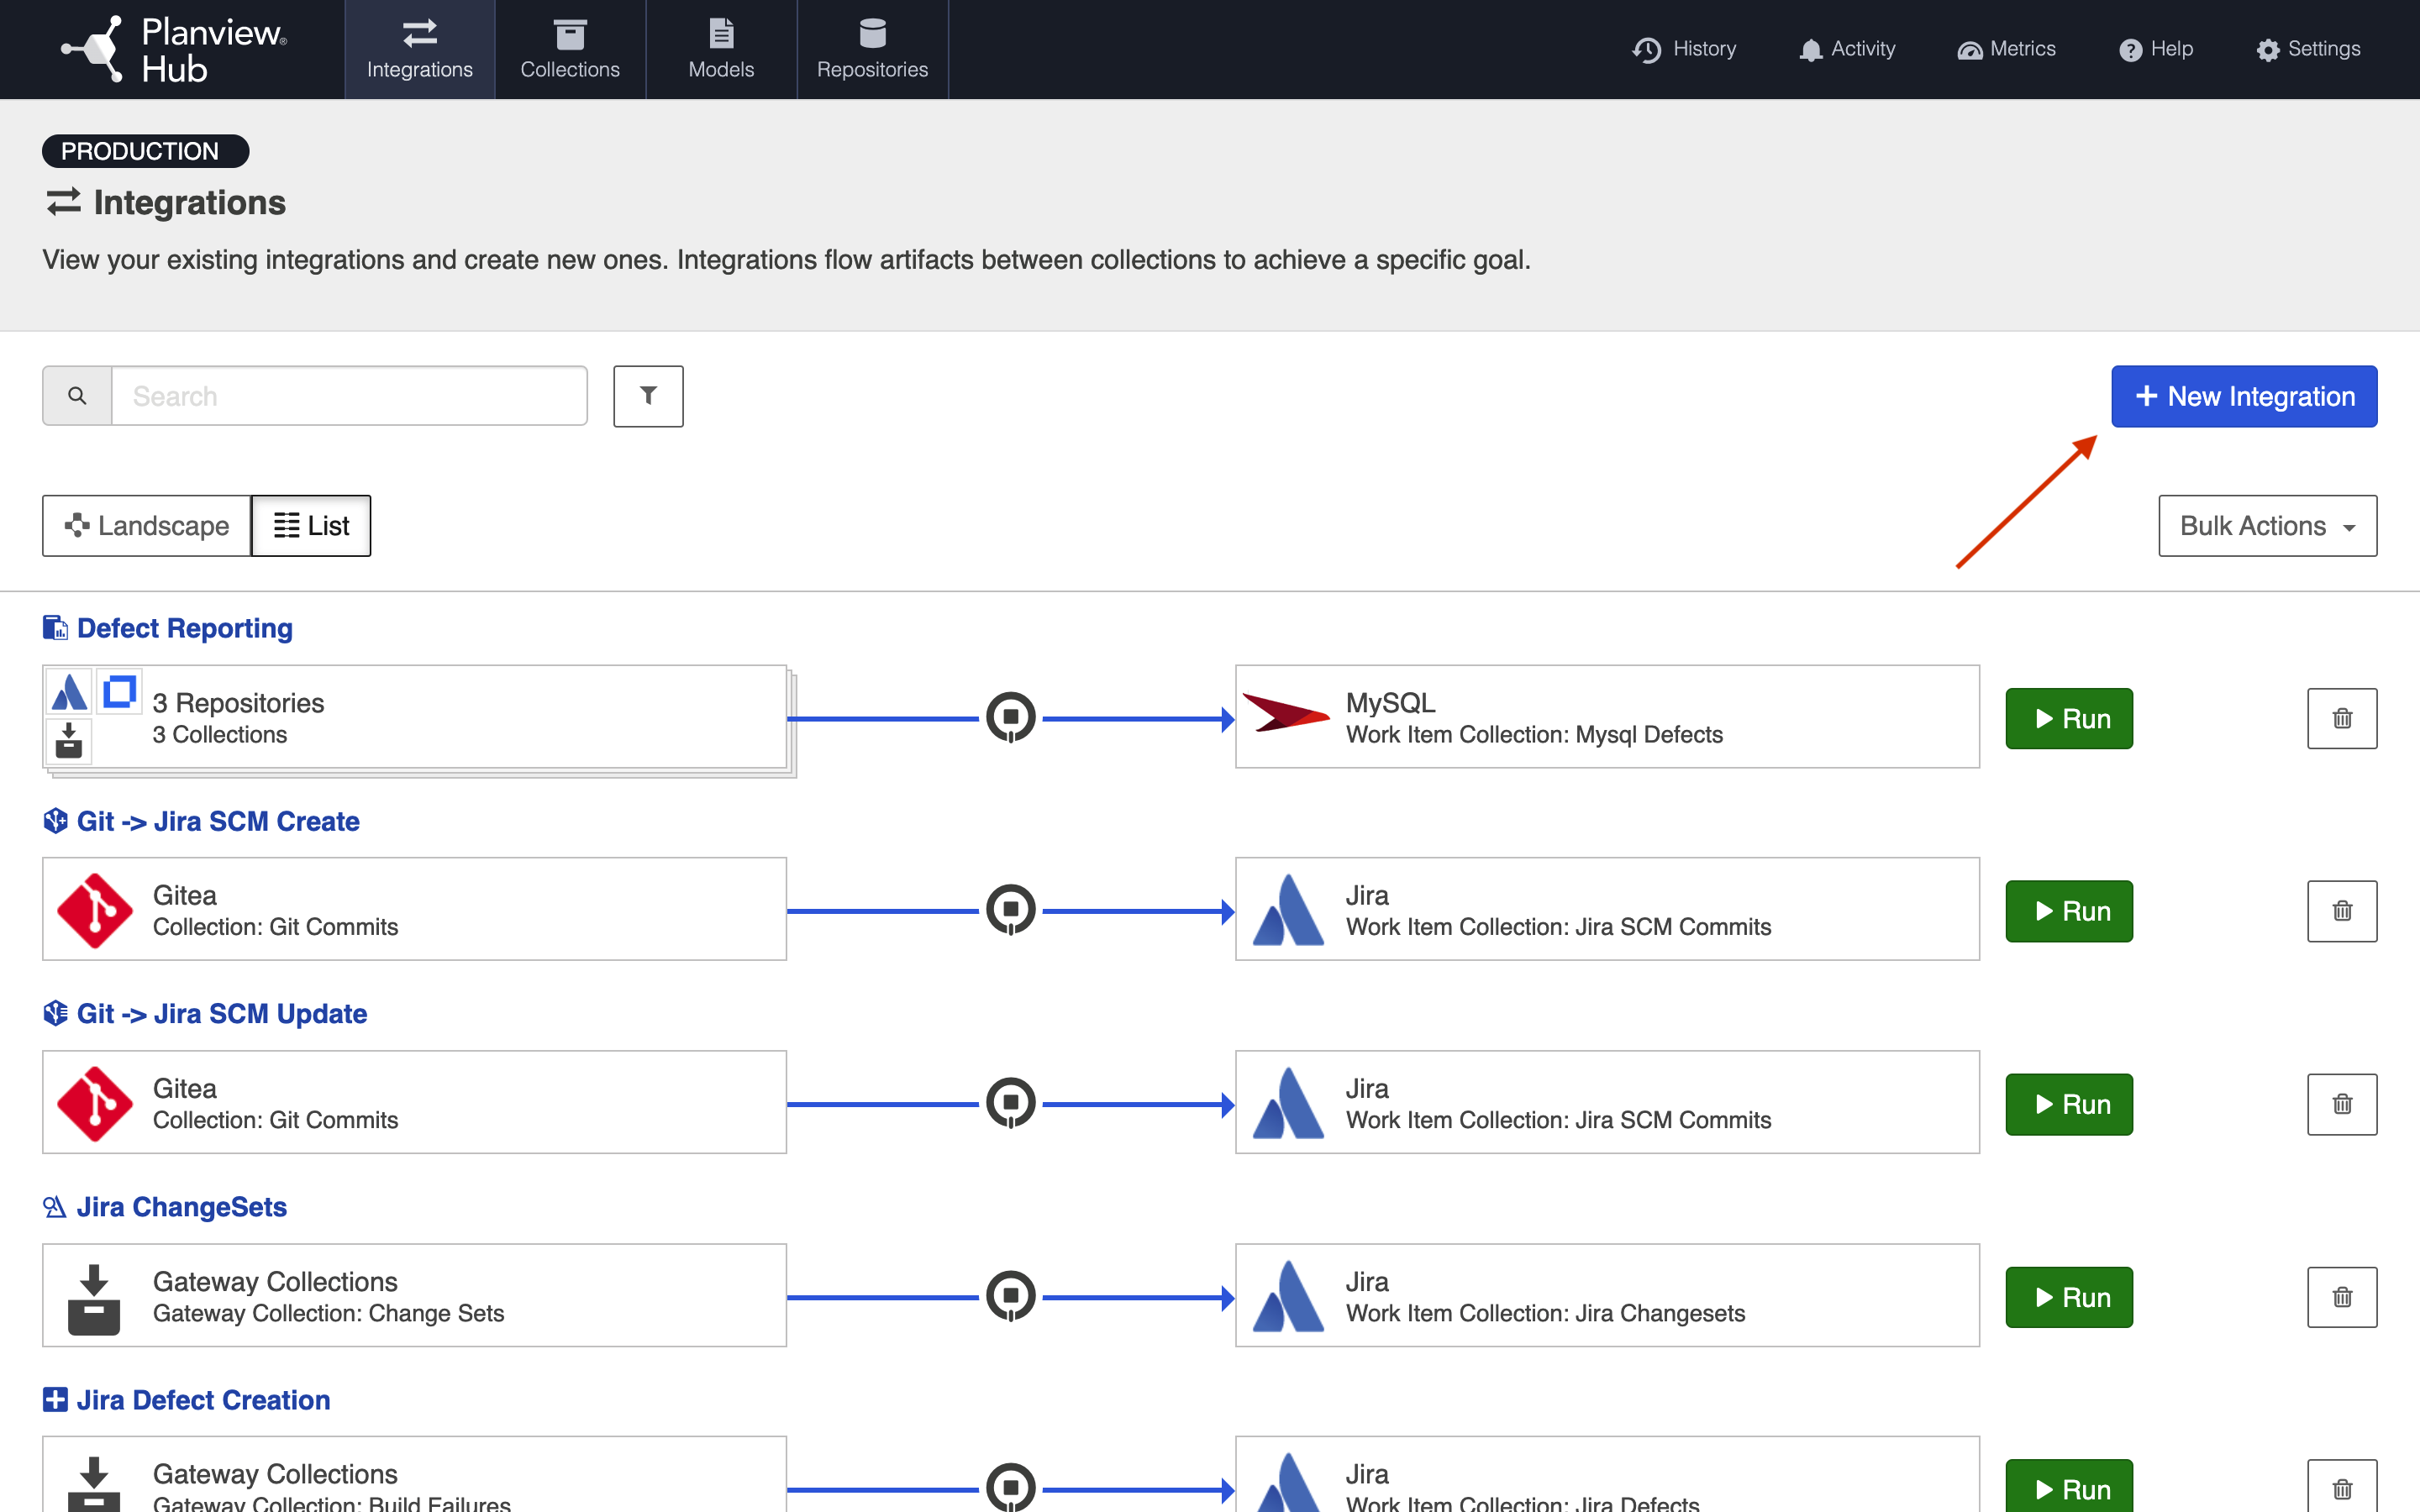
To configure your integration, select Integrations at the top of the screen, then click + New Integration.
Select the Code Traceability: Update Existing Work Item template.
Note: Depending on the edition of Hub you are using, you may not have all options available.

This will bring you to the New Integration screen.
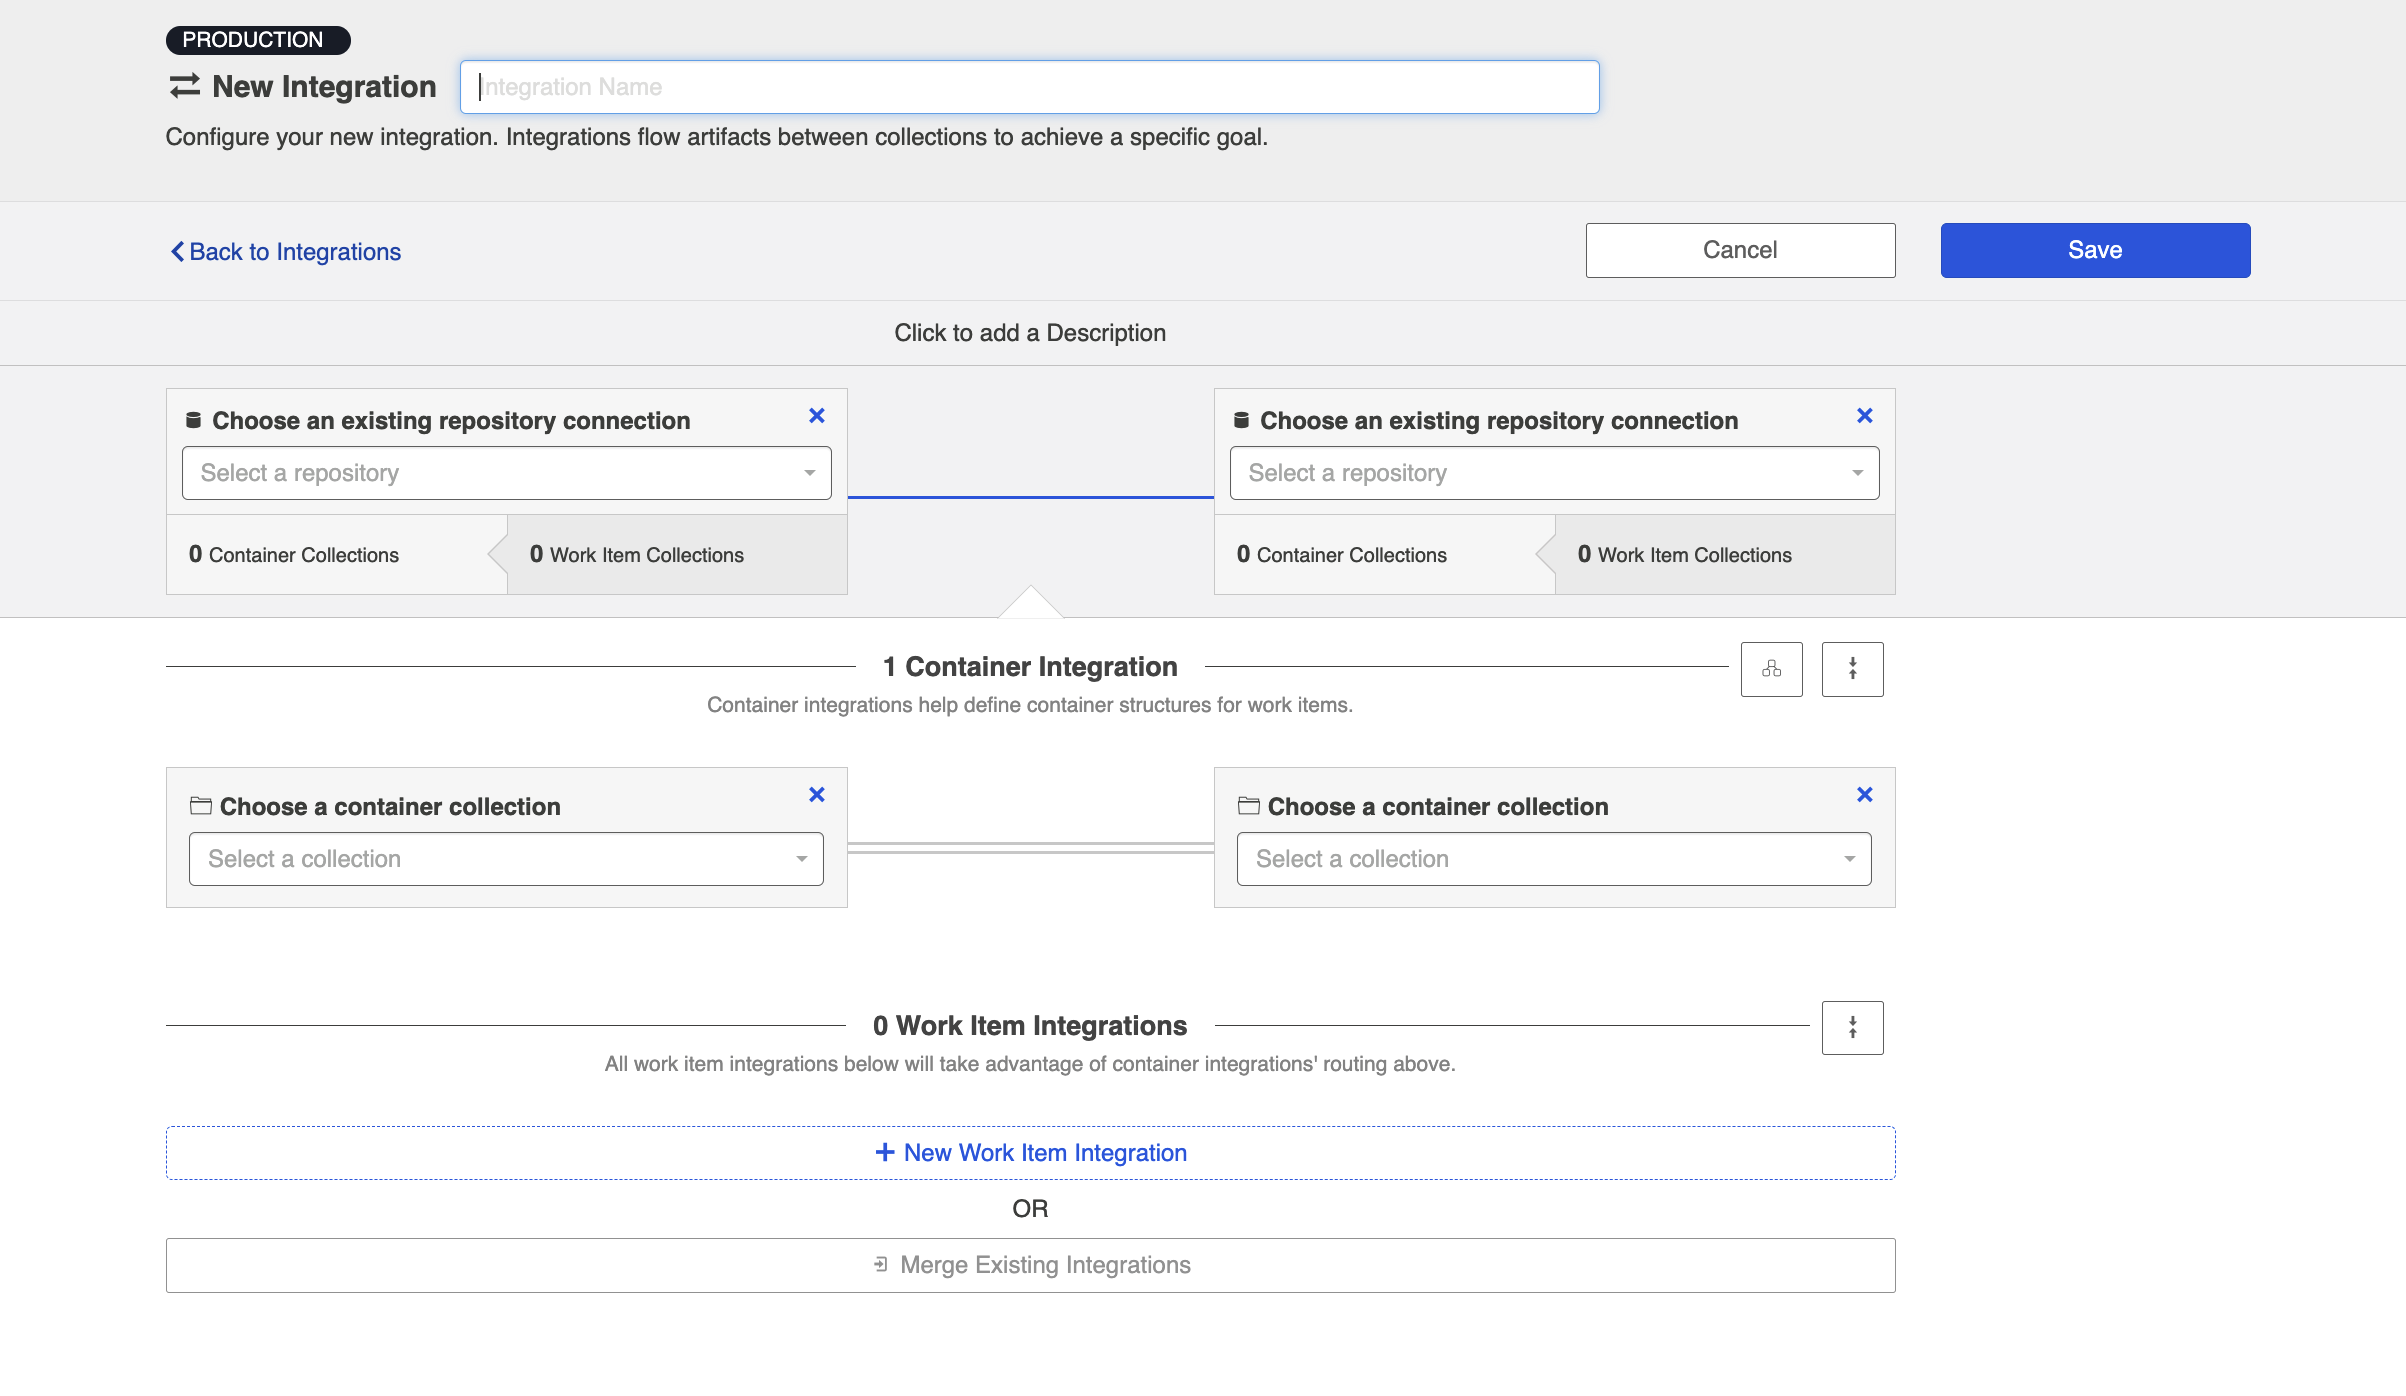
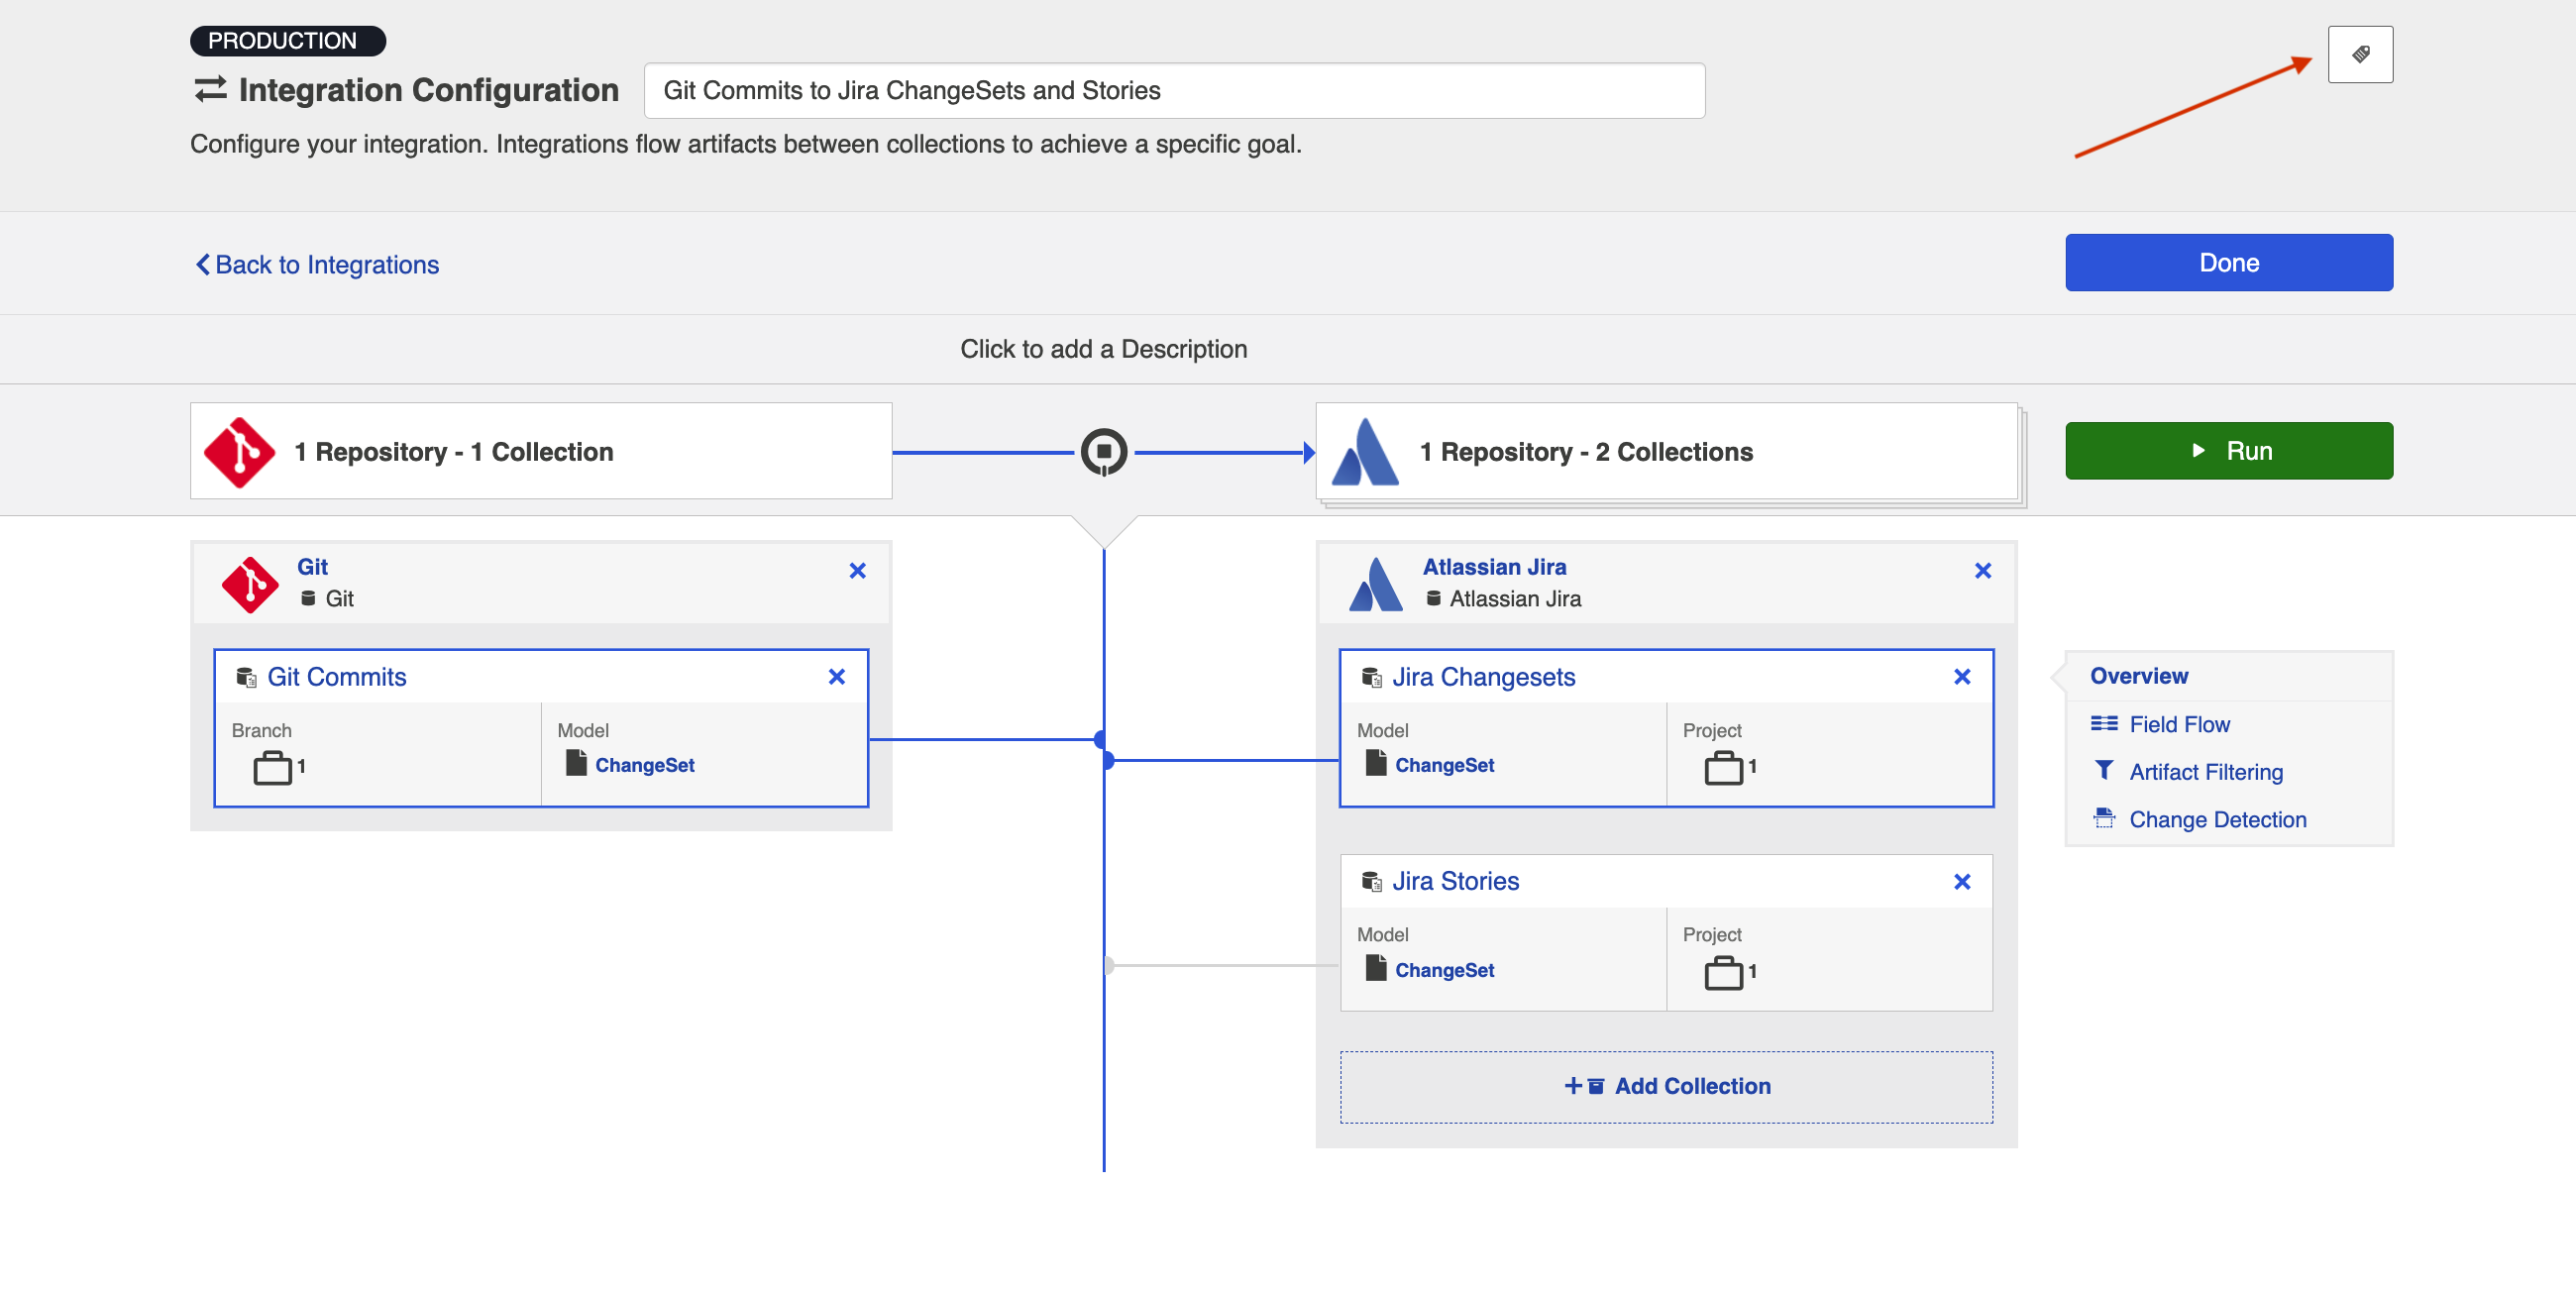
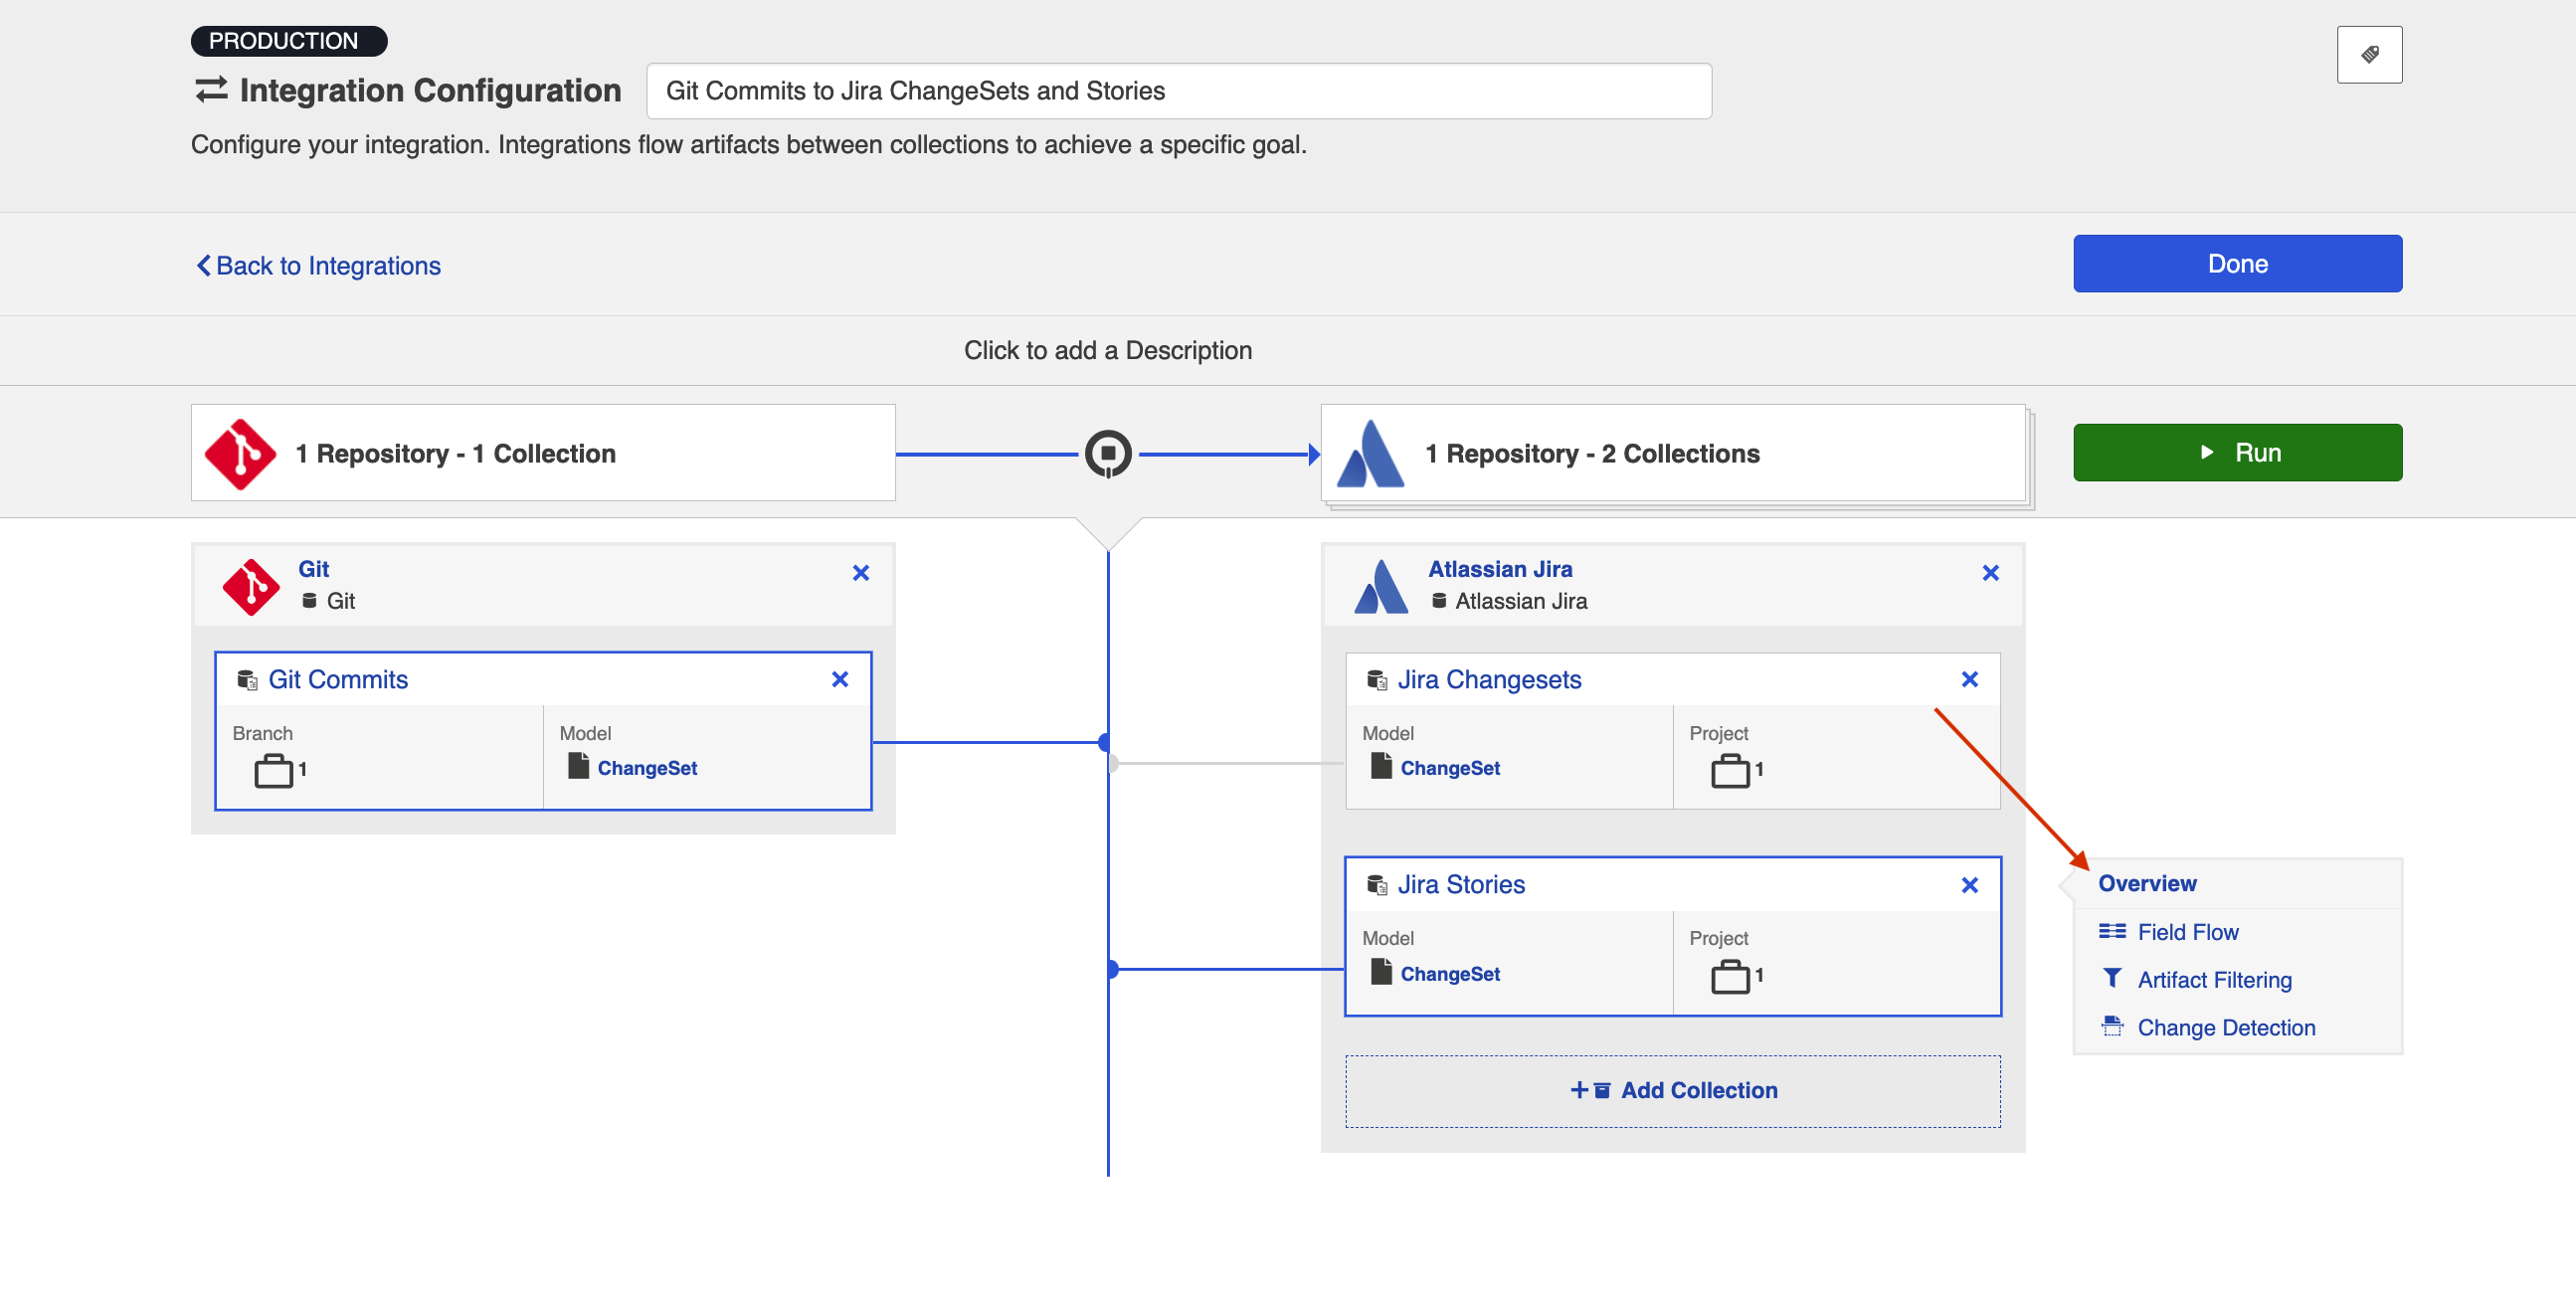
Name your integration and select your repositories and collections.
Note: You can add multiple target collections within the same repository if you'd like to flow commit information to multiple artifact types.
Click Save.
Tip: Clicking ctrl+s on Windows and cmd+s on macOS will save your configuration.

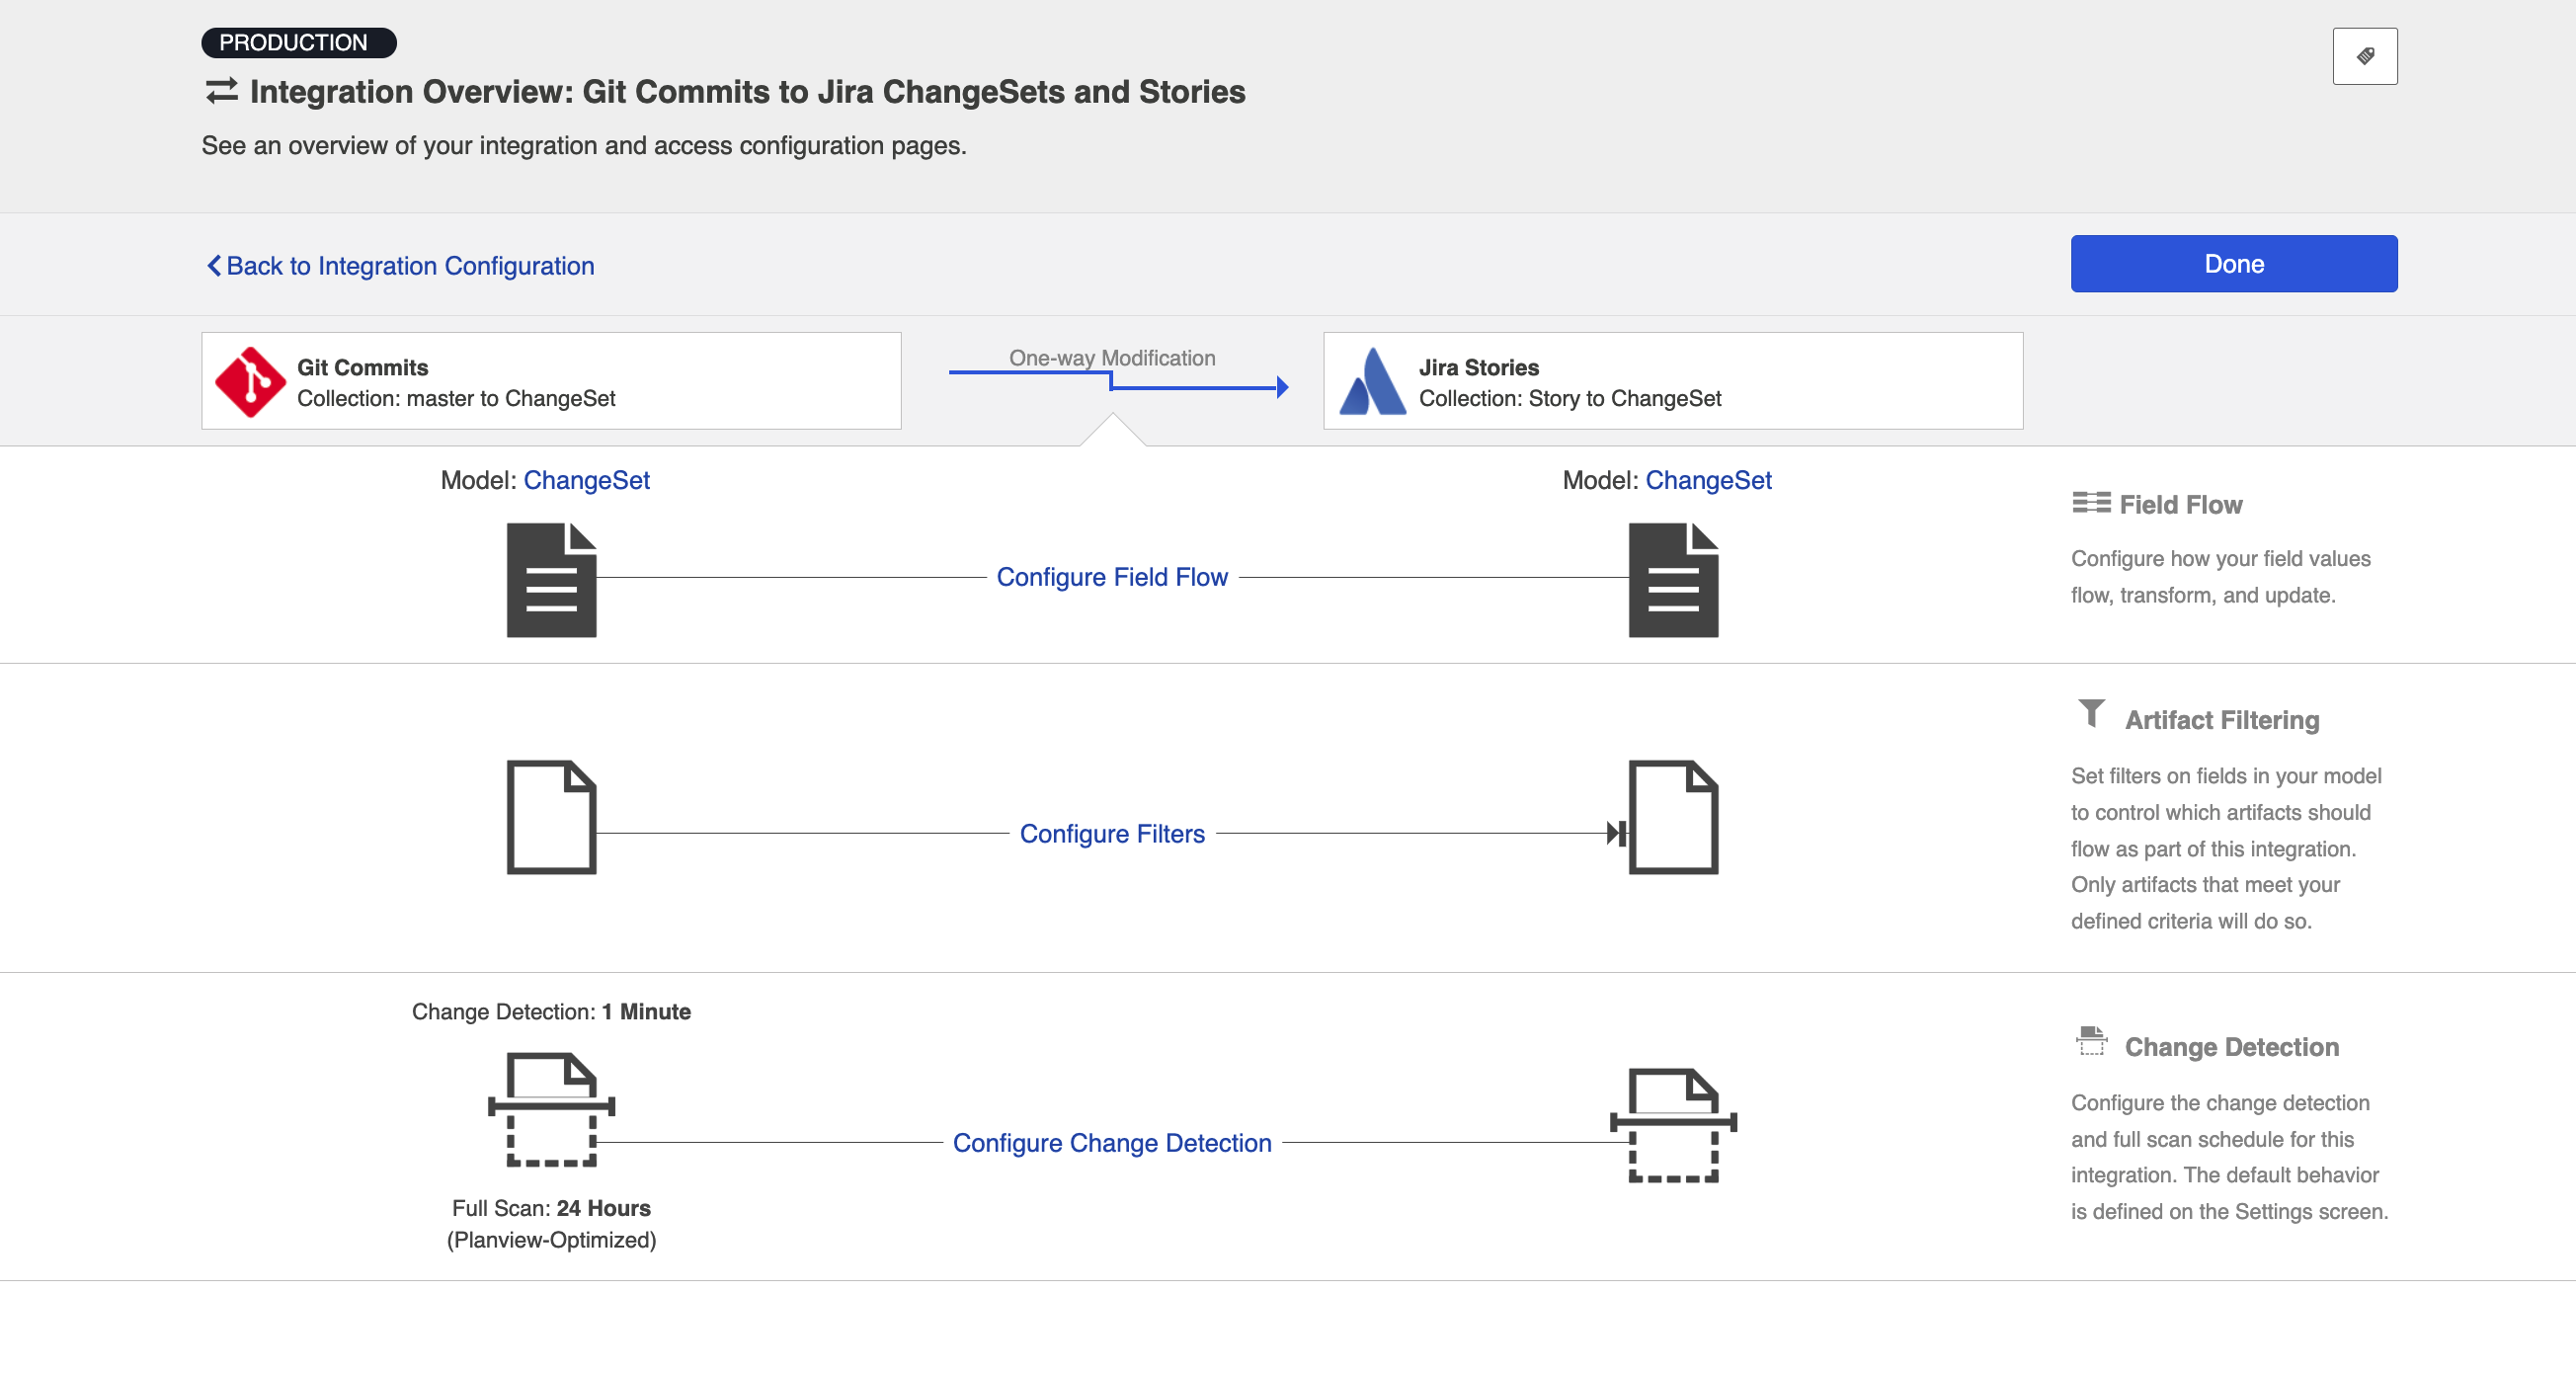
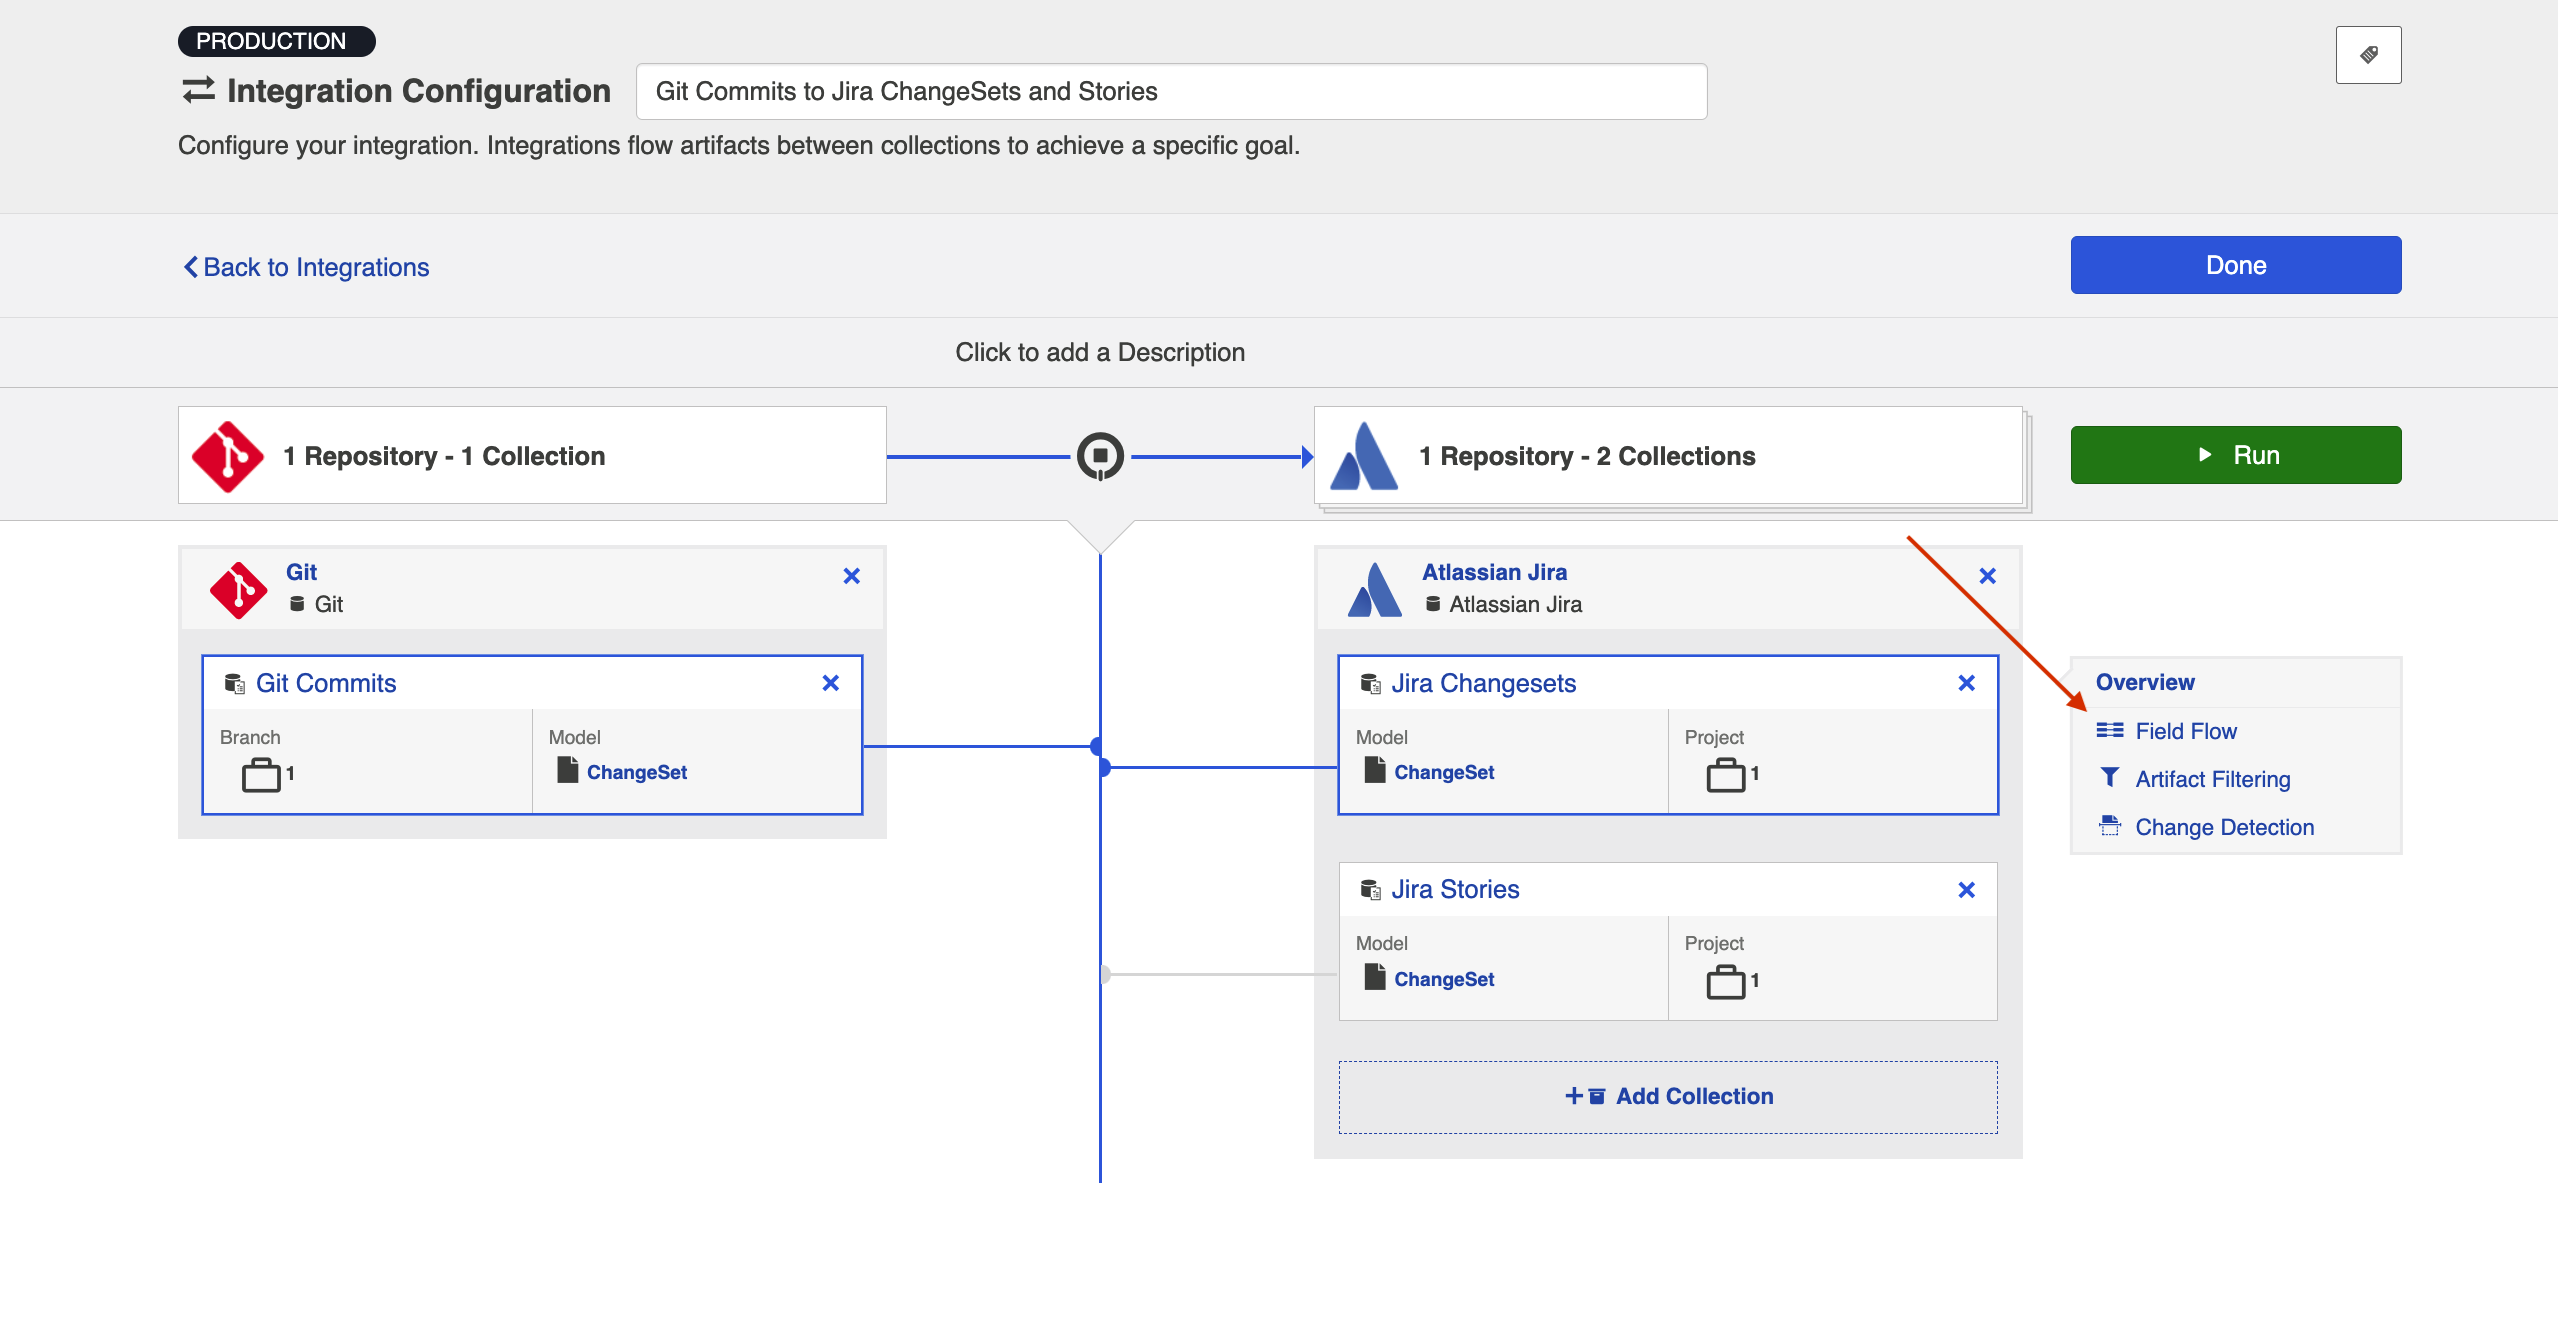
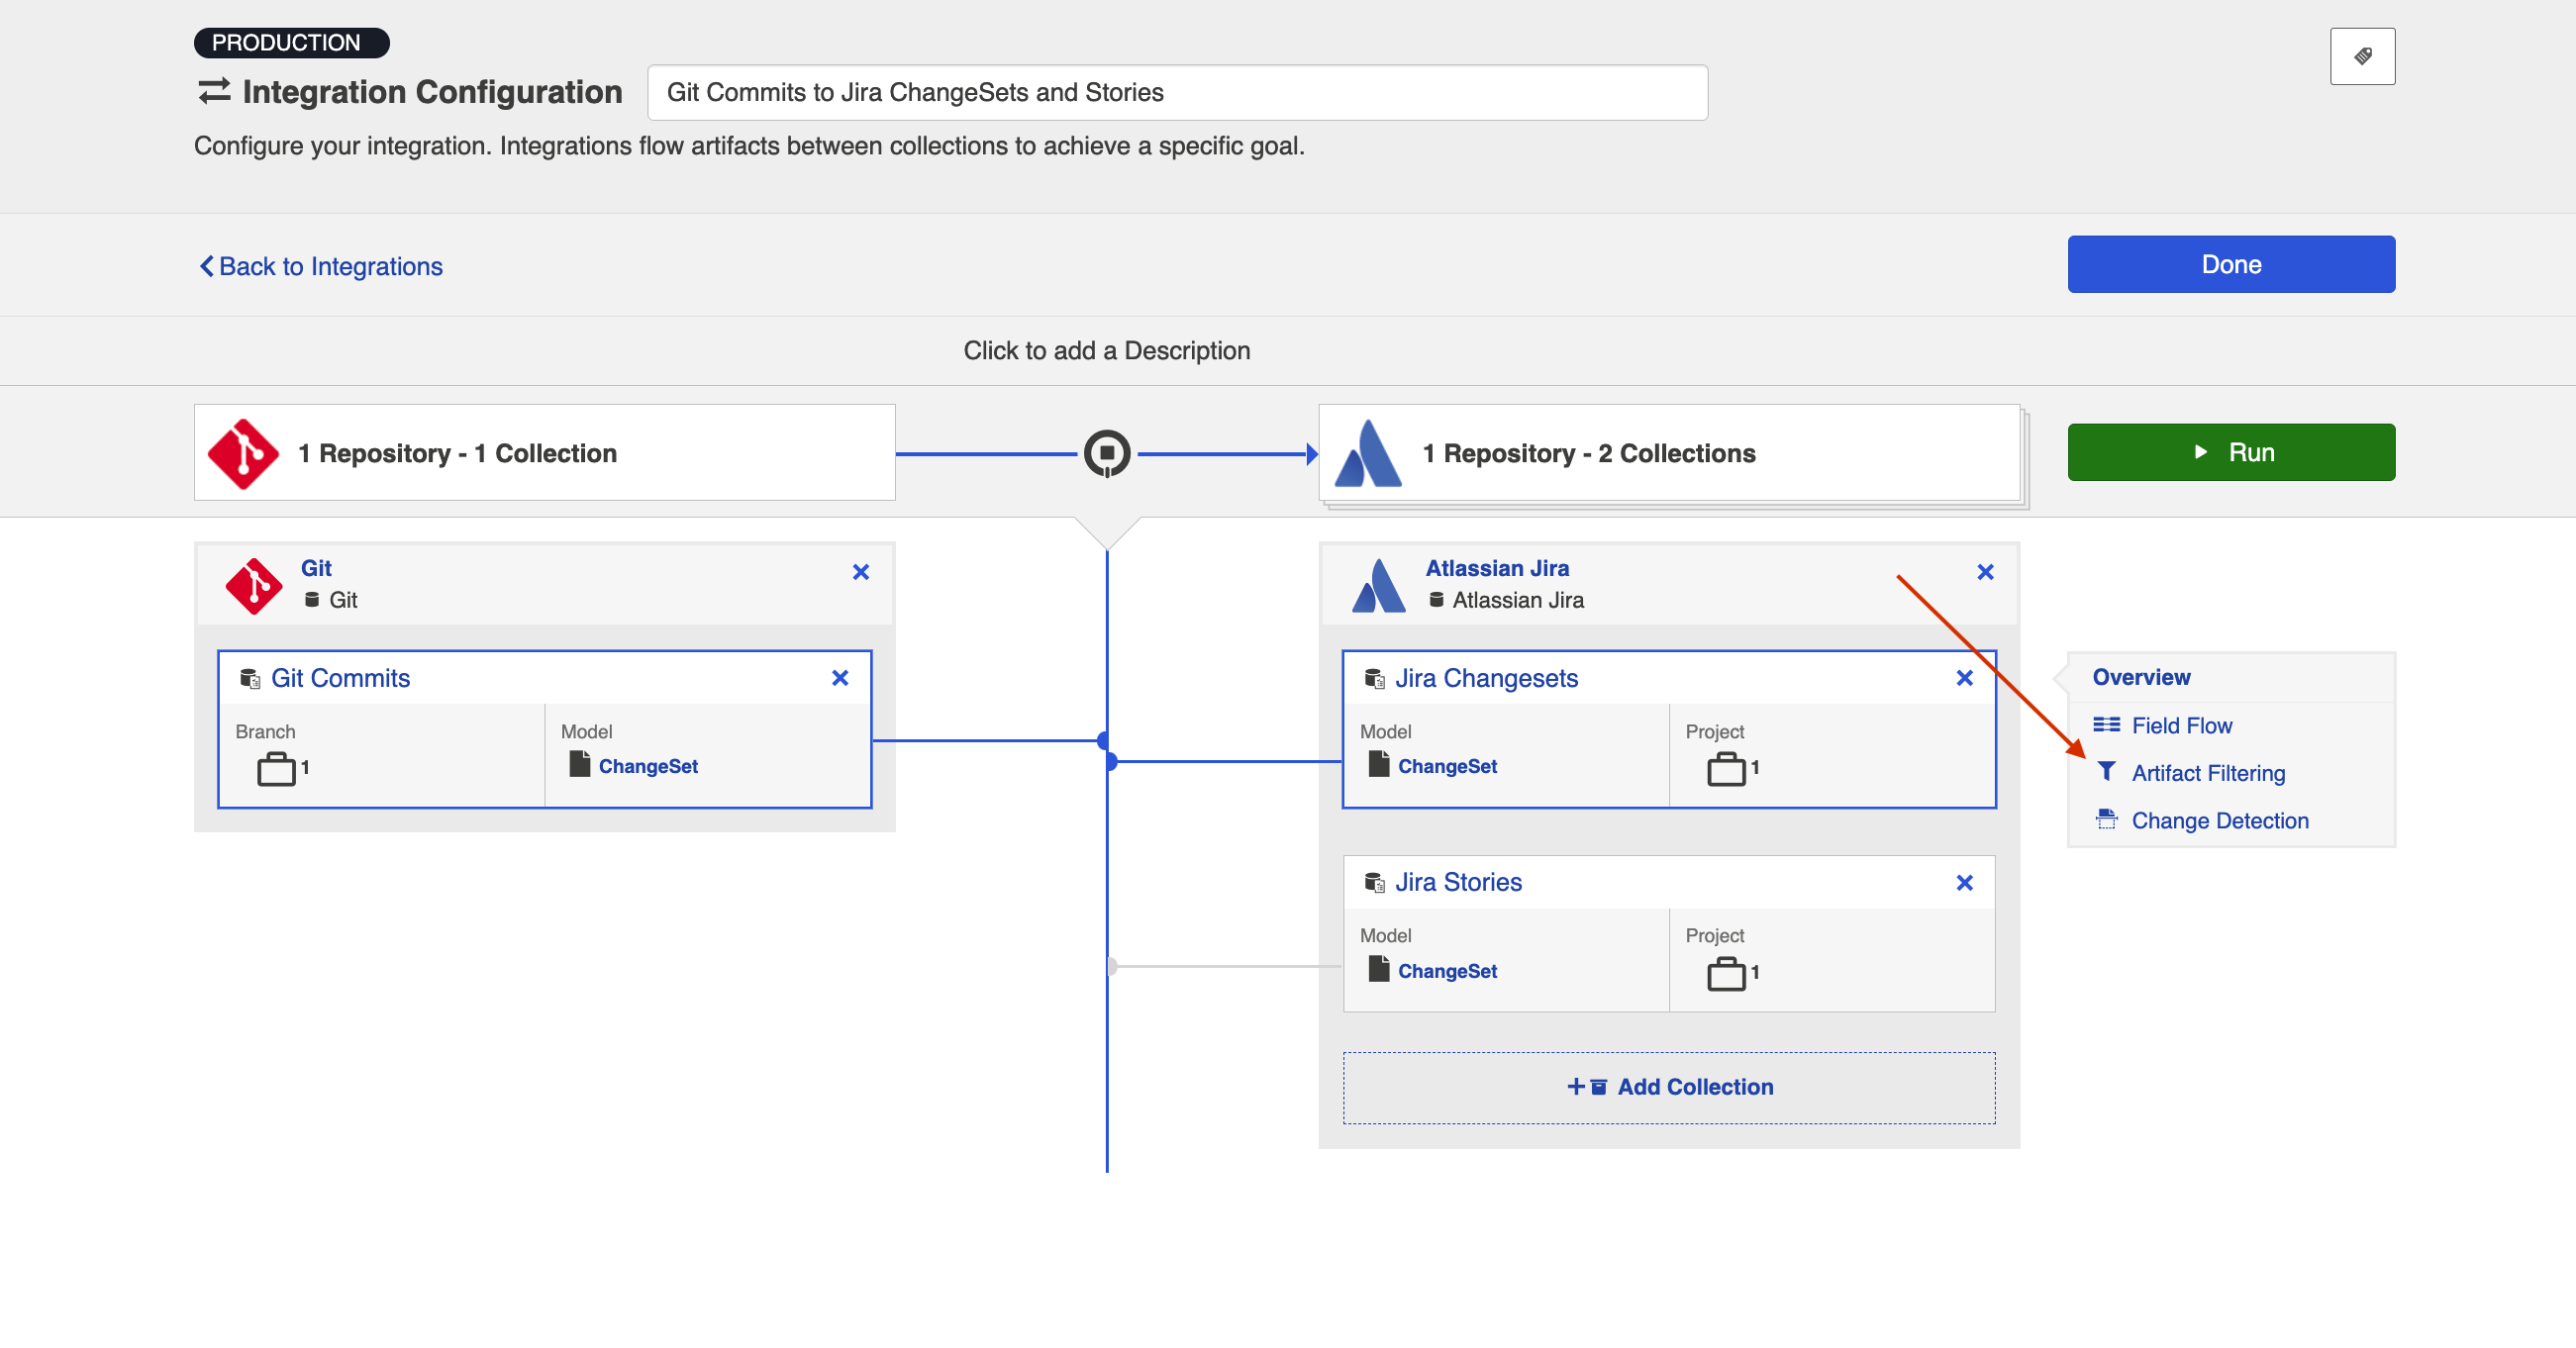
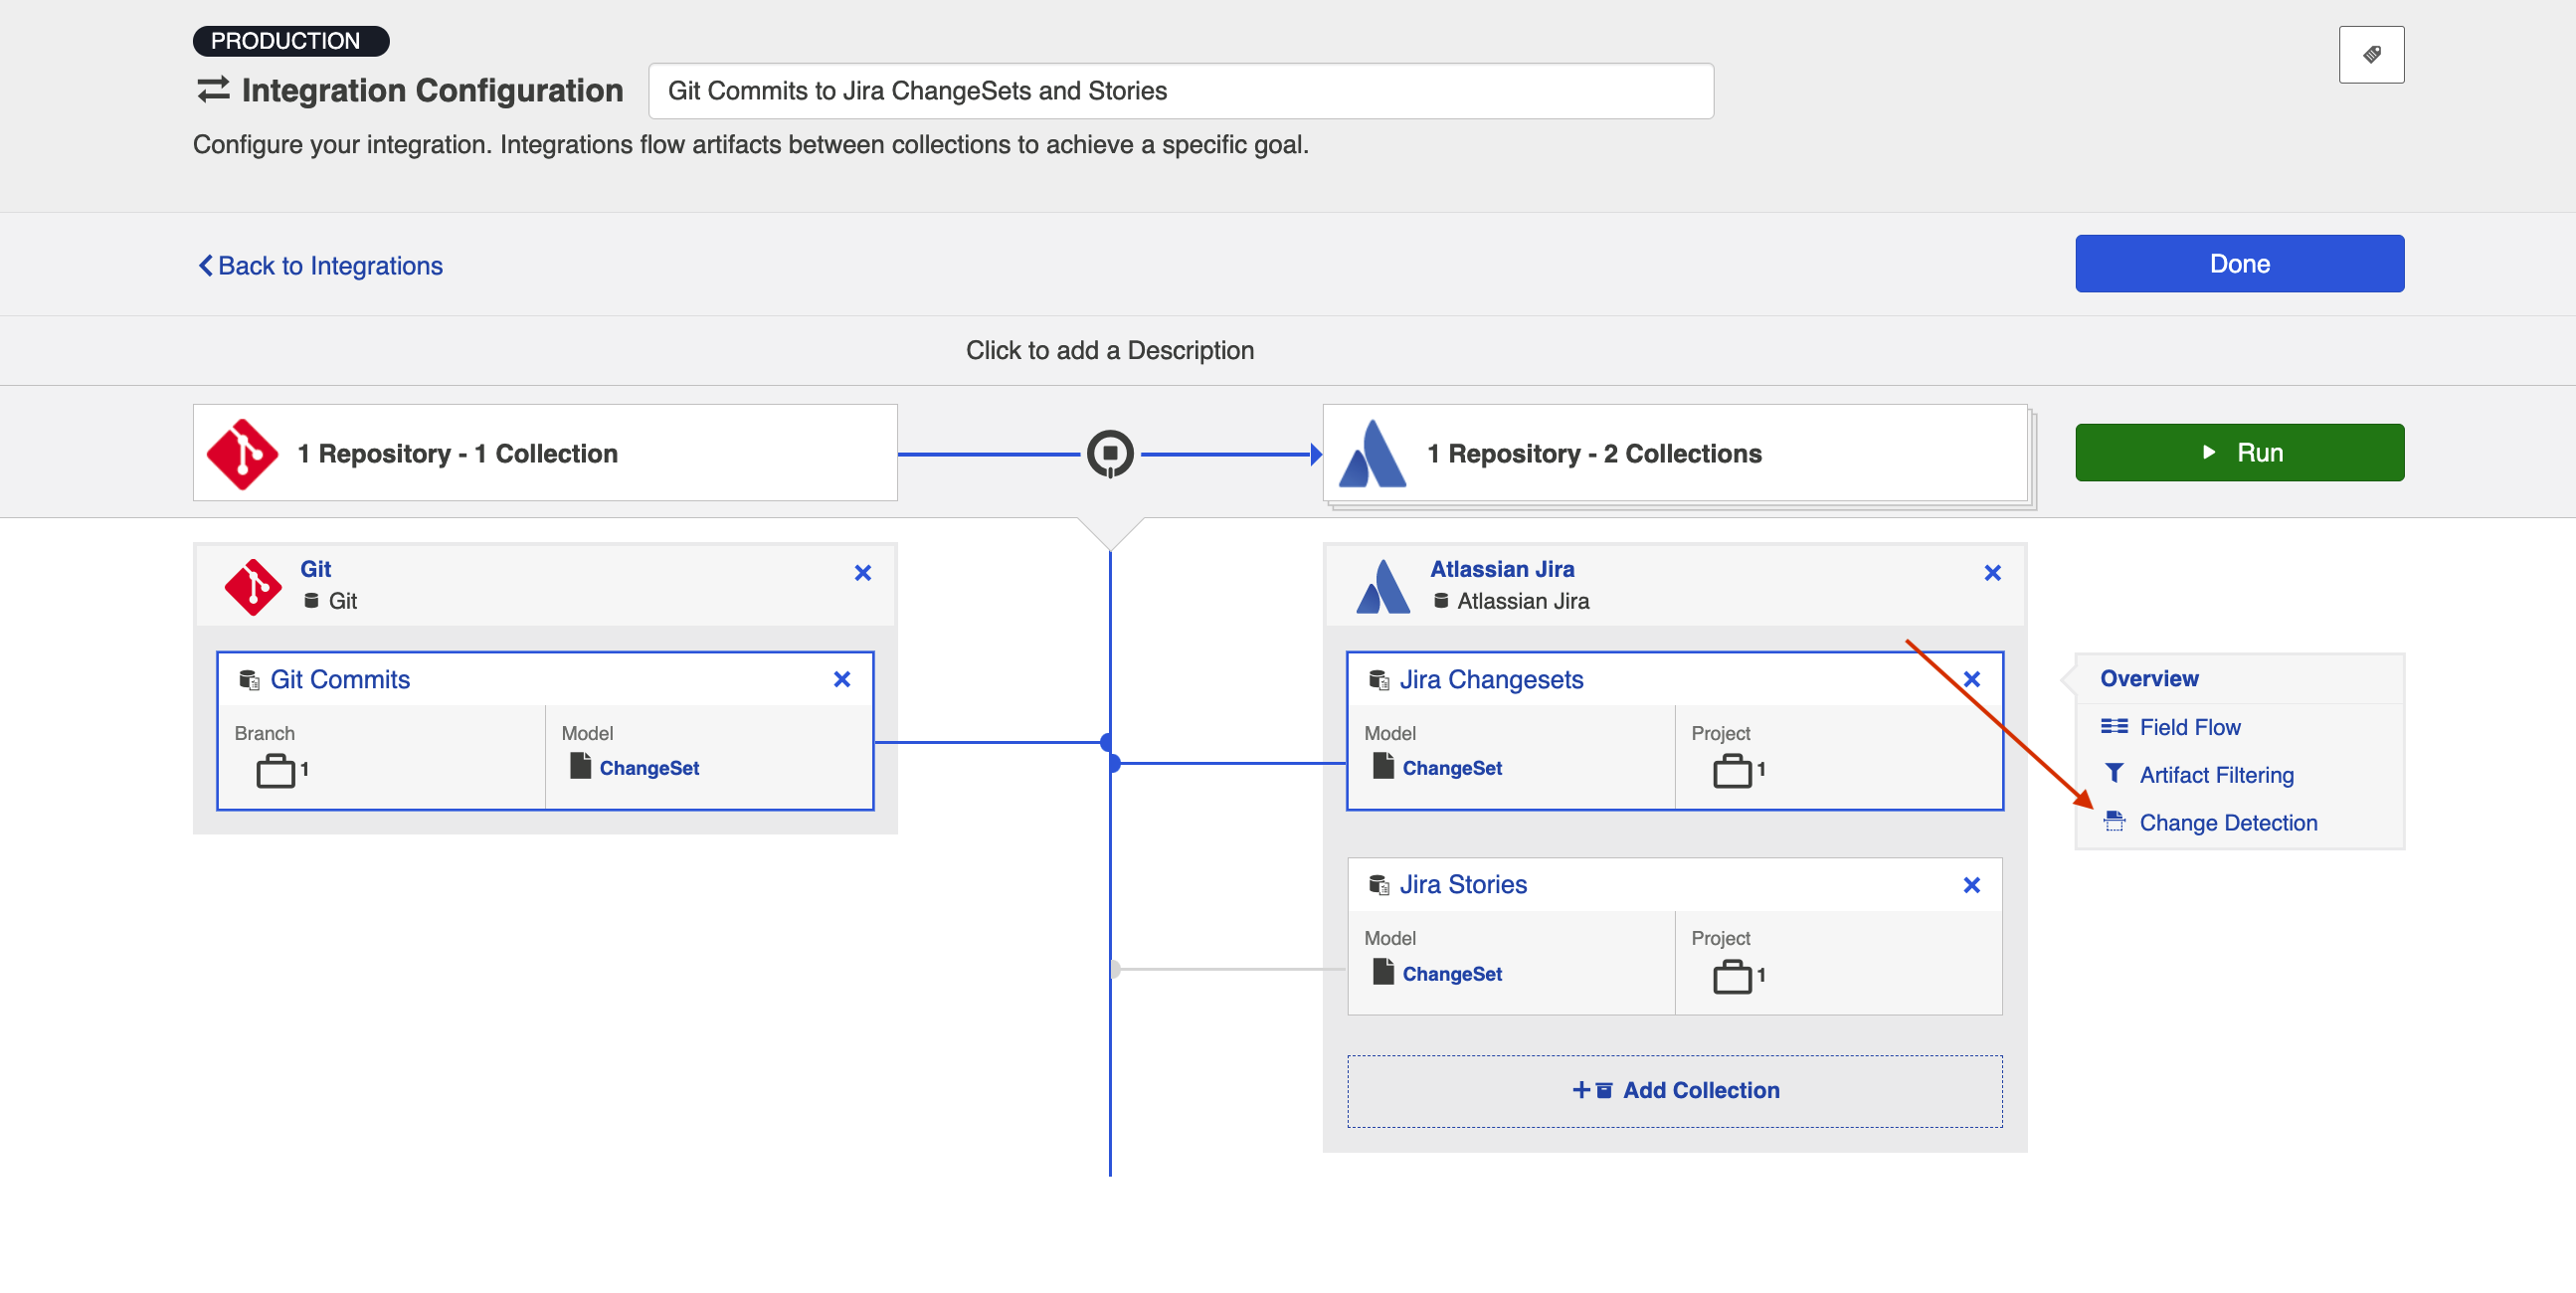
You can click the Overview link on the right side of the Integration Configuration screen to get to the main display screen (shown in the second screenshot).
Note: The Overview screen will only show two collections at a time — one source collection and one target collection. If there are multiple target collections in your integration, make sure the one you are interested in is selected before clicking Overview.
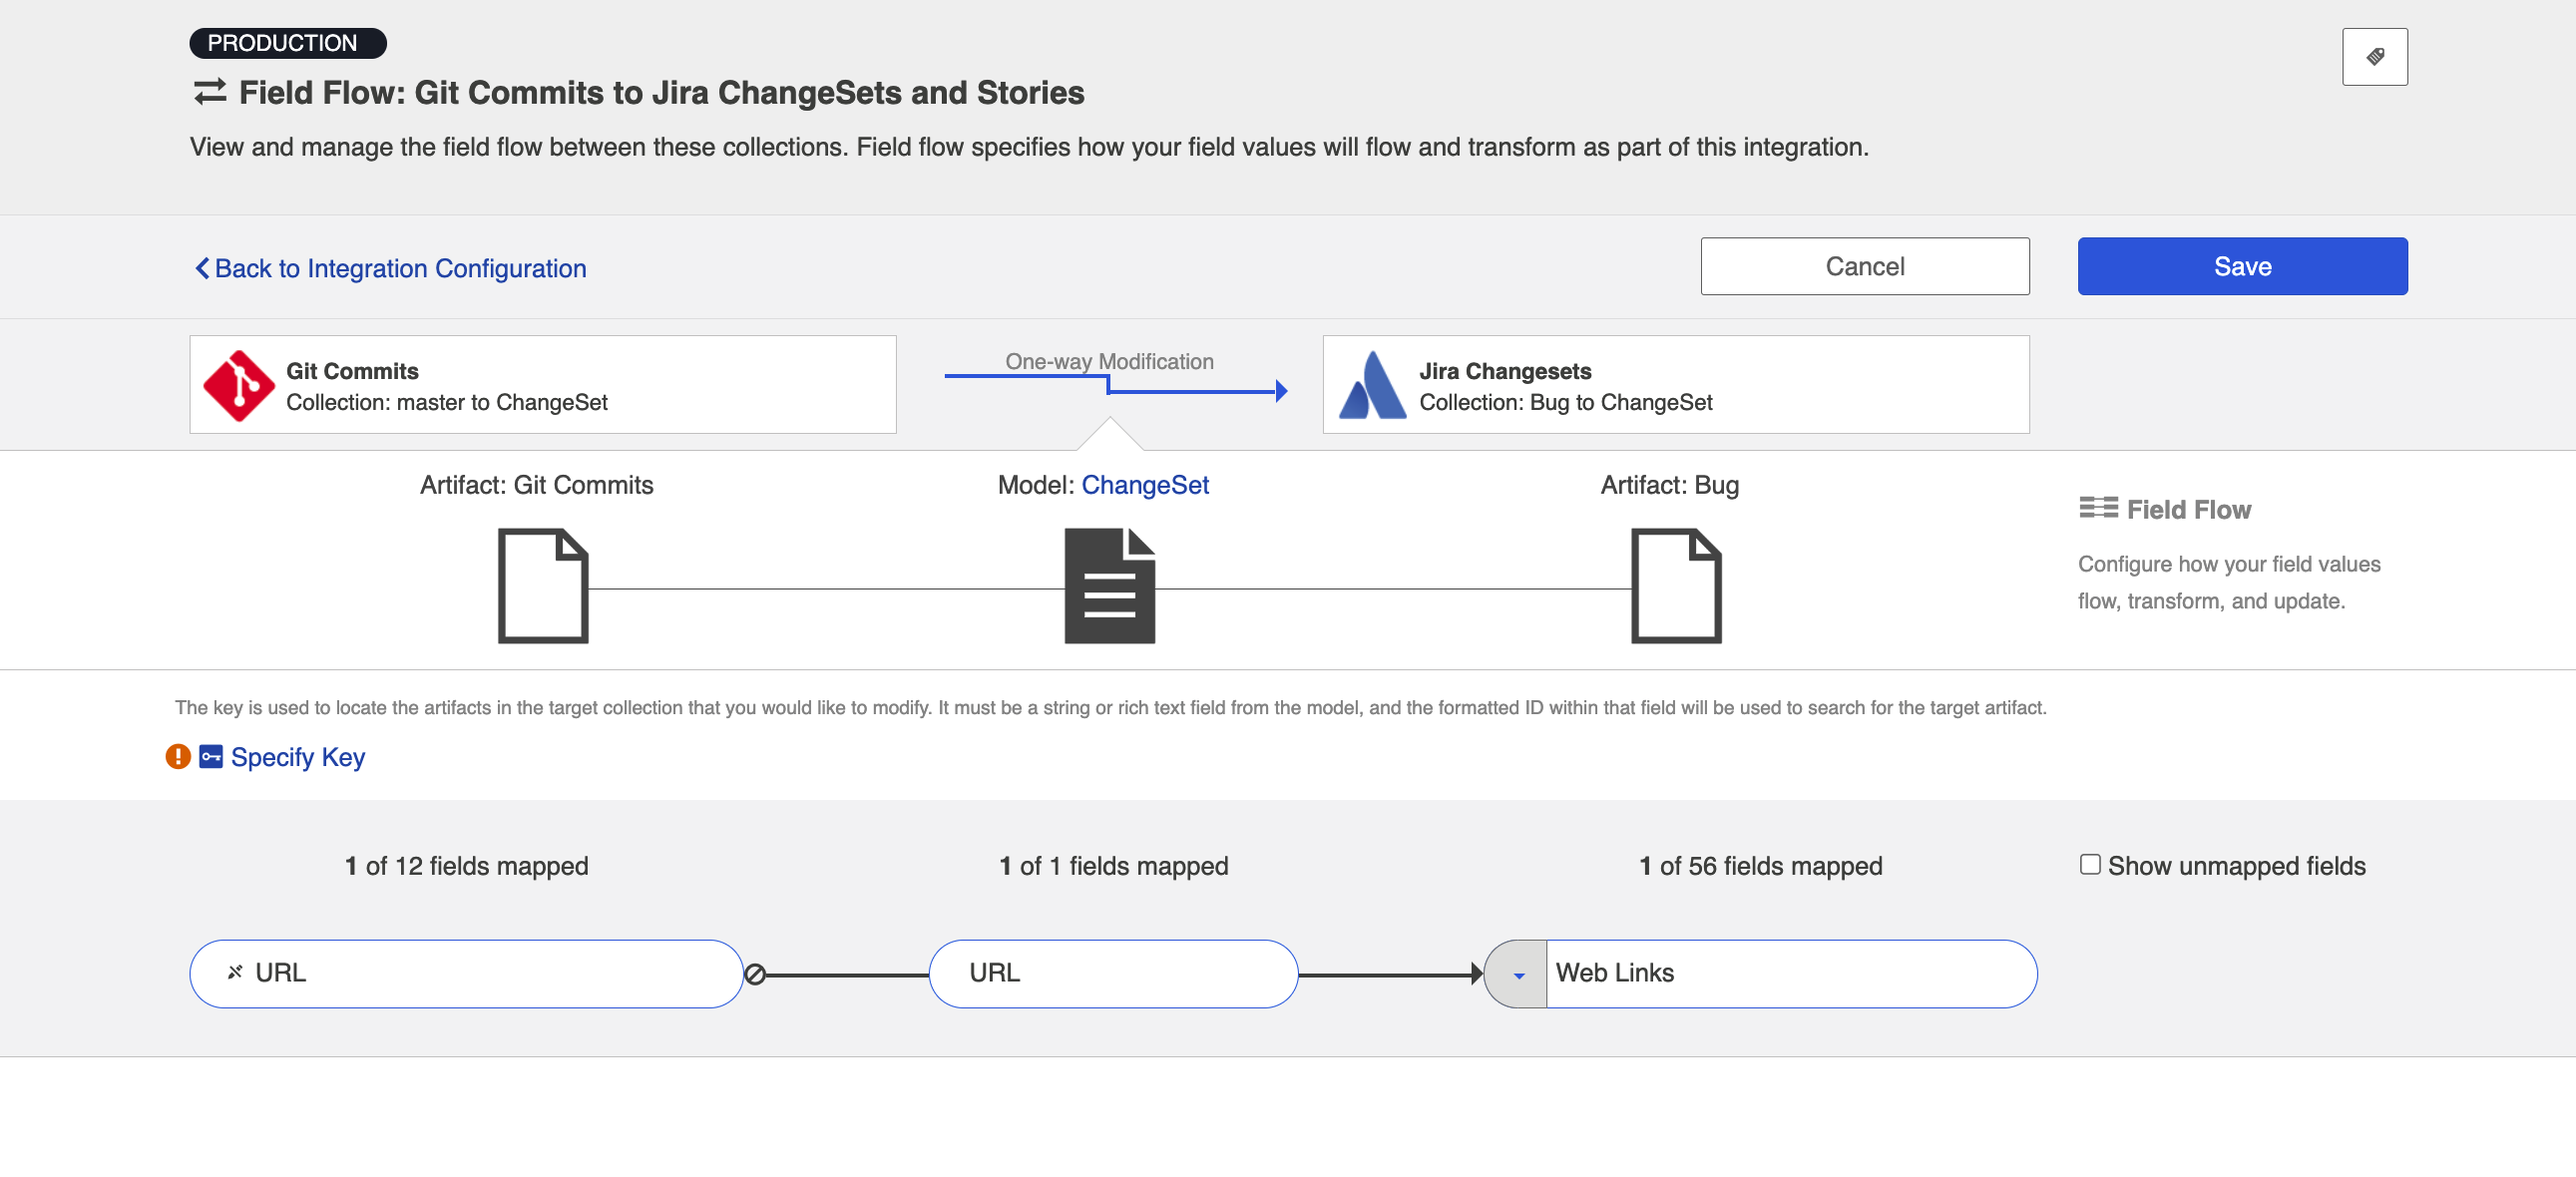
Field Flow
The field flow configured for a given integration specifies which fields should flow in that integration. For Code Traceability: Update Existing Work Item integrations, you can choose to flow a given field (Update Normally) or to not flow a given field (No Update).
To get to the Field Flow screen, select your desired collections and click Field Flow on the right side of the Integration Configuration screen.
Important Note about Field Updates
Since this integration type will update existing artifacts in your target repository, be aware that any field mappings configured in your Field Flow will update fields on that existing artifact. As such, you should ensure that only fields that you'd like to update are set to flow. For example, you likely will not want to overwrite the summary or description fields. Most likely, the only fields of concern will be the field that you are flowing the commit link to (i.e., the URL or Web Link field).
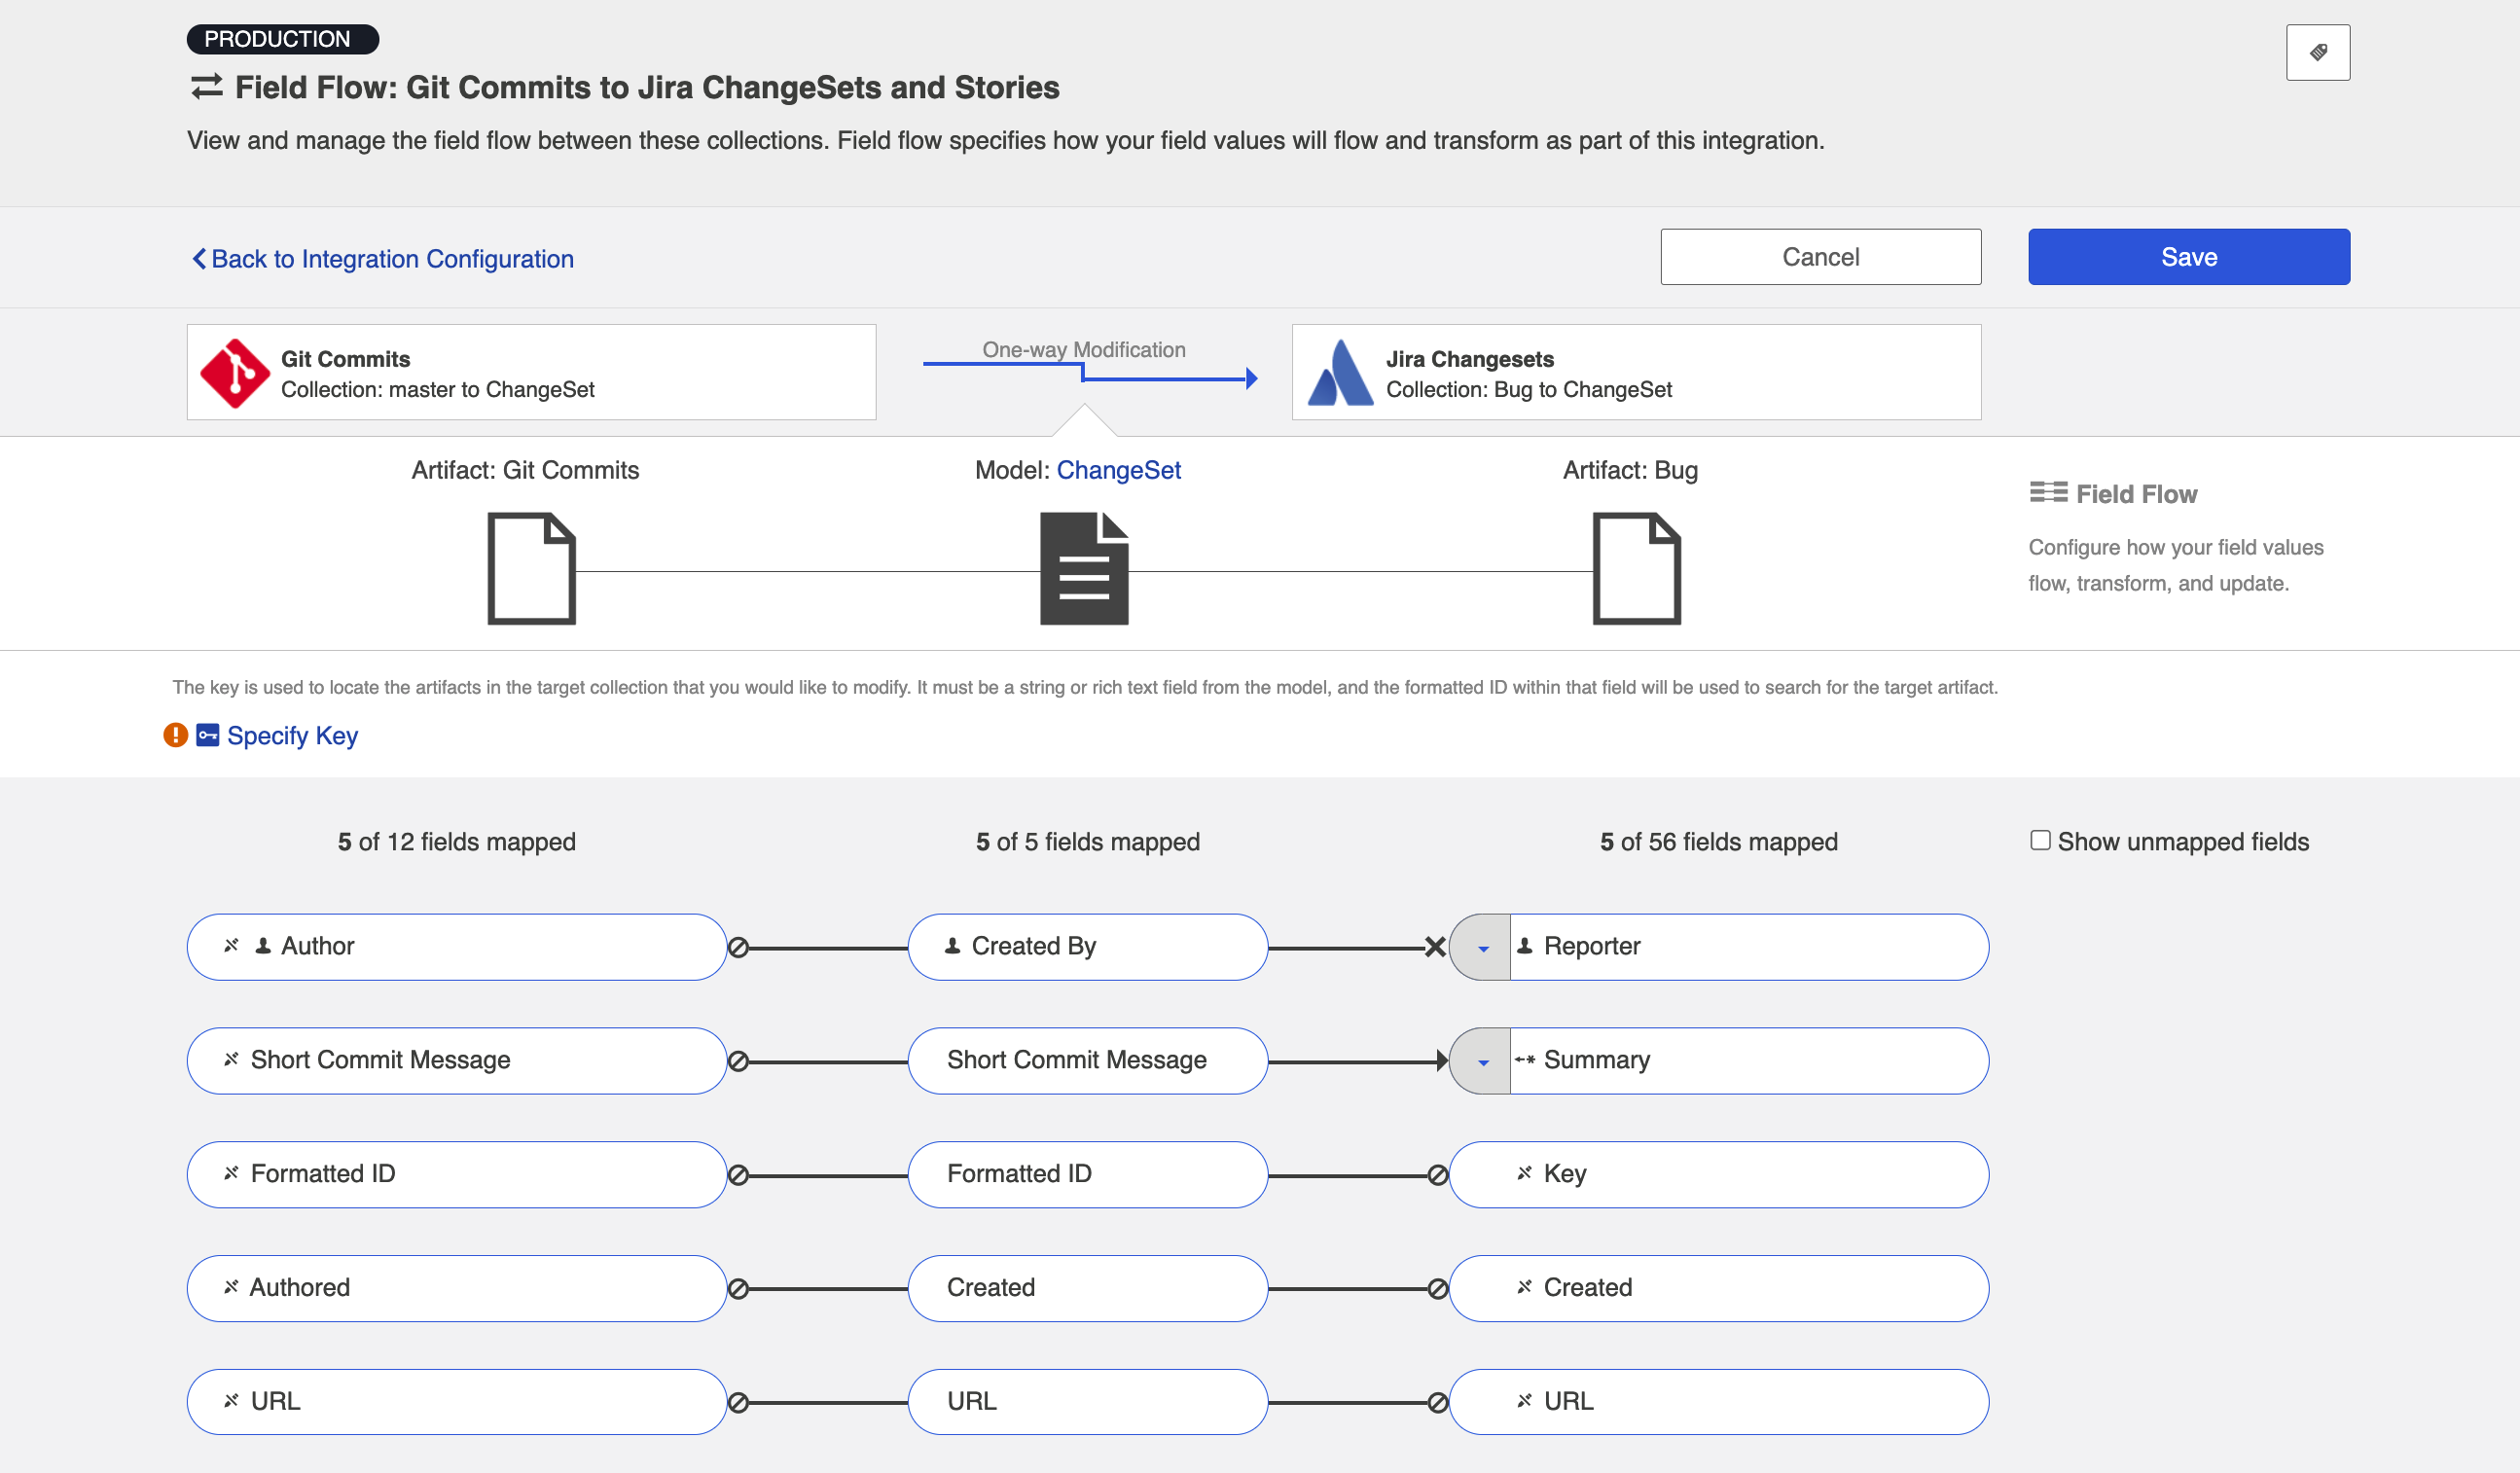
Note that in our example, only the URL field is set to flow into the target repository. Git will flow a web link for any related commits to a field on the Jira artifact, but will not overwrite any other Jira fields such as summary, description, etc.
If needed, you can manually set other fields not to flow.
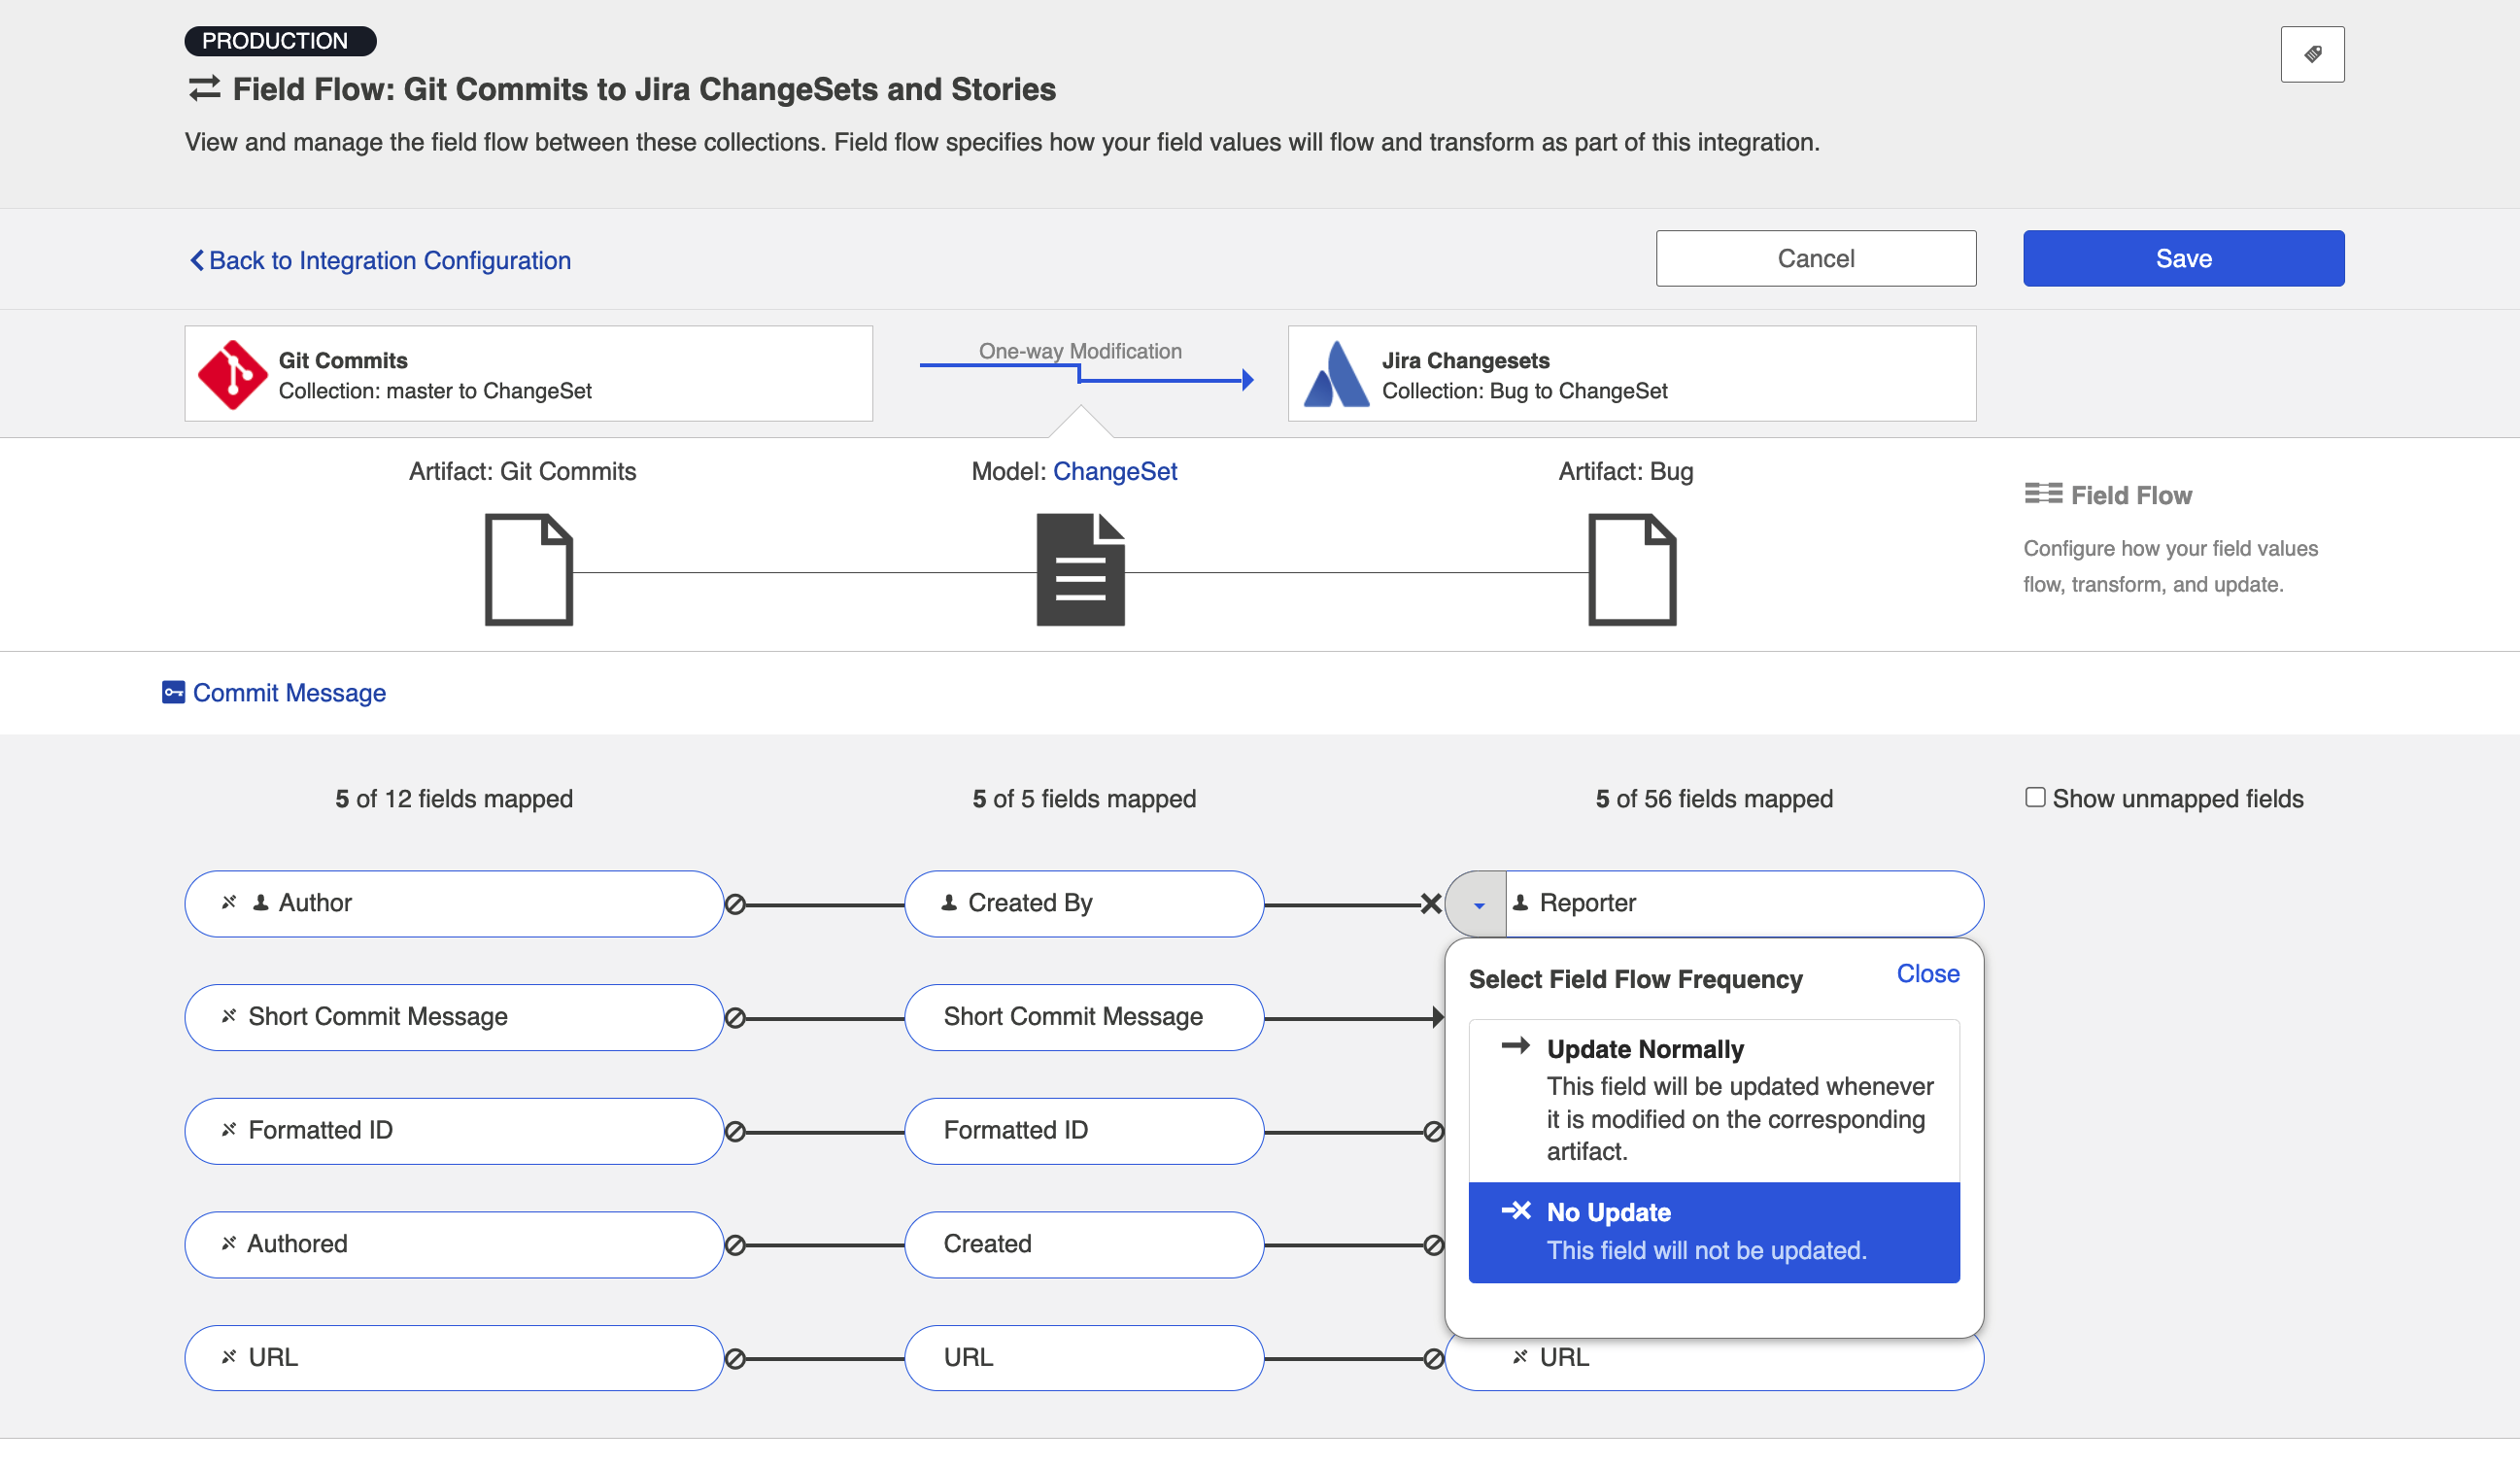
You can see the names of the mapped artifact fields for each collection on the far left and far right, with the model fields displayed in the middle. By default, model fields without mapped repository fields are hidden. You can see all model fields by checking the Show unmapped fields checkbox. Constant values will be identified by a grey box and the constant value icon.
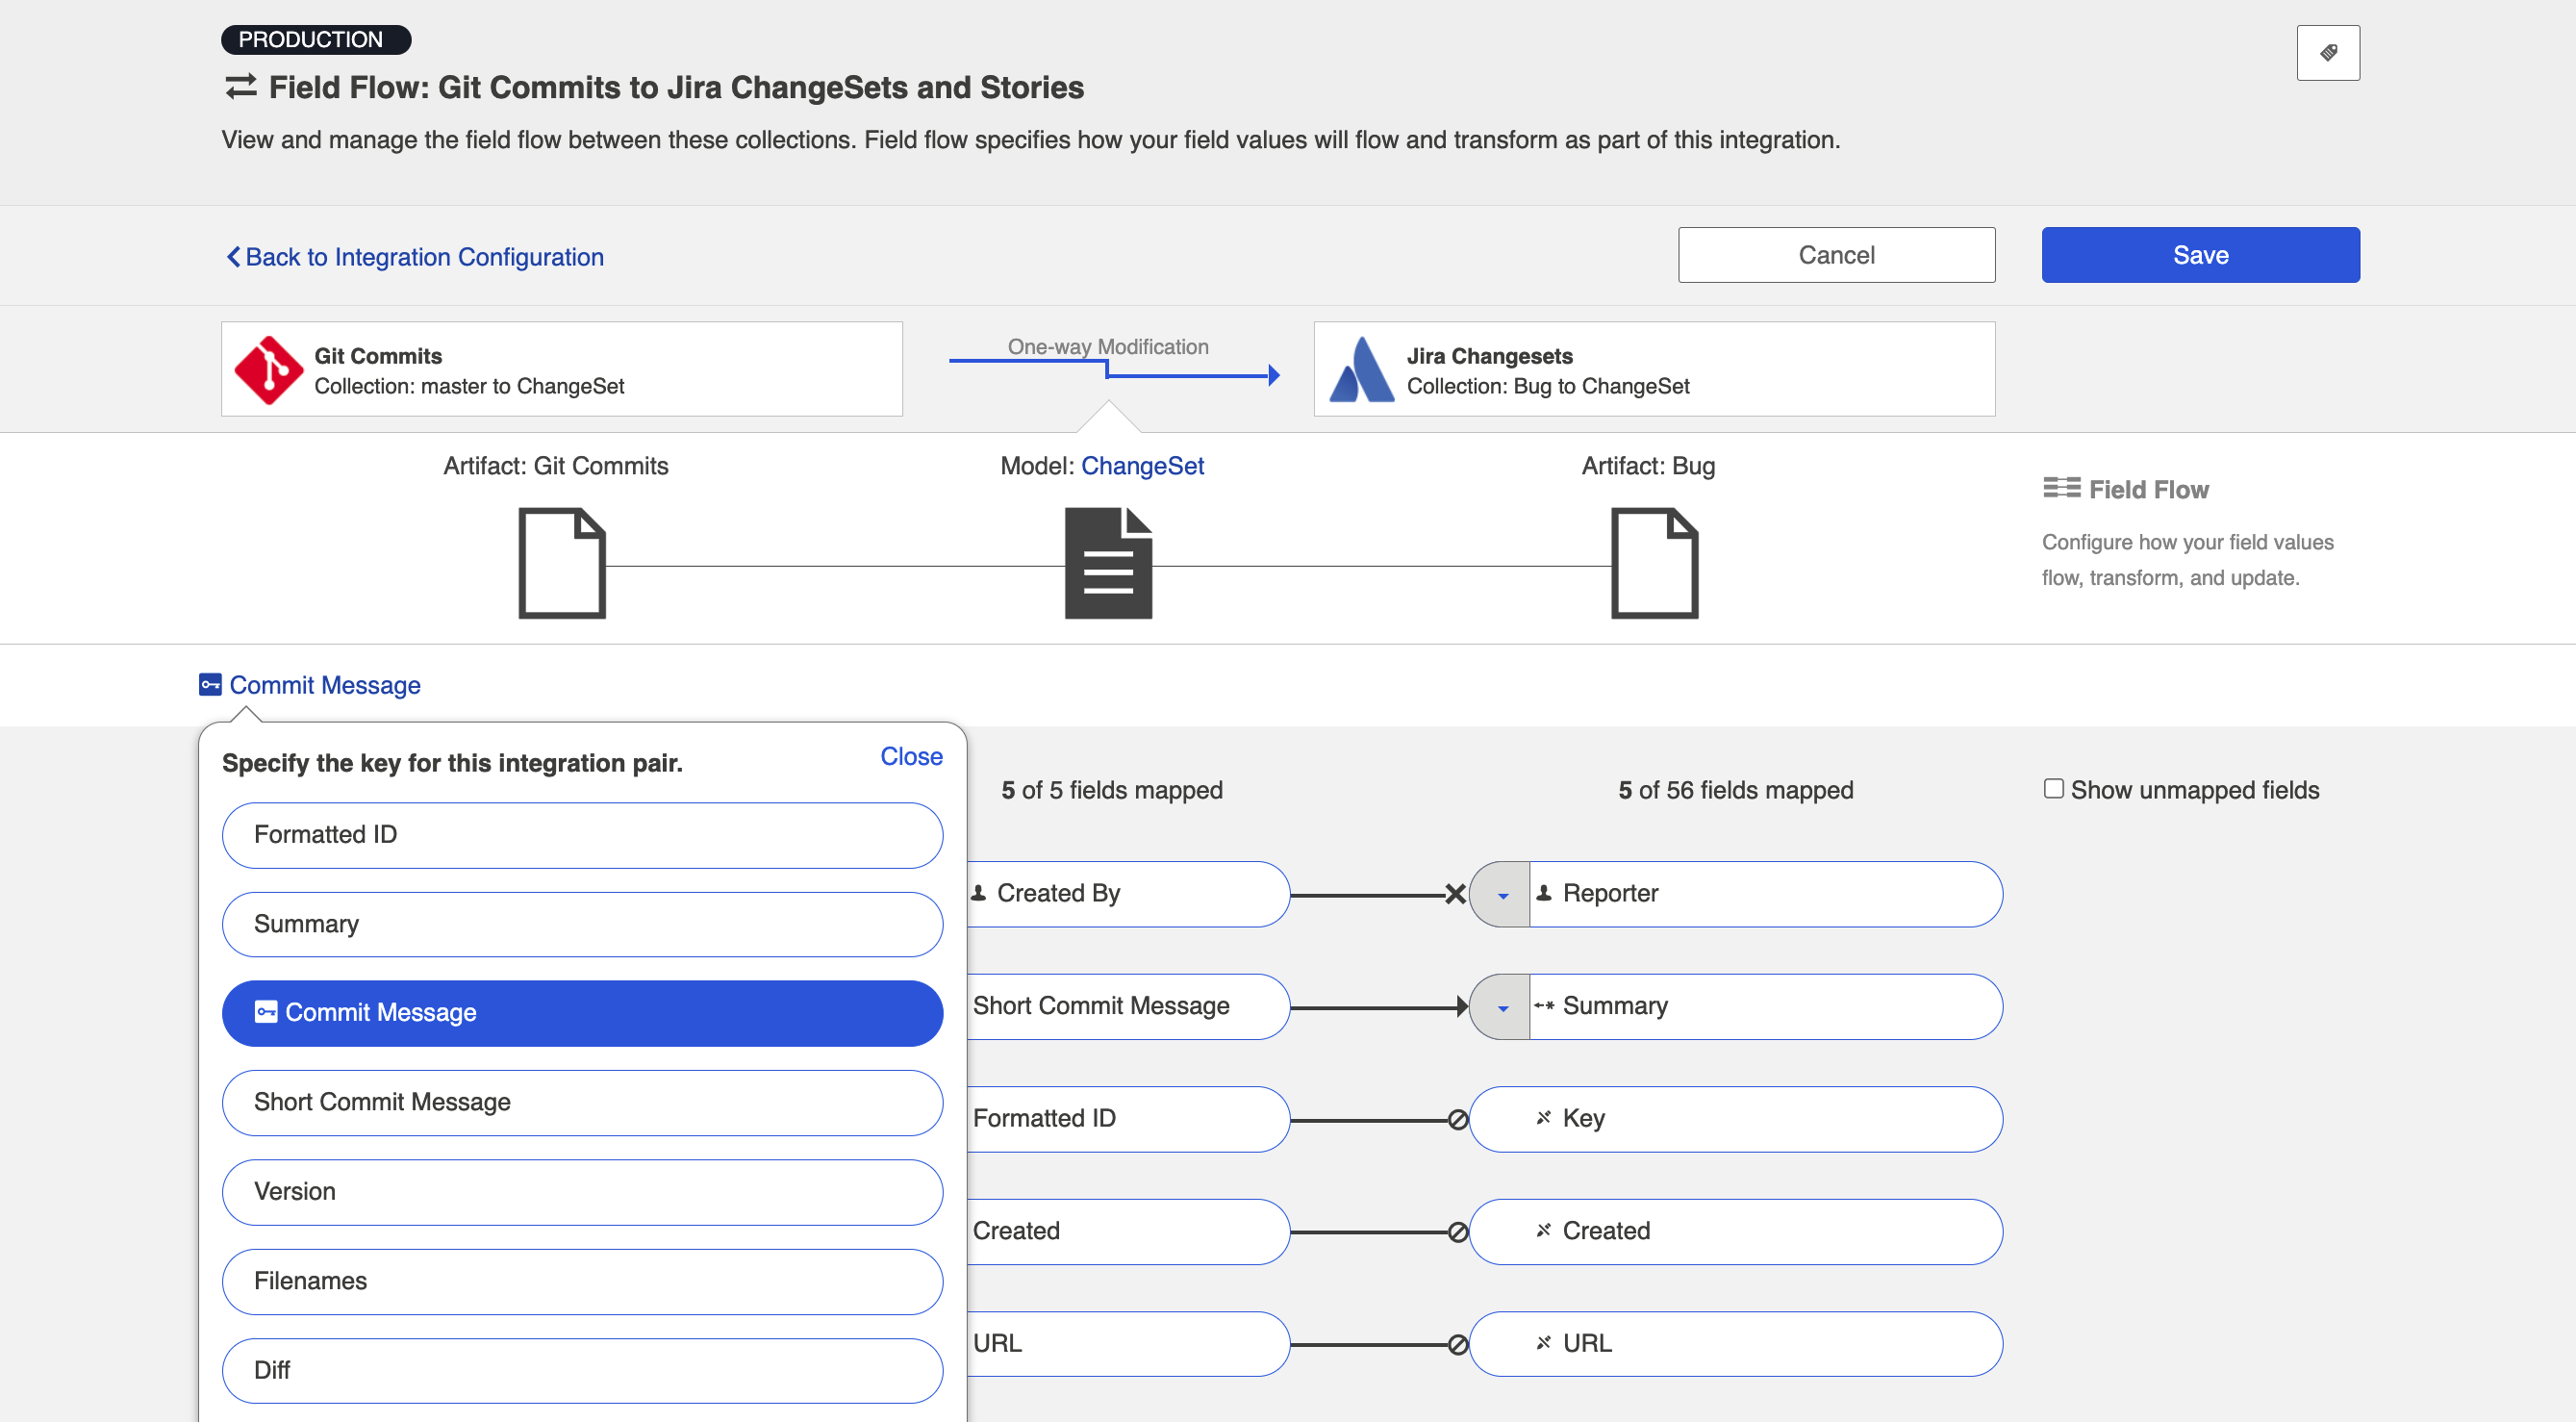
Specifying your Key
In order for your integration to run successfully, you will need to specify your key if one is not specified yet. If possible, Hub will set the key as the Commit Message field in Git. If that field is not mapped, Hub will set the key as the Summary field. If neither field is mapped, you will need to select a field to use as the key.
The key is used to locate the artifacts in the target collection that you would like to modify. It must be a string or rich text field from the model, and the formatted ID within that field will be used to search for the target artifact.
Artifact Filtering
Artifact Filtering enables you to set filters in order to limit which artifacts are eligible to flow in an integration.
To use a field for artifact filtering, it must:
-
Be a part of your model, and be mapped to the collection you are filtering from
-
Be one of the following field types:
-
Single Select
-
Note that in cases where 'allow unmapped values to flow' is enabled in the model, only fields that are already a part of the model will be considered for artifact filtering
-
-
Multi-Select
-
Note that in cases where 'allow unmapped values to flow' is enabled in the model, only fields that are already a part of the model will be considered for artifact filtering
-
-
Date
-
Date/Time
-
Duration
-
String
-
To configure Artifact Filtering, select Artifact Filtering from the right pane of the Integration Configuration screen:
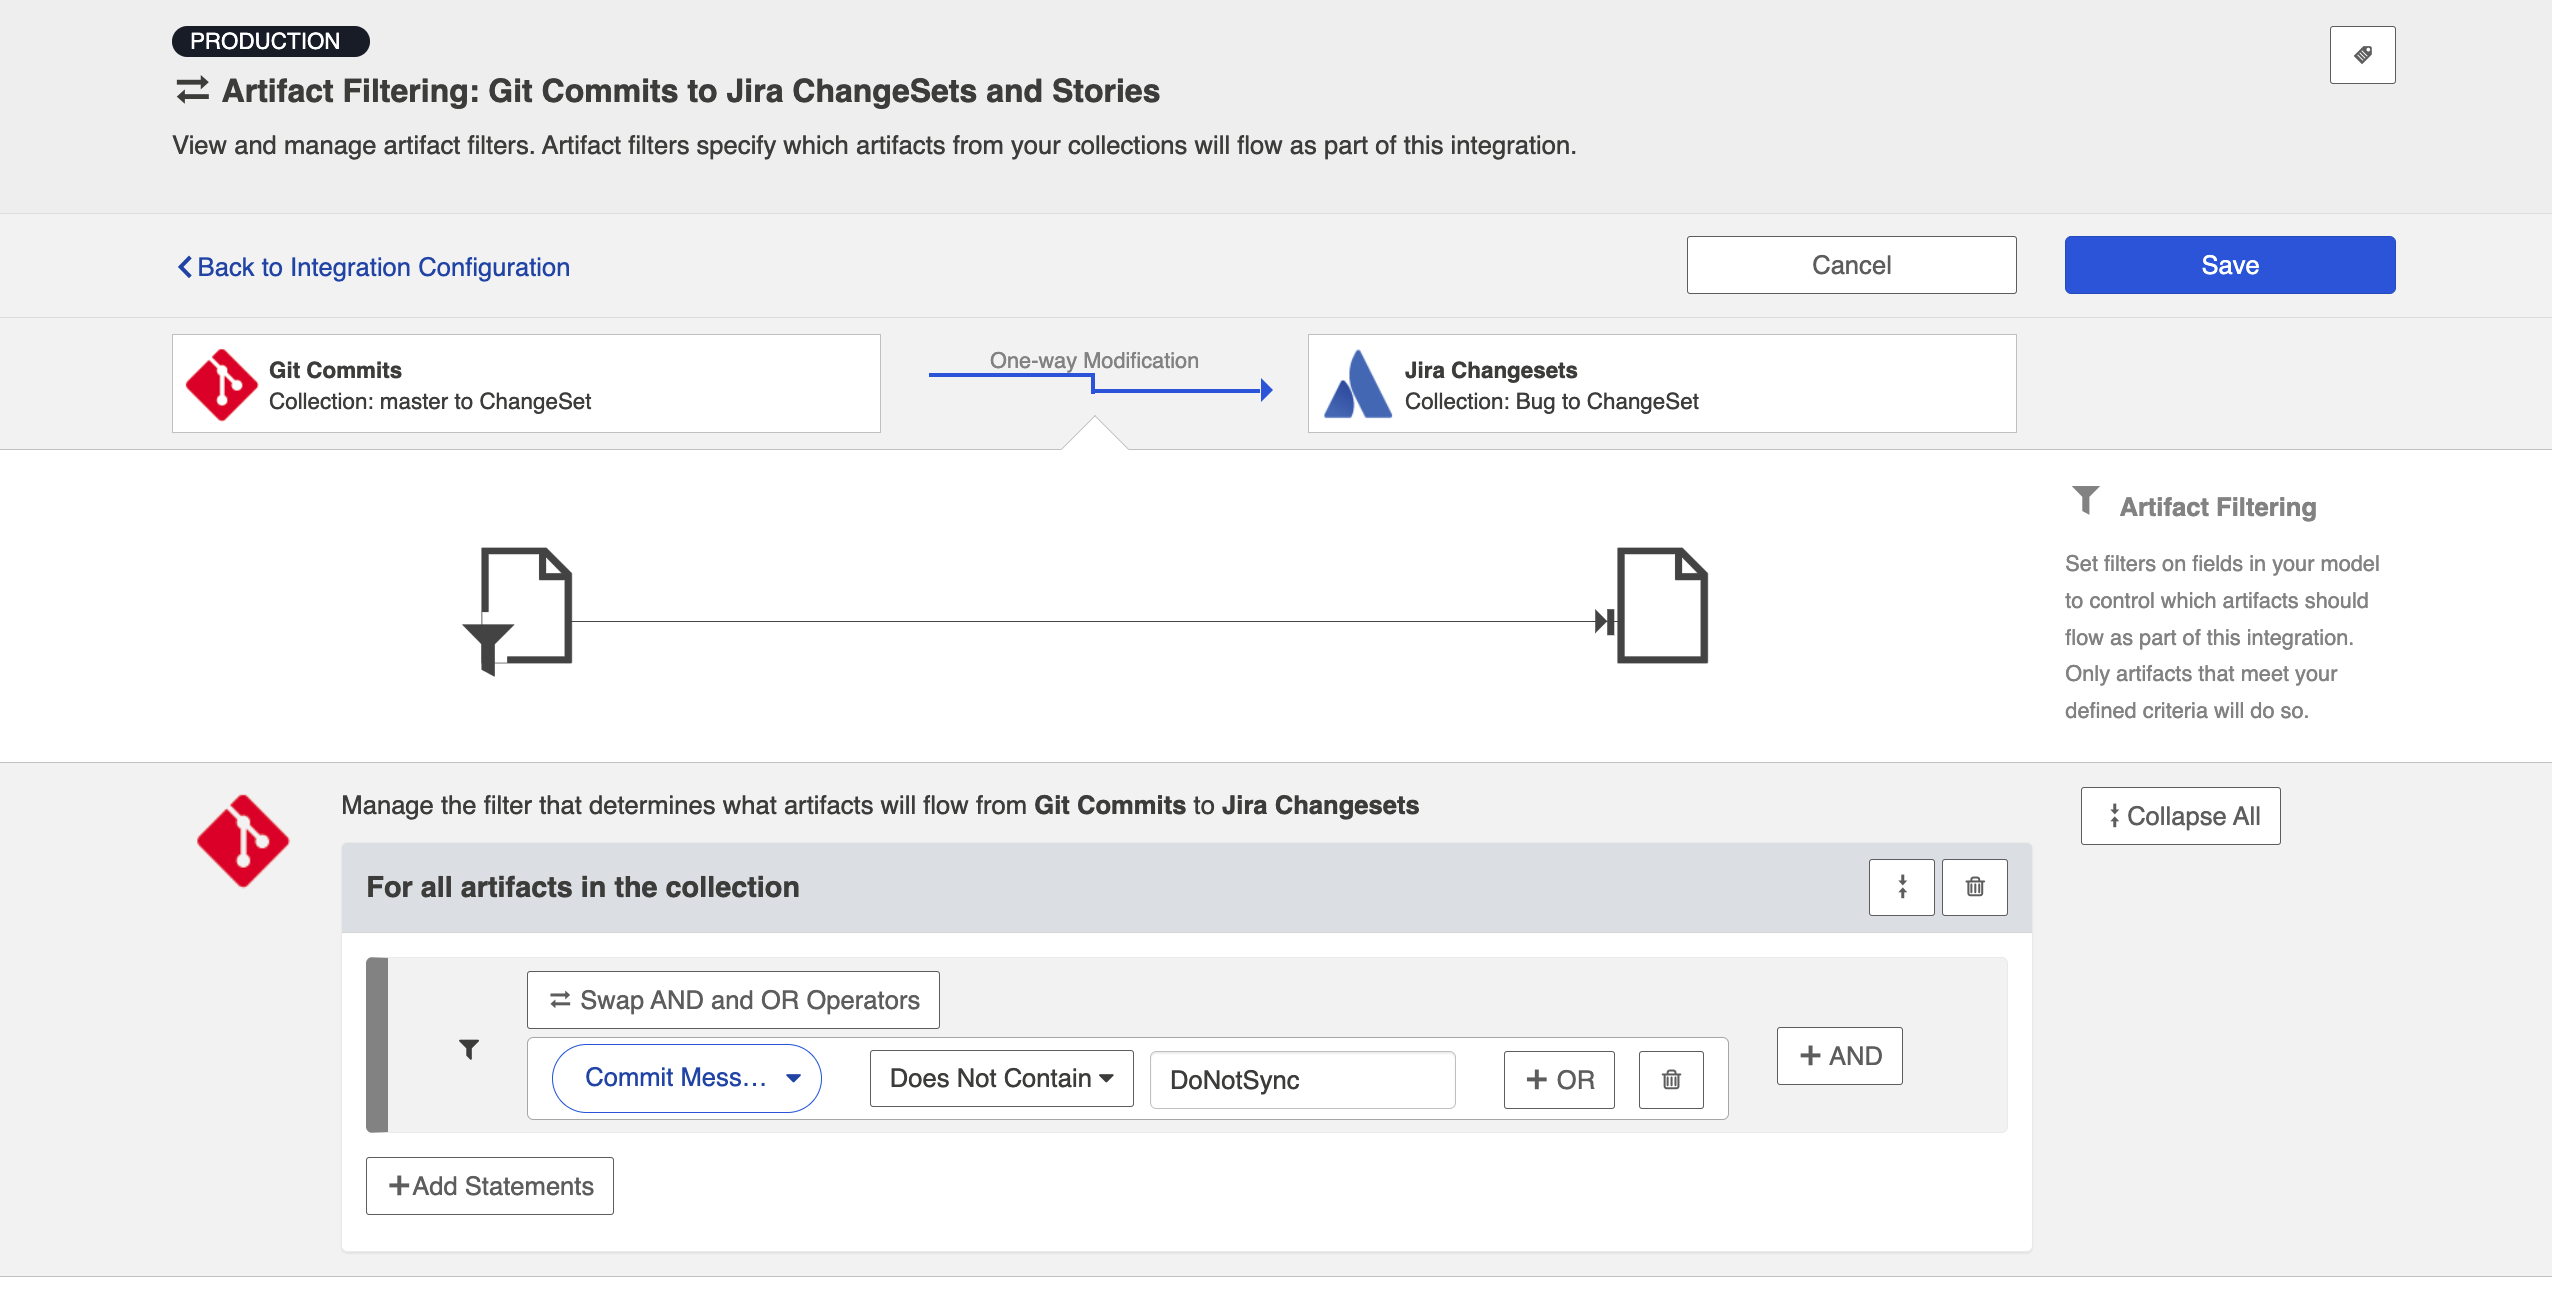
This will lead you to the Artifact Filtering Configuration screen, where you can configure one or more criteria for artifact filtering.
You can click the Collapse All button to view an easier-to-read summary of your artifact filtering statements.
Change Detection
Hub's default global change detection settings can be found on the General (Settings) screen. However, if you'd like to override the global defaults, you can configure integration-specific change detection and full scan intervals by clicking the Change Detection link.
The Change Detection Interval is the time between polling requests to detect only changed artifacts. This defaults to 1 minute on the General (Settings) screen, but can be customized as desired.
The Full Scan Interval is the time between polling requests to detect changed artifacts, in which all artifacts of a collection are scanned. Not all changes to an artifact will register as a change. Some repositories do not mark items as changed when (for example) a relationship is added or an attachment has changed. These may not be picked up by regular Change Detection, but will be picked up by a Full Scan. This defaults to 24 hours on the General (Settings) screen, but can be customized as desired. Users can also customize the full scan style for each integration to impact performance and server load, based on their integration and repository configuration.
To configure integration-specific change detection, click the Change Detection link. You can find details on this process here. Note that for a Code Traceability: Create and Relate a Changeset, change detection can only be updated for the source (Git) collection.
Running Your Integration
To run your integration, please see details here: Running Your Integration(s)
Viewing Your Integration
To view your integration, please see details here: Viewing Your Integration(s)
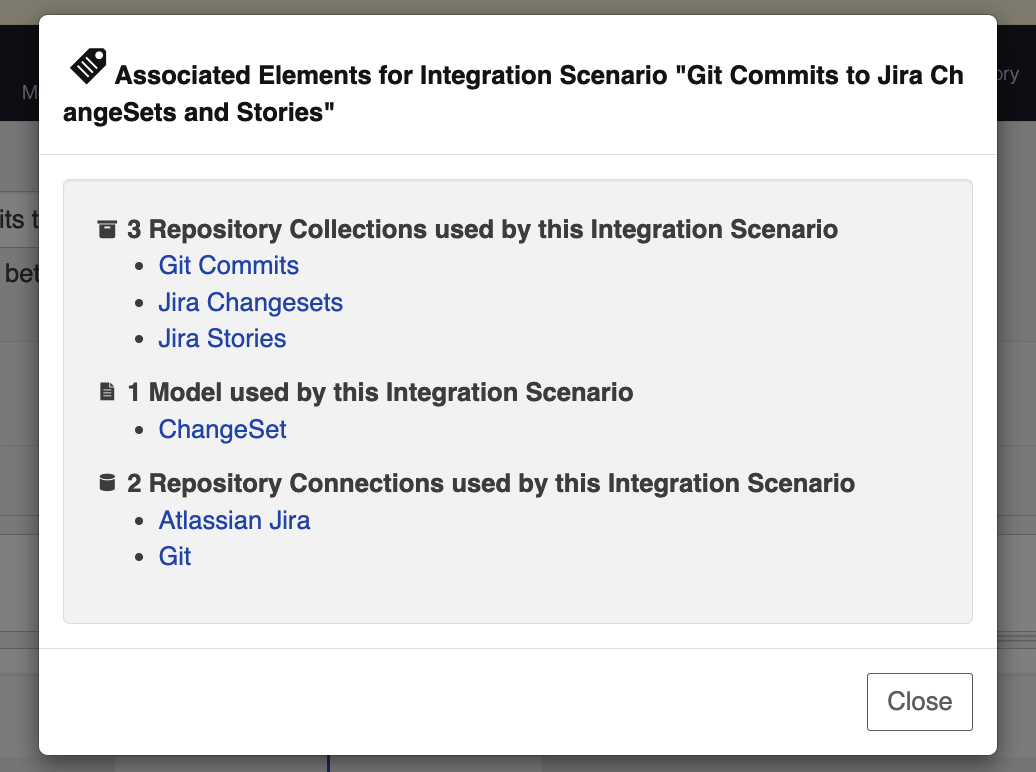
Viewing Associated Configuration Elements
To view associated configuration elements (such as collections or models that utilize the integration you are viewing), click the Associated Elements tag in the upper right corner of the screen.