
System Settings
Overview
This page describes AdaptiveWork System Settings and includes the following sections:
About System Settings
Admin users can maximize the benefits of the system and meet the needs of your organization by customizing the default settings of relevant, mandatory or optional system setting parameters.
The system setting tab is divided into several sections and can also be searched using the setting search box as seen in Figure 1 below:
1. Login and Password – allows you to define the various login and password limitation settings
2. Organization Settings – defines various behaviors associated with the overall organization
3. Permissions – allows you to define various organization permission settings
4. User Interface Settings – allows you to define various GUI settings and behaviors
5. User management – allows you to define various user related permission settings
6. Files and Collaboration – allows you to define various file management settings as well as various collaboration settings
7. Work Management Settings – allows you to define various work related behaviors
8. Resource Management – allows you to define various settings regarding the way resources are handled in the system
9. Budget Management – allows you to define the various Budget settings
10. Emails – allows you to define various organizational email related settings
11. InterAct – allows you to define the message confirmation settings for the InterAct module
12. Progress Report – allows you to define various settings regarding progress reporting
13. Time Tracking – allows you to define the way the system tracks work as well as other time tracking report options
14. Expenses – allows you to define the various expense sheet and expense approval settings.
15. Alerts – allows you to define various settings and behaviors for system alerts.
16. Mobile – allows you to define various mobile related settings
17. AdaptiveWork Labs – allows you to define whether to Opt-in to Beta preview releases of our newest features
Accessing System Settings
The Settings module is accessed either via the Navigation Panel or the User Data menu located on the masthead, as detailed in the Settings overview.
Click the System Settings tab.
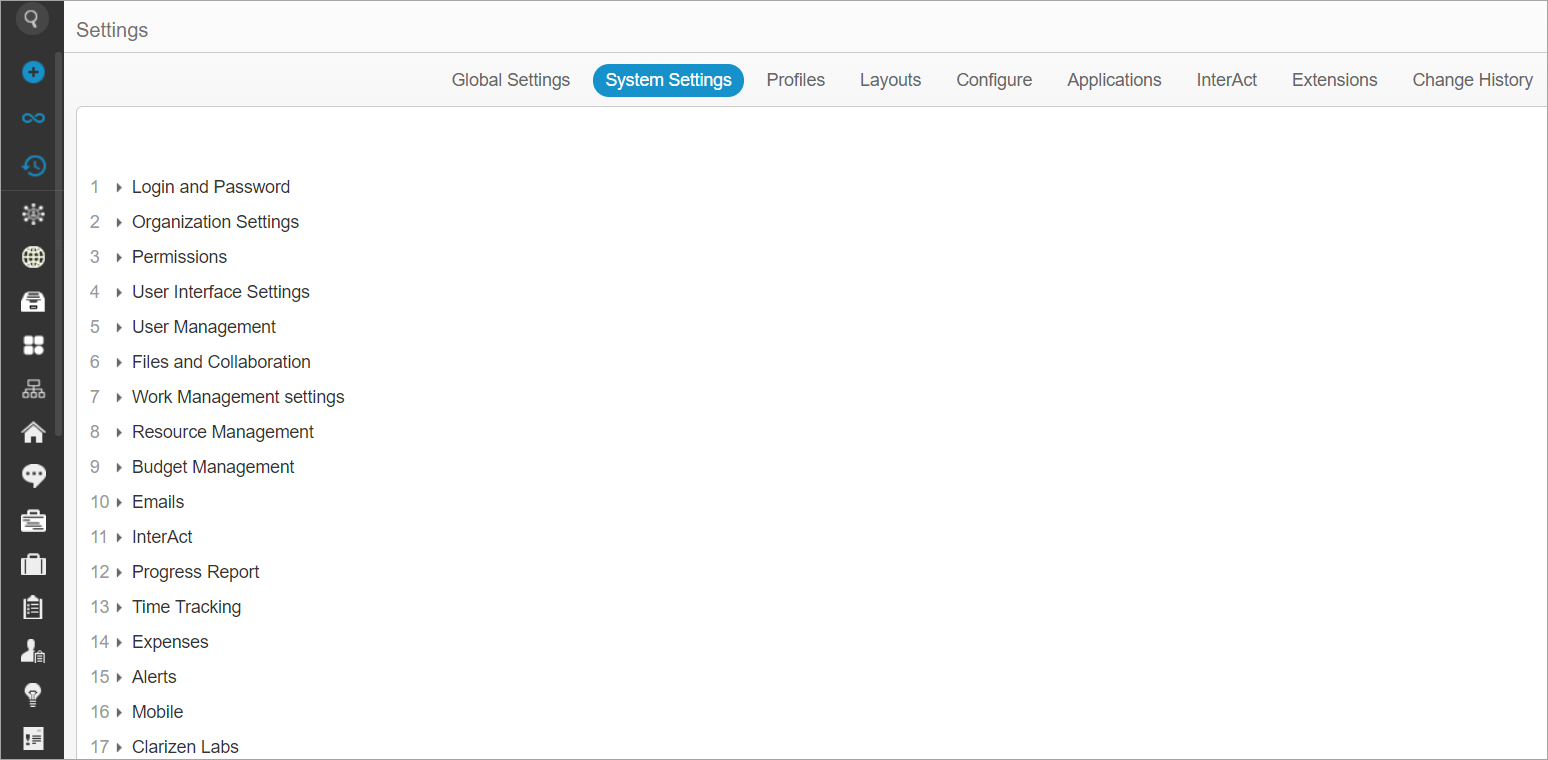
Figure 1: System Settings Tab
1.Login and Password
_______________________________________________________________________________________________________
1. Login and Password
Defines the login and password settings for AdaptiveWork users in the organization
1.2 Disable User Name autocomplete
1.3 Session timeout
1.4 Authentication attempts (#)
1.5 Lock out period
1.6 Password expiration period (months)
1.8 Password repetition period (months)
1.9 Password repetition value (# of times)
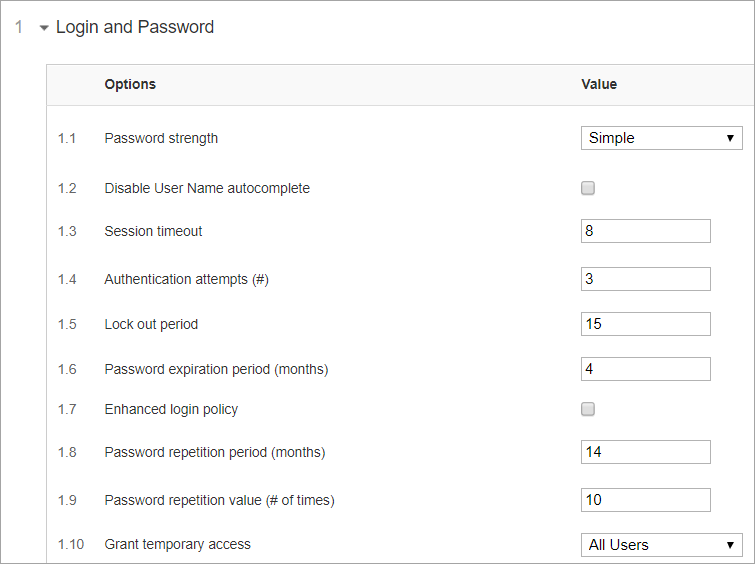
1.1 Password strength
The password strength as of January, 2021 can only be set to Strong.
Strong: requires a minimum of 8 characters which must contain lower and upper case letters, numbers, and special characters (such as !?#$%, etc)
1.2 Disable User Name autocomplete
In order to prevent identity theft and ensure that users don't hijack your credentials to AdaptiveWork, you can disable the browser's autocomplete capability for the User name field.
Select the Disable User Name autocomplete option to utilize this security enhancement
The default value is 'Off'.
1.3 Session timeout
Define the Session Timeout, which is the number of hours a session can remain inactive before expiring.
An expired session requires the user to re-enter a password.
The maximum is 8 hours
The default value is '8'.
1.4 Authentication attempts (#)
In order to prevent unauthorized access to the system, AdaptiveWork provides the ability to control the number of login attempts before locking the user out of the system for a predefined period of time.
Set the Number of authentication attempts by typing in the desired value.
The default value is '3'.
1.5 Lock out period
Once the number of login attempts is defined, set the period of time the user will be locked out before allowing him to retry login into the system.
Set the Lock out time by typing in the desired value.
The default value is '15'.
1.6 Password expiration period (months)
Note:
Requires that the Enhanced login policy setting be enabled in order for it to take affect.
Once the Enhanced login policy is enabled, define how long a password is valid for.
Set the number of months before the password expires in the Password expiration period (months) field.
The default value is '4'.
1.7 Enhanced login policy
To maintain AdaptiveWork security, you can require your users to change their login password after a user defined time interval.
Select the Enhanced login policy option to enable this feature.
The default value is 'Off'.
Note: When enabled, a notification alerting of the upcoming password expiration is sent 14 days prior the expiration date.
1.8 Password repetition period (months)
Define the timeframe in which users cannot repeat the same password in months.
For example:
A user set his first password to be 123
After 4 months(set in the Password Expiration Period), the password expired and was changed to 456
4 months later the password expired again, this time it was changed to 789
Another 4 months had gone by, its time to change the password again, its been 12 months since the user has set his original password.
If the value in the Password repetition period (months) is less than 12, the user can return to his original password (123) however if the value is greater than 12 he will need to select a different password.
Set the number of moths in the Password repetition period (months) field.
The default value is '14'.
1.9 Password repetition value (# of times)
Define the number of times users need to change their password before they are able to repeat them.
For example:
A user set his password to: 'AbCd'
After a while he forgot his password (or the password expired), and he generated a new one 'EfGh'
However he does not feel comfortable with this password and wishes to revert back to his original password.
Since the value is set to 10, he will have to change his password 9 more times before he is able to revert back to his original password
(provided that the number of months set in the Password repetition period (months) field have passed).
Set the password count limit in the Password repetition value (# of times) field.
The default value is '10'. This field can be set to values between 1-50
1.10 Grant temporary access
Defines which users (if any) can grant external individuals a temporary login access to their account. The semi-impersonation option is useful when providing support to users without the necessary access.
The default value is 'Disabled'. You can grant access for 7, 14, or 21 days.
2. Organization Settings
_______________________________________________________________________________________________________
2. Organization Settings
This section defines various behaviors associated with the overall organization
2.2 Use logo in all system generated materials
2.3 Automatic contact creation
2.4 Custom Action ribbon title
2.5 Custom Action navigation panel title
2.6 WalkMe customer ID [deprecated]
2.7 AdaptiveWork Help and Custom WalkMe options [deprecated]
2.8 API Field Relabeling Support
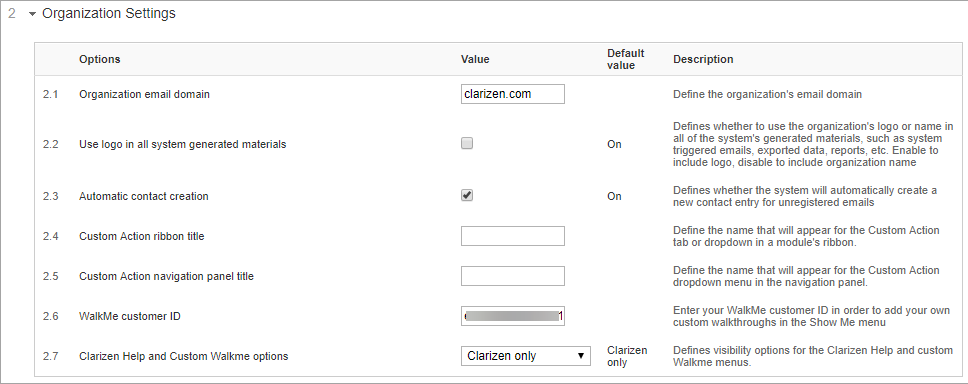
2.1 Organization email domain
Define the organization's email domain.
The default value is generated from the domain of the user who first registered the account.
2.2 Use logo in all system generated materials
Defines whether to use the organization's logo or name in all of the system's generated materials, such as system triggered emails, exported data, reports, etc. Enable to include logo, disable to include organization name.
The default value is 'On'.
2.3 Automatic contact creation
When sending emails from the system, AdaptiveWork has the ability to automatically create a contact person for an unregistered email.
Disabling the Automatic contact creation setting stops the system from creating automatic contacts.
The default value is 'On'.
2.4 Custom Action ribbon title
The Custom Action ribbon title allows you to define the name that will appear for the Custom Action Tab or dropdown located in a module's ribbon.
Type the desired title in the Custom Action ribbon title field.
The default value is 'blank' and defaults to Custom Action.
2.5 Custom Action navigation panel title
The Custom Action navigation panel title allows you to define the name that will appear for the Custom Action dropdown menu located in the navigation panel.
Type the desired title in the Custom Action navigation panel title field.
The default value is 'blank' and defaults to Custom Action.
2.6 WalkMe customer ID [deprecated]
AdaptiveWork lets you incorporate your own instance of Walkme, accessed via a Show Me menu in AdaptiveWork.
2.7 AdaptiveWork Help and Custom WalkMe options [deprecated]
Select which Help options to display:
- AdaptiveWork only
- Customer only
- None
To learn more about the WalkMe integration with AdaptiveWork, click here.
Once the settings are defined, click  located below and to the right of the System Settings screen.
3. Permissions
_______________________________________________________________________________________________________
3. Permissions
Defines what people have access to with the AdaptiveWork account:
3.1 Permission level
3.2 Enhanced permissions project visibility
3.4 Cases Inherit from Work Items
3.5 Inherit Permission Access Levels from parent group
3.7 Edit Cases by team members in enhanced permission mode
3.8 Aggregate field set across Profiles
3.9 External Users access to full people view
3.10 Widget view authentication requirement
3.11 iCal subscription authentication
3.12 Views & Reports Sharing limitations
3.13 Enable AdaptiveWork page embedding
3.14 Enforce widget password entry
3.15 Default Permission Inheritance for External Users
3.16 Role-based financial permissions
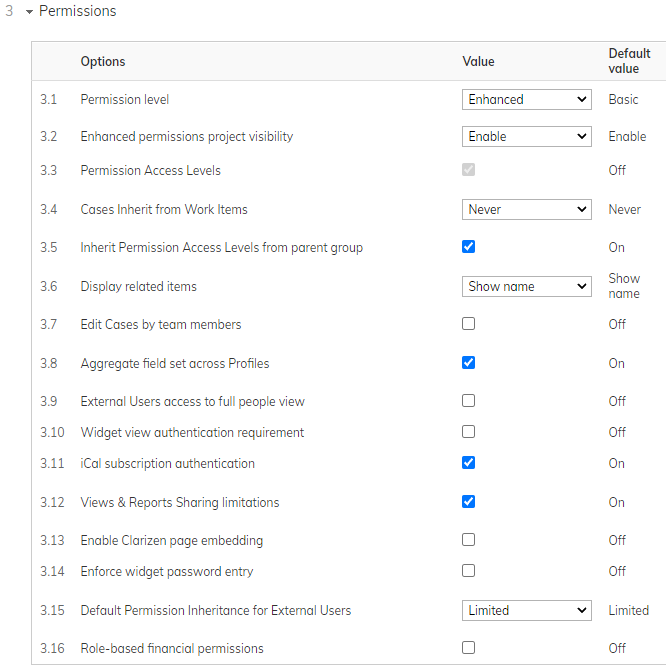
3.1 Permission level
Defines the system's Permission level
When defined as Enhanced, enhanced permissions are enforced according to User Roles.
The default value is 'Basic'.
3.2 Enhanced permissions project visibility
By default, the property is enabled, which means that in the enhanced mode, resources assigned to a project have full visibility into the project structure. When the property is disabled, internal users assigned to a project as a resource cannot view the entire project unless they are assigned to a work item within the project. In such a case, they can access the assigned work item and all its child items.
Applies to:
- Users assigned the Owner role at a work item level
- Users assigned the Resource role at a project or work item level and users added as a Resource to the project using the Add button in the Resources panel.
The property does not affect:
- Project Manager and Project Owner
- Additional Managers
For more information about the setup, click here.
The default value is 'Enable'.
3.3 Permission Access Levels
With this option, you can manage permissions (view only or edit) for users, groups or profiles. Group permissions are available for Work Items, Cases, Customers, and Custom Objects. For more information, click here.
The default is set to 'Off'.
3.4 Cases inherit from Work Items
Note: This option is only enabled when Permission Access Levels (see previous) is enabled.
When enabled, Case (Risks, Issues, Requests and Bugs) permissions are inherited from the Work Items, so if you have Viewer permissions on a Project, you automatically get the same permission on any linked Risks, Issues, Requests and Bugs. For more information, click here.
The default is set to 'Never'.
3.5 Inherit Permission Access Levels from parent group
Automatically apply permission access levels (Editor or Viewer) from parent groups to all sub-group levels.
The default is set to 'On'.
3.6 Display related items
For security reasons, you can define who is able to view items related to the items assigned to the user as a resource.
The Display related items setting defines who is able to view related items in conjunction with the Permission level setting.
When the Permission level setting is set to Basic
- Show name will enable External users to see the name of related items but they will not be able to access the item itself
- Do not Show will hide all related items from the External User
- Internal users will have the ability to view and access all related items
When the Permission Level setting is set to Enhanced
- Show name will enable both Internal and External users to see the name of related items but they will not be able to access the item itself
- Do not Show will hide all related items from both the Internal and the External User
The default value is 'Show name'.
3.7 Edit Cases by team members in enhanced permission mode
When utilizing Enhanced Permission mode checking the Edit Cases by team members in enhanced permission mode option allows team members to edit cases.
The default value is 'Off'.
3.8 Aggregate field set across Profiles
AdaptiveWork allows you to define various profiles associated with different Users, Groups, etc. See Profile Settings for more.
Enabling the Aggregate field set across Profiles option will aggregate the available field sets for users with multiple profiles.
When enabled, users associated with multiple profiles will have access to all of the allowable fields from all associated profiles regardless of what profile they are currently using.
The default value is 'On'.
3.9 External Users access to full people view
Defines whether External Users have the ability to view all other users in the system, or just their direct reports, managers, and group members
The default value is 'Off'.
3.10 Widget view authentication requirement
You can send Gantt and roadmap widgets from the AdaptiveWork system.
Define whether viewing widgets will require user authentication
Enabling the Widget view authentication requirement option limits you to send the widgets only to registered AdaptiveWork users within the organization as it will require AdaptiveWork authentication.
The default value is 'Disabled'.
3.11 iCal subscription authentication
Defines whether to use calendar authentication.
When working with Google Calendar this needs to be set to 'Off', leave this setting at the default ('On') when working with organization calendars using outlook or other organizational calendar software
The default value is 'On'.
3.12 Views & Reports Sharing limitations
As part of AdaptiveWork's personalization capability all users can create personal views and reports. In addition public grid views are also available.
When the Views & Reports Sharing limitations setting is enabled, Admins or Super Users are the only users allowed to share views and reports, whereas When disabled, all internal users can create public views and share reports.
The default value is 'On'.
3.13 Enable AdaptiveWork page embedding
Defines whether shared AdaptiveWork pages can be embedded in other webpages.
Please note, enabling this setting can lead to potential security breaches (low possibility)
The default value is 'Off'.
- Once the settings are defined, click located below and to the right of the System Settings screen.
3.14 Enforce widget password entry
Make passwords mandatory when sharing widgets. Learn more.
3.15 Default Permission Inheritance for External Users
Setting for Permission Inheritance when using Permission Access Levels where you have External Users in User Groups. Selecting Full will set the default for new Portfolios, Programs and Projects so that External Users in Groups & Profiles have visibility to Project work plans and related Cases as if they were regular internal users. Learn more.
3.16 Role-based financial permissions
Setting that determines whether a user’s role and permission access levels on a specific work item are respected and they are granted financial permissions or not.
For example, when this setting is enabled and a user with Financial Permissions is assigned as a resource on a specific task, the user can view but not edit the Financial Data.
4. User Interface Settings
_______________________________________________________________________________________________________
4. User Interface Settings
This section defines the way the system interface behaves and includes the following options:
4.1 Display density
4.5 Editor Mode
4.7 Effort related time display
4.8 Name Separator
4.9 Number Separator
4.10 Show new items based on role
4.11 Collaboration view options window
4.12 Confirmation Message Timer
4.13 Group Work Item ribbon in Miscellaneous tab
4.14 Clickable item links
4.15 User Interface Theme
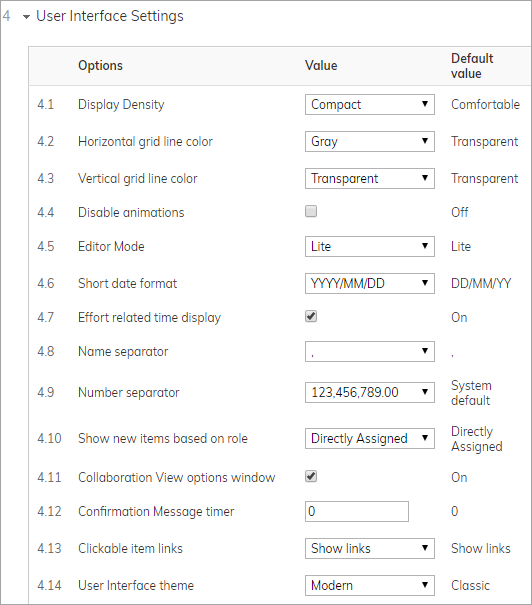
4.1 Display density
The Grid row height setting defines the way the grid items will be shown in the grid across the entire system.
The height of a Grid row can be set to either comfortable or compact, where the Comfortable setting adds padding between each row.
The default value is 'Comfortable'.
4.2 Horizontal grid line color
The Horizontal grid line color setting defines the color used for the row border in AdaptiveWork grids.
The available options are: transparent, Light Gray, Gray, and Dark Gray.
The default value is 'Transparent'.
4.3 Vertical grid line color
The Vertical grid line color setting defines the color used for the column border in AdaptiveWork grids.
The available options are: transparent, Light Gray, Gray, and Dark Gray.
The default value is 'Transparent'.
4.4 Disable animation
The Disable animations setting defines whether to enable or disable system animations.
The default value is 'Off'.
4.5 Editor Mode
Defines the editing experience for fields in AdaptiveWork:
- Standard - OK and CANCEL confirmation buttons appear on editable fields.
- Lite - This option removes the OK and CANCEL buttons from the field editor. Pressing Enter, tab, and clicking outside of the editor will confirm changes, and Esc will cancel.
- Inline - Similar to Lite, this option allows inline editing without the edit box for straight forward editing and without the need to confirm changes.
The default is 'Lite'.
4.6 Short date format
Use the Short date format setting to define the default date format displayed in AdaptiveWork.
This setting can be overridden at a user level
The options are:
- DD/MM/YY — will display for example 15/11/14
- MM/DD/YY — will display for example 11/15/14
- DD-MMM-YY — will display for example 15-Nov-14
- YY-MM-DD — will display for example 14-11-15
- DD.MM.YYYY — will display for example 15.11.2014
The default value is 'DD/MM/YY'.
4.7 Effort related time display
Duration-related fields (such as Work, Actual Effort and Remaining Effort, etc.) can be displayed in either Hours (default) or Days.
Enable the Effort related time display option to display the effort in Hours(h), removing the tick from this checkbox will cause the effort to be shown in Days(d).
The default value is 'On'.
4.8 Name Separator
The Names Separator setting defines what separator to use when displaying names while using Auto-Complete.
The available options are comma (,) or semicolon (;)
The default value is ',(comma)'.
4.9 Number Separator
The Number Separator setting defines the numeric separator display format for long numbers and the decimal point in the system.
The available options include no long number separation with either a ',(comma)' or '.(period)' for the decimal point, a ',(comma)' for long numbers and '.(period)' for the decimal point or vice versa.
The default value is ',(comma)' for long numbers and '.(period)' for the decimal point .
4.10 Show new items based on role
The Show new items based on role setting defines what work item to display in the What's new section in the masthead.
The options are Directly Assigned, showing only items where the user has a direct role, and All (Direct and Indirect Assignment), showing all work items whether they are directly or indirectly assigned to the user.
The default value is 'Directly Assigned'.
4.11 Collaboration View options window
Defines whether the Collaboration View options window is automatically displayed
The default value is 'On'.
4.12 Confirmation Message timer
When using interactive features such as the interactive Gantt, accidental changes may occur, to prevent such occurrences, a confirmation message is displayed. you can determine how long the confirmation message will appear.
The Confirmation message timer setting defines the length of time (in seconds) the confirmation message appears before automatically accepting the change.
The default value is '0'.
4.13 Group Work Item ribbon in Miscellaneous tab
Enable this setting to group the Utilities and Misc tabs of the ribbon into a single tab
The default value is 'Off'.
Once the settings are defined, click located below and to the right of the System Settings screen.
4.14 Clickable item links
Use this setting to choose how item drilldown links should be displayed:
- Show links
- Show icon
The default value is 'Show links'.
4.15 User Interface Theme
The Classic/Modern theme applies to interface elements such as fonts, colors, spacing and more.
The default is 'Classic'.
5. User Management
_______________________________________________________________________________________________________
5. User Management
This section defines various behaviors associated with the user management and includes the following settings:
5.1 New user default license type
5.2 New user invite permissions
5.3 Mass user import permissions
5.4 Mark users from other domains as External Users automatically
5.5 Group membership setting privileges
5.6 Personal Calendar update limitations
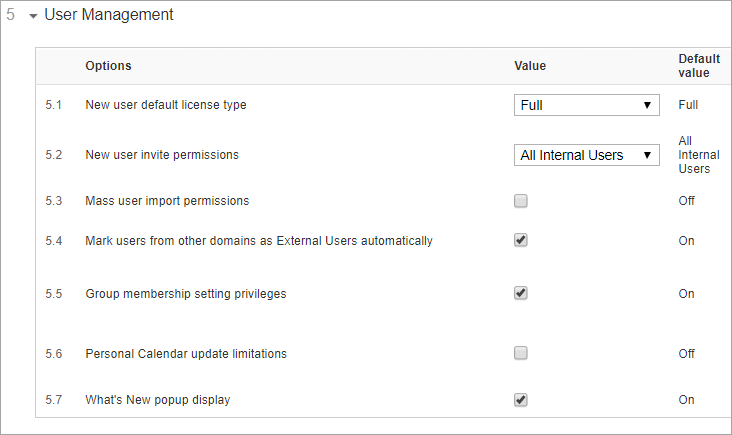
5.1 New user default license type
Defines the default license type for new users when sending an invite.
The value defined in the New user default license type setting is set as the default User Type in the 'Invite New Users' dialog for every new user invited to join the organization in AdaptiveWork.
To change this value manually for a specific user, open the 'Invite New Users' dialog box in 'Advanced' mode.
The default value is 'Full'.
5.2 New user invite permissions
The New user invite permissions setting defines who has the ability to invite new users into the organization on the AdaptiveWork network, all Internal Users can invite a new users, this can be limited to Admin only, Admin and Super Users, or increased to allow invites by External Users.
The options includes: All Internal users, Admin Only or Admin and Super Users.
The default value is 'All Internal Users'.
5.3 Mass user import permissions
AdaptiveWork allows Admin Users you to add multiple new users, the Mass user import permissions option allows non Admin users to use this option as well
The default value is 'Off'.
5.4 Mark users from other domains as External Users automatically
For added security, new users added with an email from a different domain to that of the Organization will be automatically marked as External Users, this behavior can be disabled using this setting and can be edited on a user level as needed.
The Organization email domain is defined in the Organization settings.
The default value is 'On'.
5.5 Group membership setting privileges
Defines whether User Group association can be defined by the actual user or only by Admins and a Group's Direct Manager.
When enabled:
- Users can add themselves to a user group, unless restricted by a profile
- Users cannot add other users to a user group
- Group Managers and Admins can add users to user groups
The default value is 'On'.
5.6 Personal Calendar update limitations
Define who is able to update the user's personal calendar.
When the Personal Calendar update limitations setting is enabled, individual users are prevented from updating their personal calendars.
Managers (both direct and indirect), Admin users (and Super Users) will be the only users allowed to update the resources' personal calendars.
Users that are unassigned to a manager will be considered as managers and therefor will be able to update their own calendar.
The default value is 'Off'.
5.7 What’s New popup display
Defines whether the What’s New popup will be displayed whenever a new release has been implemented, if disabled the popup is accessible from the Show Me menu.
The default value is 'Enabled'.
Once the settings are defined, click located below and to the right of the System Settings screen.
6. Files and Collaboration
_______________________________________________________________________________________________________
6. Files and Collaboration
This section defines various behaviors associated with the way the system manages files as well as various collaboration behaviours and includes the following settings:
6.2 Enable Chat [deprecated]
6.3 Enable Likes
6.6 Enable Digital Proofing external collaboration
6.8 Link attachments to objects
6.9 Allow user to set Auto Lock Proof
6.10 Allow linking to external storage
6.11 Allow direct access to files from Discussion emails
6.12 Additional Unsupported File Types
6.13 Enable SharePoint bi-directional sync.
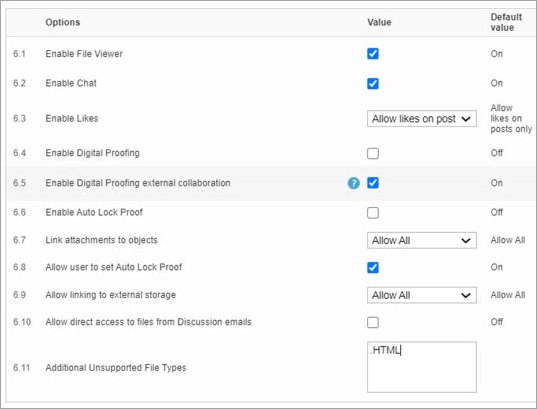
6.1 Enable File Viewer
Enabling the File Viewer module allows you to view certain file types which require third party applications such as Word documents, PowerPoint presentation, PDF files, etc..
The default value is set to ‘On’.
6.2 Enable Chat [deprecated]
Enabling the Chat module activates the chat capability for users within the organization.
The default value is ‘On’.
6.3 Enable Likes
Enabling the Likes module allows users to mark Items in the system as 'Like' and view 'Like' counters in the organization.
The default value is ‘On’.
6.4 Enable Digital Proofing
Select the Enable Digital Proofing option to enable digital proofing capabilities.
Note:
Disabling the Digital Proofing will stop all active proof processes!
The default value is ‘Off’ unless Digital proofing was installed.
6.5 Digital Proofing Type
Use this setting to define which Digital Proofing integration is used in the organization:
- ProofHQ
- ZiFlow
The default value is 'ZiFlow'.
6.6 Enable Digital Proofing external collaboration
Enabling this option will generate a Digital Proof email that allows both AdaptiveWork users and external collaborators to access the file for proofing.
When disabled, creation and update of proofs will not generate an automatic email and proof review & approval will only be available to AdaptiveWork users.
The default value is set to ‘On’.
6.7 Enable Auto Lock Proof
Enabling this setting allows the proof to be automatically locked once all decisions have been made.
The default value is set to 'Off'.
6.8 Link attachments to objects
AdaptiveWork allows you to upload links, shortcuts to networked files, and actual files, to be viewed in and attached to relevant cases, projects, resources etc.
The Link attachments to objects setting defines what of the various options is enabled:
- Allow All – All upload options are available
- Allow upload of files – Enables you to upload various files in accordance with the system limitations (see File Types, Storage Capacity and Adding Files for more information). you will not be able to attach shortcuts to networked files.
- None – Files can only be linked via external web based storage sites or website links.
Note:
In all of the options, files can be linked via external web based storage sites or website links depending on the setting defined in the Allow Linking of Google Docs and Box.com option.
The default value is 'Allow All'.
6.9 Allow user to set Auto Lock Proof
Enabling this setting allows user to control the auto lock proof.
The default value is set to 'On'.
6.10 Allow linking to external storage
AdaptiveWork allows you to link files via external web based storage sites and attach them to relevant cases, projects, resources etc.
The Allow Linking to external storage setting defines what of the various options is enabled:
- Allow All – Allows files to be linked via Google Docs and Box.com
- Google Docs – Allows files to be linked via Google Docs
- Box – Allows files to be linked via Box.com
- None – Prevents files from being linked to external storage sites
The default value is 'Allow All'.
6.11 Allow direct access to files from Discussion emails
AdaptiveWork allows you to define whether or not files related to a discussion email can be viewed without accessing the AdaptiveWork app.
Enable the Allow direct access to files from discussion email option to allow access or download of related files directly from a discussion email without having the need to login to AdaptiveWork
The default value is 'Off'.
Once the settings are defined, click located below and to the right of the System Settings screen.
6.12 Additional Unsupported File Types
Add more unsupported file types to block when uploading files to AdaptiveWork. This can be used when new security requirements arise. Block file types such as HTML, which can include scripts with malicious code.
The default file type extensions that are blocked are:
.exe, .scr, .bat, .com, .vbs, .js, .vb, .cmd, .reg, .hta, .iso, .encrypted-rar, .lnk, .mdb, .torrent, .wri, .msi
To block additional file types, add the file extensions, separated by commas.
6.13 Enable SharePoint bi-directional sync.
Enable this feature to allow collaborating on files in a folder or Site Collection on the default integration path.
Files added to folders outside of AdaptiveWork (from Microsoft Teams) can now be automatically added and linked to the Work Item.
The default is 'Off'.
7. Work Management Settings
_______________________________________________________________________________________________________
7. Work Management Settings
This section defines the various settings defining work management behavior and includes the following options:
7.3 Timesheet Reportable Work Items Manual Mode (New item report policy)
7.4 Parent item reschedule notification
7.5 Automatic calculation of percent complete based on efforts
7.6 Actual effort updated from timesheet
7.7 Actual end date calculation
7.8 Expense roll-up
7.10 Calculate consecutive working hours
7.11 Dependencies based on selection order
7.13 Items to display in Show current project's items filter for dependencies
7.14 Access Change History from Projects
7.15 Enable Advanced Export Work Plan
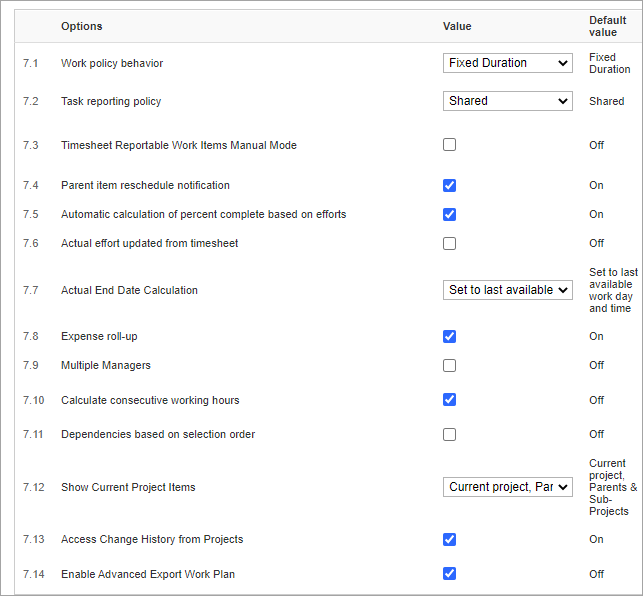
7.1 Work policy behavior
The Work policy behavior option defines the way the work plan policy is implemented in the system.
The option selected remains fixed while the remaining two are calculated by AdaptiveWork:
- Fixed Work
- Fixed Duration
- Fixed Units
The default value is 'Fixed Duration'.
For more information, click here.
7.2 Task Reporting Policy
Define the Task reporting policy setting to define how task Reporting is calculated; per individual resource or shared for all of the task's resource pool.
The value selected remains the default setting used for all new AdaptiveWork projects.
The default value is 'Shared'.
7.3 Timesheet Reportable Work Items Manual Mode (New item report policy)
Define whether you want to manually indicate when a new leaf work item is available for timesheet reporting (that is, "Reportable"). The "Reportable" flag can still be manually set per Work Item.
If set to "On" (Manual Mode), you must set work items manually to "Reportable" to make them available for timesheet reporting.
If set to "Off" (Automatic Mode), new work items are set to reportable by default and will automatically be available for timesheet reporting.
The default value is 'Off'.
WARNING: Changing this setting also changes the "Reportable" settings on existing work items that have not been manually set (including those in a Completed state) and may trigger other calculations, potentially on a large number of items.
7.4 Parent item reschedule notification
Defines whether the rescheduling options window is displayed when rescheduling a parent item that has manually set Sub-Items.
The default value is 'On'.
7.5 Automatic calculation of percent complete based on efforts
Defines whether the system will continue to calculate % complete using actual effort and remaining effort.
If disabled, % complete will be updated either manually or as a result of the work items under the task.
The default value is 'On'.
7.6 Actual effort updated from timesheet
Specify whether or not to activate automatic Actual Effort calculation based on Timesheet entries for new Projects.
This setting defines the default for new Projects.
Enable the Actual effort updated from timesheet option to activate automatic calculation of Actual Effort based on Timesheet entries for new Projects.
The default value is 'Off'.
7.7 Actual end date calculation
Project end date calculation can be performed automatically.
The Actual end date calculation setting defines if and how automatic calculation is performed.
- Don't automatically calculate – Requires you to manually set the Actual End Date
- Set to last available work day and time – Automatically calculates the last work day and time based on the item's projected work
- Set to current date and time – Defines the Actual End Date as the current date and time
The default value is 'Set to last available work day and time'.
7.8 Expense roll-up
In order to better manage a project, AdaptiveWork allows expenses incurred to be added to the costs of work items or projects.
Enable the Expense roll-up setting to add the cost of expenses incurred to the costs of work items or projects.
The default value is 'On'.
Once the settings are defined, click located below and to the right of the System Settings screen.
7.9 Multiple managers
This property enables the Multiple Manager functionality which allows adding one or more Manager to a project or a work item.
By default, the property is turned off.
For more information about the functionality and additional configuration, refer to Multiple Managers for projects and Work Items.
7.10 Calculate consecutive working hours
When this setting is enabled, setting duration as either consecutive days, weeks or months - the hours for each day during the period will be taken from the calendar settings in accordance to the working hours set per day.
When this setting is not enabled, hours will be taken as the default working hours in a day as set in the organization calendar setting.
The default value is set to 'Off'.
7.11 Dependencies based on selection order
The Dependencies based on selection order setting defines the order in which dependences are created between work items in the work plan.
For more information about the functionality and additional configuration, refer to Dependencies based on selection order.
The default is 'Off'.
7.12 Update Forecast default
This settings allows to set the default option for Update Forecast command:
- Retain full work estimate - Keep manually-set assignments
- Retain full work estimate - Ignore manually-set assignments
- Use future planned work only - Keep manually-set assignments
- Use future planned work only - Ignore manually-set assignments
The default value is 'Use future planned work only - Keep manually-set assignments'.
7.13 Items to display in Show current project items filter for dependencies
When adding predecessors or successors, a picker filter 'Show current Project's items' lets you display items only in the current Project. Choose to show only items in the current project, or those in the current project and its parents and sub-Projects.
The default is 'Current project, Parents & Sub-Projects'.
7.14 Access Change History from Projects
Enabling the setting provides access to historic events (Change History) from the Project, for users with Edit permissions (Project Manager, Owner, etc.).
The default is 'Off'.
7.15 Enable Advanced Export Work Plan
Enables the option to import new Work Item structures into Projects including simple dependencies. When enabled, users get an option for simple Download which exports all fields in the Work Plan view, and an option to download for re-Import which adds the ID, parent and parent ID fields to use more advanced import features. See Importing and Updating Data Using MS Excel.
The default is 'Off'.
8. Resource Management
_______________________________________________________________________________________________________
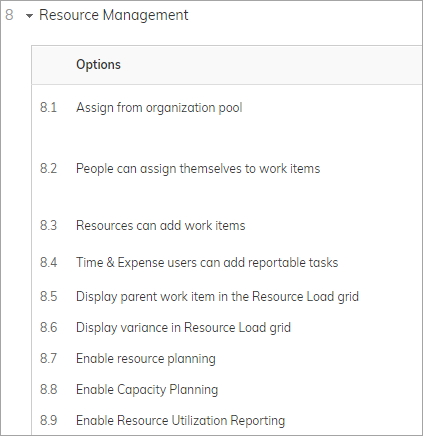
8. Resource Management
This section defines various settings regarding the way resources are handled in the system and includes the following topics:
8.1 Assign from organization pool
8.2 People can assign themselves to work items
8.3 Resources can add work items
8.4 Time & Expense users can add reportable tasks
8.5 Display parent work item in the Resource Load grid
8.6 Display variance in Resource Load grid
8.9 Enable Resource Utilization Reporting
8.10 Enable Placeholder Resources
8.11 Resource Utilization Based on Work Item Financial Time Frame
8.1 Assign from organization pool
Resources are divided into two lists, the entire organization resource list and a project based resource list, both types of lists are available in the Resource Tab and individual resources can be assigned to projects from there.
During the creation of a project, managers can access the resource pool from the Project tree, for easy assignment of resources to the project.
Enabling the Assign from organization pool option provides managers with the ability to access their organization's entire Resource List directly within the project tree. When disabled, managers will only have access to the project resource pool.
The default value is 'On'.
8.2 People can assign themselves to work items
Define if and how people can assign themselves to work items created by others anywhere in the system. If the work item is reportable, they will be able to report time for work performed.
The options are:
- Assigns the resource and splits the work
- Assigns the resource with 0 units – 0 units will only be applied when assigned from Time Tracking or when creating a new Time Entry, otherwise the work will be split equally
- Don't Allow
The default value is 'Assign resource and split work'.
8.3 Resources can add work items
When creating a project you can define how much flexibility resources assigned to a task have when creating work items.
Define the Resources can add work items permission level:
- Allow – Enables resources to create any type of sub-task; Projects, Tasks, and Milestones under the project for which he is defined as a resource
- Allow under Tasks – Enables resources to create sub-tasks and milestones under a task for which he is defined as a resource
- Allow under Tasks & Milestones – Enables resources to create sub-tasks under a task or milestone for which he is defined as a resource
- Do not Allow – Does not allow resources to create sub-tasks at all
The default value is 'Allow'.
8.4 Time & Expense users can add reportable tasks
Defines the permission level of Time & Expense users for the creation of new reportable tasks.
There are three available options:
- All (DEFAULT) – allow time and expense users to create new reportable tasks.
- To Do List – allow time and expense users to create only to do list tasks
- None – do not allow creation of new reportable tasks by time and expense users
The default value is 'All'.
8.5 Display parent work item in the Resource Load grid
Defines whether to display parent work items in the Resource Load grid.
To display the parent work item in the Resource Load display grid enable the Display parent work item in the Resource Load grid setting.
The default value is 'Off'.
8.6 Display variance in Resource Load grid
Defines whether to display variance when viewing the Resource Load by remaining effort.
Enable the Display variance in Resource Load grid to show variance (resource load conflicts) when displaying the Resource Remaining Effort.
The default value is 'Off'.
8.7 Enable Resource Planning
Enables the time-phased resource planning for determining project assignment per resource per time frame in Projects and Tasks.
The default is 'On'.
8.8 Enable Capacity Planning
Enables the Capacity Planning module for Resource Managers to plan and optimize staffing on Projects. Click here to learn more.
The default is 'Off'.
8.9 Enable Resource Utilization Reporting
Enable this option to create time-phased resource utilization reports.
Note: After enabling the setting, it can take up to 24 hours until Resource Utilization data becomes available in reports.
The default value is ‘Off’
8.10 Enable Placeholder Resources
Allows assigning job titles or groups members as resources to tasks. Learn more.
The default is 'Off'.
8.11 Resource Utilization Based on Work Item Financial Time Frame
Use the project's Financial Start and End dates as range limits, when generating Resource Utilization time-phased data. This setting is not relevant when the 'Enable Resource Utilization Reporting' setting (8.9) is disabled. Learn more.
The default is 'Off'.
9. Budget Management
_______________________________________________________________________________________________________
9. Budget Management
This section defines the various settings defining Budget settings and includes the following options:
9.2 Auto calculate budget using progress and resource rates
9.3 Projects are Billable by Default
9.4 Recalculate revenue and cost for completed work items
9.6 Enable Date Effective Rates
9.9 Enable Currency Exchange Rate Cards

9.1 Enable budget management
Enabling the Budget module, allows you to manage the project's budgeted and actual cost.
The default value is ‘On’.
9.2 Auto calculate budget using progress and resource Rates
When enabled, a work item’s actual cost is calculated as a function of its progress and resource rates.
The default value is ‘On’.
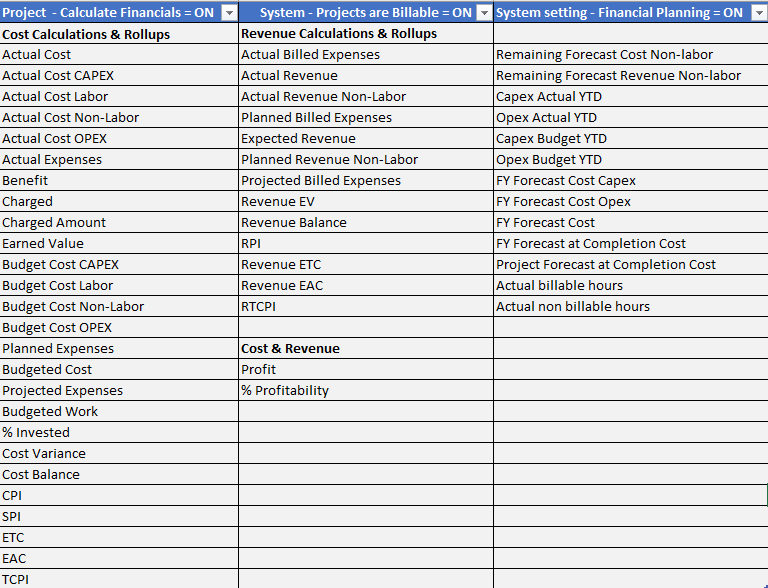
9.3 Projects are Billable by Default
Defines whether revenues and other financials are calculated by default for Projects. For each Project you can enable or disable financials.
The default value is ‘Off’.
The following table shows which fields are calculated for each of the fields (this setting, the Project-level setting, and the Financial Planning setting).
9.4 Recalculate revenue and cost for completed work items
When enabled, AdaptiveWork recalculates revenue and cost fields automatically for completed work items.
The default value is ‘Off’.
9.5 Enable Financial Planning
When enabled, will add the Non-Labor Resource object into AdaptiveWork allowing you to do time phase project financial planning.
The default value is ‘Off’.
Once this feature has been turned on, it cannot be turned off.
Once the settings are defined, click located below and to the right of the System Settings screen.
9.6 Enable Date Effective Rates
Defines whether Cost and Billing rates for organization, job title, user and project levels have date effectivity. Once this feature has been turned on it cannot be turned off.
For more information, click here.
The default is 'Off'.
9.7 Enable Rate Cards
Enables Customer Rate Cards for managing Job Title Billing Rates for billable Projects.
For more information, click here.
The default is 'Off'.
9.8 Enable multi-currency
Enabling the Multi Currency Support activates support of multi-currency in the organization and at the project level.
Once this feature has been turned on, it cannot be turned off.
This feature needs to be enabled in order to define currencies in the Global settings.
The default value is set to ‘Off’
For more on multi-currency support, click here.
10. Emails
_______________________________________________________________________________________________________
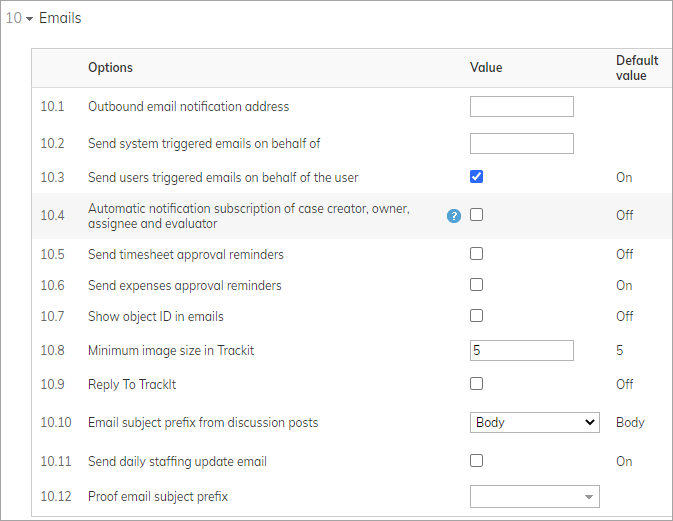
10. Emails
This section defines various email related organization behavior and includes the following settings:
10.1 Outbound email notification address
10.2 Send system triggered emails on behalf of
10.3 Send users triggered emails on behalf of the users
10.4 Automatic notification subscription of case creator, owner, assignee and evaluator
10.5 Send timesheet approval reminders
10.6 Send expense approval reminders
10.8 Minimum image size in TrackIt
10.9 Reply to TrackIt
10.10 Email subject prefix from discussion posts
10.11 Send daily staffing update email
10.12 Proof email subject prefix
10.1 Outbound email notification address
Define the Outbound email notification address to be added to the BCC field of all emails sent from AdaptiveWork.
This enables the Trackit feature which helps trace all email communication.
The default value is 'blank'.
10.2 Send system triggered emails on behalf of
Define the default sender for AdaptiveWork system triggered emails (Progress Update, Time Tracking Reminders, Daily Notifications, Project Management Alerts)
The default value is 'blank'.
Please see 'Note' below.
10.3 Send users triggered emails on behalf of the users
Users can trigger system emails to be sent from the system, (e.g, update requests) enabling the Send users triggered emails on behalf of the users option allows the administrator to determine whether each email should be sent on behalf of the Initiator or on behalf of the AdaptiveWork system.
The default value is 'On'.
Note:
Some systems include spam blocking mechanisms that detect and block ‘on behalf of’ email.
To prevent this, you may add AdaptiveWork's IP or range of IPs to your organization’s white listing where system@clarizen.com mail is sent from.
- Click here for Cloud security services IP ranges.
- AdaptiveWork Data Center IPs:
- Primary site – 63.150.165.250
- Secondary site – 74.201.126.165
10.4 Automatic notification subscription of case creator, owner, assignee and evaluator
Users associated with a case, Creator, Owner, Assignee and Evaluator , can be automatically notified of any change to the case, events such as ‘State changed’, ‘Assignment changed’ and `My Assignment’.
Select the Automatic notification subscription of case creator, owner, assignee and evaluator option to assign automatic notification.
You can Manually set case notification for each individual user in the Cases module.
The default value is 'Off'.
10.5 Send timesheet approval reminders
Define whether or not the system will send approval reminders for timesheets awaiting approval
Enable the Send timesheets approval reminders option to send notifications to Approvers for Timesheets awaiting approval.
The default value is 'Off'.
10.6 Send expense approval reminders
AdaptiveWork automatically sends expense approval reminder emails to the user's manager(s), and notifies the user once his expense sheet has been approved.
Disable the Send expenses approval reminders setting to prevent all expense notifications. Expenses awaiting approval are not sent to the approver, nor are notifications sent to the submitter that Expense Sheets have been approved.
The default value is 'On'.
10.7 Show object ID in emails
Enabling the Show object ID in emails option will display a column that includes the object ID on the Quick Update form, opened from within Progress Report emails.
The default value is 'Off'.
10.8 Minimum image size in Trackit
Trackit helps trace all email communication, in order to prevent the automatic addition of signatures to the emails sent by the system, define the signature's file size (in kilobytes) in the Minimum image size in Trackit setting.
The default value is '5'.
Once the settings are defined, click located below and to the right of the System Settings screen.
10.9 Reply to TrackIt
By default, the setting is not enabled. When enabled, if you receive an email from AdaptiveWork (for example, an update on a case), you can use Reply instead of Reply All to respond back to AdaptiveWork. The email you send using Reply appears in the Emails panels for the related object.
10.10 Email subject prefix from discussion posts
Defines the prefix of the email subject line. When the “[ID] [Object name] Body” option is selected for objects that don’t have an ID, such as Discussion Groups or People, the subject line prefix will display “[Object name] Body”. Body is the first line of text in the discussion post.
10.11 Send daily staffing update email
Defines whether to send daily staffing notification emails to Project and Resource Managers. Emails include updates to staffing requests. The same setting can be found in user settings, to enable or disable notifications for individual users.
10.12 Proof email subject prefix
Select AdaptiveWork data to be appended to the subject of a proof creation email. Click here to learn more.
11. InterAct
_______________________________________________________________________________________________________
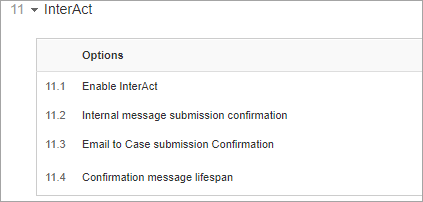
11. InterAct
Define the email InterAct messaging behavior.
11.1 Enable InterAct
11.2 Internal message submission confirmation
11.3 Email to Case submission Confirmation
11.4 Confirmation message lifespan
Additional settings for the InterAct module are required and are found in the InterAct Settings chapter.
11.1 Enable InterAct
Enabling the InterAct module activates the InterAct functionality in the organization.
The default value is ‘On’.
11.2 Internal message submission confirmation
To help the struggle against spoofing, sending messages by licensed users using InterAct requires authentication in the form of a confirmation message for each email sent to InterAct.
You can eliminate the confirmation message to improve user experience by disabling the Internal message submission confirmation option.
The default value is 'On'.
11.3 Email to Case submission Confirmation
The InterAct Module enables users outside of the organization to issue cases to AdaptiveWork directly from their email.
In order to improve the user experience of the customer sending the case confirmation messages are not required by default, however if at any time, you wish to improve security and prevent spoofing, you can enable the Email to Case submission Confirmation option, so that external users receive a submission confirmation message for each email sent to InterAct.
The default value is 'Off'.
11.4 Confirmation message lifespan
The Confirmation message lifespan field defines how many days Confirmation Message Emails remain in the AdaptiveWork system before automatically expiring.
The default value is '1'.
Once the settings are defined, click located below and to the right of the System Settings screen.
12. Progress Report
_______________________________________________________________________________________________________
12. Progress Report
This section defines the progress reporting policy and includes the following options:
12.1 Progress reporting
12.2 Actual dates can be reported directly from email progress report
12.3 Allow 'Are you on track?' updating of all active tasks
12.4 Actual and remaining effort reporting
12.5 Percent completion reporting
12.6 Expected percentage progress
12.7 Include only executable tasks in scheduled emails
12.8 Progress Email - preferred hour
Send progress reminder email - preferred day(s)
12.9 Send progress reminder email on Monday
12.10 Send progress reminder email on Tuesday
12.11 Send progress reminder email on Wednesday
12.12 Send progress reminder email on Thursday
12.13 Send progress reminder email on Friday
12.14 Send progress reminder email on Saturday
12.15 Send progress reminder email on Sunday
12.16 Progress report email expiration
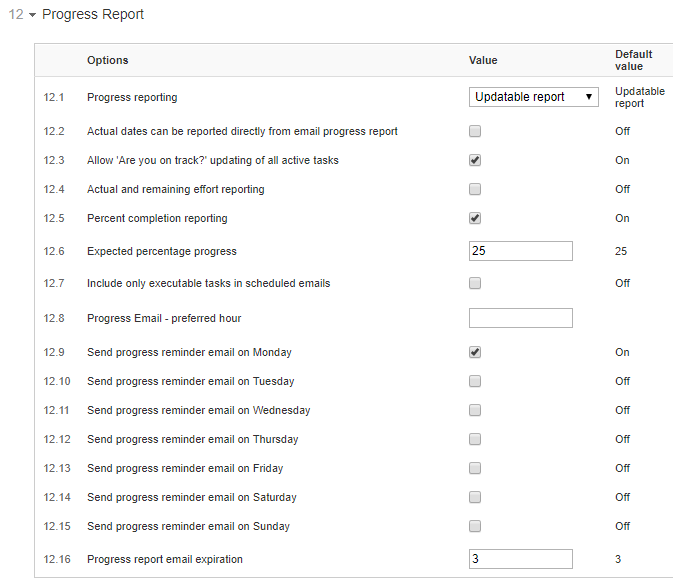
12.1 Progress Reporting
Define if and how Progress Reporting emails is available in the system.
Set the Progress Reporting setting, the options include:
- None – When Selected does not send out progress report emails
- Send Reminder – When Selected progress report emails will be sent according to the defined schedule reminding users to update their progress
- Update-able Report – When Selected progress report emails will be sent according to the defined schedule with an update form and links embedded in the email based on the email definitions selected.
The default value is 'Update-able Report'.
Note: You can override these settings on the Project level.
12.2 Actual dates can be reported directly from email progress report
The system sends automatic or user generated Progress Report emails, the content of the email includes a link to a form reporting progress, this option defines whether or not actual completion date is reportable.
Enabling the Actual dates can be reported directly from email progress report option includes the 'Actual Start Date' and 'Actual End Date' columns in the Quick Update form which is accessed from the Progress Report emails.
The default value is 'Off'.
12.3 Allow 'Are you on track?' updating of all active tasks
The automatic or user generated Progress Report email can include a link which when clicked matches the expected progress with the current progress for all active tasks.
Turn the One click progress reporting on all active tasks option on to allow Users to match their 'Current Progress' with the 'Expected' for all active Tasks with one click on the link added to the Email Progress Report Request.
The default value is 'Off'.
12.4 Actual and remaining effort reporting
Enabling the Actual and remaining effort reporting option includes the 'Actual Effort' and 'Remaining Effort' columns in the Quick Update form which is accessed from the Progress Report emails.
The default value is 'Off'.
12.5 Percent completion reporting
Enabling the Percent completion reporting option includes the '% Completed' column in the Quick Update form which is accessed from the Progress Report emails.
The default value is 'On'.
12.6 Expected percentage progress
Define the Task's expected progress interval between periodic reporting (in percents), Whatever the threshold is set to it increases by the same increment for each 'reporting period', for a progress report scheduled for twice a week with a 25% trigger the system will look for an update of 50% on the second email, 75% the next and so on.
The value entered affects the One-Click Progress Reporting on All Active Tasks setting.
For example, the progress report was scheduled for twice a week on Monday and Friday, with a 25% trigger value. You have a task scheduled for 100 work hours, on the Monday email the report is looking for at least 25h of actual effort, If the resource has reported less than 25h, the task will appear in the periodic report email, however if they reported 25h or more the task is excluded from the email. On Friday the expected actual effort will be 50 or more hours, once again if the expected effort was not reached the task will be included in the mail but if 50 hours or more were reported, the task will be excluded from the progress report email.
Type the interval value (percents) in the Expected percentage progress field.
The default value is '25'.
12.7 Include only executable tasks in scheduled emails
Some tasks have dependencies, if the dependency tasks are not completed, the task is not executable.
Enabling the Include only executable tasks in scheduled emails setting displays only active items for executable tasks.
The default value is 'Off'.
12.8 Progress Email - preferred hour
Define the preferred time of day time to send the email reporting email, type the desired hour in the Progress Email - preferred hour field.
Enter whole hour values from 00:00 to 23:00. If left empty or an invalid value is entered (for example 25:00), the system will revert to the default time.
The default value is '02:00'.
Send progress reminder email - preferred day(s)
Select the day(s) on which the Progress Reporting Email will be sent out.
The default value for all of the days is 'Off' except for Monday.
12.9 Select Send progress reminder email on Monday to send an email notification on Task progress each Monday.
12.10 Select Send progress reminder email on Tuesday to send an email notification on Task progress each Tuesday.
12.11 Select Send progress reminder email on Wednesday to send an email notification on Task progress each Wednesday.
12.12 Select Send progress reminder email on Thursday to send an email notification on Task progress each Thursday.
12.13 Select Send progress reminder email on Friday to send an email notification on Task progress each Friday.
12.14 Select Send progress reminder email on Saturday to send an email notification on Task progress each Saturday.
12.15 Select Send progress reminder email on Sunday to send an email notification on Task progress each Sunday.
Once the settings are defined, click located below and to the right of the System Settings screen.
12.16 Progress report email expiration
Define the completion report's lifespan in work days in the Progress report email expiration field.
After the Defined number of work days the if the progress report was not filled, the Progress Report email will expire and be deleted from the system.
The default value is '3'.
Once the settings are defined, click located below and to the right of the System Settings screen.
13. Time Tracking
_______________________________________________________________________________________________________
13. Time Tracking
This section defines the way the system tracks work as well as other time tracking report settings and includes the following options:
13.1 Timesheet Reporters can Self-Approve
13.2 Time reporting on future work items
13.3 Time reporting on Completed work items
13.4 Time reporting on Requested work items
13.5 Time reporting on Draft work items
13.6 Time reporting on work items marked On Hold
13.9 Timesheet Actuals Recognition Date
13.10 Approval flow
13.11 Include leaf milestones and projects
13.12 Direct managers can approve timesheets
13.13 Project managers can approve timesheets
13.14 Resource Managers can approve timesheets
13.15 Resource can reopen or delete approved timesheets
Send Timesheet update reminder email - preferred day(s):
13.16 Send Timesheet update reminder email on Monday
13.17 Send Timesheet update reminder email on Tuesday
13.18 Send Timesheet update reminder email on Wednesday
13.19 Send Timesheet update reminder email on Thursday
13.20 Send Timesheet update reminder email on Friday
13.21 Send Timesheet update reminder email on Saturday
13.22 Send Timesheet update reminder email on Sunday
13.1 Timesheet Reporters can Self-Approve
Can be used to disable self-approval for timesheets. This is so users (typically Project Managers reporting time on their own projects) can not approve timesheets they have reported for themselves.
When enabled, Superusers can still approve any timesheets including their own.
When disabled, a user's Direct Manager, Resource Manager or Super User should approve users' timesheets.
The default is 'On'.
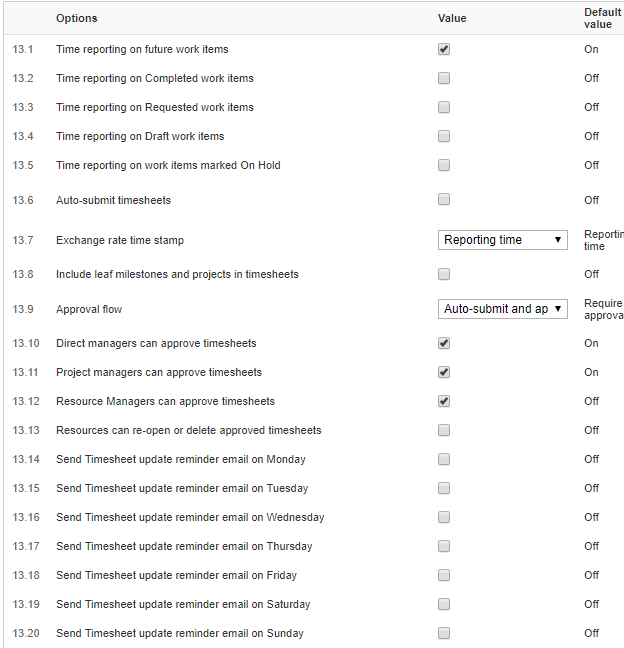
13.2 Time reporting on future work items
Specify whether or not to allow reporting work not performed yet.
Enabling the Time reporting on future work items option, allows users to report work hours on future Work Items that had not started yet.
The default value is 'On'.
13.3 Time reporting on Completed work items
Specify whether or not users can report work hours on work items already marked as completed.
Enable the Time reporting on Completed work items option to allow reporting of work hours on Completed work items.
The default value is 'Off'.
13.4 Time reporting on Requested work items
Specify whether or not users can report work hours on work items that are marked as requested.
Enabling the Time reporting on Requested work items option to allow reporting of work hours on Requested work items.
The default value is 'Off'.
13.5 Time reporting on Draft work items
Specify whether or not users can report work hours on work items defined as Draft.
Enable the Time reporting on Draft work items option to allow reporting of work hours on Work Items defined as draft.
The default value is 'Off'.
13.6 Time reporting on work items marked On Hold
Specify whether or not users can report work hours on work items marked as "On Hold".
Enable the Time reporting on work items marked On Hold option to allow reporting of work hours associated with Work Items marked as On Hold.
The default value is 'Off'.
13.7 Auto-submit timesheets
Specify whether or not to activate automatic submission of time entries at the organizational level. Each individual has the ability to override this setting for themselves in the user's Timesheet module setting.
Enabling the Auto-submit timesheets option, will allow users to automatically submit time entries whenever an entry is made by people in the organization.
Note:
This setting is not relevant when the Approval Flow option is set to Auto submit and approve
The default value is 'Off'.
13.8 Exchange rate time stamp
Indicates what time stamp should be used for the exchange rates selection.
The Exchange rate time stamp option has two available values:
- Reporting Time (DEFAULT) – The date of the exchange rate is based on the time the timesheet entry was made
- Approval Time – The date of the exchange rate is based on the time the timesheet entry was approved
The default value is 'Reporting Time'.
13.9 Timesheet Actuals Recognition Date
This settings allows to define which date period shall be used for cost and/or revenue recognition purposes.
The Timesheet Actuals Recognition Date has two available options:
- Reported Date
- Approval Date
The default value is 'Reported Date'.
13.10 Approval flow
There are three Timesheet approval process options:
- Require approval (DEFAULT) – requires both submission and approval of time entries, financial calculations will be based only on approved hours.
- Require only submit – time entries are automatically approved, only submission is required to initiate financial calculations
- Auto submit & approve – once entered, time entries are automatically added to the work item efforts. This option enables updating of time entries at any time without requiring you or your manager to Reopen a Timesheet.
The default value is 'Requires approval'.
13.11 Include leaf milestones and projects
The Include leaf milestones and projects determines whether to include standalone milestones and projects.
Enable the option to include milestones and projects with no Sub-Work Items (such as Sub-Tasks) in Timesheets.
The default value is 'Off'.
13.12 Direct managers can approve timesheets
The Direct managers can approve timesheets option determines whether or not direct managers can approve timesheets even if they are not defined as Financial, Admin or Super Users.
Enable to provide a User's direct manager with approval privileges for timesheets of subordinateness.
The default value is 'On'.
13.13 Project managers can approve timesheets
Define whether or not Project Managers and managers at the same level of the project manager can approve timesheets submitted by Users assigned to their projects
Enable the Project managers can approve timesheets option to allow approval by project managers.
The default value is 'On'.
13.14 Resource Managers can approve timesheets
Define whether or not Resource Managers can approve timesheets submitted by members of the Resource Manager's direct user groups and sub-groups.
The default value is 'Off'.
13.15 Resource can reopen or delete approved timesheets
Define whether or not resources are allowed to re-open or delete a timesheet which was already approved.
Enable the Resource can reopen or delete approved timesheets option to allow resources to manage approved Timesheets.
The default value is 'Off'.
Send Timesheet update reminder email - preferred day(s)
Select the day(s) on which the Update Timesheet Email will be sent out.
The default value for all of the days is 'Off'.
13.16 Select Send Timesheet update reminder email on Monday to send a reminder to update timesheets each Monday.
13.17 Select Send Timesheet update reminder email on Tuesday to send a reminder to update timesheets each Tuesday.
13.18 Select Send Timesheet update reminder email on Wednesday to send a reminder to update timesheets each Wednesday.
13.19 Select Send Timesheet update reminder email on Thursday to send a reminder to update timesheets each Thursday.
13.20 Select Send Timesheet update reminder email on Friday to send a reminder to update timesheets each Friday.
13.21 Select Send Timesheet update reminder email on Saturday to send a reminder to update timesheets each Saturday.
13.22 Select Send Timesheet update reminder email on Sunday to send a reminder to update timesheets each Sunday.
Once the settings are defined, click located below and to the right of the System Settings screen.
14. Expenses
_______________________________________________________________________________________________________
14. Expenses
Define the various expense sheet and expense approval settings.
For more on expense sheets click here
For more on expense approvals click here
The optional settings are:
14.1 Enable expense sheet approval process
14.2 Expense sheet approval by direct managers
14.3 Expense sheet approval by project managers
14.4 Expense sheet approval by financial users
14.5 Limited daily allowance for expenses
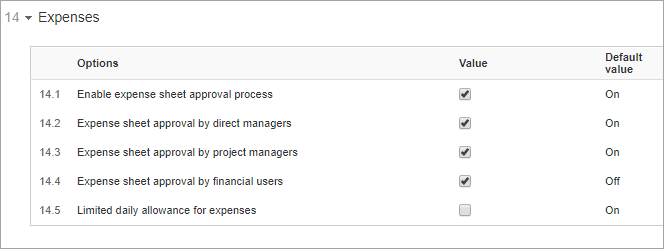
14.1 Enable expense sheet approval process
Only approved expenses are used for financial calculations.
When the Enable expense sheet approval process setting is enabled, users Expense Sheets are submitted for approval by a manager.
If left unchecked, once the expense sheet is submitted by the user it will automatically be marked as approved.
The default value is 'On'.
14.2 Expense sheet approval by direct managers
Note:
Requires that the Enable expense sheet approval process setting be enabled in order for it to take affect.
Enabling the Expense sheet approval by direct managers, gives the user's direct manager authorization to approve the user’s Expense Sheets.
When this option is not checked (and approval is necessary), either the users' task manager, project manager, or financial user will need to approve the expense sheet.
The default value is 'On'.
14.3 Expense sheet approval by project managers
Note:
Requires that the Enable expense sheet approval process setting be enabled in order for it to take affect.
In order to better manage a project, AdaptiveWork allows Project Managers to approve expense sheets associated to their project, when submitted by users assigned to the project.
Checking the Expense sheet approval by project managers setting enables project managers and managers associated to a project to approve Expense Sheets submitted by users assigned to their projects.
The default value is 'On'.
14.4 Expense sheet approval by financial users
Note:
Requires that the Enable expense sheet approval process setting be enabled in order for it to take affect.
Enabling the Expense sheet approval by financial users setting allows users with Financial Permissions to approve the Expense Sheets of all other users in the system.
The default value is 'Off'.
14.5 Limited daily allowance for expenses
When enabling the Limited daily allowance for expenses option, if a Per Diems Expense Category is selected in a daily expense sheet, only travel (such as ‘Airfare', 'Taxis', 'Local Transportation' and 'Train/Bus’) expense categories can be added for that day (in addition to the per diam expense).
For example, a user is traveling abroad on business in a company that has a limited daily allowance policy. When submitting his expense report he put in a per diem expense in his daily report, he then wishes to add an unexpected hotel expense and additional travel expenses. The travel expenses will be registered in the expense sheet, however when he will try to register the hotel expense he will receive an error stating that the expense category is not allowed.
The default value is 'On'.
Once all of the settings are defined, click located below and to the right of the System Settings screen.
15. Alerts
_______________________________________________________________________________________________________
15. Alerts
Define the various System Alert options:
15.1 License expiration notification
15.2 Alerts Super Users on new user creation
15.3 Suppress New User notification emails to Admin users
15.4 Alert Super Users on projects
15.5 Unassigned resource alert period (days)
15.6 Resolved alert display duration
15.7 Enable email alerts
15.8 Email alert repetition of high severity alerts
15.9 Email alert repetition of low severity alerts
15.10 Notify on dependency completion
15.11 New User Welcome Post
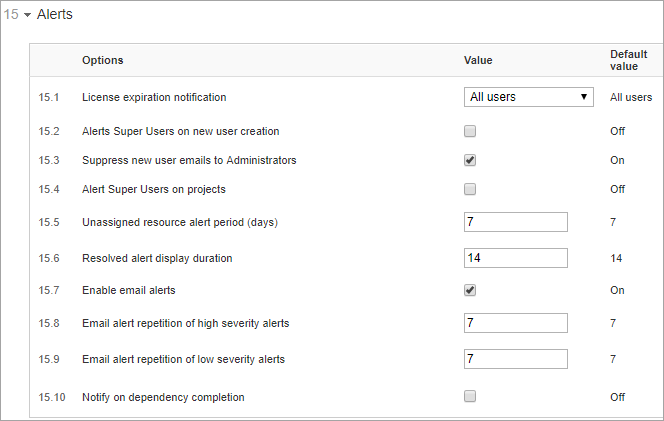
15.1 License expiration notification
Select who will be notified on impending license expiration from the License expiration notification list.
Notifications are displayed in the "Alerts" module and sent as emails.
When the "All Users" option is selected, each individual user will receive an alert regarding their own licensing status.
The default is set to 'All Users'
15.2 Alert Super Users on new user creation
Enabling the Alerts Super Users on new user creation field, sends a notifications to Super Users when new users are added to their organization.
The default value is ‘Off’.
15.3 Suppress New User notification emails to Admin users
When enabled, Administrators will not receive notifications whenever new Users are added to the Organization.
The default is 'On'.
15.4 Alert Super Users on Projects
Enabling the Alert Super Users on projects option results in the super user receiving alerts from all projects, including projects in which they have no role.
The default value is ‘Off’.
15.5 Unassigned resource alert period
Set the value of Unassigned resource alert period (days) in order to define the number of days a project manager receives Alerts prior to a task's scheduled Start Date if no resources have been assigned.
The default value is ‘7’.
15.6 Resolved alert display duration
The Resolved alert display duration field defines the number of days for which resolved alerts remain displayed in the related panels.
The default value is set to ‘14’.
15.7 Enable email alerts
Select Enable email alerts to enable email notification at the organization level. If set to off, Alerts email notifications are not sent to users.
The default value is ‘On’.
15.8 Email alert repetition of high severity alerts
Define the number of days high severity alert notification are repeated. Set the value (in days) in the Email alert repetition of high severity alerts field.
The default value is ‘7’.
15.9 Email alert repetition of low severity alerts
Define the number of days low severity alert notification are repeated. Set the value (in days) in the Email alert repetition of low severity alerts field.
The default value is ‘7’.
15.10 Notify on dependency completion
Enabling the Notify on dependency completion field generates an automatic email once work item dependency predecessors are completed, the email is sent to the work items' resources and their managers notifying them that it is possible to start working on the work item.
The default value is ‘Off’.
Once the settings are defined, click located below and to the right of the System Settings screen.
16. Mobile
_______________________________________________________________________________________________________
16. Mobile
Define the various mobile related settings:
16.2 Save mobile cache
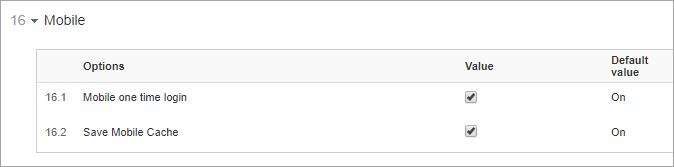
16.1 Mobile one time login
Defines whether to allow automatic re-login on the mobile app, disabling this setting will require the user to manually login every time he accesses the mobile app provided that the session was closed
The default value is ‘On’.
16.2 Save mobile cache
The mobile device can work in one of two ways; it can save data on the mobile’s Cache or receive all of the data from the network, without saving any data in the mobile device itself.
This setting defines whether to allow caching of the Mobile app in the mobile device.
The default value is ‘On’.
Once the setting is defined, click located below and to the right of the System Settings screen.
17. AdaptiveWork Labs
_______________________________________________________________________________________________________
17. AdaptiveWork Labs
You can directly enable beta previews of new features, as they become available, in the AdaptiveWork lab section of the system settings.
Define whether to opt-in to Beta preview releases of our newest features. Current lab options include:
17.1 Enable real time updates - Get automatic updates for items in the grid as they happen in real-time.
17.2 Project Utilization - Select to view the Resource Load with projects as the main objects, allowing you to view project resource utilization.
17.3 Enhanced Capacity Management