
Document Publisher
Document Publisher
This section describes the AdaptiveWork’s Document Publisher and includes the following sections:
Building your templates with the help of macros
Introduction
AdaptiveWork’s Document Publisher allows to dynamically create documents based on an item(s) data.
The document publisher works by uploading a template, that you can create using supplied macros,
and selecting the relevant items in AdaptiveWork from which you would like to gather data.
Flow view:

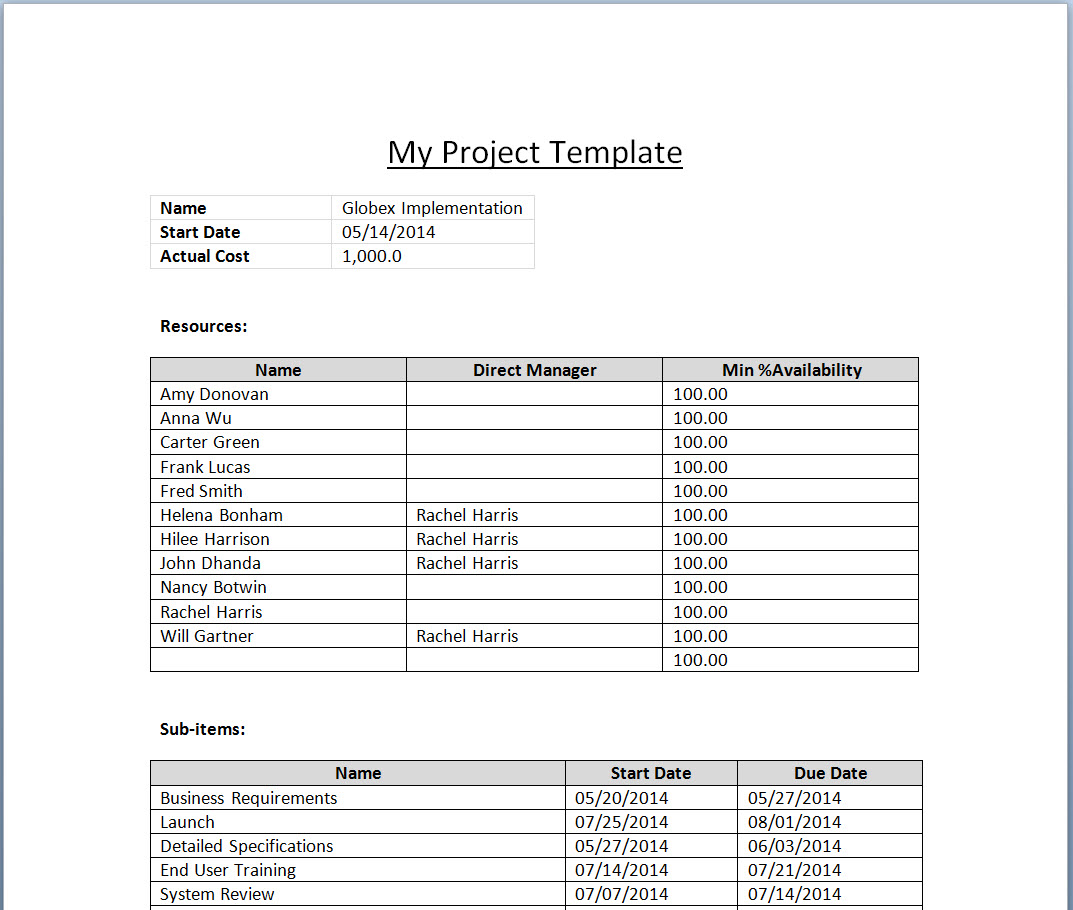
Template example:
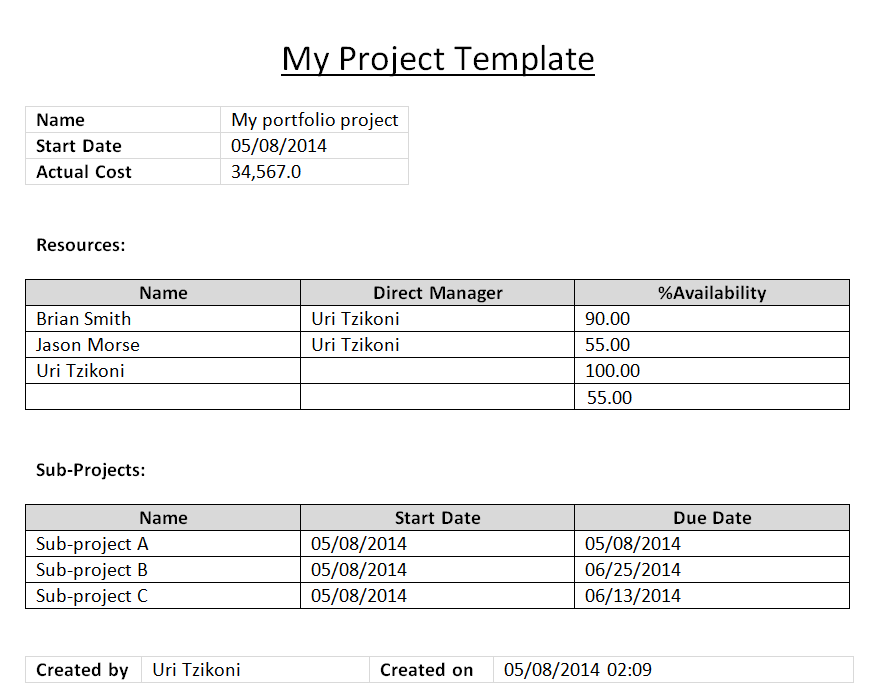
Output example:
Architecture
The process behind this feature is simple and robust:
- When an item is selected and the custom action is selected in the ribbon, a call is sent to AdaptiveWork's integration server with the user’s session id and other parameters, as set by the user
- The server then connects back to AdaptiveWork, fetches the relevant template along with the relevant data
- An Open XML component then reads the selected template, replaces the place-holders with the relevant data, downloads the document, and then uploads and attaches it back to the relevant item in AdaptiveWork
Any applications that support .docx formats (such as Microsoft Office Word, OpenOffice, LibreOffice, Abiword, Kingsoft Office, Jarte, etc.) can be used to create the templates and read the created output files. There are no read/write limitations under Windows, Linux, iOS and other operating systems.
Microsoft Office supports this format from Office 2007 and onward.
Macros that help in building templates are only available in Microsoft Office (see additional details below).
To learn more about the office Open XML and .docx/.docm format, please refer to this link:
Step by Step Guide
In order to start working, creating, and publishing documents based on templates, please follow the steps below:
- Install the “AdaptiveWork Document Publisher” app
The app includes all the relevant custom actions and business rules required to publish documents
- Create a template
Create your own customized template as detailed below. You can also download out of the box template samples and
AdaptiveWork’s MS Word file with macros to help build your own templates in the “resources section” of this document
- Upload the template into AdaptiveWork
Once your template is ready, upload it as a file to AdaptiveWork.
The item the file is attached to is not important, just ensure that it will be accessible by the relevant users. For instance,
if you want to make the template available to certain members of a group, upload the file onto the discussion group by clicking on “Add Related”
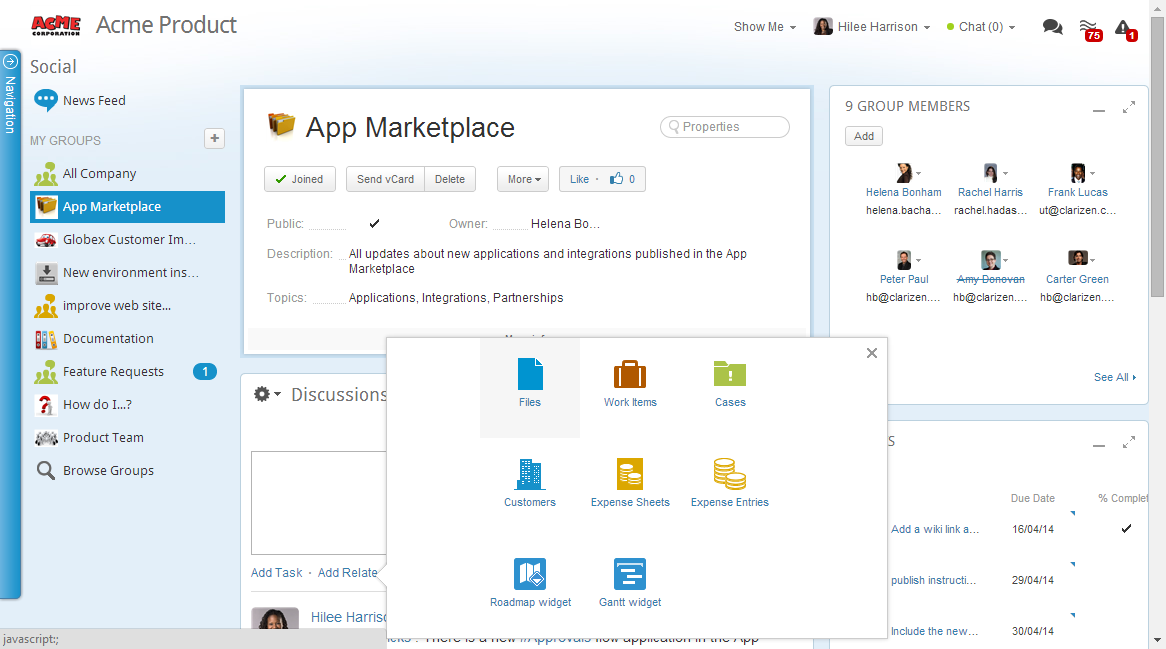
Now select file
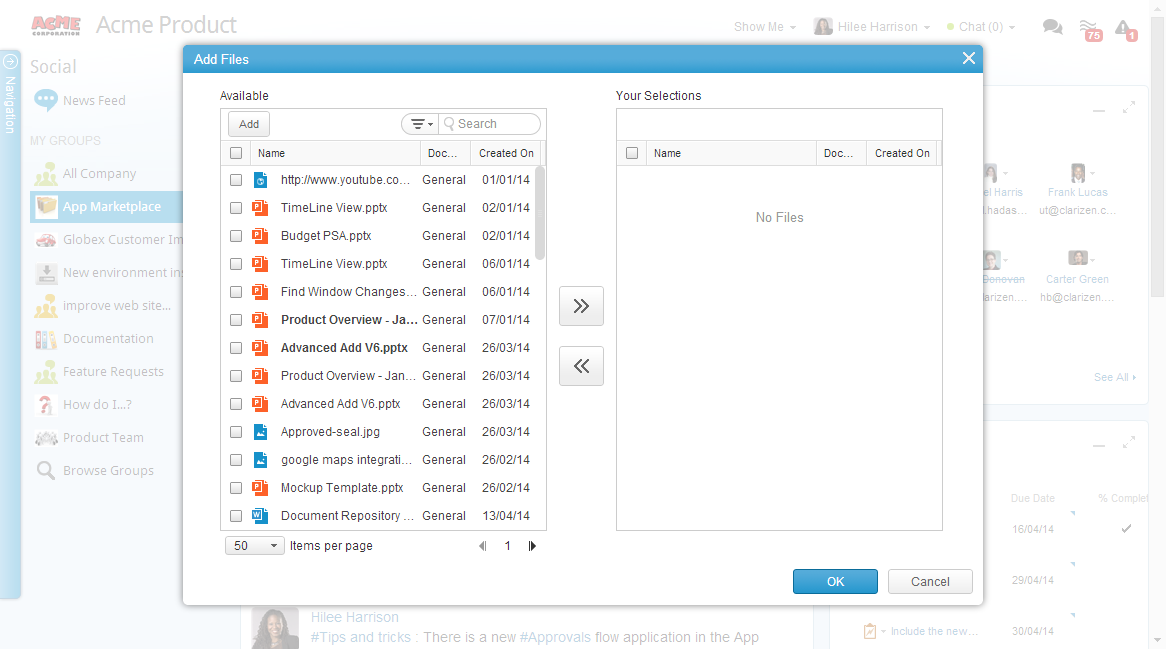
Within the popup, select the “File Upload” tab and then select the file from your PC
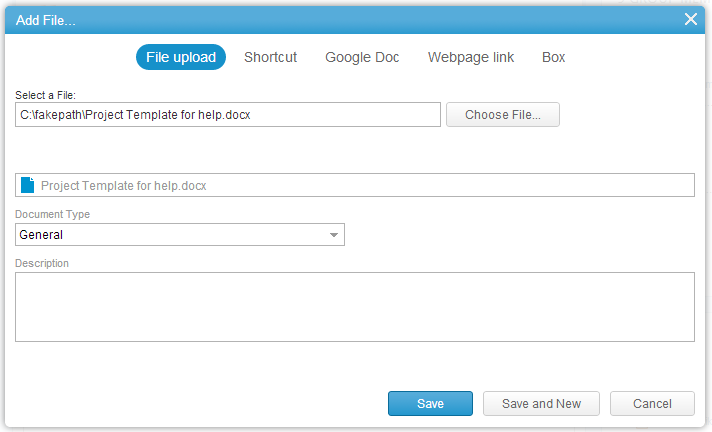
Alternatively, you can drag and drop a file directly into the file panel, or onto a new discussion post, task, case, etc.
- Publish your document
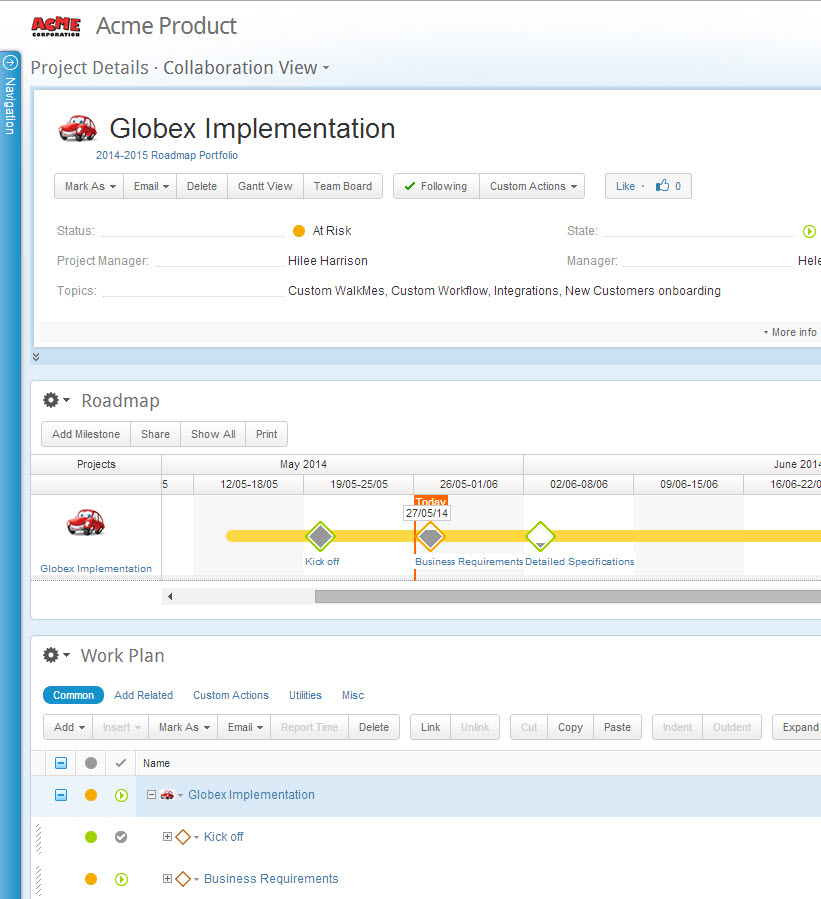
Select the AdaptiveWork item you want to run the “AdaptiveWork Document Publisher” on.
For example, to create an invoice for a specific project based on the reported and approved time entries, select the relevant project.
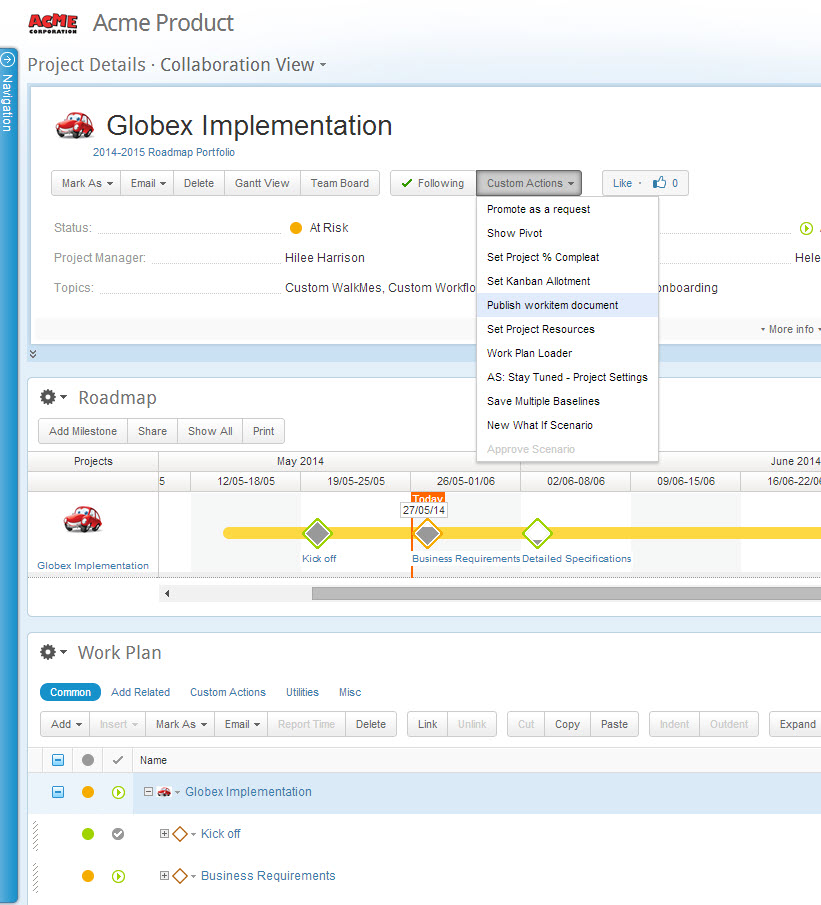
Click the 'Publish workitem document' custom action in the ribbon
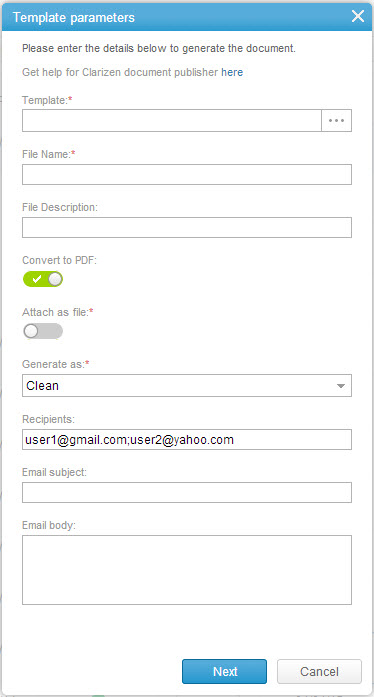
Fill in the details in the popup, and select the relevant template, the output type (docx or pdf), if to attach the output, etc.
- View the published document
You can choose to download the file and/or see the report attached on your selected item
Template Format
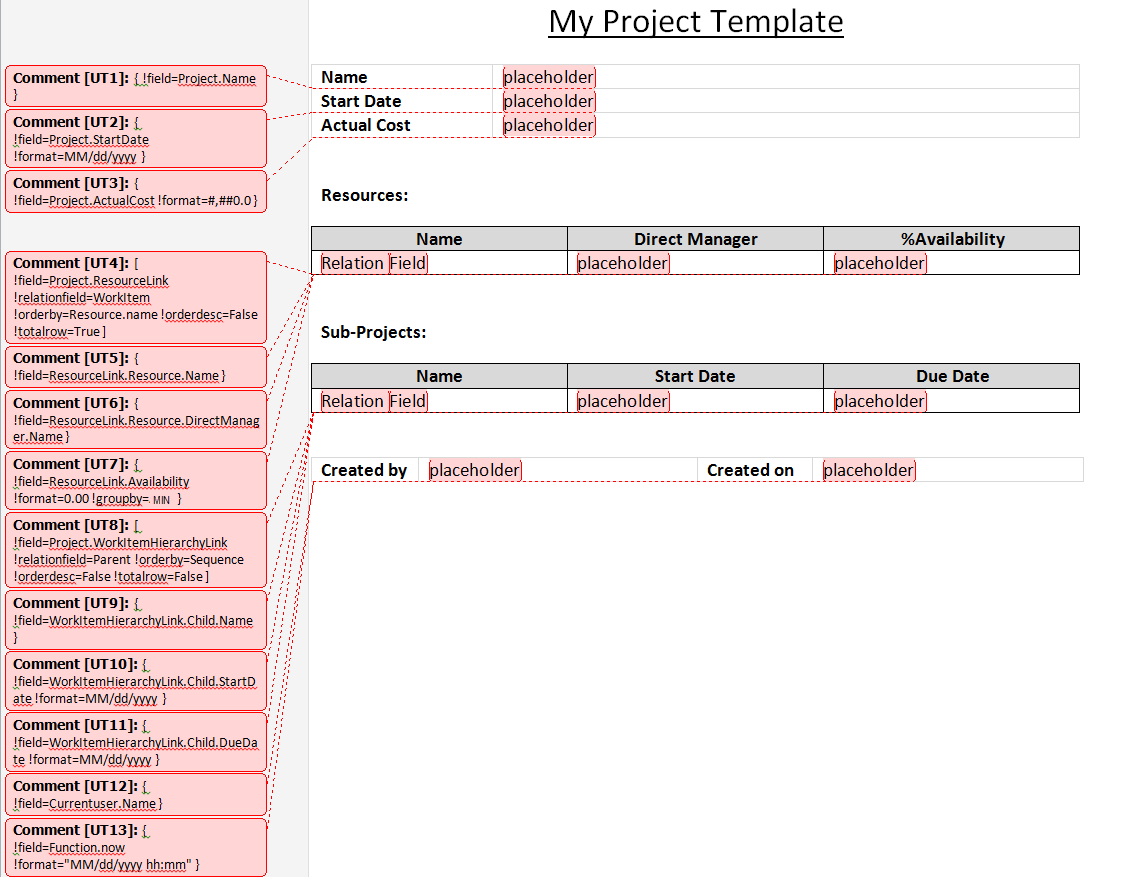
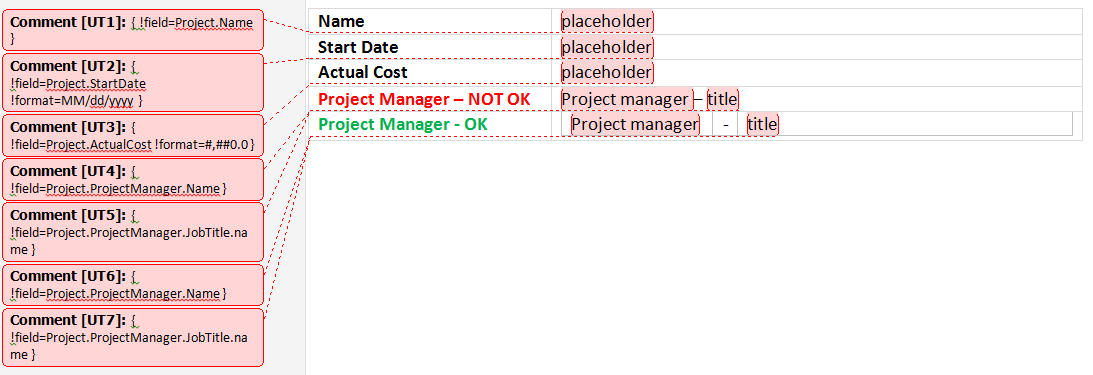
Below is an example of a template that displays data from a project.
The source item fields are ones that exist on the project, while the related fields are from the project’s team and sub projects.
A template can contain three types of "placeholder" fields:
- Type A: Source item fields – these fields come from the main/selected item (e.g. the project, organization or current user)
- Type B: Related item – enables you to define the related items you would like to access (e.g. the project’s team or sub-projects)
- Type C: Related item fields - these fields come from the related item(s) as defined in type B (e.g. resource name, sub-project start date, etc.)
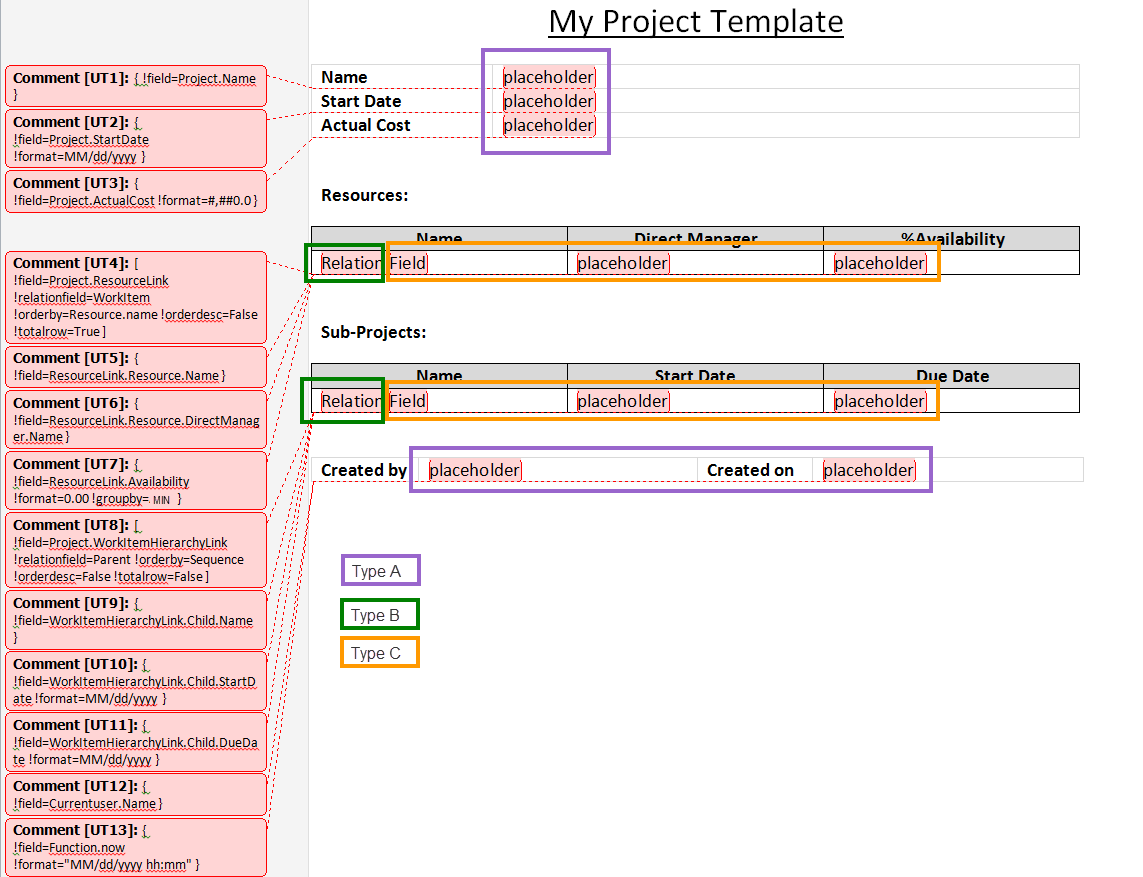
Defining the exact fields/relations that need to be accessed is done using document comments.
Simply highlight the text that needs to be replaced and click to add a new comment. You can then enter the relevant properties (as explained below).
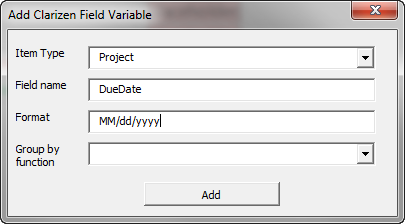
Source item fields
Source item fields are place holders that will be replaced with field values related to main item or other generic information.
- Any field from the item itself
- project.name
- project.projectmanager.name
- project.duedate
- Any field from the organization
- organization.name
- organization.billingrate
- Any field from the user running the report
- currentuser.name
- currentuser.directmanager.name
- Data sent over in the URL call ("name=value" format). Add the relevant data into the URL (e.g. …/DynamicUI/DynamicUI.aspx?DynamicType=ReportTemplate& … &name1=value1&name2=value2)
- url.name1
- url.name2
- Runtime function
- function.now - current date and time (can be formatted)
- function.logo - adds the organization logo
- function.lastweek-start
- function.today-3-start
- function.nextmonth-end
- See more date functions in the table below
| Type | Function | Description |
| Date time | now | Return the date and time of the organization time zone defined in AdaptiveWork |
| Image | logo[_size] |
Add the organization logo
|
| Date | lastYear-start | Last calendar year - start period date |
| Date | LastYear-end | Last calendar year - end period date |
| Date | LastMonth-start | Last calendar month - start period date |
| Date | LastMonth-end | Last calendar month - end period date |
| Date | LastWeek-start | Last calendar week - start period date |
| Date | LastWeek-end | Last calendar week - end period date |
| Date | Yesterday-start | Yesterday - start period date |
| Date | Yesterday-end | Yesterday - end period date |
| Date | FromBginingOfYear-start | From the beginning of the year till today - start period date |
| Date | FromBginingOfYear-end | From the beginning of the year till today - end period date |
| Date | FromBginingOfMonth-start | From the beginning of the month till today - start period date |
| Date | FromBginingOfMonth-end | From the beginning of the month till today - end period date |
| Date | FromBginingOfWeek-start | From the beginning of the week till today - start period date |
| Date | FromBginingOfWeek-end | From the beginning of the week till today - end period date |
| Date | Today(-/+ number of days)-start | Today -/+ given days specified - start period date |
| Date | Today(-/+ number of days)-end | Today -/+ given days specified - end period date |
| Date | ThisWeek-start | This calendar week - start period date |
| Date | ThisWeek-end | This calendar week - end period date |
| Date | ThisMonth-start | This calendar month - start period date |
| Date | ThisMonth-end | This calendar month - end period date |
| Date | ThisYear-start | This calendar year - start period date |
| Date | ThisYear-end | This calendar year - end period date |
| Date | ToEndOfYear-start | From today till the end of the calendar year - start period date |
| Date | ToEndOfYear-end | From today till the end of the calendar year - end period date |
| Date | ToEndOfMonth-start | From today till the end of the calendar month - start period date |
| Date | ToEndOfMonth-end | From today till the end of the calendar month - end period date |
| Date | ToEndOfWeek-start | From today till the end of the calendar week - start period date |
| Date | ToEndOfWeek-end | From today till the end of the calendar week - end period date |
| Date | Tomorrow-start | Tomorrow - start period date |
| Date | Tomorrow-end | Tomorrow - end period date |
| Date | NextWeek-start | The next calendar week - start period date |
| Date | NextWeek-end | The next calendar week - end period date |
| Date | NextMonth-start | The next calendar month - start period date |
| Date | NextMonth-end | The next calendar month - end period date |
| Date | NextYear-start | The next calendar year - start period date |
| Date | NextYear-end | The next calendar year - end period date |
Note that you can access nested fields even if they are not on the main item itself. For example, project.manager.directmanager.jobtitle.name
The format of the source item field comment should be set as follows:
|
Text part |
Mandatory |
comments |
|
{ |
Yes |
Constant opening |
|
!field=SourceItemType.FieldName |
Yes |
Indication of the field data source |
|
!format=RelevantFormat |
No |
Indication for the field format |
| !width=number in pixels | No |
Actual width of the image (in pixels) in the document Default for regular image is the original image width Default for image from URL is the 800 |
| !height=number in pixels | No |
Actual width of the image (in pixels) in the document Default for regular image is the original image width Default for image from URL is the 600 |
| !pagewidth=number in pixels | No |
Actual browser page width (in pixels) to open the URL and convert to image Default is 1024 pixels |
| !pageheight=number in pixels | No |
Actual browser page height (in pixels) to open the URL and convert to image Default is 768 pixels |
| !loadingtime=number in m illiseconds | No |
Time (in milliseconds) to wait till the page is loading (asynchronous) Default is 0 milliseconds |
|
} |
Yes |
Constant closer |
Examples
- { !field=project.name }
- { !field=project.actualcost !format=#,##0.00 }
- { !field=organization.name }
- { !field=user.directmanager.name }
- { !field=function.now !format="MM/dd/yyyy hh:mm"}
- { !field=project.C_url_to_my_image !format=image !width=16 !height=16}
- { !height=400 !pagewidth=1024 !pageheight=768 !loadingtime=10000}

The table below shows the supported formats for the relevant data types.
|
Data type |
Format |
Details |
|
Date |
All regular date and time formats |
See full details and examples in the link below http://msdn.microsoft.com/en-us/library/8kb3ddd4(v=vs.110).aspx |
|
Numeric |
All numeric date and time formats |
See full details and examples in the link below http://msdn.microsoft.com/en-us/library/0c899ak8(v=vs.110).aspx |
|
Text |
"html" |
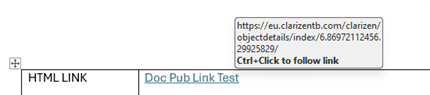
Use this format when the data accessed from AdaptiveWork contains html or rich text (such as a note’s content). When using this format debug options are not available Tip: If you to return an active link / hyperlink you can follow the steps below:
|
|
Text |
"image" |
Use this format when you want an image to be displayed (inline) in the document. The text should be the full URL to the relevant image. The dimensions of the image will be the original ones. |
| Text | "thumbnail" |
Use this format when you want to convert a web page to an thumbnail displayed (inline) in the document. The text should be the full URL to the relevant page. The dimensions of the page, thumbnail and waiting time to load the page can be specified as parameters. Use this option to embed your shared views. |
|
Currency |
"multicurrency" |
Use this format when you want to add the currency type indication to each value on screen (i.e. 1,234.56 vs 1,234.56 USD). When no format is specified the currency type will not be display next to the value. |
|
Duration |
"nounit" |
Show only the duration value without the unit type (hours, days etc.) In regular fields that have a summary function (e.g. SUM etc.) the duration value will be converted to hours |
| Image | "logo_{1}_{2}" |
Adds the relevant logo into the document, where {1} is the size and the {2} is the AdaptiveWork item type. For example " logo_16x16_workitem" or " logo_16x16_user". Please note that the "file" value (e.g. "logo" in the example above) must contain the specific item's ExternalId. Possible sizes:
|

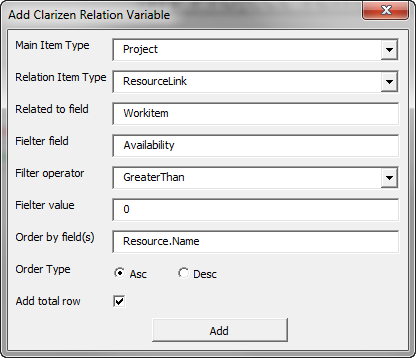
Related item definition
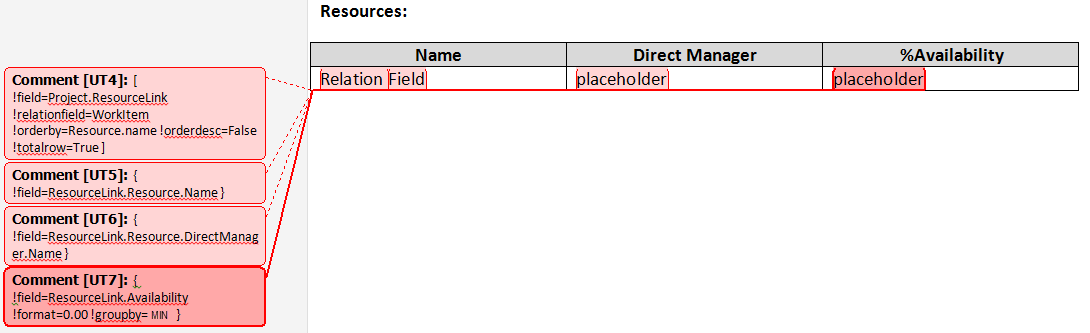
To access items related to the source item, you must create a separate table.
The first row of the table should contain names for the relevant columns, while the second row should include the indication for the related item itself.
It doesn’t matter where in the row this indication appears (any cell will do), as long as it's there. This serves as a repeatable row for each related item.

Any item related to the source item can be added to the template. It can be a link, an out of the box relation, a custom relation (with or without a reverse reference), or any item type that includes a “reference to object” field that points to the source item.
Here are a few examples:
- ResourceLink item type that links to the project’s team (users). This link contains the field WorkItem that is a "reference to object" field to the project itself
- WorkItemHierarchyLink item type that links to the project’s sub-items. This link contains the field Parent that is a "reference to object" field to the project itself
- Notes item type that has the AttachedTo field that is a "reference to object" field to the project itself
- User item type that has a custom MainProject field that is a "reference to object" field to the project itself. In this case, you don't even have to mark the field with a "reverse reference" in order to access it
With the related items, you can also determine the sort order, filter for relevant related items, and even set a total row (needs to correlate with group-by functions - see below).
The format of the related item comment needs to be as follows:
|
Text part |
Mandatory |
comments |
|
[ |
Yes |
Constant opening |
|
!field=MainItemType.RelatedItemType |
Yes |
Indication of the related item type |
|
!relationfield=RelatedItemTypeFieldName |
No |
The field in the related item that contains the reference to the source item |
|
!filterfield=RelatedItemTypeFieldName |
No |
The field in the related item to filter by If you want to use multiple filter, just add "!filterfield1=value", "!filterfield2=value" etc. |
|
!filteroperator=OperatorType |
No |
Filter operators Possible operator types are:
If you want to use multiple filter, just add "!filteroperator1=value", "!filteroperator2=value" etc. |
|
!filtervalue=ValueToFilterBy |
No |
You can use constant values or the parameters defined in the Custom Action. Constants The value to filter by When setting a value for a date filter, it best to format the value as yyyy-MM-ddThh:mmZ (for example 2014-07-25T00:00Z) If you want to use multiple filter, just add "!filtervalue1=value", "!filtervalue2=value" etc. Note: When a value includes spaces, you must wrap it in double quotes. For example: !filtervalue3="Scope Change" Parameters Use parameters defined in the Custom Action within relation filters. For example: dates, strings, numbers or toggles. For example: !filtervalue1=Param.EndDate |
| !orbetweenfilters=true or false | no |
When using multiple filters, it is possible to determine whether to use an OR condition between the filters or AND. The default is AND. |
|
!orderby=RelatedItemTypeFieldName |
No |
Sort by fields If you want to have more than one field, you need to separate the fields with ';' Order fields can also include fields that are not visible (as a column) Order fields can also include fields with "hop", e.g. "user.JobTitle.Name" |
|
!orderdesc=true or false |
No |
Determines the sort order, the default is ascending order |
|
!totalrow=true or false |
No |
When true, a total row will be added. (See the group-by section below for detailed explanations) |
|
] |
Yes |
Constant closer |
Examples
- [ !field=Project.Note !relationfield=attachedto !filterfield=createdon !filteroperator=GreaterThan !filtervalue=01/01/2014 !orderby=createdby.name !orderdesc=True !totalrow=True ]
- [ !field=Project.ResourceLink !relationfield=workitem !orderby=Resource.name !orderdesc=False !totalrow=False ]
- [ !field=Project.WorkItemHierarchyLink !relationfield=Parent !filterfield=Child !filteroperator=Equal !filtervalue=Project !orderby=Child.StartDate !orderdesc=False !totalrow=False ]
- Using parameters -
[ !field=Project.Task !relationfield=Parentproject !filterfield=state.name !filteroperator=Equal !filtervalue=active !filterfield1=DueDate !filteroperator1=LessThanOrEqual !filtervalue1=Param.EndDate
!orderby=task.duedate !orderdesc=false !totalrow=False ]
List of allowed filters per field type:
|
Filter |
String |
Boolean |
Numeric |
Date |
Duration |
Money |
Picklist |
|
Equal |
Y |
Y |
Y |
Y |
Y |
Y |
Y |
|
NotEqual |
Y |
Y |
Y |
Y |
Y |
Y |
Y |
|
LessThan |
Y |
Y |
Y |
Y |
Y |
Y |
Y |
|
GreaterThan |
Y |
Y |
Y |
Y |
Y |
Y |
Y |
|
LessThanOrEqual |
Y |
Y |
Y |
Y |
Y |
Y |
Y |
|
GreaterThanOrEqual |
Y |
Y |
Y |
Y |
Y |
Y |
Y |
|
BeginsWith |
Y |
Y |
|||||
|
EndsWith |
Y |
Y |
|||||
|
Contains |
Y |
Y |
|||||
|
DoesNotContain |
Y |
Y |
In order to support dynamic range of dates in the filter, you can use the followings constant "filter value" expressions
|
Filter constant value |
Description |
|
LastYear |
Last calendar year |
|
LastMonth |
Last calendar month |
|
LastWeek |
Last calendar week |
|
Yesterday |
Yesterday |
|
FromBginingOfYear |
From the beginning of the year till today |
|
FromBginingOfMonth |
From the beginning of the month till today |
|
FromBginingOfWeek |
From the beginning of the week till today |
|
Today |
Today |
|
ThisWeek |
This calendar week |
|
ThisMonth |
This calendar month |
|
ThisYear |
This calendar year |
|
ToEndOfYear |
From today till the end of the calendar year |
|
ToEndOfMonth |
From today till the end of the calendar month |
|
ToEndOfWeek |
From today till the end of the calendar week |
|
Tomorrow |
Tomorrow |
|
NextWeek |
The next calendar week |
|
NextMonth |
The next calendar month |
|
NextYear |
The next calendar year |
Note that you can add to all of the following values '+n' or '-n', when the 'n' represents numeric number, in order to enlarge the date scale. e.g.
· 'Today-9' to get the last 9 days
· 'ThisMonth+15' to get extra 15 days on the current calendar month
Related item fields
Related item fields are place holders that will be replaced with field values of fields from the related item, as defined in the section above.
The format of the related item field comment needs to be as follows:
|
Text part |
Mandatory |
comments |
|
{ |
Yes |
Constant opening |
|
!field=RelatedItemType.FieldName |
Yes |
Indication of the field data source |
|
!format=RelevantFormat |
No |
Indication for the field format |
|
!groupby=function name |
No |
The available functions are
|
|
} |
Yes |
Constant closer |
Examples:
- { !field= ResourceLink.Resource.name }
- { !field= ResourceLink.CreatedOn !format=MM/dd/yyyy}
- { !field= ResourceLink.Units !groupby=MIN}
When no field is marked with a "groupby" function, all relevant relations (according to the filters mentioned above) will be added to the table, one per table row.
The use of "groupby" will change the table to include summary rows and fields with the "groupby" function will display the aggregated data according to the relevant formula.
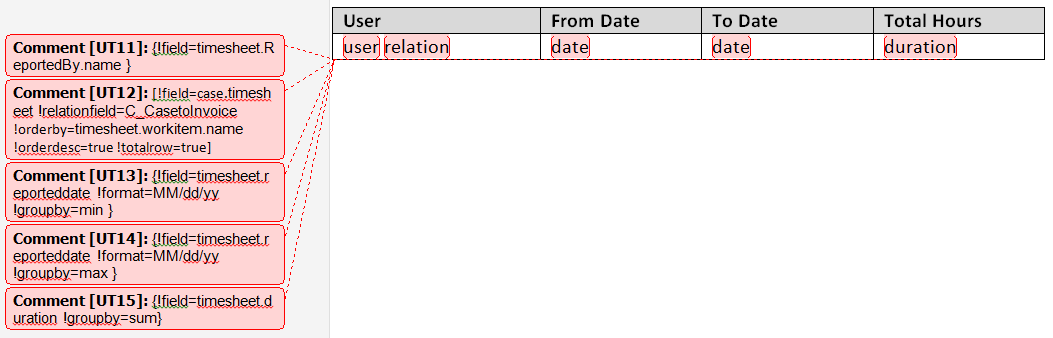
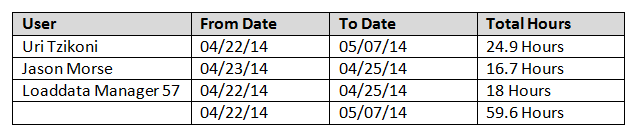
Below you will find an example of the related timesheets grouped by user.
The formulas for the "groupby" are minimum and maximum reported date and the total reported hours per user.
A total row was also added to view the total reported hours per user.
In the table below you will find a list of the supported functions per field type when using the "groupby" option
|
Name |
Description |
String |
Boolean |
Numeric |
Date |
Duration |
Money |
Picklist |
|
Count |
Count of records |
Y |
Y |
Y |
Y |
|||
|
Min |
Minimum value |
Y |
Y |
Y |
Y |
Y |
Y |
Y |
|
Max |
Maximum value |
Y |
Y |
Y |
Y |
Y |
Y |
Y |
|
Sum |
Sum of values |
Y |
Y |
Y |
-
Duration type
-
In order to get to a common denominator, duration values are converted to hours as follows
-
20 days in one month
-
5 days in one week
-
8 hours in one day
-
-
The formula value will always be displayed in hours
-
Empty value (NULL) will be set to 0 hours
-
-
Currency type
-
The currency will be ignored. When using multi-currency, all values will get summed up together
-
Empty value (NULL) will be set to 0
-
Limitations of using field placeholders
In order to recognize a field placeholder, it must be located inside a table cell. The table doesn’t have to have a border, and it can be a one cell table if needed.

When a table cell has a field placeholder inside, the entire cell content will be replaced with the field’s data, this includes text that is not marked with the comment indication.
In order to mitigate this limitation, you can add a table inside a table and locate the placeholder comment on one of the inner cells.
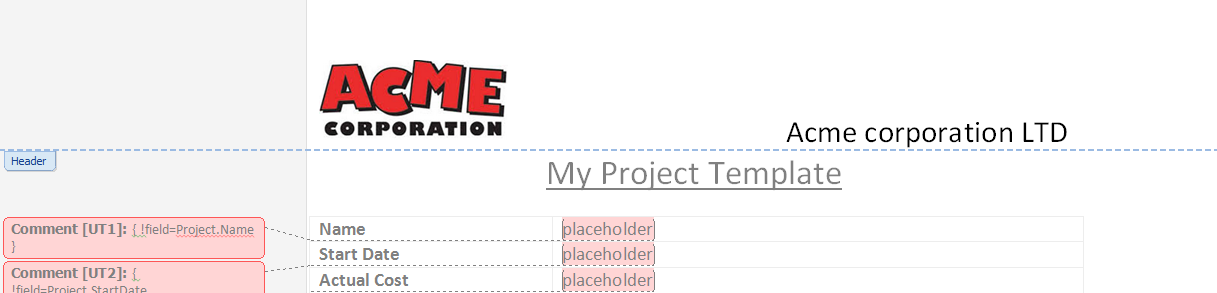
Field placeholders (comments) cannot be placed in the header or footer, only in the document body.
Building your templates with the help of macros
In order to help build templates, we have created two Microsoft Word macros that you can use.
There is a separate macro for field placeholder creation and for related item placeholder creation.
In order to use these macros, please download the document with the macros from the link in the resources section.
Once downloaded, you can design your document to fit your specific needs by highlighting the relevant text that you want to mark as a placeholder,
run the macro, fill in the data and click ok. A comment will then be added on the relevant text, with the correct format already populated.
Supported parameter via the URL
If you want to call this integration and build the URL yourself, and control the value of the parameters, please refer to the table below
|
Parameter |
Type |
Value |
| SessionId | text | AdaptiveWork session ID for API |
|
ItemType |
Text |
The main item "AdaptiveWork item type" the report is running on |
|
ItemExternalId |
Text |
The main item "external id" the report is running on |
|
TemplateExternalId |
Text |
The external id of the template file already loaded in AdaptiveWork |
|
PrintMode |
Text |
|
|
HideInvalidFields |
Boolean |
Under construction |
|
OutputType |
Text |
DOCX, PDF |
|
Attach |
Boolean |
Attaches the output file back to the item running on |
|
ConvertToPdf |
Boolean |
Is to convert to PDF format or keep the original one |
|
FileName |
Text |
The output file name |
|
FileDescription |
Text |
The output file description (relevant when attaching back to relevant AdaptiveWork item) |
|
SendDebugEmail |
Boolean |
Send an email to the running user with debug information and attachments |
|
Recipients |
Text |
List of email addresses separated by comma (,) or semicolon (;) |
|
Subject |
Text |
The email subject |
|
Body |
Text |
The email body. HTML tags are supported. |
|
Download |
Boolean |
Is to download the file in the client (or just send the email) |
| Example |
https://integration.clarizen.com/Dyn...eportTemplate& SessionID =c0b3ee78-8ec0-4d07-b441-98a8e5809380_274316& ItemType =Project& ItemExternalId =e674ea5eb2494fd888282448a1b646c2 & TemplateExternalId =PPR_Template & OutputType =DOCX& PrintMode =Clean & attach =TRUE& ConvertToPdf =True& FileName =Periodic+Project+Report+2014-Jun-11+-+2014-Aug-09& FileDescription =& SendEmail =true& subject =Test+subject& body =Test+body& recipients =abc%40clarizen.com |
Roadmaps
The following parameters should be used when inserting a roadmap:
- !format – Use “roadmap” instead of “thumbnail“ as the data type
- !width – Example: !width=2048
- !height – Example: !height=384
- !pagewidth – Example: !pagewidth=2048
- !pageheight – Example: !pageheight=384
- !daterange - Click here to see all options. Example: !daterange = ThisMonth+15
- !groupby – Example: !groupby=Project.State
- !barcolor – Example: !barcolor=Project.TrackStatus
- !barfill – Example: !barfill=PercentCompleted
- !dotcolor – Example: !dotcolor=Project.Importance
- !additionalinfo – Example: !additionalinfo=Project.PercentCompleted
- !DurationToCompare – Examples: !DurationToCompare=None / !DurationToCompare="Baseline Duration" / !DurationToCompare="Planned Duration"
- !MilestonesColor – Example: !MilestonesColor=State