Introduction
Today, IT organizations are responsible for delivering both projects and small work that originate from many different areas of the business. AdaptiveWork can help manage this process effectively by aggregating all of the data, files, and communication in one place making it easy to manage the different stages (submission, scoring, prioritization, routing and approval) of the request process. AdaptiveWork’s automation will also reduce manual work by automating laborious tasks such as sending notifications and converting requests into either a project or small work (tasks).
The roles encompassing the request intake process include the requester, demand management team member and sponsor. Each play a vital role in moving the request along its lifecycle. The best practices below describe how organizations can leverage AdaptiveWork to streamline the process, ensuring each role has clearly defined actions and the relevant information to execute.
INSTALL APPLICATION:
Click HERE to install the best practice application for request intake
DISCLAIMER: Making changes to these configurations will take them outside the scope of standard support. Please contact your CSM prior to making any changes in Settings and Mapping and Events.
Creating new requests
Intended Role: Requestor
There are several ways to create requests in AdaptiveWork, both internally in AdaptiveWork, as well as from outside the system via email or via a custom web form. Requestors benefit from using AdaptiveWork to submit requests, as they can then review request status, collaborate on requests, attach documents, and review reports across requests.
Anyone in the organization who wants to submit a request, typically to the IT team, can quickly and efficiently log a request that falls into the correct sizing, scoring, and prioritization queues, with the minimum necessary information. Your organization can configure request intake forms that ask for all mandatory data and automatically drive routing and workflow approvals based on your governance process.
Creating requests in AdaptiveWork
Description:
Leveraging AdaptiveWork custom actions, organizations can define what information the user submits as well as which specific fields are required versus optional. Additionally, the custom action provides the ability to control email and system notifications at a granular level (e.g. all new requests get routed to a particular group or user within your organization).
Admin Steps:
The best practice application includes a custom action at the organization level, with recommended fields. These should be modified to fit the needs of your organization.
-
Ensure to restrict this action to only the Profiles that should be allowed to submit requests (as dictated by your organization)
- Request the following values from the user:
-
Submitted By - default should be the current user, with the ability to override this (e.g. request being submitted on behalf of another user)
-
Title - title of the request
-
Description - short description of the project being requested
-
Project Goals - what goals is the project trying to accomplish?
-
Expected Business Value - what business value will the project bring?
-
Business Alignment - does the project align to the organization’s business objectives?
-
Justification - describe the overall justification for executing this project
-
Identified Risks - list all identified risks associated to the undertaking of the requested project
-
Estimated Cost - how much will the requested project cost the organization?
-
Sponsor - business stakeholder sponsoring the request
-
Attachment - attach supporting documentation relevant to the requested project
- Send an email confirmations (the body should include a link to the request in AdaptiveWork):
- Send an email to the submitter of the request
- Send an email notifying the responsible user or group that a new request has been submitted
End User Steps:
-
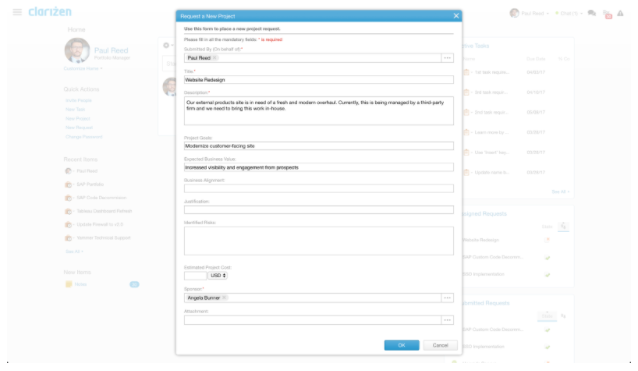
From the navigation panel open the Custom Action submenu, then click New Project Request
- In the pop-up, fill in the fields below (required fields are denoted with a red asterisk):
-
Submitted By - default should be the current user, with the ability to override this (e.g. request being submitted on behalf of another user)
-
Title - title of the request
-
Description - short description of the project being requested
-
Project Goals - what goals is the project trying to accomplish?
-
Expected Business Value - what business value will the project bring?
-
Business Alignment - does the project align to the organization’s business objectives?
-
Justification - describe the overall justification for executing this project
-
Identified Risks - list all identified risks associated to the undertaking of the requested project
-
Estimated Cost - how much will the requested project cost the organization?
-
Sponsor - business stakeholder sponsoring the request
-
Attachment - attach supporting documentation relevant to the requested project
- Click OK
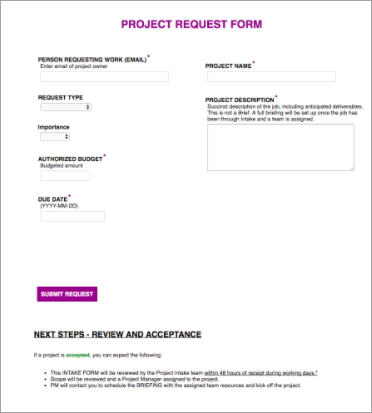
- Once successfully created, the notifications below will be created with the ability to click on a hyperlink to access the request:
- An email confirming that the request has been successfully submitted
- A green success message in AdaptiveWork that the request has been successfully submitted
Example:
Creating requests in web form
When considering how non-licensed users create requests in AdaptiveWork, we recommend using a web form when possible. You’ll be able to control the minimum fields of data you require in order to process the request and you can leverage web technologies to build a rich and interactive experience (eg. dependent forms).
Admin Steps:
Leverage AdaptiveWork’s SOAP or REST API to create a web form with recommended fields and host it on a server of your choosing.
End User Steps:
- Access your organization’s web form
-
Fill out mandatory fields and click Submit
- Confirm receipt of success email
- If you have additional information or questions,
Example:
Creating requests via email
Description:
Leveraging AdaptiveWork’s InterAct engine, organizations can easily allow non-licensed and licensed users to submit a request through email where very little structured information is required. The ability to control routing and system notifications are retained in this method (e.g. all new requests get routed to a particular group or user within your organization).
Given this method, there are inherent limitations. You’ll have to work with a few core inputs such as “To:”, “From:”, Subject Line and Body. Most organizations require specific information from the requestor beyond what email can realistically provide. This limited input typically results in a less efficient process as the team has to spend more time gathering the necessary data. If you have a large number of non-licensed users that need to submit requests, it’s recommended that you set up a web based input form that leverages our API (Guide Above).
Admin Steps:
Activate InterAct and distribute the email address to submit a request.
-
Go to the Interact page in settings, found here.
-
The Organization Domain Name will based on the Organization name you set initially. It should look like: [organizationname].clarizenmail.com. However, feel free to update it
- Click “Enable and Get Started”
-
Under the Request, click the “Email” link next to the Quick option. The email link embedded in this email will be Request.Quick@[organziationname].clarizenmail.com
- Create a user in your global directory (or LDAP) called “Project Request” and set the email address in step 4 to that user’s email.
- Send an email to “Project Request” to test. A new request should be created.
DISCLAIMER: Making changes to these configurations will take them outside the scope of standard support. Please contact your CSM prior to making any changes in Settings and Mapping and Events.
End User Steps:
- Create a new email using your organization’s email program of choice
- In the To: field, enter find the contact “Project Request”
- In the Subject, enter title of the request
- In the Body of the email, provide description and details
- Attach a file if required
Example:

Manage incoming requests
Intended Role: Demand Management Team
As a manager of an IT team, I need to be able to manage the state/stage of a piece of work, confirm or adjust its priority and move it forward for additional work by my team. This applies to big and small work (e.g. projects as big work that I agree we can take on, or requests as small work that I can route properly to a member of my team), so that I can quickly and efficiently approve, route, assign, and track progress.
Request Assignment
Description:
Once the details of a request have been submitted and centralized in AdaptiveWork, it can be assigned to the appropriate team member. By setting up views, all incoming requests across the organization will be visible and allow for real time collaboration and action all within a single area.
Admin Steps:
Edit/Update “Active Requests” view in the request module to configure it to your needs.
-
Restrict sharing to only the Profiles that should be allowed to assign requests (as dictated by your organization).
-
The view returns only requests in following Request State: Submitted, In Work, In Review, Approved.
-
Ensure that the Request Action column is displayed, allowing assignment to the appropriate team member.
Edit/Update “Overview” view in the request details to configure it to your needs.
-
Restrict sharing to only the Profiles that should be allowed to assign requests (as dictated by your organization).
- The view should display related items below:
-
Lifecycle - lets the user know where the request is with respect to the intake flow.
-
Discussions - allows for real time collaboration and provides historical context.
-
Files - supporting documentation relevant to the request
-
In the Property Card, display the fields below:
-
Title - title of the request
-
Description - short description of the project being requested
-
Project Goals - what goals is the project trying to accomplish?
-
Expected Business Value - what business value will the project bring?
-
Business Alignment - does the project align to the organization’s business objectives?
-
Justification - describe the overall justification for executing this project
-
Identified Risks - list all identified risks associated to the undertaking of the requested project
-
Estimated Cost - how much will the requested project cost the organization?
End User Steps:
-
From the navigation panel, select the Requests module.
-
If this is the first time accessing the Active Requests view, you may need to explicitly choose this view using the View Navigator.
- In the top left corner, select the current view to open the View Navigator.
-
Select the Active Requests view from the View Navigator.
-
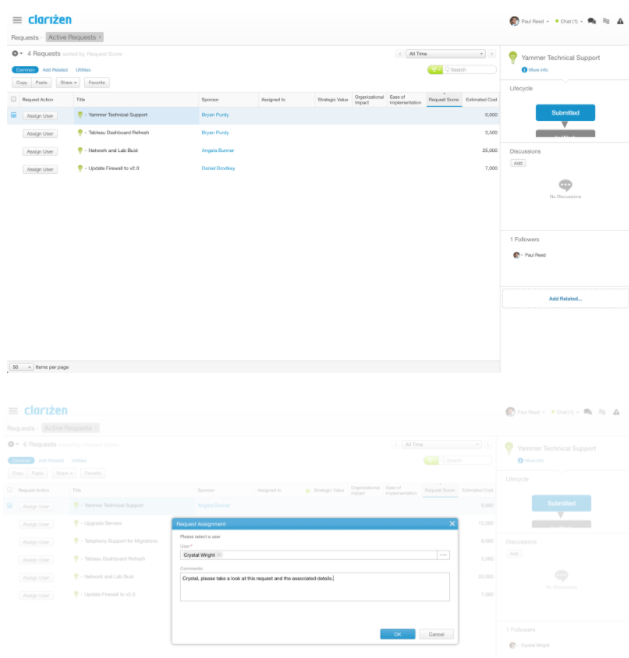
Click “Assign User” in the Request Action column.
- In the pop-up box, select the team member to assign the request to.
-
Include comments if desired (optional) and click OK.
- Once successfully processed, the following notifications will be triggered:
- An email to the team member confirming assignment to the request including a hyperlink to access in AdaptiveWork
- Any comments included will be posted to the request as a discussion
* If additional information is needed to evaluate assignment of the request, click the Item Details Page button (hover over the title of the request to expose the gray arrow button).
Example:
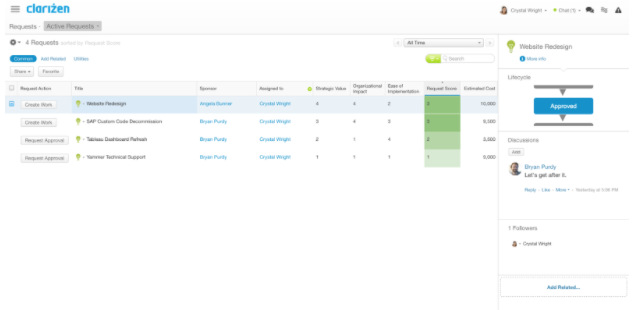
Scoring & Prioritization
Description:
Once the details of a request have been submitted and centralized in AdaptiveWork, scoring and prioritization can be accomplished through the request module. By setting up views properly, all incoming requests across the organization will be visible and allow for real time collaboration and action all within a single area.
Admin Steps:
Edit/Update “Active Requests” view in the request module to configure it to your needs.
-
Restrict sharing to only the Profiles that should be allowed to score and prioritize requests (as dictated by your organization).
-
The view returns only requests in following Request State: Submitted, In Work, In Review, Approved.
- AdaptiveWork views can be tailored to meet the needs of your organization. In this case, we want to ensure to display data that will streamline scoring and prioritization. In Manage Columns, add any additional field.
-
Title - title of the request
-
Description - short description of the project being requested
-
Project Goals - what goals is the project trying to accomplish?
-
Expected Business Value - what business value will the project bring?
-
Business Alignment - does the project align to the organization’s business objectives?
-
Justification - describe the overall justification for executing this project
-
Identified Risks - list all identified risks associated to the undertaking of the requested project
-
Estimated Cost - how much will the requested project cost the organization?
-
Request Score1 - numeric score total of the following: Strategic Alignment, Organizational Impact, Competitive Advantage, Customer Satisfaction and Ease of Implementation.
-
Strategic Value - strategic value score
-
Organizational Impact - organizational impact score
-
Ease of Implementation - ease of implementation score
- Set conditional formatting on Request Score column.
1 Request Score is a numeric formula field and represents the average of all scoring fields
* Fields 6 through 8 are picklist with the following values (1= no impact, 2 = some impact, 3 = impact , 4 = high impact)
End User Steps:
-
From the navigation panel, select the Requests module.
-
If this is the first time accessing the Active Requests view, you may need to explicitly choose this view using the View Navigator.
- In the top left corner, select the current view to open the View Navigator.
-
Select the Active Requests view from the View Navigator.
-
Based on the request info provided by the submitter (Title, Description, Project Goals, Expected Business Value, Business Alignment, Justification, Identified Risks, Estimated Cost), update the scoring fields below:
-
Strategic Value - strategic value score
-
Organizational Impact - organizational impact score
-
Ease of Implementation - ease of implementation score
-
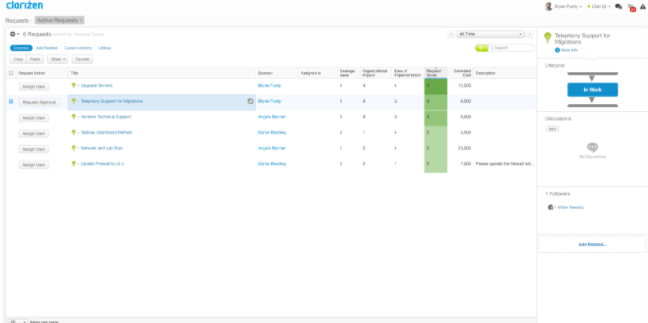
Once all scoring fields have been updated, click on the request action “Request Approval”.
* If more information is needed in order to score the request, leverage discussions to initiate dialog towards clarifying any open questions.
Example:
Manage approvals of requests
Intended Role: Sponsor
As the sponsor of an IT team, I need to be able to easily approve, reject or hold a discussion on a request that I am responsible for. This process should be easy, painless and intuitive
Routing & Approval
Description:
Once scoring and prioritization have been completed, the request should be routed to the sponsor for approval. In the request details view, sponsors can evaluate request details, scoring and supporting documentation. Additionally, all discussions that have taken place in context of the request can be seen. AdaptiveWork’s ability to present this information in a single, holistic view ensures an efficient routing and approval process.
Admin Steps:
The best practice application includes a “My Approvals” view in the request module. Edit/update the view to fit the needs of your organization.
-
Restrict sharing to only the Profiles that should be allowed to approve requests (e.g. business sponsor).
-
The view only returns requests in the In Review request state.
- AdaptiveWork views can be tailored to meet the needs of your organization. In this case, providing the information necessary for the business sponsor to make an approval decision.
-
In the Property Card, display the fields below (if these fields do not already exist in your organization, they will need to be created as custom request fields):
-
Title - title of the request
-
Request State - the current state of the request (Submitted, In Review, etc.)
-
Approve - toggle allowing the sponsor to approve the request once reviewed
-
Description - short description of the project being requested
-
Project Goals - what goals is the project trying to accomplish?
-
Expected Business Value - what business value will the project bring?
-
Business Alignment - does the project align to the organization’s business objectives?
-
Justification - describe the overall justification for executing this project
-
Identified Risks - list all identified risks associated to the undertaking of the requested project
-
Estimated Cost - how much will the requested project cost the organization?
-
Request Score1 - numeric score total of the following: Strategic Alignment, Organizational Impact, Competitive Advantage, Customer Satisfaction and Ease of Implementation.
-
Strategic Value - strategic alignment score
-
Organizational Impact - organizational impact score
-
Ease of Completion - ease of implementation score
1 Request Score is a numeric formula field and represents the average of all scoring fields
* Fields 12 through 14 are picklist with the following values (1= no impact, 2 = some impact, 3 = impact , 4 = high impact)
End User Steps:
-
From the navigation panel, select the Requests module.
-
If this is the first time accessing the My Approvals view, you may need to explicitly choose this view using the View Navigator.
- In the top left corner, select the current view to open the View Navigator.
-
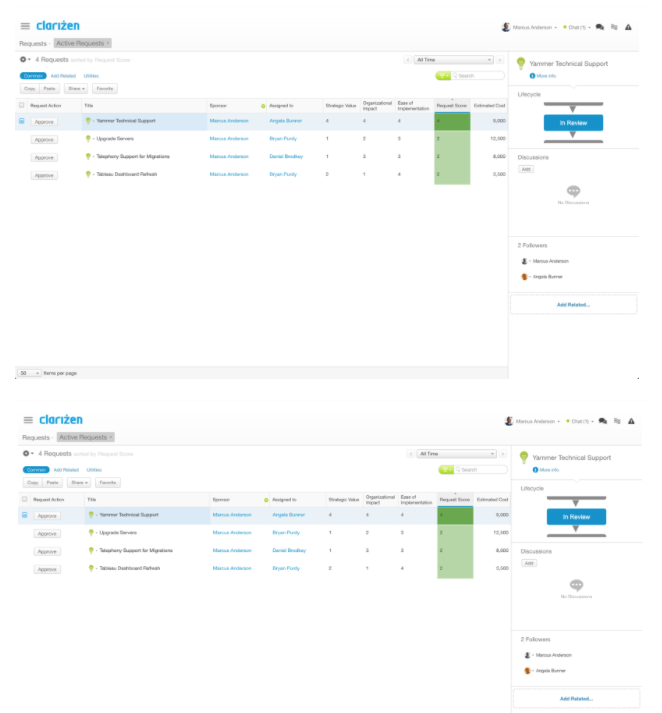
Select the My Approvals view from the View Navigator.
- Based on the request info provided by the submitter, make a decision to approve or reject.
- If more information is needed, leverage discussions to initiate dialog towards clarifying any open questions.
- Click the “Approve” Request Action to approve, reject or request more information.
Example:
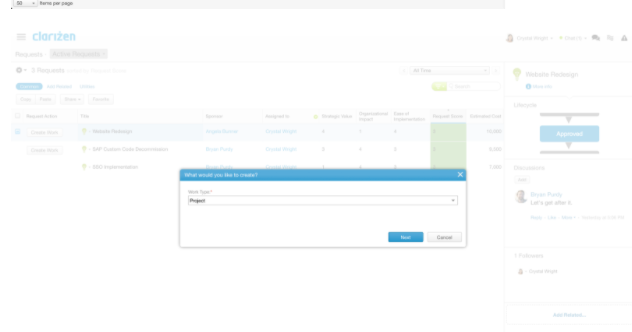
Convert requests to projects/work
Intended Role: Demand Management Team
Description:
Congrats! Your request is approved and now it’s time to create the work that will satisfy the request in an automated way. You’ve capture a lot of data on the request up until this point and it’s important that we make sure it is available in the work that is generated from it.
Creating work from a request is easy to do via the custom action “Create Work”. As a request may not end up being projects, there are options to either create a task in an existing project or smaller to-do tasks.
Admin Steps:
The best practice application includes an “Active Requests” view in the request module. Edit/update the view to fit the needs of your organization.
-
Restrict sharing to only the Profiles that should be allowed to convert requests.
-
The view returns only requests in following Request State: Submitted, In Work, In Review, Approved.
- AdaptiveWork views can be tailored to meet the needs of your organization. In this case, we want to ensure to provide the information necessary for the business sponsor to make an approval decision.
-
Ensure that the Request Action column is displayed, allowing the team member to initiate the creation of work.
End User Steps:
-
From the navigation panel, select the Requests module.
-
If this is the first time accessing the “Active Requests” view, you may need to explicitly choose this view using the View Navigator.
- In the top left corner, select the current view to open the View Navigator.
-
Select the “Active Requests” view from the View Navigator.
- Click the “Create Work” Request Action.
-
Select the work type to initiate (project or task), then click Next.
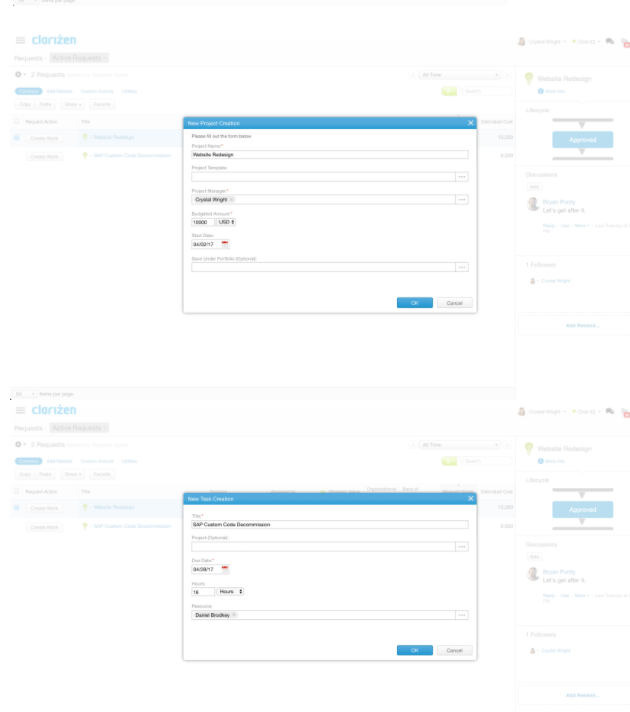
- Fill in the following based on work type selected:
-
On the Create a New Project pop-up:
- Edit the project name as desired
- Select the appropriate project template
- Assign a project manager (if known)
- Update budgeted amount if necessary (default based on estimated cost from request)
- Update the project start date as desired
-
Choose the portfolio where this project will reside (Optional).
-
On the New Task Creation pop-up:
- Edit the title as desired
-
Choose the project where this task will reside (Optional)
- Update the task start date as desired
- Update the work effort as appropriate
- Assign a resource, if known
Example: