
InterAct Settings
Overview
This page describes AdaptiveWork’s InterAct feature and includes the following sections:
- About InterAct
- Setting Your Domain Name
- Email to Case Mailboxes
- General Mailboxes
- Specific Mailboxes
- Creating a New Rule
- Sending Email
About InterAct
AdaptiveWork’s InterAct feature is a powerful tool that enables you to define any type of workflow rule that is triggered by sending an email. Basically, AdaptiveWork's InterAct feature enables creating actions from emails. Once enabled, InterAct enables you to quickly add new issues, tasks, projects or any other item within the system simply by sending an email to a mailbox and supplying any necessary details, such as a task name and it's duration. You can also create mailbox rules for specific items, which enables you to interact with that item and update or add any information. Enabling InterAct automatically
installs a set of out-of-the-box mailboxes and rules so you can get started right away.
The first step in getting started is to select your domain name. The domain name provides the ending for all emails sent in to AdaptiveWork, for example, for the Bug mailbox on an account where the domain is myorg.clarizenmail.com the email address becomes Bug@myorg.clarizenmail.com.
By default your organization domain name is set as your organization name with no spaces and always ends with clarizenmail.com.
To confirm the default domain name click Save , or choose to change it. You can edit your domain name from any InterAct screen by clicking Edit where ever it is displayed. Domain names are 100% unique.
Once you have finished setting up your domain, click the Enable and Get Started button.
AdaptiveWork comes with three out-of-the-box mailboxes and rules that enable Email to Case and Web to Case ticketing.
These mailboxes include:
- Support - Creates Issues
- Bug - Creates Bugs
- Request - Creates Requests
These mailboxes are the only ones that do NOT check for an active AdaptiveWork license and can therefore be used by non-licensed users and customers.
Email to Case Rules
Each of the three mailboxes has a set of two rules, one for the creation of a simple issue, bug or request and one that requires additional details from the end-user. These rules can be enabled/disabled as needed but cannot be edited.
To edit these rules click the ‘Save As’ option below a rule and save the rule as a copy on the selected mailbox.
To create a new rule on any mailbox click the ‘New Rule’ link located on the mailbox. For Email to Case mailboxes certain actions are not available due to the fact that these mailboxes do not check for licenses.
Run Order
The Run Order of the rules within any given InterAct mailbox is crucial in order to ensure that the correct rule is activated by an incoming email. The rule of thumb is that the more complex the rule, that is; the more details are required by the end-user, or alternatively the more complex the evaluation criteria, the higher the rule must be in the run order.
Therefore a simple rule requiring an email subject as the title for a new issue should be set below a more complex rule that has an evaluation criteria requiring specific text in the email subject.
Setting the run order correctly allows more complex rules to be bypassed or triggered before the simple rules are reached.
The out-of-the-box email to case rules are already set in the correct Run Order, however, if you decide to add any additional rules to these mailboxes, ensure setting their order according to their complexity.
General mailboxes are mailboxes that are not set for specific items.
These mailboxes are typically used for the creation of new items in the system, such as a New Project mailbox or NewTask mailbox.
Creating a New Mailbox
To create a new General Mailbox, click the Create New Mailbox link located on either the All Mailboxes or General Mailboxes pages of the InterAct center.
Once this link is selected, you can enter your mailbox name. The mailbox name is combined with your domain name to set the mailbox.
For example, if you create a new mailbox called NewProject, and your domain is set as myorg.clarizenmail.com; the email address for that mailbox is NewProject@myorg.clarizenmail.com.
Once a valid name is set for a mailbox, the first rule for the mailbox must be created.
Specific mailboxes are the ready to use mailboxes for work items and issues. Basically this means that every work item (task, milestone, project) or issue (issues, bugs, requests, risks) you create in AdaptiveWork has its own personal email address.
This means that you can communicate directly with these items by sending emails.
For example, you can update the progress of a specific task via email or update the Resource(s) assigned to an issue.
Specific Item Email Addresses and Alias
By default, an item's email address is the item's system-generated ID.
So that the email address of a project with the system ID of ‘P-1’ where your organization domain name is set to ‘myorg.clarizenmail.com’, would be ‘P-1@myorg.clarizenmail.com’.
You can also set an alias for any item by accessing the profile card of that item and entering an alias in the ‘Alias’ field.
An Alias must be unique in your organization.
The Alias field can also be accessed in business rules, so that you can create a workflow rule that will automatically set the Alias of the item based on the items name for example.
To interact with an item, you must first create rules that are triggered by incoming emails.
Rules can be created for the following items:
Work items
Rules created here affect projects , milestones and tasks .
Project
Milestone
Task
All Issue Types
Rules created here affect issues, requests, bugs, and risks.
Bug
Issue
Risk
Request
To create a new rule on any of these mailboxes click the New Rule link on the specific mailbox.
To create a new rule for a general or specific item, click the New Rule link located on the specific mailbox.
Once this link is selected the new rule wizard opens. This wizard is similar to the business rule wizard for the creation of workflow rules and custom actions.
See below for an explanation on each section.
Properties
The following fields are displayed in the Properties section:
Rule Name
The rule name is a required field that should be descriptive for the rule itself. Like workflow rules, the name not required to be unique.
Rule Alias
The rule alias enables setting an alias for a rule, thus enabling sending an email directly to a rule. Rule Alias' must be unique per mailbox. If set, the email address for a rule is as follows: mailboxname.rulealias@domain.clarizenmail.com
Description
A mandatory field used to give a detailed explanation of a rule and the actions that occur once triggered. The rule description is sent out in vCard emails and in the confirmation message once a rule is triggered. It is highly recommended that this description be as accurate as possible.
Please note: InterAct rules cannot be triggered from Custom Actions or Workflow Rules.
Apply User Permissions
A checkbox enabling to decide if the given rule is available only for users with permissions on a given item or within the system. For example, you may be creating a rule that updates the progress of a task, and only want Resources and managers to update progress. In this case, you would select to ‘Apply User Permissions’.
Filter for specific item(s)
This field is only available when creating rules for specific items, such as work item, projects, issues, etc.
The field enables including or excluding an item, or items from a rule.
For example, there may be a rule that allows all users to update the progress of a project,
but the rule creator only wants this to work on the project ‘New Product Introduction’.
You would therefore need to select the ‘Include’ option and select that project.
User Input
The user input section enables entering variables that you would like to receive from the end-user.
Similar to custom actions, this section enables setting all the details for the variable.
Variables
Variables are data included in email messages by an end-user. This data is parsed by InterAct and is used in the actions when the InterAct rule runs.
Variable Name
The name that has to be used in formulas within the actions so they use the data the user includes in the email.
Label
The field name that is shown to the user. There can be multiple labels, each separated with a comma.
This is particularly useful when requiring several languages.
Type
Select the field data type from a list of possible data values.
Mandatory
Check this for the end-user to be forced to enter a value to this field.
If set as mandatory and the data is not sent within the email, the rule is bypassed.
Email Format for User Input Data
When a user sends an email requiring a variable, the correct email format is as follows:
- Var1: some data
- Var2: some other data
- Var3: another
Where Var1, Var2, and Var3 represent a label for each variable, and any data after the colon is used when the rule is confirmed and triggered.
Set Evaluation Criteria
The evaluation criteria sets the conditions for an InterAct rule to be triggered. The evaluation criteria is not mandatory, and can be skipped if not relevant. If used, the formula has to equal to True in run-time for the rule to be triggered.
When creating a formula you should use allowed system fields, system items, functions and operators, available in the Formula Options.
Set Action List
The set action list enables you to set the actions that occur after a rule is triggered and run. Actions available are the same as those available for business rules, with the exception of InterAct Only Actions.
Accessing Email Fields
In addition to the standard variables that can be used in the Formula_Editor in all workflow rules, InterAct rules have the ability to access email fields. These email fields can be found in the Variables tab of the formula editor under EmailObject fields and include the following:
- CC - return type string
- From - return type string
- HTML Body - will return the body of the email in HTML format (can be used for rich text fields and items, such as notes)
- Sent By - return type reference to item (contacts from customers and Users)
- Sent By fields - enables you to access all fields related to contacts and the resource entities
- Subject - return type string
- Text Body - return type string
- To - return type string
InterAct Only Actions
The following actions are only available when creating mailbox rules in InterAct:
- Save Attachment:
- Enables you to save email attachments onto items within the system
- Once this action is selected a ‘Filter File Types’ input box is opened. This enables you to decide what file types you would like to upload into AdaptiveWork.
For example, if you only want to upload files of type .pdf and .doc then enter ‘ .pdf, .doc ’ into
the input box. This is an optional field. - The AttachTo field also becomes available once this action is selected, and requires you to insert the item onto which you would like to link the attachments.
- Items that attachments can be linked to must be either Issues, Work Items or Expenses
- Users can input specific items, or may refer to items using the ‘Variables’ tab in the ‘Formula Options’
- Save Triggering Email:
- Enables attaching the original email sent to activate a mailbox rule onto a newly created or existing item.
- Once selected the ‘AttachTo’ formula field becomes available.
This is a mandatory field that requires you to insert the item onto which you would like to link the email. - Items that emails can be linked to must be either issues or work items
- Users can input specific items, or may refer to items using the ‘Variables’ tab in the ‘Formula Options’
- Multiple Resource Assignment:
- This action enables you to assign multiple resources to a work item at once, and is meant to be used with either an
email's CC list or with a variable of type text that contains a list of users all separated by a comma.
Once this action is selected two fields are available: - WorkItem
This formula field must return an item of type work item and can either contain a specific item, reference to an
item, or to an item available in the ‘Variables’ tab in the ‘Formula Options’ - ResourceList
This formula field can contain a string, or series of strings, each separated by a comma.
For example to assign all users in the CC list of an email enter {EmailObject.CC}.
You can also enter the following: {EmailObject.Cc}, {username}, email@domain.com, firstname lastname, which would assign all existing CC users, a specific user set with the username, a user that is found with the email address, and a user whose first name and last name match the one entered.
Success Email
The success email is the email sent out to a user once the rule is triggered and run successfully. The Success Email field can include formula's as fields that can be created or selected using the Formula Options link. The email is always sent out to the original sender of the email that triggered the rule.
When sending an email into InterAct the following must rules be adhered to:
- The email address in the ‘from’ can only contain the InterAct email address.
- Any variables should have the variable label followed by a colon and then the data- Var1: some data.
HTML forms for InterAct
Below is a list of examples of HTML forms that can be used to trigger InterAct rules.
Please note that all rules below use the "mailto" HTML command, meaning that when "submit" is clicked, it will open the email client and implant all necessary information within.
InterAct can also work with forms generated by EmailMeForm or similar services. These forms are better suited as they do not require users to have a system based email client (such as Outlook) and will host the form generation and conversion to emails themselves.
The HTML code below can be used for the Out of the Box "Specific" rules in all three email to case mailboxes.
<form action="mailto:bug@pacey.clarizenmail.com?subject=New Bug" method="post" enctype="text/plain">
<table>
<tr>
<td>Subject:</td>
<td>
<input type="text" name="subject" value="" maxlength="180" />
</td>
</tr>
<tr>
<td>Description:</td>
<td>
<textarea rows="5" cols="30" name="description"></textarea>
</td>
</tr>
<tr>
<td>Importance:</td>
<td>
<select name="importance">
<option value="low">Low</option>
<option value="medium"selected="selected" >Medium</option>
<option value="high">High</option>
<option value="critical">Critical</option>
</select>
</td>
</tr>
<tr><td> </td>
<td>
<input type="submit" value="Submit" />
</td>
</tr>
</table>
</form>
Example Mailbox - New Project
This InterAct mailbox will allow users to create new projects in your AdaptiveWork organization via HTML forms.
First, create a new general mailbox called "NewProject".
Next, create the following rule:
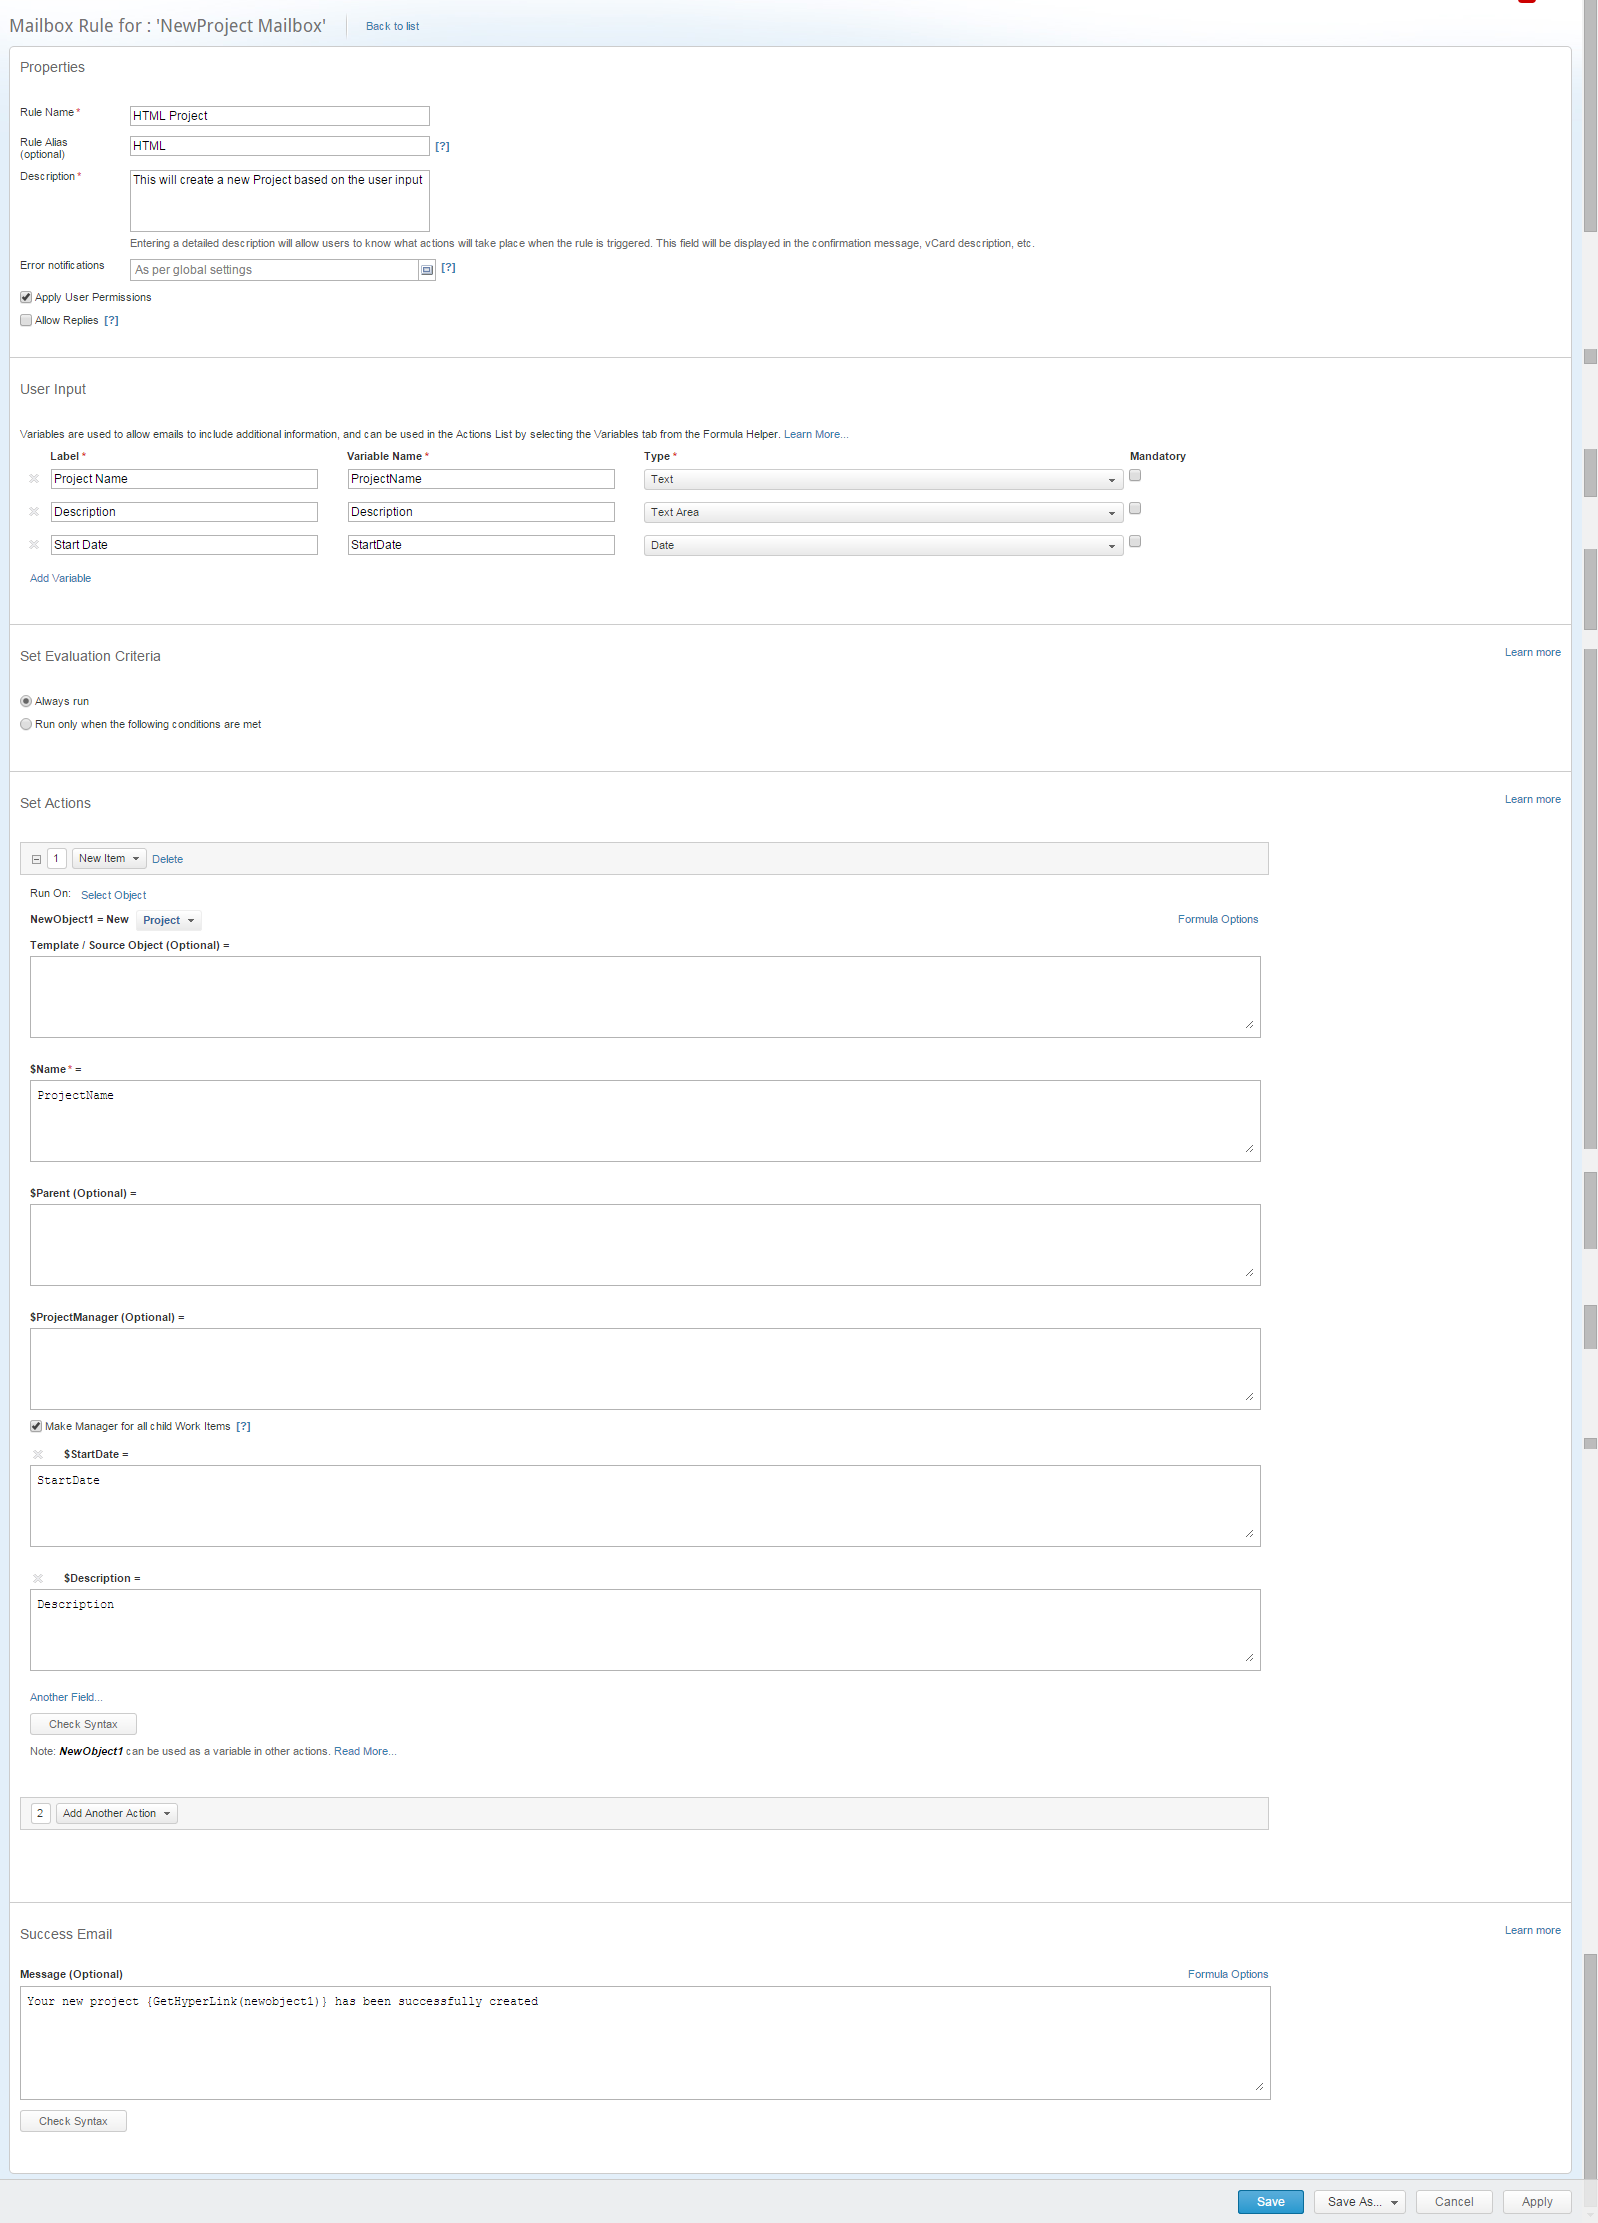
Now create an HTML form as follows:
<form action="mailto:NewProject.HTML@pacey.clarizenmail.com?subject=New Project" method="post" enctype="text/plain">
<table>
<tr>
<td>Project Name:</td>
<td>
<input type="text" name="project name" value="" maxlength="180" />
</td>
</tr>
<tr>
<td>Description:</td>
<td>
<textarea rows="5" cols="30" name="description"></textarea>
</td>
</tr>
<tr>
<td>Start Date:</td>
<td>
<input type="text" name="start date" value="" maxlength="180" />
</td>
</tr>
<td>
<input type="submit" value="Submit" />
</td>
</tr>
</table>
</form>