
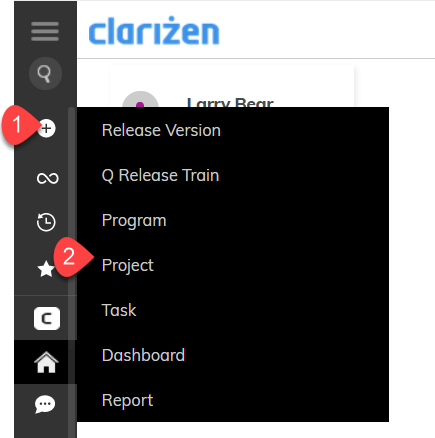
Projects
This page describes creating a project and includes the following sections:
Jump to:
- Getting Started
- The Roadmap
- The Work Plan
- Working with Files
- Discussions
- Expense Sheets
- Sharing Projects
- Using Templates
Getting Started
There are plenty of ways to create a Project inAdaptiveWork. One of the quickest ways is to:
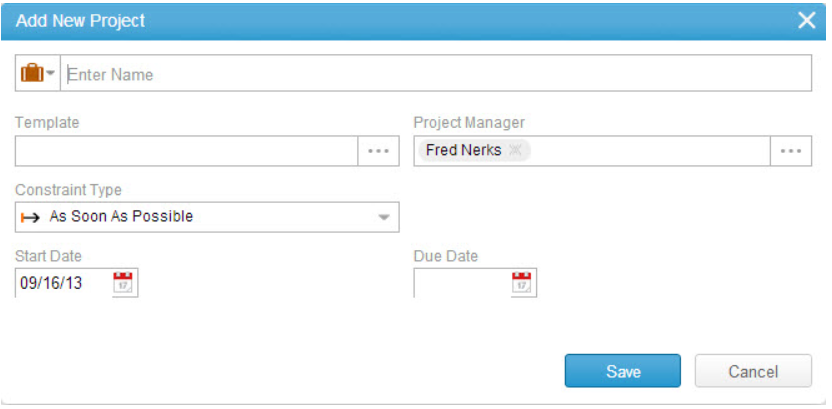
- In the Template field, click
 to select a template. (Optional).
Learn more about templates.
- In the Project Manager field, click
 to select a project manager (other than the default project manager).
 - In the Constraint Type field, click
 to define the project constraint type .
 - Click the Start Date field to define the project's start date.
- Click the Due Date field to define the project's due date.
- Click Save.
After creating your Project, you can open it in full view and use the different modules, such as Work Plan, Roadmap, etc. to manage the Project.
About Programs and Portfolios
When working with multiple Projects, you may want to use a Portfolio or Program to manage grouped Projects.
To learn about Programs and when to use them, click here. Continue reading about Portfolios:
A portfolio can be either a collection of active projects or a collection of shortcuts creating a portfolio overview.
- The portfolio parent (if any) can only be another portfolio and not a project
- Portfolios can only have projects directly under it, it cannot be the direct parent of Tasks and Milestones
- Dependencies cannot be linked to Portfolios
- Can have portfolio only under other portfolio.
To change a project to a portfolio:
- Ensure that the Project only has sub-projects
- Ensure that the parent Project (if any) is set as a Portfolio
- Ensure that the Project doesn't have any dependency links
- Ensure that the Project is not a shortcut in another Work Item
The Roadmap
Open the Project to view all its details. The first thing you may notice in the view is the Roadmap.
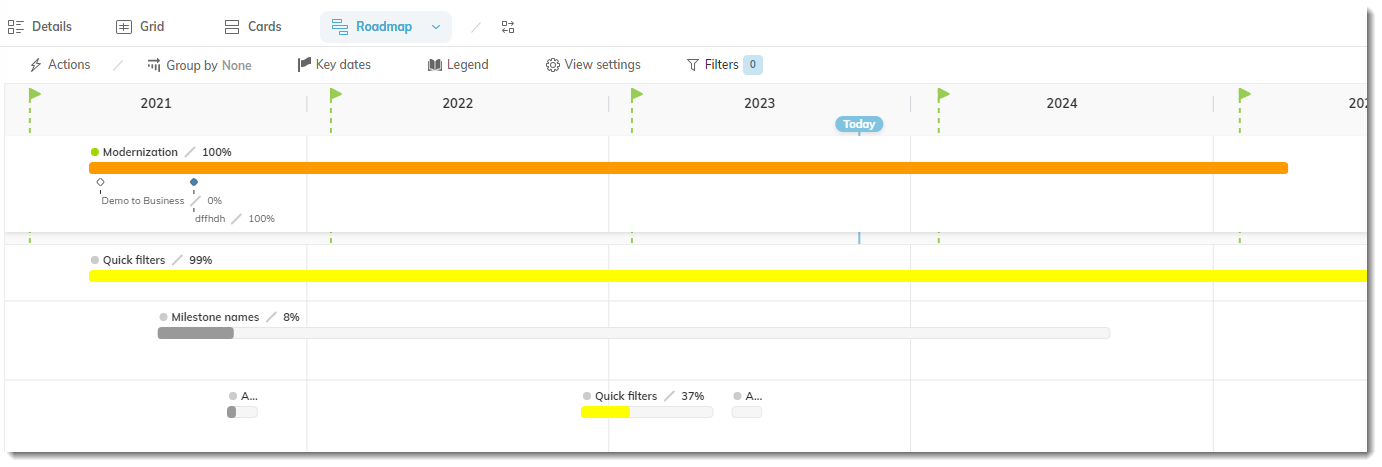
AdaptiveWork's Project Roadmap feature provides a birds-eye view of a project (and any sub-projects) and enables viewing the health and progress of each major phase or deliverable (called project milestones ) on a timeline.
The Roadmap is populated automatically as milestones are added to a project.
The Work Plan
The Work Plan or WBS (Work Breakdown Structure) enables access to your current project's structured plan of sub-projects, milestones and tasks, from where you can manage and track work items and their details, hierarchy and actuals using time tracking and progress updates of your work items.
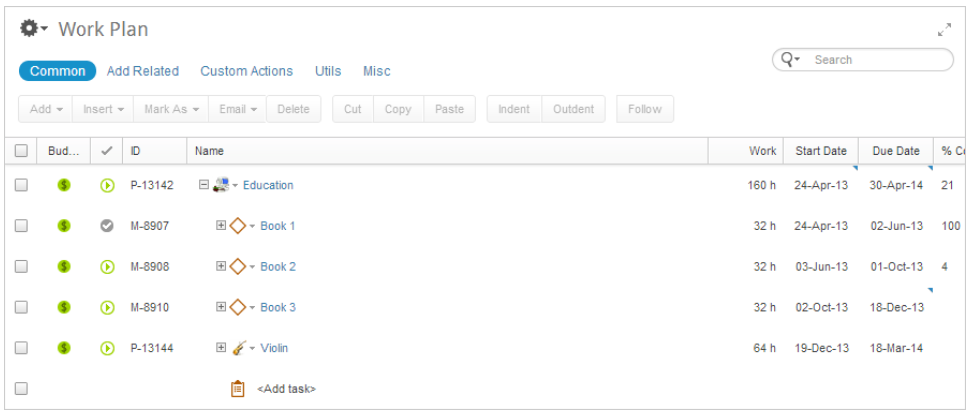
Adding a new work item to the project is achieved by selecting the project, clicking Add on the Common ribbon and selecting the relevant work item from the drop-down menu.
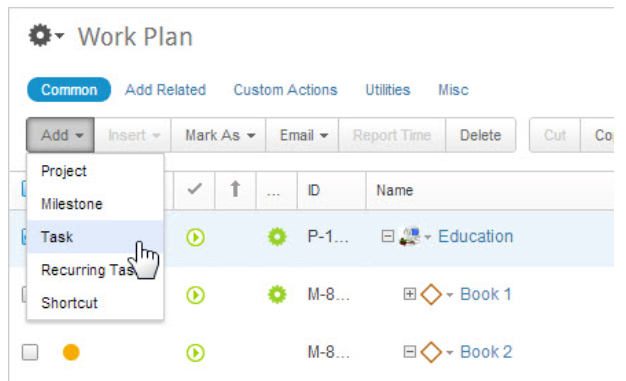
Work Plan Items
In the Work Plan, you will add the various Work Item, explained briefly below.
Milestones
A AdaptiveWork milestone can either be used as a gateway or as a hammock:
- A gateway milestone is basically a point of time in which the content of delivery is moved from one phase to another.
'At this point the project moves from one phase to the next.' Completion is represented by either an approval or a rejection of the gateway. - A hammock milestone represents a major deliverable which can be dependent on external dates for both its start and finish points, with dates normally derived from the sub-tasks, and is generally used to represent a project phase.
To create a hammock milestone, simply add sub-tasks to your milestone. The milestone start, end and overall duration periods are automatically set based on the sub-tasks. Additionally, the milestone's progress is aggregated from the tasks within.
(as displayed in the Work Plan shown above). Milestones can not have sub-milestones.
Tasks
In AdaptiveWork, a project manager or other manager may create tasks under any project work item. A task can be further detailed into other sub-tasks. At this point, the parent task becomes a container, also known as a hammock, and behaves like a milestone, summing up effort, duration and financial values from the sub-tasks below.
A task can be redefined and given a different hierarchy to suit project changes, by redefining the task as the child or parent of any task or milestone.
Sub-Projects
There are probably many different project types running in your organization. Some of them may be simple work plans with just a few milestones and tasks while others may encompass several sub-projects each of which represents a different point of your project.
Adding sub-projects into your current project is simple.
Sub-project scheduling and financial information is, of course, aggregated up into your main project automatically.
Finally, if you have sub-projects within your current project you can easily view them all on the Roadmap by clicking the Show All button on the Roadmap ribbon.
Sub-Projects and Tasks can be detached or moved to other work items, when needed.
Shortcuts
The shortcut option enables you to select an existing work item from any other draft or active project running within your organization. Shortcuts are a great way to reference external work items by enabling you to create inter-project dependencies or to enable external impacting within your current project.
You can add a shortcut to any level of your project, and shortcuted milestones will even appear in your Roadmap. Another great usage for shortcuts is for the creation of project portfolios.
When creating a project portfolio, simply select the shortcut option from the drop-down menu and search for the relevant projects you’d like to link in and select them.
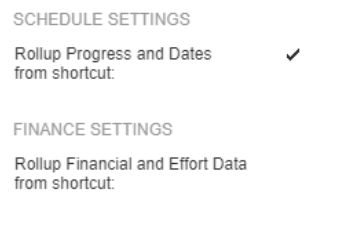
Note: Project settings define whether or not shortcuts affect project progress, effort calculations, finances or neither. To access the settings, open the Properties card and locate the Schedule Settings and Finance Settings.
Hierarchy
Setting up a project hierarchy is the first step to creating a project in AdaptiveWork.
Decide on your milestones (major goal points/deliverables/phases), determine what tasks need to be added to hammock milestones and decide on which gateway points you will be using for your workflow.
Delegating Management of parts of a Project
There are many projects which may require sub-projects or milestones to be managed by other people than the project manager such as team leads.
Changing the work item owner simply requires you to select the 'Owner' column of a specific work item and editing the Owner name. Once you select a different owner for a work item, the new owner is able to plan their part of the project, set dates and assign resources (if they are to delegate the work to others). Work Item Owners also have the ability to manage all sub-items below the item they are owner of.
After setting up your project hierarchy, the next step is to establish dependencies.
Basically, dependencies are work items that are either predecessors or dependent upon others.
The four kinds of dependencies with respect to ordering work items are:
- Finish to Start (FS)
- Finish to Finish (FF)
- Start to Start (SS)
- Start to Finish (SF)
All four may be used within your project to determine the schedule plan of what your project work flow will be.
The Duration of a work item represents the time span between the start date and the end date.
You can choose to either work with a manually set start and due date or simply input the overall duration.
When you manually set Start and Due dates for a work item, automatic date rescheduling based on dependencies & lags will not be applied. So if you are looking to automatically schedule your project based on work estimates and resource availability, it is recommended to set task and milestone Duration.
Setting a task duration will automatically sets the start and due dates based off of the project start or due date as well as any dependent work items.
It is also important to distinguish between the overall 'Work' planned effort estimate for a work item and the 'Duration' which the timeframe allotted to perform the work. You can set either or both of these fielsd.
It is highly recommended that you switch to your 'Scheduling' view to easily access the 'Work' field of each individual task.
The Work column notifies of how much effort (in man-hours / person-hours) needs to be put into a work item during the established 'duration'.
For example: a task may have a duration of 1 month, but during that 1 month, only 4 days of effort needs to be completed in order to complete the task. To input the duration and/or work for a given work item, simply type in the number and then h for hours, d for days, w for weeks, m for months and cd , cw , cm for calendar days, weeks and months respectively.
Shifting Staffing Requests and Project Assignments
Plans change and as a result project dates move.
You can move project assignments and staffing requests in the project using the Shift Dates button that appears in the Project Assignment and Staffing Request panels. This is especially useful when changing the Project's start date.
Click here to learn more.
Resources
Now that the overall plan for the project is completed, it’s time for the most important part: Assigning resources.
Resource assignment can be done in several ways in AdaptiveWork. Before assigning a resource to a work item, you need to ensure your users are in AdaptiveWork. If not send them invitations to join AdaptiveWork.
One easy method to assign resources is simply to click the Resource column field in a grid . Clicking the resource's icon displays
the resource's current availability for this period, enabling you to see if the resource is overloaded for the work item period.
Another simple method for assigning resources can be achieved when working in a team-centric view and incorporating the AdaptiveWork Team Panel.
Activation
AdaptiveWork projects and work items have five defined states which can be set by project managers and work item managers (but not by resources or reviewers).
 Draft – The planning stage. Scoping out project work, budget and resourcing.
 Active - When your project is ready to start. It is fully scoped, fully resourced and is ready to begin execution,
it does not matter if it has not reached its targeted start date. Tasks and milestones may have dependencies on
predecessor tasks and milestones, so whilst a task may be active it may not yet be executable. On Hold - if a project or individual work item has stalled for some reason, such as the customer postpones a decision,
budget is exhausted, project sponsor drops support. Canceled – the project or individual work item will not be executed.
 Completed – No further work is planned.
You can work with both Active and Draft work items in the same project. In fact, there may be a few items within your project
that are On Hold or even Canceled.
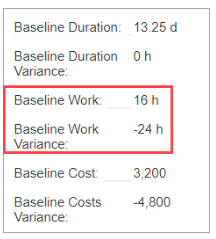
Baselines
Create Work Plan baselines to compare actual scheduling and financial parameters with planned or expected data on Work Items and resources. The available baseline fields display baseline values and variance values for start and due dates, work, and costs.
You can also see the baseline in the roadmap, and use baseline fields in reports.
To save a current Work Plan as a baseline:
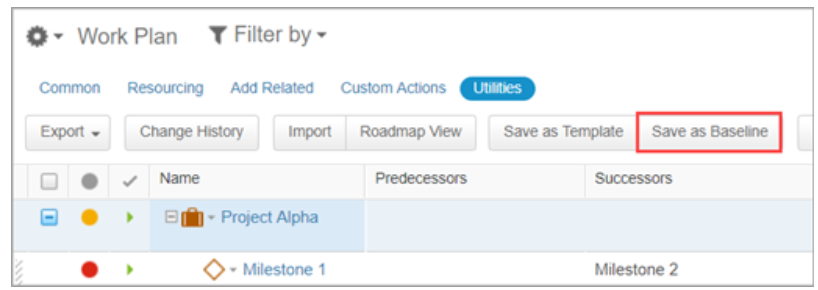
- In the Work Plan, select the Project line in the grid. Open the Utilities tab, and click Save as Baseline.
All Work Items under the selected Project will be saved in the baseline. So while you must save the baseline at the Project level, you will be able to see baseline and baseline variance data for Work Items (Milestones, Tasks, etc.) under the Project.
To view the baseline values and variances, add them to the Work Plan columns or search for them in the Property Card.
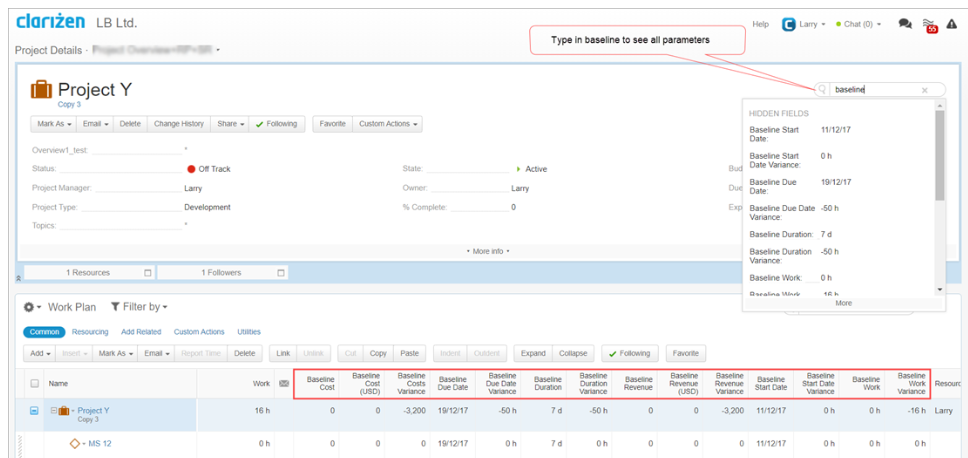
Note: The baseline variance is calculated as the baseline value less the current value. In the example below, the baseline is 16 hours less the current value of 40h, equals -24h. This is the inverse value used in MS Project, which would display 24h.
Note: You can also view baseline data on the resource link. Click here to read more.
Baseline Apps in the Apps Marketplace
Baseline Versions
Every time you save the Baseline, the new baseline overrides the previous baseline.
If you need to review and compare data between multiple baselines, you can use the Baseline Versions app to create multiple baseline versions and and review the data in a data table, in its own panel in the Project view.
Auto-Baseline
The Auto-Baseline app automatically sets a baseline when activating a Draft project, so the Project Manager does not need to manually set a new baseline once the Project plan is finalized. On creating the baseline, a notification post is added in the Project’s Discussion thread.
Enhanced Contextual (Right-Click) Menu in the Work Plan
Access frequently-used actions, usually accessible from the Common, Custom Actions, and Add Related menus.
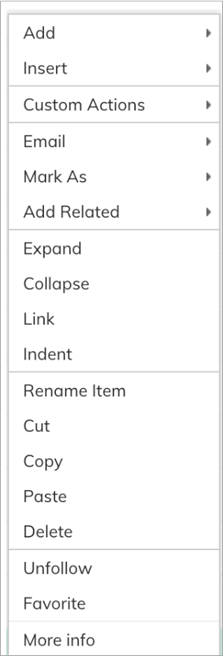
The menu is also customizable per Profile.
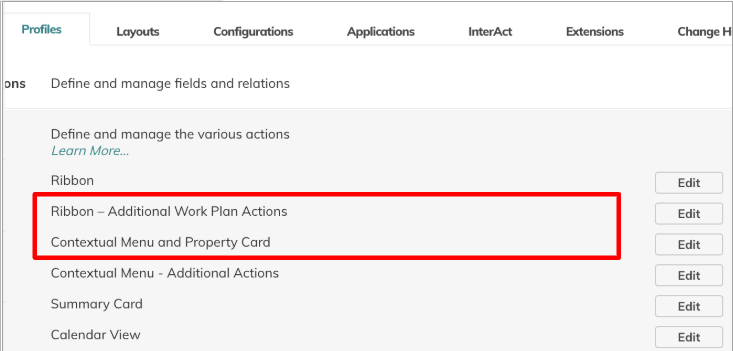
Click here to learn more about configuring the contextual menu.
Expand or Collapse the Ribbon
Save vertical real estate, and reduce menu overload.
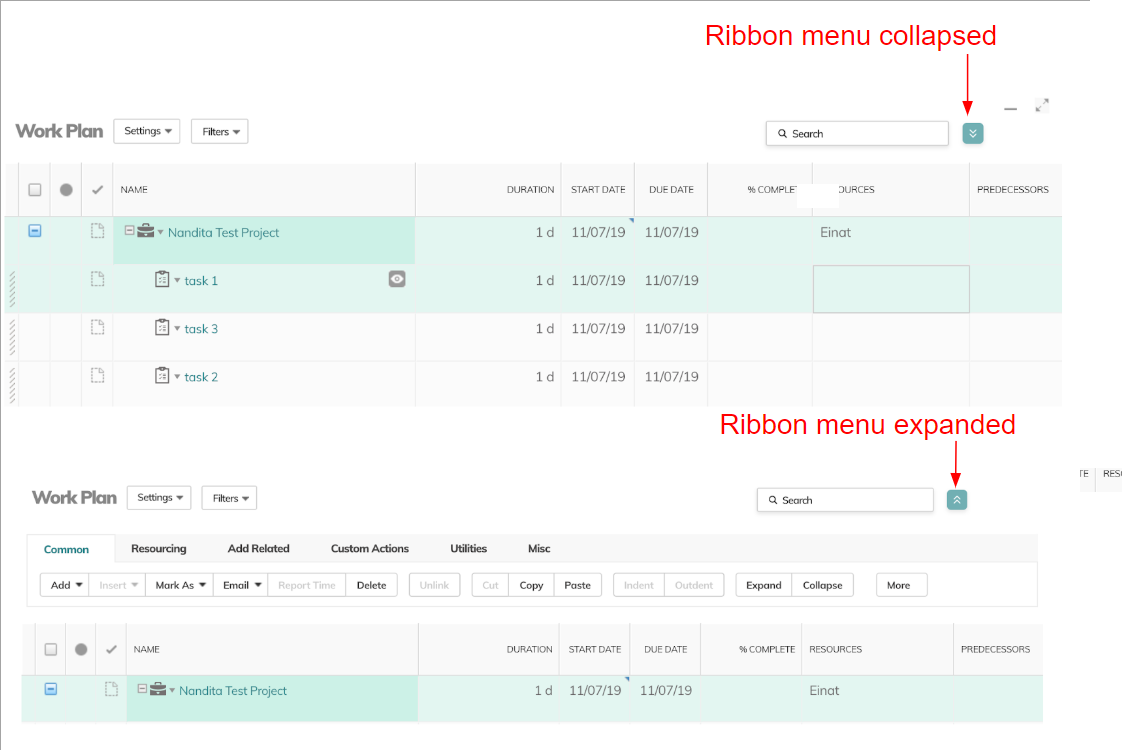
And once minimized, use the new right-click options instead of the ribbon options.
Working with Files
AdaptiveWork enables uploading supported file types of up to 25MB to a work item. You also have the ability to upload and utilize Google Docs and Box to a work item.
Discussions
AdaptiveWork discussions are an effective method for inputting additional knowledge and/or sharing data and exchanging ideas on work items.
You can create new discussions and participate in existing discussions, including discussions on all items (such as work items, cases, files and more).
Expense Sheets
Expenses are your expenditures linked to work activities, letting you keep track of project-related expenses or general expenses. Expenses can be easily associated to project activities, which in turn automatically calculates the related work item’s actual cost and revenue base. The billable expenses are included into the project’s revenue.
Sharing Projects
Projects can be shared easily with users using links and widgets.
Links can be shared only with licensed users because AdaptiveWork permissions are necessary to view information.
Widgets are read-only, so that real-time information can be shared with licensed and unlicensed users without AdaptiveWork permissions.
Using Templates
This page describes creating new projects using templates and includes the following sections :
Using templates to provide the basic framework for creating new projects from a previously built project saved in the system or from a project imported from MS-Project saves you time. All fields and data are maintained when a project is saved as a template. When creating the new project, the template properties define the configuration and planning of the project's overall architecture and strategy for achieving deliverables. The template may include user assignments and related items, such as milestones, tasks, and files.
Creating a New Project Using a Template
- Please read ' Before Getting Started ' and Steps 1 through 3 of 'Getting Started'.
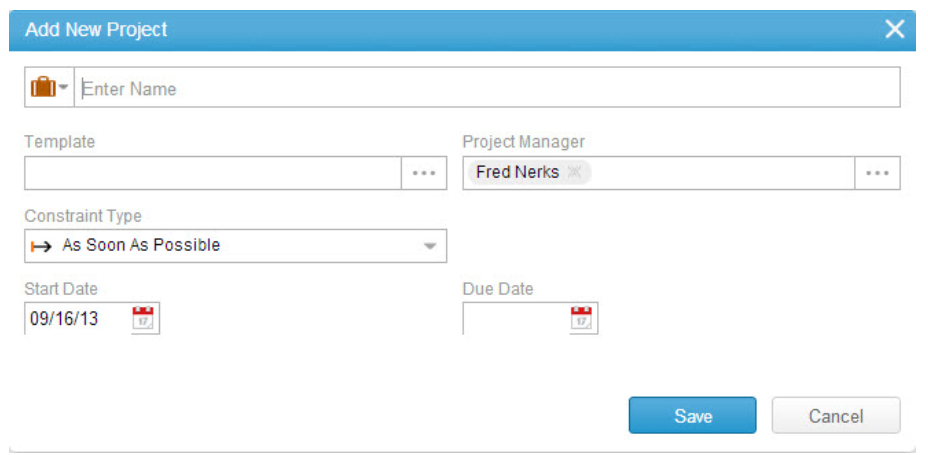
Figure 1: Add New Project Pop-up Window
 and
and  options, whereas pop-up windows are not.
Layouts for defining new items can be configured to display information and/or fields as pop-up windows or as inline editors by your organization's Admin user, via Layout Settings.
- In the Template field, click the 3-dot menu.
The Select Template find window opens listing the organizational templates (DEFAULT ).

- Click
 to change the list to AdaptiveWork 'out of the box' templates.
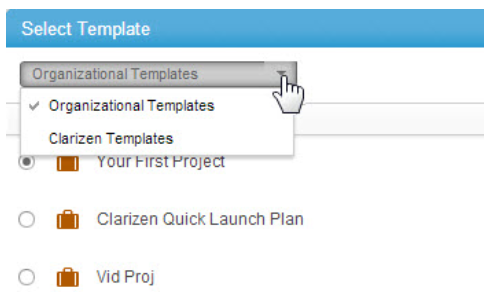
Figure 3: Select Which Templates
- Click
 or
or  to page the window .
Sort columns , define column sets and/or define search filters.

Figure 4: Filters
- Select a template.
- Uncheck the item type properties not to be included in the new project.
- From the Include list, select which related items to include from the template. Select one or more of the options: milestones, tasks, sub-projects, files, notes, resources, resource planning, NLR, NLR with time-phased data, and permissions.
NOTE
NLR stands for Non-labor Resource. Selecting NLR will only include non-labor resources linked in the template. Selecting NLR with time-phased data will also include data from time-phased financial fields tied to non-labor resources in the template.
- Click OK.
The Add New Project pop-up window or in-line editor loads with the selected template properties.
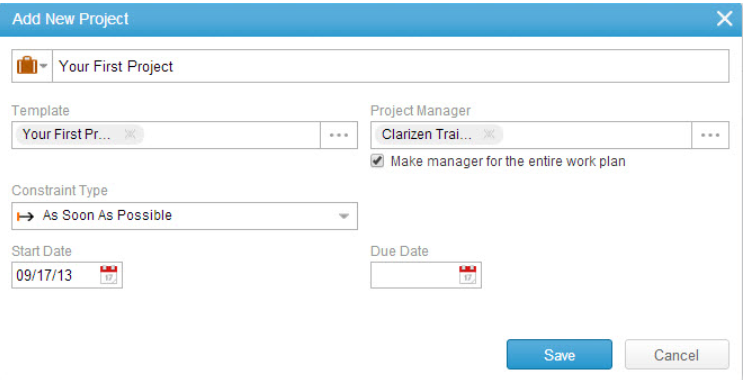
Figure 5: Add New Template Project
- Click Save.
The new project opens in Item Detail view.