Atlassian Jira
- Last updated
- Save as PDF

Overview
Atlassian Jira is a suite of agile work management solutions that powers collaboration across all teams from concept to customer. Jira is by far the most popular Agile tool in the software delivery toolchain today. It plays a central role in planning and tracking work, primarily for engineers, but often for other teams as well.
Supported Extensions
Atlassian offers a wide variety of applications and plug-ins that are supported by the Atlassian Jira connector.
Jira Core
Jira Core is the default application of the Jira platform, and will always be present in a Jira instance. It includes Jira core functionality, such as users, business projects, and workflows, and its main work item types are tasks and sub-tasks.
Jira Software
Jira Software includes users, software projects, and workflows, and its main work item types are tasks, sub-tasks, stories, bugs, and epics.
Jira Service Management
Jira Service Management (formerly Jira Service Desk) includes users, service projects, and its main work item types are change, access, purchase, IT help, fault, new feature, improvement, incident, problem, and service request.
Advanced Roadmaps for Jira Data Center Plug-in (on-prem)
Planview Viz supports the Team and Parent Link fields for the Advanced Roadmaps (formerly Jira Portfolio) plug-in.
Note: The Viz user created through Advanced Roadmaps must be granted Advanced Roadmaps shared team management permissions. To list non-shared projects/teams, you must also have Advanced Roadmaps user permissions.
Jira Plug-ins (other)
Fields created by other plug-ins may be exposed in Viz as read-only fields. These are typically fields that are added to the normal Jira artifact UI by the plug-in (i.e., a field that is displayed within the typical Jira defect UI). Fields created by unsupported plug-ins that are included in totally new UI sections in Jira, on the other hand, will likely not be exposed in Viz.
Connector Setup Details
This section describes the basic steps needed to prepare your Atlassian Jira instance for use with Viz.
Minimal User Permissions & Viz User
We recommend that you create a new user within your external tool, to be used only for Viz. This is the user information you will enter when setting up your tool connection within Planview Viz. By creating a new user, you will ensure that the correct permissions are granted.
In general, your user account should have sufficient permissions to read artifacts in your tool.
Your user should have a secure password or token. Please be aware that Viz will not allow you to save a tool connection utilizing a weak password/token, such as 'tasktop.'
See instructions on how to create a new Viz user in Atlassian Jira.
List of minimal user permissions:
Note: The minimal user must be a member of the group and have the following permissions at the project level.
|
|
jira-user |
|---|---|
|
Project Permissions |
Browse Project |
| Issue Permissions |
Create Issues (Only needed for Jira instances which have an Xray license) |
|
Global Permissions |
(if using Jira Cloud or Zephyr Cloud after 3/31/19) |
Connecting to the Jira Repository
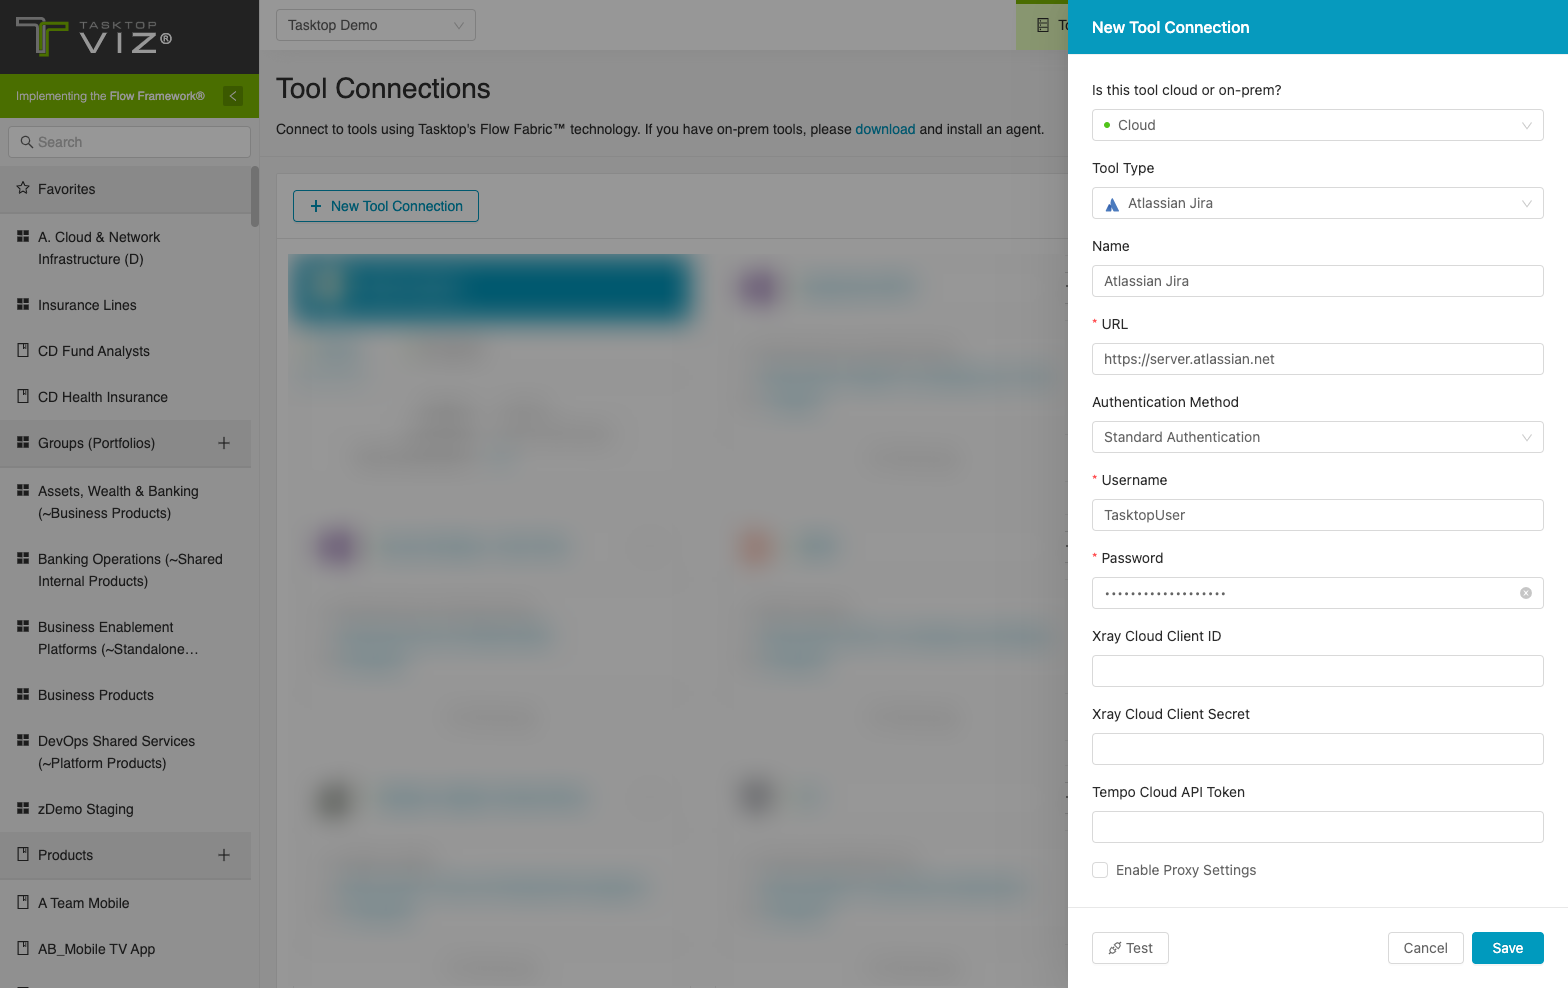
Standard Authentication
Required Fields:
- Location/Connection URL
- Example Format: https://server.atlassian.net
- Username
- Password
Standard Authentication (Via AWS Secrets Manager)
This authentication method connects to AWS Secrets Manager to retrieve the username and password and then authenticates with the Jira repository via Standard Authentication.
Note: This authentication method is only available for on-premises agents. It will not work for cloud agents. It is also only available for Jira Data Center as Jira Cloud does not support Standard Authentication.
Prerequisites:
- IAM Role Permissions: The machine hosting the agent must possess IAM Role permissions to access the necessary AWS Secrets Manager secret.
- KMS: Customer managed keys created in AWS Key Management Service (KMS), used for encrypting secrets, should be created in the same AWS account and region of the secret.
Required Fields:
- Location/Connection URL
- Example Format: https://server.atlassian.net
- AWS Secret ARN
- The Amazon Resource Name (ARN) is automatically generated in AWS when a new secret is created.
- The ARN can be copied from the AWS Secrets Manager Secret details page in the AWS console.
- Note: The Secret ARN will also support cross-account cases where the Secret is stored on a different account. In this scenario, the Policy configuration to access external AWS account Secret must be done and tested.
- The username and password must be created in that secret with keys “username” and “password” respectively.
Please see the following demo video for more information:

Optional Fields:
- Xray Cloud Client ID (see details above)
- Xray Cloud Client Secret (see details above)
- Tempo Cloud API Token (see details above)
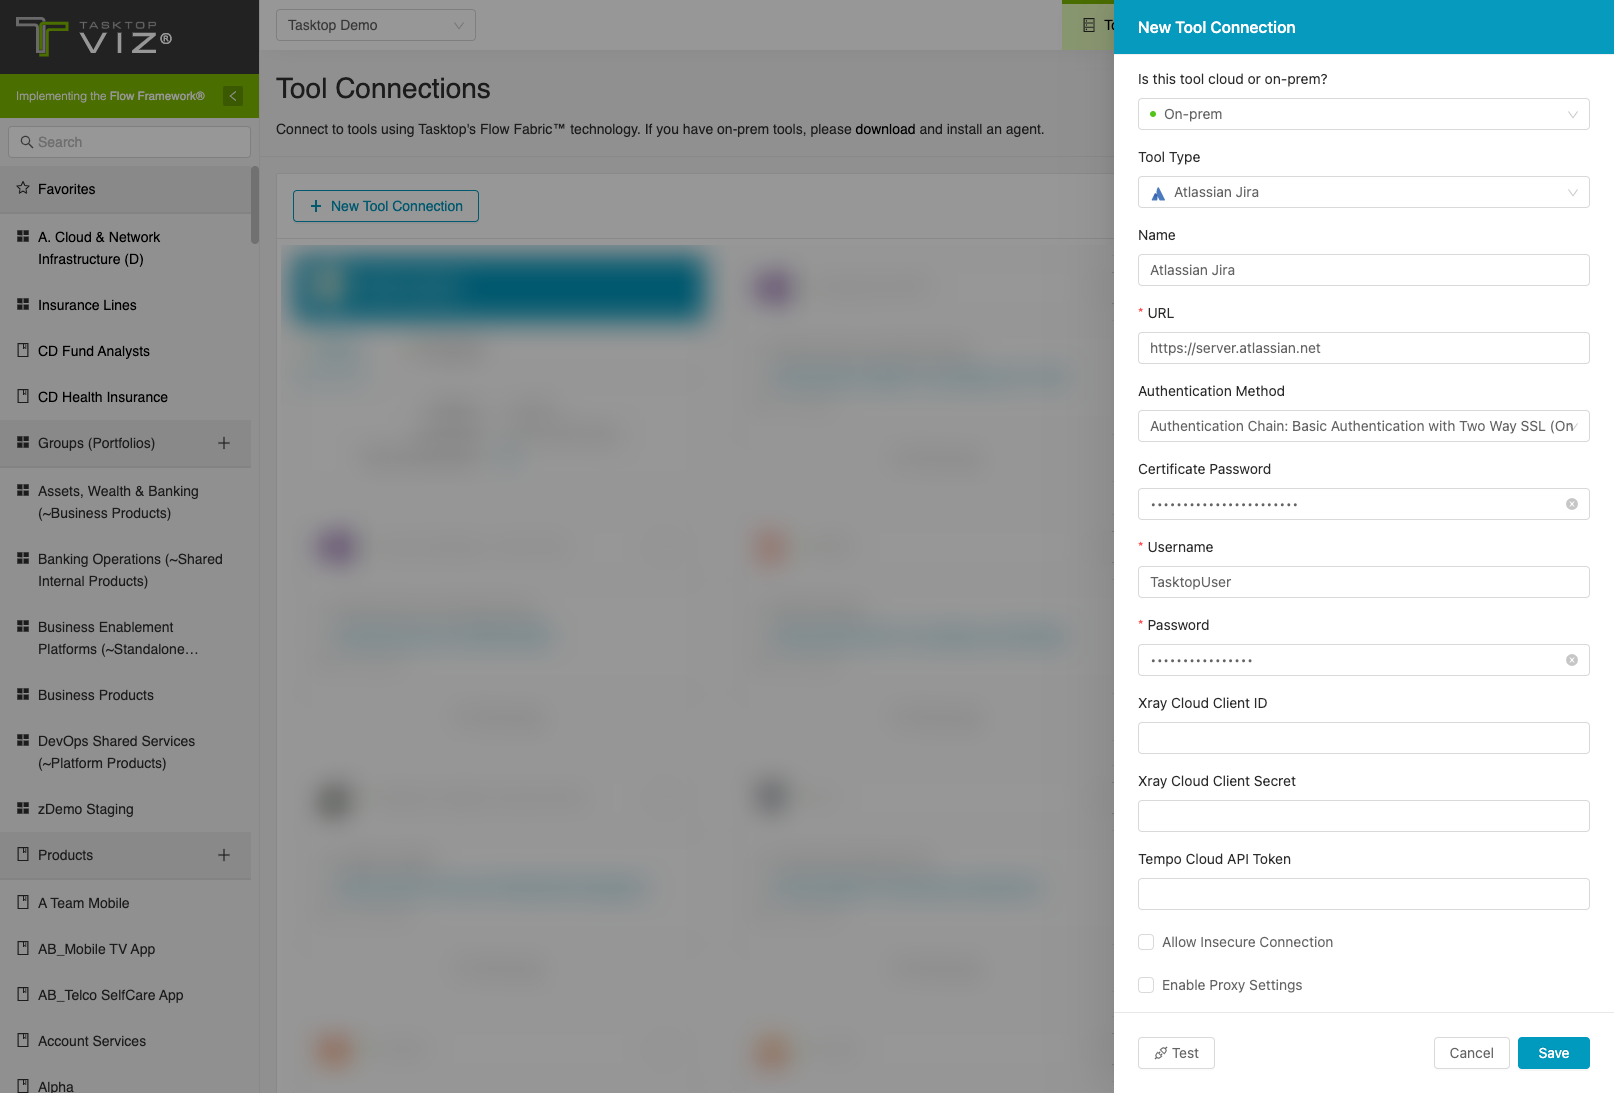
Authentication Chain: Basic Authentication with Two Way SSL
Required Fields:
- Location/Connection URL
- Example Format: https://server.atlassian.net
- Certificate Password
- Username (for Jira)
- Password (for Jira)
Optional Fields:
- Xray Cloud Client ID (see details above)
- Xray Cloud Client Secret (see details above)
- Tempo Cloud API Token (see details above)
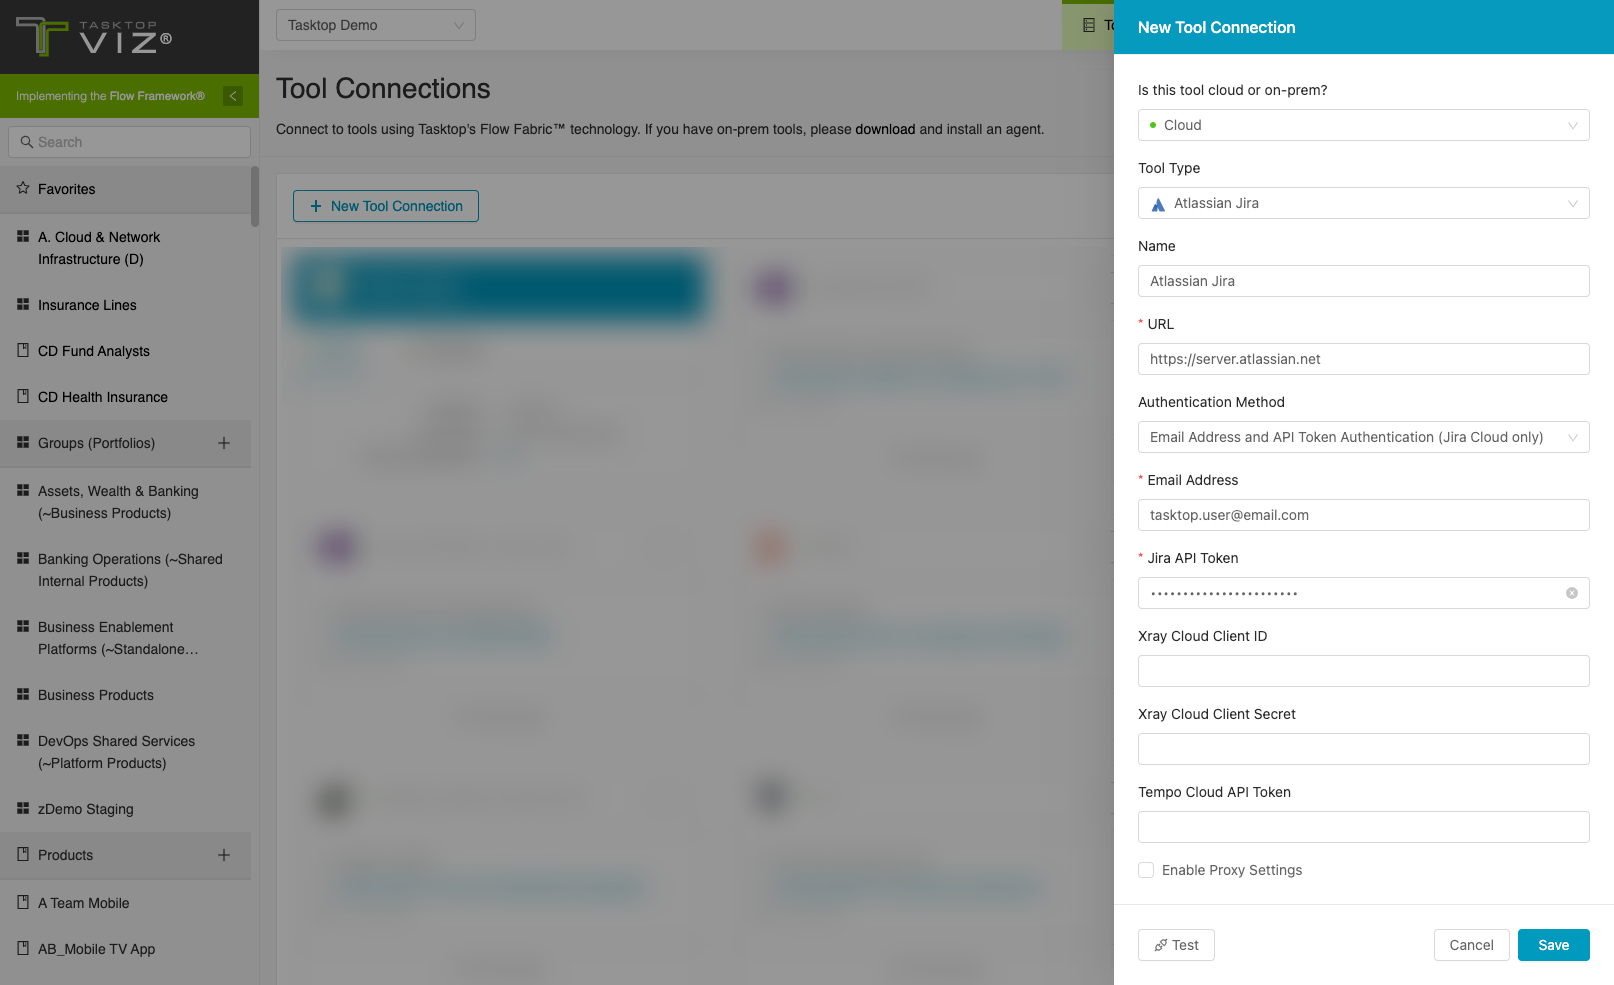
Email Address and API Token Authentication (Jira Cloud only)
Required Fields:
- Location/Connection URL
- Example Format: https://server.atlassian.net
- URL format must begin with https
- Example Format: https://server.atlassian.net
- Email Address
- The email address used to create the API token.
- Jira API Token
- You can learn how to create an API Token in Jira here
- The token can only be accessed once via the Atlassian website during this setup phase. If you lose the contents of the token, you must revoke the token and start from the beginning.
- If the token is revoked on the Atlassian website, you must create a new token and update the Viz settings.
Optional Fields:
- Xray Cloud Client ID (see details above)
- Xray Cloud Client Secret (see details above)
- Tempo Cloud API Token (see details above)
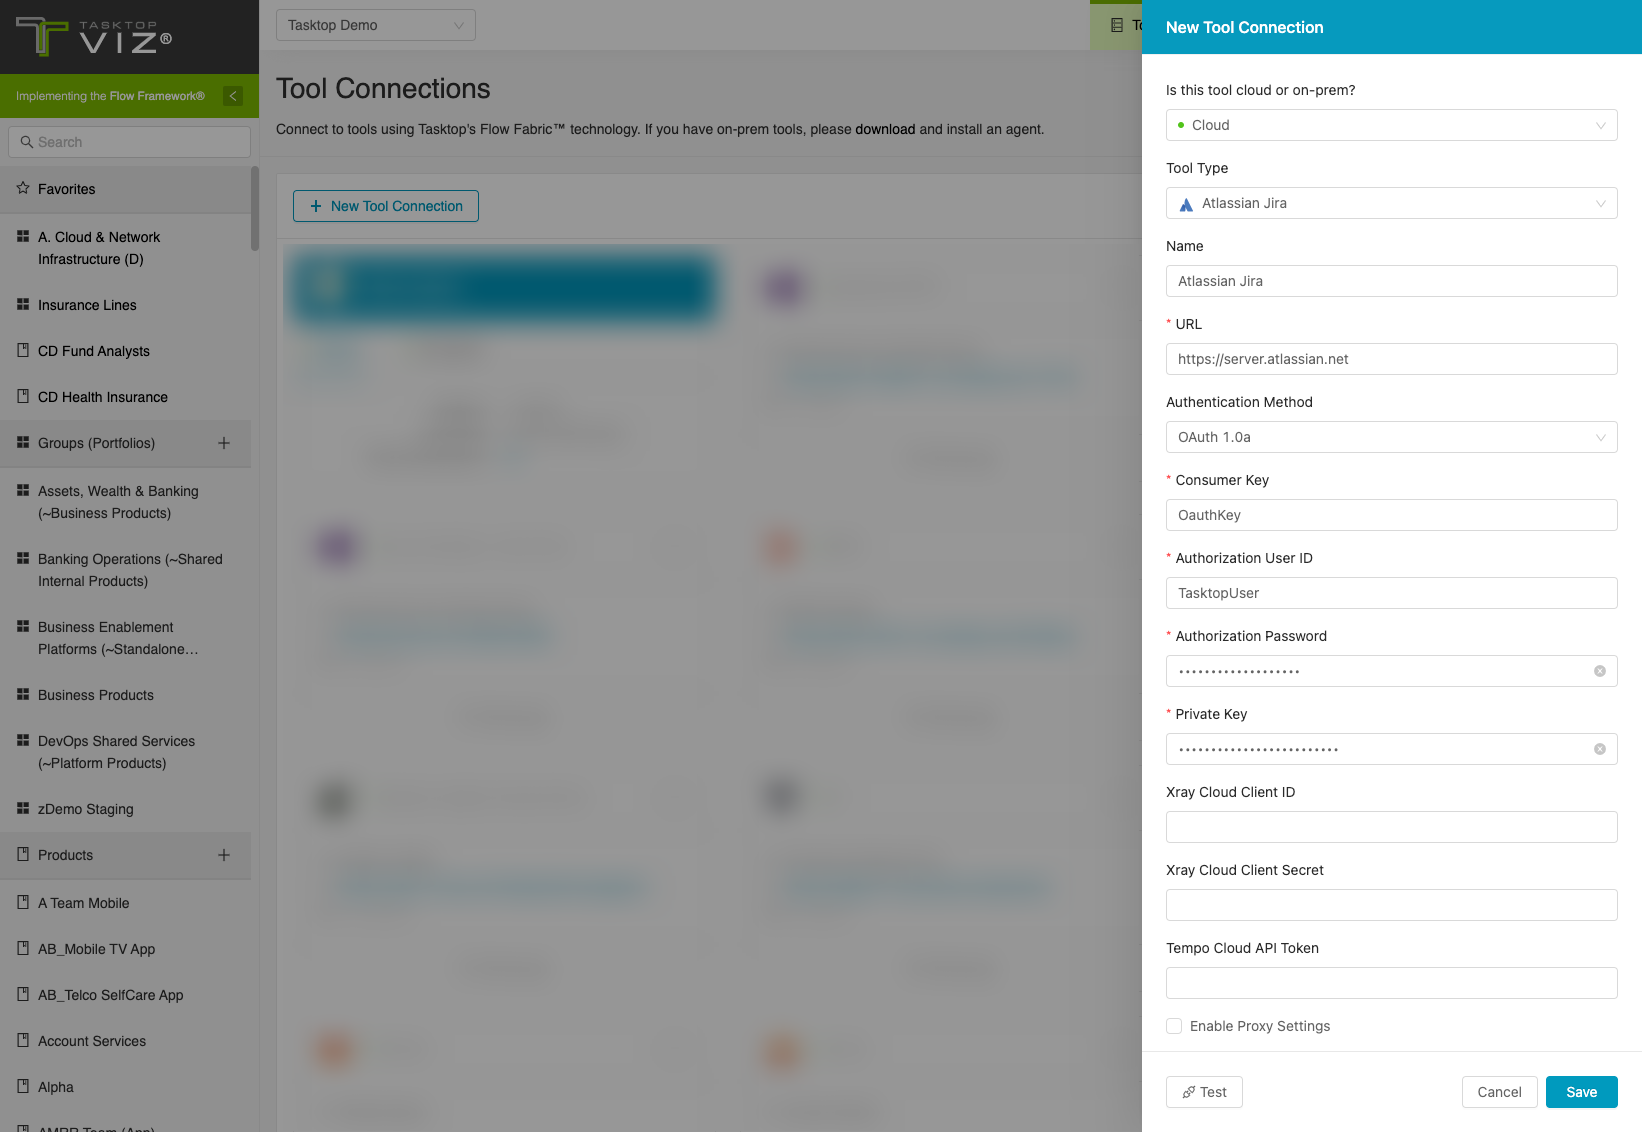
OAuth 1.0a Authentication
Required Fields:
- Location/Connection URL
- Example Format: https://server.atlassian.net
- Consumer Key
- The consumer key set up using the instructions below.
- Authorization User ID
- A valid user ID with rights to the issues you'd like to flow (see Minimal User Permissions & Viz User section above).
- Authorization Password
- The password for the Authorization User ID.
- Private Key
-
The jira_privatekey.pcks8 you created in the steps outlined below. As an example, if the private key looks like the following:
-
-----BEGIN PRIVATE KEY-----
12345
abcde
-----END PRIVATE KEY-----
You only have to copy/paste the 12345abcde text. Viz will handle with the line wrap characters for you.
Optional Fields:
- Xray Cloud Client ID (see details above)
- Xray Cloud Client Secret (see details above)
- Tempo Cloud API Token (see details above)
Public/Private Key Set-up
Before any configuration of Jira or Viz can occur, public and private keys must be created if you have not done so already. The public keys will be configured into Jira. The private key will be used by Viz during REST requests.
Prerequisites: You must have openssl installed (http://www.openssl.org)
These steps should be followed if you want to set up your own:
- Open a command prompt.
- In the command prompt, run the following:
openssl genrsa -out jira_privatekey.pem 1024
openssl req -newkey rsa:1024 -x509 -key jira_privatekey.pem -out jira_publickey.cer -days 365
openssl pkcs8 -topk8 -nocrypt -in jira_privatekey.pem -out jira_privatekey.pcks8
openssl x509 -pubkey -noout -in jira_publickey.cer  > jira_publickey.pem
The files generated will be in the current directory. You will need to refer to these files in the subsequent steps.
Jira Configuration Steps
The following are the steps to be followed to configure a Jira 7.0 instance:
- Log into the Jira administration console as a user with administration rights.
- Click on the cog icon and select the Application configuration.
- From the Application configuration, select Application Links.
- This configuration may be also available under Add-Ons depending on the version of Jira that you are using.
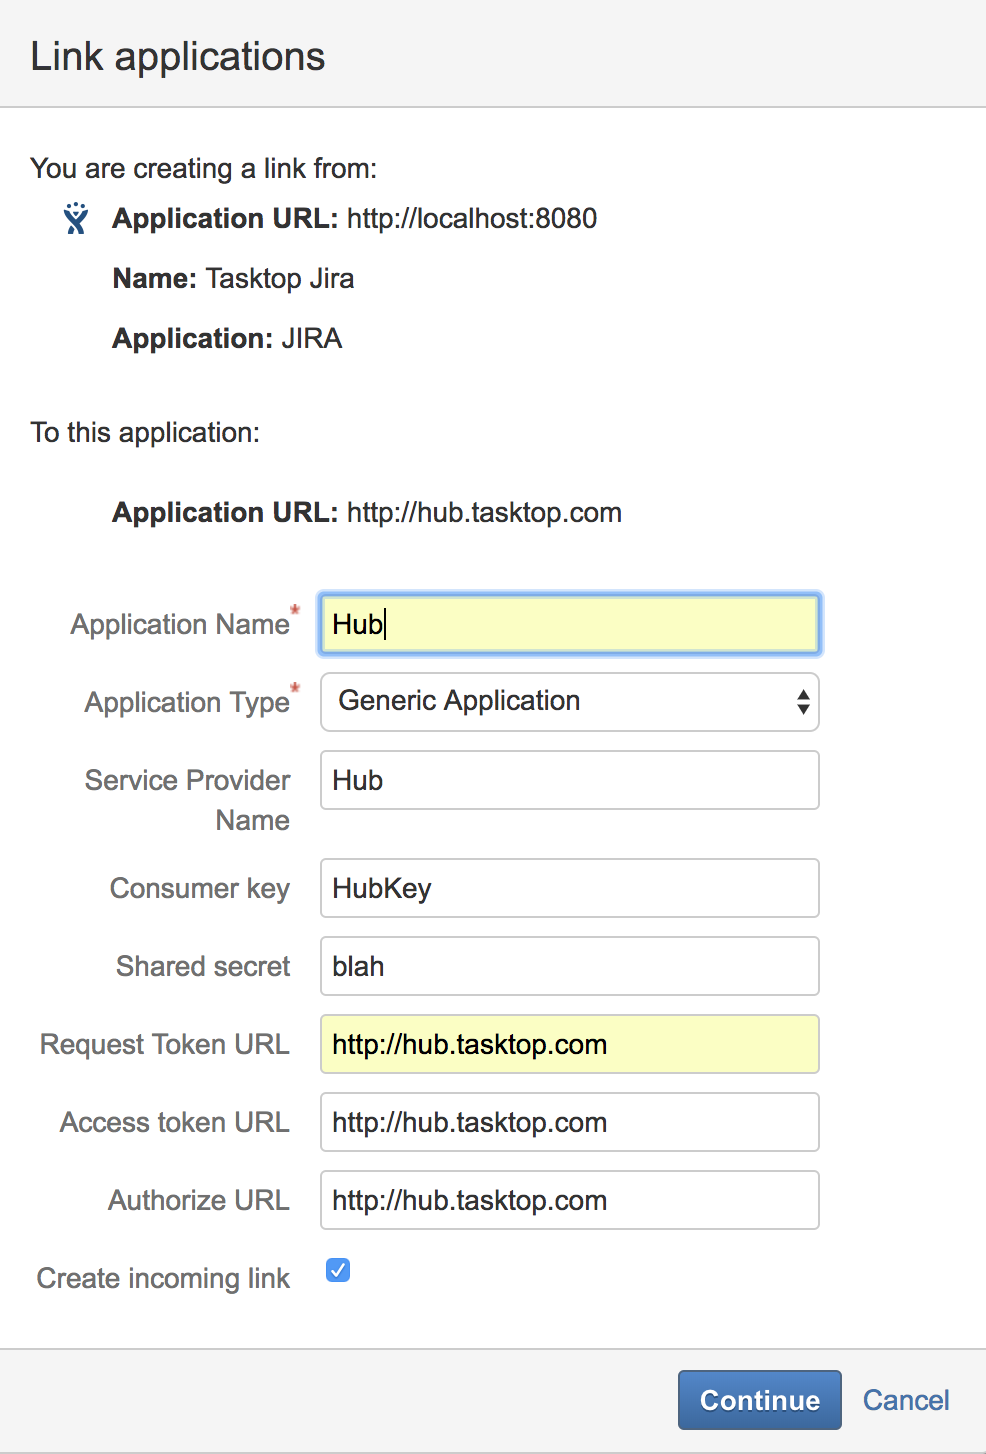
- In the text box that says Enter the URL of the application you want to link, enter any URL that represents Viz (e.g., https://viz.tasktop.net). This does not have to be a valid URL. It is used just for descriptive purposes.
-
- On the first screen of the Link Applications dialog, enter anything you want in the fields. The important part is you ensure the Create incoming link checkbox is checked.
- Press Continue.
- The Incoming Authentication dialog will appear.
- Enter the following:
- Consumer Key (A unique string to identify Viz. Record this value as it will be needed by Viz to send as part of REST requests)
- Consumer Name (A short name describing Viz)
- Description (optional)
- Public Key (the contents of the jira_publickey.pem you generated above)
-
As an example, if the below text were the public key, you would copy/paste the abcdef12345 text into the field. You do not have to worry about stripping line wrap characters as Jira will do it for you.
-----BEGIN PUBLIC KEY-----
abcdef
12345
-----END PUBLIC KEY-----
-
- Save and close.
OpenID Connect Private Key Signed JWT Authentication
Note: Jira does not support this authentication method on its own. The following plug in can be used to support this authentication method.
Required Fields
-
URL for OpenID Connect credentials
-
The token endpoint. You can get this from the authentication servers well known configuration endpoint.
-
-
OpenID Connect client ID
-
The client ID registered with the authentication server.
-
The client must have the client credentials grant type enabled.
-
The client must have registered the public certificate given in the “RSA certificate and private key (.p12)” field
-
-
OpenID Connect scope
-
Public Certificate
-
A PEM encoded public certificate of the private key being used to sign JWTs included in the requests client_assertion parameter
-
-
RSA Private Key
-
A PEM encoded PKCS8 private key used to sign JWTs included in the requests client_assertion parameter.
-
Optional Fields
- Resource Parameter
-
The Open ID Connect resource parameter sent in the access token request.
-
Required for versions of Microsoft AD FS prior to 2019.
-
- Key ID
-
The “kid” header of the JWT sent in the access token request.
-
OAuth 2.0 Client Credentials Proxy Authentication (For Jira standard artifacts only)
This authentication enables secure, token-based access via a proxy, using client credentials method.
Note: Jira does not currently support OAuth 2.0 Client Credentials authentication. As a result, the Jira connector does not allow connecting directly with the Jira repository using the OAuth 2.0 Client Credentials authentication method.
Other Configuration Settings
Note about Team-Managed Projects (formerly Next-Gen)
In Fall 2018, Jira added support for Team-Managed projects to Jira cloud. Please note Jira Team-Managed projects have not yet been tested on Planview Viz.
Updating Closed Jira Issues
By default, once an issue is closed in Jira, it cannot be modified by a Jira user or administrator, and therefore also cannot be modified by Viz. In this scenario, the Jira API will not return an error, leading Viz to believe that the update occurred as expected, even though the value(s) were not saved.
To ensure that Viz can write to closed Jira issues, we highly recommend allowing the Viz user to edit closed records. To do this, create a group in Jira (e.g., 'Edit Closed Issues') that contains all users (including the Viz user) that you would like to be able to edit closed issues:
In Jira Workflow management:
- Add the following to the properties of the Closed state:
- jira.permission.edit.group = Edit Closed Issues
- Remove the following from the properties of the Closed state:
- jira.issue.editable = false
- Publish workflow draft
All users that are in the "Edit Closed Issues" group should now be able to make modifications to closed issues. Additional details can be found on the Atlassian website.
Note: This functionality is not supported with the pre-3.5 version of the Jira connector.
Status Category Fields
The Status Category field represents one of four values related to the configuration of the Status field. The values of the Status Category field match the colors assigned to each Jira status and can be used to quickly describe the status of a Jira artifact.
For example:
- To Do = Blue
- In Progress = Yellow
- Done = Green
- No Category = Gray
Note: The following statuses have the same meaning as the Done Status Category: Resolved, Closed, Failed and Canceled. For certain scenarios, it may be useful to map using this field rather than using each individual status.
Historical Data Ingestion
When a Viz tool connection with Jira ingests artifacts for the first time, it may attempt to retrieve the history of those artifacts through Jira change logs. This allows Viz to keep track of metrics prior to creating the tool connection.
When retrieving history, there are several notable limitations:
-
Only standard ticket types include any history
-
This includes Defects, Stories, Tasks, etc.
-
This does not include other artifact types such as Components, Sprints, Versions, and plugin-specific types (Zephyr Test Execution, X-Ray Test Runs, R4J Folders, etc.)
-
-
Most system and custom fields are retrieved with the following exceptions:
-
Attachments
-
Comments
-
Certain specific fields: Formatted ID, Cascading Select Fields, Revision, Resolved Date, Closed (boolean), Location
-
Richtext Fields
-
Single and Multi ArtifactLink Fields
-
Single and Multi ContainerLinkFields
-
Weblink Fields
-
Worklogs
-
Supported Artifacts
Supported Work Items
|
Supported Work Item Type |
Applicable Repository Version |
Unique URL |
|---|---|---|
|
Story |
Any supported repository version: |
Yes |
|
Bug |
Any supported repository version: |
Yes |
|
Issue |
Any supported repository version: |
Yes |
|
Epic |
Any supported repository version: |
Yes |
|
Custom Issue |
Any supported repository version: |
Yes |
| Sprint |
Any supported repository version: |
No |
|
Jira Service Management Specific Artifact Types |
||
|
Change, Access, Purchase, IT Help, Fault, New Feature, Improvement Please review the limitations listed in the Functional Limitations table below. |
Any supported repository version: |
Yes |
|
Incident, Problem, Service Request, Service Request with Problem Please review the limitations listed in the Functional Limitations table below. |
Any supported repository version: |
Yes |
Supported Containers
|
Containers that can be modeled as Flow Items |
Applicable Repository Versions |
Unique URL? |
|---|---|---|
|
N/A |
||
|
Containers used to define which artifacts are included in an Artifact Set |
||
|
N/A (entire tool serves as container) |
Any supported repository version: |
N/A |
Supported Field Types
Planview supports configuring rule-based modeling (i.e., conditional modeling) using the field types shown below.
Note: If one field of a given type is supported, others that are also that type in theory should also work. However, sometimes there are instances in which this is not the case due to the repository. So, while we can claim support for fields at the type level, there is a chance that some specific fields of a given type will not function properly.
|
Standard Field Type |
How is field type referenced in the repository? |
Sample Repository Fields Supported |
Particular Repository Fields NOT Supported |
|---|---|---|---|
|
|
Text Field (multi-line) before 17.2.1 Text Field (single line) |
Summary Installed plugin created fields - Any installed plugin can generate new fields and those fields will be supported as read-only fields until particularly supported. |
|
|
|
Radio Buttons Select List (single choice) Version Picker (single version) Select list (cascading) *as two single selects For details on configuration, see above. |
Issue Type (read-only after creation) Priority Project (read-only after creation) Resolution Status Security Level Team (only Jira Cloud) |
|
|
|
Checkboxes Select List (multiple choices) Version Picker (multiple versions) Project Picker (multiple projects) |
Affects Version/s Fix Version/s Component/s Labels |
|
|
|
Functional Limitations
|
Category |
Limitation |
Applicable Repository Version |
|---|---|---|
| Third Party API Limitation |
Team Field The Jira Cloud API only retrieves the list of global teams and does not include plan-only teams. |
Jira Cloud |
| Good to Know |
Impact of Jira Upgrade on Conditional Modeling Upgrading a Jira instance can potentially affect conditional modeling, if team fields are involved. This is due to the change in the Jira API response difference between the old and new versions. As a workaround, incorporate an extra row in all value streams to accommodate both the team name and its corresponding ID, ensuring comprehensive representation of team-related data. Taking this step will help ensure that conditional modeling functions as expected after a Jira upgrade. |
Any supported repository version: |
|
Good to Know |
Label Manager for Jira Plug-In If an administrator edits the pre-defined labels in their repository, the listed options for the labels in Viz may be inaccurate until the cache is refreshed. Note: By default, Viz will automatically refresh the options within 24 hours. |
Any supported repository version: |
|
Good to Know |
Sprint & Assigned Sprint Fields To improve performance, the 'Sprint' and 'Assigned Sprint' fields are excluded by the Viz agent. As a result, these fields are not available for conditions in Viz. |
Any supported repository version: |
| Good to Know |
Jira Service Management Viz will handle all items by the Work Item Type and not by the Request Type. |
Any supported repository version: |
| Good to Know |
Jira Service Management It is not possible to model the flow artifact or flow state by the Request Type. |
Any supported repository version: |
| Good to Know |
Migrating to Jira Cloud When migrating form Jira on-prem to Jira Cloud, the migration process will change the internal IDs of all Jira issues. Professional services will be required to ensure the continuity of your Flow Metrics. Please reach out to Planview Support before proceeding with a Jira Cloud migration. |
Jira Cloud |


 Boolean