
Artifact Modeling
Introduction
After you have created your artifact sets, the next step will be to model your artifacts. Here, you will identify your flow items — artifacts carrying business value — and model their states into flow states. This allows Viz to generate Flow Metrics — measuring your artifacts speed and efficiency as they flow across the value stream.
Modeling your Artifacts
To begin modeling your artifacts, click the Artifact Modeling tab.
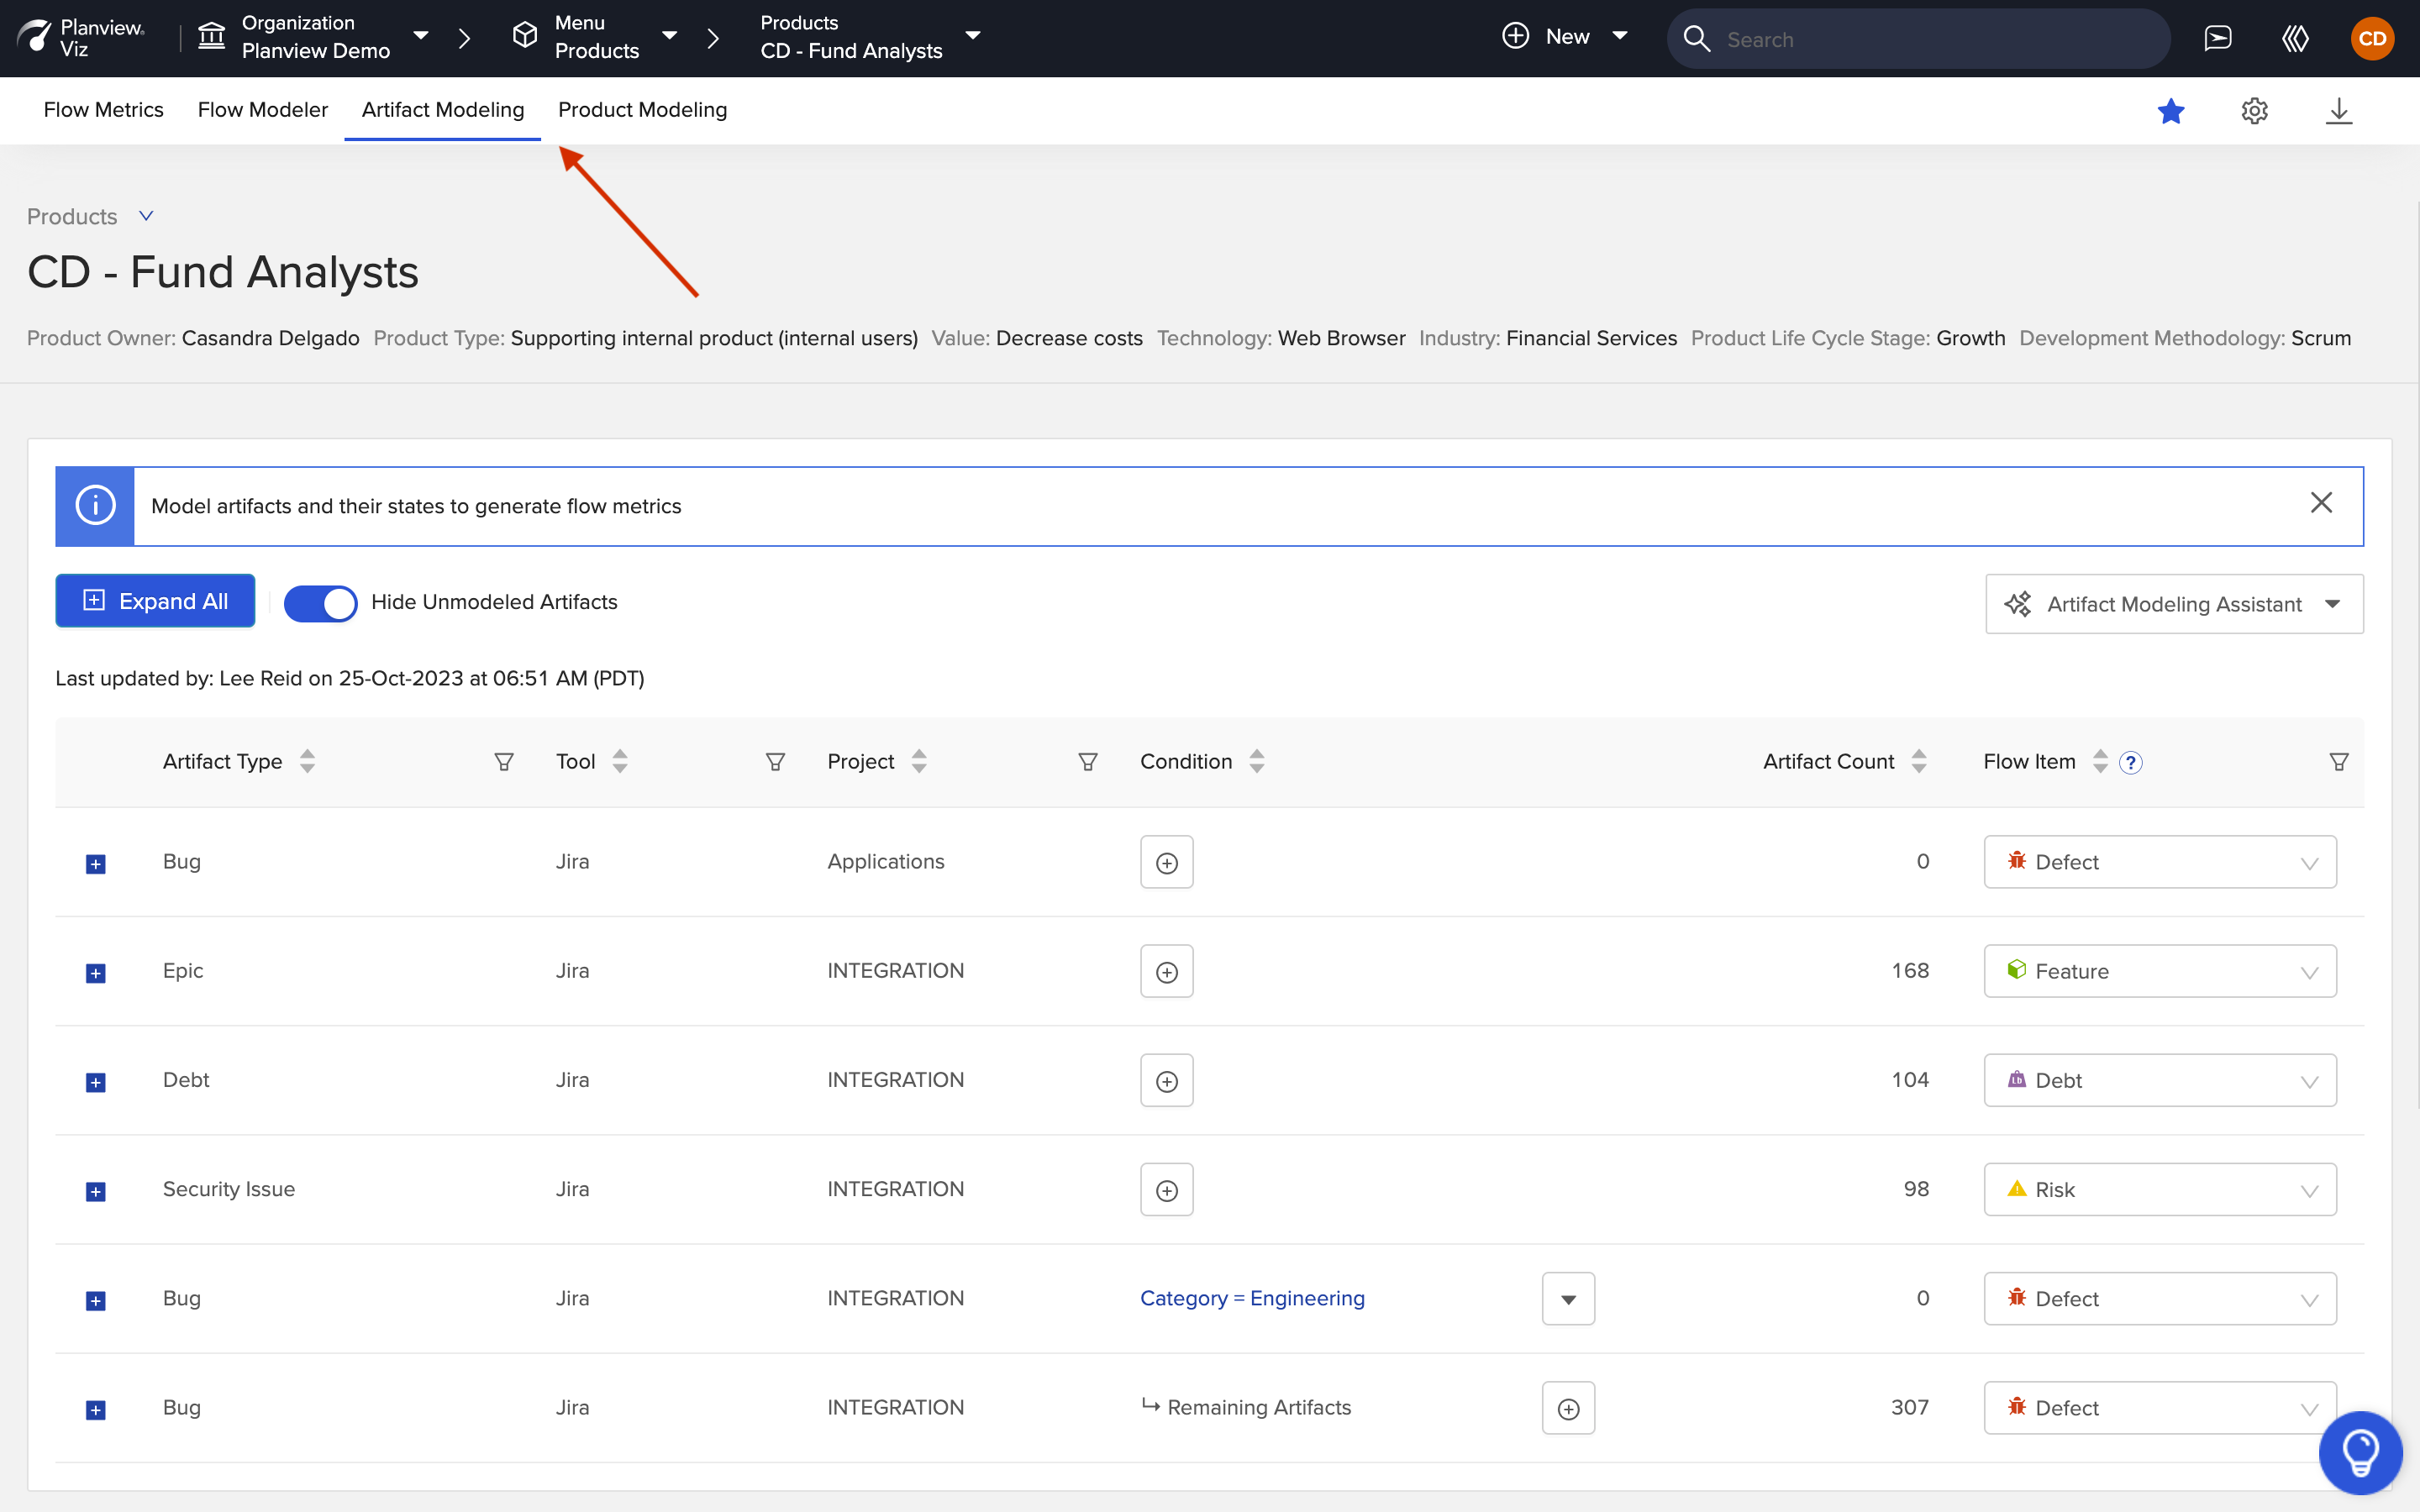
Click 'Artifact Modeling' tab
The first step is to model your relevant artifact types into flow items. A Flow Item is a unit of business value pulled by a stakeholder through a product’s value stream.
Note: If a project included in your artifact set(s) does not contain any artifacts, it will not appear on the Artifact Modeling screen.
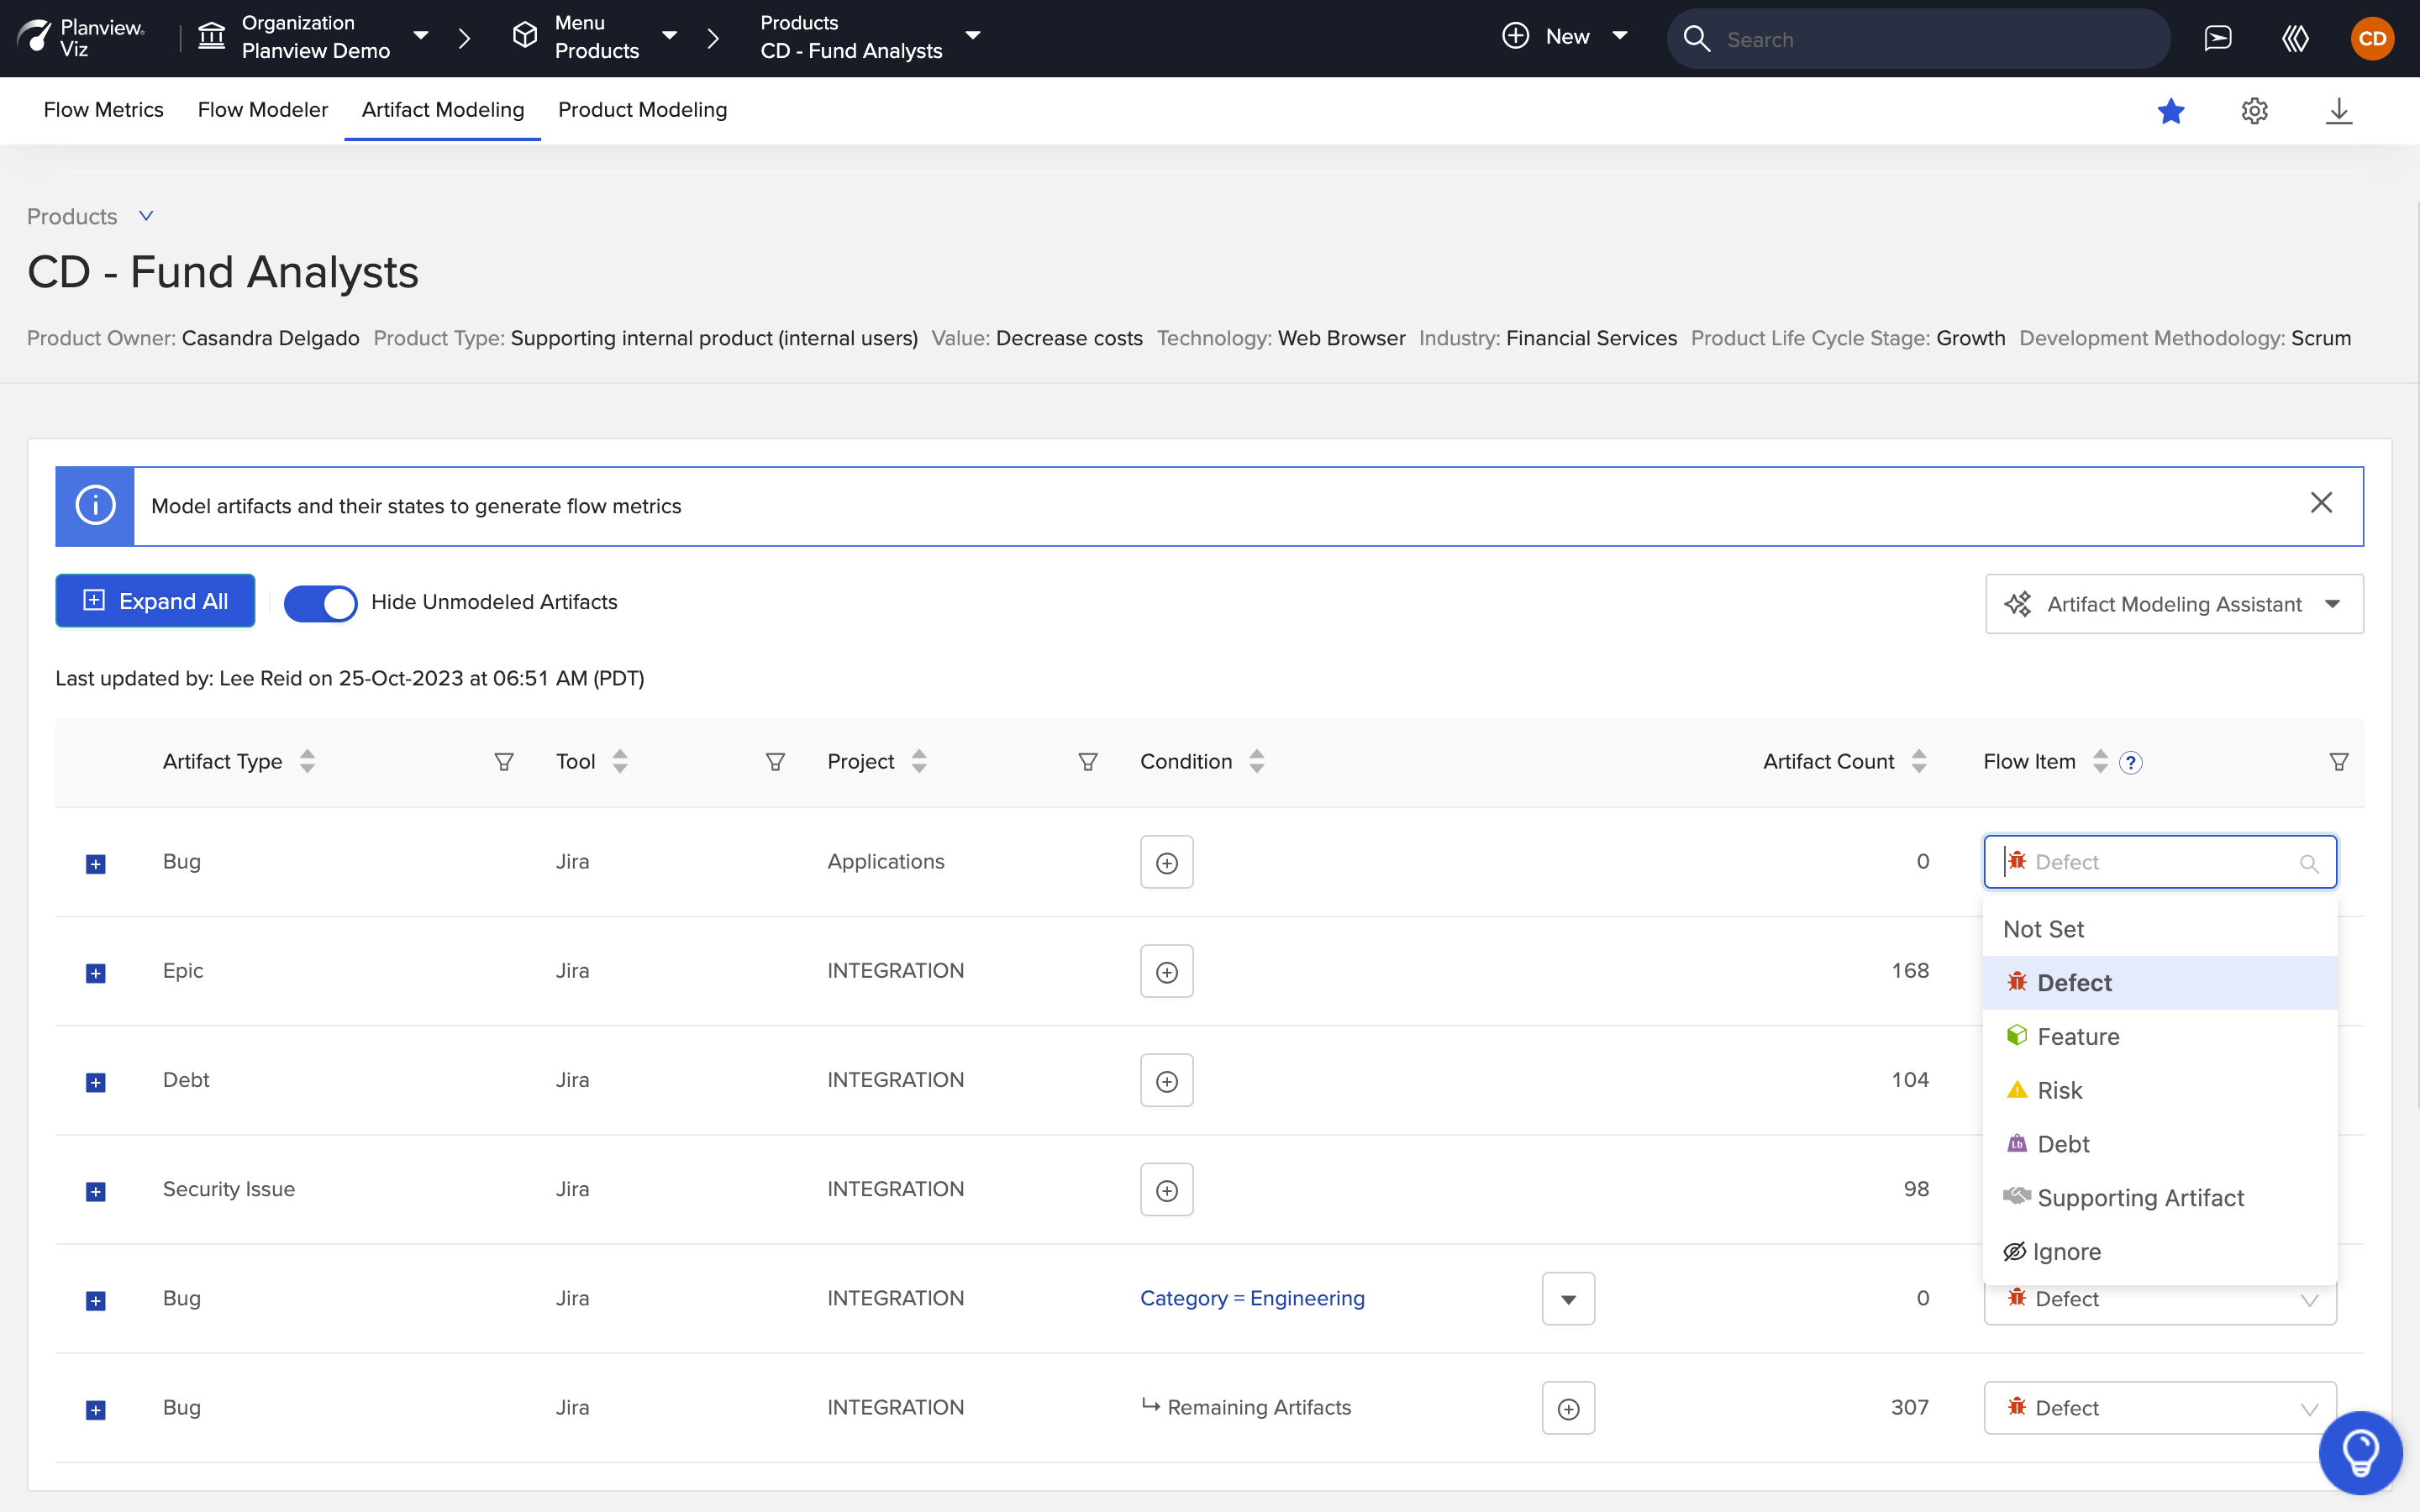
Model Flow Items
If your artifacts do not have a one-to-one match to the available flow items, or if you'd like to whittle down the set of artifacts used to generate Flow Metrics, you can apply a condition.
To learn more about flow items, click the help icon on the Artifact Modeling screen or refer to the table below.
|
Flow Item |
About this Flow Item |
Examples |
|---|---|---|
|
Feature |
Delivers Pulled By Description |
|
|
Defect |
Delivers Pulled By Description |
|
|
Risk |
Delivers Pulled By Description |
|
|
Debt |
Delivers Pulled By Description |
|
|
Supporting Artifact |
Delivers Pulled By Description |
|
|
Ignore |
Artifacts you intentionally want to exclude from your Flow Metrics |
|
Once your flow items are modeled, expand each artifact type to model its underlying Flow State, or use the Smart Model to auto-map your flow states. Flow States are the generic workflow states of a Flow Item in a value stream.
Note: If your artifact states do not have a one-to-one match to the available flow states, you can apply a conditional Flow State.

Model Flow States
To learn more about flow states, click the help icon on the Artifact Modeling screen or refer to the table below.
|
Flow State |
Description |
Examples |
|---|---|---|
|
New |
The first state an artifact enters as soon as it is opened and before it is committed to. Note: If your first state is a committed state, you don't need to assign a 'new' state. Instead, assign a 'waiting' or 'active' state. |
|
|
Waiting |
A 'holding' state indicating that the artifact is waiting and not actively being worked on. |
|
|
Active |
An active state where work is actually being done on the artifact. |
|
|
Done |
The final state an artifact moves to, representing that it is complete and has delivered some or all of its intended value. |
|
|
Canceled |
This state represents work that has been voided, deferred, or invalidated. |
|
|
Ignore |
An artifact state you intentionally want to exclude from your Flow Metrics. |
|
After you've finished modeling your flow items and flow states, click Save.
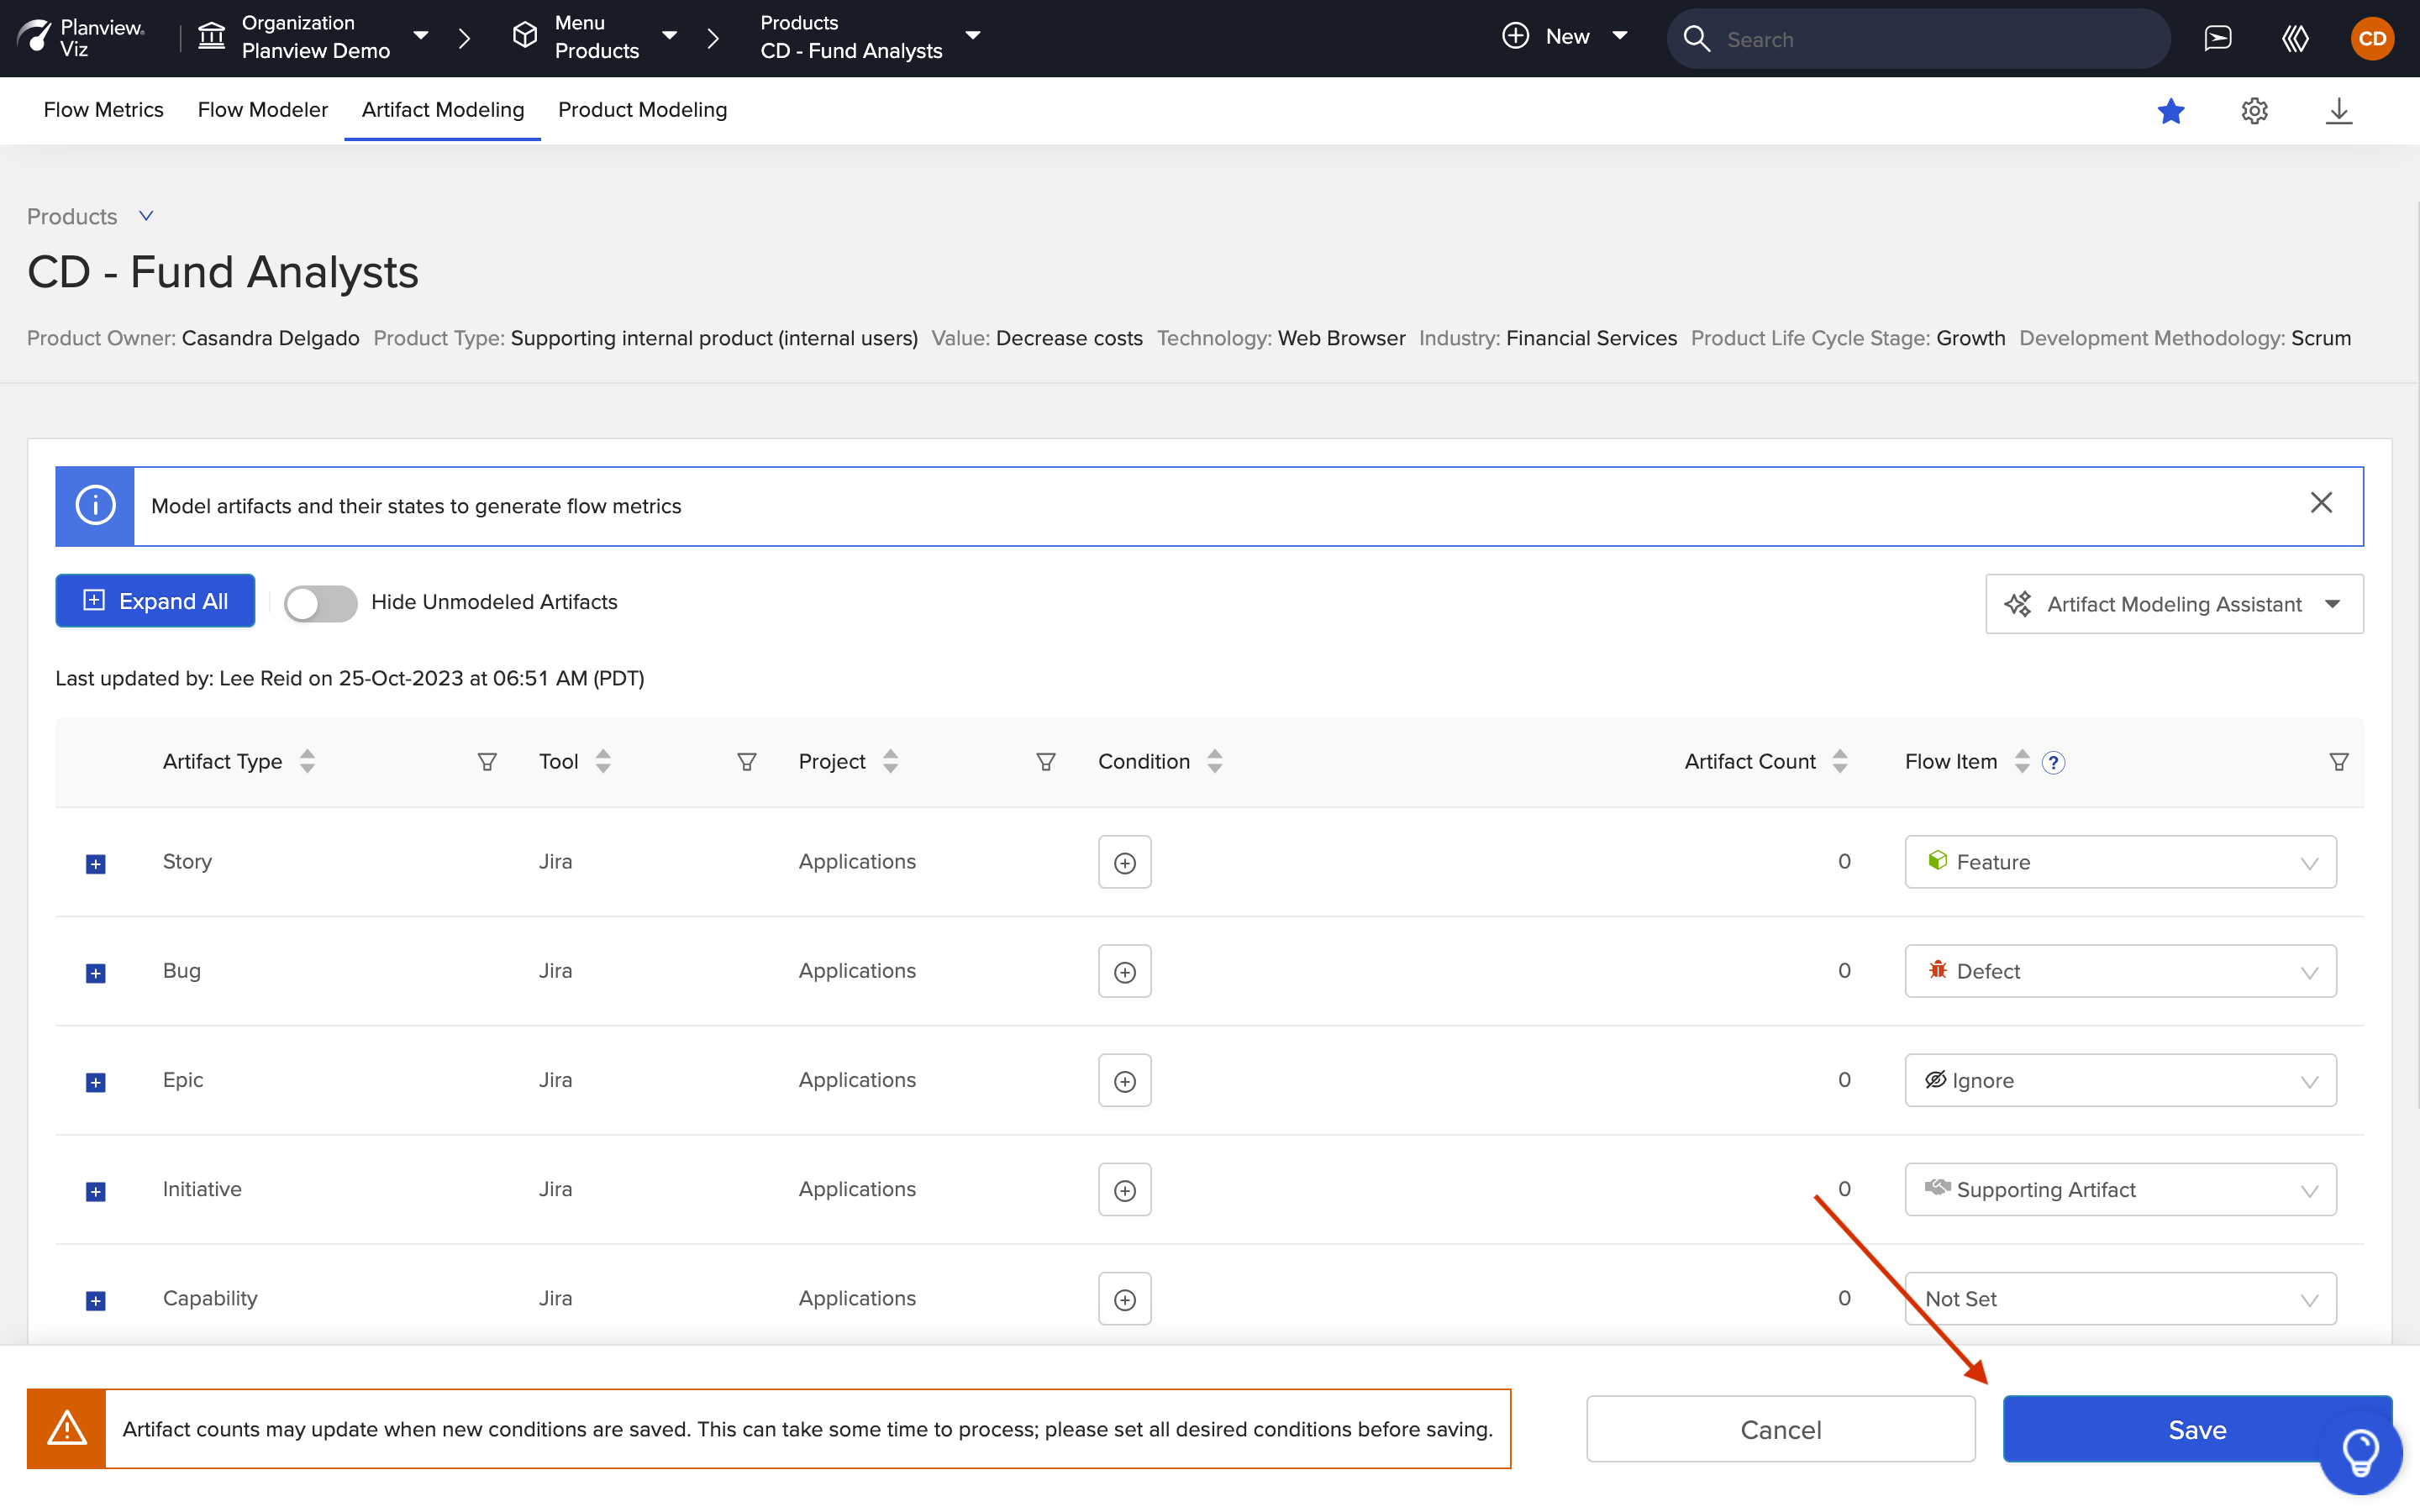
Click 'Save'
Congrats, you've modeled your value stream!
Now, you can visualize your workflow with the Flow Modeler, or head straight to your Flow Metrics dashboard to begin evaluating your metrics.
Artifact Modeling Assistant
The Artifact Modeling Assistant is a built-in tool designed to simplify and streamline the modeling process.
With the Artifact Modeling Assistant, you can:
- Import Artifact and Flow Modeling from one product to another to quickly and efficiently scale your products
- Use the Flow State Smart Modeler to auto-map your artifact states to the correct flow states — making modeling less time-consuming and more intuitive
Learn more in the sections below.
Importing Artifact Modeling
To import artifact modeling from another product value stream, click the Artifact Modeling Assistant dropdown and select Import Artifact Modeling.
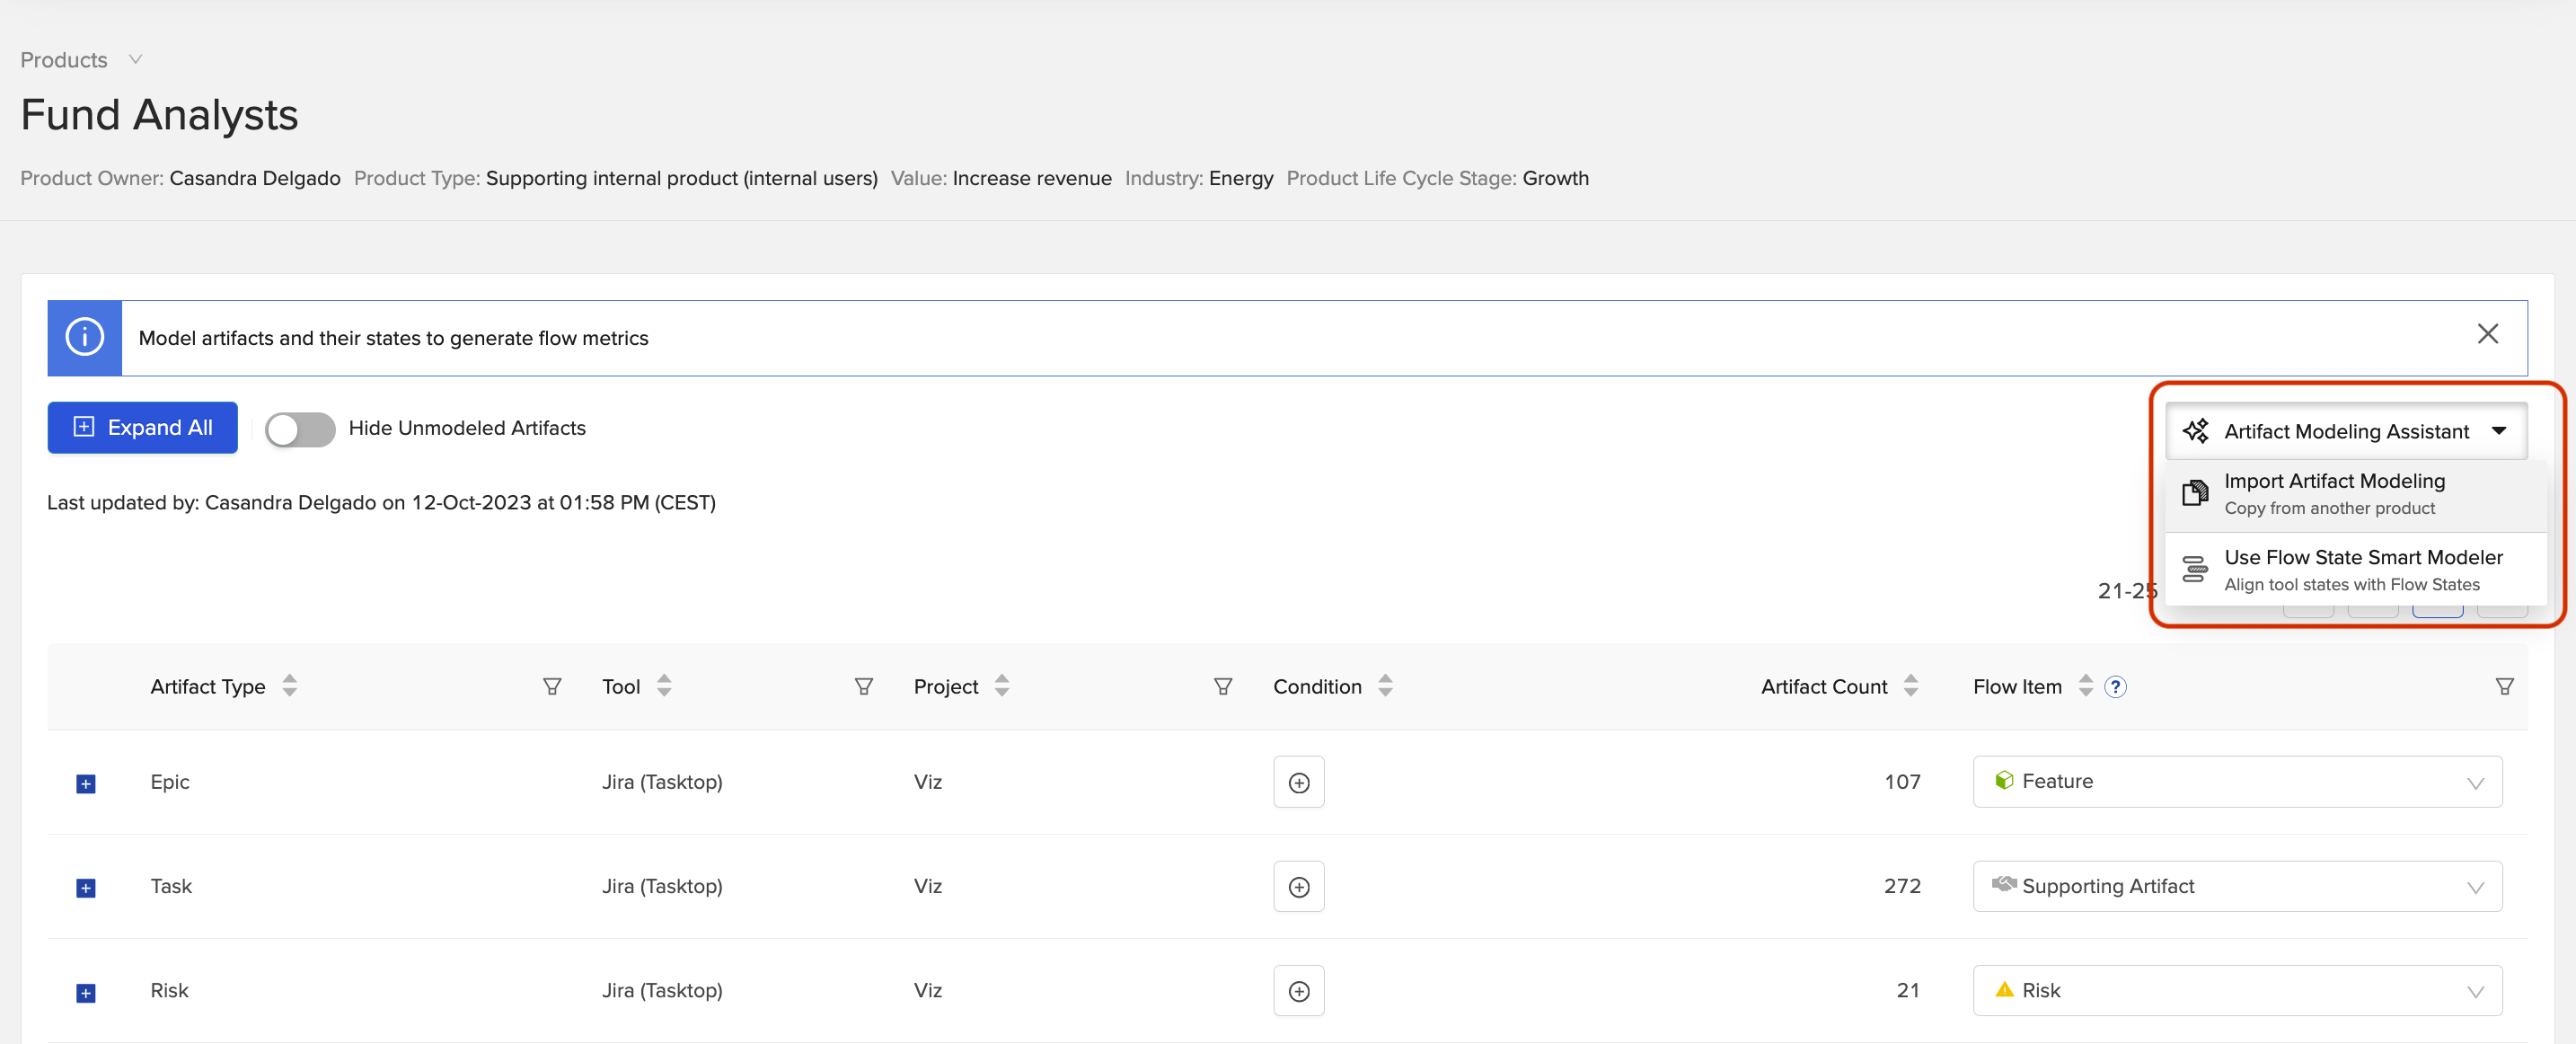
Select 'Import Artifact Modeling'
The Import Artifact Modeling pop-up will appear where you can select the source product from which you’d like to copy the modeling.
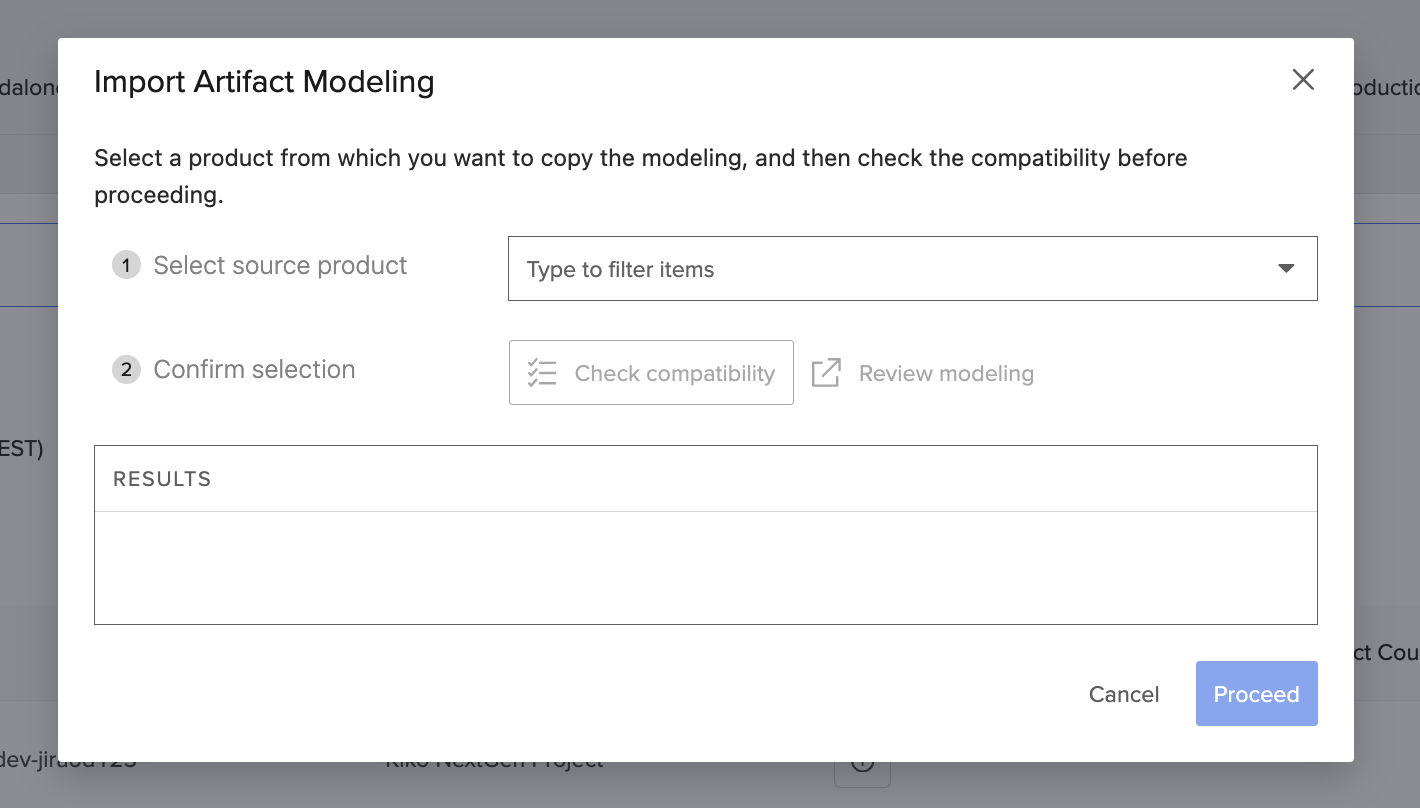
Import Artifact Modeling
Once you’ve selected the source product, you can quickly review your modeling by clicking the Review Modeling button.
After clicking this button, a new tab will be opened where you can view the artifact modeling for the selected source product and confirm your mappings.
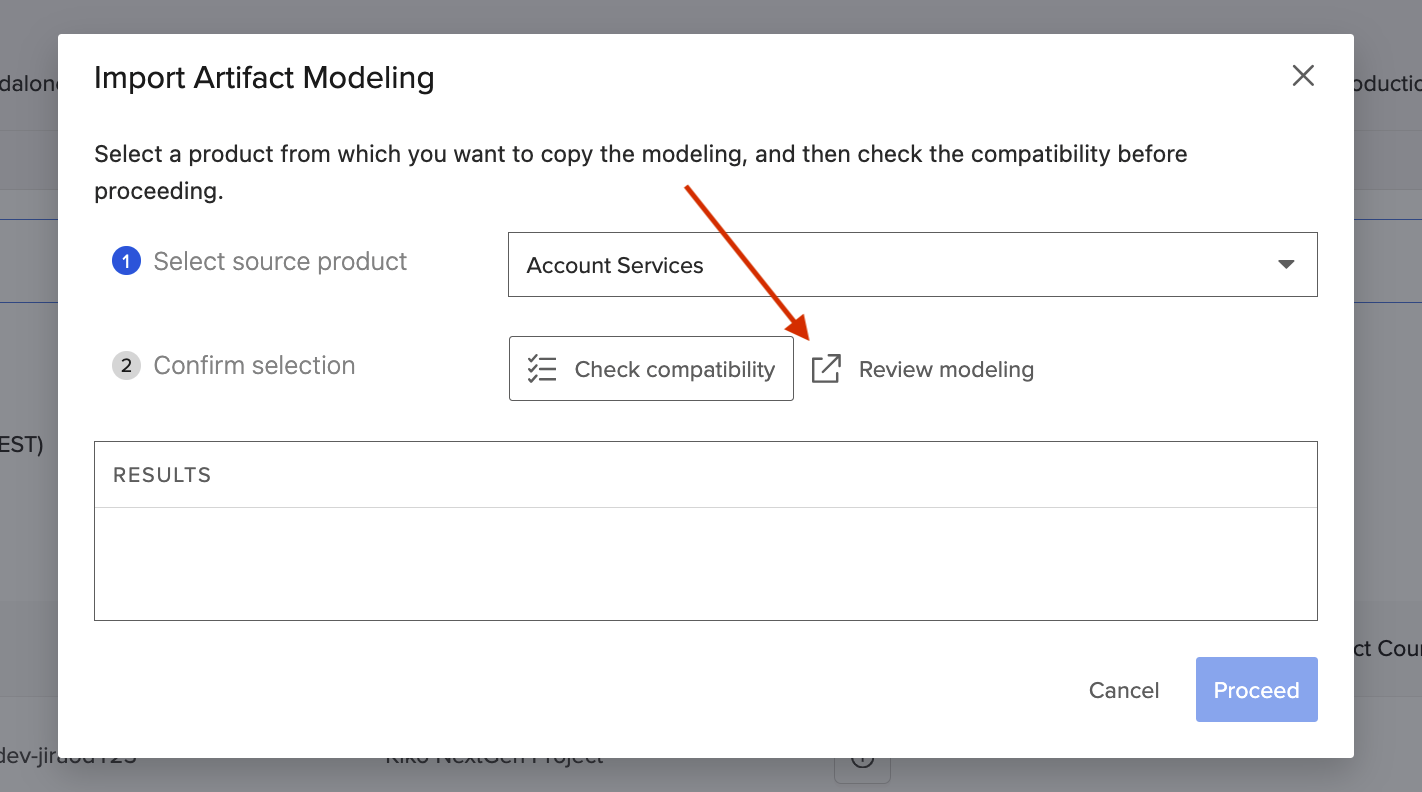
Click 'Review modeling'
Once you’ve selected the source product, you’ll need to check the compatibility between the source and target products by using the compatibility checker.
The compatibility checker will review the source and target products and let you know which mappings are not compatible for import. To be compatible for import, the following conditions must be met:
- The repositories in the source and target products must be an exact match
- The source product must only have 1 project within each repository
- The artifact types must exist in both the source and target products
- The artifact states must exist in both the source and target products
- Any fields used in conditional modeling must exist in both the source and target project
Learn more about artifact modeling compatibility here.
To check compatibility, click the Check Compatibility button.
Note: If processing is in progress for the source or target product, you must wait until after processing is complete to import artifact modeling.
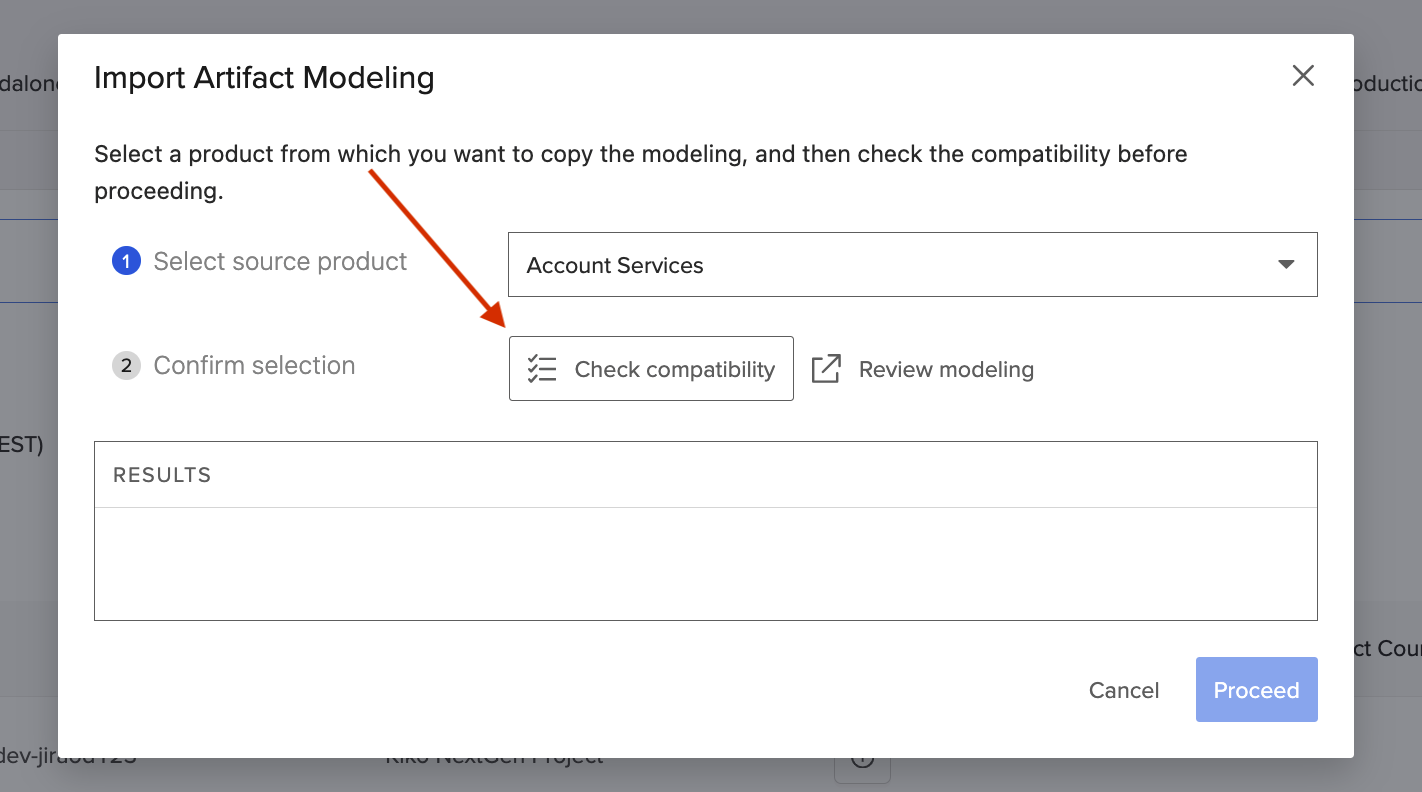
Click 'Check compatibility'
After clicking this button, the results of the compatibility check will appear.
Note: Unmatched artifact types/states will be set to not set.
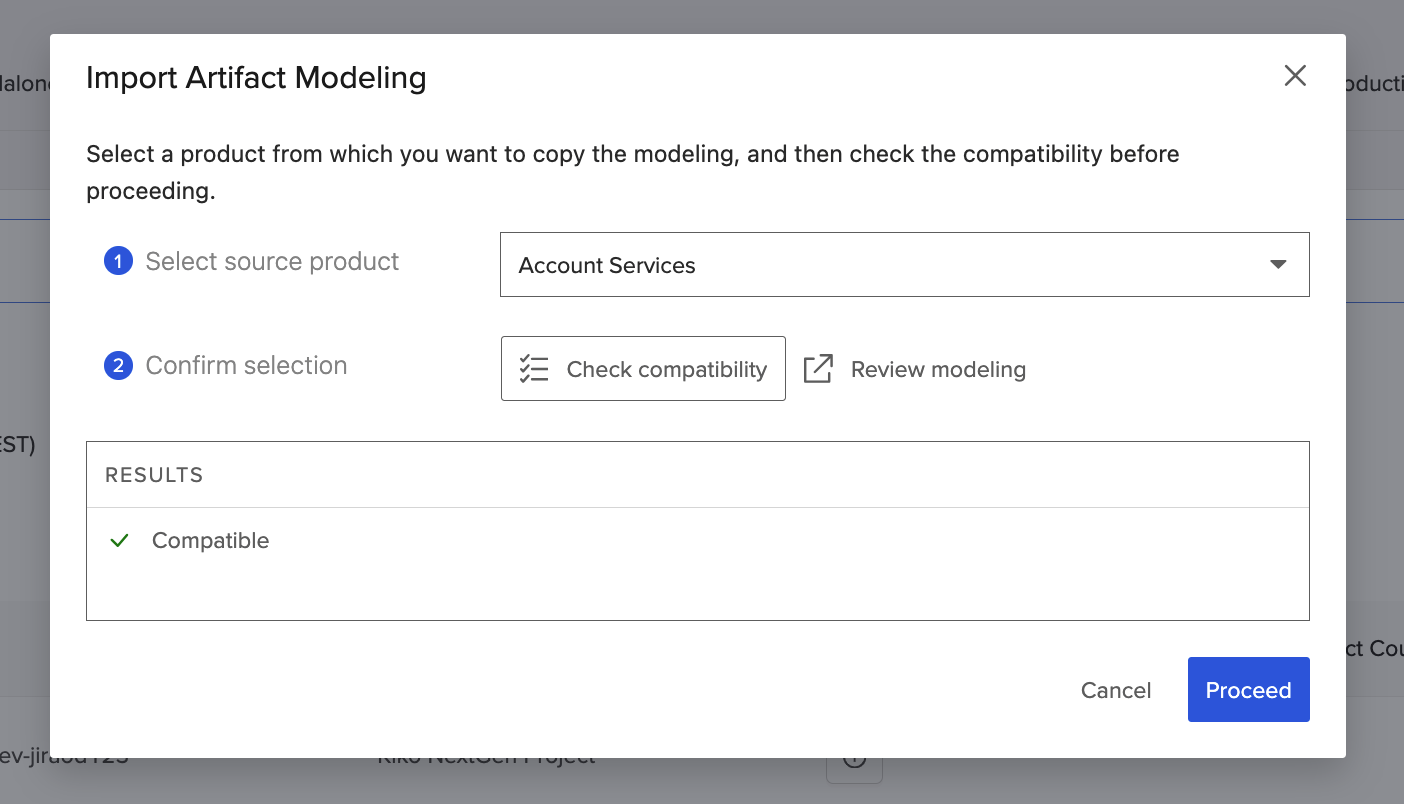
Compatibility Results
To continue with the import, click Proceed.
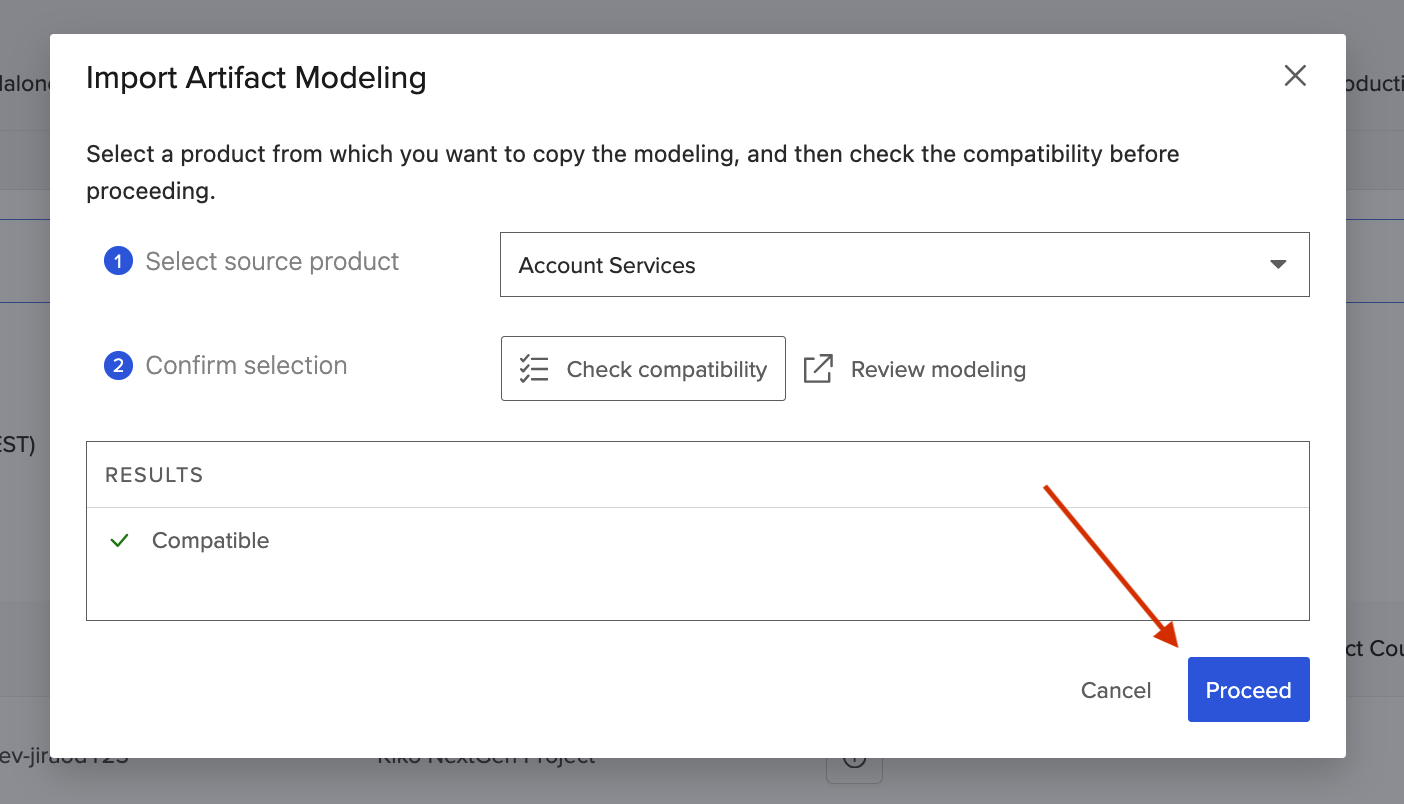
Click 'Proceed'
A Confirm Overwrite pop-up will appear with a warning message about overwriting existing modeling.
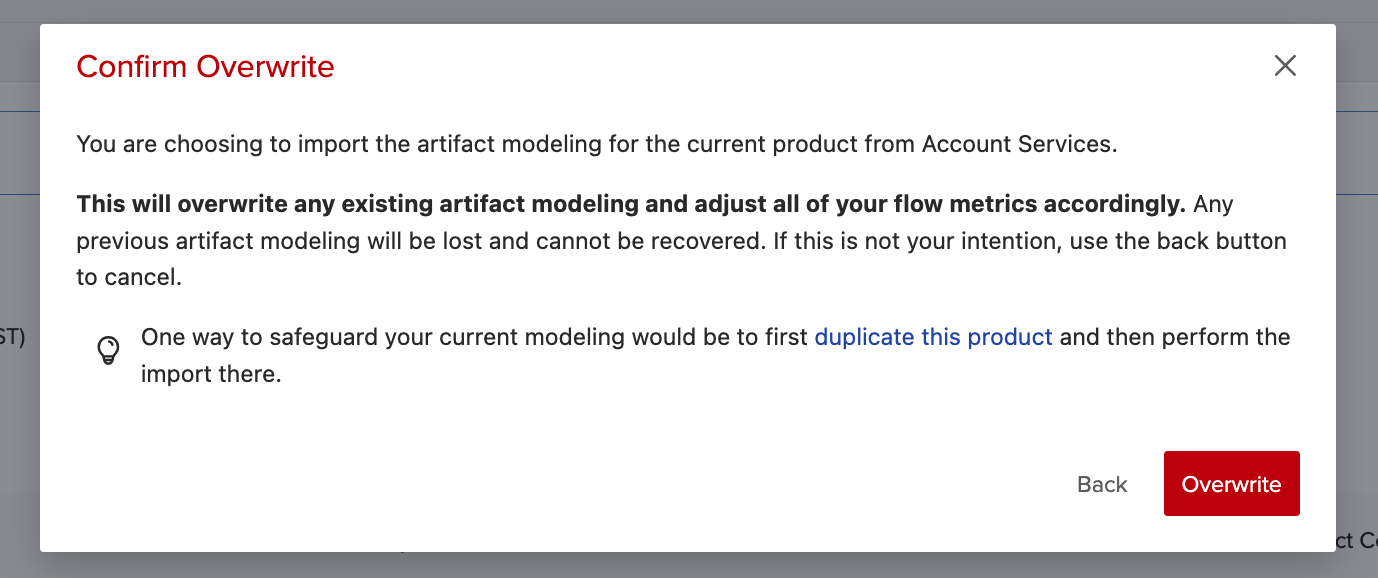
Confirm Overwrite
After reviewing the message, click Overwrite.
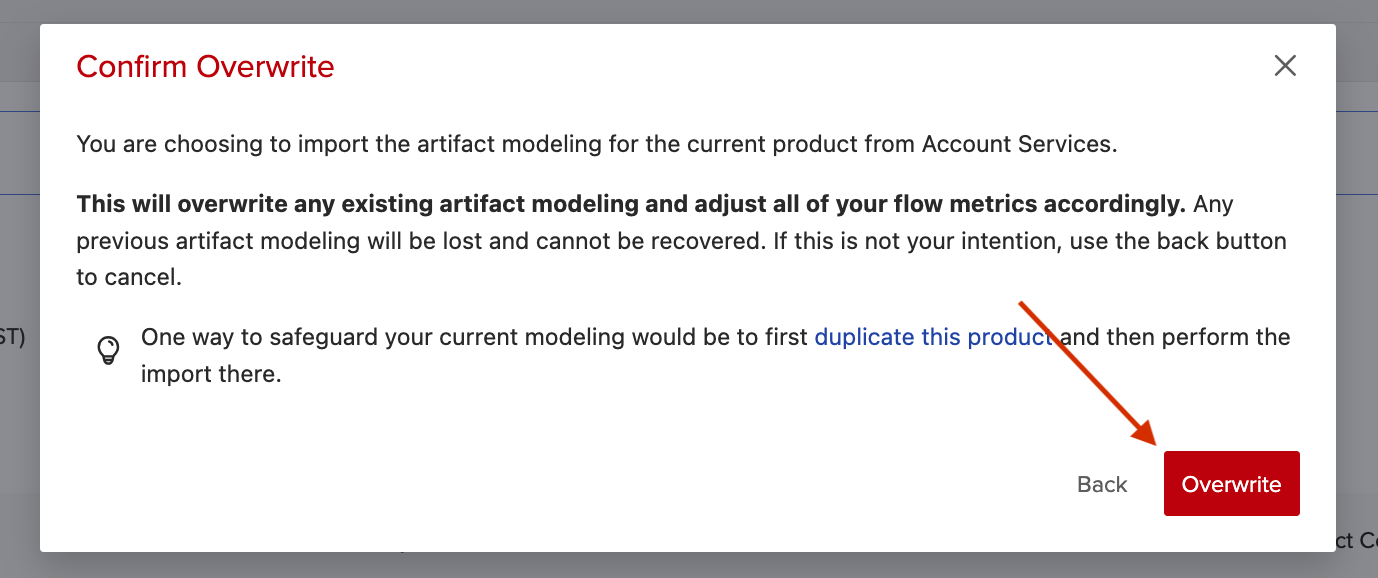
Click 'Overwrite'
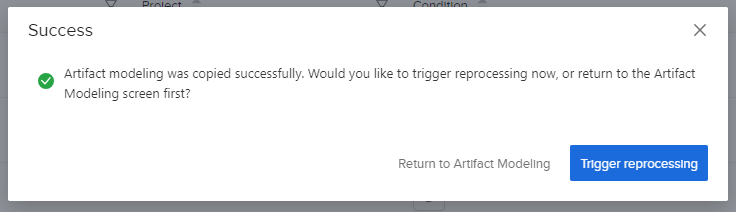
A success message will appear notifying you that the artifact modeling was copied successfully.
After successfully importing your modeling, you can either continue to edit the artifact modeling by clicking Return to Artifact Modeling or reprocess your product and apply the modeling changes by clicking Trigger reprocessing.
Note: Reprocessing will be suspended until the resume processing button has been clicked.
Using the Flow State Smart Modeler
Using Viz's built-in expertise, the Flow State Smart Modeler (formerly named Smart Model) pulls in all of the artifact states from the artifacts in your product and auto-maps them to the available flow states (new, waiting, active, done, canceled) — making the modeling process simple and efficient.
To apply the smart modeler to your artifact states, click the Artifact Modeling Assistant dropdown and select Use Flow State Smart Modeler.
Note: If you'd like to exclude a state from being modeled, select Ignore from the Flow State dropdown. If a Flow State is set to Ignore while work is in progress on a modeled Flow Item, when work enters that state it will not be shown as WIP in Flow Load® or part of the neglected WIP calculations. In general, you should not set a Flow State to Ignore if work is in progress.
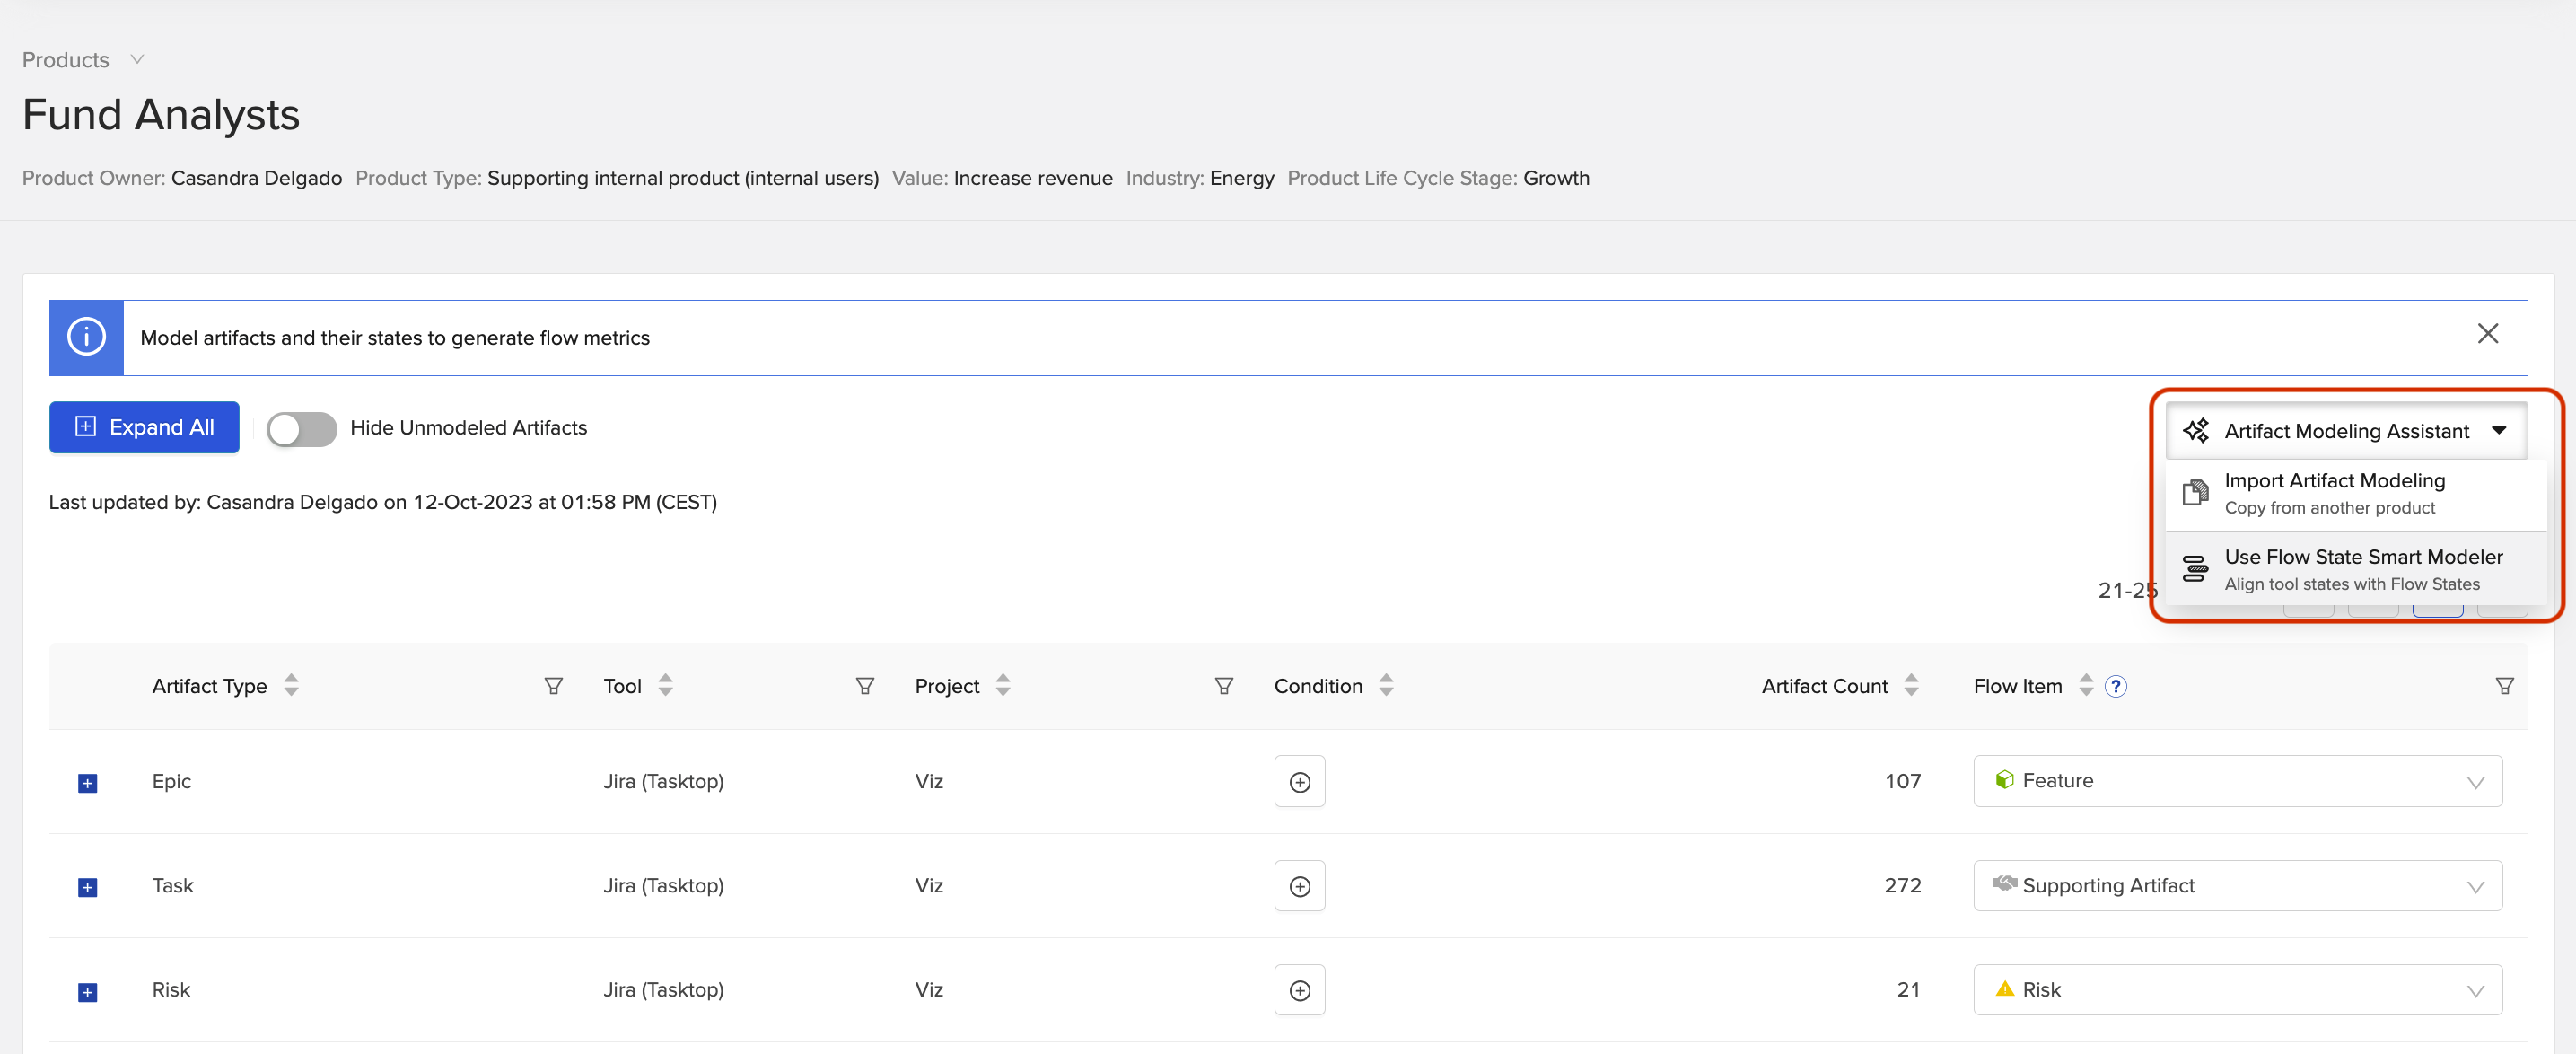
Click 'Use Flow State Smart Modeler'
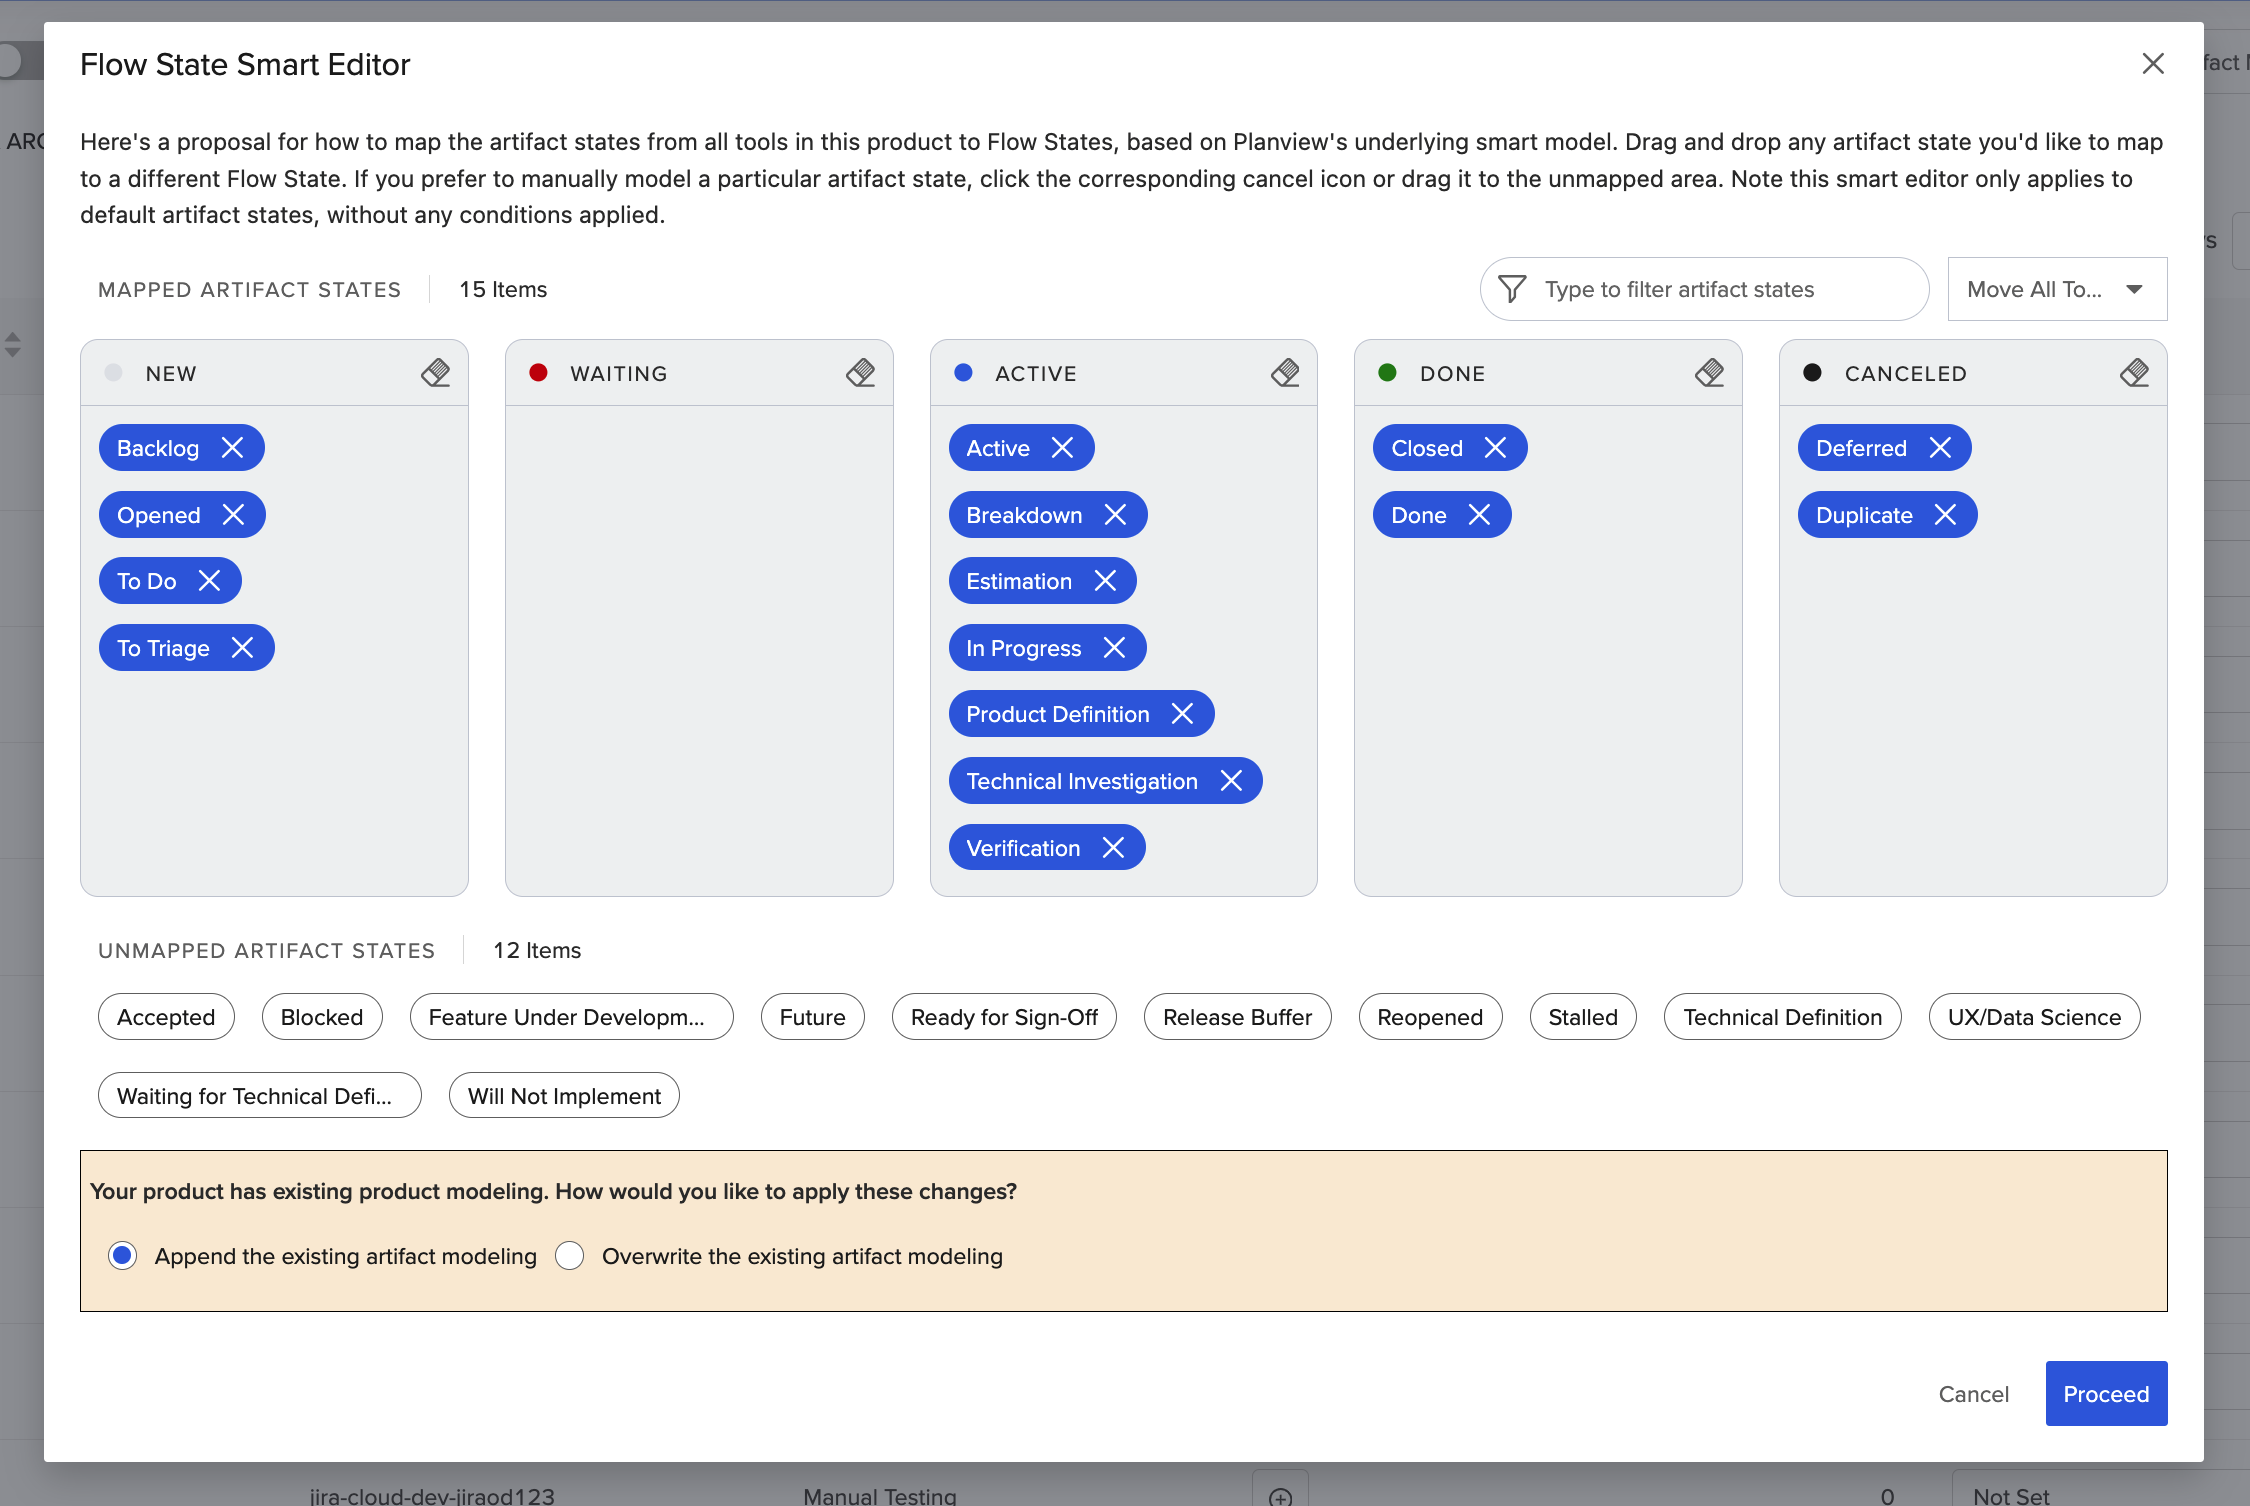
On this screen, you'll see the smart model's proposal, along with the artifact states that couldn't be auto-mapped using the smart model.
Note: If processing is in progress, you must wait until after processing is complete to use the Flow State Smart Modeler.
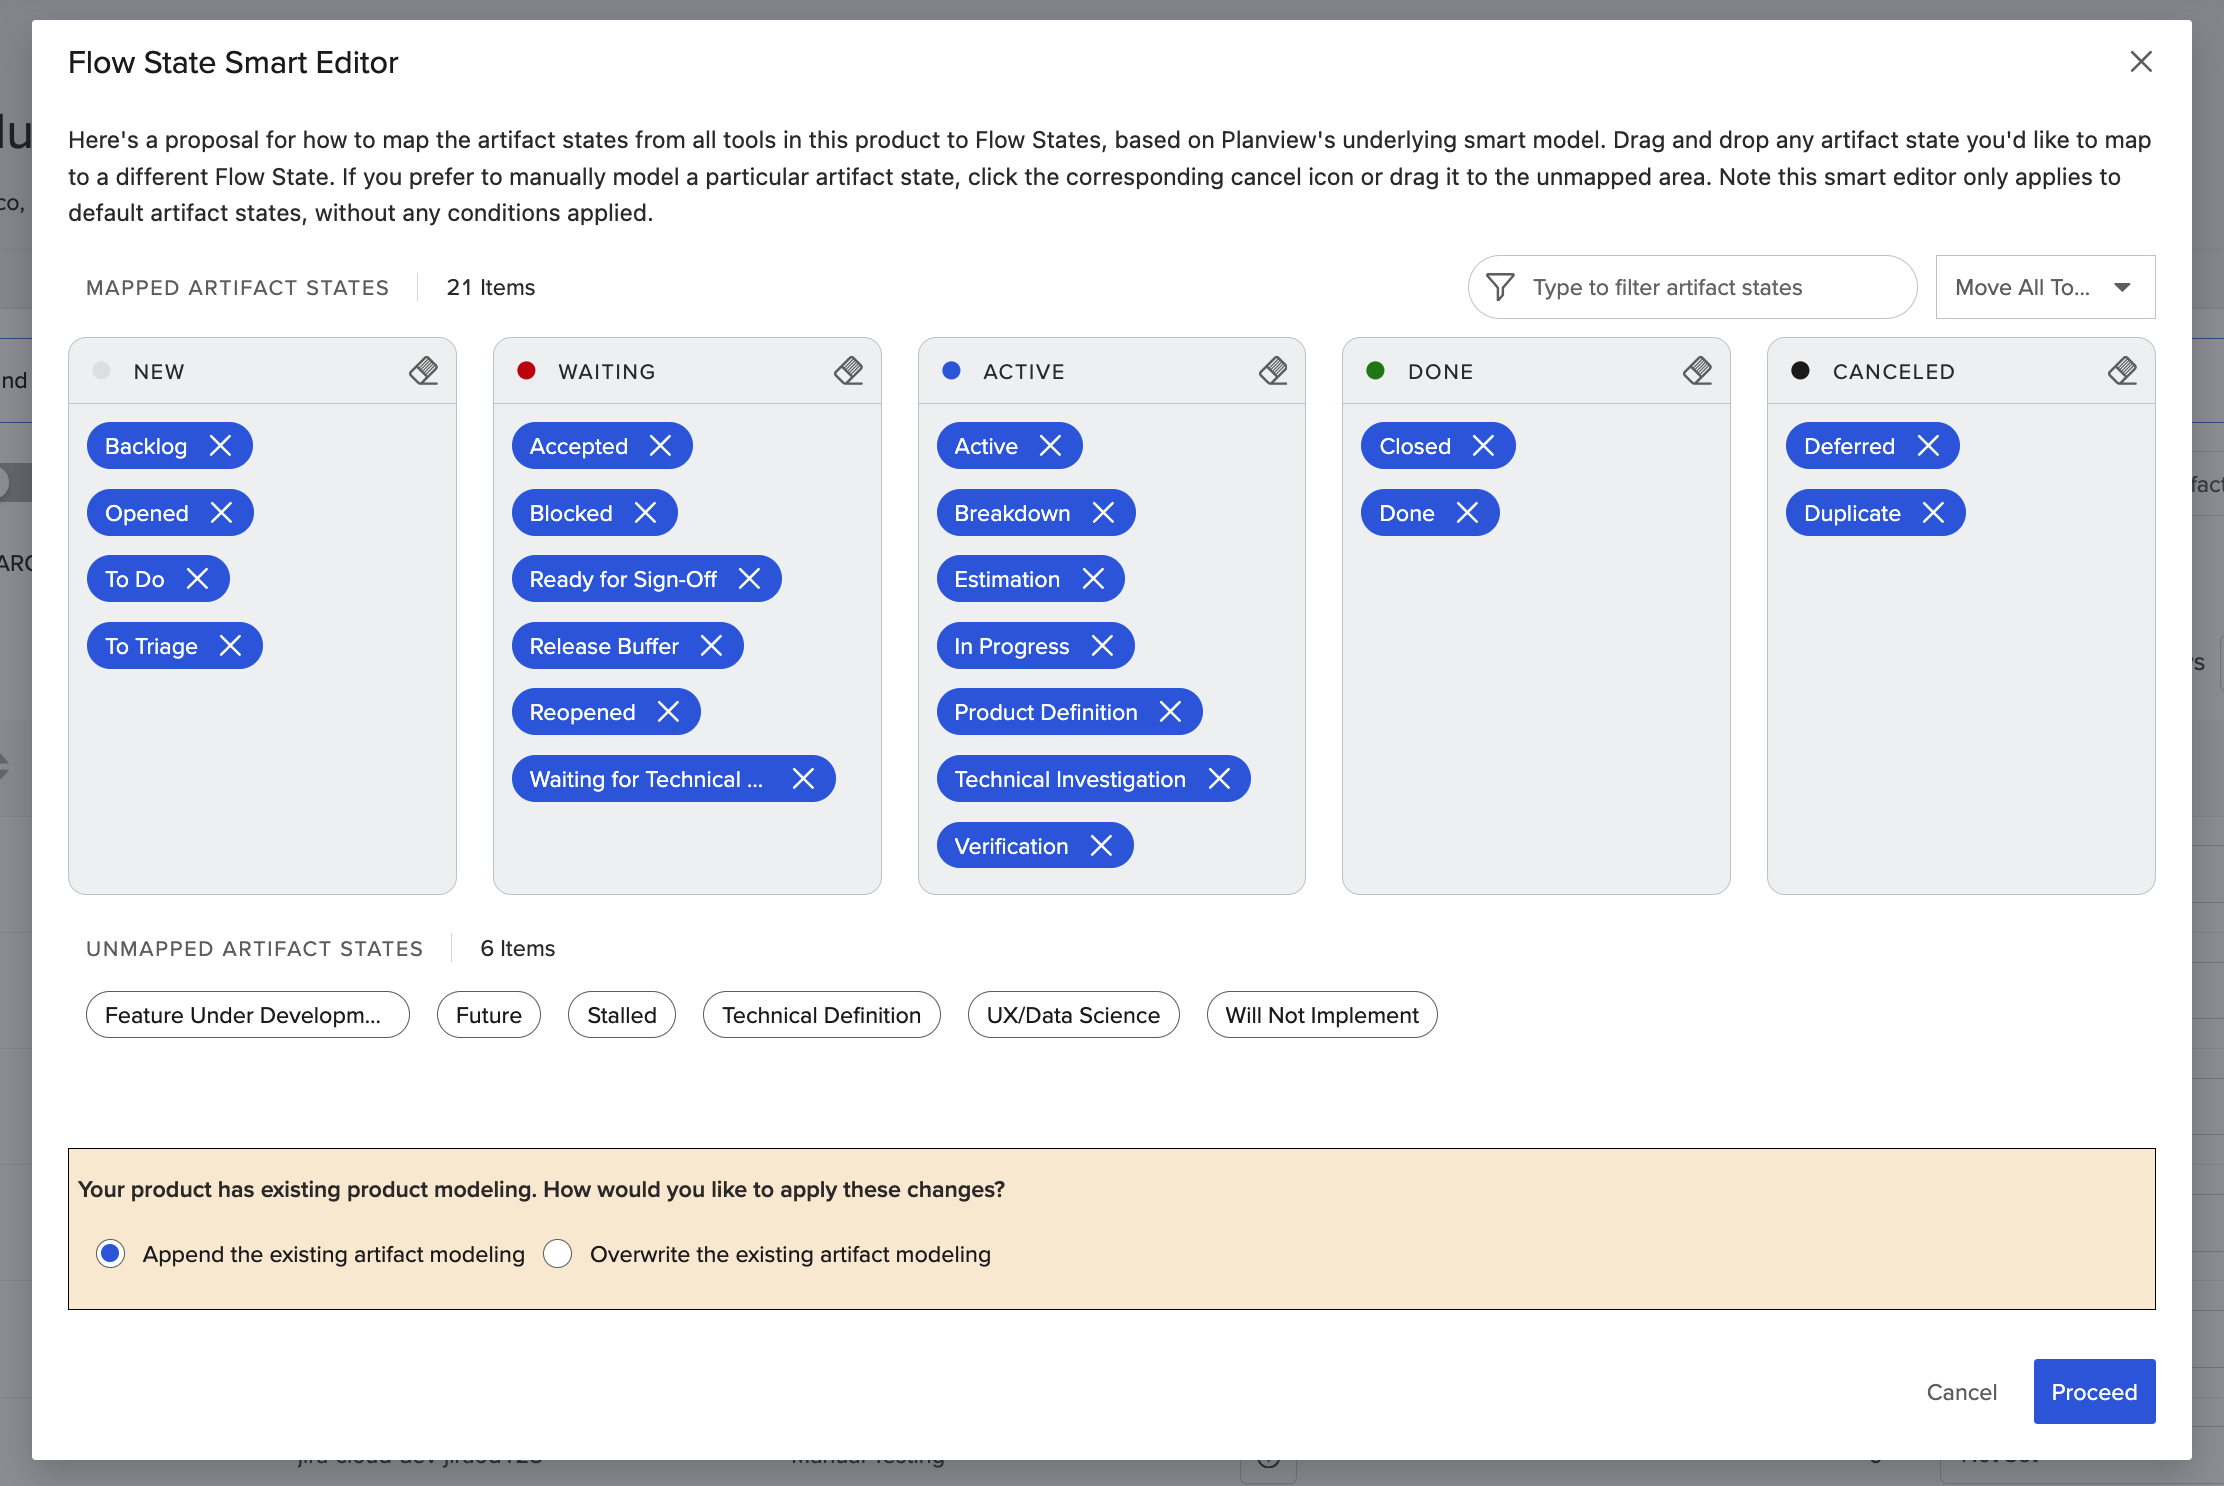
Flow State Smart Editor
If something doesn’t look right, click the x icon next to the miscategorized state to remove it from your model or drag-and-drop it to the correct Flow State.
Updating Miscategorized State
You can also move unmapped artifact states to the correct Flow State using the drag-and-drop function.
Move Unmapped Artifact States
If you'd like to remove all of your mapped artifact states from a particular Flow State, you can use the eraser icon.

Remove Flow State Mappings
After clicking this icon, your mapped artifact states will be moved to the unmapped section.
To map multiple artifact states to a particular Flow State, you can use the bulk editor.
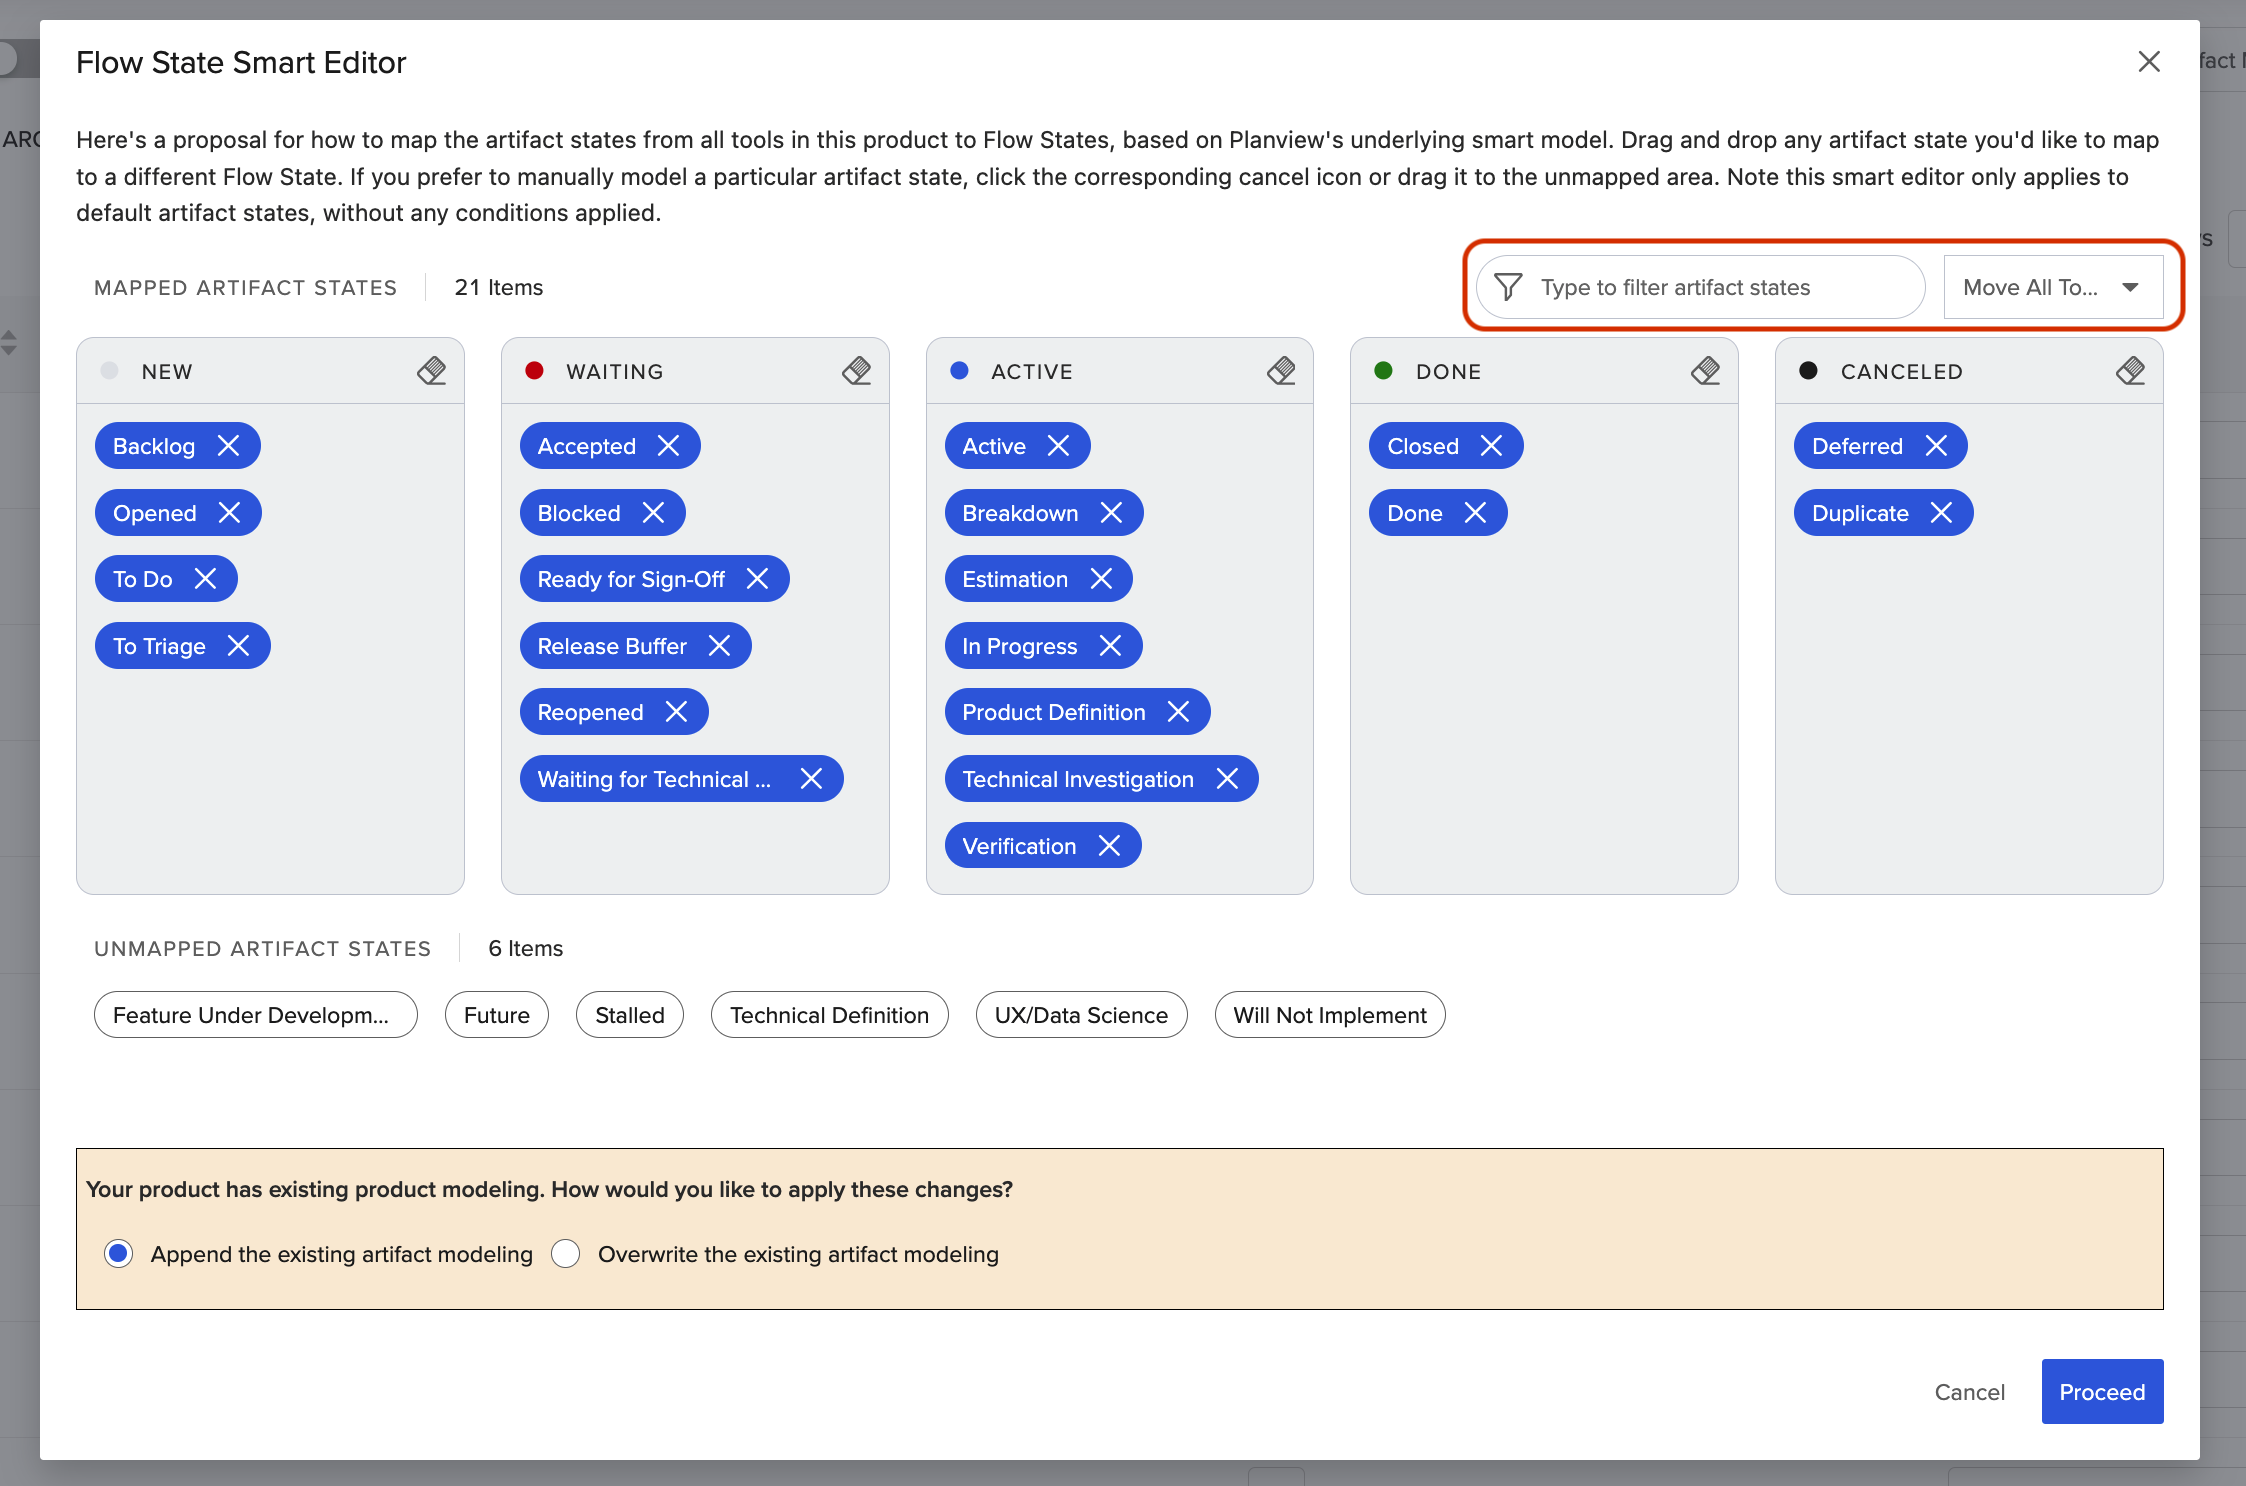
Bulk Edit Mappings
To do this, enter the artifact states in the filter and use the dropdown to select the Flow State where you’d like to map the artifact states.
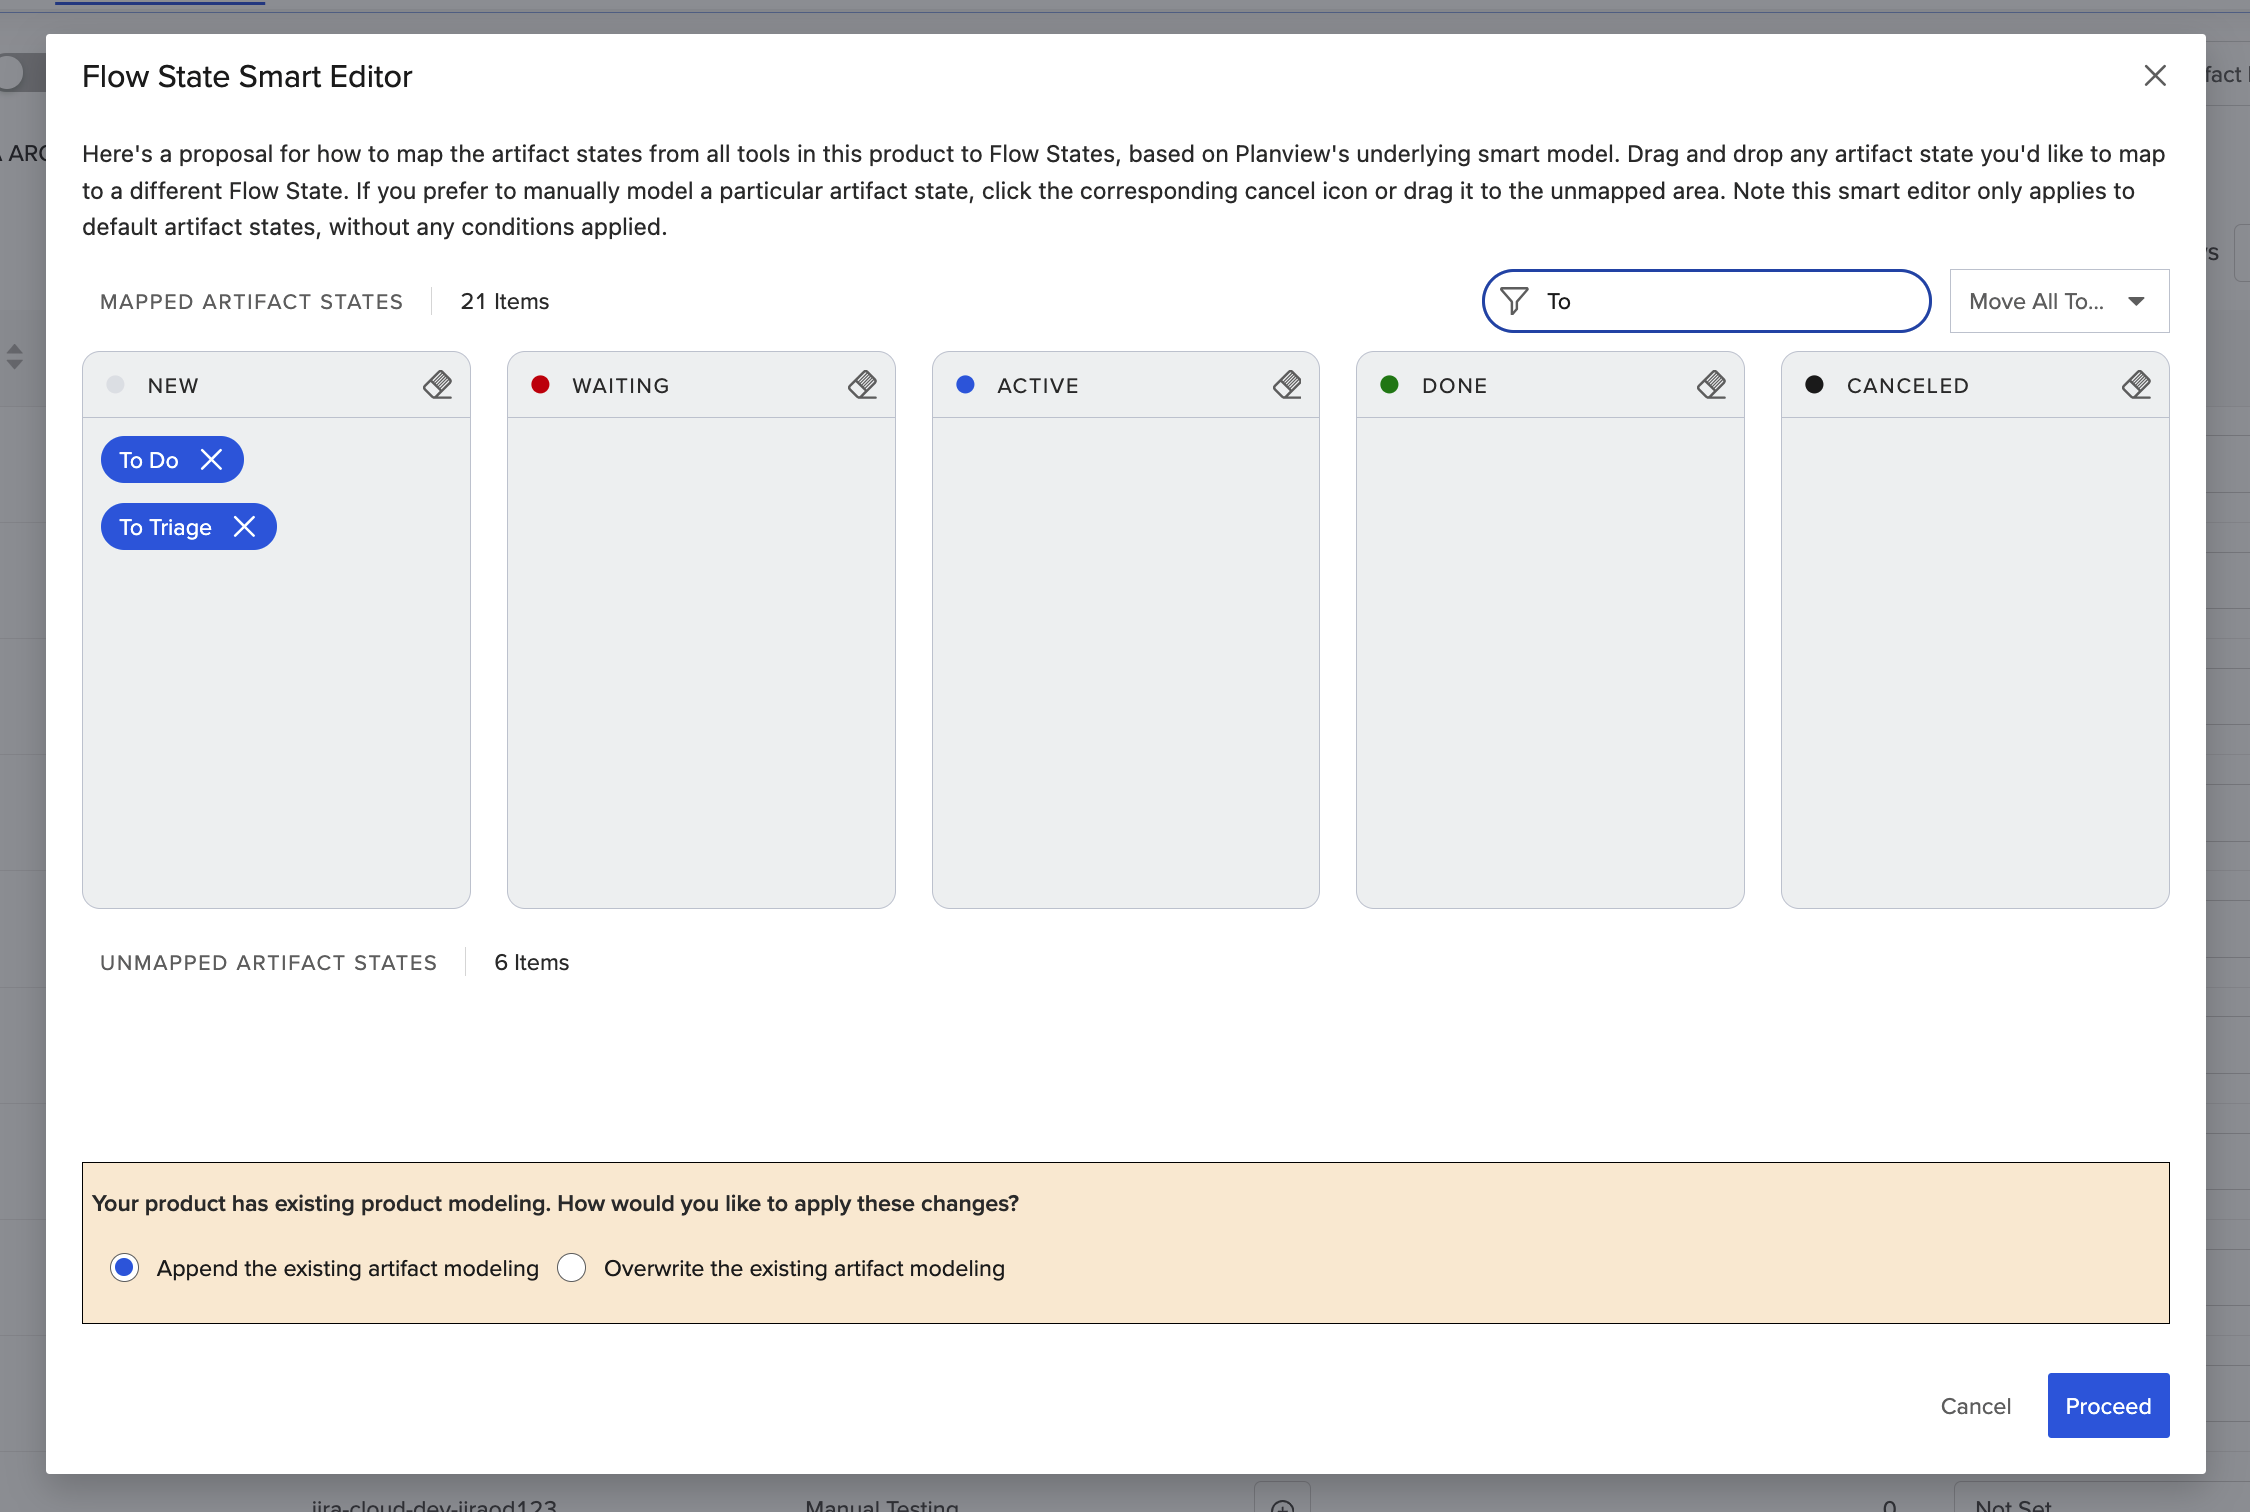
Filter Artifact States

Move Filtered Artifact States to Flow State
When you're ready to update your artifact modeling, you can choose to Append the existing artifact modeling or Overwrite the existing artifact modeling.
- Append the existing artifact modeling: This option will update artifact state mappings that are 'Not Set' to the specified Flow State.
- Overwrite the existing artifact modeling: This option will update all artifact state mappings, including previous mappings, to the specified Flow State (excluding those in the 'Unmapped Artifact States' section).
Note: By default, the smart model will not overwrite your mappings, and will default to the Append the existing artifact modeling option.
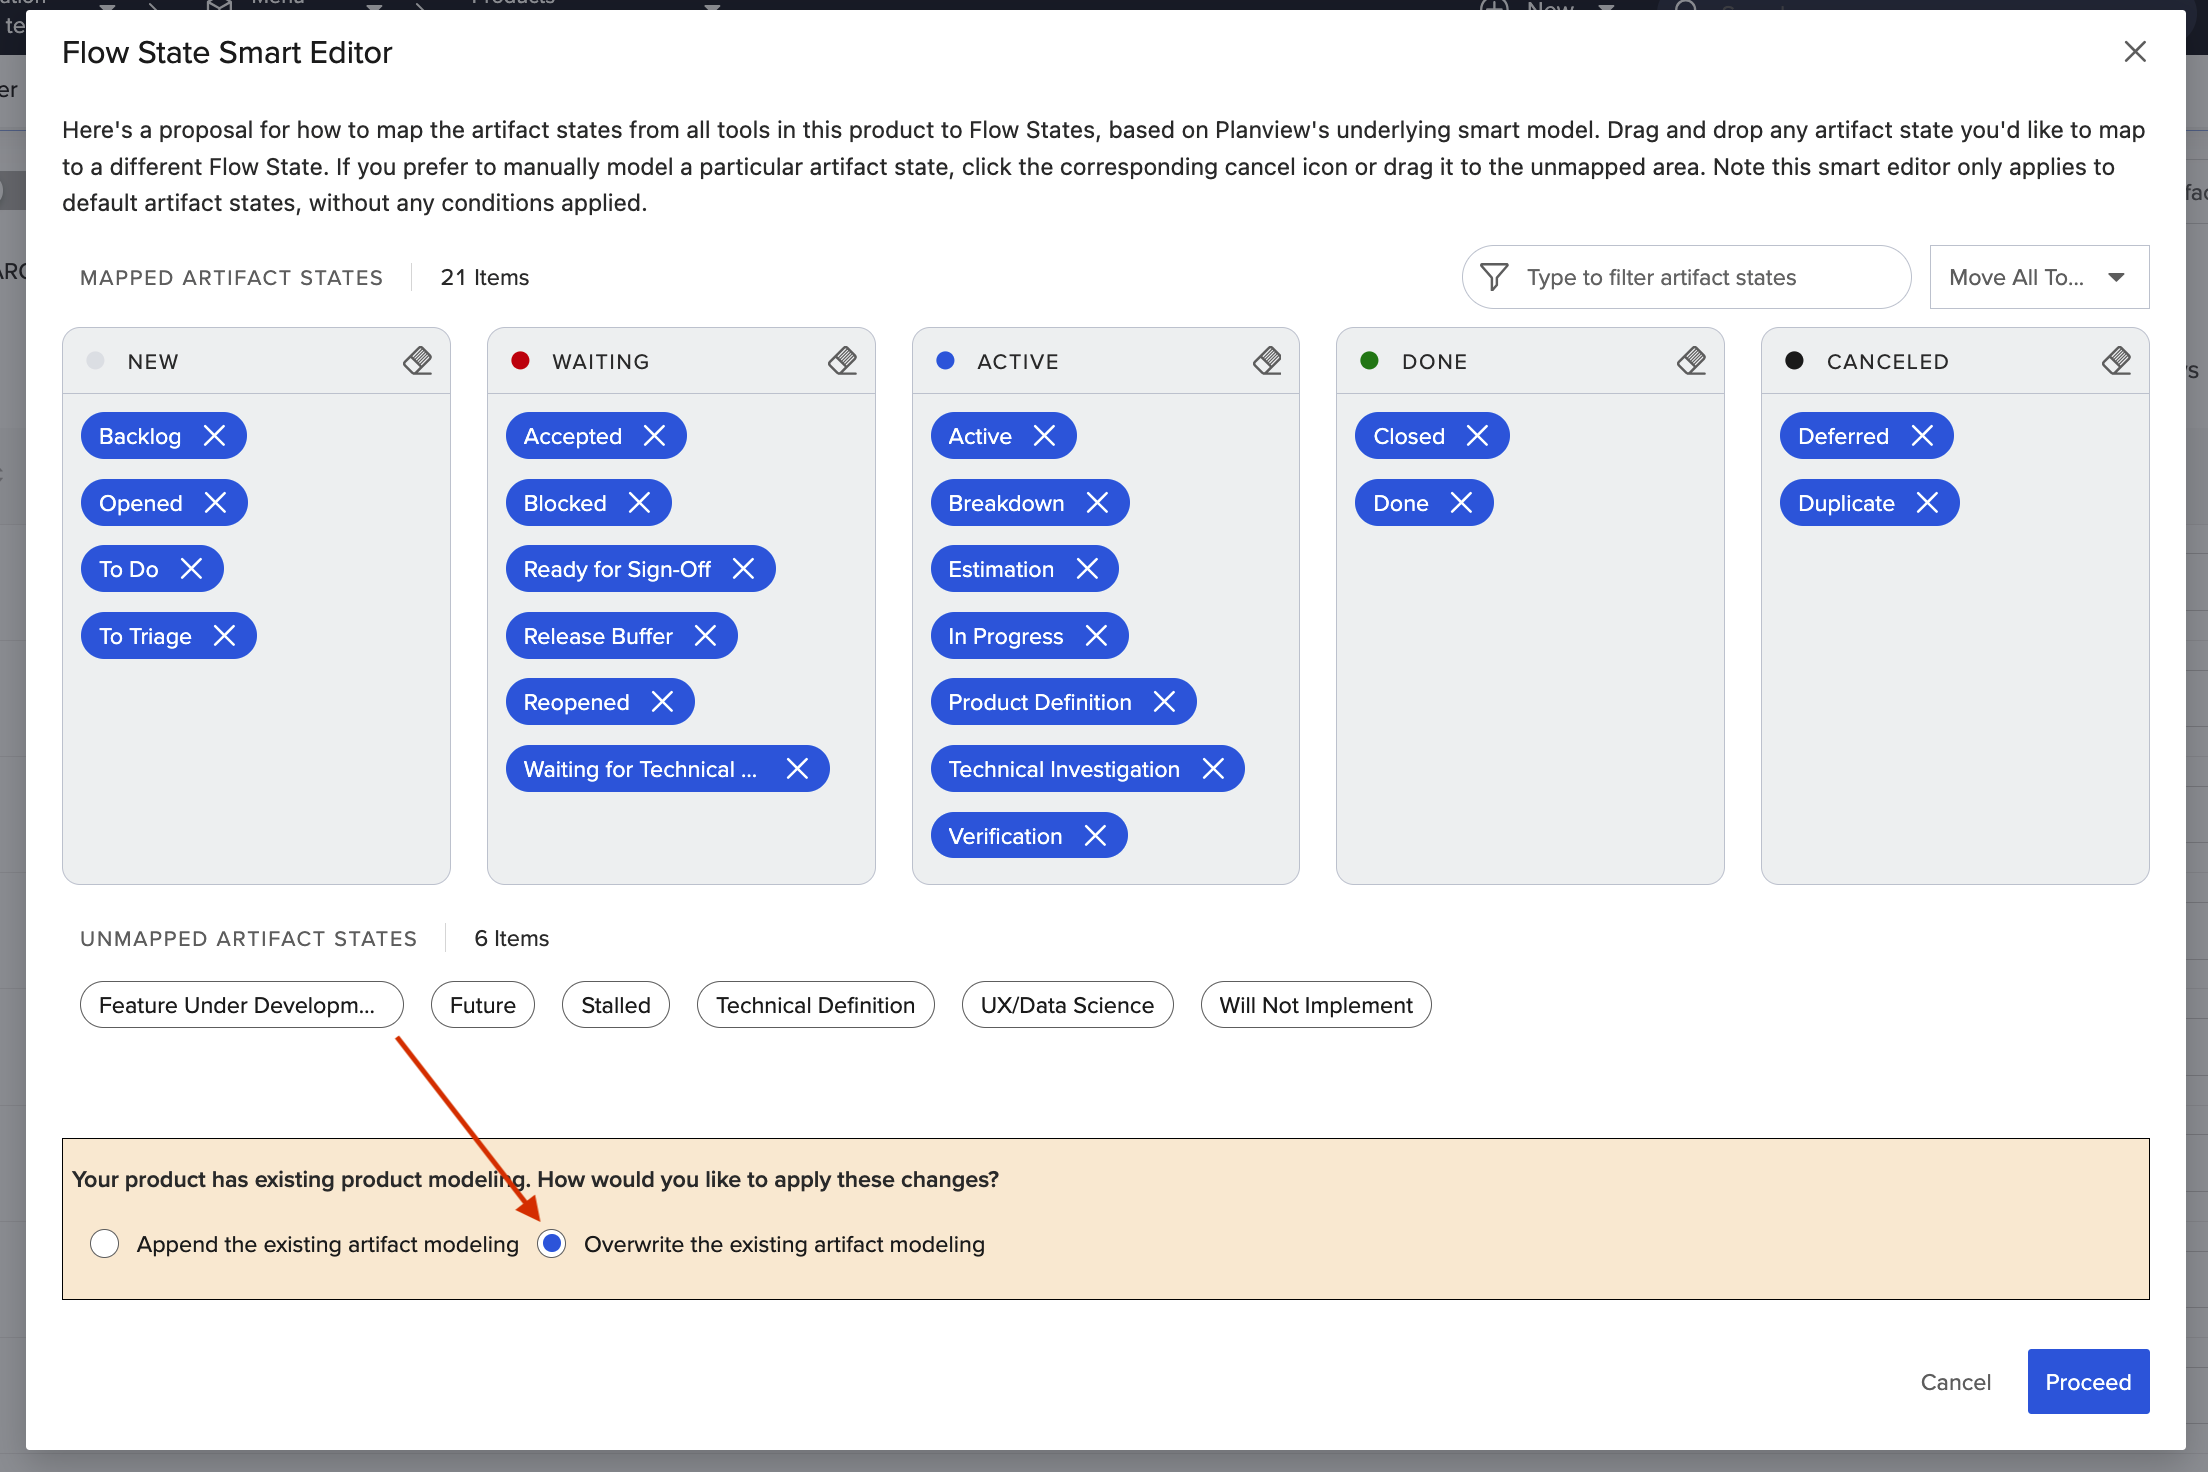
Overwrite Existing Artifact Modeling
Once you're satisfied with your selections, click Proceed.
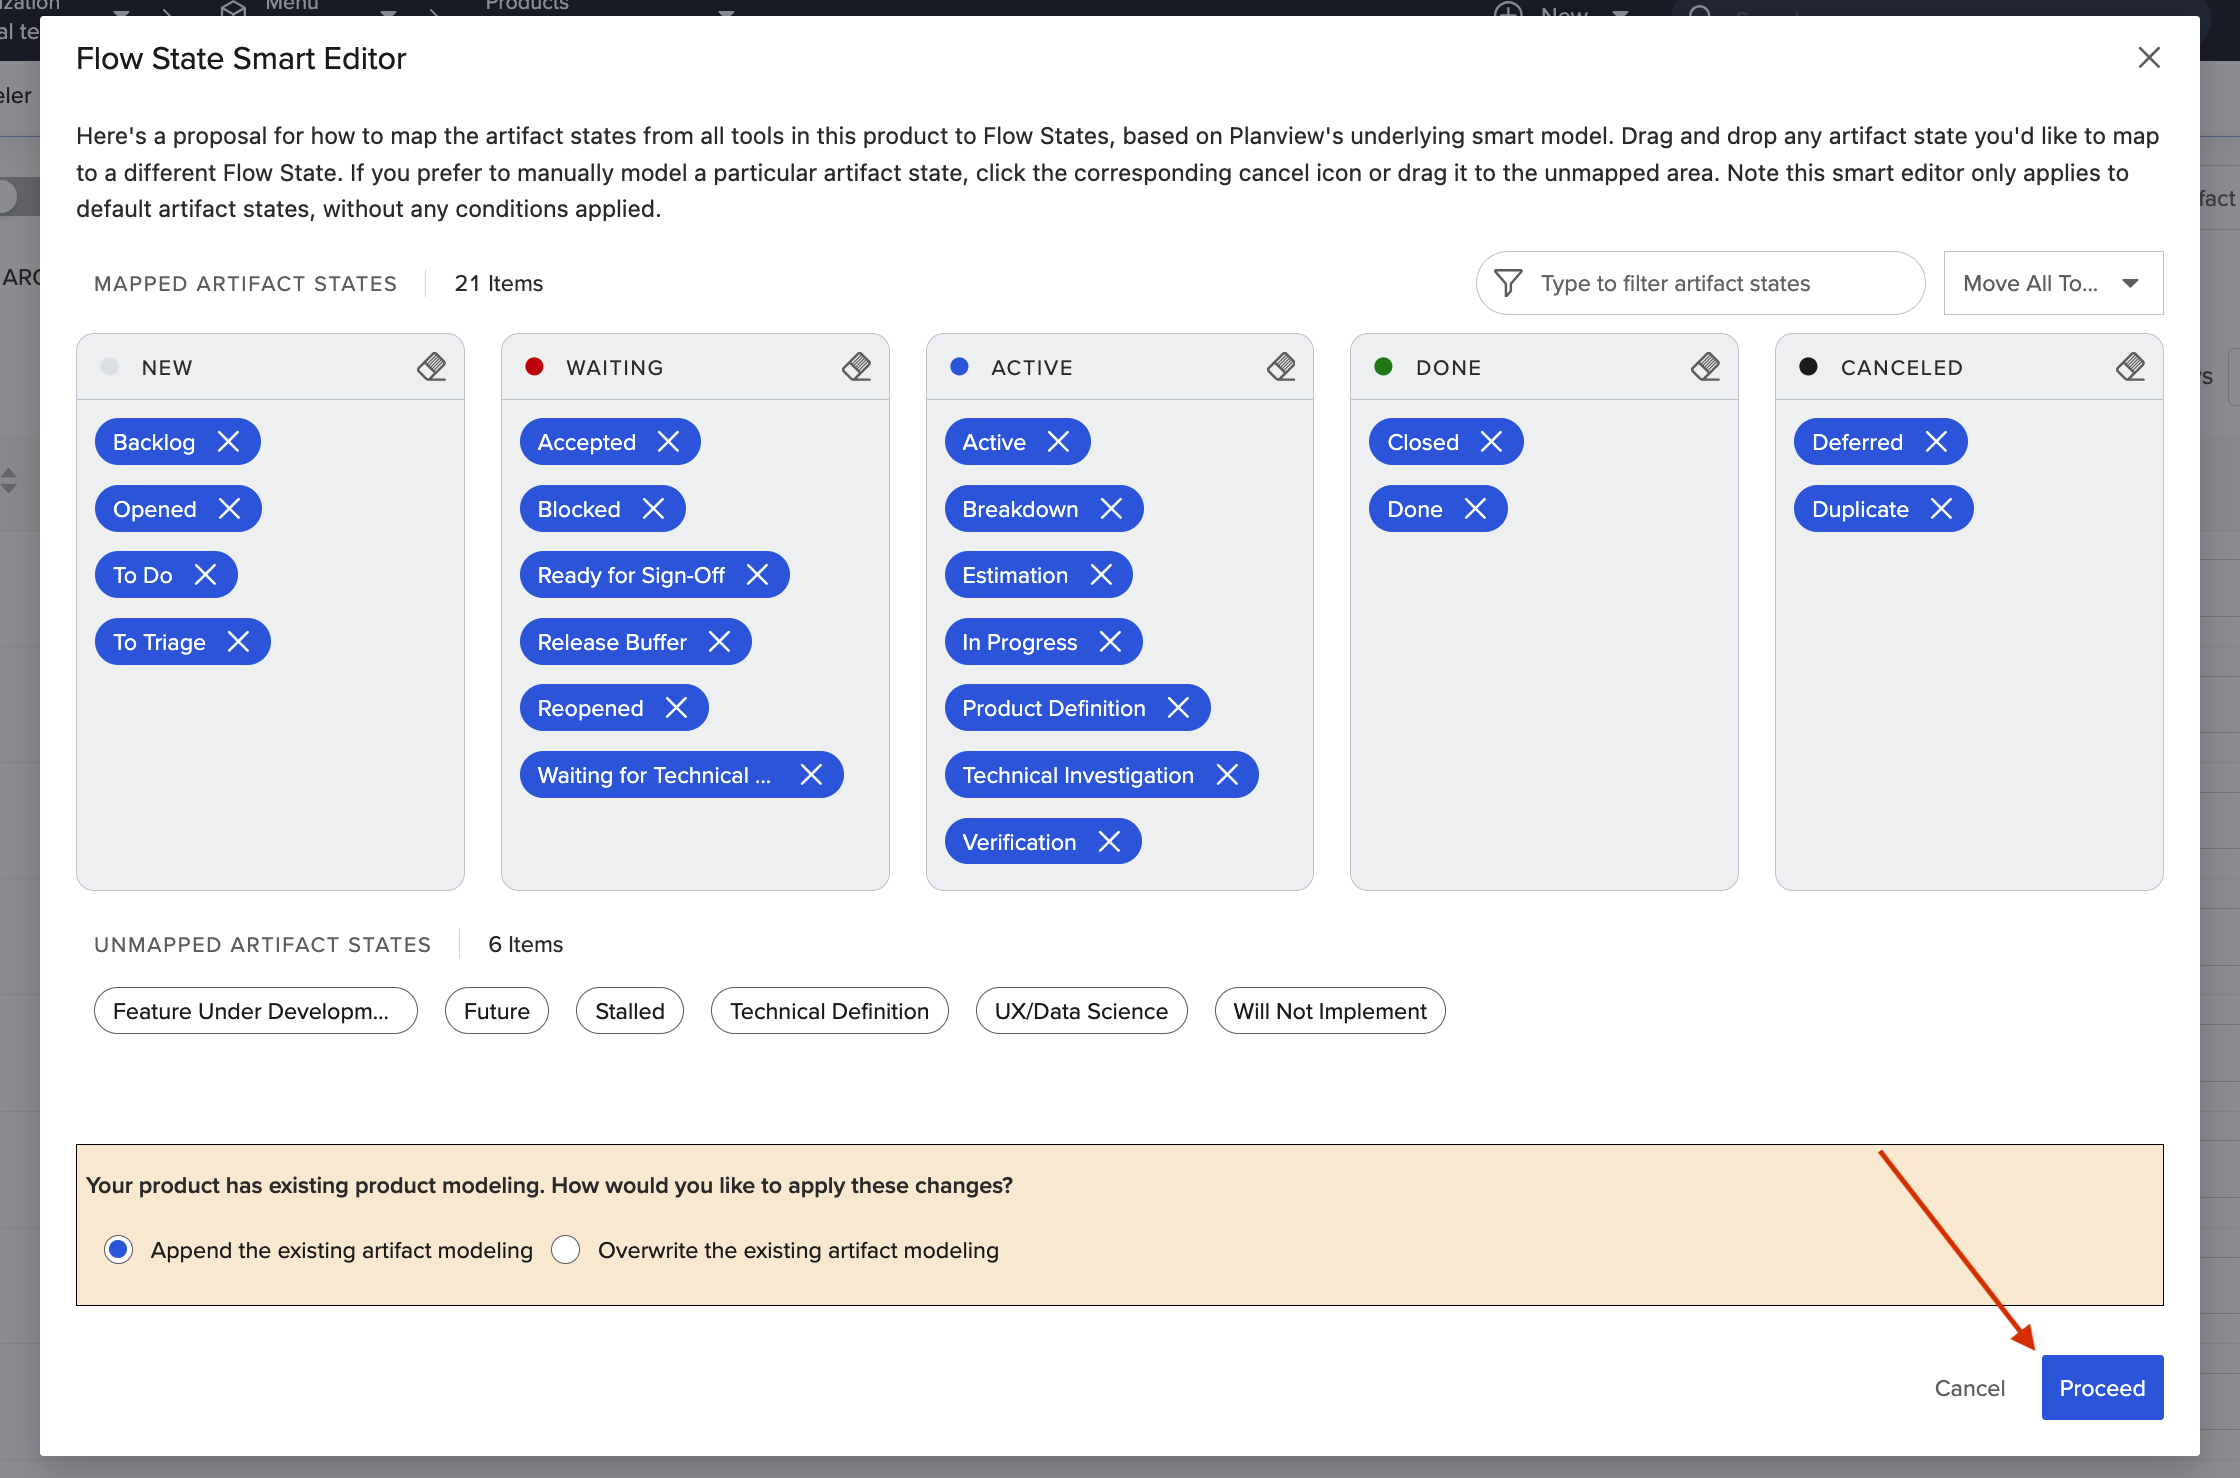
Click 'Proceed'
A confirmation message will then appear.
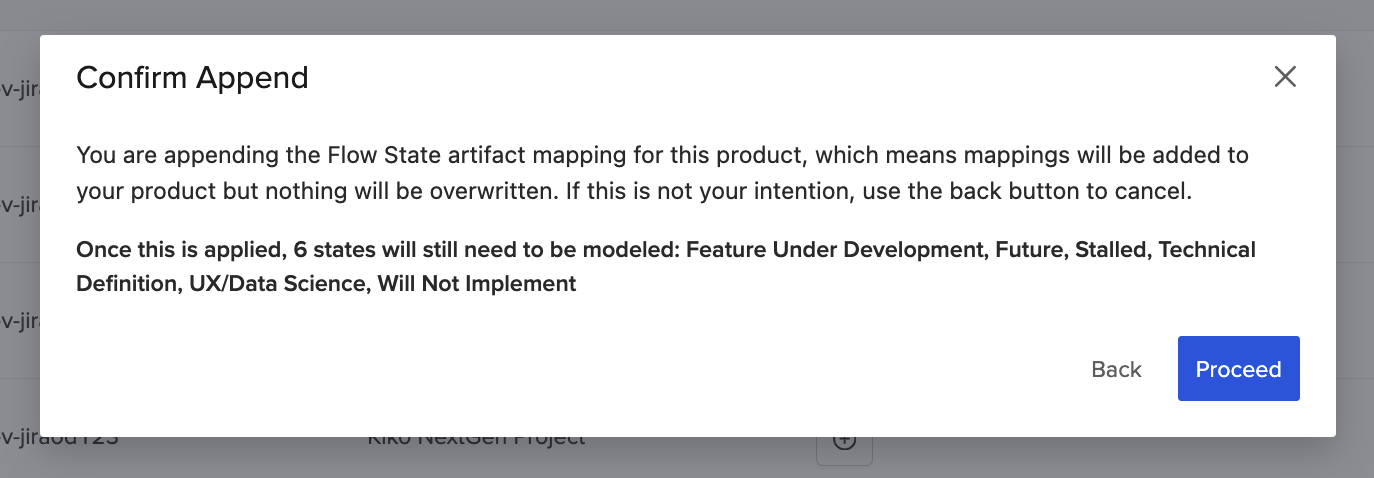
Confirmation Message
If you missed something and would like to update your mappings, click Back.
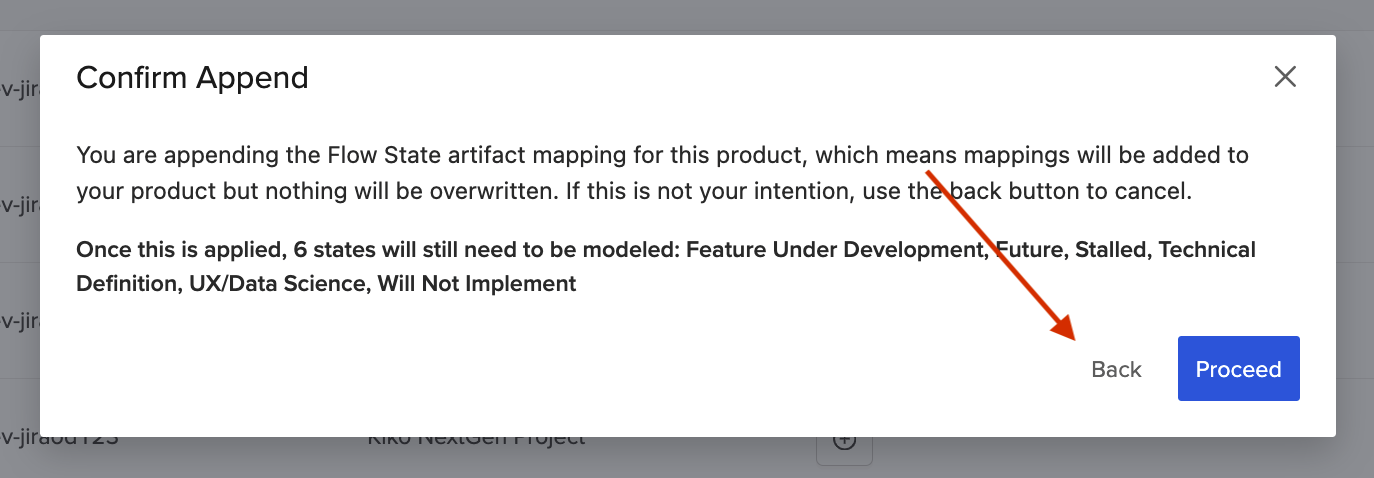
Click 'Back'
If you don’t need to make any changes to the mappings, go ahead and click Proceed and the mappings will be applied.
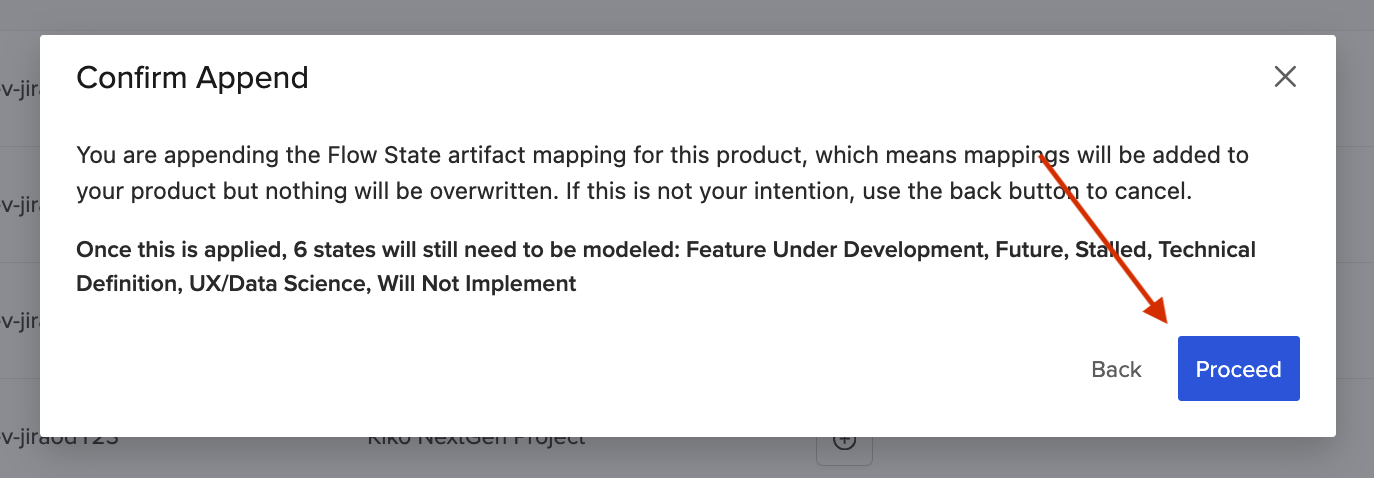
Click 'Proceed'
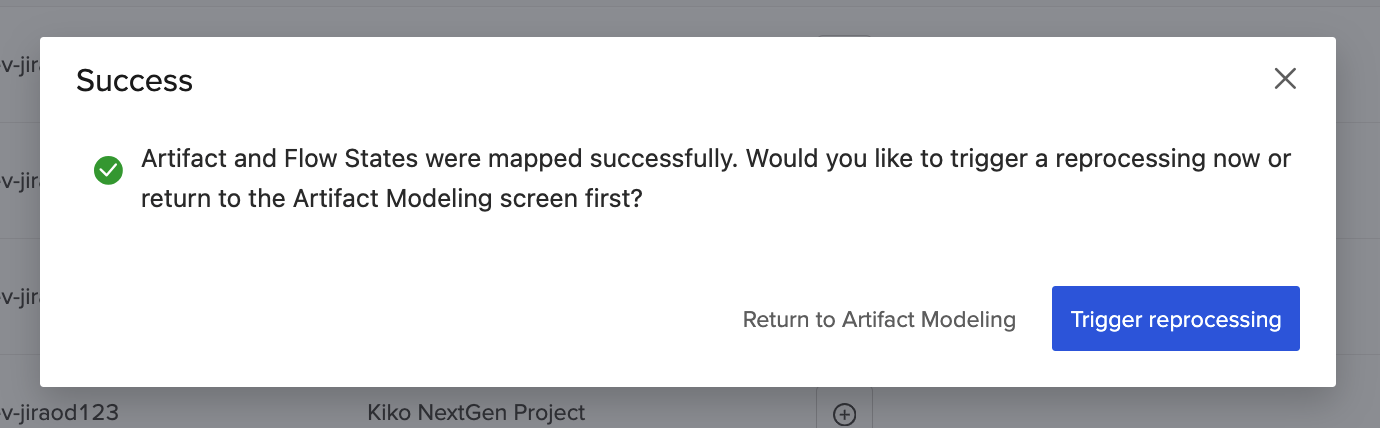
A success message will appear notifying you that the mappings were applied successfully.
After successfully updating your mappings, you can either continue to edit the artifact modeling by clicking Return to Artifact Modeling or reprocess your product and apply the modeling changes by clicking Trigger reprocessing.
Note: Reprocessing will be suspended until the resume processing button has been clicked.
Conditional Flow Items
To generate Flow Metrics, Planview Viz® affords users the ability to model their artifacts into flow items and those artifacts' statuses into flow states.
But sometimes the artifact type in your external tool doesn’t have a one-to-one match with the four flow items (Feature, Defect, Debt, Risk).
For example, in a tool like Trello where every artifact is a card, organizations may use a type field or a tag to denote whether a card is a feature, defect, debt, risk, or supporting artifact.
|
Artifact |
Tag |
Flow Item |
|---|---|---|
|
Card |
Story |
Feature |
|
Bug |
Defect |
|
|
Debt |
Debt |
|
|
Security |
Risk |
Or, you may want to whittle down the set of artifacts used to generate Flow Metrics, for example to those belonging to one specific team or component. In those cases, you can apply a condition to your Flow Item mappings. Viz will treat any artifacts that don't meet the conditions configured as Not Set (i.e., not included in Flow Metrics).
|
Artifact |
Team |
Flow Item |
|---|---|---|
|
Story |
Compliance |
Feature |
|
Bug |
Compliance |
Defect |
|
Debt |
Compliance |
Debt |
|
Security Risk |
Compliance |
Risk |
Note: If a Flow State is set to Ignore while work is in progress on a modeled Flow Item, when work enters this state it will not be shown as WIP in Flow Load or part of the neglected WIP calculations. In general, you should not set a Flow State to Ignore if work is in progress.
Viz supports configuring rule-based modeling using the following field types:
- Single Select
- Multi Select
- Boolean
- Text (Summary & Formatted ID only)
- Container (Jira Align Program field only)
Note: To ensure you can use the Starts With operator and type in free text when setting a condition, Viz matches fields by label, and not by ID. As a result, if a program or single select value is renamed, you must contact support to reload options so you can set an additional condition with the new name.
Configuring Conditional Flow Items
To configure rule-based modeling (also referred to as conditional Flow Item mapping), go to the Artifact Modeling tab for your product value stream.
Click the + icon in the Condition column for the artifact type you’d like to configure.
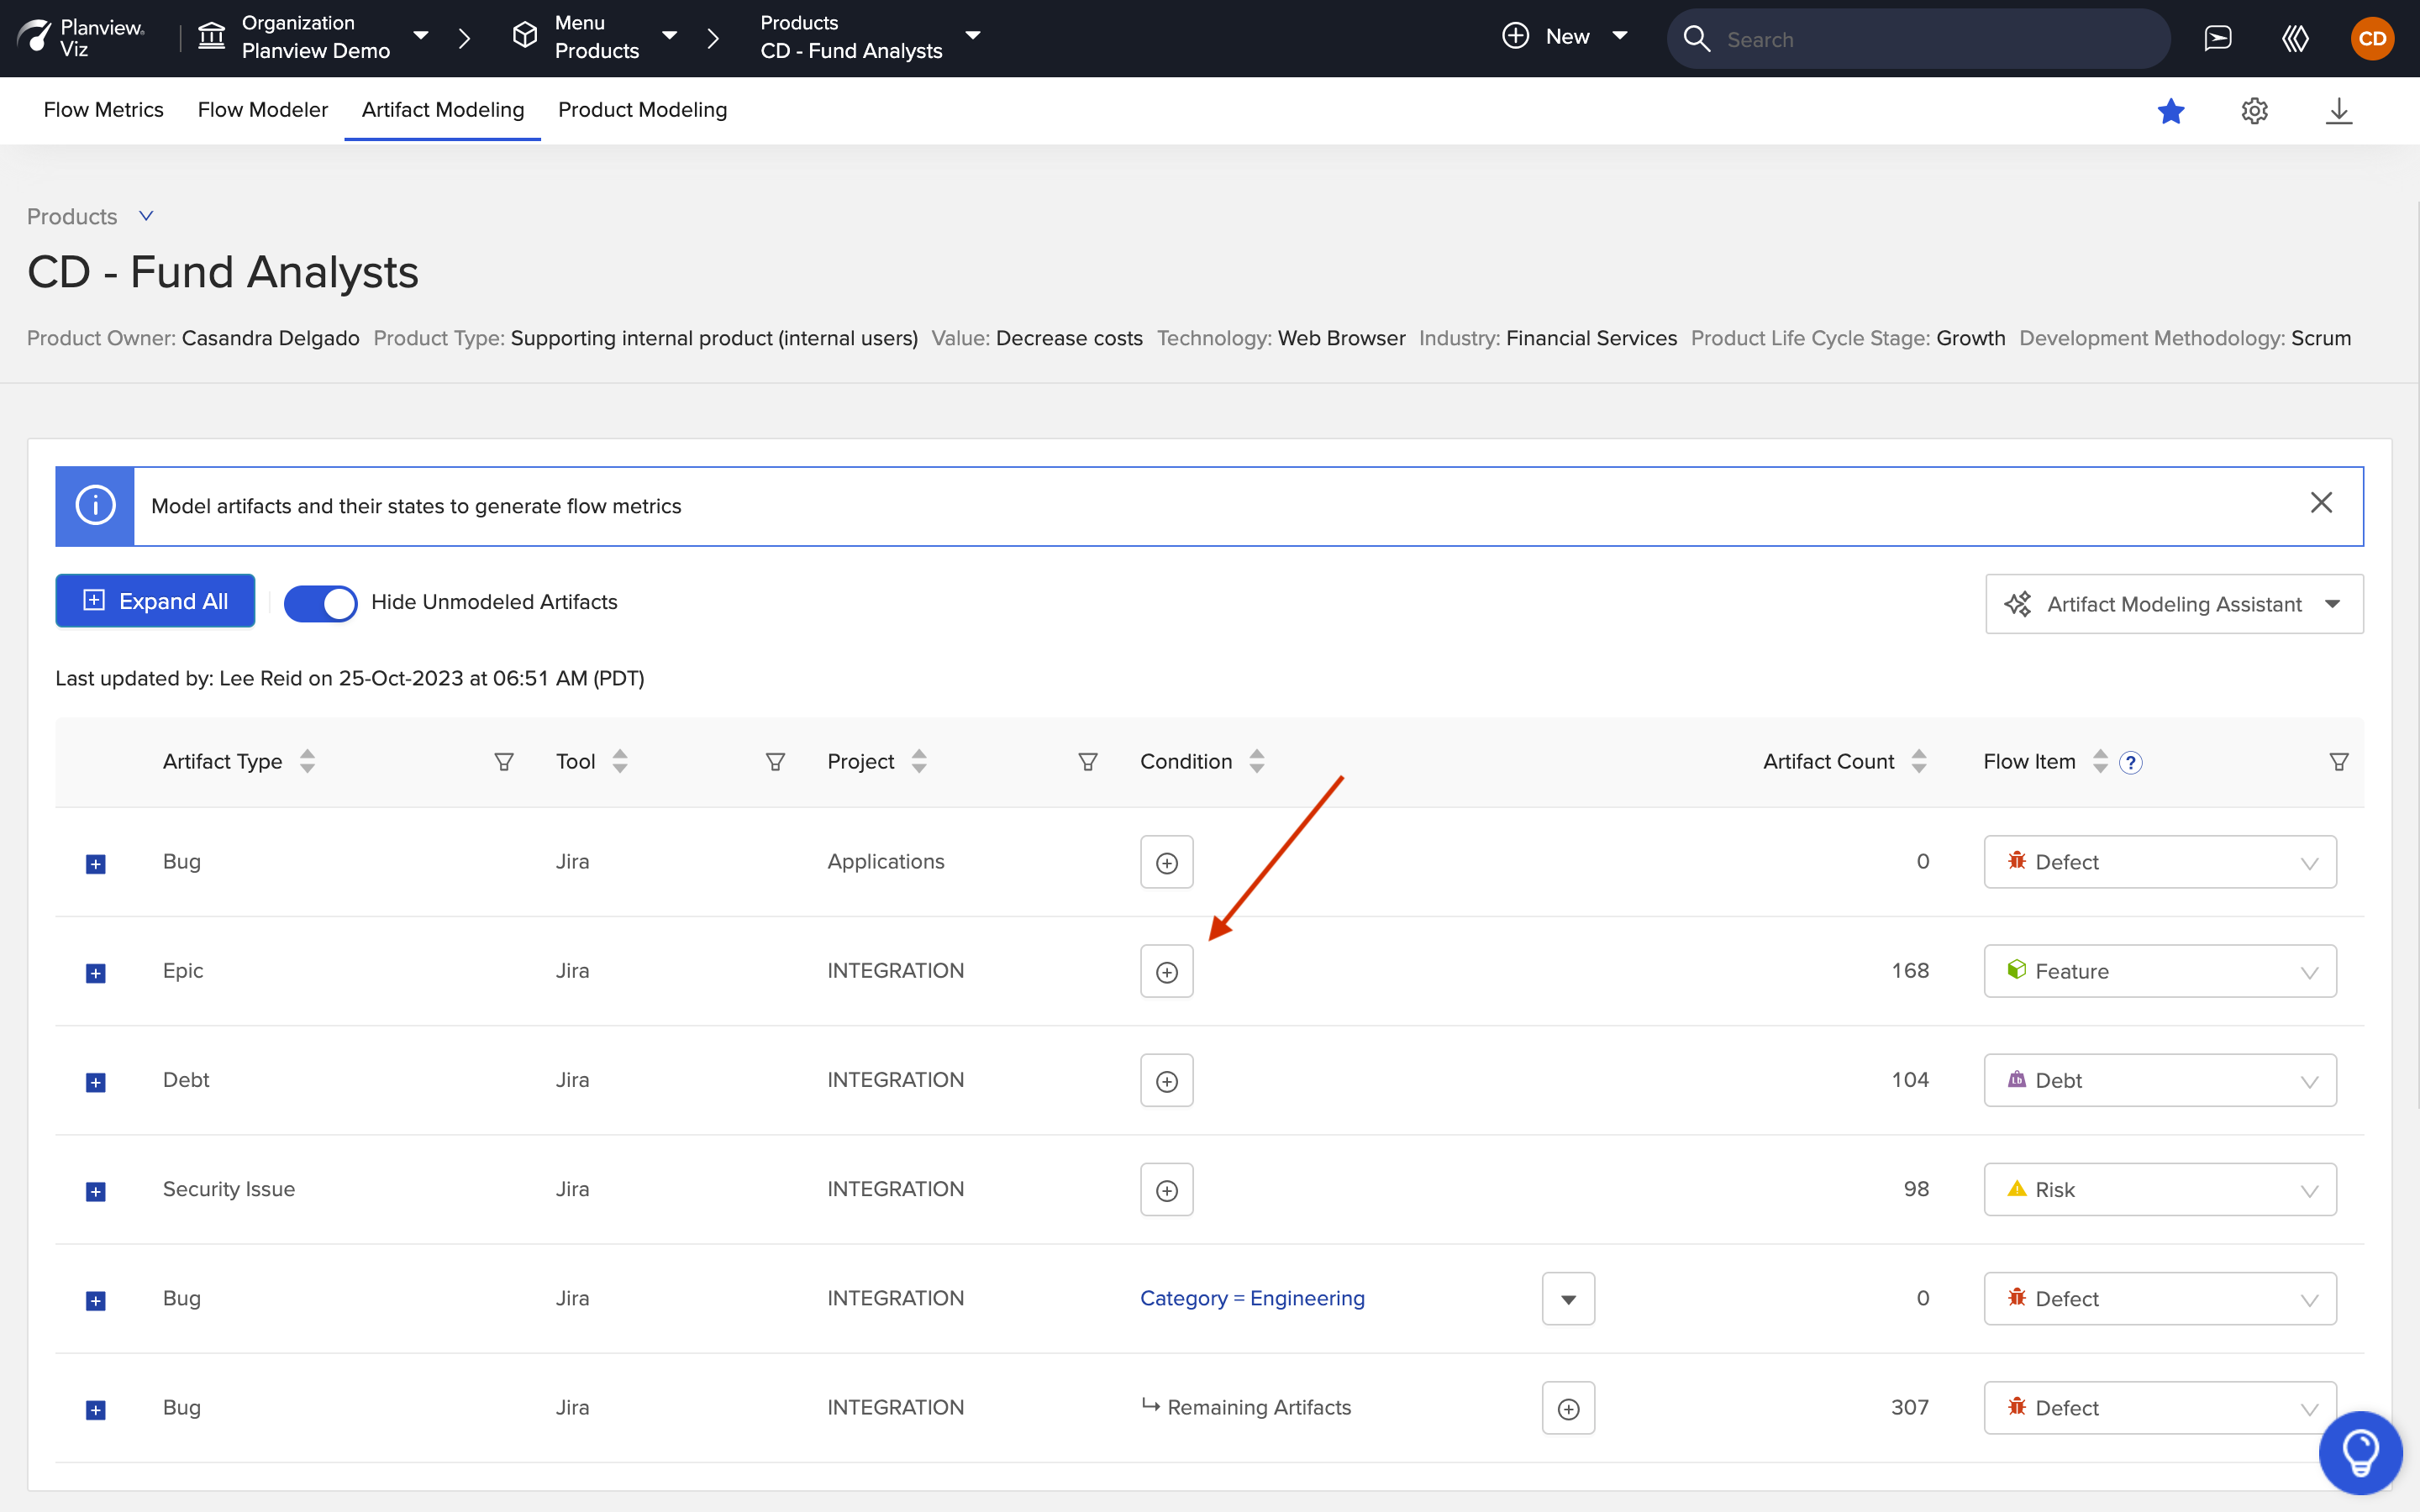
Add a Condition
In the Add Condition (Flow Item) panel, populate the condition you'd like to apply. You can click + Add Statement to add additional criteria to the condition.
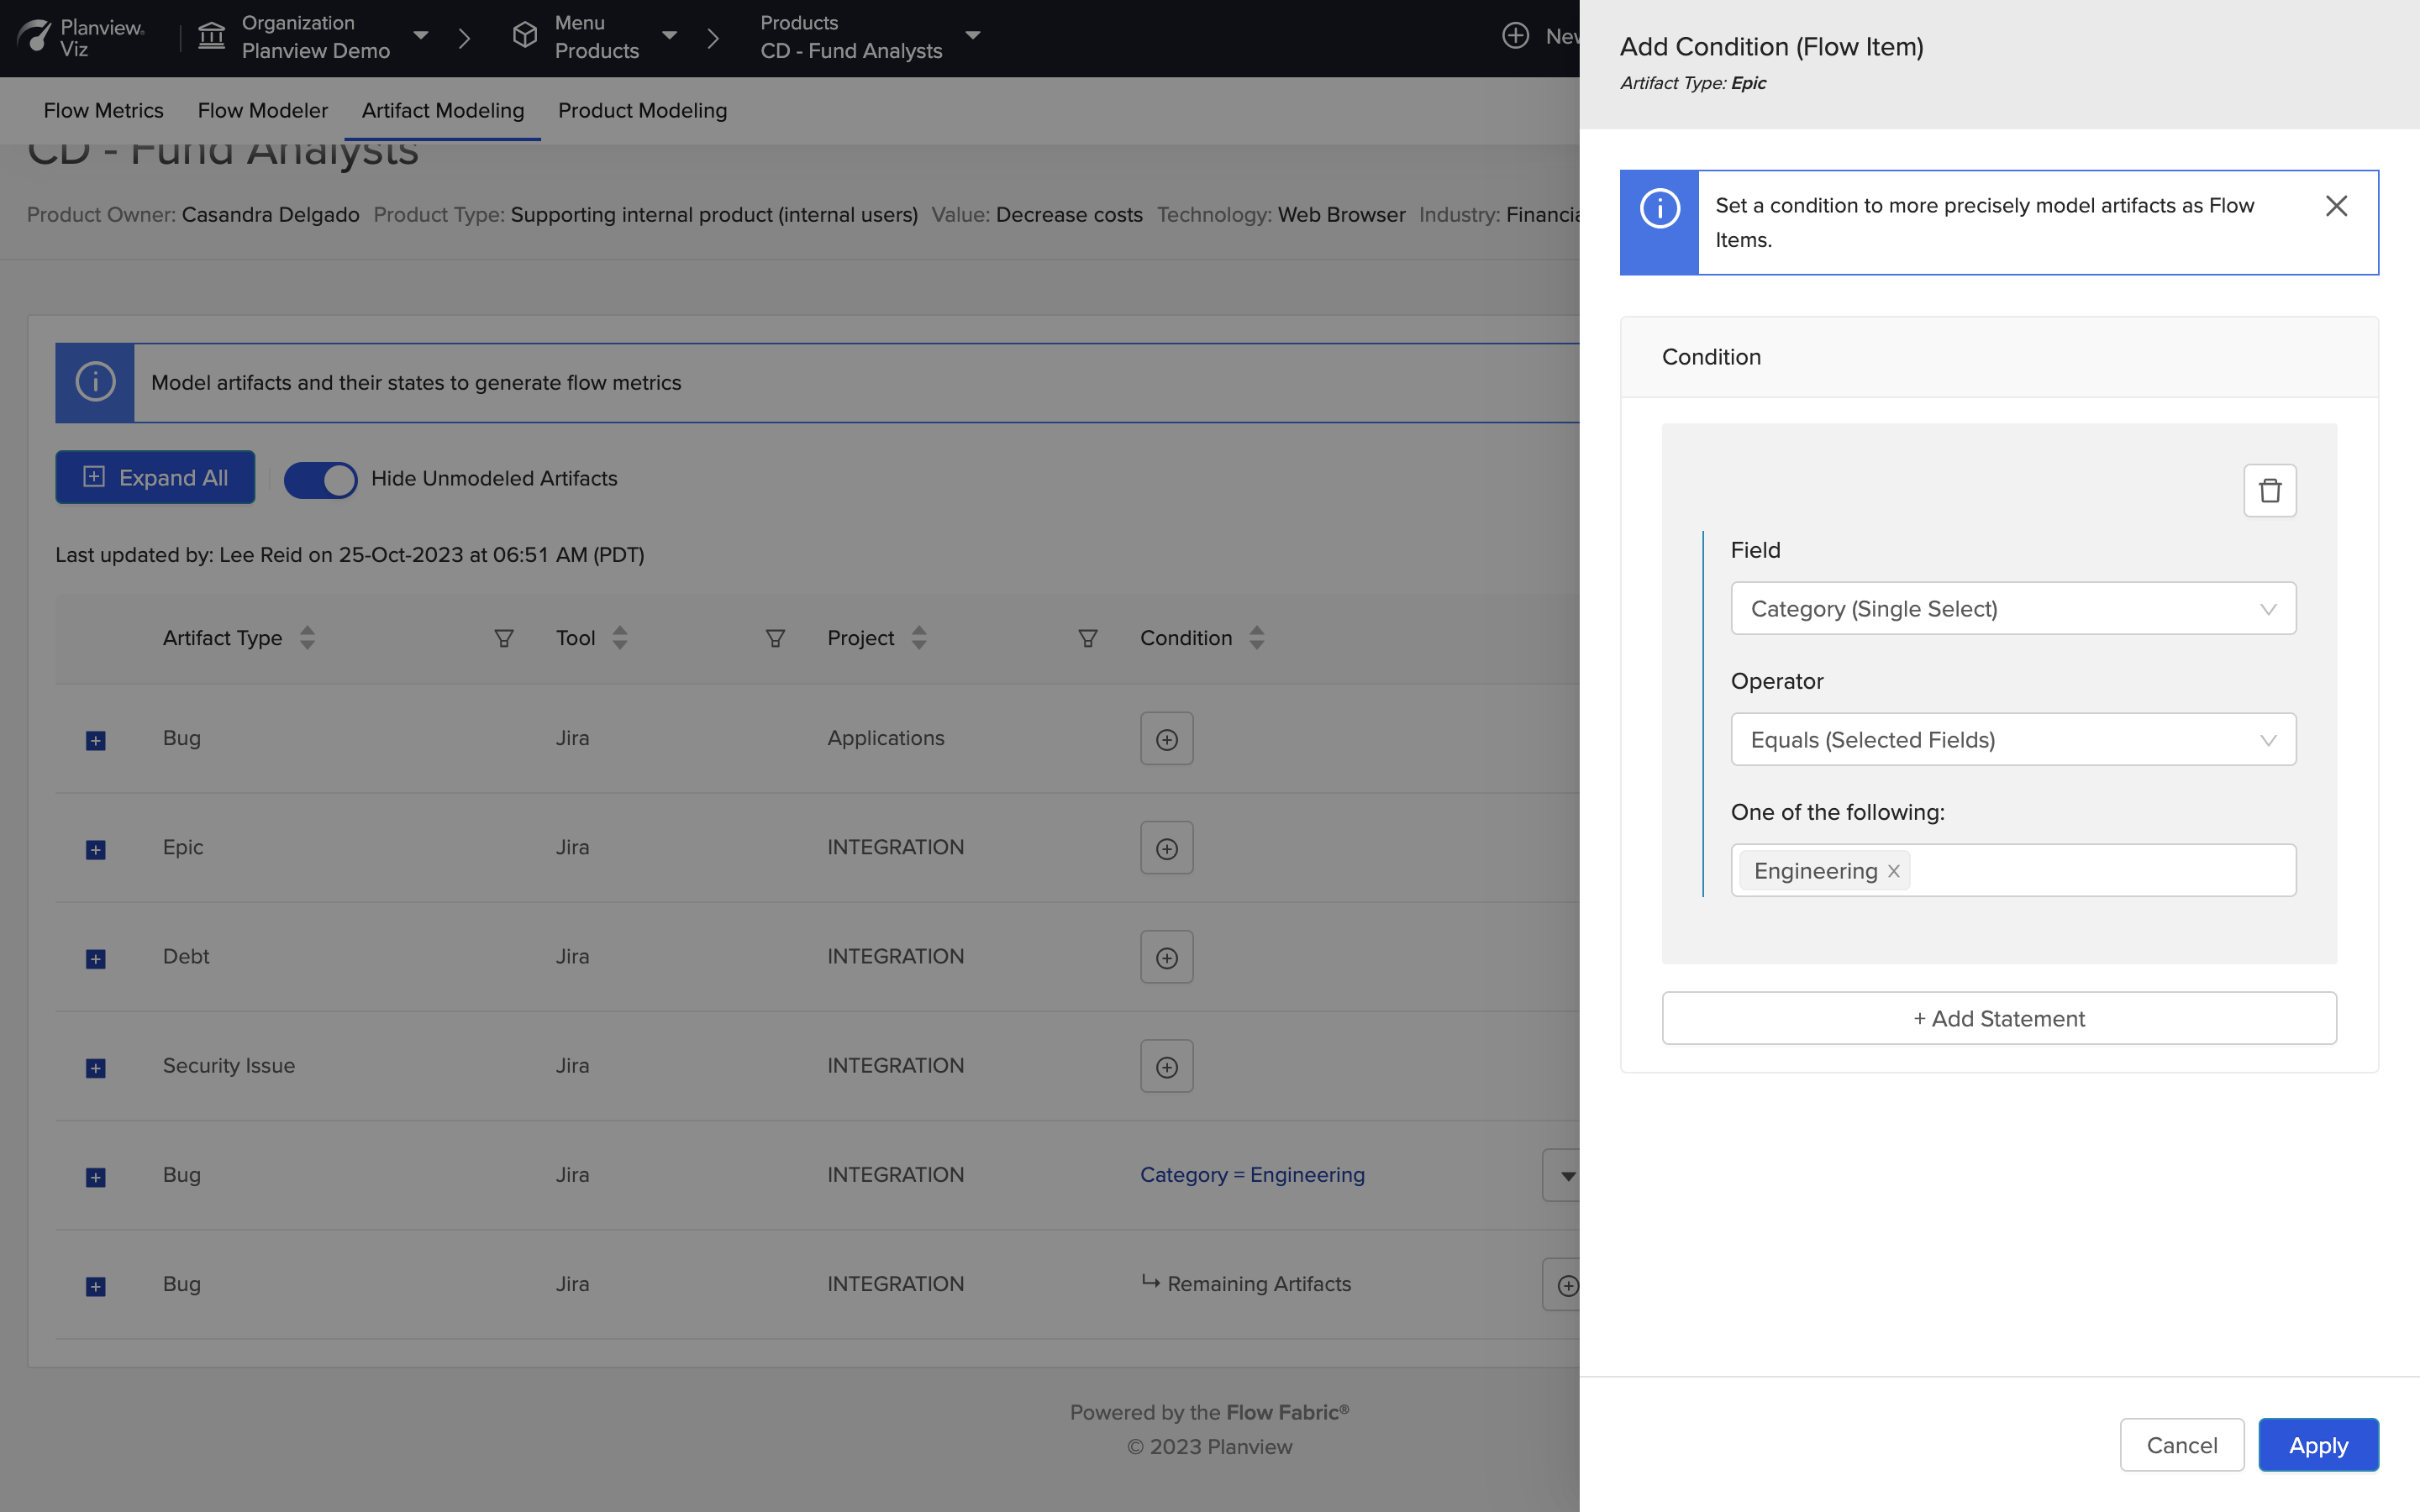
Configure and Apply the Condition
Note: Viz matches field values for Flow Item conditions based on label, so if the value's label changes in the tool (i.e., if it changes in Jira), the condition must be reconfigured in Viz to ensure metrics continue to be accurate.
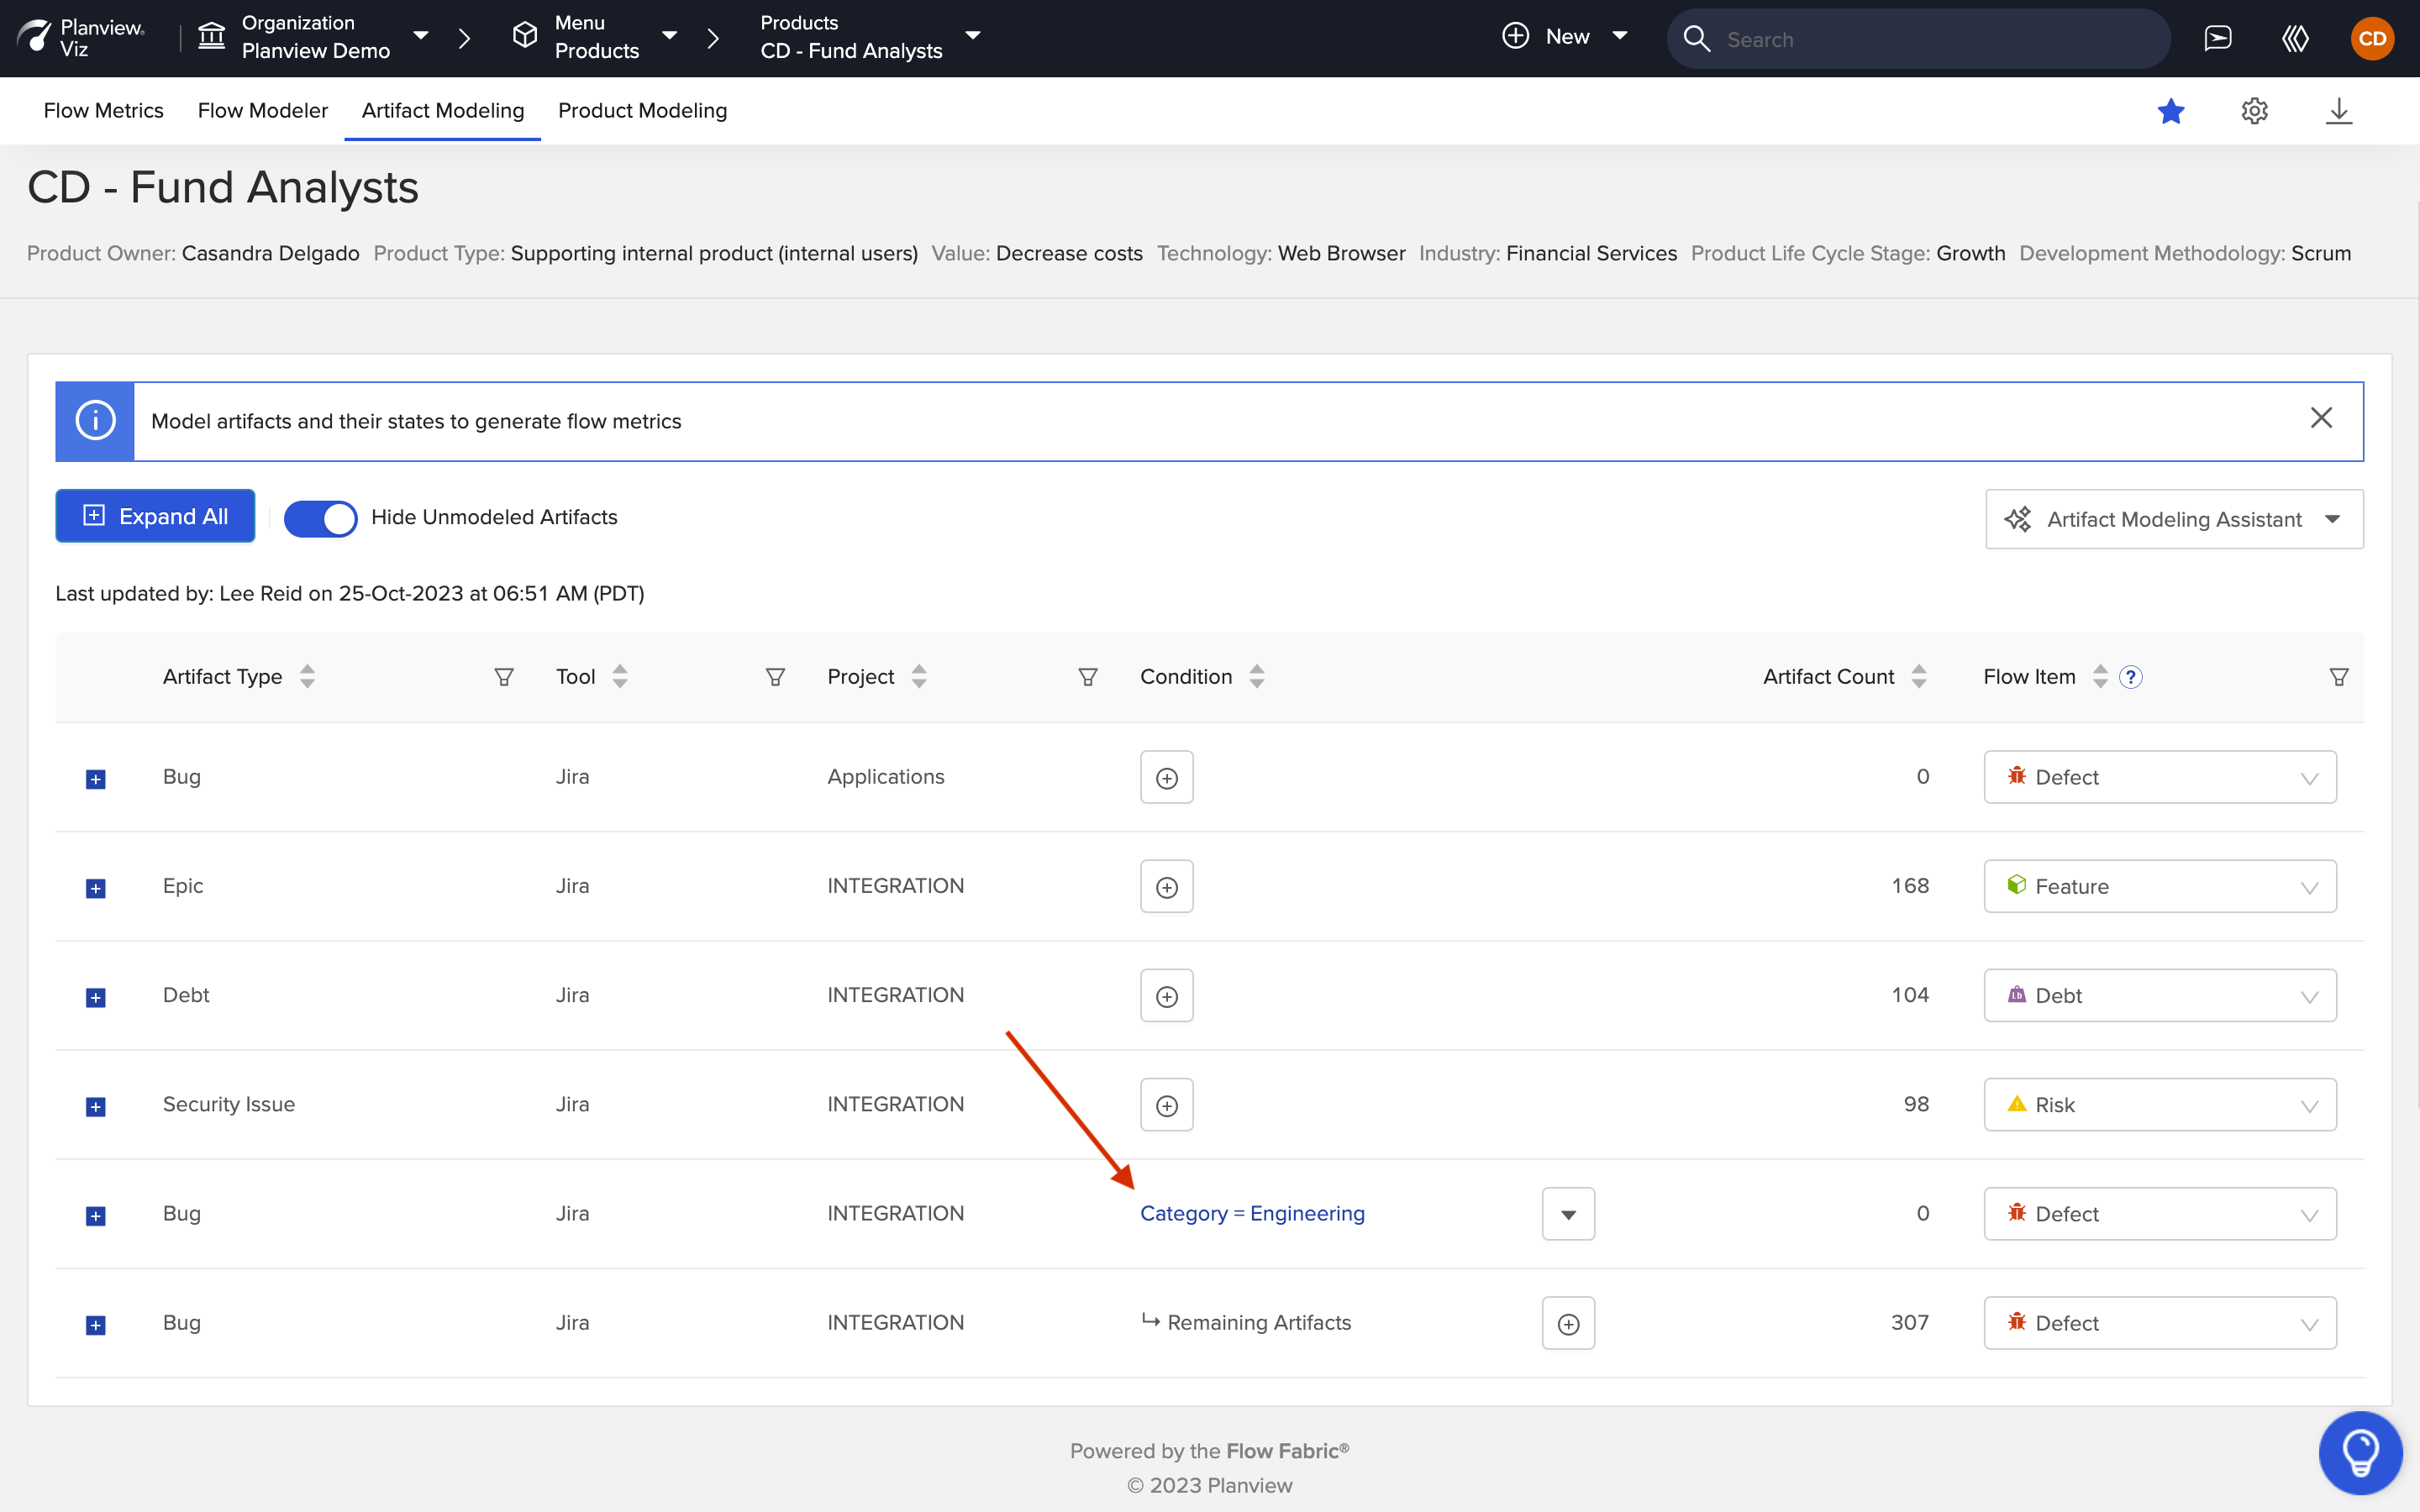
Once applied, model that row into the correct Flow Item.
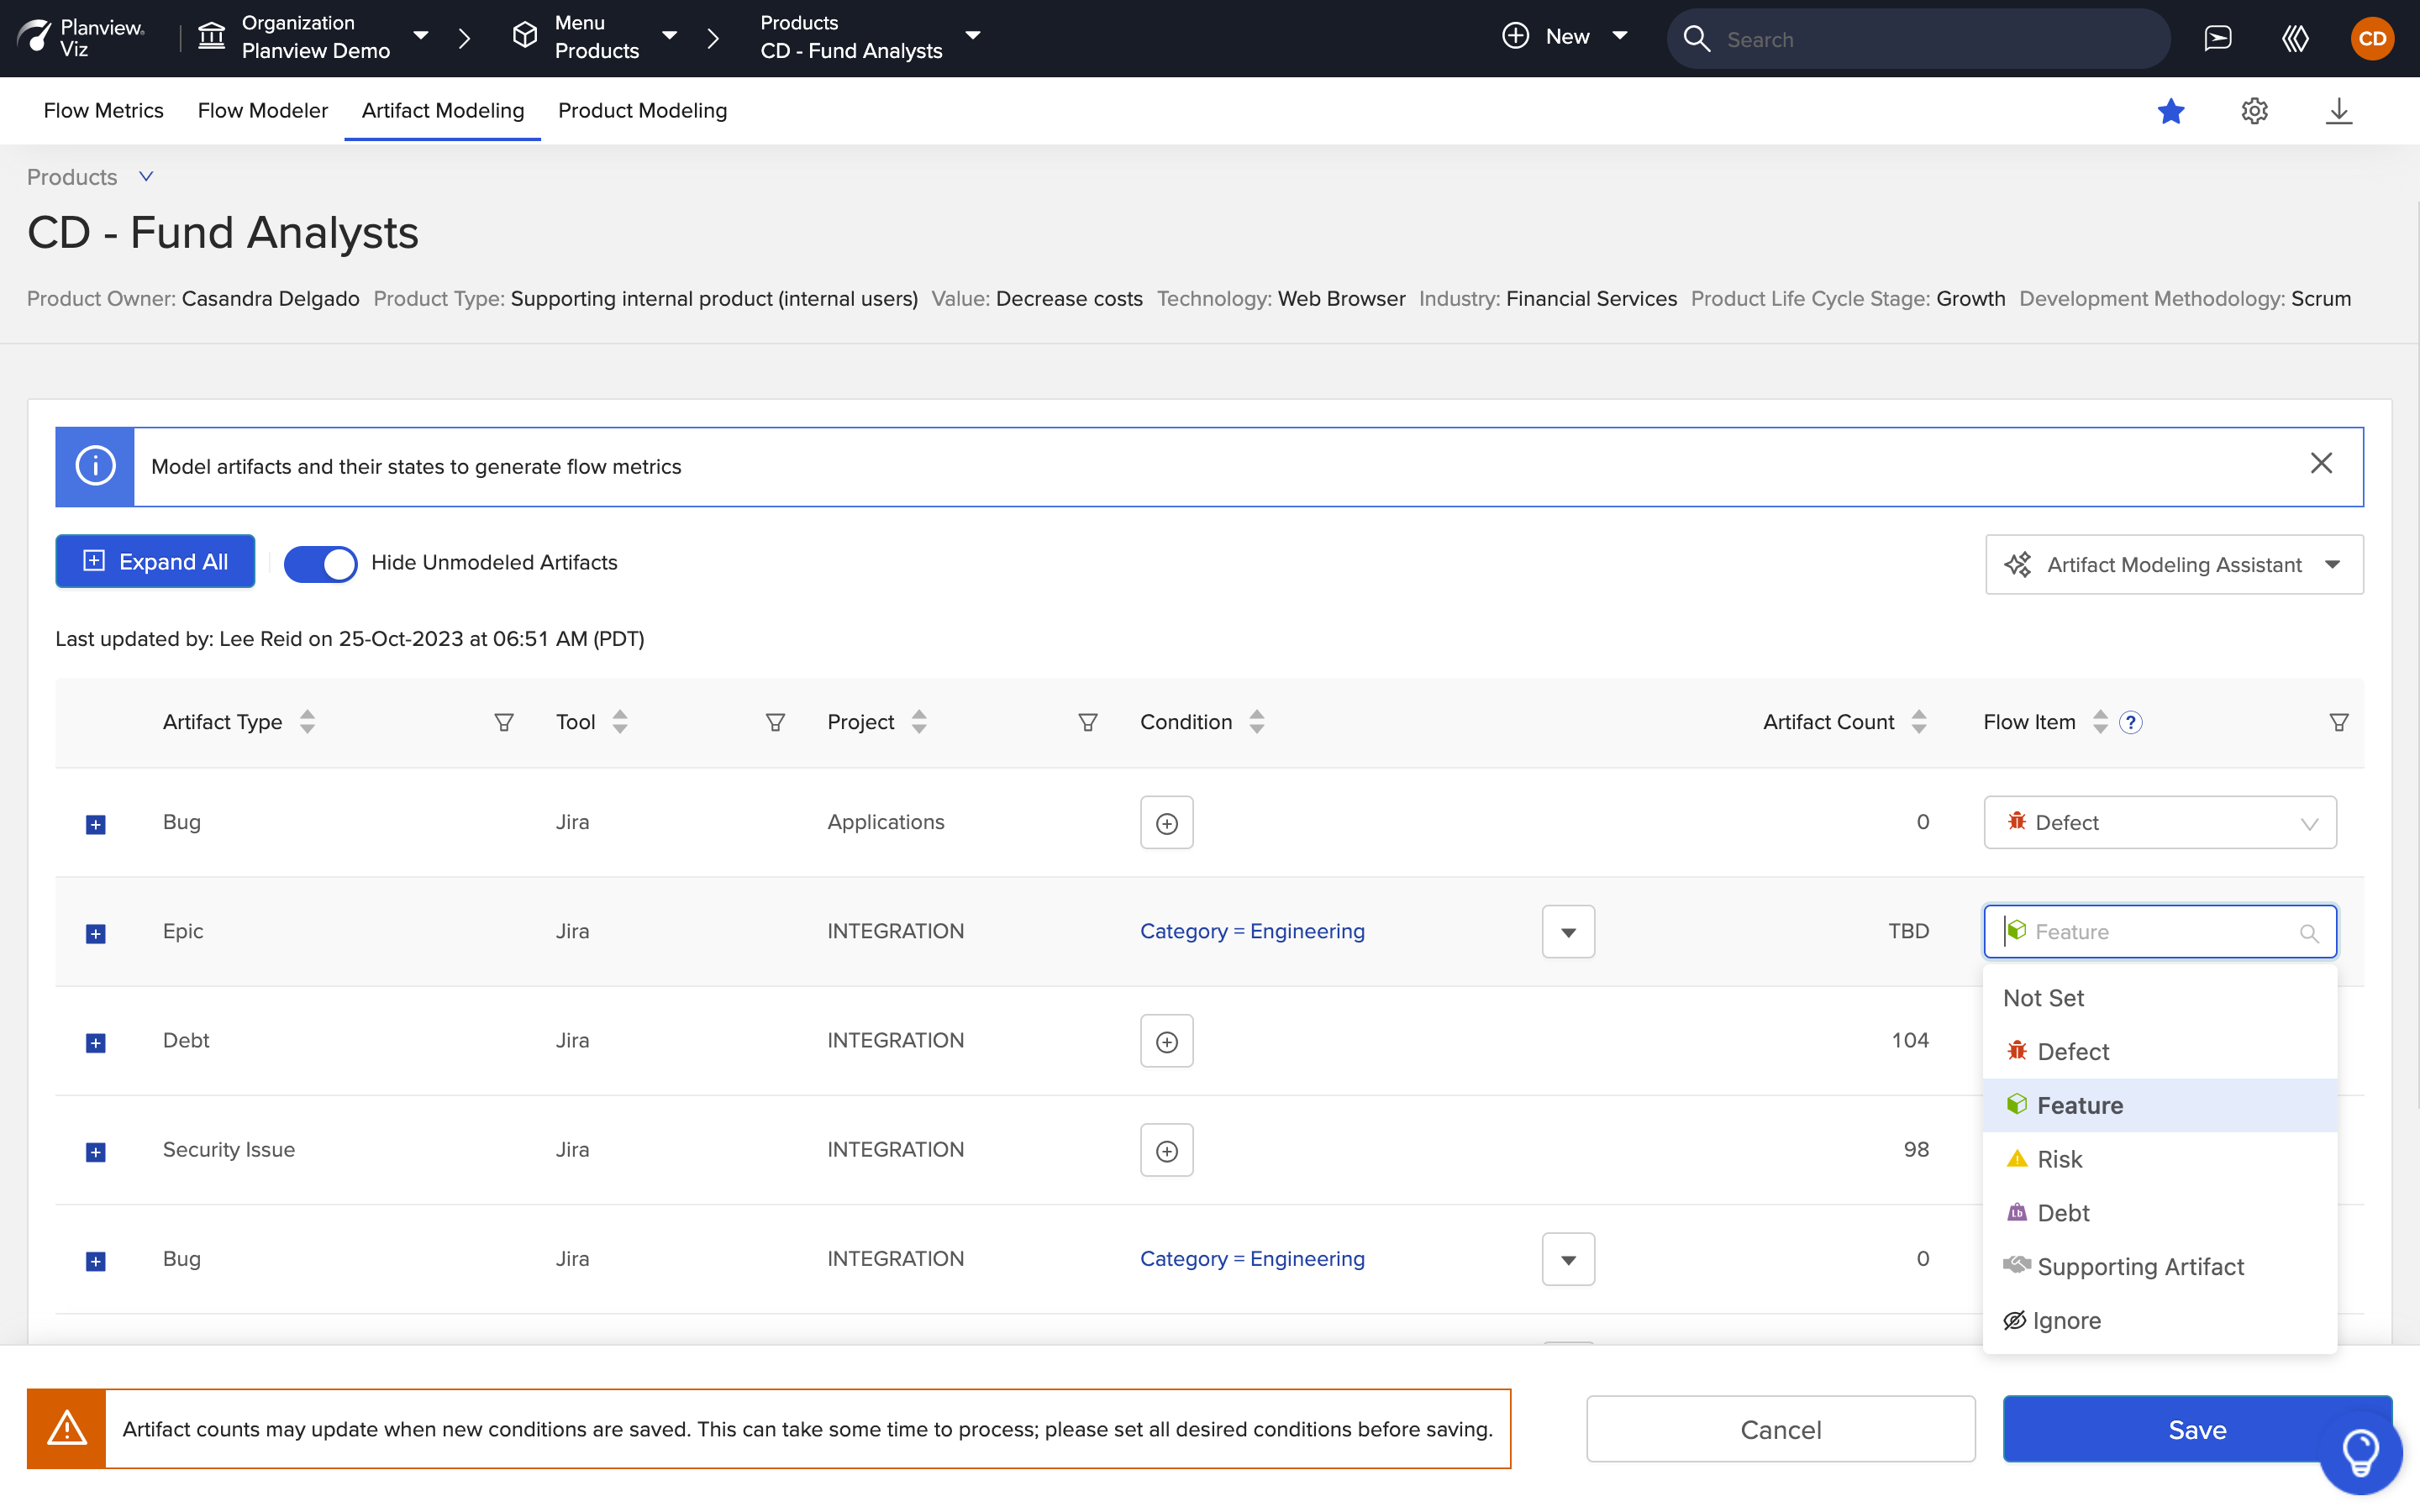
Set Flow Item Category
If you'd like to view all conditions, select Expand from the dropdown next to your condition. If you'd like to apply additional conditions to the same artifact type, select Add or Duplicate from the dropdown.
- Add: Creates a new row with no condition configured.
- Duplicate: Creates a new row with the same condition configured, so that you can easily modify field values based on the original statement. 'Duplicate' will also copy over any associated Flow State or Flow Item mappings so that they do not need to be re-mapped (if the original condition has already been saved).
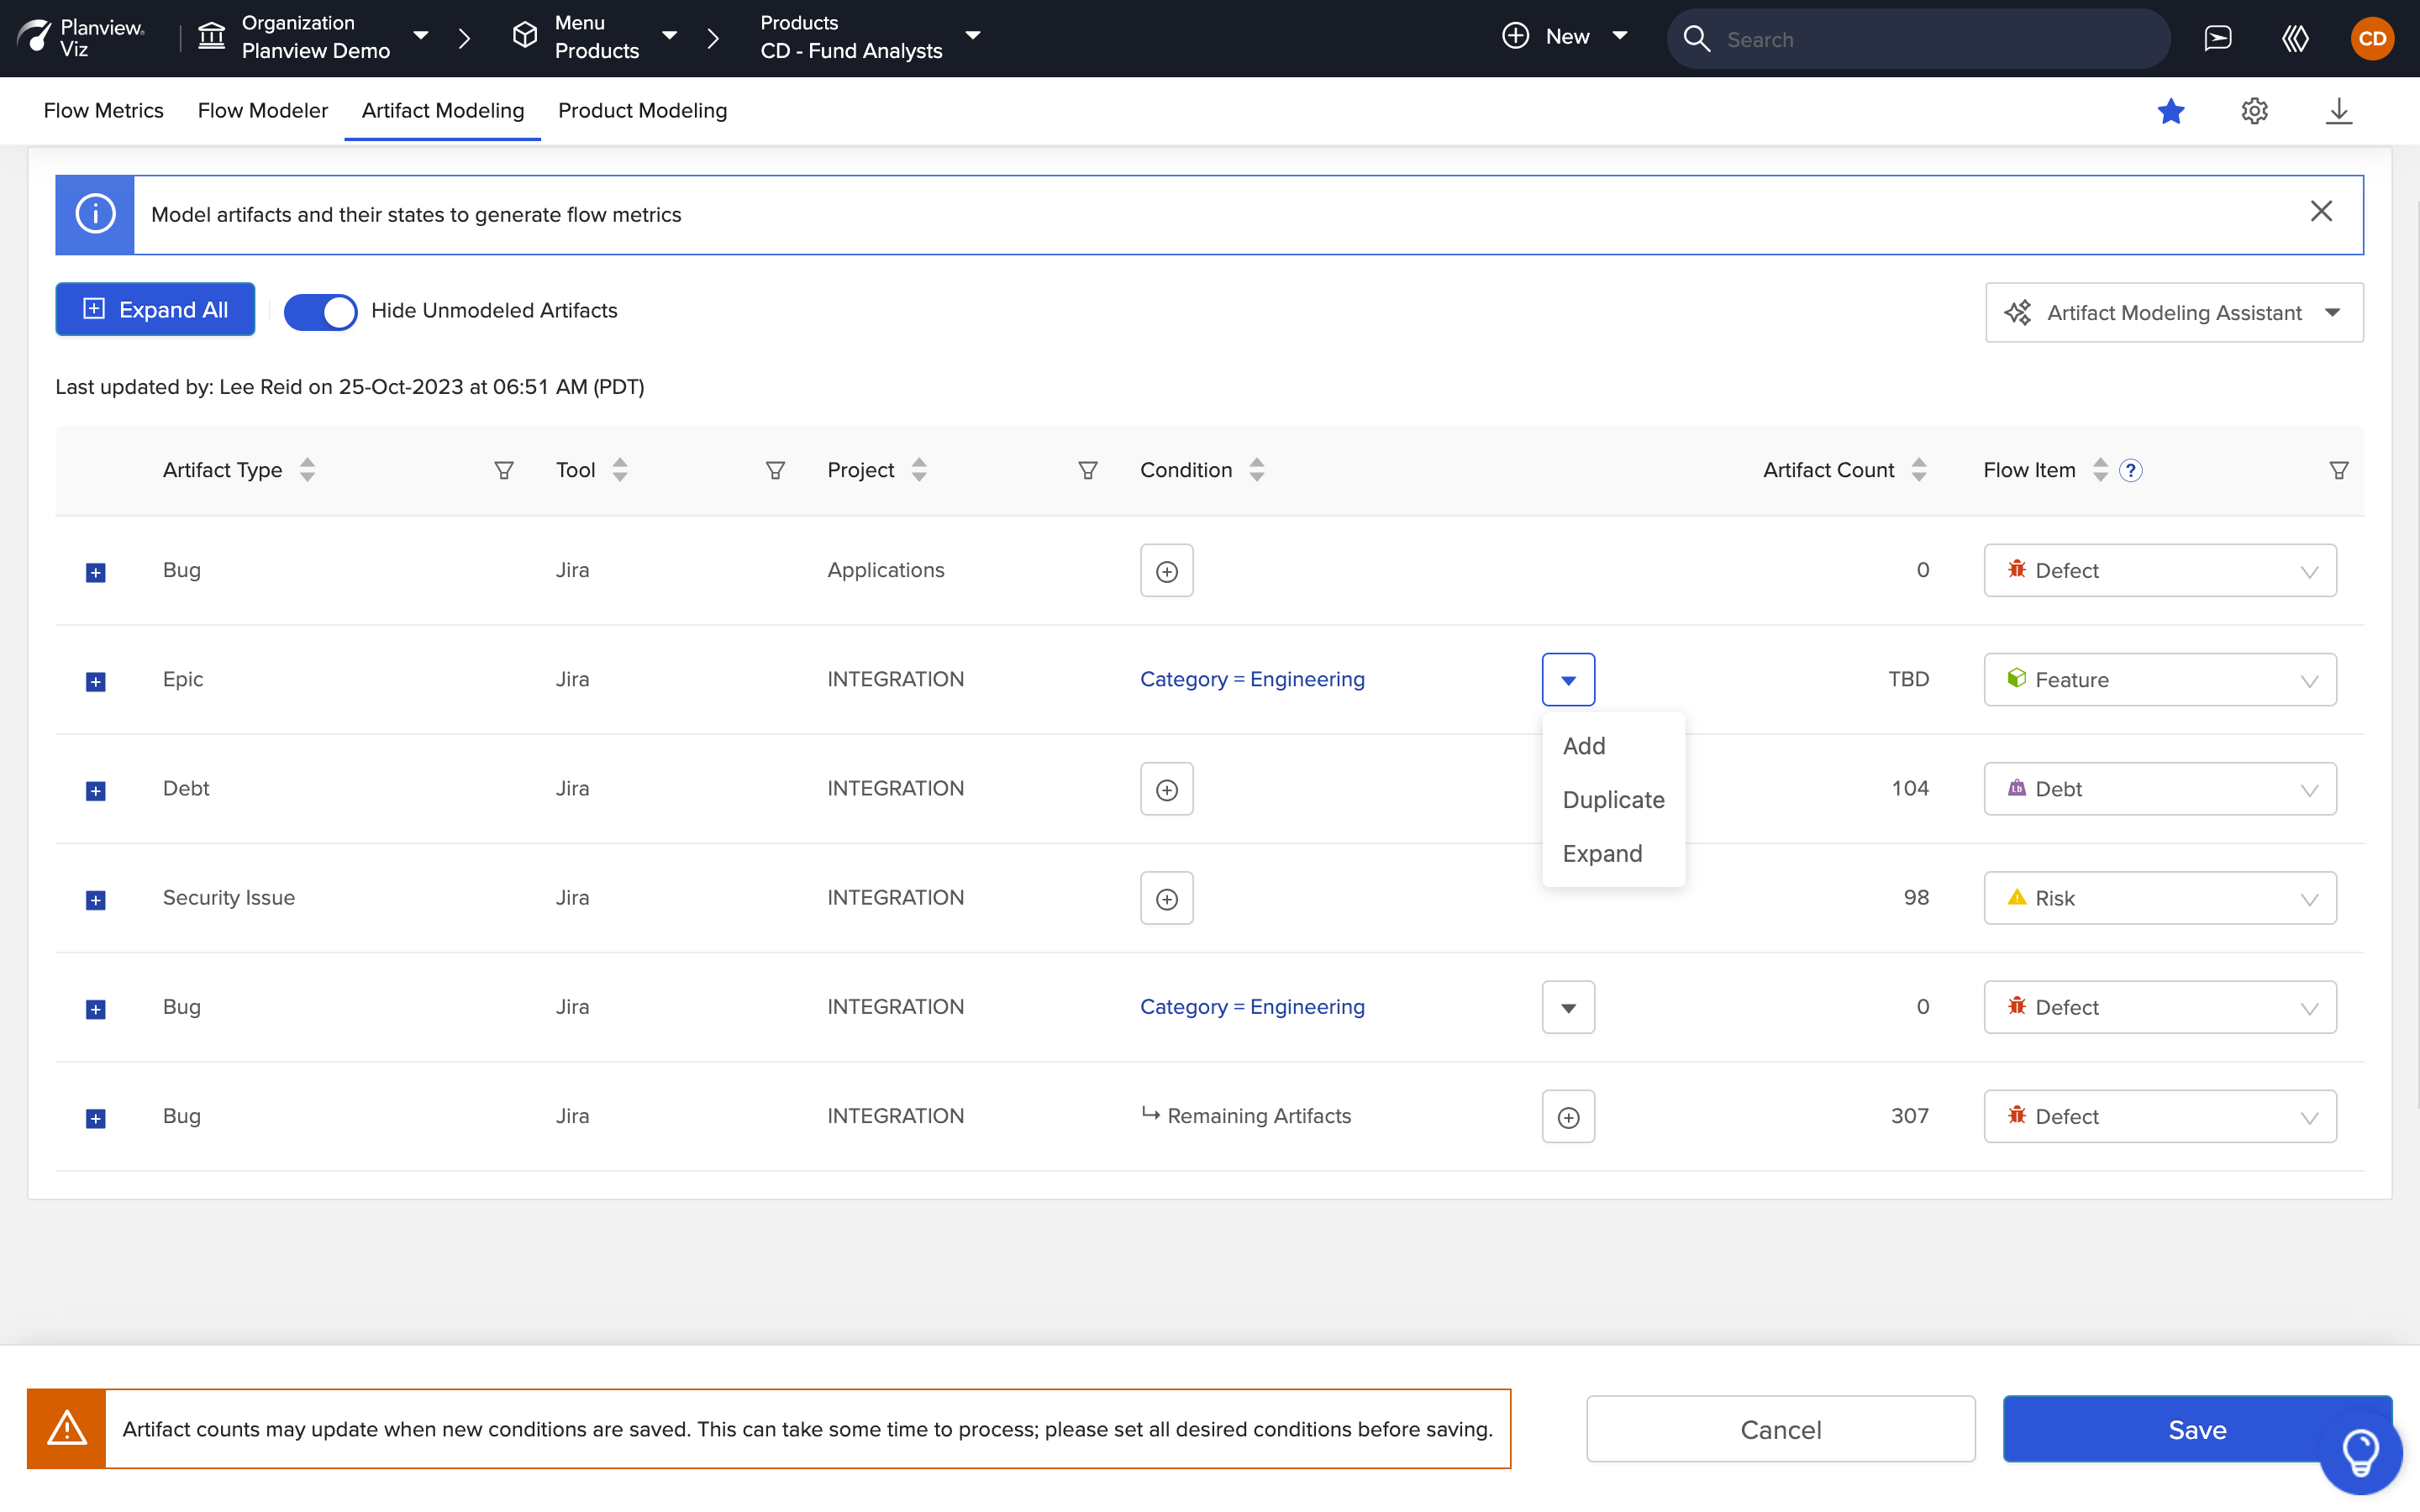
Add, Duplicate, or Expand Condition
Once all of your conditions have been set, mapped, and their associated flow states modeled, click Save.
Note: Setting a condition can take some time to process. We recommend setting all desired conditions before saving.
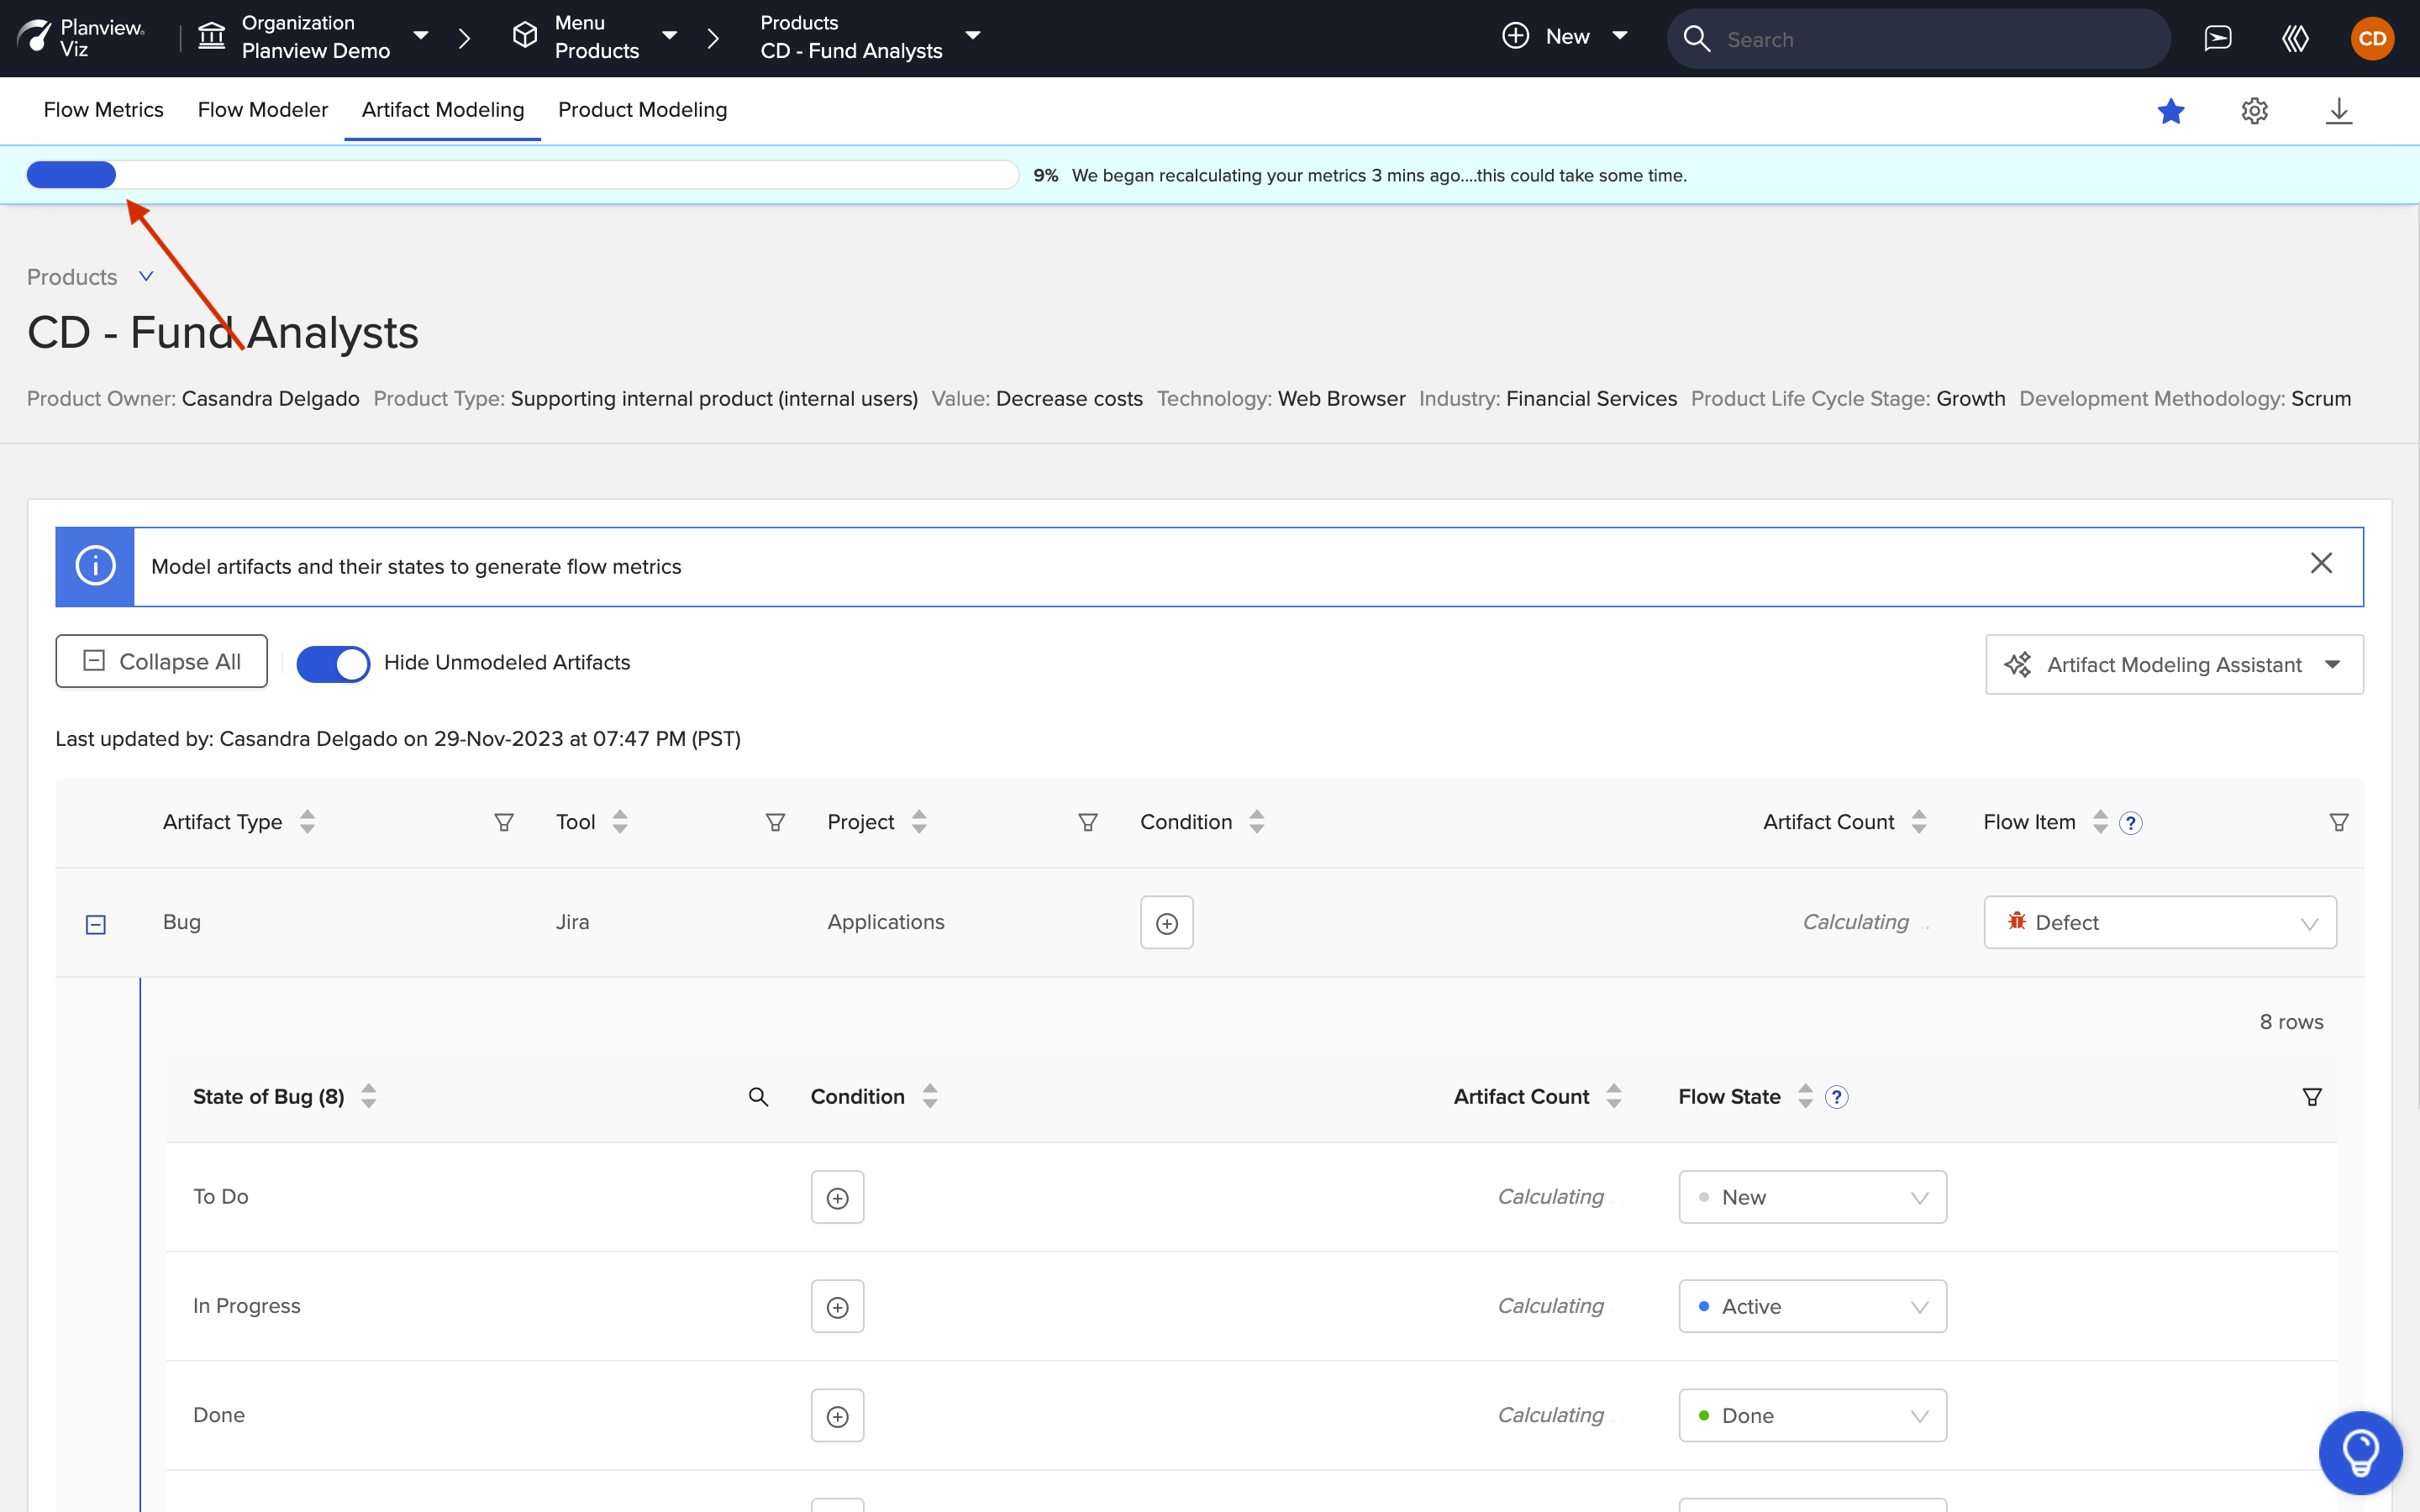
As your updated Flow Item mappings process, you can track progress using the bar at the top of the screen.
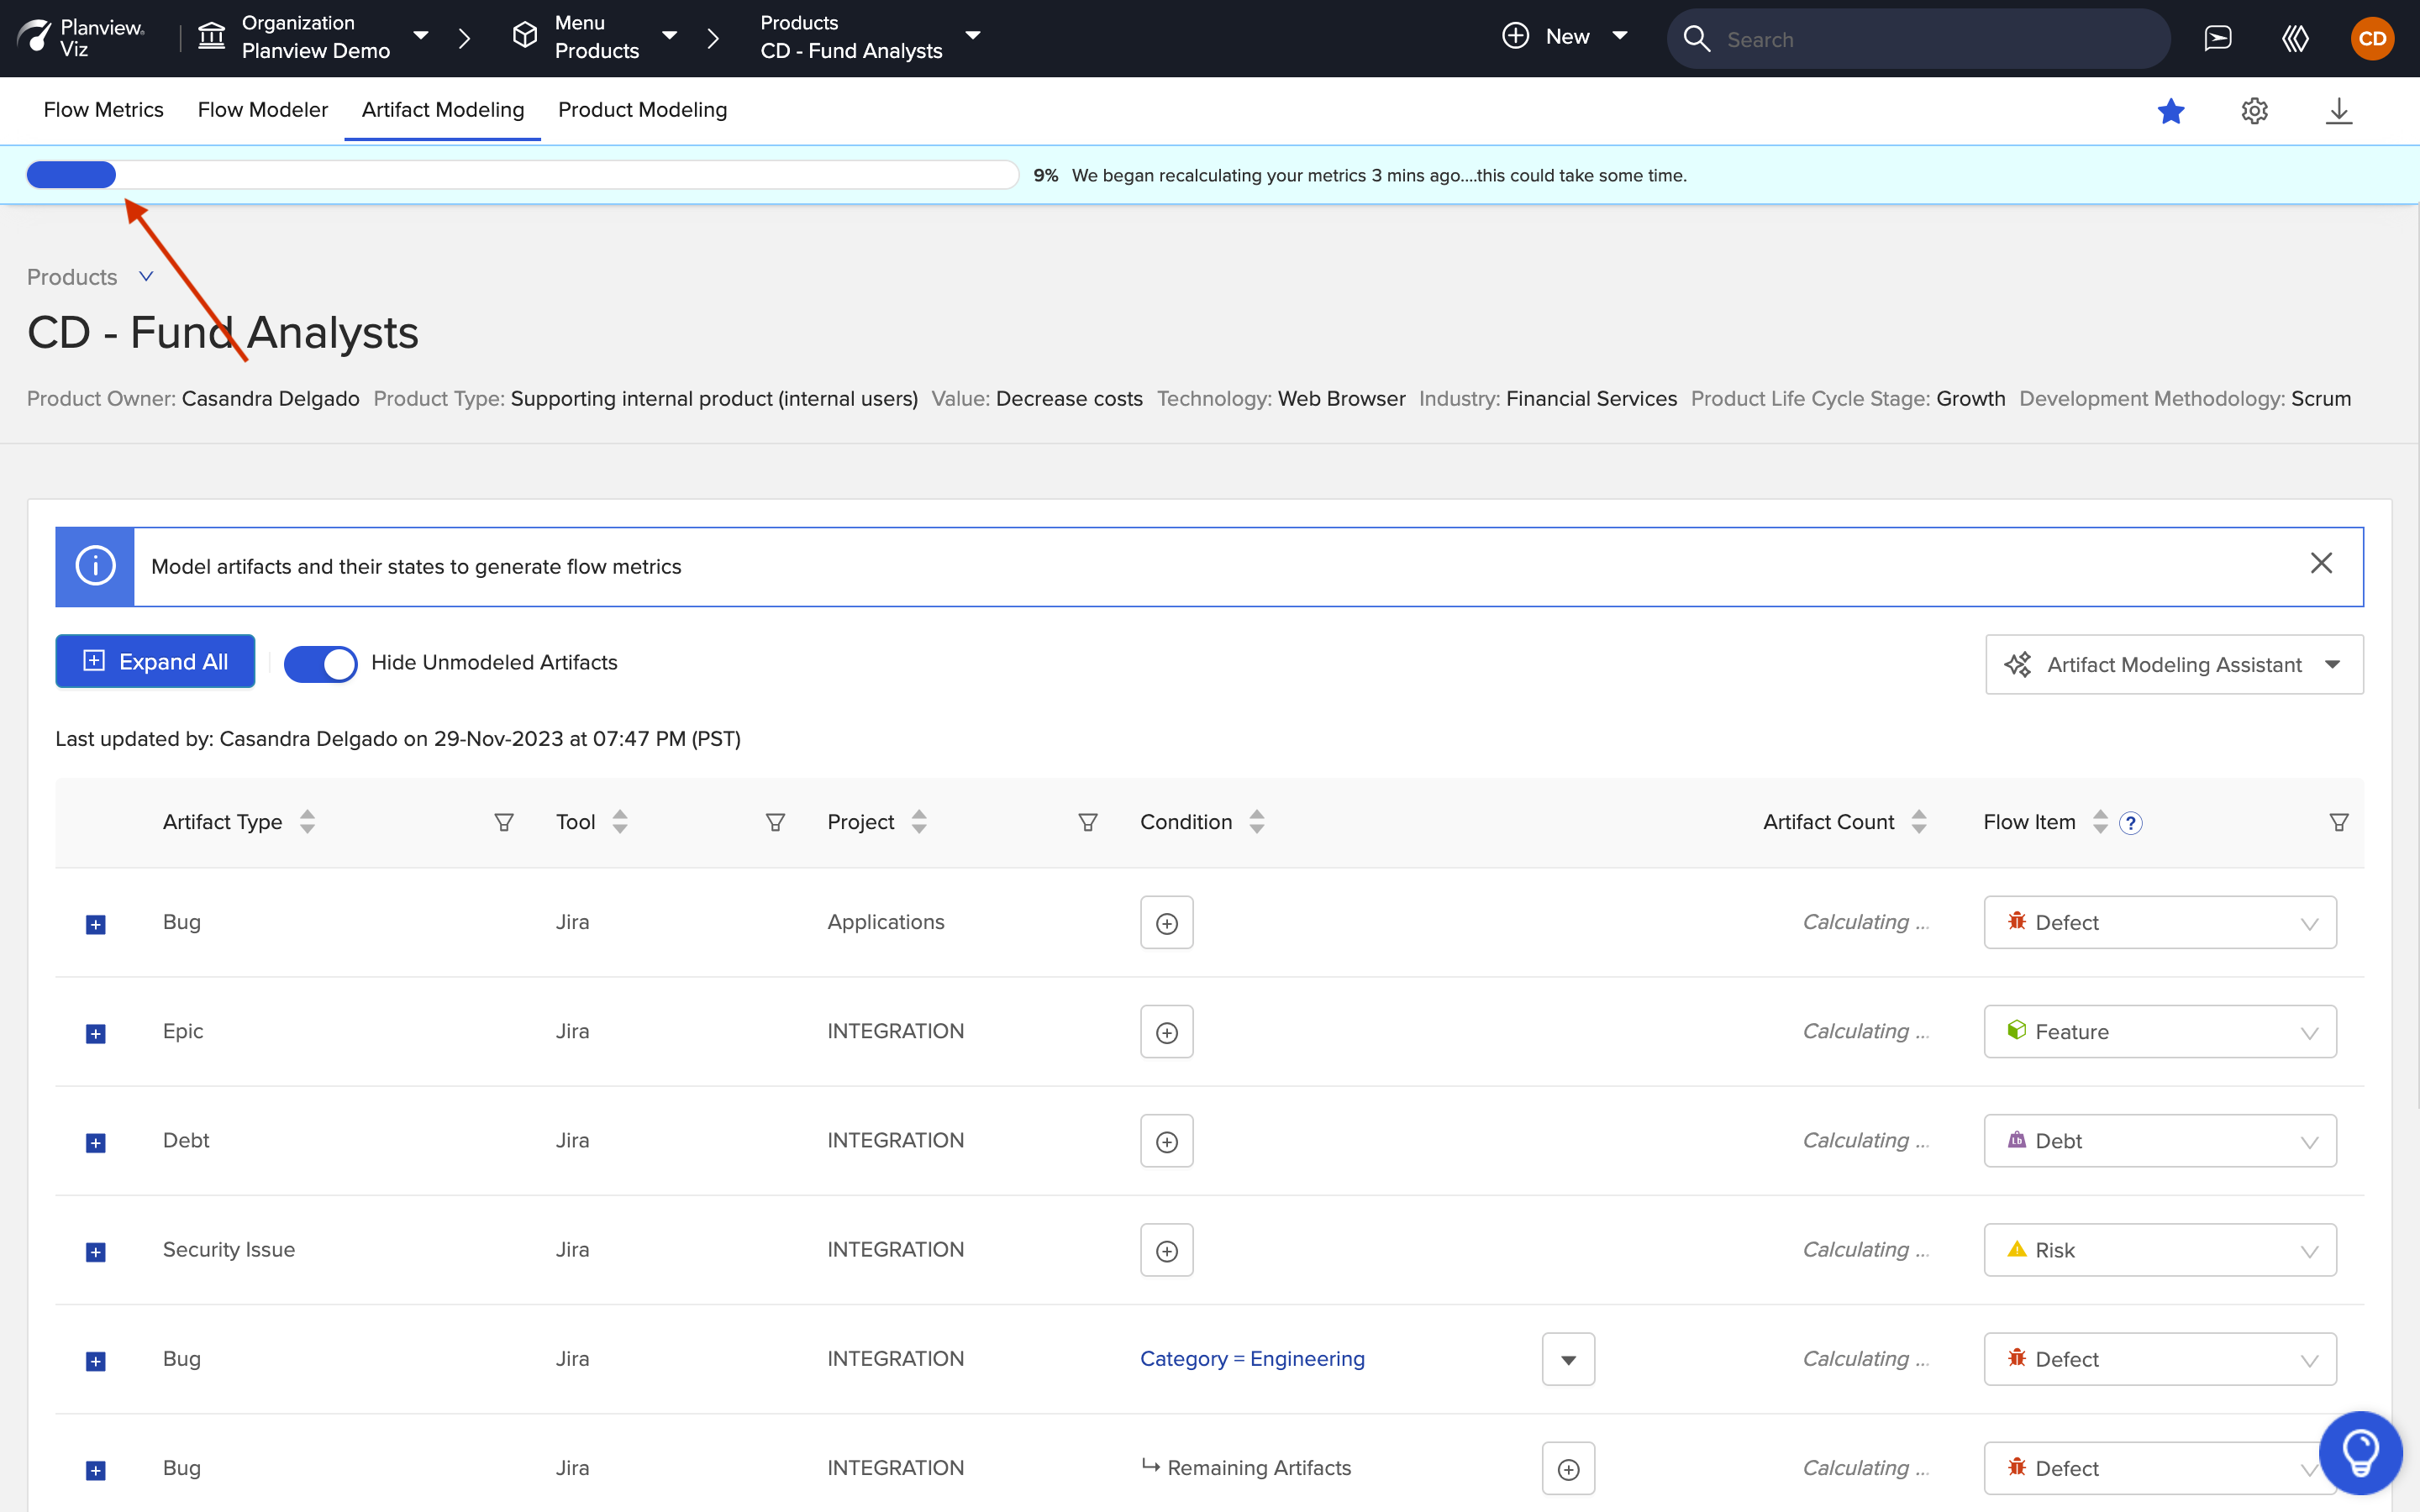
Progress Bar
Editing or Removing a Conditional Flow Item
To edit or remove a condition that you’ve set, click on the condition's link.
Edit or Remove a Condition
Click the trash can icon to remove a condition.
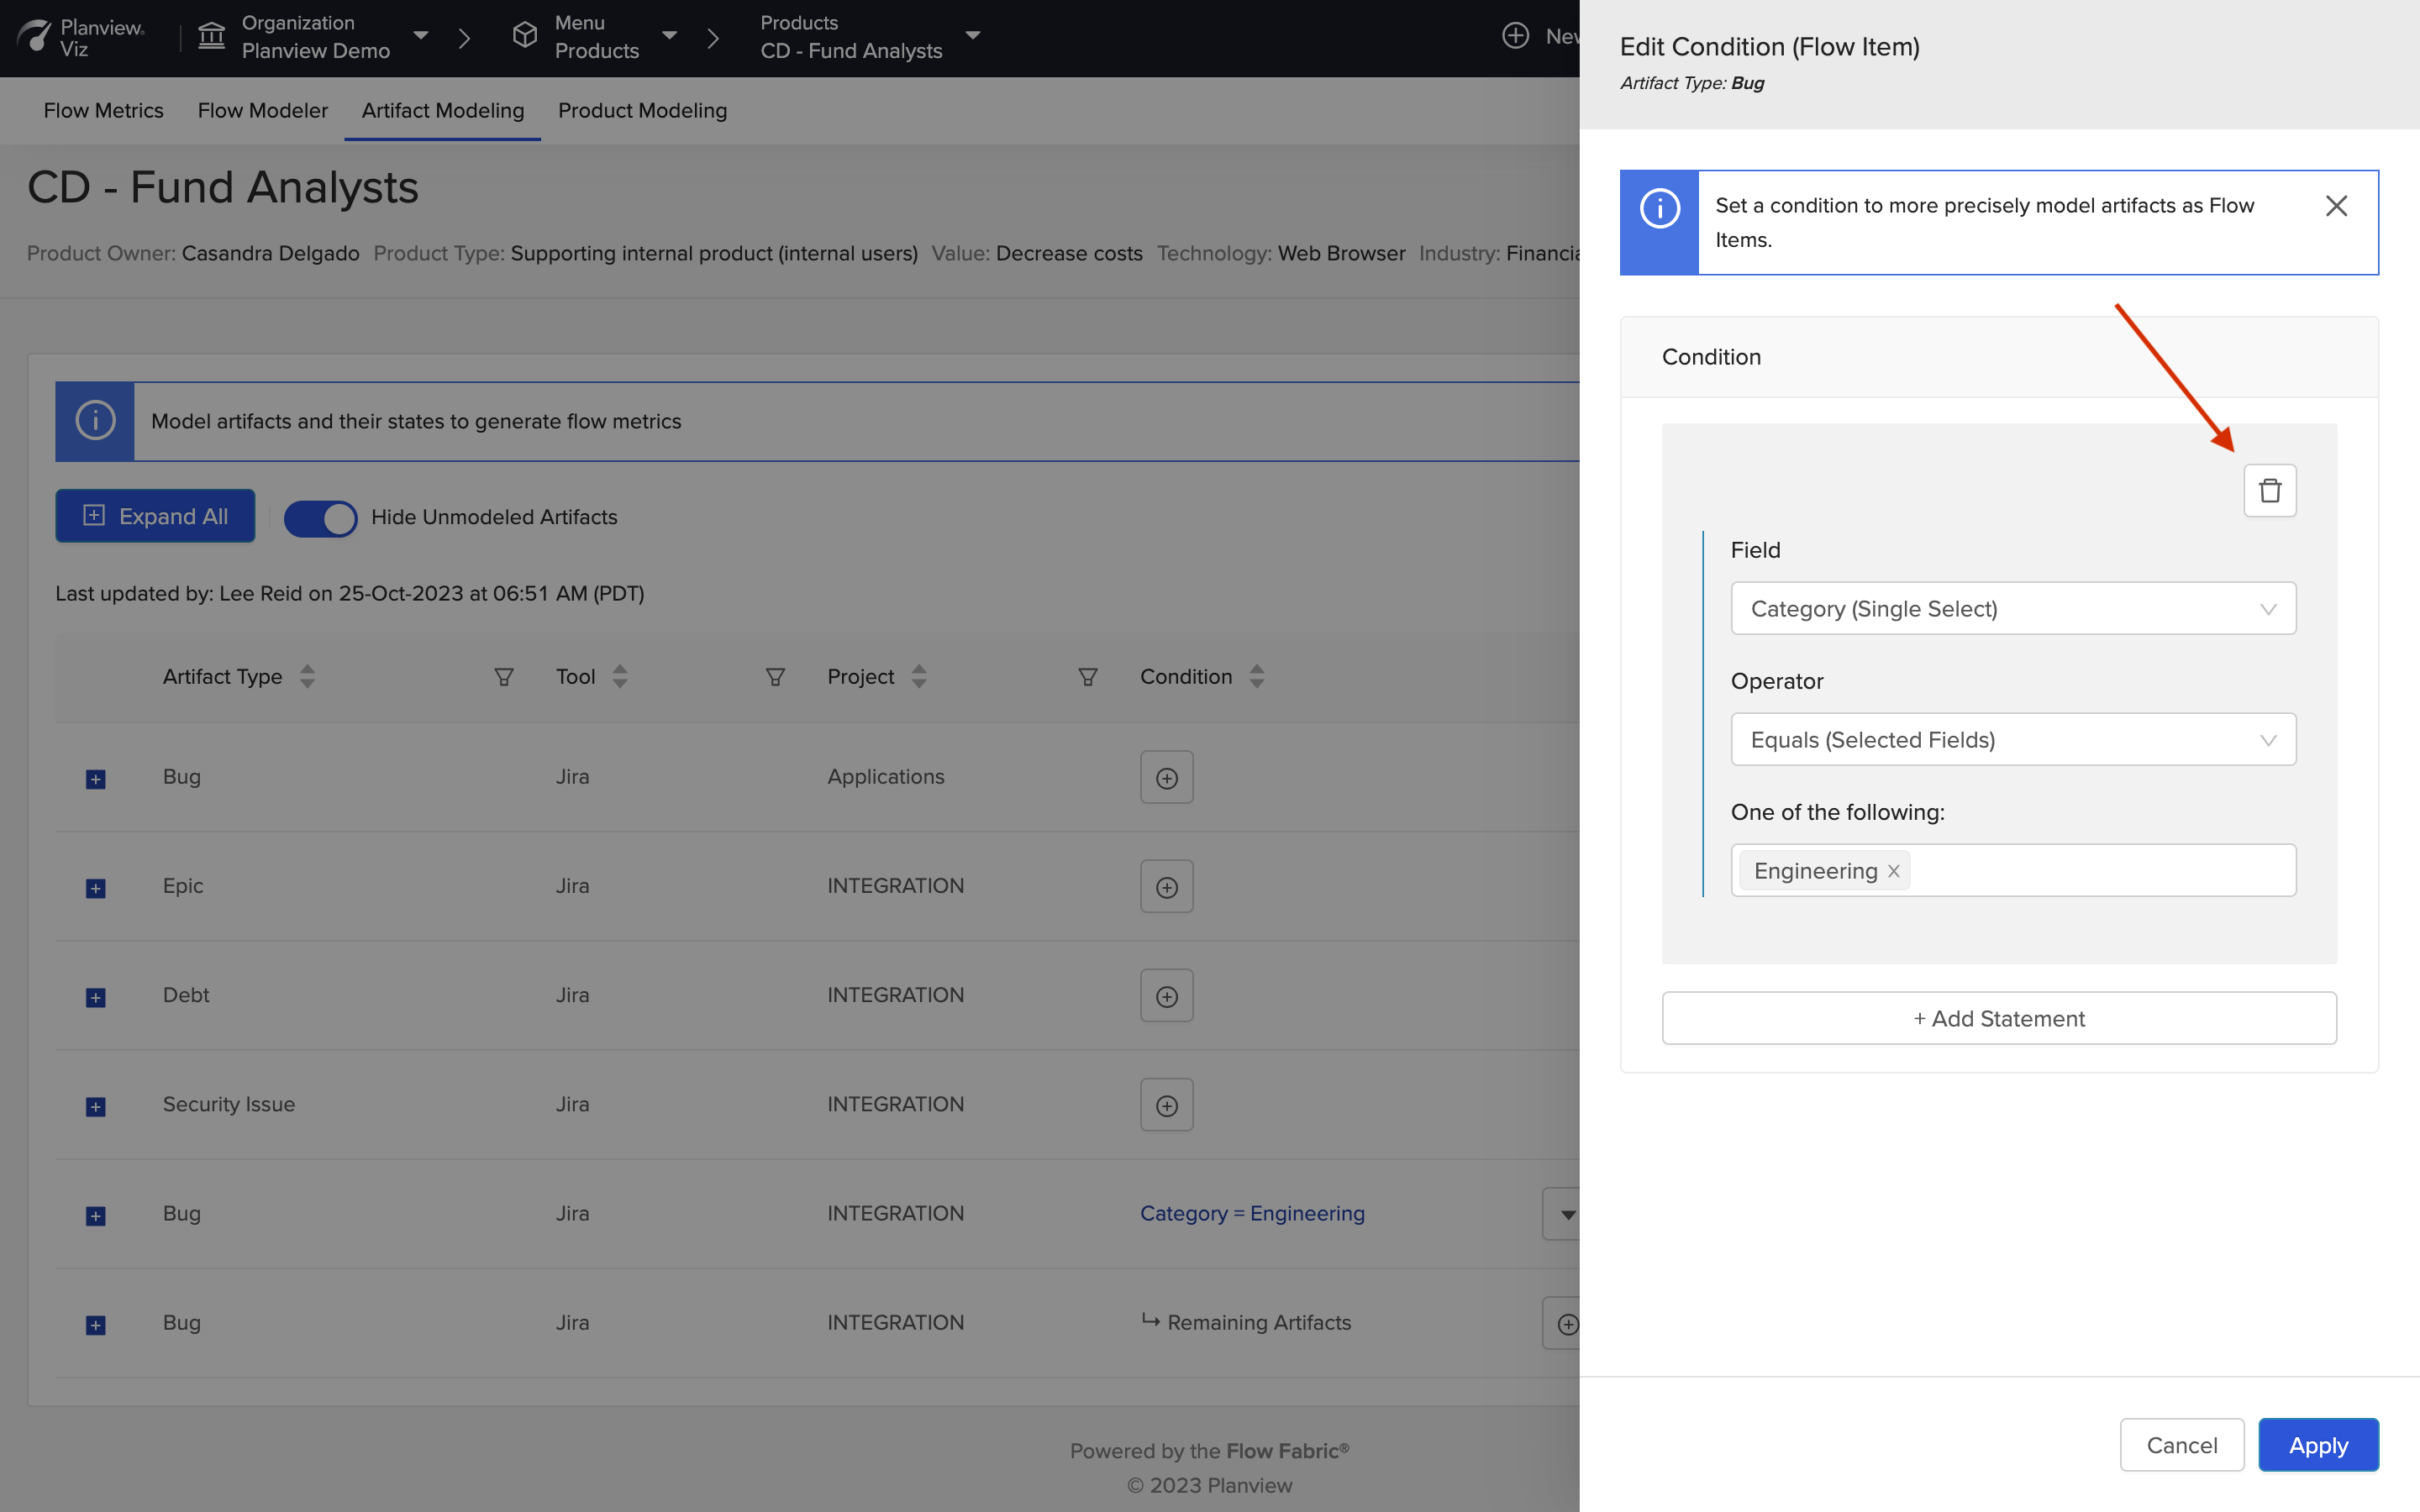
Remove a Condition
Once you’ve removed or edited your conditions as desired, click Apply.
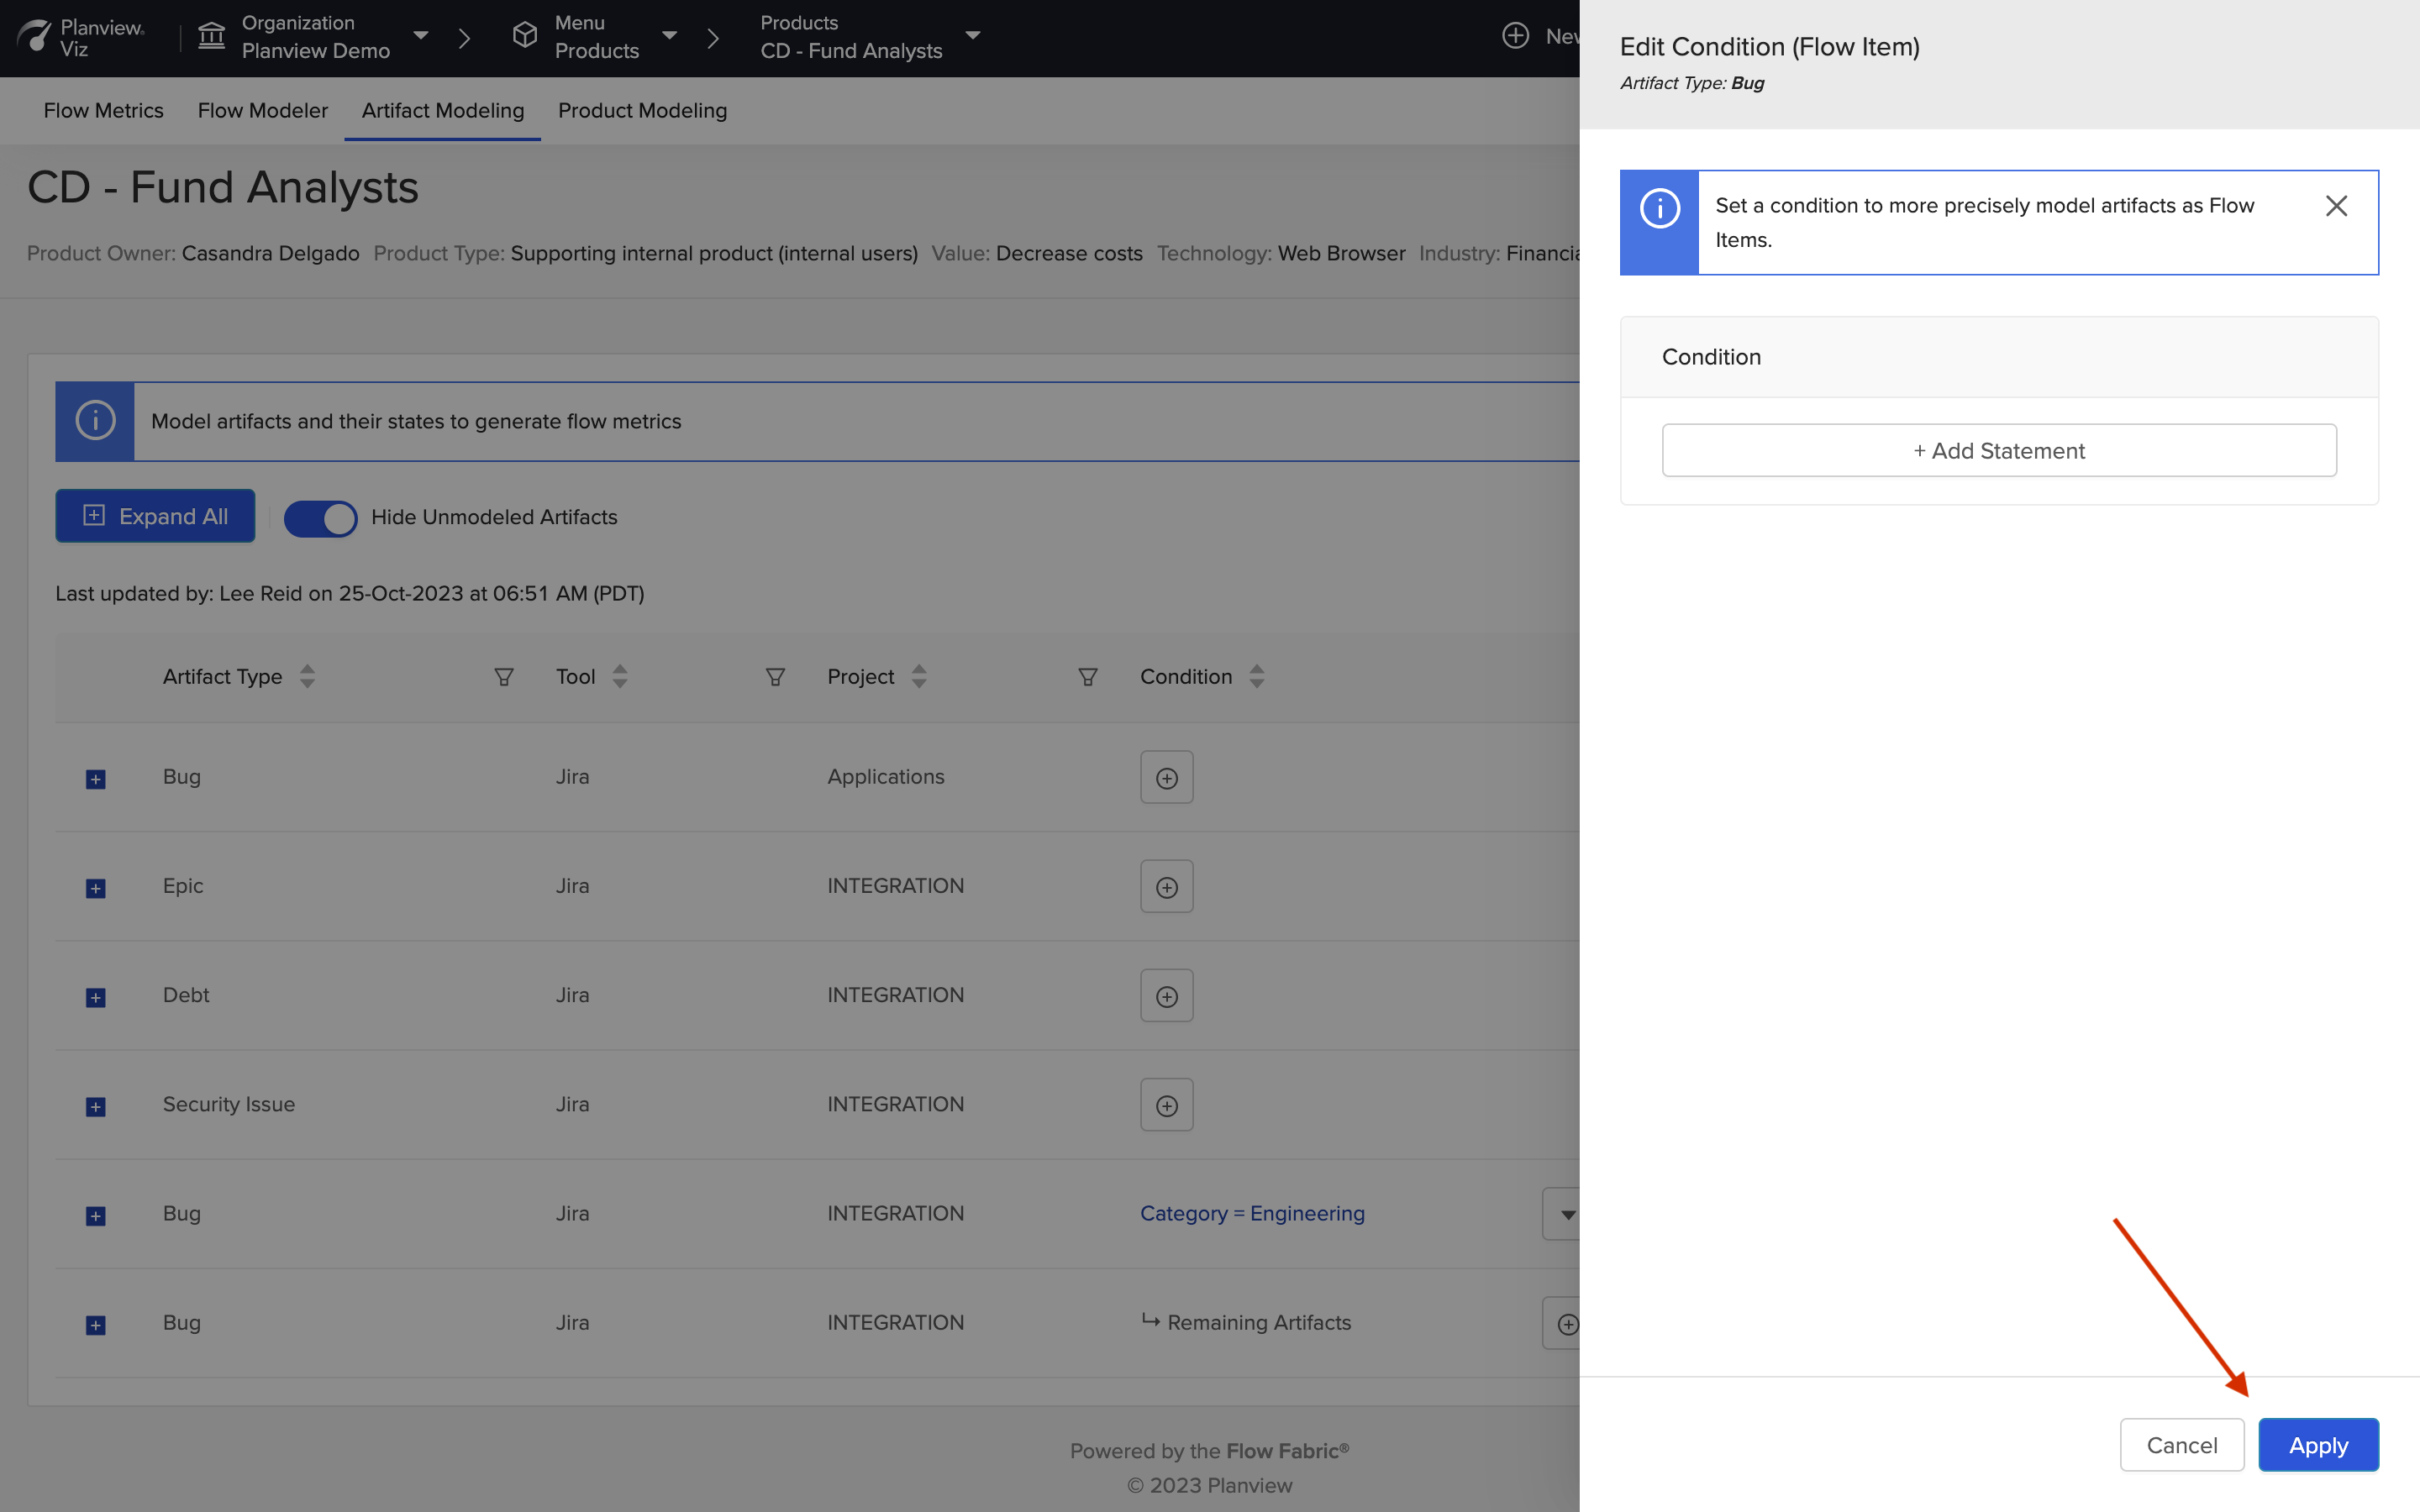
Click 'Apply'
Confirm your flow mappings look as expected, and click Save.
Note: Updating or removing a condition can take some time to process. We recommend updating all desired conditions before saving.
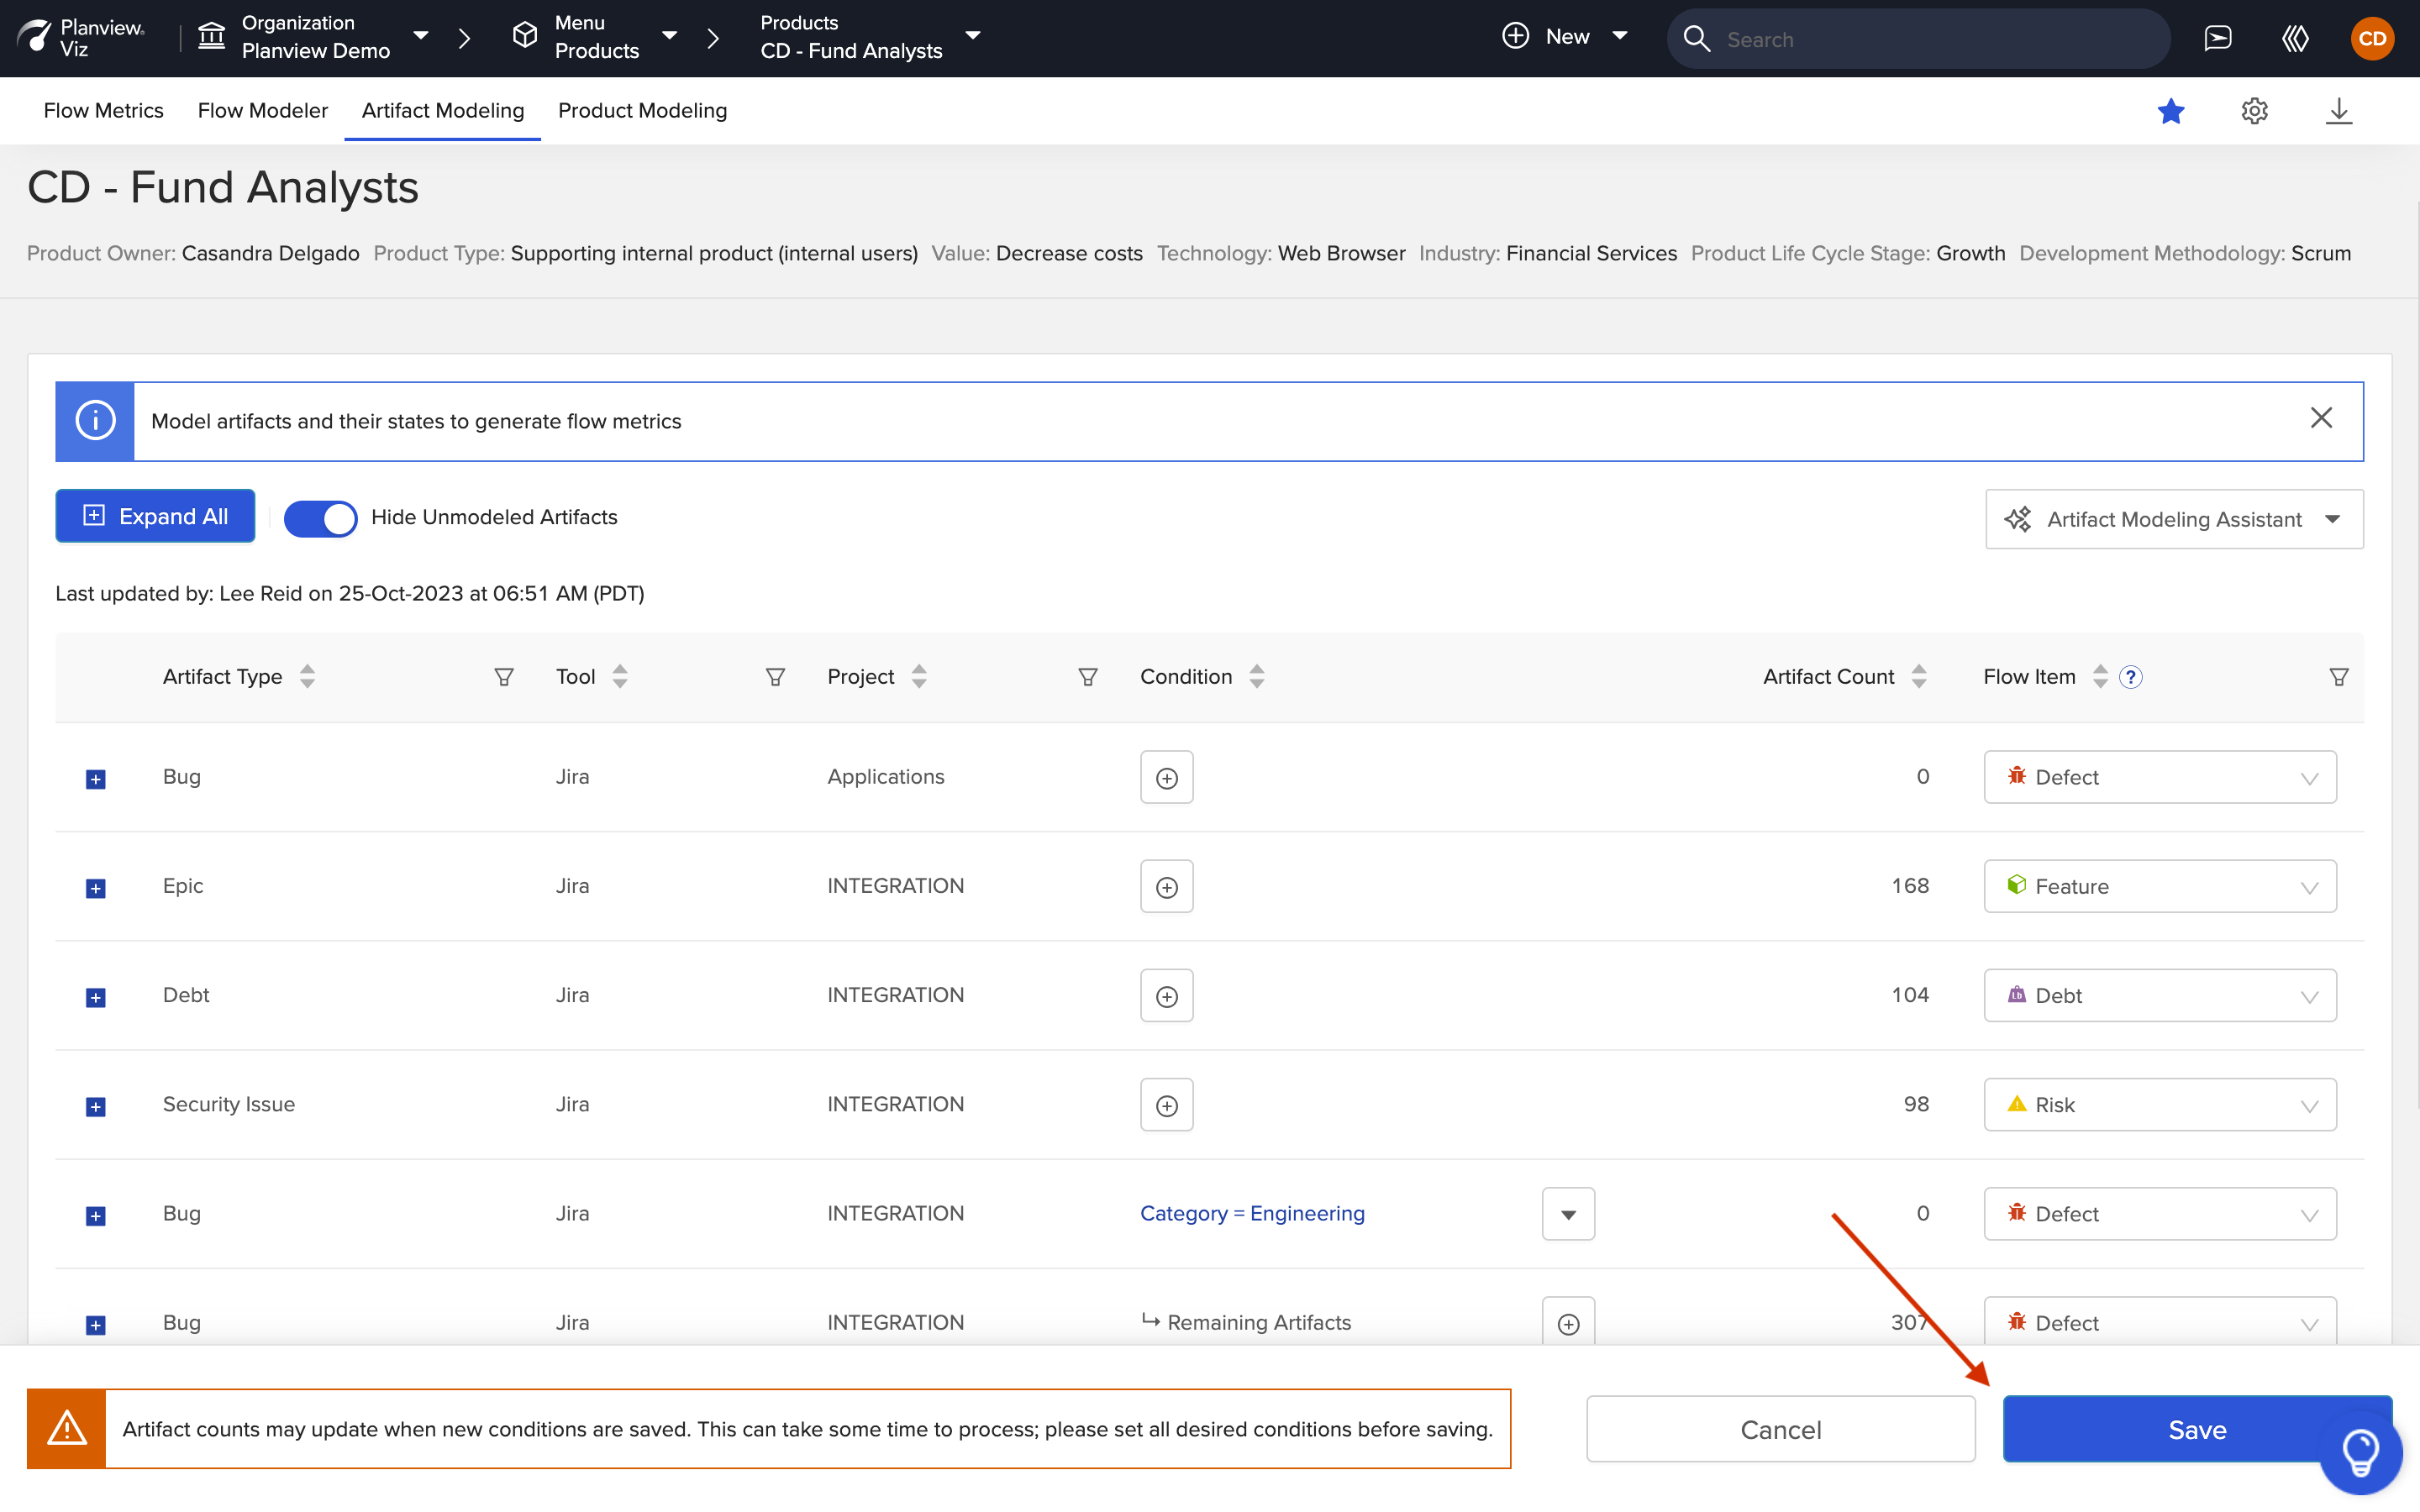
Click 'Save'
Conditional Flow States
To generate Flow Metrics, Planview Viz® affords users the ability to model their artifacts into flow items and those artifacts' statuses into flow states.
But sometimes the status in your external tool doesn’t have a one-to-one match with the five flow states (New, Active, Waiting, Done, Canceled).
For example, an in progress state could either be active or waiting depending on whether a blocked tag has been applied.
|
Status |
Tags |
Flow State |
|---|---|---|
|
In Progress |
Blocked |
Waiting |
|
Not Blocked |
In Progress |
Or a done state could be either done or new, depending on whether the Resolution field is done or deferred.
|
Status |
Resolution |
Flow State |
|---|---|---|
|
Done |
Done |
Done |
|
Deferred |
New |
In these cases, rule-based modeling can be applied to create more fine-tuned Flow State mappings.
Viz supports configuring rule-based modeling using the following field types:
- Single Select
- Multi Select
- Boolean
- Text (Summary & Formatted ID only)
- Container (Jira Align Program field only)
Note: To ensure you can use the Starts With operator and type in free text when setting a condition, Viz matches fields by label, and not by ID. As a result, if a Program or single select value is renamed, you must contact support to reload options so you can set an additional condition with the new name.
Configuring Conditional Flow States
To configure rule-based modeling (also referred to as conditional Flow State mapping), go to the Artifact Modeling tab for your product value stream.
Click the + icon next to the desired artifact type to view its statuses. Click the + icon in the Condition column for the artifact status you’d like to configure.
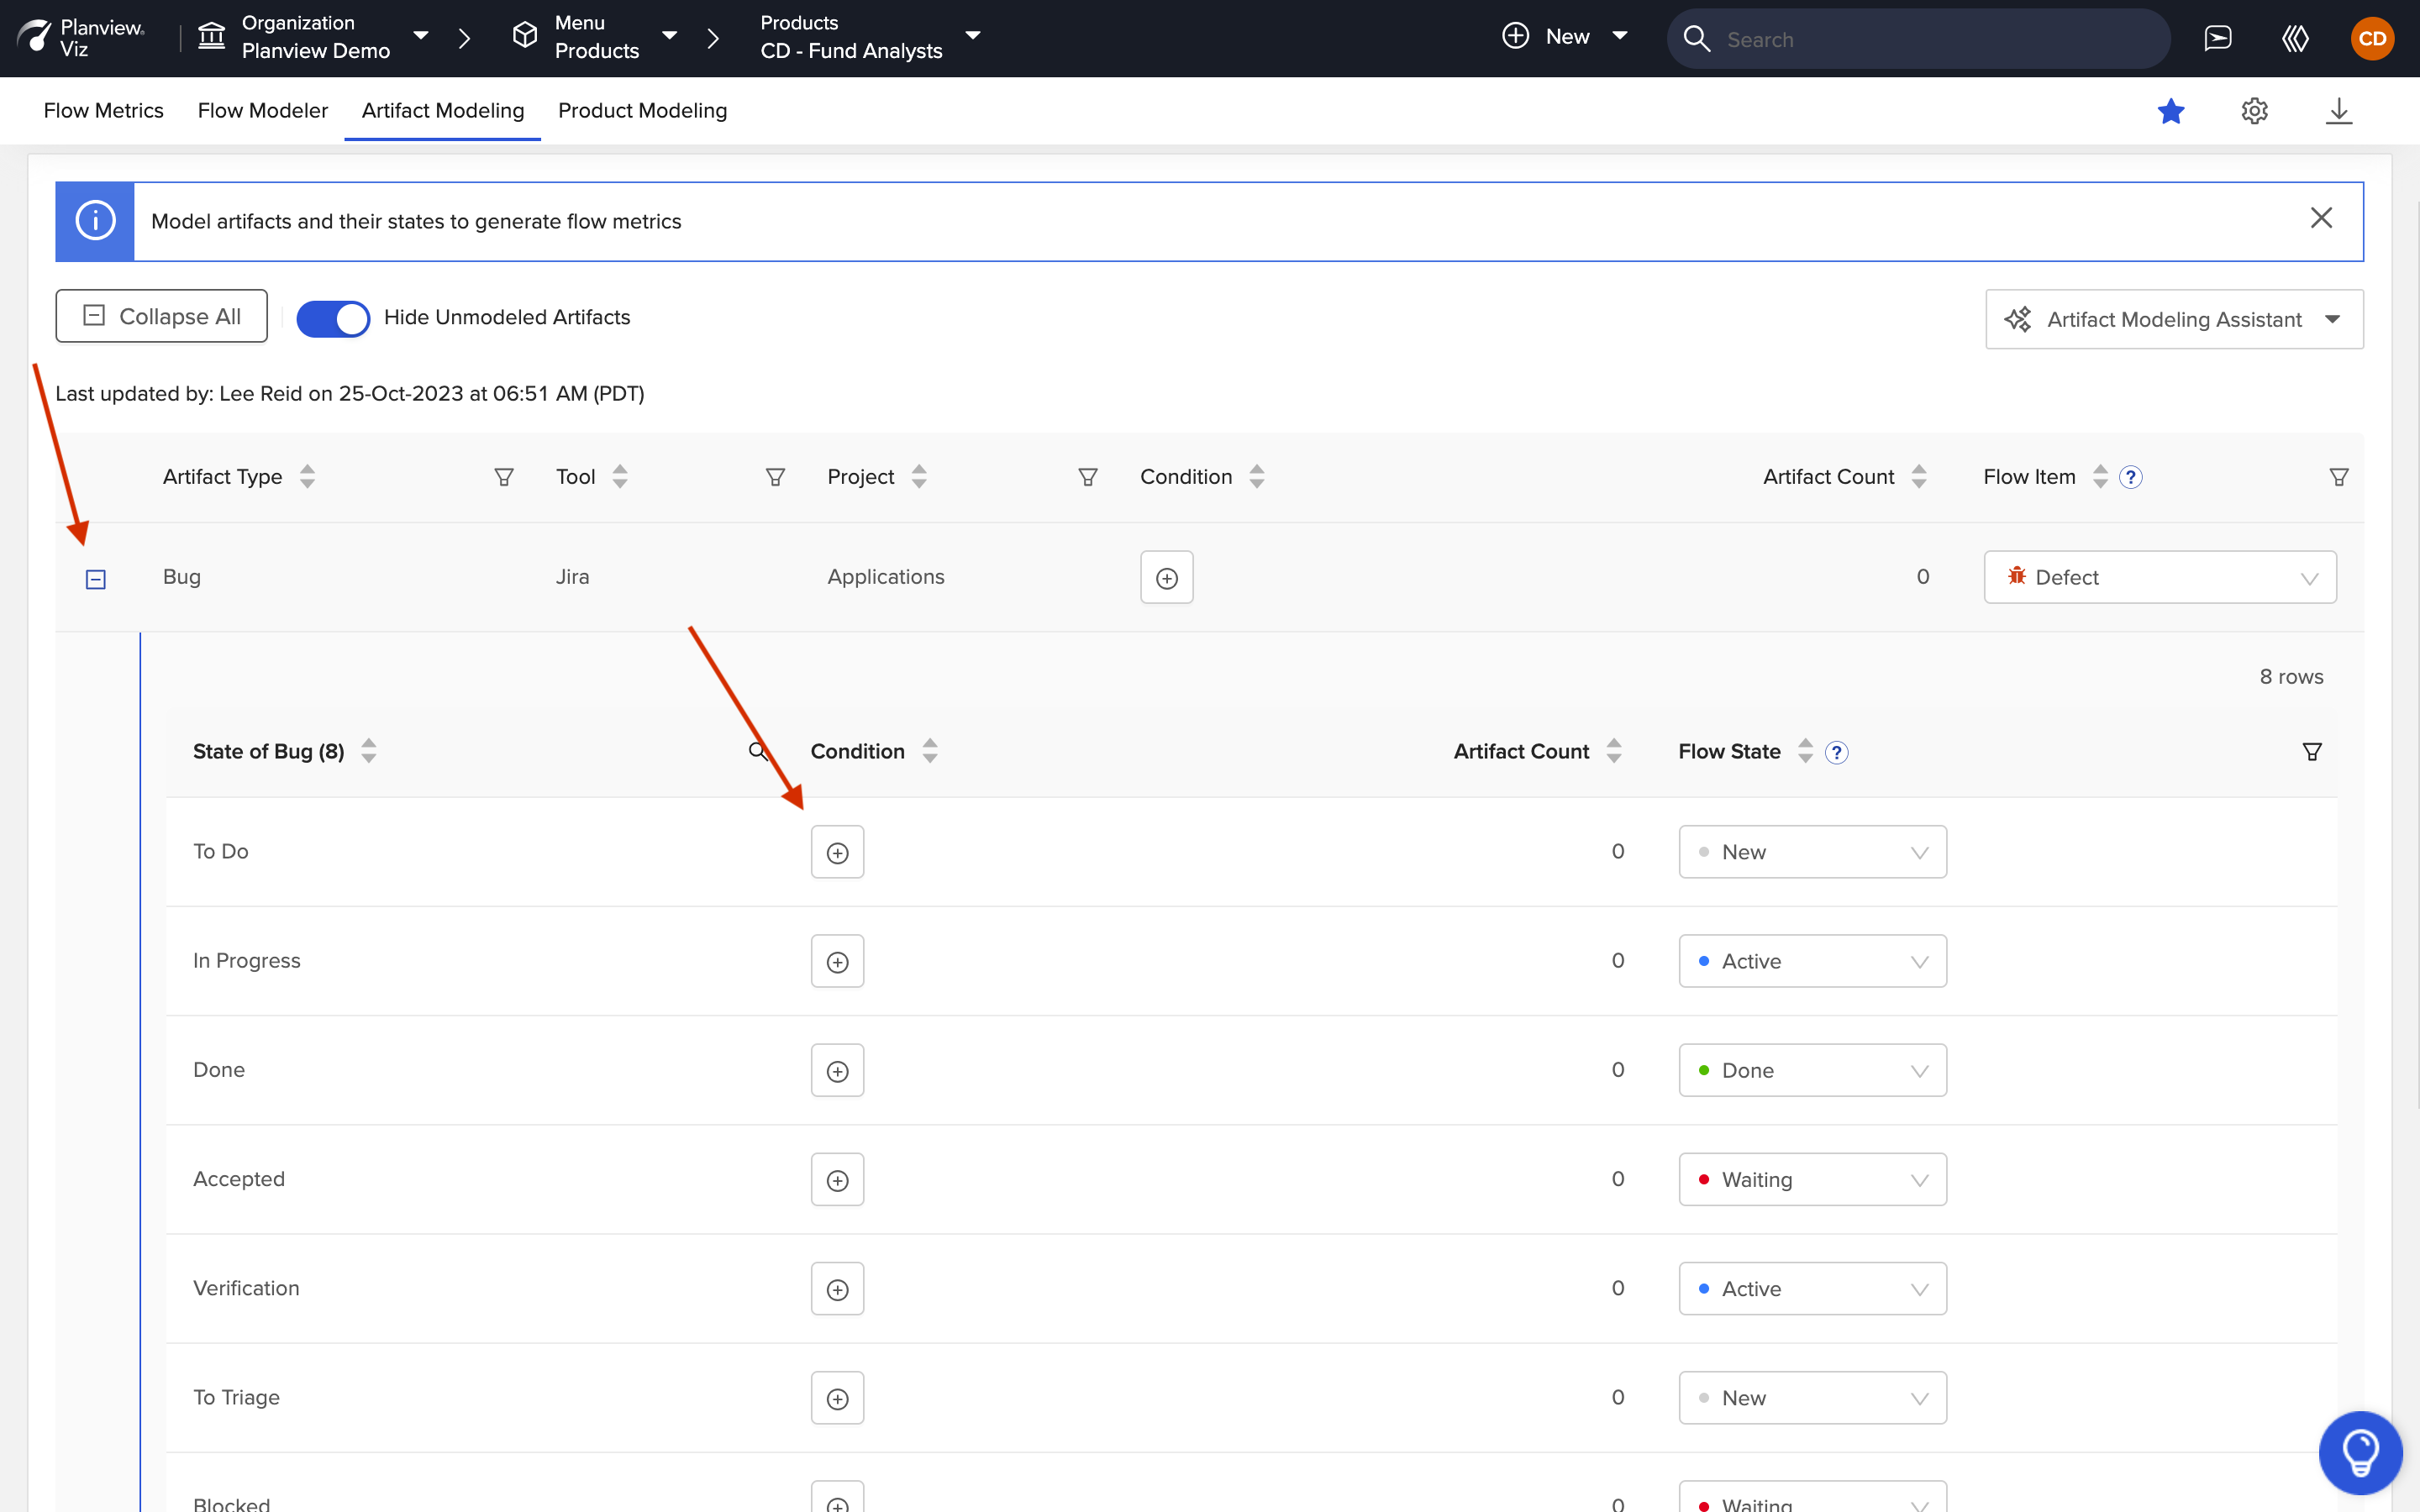
Add a Condition
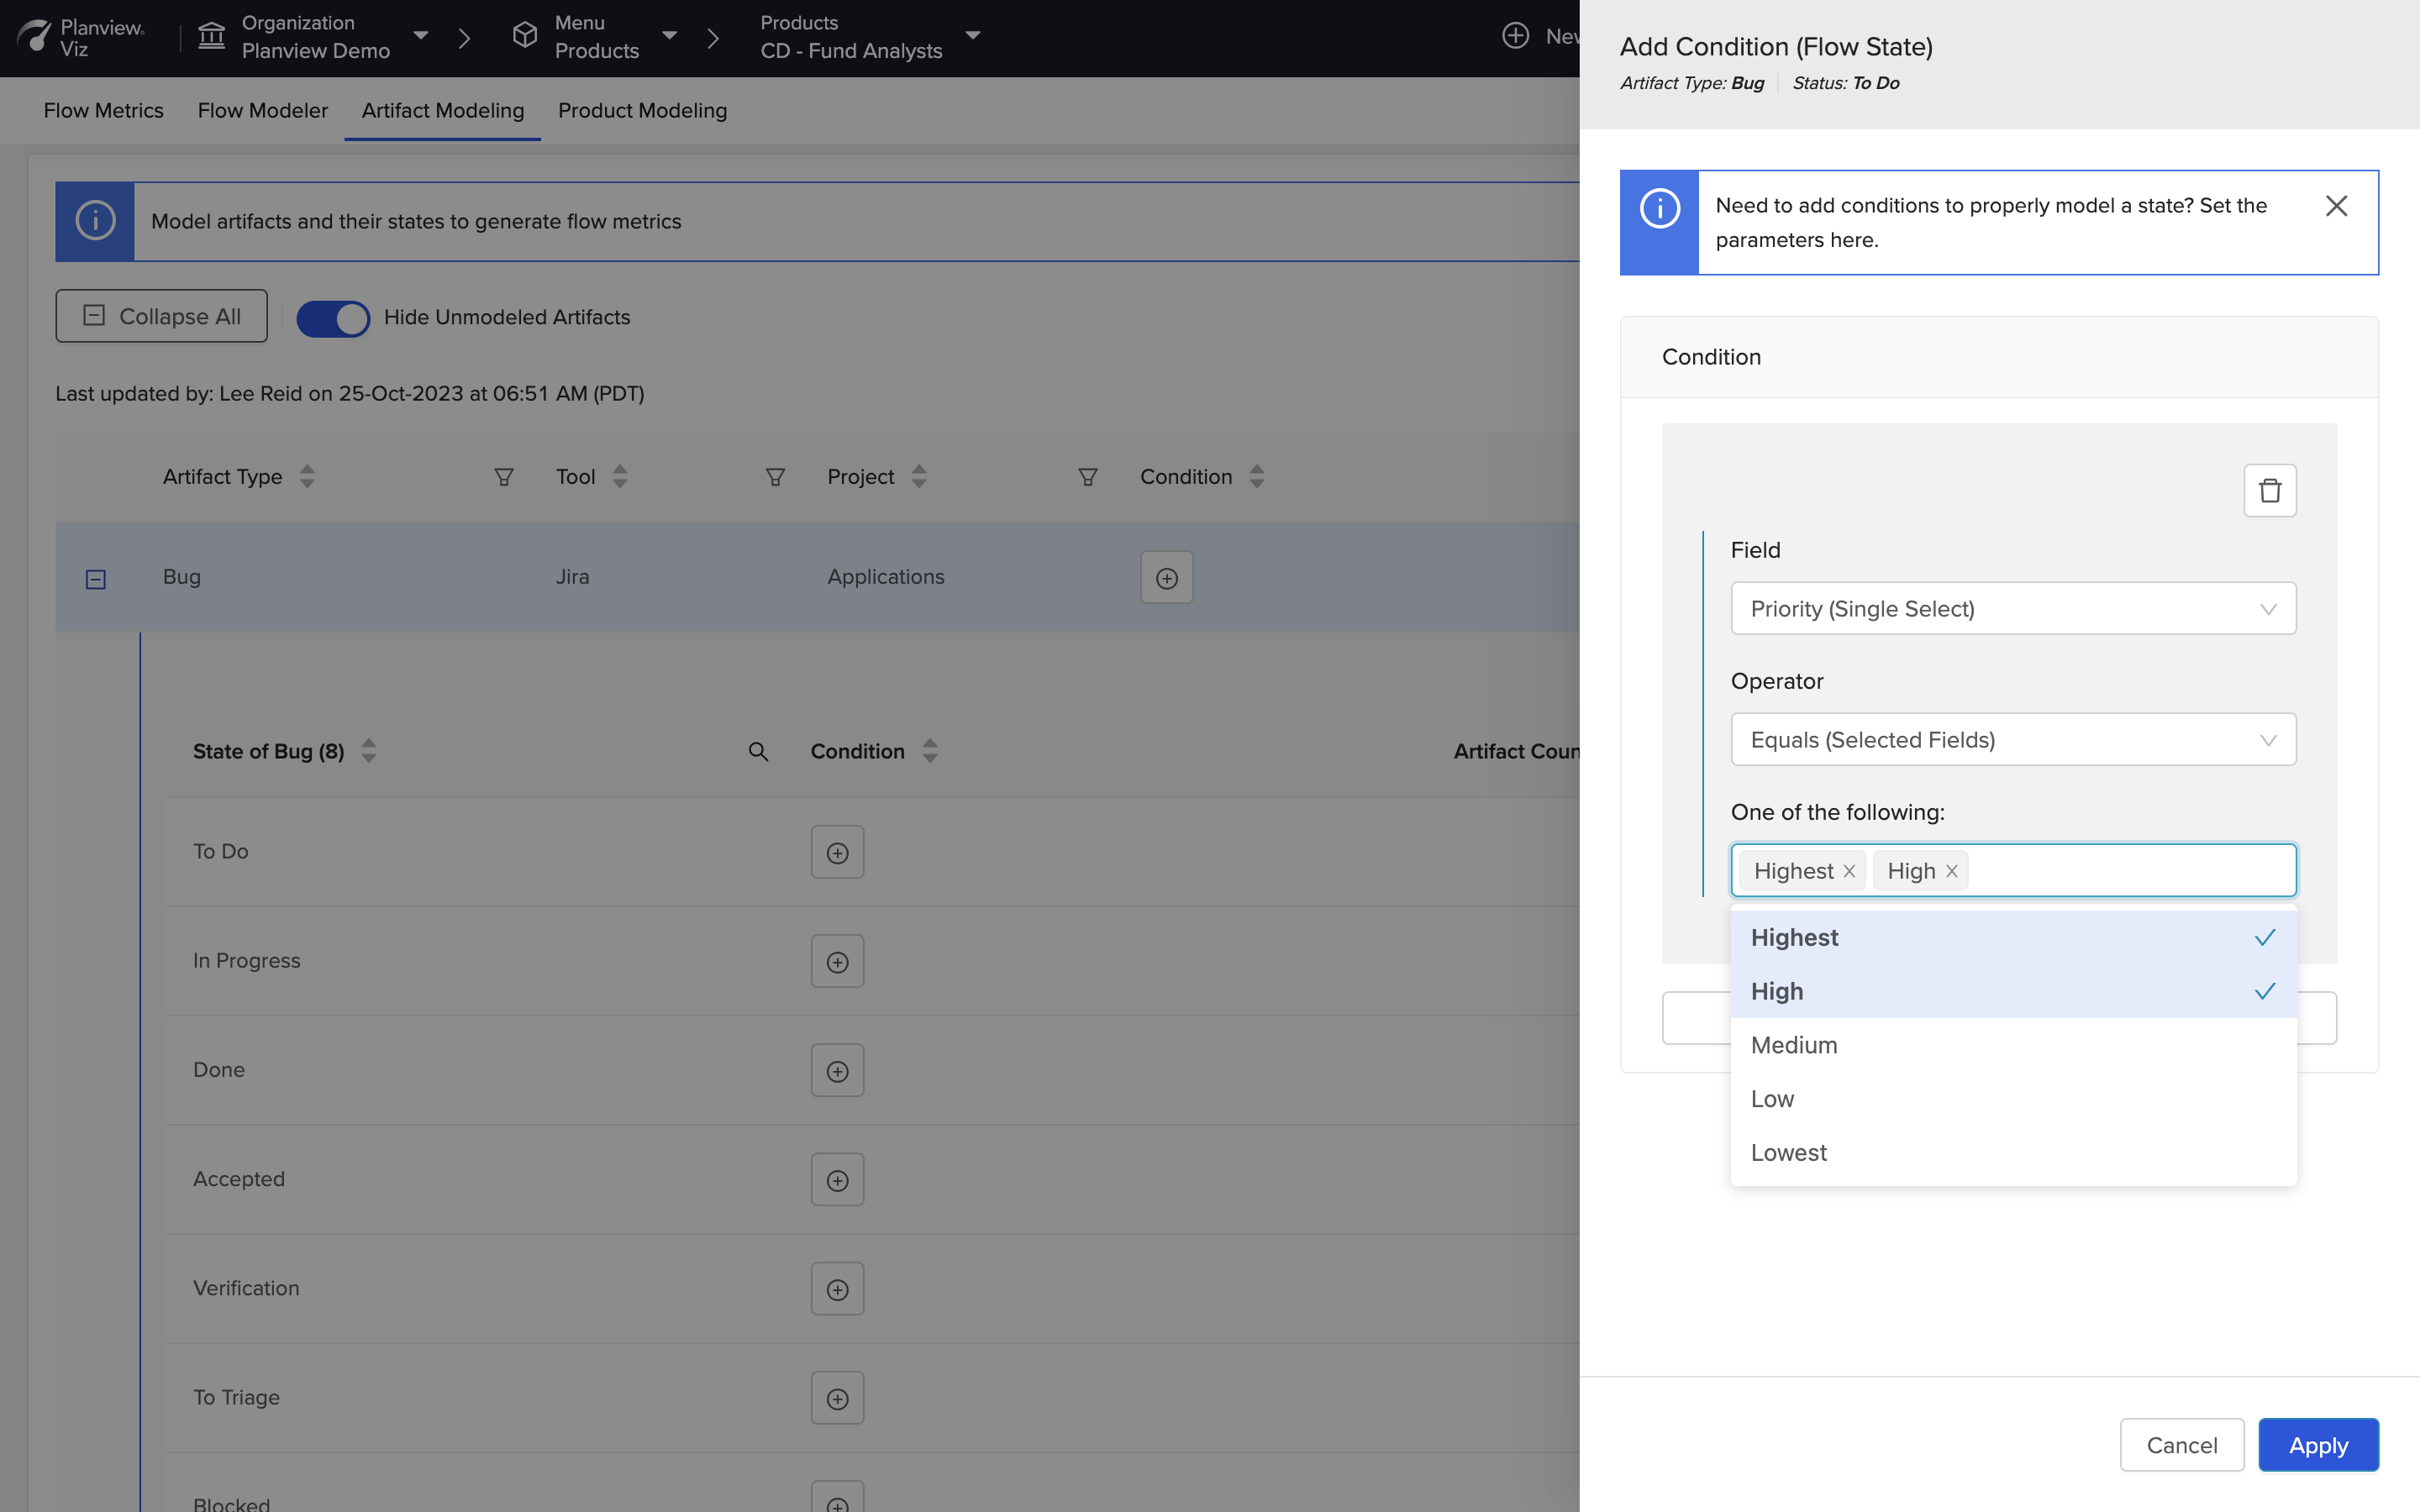
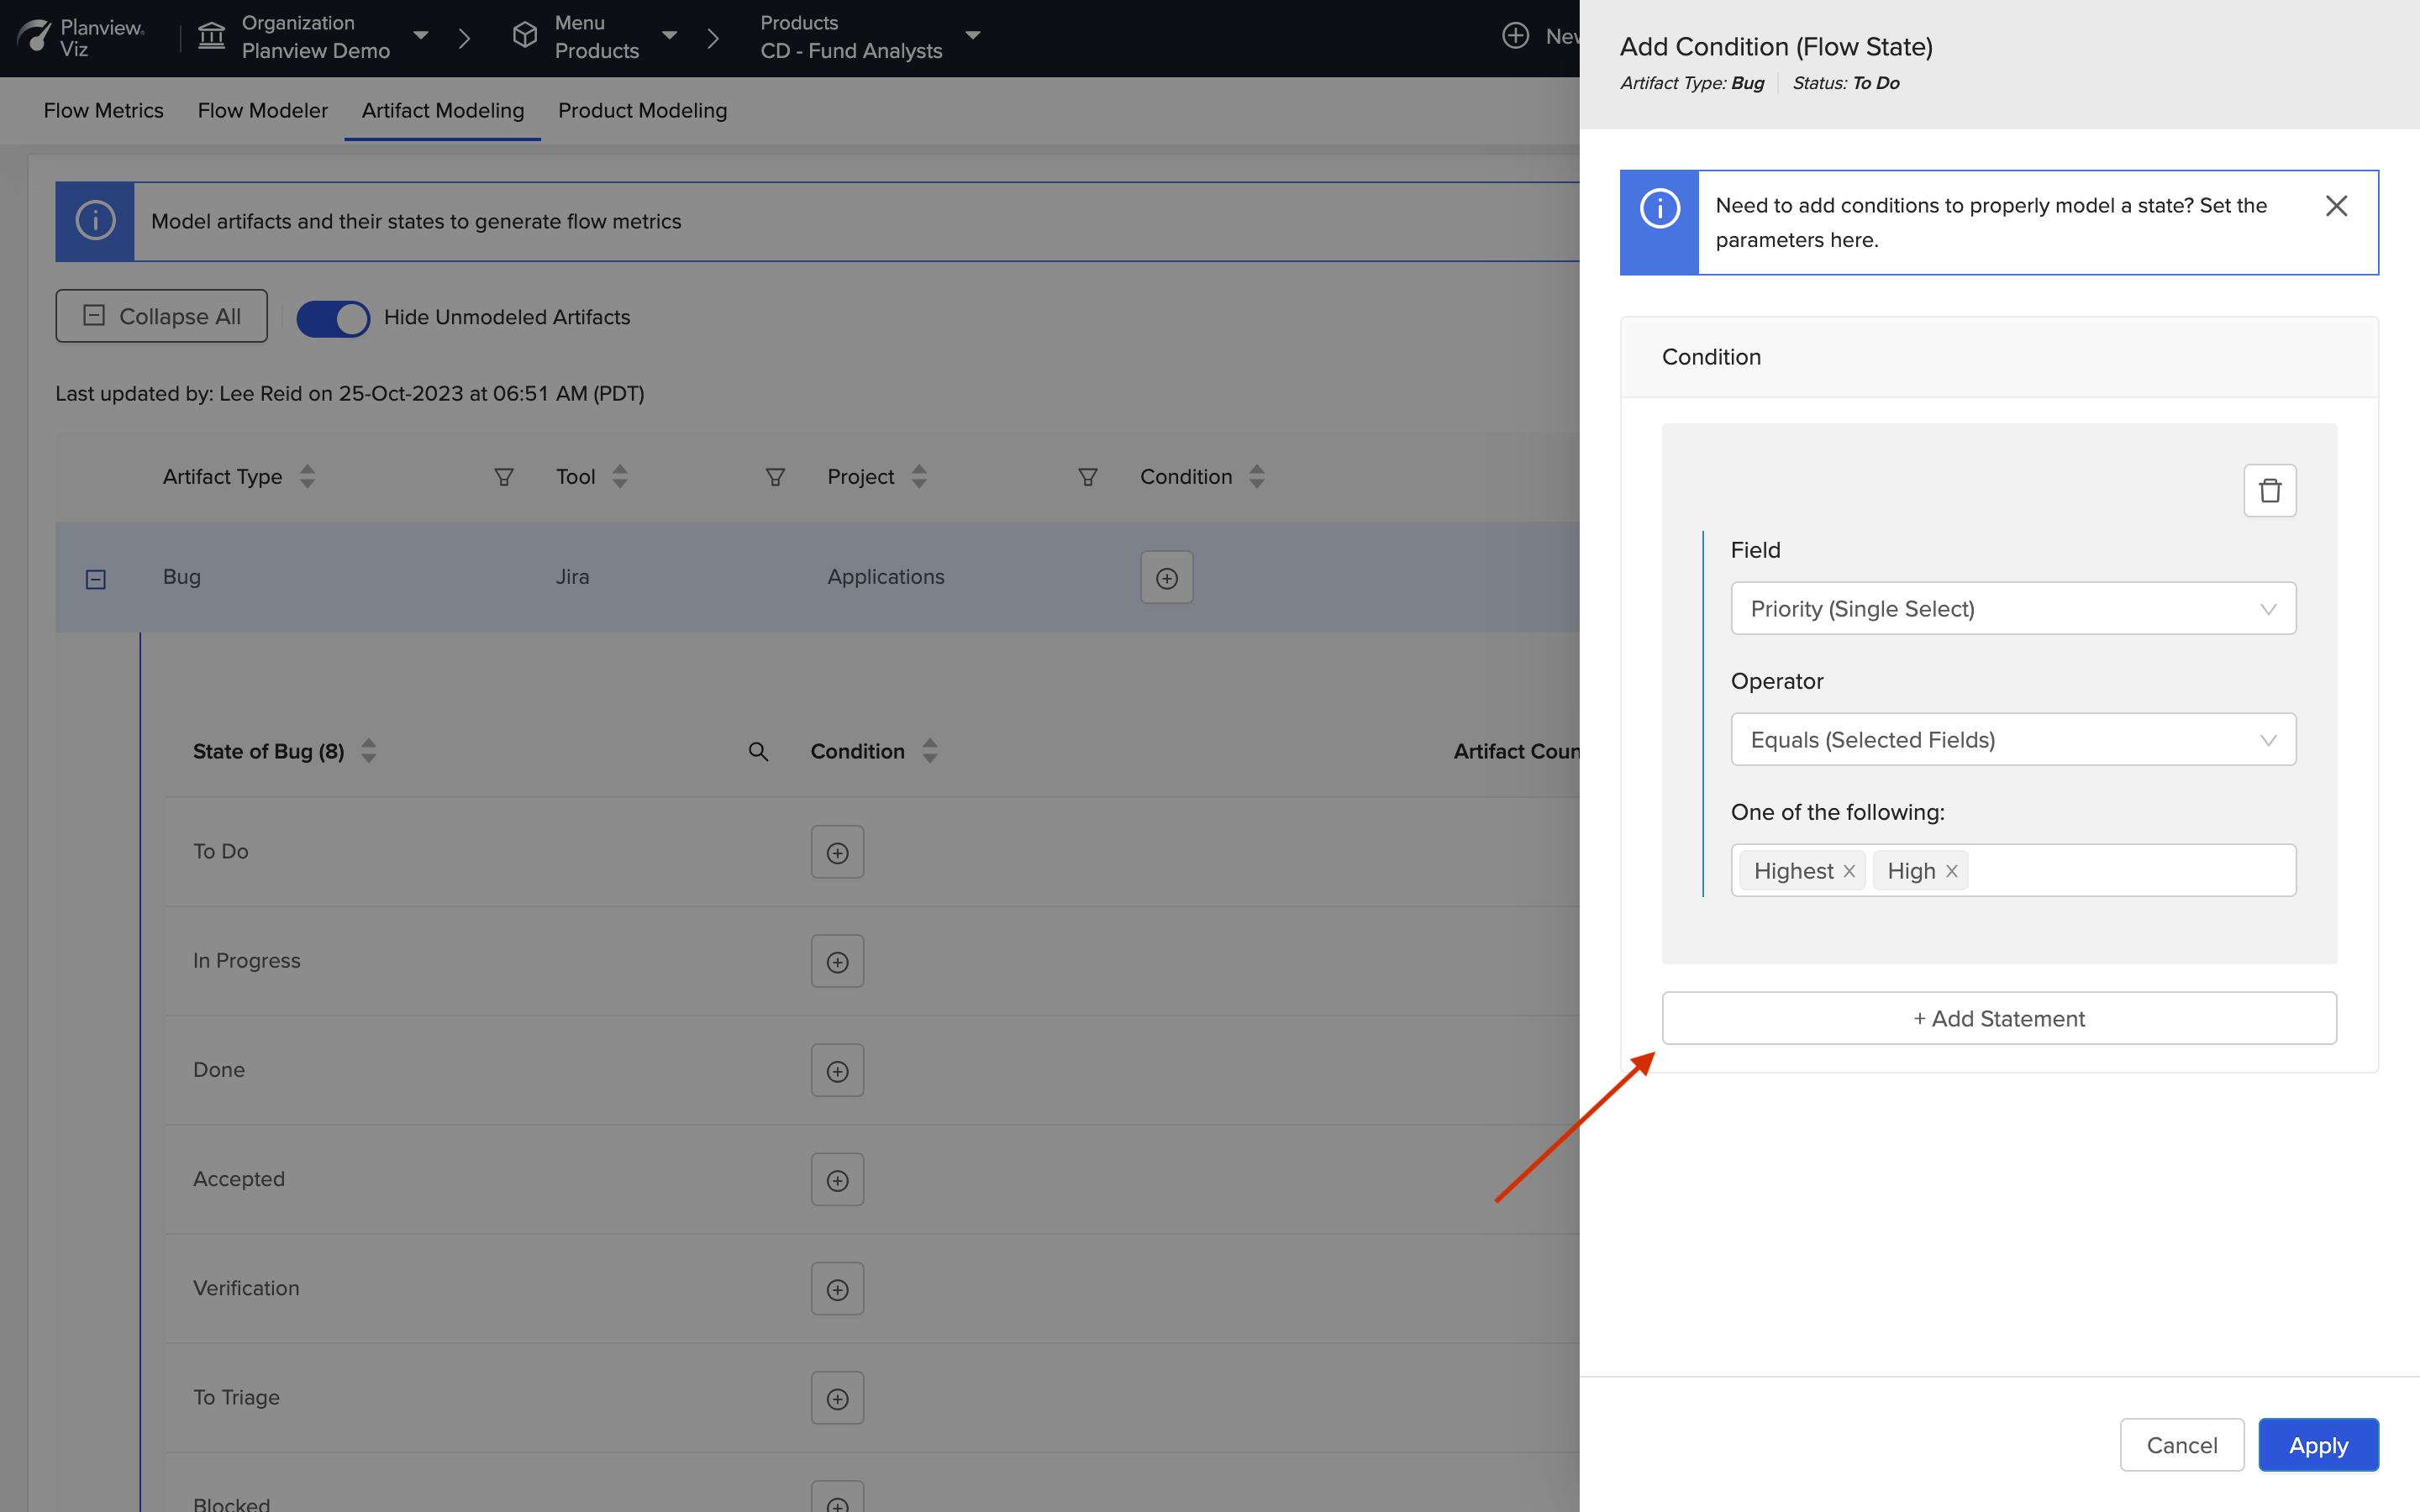
In the Add Condition (Flow State) panel, select the set of conditions you’d like to map. You can click + Add Statement to add additional criteria to the condition. Each condition will appear in the Artifact Modeling tab, which can then be categorized as a separate Flow State.
Note: To ensure that the conditional filters are mutually exclusive, the same field must be used for each condition.

Set your First Condition
Add Multiple Conditions
Add a Statement
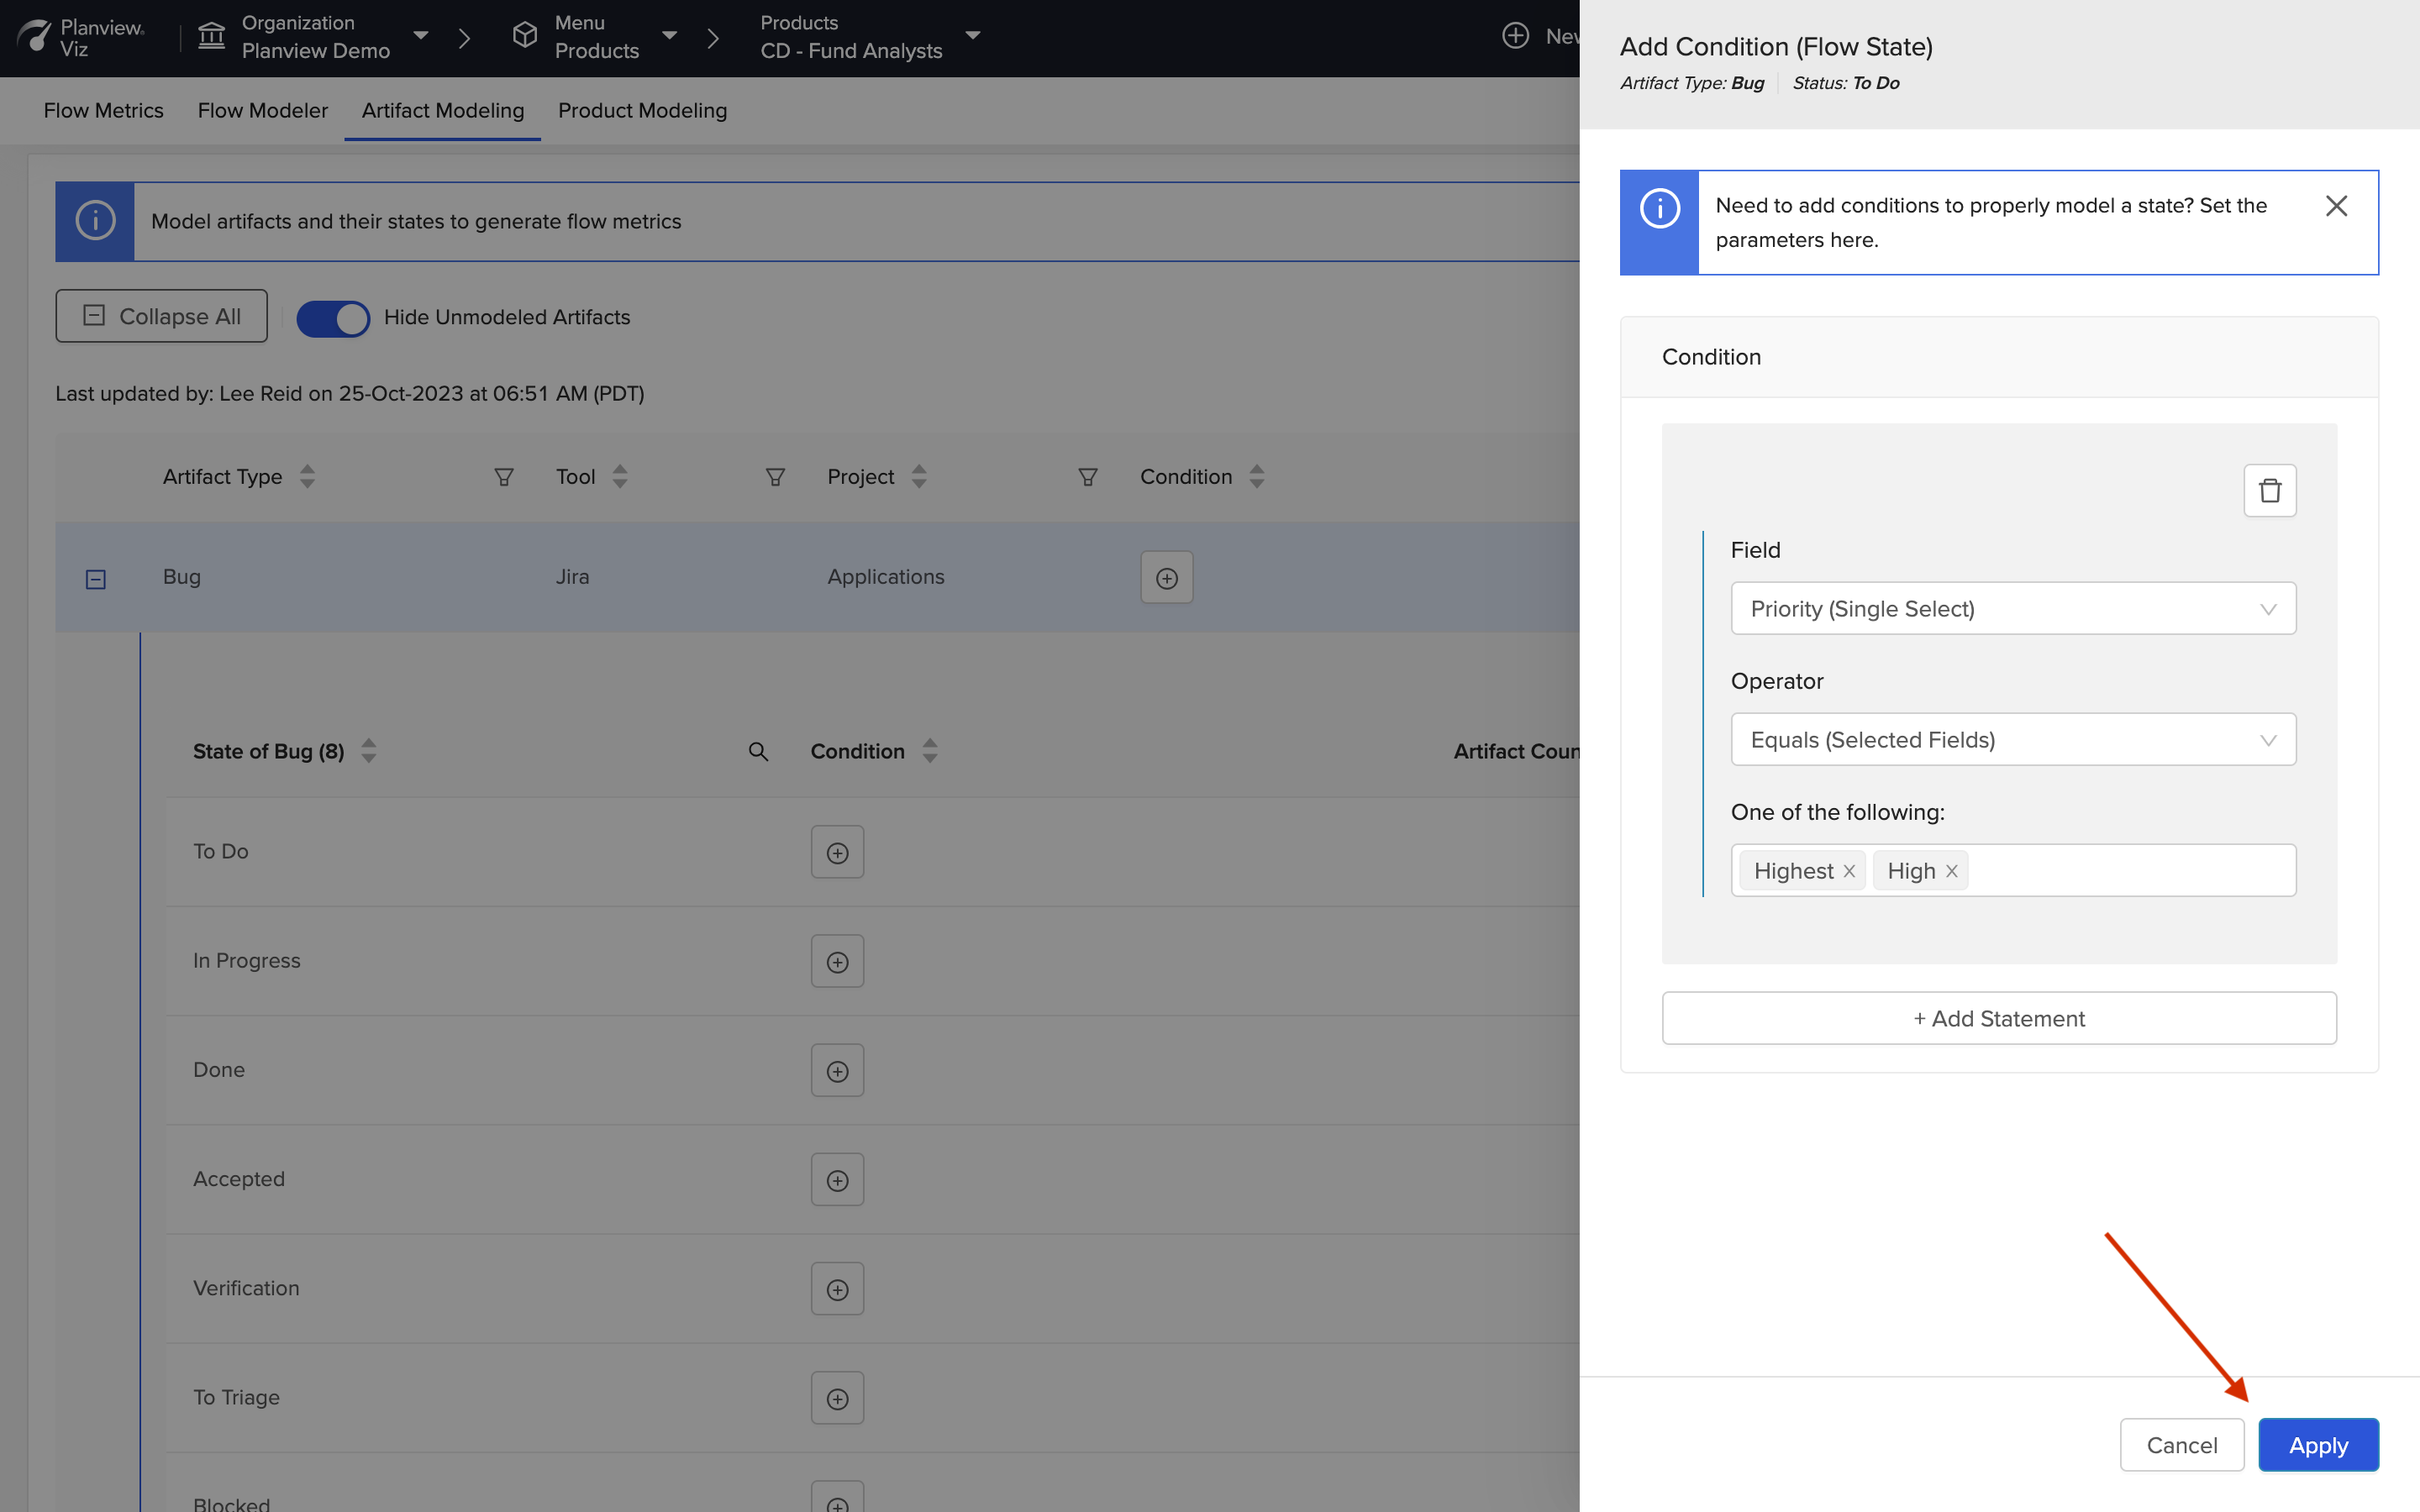
Click 'Apply'
After applying your condition(s), it will appear in the Artifact Modeling tab. You can then model your condition(s) into the correct Flow State.
Note: Setting a condition can take some time to process. We recommend setting all desired conditions before saving.
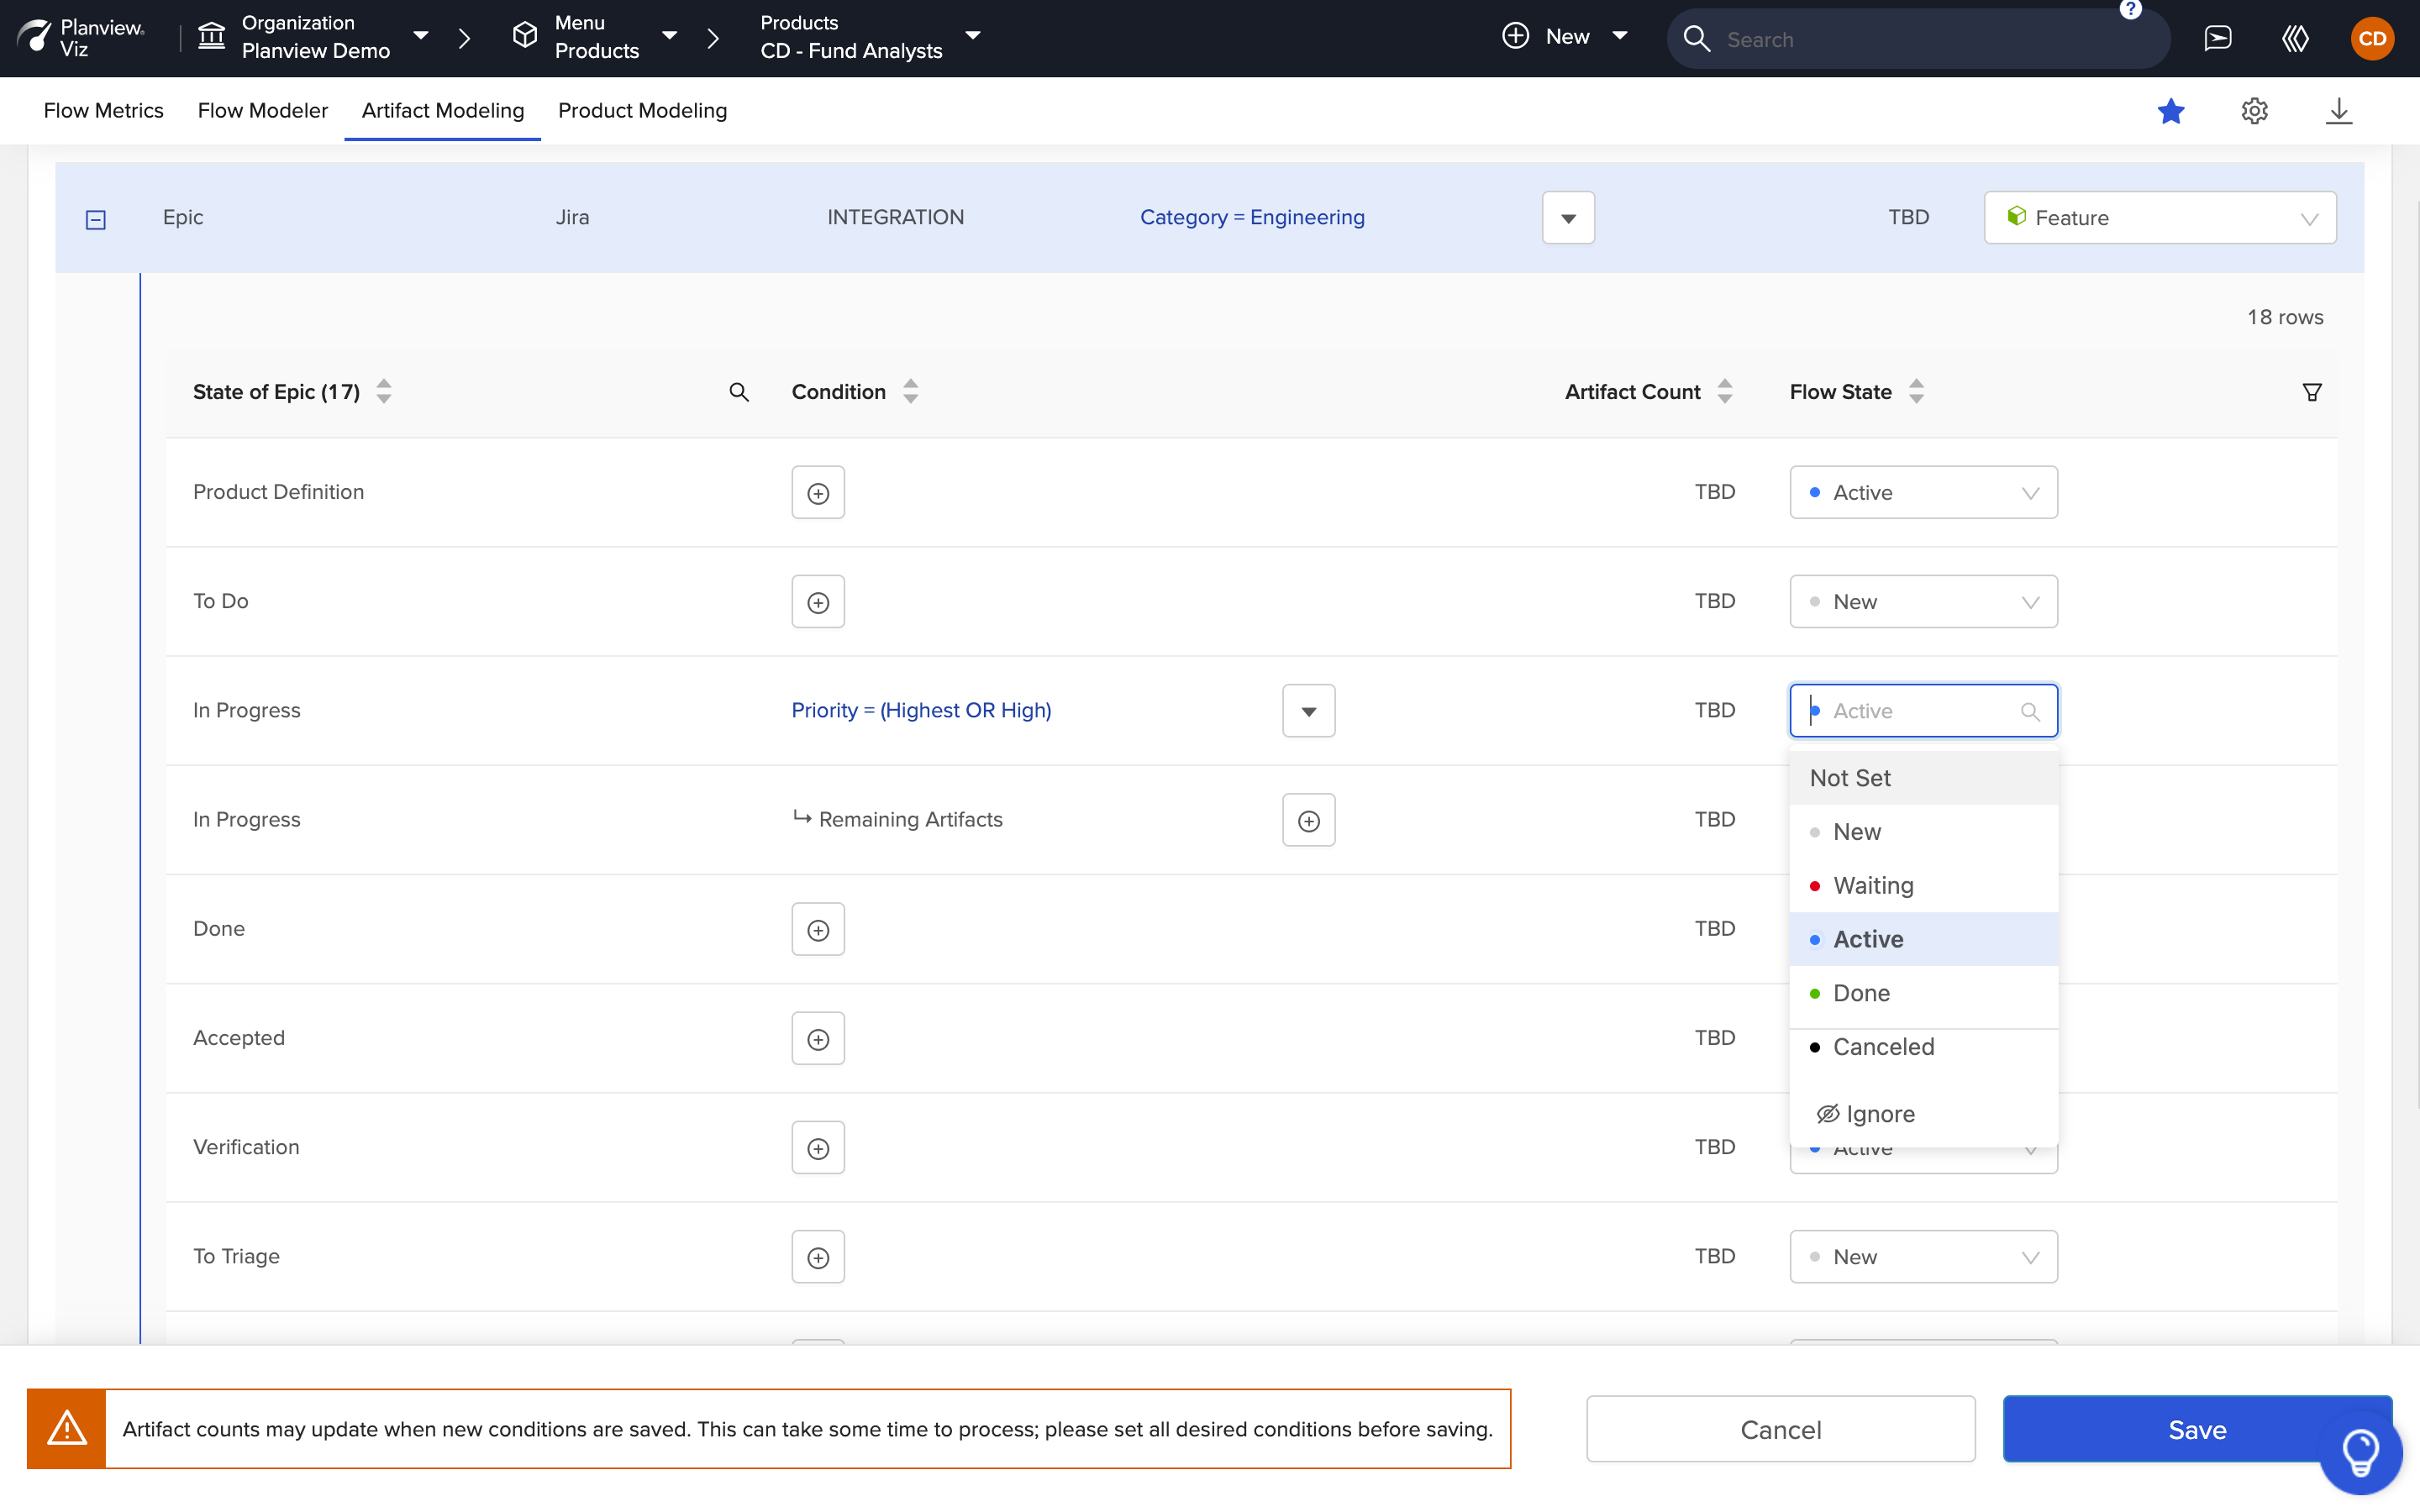
Model the Flow State
If you'd like to view all conditions, select Expand from the dropdown next to your condition. If you'd like to apply additional conditions to the same artifact type, select Add or Duplicate from the dropdown.
- Add: Creates a new row with no condition configured.
- Duplicate: Creates a new row with the same condition configured, so that you can easily modify field values based on the original statement. Duplicate will also copy over any associated Flow State mappings so that they do not need to be re-mapped (if the original condition has already been saved).
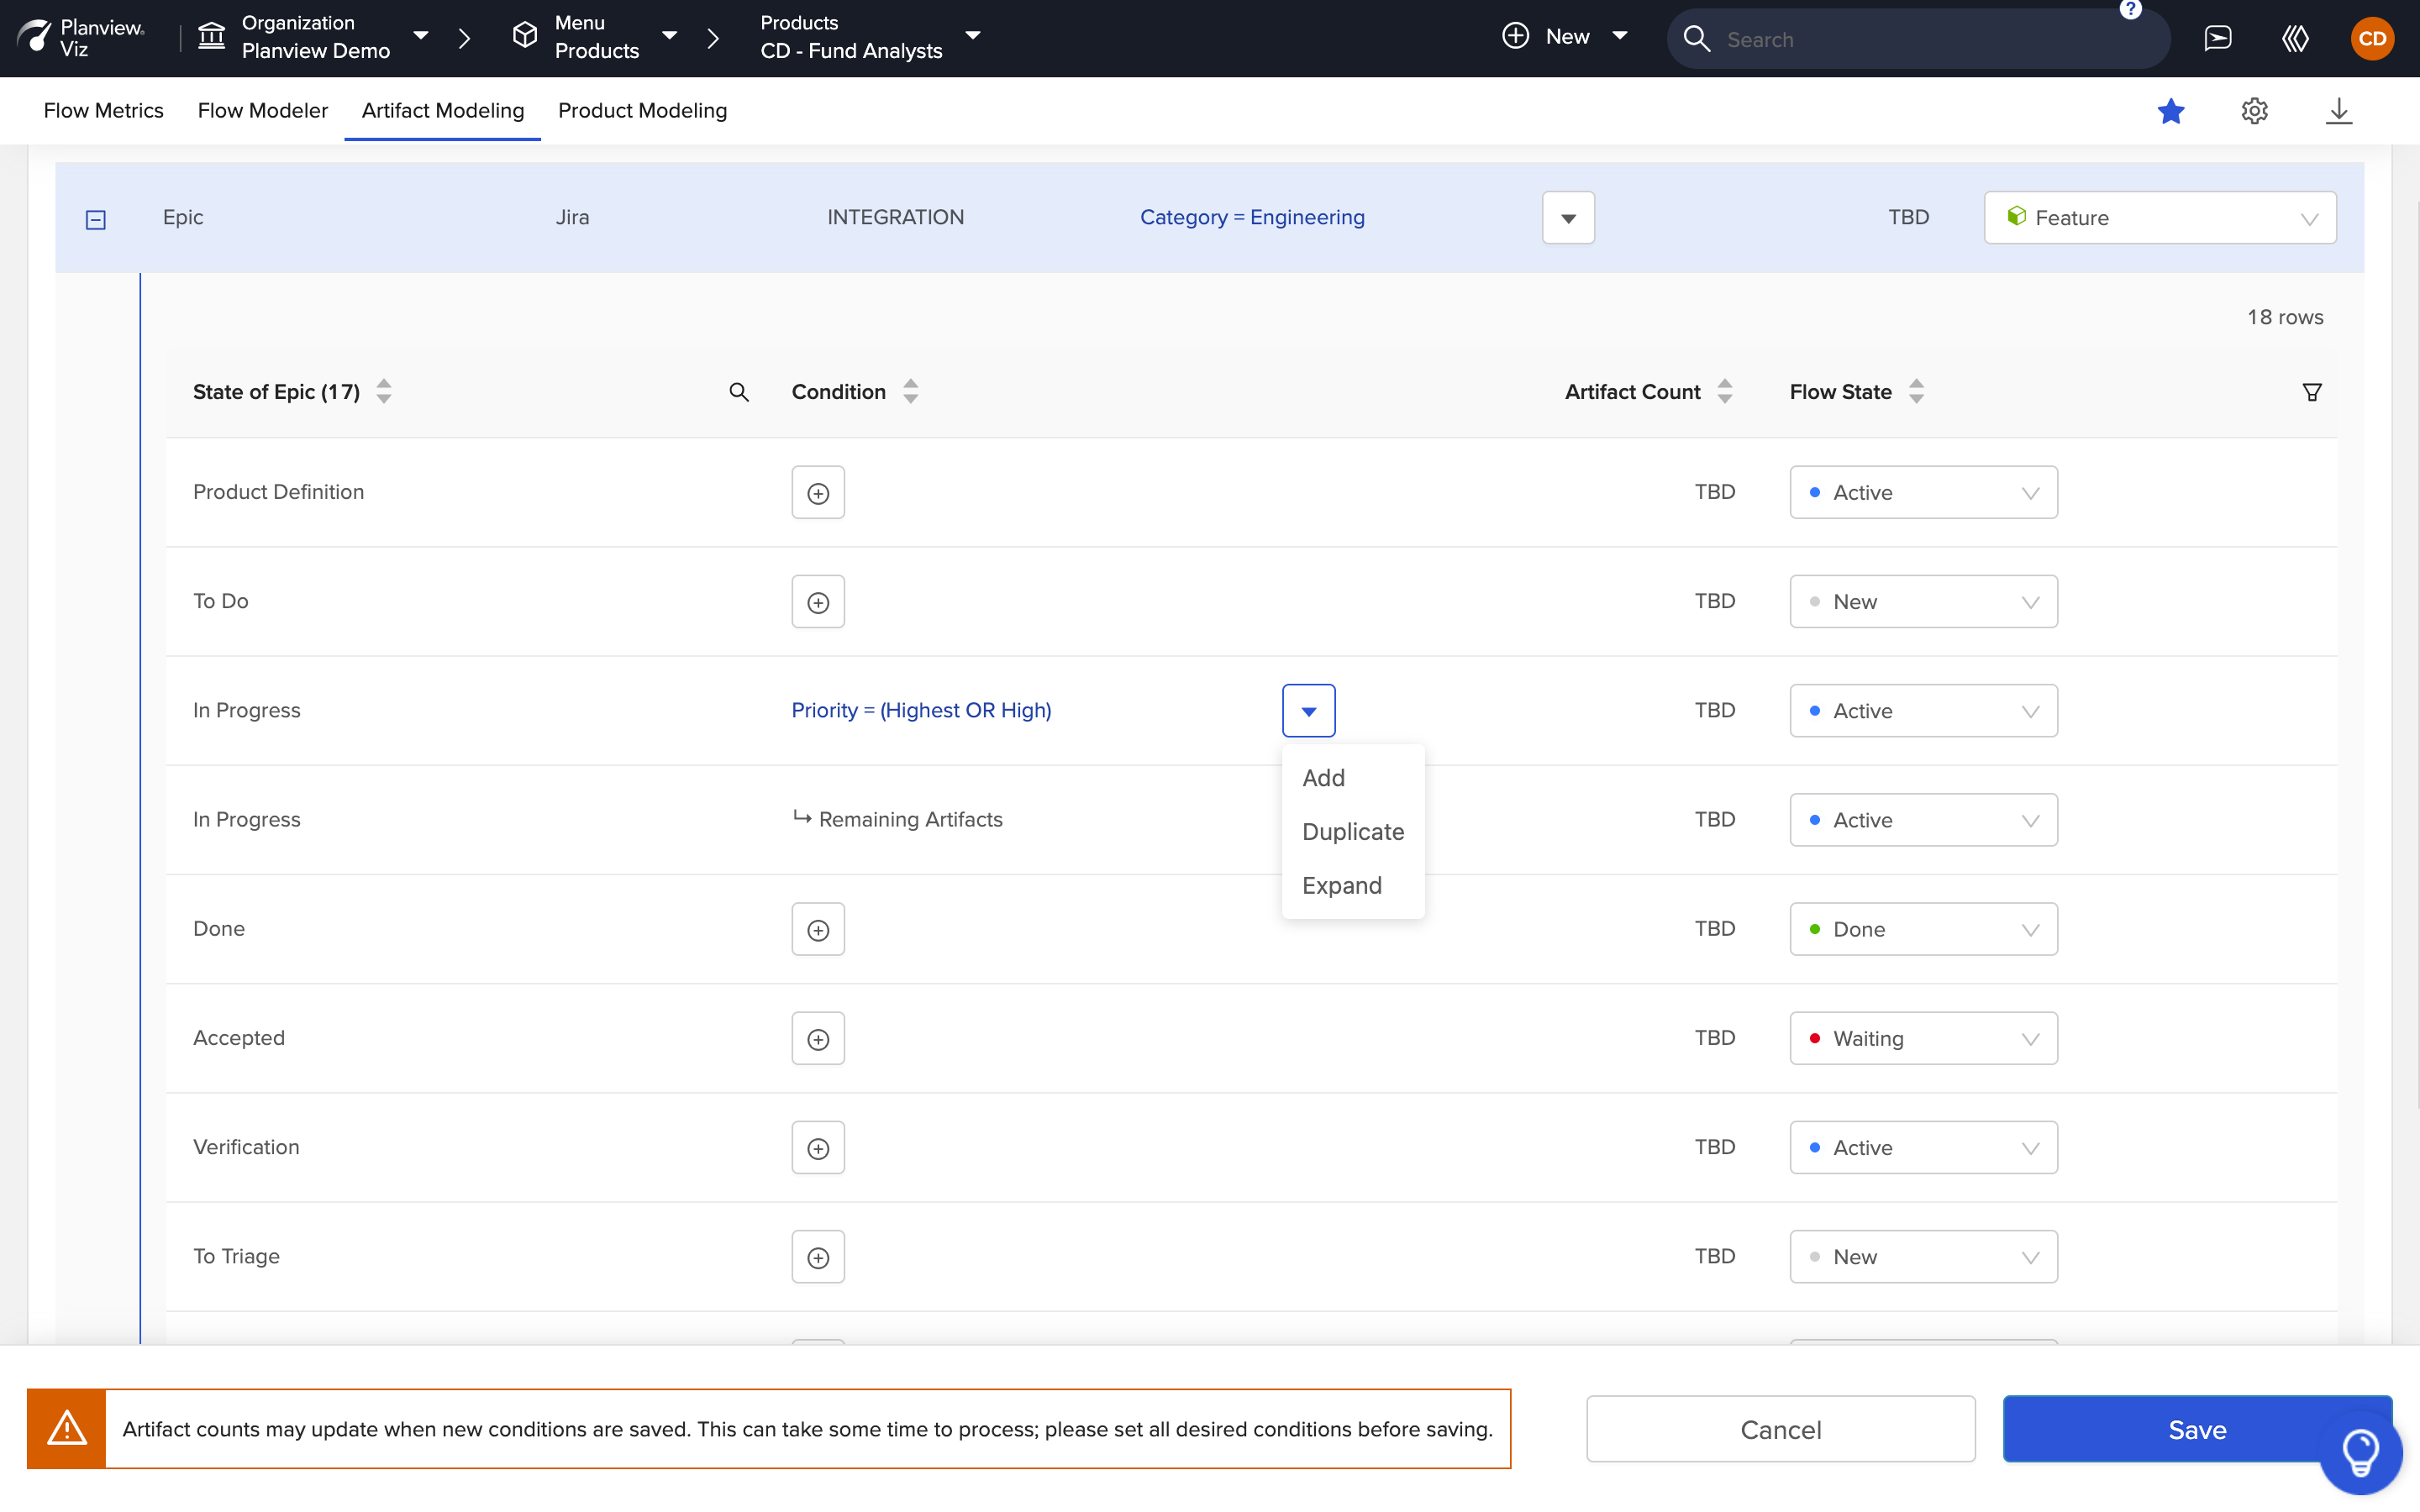
Add, Duplicate, or Expand Condition
Once all of your conditions have been set, mapped, and their associated flow states modeled, click Save.

Click 'Save'
As your updated Flow State mappings process, you can track progress using the bar at the top of the screen.
Progress Bar
Editing or Removing a Conditional State
To edit or remove a condition that you’ve set, click on the condition's link.
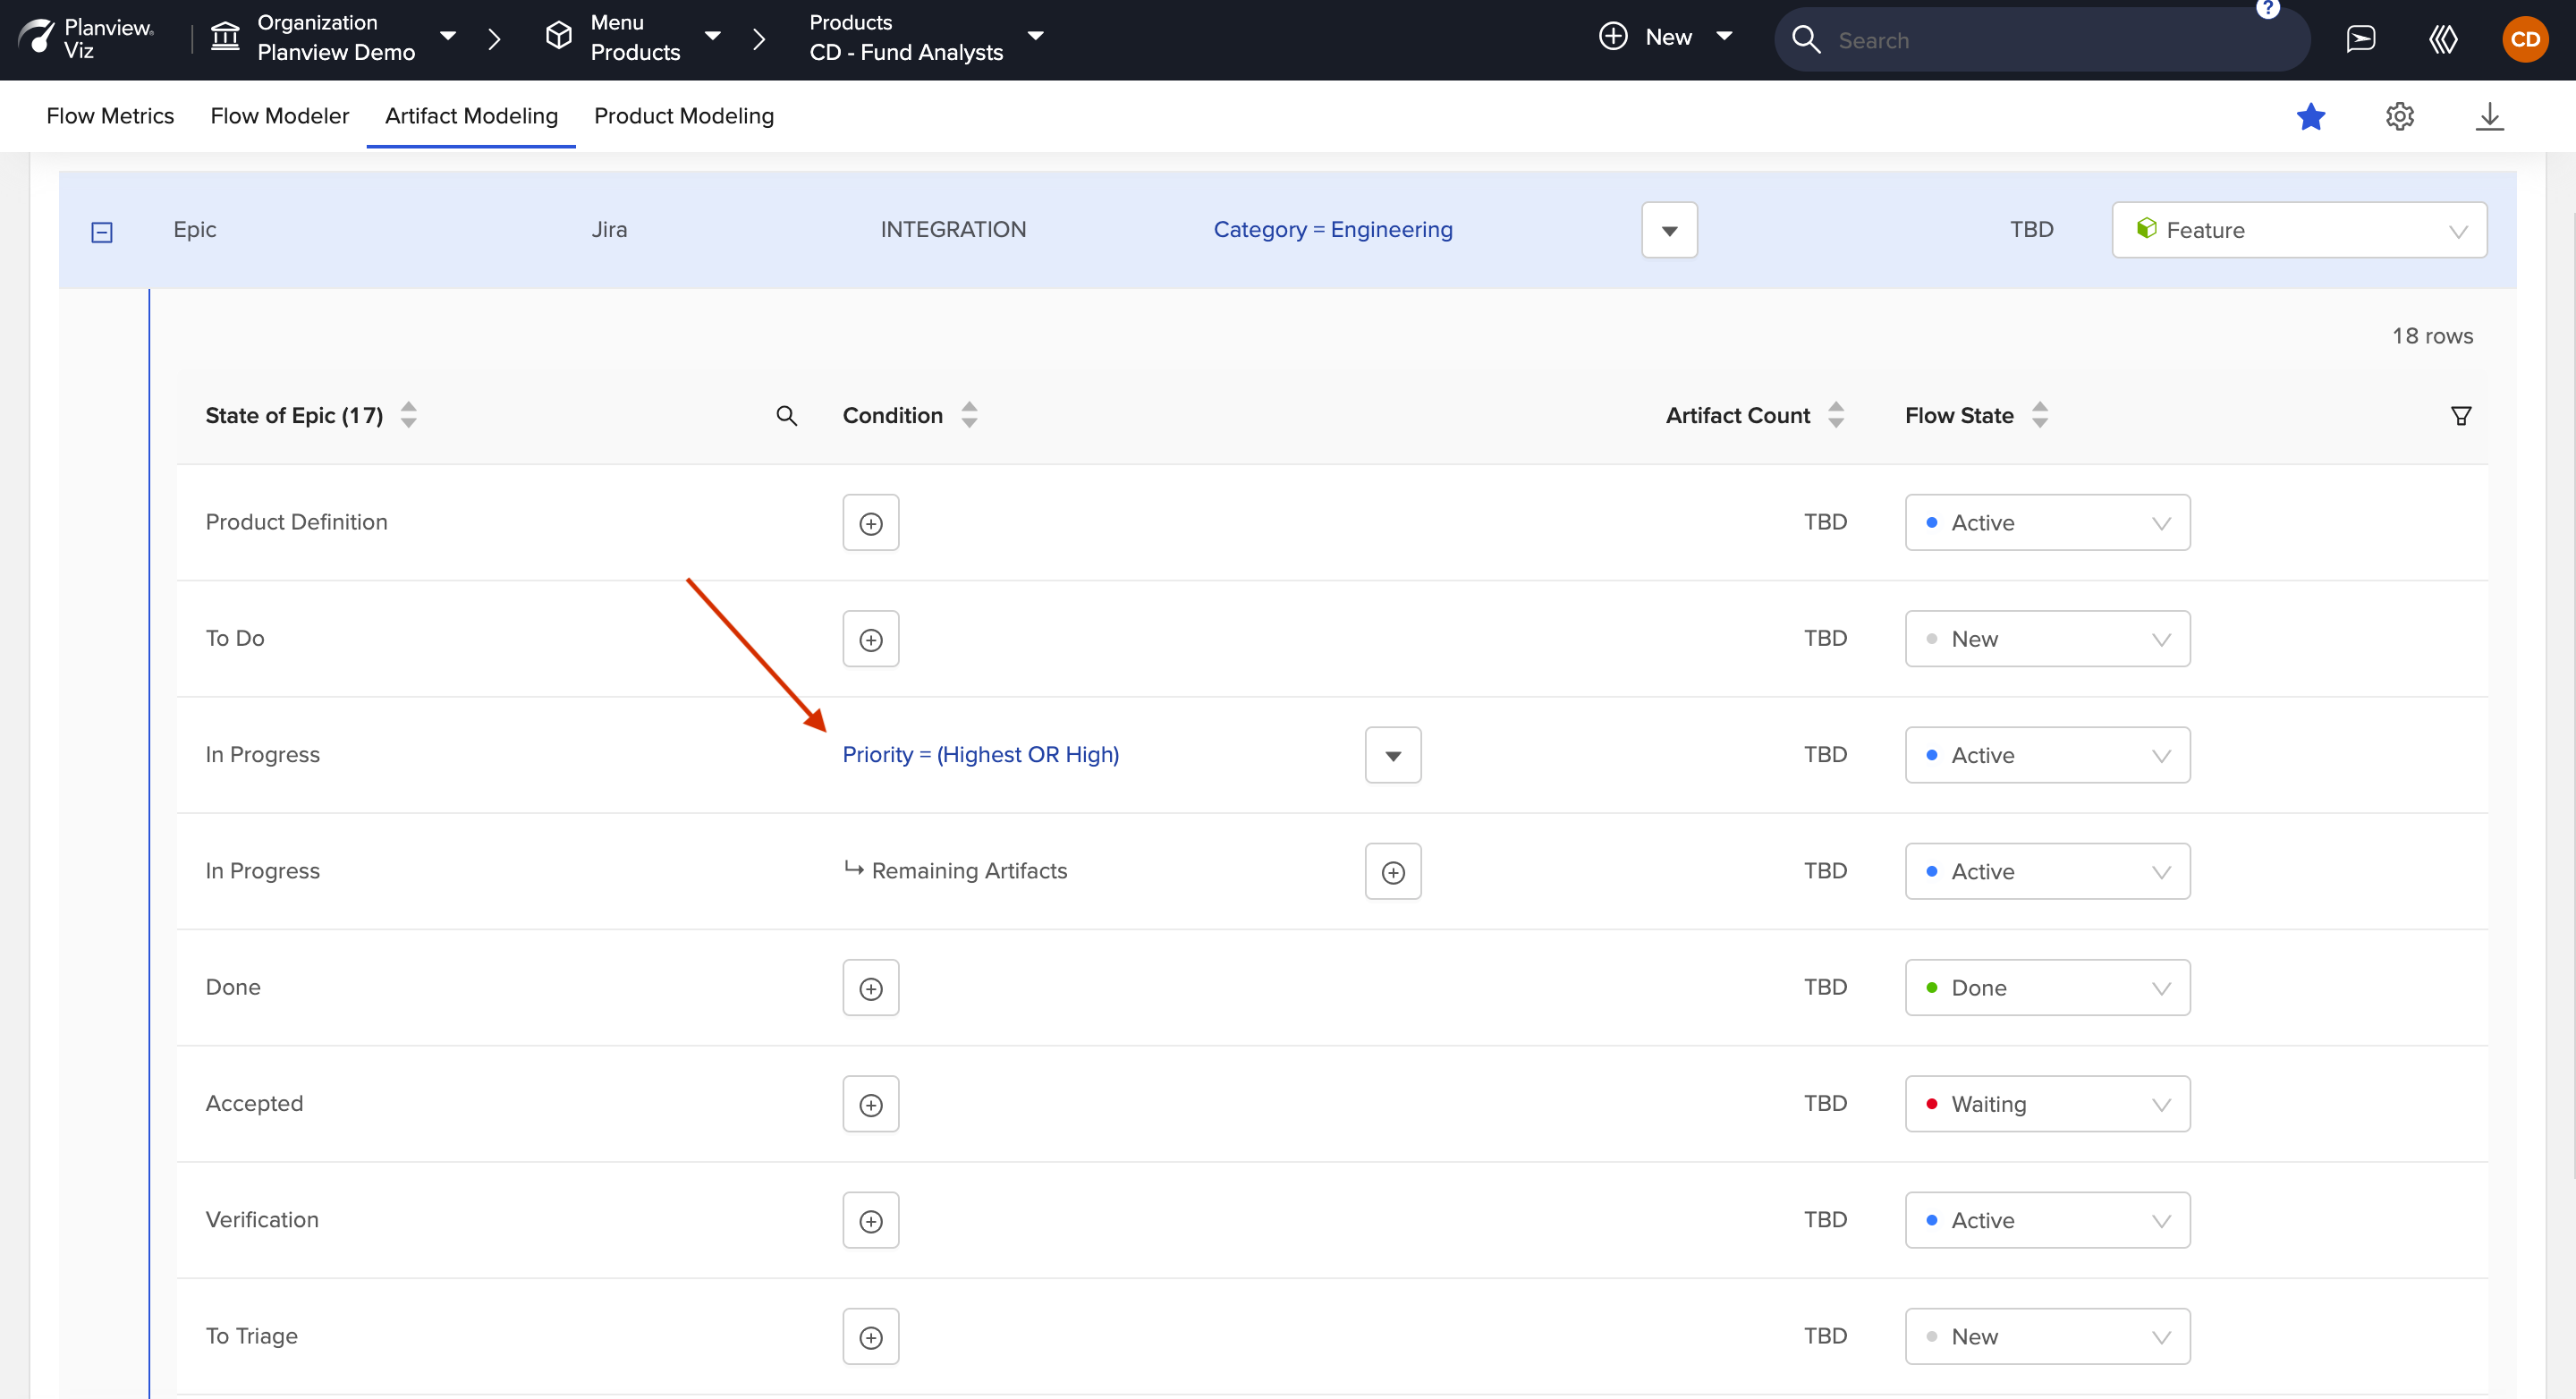
Edit or Remove a Condition
Click the trash can icon to remove the entire condition, or click the x to remove a single condition.

Remove a Condition
Once you’ve removed or edited your conditions as desired, click Apply.
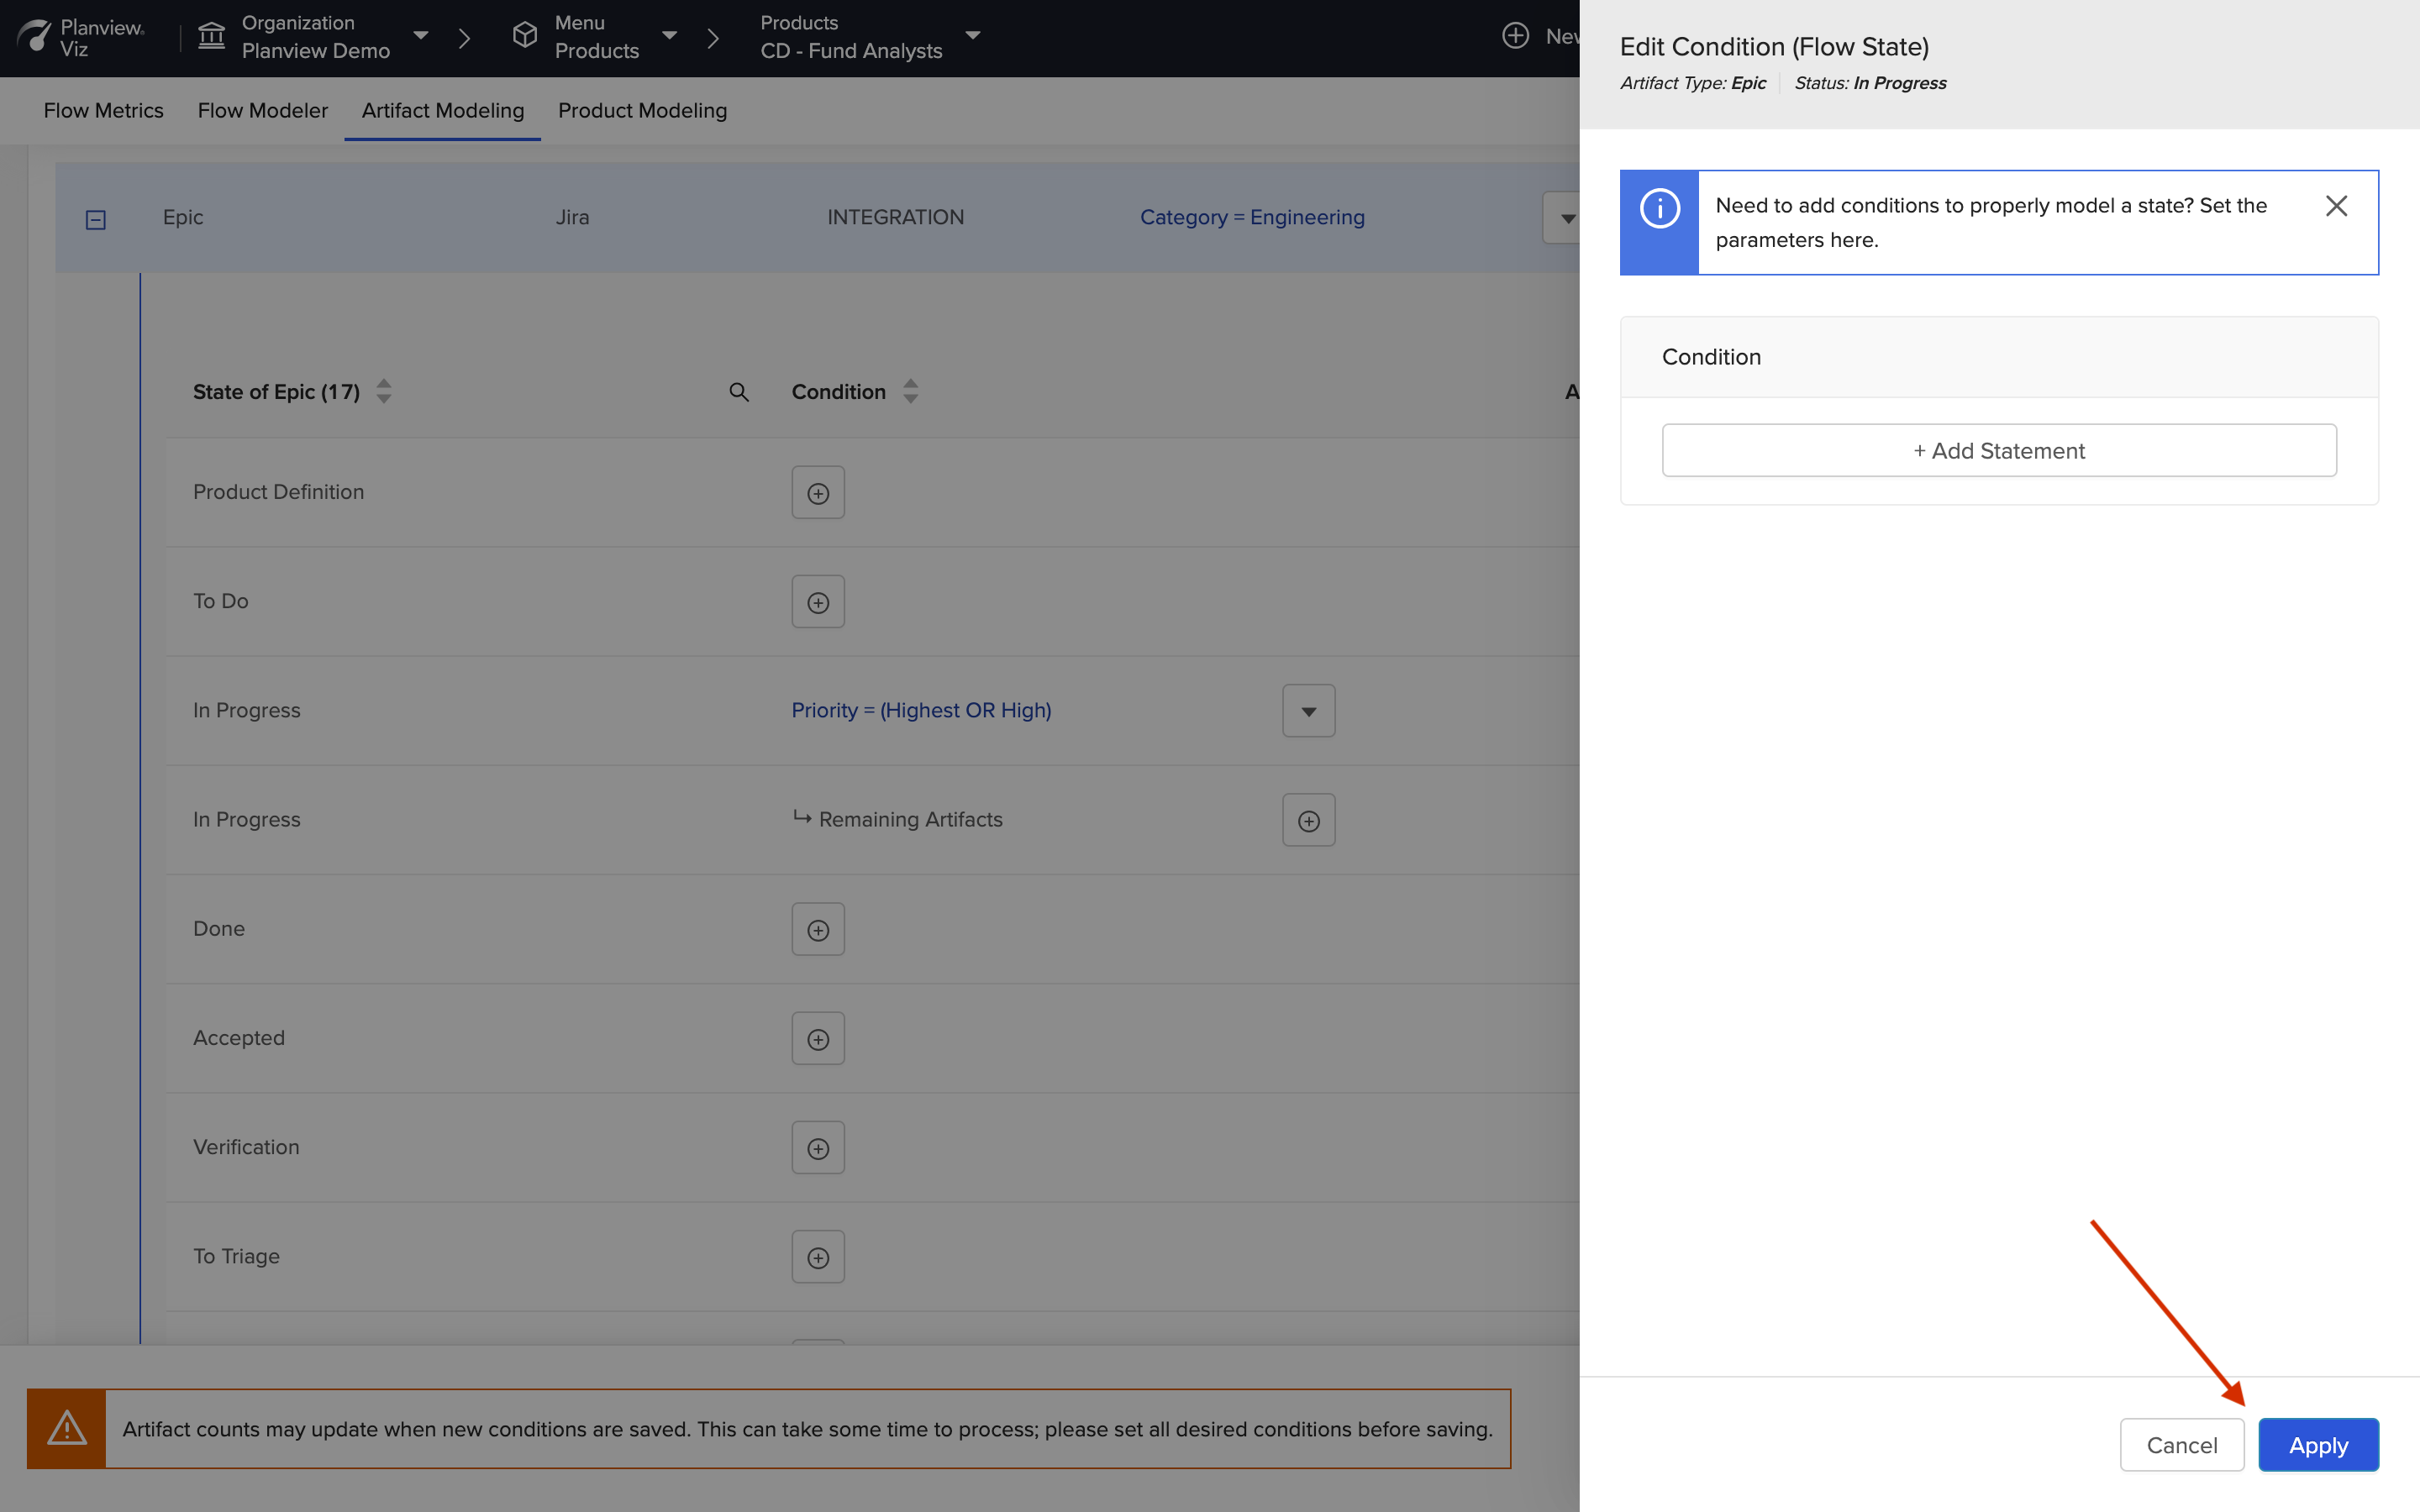
Click 'Apply'
Confirm your Flow mappings look as expected, and click Save.
Note: Updating or removing a condition can take some time to process. We recommend updating all desired conditions before saving.
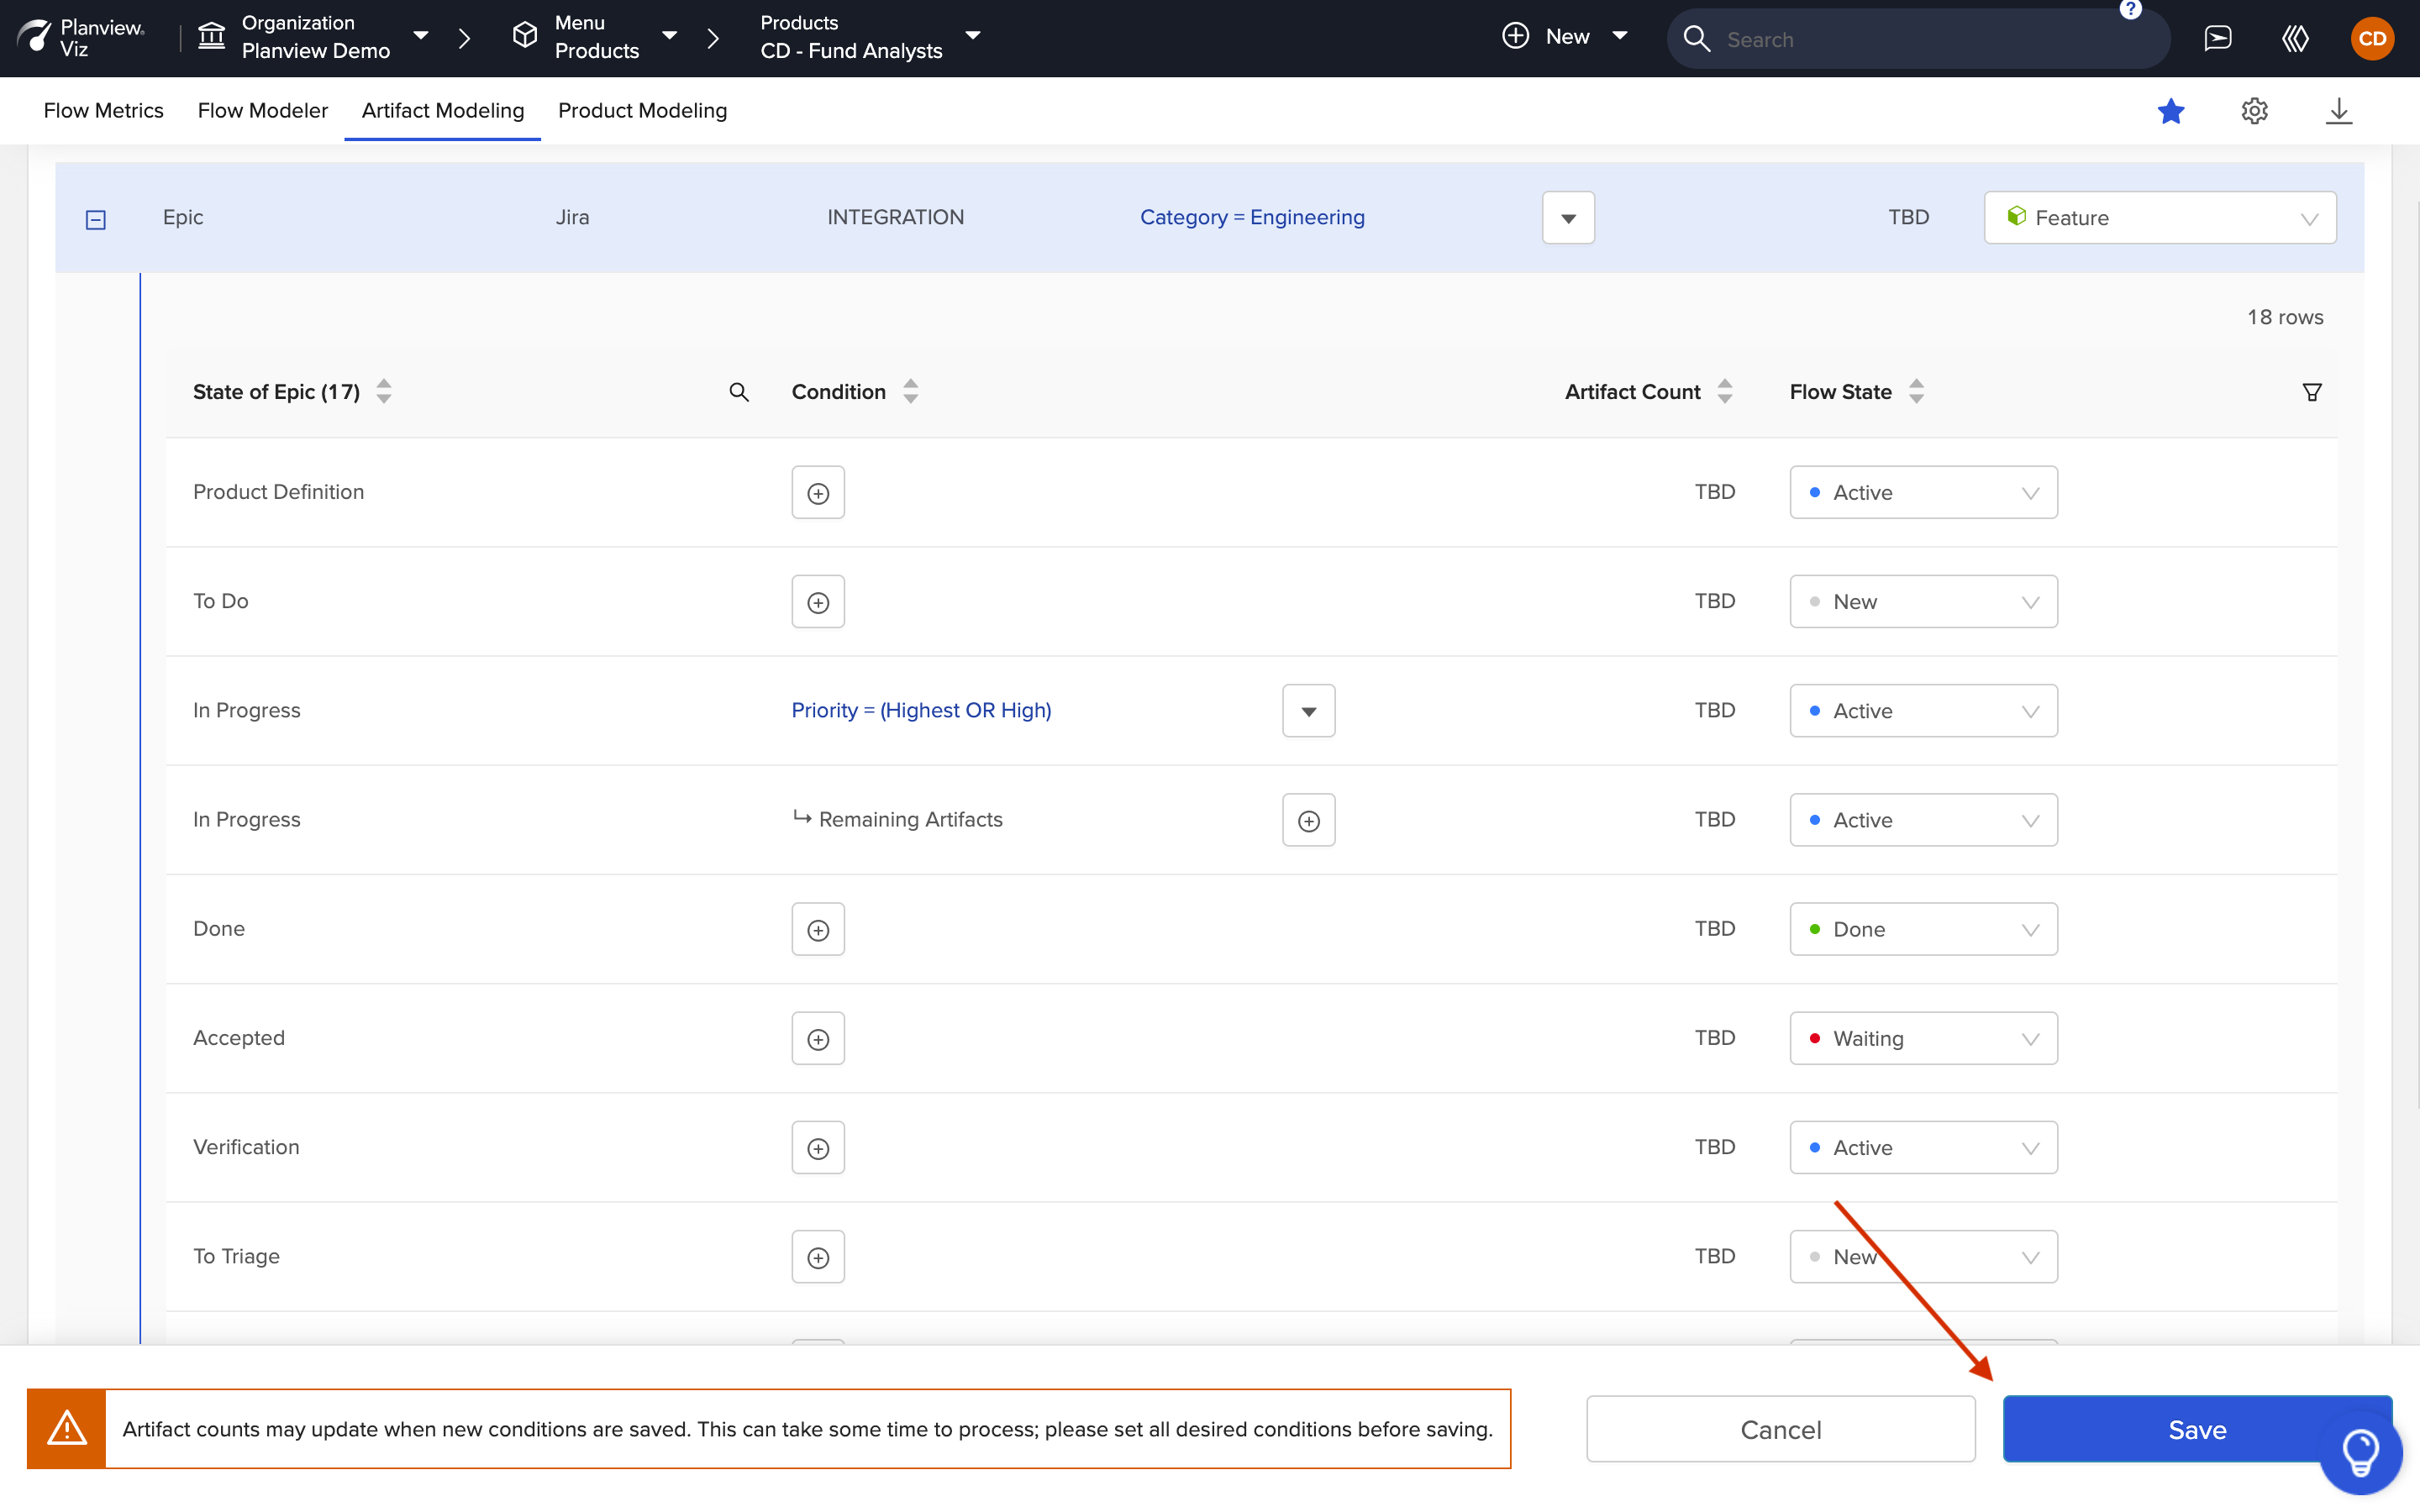
Click 'Save'
you've modeled your artifacts, you can visualize your workflow with the Flow Modeler.