
Installing the Agent
Overview
If one or more of the tools you'd like to connect to are On-prem (rather than cloud-based), Viz will require you to install an agent on a server behind your firewall. A virtual machine can be used for the server if desired.
The agent connects to your tools on-site and sends the data to Viz in the cloud. This easy deployment option is designed to ensure you do not have to punch open any incoming holes in your firewall.
Note: Viz does not support running multiple agents concurrently as it may negatively impact performance and cause errors.
Server Requirements
Requirements for the server where the agent will run are below:
|
User Requirements |
Supported Operating Systems |
|---|---|
|
The Viz agent requires an account with sufficient privileges on your server to access the projects and work items that you wish to generate Flow Metrics from.
|
The following 64-bit operating systems and versions are supported for the server where the agent will run:
Note: These requirements do not apply to the OS used to access the tools themselves (i.e., Jira). Java 8 must be installed on your operating system. |
|
Hardware Sizing Requirements |
Firewall Configuration |
|
We recommend the server have:
Note: The server where the agent is installed must be able to reach https://ingress.viz.tasktop.net/ |
If you have outbound firewall restrictions, you’ll need to open port 443 for https://viz.tasktop.net/ and https://ingress.viz.tasktop.net/ in order to access Planview Viz®. See additional information on Viz architecture and firewall configuration here. |
If you'd like to learn more about how to prepare your network for the Viz agent, click here.
Downloading and Installing the Agent
Note that only admin users can download and install the agent. If you are not a Viz admin, you can skip this section.
Once your account has been authorized by Planview, you can sign into Viz and set up the agent for access to On-prem tools.
You can access the Download an Agent guide from the Resource Center in the lower right corner or view the steps below.
Note: The agent is approximately 100 MB.

Download an Agent guide
First, navigate to the Org Settings screen from the main menu dropdown.
Note: You must download and install the agent on the server you prepared according to the system requirements here.

Click 'Tool Connections'
On the Org Settings screen, click the Tool Connections tab.

Click 'Tool Connections' tab
Next, click download to access the Agent Download screen.

Click 'download'
Then, click the link to download the appropriate agent for your system.

Download the Agent
Running the Agent
Once the agent file is downloaded and unzipped, open the bin folder and run the following script:
* start-tasktop-agent.bat (on Windows)
* start-tasktop-agent (on Linux)
If you are using Viz to connect to Microsoft Azure DevOps Server, please see additional instructions below.
Note: If migrating the agent to a different host, please see the details below.
Running the Agent as a Service
The agent should be configured to automatically start if the server is restarted. Below are instructions for enabling this on both Linux and Windows.
Note: A dedicated user and group should be created to run the agent as a service.
If connecting to ingress via a proxy, please see the details below.
Windows
- After downloading the agent, extract the agent download to the folder where you'd like the service to run from.
- Open Command Prompt as an Administrator
- Type in the following, where "C:\... is the folder containing the agent download):
cd C:\path\to\tasktop-agent\bin\
- Type in the following, where "C:\... is the folder containing the agent download):
- Run
tasktop-agent.exe install- Expected result is a message saying "Installing the service with id 'TasktopAgent' and no errors
- Optional: To verify the service has been installed check its status by running
tasktop-agent.exe status- Expected message: "Stopped"
- Start the service by running
tasktop-agent.exe start- Expected result is a message ending with "Starting the service with id 'TasktopAgent' and no errors
-
Check logs after starting to ensure the agent is running without errors
Linux (SystemD)
-
After downloading the agent and copying it to your host machine, ensure that the permissions and ownership are set correctly.
- Extract the agent download to the folder where you'd like the service to run from.
- Set the
AGENT_JAVA_HOMEvariable in your environment to match the location of your Java installation (e.g.,export AGENT_JAVA_HOME="/opt/tasktop-agent/jre) -
Create the following service in your systemD system folder (e.g.,
/etc/systemd/system/tasktop-agent.service).# Systemd unit file for tasktop agent [Unit] Description=Tasktop Agent After=syslog.target network.target [Service] WorkingDirectory=/path/to/tasktop-agent/bin/ ExecStart=/path/to/tasktop-agent/bin/start-tasktop-agent User=user Group=group [Install] WantedBy=multi-user.target
-
Do not make edits to lines of the
.servicefile except forWorkingDirectory,ExecStart,User, andGroup. -
Load the service by running the following:
-
systemctl daemon-reload
-
-
Enable the service to start at boot with the following:
-
systemctl enable tasktop-agent
-
-
Restart the machine to ensure it runs at start up.
-
Check logs after starting to ensure the agent is running without errors.
Configuring Password Encryption for the Agent
-
Add the following property to the
agent.conffile:-
agent.proxy.isEncryptionModeOn = true
-
-
Remove the following password field from the
agent.conffile:-
agent.proxy.password
-
-
Save your changes.
-
Run the new agent startup, which will now ask for a user input for the proxy password.
-
Enter the password.
-
The password should then be stored in the
agent.conffile in an encrypted format.
Microsoft Azure DevOps Server
These instructions are only necessary if you are using an On-prem agent to connect to Microsoft Azure DevOps. If you are using other tools or a cloud agent, you can ignore this section.
The Microsoft Azure DevOps Server tool connection requires installing additional Microsoft libraries that Planview does not provide or support.
TFS-SDK-14.134.0.zip and TEE-CLC-14.134.0.zip may be obtained from here.
Place these files in the <agent installation>/third-party directory and restart the agent to enable the tool connection.
Accessing Agent Details
After you've downloaded and installed your agent, you can view your agent details on the Tool Connections screen.

View Agent details
On the agent card, you can find the following details:
- The version number of your agent
- The last ping of your agent (anything longer than 30 minutes could mean that the agent is down)
- Associated tool connections
- Agent status (indicated by green or red dot; green indicates the agent is up and Viz can connect to tools, red indicates the agent is down and/or Viz cannot connect)
Note: Disabled agents are hidden from the agent card.
Disaster Recovery
A working backup strategy is a critical element of disaster recovery since only backups can mitigate complete hardware failure and user error. Regular backups of the entire Viz agent folder are an essential part of your organization’s backup strategy. If the agent server goes down or is decommissioned, a backup is required to ensure duplicate data is not sent to Viz.
Note: The backup should not be done on the same server hosting the agent, and should be done while the agent is shut down.
Connecting via a Proxy
In order to configure the agent to communicate with ingress via a proxy, you will need to add the proxy settings to /conf/agent.conf
Note: The format in the agent.conf file can contain JSON or Key-Value pairs.
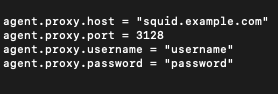
Add the proxy settings to the agent enclosure in the .conf file, as shown below:
Key-Value
agent.proxy.host = "squid.example.com"
agent.proxy.port = 3128
agent.proxy.username = "username"
agent.proxy.password = "password"
JSON
proxy {
  host = "squid.example.com"
  port = "3128"
  username = "username"
  password = "password"
}
Use the following system properties:
- host: the hostname of the proxy server (e.g., squid.example.com)
- port: the port of the proxy server (e.g., 3128)
- username: (Optional) the proxy username, if the proxy requires basic authentication
- password: (Optional) the proxy password, if the proxy requires basic authentication
Once completed, it should look like this:
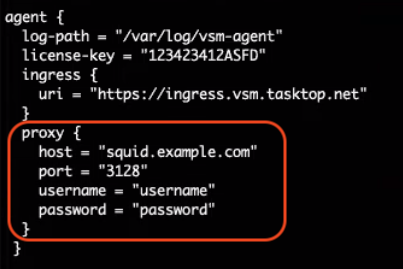
Or, like this:
Migrating the Agent to a Different Host
If the agent is migrated to a different host, ensure that the following files are moved to the corresponding location on the new host. If this step is skipped, you will risk generating inaccurate metrics due to duplicate events.
event-source.db.mv.dbevent-source.db.trace.db/conf/agent.conf- any files in
/third-party(if using Microsoft Azure DevOps)
Troubleshooting
Logs are provided to assist in agent troubleshooting. Logs can be found in the following location: [agent location]/logs/tasktop-agent.log
The most recent log file will be called tasktop-agent.log, while previous log files will be called tasktop-agent.YYYY-MM-DD.log.zip.
To change the location of the logs, you can update the agent.conf file. The key of the file is called log-path and should be located under the agent enclosure.
agent {
   log-path = "/some/path/to/log/directory/"
}
Resolving Certificate Errors
If you see an error message in the Agent logs saying, javax.net.ssl.SSLHandshakeException: General SSLEngine problem … Caused by: PKIX path building failed: sun.security.provider.certpath.SunCertPathBuilderException: unable to find valid certification path to requested target, this generally indicates that there is a proxy between the Tasktop agent and the Viz ingress service which serves a self-signed certificate.
To resolve this error you will need to import your proxy’s certificate chain into the Viz agent’s JRE keystore:
-
Stop your Viz agent
-
Obtain copies of the root certificate and all intermediate certificates used by your proxy, in a "DER encoded binary X.509 (CER)" format
-
Import each of these certificates into the Viz agent's JRE keystore using the following keytool command:
-
<agent install location>/jre/bin/keytool -import -trustcacerts -keystore <agent install location>/jre/lib/security/cacerts -file <path to certificates>/my_ca.cer -alias myca-
the default password is:
changeit
-
-
-
Start your Viz agent
Upgrading the Agent
Note that only admin users can upgrade the agent. If you are not a Viz admin, you can skip this section.
Planview periodically releases agent updates containing bug fixes and performance-enhancing features. If an updated version of the agent is available, a pop-up will appear in the Viz UI.

Agent Update Available
You can find out which version of the agent you are on by going to agent/conf/build.conf.
You can find out the version of the newest agent by downloading the agent (from the new Tool Connection panel). The version number will be in the file name.
To upgrade the agent, please follow the steps below:
Windows
-
Shut down the current agent:
-
If the agent is running as a Windows Service, follow the steps below to stop and uninstall the service:
- Open Command Prompt as Administrator
- Type in the following:
cd C:\path\to\current\tasktop-agent\bin\tasktop-agent.exe stoptasktop-agent.exe uninstall
- If the agent is running as a task, follow the instructions below:
-
Open
Control Panel\SystemandSecurity\Administrative Tools\Task Scheduler -
Right click on the agent and select end
-
-
-
Make a backup of the entire agent folder
- Download the updated agent. The agent download can be found by clicking Tool Connections > Create New Tool Connection. You can also follow the Download an Agent guided tour from the Resource Center to get to the agent download link (see section above).
- Important: Before running the new agent, copy the following files from the old agent's folder into corresponding location in the new agent install folder. Many of these files contain information for the on premise tool connections that have already been configured utilizing the agent. If this step is skipped, you will be unable to utilize existing tool connections once the updated agent is installed.
event-source.db.mv.dbevent-source.db.trace.db/conf/agent.conf- Any files in
/third-party(if using Azure DevOps/TFS) - Any other files that have previously been modified, for example certificate files (see above)
- Run and install the new agent the same way you installed the initial agent. You can find installation instructions in the associated README file.
- Set up the agent to run as a service as outlined above, or if running as a task follow the instructions below:
-
Open Control Panel\System and Security\Administrative Tools\Task Scheduler
- Set the Program/script to
C:\path\to\new\tasktop-agent\bin\start-tasktop-agent.bat - Set Start in (optional) to
C:\path\to\new\tasktop-agent\bin\
-
Note: If you have made certificate adjustments or added a new certificate to access your tools, you may need to also copy the jre\lib\security\cacerts file or re-import the certificate (see troubleshooting instructions above).
Linux
- Shut down the current agent:
sudo systemctl stop tasktop-agent(assuming you usingSystemDas described above) - Make a backup of the entire agent folder
- Move the existing installation to a temporary location
- Download the updated agent. The agent download can be found by clicking Tool Connections > Create New Tool Connection. You can also follow the Download an Agent guided tour from the Resource Center to get to the agent download link (see section above).
- Important: Before running the new agent, copy the following files from the old agent's folder into the corresponding location in the new agent install folder. Many of these files contain information for the on premise tool connections that have already been configured utilizing the agent. If this step is skipped, you will be unable to utilize those existing tool connections once the updated agent is installed.
event-source.db.mv.dbevent-source.db.trace.db/conf/agent.conf- Any files in
/third-party(if using Azure DevOps/TFS) - Any other files that have previously been modified, for example certificate files (see above)
- Start the agent
sudo systemctl start tasktop-agent - Check the logs for errors
sudeo journalctl -n 1000 -u tasktop- -n 1000 -u tasktop-agent - Check the cloud web UI to ensure it is connected
Note: If you have made certificate adjustments or added a new certificate to access your tools, you may need to also copy the jre\lib\security\cacerts file or re-import the certificate (see troubleshooting instructions above).
Next Steps
After you've finished setting up your agent, your final step in Provisioning will be connecting to your tools.