
Roadmaps for Enterprise – Getting Started Guide
Setting up Planview Roadmaps in Planview Admin
Overview 
Setting up Planview Roadmaps includes the following steps, all of which must be performed in Planview Admin by an administrator.:
- Adding the Planview Roadmaps product environment to Planview Admin.
- Adding users to the Planview Roadmaps product.
- Assigning Planview Roadmap roles and subscriptions to users.
Adding a Planview Roadmaps environment to Planview Admin
For information on how to do this, see Managing Products.
NOTE
You can add one production environment and one sandbox environment for Planview Roadmaps. The Roadmaps sandbox environment will connect to the primary sandbox of AgilePlace and Portfolios.
Adding an individual user to Planview Roadmaps
When you add users to Planview Roadmaps, they are assigned the User product role and Teams subscription type by default, but you can change these settings either when creating the user or at a later time.
There are two Roadmaps product roles:
- User – can create roadmaps and share roadmaps with other Planview Roadmap users, and can view roadmaps that have been shared with them
- Admin – can access and manage all roadmaps, including sharing, transferring ownership, and deleting roadmaps
The subscription type determines the level of access:
- Teams – access to Roadmaps for Teams
- Enterprise – access to Planview Roadmaps for Enterprise
NOTE
You are limited to assigning subscription types up to the number of entitlements allocated.
- Add the user to Planview Admin. For more information, see Managing Users.
- In Planview Admin, click Users.
- In the Users screen, locate the user, and then click
> Edit user. The Edit user dialog appears.
- In the Product environments section, select the check box for the relevant Planview Roadmaps environment (production or sandbox).
- To edit the Subscription type or Product role, select the desired option from the list.
- Click Save.
Adding multiple users to Planview Roadmaps
You can give multiple users access to Planview Roadmaps at the same time, provided that the users have already been added to one of the Planview product environments in the same Planview Admin instance.
For more information, see Adding existing users to a product environment.Editing the product roles and subscription types for multiple users
You can edit the product roles and subscription types for multiple users at the same time, provided that the users have already been added to one of the Planview product environments in the same Planview Admin instance.
For more information about editing the product roles and subscription types for multiple users, see Managing product roles and Managing subscriptions for a user.
Accessing Planview Planview Roadmaps for Enterprise
You can access Planview Roadmaps from Planview Admin or from a Roadmaps URL. For information about access permissions, see About Access Permissions for Planview Roadmaps
To access Planview Roadmaps directly
Access the URL for your geographic location:
- Prod US: https://us.roadmaps.planview.com/
- Prod EU: https://eu.roadmaps.planview.com/
- Prod AP: https://ap.roadmaps.planview.com/
To access Planview Roadmaps from Planview Admin
- Log into Planview Admin.
- On the Overview tab, click Planview Roadmaps.
To access Planview Roadmaps from AgilePlace
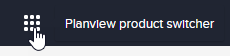
From AgilePlace, you can access Planview Roadmaps by clicking the product switcher icon and then selecting Planview Roadmaps.
To switch to another Planview product from Planview Roadmaps
If you have permissions to access other Planview products, you can access them directly from Planview Roadmaps.
To switch to a different Planview product, click the product switcher icon in the top left corner of the view, and then select the product from the list that appears.
Creating a roadmap
- In Planview Roadmaps, click
 Roadmap.
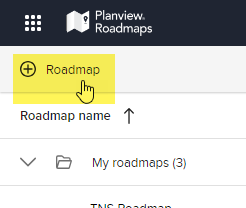
- In the Create Roadmap dialog, enter a name and description for the roadmap and then click Save. The Roadmap view displays the roadmap.
- To configure and work with the roadmap, see the articles under Working with Planview Roadmaps.
Building the roadmap
Adding items to the roadmap
There are two ways to add an item to the roadmap:
- create an item specifically for the roadmap, for which you specify all of the attribute (field) values
- import an item from another Planview product – the resulting imported item includes attributes from the source item on the product
About items imported from other Planview products
When you add an item from another Planview product, values for some of its basic attributes are included, such as parent, type, status, and start and finish dates. If the imported item includes values for the dates, the item is automatically added to the roadmap timeline. Otherwise, the item is added to the list of items to be added in the left pane.
With the exception of the start and finish dates, updates to the attributes on the source item in the other product are automatically updated on the imported item on the roadmap. The difference in dates can be reviewed and edited manually. For more information, see Viewing Items in the Timeline.
To create an item
- Click Add item.
- Enter a name for the roadmap and then press Enter. The item appears in the items list in the left panel and remains there until you drag it to the timeline or add planned dates to it.
- To add a description and planned dates to the item, click the item. The item details appear in the details panel to the right.
- Add the details and then click Save. If you added both a planned start and a planned finish date, then the item appears in the timeline; otherwise the item appears only in the items list.
To import an existing item from Planview AgilePlace
- Click Add item > Add from AgilePlace. The Add Items from AgilePlace dialog appears.
- To filter the list of cards based on a board:
- Do one of the following:
- To filter based on a board from which one or more cards have already been added, click the Filter by board arrow.
- To search for a board, enter the name or partial name of the board in the Filter by board field.
- Select the board.
- Do one of the following:
- To search for cards:
- Enter the search text from the card title or header and then press Enter.
- Select one or more cards to be added to the roadmap.
- To view only the selected cards, enable View only selected items.
- To add the cards to the roadmap, press Add.
To import an existing item from Planview Portfolios
You can import existing work, strategy, or outcome items from Planview Portfolios as roadmap items:
- for strategy and outcome items, you can import items from the lowest level items in the structure hierarchy
- for work items, you can import the primary planning level item in the structure hierarchy
When you import these items, the following attributes are included:
- Work Type: Execution Type
- Work Dates: Actual/Schedule Start; Actual/Schedule Finish
- Outcome Type: Outcome Type
- Outcome Dates: Target Start; Target Finish
- Strategy Dates: Target Start; Target Finish
- Strategy Type: Strategy Type
- Click Add item > Portfolios > Entity type (Outcome, Strategy, or Work). The Add Items dialog appears.
- Search for entity items to be added:
- In the Search name of the entity field, enter the name or partial name of the entity item.
- To display the items in a portfolio, in the Search by portfolio field, select a portfolio, or search for and then select a portfolio.
- To sort the entity items by data in a column, click in the column header.
- Select one or more items to be added.
- To view only the selected items, click the Selected items tab.
- To add the selected items, click Add selected items.
Adding milestones to the roadmap
You can add milestones to mark significant events or dates in the roadmap.
- Click Add milestone.
- Click Add. The Add milestone dialog appears.
- Enter the name, date, and description for the milestone.
- To change the color, select a different color from the list.
- Click Add. The milestone appears in the roadmap.
Managing milestones
You can edit all of the milestone details or delete the milestone.
To edit a milestone
- In the roadmap timeline, click the milestone. The milestone details appear in the right pane.
- Edit the milestone details as required.
- To change the color, select a color from the list.
- Click Save.
To delete a milestone
- In the roadmap timeline, click the milestone. The milestone details appear in the right pane.
- Click
 > Delete item.
 - In the confirmation dialog, click Delete.
Changing the roadmap display options
Showing/hiding the Items pane
To show/hide the cards pane, click the Show items/Hide items icon  .
.
Changing the timescale
To change the timescale (for example, weeks, months, quarters) displayed in the roadmap, click the timescale list  and then select the timescale option.
Starting the timeline from the current date
To view the current date in the timescale, click  Go to today.
Working with items
- Viewing Items in the Timeline – viewing items, and managing how items are displayed in the timeline (grouping, color coding, and exporting items as in a PNG file)
Showing/hiding milestones on a roadmap
By default, the milestone marker and a vertical line appear on the milestone's date the roadmap. You can show both the marker and date line, just the marker, or hide both.
To view the description of the milestone, hover over the milestone name.
To show just the milestone markers, click  > Show milestones only.
To show both the milestone markers and date line, click > Show milestones with date lines.
To hide the milestones entirely, click > Hide milestones.
Converting roadmap items to AgilePlace cards
You can convert an unlinked roadmap item to a card on an AgilePlace board. When you convert an item, you select from the boards that you have permissions to add cards to, and specify the card type. There is also an option to add the custom item attributes to the card description.
The resulting card has the same name (title) and description as the item and is created in the default drop lane on the board. A link to the card is added to the item in Roadmaps, and you can no longer edit its name, description, or standard attributes. You can edit the planned dates on the item, but the corresponding dates on the card are not changed in AgilePlace.
If the planned dates are edited on the card in AgilePlace, you have the option in Roadmaps to update the planned dates for the item to match. Changes to the other attributes in AgilePlace are updated automatically in the Roadmaps item.
To convert an item to an AgilePlace card
- In Roadmaps, locate and select the item.
- In the details pane, click > Convert to AgilePlace card. The Convert roadmap item to AgilePlace card dialog appears.
- In the Destination board list, select or search for the board that you want to add the card to.
- In the Card type list, select the card type, if different from the default card type.
- To add the custom item attributes to the card description, select the Include roadmap custom attributes in the AgilePlace card description.