Single Sign-On Settings for Planview Admin
- Last updated
- Save as PDF
What is Required to Use SSO with Planview Admin?
To use Single Sign On (SSO) functionality for your organization, you must first configure your SSO provider to work with Planview Admin before enabling SSO in Planview Admin. If your organization uses Microsoft Active Directory Federation Services (ADFS) for example as your SSO provider, you must perform the steps in set up SSO for ADFS.
Enabling SSO in Planview Admin (Planview Admin Administrator)
NOTES
- If your organization already uses SSO, you must first configure your SSO provider to work with Planview Admin (see the next section of this article) before enabling SSO in Planview Admin.
- Before enabling SSO in Planview Admin, Planview recommends only activating one product environment, which ideally would be a sandbox for testing purposes of SSO to make sure that SSO configuration is correct and works as expected to not impact production environments.
To enable SSO in Planview Admin:
- Go to Settings > SSO.
- Click Enable SSO for all in the upper-right corner of the page.
- In the Input Configuration section of the page, do one of the following options:
NOTE
Contact your IT department to determine which option they would prefer to use.
- Enter the URL to download SAML metadata: If a URL is provided, the metadata will be refreshed every 24 hours.
- Enter SAML metadata XML manually: After saving the configuration, the metadata XML is downloaded from the URL and used to connect to the IDP.
NOTE
Your metadata XML cannot contain inline XML comments; it will not validate. Please remove the comments before saving.
- (Optional) Toggle Advanced Configuration on. You can add the following advanced configuration options:
- Set NameID lookup type to either Email address, Login alias, or Username from email address.
- Set NameID policy format.
- Enter a name in the Username attribute (Optional) box.
- Add additional SAML attributes, by clicking Add Attribute and set the name, name format, friendly name, and whether the attribute is required.
- Click Save.
SSO is activated immediately in Planview Admin. If no products are activated yet then authentication will still go through it's normal process within the underlying products until Planview ID is turned on.
Configuring Your SSO Provider to Work with Planview Admin (Customer SSO Internal Resource)
If your organization already uses SSO, your SSO provider must be configured to work with Planview Admin before you enable SSO in Planview Admin.
To configure your SSO provider to work with Planview Admin:
- Contact a resource in the department responsible for SSO management in your organization (such as the IT department) to perform the following procedure and receive the IDP metadata.
- In your SSO provider, set up a new application against the Planview ID IDP metadata located in Settings > SSO > IT configuration. You can use the Copy all button to copy the metadata or use the Mail to link button to email the metadata.
- In the Reply URL field in the IDP configuration (sometimes called Assertion Consumer Service URL), add the appropriate value from the following list:
- For US customers: https://us.id.planview.com/api/loginsso/callback
- For EU customers: https://eu.id.planview.com/api/loginsso/callback
- For APAC customers: https://ap.id.planview.com/api/loginsso/callback
- Enable SSO in Planview Admin.
Setting up SSO for Microsoft Entra ID
This document provides instruction on how to set up an application in Azure that can communicate with Planview Admin via SAML.
-
On the left navigation pane, select the Entra ID service.
-
Navigate to Enterprise Applications and then select All Applications.
-
To add new application, select New application.
-
In the Add from the gallery section, type Planview Admin in the search box.
-
Select Planview Admin from results panel and then add the app. Wait a few seconds while the app is added to your tenant.
-
In the Azure portal, on the Planview Admin application integration page, find the Manage section and select single sign-on.
-
On the Select a single sign-on method page, select SAML.
-
On the Set up single sign-on with SAML page, click the pencil icon for Basic SAML Configuration to edit the settings.

-
On the Basic SAML Configuration section, perform the following step:
-
In the Identifier (Entity ID), enter your EntityID from the Planview Admin Settings page.
-
In the Reply URL textbox, type a URL using the following pattern:
https://<Region>.id.planview.com/api/loginsso/callback
-
-
On the Set up single sign-on with SAML page, In the SAML Signing Certificate section, click copy button to copy App Federation Metadata Url and save it on your computer.

-
You can now go to Enabling SSO in Planview Admin to finish the remaining steps to activate SSO.
Setting up SSO for Microsoft ADFS
If your organization uses Microsoft Active Directory Federation Services (ADFS) as your SSO provider, you must perform the following steps when setting up SSO within Planview Admin.
ADFS Replying Party Claim Rules
Planview Admin requires the Planview Admin email address to be sent in the Planview Admin namefield of the SAML Subject. This process assumes you are using the email address LDAP attribute as your Planview Admin username and configures ADFS to send it as the NameId.
To set up SSO for Microsoft ADFS:
- Right-click Relying Party and select Edit Claim Rules.
- On the Issuance Transform Rules tab, select Add Rules.
- Select Send LDAP Attribute as Claims as the claim rule template to use.
- Give the Claim a name such as
Get LDAP Attributes. - Set the Attribute Store to Active Directory, the LDAP Attribute to E-Mail-Addresses, and the Outgoing Claim Type to E-Mail-Address.
- Click Finish.
- Click Add Rule.
- Click Transform an Incoming Claim as the claim rule template to use.
- Enter a name such as Email to Name ID.
The incoming claim type should be E-mail Address (it must match the Outgoing Claim Type in rule #1). The Outgoing claim type is Name ID and the Outgoing name ID format is Email. Pass through all claim values and click Finish.
- If you edit the existing rule and click View Rule Language, they should match the following examples:
Rule #1:
c:[Type == "http://schemas.microsoft.com/ws/2008/06/identity/claims/windowsaccountname", Issuer == "AD AUTHORITY"]=> issue(store = "Active Directory",types = ("http://schemas.xmlsoap.org/ws/2005/05/identity/claims/emailaddress"),query = ";mail;{0}", param = c.Value);Rule #2:
c:[Type == "http://schemas.xmlsoap.org/ws/2005/05/identity/claims/emailaddress"]=> issue(Type = "http://schemas.xmlsoap.org/ws/2005/05/identity/claims/nameidentifier",Issuer = c.Issuer, OriginalIssuer = c.OriginalIssuer, Value = c.Value, ValueType = c.ValueType,Properties["http://schemas.xmlsoap.org/ws/2005/05/identity/claimproperties/format"]= "urn:oasis:names:tc:SAML:1.1:nameid-format:emailAddress");
Setting up SSO for Okta
If your organization uses Okta as your SSO provider, you must perform the following steps when setting up SSO within Planview Admin.
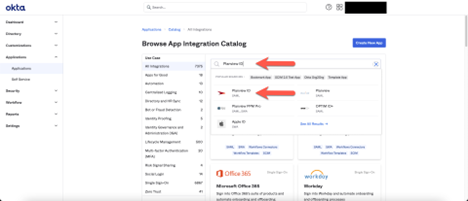
- In Okta, in the left pane, click Applications, and then in the main pane, click Browse App Catalog.
- Search for and then select Planview Admin.
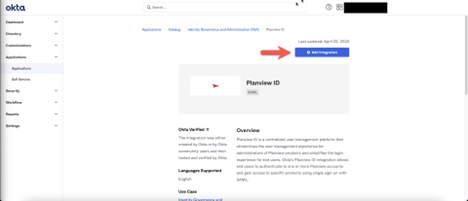
- In the Planview Admin view, click Add Integration.
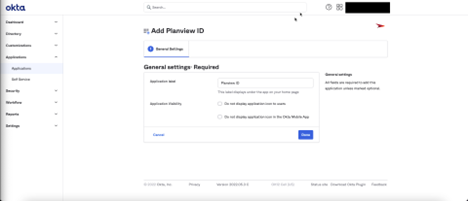
- In the General settings: Required section, you can leave the settings as is or edit them, and then click Done. The application is created.
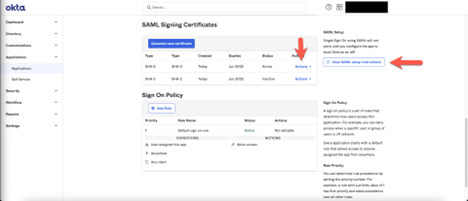
- In the Sign On section, select Edit and update the Regulatory region in accordance to what your Planview Admin organization is setup for. (US, EU, AP)
- Locate and copy the SAML metadata URL:
- In the Sign On section click View SAML setup instructions.
- Copy the URL, which is to be pasted into the Planview Admin Settings page.
NOTE
Using the SAML metadata URL is recommended because signing certificates can be updated without having to update Planview Admin. However, you can use the entire SAML XML metadata instead (see below).
- To use the SAML XML metadata instead of the SAML metadata URL:
- In the SAML Signing Certificates section, click Actions > View IdP metadata.
- Copy the metadata, which is to be pasted into the Planview Admin Settings page.
- Enable SSO in Planview Admin.
Setting up SSO for OneLogin
Follow this procedure to set up an application in OneLogin that can communicate with Planview Admin via SAML.
- In the top bar in OneLogin, click Administration.
- In the menu bar, click Applications > Applications.
- Click the Add App button.
- Search for and then select SAML Custom Connector (Advanced).
- Enter a name and description for the application, and then click Save.
- In the left pane, click Configuration.
- Complete the following fields:
- Audience (EntityID): Enter the EntityID from your Planview Admin Settings page.
- ACS (Consumer) URL Validator*: .*
- ACS (Consumer) URL*: Enter the URL based on your location as per Configuring Your SSO Provider to Work with Admin, above.
- Click Save.
- Locate and copy the SAML metadata URL:
- In the SSO section copy the Issuer URL which is pasted into the Admin Settings page.
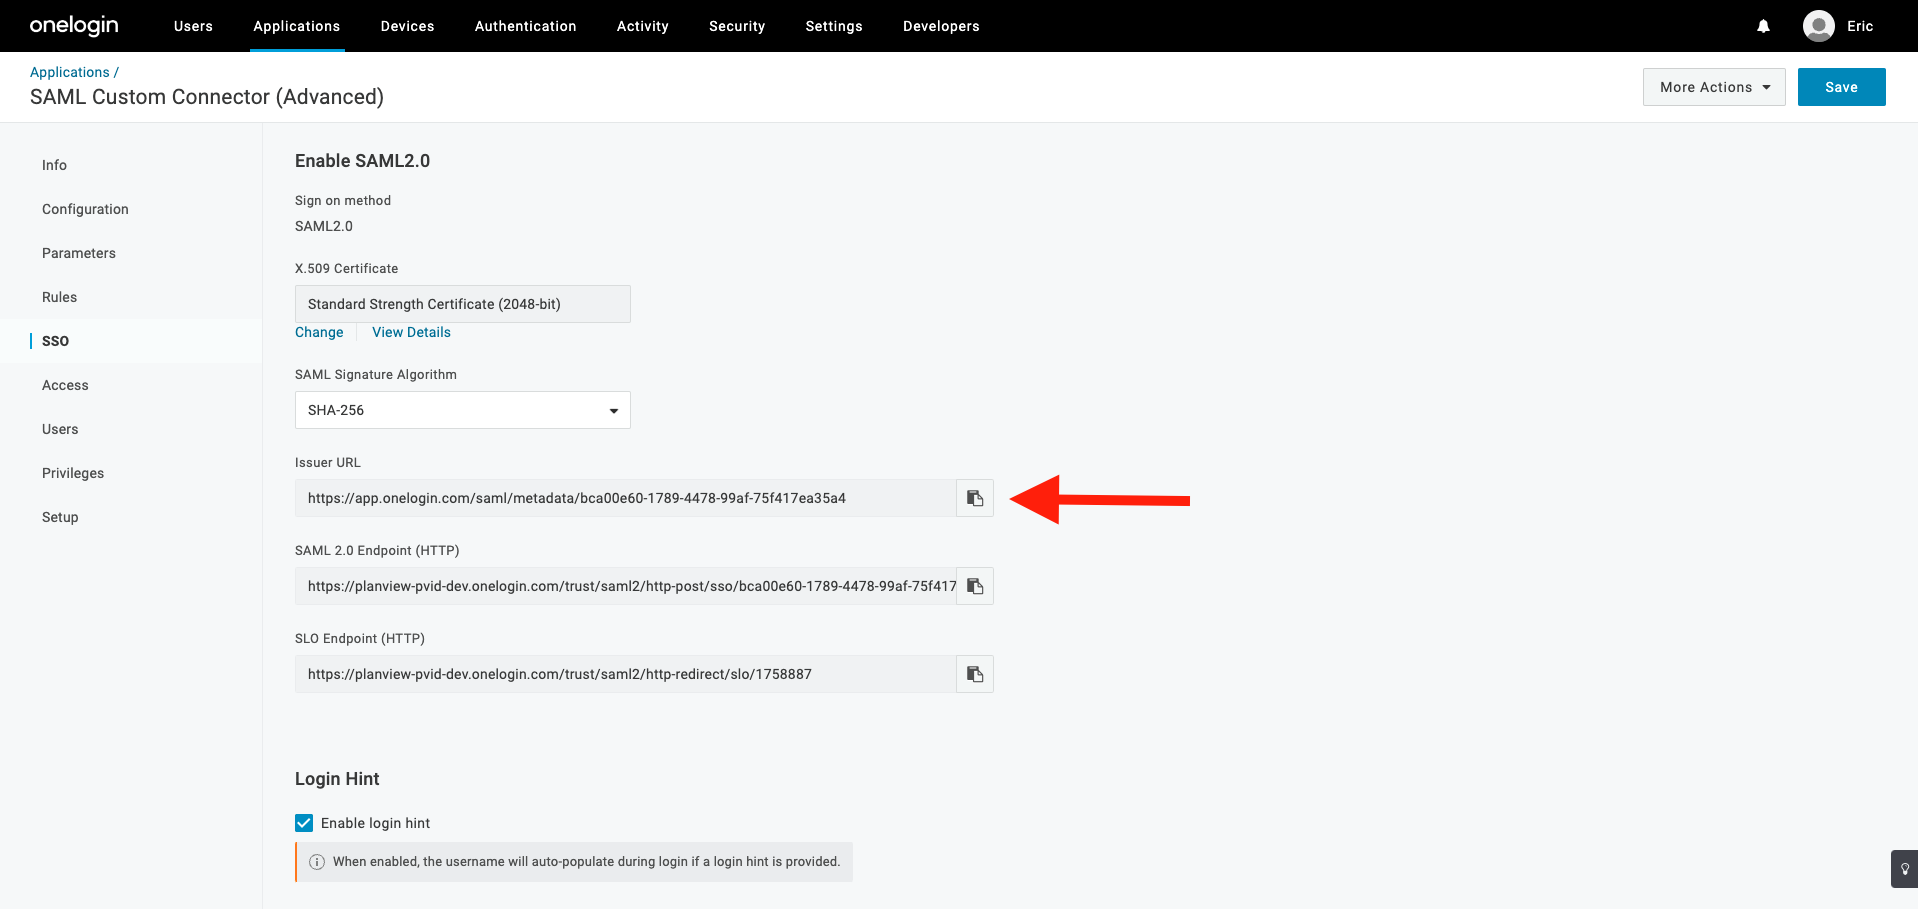
NOTE
Using the SAML metadata URL is recommended because signing certificates can be updated without having to update Planview Admin. However, you can use the entire SAML XML metadata instead (see below).
- In the SSO section copy the Issuer URL which is pasted into the Admin Settings page.
- To use the SAML XML metadata instead of the SAML metadata URL:
- Click More Actions > SAML Metadata. Save the XML file, which you will use for the following step.
- Enable SSO in Planview Admin.
SAML SSO FAQs
Here are answers to some frequently asked questions about the SAML configuration of Planview Admin.
What types of SAML SSO are supported?
Planview Admin supports both IDP- and SP-initiated authentication.
Which protocols are supported?
Planview Admin supports the SAML 2.0 protocol.
What NameID formats are supported?
Planview Admin supports the formats:
urn:oasis:names:tc:SAML:1.1:nameid-format:emailAddress
urn:oasis:names:tc:SAML:1.1:nameid-format:unspecified
Are any additional attributes required to identify a user?
No additional attributes are required by default. If an IDP wants to use a different attribute other than NameID to specify the email address of the user, they can configure which attribute Planview Admin will assess in the assertion in Settings > Single Sign On Configuration > Show Advanced Configuration > SAML Username Attribute (Optional).
What if my users do not use email addresses in my IDP?
If your IDP does not use email addresses to identify users, you can configure Planview Admin to match on a login alias. Different organizations can refer to a login alias by different terms such as NetworkID. To configure Planview Admin to use login aliases, go to Settings > Single Sign On Configuration > Show Advanced Configuration > SAML NameID Lookup Type and select Login alias. If Planview Admin is configured to use login aliases, the users in Planview Admin must still have valid email addresses to use features such as OKRs.
Where can I find the Service Provider (SP) metadata?
The SP metadata is published to /api/saml/sp-meta.xml in the appropriate environment.
Is the X509 certificate required in the SAML response?
Yes, the X509 certificate is required in Signature/KeyInfo/X509Data to validate the signature of the response.
What binding methods are supported?
Please refer to the SP metadata to determine the supported binding methods in the Assertion Consumer Service (ACS).
Are identity assertions forwarded to other entities?
No.
Is the signature in the SAML response validated with the certificate the IDP will provide?
Yes. Planview Admin validates all signatures provided in the SAML response.
What is the session expiration time?
Currently 12 hours of inactivity between requests. However, it is important to understand the relationship between Planview Admin and the underlying products and exactly what a "session" is in this context.
Once a user authenticates with Planview Admin and is sent to the another application (e.g., AgilePlace, Portfolios, ProjectPlace), they have a session with Planview Admin and with the other application. Activity within the other application does not constitute activity with Planview Admin, and therefore does not extend Planview Admin's session. Only further authentication requests, such as clicking a link to ProjectPlace from PPM Pro, will extend Planview Admin's session.
Is MFA supported or required?
MFA is not directly supported. Our recommended best practice is to configure SAML/SSO and set up MFA on your SAML IDP.
Where can I obtain the Planview Admin logo file?
You can download the Planview Admin logo file here.

