
ServiceNow Integration Customization
ServiceNow Integration allows users to synchronize data in ServiceNow with Release & Verify.
TIP
Release & Verify works with ServiceNow version Eureka and up.

Enable ServiceNow Integration with Basic Authentication
To enable ServiceNow Integration with basic authentication:
- Go to Settings
 > Customization > Integrations.
 - Click ServiceNow Integration.
- Click to select the Enable ServiceNow Integration checkbox to toggle on ServiceNow Integration. ServiceNow Integration can also be toggled off using this checkbox, without losing any of your settings.
- Type the ServiceNow URL.
- Click to select Basic Authentication radio button.
TIP
OAuth Authentication is not currently supported for ServiceNow in Release & Verify.
- Type Login and Password.
- Click to select the Auto Sync checkbox under the Release, Change, and TEBR tabs.
- Click Submit.
The yellow Your changes have been saved pop up opens and closes.
If you click away from the Customization page without clicking Submit, your changes will not save. - Click Test Connection:

- Connection to Third Party. If a red cross is present:
- Check your proxy, username, password, or URL.
- Release & Verify Integration Adaptor Online: If a red cross is present:
- Contact customer support.
- Connection to Third Party. If a red cross is present:
- Click OK.
- Click Refresh ServiceNow Fields.
Sync from ServiceNow
Once you have authenticated with ServiceNow, you can sync systems with Release & Verify.
When syncing is set up, as items change in ServiceNow they will be synced with Release & Verify. This process will also happen in reverse if you click to select the Push to ServiceNow checkbox.
To sync from ServiceNow:
- Go to Settings> Customization > Integrations.
- Click ServiceNow Integration.
- Manage auto syncing:
- Click to select the Auto Sync checkbox. (If it hasn’t been selected already.)
- Set the sync rate by selecting a time (in seconds) from Period (seconds). (Mandatory field.)
- Type a Custom Filter as a ServiceNow query string. (Optional. See Advanced Searching for more information.)
- Click Test Filter. The filter is functional if issues are selected (see screenshot below).
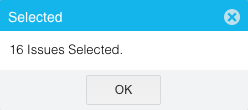
- Click Test Filter. The filter is functional if issues are selected (see screenshot below).
- Click Refresh.
- Select a table from Tables.
TIP
Only one table can be selected at a time.
- Click the up and down arrows
 on Limit of Retrieved Records to select a number.
 - Click Expression Builder (Pull) (Optional):
- Click Add Statement.
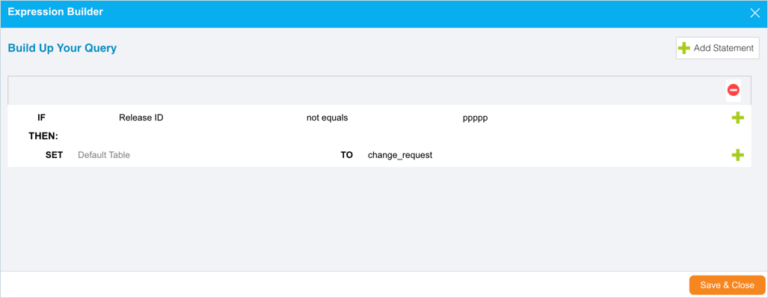
- Click to select each drop-down menu and choose a data field.
- Click the red delete button to remove a statement.
- Click Save & Close.
- Click Add Statement.
- To filter by last update date range:
- Click to select the Filter By Last Update Date Range checkbox.
- Click up and down arrows to select the number of months.
- Manage push to ServiceNow:
TIP
Push to ServiceNow exports data from Release & Verify to ServiceNow.
- Click to select the Push to ServiceNow checkbox.
- Click Expression Builder (Push):
- Click Add Statement.

- Click to select each drop-down menu and choose a data field.
- Click the red delete button to remove a statement.
- Click Save & Close.
- Click Add Statement.
- Click to select the Default Table.
- Click Refresh ServiceNow Fields again.
Selected ServiceNow Projects appear as tabs. - Select ServiceNow Fields from the drop-down menus beside the Release & Verify fields where the data should go.
- Click Submit.
The yellow Your changes have been saved pop up opens and closes.
If you click away from the Customization page without clicking Submit, your changes will not save. - View log files by clicking View Log.