
Activities Custom Group Name Customization
Activities Custom Group Name are found under Pre-Defined Forms when updating group names under the Draft tab of the Deployment Plan pop up.

Location of Activities Custom Group Name Customization
Activities Custom Group Name Customization is located in the Deployment Plan (and Master Deployment Plan) pop up, in the Activities tab:
- Go to Deployment > Manager.
- Locate a Deployment Plan (Master, child, or independent) with one or more Activity Groups (check the Activity Summary & Progress column).
- Open the Deployment Plan by clicking the blue-linked Name.
- Click the Activities tab.

- Hover your mouse cursor over an Activity Group.
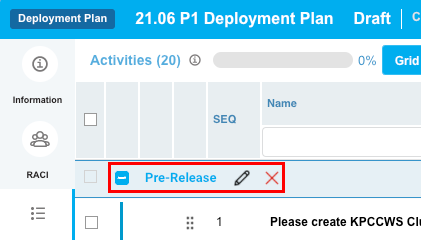
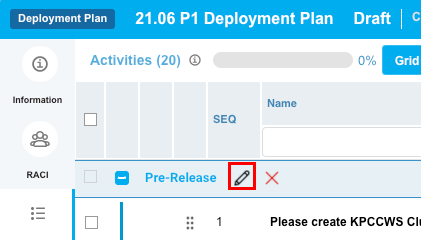
- Click to select the pen.
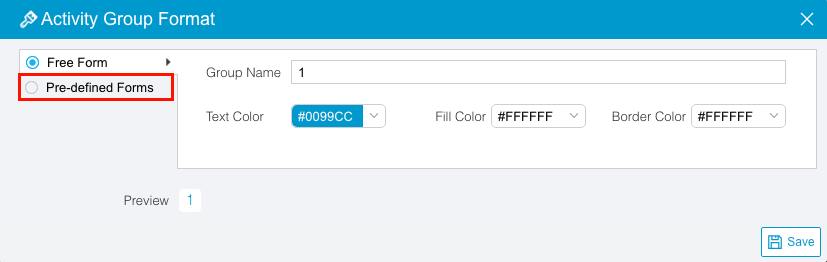
The Activity Group Format pop up opens. This allows users to manually format the name, text color, fill color, and border color of Activity Groups.

- Click to select the Pre-defined Forms radio button.
Pre-Defined Forms opens.
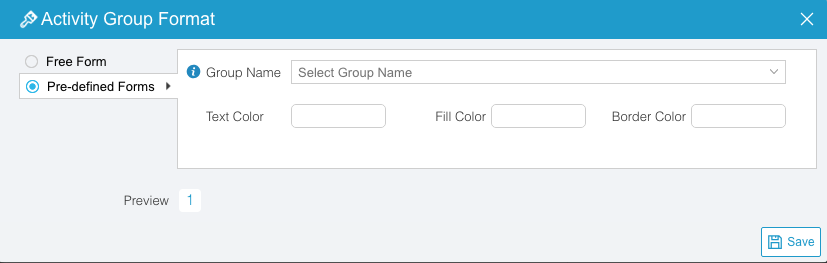
- The Activities Custom Group Name Customization affects the Group Name drop-down menu. Select a Group Name to select a pre-defined text color, fill color, and border color for the selected Activity Group.

Enable Activities Custom Group Name
When updating group names, Pre-Defined Form radio button will be grayed out on the Activity Group Format pop up if Enable Pre-defined forms checkbox is not checked.
To enable group names:
- Go to Settings
.png?revision=1) > Customization > Deployment Plans (DP).
> Customization > Deployment Plans (DP). - Click Activities Custom Group Name.
- Click to select the Enable Pre-defined Forms checkbox.
- Click Submit.
The yellow Your changes have been saved pop up opens and closes.
If you click away from the Customization page without clicking Submit, your changes will not save.
Add a Group Name
To add a Group Name:
-
Go to Settings
> Customization > Deployment Plans (DP). - Click Activities Custom Group Name.
- Click Add Field.
-
NOTE
You must have the Create or Update Master Deployment Plan or Create or Update Deployment Plan user permission for the mode you are editing. For example, Update Deployment Plan in Draft Mode.
- Type the new Group Name.
- Double click under Fill Color and select a color from the drop-down menu or type a hex color.
- Double click under Border Color and select a color from the drop-down menu or type a hex color.
- Double click under Font Color and select a color from the drop-down menu or type a hex color.
- Click Submit.
The yellow Your changes have been saved pop up opens and closes.
If you click away from the Customization page without clicking Submit, your changes will not save.
Edit an Activities Custom Group Name
To edit a Group Name:
- Go to Settings > Customization > Deployment Plans (DP).
- Click Activities Custom Group Name.
- Click to select a group name.
- Click Edit Field.
NOTE
You must have the Update Master Deployment Plan or Update Deployment Plan user permission for the mode you are editing. For example, Update Deployment Plan in Draft Mode.
- Edit the new Group Name under the Value column.
- Double click under Fill Color and select a color from the drop-down menu or type a hex color.
- Double click under Border Color and select a color from the drop-down menu or type a hex color.
- Double click under Font Color and select a color from the drop-down menu or type a hex color.
- Click Submit.
The yellow Your changes have been saved pop up opens and closes.
If you click away from the Customization page without clicking Submit, your changes will not save.
Sort Group Names
Sort Manually
Sorting Group Names manually changes their order in the pre-defined form.
NOTE
Refresh your browser to sort manually after sorting alphabetically.
To sort Group Names manually:
- Go to Settings > Customization > Deployment Plans (DP).
- Click Activities Custom Group Name.
- Hover your mouse cursor over the sort column.
The sort handle (six gray dots) appears.
.png?revision=1)
- Left click and drag the sort handle to resort the Group Name.
- Click Submit.
The yellow Your changes have been saved pop up opens and closes.
If you click away from the Customization page without clicking Submit, your changes will not save.
Sort by Column Header
Sorting Group Names by column header only changes their order on the Customization page.
To sort alphabetically on the Customization page by column header:
- Go to Settings > Customization > Deployment Plans (DP).
- Click Activities Custom Group Name.
- Click a column header.
The Group Names will revert to their previous order when you click away from the Customization page.
Delete an Activities Custom Group Name
Deleting a group name will not delete it from Release & Verify. But it will no longer be available when creating new group names.
To delete a Group Name:
- Go to Settings > Customization > Deployment Plans (DP).
- Click Activities Custom Group Name.
- Click to select the Group Name.
- Click Delete Field.
- Click Submit.
The yellow Your changes have been saved pop up opens and closes.
If you click away from the Customization page without clicking Submit, your changes will not save.