
Release Channel Impacting Systems Customization
Users select Release Channel Impacting Systems when adding or editing a Project or Independent Release.
.png?revision=1)
Location of Release Channel Impacting Systems
Release Channel Impacting Systems is a non-editable field that appears under the Project or Independent tab in the Additional Information panel.

What is the Release Channel Impacting Systems Feature?
The Release Channel Impacting Systems feature is a way of flagging when a particular System, or Systems, are having an impact on a Project or Independent Release with a selected Release Type. (Enterprise Releases do not show Release Channel Impacting Systems.)
When Release Channel Impacting Systems Customization is enabled:
- And the Project or Independent Release has a Release Type that has been associated with a System in Release Channel Impacting Systems Customization:
- And that System has been dragged and dropped into the Code Implementation Dependency panel under that Release’s System tab and saved:
- The Channel Impacting field will show Yes.
- And that System has not been dragged and dropped into the Code Implementation Dependency panel under that Release’s System tab and saved:
- The Channel Impacting field will show No.
- And that System has been dragged and dropped into the Code Implementation Dependency panel under that Release’s System tab and saved:
- And the Project or Independent Release does not have a Release Type that has been associated with a System in Release Channel Impacting Systems Customization:
- The Channel Impacting field will not display.
When Release Channel Impacting Systems Customization is not enabled:
- The Release Channel Impacting field will not display.
Enable Release Channel Impacting Systems
To enable Channel Impacting System:
- Go to Settings
.png?revision=1) > Customization > Releases.
> Customization > Releases. - Click Release Channel Impacting Systems.
- Click to select the Enable checkbox.
- Click Submit.
NOTE
Channel Impacting will now appear in Release Custom Fields. It is undeletable, and its Value and Data Type are uneditable.
The yellow Your changes have been saved pop up opens and closes.
If you click away from the Customization page without clicking Submit, your changes will not save.
Add a Release Channel Impacting System
To add a Channel Impacting System:
- Go to Settings > Customization > Releases.
- Click Release Channel Impacting Systems.
- Click Add.
- Select a System from the Application drop-down menu.
- Click Save & Close.
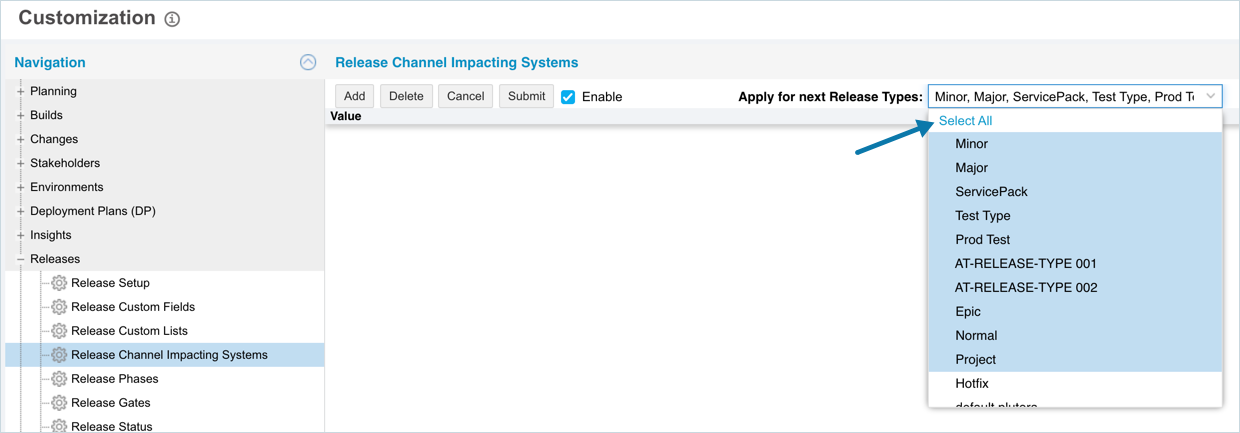
- Click to select the item you just added, and click to select one or more Release Types from the Apply for next Release types drop-down menu.
Bulk select and deselect all Release Types by clicking Select all… at the top of the list.
NOTE
If all Release Types are selected for an Application, the Channel Impacting field will appear in all Project and Independent Releases while Release Channel Impacting Systems are enabled.
- Click Submit.
The yellow Your changes have been saved pop up opens and closes.
If you click away from the Customization page without clicking Submit, your changes will not save.
Sort Release Channel Impacting Systems
Sort by Column Header
Sorting Release Channel Impacting Systems by column header only changes their order on the Customization page.
To sort alphabetically on the Customization page by column header:
- Go to Settings > Customization > Releases.
- Click Release Channel Impacting Systems.
- Click a column header.
The Release Channel Impacting Systems will revert to their previous order when you click away from the Customization page.
Delete a Release Channel Impacting System
To delete a Release Channel Impacting System:
- Go to Settings > Customization > Releases.
- Click Release Channel Impacting Systems.
- Click to select the Channel Impacting System.
- Click Delete.
- Click Submit.
The yellow Your changes have been saved pop up opens and closes.
If you click away from the Customization page without clicking Submit, your changes will not save.